

Page 1

P i O i i i i
M A II +A CT @IRI +!Q
I,l + +
FRIGIKING
Mode_ # FD/FS 350
FD/FS 450
IEAD AND £AV[
TIESE !NS UCYIONS
+ iInstaIi[aIion
o, Parts List
FDtFS 650
Serial #
IMIIII}i'ilIi _#{3[I=iA(II[WI[i _'[]Iii] I%=,1=',I{==I_== '_l_=,_,lllk:<=,_= = ' =+"=_.
11: £
I_= =I:'I::;}_'_!:_I]L;_,'[ l,/l_;;o=[iidi_!
iAi¢_ i!_ 1;iI;_,13,_'5ilI iil.l <'t
(]AIA_Y A
7<_ _ {I _¢I ;:iMI_i_,IW'II I IA
_II I II=I !,_!
Page 2
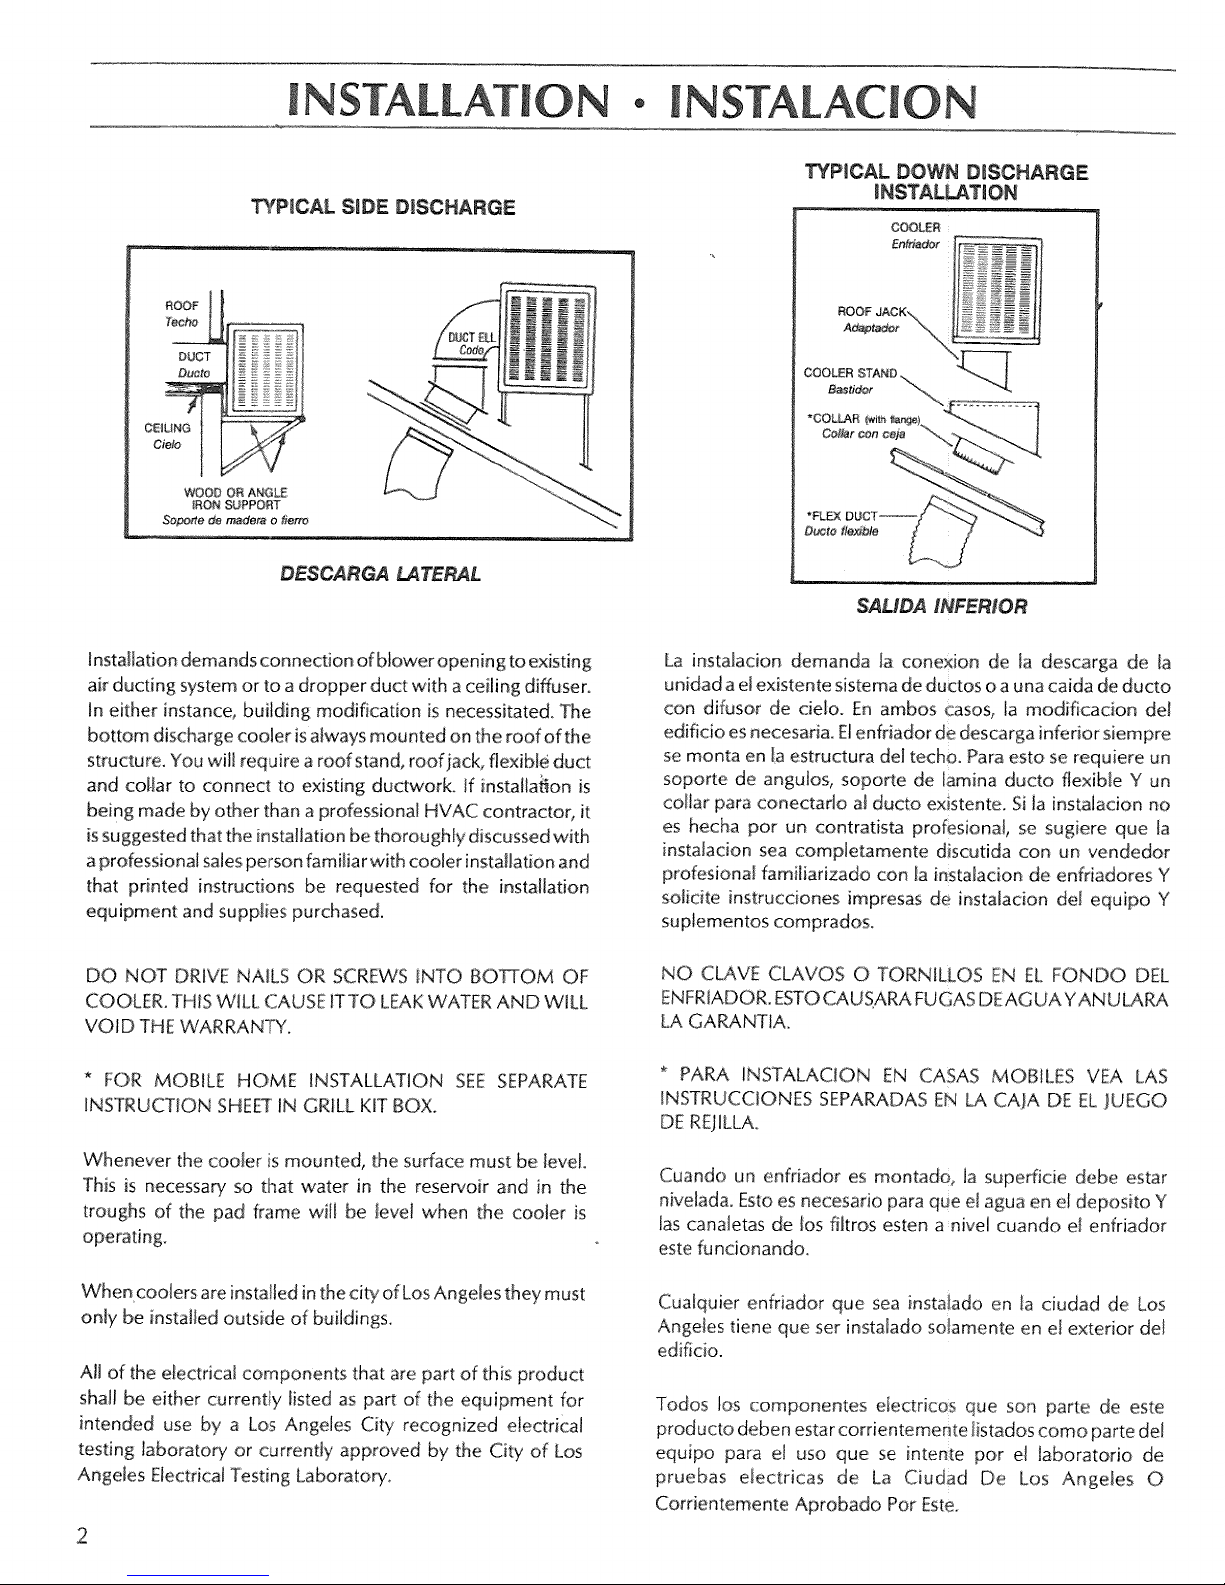
NSTALLAT[ON ° IN ON
1PfP[CAL DOWN DISCHARGE
_P_CAL SiDE D_SCHARGE
DESCARGA _TE_L
SAMDA INFERIOR
[NSTAL_TION
COOLER
Installation demands connection of blower open ing to existing
air ducting system or to a dropper duct with a ceiiing diffuser.
In either instance, bui[ding modification is necessitated. The
bottom discharge cooler is a_ways mounted on, the roof of the
structure. You ,will require a roof stand, roof_ack, flexible duct
and co[tar to connect to existing ductwork, ff instal[a_on is
being made by other than a professional HVAC contractor, it
is suggested that the installation be thoroughly discussed with
aprofessional sales person familiar with cooler installation and
that printed instructions be requested for the installation
equipment and supplies purchased.
DO NOT DRIVE NAILS OR SCREWS iNTO BOSOM OF
COOLER. TF,,liSWALL CAUSE [TTO LEAK WATER AND WtLL
VOID THE WARRANTY.
* FOJRMOBILE HOME iNSTALLATiON SEE SEPARATE
INSTRUCTION SHEETIN GRILL KIT BOX.
Whenever the cooJer is mounted, the surface must be level
This is necessa_ so that water in the reservoir and in the
troughs of the pad frame will be Ieve[ when the cooler is
operating.
La instalacion demanda [a conexion de la descarga de [a
unidad a el existente sistema de ductos o a una caida de ducto
con dffusor de cieio. En ambos casos, ia modificacion del
edificio esnecesaria. E[enffiador de descarga inf_arior siempre
se monta en Jaestructura del techo. Para esto se requiere un
soporte de anguJos, soporte de lamina ducto flexibie Y un
collar para conectado a[ ducto existente. Si Ja instaJacion no
es hecha por un contratista profesional, se sugiere que [a
instaJacion sea compJetamente d_scutida con un vendedor
profesiona[ famiJiarizado con [a instaIacion de enfriadores Y
solidte instrucciones impresas de instaJacion de[ equipo Y
sup[ementos comprados.
NO CLAVE CLAVOS O TORNJLLOS EN EL FONDO DEL
ENFRtADOR. ESTO CAUSARA FUGAS DEAGUA YANULARA
LA GARANTIA.
* PARA INSTALACJON EN CASAS MOBILES VEA LAS
[NSTRUCCIONES SEPARADAS EN LA CA;A DE EL JUEGO
DE REjILLA.
Cuando un enfriador es montado, la supefficie debe estar
nivdada. Esto es necesado para que el agua end deposito Y
Ins canaletas de [os fiJtros esten anivei cuando e[ enfriador
este fu ncionando.
When coolers are insta led in the city of Los Angeles they must
only be instaJJed outside of buildings
A[I of the electrical components that are part of this product
shall be either current y listed as part of the equipment for
intended use by a Los Angeles City recognized electrical
testing [aborato_ or currently approved by the City of Los
Angeles Electrical Testing Laboratory
2
CuaJquier enfriador que sea instal:ado en ta ciudad de Los
Angeies tiene que set instalado solamente en el exterior det
edifido.
Todos dos componentes dectdcos que son parte de este
producto deben estar cordentemente _istados como parte del
equipo para et uso que se inte_te por el laboratorio de
pruebas electricas de La Ciudad De Los Angeles O
Corrientemente Aprobado Por Este.
Page 3
[NSTALLAT[ N °
[NSTA N
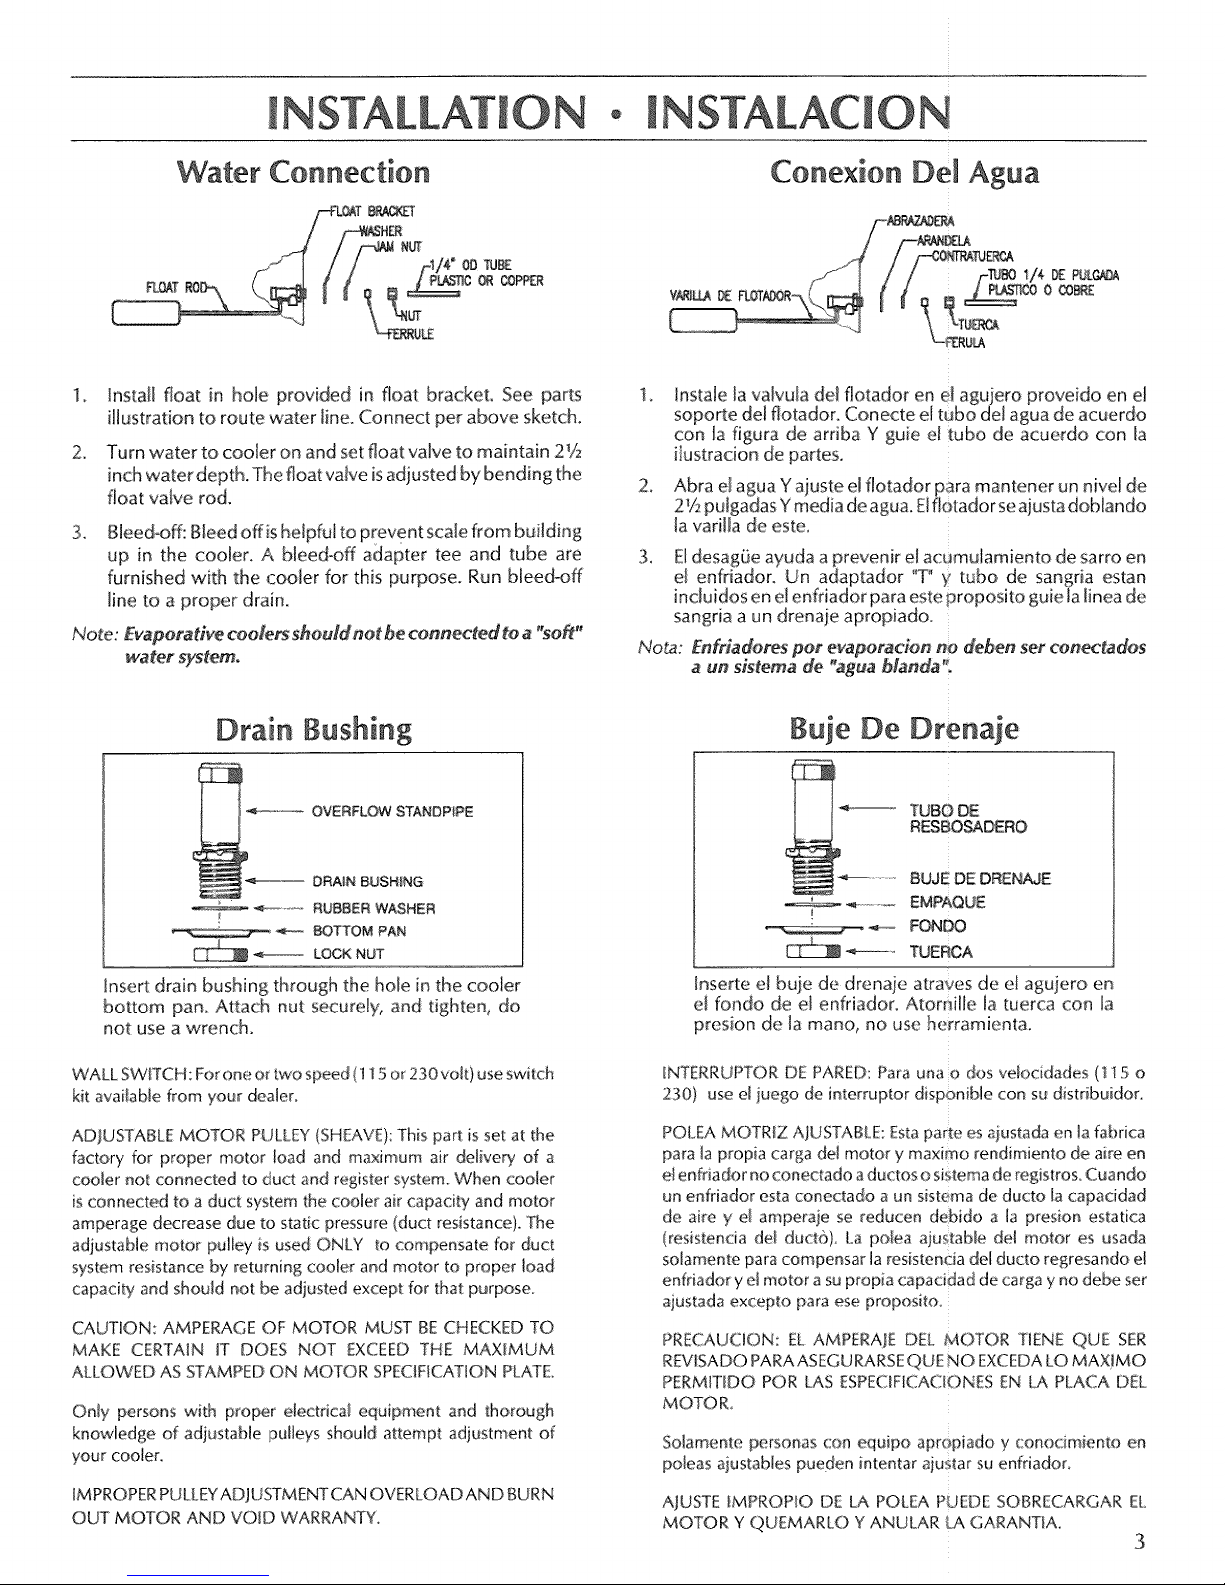
Water Connection
1, Install float in hole provided in ftoat brackeL See parts
illustration to route water line. Connect per above sketch.
2. Turn water to cooler on and set float valve to maintain 2V2
inchwater depth, The float valve is adjusted by bending the
float vane rod.
3_
Blee&off: Bleed off is he[pfui to prevent scale from building
up in the coo[err A b[eed-off adapter tee and tube are
furnished with the cooler for this purpose. Run bleed-off
line to a proper drain.
Note: Evaporative codets should not be connected tea "so_"
water system.
Drain Bushing
Cortex[on De[ Agua
[nsta[e la va]wJIa de[ flotador en el agujero proveido en el
soporte de[ fiotador Conecte el tubo del agua de acuerdo
con [a figura de arriba Y guie e! tubo de acuerdo con [a
iIustracion de partes.
2_
[a varil[a de este.
3_
E[desagQe ayuda aprevenir e[ acumu]amiento de sarro en
e[ enfdador. Un adaptador 'T° y tubo de sangria estan
induidos en e[enfriador para este proposito guie [a [inea de
sangria aun drenaie apropiado.
Nora: Enfriadores pot e_aporadon no deben set conectados
a un sistema de 'aguablanda_
Buie De Drenaje
OVERFLOW STANDPIPE
.... DRAIN BUSHING
._............. RUBBER WASHER
BOTTOM PAN
_.,_ ......... LOCK NUT
Insert drain bushing through the hole in the cooler
bottom pan. Attach nut securely, and tighten, do
not use a wrench.
WALL SWITCH: For one or two speed (115 or 230 voh)use switch
kit available from your dealer.
ADJUSTABLEMOTOR PULLEY(SHEAVE);This part is set at the
factory for proper motor toad and maximum air deliver,/of a
cooler not connected to duct and register system. When cooler
isconnected to a duct system the cooler air capacity and motor
amperage decrease due to static pressure (duct resistance)_The
adjustable motor pulley is used ONLY to compensate for duct
system resistance by returning cooler and motor to proper load
capacity and should not be adjusted except for that purpose
CAUTION: AMPERAGE OF MOTOR MUST BE CHECKED TO
MAKE CERTAIN IT DOES NOT EXCEED THE MAXIMUM
ALL.OWED AS STAMPED ON MOTOR SPECIRCAT[ON PLATE.
Only persons with proper electricaI equipment and thorough
knowledge of adjustable pulleys should attempt adjustment of
your cooIer.
IMPROPERPULLEYADJUSTMENT CAN OVERLOAD AND BURN
OUT MOTOR AND VOiD WARRANTY.
RESBO_DERO
TUBO DE
BUJEDE DRENAJE
,-,_..... _ ...............EMPAQUE
-_-- FONDO
"_---'_ TUERCA
lnserte el buie de drenaie atraves de el agujero en
e[ fondo de el enfdador. AtorniHe [a tuerca con la
presion de [a mano, no use herramienta.
INTERRUPTOR DE PARED: Para una o dos veIocidades (115 o
230) use el juego de interruptor disponibJe con su distribuidor.
POLEA MOTRIZ A]USTABLE: Estaparte es aiustada en [afabrica
para la propia carga de] motor y maximo rendimiento de aire en
el enfriador no conectado a ductos o sistema de registros. Cuando
un enffiador esta conectado a un s_stemade ducto [a capacidad
de aire y e! amperaie se reducen debido a la preston estatica
(resistencia del duct6)_ La poIea aiustab[e de[ motor es usada
so[amente para compensar ]aresistencia del ducto regresando e_
enffiador y e[ motor asu propia capacidad de carga y no debe ser
ajustada excepto para ese proposito_
PRECAUCION: EL AMPERAJE D£L MOTOR TIENE QUE SER
REVISADO PARA ASEGU RARSE QUE NO EXCEDA LO MAX] MO
PERMITIDO POR LAg ESPECIF[CACION[S EN LA PLACA DEL
MOTO R_
So[amente personas (:on equipo apropiado y conocimiento en
po[eas ajustabJes pueden intentar ajustar su enfriador,
A/USTE IMPROPIO DE LA POLEA PUEDE SOBRECARGAR EL
MOTOR Y QUEMAR[O Y ANULAR LA GARANT[A_
3
Page 4

115 VOLT MOTOR KiT INSTALLATION INSTRUCTIONS
JNSTRUCCJONES PARA INSTALAR EL MOTOR DE 115 VOLTmOS
P_
_y
1. Insta_l_e motor in the mounting cradle as shown.
2. Remove the junction box from the cooien
3. Wire _e pump and motor receptacles per the schematic shown
above,
4. Plaoe bo_ _eceptacMs in _e ju_on box as shown and reattach
the iun_on box to the coo_er top.
1_ ff_stale e$ motor en la montadura come se indica ardba.
2. Remueva la Caja electrica de el enfriedon
3, Cenecte _os enchufes del motor y la bomba de acuerdo con e_
diagrama de arriba
4, Ponga am_s recep_cuios en la caje emeotrica come se indica e
instaleta en la tape del en_dador.
The e_ange wire is r_t used,
Doubie it over and cover the bare end
w_h e}ectdcal tepe.
The red wire i_ not used on singM
speed motors,
DoubM it ever and _ver the bare end
with e_ec_rica_tape.
El a_ambre eo_er nara_a ne es usado_
Deb_e_oy cobra el lade expuesto con
cin_a etectrica
E{etambre rojo no es usado en motores
de u_a veloolda_.
Doble_o y cubra e_lade e×puesto con
c_nta e_rica
230 VOLT #OTOR KiT NSTALLAT ON NSTRUCT ONS
_NSTRUCO_ONES PARA _NSTALAR EL _OTOR DE 230 VOLT_OS
_'_-_
I }
1. {nstall _e motor in the mounting cradt_ as shown.
2. Remove the junction box from the coo_er,
& Remove 115 voff pump and pump receptacM furnished with coo_er
and replace it _tN 230 vo_ LSP-94 pump and pump receptacle.
(See replacement pa_s list),
4, Wire the pump and motor receptacMs per the schematic shown
above.
& P_ace both receptacIes in the iunction box as shown and reaAaoh
the junction box to the coo_er top,
1. Instale el motor en la montadura come se indica ardb&
2. Remueva _a ca}a electrica de el enfriador,
3. Remueva la bomba de i i 5 voBios y e_ recep_culo de la bomba
proveldos con et enfdador y remplaceia con una de 230 voWos
modelo LSP-94 yet receptaculo de ia bomb& (V'ea la iista de
pa_es de rempt_o),
4. Conecte los enchufes dei motor y la bomba de acuerdo con el
diagrama de arriba
5. Ponga ambos receptaculos en _a caje eie_rica come se indica e
instaieia en _a t_pa de1 en#iador
4
(_-| Thewhite wire is no_used
Double itover and _ver th8 bare end
with electricalt_pe.
The red wire is _ot used on single
speed motors,
Double it over _nd cover the bare end
with electoral tape,
(_) Elalambre blanco no es usado.
Doble$oycubra ellade expueste con
cietaeie_;rica.
El a_ambre r_o no _ usado en melores
de una ve[ocidad.
Page 5

No N
BLOWER BE[TADJUSTMENT: Correct beff tension adjustment
is important as incorrect adiustment increases power
consumption and shortens belt and motor [ire. install beff over
motor and Mower pulleys. (A) check bett tension by squeezing
(deflecting) belt. Proper tension will a[!ow deflection of _ to
:V4inch, (B) To increase or decrease belt tension, loosen bolt
in s[ot of motor support bracket. Adjust beff to desired tension
and retighten bolt
?RE-WET F'ADS: (For Maximum CooJing Efficiency) Prior to
the initiat start up of the cooter remove the pad frame
assemblies from the cooler and spray the pad and flames
thoroughly with water from a garden hose_
Put the pad frame assembJies back on the cooJer and white the
pads are stiJlwet start the coder "with the pump on.
BU[LT4N WINTER CLOSURE: (Down discharge units only)
an exclusive feature of your cooler (models in the 4800 to
6800 CFM range) is provided by the fuit closure damper. Your
cooler isshipped from the factory'with the damper temporarHy
fastened to the side of the btower with a shipping screw.
Remove this screw and store the damper for _ater use during
the winter months.
1. For winter use of damper, slide damper into cooler below
the biower per above sketck
2, When starting the cc)o/er in the Spring, remove the
damper and store in a safe place,
A_USTE DE BANDA: El aiuste correcto de [a banda es
importante ya que el aiuste incorrecto aumenta el consumo
de corriente y acorta [a duracion de [a banda y motor. [nstaie
la banda sob re ambas poleas (A) Revise la tension de [a banda
apretando[a (defieccionandoJa) Una tension apropiada
permitira una def[eccion de _/2a V4 de pu[gada_ (B) Para
aumentar 0 dism[nuk [a tension de la banda af[oje el torni[[o
de[ soporte de[ moton Ajuste la banda a la tension deseada y
apdete el torni[[o.
PREHUMEDEZCA LOS FiLTROS: (Para una maxima eficiencia
de enfriamiento) Antes de[ comienzo inicia[ de la unidad
remueva los fi!tros de[ enfriador y rocielos con agua
comp[etamente usando una manguera de iardin.
Ponga [os fiitros rernojados en el en#iador y ponga a funcionar
el motor y [a bomba,
COMPUERTA DE iNV[ERNO EMPOTRADA: (Unidades de
descarga inferior so[amente) una caracteristica exclusiva de
su enfriador (mode[os en e[ tango de 4800 a 6800 PCM) es
proveido por [a compuerta de que cierra completamente. Su
enffiador es enviado de [a fabrica con [a compuerta
temporah*nente suietada a el [ado de[a caja de turbina con un
torniNo. Remueva este Y guarde ta compuerta para uso
durante los meses de invierno.
1_ Para uso invernal de la compuerta, introduzca esta debajo
de la caia de turbina de acuerdo con la figura de arriba.
2_ AI echar a andar eI enfriador en el verano, remueva [a
compuerta Y guarde[a en un iugar seguro.
Page 6

MAINTENANCE ° MANTENJMJENFO
The cooler should be serviced at_east once ayear and more
often if required. This includes cJeaning, oiling, belt
adjustment or replacement (ffrequired) and pad replacement,
ALWAYS DISCONNECT ELECTRICAL POWER TO THE
COOLER BEFOREWORKING ON COOLER,
Cleaning:
7,
Remove pad frames and set them aside,
2.
Removethe overflow standpipe from the drain bushing
and allow the reservoir to empty.
.
Clean the internal surfaces of the cooler with a cloth
and dean water. DO NOT USE WIRE BRUSHESOR
OTH ERMEANSTHAT MIGHT SCRATCHTHEPAINT.
DO NOT USEANY CHEMICALS OTHERTHAN SOAP
OR DETERGENTTO CLEAN THE COOLER.
4_
Rinse the cooJer bottom pan tborougN F
5,
CMeanthe pump screen and remove any foreign mateda[
in the hose adapter between the pump and the hose.
Remove any foreign material in the distributor adapter
located between the top end of the hose and the water
distributor.
,
Touch up any scratches or bare spots inside the cooler
with a suitable cooler coating.
Etenffiador requiere servicio a[ menos una vez por afro o
mas si es necesario. Esto induye limpieza, lubrication,
ajuste de banda o remplazo (si es necesario) y reemplazo
de [a paia (aspen).
S[EMPRE QUETRABAIE EN ELENFR[ADOR DESCO NECTE
LA CORRIENTE ELE@R[CA.
Limpieza:
1.
Rem ueva los fHtros Y pongaioS a[ lado.
2.
Remueva el mbosadero de el buje de drenaje y vade
el deposito de agua.
3o
Limpie las superficies intemas de_ enfriador con un
trapo Y agua limpia. NO USE BROCHAS DE ALAMBRE
U OTRO MED/O QUE RASPE LA PINTURA. NO U5E
QUIMICOS QUE NO SEAN JABON O DETERGENTE
PARA LIMPiAR EL ENFRIADOR.
4.
Enjuague el fondo del enfriador cornpietamente.
5.
Limpie el filtro de _a bomba Y renqueva objetos que
obstruyan e[ flu}o det agua en el adaptador de [a
manguera en la bomba. Asimismo limpie el adaptador
dd distribuidor de agua a la manguera.
6.
Pinteraspaduras Ypuntosexpuesms dentro del enfriador
con un recubrimiento apropiado,
O'[ing.a"
Ffflthe oil cups on the blower shaft bearings with SAE #30
non4etergent motor oil.
BeltAdjustment:
Check bett tension, Readiust, if[oos< per instructions in the
Operation section of this manual
Fad Replacement:
1, Laypad frame on smooth surface with wire pad retainers
up, Remove wire retainers
2. Remove and discard used pads_
3. aean pad frames. Do not use wire brush or harsh
chemicals that might harm paint finish. Touch up
scratches and bare spots with touch up paint.
4. Check slots in trough attop of padffame to be sure they
are open_
5. Replace pads with new media pads of the correct size.
6, Reinstall wire retainers
7, Thoroughly wet pads with garden hose before
reinstalling.
6
Lubricacion:
Uene [as aceiteras en [as chumaseras de [aflecha con aceite
de motor SAE #30, no detergente.
Ajuste De Banda:
Revise [a tension de [a banda, Reaiuste, si esta floja,siguiendo
tas instrucciones en ta seccJon de operacion de este manual
Reemplaze de |a Faja (Aspen):
1, Co[oque e/armazon del filtro en una superficie plana
con los retenedores de alambre hacia arriba Y
remuevalos.
2. Remueva Y desche la pad
3, Limpie eJ armazon. No use brochas de aiambre o
qu_micos fuertes que puedan daffar [a pintura Pinte
raspaduras Y puntos expuestos con pintura apropiada.
4, Revise los agujeros en la canala del arrnazon cerciorece
que no esten obstruidos.
5. Use fi[tros de paja de[ tamaffo apropiado para eJ
armazon,
6, Reinstale los retenedores de a[ambre.
7. Remoje comptetamente[osfiltros usando una manguera
de jardin antes de reinstaiarios.
Page 7

Troubleshooting
Shouldanobviousprobi]emo¢¢u_with your cooler consult the fo[k_wing_b[e ff you cannot correct the problem,contact a qualifiedservicerepresentative
PROBLEM
Water
Overflow
glower
will not
Fuse blown or circuit
breaker tripped
Dry Pads
noisy
air flow
PROBABLE CAUSE
Float movement obstructed
Float valve defective
Motor defective
Switch or thermostat defective
Blower belt broken
Motor faulty
Water pump fauky
_ump i intake dogged
Wa_er pump faulty
Clogged water line
Switch faulty
Wiring faulty
Motor sheave loose
B_ower set screws loose
Pad plugged
Belt loose
Insufficient exhaust vent area
CORRE_iVE ACtiON
Freefloat from obstruction
Replace float assembly
Replace switch or thermostat
Replace belt
Repair or replace defective wiring
Replace motor
Replace water pump
Remove obstruction
Replace water pump
Locate and free obstruction
Clear debris from trough
Replace switch
Repair or replace defective wiring
ition_heei
Tighten set screws
Tighten set screws
Replace pads
Adiust belt tension
Open windows or doors
En caso de a_guna fa[_a en su e_ffiador _o_su[_e _a tab[a 2, _'Tr_zando _a_ias" Esf_ tab_a es una g_ia para los prob_emas mas obvios, Su usted no puede cor_egir el prob,iema
pongase en contacto (on un compe_ente re[_resentant_ de serv[cio,
PROBLEMA
Derrame
De Agua
La Turbina
No Funciona
Fusible Quemado
Cortacircuito
se apaga
Filtros Secos
PROBABLE CAUSA
Vaivuia fuera de ajuste
F[otador atorado
Va[vuia defectuosa
Ele(tricidad desconectada
Motor defectuoso
tot o termostato defectuso
Banda rota
Fallasen eJalambrado o alambrado incorre(tamente
Motor defectuoso
gomba defectuosa
Canaleta de[ fiffro tapada
Entrada de agua en [a bomba obstruida
Bomba defectuosa
...................... ._.__
Tubo de distribuidor tapado
Alam bre defectuoso i
Enfriador
Fluio De Aire
Turbina roza con [a caja de esta
Polea motriz ruidosa
TorniHos de turbina fioios
FiJ_rotapado
[nsuficiente escape de aire en el area ventiiada
Trazando Fa]ias
ACC[ON CORRECHVA
Aius_eVaiw3[a a 2Y_puigadas de profu_didad de agua
Libere el ftotador
_oo
Revise corriente,, rece_ cordon davija
Remp[ase el motor
Remp[ase el interruptor o termostato
Remplasela
Repare o remplase los atambres defectuosos
Remp[ase el motor
Remp[ase Bomba
Remueva obiectos de Ja canateta
Jm,pie [a entrada de agua
Remplase bomba
Localize & remueva [a obstruccion
Localize y [impie [a obstruccion en el tubo
Remp[ase el interru .....
Repare o remp[ase los a[ambres defectuosos
Realinie turbina
Apriete ]os torniilos opresores
Apr[ete los tomiHos opresore
Remptase [a paja
_e [a te_ion de esta
[ Abra ventanas o puertas
7
Page 8

Frigiking Evaporative Cooler - Replacement Parts List
Frigiking Enfriador Evaporativo - Lista Reemplazo de Partes
Replacement Part
1
Cabinet Assembly
2
Blower Assy - Complete
3
Pad Frame Assembly
4
Pump Receptacle - 115V
Pump Receptacle - 230V
5
Motor Cord Receptacle
6
Motor Cord - 115V
Motor Cord - 230V
7
Motor Mounting Clamps
8
Motor Sheave
Motor Sheave (3/4 Hponly)
9
Belt
10
Blower Pulley
11
Blower Wheel Assembly
12
Bearing Assy (set of 2)
13
Shaft
14
Water Distributor Assy.
15
Bleed off Tee & Hose
16
Float Valve Assembly
17
Pump w/Basket, 115V
Pump w/Basket, 230V
18
Overflow Standpipe
19
Motor: 115V, 1 Spd, 1/3 Hp
115V, 2 Spd, 1/3 Hp
115V, 1 Spd, 1/2 Hp
115V, 2 Spd, 1/2 Hp
230V, 1 Spd, 1/2 Hp
230V, 2 Spd, 1/2 Hp
115V, 1 Spd, 3/4 Hp
115V, 2 Spd, 3/4 Hp
230V, 1 Spd, 3/4 Hp
230V, 2 Spd, 3/4 Hp
Parte de Reemptazo
Ensamble del Gabinete
Soplador Ensamble
Ensamble del Filtro
Receptaculo de Bomba - 115V
Receptaculo de Bomba - 230V
Receptaculo de Motor Corddn
Cordon de Motor - 115V
Cord6n de Motor - 230V
Abrazaderas para el Motor
Poleas Motriz
Poleas Motriz (3/4 Hp solamente)
Banda
Polea Impulsa Turbina
Turbina
Chumaceras (juego de 2)
Eje
Distribuidor de Agua
Adaptador de Sangria y Tubo
Ensamble Valvula con FIoatdor
Bomba con Filtro, 115V
Bomba con Filtro, 230V
Tubo de Rebosadero
Motor: 115V, 1 Spd, 1/3 Hp
115V, 2 Spd, 1/3 Hp
115V, 1 Spd, 1/2 Hp
115V, 2 Spd, 1/2 Hp
230V, 1 Spd, 1/2 Hp
230V, 2 Spd, 1/2 Hp
115V, 1 Spd, 3/4 Hp
115V, 2 Spd, 3/4 Hp
230V, 1 Spd, 3/4 Hp
230V, 2 Spd, 3/4 Hp
FS350A
5-3-44
5-2-8A
5-7-6
5-7-59
5-7-5
5-7-58
5-7-57
5-7-28
5-3-66
5-3-17
5-3-59
5-3-34
5-3-37
5-3-1
5-6-187
5-6-3
5-6-1
5-6-34
5-6-44
5-6-5
MK21C
MK22C MK22C
FS450A
5-3-46
5-2-10A
5-7-6
5-7-59
5-7-5
5-7-58
5-7-57
5-7-28
5-3-66
5-3-19
5-3-58
5-3-35
5-3-38
5-3-2
5-6-197
5-6-3
5-6-1
5-6-34
5-6-44
5-6-5
MK21C
MK31C
MK32C
MK34C
MK35C
FS650A
5-3 -48
5-2-11A
5-7-6
5-7-59
5-7-5
5-7-58
5-7-57
5-7-28
5-3-66
5-3-129
5-3-24
5-3-60
5-3-36
5-3-39
5-3-3
5-6-197
5-6-3
5-6-1
5-6-34
5-6 -44
5-6-5
MK31C
MK32C
MK34C
MK35C
MK41C
MK42C
MK44C
MK45C
FD350A
5-3 -43
5-2-8A
5-7-6
5-7 -59
5-7-5
5-7 -58
5-7-57
5-7 -28
5-3-66
5-3-17
5-3 -59
5-3 -34
5-3-37
5-3-1
5-6-181
5-6-3
5-6-1
5-6-34
5-6-44
5-6-5
MK21C
MK22C
FD450A FD650A
5-3-45 5-3-47
5-2-10A 5-2-11A
5-7 -6 5-7-6
5-7-59 5-7-59
5-7-5 5-7-5
5-7-58 5-7-58
5-7-57 5-7-57
5-7-28 5-7-28
5-3-66 5-3-66
..... 5-3-129
5-3-18 5-3-24
5-3-58 5-3-60
5-3-35 5-3-36
5-3-38 5-3-39
5-3 -2 5-3-3
5-6-194 5-6-194
5-6 -3 5-6-3
5-6-1 5-6-1
5-6-34 5-6-34
5-6-44 5-6-44
5-6 -5 5-6-5
MK21C .....
MK22C .....
MK31C MK31C
MK32C MK32C
MK34C MK34C
MK35C MK35C
..... MK41C
..... MK42C
..... MK44C
..... MK45C
/
9
15
10
16
8
15
FDModel Blower Assembly Shown
FS Model Blower Assembly Similar
"11 1-999- Date:6/25/2007
 Loading...