

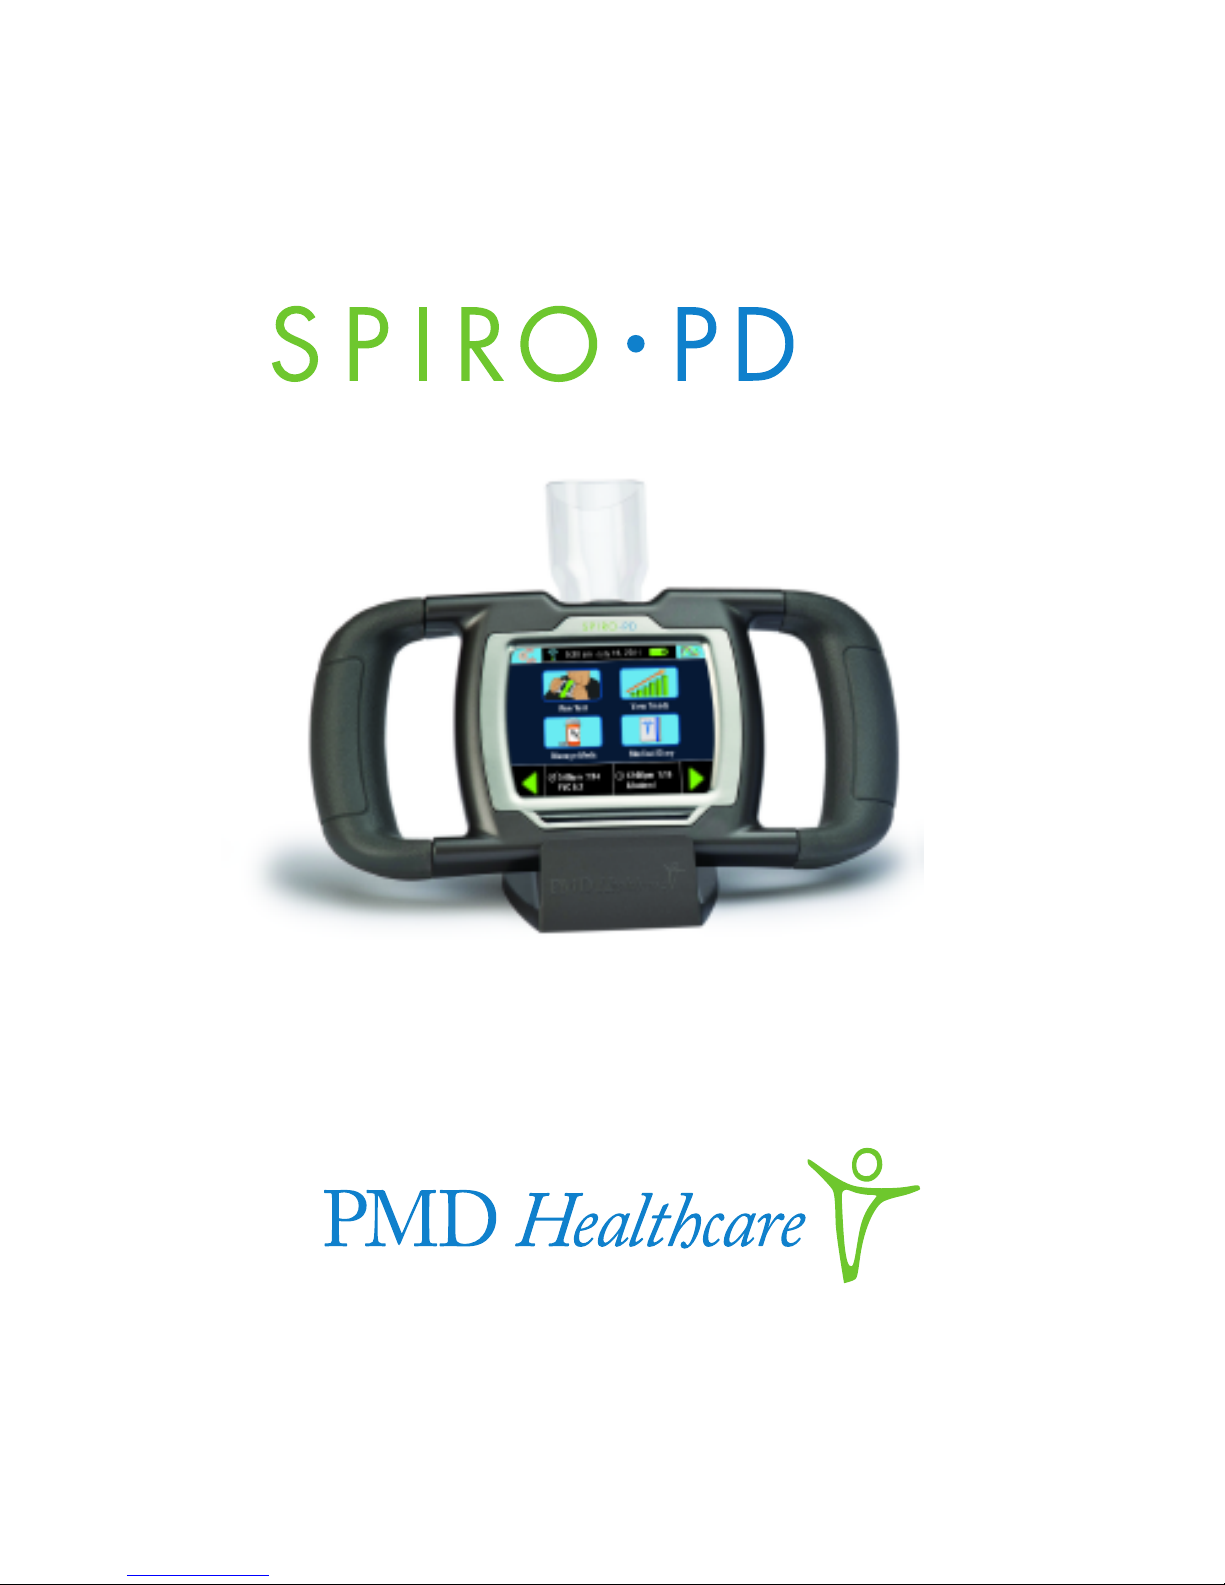
User Manual
2.0

COPYRIGHT 2017
© 2017 PMD Healthcare. All rights reserved. No part of this publication may be
reproduced, transmitted, transcribed, stored in a retrieval system, or translated
into any language in any form by any means without the prior written permission
of PMD Healtcare.

Table of Contents
Chapter 1 – Introduction
Intended Use . . . . . . . . . . . . . . . . . . . . . . . . . . . . . . . . . . . . . . . . . . . . . . . . . . . . . . . . 1
Features of Your Spiro PD 2.0 . . . . . . . . . . . . . . . . . . . . . . . . . . . . . . . . . . . . . . . . . . 2
Home Screen . . . . . . . . . . . . . . . . . . . . . . . . . . . . . . . . . . . . . . . . . . . . . . . . . . . . . . . . . 5
Run Test . . . . . . . . . . . . . . . . . . . . . . . . . . . . . . . . . . . . . . . . . . . . . . . . . . . . . . . . . . . . . . 6
View Trends . . . . . . . . . . . . . . . . . . . . . . . . . . . . . . . . . . . . . . . . . . . . . . . . . . . . . . . . . . 6
Manage Meds . . . . . . . . . . . . . . . . . . . . . . . . . . . . . . . . . . . . . . . . . . . . . . . . . . . . . . . . 6
Medical Diary. . . . . . . . . . . . . . . . . . . . . . . . . . . . . . . . . . . . . . . . . . . . . . . . . . . . . . . . . 7
Alarms & Alerts . . . . . . . . . . . . . . . . . . . . . . . . . . . . . . . . . . . . . . . . . . . . . . . . . . . . . . . 7
Wellness Management Services . . . . . . . . . . . . . . . . . . . . . . . . . . . . . . . . . . . . . . . 8
Chapter 2 – Safe Use of Your Spiro PD 2.0
Limitations of Use . . . . . . . . . . . . . . . . . . . . . . . . . . . . . . . . . . . . . . . . . . . . . . . . . . . . 10
Contraindications of Use . . . . . . . . . . . . . . . . . . . . . . . . . . . . . . . . . . . . . . . . . . . . . . 11
Spiro PD 2.0 Labels . . . . . . . . . . . . . . . . . . . . . . . . . . . . . . . . . . . . . . . . . . . . . . . . . . . 12
Chapter 3 – Setting Up Your Spiro PD 2.0
Initial Setup . . . . . . . . . . . . . . . . . . . . . . . . . . . . . . . . . . . . . . . . . . . . . . . . . . . . . . . . . . 13
Privacy Policy . . . . . . . . . . . . . . . . . . . . . . . . . . . . . . . . . . . . . . . . . . . . . . . . . . . . . . . . . 13
Your Personal Settings . . . . . . . . . . . . . . . . . . . . . . . . . . . . . . . . . . . . . . . . . . . . . . . . 14
Name . . . . . . . . . . . . . . . . . . . . . . . . . . . . . . . . . . . . . . . . . . . . . . . . . . . . . . . . . . . . . . 15
Date of Birth . . . . . . . . . . . . . . . . . . . . . . . . . . . . . . . . . . . . . . . . . . . . . . . . . . . . . . . 16
Gender. . . . . . . . . . . . . . . . . . . . . . . . . . . . . . . . . . . . . . . . . . . . . . . . . . . . . . . . . . . . . 16
Height . . . . . . . . . . . . . . . . . . . . . . . . . . . . . . . . . . . . . . . . . . . . . . . . . . . . . . . . . . . . . 17
iii

Weight. . . . . . . . . . . . . . . . . . . . . . . . . . . . . . . . . . . . . . . . . . . . . . . . . . . . . . . . . . . . . 17
Ethnicity . . . . . . . . . . . . . . . . . . . . . . . . . . . . . . . . . . . . . . . . . . . . . . . . . . . . . . . . . . . 18
Your Device Settings . . . . . . . . . . . . . . . . . . . . . . . . . . . . . . . . . . . . . . . . . . . . . . . . . . 18
Set LCD Brightness . . . . . . . . . . . . . . . . . . . . . . . . . . . . . . . . . . . . . . . . . . . . . . . . . 20
Set Volume. . . . . . . . . . . . . . . . . . . . . . . . . . . . . . . . . . . . . . . . . . . . . . . . . . . . . . . . . 20
Set Date/Time Format . . . . . . . . . . . . . . . . . . . . . . . . . . . . . . . . . . . . . . . . . . . . . . 21
Set Time & Date . . . . . . . . . . . . . . . . . . . . . . . . . . . . . . . . . . . . . . . . . . . . . . . . . . . . 21
Set Unit of Measure . . . . . . . . . . . . . . . . . . . . . . . . . . . . . . . . . . . . . . . . . . . . . . . . 22
Set Language . . . . . . . . . . . . . . . . . . . . . . . . . . . . . . . . . . . . . . . . . . . . . . . . . . . . . . 22
Chapter 4 – Running a Test with Your Spiro PD 2.0
Running a Test. . . . . . . . . . . . . . . . . . . . . . . . . . . . . . . . . . . . . . . . . . . . . . . . . . . . . . . . 24
Chapter 5 – Viewing Your Trends
Viewing Your Trends . . . . . . . . . . . . . . . . . . . . . . . . . . . . . . . . . . . . . . . . . . . . . . . . . . 33
Disease Severity . . . . . . . . . . . . . . . . . . . . . . . . . . . . . . . . . . . . . . . . . . . . . . . . . . . . . . 37
Chapter 6 – Tri-Trends®
Tri-Trends®. . . . . . . . . . . . . . . . . . . . . . . . . . . . . . . . . . . . . . . . . . . . . . . . . . . . . . . . . . . . 39
Chapter 7 – Managing Your Medication
Creating a New Medication . . . . . . . . . . . . . . . . . . . . . . . . . . . . . . . . . . . . . . . . . . . 43
Changing Your Medication . . . . . . . . . . . . . . . . . . . . . . . . . . . . . . . . . . . . . . . . . . . . 49
iv
Table of Contents

Deleting a Medication . . . . . . . . . . . . . . . . . . . . . . . . . . . . . . . . . . . . . . . . . . . . . . . . 50
Logging Your Medication . . . . . . . . . . . . . . . . . . . . . . . . . . . . . . . . . . . . . . . . . . . . . 50
Refilling a Prescription or Changing Dosage . . . . . . . . . . . . . . . . . . . . . . . . . . . 51
Viewing Your Medication History . . . . . . . . . . . . . . . . . . . . . . . . . . . . . . . . . . . . . . 52
Medication Alarm Reminder . . . . . . . . . . . . . . . . . . . . . . . . . . . . . . . . . . . . . . . . . . 53
Chapter 8 – Medical Diary
Setting Your Chronic Conditions. . . . . . . . . . . . . . . . . . . . . . . . . . . . . . . . . . . . . . . 55
Creating a Diary Entry. . . . . . . . . . . . . . . . . . . . . . . . . . . . . . . . . . . . . . . . . . . . . . . . . 57
Creating a Free Text Diary Entry . . . . . . . . . . . . . . . . . . . . . . . . . . . . . . . . . . . . . . . 58
Viewing your Diary . . . . . . . . . . . . . . . . . . . . . . . . . . . . . . . . . . . . . . . . . . . . . . . . . . . 60
Chapter 9 – Alarms & Alerts
Creating, Editing, and Deleting Alarms . . . . . . . . . . . . . . . . . . . . . . . . . . . . . . . . 63
Scheduling Your Test Alarm . . . . . . . . . . . . . . . . . . . . . . . . . . . . . . . . . . . . . . . . . 64
Test Alarm Reminder . . . . . . . . . . . . . . . . . . . . . . . . . . . . . . . . . . . . . . . . . . . . . 64
Scheduling Your Diary Alarms. . . . . . . . . . . . . . . . . . . . . . . . . . . . . . . . . . . . . . . 65
Scheduling Your Breathing Exercise Alarms. . . . . . . . . . . . . . . . . . . . . . . . . . 65
Breathing Exercise Alarm Reminder . . . . . . . . . . . . . . . . . . . . . . . . . . . . . . . 65
Alerts. . . . . . . . . . . . . . . . . . . . . . . . . . . . . . . . . . . . . . . . . . . . . . . . . . . . . . . . . . . . . . . . . 66
Creating a Biometric Alert . . . . . . . . . . . . . . . . . . . . . . . . . . . . . . . . . . . . . . . . . . 66
Test Result Alerts . . . . . . . . . . . . . . . . . . . . . . . . . . . . . . . . . . . . . . . . . . . . . . . . . . . 66
Weight/BMI Alerts . . . . . . . . . . . . . . . . . . . . . . . . . . . . . . . . . . . . . . . . . . . . . . . . . . 67
v
Table of Contents

Chapter 10 – Wi-Fi
Connecting to Wi-Fi . . . . . . . . . . . . . . . . . . . . . . . . . . . . . . . . . . . . . . . . . . . . . . . . . . 69
Wi-Fi Symbols . . . . . . . . . . . . . . . . . . . . . . . . . . . . . . . . . . . . . . . . . . . . . . . . . . . . . . . . 70
Chapter 11 – Technical Information
Product Specifications . . . . . . . . . . . . . . . . . . . . . . . . . . . . . . . . . . . . . . . . . . . . . . . . 71
EMC Regulations. . . . . . . . . . . . . . . . . . . . . . . . . . . . . . . . . . . . . . . . . . . . . . . . . . . . . . 72
Glossary . . . . . . . . . . . . . . . . . . . . . . . . . . . . . . . . . . . . . . . . . . . . . . . . . . . . . . . . . . . . . . 78
Minimum System Requirements . . . . . . . . . . . . . . . . . . . . . . . . . . . . . . . . . . . . . . 80
Chapter 12 – Maintenance and Troubleshooting
Cleaning and Disinfecting. . . . . . . . . . . . . . . . . . . . . . . . . . . . . . . . . . . . . . . . . . . . . 81
Mouthpiece Cleaning Instructions . . . . . . . . . . . . . . . . . . . . . . . . . . . . . . . . . . 81
Mouthpiece Disinfecting Instructions . . . . . . . . . . . . . . . . . . . . . . . . . . . . . . . 81
Spiro PD 2.0 Unit Cleaning Instructions . . . . . . . . . . . . . . . . . . . . . . . . . . . . . 82
Spiro PD 2.0 Unit Disinfecting Instructions . . . . . . . . . . . . . . . . . . . . . . . . . . 82
Battery Replacement. . . . . . . . . . . . . . . . . . . . . . . . . . . . . . . . . . . . . . . . . . . . . . . . . . 83
Troubleshooting Guide . . . . . . . . . . . . . . . . . . . . . . . . . . . . . . . . . . . . . . . . . . . . . . . 84
Return Policy . . . . . . . . . . . . . . . . . . . . . . . . . . . . . . . . . . . . . . . . . . . . . . . . . . . . . . . . . 87
Proper Disposal of Your Spiro PD 2.0. . . . . . . . . . . . . . . . . . . . . . . . . . . . . . . . . . . 88
LIMITED WARRANTY CONDITIONS . . . . . . . . . . . . . . . . . . . . . . . . . . . . . . . . . . . . . 88
vi
Table of Contents

CHAPTER
Introduction
1
Intended Use
The Spiro PD 2.0 spirometer is intended to be used by a patient under the
instruction of a physician or respiratory therapist to test lung function in a
child, adolescent or adult. It is also intended to be used as a single-patient
device only and can be used in the home, factory, hospital or physician's
office.
The Spiro PD 2.0 spirometer is indicated for the following age groups:
• 2–12 years — Child
• 13–21 years — Adolescent
• 22 and over— Adult
CAUTION
Federal (USA) law restricts this device to sale by or on the order of
a physician.
1
2
SPIRO PD 2.0 User ManualSPIRO PD 2.0 User Manual
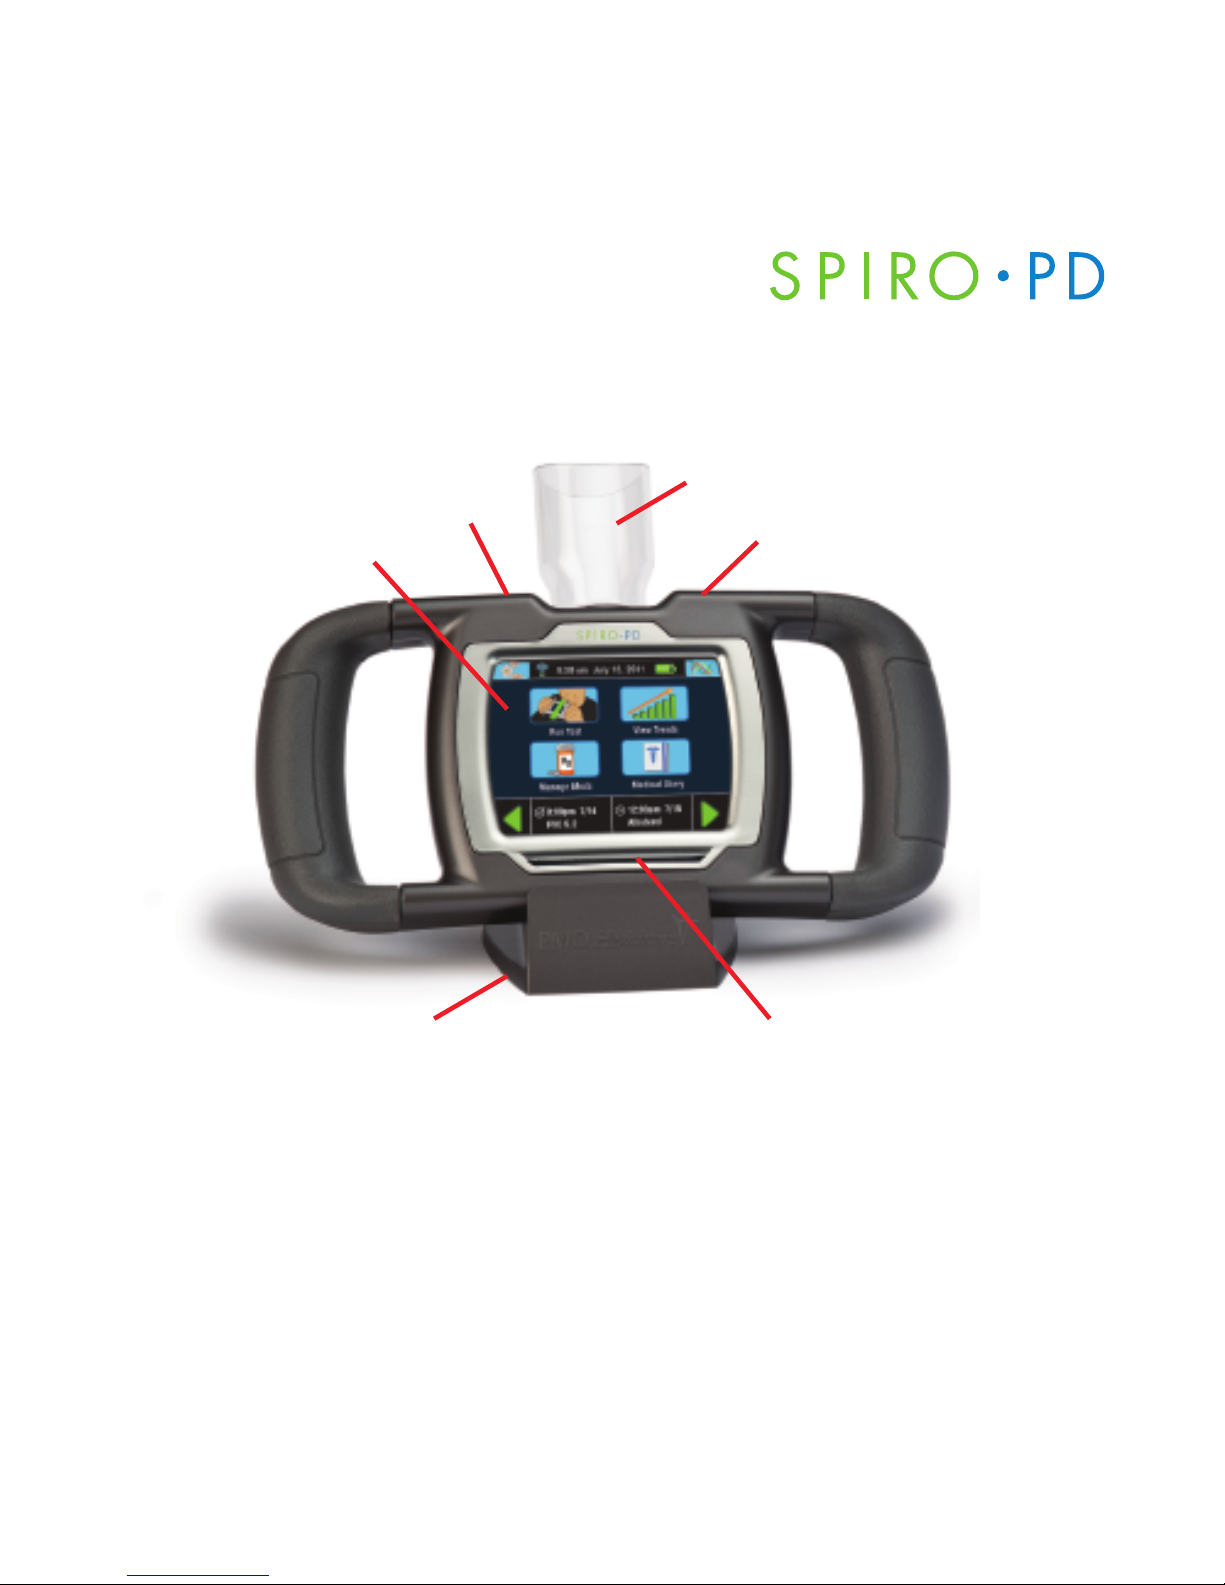
Features of Your Spiro PD 2.0
SPIRO PD 2.0 User Manual
Standby Mouthpiece
Button
LCD Display USB Connector
Screen
Cradle Indicator Lights
Standby Button
The standby button is located on the top of your Spiro PD 2.0.
Indicator Lights
There are blue Indicator Lights that flash when an Alarm is activated,
during start up or when you are performing a spirometry test.

Mouthpieces
Your Spiro PD 2.0 comes with 2 removable
mouthpieces: a child mouthpiece and an
adult mouthpiece. The mouthpiece directs
your exhaled breath into your Spiro PD 2.0
so it can be measured. The mouthpieces
are considered the applied parts.
Spiro PD 2.0 Cradle
The cradle is used to hold your Spiro PD
2.0 while charging or when it is not in use.
USB Connector
A USB connector is located on the top of
the Spiro PD 2.0. It is used to recharge the
battery or connect Spiro PD 2.0 to your
computer.
3
Introduction
Child
Mouthpiece
Adult
Mouthpiece
SPIRO PD 2.0 User ManualSPIRO PD 2.0 User Manual
Battery
Your Spiro PD 2.0 is equipped with a
rechargeable Lithium-ion battery.
It will take up to 3 hours to recharge. If
battery is removed from SpiroPD 2.0 and
stored, the average lifespan of the battery
is 3 years.
Power Adapter
Your Spiro PD 2.0 is equipped with a power
adapter which is used to charge the
rechargeable Lithium-ion battery. Connect
the USB connector to the Spiro PD 2.0 and
the power adapter. Then plug the power
adapter into an approved electrical outlet
to charge the Spiro PD 2.0 battery. Only
use the supply power adapter supplied
with your Spiro PD.
LCD Display
The LCD display is a touch screen and is
used to control your Spiro PD 2.0. Using
your Spiro PD 2.0 is as easy as touching
the screen!
4

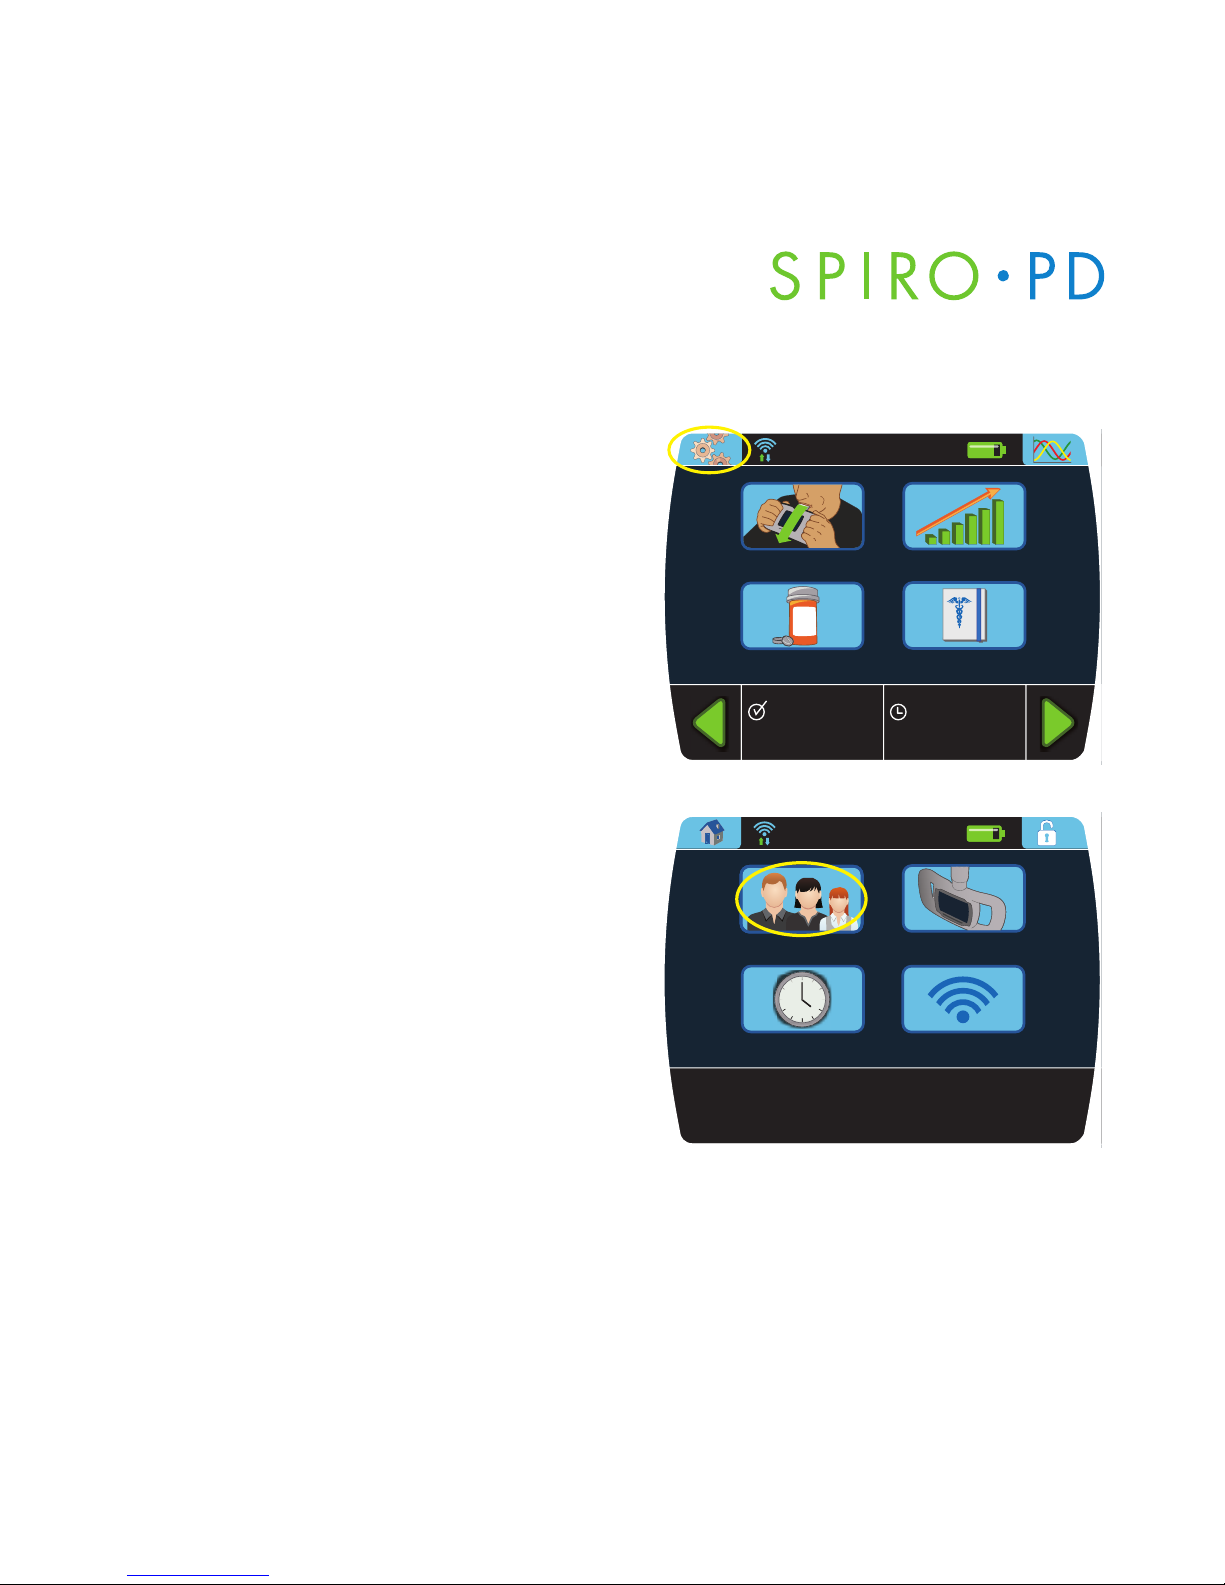
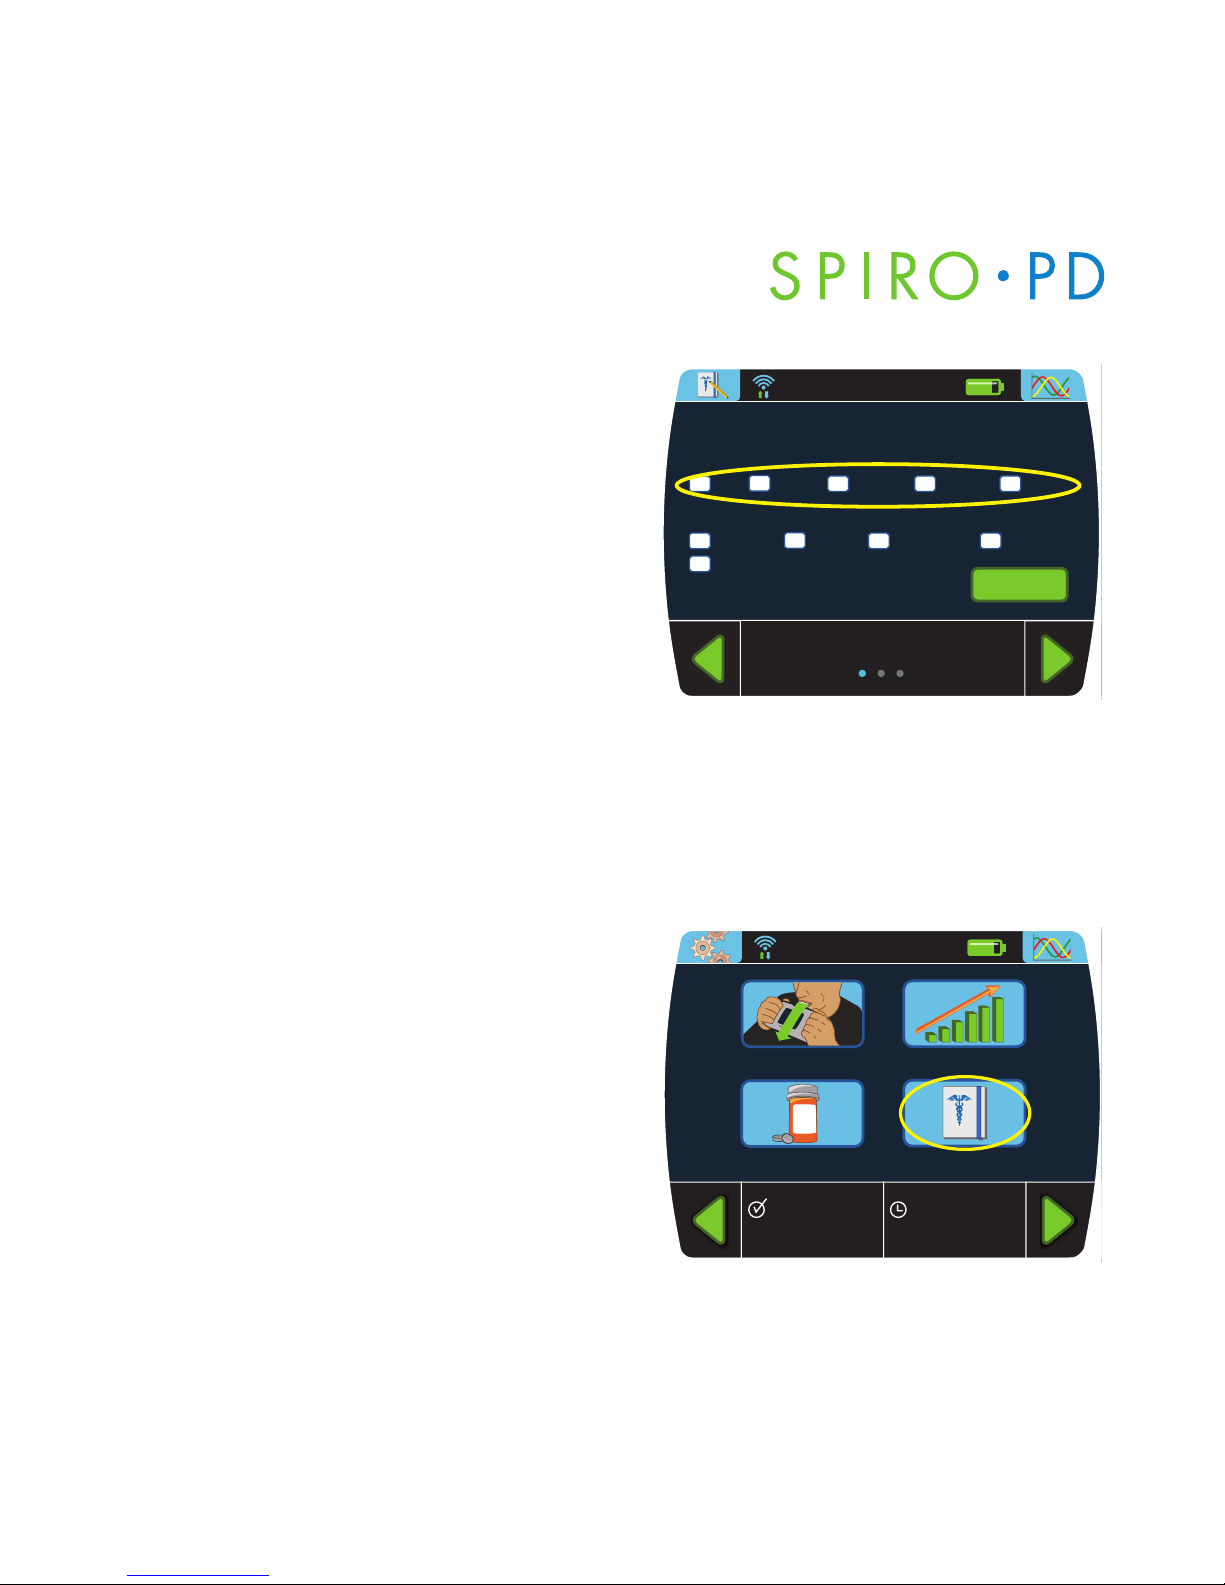
Home Screen
5
Introduction
View Trends
Medical Diary
RR
XX
Run Test
Manage Meds
3:00pm 7/14
FVC 5.2
12:00pm 7/15
Albuterol
9:30 am July 15, 2011
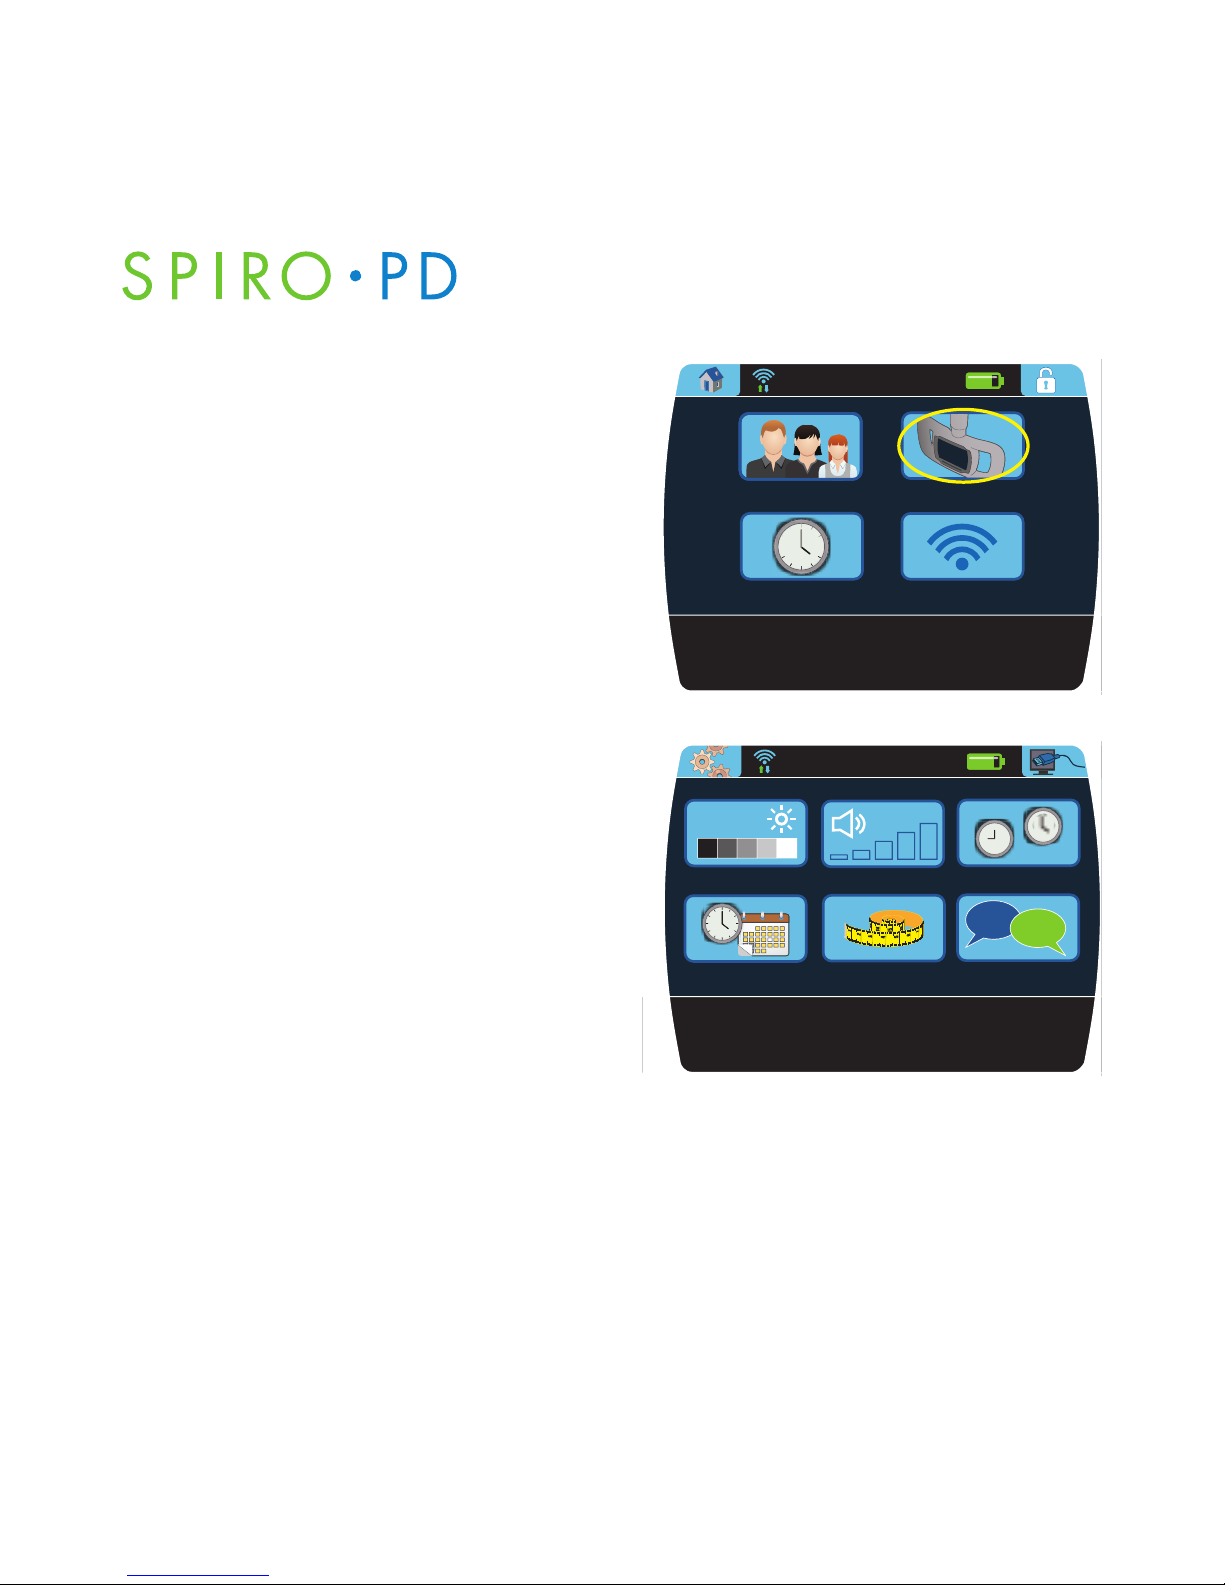
Settings Wi-Fi Status Time & Date Battery Tri-Trends
Button Display Button
Run Test View Trends
Manage Meds Medical Diary
Last Event Next Alarm
Left and Right Scroll Buttons
To view completed past events or future alarms

SPIRO PD 2.0 User ManualSPIRO PD 2.0 User Manual
Run Test
Run Test allows you to conduct your spirometry tests. You will be guided
through three spirometry tests and then the results of the best of the
three tests are displayed. Your Spiro PD 2.0 also prompts you with audible
coaching, indicator lights, and on-screen instructions to help you achieve
optimal results. All results are sent through Wi-Fi to your HIPPA compliant
Wellness Management Services system (WMS), a companion web portal.
View Trends
Trend Data allows you to view and compare your spirometry and
weight/BMI data over time. This can be shown in tabular or graphical
format by pressing the Table or Graph button. Trend data is also available
on the companion web portal.
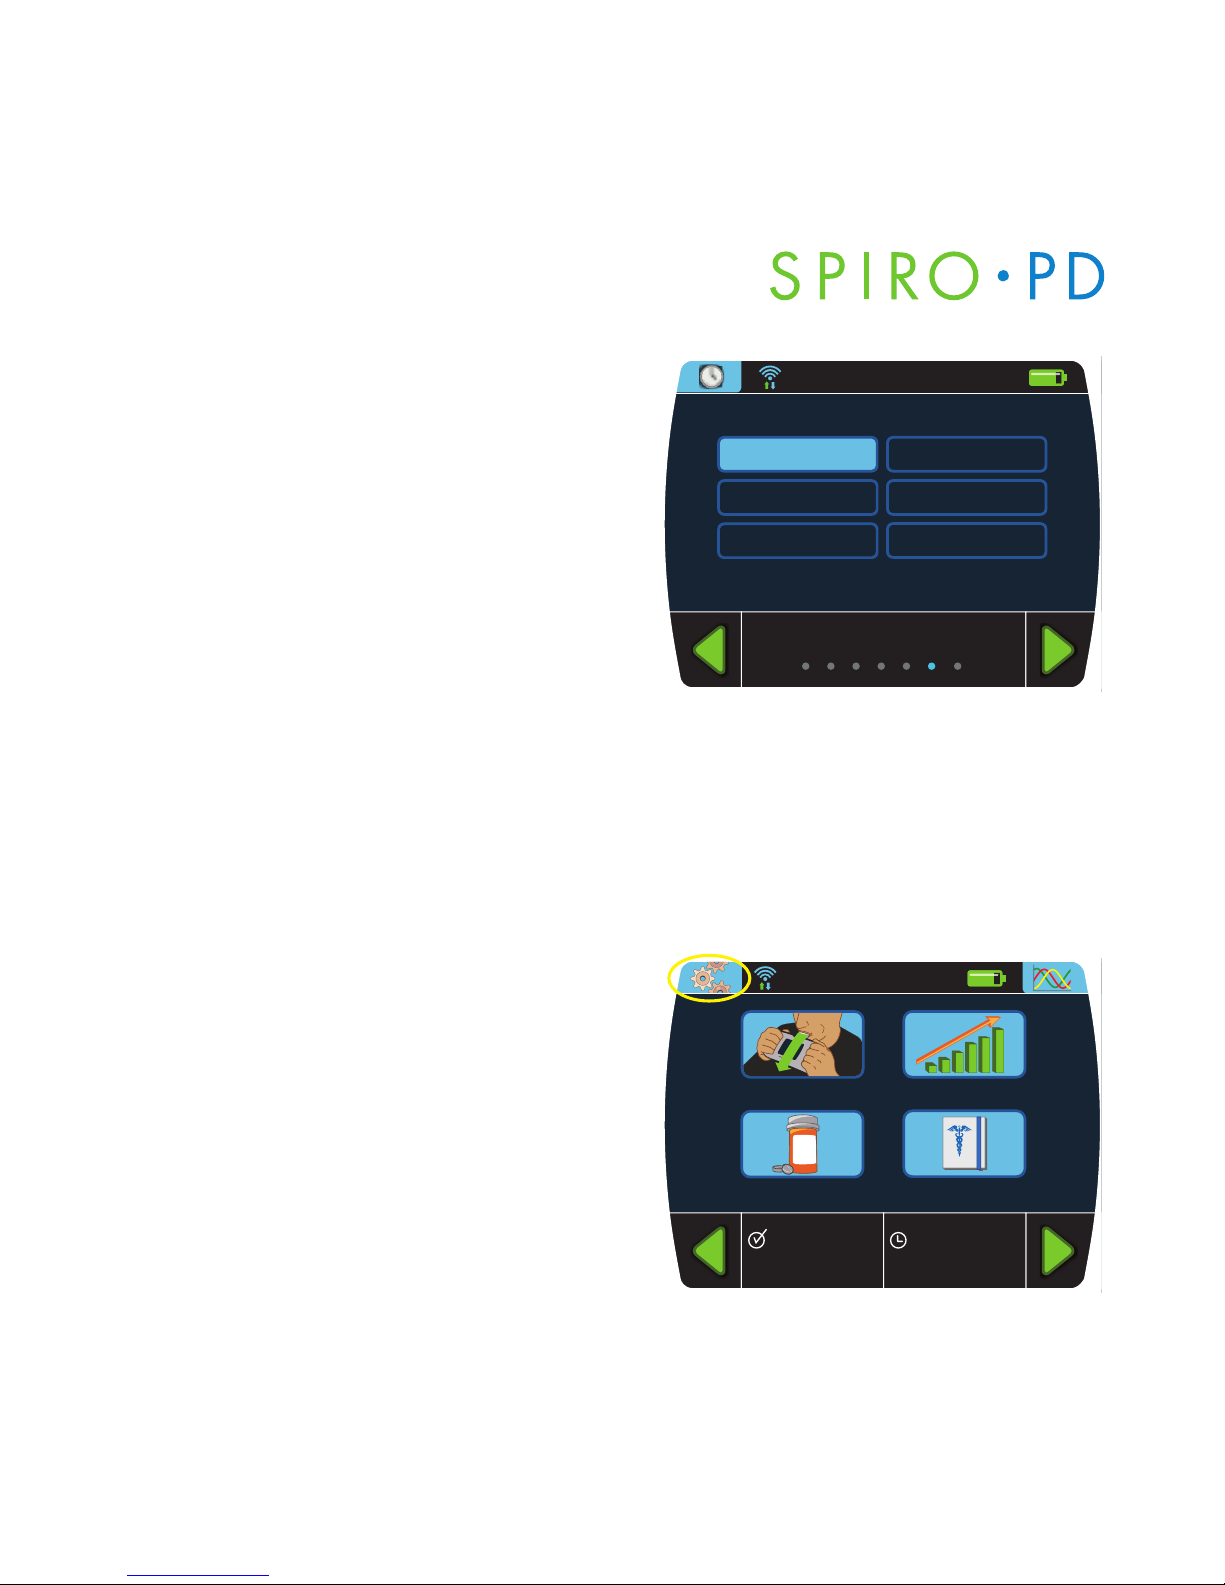
Manage Meds
Manage Meds allows you to:
• Create, edit, or delete a medication and its schedule
• Log a medication that you’ve taken
• View your medication history
• Track quantity left of each medication
Medications can also be managed on the companion web portal.
6

Medical Diary
Medical Diary allows you to enter standard symptom assessments based
on a selected chronic condition. You can then track medical symptoms
or occurrences of that condition daily. Free text notes can also be entered
and tracked to provide more information about your day. Medical Diary
entries can also be viewed or entered on the companion web portal.
Alarms & Alerts
Alarms allow you to create reminders to take spirometry tests, do breathing
exercises, make medical diary entries and/or enter your weight. You can
also create an alert that will let you know if your results fall below a
predetermined threshold. Use the companion web portal to take advantage
of additional alert and alarm options such as email and cell phone text
messaging for reminders and alerts.
7
Introduction

SPIRO PD 2.0 User Manual
Wellness Management Services
Spiro PD 2.0 synchronizes your data to a HIPPA Compliant web portal
when you are connected to Wi-Fi. Spirometry data and trends are sent
to the web portal for additional viewing. There are many other features
available on the web portal such as medication management, medical
diary entry, alarms and alerts all of which can be managed on your
Spiro PD 2.0 or through the web portal.
8
SPIRO PD 2.0 User Manual
CHAPTER
Safe Use of Your Spiro PD 2.0
2
Your Spiro PD 2.0 is designed to be an easy to use personal medical device.
Please read your User Manual carefully before use to avoid any danger to
you or damage to your device and accessories.
WARNING
Do NOT disassemble your Spiro PD 2.0. Contact with voltage inside
the device may cause injury or may damage the device.
WARNING
Do NOT use damaged accessories. Using damaged accessories could
cause damage to the Spiro PD 2.0 or the user.
WARNING
Do NOT submerge parts of your Spiro PD 2.0 in any liquid. Consult
the equipment cleaning instructions in Chapter 13. Submerging the
Spiro PD 2.0 in liquid could cause damage to the device or end user.
WARNING
Do NOT use accessories other than those provided with your
Spiro PD 2.0. Using other cables or accessories may negatively affect
the EMC performance.
WARNING
Do NOT extract data via the USB port during testing. Extracting data via
the USB port during testing could result in a loss of data.
9
SPIRO PD 2.0 User ManualSPIRO PD 2.0 User Manual
WARNING
No modification of this equipment is allowed. Modifying the
Spiro PD 2.0 or its accessories could cause damage to the Spiro PD 2.0,
the accessories or end user
CAUTION
Store your Spiro PD 2.0 in dry conditions and at temperature ranges
between -4ºF to 140ºF (-20ºC to 60ºC) and less than 95% humidity.
CAUTION
Your Spiro PD 2.0 is intended as a single user personal device. It is
not recommended that multiple users use your Spiro PD 2.0.
CAUTION
Your Spiro PD 2.0 is not intended to be used while it is plugged into
the wall outlet. The power adapter is intended for charging of your
Spiro PD 2.0 only.
CAUTION
Your Spiro PD 2.0 is intended to be used by someone 2 years of age
and older. Children ages 2 – 10 require adult supervision when using
their Spiro PD 2.0. Keep your Spiro PD 2.0 and its accessories away
from young children.
CAUTION
Your Spiro PD 2.0 is not intended to be used adjacent to or stacked
with other equipment.
10
Safe Use of Your Spiro PD 2.0
CAUTION
If your Spiro PD 2.0 acts unusual or does not work correctly, move to
another location to avoid potential electromagnetic or other
interference from nearby devices.
Limitations of Use
An analysis of the results of spirometry tests is not enough to give an
accurate diagnosis of the patient’s clinical condition. The patient’s records,
clinical history and any tests that the healthcare provider believes necessary
must also be considered. A healthcare provider must interpret all data to
determine the course of treatment required.
The alarms feature of your Spiro PD 2.0 is intended to remind you to take
a medication, run a spirometry test, log weight, log medical diary entry or
perform a breathing exercise. You are responsible for taking your medication
at the correct time, in the correct dosage, and in the correct manner as
prescribed by your doctor. You are responsible for entering your alarm
schedule and medication information correctly into your Spiro PD 2.0.
Your Spiro PD 2.0 does not, in any way, replace your personal responsibility
to take your medication correctly.
11

SPIRO PD 2.0 User ManualSPIRO PD 2.0 User Manual
12
Contraindications of Use
Reference: American Academy of Family Physicians (AAFP)
Use of your Spiro PD 2.0 is not recommended if you have any of the
following medical conditions:
•
Acute disorders affecting test performance (e.g., vomiting, nausea, vertigo)
• Hemoptysis of unknown origin (FVC maneuver may aggravate underlying
condition.)
• Pneumothorax
• Recent abdominal or thoracic surgery
• Recent eye surgery (increases in intraocular pressure during spirometry)
• Unstable cardiovascular status
• Recent myocardial infarction or unstable angina
• Thoracic aneurysms (risk of rupture because of increased thoracic pressure).
Spiro PD 2.0 Labels
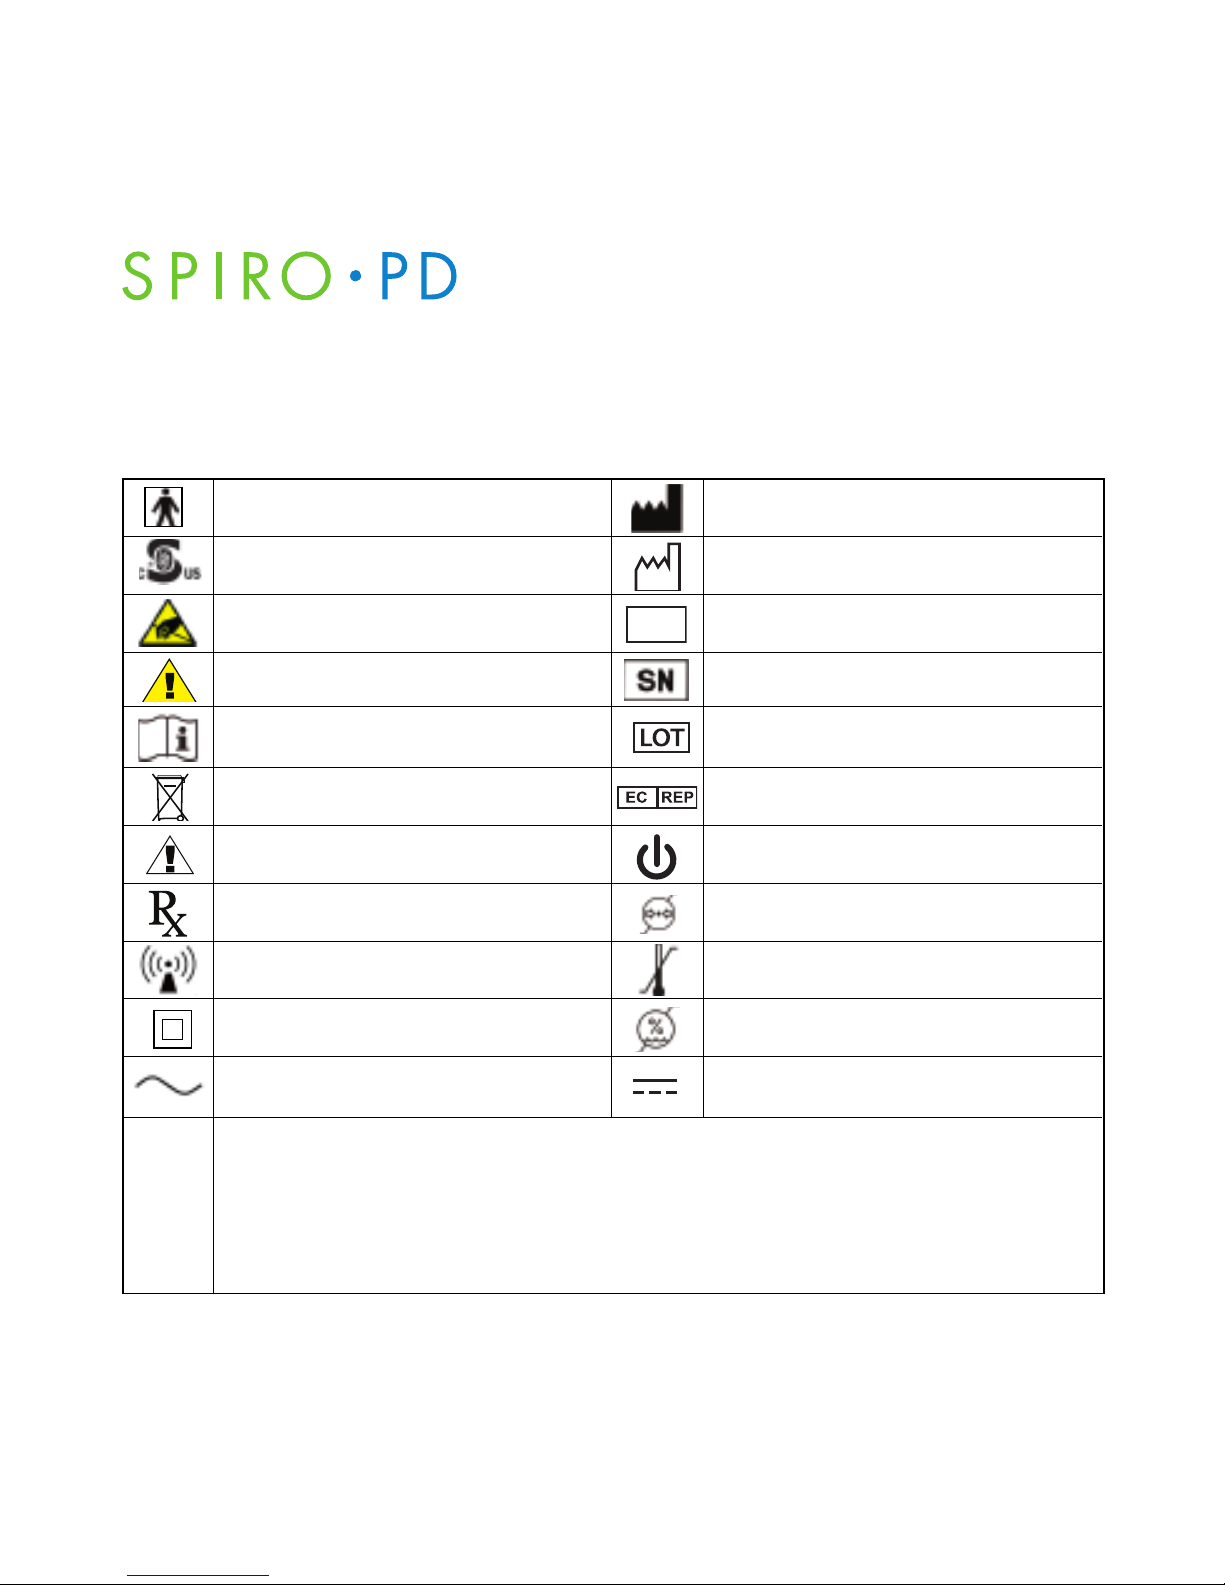
The following symbols are included on the labels on your Spiro PD 2.0.
Type BF: Protection against
electrical shock (IEC 60601-1)
This product is compliant with accepted
national safety standards.
Observe precautions for handling electrostatic sensitive devices.
Warning Caution
Consult accompanying documents
Caution, consult accompanying
documents.
Caution
Prescription only (in USA)
Potential for electromagnetic
interference
Class II Device
AC Power
Manufacturer
Date of Manufacture
Manufacturer’s catalog number or part
number.
Serial number.
Lot code or batch code numbers.
Authorized Representative in the
European Community.
Standby
Barometric Pressure Limits
85kPa to 106kPa
Temperature Limits
-20ºC to 60ªC
Humidity Limits
0% to 95%
DC Power
Ingress of water or particulate matter into device
The first digit indicates the level of protection that the enclosure provides against access
to hazardous parts (e.g., electrical conductors, moving parts) and the ingress of solid
foreign objects >12.5 mm diameter.
The second digit indicates the level of protection that the enclosure provides against
harmful ingress of water while tilted up to 15°.
IP22
-20°C
60°C
REF
106 kPa
95%
Safe Use of Your Spiro PD 2.0
13

SPIRO PD 2.0 User Manual
14

CHAPTER
Setting Up Your Spiro PD 2.0
3
Initial Setup
When you first turn on your Spiro PD 2.0, you must go through the following
screens. This information is used to calculate the % predicted values.
You can modify all of this information later by going to the appropriate
screens via Device Settings or Personal Settings.
• Language
• Unit of Measure
• Name: first, middle, & last
• Date of birth
• Gender
• Height
• Weight
• Ethnicity
• Time & Date
• Privacy Policy and Terms of Use Acknowledgement
NOTE: You must complete all of the settings in order to move to the next
screen. All information must be accurately completed in order for your
Spiro PD 2.0 to produce accurate results.
Privacy Policy
Details on the Privacy Policy and Terms of Use can be found on https://MyPMD.com.
You must agree to these policies prior to using your Spiro PD 2.0.
15
SPIRO PD 2.0 User ManualSPIRO PD 2.0 User Manual
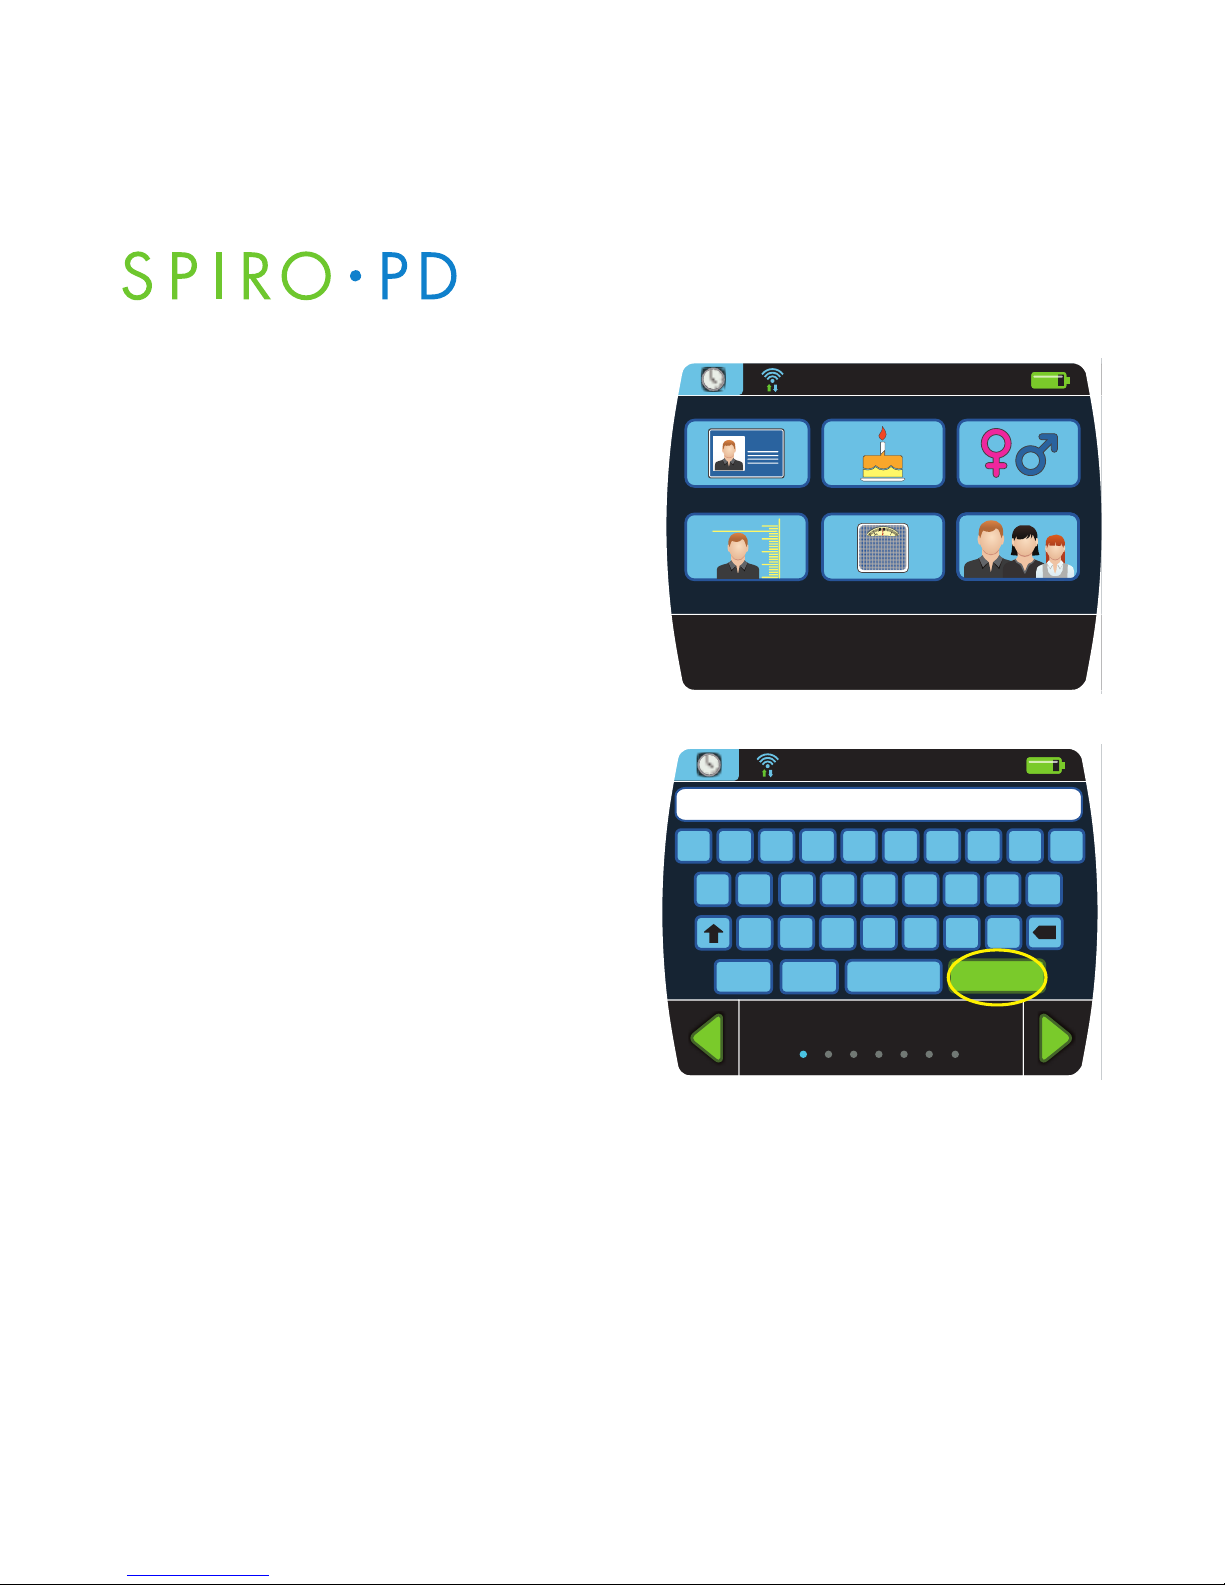
Your Personal Settings
You can enter your name, date of birth,
gender, height, weight, and ethnicity.
1. Press the Settings button on the
Home screen.
2. Press
Profile button.
16
View Trends
Medical Diary
RR
XX
Run Test
Manage Meds
3:00pm 7/14
FVC 5.2
12:00pm 7/15
Albuterol
9:30 am July 15, 2011
Settings
Wi-Fi
Alarm / Alert
Profile
Device
9:30 am July 15, 2011
There are six personal settings:
• Name: first, middle, & last
• Date of birth
• Gender
• Height
• Weight
• Ethnicity
Name
1. From the Personal Settings screen,
press
Name. A keyboard is provided
to enter your full Name.
2. Key in your First Name and press
Enter.
3. Then your Middle Name and press
Enter.
4. Finally your Last Name and press
Enter.
17
Setting Up Your Spiro PD 2.0
Personal Settings
Height
Weight
Date of Birth Gender
Ethnicity
Name
9:30 am July 15, 2011
First Name
9:30 am July 15, 2011
First
wq e
sa d
Space Enter
tr y
gf huj
oi p
lk
xz c bv n m
x
123&
sym+
SPIRO PD 2.0 User ManualSPIRO PD 2.0 User Manual
Date of Birth
1. From the Personal Settings screen,
press
Date of Birth.
2 Enter your birth date using the
numeric keypad.
3. Press
Enter when finished.
NOTE: Use the Delete key to erase
letters or numbers in the white boxes.
Gender
1. From the Personal Settings screen,
press
Gender.
2. Select your gender.
18
Date of Birth
Day
Month
Year
21 3
54 6
87 9
0Delete
Enter
30
12
1968
9:30 am July 15, 2011
Gender
FemaleMale
9:30 am July 15, 2011
Height
1. From the Personal Settings screen,
press
Height.
2. Enter your height using the numeric
keypad and press Enter.
Round your height to the nearest
whole number. For example, if you
are 5 foot 8 1/2 inches tall, enter
5 feet and 9 inches.
Weight
1. From the Personal Settings screen,
press
Weight.
2. Enter your weight using the numeric
keypad and press Enter.
Round your weight to nearest whole
number.
19
Setting Up Your Spiro PD 2.0
Height
Inches
Feet
21 3
54 6
87 9
0Delete
Enter
10
5
9:30 am July 15, 2011
Weight
Lbs21 3
54 6
87 9
0Delete
Enter
222
9:30 am July 15, 2011
SPIRO PD 2.0 User ManualSPIRO PD 2.0 User Manual
Ethnicity
1. From the Personal Settings screen,
press
Ethnicity.
2. Enter your ethnicity from the
multiple choices.
Your Device Settings
You can set the time and date. You can also adjust your LCD brightness, set
the volume control, set the date format, set the measurement units and set
the language.
1. Press the
Settings button on the
Home screen.
20
Ethnicity
White
Black
Asian
Multiracial
Latino
Other
9:30 am July 15, 2011
View Trends
Medical Diary
RR
XX
Run Test
Manage Meds
3:00pm 7/14
FVC 5.2
12:00pm 7/15
Albuterol
9:30 am July 15, 2011
2. Press the Device button.
There are six device settings that can
be selected:
• Brightness
• Volume
• Date/Time Format
• Time & Date
• Unit of Measure
• Language
21
Setting Up Your Spiro PD 2.0
Settings
Wi-Fi
Alarm / Alert
Profile
Device
9:30 am July 15, 2011
Device Settings
Brightness
Volume
Time & Date
Date/Time Format
24
6
12
15
0000 /00/0 00000/00/00
12
3
6
9
00/0 0/000 000/00/0000
Language
Hello
Bonjour
Unit of Measure
9:30 am July 15, 2011
SPIRO PD 2.0 User ManualSPIRO PD 2.0 User Manual
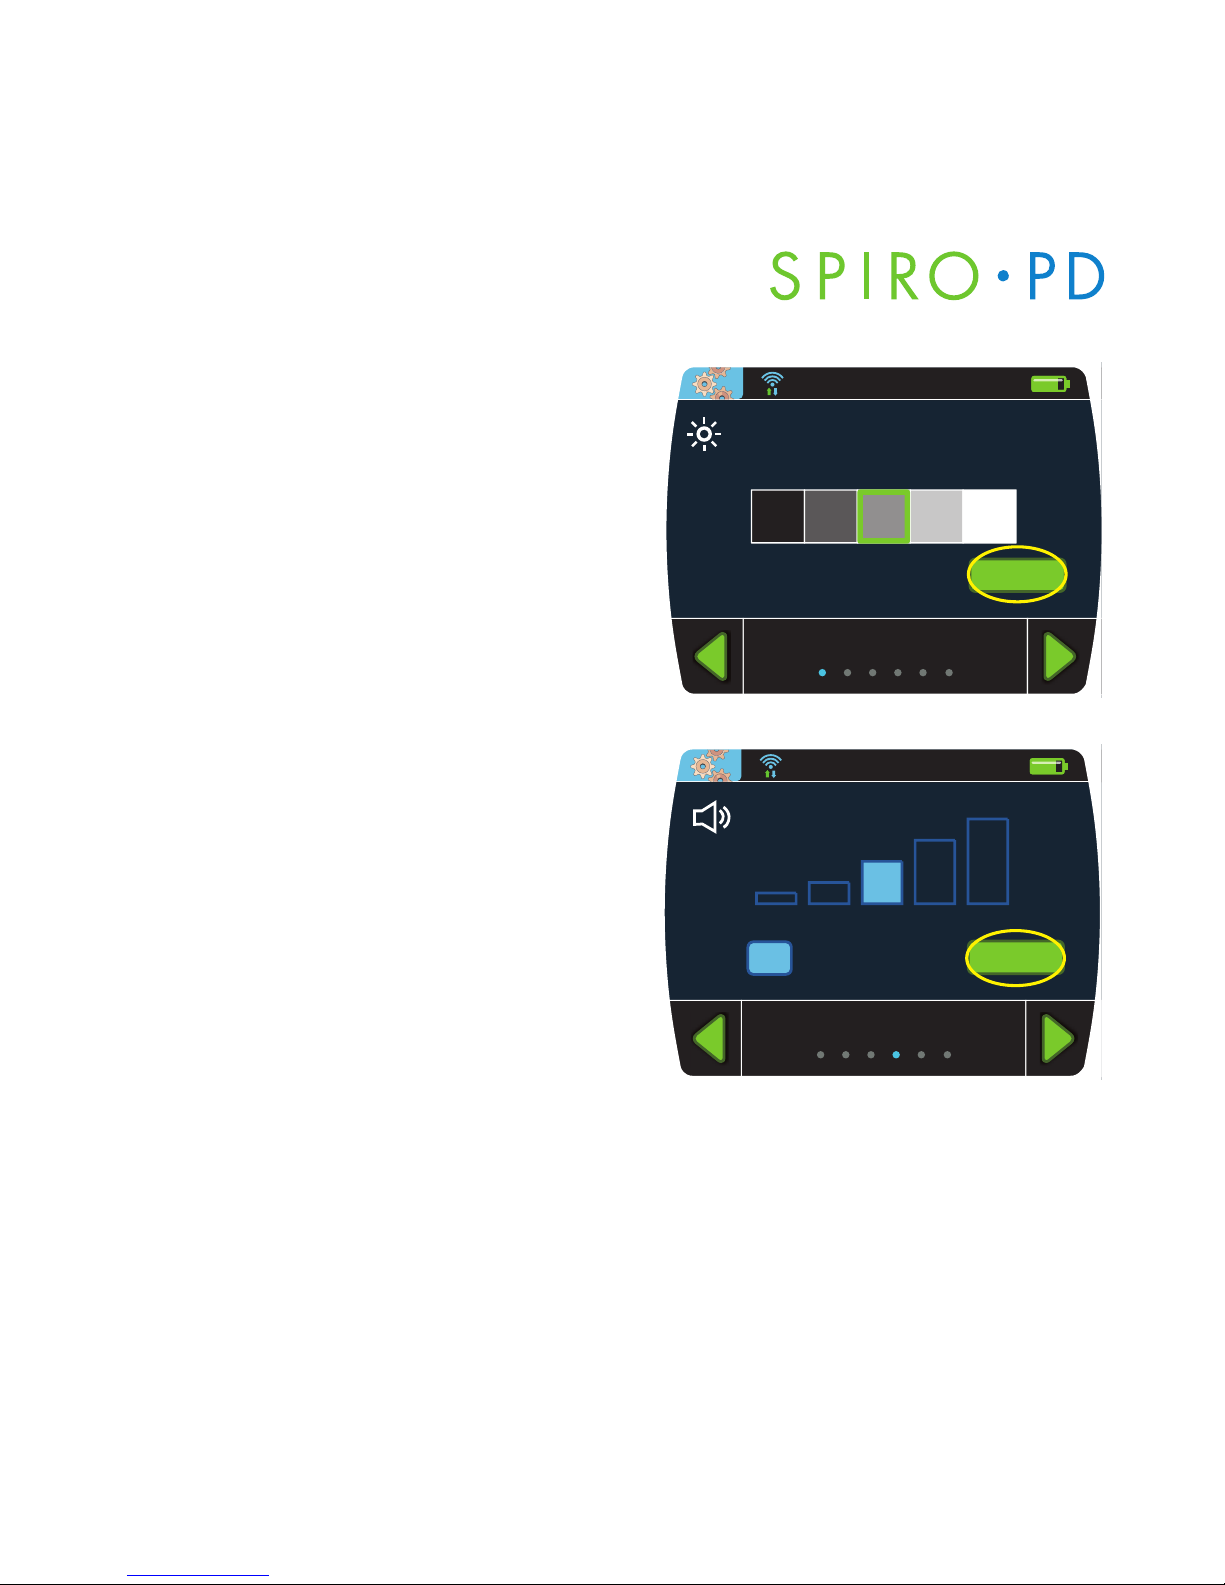
Set LCD Brightness
1. From the Device Settings screen,
press
Brightness.
2. Press the desired brightness box
to adjust the LCD Brightness and
press
Enter.
Set Volume
1. From the Device Settings screen,
press
Volume.
2. Press one of the volume boxes to
adjust the volume or press Mute
to eliminate sound and press Enter.
22
Brightness
Enter
9:30 am July 15, 2011
Enter
Mute
Volume
9:30 am July 15, 2011
Set Date/Time Format
1. From the Device Settings screen,
2. Select Date/Time Format
3. Select one of three date formats
and one time format.
Set Time & Date
1. From the Device Settings screen,
press
Time & Date.
2. Enter the time and press
Enter.
3. You are then prompted to enter
the date using the numeric keypad.
4. Enter the date and press
Enter.
23
Setting Up Your Spiro PD 2.0
Date Format
MM/DD/YYYY
DD/MM/YYYY
YYYY/MM/DD
12-hour 24-hour
9:30 am July 15, 2011
Time
21 3
am
54 6
87 9
0Delete
Enter
9:30
9:30 am July 15, 2011

SPIRO PD 2.0 User ManualSPIRO PD 2.0 User Manual
Set Unit of Measure
1. From the Device Settings screen,
press
Unit of Measure.
2. Select Imperial or Metric.
Set Language
1. From the Device Settings screen,
press
Language.
2. Select English, Español, or Français.
NOTE: Some versions of software may
have some Language options disabled.
24
Unit of Measure
9:30 am July 15, 2011
Metric
US Units
Language
Español
English
Français
9:30 am July 15, 2011

CHAPTER
Running a Test with
4 Your Spiro PD 2.0
Before you perform a spirometry test it is important for you to remember
that spirometry is an effort dependent test. The test results can change
based on whether you are standing or sitting, so you should be consistent
when you perform the test. For example, if you perform the test when you
are sitting then you should perform all future tests while you are sitting. This
will ensure that your spirometry test results are consistent from day to day.
All spirometery results are automatically sent to the companion web portal
when you are connected to Wi-Fi.
Your Spiro PD 2.0 has features to help you get the most out of your
spirometry test. There are detailed instructions on the LCD screen, audible
coaching, and personalized error messages to help you successfully and
accurately complete the test.
There are seven Indicator Lights which light up based on the amount of air
that is blown into your Spiro PD 2.0. The Indicator Lights are scaled to your
personal profile. If you can light all seven Indicator Lights, you are meeting
or exceeding the FVC lung capacity for a healthy individual of your age,
gender, height, weight, and ethnicity.
25

SPIRO PD 2.0 User ManualSPIRO PD 2.0 User Manual
Running a Test
With your Spiro PD 2.0, you can run your test and record your results,
enabling you to keep track of your lung function over time.
1. Press the Run Test button on your
Home screen.
2. Follow the audible coaching and
on-screen instructions described
in detail below.
26
View Trends
Medical Diary
RR
XX
Run Test
Manage Meds
3:00pm 7/14
FVC 5.2
12:00pm 7/15
Albuterol
9:30 am July 15, 2011
Cancel
1. Take a Deep Breath
2. Exhale into Spiro PD
9:30 am July 15, 2011

a. Hold your Spiro PD 2.0 with the LCD screen
facing away from you as shown.
b. You may optionally place a nose clip on
your nose to close off your nostrils. This
helps to keep any air from leaking from
your nose.
c. Take a big deep breath a
way from the
mouthpiece, breathing in as much as
you can inhale.
Once the audible coaching tells you to
exhale, move your Spiro PD 2.0 gently
to your mouth. Be careful, an abrupt
movement of your Spiro PD 2.0 could
cause a false start reading, resulting in
an error message.
27
Running a Test with Your SPIRO PD 2.0

SPIRO PD 2.0 User ManualSPIRO PD 2.0 User Manual
d. Place your lips around the mouthpiece to
create an airtight seal so that all of your
breath is collected by your Spiro PD 2.0.
Make sure your teeth and lips extend past
the rim of the mouthpiece.
e. In order to open your airway, keep your
chin elevated and extend your neck slightly.
Do not breathe in with your mouth on or
close to the mouthpiece.
f. When told, exhale as hard and fast as you
can, emptying your lungs as forcefully and
quickly as possible.
28

g. During expiration, squeezing the handles
can help expel the air from your lungs.
h. As you exhale into the Spiro PD 2.0, the
audible coaching feature will encourage
you to exhale forcefully and completely.
Note: You do NOT have to breathe out
the entire time you hear the “keep going”
message.
This message is for encouragement only.
29
Running a Test with Your SPIRO PD 2.0

SPIRO PD 2.0 User ManualSPIRO PD 2.0 User Manual
i. The blue Indicator Lights will light in
sequence as you are exhaling. The harder
and longer you blow, the more lights you
see. The goal is to light all of them, which
means your lungs are working at their best.
When you have completed your exhale,
take your mouth off the mouthpiece and
turn your head to the side, keep the unit
relatively still until Spiro PD 2.0 says
“Good Effort”.
NOTE: Be careful, an abrupt movement of
your Spiro PD 2.0 at the end of the test
could cause a failed test.
3. If the test was successful, a green
check mark appears. If the test
was not successful, then a red
semicircular arrow appears. You
will be asked to repeat the test.
30
Good Effort!
You have completed 2 of 3 tests.
1 32
Run
Test
Cancel
9:30 am July 15, 2011

4. You will be guided through this
process for three successful tests.
Press the
Run Test button when
you are ready to begin the next test.
NOTE: Your Spiro PD 2.0 will allow
you to rest for up to 5 minutes
between tests but you should keep
the screen active while resting
between tests. If you are unable to
complete the third test Spiro PD 2.0
will save your test results with just 2
successful tests. Select the Cancel
button once you have two green
checkmarks and confirm that you wish
to cancel on the pop up. Your results
will then be presented.
31
Running a Test with Your SPIRO PD 2.0
Please try this test again.
31 2
Run
Test
Cancel
9:30 am July 15, 2011

SPIRO PD 2.0 User ManualSPIRO PD 2.0 User Manual
Result
%Pred
Severity
FVC
4.1
91%
Norm
FEV1
3.0
87%
Norm
PEF
8.0
89%
Norm
FEV1
/FVC
73%
77%
FEF
25-75
2.5
82%
View
Trends
Spirometry
Loop
9:30 am July 15, 2011
5. The best results out of the three
tests are then displayed and saved.
6. Once completed, you can view your
results on your Spiro PD 2.0 or online
with your web portal account.
You can view trends of your test
results and view your spirometry
loop, such as your Flow-Volume loop
and your Volume-Time curve.
32

Common Errors that May Produce Incorrect Results:
Coughing If you cough during a test, press the Cancel button
and try again
Exhaling too slowly • You need to exhale as hard and as fast as you can
• Do not try to exhale long and steadily
• Your device may say “Keep Going”after you’ve
completed your exhale
Exhaling too soon • Do not inhale on the mouthpiece
• Wait until Spiro PD 2.0 completes saying, “Exhale
Now” before starting your exhale
• Keep Spiro PD 2.0 relatively still during the
inhalation
Not exhaling You need to exhale as long as you can without
completely coughing or gasping for air
33
Running a Test with Your SPIRO PD 2.0

SPIRO PD 2.0 User ManualSPIRO PD 2.0 User Manual
34

View Trends
Medical Diary
RR
XX
Run Test
Manage Meds
3:00pm 7/14
FVC 5.2
12:00pm 7/15
Albuterol
9:30 am July 15, 2011
3.0
3.9
4.1
4.3
67%
87%
91%
96%
Mild
Norm
Norm
Norm
FVC
Graph
% PredFVC
05/25/11 10:00am
05/24/11 10:00am
05/23/11 10:00am
05/26/11 10:00am
Date & Time
Severity
9:30 am July 15, 2011
CHAPTER
Viewing Your Trends
5
Your Spiro PD 2.0 allows you to view your past test results. This data can
be shown in a tabular format or graphically by pressing the Graph button.
Additional Trend views are also available on the companion web portal.
1. Press the
View Trends button on
your Home screen.
2. Your most recent test results are
displayed. Press the
Up and Down
arrows
to scroll through your results.
You can sort your test results by
touching the titles. For example,
touching Data & Time sorts your
test results chronologically.
35

SPIRO PD 2.0 User ManualSPIRO PD 2.0 User Manual
3. The right and left green arrows
allow you to cycle through your
test measurements:
• All Trends
• FVC
• FEV1
• FEV1/FVC ratio
• PEF
• FEF 25-75
• Weight/BMI
4. Press the
Graph button to view
a trending graph of data.
36
2.2
2.1
1.8
1.4
68%
69%
59%
49%
Mild
Mild
Mod
Sev
FEV1
Graph
% PredFEV1
05/25/11 10:00am
05/24/11 10:00am
05/23/11 10:00am
05/26/11 10:00am
Date & Time
Severity
9:30 am July 15, 2011
4.0
3.0
2.0
1.0
0.0
Last 7 Days Last 14 Days Last 30 Days Custom
Jun 24 27 30 3 6 9 12 15
Mild
Norm
Mod
Sev
FVC
Table
9:30 am July 15, 2011

5. Choose the column heading to filter
the display to the last 7, 14 or 30
days of data. You can also choose
a range of dates by touching the
Custom button from the filter
popup.
6. On the All Trends screen, press the
Spirometry Loop button to display
the Flow Volume loop
37
Viewing Your Trends
All Trends
4.1
4.2
4.3
4.3
3.0
3.4
3.2
3.3
73.2%
81.0%
74.4%
76.7%
2.5
3.0
2.9
2.9
8.0
8.1
8.2
8.2
Spirometry
Loop
PEFFVC FEV1
FEV1
/FVC
FEF
25-75
05/26/11 8:00am
05/25/11 8:00pm
05/25/11 4:00pm
05/26/11 12:00pm
Date & Time
9:30 am July 15, 2011
1 2 3 4 5 6
Volume( L )
Flow (L/S)
Flow Volume Loop, Thursday July 14, 2011 3:00 pm
Flow-Vol
View
Trends
12
10
8
6
4
2
9:30 am July 15, 2011

SPIRO PD 2.0 User ManualSPIRO PD 2.0 User Manual
7. Use the Right Arrow button to
display the Volume-Time curve.
8. Touching a row presents a window
with the results of that test.
38
12
10
8
6
4
2
1 2 3 4 5 6 7 8 9 10 11 12
Time ( S )
Volume ( L )
Volume Time Curve, Thursday July 14, 2011 3:00 pm
Vol-Time
Trends
9:30 am July 15, 2011
9. Select the title in the lower left of
a trend screen to see a detailed
explanation of the measurement
being displayed.
Disease Severity
Severity Levels are provided as a guideline. Follow your care plan as
specified by your health care provider.
Normal Indicates your disease is under control.
Mild Indicates caution. Additional medication may be required.
Contact your doctor.
Moderate Indicates extra caution. Contact your doctor as soon as
possible for further examination and consultation.
Severe Indicates a medical emergency. Immediate action needs to be
taken. Call your doctor, go to the emergency room, or call 911.
NOTE: To get a complete picture of your lung health, your doctor may need
to analyze the results of several different lung function test measurements
together.
39
Viewing Your Trends
5.7
25.1
5.1
5.1
98%
100%
98%
98%
Mod
Sev
Mild
Norm
FEF 25-75
Graph
Severity% PredFEF 25-75
01/30/10 10:00pm
01/29/10 10:00pm
01/28/10 10:00pm
01/31/10 10:00pm
Date & Time
9:30 am July 15, 2011
5.7
25.1
5.1
5.1
98%
100%
98%
98%
Mod
Sev
Mild
Norm
FVC
Close
The amount of air you exhale as
forcefully and completely as
possible after taking a deep breath,
measured in liters. A lower
measurement may indicate less
lung capacity than a normal,
healthy level.

SPIRO PD 2.0 User ManualSPIRO PD 2.0 User Manual
40

CHAPTER
Tri-Trends®
6
Your Spiro PD 2.0 allows you to review multiple sets of trends simultaneously.
Tri-Trends is a snapshot of Spirometry results, medication adherence, and
medical diary entries. Tri-Trends is also available for viewing on the
companion web portal.
The Tri-Trends page is easily accessible
and available from most screens.
On the Tri-Trends page you will see a
large graph with two lines. These show
your FVC and FEV1 data over time. The
color coded lines make it easy to see
your overall lung functionality.
If an alert is set it will be represented by
a dotted line. Alerts are optional and
can be set up in Alarms & Alerts.
41
View Trends
Medical Diary
RR
XX
Run Test
Manage Meds
3:00pm 7/14
FVC 5.2
12:00pm 7/15
Albuterol
9:30 am July 15, 2011
FVC
FEV1
Used Rescue In haler
Med D iary
Entry Made No Entry
Med H istory
Took Med
Misse d Med
!
!
2.0
6.8
1 2 3 4 5 678 9 101112
13
14
FVC Alert
9:30 am July 15, 2011
8
6
4
2
0
July
. . . . . . . . . . . . . . . . . . . . . . . . . . . . . . . . . . . . . . . . . . .
!
!

SPIRO PD 2.0 User ManualSPIRO PD 2.0 User Manual
Tri-Trends also shows your Medical Diary history and your Medication history
over the last 14 days. The legend in the upper portion of the page provides
detail for each icon.
42
Used Rescue Inhaler
Med Diary
Entry Made No Entry
Med History
Took Med Missed Med
!

CHAPTER
Managing Your Medication
7
You can use your Spiro PD 2.0 to manage your medication. By creating
a schedule for your medication your Spiro PD 2.0 will remind you when
it is time to take it. You can also log when a medication is taken and view
medication history. You can set a low dose point when you need to refill
your medication. You can also set an alert when your medication reaches
that designated Low Dose point. All medication can also be managed on
the companion web portal.
1. Press the
Manage Meds button on
your Home screen.
View Trends
Medical Diary
RR
XX
Run Test
Manage Meds
3:00pm 7/14
FVC 5.2
12:00pm 7/15
Albuterol
9:30 am July 15, 2011
43

SPIRO PD 2.0 User Manual
2. The Manage Meds screen shows the
medication details for each of your
medications. Use the green arrows
to display each medication detail,
dosage, and schedule.
History displays a list of the medications that you've recorded on your
Spiro PD 2.0.
New Med allows you to add a new medication.
Edit Med allows you to modify the medication being displayed.
Delete Med removes the displayed medication.
Log Med records the current date and time for the medication being
displayed in History and reduces the quantity left by one dose. This can be
used for a medication without an alarm schedule, such as taken as needed,
like an emergency inhaler.
44
SPIRO PD 2.0 User Manual
ADVAIR
ADVAIR
Dosage: 1 puff
Dates: 5/1/11 – 5/30/12
Recurrence: Daily at 7:30am
Prescription No.: 7012668
Expiration Date: 2/4/13
Dosage Left: 28 puffs
New
Med
RR
XX
History
Edit
Delete
Log
RR
XX
RR
XX
9:30 am July 15, 2011

Creating a New Medication
1. Select New Med from your Manage
Meds screen.
2. Enter the new medication name and
press Enter.
45
Managing Your Medication
ADVAIR
ADVAIR
Dosage: 1 puff
Dates: 5/1/11 – 5/30/12
Recurrence: Daily at 7:30am
Prescription No.: 7012668
Expiration Date: 2/4/13
Dosage Left: 28 puffs
New
Med
RR
XX
History
Change
Delete
Log
RR
XX
RR
XX
9:30 am July 15, 2011
Med Name
Albuterol
wq e
sa d
Space Enter
tr y
gf huj
oi p
lk
xz c bv n m
x
123&
sym+
9:30 am July 15, 2011

SPIRO PD 2.0 User Manual
3. Select the Medication Class and
press
Enter.
4. Using the keyboard, enter the
Prescription number, if applicable.
The Prescription number is optional.
46
SPIRO PD 2.0 User Manual
Albuterol
Medication Class
Respiratory – Control Med
Respiratory – Rescue Inhaler
Pain Management
Vitamin & Supplement
Depression
Blood Pressure
Cholesterol
Heart Disease
Diabetes
Others
Enter
9:30 am July 15, 2011
589658
wq e
sa d
Space Enter
tr y
gf huj
oi p
lk
xz c bv n m
x
123&
sym+
Prescription Number
9:30 am July 15, 2011

5. Using the number pad, enter the
expiration date and press
Enter.
6. Select the Form of Medication
Use the other button to specify
your own form of medication on
the provided keyboard screen.
47
Managing Your Medication
Expiration Date
21 3
54 6
87 9
0Delete
Enter
Day
01
Month
08
Year
2017
9:30 am July 15, 2011
Albuterol
Form of Medication
tablet capsule soft gel
puff tsp ml
drop patch other
9:30 am July 15, 2011

SPIRO PD 2.0 User Manual
7. Using the number pad, enter the
total quantity per bottle/box and
press
Enter. This is the total quantity
of medication that you have on
hand.
8. Using the number pad, enter the
quantity taken per dose and press
Enter.
48
SPIRO PD 2.0 User Manual
Albuterol 100 mcg
Quantity Per Bottle/Box
Enter
21 3
54 6
87 9
0
Del .
60 Sprays
9:30 am July 15, 2011
Albuterol
Quantity Per Dose
Enter
21 3
54 6
87 9
0
Del .
2 Sprays
9:30 am July 15, 2011

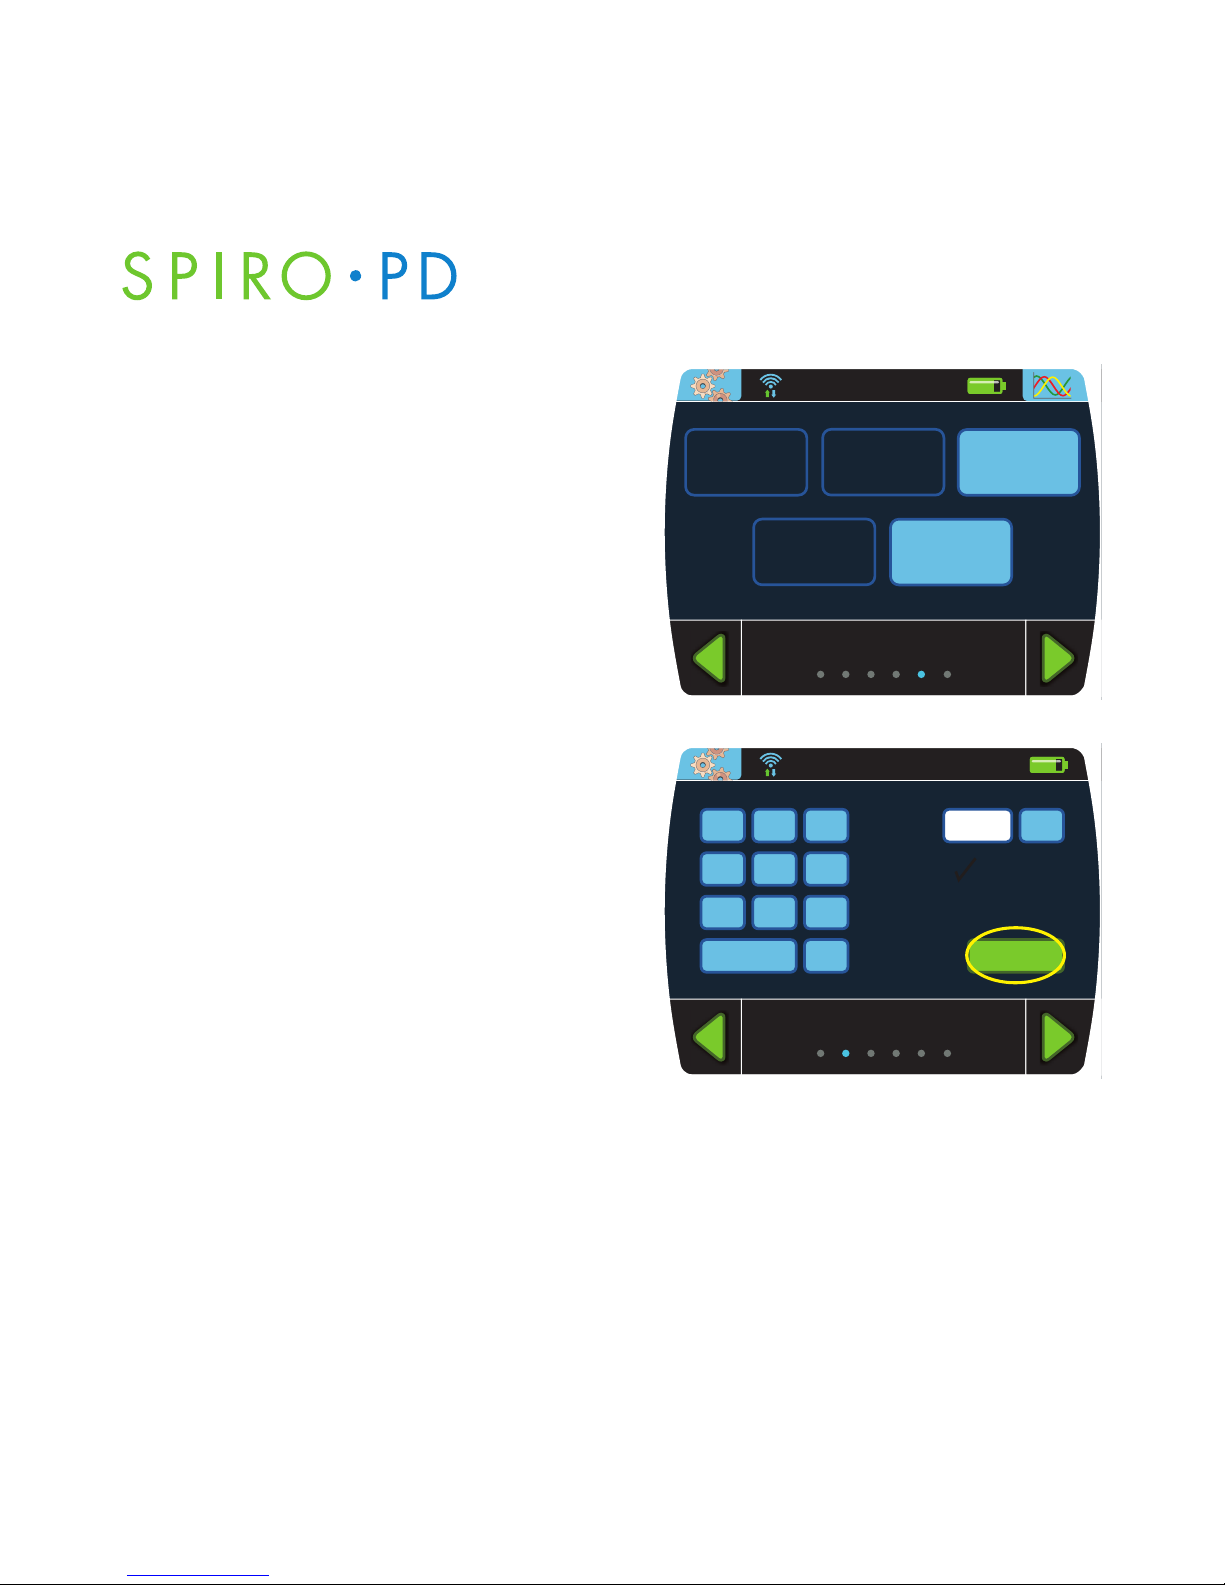
9. Select a Start Date and press Enter.
10. Select the frequency:
• Daily
• Weekly
• Monthly
• Yearly
• Once
• As Needed
NOTE: Select 'As Needed' for a medication that does not have a set schedule.
For example, an emergency inhaler is often taken on an 'as needed' basis.
49
Managing Your Medication
Albuterol 90 mcg
Start: July 15, 2011
Daily Weekly
Yearly Once
Monthly
As
Needed
Recurrence
9:30 am July 15, 2011

SPIRO PD 2.0 User Manual
You can set your medication schedule by choosing one of the recurrences
and entering the required information.
• Daily – select a time option based on
how you are taking your medication
each day.
•
Specific Times allows you to enter
up to 6 times per day that you take
your medication. You will be
prompted for additional times if
you take your medication more
than once a day.
•
Set Every X Hours allows you to
enter how often you will take your
medication throughout the day
at a regular interval.
• Weekly - used for a medication that
is taken on specific days of each week.
• Choose the day(s) and then enter
the times you will take your
medication.
50
SPIRO PD 2.0 User Manual
Time Options
Every X
Hours
Specific
Times
Albuterol 200 mcg
Start: July 15, 2011
9:30 am July 15, 2011
Days of Week
Albuterol 200 mcg
Start: July 15, 2011
WedTueMonSun
Sat EnterFriThur
9:30 am July 15, 2011

• Monthly – used for a medication that
is taken on a monthly basis. You will
first choose the day(s) of the month
you will take your medication and
then enter the times you take the
medication. For example, every 1st
of the month.
11. Once you've entered the medication
detail, you can add an optional
end date.
12. Press
Confirm to save the medication.
Changing Your Medication
Your Spiro PD 2.0 allows you to edit any existing Medication. You can easily
make changes to any value.
1. Press the
Manage Meds button on your Home screen.
2. Press the
left or right green arrows until the medication schedule you
want to edit is displayed.
51
Managing Your Medication
Date of Month
21 3
54 6
87 9
0Delete
Enter
of every month
Day
9:30 am July 15, 2011

SPIRO PD 2.0 User Manual
3. Select Edit Med from the Medication screen.
Use the green arrows at the bottom of the screen to navigate to the
screen that you would like to update. Once you’ve made all changes,
press confirm on the confirmation screen to save.
NOTE: The Quantity Per Bottle/Box screen will display your current quantity
left of the medication.
Deleting a Medication
1. Press the Manage Meds button on your Home screen.
2. Press the
left or right green arrows until the medication you want to
delete is displayed.
3. Press the Delete Med button to delete the medication being displayed.
Logging Your Medication
Your Spiro PD 2.0 can record when you take your medication.
1. Press the
Manage Meds button on your Home screen.
2. Press the
left or right green arrows until the medication you want to log
is displayed.
3. Press the Log Med button to indicate that you took the medication being
displayed. Your Spiro PD 2.0 will record the current date & time for that
medication in your medication history.
52
SPIRO PD 2.0 User Manual

Refilling a Prescription or Changing Dosage
Your Spiro PD 2.0 records when you take your medication and calculates
the quantity left of each medication. If you refill a medication you can
change the total quantity left by editing the medication.
1. Press the
Manage Meds button on your Home screen.
2. Press the
left or right green arrows until the medication you want to
change is displayed.
Refilling: To refill a medication navigate to the Quantity Per Bottle/Box
screen and enter your current total quantity of the medication. You
may have to add your newly received amount to the number that you
currently have. For example, if you have 5 tablets left and refill that
medication with a new bottle of 30 tablets, you would type in 35 as
your total quantity.
Changing Dose: To change a medication dosage, navigate to the
Quantity Per Dose screen and enter the new dosage.
3. Once your changes are complete, navigate to the confirmation screen
and press the
Confirm button to save your information.
53
Managing Your Medication

SPIRO PD 2.0 User Manual
Viewing Your Medication History
Your Spiro PD 2.0 allows you to view your medication history.
1. Press the
Manage Meds button on your Home screen.
2. Press the
History button.
3. Use the blue up and down buttons
to navigate through the Medication
History Log.
You can sort your medication history by
touching Date & Time or Medication.
A medication alarm that was dismissed
and not logged is shown in red.
54
SPIRO PD 2.0 User Manual
Date & Time
2/8/2014 8:00am
2/7/2014 8:00am
2/6/2014 8:00am
2/4/2014 8:00am
2/9/2014 8:00am
!
2/5/2014 8:00am
Medication
ADVAIR
ADVAIR
ADVAIR
ADVAIR
ADVAIR
ADVAIR
Dose
Left
79
80
81
82
79
82
!
Dosage
1 puff
1 puff
1 puff
1 puff
1 puff
1 puff
9:30 am July 15, 2011

Medication Alarm Reminder
Your Spiro PD 2.0 will remind you to take your medication based on the
schedule you have entered. This can help you comply with your medication
treatment regimen.
A reminder pop up window is displayed when it is time to take your
medication.
1. Select the
Log Med button to record
that you took the medication. Your
Spiro PD 2.0 will record the current date
& time for this medication in your
medication history.
2. Select the
Snooze button to delay this
reminder by another 8 minutes.
3. Select Dismiss if you will not be taking
this medication. Your Spiro PD 2.0 will
record that you did not take this
medication in your medication history.
55
Managing Your Medication
RR
XX
Run Test
ADVAIR
Dosage: 1 puff
Time: 9:30am
Date: 7/15/2011
Dismiss
Snooze
Log
Med
RR
XX

SPIRO PD 2.0 User Manual
56
SPIRO PD 2.0 User Manual

CHAPTER
Medical Diary
8
Your Spiro PD 2.0 allows you to create a diary of medical symptoms.
The medical diary allows you to keep track of your daily lung function,
respiratory symptoms and free text notes. Medical Diary entries can be
entered and viewed on the Spiro PD 2.0 or the companion web portal.
Setting Your Chronic Conditions
1. Press the Medical Diary button on
the home screen.
57
View Trends
Medical Diary
RR
XX
Run Test
Manage Meds
3:00pm 7/14
FVC 5.2
12:00pm 7/15
Albuterol
9:30 am July 15, 2011

SPIRO PD 2.0 User Manual
2. Press the Chronic Conditions button
in the upper right corner.
3. Select any conditions that you
would like to enter any medical
diary entries about and press
Enter.
Each option displays the
corresponding questionnaire
in the Medical Diary entry. If you
select all conditions you will see all
questionnaires displayed one after
another when entering your
medical diary entries.
58
SPIRO PD 2.0 User Manual
Medical Diary
9:30 am July 15, 2011
Enter Note
View History
Take Assessment

Creating a Diary Entry
1. Press the Medical Diary button on
the Home screen.
2. Press the
Take Assessment button.
59
Medical Diary
View Trends
Medical Diary
RR
XX
Run Test
Manage Meds
3:00pm 7/14
FVC 5.2
12:00pm 7/15
Albuterol
9:30 am July 15, 2011
Medical Diary
9:30 am July 15, 2011
Enter Note
View History
Take Assessment
SPIRO PD 2.0 User Manual
3. The assessment test associated
with the selected chronic condition
is presented. Select the checkbox
to select an answer to the question.
All questions much be answered
prior to selecting the Enter button.
Proceed through each page of
questions to complete the
assessment test. The score shall
be presented in the View History
section of the Medical Diary.
Creating a Free Text Diary Note
1. Press the Medical Diary button on
the Home screen.
60
SPIRO PD 2.0 User Manual
Asthma Diary
Enter
1. How much of the time did asthma keep you
from getting things done?
2. Have you had shortness of breath?
9:30 am July 15, 2011
all most some rarely none
2+/day 1/day 3-6/week 1-2/week
not at all
View Trends
Medical Diary
RR
XX
Run Test
Manage Meds
3:00pm 7/14
FVC 5.2
12:00pm 7/15
Albuterol
9:30 am July 15, 2011

2. Press the Enter Note button on the
Medical Diary screen.
3. Enter your own notes and press the
Enter button to complete the entry.
61
Medical Diary
Medical Diary
9:30 am July 15, 2011
Enter Note
View History
Take Assessment
wq e
sa d
Space Enter
tr y
gf huj
oi p
lk
xz c bv n m
x
123&
sym+
9:30 am July 15, 2011

SPIRO PD 2.0 User Manual
Viewing Your Diary
1. Press the Medical Diary button on
the Home screen.
2. Press the
View Diary button.
62
SPIRO PD 2.0 User Manual
View Trends
Medical Diary
RR
XX
Run Test
Manage Meds
3:00pm 7/14
FVC 5.2
12:00pm 7/15
Albuterol
9:30 am July 15, 2011
Medical Diary
9:30 am July 15, 2011
Enter Note
View History
Take Assessment

3. Diary entries appear in chronological
order with the most recent at the top.
A header row separates each
condition containing the name
of the condition along with any
applicable scores for that
questionnaire. For example,
the header for Asthma also
shows the ACT score.
4. Press the blue up and down arrows
to scroll through your entries.
5. Use the Home button in the upper
left hand corner to exit diary to the
Home screen.
63
Medical Diary

SPIRO PD 2.0 User Manual
64
SPIRO PD 2.0 User Manual

CHAPTER
Alarms & Alerts
9
Spiro PD 2.0 can be set up to remind you to complete actions such as
taking your spirometry tests, breathing exercises, or updating your medical
diary. You can also set thresholds for your spirometery results or changes
to your Weight/BMI and have an alert sent if you fall below that threshold.
Additionally these alarms and alerts can be managed on the companion
web portal and can incorporate email or text messages into the reminders
or alerts.
Creating, Editing, and Deleting Alarms
1. Select the Settings button on your
Home screen.
2. Select the Alarm/Alert button on
the Settings screen.
There are three alarms:
• Test Alarm
• Diary Alarm
• Exercise Alarm
65
Alarm / Alert Settings
Test Alarm
Exercise Alarms
Diary Alarm
Weight/BMI Alert
Test Result Alerts
0
Symptom Alert
9:30 am July 15, 2011

SPIRO PD 2.0 User Manual
Scheduling Your Test Alarm
The Test Alarm screen allows you to create a new test alarm and edit or
delete an existing test alarm. This can help you evaluate your lung health
by enabling you to track your progress and trends.
1. From the Alarm/Alert Settings
screen, tap on the Test Alarm button
2. Select the
New Alarm button to
create a new alarm.
3. Enter the alarm details and press
confirm to save.
Test Alarm Reminder
Your Spiro PD 2.0 will remind you to take your spirometry test based
on the schedule you have entered.
A reminder pop up window is displayed when it is time to take your
spirometry test.
1. Select the Run Test button to start a spirometry test.
2. Select the
Snooze button to delay this reminder by another 8 minutes.
3. Select
Dismiss if you will not be doing this test.
66
SPIRO PD 2.0 User Manual
Test Alarm
Test Alarm
Dates: 7/15/11 – 12/31/11
Recurrence: Daily at
3:00pm
New Alarm
Edit
Delete
9:30 am July 15, 2011

Scheduling Your Diary Alarms
Your Spiro PD 2.0 can be programmed to alarm when it is time to create
a new diary entry. This can help you keep records of your daily respiratory
symptoms.
Scheduling Your Breathing Exercise Alarms
Your Spiro PD 2.0 can be programmed to alarm when it is time for your
breathing exercises. This can help you follow your respiratory therapy.
Breathing Exercise Alarm Reminder
Your Spiro PD 2.0 will remind you to do your breathing exercises based
on the schedule you have entered.
A reminder window is displayed when it is time to do your breathing
exercises.
1. Select the Do Exercise button and perform your breathing exercise.
2. Select the
Snooze button to delay this reminder by another 8 minutes.
67
Alarms & Alerts

SPIRO PD 2.0 User Manual
Alerts
Creating a Biometric Alert
1. Click the Settings button on the
Home screen.
2. Click the Alarm/Alert button on the
Settings screen.
There are three Biometric Alerts:
• Test Result Alerts
• Symptom Alert
• Weight/BMI Alert
Test Result Alerts
Your Spiro PD 2.0 can be programmed
to alert you when your FVC, FEV1,
and/or FEV1/FVC levels go below a
certain baseline. This can help you see
trends and adhere to your emergency
medication plan.
68
SPIRO PD 2.0 User Manual
Alarm / Alert Settings
Test Alarm
Exercise Alarms
Diary Alarm
Weight/BMI Alert
Test Result Alerts
0
Symptom Alert
9:30 am July 15, 2011
FVC Result Alert
21 3
54 6
87 9
0Delete
Enter
FVC Baseline
Decline
More Than
For Number of
Consecutive
Day(s)
L
%
9:30 am July 15, 2011

Weight/BMI Alerts
Your Spiro PD 2.0 can be programmed
to alert you when your weight goes
above or below your baseline. This
function allows you to keep track
of trends.
69
Alarms & Alerts
Weight/BMI Alert
21 3
54 6
87 9
0Delete
Enter
Baseline
Change
More Than
For number of
Check Weight
Every
lbs
lbs
Day(s)
Day(s)
+
9:30 am July 15, 2011

SPIRO PD 2.0 User Manual
70
SPIRO PD 2.0 User Manual

CHAPTER
Wi-Fi
10
Your Spiro PD 2.0 synchronizes your data with your online WMS Web Portal.
The data is stored on your device and a secure Wi-Fi network. Spiro PD 2.0
uses a Wi-Fi signal to send and receive data from the Web Portal. This allows
your Spiro PD to connect to your WMS Web Portal account and send
information to the people you designate.
Connecting to Wi-Fi
1. Press the Settings button in the top
left corner.
2. Press the Wi-Fi button on the
Settings screen.
3. Press a Wi-Fi network from the
Available Networks list.
4. Enter the password, if applicable,
and press
Connect.
NOTE: Spiro PD will remember the password for your network and will
automatically connect when the network is available.
Wi-Fi Symbols
Wi-Fi connected Wi-Fi disconnected
71
Wi-Fi Networks
9:30 am July 15, 2011
ABCDEFGHIJKLMNOPQRST
UVWXYZ
1234567890
ABC987654
x

SPIRO PD 2.0 User Manual
72
SPIRO PD 2.0 User Manual

CHAPTER
Technical Information
11
Product Specifications
Interpretation based on
• ATS (American Thoracic Society)
Measurements
• Measurement Scale (BTPS)
• Flow (l/s) 0 to 16
Flow Accuracy +/- 5% or 200ml/sec
• Volume (l) 0 to 15
Volume Accuracy +/- 3% or 50ml
Operating temperature range: 32° F to 113° F (0° C to 45° C)
Operating relative humidity: 0 to 95% (without condensation)
Barometric pressure: 85 kPa to 106 kPa
Power supply: Rechargeable Lithium-ion battery
•Size: 7.9 x 3.8 x 1.6 inches (200 x 96 x 40mm)
Weight: 9 ounces (256 g)
Wi-Fi: Transmits and receives at a frequency and bandwidth of 8.02.11 b/g/n
ERP (Effective Radiated Power): -12.25 dBW
Battery Usage:
Up to 13 days of standby time
Up to 2.5 hours of continued use
Device & Accessories (excluding Battery) Lifetime: 5 years
73

74
SPIRO PD 2.0 User Manual
EMC Regulations
Guidance and manufacturer’s declaration— electromagnetic emissions
The Spiro PD is intended for use in the electromagnetic environment specified below.
The customer or the user of the Spiro PD should assure that it is used in such an
environment.
Emissions test Compliance Electromagnetic environment — guidance
RF emissions Group 1 The Spiro PD uses RF energy only for its internal
CISPR 11 function. Therefore, its RF emissions are very low
and are not likely to cause any interference in
nearby electronic equipment.
RF emissions Class B The Spiro PD is suitable for use in all
CISPR 11 establishments, including domestic establish-
ments and those directly connected to the public
Harmonic Not applicable low-voltage power supply network that supplies
emissions buildings used for domestic purposes.
IEC 61000-3-2
Voltage Complies
fluctuations/
flicker emissions
IEC 61000-3-3

75
Technical Information
Guidance and manufacturer’s declaration — electromagnetic immunity
The Spiro PD is intended for use in the electromagnetic environment specified below.
The customer or the user of the Spiro PD should assure that it is used in such an
environment.
Immunity test IEC 60601 Compliance level Electromagnetic environment -
test level guidance
Electrostatic ±8 kV contact ±8 kV contact Floors should be wood, concrete
discharge (ESD) ±15 kV air ±15 kV air or ceramic tile. If floors are
IEC 61000-4-2 covered with synthetic material,
the relative humidity should be
at least 30%.
Electrical fast ±2 kV for ±2 kV for power Mains power quality should be
transient/burst power supply supply lines that of a typical commercial or
IEC 61000-4-4 lines ±1 kV for input/ hospital environment.
±1 kV for output lines
input/output
lines
Surge ±1 kV line(s) ±1 kV line(s) to Mains power quality should be
IEC 61000-4-5 to line(s) line(s) that of a typical commercial or
±2 kV line(s) ±2 kV line(s) to hospital environment.
to earth earth

76
SPIRO PD 2.0 User Manual
Immunity test IEC 60601 Compliance level Electromagnetic environment -
test level guidance
Voltage dips, <5 % U
T
<5 % U
T
Mains power quality should be
short for 1 cycle for 1 cycle that of a typical commercial or
interruptions <5 % U
T
<5 % U
T
hospital environment, If the user
and voltage (>95 % dip (>95 % dip of the Spiro PD requires
variations on in UT) for in UT) for continued operation during
power supply 0,5 cycle 0,5 cycle power mains interruptions, it is
input lines 40% U
T
40% U
T
recommended that the Spiro PD
IEC 61000-4-11 (60% dip (60% dip be powered from an
in UT) for in UT) for uninterruptible power supply or
5 cycles 5 cycles a battery.
70% U
T
70% U
T
(30% dip (30% dip
in UT) for in UT) for
25 cycles 25 cycles
<5% U
T
<5% U
T
(>95 % dip (>95 % dip
in UT) for in UT) for
5 sec 5 sec
Power 30 A/m 30 A/m Power frequency magnetic fields
frequency should be at levels characteristic
of a typical location in a typical
(50/60 Hz) commercial or hospital
magnetic environment.
field
IEC 61000-4-8
NOTE UTis the a.c. mains voltage prior to application of the test level.

77
Technical Information
Guidance and manufacturer’s declaration — electromagnetic immunity
The Spiro PD is intended for use in the electromagnetic environment specified below.
The customer or the user of the Spiro PD should assure that it is used in such an
environment.
Immunity test IEC 60601 Compliance level Electromagnetic environment -
test level guidance
Portable and mobile RF
communications equipment
should be used no closer to any
part of the Spiro PD, including
cables, than the recommended
separation distance calculated
from the equation applicable to
the frequency of the transmitter.
Recommended separation
distance
Conducted RF 3 Vrms 3Vrms d=1.17√
¯¯
P
IEC61000-4-6 150 kHz to
80 MHz
Radiated RF 3 V/m 3 V/m d=1.17√
¯¯
P
80 MHz to 800 MHz
IEC 61000-4-3 80 MHz to
2,5 GHz
d=2.33√
¯¯
P
80 MHz to 2,5 GHz
where P is the maximum output
power rating of the transmitter
in watts (W) according to the
transmitter manufacturer and d
is the recommended separation
distance in metres (m).

78
SPIRO PD 2.0 User Manual
Immunity test IEC 60601 Compliance level Electromagnetic environment -
test level guidance
Field strengths from fixed RF
transmitters, as determined by
an electromagnetic site survey,
a should be less than the
compliance level in each
frequency range.
b
Interference may occur in the
vicinity of equipment marked
with the following symbol:
NOTE 1 At 80 MHz and 800 MHz, the higher frequency range applies.
NOTE 2 These guidelines may not apply in all situations. Electromagnetic propagation
is affected by absorption and reflection from structures, objects and people.
a The ISM (industrial, scientific and medical) bands between 150 kHz and 80 MHz are 6,765 MHz to 6,795 MHz; 13,553 MHz to
13,567 MHz; 26,957 MHz to 27,283 MHz; and 40,66 MHz to 40,70 MHz.
b The compliance levels in the ISM frequency bands between 150 kHz and 80 MHz and in the frequency range 80 MHz to 2,5
GHz are intended to decrease the likelihood that mobile/portable communications equipment could cause interference if
it is inadvertently brought into patient areas. For this reason, an additional factor of 10/3 has been incorporated into the
formulae used in calculating the recommended separation distance for transmitters in these frequency ranges.
c Field strengths from fixed transmitters, such as base stations for radio (cellular/cordless) telephones and land mobile radios,
amateur radio, AM and FM radio broadcast and TV broadcast cannot be predicted theoretically with accuracy. To assess the
electromagnetic environment due to fixed RF transmitters, an electromagnetic site survey should be considered. If the
measured field strength in the location in which the Spiro PD is used exceeds the applicable RF compliance level above,
the Spiro PD should be observed to verify normal operation. If abnormal performance is observed, additional measures
may be necessary, such as re-orienting or relocating the Spiro PD.
d Over the frequency range 150 kHz to 80 MHz, field strengths should be less than [V1] V/m.

79
Technical Information
Recommended separation distances between portable and mobile RF
communications equipment and the Spiro PD
The Spiro PD is intended for use in an electromagnetic environment in which radiated
RF disturbances are controlled. The customer or the user of the Spiro PD can help
prevent electromagnetic interference by maintaining a minimum distance between
portable and mobile RF communications equipment (transmitters) and the Spiro PD
as recommended below, according to the maximum output power of the
communications equipment.
Rated maximum Separation distance according to frequency of transmitter m
output power of
150 kHz to 80 MHz 80 MHz to 800 MHz 800 MHz to 2,5 GHz
transmitter W d=1.17√
¯¯
P
d=1.17√
¯¯
P
d=2.33√
¯¯
P
0.01 0.12 0.12 0.23
0.1 0.38 0.38 0.73
1 1.2 1.2 2.3
10 3.8 3.8 7.3
100 12 12 23
For transmitters rated at a maximum output power not listed above, the
recommended separation distance d in metres (m) can be estimated using the
equation applicable to the frequency of the transmitter, where P is the maximum
output power rating of the transmitter in watts (W) according to the transmitter
manufacturer.
NOTE 1 At 80 MHz and 800 MHz, the separation distance for the higher frequency
range applies.
NOTE 2 These guidelines may not apply in all situations. Electromagnetic propagation
is affected by absorption and reflection from structures, objects and people.

SPIRO PD 2.0 User Manual
Glossary
This glossary defines key terms used to discuss spirometry and lung health.
If you have any questions, please talk with your doctor.
Spirometry
The measurement of the amount (volume) and speed (flow) of air you inhale
and exhale. Using these measurements help you evaluate your lung health.
FVC
(Forced Vital Capacity): The amount of air you exhale as forcefully and
completely as possible after taking a deep breath. The result is measured in
liters. A lower measurement may indicate less lung capacity than a normal,
healthy level.
FEV1
(Forced Expiratory Volume in 1st second) The amount of air you exhale in
the first second after taking a deep breath. The result is measured in liters.
A lower measurement may indicate an obstruction of your airway that keeps
air from leaving your lungs.
FEV1/FVC Ratio
The ratio of FEV1 to FVC. A lower measurement may indicate an obstruction
of your airway that causes you to exhale less air than normal. A higher
measurement may indicate a restriction of your lungs, meaning less lung
capacity than a normal, healthy level.
80
SPIRO PD 2.0 User Manual

FEF25-75
(Forced Mid-expiratory Flow) The average speed of air flow during the
middle part of your breath as you exhale. The result is measured in liters per
second. A lower measurement may indicate a narrowing of your airway.
PEF
(Peak Expiratory Flow) The maximum speed of air you exhale. The result
is measured in liters per second. A lower measurement may indicate a
narrowing of your airway.
Flow-Volume Loop
The speed of air you exhale measured against the amount of air you exhale.
Volume-Time Curve
The amount of air you exhale measured against time.
% Pre (% Predicted)
The result of your spirometry test compared to the predicted value that
matches your age, gender, height, weight, and ethnicity. This percentage
is used to diagnose your lung health and is expressed in terms of severity.
81
Technical Information

SPIRO PD 2.0 User Manual
Minimum System Requirements
Microsoft Windows
• Windows PC with a 1GHz Intel or AMD processor and 512MB of RAM
• Windows XP Service Pack 2 or later or Windows 10 (32-bit or 64-bit
editions)
• USB 2.0
• 2MB of available disk space
Apple Macintosh
• Mac computer with an Intel, PowerPC G5 or G4 processor and
512MB of RAM
• Mac OS X version 10.5 or later
• USB 2.0
• 2MB of available disk space
82
SPIRO PD 2.0 User Manual

CHAPTER
Maintenance and
12 Troubleshooting
Cleaning and Disinfecting
Mouthpiece Cleaning Instructions
NOTE: Your Spiro PD 2.0 mouthpiece should be removed from the
spirometer and cleaned immediately and thoroughly after each use.
1. Hand wash the mouthpiece using a clean bottle brush with warm water
(min. 100° F.) and an antibacterial dishwashing detergent (containing
L-Lactic Acid 2.00%) for at least one minute.
2. Rinse thoroughly under warm running water (min. 100° F.) for at least a
minute.
3. Shake off excess water and let the mouthpiece air dry completely.
Mouthpiece Disinfecting Instructions
1. Clean as per above cleaning instructions.
2. Submerge mouthpiece in household bleach (sodium hypochlorite
5.25%) at 1:50 dilution (1 US tsp per 1 US cup of water) for 10 minutes
3. Rinse thoroughly under warm running water (min. 100° F.) for at least
a minute.
4. Shake off excess water and let the mouthpiece air dry completely.
NOTE: If the mouthpiece is discolored or cannot be cleaned, replace the
mouthpiece by calling 888-PMD-4YOU.
83

SPIRO PD 2.0 User Manual
Spiro PD 2.0 Unit Cleaning Instructions
1. Wipe all surfaces clean with disinfecting wipes (containing Alkali
and Dimethyl Benzol Ammonium Chloride).
2. Let surface air dry completely.
Spiro PD 2.0 Unit Disinfecting Instructions
1. Wipe all surfaces to be disinfected with disinfecting wipes
(containing Alkali and Dimethyl Benzol Ammonium Chloride).
2. Use enough wipes for treated surface to remain visibly wet for
10 minutes.
3. Let surface air dry completely.
NOTE: Avoid getting moisture into the unit.
CAUTION
Avoid pets and loose hair around the Spiro PD device. Loose hair can
become entangled in the Turbine Assembly of the device causing the
Spiro PD to provide inaccurate results or cease functioning.
CAUTION
Do not use solvents or other similar substances, such as alcohol,
for cleaning as they may cause damage.
84
SPIRO PD 2.0 User Manual

Battery Replacement
To remove the battery, turn your Spiro PD 2.0
upside down. Press on the battery door with
your thumbs and slide the battery door out
towards the handle. Then flip your Spiro PD 2.0
over and the battery will drop into your hands
with a mild tap.
To install the battery, place the
battery into the battery compartment
with the battery connections lined up.
Then place the battery door into back
cover, slide the battery door into place
and close. The battery door must snap
into place.
85
Maintenance and Troubleshooting

SPIRO PD 2.0 User Manual
Troubleshooting Guide
Problem Solution
Unsuccessful Test: Turbine was already in motion when
Do not exhale too soon Spiro PD 2.0 said ‘Exhale Now’
Make sure:
• there’s no fast movement of the unit
during inhale
• a fan or breeze is not present
• you’re not inhaling on the mouthpiece
• you didn’t exhale before instructed
Unsuccessful Test: Make sure:
Exhale more forcefully • exhale was not long and steady
and quickly • exhale quickly and forcefully
Unsuccessful Test: • No exhale
Exhale longer • Exhale shorter than 1 second
Make sure:
• there is an exhale during the test
• the exhale is longer than 1 second
The Redo symbol and • Make sure your Spiro PD 2.0 is free of
“try again”message keep debris
occurring during a Run Test
86
SPIRO PD 2.0 User Manual

Problem Solution
LCD screen is black or dim Make sure:
• The brightness is turned up
• The battery is charged
• Turn your Spiro PD 2.0 off and then
back on
The LCD screen is white or • Remove the battery, wait 5 seconds,
images appear incorrect on and then reinstall the battery
the LCD screen
Your Spiro PD 2.0 does not
• Confirm that you are touching only
respond to touches a single point on the LCD screen at a time
• Turn your Spiro PD 2.0 off and then back on
• Remove the battery and wait 5 seconds
and then reinstall the battery
The Indicator Lights are not • Turn your Spiro PD 2.0 off and then back on
lighting up or do not go off • Remove the battery and wait 5 seconds
after a spirometry test and then reinstall the battery
87
Maintenance and Troubleshooting

SPIRO PD 2.0 User Manual
Problem Solution
Your Run Test values appear • Verify that your personal settings are
normal but the severity is correct
Severe or your values appear
out of range but the severity
is Normal
Your computer does not
• Turn your Spiro PD 2.0 off and then back on
recognize your Spiro PD 2.0 • Check that your computer meets
when you plug in the USB the minimum system requirements
cable • Try another USB cable
• Try another computer
Your Spiro PD 2.0 is not • Check your alarm schedules are correct
reminding you with its alarms including the start and end dates
• Confirm the current date & time are
correct
There is low or no audio • Check the volume
during an alarm or spirometry • Turn the mute feature off
test
Your Spiro PD 2.0 does not
• Check that the on/off button moves in
turn off or turn on and out and is free from debris
88
SPIRO PD 2.0 User Manual

Problem Solution
Your Spiro PD 2.0 is not • Try another USB cable
charging • Connect your Spiro PD 2.0 to your
computer and try to charge it from your
computer
• Remove the battery, check that the
electrical contacts are clean, then reinstall
the battery
The charge on your • Remove the battery, check that the
Spiro PD 2.0 does not last electrical contacts are clean, then
several days reinstall the battery
• Replace the battery
The mouthpiece won’t fit • Ensure that you are inserting the correct
into your Spiro PD 2.0 end of the mouthpiece into your
Spiro PD 2.0
Wi-Fi does not connect • Incorrect password entered
• Wrong Network selected
For assistance, if needed, in setting up, using or maintaining the Spiro PD 2.0
device or to report unexpected operation or events, please contact the
Manufacture or the Manufacture’s representative shown on the back of
the cover of the manual.
89
Maintenance and Troubleshooting

SPIRO PD 2.0 User Manual
Return Policy
Any unopened merchandise may be returned to PMD Healthcare within 15 days
of the ship date. Please contact PMD Healthcare at customercare@Spiro PD.com
or by calling 888-PMD-4YOU. Customer is responsible for return freight charges.
Proper Disposal of Your Spiro PD 2.0
Your Spiro PD 2.0 contains electronics that must be disposed of properly. It also
has a lithium-ion battery that also must be disposed of in accordance with local
environmental regulations. Consult your local recycling center on how to properly
dispose of the electronics and the battery contained in your Spiro PD 2.0.
LIMITED WARRANTY CONDITIONS
PMD Healthcare warrants that Spiro PD 2.0 personal spirometer shall be free of
defects in material and workmanship for a period of one year from the date of
purchase for the original purchaser only. PMD Healthcare will repair or replace
the defective parts or product at the discretion of PMD Healthcare. The warranty
does not apply to the following cases:
• The problem was caused by improper use of the device
• The device has been altered, tampered with, abused, or repaired by personnel
not authorized by PMD Healthcare
• The defect was originated by a power source or another product that the
device was connected to
• The device was damaged or subjected to physical stress
• The serial number of the device is missing, altered, and/or not legible
The freight of the returned goods to and from PMD Healthcare is the customer’s
responsibility.
90
SPIRO PD 2.0 User Manual

Australian Sponsor
Emergo Asia Pacific Pty Ltd.
Level 20, Tower II Darling Park
201 Sussex Street
Sydney, NSW 2000
Australia
Emergo Group
Prinsessegracht 20
2514 AP, The Hague
The Netherlands
Ph (31) 70.345.8570
Fax (31) 70.346.7299
PMD Healthcare
6620 Grant Way
Allentown, PA 18106
888-PMD-4YOU
www.mypmd.com
10000197 Rev. B
 Loading...