

Page 1

User Guide
remote
control
Serial No.
Hand built by
Page 2

Page 3

IMPORTANT
!
Warranty Certicate
Please take a few moments to complete the warranty card at the back of this
booklet (or register at www.pmc-speakers.com) as this not only records the
purchase of your product but also provides you with an opportunity to make
suggestions and provide feedback directly to PMC.
Product Support
For product support, accessories or servicing advice, please contact
a PMC authorised dealer. See www.pmc-speakers.com
Company Details
THE PROFESSIONAL MONITOR COMPANY LIMITED
HOLME COURT, BIGGLESWADE, SG18 9ST, UK
T. 0870 4441044 F. 0870 4441045
email: sales@pmc-speakers.com web: www.pmc-speakers.com
© 2014 PMC. All rights reserved.
Ref. no - 483
This document should not be construed as a commitment on the part of PMC. The information it contains is
subject to change without notice. PMC assumes no responsibility for any errors within this document.
CE Conformity: PMC active loudspeakers conform to EC Directive LVD2006/95/EC and EMC 2004/108/EC.
WEEE European directive: PMC is a member of a National Compliance scheme and has gained the
associated certication of compliance from the Environment Agency with the registration WEEE/GJ0101WU.
WEEE EU Directive
This symbol on the product, and in or on its packaging, indicates that this product must not be disposed
of with other household waste. It is the responsibility of the owner to dispose of waste equipment via a
designated collection point for the recycling of waste electrical and electronic equipment. The recycling
of waste equipment is an attempt to conserve natural resources and ensures that it is recycled in a manner
that protects human health and the environment. For more information about where to dispose of waste
equipment for recycling, please contact your local waste/recycling authority or the dealer from whom you
purchased the product.
Page 4

A message from Peter Thomas:
Peter Thomas
Owner & Chief Designer
“
Our sole aim while designing loudspeakers is to recreate the true essence of an artist’s
intention, combining the ultimate level of sonic resolution with solid engineering principles.
We believe that the same loudspeaker can be used throughout the entire audio chain,
from composer to studio or lm stage, post-production or mastering and then, nally,
the consumer. We also think that a well designed loudspeaker should be able to excel
regardless of the audio genre, and reproduce spoken word, rock, pop, or classical music
with the same precision and accuracy. Our unswerving passion for getting it right has made
this goal possible.
Thank you for choosing PMC products. Please read this user guide and install your new
twotwo remote control bearing in mind the advice given within.
Page 5

Over more than two decades PMC
has earned an unrivalled reputation for
creating the world’s nest professional
loudspeakers. Simply put, our loudspeakers
provide a reference for the world’s highest
prole productions and events. They are
found at every stage of the creative
process, from conception to recording
and broadcast and, of course, in the
home.
Our client list reads like a who’s who of the
sonically aware, with Prince, Elbow,
Stevie Wonder, Coldplay, Brian May,
Universal, EMI, Sony, Pinewood Studios,
Dreamworks, Deutsche Grammophon and
the BBC among the makers of movies and
music who use our products.
Our loudspeakers were also used in the
production of Titanic, Spiderman III, Iron
Man 2, Finding Nemo, Pirates of the
Caribbean III, and during broadcasts of
the London Olympics, 2012.
EMI
Stevie Wonder
BBC
Tony Bennett
Prince
Coldplay
UNIVERSAL MUSIC GROUP
elbow
Thomas Newman
Royal College of Music
Brian May
Warner Music
Kraftwerk
Pinewood Studios
Emil Berliner/Deutsche
Grammophon
Google
ESPN
SONY
JVC Studios
PMC: the authority for quality sound.
Congratulations - You have joined the elite.
Page 6

User Guide
Contents
General Usage Guidelines
Introduction
Unpacking and Care
Specications
Operational Controls
Menu Structure Table
Service
The PMC Professional Range
Warranty On-Line
Warranty Certicate – Part 1 – Your copy
Warranty Certicate – Part 2 – PMC’s copy
Help us improve – Your Comments
Page 7

Read these instructions and keep them in a safe place for future reference.
Heed all electrical safety warnings, including any on the twotwo remote control itself.
Do not install the twotwo remote control near heat sources such as radiators, ovens or
other very hot equipment.
Do not attempt to service the equipment. There are no user-serviceable parts inside.
Please refer all servicing to PMC authorised personnel.
Servicing is required when the apparatus is damaged, exposed to moisture, or exhibits
a distinct or sudden change of operation or audio performance.
Packaging material can pose danger to the young and vulnerable. Ensure these items
are stored or disposed of safely.
twotwo Series loudspeakers can produce high sound pressure levels. Exposure to high
levels of sound has the potential to cause hearing damage. Use care when adjusting the
system volume to ensure sound pressure levels remain within safe and comfortable limits.
The twotwo remote control should only be cleaned with a dry, lint-free, cloth. Do not use
solvents, abrasives, waxes or liquids as they may be detrimental to the nish.
PMC has made efforts to provide accurate installation information and good quality
xings. However, PMC will not be held responsible or liable for injuries or property
damage (direct, indirect or consequential) arising out of use or inability to use this
product safely and properly.
This product may contain nuts.
General Usage Guidelines
Page 8

Thank you for choosing the PMC twotwo remote control. This guide provides installation and
operating instructions.
The twotwo remote control can be used with any combination of twotwo series loudspeakers
and sub-woofers, allowing operational control and full conguration of all connected devices.
Connections
The twotwo remote control is connected to the RJ45 In socket on the rst twotwo series in the
control chain using the supplied RJ45 cable. The RJ45 Thru socket of the rst loudspeaker in the
chain is then connected to the RJ45 In socket of the subsequent speaker using another RJ45
cable. Additional speakers are daisy chained it the same manner.
The supplied loop-back terminator must be plugged into the RJ45 Thru port of the last
loudspeaker in the control chain.
Loudspeakers can be connected in any order, but digital audio is passed only from one
speaker to the following speaker in the chain. For example, if you connect a stereo digital
input to the front left speaker, it makes sense to connect the front right speaker as the following
device in the control chain, since it can then access the right audio channel directly via its RJ45
connection.
Introduction
!
Page 9

Unpacking and Care
This PMC twotwo remote control is packed in a protective carton. Please retain the carton
to ensure that the device can be transported safely if the need arises in the future. If you
dispose of the packaging please do so in an environmentally responsible and safe way.
What’s in the Box?
Do not attempt to use this remote controller if the packaging has been water-
damaged.
Care and Service
In normal usage this PMC twotwo remote control should provide many years of trouble-free
operation, but in the unlikely event that you suspect damage or failure has occurred do not
attempt to repair the unit yourself. There are no user-serviceable parts inside. Contact your
dealer for advice and a service return address.
Clean the remote control only with a dry and lint-free cloth, and avoid the use of solvents as
they may damage the nish of the unit.
!
1x twotwo remote control
1x RJ45 control link cable
1x Loop-back terminator
1x User Guide
Page 10
Connections A single RJ45 connector is provided which accepts
power from any twotwo monitor or subwoofer and
conveys control data into the twotwo network.
Maximum Cable Length 25 metres
Dimensions H109.5 W143.5 D34 (mm)
Specications
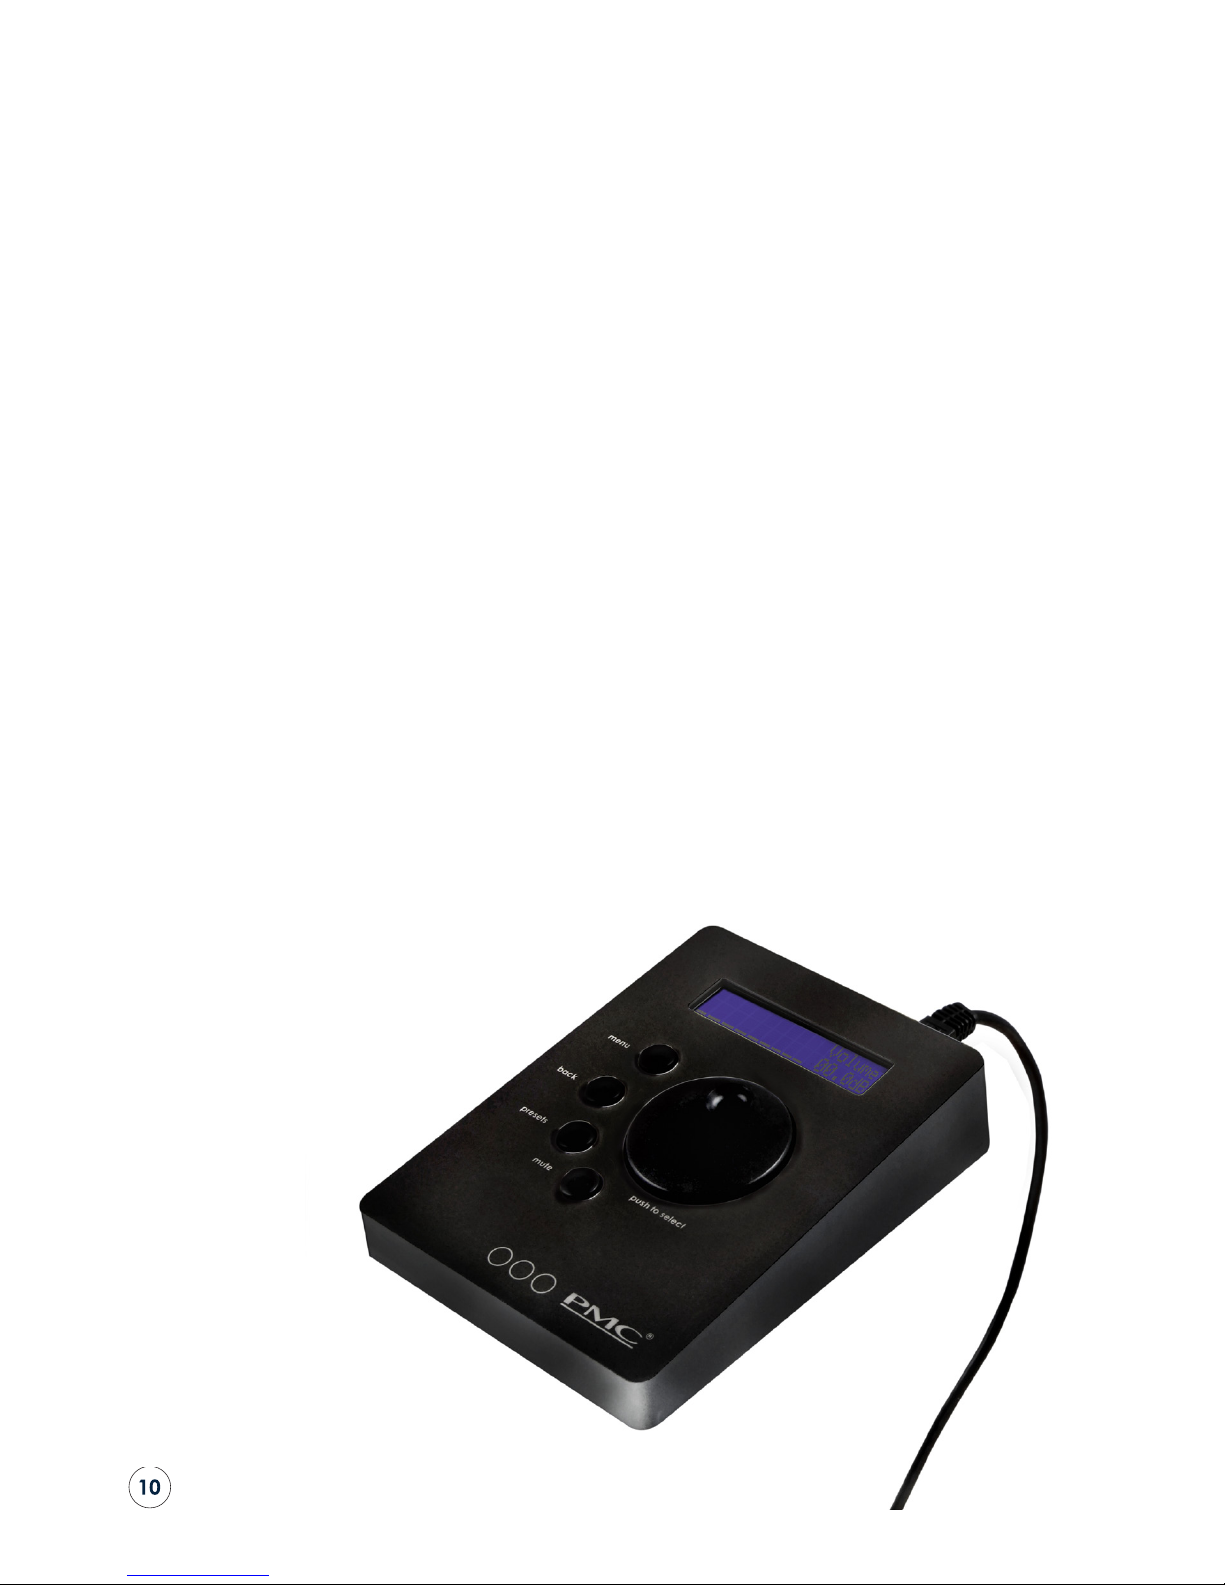
Page 11
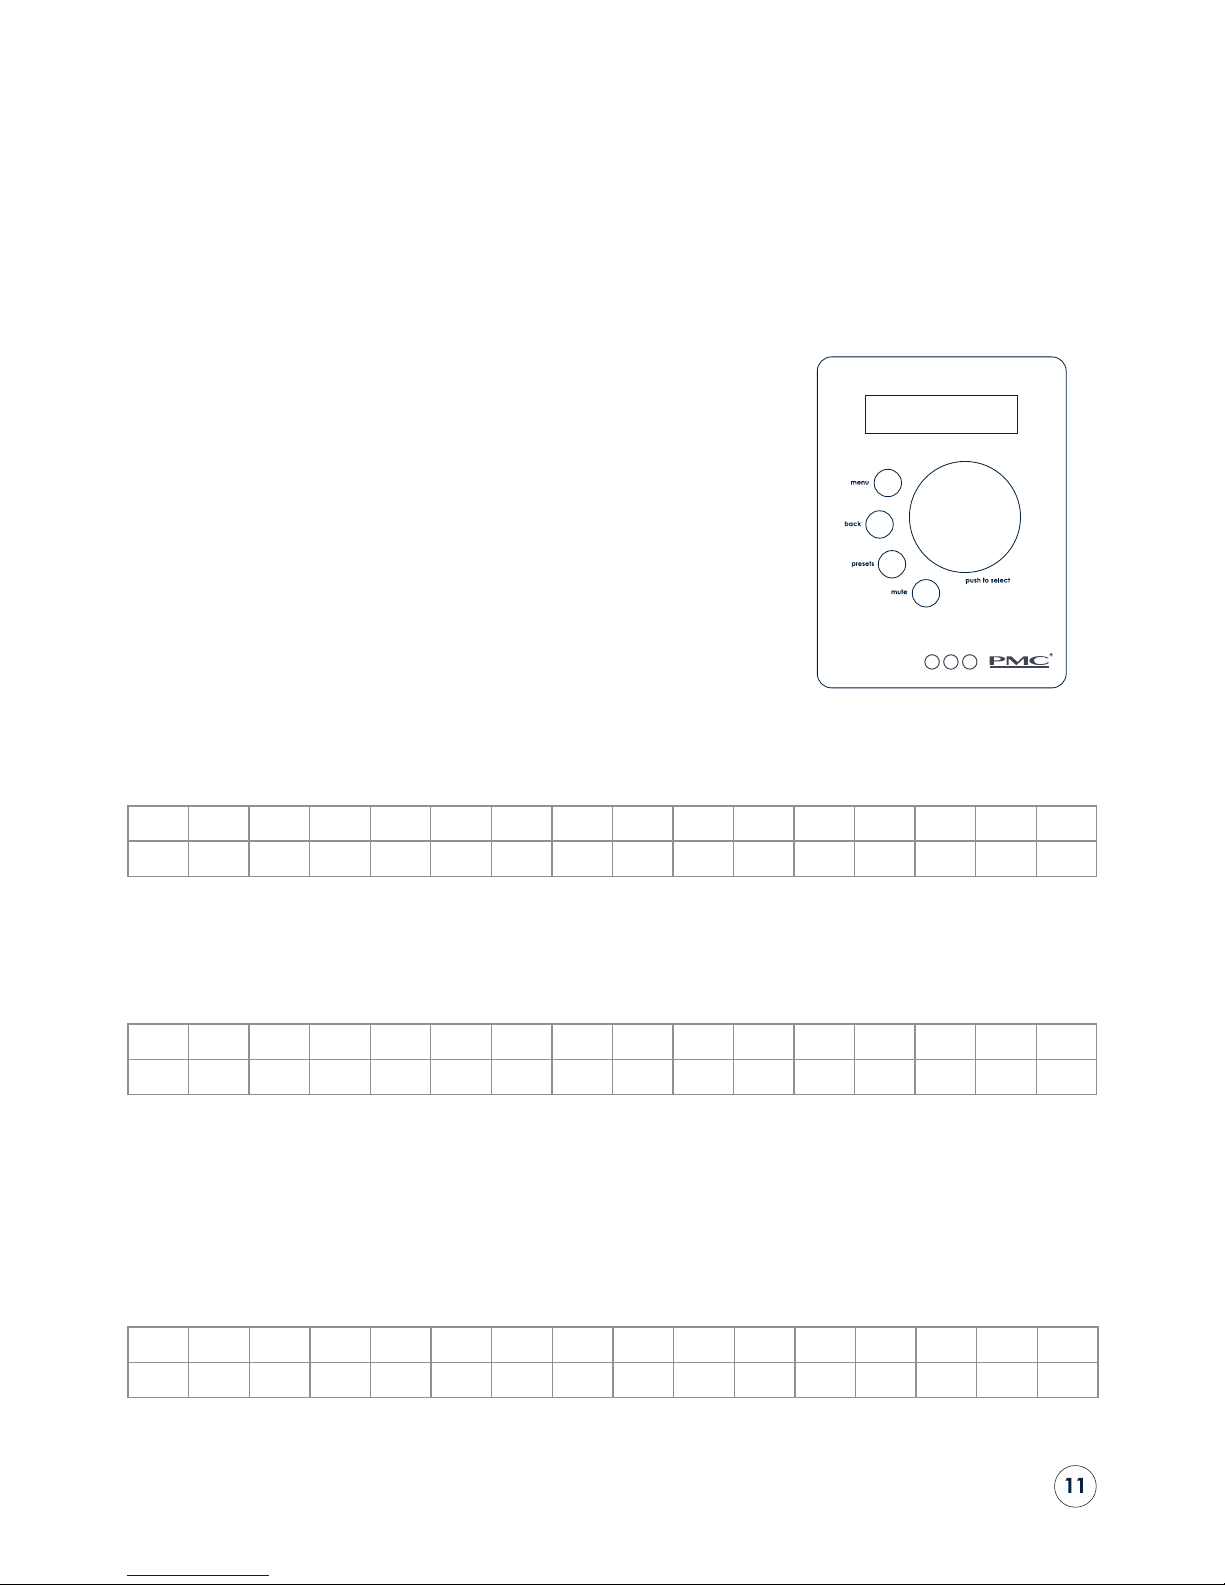
twotwo series monitors and sub-woofers can be congured and controlled
via the optional twotwo remote control which has an LCD display with
two rows of up to 16 characters each, plus four push buttons and a rotary
control.
The top push button accesses the conguration MENU, with a BACK
button below to exit. The PRESET button accesses the user preset facilities,
and the MUTE button mutes the loudspeakers.
The menu displays are navigated using the rotary control wheel which
has a push-button action to select the currently displayed parameter.
1 Power Up
With the remote control plugged into the rst speaker in the chain and the speakers turned on, the display
shows ‘Waiting...’ until all the speakers are fully powered up (see below).
W a i t i n g . . .
1.1 Standby Mode
Standby mode is activated when the Power Off Mode is selected in the main menu.
In standby mode the display will look like this:
Z z z
Actions: (Note: Backlight is off, and there is no submenu)
Buttons: MENU/BACK/PRESETS/MUTE/SELECT: The System turns on and the
default display appears (see 2).
Rotary: Nothing.
When powered on by the remote control, the LCDs on all twotwo monitors show the volume and source, eg:
V o l u m e – 2 0 . 5 d B
A n a l o g u e X L R
Operational Controls
Page 12

The LCD on any twotwo sub-woofers in the system shows the volume and LF Roll-off, e.g:
V o l u m e – 2 0 . 5 d B
L F R o l l 5 0 H z / 6
2 Default Display
This display appears when there is no menu activity for more than 60 seconds, when the BACK button is
pressed in the main menu, PRESET menu, or after a button press in standby mode. When the system is un-muted
the default display shows: (in this example only left and right channels are assigned and volume is +15dB)
L
–
R
– – – – – –
V o l u m e
+ 1 5 . 0 d B
Actions: (Note: No Submenus)
Rotary: UP/DOWN changes volume in 0.5dB steps (minimum -48.5dB, maximum
+15dB). Save value and send value to all channels.
Buttons: MENU: the main menu appears (see 3).
BACK: If held for more than two seconds the volume locks at the current
setting. The display looks like this (with +15.0 volume value as an example):
L C R L R L R S S V L o c k
s s b b + 1 5 . 0 d B
If the BACK button is held again for more than two seconds the volume
unlocks and the display reverts to the default display.
PRESET: If pressed briey the current preset is displayed for two seconds.
If held for more than two seconds, the preset menu appears (see 4).
SELECT: Nothing.
MUTE: a mute command will be sent to all channels and the display back
light will ash twice per second. The Volume cannot be changed during
mute. (From now on this will be the default display, until the MUTE
button is pressed in any menu). This display shows:
A l l C h a n n e l M u t e
The LCD on each twotwo monitor displays Remote Mute and the input source. The backlight ashes slowly, eg:
R e m o t e M u t e
A n a l o g u e X L R
Page 13

3 Main Menu
The main menu is shown when the MENU button is pressed in the default display, or when BACK is pressed
in the setup menu. The sub-menu options which appear depend on the last shown main sub-menu (in this
example power off):
t w o t w o r e m o t e 1 . 1
P o w e r o f f
Sub-menus: Power off, Setup
Actions:
Rotary: UP/DOWN: scroll up/down in the submenu list.
Buttons: MENU: nothing.
BACK: default display appears (see 2).
PRESET: If pressed briey the current preset shown for two seconds. If
held for more than two seconds the preset menu appears (see 4).
SELECT: dependent on submenu:
Power off: turn off and shows standby menu (see 1).
Setup: enters setup menu (see 3.1).
MUTE: a mute/un-mute command is sent to all channels. If mute is
enabled the display backlight will ash twice per second.
3.1 Setup Menu
The setup menu is shown when the SELECT button is pressed in the main menu with setup menu as the active
sub-menu, or when the BACK button is pressed in the channel aliases menu, the analogue input sensitiv-
ity menu, or the channel settings menu. Which setup sub-menu option appears is dependent on the last
shown setup sub-menu option. The last shown setup sub-menu option appears (in this example Channel
Aliases):
S e t u p
C h a n n e l A l i a s e s
Sub-menus: Channel Aliases, Analogue Input Sensitivity, Backlight (BL) Timeout
1: None (default), Further channel aliases 2: None, ... down to 14: none.
Actions:
Rotary: UP/DOWN: scrolls up/down through the sub-menu list.
Buttons: MENU: nothing.
BACK: the main menu appears (see 3).
PRESET: if pressed briey the current preset is displayed for two seconds.
If pressed for more than two seconds the preset menu appears (see 4).
SELECT: dependent on sub-menu.
Channel Aliases: enter Aliases Channel Select menu (see 3.1.1).
Analogue Input Sensitivity: enter Analogue Sensitivity menu (see 3.1.4).
Backlight (BL) Timeout: enter BL timeout menu (see 3.1.3)
1: None: enter channel Settings Menu (see 3.1.4)
2: None: enter channel Settings Menu (see 3.1.4)
.... 14: None: enter channel Settings Menu (see 3.1.4)
MUTE: a mute/un-mute command will be sent to all channels and the
display backlight will ash twice per second when the mute is active.
Page 14

3.1.1 Aliases Channel Select Menu
The aliases channel select menu is shown when the SELECT button is pressed in the setup menu with channel
aliases menu as the active sub-menu, or when the BACK button is pressed in channel aliases menu. Which
aliases appear in the channel select sub-menu option depends on the last shown aliases channel select
sub-menu option (in this example Ch1).
C h a n n e l A l i a s e s
C h 1
Sub-menus: Access Ch1 through Ch14
Actions:
Rotary: UP/DOWN: scroll up/down in the submenu list.
Buttons: MENU: nothing.
BACK: the setup menu appears (see 3.1).
PRESET: if pressed briey the current preset is displayed for 2 seconds. If
pressed for more than two seconds the preset menu appears (see 4).
SELECT: enters channel aliases menu (see 3.1.1.1).
MUTE: a mute/un-mute command will be sent to all channels. The display
backlight ashes twice per second when muted.
3.1.1.1 Channel Aliases Menu
The channel aliases menu is shown when the SELECT button is pressed in the aliases channel select menu.
The selected channel appears (in the example below, channel one is selected). The channel aliases sub-
menu option that appears depends on the current channel alias, but the selected channel and current
alias is shown in the display (in this example the default option: None).
C h 1 A l i a s
N o n e
Sub-menus: None, Left, Right, Centre, Left Surround, Right Surround, Left Back, Right
Back, Sub woofer (Note: Subwoofer only appears if one is detected in the
system: see 3.1.5)
Actions:
Rotary: Up/Down: scroll up/down in the sub-menu list.
Buttons: MENU: nothing
BACK: the aliases channel select menu appears (see 3.1.1).
PRESET: If pressed briey the current preset is displayed for two seconds. If
held for more than two seconds the preset menu appears (see 4).
SELECT: Stores the current alias.
MUTE: a mute/un-mute command will be sent to all channels. The display
backlight will ash twice per second when muted.
Page 15

3.1.2 Analogue Input Sensitivity Menu
The analogue input sensitivity menu is shown when the SELECT button is pressed in the setup menu
with analogue input sensitivity menu as active sub-menu. The current value appears (in this example
+4.00dB).
A n a l o g u e I n S e n s
+ 4 . 0 0
Actions: (Note: No submenus.)
Rotary: UP/DOWN: change the analogue input sensitivity in steps of 0.25dB, with
a minimum value of +4dB and a maximum of +20dB.
Buttons: MENU: nothing.
BACK: the setup menu appears (see 3.1).
PRESET: If pressed briey the current preset is displayed for two seconds.
If held for more than two seconds the preset menu appears (see 4).
SELECT: saves value and sends to all channels. Setup menu appears (see 3.1).
MUTE: a mute/un-mute command is sent to all channels. The display
backlight ashes twice per second when muted.
3.1.3 BackLight (BL) Timeout
The Backlight(BL) Timeout menu is shown when the SELECT button is pressed in the setup menu with the
BL Timeout menu as active submenu. The BL Timeout submenu option which appears depends on the
current BL Timeout. The current BL Timeout value appears (in this example 2 mins)
B L T i m e o u t
2 m i n
Sub-menu: OFF, 30 sec, 2 min, 5 min
Actions:
Rotary: UP/DOWN: scrolls up/down through the sub-menu list.
Buttons: MENU: nothing.
BACK: the setup menu appears (see 3.1) .
PRESET: If pressed briey the current preset is displayed for two seconds.
If held for more than two seconds the preset menu appears (see 4).
SELECT: saves setting and sends to all channels. Setup menu appears (see 3.1).
MUTE: a mute/un-mute command is sent to all channels. The display
backlight ashed twice per second when muted.
Page 16

3.1.4 Channel Settings Menu
The Channel Settings menu is shown when the SELECT button is pressed in the setup menu with Channel Set-
tings menu as active sub-menu, or when the back button is pressed in main source menu, main trim menu,
twotwo HF shelf, twotwo LF shelf, twotwo LF Rollof, twotwo LF RollFR, or Subwoofer settings menus. The
selected channel in the setup menu and selected alias appears (in this example Left). The Channel Settings
sub-menu option which appears depends on the last shown sub-menu option (eg. Main Source).
L e f t
M a i n S o u r c e
Sub-menus: Main Source, Main Trim,
twotwo HF Shelf, twotwo LF Shelf, twotwo LF Rollof, twotwo LF RollFr
Actions:
Rotary: UP/DOWN: scrolls up/down through the sub-menu list.
Buttons: MENU: nothing.
BACK: the setup menu appears (see 3.1).
PRESET: If pressed briey the display shows the current preset for two
seconds. If held for more than two seconds the preset menu appears (see 4).
SELECT: depends on sub-menu:
Main Source: enter Main Source menu (see 3.1.4.1).
Main Trim: enter Main Trim menu (see 3.1.4.2).
twotwo HF Shelf: enter HF Shelf menu (See 3.1.4.3)
twotwo LF Shelf: enter LF Shelf menu (See 3.1.4.4)
twotwo LF Rollof: enter LF Rollof menu (See 3.1.4.5)
twotwo LF RollFr: enter LF RollFr menu (See 3.1.4.6)
MUTE: a mute/un-mute command is sent to all channels. The display
backlight will ash once per second when muted.
3.1.4.1 Main Source Menu
The Main Source menu is shown when the SELECT button is pressed in the Channel Setting menu with Main
Source as active sub-menu. The selected channel in the channel settings menu appears (in the example
below, Channel 1). Which Main source sub-menu option appears depends on the current main source (in
this example, Analogue XLR).
M a i n S o u r c e
A n a l o g u e X L R
Sub-menus: Analogue XLR, Analogue RCA, Main AES3 Left, Main AES3 Right.
Actions:
Rotary: UP/DOWN: scroll up/down in the sub-menu list.
Buttons: MENU: nothing.
BACK: the channel settings menu appears (see 3.1.4).
PRESET: If pressed briey the current preset is displayed for two seconds. If
held for more than two seconds the preset menu appears (see 4).
SELECT: saves setting and sends to selected channel. The channel settings
menu appears (see 3.1.4).
MUTE: a mute/un-mute command is sent to all channels. The display
backlight ashes twice per second when muted.
Page 17

3.1.4.2 Main Trim Menu
The Main Trim menu is shown when the SELECT button is pressed in the Channel Setting menu with Main Trim
as active sub-menu. The current value appears (in this example +1.00dB).
M a i n T r i m
+ 0 1 . 0 0
Actions: (Note: No submenus)
Rotary: UP/DOWN: changes the Main trim in steps of 0.125dB. The minimum setting
is -8.00dB and the maximum is +7.87dB.
Buttons: MENU: nothing.
BACK: the channel settings menu appears (see 3.1.4).
PRESET: If pressed briey the current preset is displayed for two seconds. If
held for more than two seconds the preset menu appears (see 4).
SELECT: saves value and sends to selected channel. The channel settings
menu appears (see 3.1.4).
MUTE: a mute/un-mute command is sent to all channels. The display
backlight ashes once per second when muted.
3.1.4.3 twotwo HF Shelf Menu
The HF Shelf menu is shown when the SELECT button is pressed in the Channel Setting menu with HF Shelf as
active sub-menu. The curent value appears (in this example +01.00dB)
t w o t w o H F S h e l f
+ 0 1 . 0 0
Actions: (Note: No submenus)
Rotary: UP/DOWN: changes HF Shelf in steps of 0.125dB.The minimum value is
-4.00dB and the maximum is +4.00dB.
Buttons: MENU: nothing.
BACK: the channel settings menu appears (see 3.1.4).
PRESET: If pressed briey the current preset is displayed for two seconds.
If held for more than two seconds the preset menu appears (see 4).
SELECT: saves setting and sends to selected channel. The channel settings
menu appears (see 3.1.4).
MUTE: a mute/un-mute command is sent to all channels. The display
backlight ashes twice per second when muted.
Page 18

3.1.4.4 twotwo LF Shelf Menu
The LF Shelf menu is shown when the SELECT button is pressed in the Channel Setting menu with LF Shelf as
active submenu. The current value appears. (In this example +01.00dB)
t w o t w o L F S h e l f
+ 0 1 . 0 0
Actions: (Note: No Submenus)
Rotary: UP/DOWN: changes the LF Shelf in steps of 0.125dB. The minimum value is
-4.00dB and the maximum is +4.00dB
Buttons: MENU: nothing.
BACK: the channel settings menu appears (see 3.1.4).
PRESET: If pressed briey the current preset is displayed for two seconds.
If held for more than two seconds the preset menu appears (see 4).
SELECT: saves value and sends to selected channel. The channel settings
menu appears (see 3.1.4).
MUTE: a mute/un-mute command is sent to all channels. The display
backlight ashes twice per second when muted.
3.1.4.5 twotwo LF Rollof Menu
The LF Rollof menu is shown when the SELECT button is pressed in the Channel Setting menu with LF Rolloff
as active sub-menu. The current value appears (in this example On)
t w o t w o L F R o l l o f
O N
Submenus: On, Off
Actions:
Rotary: UP/DOWN: scroll up/down in the sub-menu list.
Buttons: MENU: nothing.
BACK: the channel settings menu appears (see 3.1.4).
PRESET: If pressed briey the current preset is displayed for two seconds.
If held for more than two seconds the preset menu appears (see 4).
SELECT: saves setting and sends to selected channel. The channel settings
menu appears (see 3.1.4).
MUTE: a mute/un-mute command is sent to all channels. The display
backlight ashes twice per second when muted.
3.1.4.6 twotwo LF RollFr Menu
The LF RollFr menu is shown when the SELECT button is pressed in the Channel Setting menu with LF RollFr as
active submenu. Which LF RollFr sub-menu option appears depends on the current LF RollFr (in this example,
200Hz).
t w o t w o L F R o l l F r
2 0 0 H z
Page 19

Submenus: 50Hz, 80Hz, 120Hz, 150Hz, 200Hz
Actions:
Rotary: UP/DOWN: scroll up/down in the sub-menu list
Buttons: MENU: nothing.
BACK: the channel settings menu appears (see 3.1.4).
PRESET: If pressed briey the current preset is displayed for two seconds.
If held for more than two seconds the preset menu appears (see 4).
SELECT: saves value and sends to selected channel. The channel settings
menu appears (see 3.1.4).
MUTE: a mute/un-mute command is sent to all channels. The display
backlight ashes twice per second when muted.
3.1.5 Subwoofer Menu
The Subwoofer menu is shown when the SELECT button is pressed in the setup menu with Subwoofer menu
as active submenu, or when the BACK button is pressed in main source menu, main trim menu, HF shelf,
LF shelf, LF Rollof, LF RollFr or Subwoofer settings menus. The subwoofer alias appears. Which Subwoofer
submenu option appears depends on the last shown subwoofer submenu option. The last shown subwoofer
submenu option appears. (In this example Main Source).
S u b w o o f e r
M a i n S o u r c e
Submenus: Main Source, Main Trim, Sub LF Rollslope, Sub LF RollFr, +10dB Gain, Phase
Reverse, Phase, Parametric EQ, PEQ Gain, PEQ Freq, PEQ Q, LR
Out Response, LR Out Level.
Actions:
Rotary: UP/DOWN: scroll up/down in the sub-menu list
Buttons: MENU: nothing.
BACK: the Setup menu appears (see 3.1).
PRESET: If pressed briey the current preset is displayed for two seconds.
If held for more than two seconds the preset menu appears (see 4).
SELECT: depends on submenu:
Main Source: enter Main Source menu (see 3.1.5.1).
Main Trim: enter Main Trim menu (see 3.1.5.2).
Sub LF Rollslope: enter Sub LF Rollslope menu (see 3.1.5.3)
Sub LF RollFr: enter Sub LF RollFr menu (see 3.1.5.4)
+10dB Gain: enter +10dB Gain menu (see 3.1.5.5)
Phase Reverse: enter Phase Reverse menu (see 3.1.5.6)
Phase: enter Phase menu (see 3.1.5.7)
Parametric EQ: enter Parametric EQ menu (see 3.1.5.8)
PEQ Gain: enter PEQ Gain menu (see 3.1.5.9)
PEQ Freq: enter PEQ Freq menu (see 3.1.5.10)
PEQ Q: enter PEQ Q menu (see 3.1.5.11)
LR Out Response: enter LR Out Level menu (See 3.1.5.12)
LR Out Level: enter LR Out Level menu (See 3.1.5.13)
MUTE: a mute/un-mute command is sent to all channels. The display
backlight ashes twice per second when muted.
Page 20

3.1.5.1 Main Source Menu
The Main Source menu is shown when the SELECT button is pressed in the Subwoofer menu with Main
Source as active submenu. Which Main source submenu option appears depends on the current main
source. The current main source option appears. (In this example Analogue XLR)
M a i n S o u r c e
A n a l g u e X L R
Submenus: Analogue XLR, Main AES3 Left, Main AES3 Right, AES L+R
Actions:
Rotary: UP/DOWN: scroll up/down in the sub-menu list
Buttons: MENU: nothing.
BACK: the Setup menu appears (see 3.1.5).
PRESET: If pressed briey the current preset is displayed for two seconds.
If held for more than two seconds the preset menu appears (see 4).
SELECT: saves setting and sends to selected channel. The Subwoofer menu
appears (see 3.1.5)
MUTE: a mute/un-mute command is sent to all channels. The display
backlight ashes twice per second when muted.
3.1.5.2 Main Trim Menu
The Main Trim menu is shown when the SELECT button is pressed in the Subwoofer menu with Main Trim as
active submenu. The current value appears. (In this example +1.00)
M a i n T r i m
+ 0 1 . 0 0
Actions: (Note: No Submenus)
Rotary: UP/DOWN: changes the Main trim in steps of 0.125dB. The minimum setting
is -8.00dB and the maximum is +7.87dB.
Buttons: MENU: nothing.
BACK: the Setup menu appears (see 3.1.5).
PRESET: If pressed briey the current preset is displayed for two seconds.
If held for more than two seconds the preset menu appears (see 4).
SELECT: saves setting and sends to selected channel. The Subwoofer menu
appears (see 3.1.5)
MUTE: a mute/un-mute command is sent to all channels. The display
backlight ashes twice per second when muted.
3.1.5.3 Sub LF Rollslope Menu
The Sub LF Rollslope menu is shown when the SELECT button is pressed in the Subwoofer menu with Sub LF
Rollslope as active submenu. Which Sub LF Rollslope submenu option appears depends on the current Sub
LF Rollslope. (In this example the Sub LF Rollslope option is 6dB/Oct).
S u b L F R o l l s l o p e
6 d B / O c t
Page 21

Submenus: Off, 6dB/Oct, 12dB/Oct, 18dB/Oct
Actions:
Rotary: UP/DOWN: scroll up/down in the sub-menu list
Buttons: MENU: nothing.
BACK: the Setup menu appears (see 3.1.5).
PRESET: If pressed briey the current preset is displayed for two seconds.
If held for more than two seconds the preset menu appears (see 4).
SELECT: saves setting and sends to selected channel. The Subwoofer menu
appears (see 3.1.5)
MUTE: a mute/un-mute command is sent to all channels. The display
backlight ashes twice per second when muted.
3.1.5.4 Sub LF RollFr Menu
The Sub LF RollFr menu is shown when the SELECT button is pressed in the Subwoofer menu with Sub LF RollFr
as active submenu. Which Sub LF RollFr submenu option appears depends on the current Sub LF RollFr.
S u b L F R o l l F r e q
2 0 0 H z
Submenus: 50Hz, 80Hz, 120Hz, 150Hz, 200Hz
Actions:
Rotary: UP/DOWN: scroll up/down in the sub-menu list
Buttons: MENU: nothing.
BACK: the Setup menu appears (see 3.1.5).
PRESET: If pressed briey the current preset is displayed for two seconds.
If held for more than two seconds the preset menu appears (see 4).
SELECT: saves setting and sends to selected channel. The Subwoofer menu
appears (see 3.1.5)
MUTE: a mute/un-mute command is sent to all channels. The display
backlight ashes twice per second when muted.
3.1.5.5 +10dB Gain Menu
The +10dB Gain menu is shown when the SELECT button is pressed in the Subwoofer menu with +10dB Gain
as active submenu. The current value appears. (In this example: On)
+ 1 0 d B G a i n
O n
Submenus: On, Off
Actions:
Rotary: UP/DOWN: scroll up/down in the sub-menu list
Buttons: MENU: nothing.
BACK: the Setup menu appears (see 3.1.5).
PRESET: If pressed briey the current preset is displayed for two seconds.
If held for more than two seconds the preset menu appears (see 4).
SELECT: saves setting and sends to selected channel. The Subwoofer menu
appears (see 3.1.5)
MUTE: a mute/un-mute command is sent to all channels. The display
backlight ashes twice per second when muted.
Page 22

3.1.5.6 Phase Reverse Menu
The Phase Reverse menu is shown when the SELECT button is pressed in the Subwoofer menu with Phase
Reverse as active submenu. The current value appears. (In this example: On)
P h a s e R e v e r s e
O n
Submenus: On, Off
Actions:
Rotary: UP/DOWN: scroll up/down in the sub-menu list
Buttons: MENU: nothing.
BACK: the Setup menu appears (see 3.1.5).
PRESET: If pressed briey the current preset is displayed for two seconds.
If held for more than two seconds the preset menu appears (see 4).
SELECT: saves setting and sends to selected channel. The Subwoofer menu
appears (see 3.1.5)
MUTE: a mute/un-mute command is sent to all channels. The display
backlight ashes twice per second when muted.
3.1.5.7 Phase Menu
The Phase menu is shown when the SELECT button is pressed in the Subwoofer menu with Phase as active
submenu. The current value appears. (In this example 30deg)
P h a s e
3 0
Actions: (Note: No Submenus)
Rotary: UP/DOWN: changes the Phase in 5 degree stepss. The minimum setting is 0
degrees and the maximum is 180 degrees.
Buttons: MENU: nothing.
BACK: the Setup menu appears (see 3.1.5).
PRESET: If pressed briey the current preset is displayed for two seconds.
If held for more than two seconds the preset menu appears (see 4).
SELECT: saves setting and sends to selected channel. The Subwoofer menu
appears (see 3.1.5)
MUTE: a mute/un-mute command is sent to all channels. The display
backlight ashes twice per second when muted.
3.1.5.8 Parametric EQ Menu
The Parametric EQ menu is shown when the SELECT button is pressed in the Subwoofer menu with Paramet-
ric EQ as active submenu. The current value appears. (In this example: On)
P a r a m e t r i c E Q
O n
Page 23

Submenus: On, Off
Actions:
Rotary: UP/DOWN: scroll up/down in the sub-menu list
Buttons: MENU: nothing.
BACK: the Setup menu appears (see 3.1.5).
PRESET: If pressed briey the current preset is displayed for two seconds.
If held for more than two seconds the preset menu appears (see 4).
SELECT: saves setting and sends to selected channel. The Subwoofer menu
appears (see 3.1.5)
MUTE: a mute/un-mute command is sent to all channels. The display
backlight ashes twice per second when muted.
3.1.5.9 PEQ Gain Menu
The PEQ Gain menu is shown when the SELECT button is pressed in the Subwoofer menu with PEQ Gain as
active submenu. The current value appears. (In this example +1.00)
P E Q G a i n
+ 0 1 . 0 0
Actions: (Note: No submenus)
Rotary: UP/DOWN: changes the PEQ gain in steps of 0.125dB. The minimum setting
is -8.00dB and the maximum is +7.87dB.
Buttons: MENU: nothing.
BACK: the Setup menu appears (see 3.1.5).
PRESET: If pressed briey the current preset is displayed for two seconds.
If held for more than two seconds the preset menu appears (see 4).
SELECT: saves setting and sends to selected channel. The Subwoofer menu
appears (see 3.1.5)
MUTE: a mute/un-mute command is sent to all channels. The display
backlight ashes twice per second when muted.
3.1.5.10 PEQ Freq Menu
The PEQ Freq menu is shown when the SELECT button is pressed in the Subwoofer menu with PEQ Freq as
active submenu. The current value appears. (In this example 80Hz)
P E Q F r e q
8 0 H z
Actions: (Note: No submenus)
Rotary: UP/DOWN: changes the PEQ centre frequency in 5Hz stepe. The minimum
setting is 20Hz and the maximum is 150Hz.
Buttons: MENU: nothing.
BACK: the Setup menu appears (see 3.1.5).
PRESET: If pressed briey the current preset is displayed for two seconds.
If held for more than two seconds the preset menu appears (see 4).
SELECT: saves setting and sends to selected channel. The Subwoofer menu
appears (see 3.1.5)
MUTE: a mute/un-mute command is sent to all channels. The display
backlight ashes twice per second when muted.
Page 24

3.1.5.11 PEQ Q Menu
The PEQ Q menu is shown when the SELECT button is pressed in the Subwoofer menu with PEQ Q as active
submenu. The current value appears. (In this example 5)
P E Q Q
+ 0 5 . 0 0
Actions: (Note: No submenus)
Rotary: UP/DOWN: changes the PEQ Q (bandwidth) in steps of 0.5. The minimum
setting is 1.0 and the maximum is 8.0.
Buttons: MENU: nothing.
BACK: the Setup menu appears (see 3.1.5).
PRESET: If pressed briey the current preset is displayed for two seconds.
If held for more than two seconds the preset menu appears (see 4).
SELECT: saves setting and sends to selected channel. The Subwoofer menu
appears (see 3.1.5)
MUTE: a mute/un-mute command is sent to all channels. The display
backlight ashes twice per second when muted.
3.1.5.12 LR Out Response
The LR Out Response menu is shown when the SELECT button is pressed in the Subwoofer menu with LR Out
Response as active submenu. The current value appears. (In this example: Filtered)
L R O u t R e s p o n s e
F i l t e r e d
Submenus: Filtered, Full-range
Actions:
Rotary: UP/DOWN: scroll up/down in the sub-menu list
Buttons: MENU: nothing.
BACK: the Setup menu appears (see 3.1.5).
PRESET: If pressed briey the current preset is displayed for two seconds.
If held for more than two seconds the preset menu appears (see 4).
SELECT: saves setting and sends to selected channel. The Subwoofer menu
appears (see 3.1.5)
MUTE: a mute/un-mute command is sent to all channels. The display
backlight ashes twice per second when muted.
Page 25

3.1.5.13 LR Out Level
The LR Out Level menu is shown when the SELECT button is pressed in the Subwoofer menu with LR Out Level
as active submenu. The current value appears. (In this example: Fixed)
L R O u t L e v e l
F i x e d
Submenus: Fixed, Variable
Actions:
Rotary: UP/DOWN: scroll up/down in the sub-menu list
Buttons: MENU: nothing.
BACK: the Setup menu appears (see 3.1.5).
PRESET: If pressed briey the current preset is displayed for two seconds.
If held for more than two seconds the preset menu appears (see 4).
SELECT: saves setting and sends to selected channel. The Subwoofer menu
appears (see 3.1.5)
MUTE: a mute/un-mute command is sent to all channels. The display
backlight ashes twice per second when muted.
4 Preset Menu
The preset menu is shown whenever the PRESET button is pressed (unless in standby mode), or when the
BACK button is pressed in the preset setup menu. Which preset sub-menu option appears depends on the
last shown preset sub-menu option (this example shows the Preset Setup). An asterix (*) means the name is
changeable by the user.
P r e s e t
P r e s e t S e t u p
Sub-menus: Preset Setup, No Preset, 1:PRESET A* to 5:PRESET E*
Actions:
Rotary: UP/DOWN: scrolls up/down through the sub-menu list.
Buttons: MENU: nothing.
BACK: the default display appears (see 2).
PRESET: If pressed briey the current preset is displayed for two seconds.
If held for more than two seconds: nothing.
SELECT: depends on sub-menu:
Preset Setup: enters Preset Setup menu (see 4.1).
No Preset: clears preset values. Shows selected preset for two seconds and
enters default display (see 2).
Preset A*-E*: activates preset A-E settings. Displays selected preset for two
seconds and enters default display (see 2).
MUTE: a mute/un-mute command is sent to all channels. The display
backlight ashes twice per second when muted.
Page 26

4.1 Preset Setup Menu
The preset setup menu is shown when the SELECT button is pressed in the preset menu with preset setup
as the active sub-menu, or when the BACK button is pressed in the preset aliases menu or preset settings
menu. Which setup sub-menu option appears depends on the last shown preset setup sub-menu option (in
this example, Preset Aliases).
P r e s e t S e t u p
P r e s e t A l i a s e s
Sub-menus: Preset Aliases, 1: PRESET A* to 5: PRESET E*.
Actions:
Rotary: UP/DOWN: scrolls up/down through the sub-menu list.
Buttons: MENU: nothing.
BACK: the preset menu appears (see 4).
PRESET: If pressed briey the current preset is displayed for two seconds.
If held for more than two seconds the preset menu appears (see 4).
SELECT: depends on sub-menu:
Preset Aliases: enter Aliases Preset Select menu (see 4.1.1)
Preset A*-E*: enter Preset settings menu (see 4.1.2)
MUTE: a mute/un-mute command is sent to all channels. The display
backlight ashes twice per second when muted.
4.1.1 Preset Aliases Select Menu
The aliases preset select menu is shown when the SELECT button is pressed in the preset setup menu with
aliases preset select as active sub-menu. Which aliases preset select sub-menu option appears depends on
the last shown aliases preset select sub-menu option (in this example, 1).
P r e s e t A l i a s e s
1 : P R E S E T A
Sub-menus: 1:PRESET A* to 5: PRESET E*
Actions:
Rotary: UP/DOWN: scrolls up/down through the sub-menu list.
Buttons: MENU: nothing.
BACK: the preset setup menu appears (see 4).
PRESET: If pressed briey the current preset is displayed for two seconds.
If held for more than two seconds the preset menu appears (see 4).
SELECT: depends on sub-menu.
MUTE: a mute/un-mute command is sent to all channels. The display
backlight ashed twice per second when muted.
Page 27

4.1.1.1 Preset Aliases Menu
The preset aliases menu is shown when the SELECT button is pressed in the preset setup menu. The selected
preset is shown (in this example 1). Which alias appears depends on the last stored alias.
A l i a s P r e s e t 1
P R E S E T A
Sub-menus: A to Z.
Actions:
Rotary: If no place selected: UP/DOWN scrolls between characters, left to right.
If place selected, UP/DOWN scrolls through the alphabet.
Buttons: MENU: nothing.
BACK: the aliases preset select menu appears (see 4.1.1).
PRESET: if pressed briey the current preset is displayed for two seconds.
If held for more than two seconds the preset menu appears (see 4).
SELECT: When no character us selected this highlights the current position
to change character. The UP/DOWN rotary function can then be
used to scroll through the alphabet. Selecting a character stores the current
character.
MUTE: a mute/un-mute command is sent to all channels. The display
backlight ashes twice per second when muted.
4.1.2 Preset Settings Menu
The preset settings menu is shown when the select button is pressed in the preset setup menu with one of
the ve presets as active submenu, or when the back button is pressed in the preset Front LF Shelf menu,
Front HF Shelf menu, Rear LF Shelf menu, Rear HF Shelf menu. Which preset settings submenu option ap-
pears depends on the last shown preset settings submenu option (in this example Front LF Shelf).
P r e s e t S e t t i n g s
F r o n t L F S h e l f
Sub-menus: Front LF Shelf, Front HF Shelf, Rear LF Shelf, Rear HF Shelf.
Actions:
Rotary: UP/DOWN: scrolls up/down through the sub-menu list.
Buttons: MENU: nothing.
BACK: the preset setup menu appears (see 4).
PRESET: if pressed briey the current preset is displayed for two seconds.
If held for more than two seconds the preset menu appears (see 4).
SELECT: depends on sub-menu:
Front LF Shelf: enter Front LF Shelf menu (see 4.1.2.1).
Front HF Shelf: enter Front HF Shelf menu (see 4.1.2.2).
Rear LF Shelf: enter Rear HF Shelf menu (see 4.1.2.3).
Rear HF Shelf: enter Rear HF Shelf menu (see 4.1.2.4).
MUTE: a mute/un-mute command is sent to all channels. The display
backlight ashes twice per second when muted.
Page 28

4.1.2.1 Front LF Shelf Menu
The Front LF Shelf menu is shown when the SELECT button is pressed in the preset settings menu with Front LF
Shelf as active sub-menu (in this example 1), along with the current value (in this example +1.00dB).
1 : F r o n t L F S h e l f
+ 1 . 0 0
Actions: (Note: No Submenus)
Rotary: UP/DOWN: changes the Front LF Shelf in steps of 0.125dB. The minimum
value is -8.00dB and the maximum is +7.87dB
Buttons: MENU: nothing.
BACK: the preset settings menu appears (see 4.1.2).
PRESET: if pressed briey the current preset is displayed for two seconds.
If held for more than two seconds the preset menu appears (see 4).
SELECT: saves value and sends to all channels. The preset settings menu
appears (see 4.1.2).
MUTE: a mute/un-mute command is sent to all channels. The display
backlight ashes twice per second when muted.
4.1.2.2 Front HF Shelf Menu
The Front HF Shelf menu is shown when the SELECT button is pressed in the preset settings menu with Front HF
Shelf as active sub-menu : (1 in this example) along with the current value (+1.00dB).
1 : F r o n t H F S h e l f
+ 1 . 0 0
Actions: (Note: No Submenus)
Rotary: UP/DOWN: changes the Front HF Shelf in steps of 0.125dB. The minimum
value is -8.00dB and the maximum is +7.87dB.
Buttons: MENU: nothing.
BACK: the preset settings menu appears (see 4.1.2).
PRESET: if pressed briey the current preset is displayed for two seconds.
If held for more than two seconds the preset menu appears (see 4).
SELECT: saves value and sends to all channels. The preset settings menu
appears (see 4.1.2).
MUTE: a mute/un-mute command is sent to all channels. The display
backlight ashes twice per second when muted.
4.1.2.3 Rear LF Shelf Menu
The Rear LF Shelf menu is shown when the SELECT button is pressed in the preset settings menu with Rear LF
Shelf as active sub-menu: (1 in this example) along with the current value (in this example +1.00dB).
1 : R e a r L F S h e l f
+ 1 . 0 0
Page 29

Actions: (Note: No submenus)
Rotary: UP/DOWN: changes the rear LF Shelf in steps of 0.125dB. The minimum
value is -8.00dB and the maximum is +7.87dB.
Buttons: MENU: nothing.
BACK: the preset settings menu appears (see 4.1.2).
PRESET: if pressed briey the current preset is displayed for two seconds.
If held for more than two seconds the preset menu appears (see 4).
SELECT: saves value and sends to all channels. The preset settings menu
appears (see 4.1.2).
MUTE: a mute/un-mute command is sent to all channels. The display
backlight ashes twice per second when muted.
4.1.2.4 Rear HF Shelf Menu
The Rear HF Shelf menu is shown when the SELECT button is pressed in the preset settings menu with Rear HF
Shelf as active sub-menu. The selected preset in the preset settings menu appears (1 in this example) along
with the current value (in this example +1.00dB).
1 : R e a r H F S h e l f
+ 1 . 0 0
Actions: (Note: No Submenus)
Rotary: UP/DOWN: changes the rear LF Shelf in steps of 0.125dB. The minimum
value is -8.00dB and the maximum is +7.87dB.
Buttons: MENU: nothing
BACK: the preset settings menu appears (see 4.1.2)
PRESET: if pressed briey the current preset is displayed for two
seconds. If held for more than two seconds the preset
menu appears (see 4)
SELECT: saves value and sends to all channels. The preset settings
menu appears (see 4.1.2)
MUTE: a mute/un-mute command is sent to all channels. The
display backlight ashes twice per second when muted.
Summary Table
The table on the following three pages summarises the menu structure of these control functions and
associated displays, with reference to the notes below:
1. Menu option only available if subwoofer detected in system.
2. twotwo menu items do not appear if channel has subwoofer alias.
3. Section only available with subwoofer alias and subwoofer detected in system.
4. Phase shift in ve degree steps.
5. Adjusts PEQ frequency in 5Hz steps.
6. Adjusts PEQ bandwidth (Q) in 0.5 steps,
Please Note: The nal loudspeaker in the chain must have the loop-back
!
connector tted to the RJ45 Remote Thru socket.
Page 30

Display Buttons Rotary Select Rotary Select Rotary Select Rotary Select
Volume Volume -48.5 to +15dB
Chan Assignment
Volume/Vlock Back >2 secs
Menu Power Off – Zzz
Setup
– Channel Aliases – Ch.1 – None –
Left –
Right –
Centre –
Left Surround –
Right Surround –
Left Back –
Right Back –
Subwoofer (1) –
All Channel Mute MUTE
Blacklight Flashes Ch.2 –
.... Ch.3, Ch.4 ... –
Ch.14 –
Analogue In Sens – +4dB to +20dB –
Backlight Timeout – Off
30 sec
2 min
5 min
Left – Main Source – Analogue XLR
Analogue RCA
Main AES3 Left
Main AES3 Right
Main Trim – -8.00 to +7.87dB
twotwo HF Shelf (2) -4.00dB to +4.00dB
Page 31

Display Buttons Rotary Select Rotary Select Rotary Select Rotary Select
Main Trim – -8.00 to +7.87dB
twotwo HF Shelf (2) -4.00dB to +4.00dB
twotwo LF Shelf (2) -4.00dB to +4.00dB
twotwo LF Rollof (2) Off
On
twotwo LF RollFreq (2) 50Hz
80Hz
120Hz
200Hz
Right –
Centre –
Left Surround –
Right Surround –
Left Back –
Right Back –
Subwoofer (3) Main Source – Analogue XLR
Main AES3 Left
Main AES3 Right
AES L+R
Main Trim – -8.00 to +7.87dB
Sub LF Rollslope – Off
6dB/Oct
12dB/Oct
18dB/Oct
Sub LF RollFr – 50Hz
80Hz
120Hz
150Hz
200Hz
Page 32

Display Buttons Rotary Select Rotary Select Rotary Select Rotary Select
+10dB Gain Off
On
Phase Reverse Off
On
Phase 0 – 180 degrees
Parametric EQ Off
On
PEQ Gain -8.00 to +7.87dB
PEQ Freq 20Hz – 150Hz (5)
PEQ Q 1 to 8 (6)
Current Preset PRESETS
Preset ‘n’ Alias
Preset Presets >2 secs Preset Setup – Preset Aliases – Preset A – ABC...HIJ
Preset ‘n’ Alias Preset B –
Preset C –
Preset D –
Preset E –
1: PRESET A – Front LF Shelf – -4.00 to +4.00dB
Front HF Shelf – -4.00 to +4.00dB
Rear LF Shelf – -4.00 to +4.00dB
Rear HF Shelf – -4.00 to +4.00dB
2: PRESET B –
3: Preset C –
4: Preset D –
5: Preset E –
No Preset –
1: PRESET A –
2: PRESET B –
3: PRESET C –
4: PRESET D –
5: PRESET E –
Page 33

Service
We are condent that your twotwo remote control will afford many years of
trouble-free use. However, in the unlikely event of requiring repair, for any issues
that might arise, or for advice and service requirements, the primary point of
contact should be your authorised PMC dealer/distributor.
If you do not have a local representative please see www.pmc-speakers.com
and click on ‘distribution.’
Alternatively you can view the FAQ’s (Frequently Asked Questions) and servicing
section on our website. (Click on the ‘contacts’ section and select ‘FAQ’).
Important Note: Please do not return any products to PMC
directly without rst contacting our service department.
!
Page 34

The PMC Range
406
296
500
The PMC range of professional monitors currently spans 25 different models, from the
enormous BB5 XBD-A agship system down to the diminutive DB1 passive speaker. However,
every monitor is designed with the same care and attention, using shared families of drive
units, crossover designs and ampliers. As a direct consequence they all enjoy the same
family characteristics of wide dispersion, low distortion, consistent voicing, and an even bass
response regardless of listening level. This feature allows different sizes of monitors to be used
in concert to create effective multichannel systems where space is at a premium.
The twotwo series of active PMC monitors share the same core DSP signal processing, class-D
amplication, and ability to operate in either portrait or landscape orientations without
compromising the stereo imaging or tonality. The range currently comprises three two-
way monitors with 5, 6 and 8-inch bass drivers for near and mid-eld applications, plus a
dedicated system subwoofer to facilitate 2.1 stereo systems or larger surround systems. An
optional remote controller is also available, as is PMC’s bespoke surround-capable Monitor
Control system which includes comprehensive bass management facilities.
Page 35

If you do not have access to the Internet please ll in the
Warranty form on pages 37 and 38, and return to PMC.
PLEASE ACTIVATE YOUR 5-YEAR
WARRANTY ON-LINE
Warranty On-Line
GO TO WWW.PMC-SPEAKERS.COM AND CLICK ON REGISTER PRODUCT
WARRANTY ON-LINE
Page 36

WARRANTY CERTIFICATE - PART 1
Your copy
to keep
Servicing and warranty issues – Please read the following carefully.
Non-UK clients
Contact your local dealer/distributor for the details of warranty repairs – see www.pmc-speakers.com and click on distribution
for their details.
UK clients
In the unlikely event of a fault occurring with your PMC product please contact your dealer where the product was purchased.
Do not return a product to PMC without rstly contacting our technical department. If the product needs to be returned for service you will
be issued with a Returns Authorisation number.
If a product is returned to PMC and subsequently is found to have no fault or a non-warranty fault there will be minimum charge of £50.00
plus the carriage for its return.
Proof of purchase is required for any claim covered by this warranty.
This product is warranted for a period of ve years from the date of purchase or valid warranty registration which is either by receipt of the
‘Our Copy’ card or an on-line registration which must be made within ten days of purchase or receipt.
The warranty covers defects due to faulty materials or workmanship but does not cover defects arising from accidental damage,
misuse or wear and tear. The warranty is void if any attempt has been made by persons not authorised by PMC to dismantle,
repair or modify any part of the product.
Products must be returned using original packing material. This warranty does not cover damage in transit.
Note that the cost of the carriage to PMC is not covered by the warranty.
Returned products that are defective but no longer covered by warranty will be repaired or replaced at the discretion of PMC.
Please allow a minimum of 14 working days for return of warranty repairs.
This warranty does not affect your consumer rights under statutory law. This warranty certicate is only valid in the United Kingdom.
THE PROFESSIONAL MONITOR COMPANY LIMITED 43-45 Crawley Green Road Luton LU2 0AA UK T +44 (0) 870 4441044 F +44 (0) 870 4441045
Please complete and retain this page for your own records
Product
Serial No’s
Date of purchase
Dealer’s name
Dealer’s address
Town
County
Postcode
Dealer’s Telephone No.
Page 37

Product
Serial No’s
Date of purchase
Purchased from
Your name
Your email address
Your address
Town
County
Postcode/Zip code
WARRANTY CERTIFICATE - PART 2
Please complete and return this section – or simply complete the on-line
registration at www.pmc-speakers.com and click on ‘register product.’
PMC’s copy
Help us to improve
our products.
See over
Page 38

Which magazines do you read?
HiFi Pro Lifestyle On-Line
HiFi Choice Future Music T3 mixonline.com
What HiFi Sound On Sound Stuff gearslutz.com
Stereophile Audio Media GQ avreview.co.uk
HiFi World Pro Sound News Boys Toys avforums.com
HiFi Critic Resolution FHM HiFi WigWam.com
HiFi News Audio Fanzine Shortlist What HiFi.com
HiFi+ IBE Maxim SoundonSound.com
Gramophone Tape Op Esquire SoundonSound/forum
Other Other Other Other
Please tell us how your new PMC remote controller performs. Your comments
may appear on the customer quotes section for this product on our website –
but don’t worry, the comments will be anonymous and your personal details will
not be published.
‘We hope you enjoy your latest purchase as much as we
enjoyed designing and building them – Thank you’
We value all of our clients’ comments. Please take a moment to help us improve:
If there is one thing we should change, what would it be?
Help us Improve. Your Comments?
Page 39

Copyright ® 2014. All rights reserved.
Document produced by Apple & Pear Productions Ltd.
twotwo is a trademark of The Professional Monitor Company Limited.
This document should not be construed as a commitment on the part of The Professional Monitor Company Limited.
The Professional Monitor Company Limited will not assume responsibility for errors that may appear in this document.
Information may be subject to change.
Page 40

T + 44 (0) 870 444 1044
E sales@pmc-speakers.com
W www.pmc-speakers.com
Ref No. 483 - 07/14
 Loading...