

Page 1

the pure analogue amplier
USER GUIDE
Page 2
Page 3

WE ARE DRIVEN
We believe that music is what really matters. It’s what moves
us and gives us our passion for what we do — bringing
emotion and engineering together. In our designs, science
serves sound in our quest to present music as naturally as
possible, exactly as its creators intended.
For over 25 years, the Emmy-winning design philosophy
behind PMC’s loudspeakers has been to eradicate
everything that isn’t music, including unnatural resonance,
distortion and noise — an approach requiring years of
obsessive attention to detail at all stages of product design.
Our success is plain; PMC loudspeakers are used by the
world’s leading composers and in the nest studios and
audiophile listening environments. Our involvement at all
stages of musical creation means that we know what it is to
capture all the emotion in a performance.
We’ve now used this knowledge to bring you the cor
integrated amplier — for analogue purists.
Peter Thomas, Owner &
Oliver Thomas, Head of Design
Page 4

INTRODUCING THE COR INTEGRATED
Congratulations on your purchase of this pure analogue
Class A/B PMC creation, entirely designed and built in the
UK. The cor integrated stereo amplier has the power to
drive virtually any passive loudspeaker to impressive output
levels — 95W into 8Ω, or 140W into 4Ω — but with renement,
transparency and neutrality. Every single component used
in the cor is selected by ear, ensuring a supreme-quality
analogue product, from the headphone amplier to the
remotely controllable tone and balance controls.
Page 5
Page 6
GETTING STARTED
75mm
Before you plug in
The cor integrated amplier is shipped in a heavy-duty
protective carton. Please retain the carton to ensure that
the amplier can be transported safely if the need arises in
the future. If you dispose of the packaging, please do so in
an environmentally responsible and safe way.
What’s in the Box?
1 x cor integrated amplier
1 x mains cord
1 x user guide
1 x aluminium extruded remote control
3 x AAA Batteries
1 x 1.5mm Allen key (for battery removal)
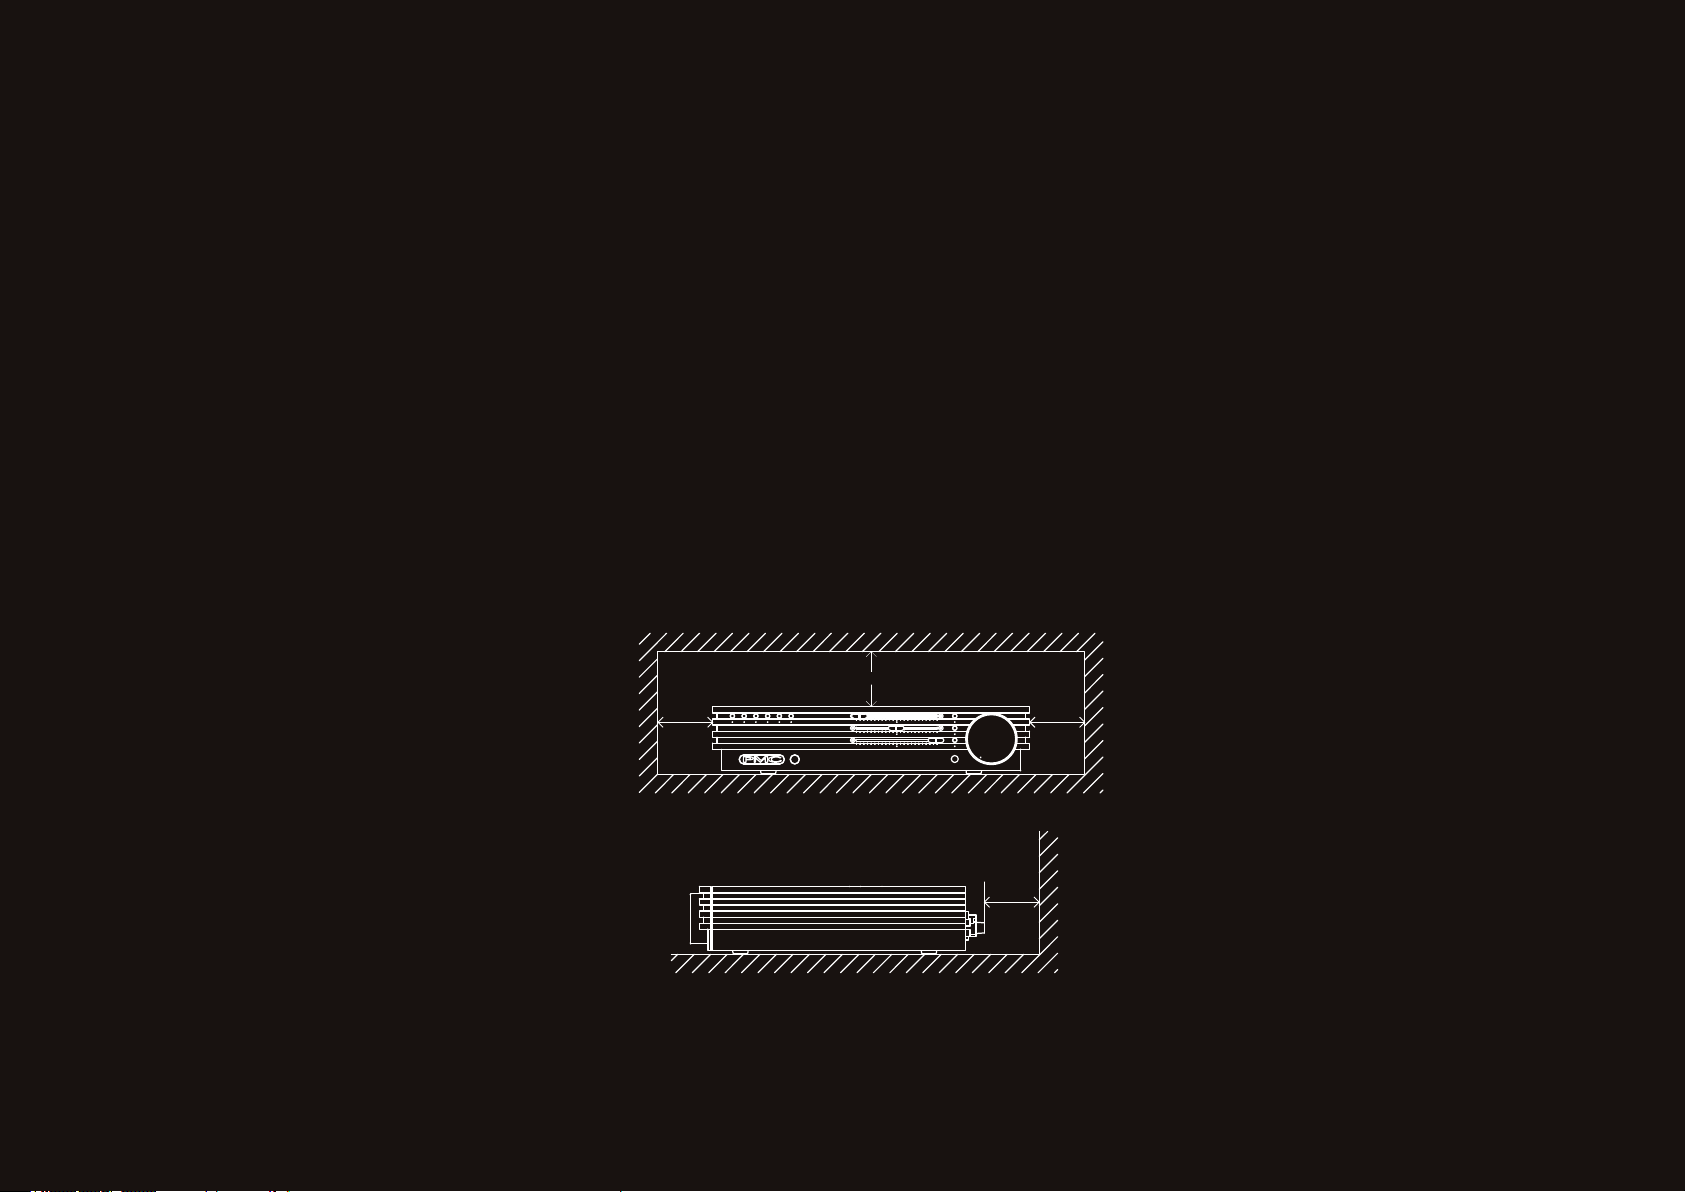
Setting up
Place the amplier on a hard, level, stable surface, avoiding
moisture and sources of heat, including direct sunlight and
other electronics.
Position the amplier in free space; enclosing it may
obstruct airow and cooling. If you are in doubt, leave at
least 75mm of clear space around the top and sides to
ensure airow is not impeded.
75mm
75mm75mm
75mm
Avoid placing a record player on top of this amplier.
Cartridges and record players can be adversely affected
by close proximity to high power devices like the cor
integrated.
Make sure the remote-control receiver has a clear line of
sight from the listening position.
Page 7

Power
Push the power cable rmly into the power inlet socket
on the back of the amplier, ensuring the connection is
properly made.
Plug the cable’s mains plug into your mains outlet/socket.
If there is a switch on the mains socket, turn it to the on
position.
NB: The PMC logo on the front of the unit is the touch
sensitive on/off button.
If the mains cord and your local mains supply do not match,
please contact the PMC retailer or distributor in your region
for advice.
Interconnect cables
PMC recommends the use of robust, high-quality screened
cables in all cases, suitably terminated.
If your source equipment features an XLR balanced
connection, you may nd that the quality of your audio
is improved by using XLR cables rather than single-ended
phono connections, due to the increased noise rejection
capabilities of XLRs — especially if the cable is longer than
2 metres.
Avoid bunching signal and mains cables together — this
may add unwanted noise to your audio.
Avoid using coiled or excessively long cables of any type.
Page 8

WARRANTY & SERVICE
Warranty
For your full 5 year warranty, register within 30 days of
purchase at www.pmc-speakers.com (click on ‘register a
product’). This records the purchase of your product and
provides you, the customer, with an opportunity to make
suggestions and provide feedback directly to PMC.
Product support & servicing
We are condent your cor integrated amplier will afford
you many years of trouble-free high-quality listening.
But in the unlikely event that it should require repair, we
can ensure that any replaced parts will exactly match
the performance of the original — because uniquely,
during manufacture, we note the precise value of each
component together with the response of the system as a
whole.
For advice and service requirements, your primary point
of contact should be your knowledgeable and authorised
local PMC dealer or distributor. If you are uncertain who this
is, please go to the PMC web site at www.pmc-speakers.
com and click on the ‘where to buy’ link at the top of the
home page.
NB: Please do not return any products to PMC itself without
rst contacting our service department.
THE PROFESSIONAL MONITOR COMPANY LIMITED
HOLME COURT, BIGGLESWADE, SG18 9ST, UK
T +44 (0) 1767 686300
www.pmc-speakers.com
Page 9

Page 10

MAKING CONNECTIONS
Inputs
The rear panel of the cor integrated features four singleended unbalanced RCA inputs, plus a balanced XLR input.
There is also a direct input which directly feeds the power
amp, bypassing the preamp.
NB: The preamp is still fully functional in direct mode.
Outputs
The loudspeaker outputs are provided on two pairs of
4mm binding posts. If you wish to use the cor integrated
as a pre amplier, there is a preamp output on twin RCA
connectors.
The binding posts can accommodate bare wire, but we
recommend the use of either spade lugs or 4mm ‘banana’
plugs in order to maintain an electrical connection of the
highest integrity and avoid the possibility of short circuits.
Do not use tools to tighten the binding posts.
To avoid potential damage, ensure that the amplier
is turned off before connecting or disconnecting your
loudspeakers.
It is of vital importance to observe the polarity markings and
maintain positive-to-positive and negative-to-negative
connections. The terminals are colour-coded to aid in their
identication: positive terminals are red, negative terminals
are black.
Page 11

Balanced XLR inputs
For premium, low-noise connection.
Pre-amplier output
Allows use of additional
power amplication or
processor.
IEC Mains power input
Phono/RCA unbalanced source inputs
All inputs are line level & sonically identical.
Direct input
Feeds directly to power amp bypassing
pre amp. Warning – audio input via this
connection will be reproduced at full
level, use with caution.
Loudspeaker connections
These binding posts accept spade lugs,
4mm plugs or bare wire.
Rear-panel power switch
Page 12

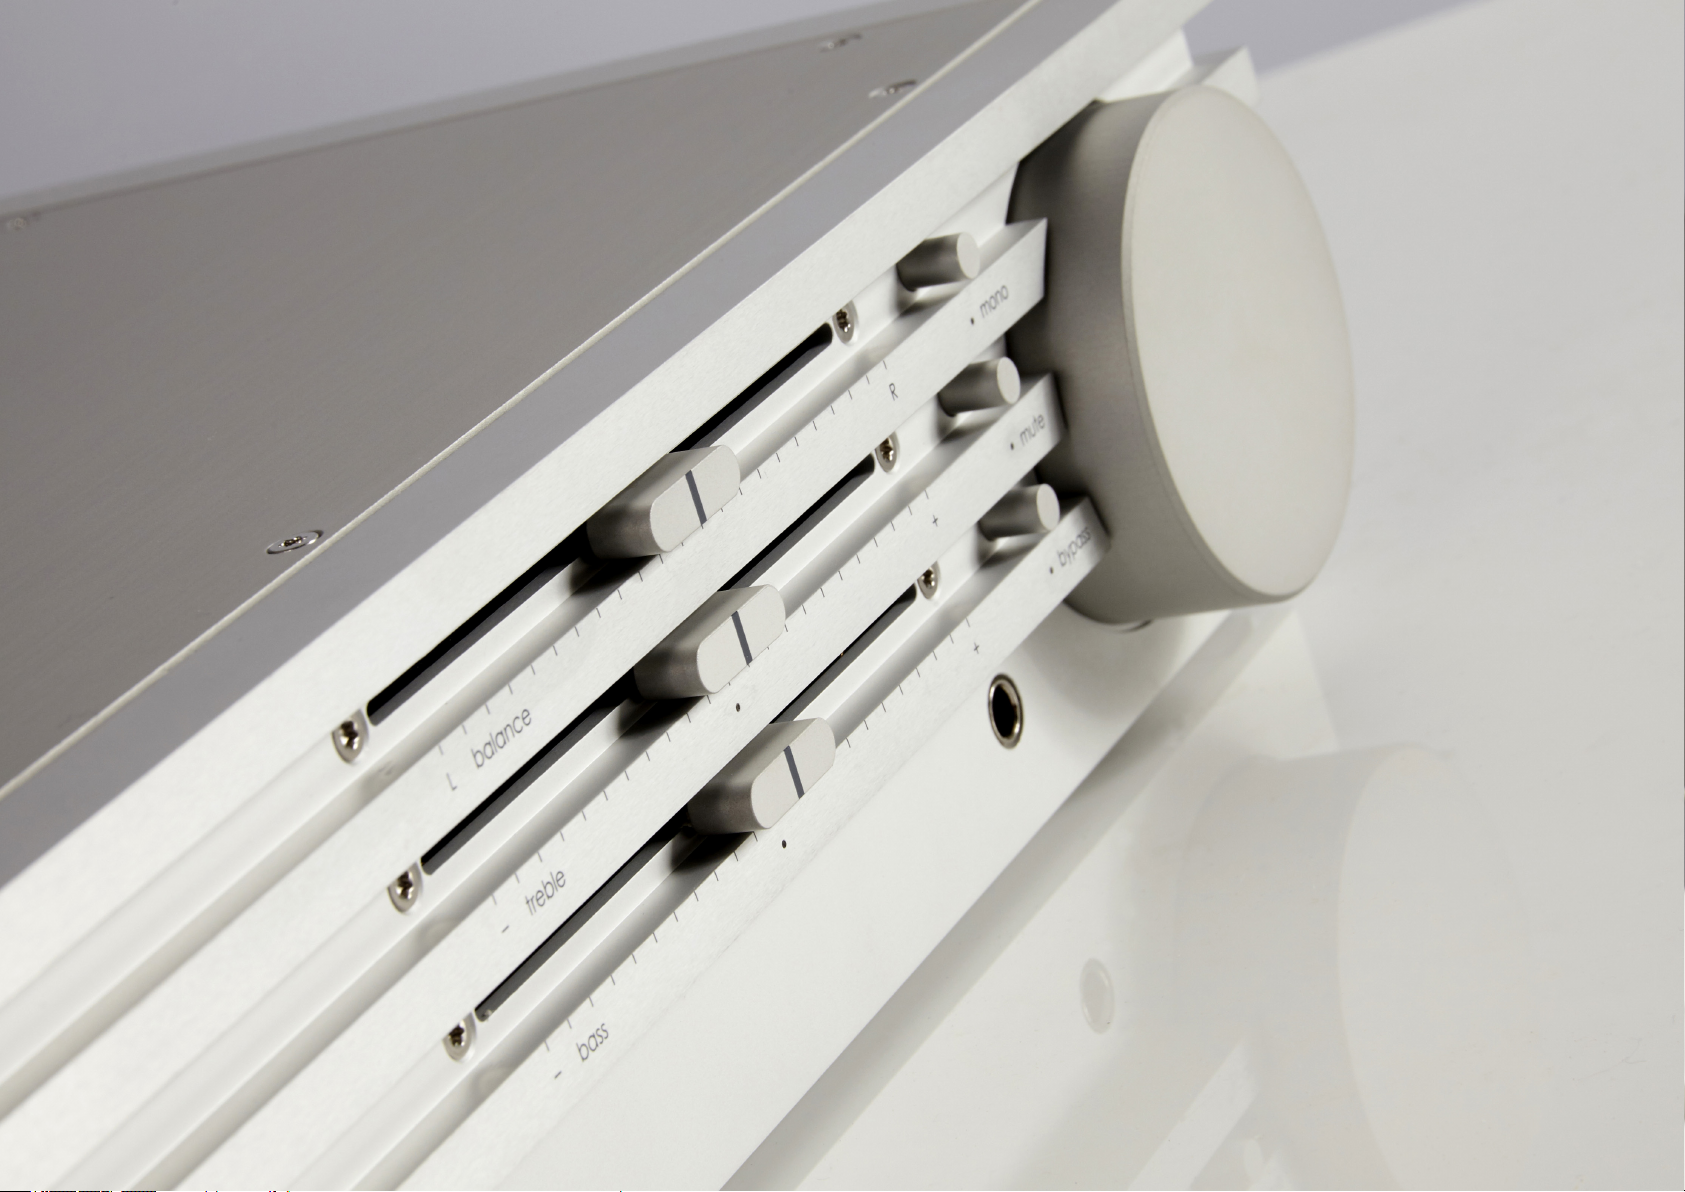
FACING FRONT
The cor integrated offers a simple, even minimalist front
panel, yet offers all the control listeners will ever need.
The volume dial and treble, bass and balance faders are
motorised using technology from professional studio mixing
consoles, which allows them to be controlled via the
included remote, but they are pure analogue designs, not
digital encoders as on many other modern integrated amp
designs.
Aside from the single front-panel headphone jack and
source selection buttons on the left, the user options are
completed by buttons on the right to sum the output to
mono, mute it altogether, and — for absolute sonic purists
— a bypass control to defeat all of the front-panel options
except the volume dial.
With controls this straightforward, listening pleasure is a
simple matter of turning on the amplier, selecting an audio
source from the buttons on the left, and adjusting the tone
controls and volume if required.
Page 13

Input selectors
Audio source selection buttons,
lit when selected.
Direct
Press when direct input is
required to the power amp,
bypassing the pre amp. Lit
when selected.
Balance fader
Allows for adjustment of left/
right balance. White LED is lit
when fader is centred, red LED
indicates fader is offset. This still
functions when in mono mode.
Mono
When selected this sums
both left and right to a
single mono signal.
Tone bypass
This disables the tone
controls regardless of
the faders’ position
and fader LEDs.
Mute
When selected it silences all
output with the exception of
the direct input to the power
amplier & the headphone
output.
IR receiver
This is the window for the
infra-red signals from direct
sight of the remote control
Front-panel power switch (touch sensitive)
Illuminates red for initial power-up. Once touched,
logo turns white and amp enters start up mode in
mute. When amp is ready, mute will disable.
Tone controls/faders
For micro adjustment of the tonal
balance of high & how frequency,
with a range of +/-10dB. When fader
is centred, a white LED is lit. When
boosting or cutting, a red LED is lit.
Fader will pause in centre when
panning via remote.
Volume
The volume control is fully
motorised and can be
controlled via the remote
Headphone output
This is auto-sensing and mutes the main
output when headphones are inserted
fully. When headphones removed
amplier will go into mute mode, and
must be manually unmuted.
Page 14

REMOTELY INTERESTING
The extruded aluminium remote control replicates all of
the front-panel functions of the cor integrated amplier.
Thanks to the cor motorised controls, adjustments made
via the remote from the comfort of your favoured listening
position are replicated on the front panel of the amp.
Do not move the front-panel controls at the same time as
they are being reset via the remote control; this may put
strain on the motorised controls.
The remote control’s batteries can be changed by
removing the rear cover. This requires the use of the
included Allen key to unscrew the two small countersunk
bolts. The remote runs from three AAA batteries. The bolts
should be retightened with the Allen key following battery
replacement.
The performance of the remote control may be impaired if
the IR sensor on the amplier or the transmitter on the remote
control is exposed to direct sunlight, or strong articial light
from a uorescent or infra-red light. The maximum effective
range (with a direct line of sight) is ve metres, with a 30°
viewing angle.
If the cor controls do not respond, even when using the
•
remote control close to the amplier’s IR sensor, the
batteries should be replaced.
Insert the batteries in the proper direction, following the +
•
and - marks indicated.
Remove the batteries from the remote control during
•
prolonged periods of non-use.
Page 15

Page 16

TROUBLESHOOTING
if you have no sound, check the following:
•
The mains supply has not been switched off/ disconnected
or the plug’s mains fuse is not faulty.
•
The fuse located below the main inlet on the amplier is
intact.
•
The amplier is switched on both at the rear and front via
the lit PMC logo.
•
The amplier is not in mute mode — if it is, the LED below the
Mute button will be lit.
NB: If headphones are unplugged, the amplier will
automatically mute to protect the loudspeakers from the
sudden high-level audio that may result.
•
You have selected the source (CD, Radio, etc) that is
producing audio.
•
The Direct button is not depressed — if it is, the LED below
the Direct button will be lit.
•
The signal cables and loudspeaker cables are intact and
connected.
•
The loudspeakers are functioning.
If you have no sound and the illuminated PMC logo is
ashing, this means the cor has entered one of its two
protection modes. If the white and red LEDs are alternating
then it is an amplier fault. Possible causes include:
Over-temperature (the amplier is being driven too hard,
•
or has overheated due to inadequate ventilation, or
due to being used in direct sunlight or too near another
heat source). Reducing playback volume or improving
ventilation may help.
Over-current (the amplier is being driven too hard).
•
Short circuit. Check that both signal cables and loudspeaker
•
cables are intact and not shorting.
If the red and white LEDs are ashing simultaneously then it
is a power supply fault. Possible causes include:
Mains surge.
•
Mains under-voltage/brown-out. Check with your electricity
•
supplier or a qualied electrician.
Incorrect mains voltage. Check that the mains voltage
•
detailed on the rear of the amplier corresponds with your
local supply.
NB: After remedying the issues, the protection circuits can
be reset by switching the amplier off via the rear-panel
mains switch for two seconds and then switching back on.
If the amplier is hot, leave it to cool and then reset.
If the problem persists or you are unsure of the correct
procedure, contact your PMC authorised retailer or local
distributor for further information.
See www.pmc-speakers.com and click on the ‘where to
buy’ link at the top of the home page.
If the tone controls have no effect
Check that the Bypass button is not active — if it is, the LED
•
below the Bypass button will be lit.
If the sound is distorted
Check that the source output level is not excessively high
•
(seek advice from your retailer if you are unsure).
If sound is only being produced by one loudspeaker
Check the following:
The signal cables and loudspeaker cables are intact and
•
connected.
The loudspeaker is functioning.
•
The balance fader is centred and its LED is lit white.
•
Page 17

SAFETY GUIDELINES
Read and keep these instructions.
1
Heed all warnings and follow all instructions.
2
Do not use this equipment near water.
3
Site the apparatus in a safe and stable position, where it is
4
free from the risk of falling or tipping.
Clean only with a clean, soft, dry lint-free cloth. Do not use
5
abrasive, chemical solvents, wax or silicon-based cleaning
products.
Airow & ventilation
Warning — do not install near any heat sources or other
6
equipment (including other ampliers) that produces heat.
This product must be installed with a minimum of 75mm of
clear space around it for airow and ventilation purposes,
and in order that heat produced by its operation can
disperse safely.
Electrical
Warning — this product must be earthed, and the required
7
connection is provided via the mains plug. Do not therefore
disable or remove the safety earth from the mains plug. The
safety earth is required to reduce the risk of serious injury.
If the plug provided does not t into your mains outlet,
consult an electrician.
Warning — only replace fuses with those of identical rating
8
and specication.
Liquids
Warning — do not expose this apparatus to liquids, rain
9
or moisture of any kind. Liquid-lled objects such as vases
should not be placed near or on the equipment.
Atmosphere & climate
This equipment has been designed for domestic use
10
in moderate climates. Warning — disconnect during
electrical/lightning storms to prevent possible damage.
Power sources
Only connect the equipment to a power supply of the type
11
described in the operating instructions or as marked on the
equipment.
To completely disconnect this equipment from the mains,
12
disconnect the power supply cord plug from the AC
socket/wall outlet.
The mains plug of the power supply cord shall remain
13
readily accessible and operable.
Mains cord protection
Protect the power cord from damage, for example
14
excessive bending, pinching by heavy weights or abrasion
by holes in trunking or conduit, equipment racks or furniture.
Warning — the loudspeaker terminals can produce
15
voltages which are considered HAZARDOUS LIVE. The
external connections to these terminals should be made
with ready-made leads or cords and be installed by a
person qualied to prevent any electrical dangers or risks.
Warning — to avoid potential damage, ensure that the
16
amplier is turned off before connecting or disconnecting
your loudspeakers.
Heat
Warning — the side panels of the cor integrated amplier
17
act as heatsinks and may become hot during operation.
Do not touch if they are hot.
Extended periods of non-use
If the equipment is not being used for an extended period,
18
we recommend that you unplug the power cord of the
equipment from the outlet.
Smoke & odours
If smoke or an unusual smell emanates from the equipment,
19
turn the power off immediately and disconnect the power
cord from the AC socket/wall outlet. Do not reconnect.
Contact qualied personnel authorised by PMC.
Servicing
Refer all servicing to qualied service personnel. Servicing
20
is required when the equipment has been damaged in
any way: for example, if the power supply cord or plug
is damaged, if liquid has been spilled on the apparatus
or objects have fallen into it, if the equipment has been
exposed to rain or moisture, or if it fails to operate normally
or has been dropped.
Warning — there are no user-serviceable parts inside. Do
21
not attempt to service or modify the amplier. Service and
repair should only be undertaken by qualied personnel
authorised by PMC. Unauthorised repairs or modications
will invalidate your warranty.
The lightning ash with an arrowhead symbol within a
22
triangle, alerts the user to uninsulated ‘dangerous voltages’
within the product that may constitute a risk of electric
shock.
The exclamation mark within a triangle alerts the user
23
to important operating and maintenance (servicing)
instructions.
Warning — packaging material can pose danger to the
24
young and vulnerable. Ensure these items are stored or
disposed of safely.
PMC has made efforts to provide accurate installation
25
information. However, PMC will not be held responsible
or liable for injuries or property damage (direct, indirect
or consequential) arising out of use or inability to use this
product safely and properly.
Batteries (in remote control)
Do not: use different battery types, expose to heat,
26
short-circuit or disassemble. Dispose of the batteries in
accordance with local regulations.
Page 18

SPECIFICATIONS
Specication overview
Type
Inputs
Outputs
Preamplier
Frequency response
Maximum gain
Tone controls
Input impedance
THD
IMD
Noise
Maximum input
Maximum output
Pure analogue Class A/B integrated amplier
1 x balanced, 4 x single-ended, direct in
4mm binding posts, preamp out
20Hz - 20kHz +0/-0.2dB
5Hz - 80kHz +0/-1dB
15dB
+/- 10dB
25kOhms, unbalanced
>14kOhms, balanced
0.001% at 1kHz
<0.005%, 20Hz - 20kHz, 80kHz measurement bandwidth
<0.001% SMPTE
-100dBV A-weighted
5.5Vrms
10Vrms
Power amplier
Rated output power, 230V mains
Frequency response
Input impedance
Sensitivity
Gain
THD (Rated output power into 8Ohms)
Noise
Output Impedance
Damping factor
General
Dimensions
Weight
Available nishes
95W into 8Ohms
140W into 4Ohms
20Hz - 20kHz +0/-0.1dB
5Hz - 80kHz +0/-1dB
23.5kOhms
1V = 100W into 8Ohms
28.9dB
0.001% at 1kHz
<0.01%, 20Hz - 20kHz, 80kHz measurement bandwidth
-101dB A-weighted re. rated output
<0.05Ohms, 20Hz - 20kHz
>160 into 8Ohms, 20Hz - 20kHz
W 432mm H 87.5mm D 401mm (inc. feet)
12kg
Silver & Black
Silver Black
Page 19

WEEE EU directive
This symbol on the product or in/on its packaging indicates
that this product must not be disposed of with other
household waste. It is the responsibility of the owner to
dispose of waste equipment via a designated collection
point for the recycling of waste electrical and electronic
equipment. The recycling of your waste equipment is an
attempt to conserve natural resources and ensures that it
is recycled in a manner that protects human health and
the environment. For more information about where you
dispose of your waste equipment for recycling, please
contact your local waste/recycling authority or the dealer
from whom you purchased the product.
This document should not be construed as a commitment on the part of The Professional Monitor Company Limited (PMC). The information it contains is subject to change without notice.
PMC assumes no responsibility for errors that may appear within this document. cor is a Trademark of The Professional Monitor Company Limited. 2017 PMC. All rights reserved.
Page 20

THE PROFESSIONAL MONITOR COMPANY LIMITED
Holme Court Biggleswade SG18 9ST UK
T +44 (0)1767 686300 F +44 (0)870 4441045
E sales@pmc-speakers.com W www.pmc-speakers.com
Reg No: 3328009
Item no. 842v2/PMC stock code 15310/©July’17
 Loading...