

Page 1
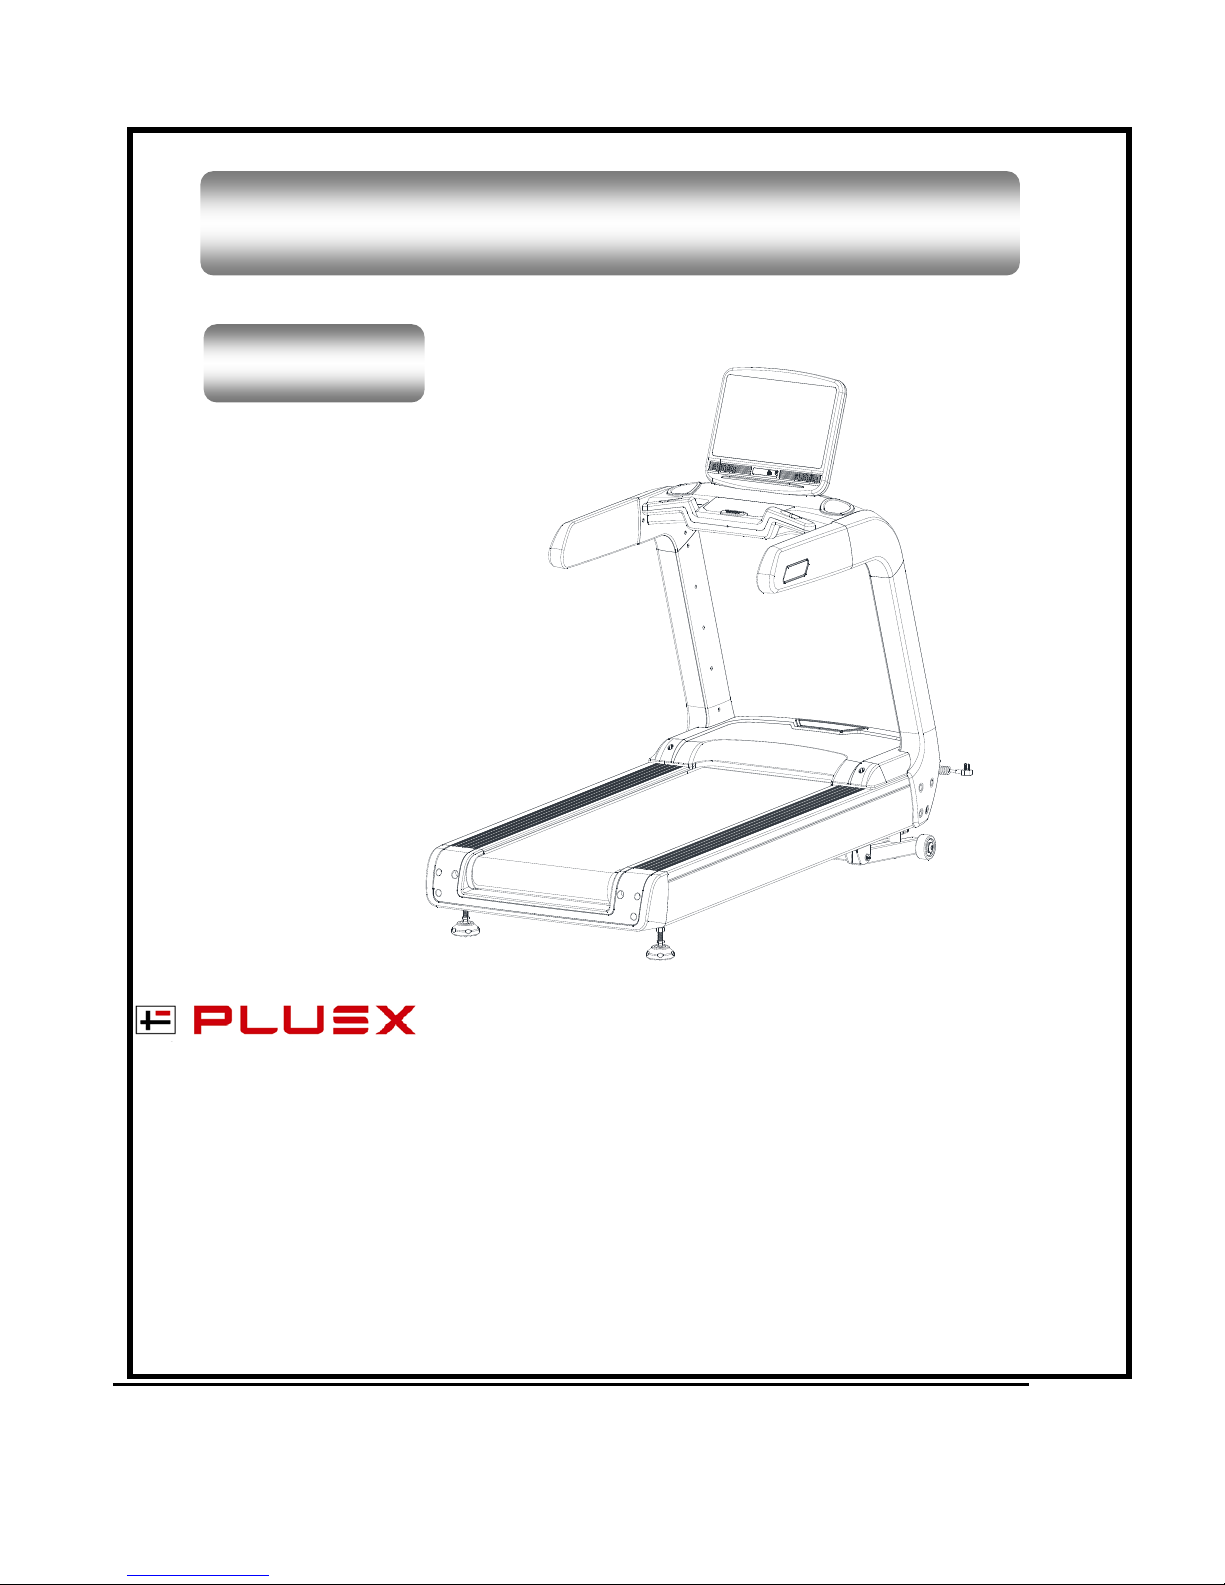
Fitness Equipment Manufacturer: Plusx Health Technology Co., LTD.
Installation·Operation·Maintenance Manual
Notes:
1. When operating Treadmill Please read the instructions carefully.
2. Keep Instruction properly in case of consulting later.
MMoottoorriizzeedd TTrreeaaddmmiillll IInnssttaallllaattiioonn AAnndd OOppeerraattiioonn IInnsst
trruuccttiioonn
T300
Page 2
Installation In struction
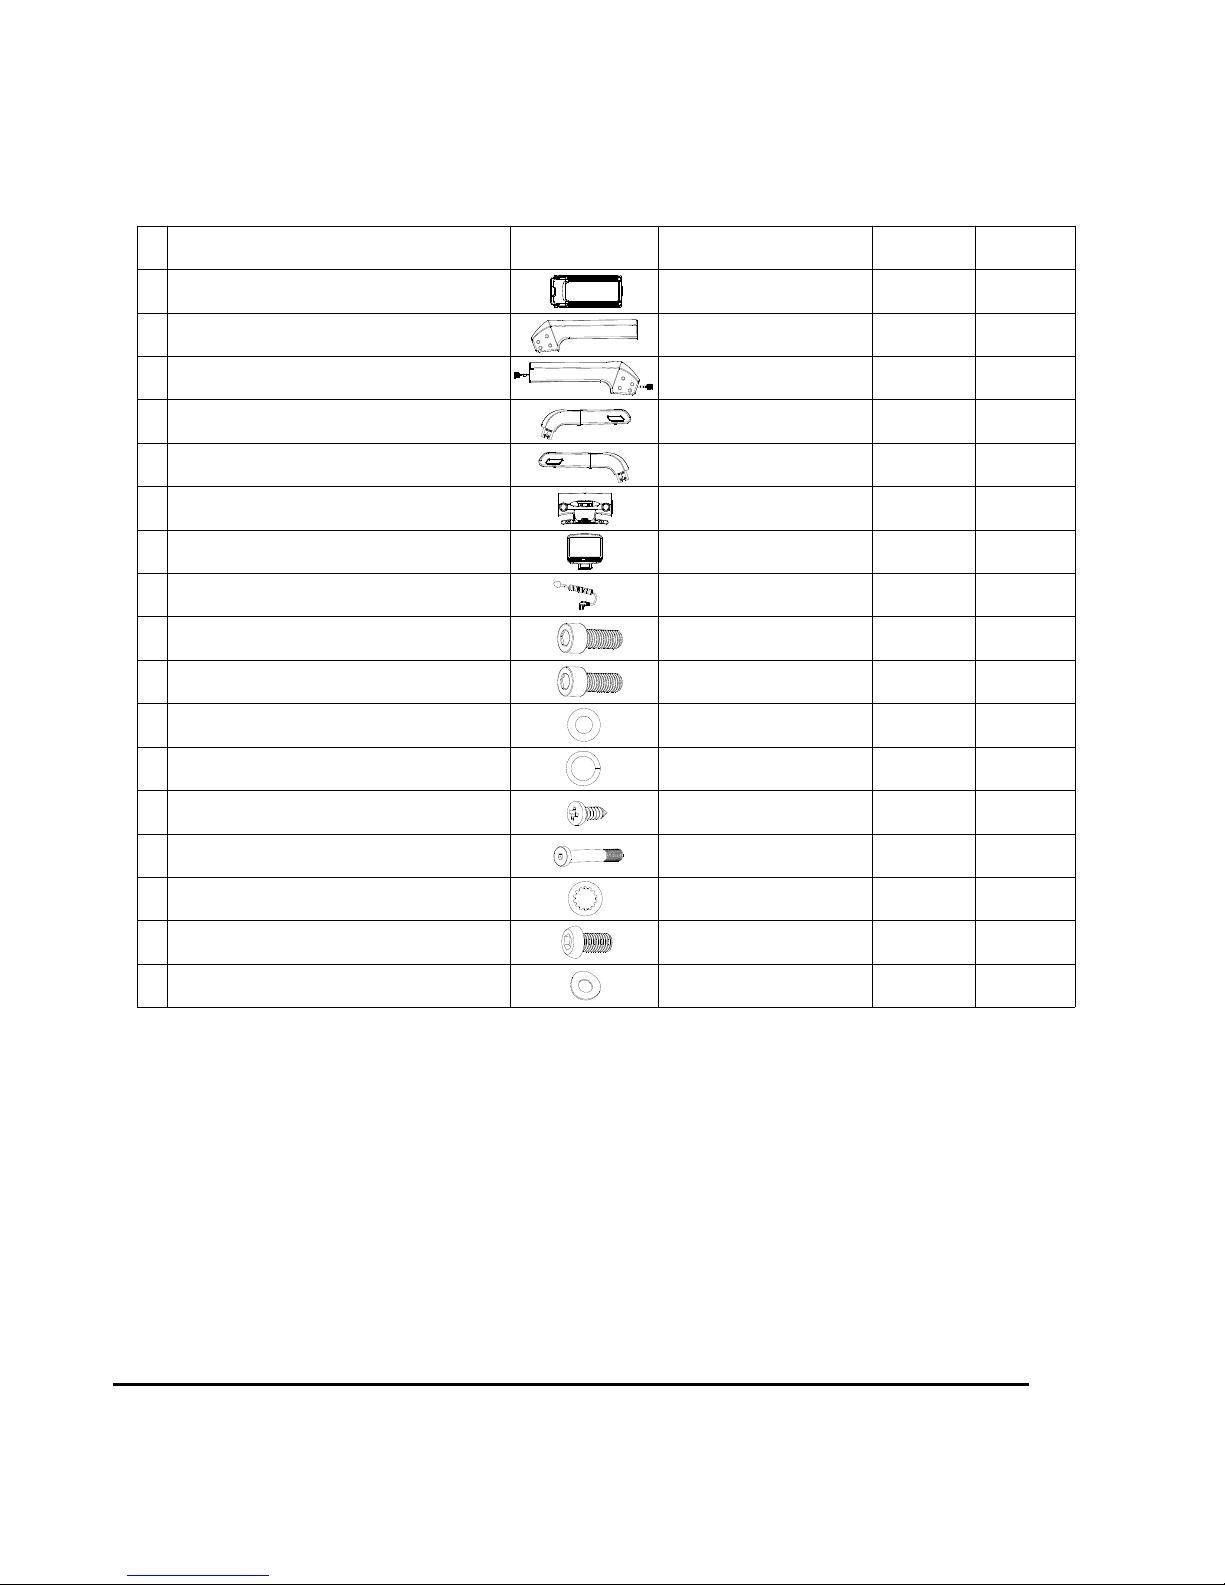
Parts figure of Finished machine installation as bellow:
Name
Sketch
Spec Quantity
No
2
3
6
2147*934*388
1
935*281*100
1
935*281*100
1
1
798*448*155
1
8
1
7
8
9
10
492*486*118
M12*40mm
2
M10*20mm
4
4
φ10.5*φ18*T1.0
ST4.2*12
32
16
M10*60mm
16
13
14
15
4
5
11
12
1
1
955*321*95
955*321*95
M8*45mm
2
φ10.5*φ20*T2.0
φ8.4*φ15*T1.6
φ9.1*φ14.5*T4.7
4
16
17
1
Remark
The overall Treadmill
Left Column Group
Right Column Group
Left Armrest Group
Right Armrest Group
Upper digital meter
under digital meter,power line
Hexagon socket head cap screws
Hexagon socket head cap screws
Hexagon socket head cap screws
flat washer
Spring washer
recessed raised cheesehead tapping screw
flat hex bolts
internal teeth lock washer
cup-head bolt
curved washer
Tail insertion1.8m
Installation Necessary Tool:
Cross Screwdriver; 8mm Allen Wrench; 6mm Allen Wrench; 5mm Allen Wrench (provided as accessories).
Installation Process:
Open the package, and take off above Materials and parts. Place the machine on the ground flatwise.
Prompt:
When lifting the machine from the packing box, it is suggested that the operation and assembly of the two or
more persons shall be operated by the two persons, so as not to cause accidents.
Page 3
1
2
4
13
14
15
16
17
F
E
D
No
Name
Sp e c qu a n tity
13
14
15
screw
washer
ST4.2*12
12
4
4
M10*60
φ10.5*φ 18*T1.0
16
17
bolt
bolt
M10*20
1
washer
1
φ10.5*φ 20*T2.0
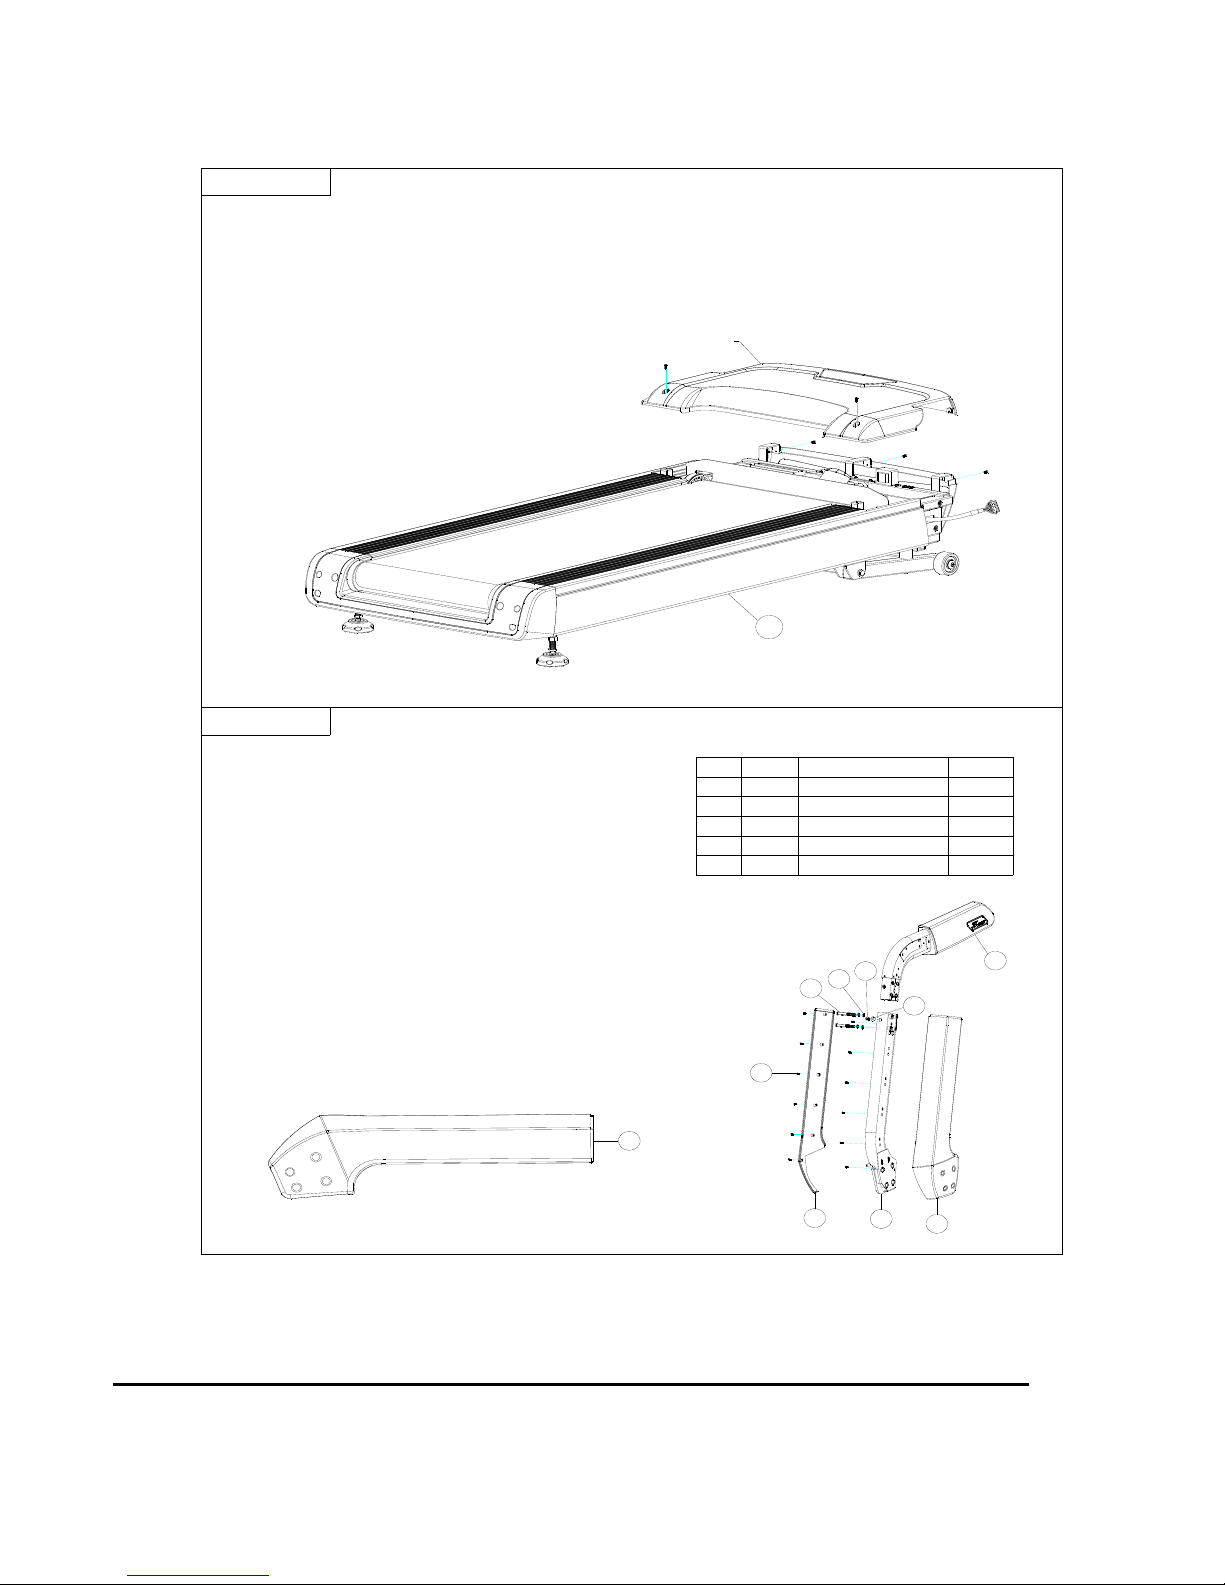
Assemblage 1
motor cover
1.Put the overall platform 1 on the proper position,
and open the motor cover by cross screwdriver as the
figure showing.
2.Place motor cover and screw on a position where
w ill no t a ffe ct a sse mb la ge ne a tly .
Assemblage 2
1.Open left column group 2 and left armrest
group 4 as the figure showing, place part D and
part F on a proper position where will not affect
assemblage.
2.Pre lock 4 on E with 14, 15 by using 5mm
Allen Wrenc h. (Do n't lock the screw)
3.Pre lock 4 on E with 16, 17 by using 6mm
A llen W ren ch, an d then lock the sc rew of 14,1 6
in sequence.
4.Lock D on E in sequence as the figure showing
by using cross screwdriver and fasten.
5.Lock F on E in sequence as the figure showing
by using cross screwdriver and fasten.
Page 4
No Name
9
13
M12*40
8
No
Name
Spec
quan t ity
13
14
15
screw
washer
ST4.2*12
12
4
4
M10*60
φ10.5*φ18*T1.0
16
17
bolt
bolt
M10*20
1
washer
1
φ10.5*φ20*T2.0
5
3
13
14
15
16
17
B
A
C
G
ST4.2*12
4
2
3
4
5
13
13
13
13
9
9
H
G
1
I
J
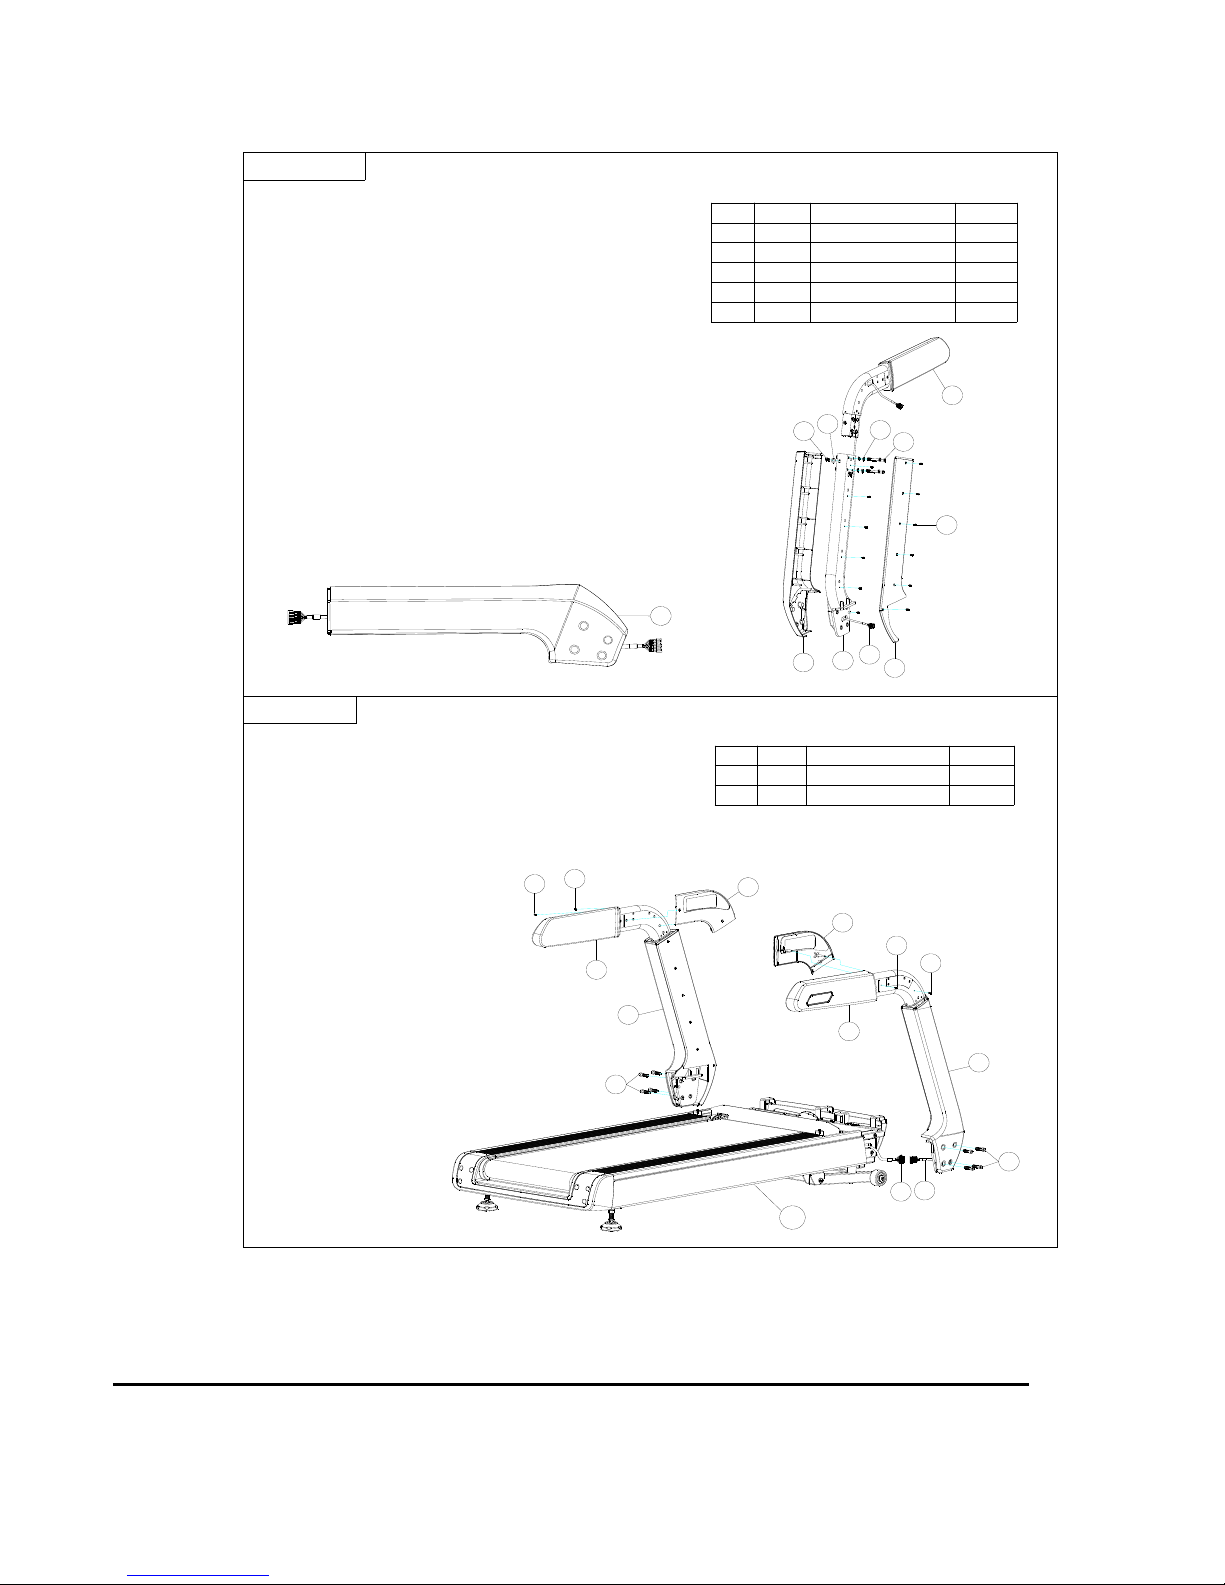
Assemblage 3
1.Open right column group 3 and right armrest group 4 as
the figure showing, place part A and part C on
a proper position where will not affect assemblage.
2.Make connector wire G penetrate 5 through B as the
figure showing, and pull it out from outlet.
3. Pre lock 5 on B with 14, 15 by using 5mm Allen Wrench.
(Don ' t lo c k t h e sc re w)
4. Pre lock 5 on B with 16, 17 by using 6mm Allen Wrench,
and then lock the screw of 14,16 in sequence.
5. Lock A on B through 13 as the figure showing in
sequence as the figure showing by using cross
screwdriver and fasten.
6. Lock C on B through 13 as the figure showing in
sequence as the figure showing by using cross
screwdriver and fasten.
Attention : Do not pull wire heavily when plugging.
Assemblage 4
1. Pre lock left column group 2 and left armrest group 4 on 1
through 9 bu using 8mm Allen Wrench.
2. Lock I on 4 through 13 as the figure showing in sequence as the
figure showing by using cross screwdriver and fasten.
3. Link connector wire G of right column
and entire platform connector wire H,
and tuck the wire in outlet
to avoid affecting assemb lage.
4. Pre lock righ t colu mn gro up 3 and right
armrest group 5 on 1 through 9 by using
8mm Allen Wrench as the figure show.
5. Lock J on 5 through 13 as the figure
showing in sequence as the figure
showing by using cross screwdriver and
fasten.
Attention
:Do not pull wire heavily when plugging.
bolt
screw
Spec
quantity
Page 5
No
Name
Spec
qu a n tity
11
M8*45
4
No
Name
Spec
quantity
13
14
15
screw
washer
ST4.2*12
8
8
M10*60
φ10.5*φ 18*T1.0
bolt
bolt
washer
4
4
13
13
14
15
15
14
13
K
M
6
4
5
N
O
9
9
P
P
P
10
12
11
7
10
φ8.4*φ 15*T1.6
12
washer
4
φ8.4*φ 15*T1.6
4
5
3
2
1
9
8
7
6
2
4
5
1
3
2
1
1
2
3
4
5
6
7
8
9
Q
R
6
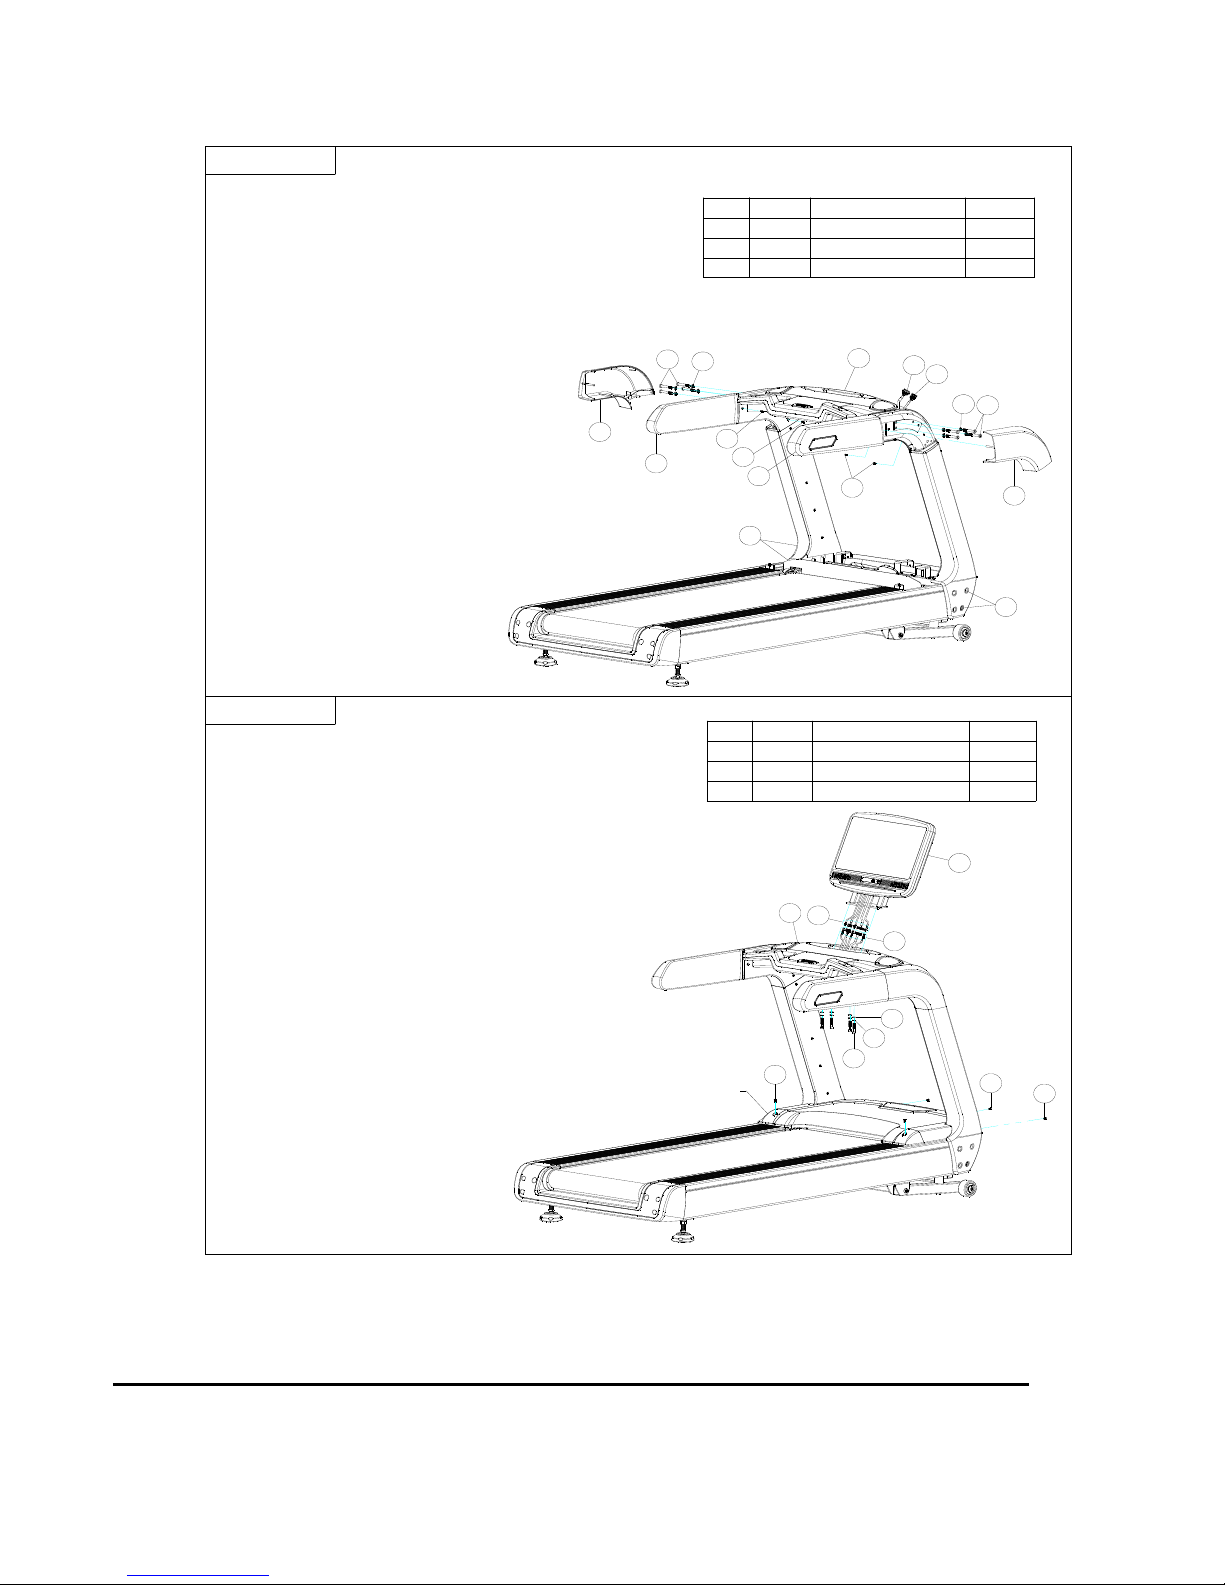
Assemblage 5
Atten tio n: Do not pull wire heavily when plugging.
1. Link connector wire 0 of under digital meter 6 and right
armrest group 5 connector wire N,and tuck the
wire in outlet to avoid affecting assemblage.
2. Enclose under digital meter into left armrest group 4 and
right armrest group 5 by using 5mm Allen Wrench
And fasten gradually as the figure showing.
3. Enclose K and M into the corresponding position
as the figure show by using cross screwdriver.
4. Fasten pre locking bolt 9 of assemblage 4
gradually by using 8mm A llen Wrench.
Assemblage 6
Atten tio n: Do not pull wire heavily when plugging.
1. Link connector wire R of upper digital meter 7 and
under digital meter 6 connector wire Q, and tuck the
wir e in to o utle t o f 7 to av o id af fe ctin g as se mb lag e.
2. Enclose upper digital meter 7 into under digital
meter 6 through 10, 11, 12 by using 6mm Allen
Wrench and fasten it gradually.
3. Lock motor cover on entire platform 1 through P
by using cross screwdriver as the figure show and
fasten it gradually.
motor cover
Page 6
Location Place and Requirement:
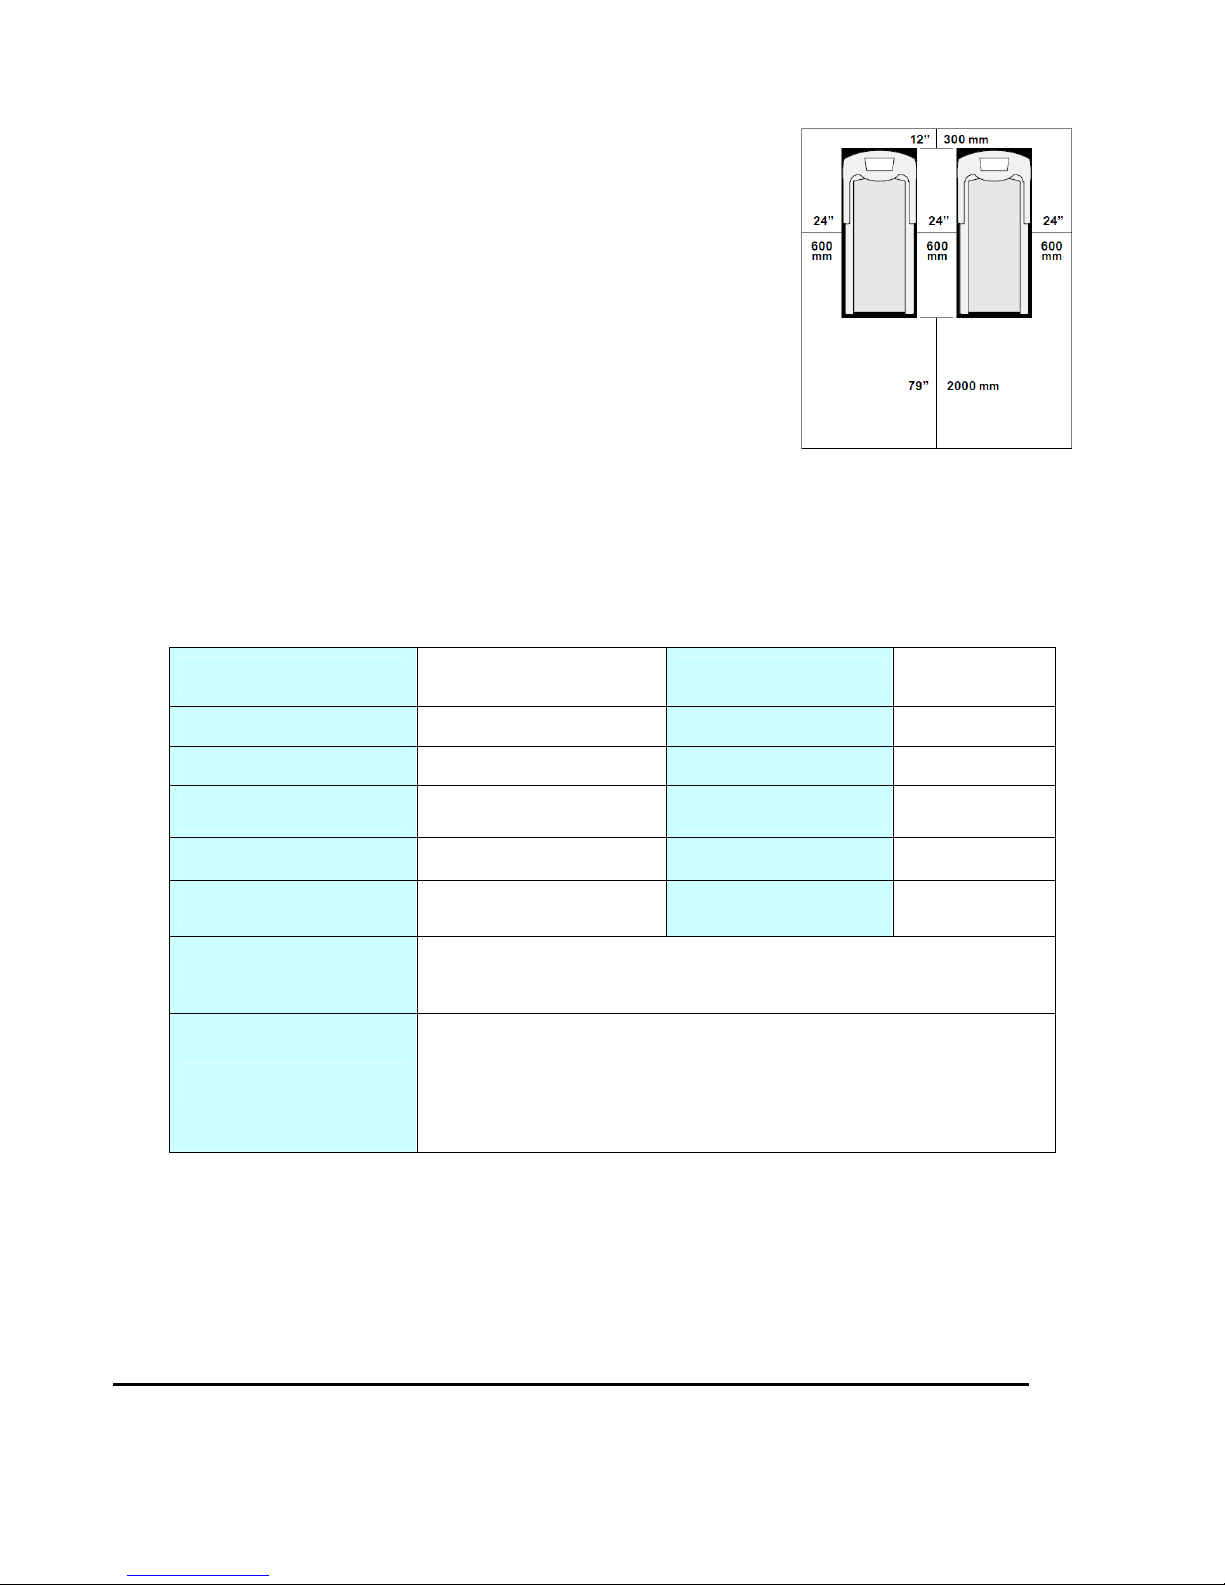
Put the treadmill on flat and stable ground and keep avoiding direct
sunlight because intense ultraviolet will lead to color change of
plastic. Put it in the condition of cool temperature and low
humidity. To ensure user have a obvious exit leave 2000mm area
behind the treadmill, And leave 600mm area on both sides of the
treadmill for the convenience of instruction of trainer. Do not place
it on the bad condition of ventilate and dry.
Pls attention: Do confirm all the a ssemb l age ma d e as the abov e requ iremen t c o mplet ed and th en po we r
on. Pls refer to following related illustration about the operation and using.
Technical Parameters
Assemble Size (mm) 2468*966*1690 Power Using
∽
AC 220 240v
Platform Size (mm) 620*1675 Rated Output 2200W
Net weight 103Kg Rated Current 10.0A
Package Gross Weight
122Kg
Speed Range 1—20Km/H
Incline Range
0~20%(front incline)
Condition Temperature
0—40℃
Load User Weight
≤180Kg
Type and Grade SA
LED Display
Program; Incline; Speed; Calorie; Distant; Time; Heart Rate; Blue
Tooth
Safety Guard
A. Red safe switch on meter.
B. Over current switch and voltage of front part of equipment push
type and recoverable safetyswitch.
C. Over Current safety witch inside control panel
Products Implemention Standards
1. GB17498.1-2008/ISO20957-1:2005 General Safety Requirement and Test Approach;
2. GB17498.6-2008/ISO20957-6:2005 Treadmill Additional Specialised Safety Requirement and Test
Page 7

Approach;
3. GB5296.7-2008 Gym Equipment Consumer Goods User Manu a l;
The company reserves the right of technical improvement. Subject to change without prior notice.
Movement Inst r uction
Treadmill Movement:
Lift the rear end of the treadmill 10 d egree from the ground and mov e it directly because there are two wheels ih
the front of the equipment. Do not lift it too highin case of the front touching the ground.
Attention: pls confirm have pulled out the plug before moving treadmill other wise will damage plug and socket.
Moving and convey on wooden floor is not suggested.
Product Feature Illustration
1. It adopts high strength, tensile and anti-static maintenance running belt and high strength, high
density, wear-resisting and non-lubricated running board, which brings a safer and more comfortable
running experience
2. Stable full-cover running platform design, reducing vibration noise, and more effective preventing
movement injury to bring a safer sports experience.
3. Front and back roller adopts advanced import bearing, ensuring the smooth and stable motion, and
the taper of both ends, which makes the running belt automatic reset function.
4. LED display, show carorie, heart rate, time, distant, incline, speed, speed range: 1-20km/h, incline
range: 1-20degree.
5. 4 inverse modes(time,distant,carorie,recovery)are avaliable for user.
6. Digital meter attached withhi-fi set, the output of MP3 audio source and the input function of the
USB sound source can be supported.
7. Heartrate handle enable user can monitor heart rate , and djust the intensity of the exercise properly.
8. Fast function with speed and slope, ea sy to control and change the intensity of movement.
9. Electronic watch can hold books and tablets, which greatly enrich the entertainment of running.
9. The structure of steel body is made of titanium alloy.
11. It has all kinds of protective functions such as overpressure, overcurrent, underpressure and
overload.
Thank you for choosing the company's products. The correct use of the treadmill is your safe and
Safety Tips
Page 8

convenient guarantee. Please read the following carefully before using the treadmill:
1. Warning! In order to confirm the installation of the electric treadmill according to the installation
instructions, before exercising, make sure that the electric treadmill is stationary before the power can
be switched on. Don't block the plug on the wall to facilitate insertion.
2. Warning! The power cord plug must b e p lugged in to an electrical outlet with a secure g rounding , To
prevent the generation of static electricity through the grounding line, static electricity may interfere
with the operation of the electronic watch and even damag e the electronic watch. The power cord of
the electric treadmill is dedicated, If the power cord damage happend, pls buy from distributor or
contact with us directly.
3. Warning! As far as possible avoid the use of other appliances in he same power supply circuit in case
of generating circuit inter nois and leading to damage or abnomal phenomena of treadmill or other
appliances.
4. Warning! Electric treadmill must be placed on the hard ground or solid platform; Treadmill put to
smooth, put place to clean level off, pay attention to moistureproof, don't put on items like the thick
carpet treadmill, lest affect the treadmill lower air flo w. Electric treadmill for special equipment, please
do not modified and do it with.
5. Do not wear too long and loose clothes when exercise, to prevent electric treadmill cause safety
accidents. Suggest to wear a rubber soled shoes or gym shoes.
6. Please do not remove the protective cover casually, if need to open for maintenance, be sure to
remove the power cord plug.
7. Warning! When electric treadmill is in use, please do not let children near, prevent dangerous, in
case of hands, fingers and feet are card holder.
8. Minors use of electric machine running should be adults in the escort.
9. If this is your first time to use electric treadmill, please be sur e hold handrail and loosen the arm
until it is comfortable.
10.The emergency stop switch device (red), if found abnormal treadmill running process or feel danger,
please press the emergency stop switch device (i.e., safety lock), make the treadmill to immediately
stop, avoid accident risk.
11. Warning! Shut down immediately after using the equipment, and unplug the power cord plug away.
12. Warning! Never touch touch any part of the movement.
13. Heart rate sensor does not belong to medical equipment, there are many reasons can cause
inaccurate detection, test results are for reference only.
Page 9

14. Warning! During exercise if feel danger, should use both sides armrest emergency jumped off the
ground or in on both sides of the pedal platform.
15. Warning! Electric treadmill exercise is rear to 2000 mmx1000mm safety area, prevent accident
danger to have emer gency jumping out of the space.
16. Exercise safety operation need free space for 2000 mm (long) X1000mm (wide) X2250mm (high).
17. Warning! Electric treadmill for indoor equipment, do not use outdoors, su itable for aerobic cardio,
main is to increase the cardiopulmonary function is given priority to, training muscles is
complementary.
18. Warning! Users may be movement interference of any control devi ce should not deviate from the
design.
Getting Started Guide
If this is your first time to use electric treadmill, you need to read the following content:
Preparation:
Before exercise you need to k now their health status, to make a suitable exercise program, suggest to
consult a doctor or a prof essio na l, maybe you can get twice the result with ha lf the effort.
Before the first use of electric treadmill, please to be familiar with how to control it first, such as start,
stop and speed regulation, you can use it untill you are familiar with it. Then stand on the plastic
checkered plate on both sides of the treadmill, seize the handrail with both hands, adjust speed for 1.6
~ 3.2 km/h machine of low velocity, the body stand up straight, look ahead, hrust against the ground,
try to relax. And then to run with its movement. A fter theyou feel adaptation, gradual ly increase the
speed to 3 ~ 5 km/hour. Keep this speed about 10 minutes, then slowly let the machine stop. First use
do not speed too high, to prevent falling.
Exercise:
Walk with the pace of fixed about 1 km, and record the time. This could use 15 to 25 minutes. Walking
at a speed of 4.8 km/h, 1 km distance will takes about 20 minutes. After you can easily do it a few
times, gradually increase speed, last 30 minutes, you can get a good exercise. Before walking exerci se
program, the in the mind be clear: n ot irrita b l e, this exercise for your health, my own life, not a night of
magic.
Page 10
Frequency:
Goal is 3-5 times per week, 15 to 60 minutes at a time.It is best to develop good exercise schedule
according to their own physical condition rather than to exercise according to his be fond of, you can
master the acuteness degree of motion by adjusting the speed and the movement time.
Amount of Exercise:
Shortcuts - 15-20 minutes of exercise is a good way to save time. Warm up for 5 minutes at 4-4.8
km/hour speed, then increase the speed of 0.3 kilometers per hour every 2 minutes to , until you feel
keep on moving at a speed of 45 mi nutes will be very challenging.
Dress:
All you need is a pair of good shoes, it is suggested that choose running shoes or gym shoes. Don't
stick with sole foreign body at the same time, avoid foreign bodies carry into running down the wear
plate and the running belt. Clothes should be comfortable and suitable for sports, it is suggested that
chooses cotton breathable sportswear.
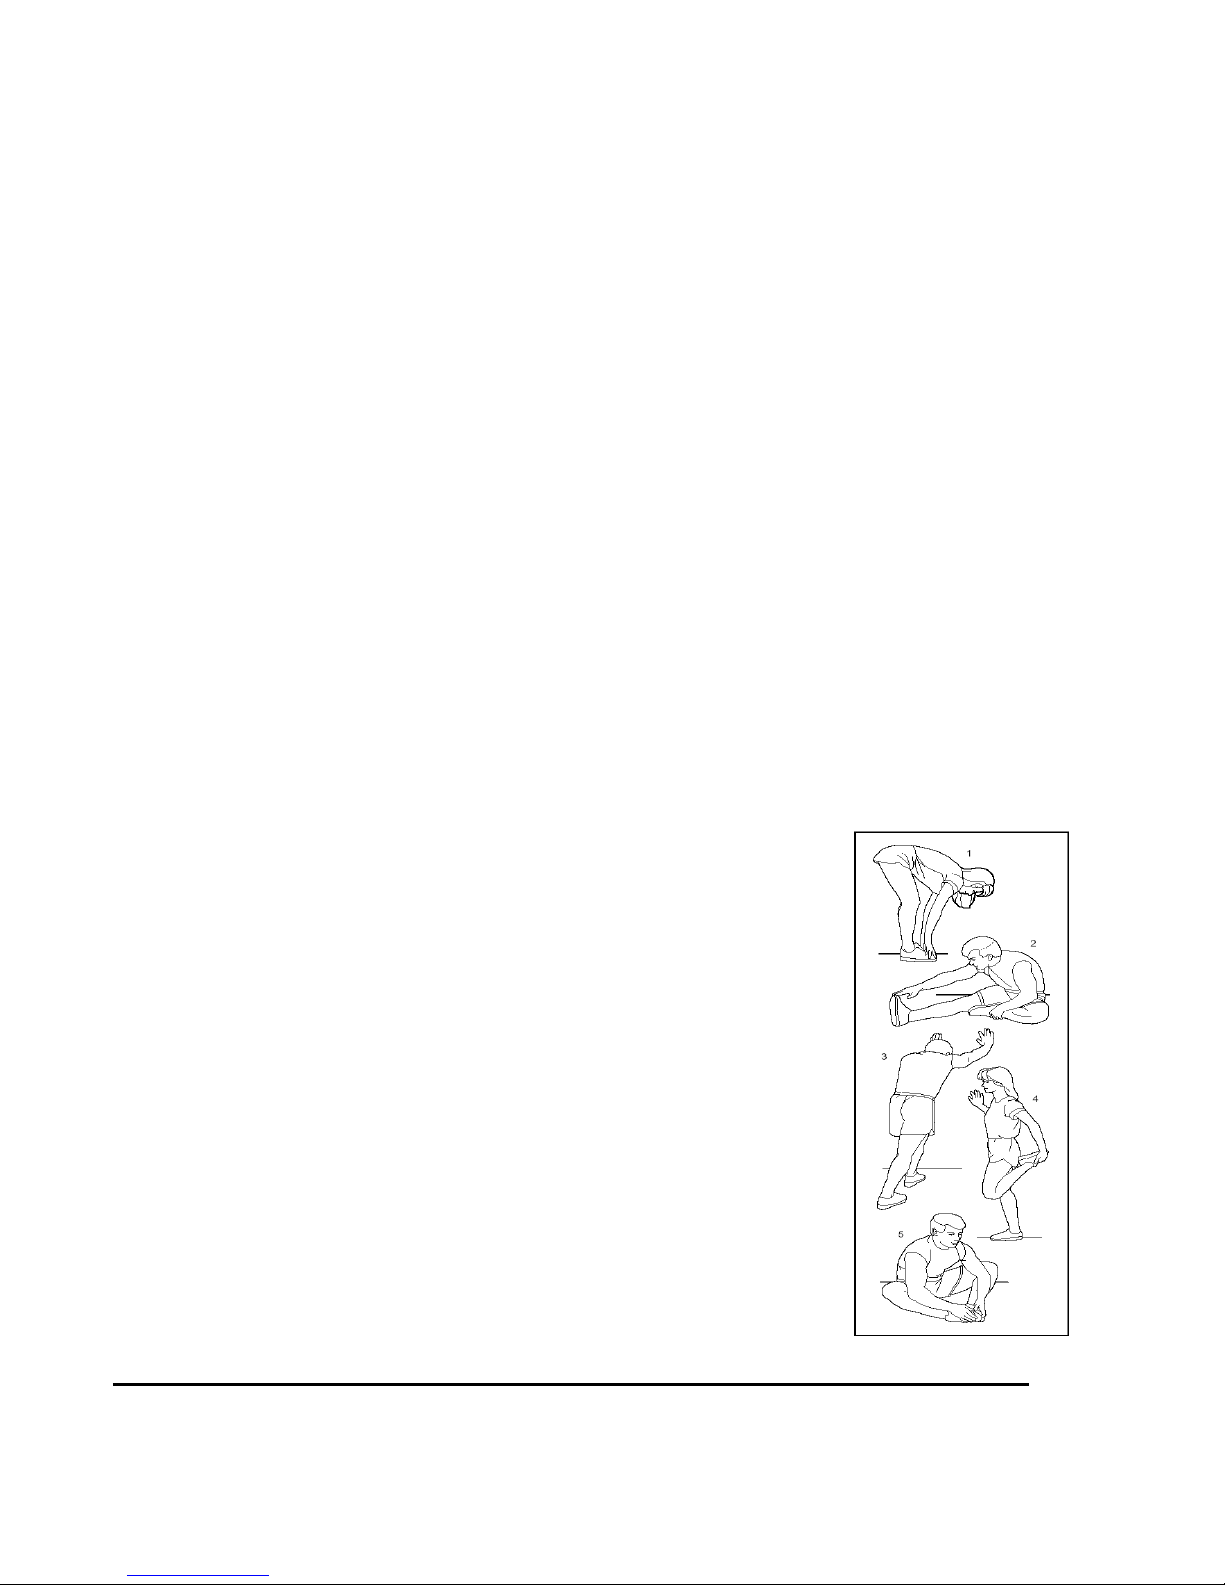
Stretching Exercise:
No matter what speed you walk at, you are suggested to stretch first.
Warm muscle is more easy to stretch, so on 5 ~ 10 minutes to warm up
first. Then stop according to the following method to stretch, do 5 times,
each time each leg for 10 seconds or mo re time; Do it again at the end of
the exercise.
1. Down the stretch
bent knees slightly, slowly bend forward, back and shoulders relaxed,
both hands try to touch your toes. Maintain 10 ~ 15 seconds, then relax.
Repeat 3 times (see figure 1).
2. Hamstring stretch
Sit on a clean cushion, extent one leg,Put another leg to adduction, make
it close to straight to the inside (see figure 2).
3. The calves and heel tendon stretch
Page 11
Stand with your hand hold the wall or tree, with one feet back, keep back leg up-righ t and
slant forward to wall or tree. Keep 10~15 seconds, then relax, repeat 3 times every leg.(see
figure 3).
4. Quadriceps stretch
Helps balance wall or table with his left hand, and then the right hand back, seize the right ankle
slowly to the hips, until you feel in front of the thigh muscles tense. Maintain 10 ~ 15 seconds, then
relax. Each leg repeat 3 times (see figure 4).
5. Sartorius (thigh muscles)
Foot, knee outward and sat down. Hands seize feet pulled in the direction of the groin. Maintain 10 ~
15 seconds, then relax
Repeat 3 times (see figure 5).
Treadmill Operating Instruction
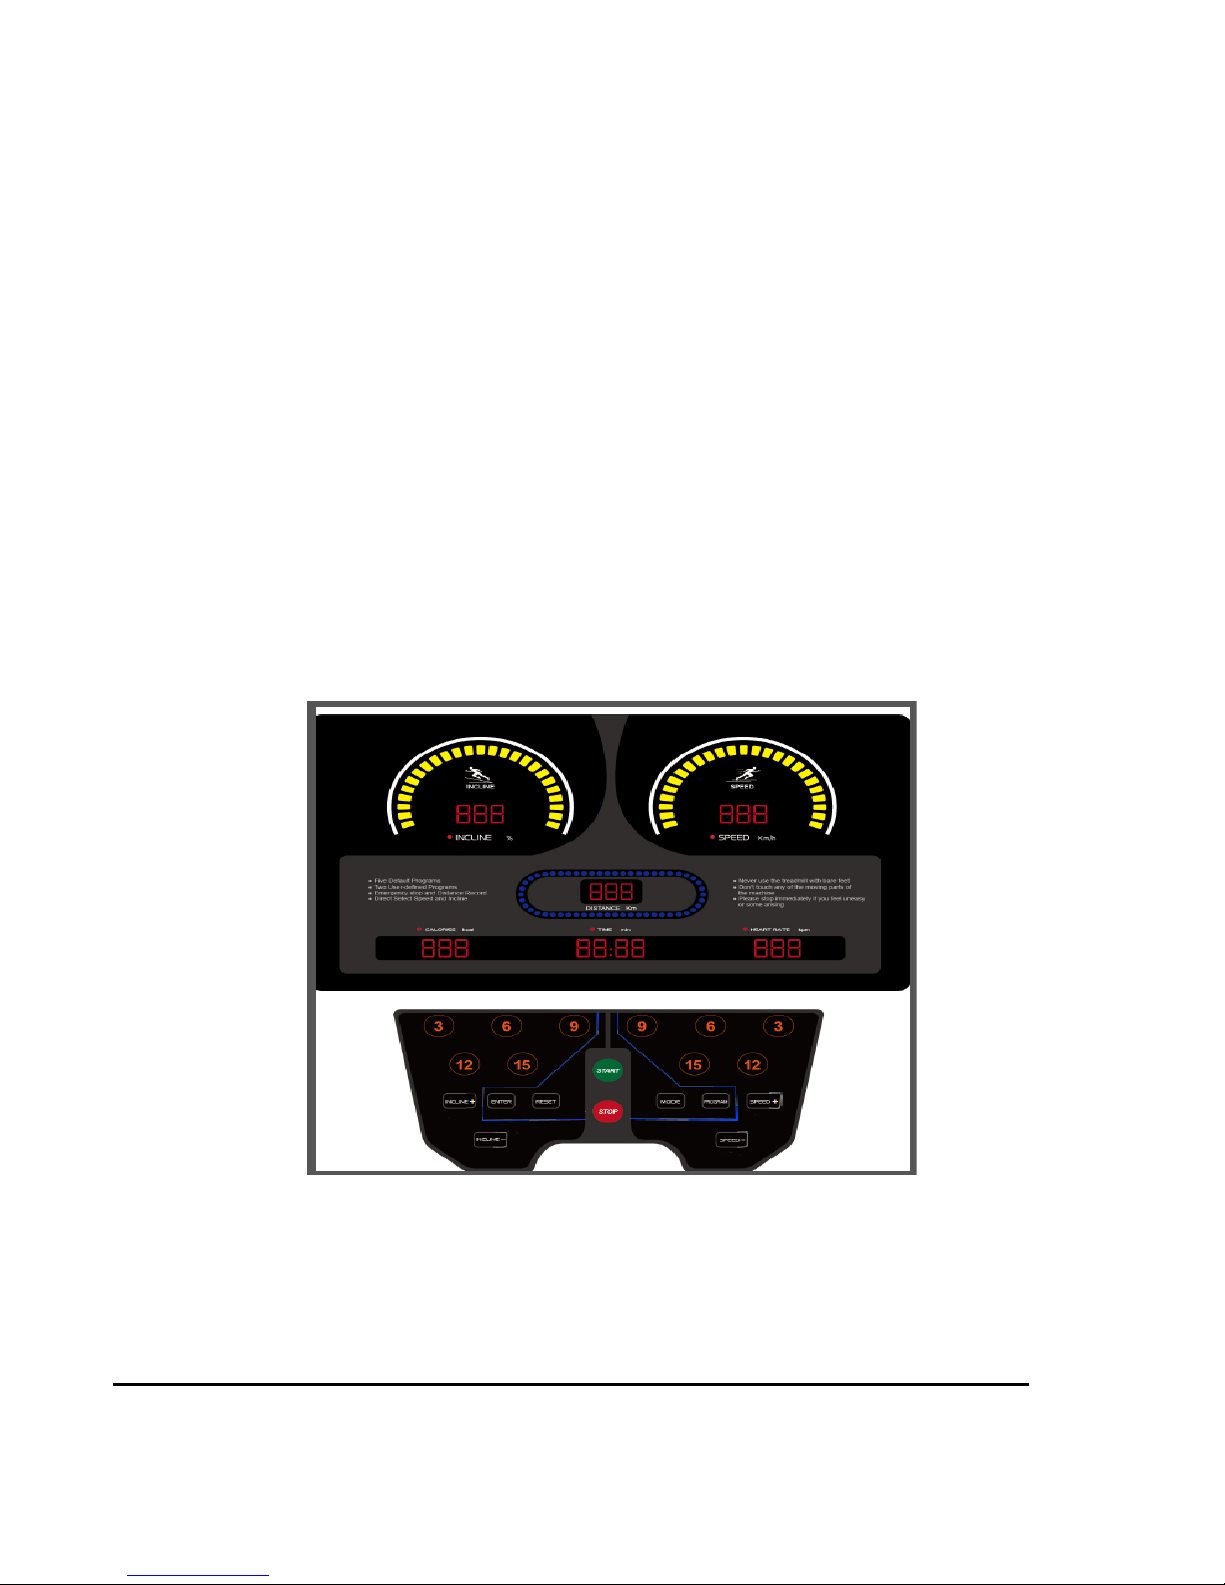
1 Display effect and Connection instruction:
1.1 Display effect
1.2 Interface:
1.2.1 Communication in te rface:J9 connect lower-control;
1.2.1 Safety switch:J8 connect safety switch;
1.2.2 Heartbeat connection:J5、J6 connect heartbeat board ;
1.2.3 Wireless heartbeat connection:J7 wireless heartbeat plate;
Page 12

1.2.4 MP3 control interface:J10 connect MP3 control interface;
1.2.5 Power interface:J3 connect inverter 12V power source;
1.2.6 Power of amplifier interface:J12 connect power amplifier board;
1.2.7 Fan blower i nt e rface:J14 connect fan blower;
1.2.8 Handrail keypad interface:J1 interface for accelerate and decelerate speed,J2 interface for up
and down.
2 Window status
2.1 Time display window:
2.1.1 Time countdown mode that show remaining time;
2.1.2 When in manual operation, showing total running hours;
2.1.3 Time showing range:00:00—99:59, to show set time when enter into mode setting da ta;
2.1.4 To show parameter value under parameter setting status.
2.2 Distance display window:
2.2.1 Distance display window that show running distance value;
2.2.2 Operating under manual mode and prog r am mode, show total running distance;
2.2.3 Distance showing range:(0.00—999)KM.
2.3 Calorie display window:
2.3.1 Manual mode and program mode that show calorie consumption value;
2.3.2 Calorie display range(0.00—999)Kcal
2.3.3 To show calorie setting value when enter into manual mode, program mode or user mode.
2.3.4 To show parameter code under parameter s etting status.
2.4 Heart rate display window:
2.4.1 Show “P” without heart rate input;
2.4.2 Show heart rate value with input
2.4.3 Heart rate showing range:(50—256)
2.5 Speed display window:
2.5.1 To show actual speed value at present;
2.5.2 Speed showing range:(1.0—20)KM/H, rehibilitation mode(0.8—20)KM/H。
2.6 Incline display window:
2.6.1 To show actual incline at present;
2.6.2 Incline showing range:(0—20)%
2.6.3 Showing error mode when occur incline malfunction.
3 Keypad and its function
3.1 Speed+: Under manual operating status, increase speed value. Under parameter setting status,
increase parameter value of selected function;
3.2 Speed-: Under manual operating status, reduce speed value. Under parameter setting status,reduce
parameter value of selected func tion;
3.3 Incline+: Under manual operating status, increase incline value;
3.4 Incline-: Under manual operating status, reduce incline value;
3.5 Operating under fixed program, both speed value and incline value can be changed according to
your need.
3.6 Speed shortcut key(3、6、9、12、15):Operating under manual mode, quickly s et acc o rdingly
speed;
3.7 Incline shortcut key(3、6
、9、12、15):Op erating under manual mode, quickly set according l y
Page 13

incline;
3.8 Operating keypad: Under standby status, enter into running status after press keypad;
3.9 Stop ke ypa d:Under running status, enter into stop stat us after press keypad;
3.10 PROGRAM : Enter into optional mode(P1~P8、U1~U2、);(default manual setting when open
machine)
3.11 ENTER: Used to confirm parameter setting or exit mode setting after press keypad;
3.12 RESET: Under stop status, all of parameter return to zero after press it;
3.13 MODE:With four countdown mode(time,distance,calorie,rehibilitation)。
(Tips: With an efficient keypad,buzzer will make long sound; when the keypad is inefficient,
buzzer will click two times)
4 Operation
Power on, buzzer makes a long sound, luminous tube, digital tube and lattice screen will show within
3seconds, meanwhile, lifting motor declines to the lowest level, then recover to level. (the lowest station is
level), enter into standby status after 3 seconds. Time window show“00:00”, incline window show“0”, heart
rate show “P”, distance window show “0.00”, calorie window show “0”, speed window show “1.0”,at this
time, you can operate the console.
5 Setting mode
Under the standby status, press “set” keypad that can switch 4 setting functions (time, distance, calorie,
rehibilitation). Press sp eed keypad to set various parameter value. When inverse parameter counting return to
zero, enter into shutdown program mode, speed and incline will be halved, the countdown time is 150seconds,
while count to 15seconds, the warning of buzzer will ready to stop.
5.1.1 Countdown mode
5.1.1.1 Press "set" keypad with one time, enter into countdown program, time window
flashing, show the default time 30:00, accelerate and decelerate keypad can be used to
change the time; when operating, countdown with the set number. When return to zero,
enter into stop status, speed and incline will be halved, the countdown time is
150seconds, while count to 15seconds, the warning of buzzer will ready to stop.
5.1.1.2
Distance window:When start running, show “3”、“2”、“1” 3 seconds countdown;
while stop using, buzzer click one time; Ligh t runway gradually be lighten, (one round
of 400-meter runway which made by 46 lights), the center position of runway(to
window)show the actual running distance.
5.1.2 Countdown distance mode
5.1.2.1 Press "set" keypad on the second time, enter into distance countdown program,
distance window flashing, show the default distance value 5.00; sh ow running distance
by countdown. Change distance value by the accelerate and decelerate keypad, when
operating, countdown with the set number. When return to zero, enter into stop status,
speed and incline will be halved, the countdown time is 150seconds, while count to
15seconds, the warning of buzzer will ready to stop.
5.1.3 Countdown distance mode
5.1.3.1 Press “set”keypad on the third time, enter into calorie countdown program, calorie
window flashing, show the default value is 100; show running calorie by countdown;
Change distance value by the accelerate and decelerate keypad, when operating,
Page 14

countdown with the set number. When return to zero, enter into stop status, speed and
incline will be halved, the countdown time is 150seconds, while count to 15seconds,
the warning of buzzer will ready to stop.
5.2 Program
5.2.1 Fixed program
5.2.1.1 Under standby status, press “program” keypad one time, enter into fixed program 1;
press “program” keypad two times, enter into fixed program 2,,,,,,press “program”
keypad eight times, enter into fixed program 8. The distance window show the
accordingly number.
5.2.2 User program
5.2.2.1 Under standby status, press “program” keypad ten times, enter into u ser program 1;
press “program” keypad eleven times, en ter into user program 2. The distance window
show the accordingly number.
5.2.2.2 Under user program, time window flashing, show the default time 30:00; change
time by the accelerate and decelerate k eypad; press “enter”keypad once, speed window
flash;enter into various setting time slot.(totally 16). Press “the accelerate and decelerate
speed” keypad, can set speed value in various time slot. Press “enter” keypad two times,
enter into the second time slot; press “the accelerate and decelerate speed” keypad, can
set speed value in various time slot. Then, totally 16 sections.
5.2.3 Rehibilitation program
5.2.3.1 Under standby status, press “program” keypad 9 times, enter into rehibilitation mode;
enter into rehibilitation program, speed window flashing, show the default speed 1
kilometer; speed adjustment range(0.8KM-8KM). After running, speed adjustment
0.8KM-8KM, the shortcut keypads can be used.
5.3 Manual mode pr ogr am:
5.3.1.1 Under standby status, manual mode as the default mode. The first luminous tube of
speed and incline is lighting all the time, press start/stop directly, the lattice screen
show “3”、“2”、“1” 3seconds countdown. Start the machine, press the accelerate and
decelerate speed keypad or direct keypad to adjust the speed value; p ress the accelerate
and decelerate incline keypad or direct keypad to adjust the incline value; Light runway
gradually be lighten, (one round of 400-meter runway which made by 46 lights), the
center position of runway(to window)show the actual running distance. Press “stop”
keypad, the machine will stop running and counting; press “reset” keypad, all of the
parameter value will return to zero.
6 Heartbeat test
6.1 Both hands hold the steel sheet of heart rate sensor, when controller receive the heartbeat signal,
heart rate window will flash, and showing “P”, meanwhile, the indicator light of heart rate will
light, and show the accordingl y hea rtbeat value after 5seconds.
6.2 Measurement before exercise, both feet stand on both sides of the edge of deck, both hands grip
heart rate sensor lightly, waiting for about 20 seconds, an accurate heart rate value will show on the
window.
6.3 Measurement after exercise, both feet stand on both sides of the edge of deck, both hands grip
Page 15
heart rate sensor lightly, waiting for about 20 seconds, an accurate heart rate value will show on the
window.
Tips:In order to get more accurate data, you’d better do not measure durin g runni n g.
8 Parameter settings
8.1. Calibration mode
When the program is not running,(under standby status after reset)meanwhile, press speed+keypad,
speed-keypad, incline+keypad, incline-keypad, after 3 seconds, automatically enter into incline
calibration mode. Time window show calibration countdown 150seconds. After calibration, console
will return to starting status automatically.
8.2. Parameter settings of console
8.2.1. Under starting status, press speed+and speed- keypad 3 seconds, enter into parameter settings;
calorie window show parameter’s number, time window show parameter value, let go of
speed+and speed-keypa d, enter into parameter settings of console.
8.2.2. Under parameter settings status, speed window show parameter n umber 0~11,time window
show parameter value, calorie window show code;
8.2.3. Speed+speed-keypad can be used to modify parameter settings, press(ENTER)can confirm
parameter settings and enter into next parameter settings. Meanwhile, press speed+ and
speed-keypad to preserve param eter a nd e x it p arameter settings.
8.2.4. Parameter table
No.
Lattice screen show
character
Definition of parameter Unit Range
1 Minimum speed Minimum speed Km/h
0.2~6.0(1.0)
2 Maximum speed Maximum speed Km/h
16.0~30.0(20.0)
3 Maximum incline Maximum incline value degree
10~20(20)
4 Accelerate time Accelerate time/kilometer S(second)
1~5(1)
5 Decelerate time Decelerate time/kilometer S(second)
1~5(1)
6 Transmission ratio Transmission ratio 1KM=HZ
1HZ-8HZ(4.5HZ)
7 Total time Total running time
hour(h) 0~9999
8 Total distance
Total running
distance
kilometer
(KM)
0~9999
9. Protection display
Inverter under operating status, occur protective action, time window shows as following:
Inverter system failure
Er 1 power error(under voltage)
Er 2 over current protection
Er 3 over voltage protection
Er 4 over load protection
Er 5 over heat protection
Er 6 communication error
Er 8 incline and decline warning
SAFE safety switch in valid
Page 16
Attention:Different speed with different calorie;
Speed increase or decrease, and fixed speed, with different running distance in same
time;
The bottom control board should have indicator light, which indicate power on;
Under fixed speed and running time, different incline with different calorie.
10. Corresponding speed of fixed program and the default speed value of user customized program.
P1 SP 3 3 3 5 5 6 6 6 6 5
5 5 4 4 3 3
P2 SP 3 3 3 4 4 5 5 5 6 6
6 6 5 5 4 4
P3 SP 3 4 5 6 7 8 9 10 10 10
9 8 7 6 5 4
P4 SP 3 3 4.5 4.5 4.5 4.5 4.5 4.5 4.5 4.5 4.5 4.5 4.5 4.5 3 3
P5 SP 3 4 5 6 7 6 5 4 5 6
7 8 7 6 5 4
P6 SP 3 3 4 5 6 6 5 5 5 4
4 4 3 3 3 3
P7 SP 6.4 8.8 8.8 6.4 8.8 8.8 6.4 8.8 8.8 6.4 8.8 8.8 6.4 8.8 8.8
6.4
P8 SP 6.4 6.4 8 6.4 6.4 8 6.4 6.4 8 6.4 6.4 8 6.4 6.4 8
6.4
U1 SP 3 3 4 5 6 6 5 5 5 4
4 4 3 3 3 3
U2 SP 3 3 4 5 6 6 5 5 5 4
4 4 3 3 3 3
11. USB player(support MP3 audio file), definition of keypad:
MP3 keypad settings: press ENTER in long time meaning volume+, press STOP in long time meaning
volume-, press MODE in long time meaning last music, press PROGRAM in long time meaning next
music, press START in long time meaning play or pause.
Tips: Because MP3 functional keypad operates on other keypad, so whe n o pe rating, donot run, under
running status, STOP can not implement volume- in long time pressing, treadmill will stop
running, due to press the keypad in long time that implement MP3 functional keypad once.
12. The treadmill with no operation will enter into standby sleep status, with display closed, and can
be aroused by any keypad.
13. Power off:
User can shut down the switch to close treadmill at any time, which will not dama ge the treadmill.
14. Attentions:
1. Before exercise, firstly, must test whether load power supply or not; test the safety lock whether
effective or not.
2. Occur abnormal situation when exercising, can press emergent stop switch, the treadmill will quickly
decelerate to stop;loosen the emergent stop switch, waiting for input demand.
3. If there are some mistakes, please contact distributor, people except professional member must not
dismantle or repair, av oid damaging the machine.
Page 17
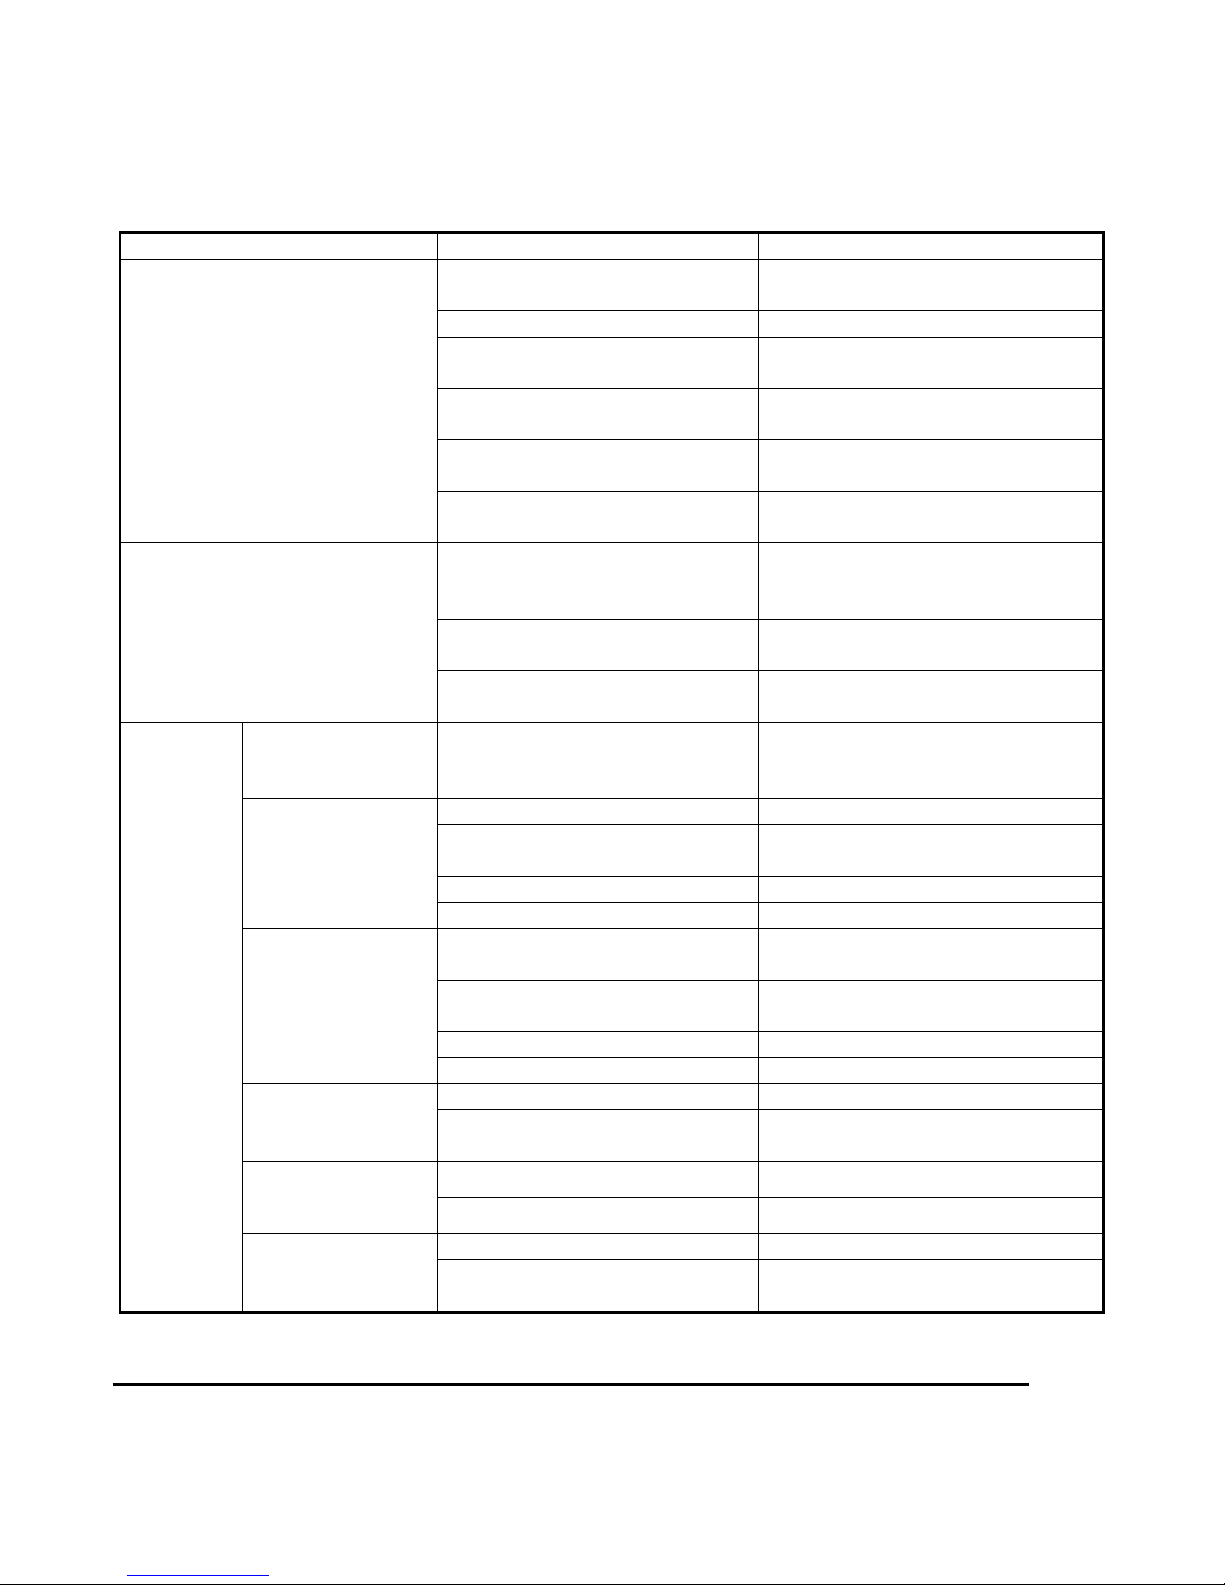
15. Simple troubleshooting method of tr e adm ill
trouble Impossible reasons Processing method
Treadmill with no display
A no plug in power or without
power
power cord access to AC or check
AC socket
B not open power switch put power switch to ON positi o n
C actuator of no power supply or
damaged
Press overload protection again or
replace the actuator
D signal line of electrical meter
open circuit
Replace signal line and plug again
E electrical meter has been
damaged
Replace electrical meter
F(LCD) backlight is not bright Need to repair, check backlight line,
or replace backlight
Treadmill with incomplete
display, lack strokes
A display driver IC pseudo
soldering or weld without
stopping
Need to be repaired, check solder
joints, weld again
B(LCD) bus bar slide, not fixed
in position
Reassemble LCD
C display driver IC has trouble Need to be repaired, weld a new
display driver IC.
Electrical
meter
display
SAFE-safety
switch in valid
A line of safety switch has loosen
B micro switch e rror
Replace signal line, plug again
Replace micro switch, plug again
Er 1-power error
A inverter line has loosen Plug again
B input power less than input
voltage
Return to factory for repairing
C inside of motor has short circuit Replace motor
D actuator has been damaged Replace actuator
Er 2-overcurrent
protection
A overload System protection, caused by
person, then restart
B transmission parts stuck or has
obstacles
Adjust transmission parts, or add
lubricating oil
C inside of motor has short circuit Replace motor
D actuator has been damaged Replace actuator
Er 3-overvoltage
protection
A motor line has been loosen Plug again
B motor line has short circuit
Return to factory for repairing or
replacing
Er 4-overload
protection
A motor line has been loosen Plug again
B over load Return to factory for repairing
Er 5-overheat
protection
A inverter fan drive abnormally Replace inverter
B inverter fan has dust or foreign
matter
Clean the dust and foreign matter in
time
Page 18
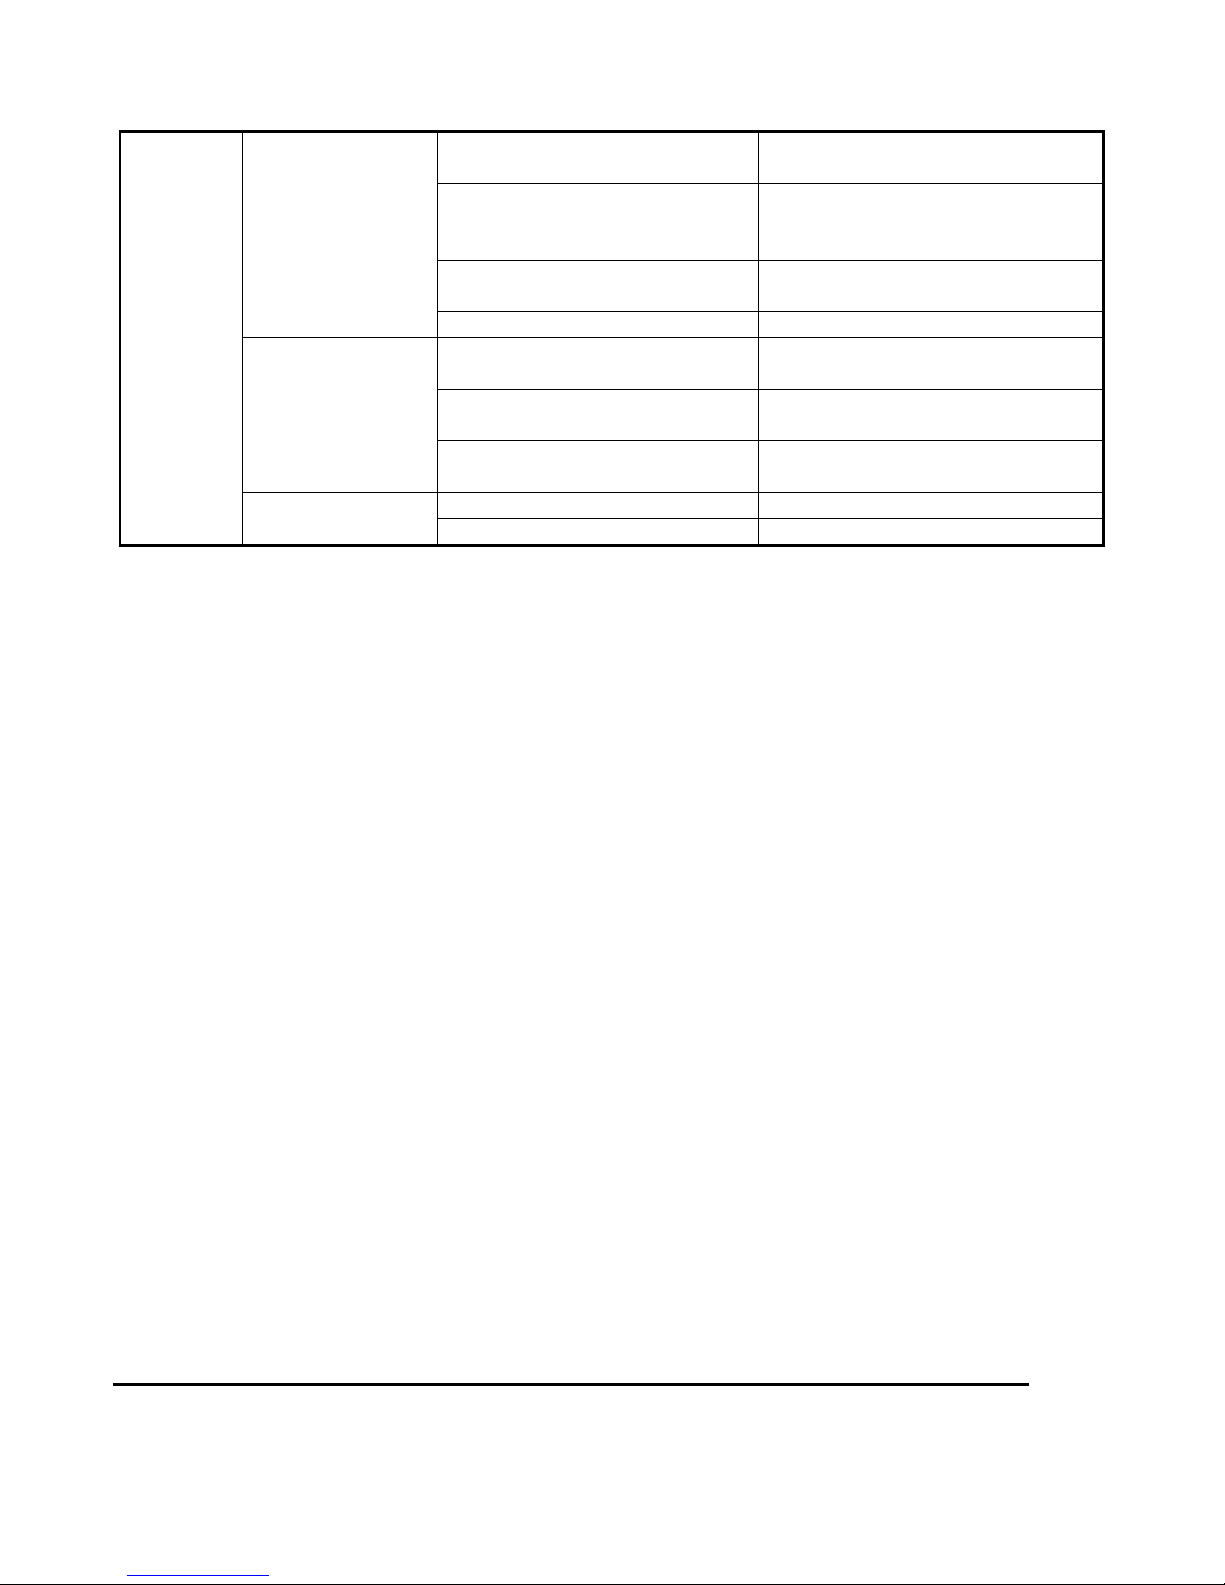
Er
6-communication
error
A signal line of electrical meter
has not been connected well
Connect again
B signal line of electrical meter
has been damaged, short circuit
or open circuit
Replace signal line
C signal line of electrical meter
has error
Replace electrical meter
D signal line of actuator has error Replace the actuator
Er 8 incline and
decline warning
A lines of incline and decline
motor have loosen
Plug again
B signal lines of incline and
decline motor have loosen
Plug again
C lines of incline and decline
motor have been mistaken
Return to factory for repairing
Exercise safety measures
Before exercise, please consult professional member. He(she) can recommend exercise frequency,
intensity, and exercise time that both fit your age and physical condition. During exercising, please
stop exercising at once, if you feel ch est distress, chest pain, has irregular heartbeat, short of breath,
dizzy or other discomfort. Please consult the professional member before continue to exercise.
Maintenance guide
Warning: before clean or maintain machine, must pull the plug.
cleaning
Comprehensive cleaning will prolong life-span of treadmill.
Remove the dust regularly, in order to ensure clea n. Please clean both exploded sides of running belt,
which can decrease impurity accum ulation.And ensure the cleaning of shoes, a v oid take foreign matters
into running belt, which will tear the running deck and belt. The surface of running belt should clean by
wet cloth that with soap. And please notice that won’t let water splash on electrical set and the back of
belt.
Warning: P le ase pull the plug before remove the cover of treadmill. Open the protective cover to clean
the treadmill more than once per year.
We suggest that check running deck and belt regularly. If there are breakage on the surface of deck, please
contact service center for clients.
Page 19
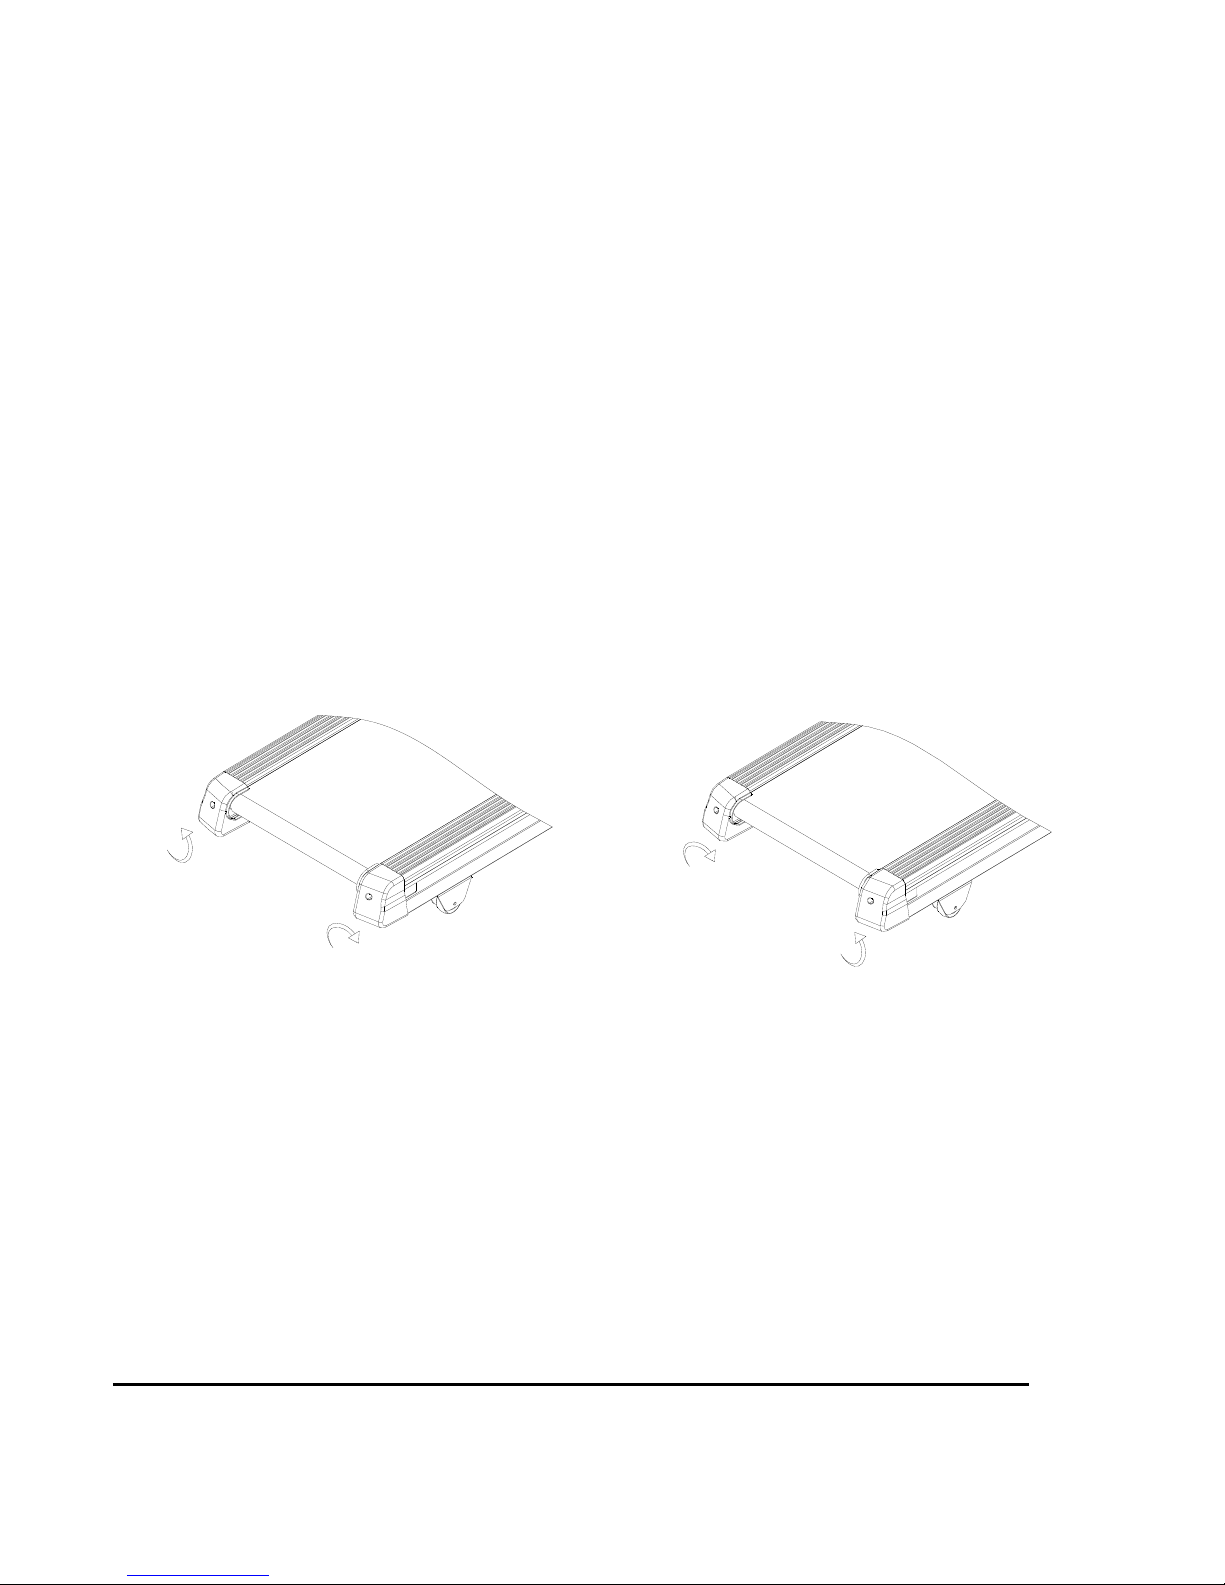
Maintenance introduction
1.In order to maintain your treadmill, and prolong the life-span of it, we suggest that after 2 hours
operating, turn off the switch; continue to use after 10 minutes.
2.If the running belt is too loose, it will have slip during running; if it is too tight, that will reduce the
performance of motor, and increase the wear of roller and belt. When the degree of tightness
is suitable, you can use your hand to let both sides of belt from deck about 40 — 60mm.
Centring of running belt and the adjustment of the degree of tightness
In order to ensure the treadmill work better, you need to adjust the running belt to the best state.
Centring of running belt:
·Put the treadmill on the flat floor;
·Make it operate with 3-6km /;
·If the running belt inclines to the right part, then let the right bolt rotate 1/2 round along the clockwise
direction, next let left bolt rotate 1/2 round along counter clockwise direction. Picture A
·If the running belt inclines to the left part,then let the left bolt rotate 1/2 round along the clockwise direction,
next let right bolt rotate 1/2 round along counter clockwise direction. Picture B.
Picture A adjust to left part Picture B adjust to right part
The adjustment of the degree of tightness of poly V-belt
After running long time, the poly V-belt will loose due to wear and extrude,
You have to make suitable adjus tme nt to ensure safety using. Meth od: durin g regular run ning, you can feel
occasionally pause when your feet on the deck, which indicate that ru n nin g be lt or poly V-belt has been
loosen, and you have to confirm. Methods to adjust which parts has been loosen: dismantle 5 slots of the
above protective cover, let the treadmill run at 1km/h, then stand on running belt, grip handles tightly, both
feet slightly hard to jam on the running belt.(We recomm end that users use their body weight of pressing
power to jam on the running belt)
Page 20

A If the instantaneous pressing force can not make the belt stop, that indicates the tightness of poly V-belt is
not fit.
B If the instantaneous pressing forc e c an make the belt stop, but poly V-belt and front roller still rotating,
indicating running belt has been a little loosen, must be adjusted.(please take maintenance for
conference )
C If the instantaneous pressing force can make the belt and poly V-belt stop, but motor still rotate, indicate
that poly V-belt has been loosen, must adjust to ensure safety usage.
Adjustable methods:
Step 1: Dismantle the 5 slots of front protective cover, by this way you can dismantle the cover;
Step 2: Loosen (do not dismantle)4 slots that fixed the motor base, then use wrench to adjust 2 adjusting
screw rod above motor box. Meanwhile, use your hand slightly overturn poly V-belt that between motor
axle and front roller, if it is too loose, you can overturn the poly V-belt with 100%; if it is too tight, the
overturn degree is with limitation. After adjustment, if you can overturn the poly V-belt with 80%, it is
suitable. Please adjust the tightness of the poly V-belt to the state that can be overturn 80%.
Step 3: Please lock the motor base, and install the protective cover.
Common fault and elimination methods
fault reason methods
Can not
start
一、 Didn’t connect power
or switch;
二、 The over current
protective part has been
disconnected;
三、 Room over current
protective part has been
disconnected;
四、 Without safety switch
1.Plug power or connect the switch
2.Replace the power fuses
3.Set protector of the over current again
4.Put the safety switch to correct position
Running
belt with
slip
Belt has been loosen
Adjust the tightness of running belt(refer to
maintenance guide)
Page 21
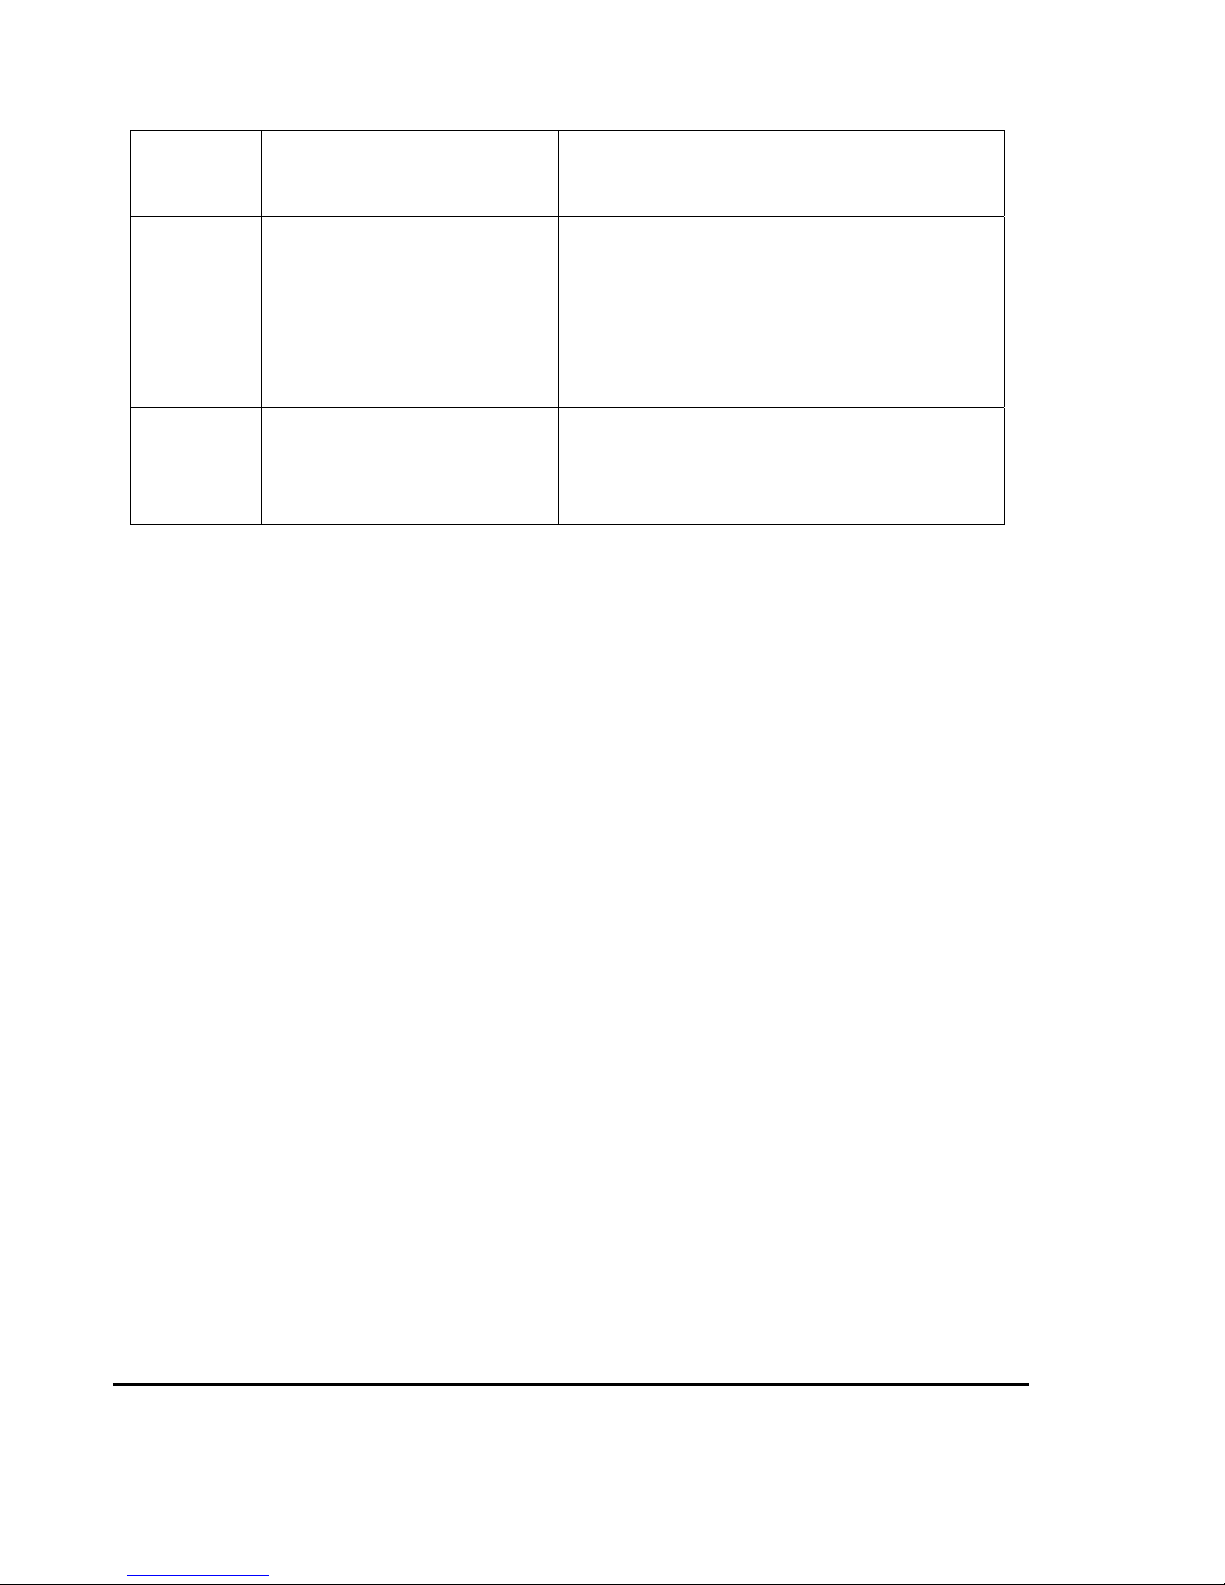
Poly V-belt
with slip
Poly V-belt has been loosen
Adjust the tightness of Poly V-belt (refer to
maintenance guide)
Running
belt didn’t
on the
center of
deck
The balance of roller wasn’t
suitable
Adjust the running belt to the central position
(refer to maintenance guide )
With noise
while
exercising
1.Rotating axle need to add
lubricating oil
2.Slots have been loosen
1.Add lubricating oil
2.Tight the loosen slots
If the fault of your treadmill beyond the above range, please contact our service center for
clients, we will give you a satisfied service.
If there are damaged spare parts, please stop use that machine at once.After replace the
original spare parts and install well, you can continue to use.
Warranty
1. warranty range
Warranty range:Under the regular right maintenance, occur non-artificial damage with normal usage;
Warranty card can only be used by original buyer, can’t be transferred.
2. The date of warranty period with 1 year start on purchasing date.
3. Without warranty as following situations:
(1) Damage due to abuse, negligence, accident,or mo dified without authorization;
(2) Damage due to mistake adjustment of running belt and driver belt;
(3) Damage due to mistake maintenance;
(4) Other irregular operation and which lead to damage.
4. Repair and maintain service
All of the spare parts of treadmill can be bought through local distributor. Distributor can provide the
service you need.
Page 22

Company address: Jiangsu Plusx Health Technology Co., Ltd. Binhu Ave. Paoche Economic
Development Zone,Pizhou City, Xuzhou, Jiangsu Province, China.
Postcode:221327
Page 23

6
Warning:
changesormodificationsnotexpresslyapprovedbythepartyresponsiblefor
compliancecouldvoidtheuser’sauthoritytooperatetheequipment.
ThisdevicecomplieswithPart15oftheFCCRules.Operationissubjecttothe
followingtwoconditions:(1)thisdevicemaynotcauseharmfulinterference,and
(2)thisdevicemustacceptanyinterferencereceived,includinginterferencethat
maycauseundesiredoperation.changesormodificationsnotexpresslyapproved
bythepartyresponsibleforcompliancecouldvoidtheuser'sauthoritytooperate
theequipment.
NOTE:Thisequipmenthasbeentestedandfoundtocomplywiththelimitsfora
ClassB
digitaldevice,pursuanttoPart15oftheFCCRules.Theselimitsare
designedtoprovidereasonableprotectionagainstharmfulinterferenceina
residentialinstallation.Thisequipmentgenerates,usesandcanradiateradio
frequencyenergyand,ifnotinstalledandusedinaccordancewiththe
instructions,maycauseharmfulinterferenceto
radiocommunications.However,
thereisnoguaranteethatinterferencewillnotoccurinaparticularinstallation.
Ifthisequipmentdoescauseharmfulinterferencetoradioortelevisionreception,
whichcanbedeterminedbyturningtheequipmentoffandon,theuseris
encouragedtotrytocorrecttheinterferencebyoneormoreofthefollowing
measures:
‐‐Reorientorrelocatethereceivingantenna.
‐‐Increasetheseparationbetweentheequipmentandreceiver.
‐‐Connecttheequipmentintoanoutletonacircuitdifferent
Page 24

7
fromthattowhichthereceiverisconnected.
‐‐Consultthedealeroranexperiencedradio/TVtechnicianforhelp.
NOTE:Thisdeviceanditsantenna(s)mustnotbeco‐locatedoroperationin
conjunctionwithanyotherantennaortransmitter.
 Loading...