

Plustek V1.4, OpticPro User Manual

OpticPro User Guide V1.4
A n easy-to-use guide to
help you get the most from
your scanner
All trademarks and brand names mentioned in this publication
are property of their respective owners.
1997. All rights reserved. No portion of this document may be
repr oduced

ii
Introduction
Welcome to the world of ultimate offi ce imaging. Your new
scanner will help improve the professionalism of your documents
by allowing you to input quality images as well as electronic text
into your com puter system.
Like all of our products, your new scanner has been
thoroughly te sted and is backed by our reputation for unsurpassed
dependability and customer satisfaction.
Please remember to fill out and return the provided registration
card. As a re gistered customer, you will rece ive customer support,
new product information and software upgrades.
Thank you for choosi ng us as your scanner supplier. We hope
you will continue to turn to us for additional qual ity products as
your computing needs and interests grow.

iii
TABLE OF CONTENTS
In troduction ii
How to Use This Guide v
Conventions of This Guide vii
A Note about Icons vii
Scanner Features viii
Package Contents ix
CHAP TER I. HARDWARE INSTALLATION 1
Hardware R equirements 2
In stalling the Scanner Hardware 3
CHAP TER II. SOFTWARE SETUP 7
Software Installation 8
Software Setup Troubleshooting Guide 8
In stalling Additional Softw are 9
CHAP TER III. US AGE A ND MAINTENANCE 11

i
v
Op erating the Scanner 12
Testing the Scanner 12
Scanner Utility 14
Maintenance 14
Cleaning your Scanner 15
CHAP TER IV. USING TWAIN 17
Scanning Using TWAIN 18
Choosing TWAIN 19
Control Panel & Scan Mod e 19
TWAIN Menu Options 22
Scanning Hints 28
APPE NDIX A: TROUBLESHOOTING 29
APPE NDIX B: CUSTOMER SERVICE AND
WARRANTY 33
APPE NDIX C: INDEX 35

v
Ho w To Use This Guide
Thi s User Guide provides instructions and illustrations
on how to install and operate your scanner. We re comm end that
you re ad through the entire Hardware Installati on, Chapte r I,
before you be gin installing the scanner.
Chapter I describe s how to install the scanner to your
computer. Note: The scanner interface is through an
Enhanced Parallel Port. If your computer does not support
EPP, you may need to purchase an additional i nterface c ard
that doe s support EPP technology to maximize the Flatbed
Scanner performance.
Chapter II describes how to install the sc anner software.
We suggest that you do not install the software before installing the
hardwar e.
After you complete installing the scanner software,
Chapter III describe s how to use the TWAIN interface . TWAIN is
a scanning standard and one of the most widely used technologies
in the scanner industry today. Please carefully read through
Chapter III to learn about how to operate the scanner TWAIN
interface. After learning about how to operate the TWAIN
interface, Chapter IV describes how to test, maintain and clean
your scanner.
Appe ndices A & B have tec hnical support information that can
help you solve problem s. Be fore calling for help, please read
through Appe ndix A: Troubleshooting.

vi

vii
Co nventions of This Guide
1. Bold — First use of an important term i n a chapter.
2. ALL CAPS — Represent commands.
3. Note — Special information about the current subject
A Note about Icons
Thi s guide uses the foll owing icons to point out information
that deserves special attention.
Danger. A procedure that must be followed carefully to pre vent
injury, or accidents.
Caution. Information that, if not followe d, may result in data loss
or damage to the product.
Pay Special Attenti on. Instructions that will ease installation and
preve nt mistakes.
Caution
Attention
Danger

viii
Scanner Features
• Cold Cathode Lamp (for quality im ages and long-lasting
operation)
• OpticPro 4830: 300 by 600 dots per inch (4800 x 4800
software interpolated)
• OpticPro 9630: 600 by 600 dots per inch (9600 x 9600
software interpolated)
• RGB Color
• Grayscale
• Line-Art
• TWAIN compliance
• Printer Port Pass-Through
• Enhanced Parallel Port (EPP)
• LED
• Acce ss Button

i
x
Package Contents
1. Scanner engine
2. Power adapter
3. Scanner cable
4.
1
CD ROM
a) Scanner Setup disk & Acti on Manager software
b) Optical character recogni tion (OCR) software
c) Image editing software
d) This user guide
e) Action Manager user guide
f) Registration form
g) OCR & image-editing quick guide
1
3.5 “ Floppy Disks Availa ble (Call us for details)
123
4


Chapter I
Chapter I. Hardware Installation

2
Chapter I
Before installing your scanner, ve rify that you have all of the
proper components. A list of the package c ontents is provided on
page ix at the begi nning of this guide.
Hardware Requirements
Your sc anner uses an interface c alled an nhanc ed Parallel
Port (EPP)”. *
* The scanner is designed to the latest parallel port specifications,
however, because there is no single set of parallel port standard
in the computer field, there are some parallel port or multi I/O
adapters, parallel port peripherals, and software dongles that are
not fully compatible with the scanner EPP interface and may
cause unpredictable results when used on the same parallel port
connection as the scanner EPP interface. If you are
experiencing problems with your scanner EPP interface, or if
you want to connect other parallel port devices, it would be best
to add another parallel port to your computer.
Chapter I
3
Note: OpticPro should function wi th a Standard Printer Port
(SPP) that supports bi-directional communication. However, if
you have an SPP port that is not bi-direc tional, it is highly likely
that the sc anner will not be found. Also, bi-directional SPP
technology is much slower than EPP.
Installing the Scanner Hardware
If you have already installed your scanner, please skip this
section. The following section de scribes how to connect the
scanner to your com puter and pri nter. Please carefully fol low
along to ensure proper installation.
1. Turn OF F your computer, its related peripherals and
disconnect all related power cabl es!
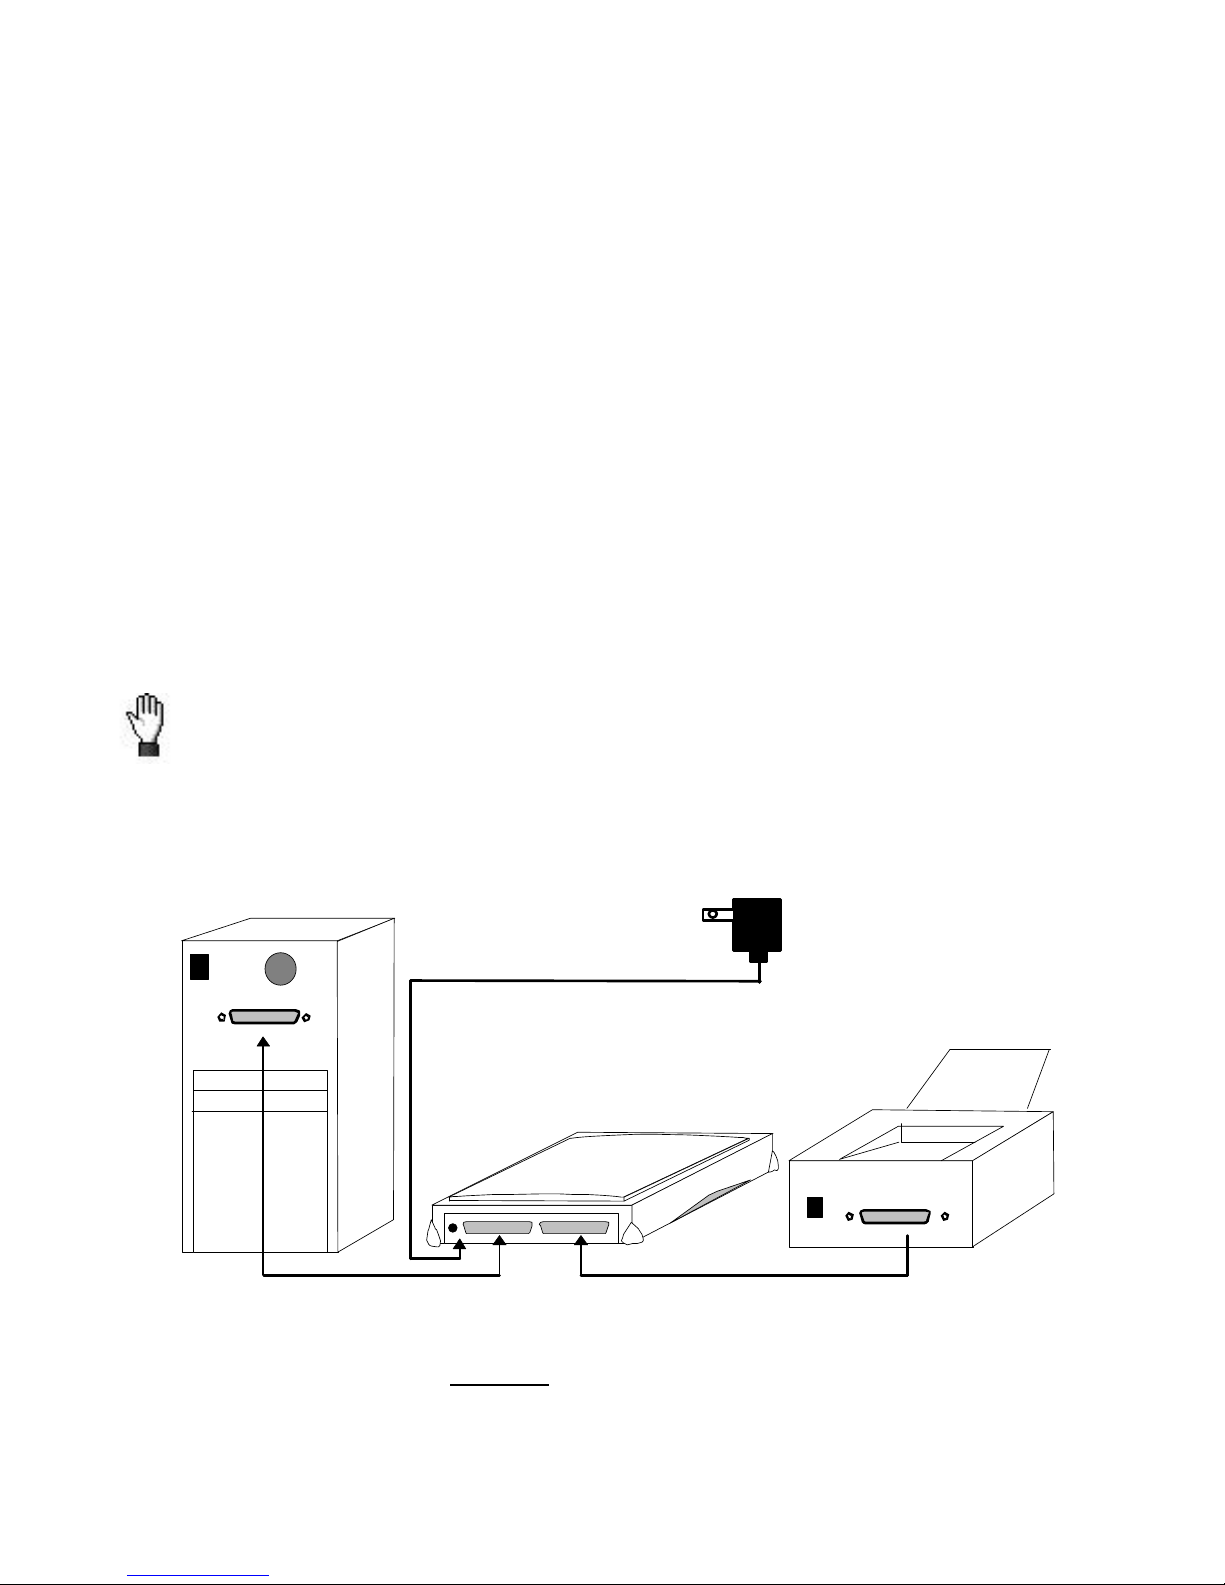
2. Please take a mome nt to study Figure 1.
Figure 1. C onnecting the Scanner
Host Printer
Powe r
Adapter
Rear of Computer
Rear of Scanner
4
Rear of Printer
2
3
1

4
Chapter I
3. If you have a printer connected to your computer, please
disconnect its c able from the rear of the computer. If you have
more than one printer port connected to you compute r, then
locate the printer port that the Enhanced Parallel Port
(EPP).
4. Plug the SCANNER CABLE into the scanner (se e Figure 1
and number 1).
5. Connect the other end of the SCANNER CABL E in to the PC
printer port (see Fi gure 1, and numbe r 1).
Attention: If you do not have a printer connected to your
computer and are not sure where the printer port is, see
your c omputer information book and locate the
section about the printe r por t connector.
6. Next, plug the disconnected printer cable i nto the rear of the
scanner (see Figure 1 and number 2).
7. After plugging the scanner and printer cables into their
respective loc ati ons, plug the power adapter i nto i ts power
receptor (se e Figure 1 and numbe r 3).
8. Plug the power adapter into a standard AC outlet, see Figure 1
and number 4. Note: When the sc anner is not in use, please
leave the power adapter connected to the AC outlet.
Only use the power adapte r that is included with your
scanner (24V 550mA). The use of a diffe rent power
adapter may damage the unit and void your warranty!
9. Plug in all power cords and turn on your computer.
Attention
Danger

Chapter I
5
10. Instal l the scanner software (see Chapter II. Software
Setup page 7).
 Loading...