


Scanner User’s Guide V1.2
An easy-to-use guide to
help you get the most from
your scanner
All trademarks and brand names mentioned in this publication are
property of their respective owners.
1997. All rights reserved. No portion of this document may be
reproduced.

Introduction
Welcome to the world of ultimate office imaging. Your new
scanner will help improve the professionalism of your documents by
allowing you to input quality images as well as electronic text into
your computer system.
Like all of our products, your new scanner has been thoroughly
tested and is backed by our reputation for unsurpassed
dependability and customer satisfaction.
Please remember to fill out and return the provided registra tion
card. As a registered customer, you will receive customer support,
new product information and software upgrades.
Thank you for choosing us as your scanner supplier. We hope
you will continue to turn to us for additional quality products as
your computing needs and interests grow.
ii

TABLE OF CONTENTS
INTRODUCTION...................................................................................... ii
HOW TO USE THIS GUIDE................................................................ ........v
CONVENTIONS OF THIS G UIDE................................................................vi
A NOTE ABOUT ICONS............................................................................vi
SCANNER’S FEATURES...........................................................................vii
COMPUTER REQUIREMENTS...................................................................vii
PACKAGE CONTENTS........................................................................... viii
CHAPTER I. HARDWARE INSTALLATION..................................1
HARDWARE REQUIREMENTS....................................................................2
INSTALLING THE SCANNER’S HARDWARE.................................................3
CHAPTER II. SOFTWARE SETUP...................................................5
SOFTWARE INSTALLATION REQUIREMENTS...............................................6
SOFTWARE INSTALLATION.......................................................................6
SOFTWARE SETUP TROUBLESHOOTING GUIDE................................ ..........7
INSTALLING ADDITIONAL SOFTWARE.......................................................7
CHAPTER III. USAGE AND MAINTENANCE................................9
OPERATING THE SCANNER.....................................................................10
TESTING THE SCANNER .........................................................................10
SCANNER UTILITY.................................................................................12
MAINTENANCE......................................................................................13
CLEANING YOUR SCANNER....................................................................13
REMOVING THE SCANNER’S LID
................................................................14
CHAPTER IV. USING TWAIN........................................................15
iii

iv
SCANNING USING TWAIN.....................................................................16
CHOOSING TWAIN...............................................................................17
CONTROL PANEL & SCAN MODE ...........................................................17
TWAIN MENU OPTIONS.......................................................................20
SCANNING HINTS..................................................................................26
APPENDIX A: TROUBLESHOOTING...........................................27
APPENDIX B: CUSTOMER SERVICE...........................................30
APPENDIX C: INDEX................................................................ .......32
CONTACT PLUSTEK...................................................................... 36

v
How to Use This Guide
This User’s Guide provides instructions and illustrations on
how to install and operate your scanner. We recommend that you
read through the entire Hardware Installation, Chapter I, before you
begin installing the scanner.
Chapter I describes how to install the scanner to your computer.
Note: The scanner’s interface is through an Enhanced Parallel
Port (EPP). If your computer does not support EPP, you may
need to purchase an additional parallel port.
Chapter II describes how to install the scanner’s software. We
suggest that you do not install the software before installing the
hardware.
After you complete installing the scanner’s software, test the
scanner by following the steps outlined in Chapter III. Chapter III
describes how to test, maintain and clean your scanner. Chapter IV
describes how to use the TWAIN interface. TWAIN is a scanning
standard and one of the most widely used technologies in the
scanner industry today. Please carefully read through Chapter IV to
learn about how to operate the scanner’s TWAIN interface.
Appendices A & B have technical support information that can
help you solve problems. Before calling for help, please read
through Appendix A: Troubleshooting.

vi
Danger
Caution
Attention
Conventions of This Guide
1. Bold — First use of an important term in a chapter.
2. ALL CAPS — Represent commands.
3. Note — Special information about the current subject
A Note about Icons
This guide uses the following icons to point out information that
deserves special attention.
Danger. A procedure that must be followed carefully to prevent
injury, or accidents.
Caution. Information that, if not followed, may result in data loss
or damage to the product.
Pay Special Attention. Instructions that will ease installation and
prevent mistakes.

vii
Scanner’s Features
• Scanning Area: 8.5” x 11.7” (inches) / A4 210 x 297 mm
• Cold Cathode Lamp (for long-lasting operation)
• Scan Method: Single-Pass
• 30-Bit Colour
• 10-Bit Greyscale
• 1-Bit Line-art (Black & White)
• Resolution:
1230P/9631P: 600 x 1200 dots per inch (9600 x 9600 software
interpolated).
600P/4831P: 300 x 600 dots per inch (4800 x 4800 softwareinterpolated)
• TWAIN Compliance
• Printer Port Pass-Through
• Connection: Enhanced Parallel Port (EPP)
• 1 Year Warranty (from date of purchase)
• Removable Scanning Lid
Computer Requirements
• Windows/Intel Compatible Personal Computer
• Pentium CPU or Later
• CD-ROM Drive
• 16 MB RAM (32 MB Recommended)
• 60 MB Free Hard Disk Space (100 MB Recommended)
• Enhanced Parallel Port (EPP)
• Windows 3.1x, Windows 9x, or Windows NT 4.x
• Graphics Accelerator (Video Card), with at least 16-bit colour
support
viii
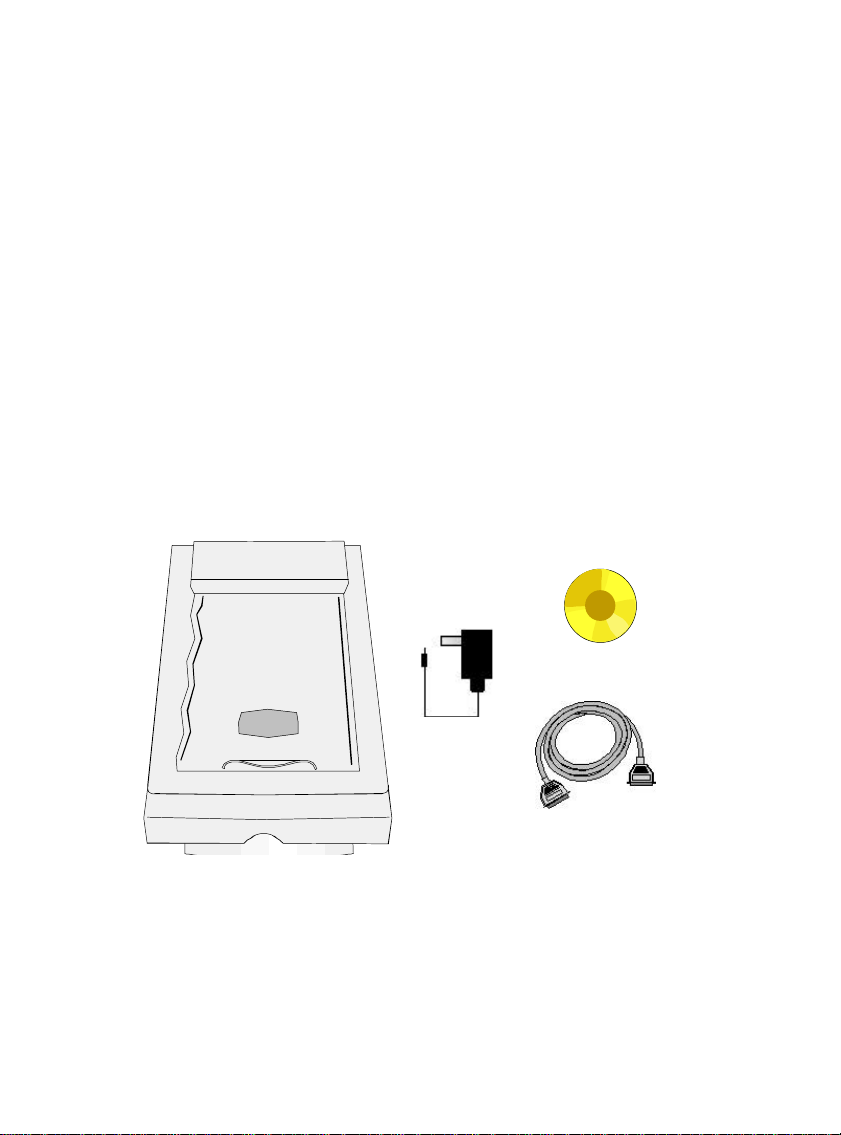
Package Contents
1. Scanner engine
2. Power adapter
3. Scanner cable
4. CD-ROM
a) Scanner Setup Programme
b) Optical Character Recognition (OCR) software
c) Image editing software
d) This user’s guide
e) Registration forms
f) OCR & image-editing guides
1
2
4
3

1
Chapter I. Hardware Installation
2
Before installing your scanner, verify that you have all of the
proper components. A list of the package contents is provided on
page viii at the beginning of this guide.
Hardware Requirements
Your scanner uses an interface called an Enhanced Parallel
Port. The scanner’s EPP interface allows you to scan information
into your computer as quickly as scanners costing hundreds of
dollars more that use interface cards. If your computer’s printer
port does not support EPP, then it is recommended that you
purchase an additional parallel port interface card that supports
EPP technology to maximize the scanner’s performance.
3
Caution
Installing the Scanner’s Hardware
If you have already installed your scanner, please skip this
section. The following section describes how to connect the
scanner to your computer and printer. Please carefully follow
along to ensure proper installation.
1. Turn OFF your computer, its related peripherals and
disconnect all related power cables!
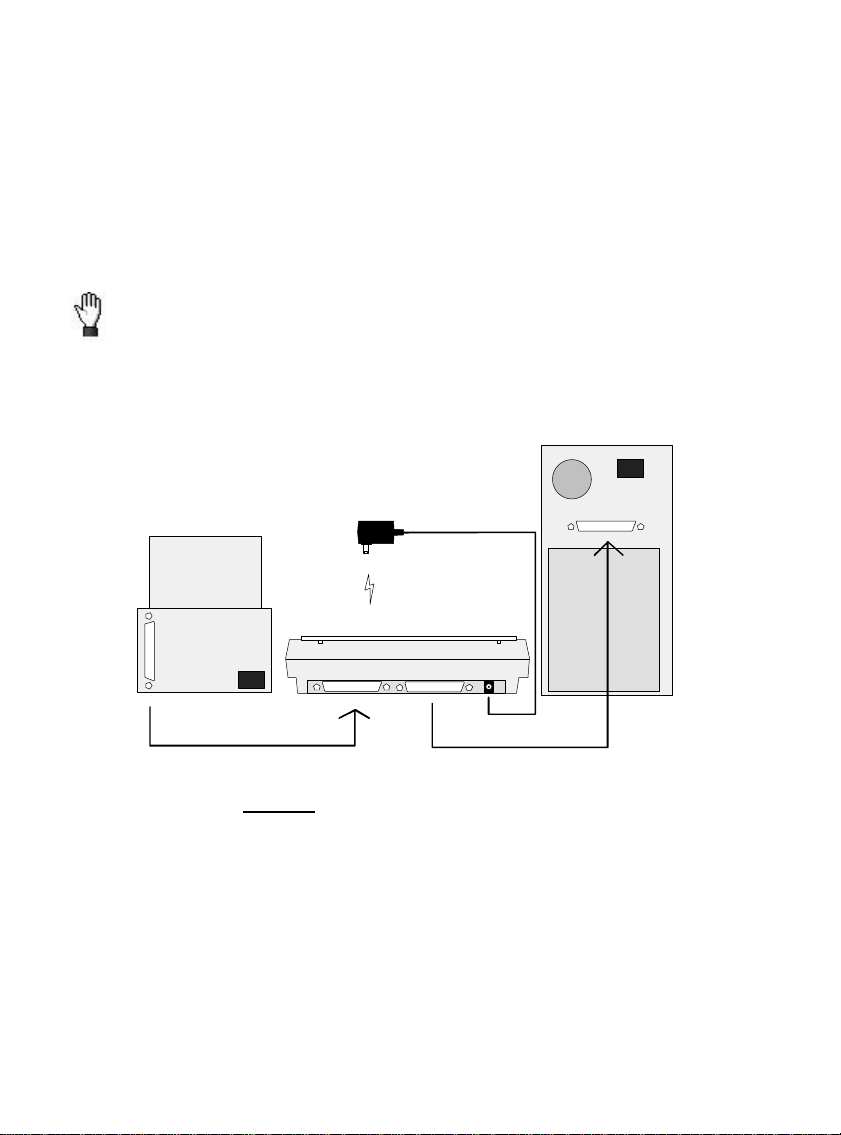
2. Please take a moment to study Figure 1.
Computer
Printer
Step 2
Power Adapter
Scanner
Printer
Step 4
Host
Step 1
Figure 1. Connecting the Scanner
3. If you have a printer connected to your computer, please
disconnect its cable from the rear of the computer. If you
have more than one printer port connected to you computer,
then locate the printer port that’s the Enhanced Parallel Port
(EPP).
4. Plug the female end of the SCANNER CABLE into the rear

4
Attention
Danger
of the scanner marked HOST (see Figure 1 and step 1).
5. Connect the male end of the SCANNER CABLE into the
PC’s printer port (see Figure 1, and step 1).
Attention: If you do not have a printer connected to your
computer and are not sure where the printer port is
located, see your computer’s information book and read
the section about the printer port connector.
6. Next, plug the disconnected printer cable into the rear of the
scanner marked PRINTER (see Figure 1 and step 2).
7. After plugging the scanner and printer cables into their
respective locations, plug the power adapter into the
scanner’s power receptor (see Figure 1 and Step 3).
8. Plug the power adapter into a standard AC outlet or wall
branch.
Only use the power adapter that is included with your
scanner. The use of a different power adapter may
damage the unit and void your warranty!
9. Plug in all power cords and turn on your computer.
10. Install the scanner’s software (see Chapter II. Software Setup
page 5).

5
Chapter II. Software Setup

6
Before installing the scanner’s software, make sure that the
scanner is properly connected as described in Chapter I,
Hardware Installation, page 1.
Software Installation Requirements
Your scanner comes bundled with OCR software, image-
editing software, the scanner’s driver, and TWAIN software. The
scanner’s software uses approximately 40 megabytes of hard disk
space after it is installed to your computer. For Setup to properly
install the scanner’s software it is recommended that you have
over 100 megabytes of available hard disk space. Note: The 100
megabyte free hard disk space requirement is necessary so the
installation will have plenty of room to perform its swapping
routines. Otherwise, you might receive error messages during the
installation.
Software Installation
The installation programme called Setup/Application CD-
ROM must be run from within Microsoft Windows™. Once
Windows is running on your system, please follow the steps
below to properly install the software:
1. Insert the installation CD-ROM into its disc drive.
2. If using Windows 95, click on START and RUN. If using
Windows 3.1x, from Programme Manager choose FILE and
RUN.
3. In the Open field, or Command Line if using Windows 3.1x,
enter the letter of your disc drive followed by SETUP.EXE

7
(i.e., D:\SETUP.EXE), and press ENTER. After
approximately 15-20 seconds you should be at the Setup
programme.
4. Follow the on-screen instructions carefully to properly install
the scanner’s software to your computer.
Software Setup Troubleshooting Guide
If you encounter a damaged or missing CD-ROM: Call our
support line located at the end of this user’s guide and request a
replacement disc. You can also download the scanner’s driver
from our world wide web (WWW) site (see the end of this guide
for details). Note: The image-editing software and OCR software
are not available for downloading from the Web site!
Installing Additional Software
Your scanner is TWAIN compliant and functions with
virtually all available TWAIN compatible scanning software.
When purchasing new software for your scanner, please make
sure that it conforms to the TWAIN standard.
• Please be sure to select the correct TWAIN source when
setting up new scanning software. If you intend to use
different programmes with your scanner, choose the scanning
source as TWAIN within the scanner setup and select the
TWAIN source as your scanner. Note: The 16-Bit TWAIN
source is for using the scanner with Windows 3.1 “native”
scanning programmes that are 16-bit. The 32-Bit TWAIN
source is for using the scanner with programmes designed
exclusively for Windows 95 and are 32-bit.

8

9
Chapter III. Usage and
Maintenance

10
Operating the Scanner
Your scanner accepts documents as small as business cards
and as wide as A4-sized documents. However, some software
programmes can have limitations as to the information they can
handle. The capacity of the computer’s memory, or free hard disk
space, can also limit the size of the document that you can scan.
Testing the Scanner
Before testing your scanner, double-check and make sure that
all connections are securely fastened. The following test
procedure checks to see if the scanner is properly functioning
with your computer and the scanning software.
To properly test your scanner, please perform the following
steps:
1. Exit all open applications and “Shut Down” your computer.
2. After the computer has shut down, turn it off and wait
approximately one minute before turning it back on.
3. Once your computer is running, enter Windows.

11
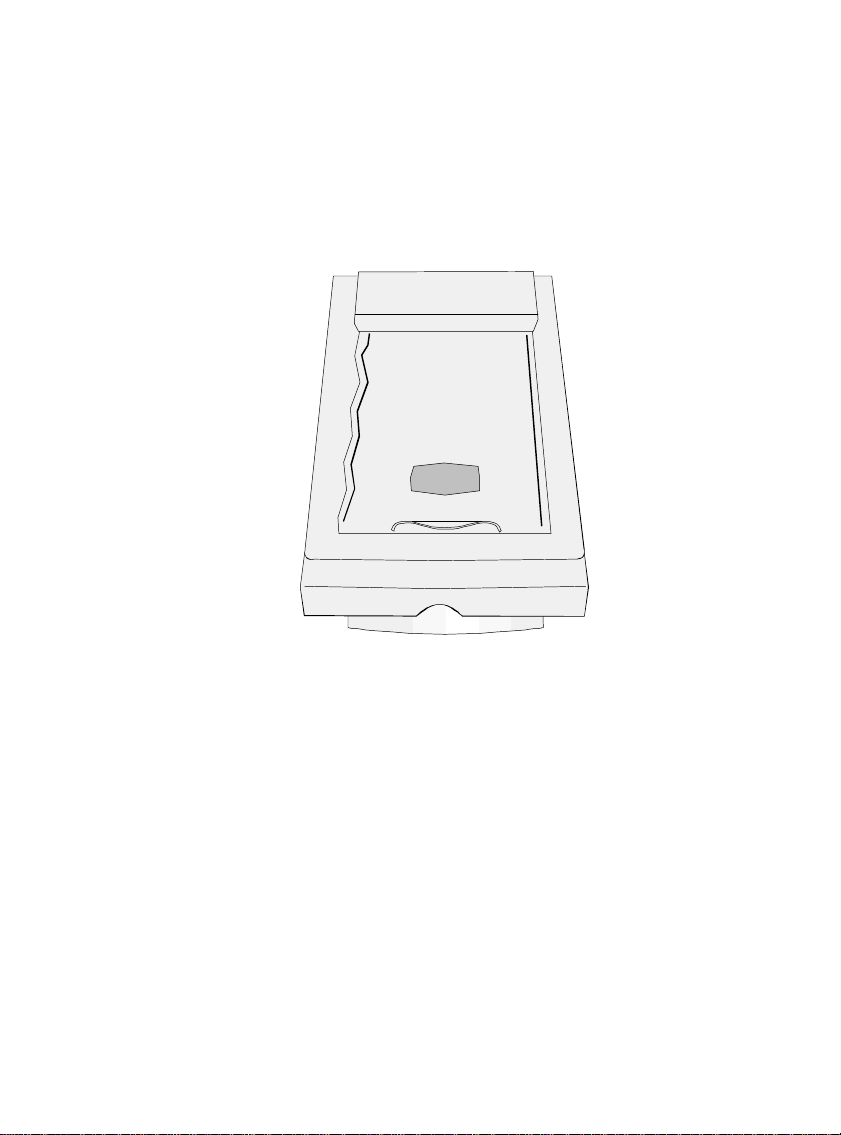
Document Cover
Place a picture at the
back of scanner and
face-down.
Scanning Window
Figure 2. Flatbed Scanner
4. Open the document cover and place a picture onto the
scanning window face-down.
5. Next go to the scanner’s programme group and open the
Scanner Utility.
6. Click on the Lamp Control tab located at the bottom of the
dialogue box.
7. While looking at the scanner, click on the Turn on Lamp
and Turn off Lamp icons (see Figure 3). This test checks to
see if the scanner’s light source is properly working.
8. Slowly close the document cover.

12
9. Next, go to the scanner’s programme group and open the
image-editing software.
10. Select the TWAIN source from the image editing software.
11. From the FILE menu choose ACQUIRE (SCAN).
12. The TWAIN dialogue box will pop-up.
13. To scan, click the SCAN button.
14. When the scan is completed, click on CANCEL to view the
image. For more information about the TWAIN dialogue box
and its features, see Chapter IV. Using TWAIN.
Note: If the above test failed in any way, please read Appendix A:
Troubleshooting for possible solutions.
Scanner Utility
The Scanner Utility, located inside the scanner programme
group, is for determining what printer port your system has. The
only time you need to verify your system’s printer port is if the
scanner does not respond when trying to scan.
To set the amount of time the scanner’s light source stays on
(the factory default is approximately 7 minutes), click the tab
that reads Lamp Control. Under the heading Lamp Control ,
click “Turn off lamp after 5 minutes.” You can also test the
scanning lamp by clicking the Turn off Lamp, Turn on Lamp
icons.

13
Turn Off Lamp
Keep Scan Light
on for set amount
on Always
Keep Scan Light
Caution
Turn On Lamp
Figure 3. Scanner Utility and Verifier
Maintenance
To keep your scanner working smoothly, take a moment to
review the following maintenance tips.
• Avoid using the scanner in a dusty environment. When it is
not in use, keep the scanner covered. Dust particles and other
foreign objects may damage the unit.
• Do not attempt to disassemble the scanner. There is danger of
an electrical shock. If a problem occurs, have the scanner
serviced by an authorized dealer.
• Do not subject the scanner to excessive vibration. It may
damage the internal components.
• Your scanner operates best in temperatures between 10° C to
40° C (50° F to 104° F).
Cleaning Your Scanner
Clean the scanner by lightly spraying a nonabrasive glass
cleaner on the scanning window. Be sure to wipe up all excess
liquid before scanning. To clean the scanner’s exterior, also use a

14
nonabrasive cleaner to remove any dust or grease from the
machine.
Removing the Scanner’s Lid
The scanning lid has been designed for easy removal. To
remove the scanner’s lid, open the lid until it’s perpendicular to
the scanner. Place your hand firmly at the back of the scanner
and lift the lid off its hinges. To replace the lid, simply snap it
back into place.

15
Chapter IV. Using TWAIN

16
Scanning Using TWAIN
There are a few terms that you must become familiar with to
maximize the quality of images generated by your scanner. The
following chapter describes the TWAIN interface which pops-up
whenever you click SCAN, or ACQUIRE from within a TWAIN
compatible scanning programme (see Figure 4).
Menu Items
Predefined Settings
Margin Selector
Zoom Control
Colour Distribution
Scanning Control
Image Preview
Scan area, margin
frame position and
margin frame size.
Margin Frame
Prescan Window
Figure 4. TWAIN Dialogue Box
Image Size
The TWAIN interface allows you to make important adjustments
before scanning. For example, you can scan in different modes:
colour, B/W or greyscale; increase or decrease the resolution

17
(dots per inch of an image), and adjust the brightness and/or
contrast. The Prescan option allows you to adjust the margins of
a document by increasing or decreasing the frame located inside
the Prescan Window. The TWAIN interface also provides you
with statistics: such as how big an image will be after you scan it,
the scanning area and position of the margins.
Choosing TWAIN
To select the TWAIN interface, from your TWAIN
compatible programme, locate SCANNER and choose TWAIN
SOURCE and your scanner.
Note: The 16-Bit source is for scanning with 16-bit
applications (Windows 3.1x native architecture), and the 32-bit
source is for scanning in 32-bit applications (Windows 95 native
architecture). Your scanner comes with 32-bit scanning
applications for Windows 95 and 16-bit scanning applications for
Windows 3.1x. However, if you are using a 16-bit scanning
application inside Windows 95, you must select the 16-bit
TWAIN source for your scanner to properly function. The same
applies for 32-bit scanning applications, you must select the 32bit TWAIN source for your scanner to properly function.
Control Panel & Scan Mode
There are three modes that you can select for scanning
documents: RGB Colour, Greyscale, or Black & White (also
called Line-art). To change the scan mode, click the PANEL
button located inside the TWAIN dialogue box.
Figure 5 is the Scanning Control Panel. It allows you to

18
Scan Mode
Resolution
Scan Scale
Brightness
Contrast
adjust the brightness and contrast, resolution, scale and the scan
mode. The following describes the various options located inside
the Control Panel:
Scan Mode
B&W (Black & White) comprises of documents that have only
two values (black and white). Use B&W for scanning text
documents created with a laser-jet, ink-jet or bubble-jet printer
(no photographs or other images).
Figure 5. Scanning Control Panel
Greyscale (10-bit) captures more than two grey values during
scanning. When entering documents to your computer that
contain photographs, or other detailed pictures choose greyscale
as the scanning mode.
RGB Colour (30-bit) captures the most information and detail

19
during scanning, and is the best choice for scanning pictures and
documents that contain detailed colour and graphics. The RGB
Colour option, when selected, enables the scanner to scan at its
maximum bit capability (230=1,073,741,824 colours).
Resolution
Resolution is how many dots per inch (dpi) or pixels are scanned.
For example, if you scan a Greyscale image at a resolution of
150, the hard disk space needed to scan a letter size document
will be approximately 2.6 MB. For a listing of what resolutions
you should use with each mode, see the end of this chapter and
Scanning Hints.
Scale
Scale is for adjusting the size of scanned images. For example,
when scanning to an image-editing programme, like IMAGE-IN
or Photo Magic, you can pre-adjust how big, or how small the
image will look after it enters your system. The scale can also
depend on what resolution you have your display set at, and the
scan resolution.
Brightness and Contrast
Brightness is the amount of light that is concentrated onto a
document while it is being scanned. Adjust the brightness by
sliding the button located between the arrows either left or right.
Turn the brightness down if characters are thick and dark, and up
if characters are thin.
Contrast adjusts the tonal range of an image by lowering mid-

20
tone values and increasing values for high and low tones. For
example, use contrast to eliminate noise or shading on Black &
White and Greyscale scans or to “clean-up” colour scans.
Inverse
When Inverse is checked the colours of an entire image, or
portions of an image will become reversed. A black-and-white
image reverses where the white dots become black and the black
dots become white. A black-and-white image looks like a photo
negative. A colour image reverses using additive colours.
TWAIN Menu Options
Most of the menu options are considered advance features.
We strongly suggest that you first become familiar with scanning
and using the Control Panel before attempting to use any of the
following features. Once you become comfortable with how our
scanner works, and how to create clear images, you can begin
experimenting with the advance features of the TWAIN dialogue
box.
File Menu Item
There are five choices located under the File menu item.
Please read through the following descriptions to learn how to use
the file menu options. If you have any further questions about any
of the items located inside the file menu, click on Help located
inside the TWAIN dialogue box to see more information.
Save Settings is for saving changes that you make within the
TWAIN dialogue box. For example, if you change the resolution,

21
brightness or any other attributes, save the changes by choosing
Save Settings.
Save Settings As lets you create a unique name for your
changes. As an example: You can set various resolutions and
scan modes and save them as a custom name (i.e., 75-dpi colour
200 scale).
Load Default reinstates the factory setting of TWAIN. The
factory default is set to RGB and 50 DPI and 50% for brightness
and contrast. Note: You can not make changes to the Default
settings file.
Settings Files allows you to change the names, or delete
settings that you set up and define. Note: Once you change, or
delete a setting, you can not recover it, so please be cautious!
Filter Menu Item
You have seven filter choices located under the Fi lter menu
item. The filters will help you improve your scans by allowing
you to sharpen images and remove excessive dots and distortion.
Please read through the following explanations and examples to
learn how to properly use filtration. In many cases you might find
that experimentation is an excellent way of determining which
filter will work.
Average determines the medium depth of an image, and
averages adjacent pixels to make images appear softer.
Blur lets you dull the edges within an image, and decreases
the contrast by making dark edges lighter and light edges darker.
Blur More: see Blur.
Sharpen allows you to sharpen the edges within an image by
making the edges in an image more distinct. The Sharpen filter

22
also increases contrast by making dark edges darker and
surrounding light edges lighter.
Sharpen More: see Sharpen.
Descreen applies filtering to images that contain moiré
patterns (or herringbone). A moiré pattern is created from
scanning pictures in magazines, or printed material that use
colour dithering. Hint: We suggest leaving the Descreen option
checked at all times. It is the best filtering method for most
practices.
Advanced Menu Item
The Advance menu item has three options: Enhance,
Preferences and Monitor Gamma. The items located under the
advance menu are intended for users who are familiar with image
editing tools and how they affect images. If you are just learning
how to scan, then we strongly recommend not using these
features until you become familiar with your scanner and its
terminology.
Enhance
Enhance pops-up TWAIN’s colour correction options:
Histogram, Tone Map and Gamma Data. Many image-editing
programmes already have these features. However, if the need
arises to adjust the colour level of your scanned images, then
enter Preferences and perform the following adjustments. Note:
Before adjusting the Tone, Gamma and Histogram, perform a
Prescan so you can view the changes before you scan an image.
Histogram is a representation of statistical data by
rectangles: widths represent class intervals and heights represent

23
similar frequencies. Make adjustments to the histogram only
when the colour balance of your scanned image does not match
the original picture. Hint: We suggest leaving the histogram set to
AUTO when not encountering colour depth discrepancies.
Figure 6. Histogram
Tone Map enables you to modify the tonal range and to
adjust highlight, mid-tone, and shadow areas of an image. For
example: When an image is too dark or too light, it may have
hidden details that can be uncovered by using Tone Map. This
usually improves the contrast of an image. For example, when the
darkest tone is 65% black, you can use the Tone Map to make it
100% black.
Gamma values follow a smooth curve, as seen below in
Figure 7. By adjusting the gamma, you can change the tonal
range of the selected Channel (colour). Gamma values are
primarily a measure of a channel’s brightness. The larger the

24
gamma value, the brighter the colour becomes. Note: By
changing the gamma values you affect the image’s data, and
influence the how an image displays on your computer’s monitor,
and printer.
Figure 7. Gamma
Channels let you split a colour image into individual Hue,
Saturation, and Lightness channels. For example, each image
represents one of three additive colours (red, green, and blue).
The name of the channel appears in the title bar. This can be
useful in comparing colour ranges between the colour values, and
in identifying methods when editing specific areas.
Preferences
Use the Preferences option to change the unit of measure from
English (in.) to Metric (cm), or from Metric (cm) to English (in.).
Click Preserve Prescan, so the image displayed in the Prescan
window will not be removed after you close the TWAIN dialogue
box. This feature is extremely convenient if you are checking
scanned images for quality, proper filtering and/or scale.

25
Monitor Gamma
The Monitor Gamma option lets you adjust your monitor so
you can properly and accurately view images. For example, there
are different situations that might affect your ability to correctly
view images: Lighting conditions, human perception of colours,
and the monitor you are using are some common factors.
To correctly adjust the monitor gamma, you must first have
your computer and working environment stable: including
lighting, and your monitor’s brightness, contrast and colours
properly adjusted. Next, select the Monitor Gamma option.
Drag the slider bars until the hue inside each rectangle is the same
colour as their adjacent colours (as seen below). When finished
adjusting your monitor’s gamma, click OK to exit.
Red Hue
Green Hue
Blue Hue
Grey Hue
Monitor
Gamma
Adjustments
Figure 8. Gamma Control

26
Scanning Hints
B/W & Greyscale Scanning
If scanning B/W images, match the DPI to the resolution of
your printer, or scanner. For example, if you have a 300-dpi
scanner, then set the resolution to 300. If you have a 600-dpi
printer, set the scanning resolution to 600.
When not scanning using B/W, but rather Greyscale, we
find that a resolution of 150 works extremely well. Note:
Sometimes increasing the brightness and contrast can help
improve and lighten the greyscale image quality.
Colour Scanning
When scanning in colour, remember that 24 to 30 bits of
information take up a lot of disk space. If you are going to scan a
colour image and then print it out, scan at 200 dpi. If you are
going to scan a colour image just to experiment, scan between 75
and 100 dpi to conserve hard disk space.

27
Appendix A: Troubleshooting

28
Most problems are easily solved, and some of the most
common questions and their recommended solutions are listed
below.
Symptom Possible Solutions
Scanner scans very
slowly
Cannot print to
printer
Scanner does not
respond
Scanner does not
emit any light
Scanner not found
The scanner’s light
source stays on all
the time
• Make sure the resolution of the scanner is not set
too high. A range between 75-200 should work
fine.
• Set the Parallel Port Mode inside computer’s
BIOS to EPP (enhanced parallel port).
• Make sure all filters are deselected inside
TWAIN.
• Check that printer cable is properly secured to
printer and scanner.
• Make sure printer is turned on.
• Turn off the computer and the printer. Make sure
that the scanner is plugged into a constant power
source (leave scanner on at all times). Turn the
computer on and enter Windows. Once inside
Windows turn on the printer and try printing a
document.
• Disable the “Bi-directional” option of the printer.
• Reset the computer (turn it off and on).
• Unplug the power cable from the rear of the
scanner and open the scanner’s lid. Looking at the
front of the scanner while the lid is open plug the
power cable back into the scanner. If the light
turns on and off quickly, the scanner is properly
working.
• Please see http://www.plustekusa.com and the
Knowledge Base for more information.
• The scanner’s light source is designed to stay on
for 30 minutes. To turn off the scanner’s light,
enter the Scanner Utility and choose the Lamp
Control tab.

29
Symptom Possible Solutions
During printing only
garbage prints
Unable to find
scanner
The computer’s
mouse, keyboard, or
floppy drive does not
work
The computer has an
SPP that does not
support bi-directional
communication
Cannot scan to
application software
• Purchase a shorter printer cable and try it.
Sometimes when information has to travel a
long distance it becomes distorted. Shortening
the printer’s cable can decrease the possibility
of information becoming damaged.
• Disable the “Bi-directional” option of the
printer.
• Check your computer’s parallel port to see if it
is an EPP by entering computer’s BIOS. If the
parallel port mode is set at ECP or SPP, change
it to EPP. Save and exit the BIOS and run
Windows. Enter the Scanner Utility and click
the proper address and EPP and choose Verify
Port.
• Make sure the printer is on when it is connected
to the rear of scanner.
• Upgrade printer port, or controller card to an
EPP interface.
• Enter the computer’s BIOS and change the
printer port to EPP and its address to 278, or
378.
• If the above steps do not solve the problem, add
the following statement to the SYSTEM.INI file
below the heading "[386Enh]:"
PORT_CHIPCONTROL= 1
• Purchase and have install an EPP interface card
and disable the computer’s standard printer
port.
• Look at the Scanner Setup option inside the
scanning application and make sure the correct
scanner is chosen.
• Check all connections and make sure they’re
secure and correct.

30
Appendix B: Customer Service

31
I f you encounter problems with your scanner, please review the
installation instructions and troubleshooting suggestions
contained in this guide.
For further assistance call our customer support phone
number listed on the back cover of this guide. One of our
representatives will be happy to assist you between Monday and
Friday. To avoid any delays, please have the following
information available before calling:
• • Scanner name and model number.
• • A detailed description of the problem.
• • This guide.
• • Your computer manufacturer and its model number.
• • The speed of your CPU (Pentium, 486, etc.).
• • Your current operating system and BIOS (optional).
• • Other interface cards in your system (including I/O
address settings and IRQ settings).
• • Name of software package(s), version or release number
and manufacturer of the software.
Attention
We are continuously enhancing the performance of our
product drivers. To check for the latest device driver visit our
Web site.

32
Appendix C: Index

33
A
H
Attention, vi
Average, 21
B
Blur, 21
Brightness & Contrast, 19
C
Caution, vi
CD ROM, viii
Channels, 24
Cold Cathode, vii
Control Panel, 17
D
Danger, vi
Descreen, 22
E
Enhance, 22
Enhanced Parallel Port, v, vii, 2, 3
EPP, v, vii, 2, 3, 28, 29
Histogram, 22
I
Inverse, 20
M
Monitor Gamma, 25
O
OCR, viii
R
Resolution, 19
S
Scale, 19
Scan Mode, 18
Scanner Utility, 12, 13, 28, 29
Sharpen, 21
T
Gamma, 23
G
Testing, 10
Tone Map, 23
TWAIN, v, vii, 15, 16, 17, 20, 21, 22,
24

Statement of Limited Warranty
This Statement of Limited Warranty applies only
to the options you originally purchase for your use,
and not for resale, from an authorized reseller.
The manufacturer warranty period for this product
is one year from the date of Original Purchase as
shown on your receipt, and includes all parts and
labor. You should keep the receipt as it
establishes Proof of Original purchase. You will
need it to obtain warranty service.
If you transfer this product to another user,
warranty service is available to that user for the
remainder of the warranty period. You should give
your proof of purchase and this statement to that
user.
We warrant that this machine will be in good
working order and will conform to its functional
descriptions in the documentation provided. Upon
provision of proof of purchase, replacement parts
assume the remaining warranty of the parts they
replace.
Before presenting this product for warranty
service, you must remove all programmes, data
and removable storage media. Products returned
without guides and software will be replaced
without guides and software.
This Limited Warranty service does not provide
for carry-in exchange when the problem results
from accident, disaster, vandalism, misuse,
abuse, unsuitable environment, programme
modification, another machine or non-vendor
modification for this product.
If this product is an optional feature, this Limited
Warranty applies only when the feature is used in
a machine for which it was designed.
If you have any questions about your Limited
Warranty, contact the approved retailer from
whom you bought the product or the
manufacturer.
THIS LIMITED WARRANTY REPLACES ALL
OTHER WARRANTIES, EXPRESS OR IMPLIED,
INCLUDING, BUT NOT LIMITED TO, THE
IMPLIED WARRANTIES OF MERCHANTABLITY
AND FITNESS FOR A PARTICULAR PURPOSE.
HOWEVER, SOME LAWS DO NOT ALLOW THE
EXCLUSION OF IMPLIED WARRANTIES. IF
THESE LAWS APPLY, THEN ALL EXPRESS
AND IMPLIED WARRANTIES ARE LIMITED IN
DURATION TO THE WARRANTY PERIOD. NO
OTHER WARRANTIES APPLY AFTER THAT
PERIOD.
Some jurisdictions do not allow limitations on how
long an implied warranty lasts, so the above
limitation may not apply.
Under no circumstances are we liable for any of
the following:
1. Third party claims against you for losses or
damages.
2. Loss of, or damage to, your records or data;
or
3. Economic consequential damages
(including lost profits or savings) or
incidental damages, even if we are informed
of their possibility.
Some jurisdictions do not allow the exclusion or
limitations of incidental or consequential
damages, so the above limitation or exclusion
may not apply to you.
This Limited Warranty gives you specific legal
rights, and you may also have other rights that
vary from jurisdiction to jurisdiction.

FCC Radio Frequency Statement
This equipment has been tested and found to comply with the limits for
a Class B digital device, pursuant to part 15 of the FCC rules. These limits
are designed to provide reasonable protection against harmful interference
in a residential installation.
This equipment generates, uses and can radiate radio frequency energy
and, if not installed and used in accordance with the instructions, may
cause harmful interference to radio communications. However, there is no
guarantee that interference will not occur in a particular television
reception (which can be determined by turning the equipment off and on),
the user is encouraged to try to correct the interference by one or more of
the following measures:
√ Reorient or relocate the receiving antenna.
√ Increase the separation between the equipment and receiver.
√ Connect the equipment to an outlet on a circuit different from that which
the receiver is connected.
√ Shielded interconnect cables and shielded power cord which are supplied
with this equipment must be employed with this equipment to ensure
compliance with the pertinent RF emission limits governing this device.
√ Consult the dealer or an experienced radio/TV technician for help if the
conditions persist.
√ Changes or modifications not expressly approved by the manufacturer or
authorized service center could void the user’s authority to operate this
equipment.

Plustek Electronics GmbH
Broedermannsweg 17, 22453 Hamburg, Germany.
Tel: 49-40-514316-0
Fax: 49-40-543638
BBS: 49-40-5133487 Log in & Password: GAST
E-mail: info@plustek.de
Web site: www.plustek.de
Office Hours: 9:00 a.m. until 5:30 p.m. CET Monday through Friday.
Plustek USA
309 East Brokaw Rd., San Jose, CA 95131.
Tel: (408) 453-5600
Fax: (408) 453-5780
BBS: (408) 453-5718
Email: techsupport@plustek.com
Web site: www.plustekusa.com
Office Hours: 8:30 a.m. until 5:30 p.m. pacific time Monday through
Friday.
Plustek Inc. Taiwan
4F, No. 1, Lane 50, Sec. 3, Nan Kang Rd., Taipei, Taiwan, R.O.C.
Tel: 886-2-651-5311
Fax: 886-2-651-5310
E-mail: tplustek@ms2.hinet.net
Web site: www.plustek.com
36
 Loading...