

Plustek OPTICPRO 1248U User Manual

Version 2.7
OpticPro 1248U
• Installation • Usage &
Maintenance
• Troubleshooting
All trademarks and brand names mentioned in this publication are property of their
respective owners.
© 2001-2002. All rights are reserved. No portion of this document may be reproduced
without permission.

Table of Contents
INTRODUCTION.........................................................................................................................................1
HOW TO USE THIS GUIDE............................................................................................................................1
CONVENTIONS OF THIS GUIDE....................................................................................................................2
A NOTE ABOUT ICONS ................................................................................................................................2
SYSTEM REQUIREMENTS............................................................................................................................. 3
BOX CONTENTS .......................................................................................................................................... 3
PRODUCT INFORMATION.............................................................................................................................4
CHAPTER I. INSTALLING THE PLUSTEK OPTICPRO SCANNER................................................. 5
SOFTWARE INSTALL ATION REQUIREMENTS................................................................................................. 5
HARDWARE REQUIREMENTS....................................................................................................................... 5
INSTALLING AND SETTING UP THE SCANNER............................................................................................... 6
Step 1. Connecting the OpticPro Scanner to Your Computer............................................................... 6
Step 2. Installing the Software.............................................................................................................. 7
SOFTWARE SETUP TROUBLESHOOTING....................................................................................................... 8
INSTALLING ADDITI ONAL SOFTWARE.......................................................................................................... 9
SCANNER SETUP AFTER WINDOWS XP UPGRADE ...................................................................................... 9
CHAPTER II. USAGE AND MAINTENANCE...................................................................................... 10
OPERATING THE SCANNER ........................................................................................................................ 10
Testing the Scanner............................................................................................................................. 11
THE SCANNER UTILITY PROGRAM ............................................................................................................ 12
Connection Status................................................................................................................................ 13
Aligning the Scanner........................................................................................................................... 13
LAMP CONTROL........................................................................................................................................14
MAINTENANCE.......................................................................................................................................... 14
REMOVING THE DOCUMENT COVER.......................................................................................................... 14
APPENDIX A: TROUBLESHOOTING...................................................................................................16
SCANNING PROBLEMS............................................................................................................................... 16
COMMON -HOW-TO- QUESTIONS .............................................................................................................. 19
APPENDIX B: SPECIFICATIONS.......................................................................................................... 21
APPENDIX C: CUSTOMER SERVICE AND WARRANTY................................................................ 22
STATEMENT OF LIMITED WARRANTY........................................................................................................22
FCC RADIO FREQUENCY STATEMENT ...................................................................................................... 23
CONTACTING PLUSTEK........................................................................................................................25

1
Introduction
Welcome to the world of Plustek scanners – the ultimate in computer imaging.
Your new scanner will improve the professionalism of your day-to-day computing
tasks by allowing you to input images and electronic text into your computer system.
Like all of our products, your new scanner is thoroughly tested and backed by our
reputation for unsurpassed dependability and customer satisfaction.
Please remember to register your scanner. Registration may be completed in one
of three ways:
1) By registering online via Plustek’s Web Site;
2) By printing out and faxing a completed registration card to Plustek’s
customer service center;
3) By printing out and mailing the registration card directly to the Plustek office
nearest you.
See the last page of this user’s guide for a complete list of Plustek offices
worldwide.
As a registered customer, you will receive customer support, new product
information and software upgrades.
Thank you for choosing us as your scanner supplier. We hope you will continue
to turn to us for additional quality products as your computing needs and interests
grow.
How to Use This Guide
This User’s Guide provides instructions and illustrations on how to install and
operate your scanner. This guide assumes the user is familiar with Microsoft Windows.
If this is not the case, we suggest you learn more about Microsoft Windows by
referring to your Microsoft Windows manual before using your scanner.
The Introduction section of this manual describes the box contents and minimum
computer requirements to use this scanner. Before you start installing your Plustek
OpticPro scanner, check the box contents to make sure all parts are included. If any
items are damaged or missing, please contact the vendor where you purchased your
scanner or Plustek’s customer service directly at one of the locations at the back of
this manual.
Chapter I. Installing the Plustek OpticPro Scanner describes how to install
scanner’s software and connect the scanner to your computer. Note: The scanner
connects to your computer through the Universal Serial Bus (USB). If your
computer does not support USB technology, you will need to purchase a USB

2
interface card to add USB capabilities to your computer, or buy and install USB
connectors if your motherboard has USB capability. This guide assumes that
your computer is USB-ready and has a free USB port.
Chapter II describes how to test, maintain and clean your scanner. It also
describes how to use the scanner utility program which helps you troubleshoot and fix
connection problems which may have occurred during the scanner installation.
Appendices A & B have technical support information that can help you solve
simple problems. Before calling for help, please read through Appendix A:
Troubleshooting.
Appendix C contains Plustek’s limited warranty agreement and FCC statement
concerning the product.
Conventions of This Guide
Bold — Important note or first use of an important term in a chapter.
ALL CAPS — Represents commands or contents on your computer screen.
A Note about Icons
This guide uses the following icons to point out information that deserves special
attention.
Danger
Danger: A procedure that must be followed carefully to prevent
injury, or accidents.
Caution
Caution: Information that, if not followed, may result in data
loss or damage to the product.
Attention
Pay Special Attention: Instructions that are important to
remember and may prevent mistakes.
3
System Requirements1
• Windows/Intel Compatible Personal Computer
• Pentium CPU or above
• CD-ROM Drive
• 64 MB RAM (128 MB Recommended)
• 160 MB Free Hard Disk Space (260 MB Recommended)
• USB Port
• Microsoft™ Windows XP, 98, Me or 2000 Professional
NOTE: Windows NT 4.0 does not support Universal Serial Bus (USB)
connectivity.
• Video card that supports 16-bit color or greater
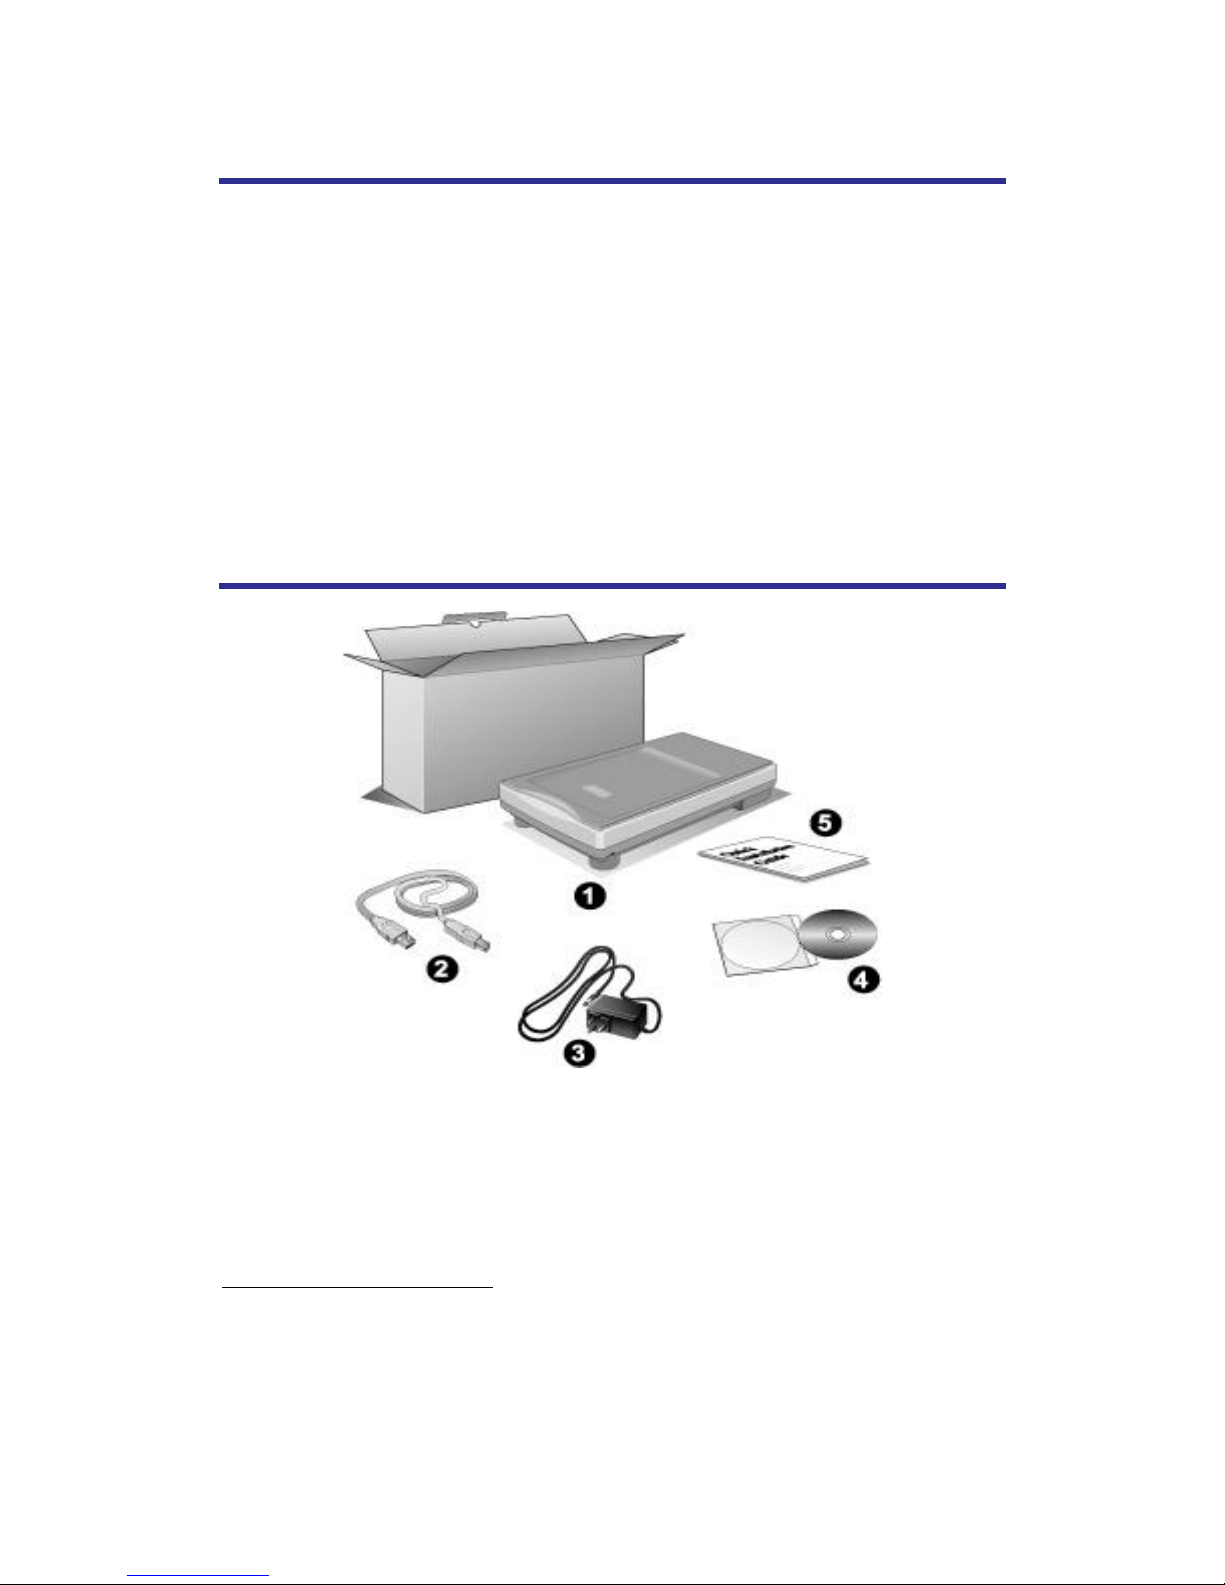
Box Contents2
1. Scanner
2. USB Cable
3. Power Adapter
4. Setup / Application CD-ROM includes the following software applications
3
:
• Scanner Setup software
1
Higher requirements might be needed when scanning or editing a large quantity of image data. The
system requirements here are only a guide line, as in general the better the computer (motherboard,
processor, hard disk, RAM, video graphic card), the better the results.
2
Save the box and packing materials in case you need to transport this scanner in the future.
3
The bundled software may change at any time without prior notice.

4
• ABBYY FineReader Sprint 4.0 (OCR software)
• NewSoft Presto! PageManager (Document Management Software)
• NewSoft Presto! ImageFolio (Image Editing Software)
• NewSoft Presto! Mr. Photo (Photo Organizer)
• Bridgewell Page abc (Scan-to-Web Software)
• Action Manager 32
• Adobe Acrobat Reader 4.0 (PDF Product Manuals Reading Program)
• This User’s Guide (Electronic version)
• Scanner Software User’s Guide (Electronic version)
• Registration Form (Electronic version)
5. Quick Installation Guide
Product Information
Please fill in the following information for your own records. You will need it if
you contact your dealer or Plustek service center in the future.
Serial Number:
!!!!!!!!!!!!
(Located at the back of the scanner)
Date of Purchase:
!! - !! - !!!!

5
Chapter I. Installing the Plustek
OpticPro Scanner
Before installing your scanner, please verify that you have all of the proper
components. A list of the package contents is provided in the Box Contents section on
page 3 of this guide.
Software Installation Requirements
Your scanner comes with the image-editing software (Presto! ImageFolio), OCR
software (FineReader), document management software (Presto! PageManager), the
scanner’s driver, Scanner Utility and Action Manager 32 software. All of these
software applications use approximately 160 megabytes of hard disk space after they
are installed into your computer. To ensure ample room for the installation, as well as
for scanning and saving images, a minimum of 260 megabytes of hard disk space is
recommended.
The OpticPro USB scanner can only operate under the Microsoft Windows XP,
98, Me or 2000 Professional operating system.
Hardware Requirements
This scanner connects to your computer through the Universal Serial Bus (USB)
which supports hot Plug and Play. To determine whether your computer is USBcapable, you must check the rear of your PC to locate a USB jack that looks the same
as the one pictured below. Note that on some computers, the USB port at the rear of
the computer may be occupied and additional ports may be found on the monitor or
keyboard. If you are having trouble in locating the USB port on your computer, please
refer to the hardware manual that came with your computer.
Upon examination, you should find one or two rectangular USB ports, which
usually appear as shown below.
6
If you don’t find such USB ports on your computer, then you need to purchase a
certified USB interface card to add USB capabilities to your computer.
Installing and Setting up the Scanner
Please follow the step-by-step procedures described below to install the Plustek
OpticPro USB scanner.
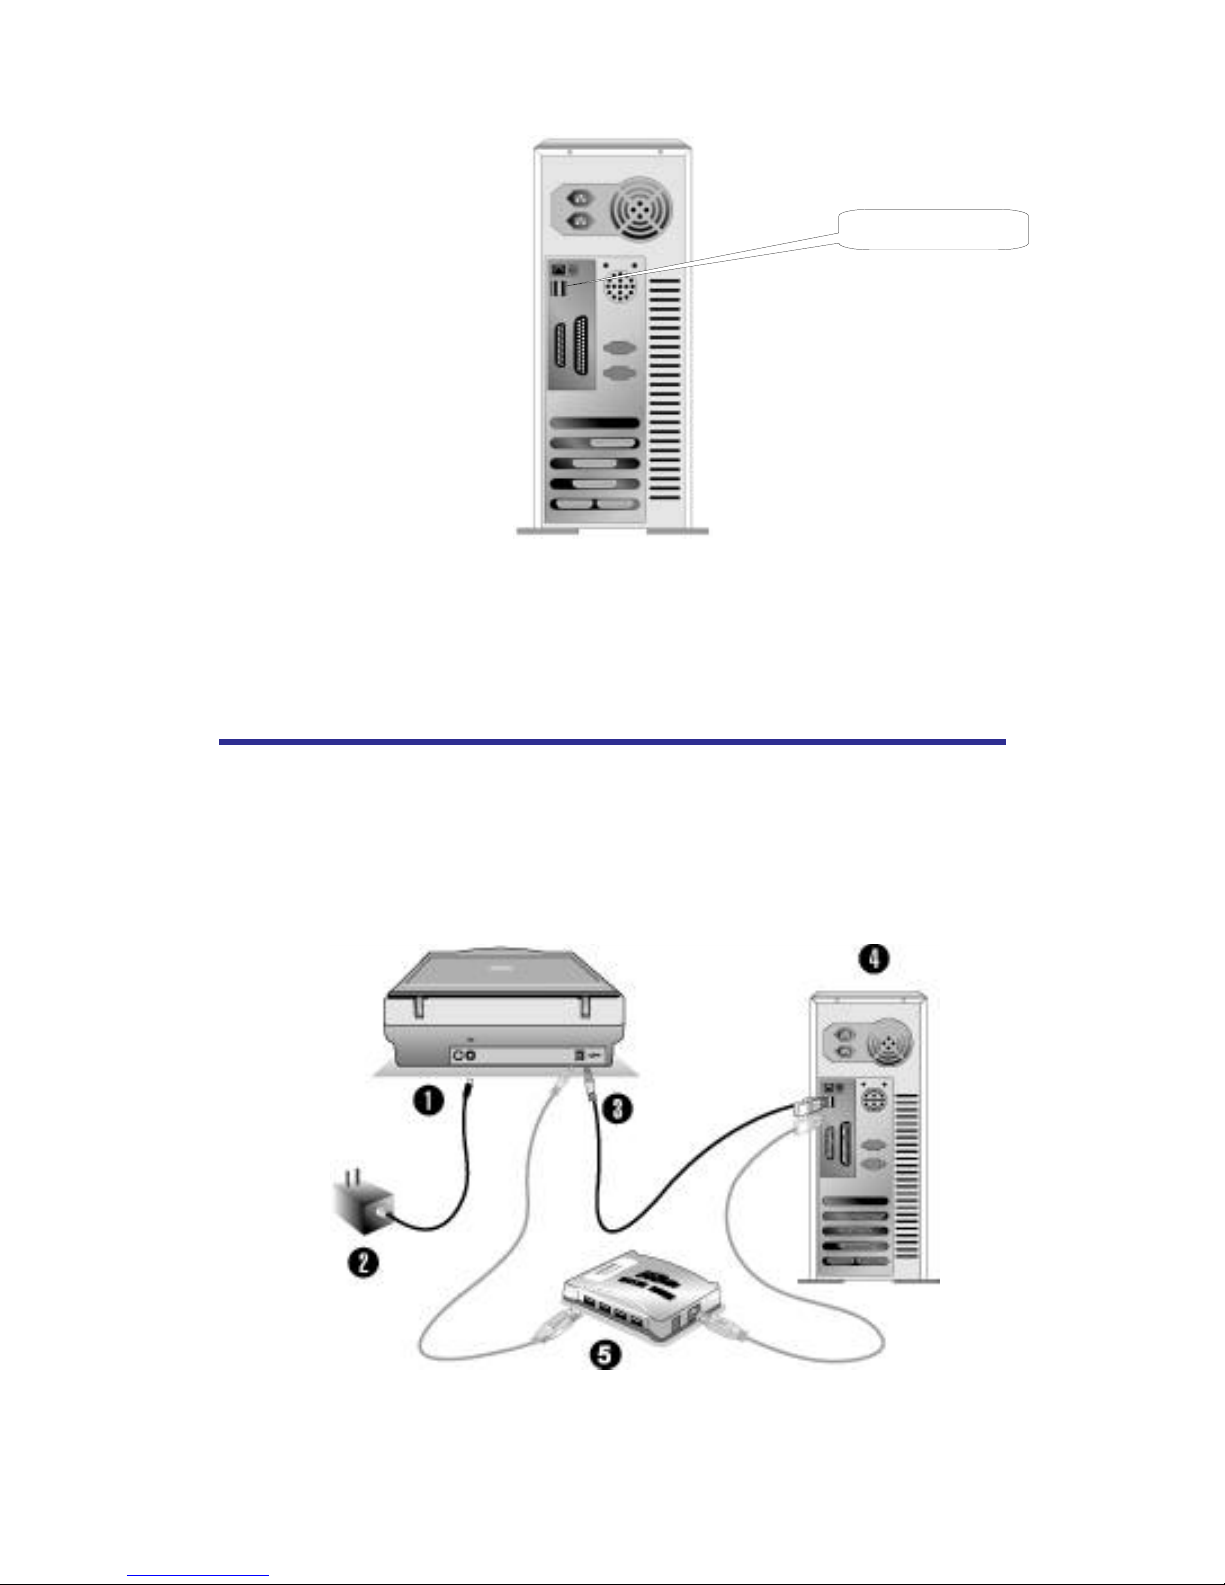
SStteepp 11.. CCoonnnneeccttiinngg tthhee OOppttiiccPPrroo SSccaannnneerr ttoo YYoouurr
CCoommppuutteerr
USB Connector(s)

7
1. Plug the power adapter into the scanner’s power receptor which can be
identified by the symbol
on its top.
2. Plug the other end of the power adapter into a standard AC power outlet.
3. Plug the square end of the included USB cable to the USB port at the rear of
the scanner. You can find a USB sign
beside the USB connector at
the rear of the scanner.
4. Plug the rectangular end of the USB cable to the USB port on th e back of
your computer.
Note: If there is another USB device connected to the computer, connect the
scanner to an available USB port.
5. If you plan to connect your scanner to a USB hub
4
, make sure that the hub is
connected to the USB port in your computer. Next, connect the scanner to
the USB hub.
Note: If you do not have a USB port available, you might need to buy a USB
port.
SStteepp 22.. IInnssttaalllliinngg tthhee SSooffttwwaarree
1. If the USB components on your computer are functioning correctly, they will
automatically detect the scanner causing the “Add New Hardware Wizard” or
“Found New Hardware Wizard” to be launched.
2. For Windows 98/Me
a. Click on the NEXT button when the “Add New Hardware Wizard”
window is displayed.
b. Select “SEARCH FOR THE BEST DRIVER FOR YOUR DEVICE
[RECOMMENDED]” and click on the NEXT button.
c. The next window will ask you where to search to find the drive. Select
“CD-ROM drive”, and deselect “Floppy disk drives” if it is checked.
d. Insert the Setup/Application CD-ROM, included with your scanner, into
your CD-ROM drive and then click on the NEXT button.
e. The next window will display the location of the USBSCAN.INF file.
Click on the NEXT button.
3. For Windows 2000/X
P
a. Insert the Setup/Application CD-ROM, included with your scanner, into
your CD-ROM drive.
b. Select “INSTALL THE SOFTWARE AUTOMATICALLY
4
The USB hub is not included with the scanner.
 Loading...