

Plustek MobileOffice AD480 User Manual

Installation
Usage & Maintenance

Trademarks
© 2017 Plustek Inc. All rights are reserved. No portion of this document may be
reproduced without permission.
All trademarks and brand names mentioned in this publication are property of their
respective owners.
Liability
While all efforts have been made to ensure the accuracy of all contents in this
manual, we assume no liability for errors or omissions or by statements of any kind
in this manual, whether such errors are omissions or statements resulting from
negligence, accidents, or any other cause. The contents of this manual are subject
to change without notice. We will not shoulder any legal liability, if users failed to
follow the operation instructions in this manual.
Copyright
The scanning of certain documents, for example checks, bank notes, I.D. cards,
government bonds, or public documents, may be prohibited by law and/or subject
to criminal prosecution. We recommend you to be responsible and respectful of the
copyrights laws when you are scanning books, magazines, journals and other
materials.
Environmental Information
Recycle or disposal at end-of-life information, please ask local distributors or
suppliers for recycle and disposal information. The product is designed and
produced to achieve sustainable environmental improvement. We strive to produce
products in compliance with global environmental standards. Please consult your
local authorities for proper disposal.
The product packaging is recyclable.
Attention for recycling (For EU country only)
Protect your environment! This product should not be thrown into the household
waste container. Please give it to the free collecting center in your community.
Screen Examples in This Manual
The screen shots in this guide were made with Windows 7. If you are using
Windows XP / Vista / 8 / 10, your screen will look somewhat different but functions
the same.

Table of Contents
INTRODUCTION....................................................................................................1
How to Use This Guide...............................................................................................1
Conventions of This Guide .........................................................................................2
A Note about Icons............................................................................................................... 2
Safety Precautions......................................................................................................2
Minimum System Requirements.................................................................................3
Box Contents..............................................................................................................4
Scanner Overview ......................................................................................................4
CHAPTER I. INSTALLING THE SCANNER....................................................................6
Software Installation Requirements............................................................................ 6
Hardware Requirements.............................................................................................6
Installing and Setting up the Scanner.........................................................................7
Step 1. Connecting the Scanner to Your Computer.............................................................7
Step 2. Installing the Software..............................................................................................8
Step 3. Testing the Scanner...............................................................................................10
Installing Additional Software....................................................................................10
CHAPTER II. SCANNING..................................................................................... 11
Preparing Documents...............................................................................................11
Checking Document Conditions......................................................................................... 11
Loosening Documents........................................................................................................13
Loading Documents..................................................................................................13
Loading Business Cards...........................................................................................15
Loading Plastic Cards...............................................................................................15
Scanning Documents................................................................................................16
Scanning via TWAIN Interface ...........................................................................................16
Scanning from the Scanner’s Panel or On-screen DocAction's Execute Menu.................18
CHAPTER III. CARE AND MAINTENANCE ............................................................... 20
Cleaning the Scanner...............................................................................................20
Cleaning Materials..............................................................................................................20
Cleaning the ADF ...............................................................................................................21
Replacing Consumables...........................................................................................22
Replacing the Pad Module .................................................................................................23
Calibrating the Scanner............................................................................................24
Power Savings..........................................................................................................25
CHAPTER IV. TROUBLESHOOTING........................................................................ 26
Scanner Connection.................................................................................................26
Clearing Paper Jams................................................................................................27
APPENDIX A: SPECIFICATIONS............................................................................ 28
APPENDIX B: CUSTOMER SERVICE AND WARRANTY................................................ 29
Service & Support Information (For EU country only)...............................................29
Statement of Limited Warranty .................................................................................30
FCC Radio Frequency Statement............................................................................. 31

INTRODUCTION
Thank you for choosing us as your scanner supplier. Your new scanner will
improve the efficiency of your day-to-day computing tasks by allowing you to input
images and electronic text into your computer system. You can easily scan singlesided or double-sided documents with your scanner.
Like all of our products, your new scanner is thoroughly tested and backed by our
reputation for unsurpassed reliability and customer satisfaction. We hope you will
continue to turn to us for additional quality products for your future imaging
requirements.
HOW TO USE THIS GUIDE
This User’s Guide provides instructions and illustrations on how to install and
operate your scanner. This guide assumes the user is familiar with Microsoft Windows.
If this is not the case, we suggest you learn more about Microsoft Windows by referring
to your Microsoft Windows manual before using your scanner.
The Introduction section of this manual describes the box contents and minimum
computer requirements to use this scanner. Before you start installing your scanner,
check the box contents to make sure all parts are included. If any items are damaged
or missing, please contact the vendor where you purchased your scanner or our
customer service directly.
Chapter I describes how to install scanner’s software and connect the scanner to
your computer. Note: The scanner connects to your computer through the Universal
Serial Bus (USB). If your computer does not support USB technology, you will need to
purchase a USB interface card to add USB capabilities to your computer, or buy and
install USB connectors if your motherboard has USB capabilities. This guide assumes
that your computer is USB-ready and has a free USB port.
Chapter II describes how to use your scanner.
Chapter III describes how to maintain and clean your scanner.
Chapter IV contains technical support information that can help you solve simple
problems.
Appendix A contains the specifications of the scanner you purchased.
Appendix B contains our customer service, the limited warranty agreement and
FCC statement concerning the product.
1
CONVENTIONS OF THIS GUIDE
Bold —Represents commands or contents on your computer screen.
ALL CAPS —Important note or first use of an important term in a chapter.
Italic —Represents buttons on your scanner OR important notes.
A Note about Icons
This guide uses the following icons to point out information that deserves special
attention.
A procedure that must be followed carefully to
Warning
Attention
prevent injury, or accidents.
Instructions that are important to remember and may
prevent mistakes.
Information
Optional tips for your reference.
SAFETY PRECAUTIONS
Before using this device, please read the
following important information to eliminate or
reduce any possibility of causing damage and
Warning
1. Usage, the product is for indoor use in dry locations. Moisture condensation may
occur inside this device and cause malfunction at these conditions:
when this device is moved directly from a cold to a warm location;
after a cold room is heated;
when this device is placed in a damp room.
To avoid the moisture condensation, you are recommended to follow the procedure:
i. Seal this device in a plastic bag for it to adapt to room conditions.
personal injury.
ii. Wait for 1-2 hours before removing this device from the bag.
2. Do use the AC adapter and USB cable provided with the scanner. Use of other AC
adapter and cables may lead to malfunction.
3. Keep the space around the AC adapter clear in case you need to quickly unplug
the AC adapter during emergencies.
2

4. Damaged wire may cause fire or electrical shock. Keep the power cord straight and
without being twisted, bended, or scraped.
5. Unplug this device if you don’t need to use for a certain period of time, such as,
during night or long weekend, to avoid any risks of causing fire.
6. Do not attempt to disassemble the scanner. There is danger of an electrical shock
and opening your scanner will void your warranty.
7. Be sure not to bump or knock the scanner glass as it is fragile and could break.
8. Do not subject the scanner to excessive vibration. It may damage the internal
components.
MINIMUM SYSTEM REQUIREMENTS1
PC with Intel Pentium® IV 2.0 GHz processor or compatible
1 GB RAM
Available USB 2.0 port
DVD-ROM Drive
800 MB Free Hard Disk Space
Video card that supports 16-bit color or greater
Operating System: Windows XP / Vista / 7 / 8 / 10
Systems with Pentium® IV 3.0 GHz processor
Information
and 1GB free hard disk space are recommended
for optimal performance.
1
Higher requirements may be needed when scanning or editing large quantities of images. The
system requirements stated are only a guideline, generally the better the computer
(motherboard, processor, hard disk, RAM, video graphic card), the better the results.
3

BOX CONTENTS2
1. Scanner
2. USB Cable
3. AC Adapter
4. Quick Guide
5. Setup/Application DVD-ROM
6. Cleansing Cloth
7. Calibration Sheet
SCANNER OVERVIEW
1. PAPER CHUTE COVER—Helps keep the paper in place. Open paper chute cover
when using the scanner.
2
Save the box and packing materials in case you need to transport this scanner in the future.
4

2. PAPER WIDTH SLIDER—Adjusts the paper width slider for the paper size you are
using.
3. COVER OPEN LEVER—Opens the ADF cover. Pull it to open the ADF cover when
you need to clear paper jam or clean the scanner.
4. ADF (AUTOMATIC DOCUMENT FEEDER)—Automatically feeds a stack of
documents for scanning.
5. ANTI-STATIC BRUSH—Eliminates and removes all static electricity during the
scan process to protect the scanner.
6. POWER LED—Indicates the scanner status.
Light Status
Blue The scanner is turned on, ready to scan images.
Green The scanner is in standby mode if it is idle for 10 minutes.
The scanner is off, either because the power is not turned on, or
Off
because the AC adapter is not properly plugged into an AC power
outlet.
7. SCAN BUTTON—Press to perform a predefined scanning task.
8. BCR BUTTON—Press this button to scan the card.
9. PDF BUTTON—Press this button to scan documents into PDF files.
10. PAPER CHUTE EXTENSION—Extends to hold longer paper.
11. CARD SLOT—Feed the card into the scanner from this slot. You can feel the card
being grabbed by the scanner.
12. ALIGNMENT MARK—Always align the edges of your card to this arrow sign.
13. USB PORT—Connects the scanner to a USB port on your computer by the
included USB cable.
14. POWER RECEPTOR—Connects the scanner to a standard AC power outlet by the
included AC adapter.
15. POWER SWITCH—Use this to turn the scanner ON or OFF.
5
CHAPTER I. INSTALLING THE SCANNER
Before installing your scanner, please verify that you have all of the proper
components. A list of the package contents is provided in the “Box Contents” section of
this guide.
SOFTWARE INSTALLATION REQUIREMENTS
Your scanner comes with the OCR software (ABBYY FineReader Sprint), the
business card recognition software (NewSoft Presto! BizCard), the scanner’s driver and
the DocAction program. All of these software applications use approximately 400
megabytes of hard disk space after they are installed into your computer. To ensure
ample room for the installation, as well as for scanning and saving images, a minimum
of 1 GB of hard disk space is recommended.
This USB scanner can only operate under the Microsoft Windows XP / Vista / 7 / 8 /
10 operating systems.
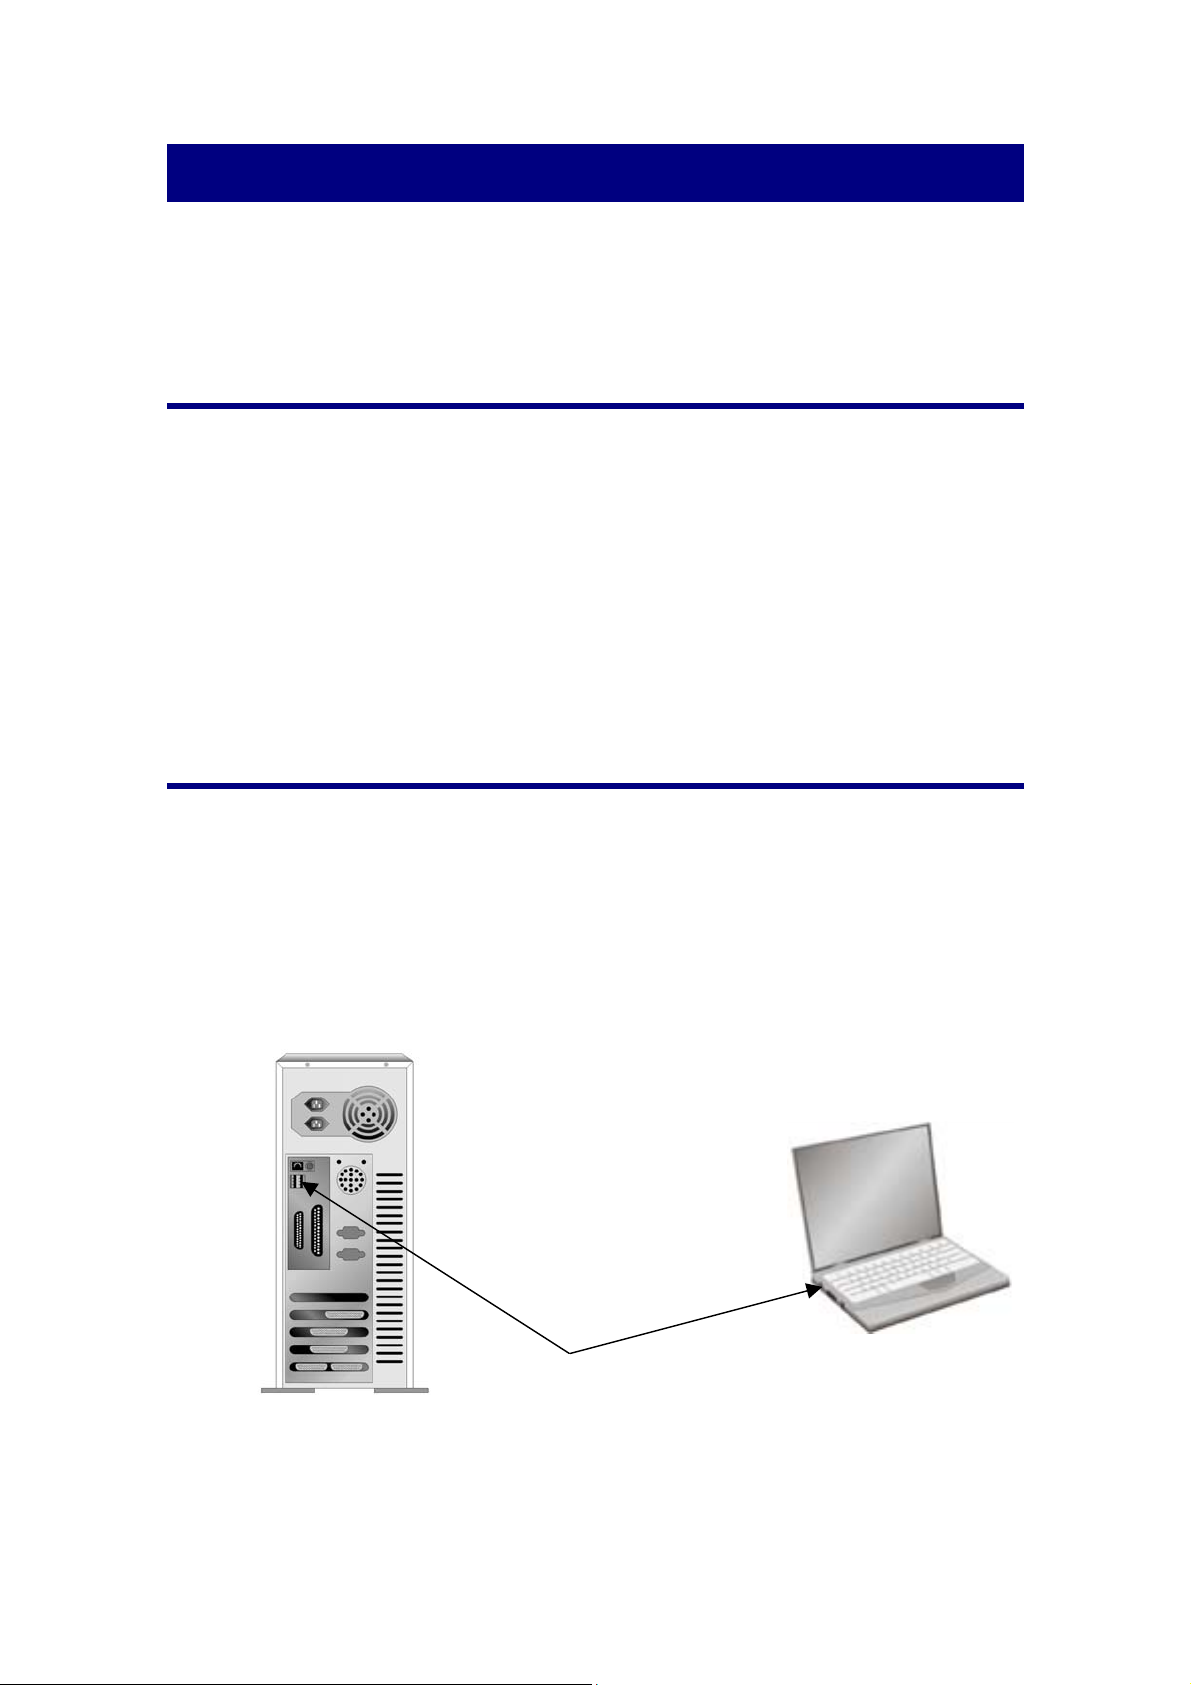
HARDWARE REQUIREMENTS
This scanner connects to your computer through the Universal Serial Bus (USB)
which supports HOT PLUG AND PLAY. To determine whether your computer is USBcapable, you must check the rear of your PC to locate a USB jack that looks like the
picture below. If you are having trouble in locating the USB port on your computer,
please refer to the hardware manual that came with your computer.
Upon examination, you should find one or two rectangular USB ports, which usually
appear as shown below.
If you don’t find such USB ports on your computer, then you need to purchase a
certified USB interface card to add USB capabilities to your computer.
USB Connector(s)
6
INSTALLING AND SETTING UP THE SCANNER
Please follow the step-by-step procedures described below to install the Plustek
scanner.
Choose a Proper Site First!
Always place your scanner on a level, smooth
and strong surface before proceeding the
scanner setup or any scanning task. Tilted or
Attention
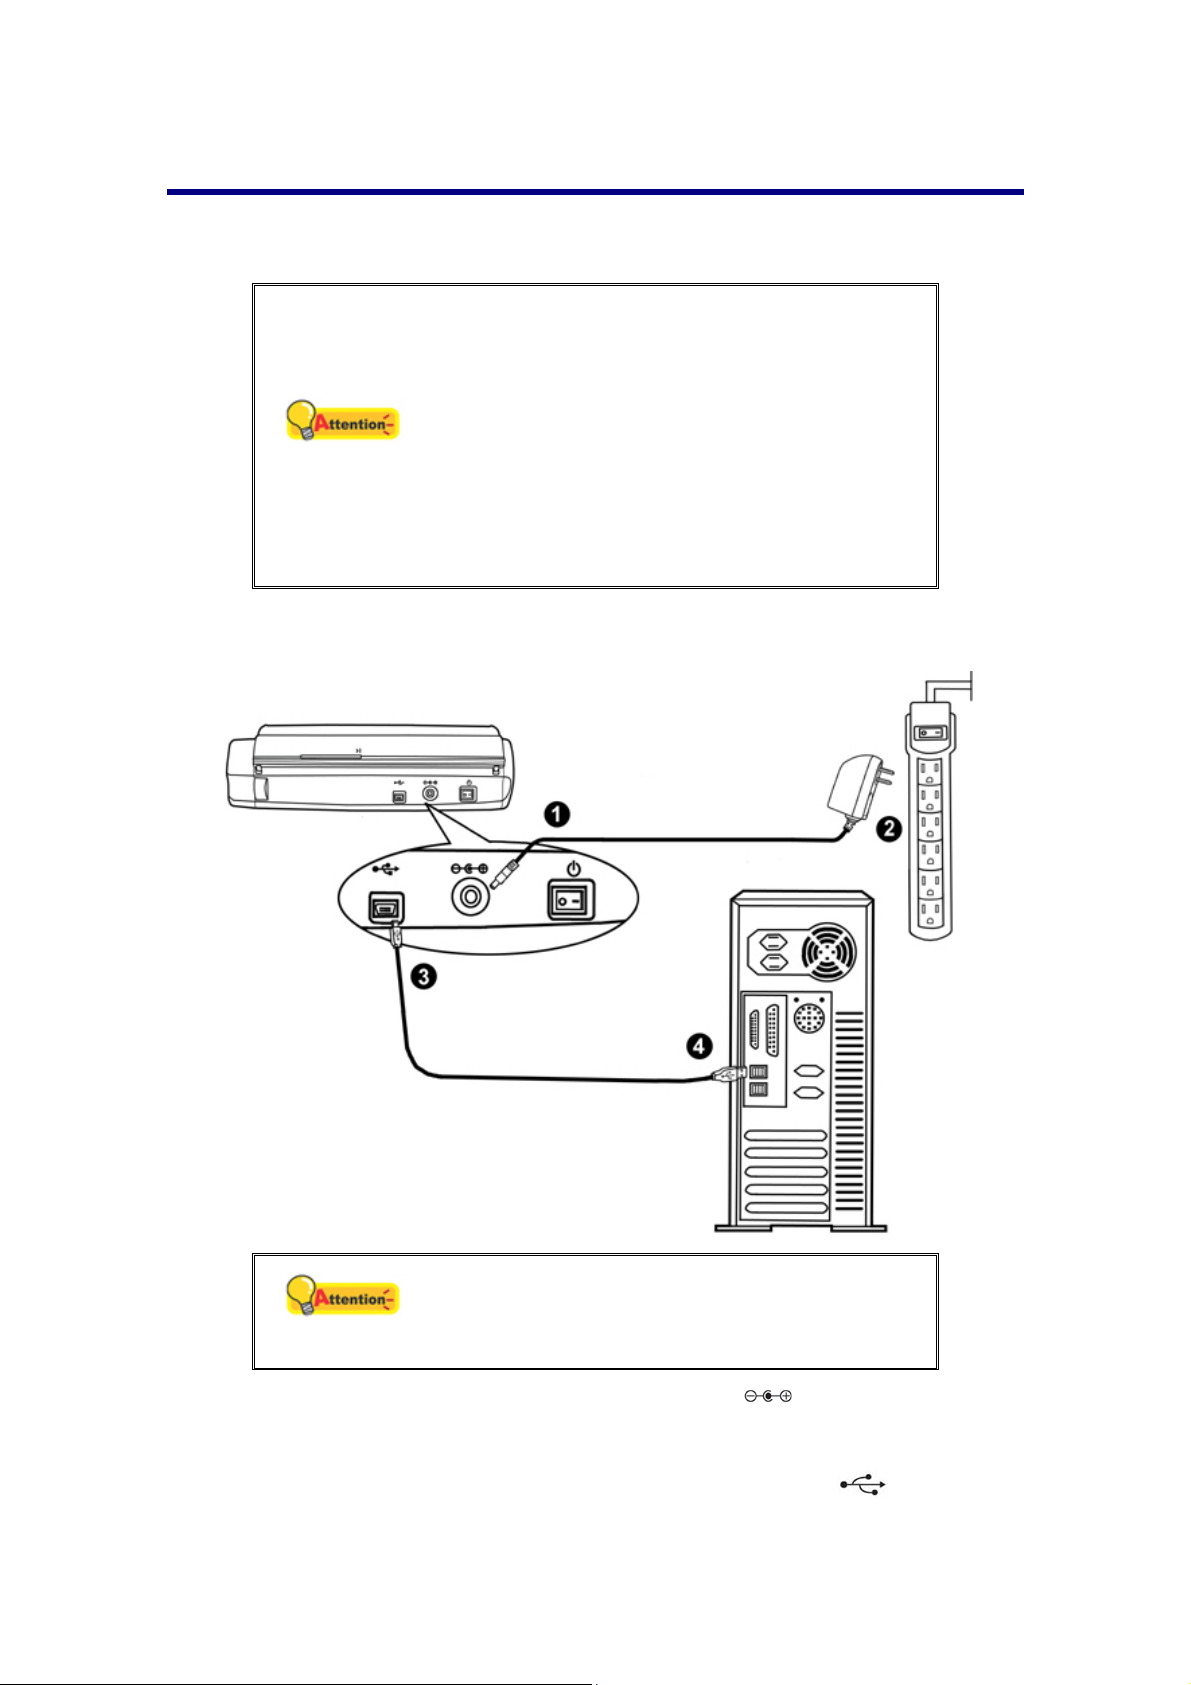
Step 1. Connecting the Scanner to Your Computer
uneven surface may cause paper-feeding
errors, scanner damage or personal injury.
Avoid using the scanner in a dusty
environment. Dust particles and other foreign
objects may damage the unit.
Please make sure the scanner is turned OFF
before you plug or unplug the scanner power
adapter.
Attention
1. Plug the AC adapter into the scanner’s power receptor .
2. Plug the other end of the AC adapter into a standard AC power outlet.
3. Plug the square end of the included USB cable to the USB port
the scanner.
7
at the rear of

4. Plug the rectangular end of the USB cable to an available USB port on your
computer.
Step 2. Installing the Software
1. Switch on the scanner power from the rear of the scanner.
2. If the USB components on your computer are functioning correctly, they will
automatically detect the scanner causing the Add New Hardware Wizard or
Found New Hardware Wizard to be launched.
If your computer is off when the scanner is
Information
3. For Windows XP:
a. Insert the Setup/Application DVD-ROM, included with your scanner, into your
DVD-ROM drive.
connected, the “Add New Hardware Wizard”
message will not be displayed until the computer
is on and Windows starts.
b. Select Install the software automatically recommended and click the Next
button.
c. Click the Next button in the window that appears. Afterwards, please skip to
procedure 7.
4. For Windows Vista:
a. Select “Locate and install driver software (recommended)” when the “Found
New Hardware” window is displayed.
b. Click on the Continue button when the “User Account Control” dialog pops up.
c. Insert the Setup/Application DVD-ROM, included with your scanner, into your
DVD-ROM drive when the system prompts you “Insert the disc that came with
your USB Scanner“, and click on the Next button. Afterwards, please skip to
procedure 8.
5. For Windows 7:
When the Setup/Application DVD is for several scanner models
a. Insert the Setup/Application DVD-ROM, included with your scanner, into your
DVD-ROM drive. Click Run install.exe in the AutoPlay window.
b. Click on the Yes button if the User Account Control dialog pops up. Follow the
instructions in the pop-up installation message.
8
 Loading...