

Installation
Usage & Maintenance
Troubleshooting

© 2009. All rights are reserved. No portion of this document may be reproduced without
permission. All trademarks and brand names mentioned in this publication are property of
their respective owners.
While all efforts have been made to ensure the accuracy of all contents in this manual,
we assume no liability for errors or omissions or by statements of any kind in this manual,
whether such errors are omissions or statements resulting from negligence, accidents, or
any other cause. The contents of this manual are subject to change without notice.
The scanning of certain documents, for example checks, bank notes, I.D. cards,
government bonds, or public documents, may be prohibited by law and/or subject to
criminal prosecution. We recommend you to be responsible and respectful of the
copyrights laws when you are scanning books, magazines, journals and other materials.
The product is designed and produced to achieve sustainable environmental
improvement. We strive to produce products in compliance with global environmental
standards. Please consult your local authorities for proper disposal. The product
packaging can be recycled.
Attention to recycling (For EU country only)
Protect your environment! This product should not be thrown into the household waste
container. Please give it to the free collecting center in your community.
The screen shots in this guide were made with Windows XP. If you are using Windows
2000 or Vista, your screens will look somewhat different but function the same.

Table of Contents
INTRODUCTION....................................................................................................1
How to Use This Guide............................................................................................... 1
Conventions of This Guide ................................................................................................... 2
A Note about Icons ............................................................................................................... 2
Safety Precautions...................................................................................................... 2
System Requirements ................................................................................................ 3
Box Contents .............................................................................................................. 4
The Scanner’s Features ............................................................................................. 5
Product Information .................................................................................................... 5
CHAPTER I. INSTALLING THE SCANNER....................................................................6
Software Installation Requirements ............................................................................ 6
Hardware Requirements............................................................................................. 6
Installing and Setting up the Scanner ......................................................................... 7
Step 1. Connecting the Scanner to Your Computer............................................................. 7
Step 2. Installing the Software.............................................................................................. 7
Step 3. Testing the Scanner ................................................................................................. 9
Software Setup Troubleshooting .............................................................................. 10
Installing Additional Software.................................................................................... 11
CHAPTER II. SCANNING ..................................................................................... 12
Scanning................................................................................................................... 12
Scanning Button ................................................................................................................. 12
Card Scanning.................................................................................................................... 13
Document Scanning ........................................................................................................... 14
Scanning Methods .................................................................................................... 14
Scanning via TWAIN Interface ........................................................................................... 15
Scanning from Plustek DI Capture Program ...................................................................... 18
Scanning from the Scanner’s Panel or On-screen DocAction's Execute Menu................. 19
Scanning Tips ........................................................................................................... 21
Scanner Connection ................................................................................................. 22
CHAPTERIII.CLEAN AND MAINTENANCE ............................................................... 23
Clean the Scanner .................................................................................................... 23
Cleaning Materials.............................................................................................................. 23
Clean Feed Roller and Glass ............................................................................................. 23
Calibrating the Scanner ...................................................................................................... 24
Usage & Maintenance Tips....................................................................................... 25
APPENDIX A: TROUBLESHOOTING........................................................................ 26
Scanning Problems................................................................................................... 26
Common -How-to- Questions ...................................................................................29
APPENDIX B: SPECIFICATIONS............................................................................ 31
APPENDIX C: CUSTOMER SERVICE AND WARRANTY............................................... 32
Statement of Limited Warranty ................................................................................. 32
FCC Radio Frequency Statement............................................................................. 33
CONTACTING PLUSTEK ....................................................................................... 35

Introduction
Welcome to the world of Plustek scanners – the ultimate in computer imaging.
Your new scanner will improve the professionalism of your day-to-day computing tasks
by allowing you to input images and electronic text into your computer system.
Like all of our products, your new scanner is thoroughly tested and backed by our
reputation for unsurpassed dependability and customer satisfaction.
Please remember to register your scanner. Registration may be completed in one
of three ways:
1) By registering online via Plustek’s Web Site;
2) By printing out and faxing a completed registration card to Plustek’s customer
service center;
3) By printing out and mailing the registration card directly to the Plustek office
nearest you.
See the last page of this user’s guide for a complete list of Plustek offices
worldwide.
As a registered customer, you will receive customer support, new product
information and software upgrades.
Thank you for choosing us as your scanner supplier. We hope you will continue to
turn to us for additional quality products as your computing needs and interests grow.
How to Use This Guide
This User’s Guide provides instructions and illustrations on how to install and
operate your scanner. This guide assumes the user is familiar with Microsoft Windows
XP, Vista and 2000 Professional. If this is not the case, we suggest you learn more
about Microsoft Windows by referring to your Microsoft Windows manual before using
your scanner.
The
Introduction section of this manual describes the box contents and minimum
computer requirements to use this scanner. Before you start installing your scanner,
check the box contents to make sure all parts are included. If any items are damaged
or missing, please contact the vendor where you purchased your scanner or our
customer service directly.
Chapter I describes how to install scanner’s software and connect the scanner to
your computer. Note: The scanner connects to your computer through the Universal
Serial Bus (USB). If your computer does not support USB technology, you will need to
purchase a USB interface card to add USB capabilities to your computer, or buy and
install USB connectors if your motherboard has USB capabilities. This guide assumes
that your computer is USB-ready and has a free USB port.
1

Chapter II and III describes how to use, maintain and clean your scanner.
Appendix A contains technical support information that can help you solve simple
problems. Before calling for help, please read through Appendix A: Troubleshooting.
Appendix B contains the Specifications of the scanner you purchased.
Appendix C contains our limited warranty agreement and FCC statement
concerning the product.
CCoonnvveennttiioonnss ooff TThhiiss GGuuiiddee
Bold — Important note or first use of an important term in a chapter.
“XX X”— Represents commands or contents on your computer screen.
AA NNoottee aabboouutt IIccoonnss
This guide uses the following icons to point out information that deserves special
attention.
A procedure that must be followed carefully to prevent injury, or
Warning
Attention
Information
accidents.
Instructions that are important to remember and may prevent
mistakes.
Optional tips for your reference.
Safety Precautions
Before using this device, please read the following important information to
eliminate or reduce any possibility of causing damage and personal injury.
1. Moisture condensation may occur inside this device and cause malfunction at
these conditions:
• when this device is moved directly from a cold to a warm location;
• after a cold room is heated;
• when this device is placed in a damp room.
To avoid the moisture condensation, you are recommended to follow the procedure:
i. Seal this device in a plastic bag for it to adapt to room conditions.
ii. Wait for 1-2 hours before removing this device from the bag.
2

2. Do use the AC adapter and USB cable provided with the scanner. Use of other
cable may lead to malfunction.
3. Avoid using the scanner in a dusty environment. Dust particles and other foreign
objects may damage the unit. If you will not use the scanner for some time, please
place it in the travel pouch.
4. Do not subject the scanner to excessive vibration. It may damage the internal
components.
5. Unplug this device if you don’t need to use for a certain period of time, such as,
during night or long weekend, to avoid any risks of causing fire.
6. Do not attempt to disassemble the scanner. There is danger of an electrical shock
and opening your scanner will void your warranty.
System Requirements
PC with Intel Pentium®III 1G processor or compatible
128 MB RAM (256MB RAM for Windows XP)
Available USB 2.0 port
CD-ROM Drive or DVD-ROM Drive
400 MB Free Hard Disk Space (500MB Recommended)
Operating System: Windows 2000 Professional, Windows XP Home Edition, or
Windows XP Professional, Windows Vista
1
1
Higher requirements might be needed when scanning or editing a large quantity of image data.
The system requirements here are only a guideline, as in general the better the computer
(motherboard, processor, hard disk, RAM, video graphic card), the better the results.
3

Box Contents
1. Scanner
2. USB Cable
3. AC Adapter
2
4. Calibration Sheet
5. Cleansing cloth
6. Travel Pouch
7. Quick Guide
8. Setup/Application CD-ROM
2
Save the box and packing materials in case you need to transport this scanner in the future.
The product packaging can be recycled.
4

The Scanner’s Features
1. Power Receptor: Connects the scanner to a standard AC power outlet by the
included AC adapter.
2. USB Port: It connects the scanner to a USB port on your computer by the included
USB cable.
3. Alignment Mark: Always align the edges of your documents to this arrow sign.
4. Page Feed Slot: Feed the document into the scanner from this slot. You can feel
the document being grabbed by the scanner.
5. Scan Button: Press to perform a predefined scanning task.
6. Power LED: Indicates the scanner status.
Light Status
On
Off
7. Bracket: Open the bracket when using the scanner. Hold the document or card in
place.
The scanner is turned on, ready to scan images.
The scanner is off, either because the power is not turned on, or
because the AC adapter is not properly plugged into an AC power
outlet.
Product Information
Please fill in the following information for your own records. You will need it when
you contact your dealer or our service center in the future.
Serial Number:
Date of Purchase:
(Located at the bottom of the scanner)
- -
5
Chapter I. Installing the Scanner
Before installing your scanner, please verify that you have all of the proper
components. A list of the package contents is provided in the Box Contents section of
this guide.
Software Installation Requirements
Your scanner comes with the OCR software (ABBYY FineReader 6.0 Sprint Plus),
the scanner’s driver and the DocAction software. All of these software applications use
approximately 400 megabytes of hard disk space after they are installed into your
computer. To ensure ample room for the installation, as well as for scanning and
saving images, a minimum of 500 megabytes of hard disk space is recommended.
The USB scanner can only operate under the Microsoft Windows 2000
Professional, XP operating system or Windows Vista.
Hardware Requirements
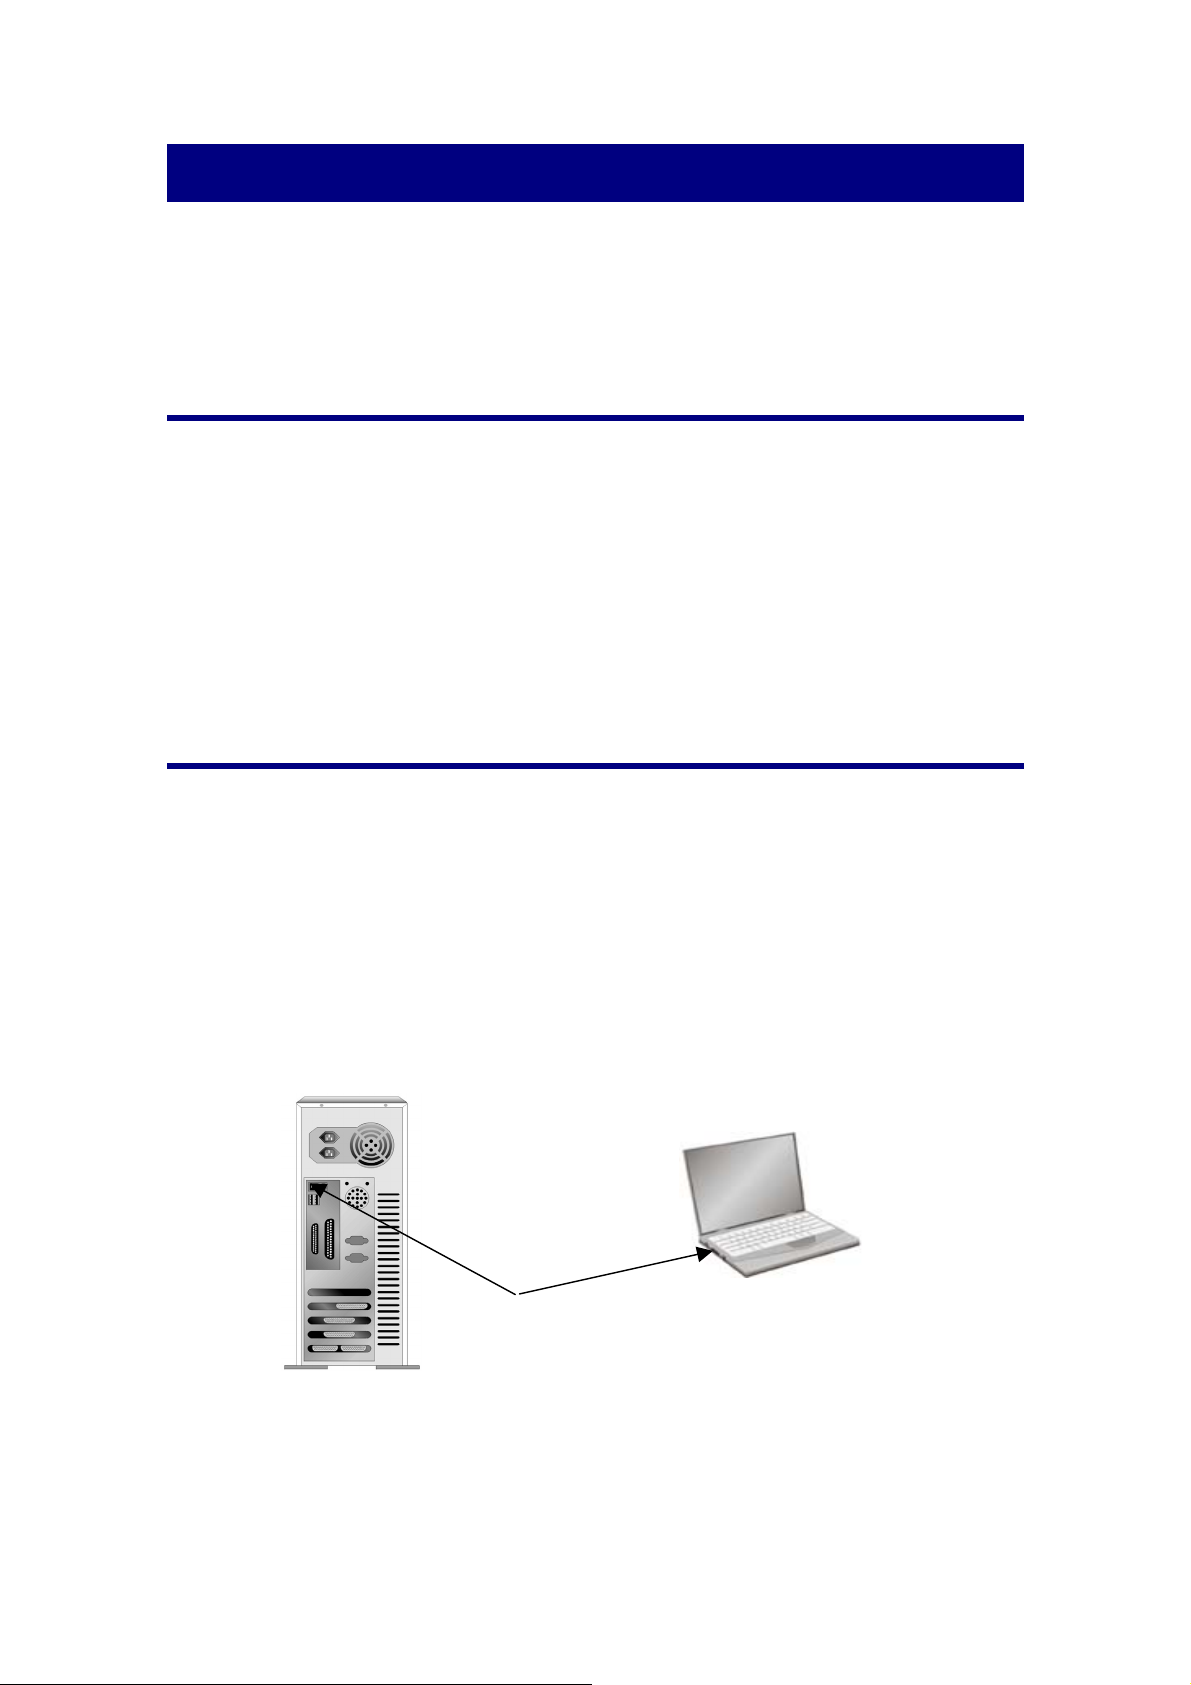
This scanner connects to your computer through the Universal Serial Bus (USB),
which supports hot swap. To determine whether your computer is USB-capable, you
must check the rear of your PC to locate a USB jack that looks the same as the one
pictured below. Note that on some computers, the USB port at the rear of the computer
may be occupied and additional ports may be found on the monitor or keyboard. If you
are having trouble in locating the USB port on your computer, please refer to the
hardware manual that came with your computer.
Upon examination, you should find one or two rectangular USB ports, which
usually appear as shown below.
USB Connector(s)
If you don’t find such USB ports on your computer, then you need to purchase a
certified USB interface card to add USB capabilities to your computer.
6
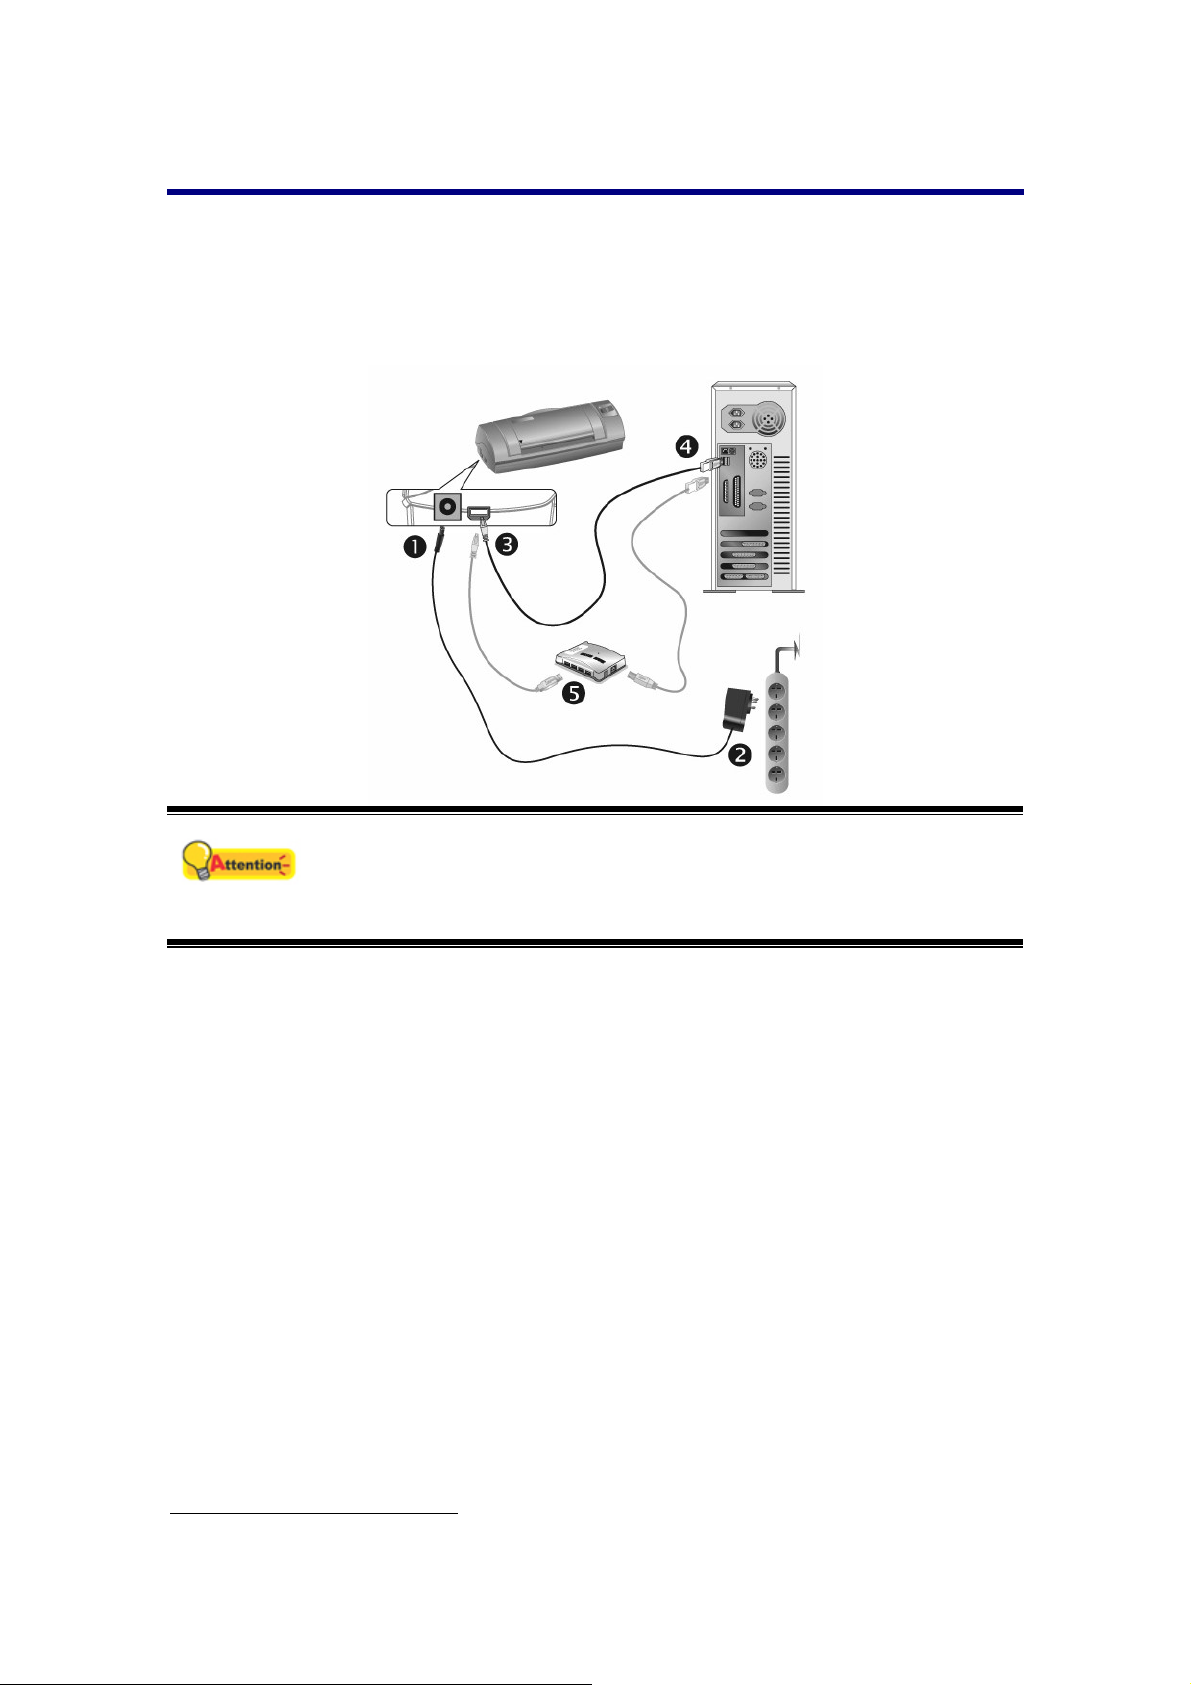
Installing and Setting up the Scanner
Please follow the step-by-step procedures described below to install the Plustek
scanner.
SStteepp 11.. CCoonnnneeccttiinngg tthhee SSccaannnneerr ttoo YYoouurr CCoommppuutteerr
Please make sure the scanner is turned OFF before you plug or unplug
the scanner power adapter.
Attention
1. Plug the AC adapter into the scanner’s power receptor.
2. Plug the other end of the AC adapter into a standard AC power outlet.
3. Plug the square end of the included USB cable to the USB port of the scanner.
4. Plug the rectangular end of the USB cable to the USB port on the back of your
computer.
Note: If there is another USB device connected to the computer, connect the
scanner to an available USB port.
3
5. If you plan to connect your scanner to a USB hub
connected to the USB port in your computer. Next, connect the scanner to the
USB hub.
Note: If you do not have a USB port available, you might need to buy a USB port.
SStteepp 22.. IInnssttaalllliinngg tthhee SSooffttwwaarre
1. If the USB components on your computer are functioning correctly, they will
e
, make sure that the hub is
3
The USB hub is not included with the scanner. If using a hub, you are recommended to use a
hub with its own external power adapter.
7

automatically detect the scanner causing the “Add New Hardware Wizard” or
“Found New Hardware Wizard” to be launched.
Note: If your computer was off when you connected the scanner, the “Add New
Hardware Wizard” message will be displayed when you turn the computer on and
when Windows starts.
For Windows 2000
2.
a. Click on the ”Next” button when the “Add New Hardware Wizard” window is
displayed.
b. Select “Search For The Best Driver For Your Device [Recommended]” and
click on the “Next” button.
c. The next window will ask you where to search to find the drive. Select “CD-
ROM drive”, and deselect “Floppy disk drives” if it is checked.
d. Insert the Setup/Application CD-ROM, included with your scanner, into your
CD-ROM drive and then click on the “Next” button.
e. Click on the “Next” button in the window that appears.
f. During the process of the installation, a message “Digital Signature required”
might be prompted. Please ignore it, and click on “Yes” to continue the
installation without any misgiving at your scanner functioning. Afterwards,
please skip to Step 5.
For Windows XP
3.
a. Insert the Setup/Application CD-ROM, included with your scanner, into your
CD-ROM drive.
b. Select “Install The Software Automatically [Recommended]” and click on the
“Next” button.
c. Click on the “Next” button in the window that appears. Afterwards, please skip
to Step 5.
For Windows Vista
4.
a. Select “Locate and install driver software (recommended)” when the “Found
New Hardware” window is displayed.
b. Click on the [Continue] button when the “User Account Control” dialog pops up.
c. Insert the Setup/Application CD-ROM, included with your scanner, into your
CD-ROM drive when the system prompts you “Insert the disc that came with
your USB Scanner”, and click on the [Next] button.
8

d. During the process of the installation, a message “Windows can’t verify the
publisher of this driver software” might be prompted. Please ignore it, and
click on [Install this driver software anyway] to continue the installation without
any misgiving at your scanner functioning.
5. When the system completes the installation, click on the “Finish” button.
6. Follow the on-screen instructions to install all software that your new USB scanner
requires.
7. After the software is installed, close all open applications and click on the “Finish”
button to restart your computer.
8. After the computer is restarted, you will be prompted to perform the scanner
calibration.
9. Insert the special calibration sheet, included with the scanner, face up into the page
feed of the scanner.
10. Follow the on-screen instructions to complete the scanner calibration.
If the scanner installation is not started and displayed
automatically on the screen, click “START”, select “Run” and type
Attention
SStteepp 33.. TTeessttiinngg tthhee SSccaannnneerr
The following test procedure checks to see if the scanner is properly functioning
with your computer and the scanning software. Before testing your scanner, double
check to make sure that all connections are securely fastened.
in “D:\Install” (where D: is the drive letter assigned to the CD-
ROM drive of your computer.)
Alternatively you may also use any plain white sheet of paper
sized in A6 (105 x 148 mm) instead; however, the calibration effect
may be less good than the special calibration sheet.
To properly test your scanner, please perform the following steps:
1. Do one of the following to open the Button Configuration window:
Double-click the DocAction icon
9
in the Windows system tray.

A
Right-click the DocAction icon in the Windows system tray, and then
choose Button Configuration… in the pop-up menu that opens.
2. In the Button Configuration window, choose from the dropdown list of Button
Template to select “File Utility”, and keep in mind the default saving folder show
in the “Saving folder” dropdown list.
3. Insert the document face up into the scanner. Align the paper to the arrow sign
on the left of the scanner.
4. Click the Scan button, and the scanning starts immediately. After the scanner
pulls through the paper, you’ll see a scanned image of the document in the
default saving folder; your scanner is working properly.
Attention
If the test failed in any way, please refer to “
Troubleshooting” section of this manual and follow the instructions
therein.
ppendix A:
Software Setup Troubleshooting
Carefully review the steps outlined in this guide and the Quick Guide that
accompanied your scanner.
If you are still having problems, please check that:
You have 500 MB of free space on your hard disk drive.
The scanner is plugged in and has power.
You are using the USB cable supplied with the scanner.
The square end of the USB cable is plugged into the rear of the scanner.
The rectangular end of the USB cable is plugged into the back of your
computer.
If you deviated from the installation procedures defined in this manual, please
unplug the USB cable from the scanner and reinstall the software from the CD-ROM.
10

To reinstall your scanner’s software, click “Start”, “Run”, then type “D:\Install (where D
represents the letter of your CD-ROM drive)”. Carefully follow all the installation
instructions presented in the Setup Wizard. Reboot your computer when prompted,
and plug the USB cable back into the scanner while your computer is still turned on.
Installing Additional Software
Your scanner is TWAIN compliant and functions with virtually all available TWAIN
compatible software. If you purchase additional software to be used with your scanner,
please make sure that it conforms to the TWAIN standard.
11

Chapter II. Scanning
Your scanner needs to be driven by certain type of software program. Since all
documents or images (whether text or pictures) that are acquired from the scanner are
treated by your computer as images, most scanning will probably be done from an
image-editing program where you can view, edit, save and output the scanned images.
An image-editing program has been bundled for your scanner on the included
Setup/Application CD-ROM. It will allow you to alter and correct any scanned images
by using a variety of filters, tools and effects.
What about scanning text documents and editing them in a word processor? This is
the role of Optical Character Recognition (OCR) software. OCR software converts the
image files that are created from scanning text documents into text files that can be
viewed, edited and saved by word processors. An OCR program has also been
bundled on the included Setup/Application CD-ROM, and if you wish to use the
scanner in this way you should install the OCR software that is included.
DI Capture, as its name suggests, is a specialized document image capture
program that allows you to conveniently digitize your paper documents and
automatically save their electronic files in the designated folder. If you are not familiar
with scanning, no problem: the Scan Wizard will guide you through to complete each
scanning task.
The DocAction program, seamlessly integrating the operation of your scanner with
your computer and other peripherals, provides a quick and convenient way to perform
various scanning functions. With DocAction, you don't need to adjust settings every
time you scan. Simply press any button on the scanner's front panel or click any
scanning menu item of DocAction on the screen. The scanner starts to scan your paper
documents and transfer them to your assigned destination. The destination can be a
printer, your E-mail program, files on your disk drives, an image-editing program, etc.
Please refer to the online help of each program to guide you through any questions
you may have while scanning within that program.
Scanning
SSccaannnniinngg BBuuttttoonn
Your scanner is equipped with one button designed to make your scanning
experience more convenient and efficient.
12

Attention
Scan Button
To use the button, ensure you have installed the relevant software (e.g.,
the printer driver is required for using the printer function) beforehand.
CCaarrdd SSccaannnniinngg
This is the special design for plastic card scan. Besides A6 documents, you can
insert up to 1.2mm thickness plastic card for scanning. Plastic cards include:
emboss/credit card, driver license, ID card, medic-care or any membership cards.
Plastic card scanning
To scan the plastic card, please follow the steps:
1. Please change the button setting from the DocAction window. Align the plastic
card to the arrow sign on the left of the scanner.
2. Press the Scan Button. The scanning starts immediately.
3. If you have the "Continuous scan" option checked, insert another card until
you have scanned all.
4. When the scan completes, the scanned images will be saved to the defined
file path as separate image files and sent to the assigned post-processing
software. (e.g. File, Program, PDF, OCR, E-mail, or Printer)
Business card scanning
To scan the business card, please follow the steps:
1. Please change the button setting from the DocAction window. Align the
business card to the arrow sign on the left of the scanner.
13

2. The steps 2 to 4 please refer to the same steps of the “Plastic card scanning”.
DDooccuummeenntt SSccaannnniinngg
Actually, document scanning is similar with the card scanning, however, we’ll
describe the steps simply for you:
1. Please change the button setting from the DocAction window. Align the
document to the arrow sign on the left of the scanner.
2. The steps 2 to 4 please refer to the same steps of the “Plastic card scanning”.
Scanning Methods
There are four different ways to operate the scanner:
1. By acquiring images from the scanner through our TWAIN interface within
any TWAIN-compliant application programs.
2. By scanning images within our DI Capture software.
3. By scanning from the button on the scanner front panel.
4. By scanning from DocAction's Execute menu on the screen.
The TWAIN interface, DI Capture and DocAction software is automatically installed
to your system along with the scanner driver.
14

Before you start scanning, check the following:
1. The power of both your computer and scanner is turned on.
Attention
2. The icon
3. Paper is appropriately loaded into the scanner.
SSccaannnniinngg vviiaa TTWWAAIINN IInntteerrffaaccee
The TWAIN program is a very important piece of software that comes with your
scanner. This program acts as an interface between the scanner hardware and the
image-editing software you are using to view and edit images. The TWAIN program
allows you to adjust a number of settings to define the quality of the scanned image.
The following describes how you may use our bundled image-editing application
(NewSoft Presto! ImageFolio), OCR software (ABBYY FineReader 6.0 Sprint Plus) and
Business card Recognition Software (HotCard BizCard Finder) to scan via TWAIN
interface. When you get familiar with the scanning, you may alternatively use other
TWAIN compatible scanning program or image-editing application to do your scanning
projects.
appears on the Windows system tray.
Select the Scan Source:
If you have more than one scanner or other imaging devices installed on your
computer, you need to set this scanner as the default scanning source before you
acquire TWAIN program.
1. For NewSoft Presto! ImageFolio: From the File menu, click Select Source.
For ABBYY FineReader 6.0 Sprint Plus: From the File menu, click Select
Scanner….
For HotCard BizCard Finder: From the Main Toolbar, click Settings > Acquire
Options > Flatbed/TWAIN Scan, and then click Settings > Acquire Options
> Select Flatbed/TWAIN Scanner.
2. In the window that opens, choose this scanner and then click the OK button to
set this scanner as the default scanning source.
Scan within NewSoft Presto! ImageFolio:
1. Click the Windows Start button to launch Presto! ImageFolio.
2. Within Presto! ImageFolio, click File > Acquire > Acquire.
3. In the TWAIN window that opens, select Sheet Feeder (Front Side) as the
Scan Type if you want to scan single-sided documents, or select Sheet Feeder
(Duplex) to scan double-sided documents.
15

4. Adjust the scanning settings. For Sheet Feeder (Duplex) scan, you can tailor
settings individually for front and rear sides of the documents. Click Front Side
button to adjust the scanning settings of document front side and then click
Rear Side button to adjust the scanning settings of document rear side.
You can enable the function of Merge Pages only when you select Sheet
Feeder (Duplex) as Scan type and Automatic Size as Page Size to output
the scan images of both front and rear sides in one image. After the function of
Merge Pages is enabled, you can make the selection of Horizontally to
generate both front and rear image data horizontally in a joined image (the rear
image will be placed at the right side next to the front image), or make the
selection of Vertically to generate both front and rear image data vertically in a
joined image (the rear image will be placed below the front image).
5. Load one page of the document and click the Scan button.
6. When the scan finishes, click the Exit button to close the TWAIN window. The
scanned images are displayed in Presto! ImageFolio, and you may perform the
image editing tasks.
Scan within ABBYY FineReader 6.0 Sprint Plus:
1. Click on the Windows Start button, point to Programs > ABBYY FineReader
6.0 Sprint Plus and then click ABBYY FineReader 6.0 Sprint Plus to launch
the FineReader program.
2. To scan one page from the Sheet Feeder:
Click
and then click Scan Image from its drop-down menu.
16

3. In the TWAIN window that opens, select Sheet Feeder (Front Side) as the
Scan Type if you want to scan single-sided documents, or select Sheet Feeder
(Duplex) to scan double-sided documents.
4. Adjust the scanning settings. For Sheet Feeder (Duplex) scan, you can tailor
settings individually for front and rear sides of the documents. Click Front Side
button to adjust the scanning settings of document front side and then click
Rear Side button to adjust the scanning settings of document rear side.
You can enable the function of Merge Pages only when you select Sheet
Feeder (Duplex) as Scan type and Automatic Size as Page Size to output the
scan images of both front and rear sides in one image. After the function of
Merge Pages is enabled, you can make the selection of Horizontally to
generate both front and rear image data horizontally in a joined image (the rear
image will be placed at the right side next to the front image), or make the
selection of Vertically to generate both front and rear image data vertically in a
joined image (the rear image will be placed below the front image).
5. Load one page of the document and click the Scan button.
6. The scanned images are displayed in the FineReader main window, and you
may proceed OCR to convert images into pdf or editable text formats.
If you usually scan images with the same settings, you can
Information
define a scan profile to save the settings you have configured by
entering a name or description for this new profile in the white
area beside the word Profile and then click the Save button.
Next time when you want to scan similar documents and apply
the same settings, you can just select this profile from the dropdown list and then click the Scan button.
Scan within HotCard BizCard Finder:
1. Click on the Windows Start button, point to Programs > Business card
Recognition Software and then click Business card Recognition Software
to launch the Business card Recognition Software.
2. Within Business card Recognition Software, click Scan
toolbar.
3. In the TWAIN window that opens, select Sheet Feeder (Front Side) as the
Scan Type if you want to scan single-sided business cards, or select Sheet
Feeder (Duplex) to scan double-sided business cards.
4. Adjust the scanning settings (Paper Size: Automatic Size, Resolution: 300).
For Sheet Feeder (Duplex) scan, you can tailor settings individually for front
and rear sides of the business cards. Click Front Side button to adjust the
scanning settings of front side and then click Rear Side button to adjust the
scanning settings of rear side.
You can enable the function of Merge Pages only when you select Sheet
Feeder (Duplex) as Scan type and Automatic Size as Page Size to output the
from the main
17

r
r
scan images of both front and rear sides in one image. After the function of
Merge Pages is enabled, you can make the selection of Horizontally to
generate both front and rear image data horizontally in a joined image (the rear
image will be placed at the right side next to the front image), or make the
selection of Vertically to generate both front and rear image data vertically in a
joined image (the rear image will be placed below the front image).
5. Load one business card and click the Scan button.
6. The scanned images are displayed in the BizCard Finder main window, and
you may proceed OCR to convert images into editable text formats.
SSccaannnniinngg ffrroomm PPlluusstteekk DDII CCaappttuurree PPrrooggrraamm
1. Click the Windows Start button to launch DI Capture.
Select the
scanne
Folde
Pane
Scan Profile
Toolbar
Viewer
Pane
Browser
Pane
Scan Settings Pane
2. Within DI Capture, select this scanner from the drop-down list of
.
3. Select a document from the Folder Pane to store the scanned images.
(To create a new folder and/or a new document, click the New Folder and/or
New Document button from the toolbar.)
4. Select an appropriate scan profile. (You may click the tab of Scan Settings
Pane to check if the current settings of the selected scan profile meet your
needs. If not, you may click the Create or Manage button beside the Scan
Profile to create a new profile or modify an existing profile.)
5. Click the Scan – Append button from the toolbar.
6. When the scan finishes, all scanned images are displayed on the Browser
Pane. The last scanned image appears on the Viewer Pane.
18

Alternatively you may click the Scan Wizard button from the toolbar to let Scan
Wizard guide you through the entire scan process.
You may also tailor your own user interface of DI Capture such as the toolbar
buttons, Viewer Pane, Browser Pane, etc.
Refer to the online help of DI Capture to explorer more about DI Capture!
SSccaannnniinngg ffrroomm tthhee SSccaannnneerr’’ss PPaanneell oorr OOnn--ssccrreeeenn DDooccA
Exxeeccuuttee
E
The settings for the button on the scanner’s panel are configured through
DocAction. DocAction offers you quick access to the most frequently-used scanning
functions. They are especially useful when you need to repeatedly scan with the same
settings and send images to the same destination.
The button on the scanner panel will be used in this guide to demonstrate the
scanner operations. You may also use DocAction's on-screen Execute menu to
perform the same scanning tasks.
MMeennuu
Accttiioonn''ss
Configure Button Settings
Before performing your first scan via scanner buttons, you are recommended to
configure the button settings to your needs and preferences first. There are two ways
to configure or view the button settings of DocAction:
Double-click the icon
in the Windows system tray.
Right-click the icon
Button Configuration in the pop-up menu that opens.
Within the “Button Configuration” window, you can find Custom icon on the left side
of the window. Clicking the icon on the left pane and its current button settings are
displayed immediately on the right pane. Select the desired function from the drop-
down list of Button Template. You may adjust the settings as desired.
Click the Help button within the Button Configuration window for more information
about the settings.
in the Windows system tray, and then choose
Scan from the Button
Scanning documents or images from this scanner is very easy. Follow the two
steps described below:
1. Place the document or image onto the scanner.
2. Do one of the following to start scanning:
19

Press the button from the scanner's panel.
Right-click the icon
Execute in the pop-up menu that opens. Click the Custom button function
item in the pop-up menu.
The scanner starts to scan immediately and carry out the corresponding action
according to the settings you have set up in the Button Configuration window.
in the Windows system tray, and then choose
The [Custom] button can function with the default setting “Scan”,
even though you didn’t define the function by using DocAction
beforehand.
Attention
Button Functions Overview
OCR -- Scans documents directly to a text editor or viewer, thus saving you
the time usually needed for retyping. It converts the scanned images into an
editable text file or a text-searchable pdf file. ABBYY FineReader 6.0 Sprint
Plus is the default software to support OCR scanning. The *.txt, *.rtf and *.xls
file formats are editable, but *.pdf file format is not editable.
File -- Scans documents or images and saves them to files. You may
determine where they are saved and how their files are named to best meet
your needs.
Scan -- Scans documents or images to a linked image-editing application
programs for viewing or post processing. Alternatively you may set up this
button as a hot key to simply launch any application program without scanning
action. Image Folio and Page Manager are the default softwares to support
this function.
Copy -- Scans documents or images directly to the printer without saving them
to your hard drive, making it ideal for getting a quick copy of a document or
image. DocAction transforms your scanner and printer into a convenient office
copier.
E-Mail -- Scans documents or images directly to your e-mail program and
automatically creates a new message with the image files attached. A copy is
20

automatically saved on your disk drive too. Microsoft Outlook and Outlook
Express are the default e-mail programs to support this scanning function.
BCR -- BCR application program is a valuable business tool to input, retrieve
and manage business cards. With this tool, input, recognizing and managing
processes of name cards can be easily finished.
DI Capture -- DI Capture is a document image capture application that you
can use to digitize your documents and written materials (e.g., invoices,
courier receipts, letters, contracts, purchase orders, HR records...) and
organize such digitized data in an efficient way. Filing, open, view, edit and
print them -- all in this DI Capture program.
Scanning Tips
Reducing the File Size of An Images:
Change the scan mode. Color mode collects the most amount of information
and therefore requires more memory than either grayscale or black and white
mode.
Reduce the resolution.
Reduce the scan area.
Determining the Correct Amount of Resolution:
In many cases a high-resolution image will do nothing more but dramatically
increase the file size, take up more disk space, and slow down the process.
Internet Applications: For e-mailing color photos or pasting images on Web
sites, a resolution of 100 dpi is the best choice. This is because the actual
viewable resolution of the average monitor is 72 dpi. Additionally, download
times are dramatically reduced.
Printing to Ink Jet Printers: Check your printer documentation for
recommended printer resolution settings. We recommend ranges between
75-300 dpi in general. Only use a higher scanning resolution (300 dpi and
above) for smaller images when detail must be captured in a small area
because it will be enlarged later.
Laser and Commercial Printers: When printing an image to a laser printer or
commercial printing press, it is important to understand the process in terms
of line screen (a.k.a., LPI). Line screens are the number of screen lines per
inch when an image is halftoned. Halftoning is the process of breaking the
image down into a series of dots to reproduce continuous-tone art when
printing on a press. A general rule when printing in one of these two manners
is to scan one and a half to two-times the amount of the line screen. Laser
printers that have resolution ranges of 300 and 600 dpi will have line screens
between 50 and 100. Typical commercial printing is done at an average line
21

screen of about 150. Therefore, an optimal scanning resolution would be 200
or 300 dpi.
Scanner Connection
The first step to take when troubleshooting connection problems with your
scanner is to check all physical connections. The DocAction icon
Windows system tray, indicates if the scanner software is properly launched and the
scanner and computer are communicating with each other.
Appearance Status
The program has been successfully launched and the scanner
No Display
is connected with the computer, ready to scan mages.
The scanner is not connected with the computer. Or, the
scanner power is not switched on.
You have chosen to terminate the program, no matter the
scanner is connected or disconnected with the computer.
, located on the
22

ChapterIII.Clean and Maintenance
Your scanner is designed to be maintenance-free. However, constant care and
maintenance can keep your scanner working smoothly.
Clean the Scanner
Paper powder, dust, ink and toner from paper being scanned may make the inner
scanner dirty, which leads to poor image quality or document-feeding errors. Often
clean your scanner could ensure your scanning better efficiency.
Before cleaning the scanner, turn off the scanner and disconnect
Warning
the scanner’s power cable and USB cable, and then wait a few
minutes for the glass and/or the inner scanner to cool to ambient
temperature.
Wash your hands with soap and water after cleaning the scanner.
CClleeaanniinngg MMaatteerriiaallss
Have the following cleaning materials ready to clean the scanner:
Cleansing cloth (or a cotton swab)
non-abrasive cleaner - Isopropyl alcohol (95%). DO NOT use water.
Alternatively you can use glass cleaner or neutral detergent for
windows cleaning to clean the scanner glass.
Attention
However, DO NOT use either of them to clean the scanner.
Use of other cleaning materials could damage your scanner.
CClleeaann FFeeeedd RRoolllleerr aanndd GGllaassss
1. Open the scanner cover gently.
23

2. Wipe the Feed Roller from side to side and then roll it.
3. Clean the glass side to side. Repeat this until its entire surface is cleaned.
Do not spray cleaner directly onto the scanner glass. Excess liquid
residue may fog or damage the scanner.
Attention
4. Wait for cleaned areas to dry completely.
5. Press down the revolt bracket until it snaps back into place.
CCaalliibbrraattiinngg tthhee SSccaannnneerr
Calibrate the scanner if colors appear in areas that should be white, or colors of
the scanned image and the original vary a lot. This allows you to adjust and
compensate for variations that can occur in the optical component over time by its
nature.
The following describes how to calibrate the scanner:
1. Insert the special calibration sheet face up into the page feed slot of the
scanner.
24

Please insert the special calibration sheet included with the scanner.
Alternatively you may also use any plain white sheet of paper sized in
Attention
2. Click Start > Programs > Your scanner model name > Calibration Wizard.
A6 (105 x 148 mm) instead; however, the calibration effect may be less
good than the special calibration sheet.
3. Click Next from the Calibration Wizard that pops up and then click Calibrate
Now....
4. The scanner pulls the calibration sheet through the scanner, which completes
this scanner calibration. After the calibration is complete, click OK and then
click Finish.
Usage & Maintenance Tips
To keep your scanner working smoothly, take a moment to review the
following usage & maintenance tips.
Attention
Do not insert any document into the scanner with small objects such as
paper clips, pins, staples or any other fasteners attached.
Do not insert damp, curled or wrinkled documents into the scanner for
scanning. These documents can cause paper jams and possibly damage the
unit.
Your scanner operates best in temperatures between10° C to 40° C (50° F to
104° F).
25

Appendix A: Troubleshooting
Scanning Problems
Most problems are easily solved, and some of the most common questions and
their recommended solutions are listed below.
Symptom: After following the installation instructions, my computer cannot
find the scanner.
Cause 1: Your software may have not been successfully installed.
Solution 1: Please insert the CD-ROM and reinstall the scanner software. Follow the
on-screen instructions carefully when installing the software.
Cause 2: Some aspect of your computer system does not support USB.
Solution 2: Download and execute the file USBREADY.EXE at
http://www.usb.org/home to determine the level of your computer’s
USB support.
Cause 3: USB is not enabled in your BIOS settings.
Solution 3: Enable the USB controller in your BIOS settings. This is typically done
by pressing a key
BIOS Settings screen that appears, find the option for USB and enable it.
Exit and Save the changes you made. Your computer is rebooted
automatically. Please consult your computer vendor before attempting
to do this change.
Cause 4: The USB controller was improperly installed on your computer.
Solution 4: To reinstall the USB controller, click on the Start button, choose Settings
and select Control Panel. In the window that opens, double-click on the
Add New Hardware icon. Carefully follow the instructions that appear on
your screen.
Symptom: The scanned image looks grainy on the screen.
Cause: Your video mode is not set to show more than 256 colors.
Solution: We recommend that you set your video mode to 16 bits per pixel (65536
colors) or higher. Please consult your video card, computer or Windows
documentation to change the video mode.
Symptom: The scanner scans very slow.
Cause 1: You are running other applications in the background.
4
(usually <del>, <F1> or <F10>) during startup. In the
4
Please consult your computer manual on how to modify your BIOS/CMOS settings.
26

Solution1: Close all the other applications that are running in the background.
Cause 2: You are scanning at a high resolution (DPI).
Solution 2: Reduce the resolution.
Symptom: The scanned document comes out as strange characters on the
screen after the OCR process is completed.
Cause 1: Text page was scanned upside down.
Solution 1: Reverse the page and scan again.
Cause 2: The OCR software is limited to certain types of documents, fonts and
formats. You might be trying to scan a form, spread sheet, a hand
written letter or a document with color text or color page.
Solution 2: Scan a clean document that contains, preferably, one column and has
black text on a white page.
Symptom: The scanner is not in the list of supported scanners in other
commercial software.
Solution: Select TWAIN as the scanner.
Symptom: Unable to scan from other software other than the one that came
with the scanner.
Solution: Enter the Scanner Setup within the program, Select TWAIN and you will
see your scanner listed (e.g., Your Scanner Model Name).
Symptom: Unable to save to a floppy diskette.
Cause 1: The floppy disk might be writing protected.
Solution 1: Move the write protection tab, located in the back of the diskette, to the
closed position.
Cause 2: Your disk might not be formatted.
Solution 2: Format the diskette.
Cause 3: There is not enough space available in the disk to save the document.
Solution 3: Delete any files that you do not need from the floppy disk.
Cause 4: You might be scanning your document at a high resolution. Documents
scanned using higher resolution modes will take a considerable amount
of disk space.
Solution 4: Reduce the resolution.
Symptom: The image looks good in the software that came with the scanner
but it does not look good when I export the image to another
program.
27

Cause: Different imaging programs use different Monitor Gamma settings.
Solution: Change the Monitor Gamma settings in either of the programs so that
they match. Please consult the help files for each program to find out
how to adjust the Monitor Gamma.
Symptom: The image looks good in the screen but is very dark when printed.
Cause1: The Monitor Gamma Settings or the scanner brightness settings are not
set properly.
Solution 1: 1) Change the Monitor Gamma to a value between 1.0 and 1.5.
Please consult your help file for information on how to adjust the
Monitor Gamma.
2) Adjust the brightness control in the TWAIN window before scanning.
Cause2: The printer brightness setting is not set properly.
Solution 2: Adjust the brightness in the printer. Some printers allow you to change
the brightness settings. Please consult your printer documentation.
Symptom: The scanned image takes too long to be sent with an email
message.
Cause1: The image was scanned at a high resolution or is physically large.
Solution1: Scan at a lower resolution (DPI).
Cause 2: The Internet might be congested.
Solution 2: Try sending the message at a later time.
Symptom: The image that I sent through email looks good in my computer but
it looks dark in the recipient computer.
Solution: The Monitor gamma settings should be approximately the same in your
and the recipient computer.
Symptom: A. -Disk is full- error is displayed when I click on the scan button.
Cause: Your computer is running low in resources. Your computer hard disk
drive does not have enough space to process the image. This may be
because you are scanning at too high of a resolution.
Solution: Obtain a larger hard disk or rescan at a lower resolution.
Symptom: A -Disk I/O error- message is displayed.
Cause 1: This error is caused if the hard disk drive does not have enough space
available to process the image.
Solution 1: Make some space available in the hard disk drive by deleting any
programs or files that you do not need.
Cause 2: Your hard disk drive might be heavily fragmented or it might contain
some bad sectors.
28

Solution 2: Run the Scan Disk utility that came with your Windows computer.
Please consult your computer documentation or the Windows help files
on how to run the Scan Disk Utility.
Symptom: The error “Scanner not Found” that is displayed.
Cause 1: The USB cables are not connected properly.
Solution 1: Make sure that the cables are connected tightly and to the proper port.
Cause 2: The USB cable might be too long.
Solution 2: Please use the USB cable that comes with your scanner.
Cause 3: The scanner’s power cord is not connected properly.
Solution 3: Make sure that the AC adapter is connected to an outlet. If the scanner
is connected to a Surge Protector, make sure that the Surge Protector is
turned on.
Symptom: The document or photo has been inserted into the scanner but is
not fed through the scanner.
Cause 1: The document or photo was not correctly inserted into the scanner.
Solution 1: Make sure the document or photo is properly inserted into the page feed
of the scanner.
Solution 2: The paper may be too think or too thick.
Cause 2: The thickness of the paper is out of scanner specifications.
Symptom: The document or photo got jammed while getting fed into the
scanner.
Cause: The document or photo was not correctly inserted into the scanner.
Solution: Grab ahold of the jammed paper and pull it through the scanner. Try to
avoid creasing, wrinkling or tearing the paper.
Common -How-to- Questions
Symptom: How do I save the scanned image in JPG format?
Solution: 1) In the Image-editor, click on [File] and then [Save As].
2) Select the folder where you want to save your image.
3) Select JPEG or JPG under Save as type:
4) Type the name of the file name for your image.
Symptom: How do I cut an image and paste in another program?
Solution: 1) Select the area that you want to cut.
2) Click on [Edit].
3) Click on [Cut].
29

4) Start the program and open the document where you want to paste
your image.
5) Click on [Edit].
6) Click on [Paste].
Please consult your program documentation on how to Cut and Paste if
you have any more questions.
Symptom: How do I place a scanned image into my word processor?
Solution: 1) Find out what formats are supported by your word processor.
2) Write the name and the location of the file before you save it.
3) Save in a format supported by your word processor.
4) Depending on your word processor, select [Insert] or [Import] from
your menu, then select [Image] or [Picture].
Consult your Word Processor documentation for more information on
how to import images.
Symptom: How do I send a scanned image using my email program?
Solution: Save your scanned image in a format that is supported by your email
program (JPG, GIF or PNG are recommended). Once your picture is
saved, consult the documentation of your email program on how to
attach a file to a message.
30

Appendix B: Specifications
Plustek MobileOffice D600
Technology Color Contact Image Sensor (CIS)
Hardware Resolution 600 dpi
Color: Input 48-bit; Output 24-bit
Scan Modes
Scan Method Single Pass
Scanning Speed
Scan Area
(W × L)
Acceptable Paper
Thickness
Power Adapter AC 100~240V / DC 15V, 1A
Interface USB 2.0
Weight 450 g (1 pound)
Dimensions (W ×D × H)
Grayscale: Input 16-bit; Output 8-bit
Black & White: 1-bit
Simplex Scan:
3.1 sec / page @ 300 dpi, color mode
1.1 sec / page @ 300 dpi, grayscale mode
Duplex Scan:
6.5 sec / page @ 300 dpi, color mode
1.7 sec / page @ 300 dpi, grayscale mode
Maximum 105 x 148 mm (4.1” x 5.8”) A6 paper size
TWAIN supports length up to 500 mm
Paper: 0.05~ 0.8mm
Plastic Card: 0.05~1.2mm
194 x 73 x 54 mm (7.6’’ x 2.8’’ x 2’' )
5
Environment Request ROHS/ WEEE
5
Hardware specifications may change at any time without prior notice.
31

Appendix C:
Customer Service and Warranty
If you encounter problems with your scanner, please review the installation
instructions and troubleshooting suggestions contained in this guide.
For further assistance call our customer support phone number listed on the last
page of this guide. One of our representatives will be happy to assist you from Monday
through Friday in office working hours as shown below:
Europe 9:00 a.m. – 5:30 p.m. (CET)
Other Countries or Areas 9:00 a.m. – 6:00 p.m. Taiwan Time
To avoid delays, please have the following information available before calling:
Scanner name and model number
Scanner serial number (Located at the bottom of the scanner)
A detailed description of the problem
Your computer manufacturer and its model number
The speed of your CPU (Pentium 133, etc.)
Your current operating system and BIOS (optional)
Name of software package(s), version or release number and manufacturer
of the software
Other USB devices installed
Statement of Limited Warranty
This Statement of Limited Warranty applies only to the options you originally
purchase for your use, and not for resale, from an authorized reseller.
The manufacturer warranty includes all parts and labor, and is not valid without
the receipt of original purchase. To obtain warranty service, you may contact the
authorized dealer or distributor, or visit our website to check out the available service
information, or send a request via E-mail for further help.
If you transfer this product to another user, warranty service is available to that
user for the remainder of the warranty period. You should give your proof of purchase
and this statement to that user.
We warrant that this machine will be in good working order and will conform to its
functional descriptions in the documentation provided. Upon provision of proof of
purchase, replacement parts assume the remaining warranty of the parts they replace.
Before presenting this product for warranty service, you must remove all
programmes, data and removable storage media. Products returned without guides
and software will be replaced without guides and software.
32

This Limited Warranty service does not provide for carry-in exchange when the
problem results from accident, disaster, vandalism, misuse, abuse, unsuitable
environment, programme modification, another machine or non-vendor modification for
this product.
If this product is an optional feature, this Limited Warranty applies only when the
feature is used in a machine for which it was designed.
If you have any questions about your Limited Warranty, contact the approved
retailer from whom you bought the product or the manufacturer.
THIS LIMITED WARRANTY REPLACES ALL OTHER WARRANTIES, EXPRESS
OR IMPLIED, INCLUDING, BUT NOT LIMITED TO, THE IMPLIED WARRANTIES OF
MERCHANTABLITY AND FITNESS FOR A PARTICULAR PURPOSE. HOWEVER,
SOME LAWS DO NOT ALLOW THE EXCLUSION OF IMPLIED WARRANTIES. IF
THESE LAWS APPLY, THEN ALL EXPRESS AND IMPLIED WARRANTIES ARE
LIMITED IN DURATION TO THE WARRANTY PERIOD. NO OTHER WARRANTIES
APPLY AFTER THAT PERIOD.
Some jurisdictions do not allow limitations on how long an implied warranty lasts,
so the above limitation may not apply.
Under no circumstances are we liable for any of the following:
1. Third party claims against you for losses or damages.
2. Loss of, or damage to, your records or data; or
3. Economic consequential damages (including lost profits or savings) or
incidental damages, even if we are informed of their possibility.
Some jurisdictions do not allow the exclusion or limitations of incidental or
consequential damages, so the above limitation or exclusion may not apply to you.
This Limited Warranty gives you specific legal rights, and you may also have other
rights that vary from jurisdiction to jurisdiction.
FCC Radio Frequency Statement
This equipment has been tested and found to comply with the limits for a Class B
digital device, pursuant to part 15 of the FCC rules. These limits are designed to
provide reasonable protection against harmful interference in a residential installation.
This equipment generates, uses and can radiate radio frequency energy and, if
not installed and used in accordance with the instructions, may cause harmful
interference to radio communications. However, there is no guarantee that interference
will not occur in a particular television reception (which can be determined by turning
the equipment off and on), the user is encouraged to try to correct the interference by
one or more of the following measures:
Reorient or relocate the receiving antenna.
33

Increase the separation between the equipment and receiver.
Connect the equipment to an outlet on a circuit different from that which the
receiver is connected.
Shielded interconnect cables and shielded power cord which are supplied
with this equipment must be employed with this equipment to ensure
compliance with the pertinent RF emission limits governing this device.
Consult the dealer or an experienced radio/TV technician for help if the
conditions persist.
Changes or modifications not expressly approved by the manufacturer or
authorized service center could void the user’s authority to operate this
equipment.
34

Contacting Plustek
North America:
Worldwide except
Europe & North America:
http://www.plustek.com/support/support.htm
Europe:
for more customer service information.
Plustek Technology GmbH
Gutenbergring 38
22848 Norderstedt
Germany
Tel.: +49 (0) 40 523 03 130
Fax: +49 (0) 40 523 03 500
E-mail:
Website: www.plustek.de
Plustek Technology Inc.
17517 Fabrica Way, Suite B
Cerritos, CA 90703
U.S.A.
Tel: +1 -562-802-7731
Fax: +1 -562-802-7750
E-mail:
Plustek Inc.
13F-1, No.3 (Building F), Yuan Qu Street
115 Nankang, Taipei
Taiwan
Tel: +886-2-2655 7866
Fax: +886-2-2655 7833
Website:
Visit our website
support@plustek.de
supportusa@plustek.com
www.plustek.com
35
 Loading...