


EQP-102
AUTOMOTIVE MULTIMETER
Ω
Ω
USER MANUAL
Contents
Introduction……………………………………………………………………….1
Safety………………………………………………………………………………2
Getting Started…………………………………………………………………6
Digital LCD Display………………………………………………………………7
Front Panel Description…………………………………………………………7
LCD Symbols……………………...…………………………………………………8
Push-button Functions……………………………………………………9
Mode Button…………………………………………………………9
Manual range & Stroke 4/2,Hz,%,ms,CYL Button………………………… 9
Data Hold /Backlight Button………………………………………………9
Relative Button………………………………………………………………11
Meter Functions
Voltage (V)……………………………………………………………………12
Resistance (Ω) ………………………………………………………………13
Diode Check( )……………………………………………………………14
Capacitance(CAP) …………………………………………………………15
Audible Continuity ( )……………………………………………………16
AC or DC Current (A) ………………………………………………………17
Temperature (0C /0F) ………………………………………………………18
Frequency (Hz) ……………………………………………………………19
Dwell ( )…………………………………………………………………20
Duty Cycle (%)………………………………………………………………21
Ms – PULSE……………………….………………………………………22
RPM ( ) ……………………………………………………………………24
IR Temperature Probe……………………………………………………….25
General Specifications…………………………………………………………30
Electrical Specifications…………………………………………………………31
Replacing the Battery…………………………………………………………34
Battery Installation…………………………………………………………35
Replacing the Fuses………………………………………………………………35
Trouble Shooting…………………………………………………………………36
-1 0

his chapter covers brief, introductory information, You will find:
Safety precautions
Ω
Safety
DANGER
Engines produce carbon monoxide which
is odourless, cause’s slower reaction time,
and can lead to serious injury. When the
engine is operating, keep service areas
WELL VENTILATED or attach the vehicle
exhaust system to the shop exhaust
removal system.
Set the parking brake and block the
wheels before testing or repairing the
vehicle. It is especially important to block
the wheels on front-wheel drive vehicles;
the parking brake does not hold the drive
wheels.
Ω
Wear an eye shield when testing or
repairing vehicles.
Exceeding the limits of this meter is
dangerous. This will expose you to serious
or possibly fatal injury. Carefully read and
understand the cautions and the
specification limits of this meter.
Voltage between any terminal and ground
must not exceed 600V DC or 600V AC.
Use caution when measuring voltage above 25V DC or 25V AC.
Circuit tested must be protected by a 20A fuse or circuit breaker.
Do not use the meter if it has been damaged.
Do not use the test leads if the insulation is damaged or if metal
is exposed.
1 2

Safety Cont’d…
Function
TEMP. Adaptor,
Safety Cont’d…
Danger
Avoid electrical shock: do not touch the test
leads, tips or the circuit being tested.
Do not try a voltage measurement with the
test leads in the 20A or the mA terminal.
When testing for the presence of voltage or current, make sure
the meter is functioning correctly. Take a reading of a known
voltage or current before accepting a zero reading.
Choose the proper range and function for the measurement. Do
not try voltage or current measurements that may exceed the
ratings marked on the Function/Range switch or terminal.
When measuring current, connect the meter in series with the
load.
Never connect more than one set of test leads to the meter.
Disconnect the live test lead before disconnecting the common
test lead.
The mA and the 20A terminals are protected by fuses. To avoid
possible injury or damage, use only in circuits limited to 400mA
or 20A for 30 seconds.
See also…
Fuse Replacement
IMPORTANT
To maintain accuracy of the meter, replace the discharged
battery immediately when the battery symbol “BAT”
appears on the meter display.
Avoid measuring error from outside interference. Keep the
meter away from spark plug or coil wires.
Avoid damaging the meter when testing voltage. Disconnect
the test leads from the test points before changing functions.
Do not exceed the limits shown in the table below:
Terminal Input limit
DC/AC Volts,
Ohm/Continuity
/Diode,CAP.,IR-
V-Ω-RPM
Type-K
TEMP.,Hz,%Duty,
Ms Dwell, RPM
AC/DC μA mA μA / mA 400mA DC/AC
AC/DC20A 20A *20A DC/AC
* 20Amp measurement for 30 seconds maximum.
① Ohms can not be measured if voltage is present, ohms
can be measured only in a non-powered circuit. However,
the meter is protected to 600 volts.
600VoltsAC DC
3 4
Notes:
Getting Started
his chapter will help you get started. It describes the basic
functions of the Meter.
Ω
Ω
5 6
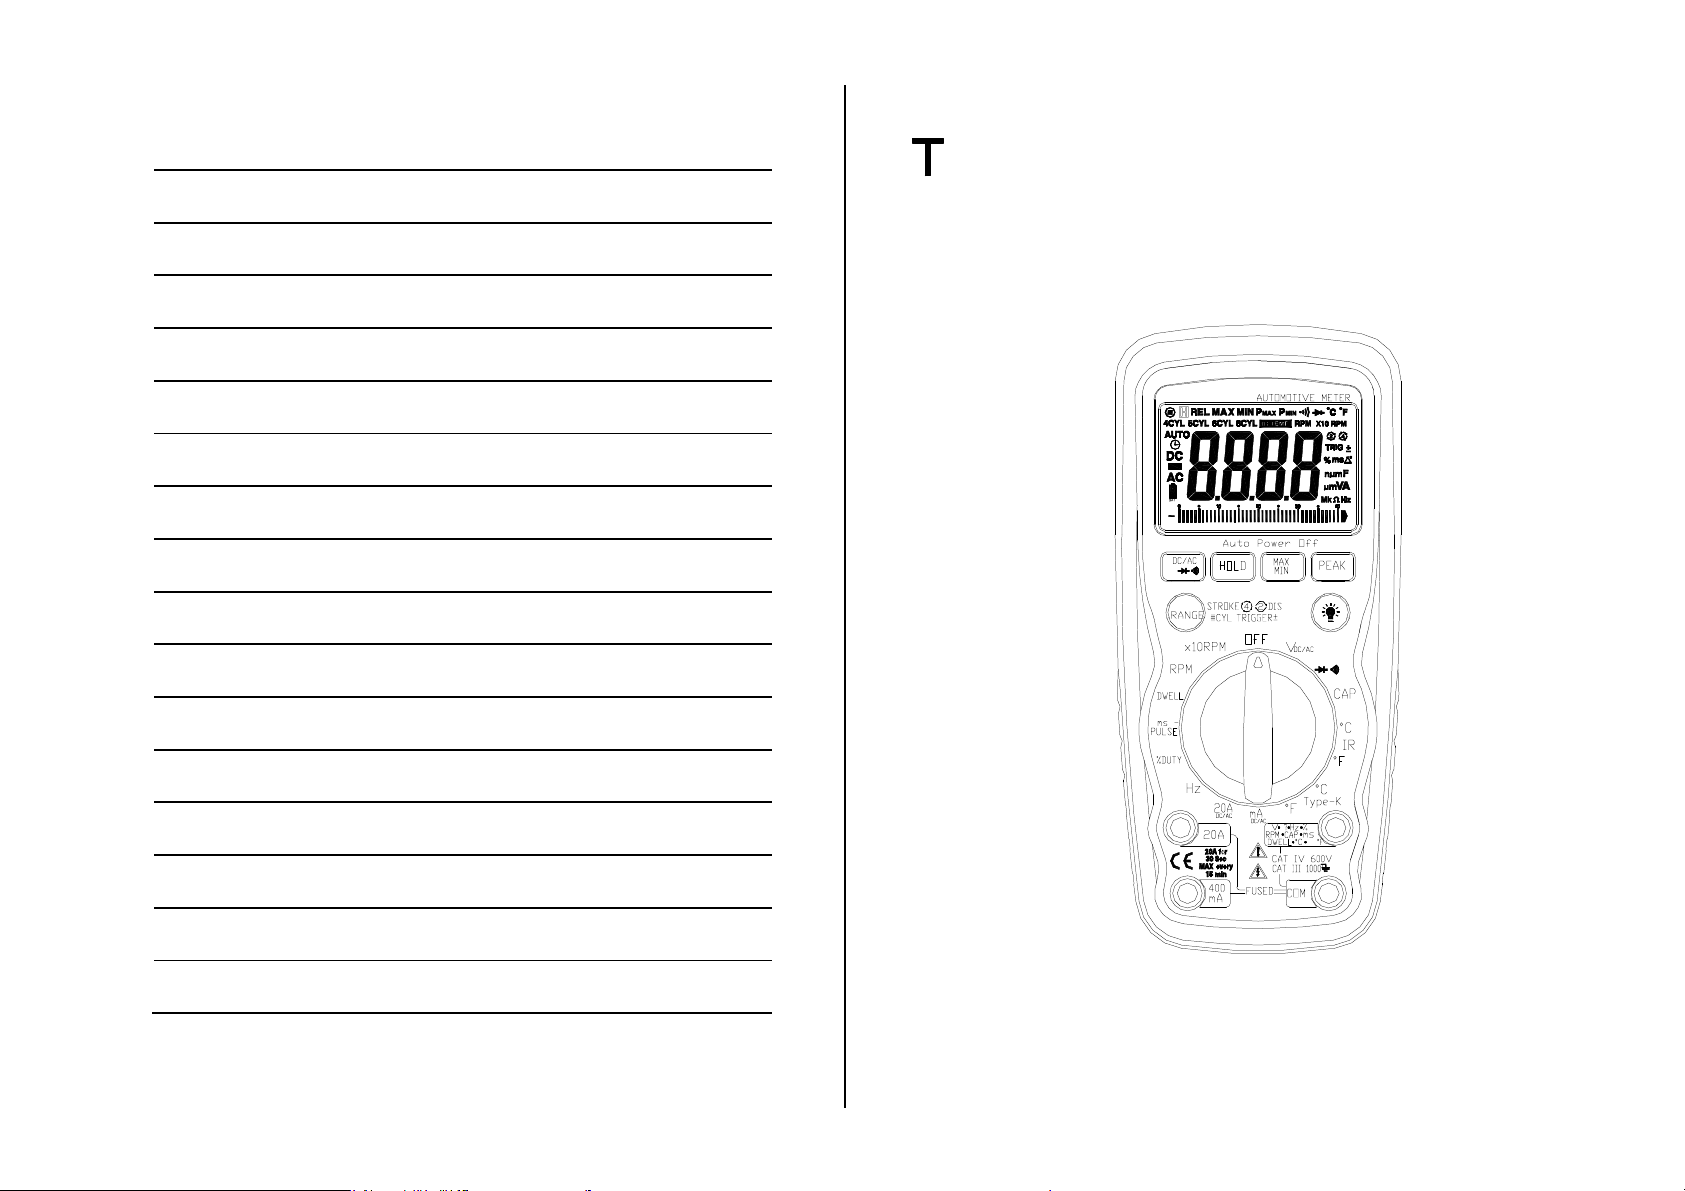
Meter Basics
1.Digital LCD display
Display features:
1a. Symbols to identify function
1b. Four character digital display
The digital display is best for
stable input. The bar graph is best
for rapidly changing input.
2.Function buttons
Press the button to select a
function. A symbol will display to
verify your choice.
LCD DISPLAY SYMBOLS AND ANNUNCIATORS
1a
1b
Ω
Ω
2
-8.8.8.8 LCD display reading
Continuity
BAT Low Battery
3
DATAHOLD Data Hold
AUTO Auto Ranging
Diode
3.Rotary Selector Switch
Turn this switch to select a
function or turn the meter OFF.
4.Volts Terminal
The Red test lead is used to
measureAmps, Volts, Ohms,
TEMP, Hz, RPM, Cap, mS and
Dwell.
The Black test lead is used in the
Common (COM) terminal for
all tests
7 8
4
AC Alternating Current or Voltage
DC Direct Current or Voltage
n nano (10-9) (capacitance)
µ micro (10-6) (amps, cap)
m milli (10-3) (volts, amps) A Amps
k kilo (103) (ohms) F Farads (capacitance)
M mega (106) (ohms) Ohms
Hz Hertz (frequency) V Volts
% Percent (duty ratio)
ºF Degrees Fahrenheit
ºC Degrees Centigrade
IR TEMP Infrared Temperature

Push–button Functions
Mode Button
Press the mode pushbutton to select
the following functions;
DC/AC Voltage, DC/AC Current
Resistance, Diode, Continuity &
Capacitance
Manual Range & Stroke 4/2(DIS),
Hz, %, ms +, CYL Button
Press to this button to select;
STROKE 4, 2DIS, Hz ,%, ms+ ,
CYL range & V/A/ Resistance
manual Range
Manual Ranging
The meter turns on in the auto ranging mode.
Press the Range button to go to manual ranging.
The display icon " " will appear. Each press of the range button
will step to the next range as indicated by the units and decimal
point location. Press and hold the Range button for two seconds to
return to auto ranging.
Ω
Ω
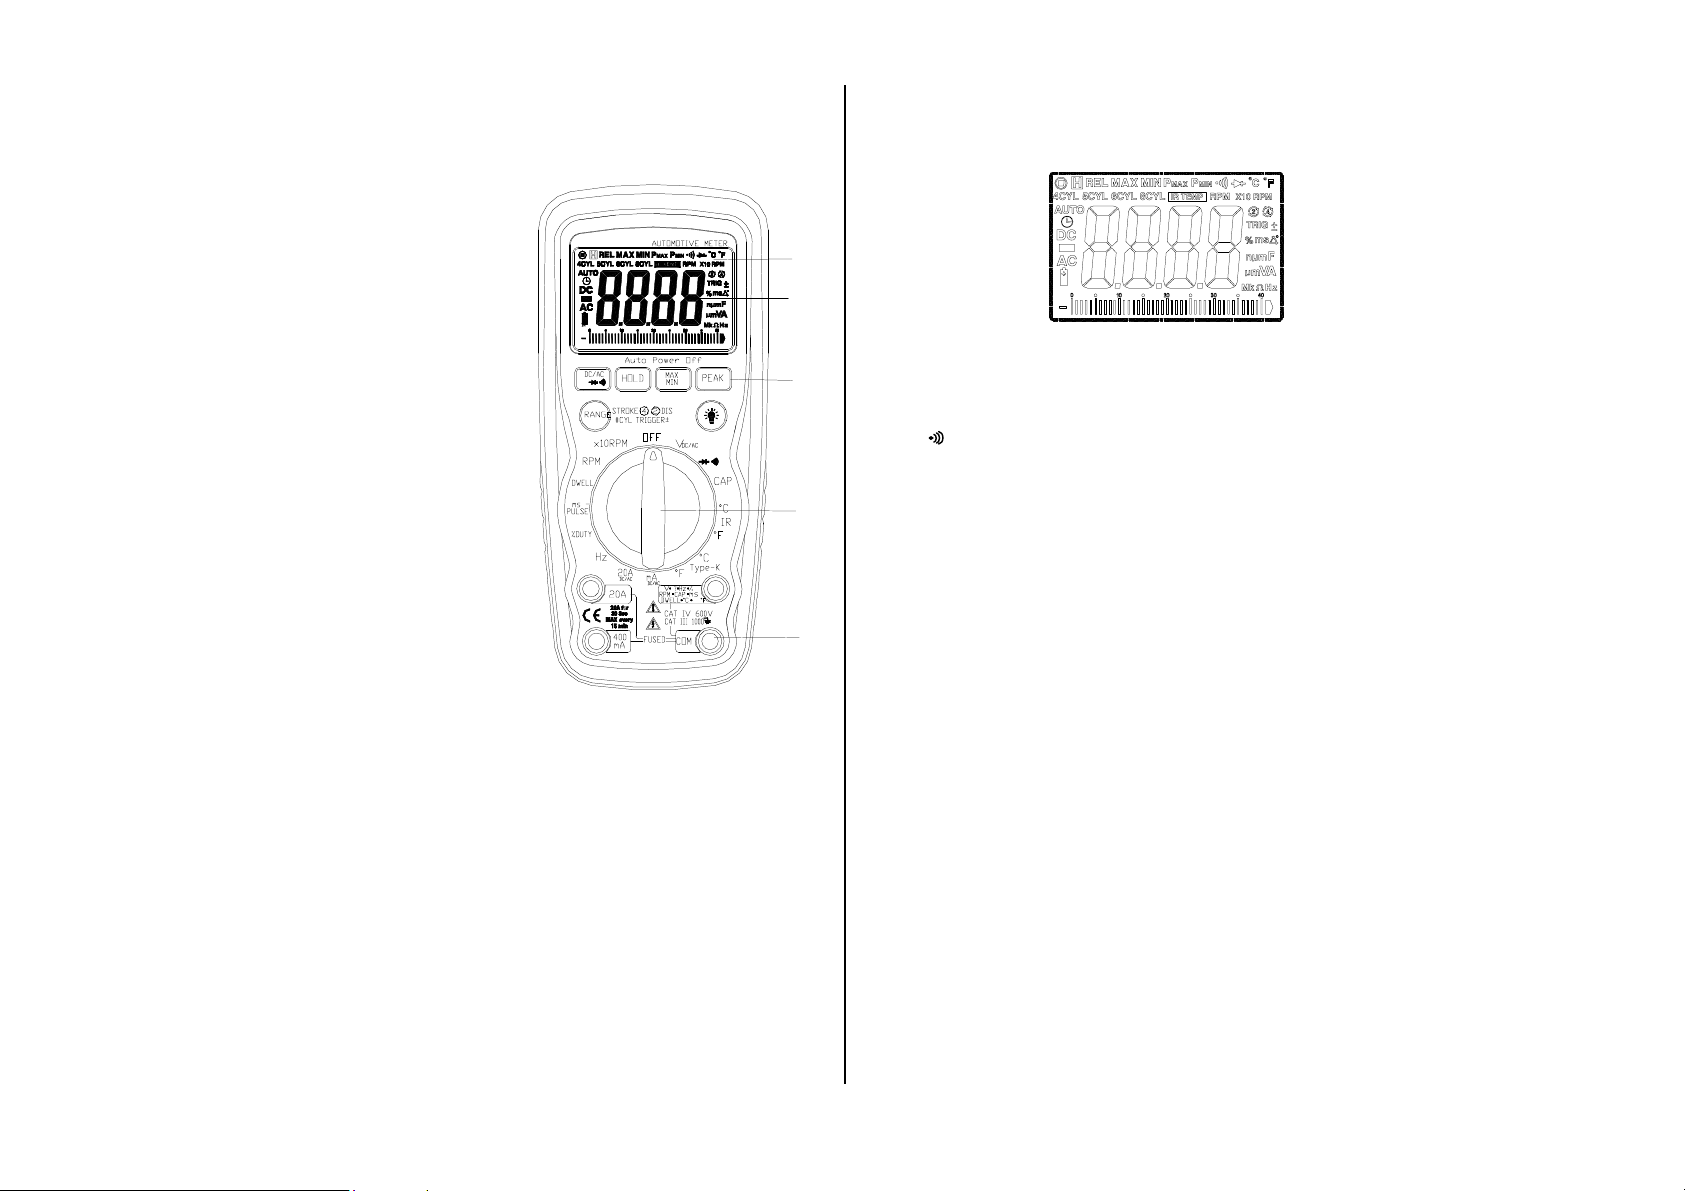
Peak Hold
The Peak Hold function captures
the peak AC or DC voltage or current.
The meter can capture negative
or positive peaks as fast as
1 millisecond in duration.
Ω
1. Turn the function switch to the A or V position.
2. Press and Hold the PEAK button until “CAL” appears
in the display. This procedure will zero the range
selected & meter go to manual ranging.
3. Press the PEAK button, Pmax will display.
4. The display will update each time a higher positive
peak occurs.
5. Press the PEAK button again, Pmin will display. The
display will now update and indicate the lowest
negative peak.
Data Hold
The Data Hold function allows the
meter to "freeze" a measurement for
later reference.
1. Press the DATA HOLD button to
“freeze” the reading on the indicator.
The indication of “HOLD” will appear
in the display.
2. Press the DATA HOLD button
again to return to normal operation.
9 10
6. To return to normal operation, press and hold the
PEAK button until the Pmin or Pmax indicator
switches off.
Note: If the Function switch position is changed after a
calibration the Peak Hold calibration must be repeated for the
Ω
new function selected.
MAX/MIN
WARNING
measuring voltage,
be sure the Red test lead is
in the terminal marked “V”.
If the test lead is in an Amp
terminal, you may be
injured or the meter
Ω
1. Press the MAX/MIN key to activate the MAX/MIN
recording mode. The display icon "MAX or MIN" will
appear. The meter will go to manual ranging & display and
hold the maximum or minimum reading and will update
only when a new “max or min” occurs.
2. Press the MAX/MIN key and a blinking “MAX MIN” will
appear. The meter will display the present reading, but will
continue to update and store the max and min readings.
To exit MAX/MIN mode press and hold the MAX/MIN key for 2
seconds.
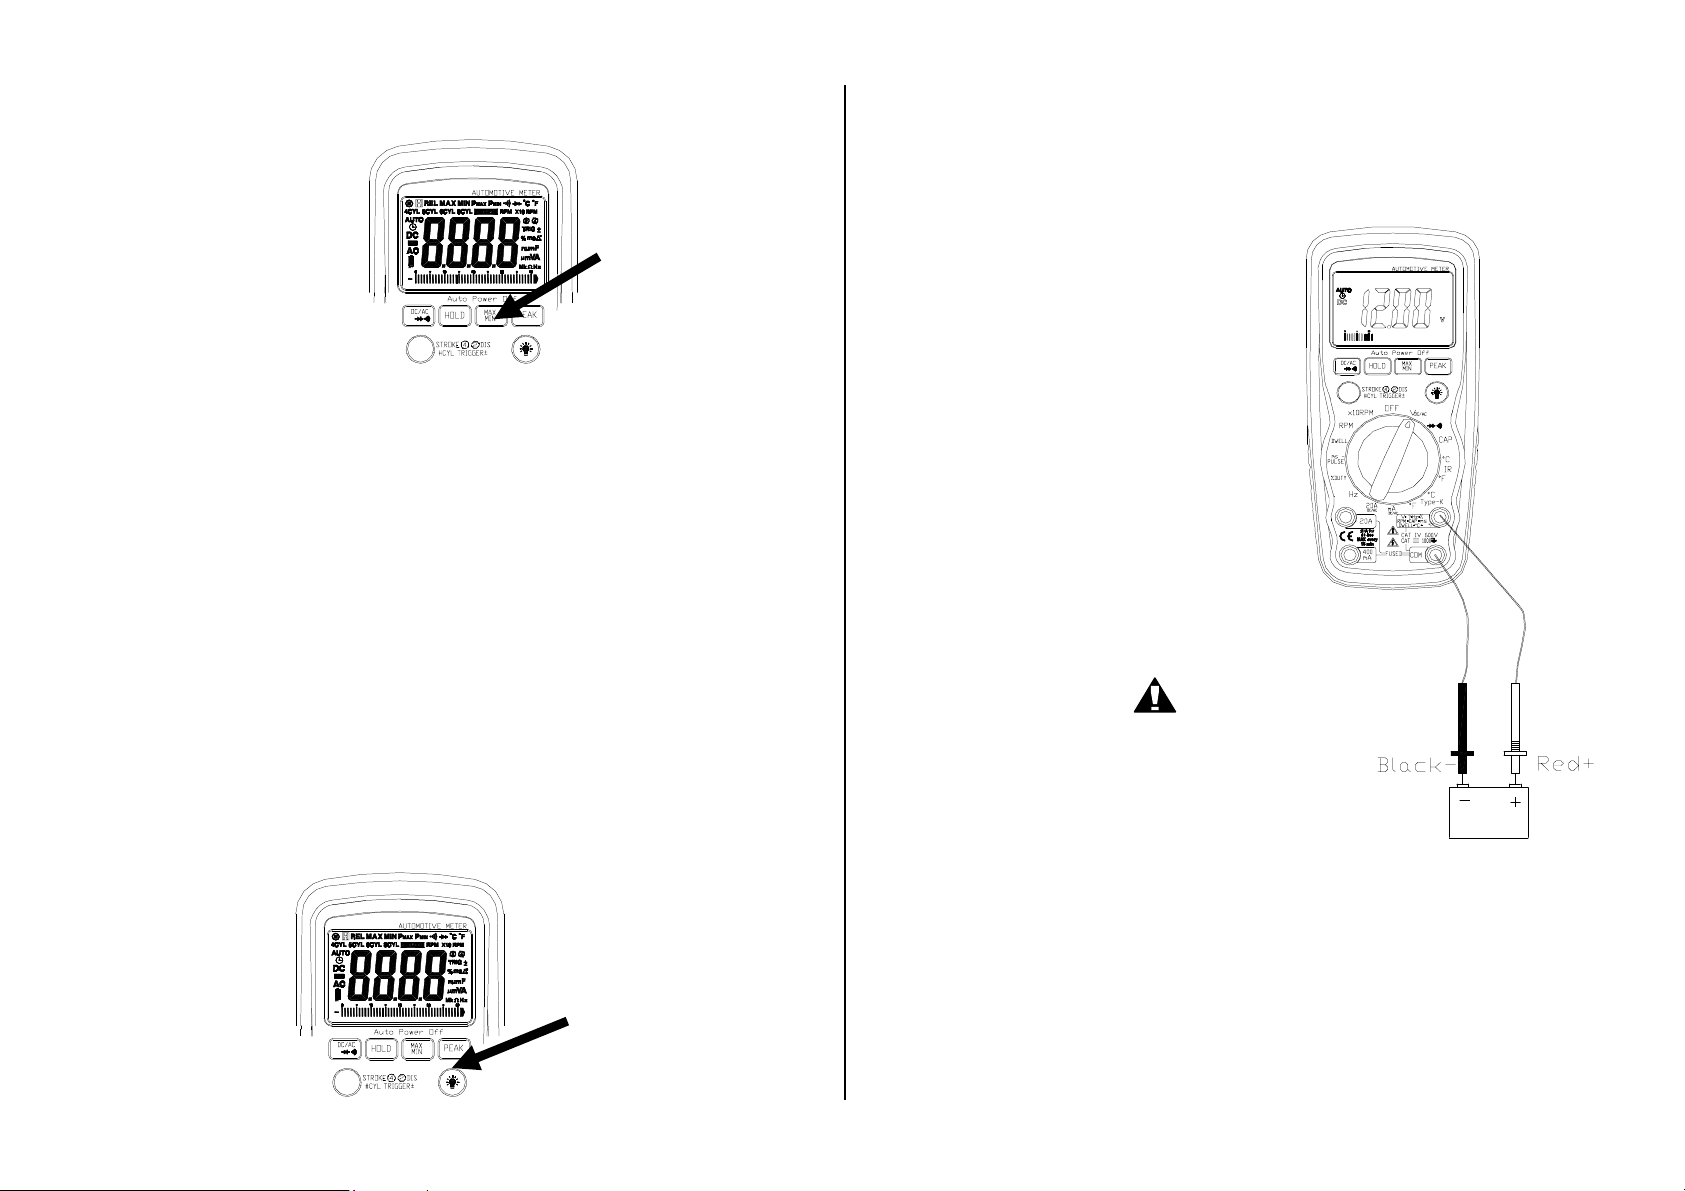
Meter Functions - Voltage (V)
Select the Volts “ V” range with
the rotary switch.
The meter will automatically
select the best voltage (V) range.
Select DCV or ACV with the
MODE button.
Insert:
Black lead in COM terminal.
Red lead in V-Ω-RPM terminal
Touch the Black probe to ground or
to the negative (-) circuit
Touch the Red probe to the circuit
coming from the power source
IMPORTANT: Voltage must be
measuring in parallel (Red probe
measuring circuit from power
source).
When
Ω
Ω
Backlight Button
1. Press the BACKLIGHT button to turn the backlighting ON.
2. Press the BACKLIGHT button again to turn the backlighting
OFF.
(A) or Milliamp (mA)
damaged.
Ω
11 12

Meter Functions – Resistance (Ω)
IMPORTANT: If you are testing
an application that has capacitors
in the circuit, be sure to turn the
power OFF on the test circuit and
discharge all capacitors. Accurate
measurement is not possible if
external or residual voltage is
present.
Select the Resistance “ Ω”
range with the rotary switch.
Ω
Meter Functions –Diode Check ( )
IMPORTANT: Turn the power OFF to
the test circuit
Select the Diode Check “ “
function with the rotary switch and
mode button.
Insert:
Black lead in COM terminal.
Red lead in V-Ω-RPM terminal.
Ω
Touch the Black test probe to the
negative (-) side of the diode.
Touch the Red test probe to the positive
(+) side of the diode. Reverse the probes:
Black to the positive
(+) side and Red to the negative (-) side.
Ω
Ω
Select the Resistance “Ω”
function with the Mode button.
Please note the unit defaults to
resistance.
Insert:
Black lead in COM terminal.
Red lead in V-Ω-RPM terminal.
Touch the test lead probes across
the resistor to be tested.
13 14
Note:
A “good” diode will read low in one
`direction and high in the other direction
when the probes are reversed (or vice
versa).
A defective diode will have the same
reading in both directions or read
between 1.0 to 3.0 V. in both directions
Reverse
Probes
Diode - to +
Good
.4 to .9V OL
OL .4 to .9V
OL 1.0 to 3.0V
1.0 to 3.0V OL
.4 to .9V .4 to .9V
Bad
OL OL
.000V .000V
+ to -

Meter Functions – Capacitance ( CAP )
IMPORTANT: Turn the power OFF to
the test circuit
select the Capacitance “ CAP “
function with the rotary switch and
mode button
Insert:
Black lead in COM terminal.
Red lead in V-Ω-RPM terminal
CAUTION: When checking in-circuit
capacitance, be sure
that the circuit has all power
removed and all capacitors are
fully discharged.
Touch the test lead probes across the
capacitance circuit to be tested.
Read the measured value from the
LCD display.
Note:
1. The bar graph is disabled in capacitance measurement mode.
However, since the measurement time of 4mF and 40mF
modes is quite long (3.75s and 7.5s respectively,
to be precise,) the bar graph is used to display
the time rest to accomplish the measurement.
2. In order to obtain an accurate reading,
a capacitor must be discharged before measurement begins. The meter has a
built-in discharge mode to automatically discharge the capacitor. In discharge
mode, the LCD displays “DIS.C”
3. Discharging through the chip is quite slow. We recommend the user to
discharge the capacitor with some other apparatus.
Ω
Ω
Meter Functions –Audible Continuity ( )
IMPORTANT: Turn the power
OFF on the test circuit
Select the Audible Continuity
“ “ function with the rotary
switch and mode button.
Insert:
Black lead in COM terminal.
Red lead in V-Ω-RPM terminal.
Connect one test probe to each
end of the circuit to be tested.
Circuit complete, the meter will
beep continuously.
Circuit open, there is no beep
and the display shows to OL
(over limit).
Ω
Ω
15 16

Meter Functions –AC or DC Current (A)
N
ote:
Current must always be
measured with the meter test
probes connected in series,
IMPORTANT: All current measured
flows through the meter.
It is important that you do not:
Measure current greater than
600 Volts AC or DC, with
respect to ground.
Do Not Exceed 30 seconds
when measuring continuous
current between 1A-20A.
Allow five minutes for cool
down before continuing.
Select the “20A” or “mA”
range with the rotary switch.
Ω
Meter Functions –Temperature (0C/0F )
IMPORTANT: To avoid heat
damage to the meter, keep
it away from sources of
very high temperature. The
life of the Temperature
Probe is also reduced
when subjected to very
high temperatures. Probe
operating range is
–58oto 482oF.
Ω
Select the Temperature
“0C or0F” function with the
rotary switch.
Ω
Ω
Press the Mode button to
select AC or DC.
Insert:
Black lead in COM terminal.
Red lead in the 20A or mA
terminal (select 20A if you are
unsure of the current draw).
IMPORTANT: Turn OFF all power
to the circuit or disconnect the
circuit from the power source.
Connect:
The Red probe to the side of the
circuit closest to the power
source.
The Black probe to the side of
the circuit to ground.
Turn the power ON and test.
Insert the temperature probe
connector into the K-type
thermocouple adapter.
Insert the adapter into the
front of the meter as shown.
Touch the end of the
temperature sensor to the area
or surface of the object to be
measured.
as described.
17 18

Meter Functions –Frequency (Hz)
Meter Functions-Dwell ( )
Selectthe “Hz” Frequency
function with the rotary
switch.
Insert:
Blackleadin COM terminal.
Red leadinV-Ω-RPM terminal.
Connect the Black test probe
to ground.
Connect the Red test probe to
the “signal out” wire of the
sensor to be tested.
Select the “DWELL”
function with the rotary
switch.
Insert:
Auto Power Off
Ω
4 2
V
Ω
Black lead in COM terminal.
Red lead in V-Ω-RPM
terminal.
Connect the Black test probe to
ground.
Ω
Ω
Connect the Red test probe to
V
the wire that connects to the
breaker points (see illustration).
Black-
"Signal Out"
Side
"Voltage In"
Red+
Ground
Side
19 20

Meter Functions-Duty Cycle (%)
Meter Functions- ms-PULSE (Pulse Width) &
Select the “% Duty” Cycle
function with the rotary switch.
Insert:
Black lead in COM terminal.
Red leadin V-Ω-RPM terminal.
Connect the Black test probe to
ground.
Connect the Red test probe to
the signal wire circuit.
The illustration for a mixture
control solenoid is shown with the
metering rod in the closed
position. The meter will display
the percentage of time the
plunger is in the closed position.
(low duty cycle) during one duty
cycle.
ms- PERIOD (Period)
Pulse Width is the length of time an actuator is energized. For
example, fuel injectors are activated by an electronic pulse from
the Engine Control Module (ECM).
This pulse generates a magnetic field that pulls the injectors nozzle
Ω
Ω
valve open.
The pulse ends and the injector nozzle is closed.
This open to close time is the Pulse Width and is measured in
milliseconds( ms).
The most common automotive application for measuring pulse
width is on fuel injectors.
You can also measure the pulse width of the fuel mixture control
solenoid and the idle air control motor.
This exercise shows how to measure Pulse Width on Port Fuel
injectors.
(continued on next page)
21 22

To measure pulse width (mS):
242
Select the “mS-Pulse”
function with the rotary
switch.
Press the ±TRIG button for 2
seconds until the negative (-)
trigger slope is displayed on
the upper left side of the
display.
NOTE: The applied time for
most fuel injectors is
displayed on the
negative (-) slope.
Insert:
Black lead in COM jack.
Red lead in V-Ω-RPM jack.
Ω
Meter Functions-RPM/×10RPM
Select the RPM range with the
rotary switch.
OR
Select the×10RPM range with
the rotary switch (1,000 to
12,000 RPM). Multiply the
displayed reading by ten to get
actual RPM.
Ω
Press STROKE / DIS
button to select through
4
RPM for 4-stroke, RPM
for 2-stroke and DIS ignitions.
Insert the inductive pickup
connecting terminal into the
meter.
Black lead in COM terminal.
Ω
Ω
Connect:
Jumper wires between the fuel
injector and the harness
connector.
Black test probe to a good
ground at the fuel injector or the
negative (-) vehicle battery post.
Red test probe to the fuel
injector solenoid driver input on
the jumper cable.
Startthe engine. A pulse width in
milliseconds should be read.
Note: Initially, the unit will read
“OL”, then readings will descend
and stabilize to the actual pulse
width. If “OL” remains,
re-check your connections.
23 24
Red lead in V-Ω-RPM
terminal.
Connect the inductive pickup to
a spark plug wire. If no reading
is received, unhook the clamp,
turn it over and connect again.
Note:
Position the inductive pick-up as far away from the distributor and the
exhaust manifold as possible.
Position the inductive pick-up to within six inches of the spark plug or move
it to another plug wire if no reading or an erratic reading is received.
RPM 4 : For RPM of 4-stroke engines which have 1 ignition on
every 4 engine strokes
RPM 2: For RPM of DIS (Distributor less ignition System) &
2-stroke engines which Have 1 ignition on every 2
engine strokes
PLEASE NOTE- THE RPM PICK-UP HAS AN ADJUSTABLE SENSITIVITY
SWITCH THAT CAN ALSO BE USED TO CORRECT AN
UNSTABLE READING.

Meter Functions – Non-contact Infrared
Infrared Temperature Probe Introduction
Temperature (0C /0F )measurements
Ω
Ω
Infrared
Temperature
Probe
The Infrared Temperature Probe is a noncontact temperature measurement
accessory for use with a test instrument capable of measuring DC volts in the
millivolt range (200mV/400mV/600mV/2V/4V/6V range). The probe has a
temperature range of -30°C to 550°C (-22°F to 1022°F), with a basic accuracy
of 2% of reading, and an output of 1 mV dc per °C or °F.
Temperature is measured by pointing the probe at the surface to be measured,
and reading the temperature on the test instrument display.
Compatibility
The probe is compatible with all DC millivolt measuring instruments or this
automotive meter. Infrared Temperature (0C/0F ) ranges measuring
instruments that have a minimum of 1 MΩ input impedance and accept safety
shrouded, standard diameter 0.16 in. (4 mm) banana plugs
Field of View
The meter’s field of view is 8:1, meaning that if the meter is 8 inches from the
target, the diameter of the object under test must be at least 1 inch. Other
distances are shown below in the field of view diagram. Refer to the chart
printed on the meter for more information.
Field of View
Make sure that the target is larger than the unit’s spot size. The smaller the
target, the closer you should be to it. When accuracy is critical, make sure the
target is at least twice as large as the spot size
25 26

SAFETY
Use extreme caution when the laser beam is turned on.
Do not let the beam enter your eye, another person’s eye or the eye of
an animal.
Be careful not to let the beam on a reflective surface strike your eye.
Operation
To take a measurement, perform the following steps:
1. Plug the red connector into the V mV dc input jack and the black connector
into the common or ground input jack on the test instrument.
2. Select Infrared Temperature (0C /0F ) or mV dc range on the test
instrument.
3. Press the probe button laser, the Infrared Temperature Probe ON
4. Point the tip of the probe as close as possible to the object being measured
without touching the object.
5. Read the test instrument display.
C
F
C
¡ã
F¡ã
¡ã¡ã
Additional considerations are:
Release the probe button laser and the Infrared Temperature Probe OFF
the DMM display will show 0°C or 0°F or 0mV.
The temperature scale can be changed to °C or °F by removing the
battery from the battery compartment and moving the internal °C/°F
switch to the desired position.
9V
If the test instrument displays an overload condition, switch the DMM
range from mV dc to V dc. Increasing the range to V dc moves the
decimal position three places to the left (500°F displays as 0.500V).
Note: Measurement considerations
Holding the meter by its handle, point the IR Sensor toward the
object whose temperature is to be measured. The meter
automatically compensates for temperature deviations from
ambient temperature. Keep in mind that it will take up to 30
minutes to adjust to wide ambient temperatures are to be
measured followed by high temperature measurements,
sometime (several minutes) is required after the low (and
before the high) temperature measurements are made.
This is a result of the cooling process which must take place for the IR
sensor.
27 28

C) whichever is
Note: Accuracy is specified for the following
64 to 82°F (18 to
General Specifications
Response rate 0.5 second approx.
Operating Temperature
32°F to 122°F (0°C to 50°C)
Operating Humidity Max. 80% RH.
Power Supply 9V battery
Weight 182g
Size 164 x 50 x 40mm
Infrared Thermometer Specifications
Range -30 to 550oC/-22 to 1022oF
Output 1mV=1oC or 1oF
Accuracy ± 2% of reading or ± 4oF (2
greater.
ambient temperature range:
28°C)
Emissivity 0.95 fixed value
Field of View D/S = Approx. 8:1 ratio (D = distance, S = spot)
(Has 90% encircled energy at the focal point)
Laser power Less than 1mW
Spectral response 6 to 14 µm (wavelength)
BATTERY REPLACEMENT
② As battery power is not sufficient, LED show will “ ON ” replacement with
one new battery type 9V is required.
o
General Specifications
General Specifications
The instrument complies with: IEC 1010-1 EN61010-1.
Insulation: Class2, Double insulation.
Overvoltage category: CATIII1000V/CATIV600V.
Display: 4000 counts LCD display with function indication.
Polarity:Automatic, (-) negative polarity indication.
Overrange: “OL” mark indication.
Low battery indication: The “BAT” is displayed when the battery
voltage drops below the operating level.
Measurement rate: 2 times per second, nominal.
Auto power off: Meter automatically shuts down after approx. 30
minutes of inactivity.
Operating environment: 0oC to 50oC (32oF to 122oF) at <
70 % relative humidity.
Storage temperature: -20oC to 60oC (-4oF to 140oF) at < 80 %
relative humidity.
For inside use, max height: 2000m
Pollution degree: 2
Power: One 9V battery , NEDA 1604, IEC 6F22.
Dimensions: 182 (H) x 82 (W) x55 (D) mm
Weight: Approx.: 375g.
② Open battery cover, then take out the battery from instrument and replace
with a new 9-Volt battery and place the battery cover back.
29 30

Electrical Specifications
Electrical Specifications
*Accuracy is given as ± ([% of reading] + [number of least
significant digits]) at 18 to 28℃ (65F to 83F), with relative
humidity up to 70%.
RPM (Tach)
Range Resolution Accuracy
600~4000
RPM 4
RPM 2/DIS 300~4000
Effect Reading: >600 RPM
RPM
1000~12000
RPM
(X10 RPM)
RPM
1000~6000
RPM
(X10 RPM)
1 RPM
10 RPM
+2 % of rdg + 4 dgts
1 RPM
10 RPM
AC Voltage
Range Resolution Accuracy
400.0mV 0.1mV +1.5% of rdg + 5 dgts
4.000V 1mV +1.0% of rdg + 3 dgts
40.00V 10mV +1.5% of rdg + 3 dgts
400.0V 100mV
600V 1V +2.0% of rdg + 4 dgts
Input Impedance: 10MΩ.
Frequency Range: 50 to 60Hz
DC Current
Range Resolution Accuracy
40.00mA 10uA +1.5% of rdg + 3 dgts
400.0mA 100uA
20A 10mA +2.5% of rdg + 5 dgts
Overload Protection: 0.5A / 250V and 20A / 250V Fuse.
Maximum Input: 400mA dc or 400mA ac rms on uA / mA
ranges,20Adc or ac rms on 20A range.
DEWLL ANGLE
Cylinder Range Resolution Accuracy
4CYL 0~90.0° 0.1° +2.0% of rdg + 4 dgts
5CYL 0~72.0°
6CYL 0~60.0°
8CYL 0~45.0°
DC Voltage
Range Resolution Accuracy
400.0mV 0.1mV +0.5% of rdg + 3 dgts
4.000V 1mV
40.00V 10mV
400.0V 100mV
600V 1V +1.8% of rdg + 2 dgts
Input Impedance: 10MΩ
+1.5% of rdg + 2 dgts
31 32
AC Current
Range Resolution Accuracy
40.00mA 10uA +1.8%of rdg + 5 dgts
400.0mA 100uA
20A 10mA +3.0% of rdg + 7 dgts
Overload Protection: 0.5A / 250V and 20A / 250V Fuse.
Frequency Range: 50 to 60 Hz
Maximum Input: 400mA dc or 400mA ac rms on uA / mA ranges,
20A dc or ac rms on 20A range.
Resistance
Range Resolution Accuracy
400.0Ω 0.1Ω +1.2% of rdg + 4 dgts
4.000kΩ 1Ω +1.0% of rdg + 2 dgts
40.00kΩ 10Ω +1.2% of rdg + 2 dgts
400.0kΩ 100Ω
4.000MΩ 1kΩ

40.00MΩ 10kΩ +2.0% of rdg + 3 dgts
Capacitance
Range Resolution Accuracy
4.000nF 1pF +5.0% of rdg+50 dgts
40.00nF 10pF +5.0% of rdg + 7 dgts
400.0nF 0.1nF
4.000uF 1nF
40.00uF 10nF
400.0uF 0.1uF
4.000mF 0.001mF +10% of rdg + 10 dgts
40.00mF 10.00mF
+3.0% of rdg + 5 dgts
Type-K Temperature
Range Resolution Accuracy
-30oC~ 1000oC 1oC +3% of rdg +5oC/8oF
-22oF~1832oF 1oF
(Meter only, probe accuracy
not included)
Sensor: Type K Thermocouple
Diode Test
Test current Resolution Accuracy
1.0mA typical 1 mV +5% of rdg +15 dgts
Open circuit voltage: 3.0V dc typical
Frequency
Range Resolution
4.000kHz 1Hz
40.00kHz 10Hz
400.0kHz 100Hz
4.000MHz 1000Hz
40.00MHz 1kHz
Sensitivity
>5V RMS
>15V RMS
Accuracy
+1.5% of rdg + 3 dgts
+2.0% of rdg + 4 dgts
Duty Cycle
Range Resolution Accuracy
0.5%~99.0 % 0.1% +2% of rdg + 5 dgts
Pulse width: >100us, <100ms;
Frequency width: 5Hz – 100kHz
Sensitivity: >5V RMS
Pulse Width
Range Resolution Accuracy
1.0~ 20.0ms 0.1ms +2% of rdg +20 dgts
Audible continuity
Audible threshold: Less than35Ω Test current: <1mA dc typical
Maintenance
REPLACING THE BATTERY
WARNING: To avoid electric shock, disconnect the test leads
from any source of voltage before removing the battery door.
1. When the batteries become exhausted or drop below the
operating voltage, “BAT” will appear in the right-hand side of the
LCD display.The battery should be replaced.
2. Follow instructions for installing battery. See the Battery
Installation section of this manual.
3. Dispose of the old battery properly.
WARNING: To avoid electric shock, do not operate your meter
until the battery door is in place and fastened securely.
33 34

9V Battery
Rear cover screws
BATTERY INSTALLATION
WARNING: To avoid electric shock, disconnect the test leads
from any source of voltage before removing the battery door.
1. Disconnect the test leads from the meter.
2. Open the battery door by loosening the screw using a Phillips
head screwdriver.
3. Insert the battery into battery holder, observing the correct
polarity.
4. Put the battery door back in place. Secure with the two screws.
WARNING: To avoid electric shock, do not operate your meter until
the fuse door is in place and fastened securely.
9V Battery Door Screws
9V Battery Door
WARNING: To avoid electric shock, do not operate the meter
until the battery door is in place and fastened securely.
NOTE: If your meter does not work properly, check the fuses and
battery to make sure that they are still good and that they are
properly inserted.
REPLACING THE FUSES
WARNING: To avoid electric shock, disconnect the test leads
from any source of voltage before removing the rear cover (fuse
door).
1. Disconnect the test leads from the meter and any item under
test.
2. Open the fuse door by loosening the screws on the rear cover
using a Phillips head screwdriver.
3. Remove the old fuse from its holder by gently pulling it out.
3. Install the new fuse into the holder.
4. Always use a fuse of the proper size and value (0.5A/250V -φ5
x 20, fast blow for the 400mA range, 20A/250V –φ6.3 x 32 fast
blow for the 20A range).
5. Put the fuse door back in place. Insert the screw and tighten it
securely.
Rear cover screws
F1 500mA/250 FUSE
F2 20A/250V FUSE
Trouble Shooting
1. Meter will not turn ON.
Check the battery contacts for a tight fit.
Check for a minimum battery voltage of 8.0 volts.
2. Ampere reading is erratic or there is no reading at all.
Disassemble the meter back cover as per the fuse
replacement instructions on page 36 and test the fuses for
continuity with another meter.
3. Meter reading is erratic.
Printed circuit board damaged from handling with hands.
Low battery.
“Blown” fuse.
Open circuit in a test lead (frayed or broken wire).
4. Meter readings do not change.
“Hold” feature is still toggled ON.
35 36
 Loading...