


1
www.plusmed-health.com
Kullanım Kılavuzu
Instruction Manual
Ref.: pM-100
Blood Glucose Monitoring System
Kan Şekeri Ölçüm Sistemi


Kullanım Kılavuzu
Kan Şekeri Ölçüm Sistemi

İçindekiler
Önemli Bilgiler ...........................................................................................................6
Giriş ......................................................................................................................... 10
Ürün Hakkında ........................................................................................................ 11
plusmed fasTTest Ölçüm Cihazı Hakkında ................................................ 12
plusmed fasTTest Ölçüm Cihazı Ekranı Hakkında ..................................... 14
plusmed fasTTest Test Stribi Hakkında ..................................................... 16
plusmed fasTTest Test Stribi Şişesi Hakkında ........................................... 17
Pil takma/değiştirme .................................................................................. 18
Ölçüm Cihazının Ayarlanması ............................................................................... 19
Tarih ve Saatin Ayarlanması ....................................................................... 19
Alarmın Kurulması ...................................................................................... 20
Birim Seçimi ............................................................................................... 23

Kontrol Solüsyonu Testi ........................................................................................ 24
Kan Şekeri Seviyenizin Test Edilmesi .................................................................. 28
Test Stribinin Hazırlanması ......................................................................... 29
Kan Örneği Alınması .................................................................................. 30
plusmed fasTTest Test Stribine Kan Örneği Uygulanması ........................ 30
Hafıza Özellikleri ..................................................................................................... 34
Test Sonuçlarının Bilgisayara Aktarılması ........................................................... 36
Bakım ve Saklama .................................................................................................. 37
Ekran Mesajları ....................................................................................................... 38
Teknik Özellikler ..................................................................................................... 45
Prosedür Sınırlamaları ................................................................................ 47
Servis ve Garanti .................................................................................................... 48
Müşteri Hizmetleri .................................................................................................. 50
Kendi Kendine Ölçüm için Kayıt Günlüğü .......................................................... 102

6
Uygun Alternatif Bölge Testi: Avuç içi ve ön kol
Alternatif Bölge Testi (ABT), kan şekeri seviyenizi kontrol etmek için daha hassas olan
parmak uçlarınız haricinde vücudunuzun diğer kısımlarından da faydalanabileceğiniz
anlamına gelmektedir. plusmed fasTTest Kan Şekeri Ölçüm Sistemi, parmak ucundan
yapılan test ile eşdeğer sonuçlar veren avuç içi ve ön koldan teste izin verir.
Önemli Bilgiler
Avuç içi
Ön kol
ABT açısından sınırlamalar
bulunmaktadır.
Lütfen ABT gerçekleştirmeden önce
hekiminize başvurun.

7
Yemek sonrasında, insülin aldıktan sonra, egzersiz yaparken, hasta yahut stresli
olduğunuz zamanlar gibi glikoz seviyelerinin hızla değiştiği anlarda alternatif bölge
sonuçları parmak ucundan elde edilen sonuçlardan farklılık gösterir. Şu durumlarda
alternatif bölge yerine parmak ucundan kan alın:
• kan şekerinizin düşük olduğunu düşünüyorsanız;
• kan şekerinizin düşük olduğuna dair düzenli semptomlara sahip değilseniz;
• hissiyatınız alternatif bölgeden elde edilen sonuçlar ile uyuşmuyorsa;
• kısa süre önce insülin aldıysanız veya egzersiz esnasında veya sonrasında;
• hastalık gibi, o gün ortaya çıkan bilinmeyen değişkenler mevcut ise;
• araç kullanacaksanız
DİKKAT:
1. Parmak ve diğer test bölgeleri mesela ön kol ve avuç içi arasındaki sirkülasyondaki ziksel farklılıklar, diğer test bölgeleri ve parmak uçlarınızdan elde
edilen kan şekeri ölçümlerinde farklılıklara neden olabilir. Kan şekerindeki
değişimler parmaktan alınan kan örneklerinde, ön kol ve diğer alternatif bölgelerden alınan kan örneklerinden daha kısa sürede gözlenir. Kan almadan önce
yaklaşık 20 saniye süreyle alternatif test bölgelerini ovuşturun. Hipoglisemi
(düşük kan şekeri) testi yapıyorsanız veya hipogliseminin farkında değilseniz,
parmak uçlarınızdan ölçün yapmanızı tavsiye ederiz.

8
2. Alternatif bölge testinin sizin açınızdan uygun olup olmadığını doktorunuz
ile görüşün. Diyabetli hastalar açısından daha sık test yapılması iyidir. Şunu
unutmayın: Hassas, güncel bir kan şekeri ölçümü almak istediğinizde, parmak
ucunuzdan ölçüm yapın.
3. ABT’yi YALNIZCA şu aralıklarda tavsiye etmekteyiz:
• Yemek öncesinde veya aç karnına (en son yenilen yemekten en az 2 saat sonra)
• İnsülin aldıktan en az 2 saat sonra
• Egzersiz yaptıktan en az 2 saat sonra
Şu durumlarda ABT’den FAYDALANMAYIN:
• Kan şekerinizin düşük olduğunu düşünüyorsanız;
• Hipogliseminin farkında değilseniz;
• Hissiyatınız alternatif bölgeden elde edilen sonuçlar ile uyuşmuyorsa;
• Hiperglisemi (yüksek kan şekeri) testi yapıyorsanız
• Rutin glükoz sonuçlarınız sıklıkla dalgalanma sergiliyor ise
• Gebe iseniz

9
• Düşük veya yüksek kan şekeri ölçümleri, potansiyel olarak ciddi bir tıbbi
durumun göstergesi olabilir. Kan şekeri ölçümünüz olağandışı şekilde düşük
veya yüksek ise veya sonuçlarla hissettikleriniz örtüşmüyor ise, testi yeni bir
test stribi ile tekrar edin. Eğer sonuçlar semptomlarınız ile tutarlı değilse veya
kan şekeri sonucunuz 60 mg/dL’den (3.3 mmol/L) düşük veya 240 mg/dL’den
(13.3 mmol/L) yüksek ise hekiminize başvurun.
• Bir hekimin veya sağlık profesyonelinin izni ve tavsiyesi olmadan plusmed
fasTTest kan şekeri test sonuçlarına dayanan bir ilaç değişikliği veya
uygulamasında bulunmayınız.
• Şiddetli dehidrasyon ve aşırı su kaybı hatalı derecede düşük sonuçlara yol
açabilir. Şiddetli dehidrasyon şikayetiniz varsa derhal hekiminize başvurun.

10
Biyosensör teknolojisindeki en ileri cihaz olan plusmed fasTTest Kan Şekeri Ölçüm
Sistemini seçtiğiniz için teşekkür ederiz.
Kullanım kolaylığı ve hızlı yanıt süresi ile tanınan plusmed fasTTest Kan Şekeri Ölçüm
Sistemi, in vitro tanılara yönelik olarak sadece küçük bir miktarda kan almak sureti ile doğru sonuçları göstermek üzere tasarlanmıştır. plusmed fasTTest Kan Şekeri
Ölçüm Sistemi, parmak ucundan, avuç içinden ve ön koldan elde edilen tam kan
şekeri seviyelerini görüntülemek üzere evde ve profesyonel yerlerde kullanıma yönelik
planlanmıştır. Reçetesiz temin edilebilen bir üründür.
Lütfen bu ürünü kullanmadan önce Kullanım Kılavuzunu dikkatle okuyunuz.
Giriş

11
plusmed fasTTest Kan Şekeri Ölçüm Sisteminiz birkaç bileşenden oluşmaktadır.
Bu kılavuz size ayrıntılı yönlendirmeler ve resimler ile sistemin işleyişi hakkında yol
gösterme amacı taşır. plusmed fasTTest Kan Şekeri Ölçüm Sisteminiz şunları içermektedir:
• plusmed fasTTest ölçüm cihazı
• Bir delme cihazı (opsiyonel)
• Lanset/İğne(10 adet)
• Bir taşıma çantası
• Kullanım kılavuzu (dahili kayıt günlüğü)
• Hızlı kullanım kılavuzu
• Parmak delme kalemi için talimatlar
Ürün Hakkında

12
plusmed fasTTest Ölçüm Cihazı Hakkında
ÖN ARKA
Trimpeks İth.İhr.Tur.ve Tic.A.Ş.
Eski Büyükdere Cad. Yunus Emre Sok. No:1/12
4. Levent, 34418 İstanbul Tel +90 212 319 50 00
Fax +90 212 319 50 50, www.trimpeks.com
B04Q102167(03)
Rev. date: 10/2014
Battery/Pil:
Made in Taiwan
Tayvan'da üretilmiştir

13
1. Ekran: Test sonuçlarınızın görüntülendiği yerdir. Geniş, okunması kolay ekran
kılavuzları ile test süresince kolayca kullanabilirsiniz.
2. M düğmesi: M (mod) düğmesi saati ayarlamak, alarm işlevi, 7/14/30 günlük
ortalama sonuçları görmek için hafıza moduna girmek ve cihazı açıp kapamak
için kullanılır.
3. S Düğmesi: S (seçme/ayar) düğmesi yıl, ay ve günü, saati seçmede, sonuç
hafızasını seçmede ve kontrol solüsyonu modunu işaretlemede kullanılır.
4. Test Portu: Test Stribini Cihazın içerisine soktuğunuz kısımdır.
5. Birim Düğmesi: mmol/L veya mg/dL arasında değiştirilebilir. 1 mmol/L= 18 mg/dL.
6. Pil Yuvası Kapağı
7. Etiket
8. Reset Düğmesi: Bu düğmeye basıldığında sistem yeniden başlatılır.
9. Veri Portu: Veri aktarımı için arayüz kablosu bağlanır.

14
1. Tarih
2. Saat
3. Kontrol Solüsyonu Testi
Bir kontrol solüsyonu testi
gerçekleştirirken ve sonucu bir
kontrol solüsyonu testi şeklinde
işaretlerken gözükür.
4. Hafıza sembolü
Hafıza modunu gösterir.
5. Ölçüm birimleri
Test sonucu mmol/L veya mg/dL
şeklinde gözükür.
6. Pil sembolü
Pil zayıadığında veya
değiştirilmesi gerektiğinde
gözükür.
plusmed fasTTest Ölçüm Cihazı Ekranı Hakkında
5
2
7
10
13
6
8
11
3
1
4
9
12

15
7. Kan damlası sembolü
Örneği Test Stribine uygulamaya hazır olduğunda yanıp söner.
8. Uyarı sembolü
Sonuç, ayar referans değeri aralığınızın dışına iken gözükür.
9. Alarm işlevi sembolü
Saat alarmı kurulu oluğunda gözükür.
10. Test Stribi sembolü
Cihazın teste hazır olduğunu gösterir.
11. Günlük Ortalama sembolü
Test sonuçlarının ortalama değerini gösterir.
12. Test Sonucu Bölgesi
Test sonuçlarını gösterir.
13. Sıcaklık Mesajı
Cihaz işletme sıcaklık aralığı dışında iken gözükür.

16
plusmed fasTTest Test Stribi Hakkında
plusmed fasTTest Test Stribi, plusmed fasTTest Ölçüm
Cihazı ile birlikte kan şekeri testi gerçekleştirmede kullanılır.
Her bir strip yalnızca bir kez kullanılabilir.
Test Stribi şu kısımlardan oluşur:
1. Onay Penceresi
Hedef bölgeye yeterli kanın uygulanmış olduğunu teyit
eden kısımdır.
2. Hedef Bölge
Kanın Test Stribi içerisine çekildiği kısımdır.
3. Temas Çubuğu
Test Stribinin bu ucu Ölçüm Cihazını aktif kılmak için
Test Portuna sokulur (beyaz kısım yukarı bakacak).
3
1
2

17
plusmed fasTTest Test Stribi Şişesi Hakkında
ŞİŞE ETİKETİ
Kontrol solüsyonu aralığı
Lot Numarası
Son kullanım tarihi
TEST STRİBİ ŞİŞESİ
Made in Taiwan
Tayvan'da üretilmiştir
www.plusmed-health.com
Trimpeks İth.İhr.Tur.ve Tic.A.Ş.
Eski Büyükdere Cad., Yunus Emre Sok., Topçu İş
Merkezi No:1/12, 4. Levent, 34418 İstanbul,Türkiye
Tel +90 212 319 50 00 Fax +90 212 319 50 50
www.trimpeks.com
B04Q102166(03)
Rev. date: 10/2014
Made in Taiwan
Tayvan'da üretilmiştir
www.plusmed-health.com
Trimpeks İth.İhr.Tur.ve Tic.A.Ş.
Eski Büyükdere Cad., Yunus Emre Sok., Topçu İş
Merkezi No:1/12, 4. Levent, 34418 İstanbul,Türkiye
Tel +90 212 319 50 00 Fax +90 212 319 50 50
www.trimpeks.com
B04Q102166(03)
Rev. date: 10/2014

18
Pil zayıadığında ölçüm cihazı bir uyarı sinyali görüntüler. Ekranda bu gözüktüğünde yeni pil takılması gerekir. Zayıf pil uyarı ibaresi gözüktüğünde, ölçüm cihazı yaklaşık 50 ölçüm kadar doğru
sonuç vermeye devam eder.
1. Ölçüm cihazının arka kısmındaki pil yuvası kapağını hafçe kaldırın.
2. Bir adet 3 Volt lityum pil (CR-2032); “+” taraf yukarı bakacak şekilde.
3. Pil yuvası kapağını kapatın.
Pil takma/değiştirme
Pilleri Değiştirme
1 2 3
Trimpeks İth.İhr.Tur.ve Tic.A.Ş.
Eski Büyükdere Cad. Yunus Emre Sok. No:1/12
4. Levent, 34418 İstanbul Tel +90 212 319 50 00
Fax +90 212 319 50 50, www.trimpeks.com
B04Q102167(03)
Rev. date: 10/2014
Battery/Pil:
Made in Taiwan
Tayvan'da üretilmiştir
Trimpeks İth.İhr.Tur.ve Tic.A.Ş.
Eski Büyükdere Cad. Yunus Emre Sok. No:1/12
4. Levent, 34418 İstanbul Tel +90 212 319 50 00
Fax +90 212 319 50 50, www.trimpeks.com
B04Q102167(03)
Rev. date: 10/2014
Battery/Pil:
Made in Taiwan
Tayvan'da üretilmiştir
Trimpeks İth.İhr.Tur.ve Tic.A.Ş.
Eski Büyükdere Cad. Yunus Emre Sok. No:1/12
4. Levent, 34418 İstanbul Tel +90 212 319 50 00
Fax +90 212 319 50 50, www.trimpeks.com
B04Q102167(03)
Rev. date: 10/2014
Battery/Pil:
Made in Taiwan
Tayvan'da üretilmiştir
Trimpeks İth.İhr.Tur.ve Tic.A.Ş.
Eski Büyükdere Cad. Yunus Emre Sok. No:1/12
4. Levent, 34418 İstanbul Tel +90 212 319 50 00
Fax +90 212 319 50 50, www.trimpeks.com
B04Q102167(03)
Rev. date: 10/2014
Battery/Pil:
Made in Taiwan
Tayvan'da üretilmiştir

19
Ölçüm Cihazının Ayarlanması
Tarih ve Saatin Ayarlanması
Cihazı çalıştırmak için önce bir pil takın, daha sonra cihazın arka kısmında konumlu
reset düğmesine basın ve şunları uygulayın.
1. Bu moda giriş yapmak için M düğmesine
basın. “24hr” veya “12hr” ayarını seçmek için S
düğmesine basın. Tercih ettiğiniz saat modun da, M düğmesine basın, yıl ayarı gözükür.
Doğru yıl ayrına gelinceye dek S düğmesine
basın (Şekil 1).
2. Yılı kaydetmek ve ay kısmına devam etmek
için M düğmesine basın. Ayı değiştirmek için S
düğmesine basın (Şekil 2).
3. Ayı kaydetmek ve gün kısmına devam etmek
için M düğmesine basın. Günü değiştirmek için
S düğmesine basın. (Şekil 3)
(Şekil 1)
(Şekil 2)
(Şekil 3)

20
4. Günü kaydetmek ve saat ayarına ilerlemek için M düğmesine
basın (Şekil 3).
5. Saati değiştirmek için S düğmesine basın. Saati kaydetmek
ve dakika kısmına ilerlemek için M düğmesine basın (Şekil 4).
6. Dakikayı değiştirmek için S düğmesine basın. Dakikayı
kaydetmek ve alarm ayarına ilerlemek için M düğmesine
basın (Şekil 4).
7. İlk alarmı kurmak için M düğmesine basın (evet). S düğme-
sine (hayır) basarsanız, sağlık yönetimi alarm ayarına (adım
11) ilerler. Saati değiştirmek için S düğmesine basın. Saati
kaydetmek ve dakikaya ilerlemek için M düğmesine basın.
Dakikayı değiştirmek için S düğmesine basın. Dakikayı
kaydetmek ve ikinci alarm ayarına ilerlemek için M düğmesine
basın (Şekil 5).
Alarmın Kurulması
(Şekil 4)
(Şekil 5)

21
8. İkinci alarmı kurmak için M düğmesine (evet) basın. S düğme-
sine (hayır) basarsanız, sağlık yönetimi alarm ayarına (adım 11)
ilerler. Saati değiştirmek için S düğmesine basın. Saati kaydet mek ve dakikaya ilerlemek için M düğmesine basın. Dakikayı
değiştirmek için S düğmesine basın. Dakikayı kaydetmek ve
üçüncü alarm ayarına ilerlemek için M düğmesine basın
(Şekil 6).
9. Üçüncü alarmı kurmak için M düğmesine (evet) basın. S düğme sine (hayır) basarsanız, sağlık yönetimi alarm ayarına (adım 11)
ilerler. Saati değiştirmek için S düğmesine basın. Saati kaydet mek ve dakikaya ilerlemek için M düğmesine basın. Dakikayı
değiştirmek için S düğmesine basın. Dakikayı kaydetmek ve
dördüncü alarm ayarına ilerlemek için M düğmesine basın
(Şekil 7).
(Şekil 6)
(Şekil 7)

22
10. Dördüncü alarmı kurmak için M düğmesine (evet) basın. S
düğmesine (hayır) basarsanız, sağlık yönetimi alarm ayarına
(adım 11) ilerler. Saati değiştirmek için S düğmesine basın. Saati
kaydetmek ve dakikaya ilerlemek için M düğmesine basın.
Dakikayı değiştirmek için S düğmesine basın. Dakikayı
kaydetmek ve sağlık yönetimi “HI alarm ayarı”na ilerlemek için M
düğmesine basın (Şekil 8).
Not: alarm çalıyorken, alarmı kapatmak için S veya M düğmesine
basın; basmazsanız 30 saniye içerisinde alarm kendiliğinden
susar.
11. “HI alarm ayarı”nı değiştirmek için S düğmesine basın. “HI alarm
ayarı”nı ayarlamak ve “LO alarm ayarı”na ilerlemek için M
düğmesine basın (Şekil 9).
12. “LO alarm ayarı”nı değiştirmek için S düğmesine basın. “LO
alarm ayarı”na giriş yapmak için M düğmesine bir kere daha
basın ve cihaz ayarını sonlandırın, cihazı kapatın (Şekil 9).
(Şekil 8)
(Şekil 9)

23
1. Arka kısımdaki birimi seçin; mg/dL veya mmol/L.
Birim Seçimi
mmol/L mg/dL
Trimpeks İth.İhr.Tur.ve Tic.A.Ş.
Eski Büyükdere Cad. Yunus Emre Sok. No:1/12
4. Levent, 34418 İstanbul Tel +90 212 319 50 00
Fax +90 212 319 50 50, www.trimpeks.com
B04Q102167(03)
Rev. date: 10/2014
Battery/Pil:
Made in Taiwan
Tayvan'da üretilmiştir

24
Kontrol Solüsyonu Testi
Ne zaman Kontrol Solüsyonu Testi Gerçekleştirilir
Kontrol solüsyonu, plusmed fasTTest Kan Şekeri Ölçüm Sisteminin ve plusmed
fasTTest Test Stribinin bir arada düzgün şekilde çalıştığını ve testi doğru şekilde
gerçekleştirdiğinizi kontrol ve garanti etmede kullanılır.
1. Kan şekeri Ölçüm Sistemini ilk kez kullanıyorsanız;
2. Yeni bir Test Stribi partisi kullanıyorsanız;
3. Sistem performansına dair kuşkunuz varsa; veya hassasiyeti düzenli aralıklarla
mesela haftada bir kontrol etmek için;
4. Diyabetik ilaç planlarınızı ayarlarken;
5. Kan şekeri test sonucunuz normal seviyeden düşük veya yüksek ise.
Not:
Arzu edilen farklı sulu glükoz aralığında üç Kontrol Solüsyonu (Düşük, Normal
veya Yüksek) mevcuttur. Kontrol Solüsyonu hakkında daha fazla bilgi için lütfen Kontrol
Solüsyonu prospektüsüne bakınız. İki kontrol solüsyonu seti kullanılmalıdır, seçiminize
göre yüksek seviye ve düşük seviye kontrol solüsyonu. Bu solüsyon aldığınız ölçüm
setleri için opsiyoneldir. Sipariş bilgisi için yetkili satıcınız ile görüşünüz.

25
Kontrol Solüsyonu Testi Gerçekleştirirken
1. Test öncesinde, Kontrol Solüsyonunun oda sıcaklığında olduğundan emin olunuz
(15°C ila 35° veya 59°F ila 95°F).
2. İlk önce Temas Çubuğu ucundan beyaz kısım yukarı bakacak şekilde bir Test
Stribi sokun. Cihaz otomatik olarak açılıncaya dek test portu içine itin (Şekil 10).
3. LCD ekranın tüm segmentleri aktif hale gelir, bir bip sesi duyulur ve yanıp sönen
“ ” sembolü ardından hareketli kesik çizgiler gözükür (Şekil 11).
4. “ ” sembolü gözüktükten sonra, kontrol solüsyonu moduna geçmek için 3
saniye süreyle S düğmesine basınız. “ctl” sembolü cihazın Kontrol Solüsyonu
testi şeklinde mevcut testi kayda alacağını gösterir. Artık, Kontrol Solüsyonu
uygulamaya hazırsınız demektir. (Şekil 12)
(Şekil 11)
(Şekil 12)
(Şekil 10)

26
5. Kontrol Solüsyonunun ilk damlasını atın ve küçük bir damla
Kontrol Solüsyonunu temiz, emici olmayan bir yüzeye damlatın
(temiz bir parça mumlu kağıt gibi). Kontrol solüsyonunu şişeden
doğrudan Test Stribi üzerine uygulamayın.
6. Kontrol Solüsyonu damlasını Test Stribi ucuna hafçe değdirin.
Kontrol Solüsyonu bu uç vasıtasıyla otomatik olarak strip içerisine
çekilir. Cihaz bip sesi verinceye dek bekleyin. Cihaz 5’den 1’e
doğru geri saymaya başlar ve Kontrol Solüsyonu test sonucu
ekrana gelir.
DİKKAT:
Kirliliği önlemek adına, Kontrol Solüsyonu testini yukarıdaki talimatlara uyarak
gerçekleştirin.

27
Kontrol Solüsyonu Sonuçlarının Karşılaştırılması
Sonuçlar Test Stribi şişesi üzerinde belirtilen aralık dahilinde ise plusmed fasTTest Kan
Şekeri Ölçüm Sistemi düzgün çalışıyor demektir. Test sonuçları belirtilen aralık dışında
ise testi tekrarlayın.
Belirtilen aralık dışındaki sonuçların nedeni şunlar olabilir:
• Testi gerçekleştirmede hata
• Kontrol solüsyonu sıcaklığı 15°C’den (59°F) düşük veya 35°C’den (95°F) yüksek
• Son kullanma tarihi geçmiş veya kirlenmiş Kontrol Solüsyonu
• Son kullanma tarihi geçmiş veya kirlenmiş Test Stripleri
• Cihaz arızası
Not: Sonuç, Kontrol Solüsyonu testi “ctl” modunda iken ortalamaya dahil edilmez.
Problem devam ederse sistemi KULLANMAYIN.
Lütfen merkez teknik servisimiz ile iletişime geçin.

28
Kan şekeri testi öncesinde şunlara ihtiyacınız olacaktır:
1. plusmed fasTTest cihaz
2 plusmed fasTTest test stribi
3. Ayarlanabilir delme cihazı
4. Steril lanset
Kan Şekeri Seviyenizin Test Edilmesi
DİKKAT:
Enfeksiyon riskini azaltmak adına;
• Asla delme aletini ve lanseti bir diğer kişi ile paylaşmayın
• Daima yeni ve steril bir lanset kullanın. Lansetler(İğne) tek kullanımlıktır.
• Daima yeni bir Test Stribi kullanın; test stripleri tek kullanımlıktır.
• Lanset(İğne) veya delme aleti üzerine losyon, yağ, kir veya çöküntü gelmesini
önleyin.

29
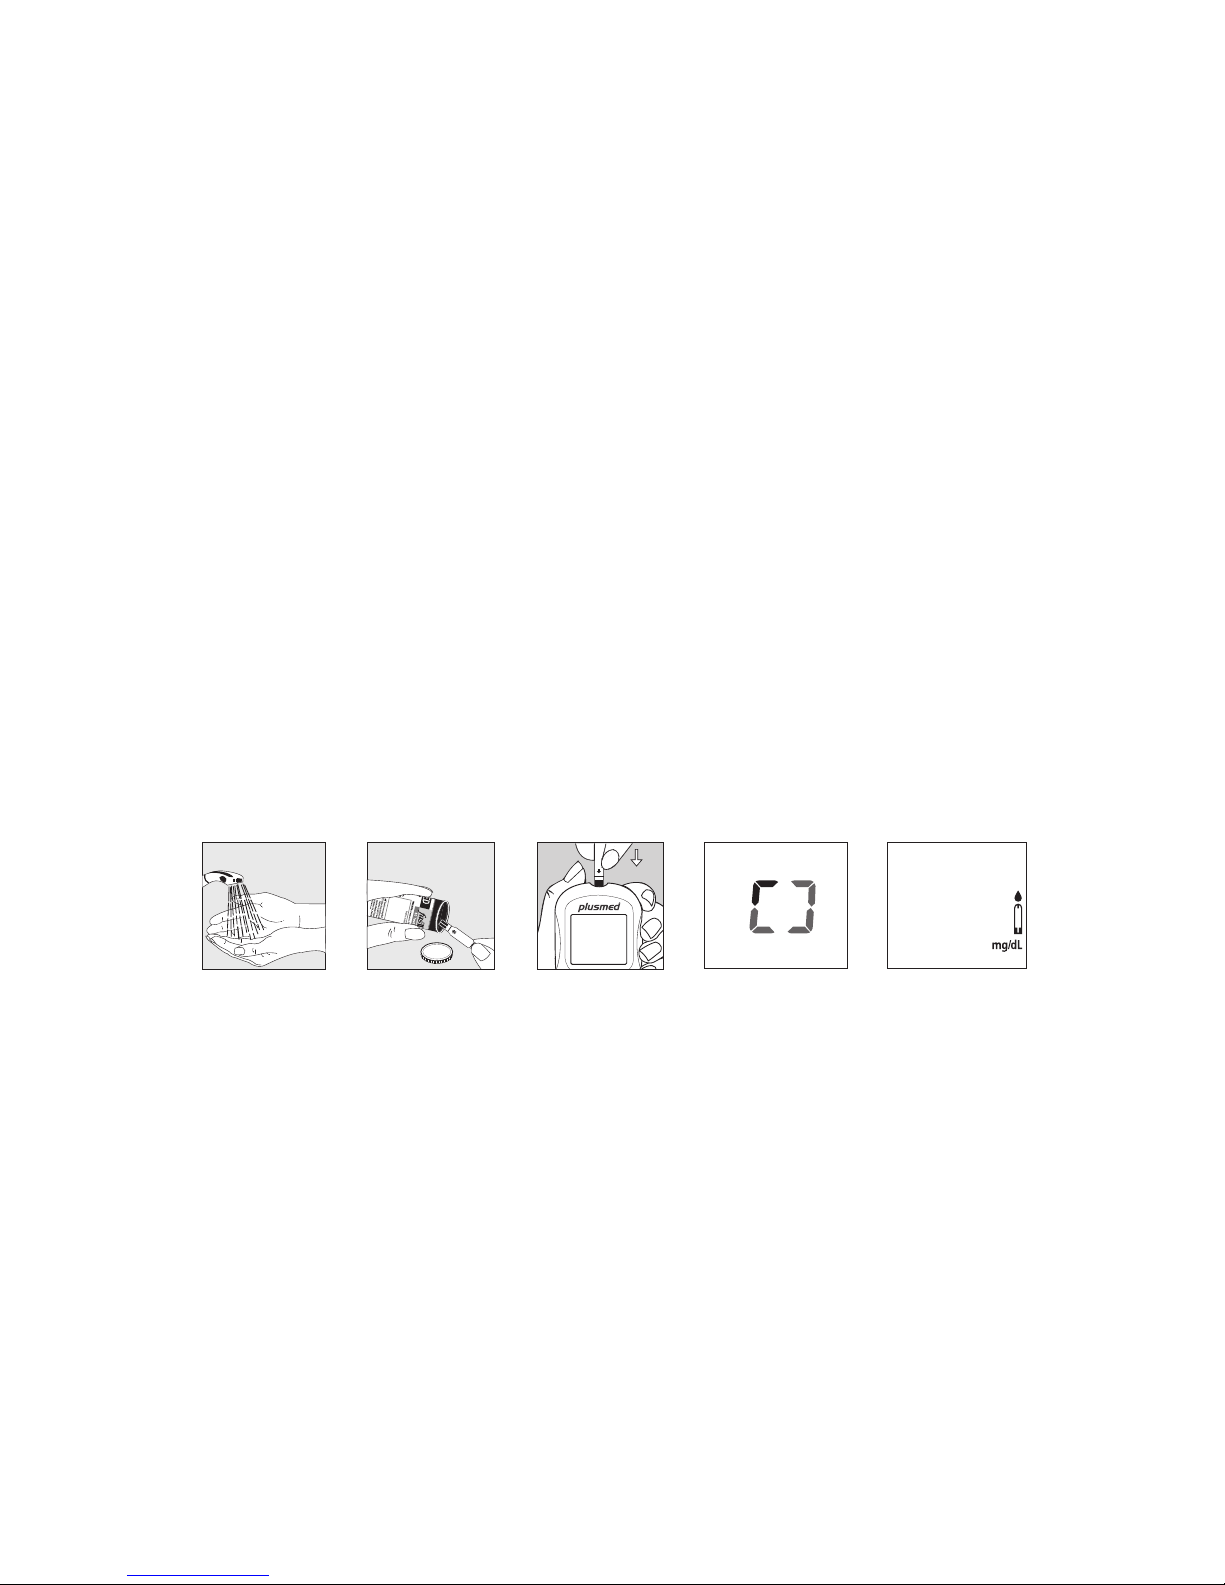
Test Stribinin Hazırlanması
1. Su ve sabunla ellerinizi yıkayın. İyice durulayın ve kurulayın.
2. Şişeden bir Test Stribi çıkartın ve şişeyi hemen kapatın.
3. Beyaz kısım yukarı bakacak şekilde Test Stribini ilk önce Temas Çubuğu ucuna
sokun. Cihaz otomatik olarak açılıncaya dek test portu içerisine itin.
4. Bip sesi gelir ve saat yönünde hareket eden çizgi ekrana gelir.
5. Şu an kan örneği almaya hazırsınız demektir.
1 3 4 52

30
Kan Örneği Alınması
PARMAKTAN, AVUÇ İÇİNDEN VEYA ÖN KOLDAN ÖRNEK ALINABİLİR
Daha fazla bilgi için lütfen delme kalemi ile verilen prospektüse bakınız.
1. Delme kaleminin ucundaki başlığı çıkartın.
2. Lanseti delme kaleminin tutucusuna sokun.
3. Steril lanseti açığa çıkarmak için koruyucu başlığını döndürerek çıkartın.
4. Delme kaleminin gövdesine başlığı yeniden takıp döndürün
5. Duruncaya kadar kurma mekanizmasını geriye doğru çekin
6. Delme kalemini sıkıca parmak ucuna yerleştirin ve serbest bırakma düğmesine
basın
7. Örnek alımı sonrasında, kullanılmış lansetin içinde olduğu başlığı dikkatle çıkartın
8. Lanseti delme kaleminden çıkartın. Kullanılmış lanseti yerel yasalar, devlet
yasaları ve federal yasalara uygun şekilde atın.

31
plusmed fasTTest Test Stribine Kan Örneği Uygulanması
1. Kan örneği aldıktan sonra, damlayı Test Stribinin test haznesine yerleştirin. Kan
otomatik olarak Test Stribi içerisine çekilir.
2. Test Stribinin Onay Penceresinden (resme bkz.) yeterince kan olduğu
gözüktüğünde, ölçüm cihazı bip sesi verir ve 5’den 1’e doğru geri saymaya
başlar. LCD ekranda kan şekeri sonucunuz görüntülenir ve otomatik olarak cihaz
hafızasına kaydedilir.
Not: Doğru sonucu garanti etmek adına, Test Stribinin Onay Penceresinin kan örneği
ile tamamen dolduğundan emin olun.

32
3. Test sonucu görüntülendikten sonra, başka test yapılmayacak ise, cihaz 3 dakika
sonra otomatik olarak kapanır. Test tamamlandıktan sonra, kullanılan stribin
cihazdan doğru şekilde çıkartılıp atılması için bir tuvalet kağıdı kullanmanızı
öneririz.

33
HI (yüksek) ve LO (düşük) ölçümler
1. Test sonuçları 20 ila 600 mg/dL aralığındadır (1.1 ila 33.3
mmol/L). Ekranda bir “HI” mesajı görünür ise, cihazınız kan
şekeri seviyenizin 600 mg/dL’nin (33.3 mmol/L) üzerinde
olduğunu tespit etmiş demektir. Test prosedürünü gözden
geçirerek testi yeni bir Test Stribi ile tekrarlamanızı tavsiye
ederiz. Aynı sonuç ortaya çıkar ise derhal hekiminize başvurun.
(Şekil 13)
2. Ekranda bir “LO” mesajı görünür ise, cihazınız kan şekeri
seviyenizin 20 mg/dL’nin (1.1 mmol/L) altında olduğunu tespit
etmiş demektir. Test prosedürünü gözden geçirerek testi yeni
bir Test Stribi ile tekrarlamanızı tavsiye ederiz. Aynı sonuç
ortaya çıkar ise derhal hekiminize başvurun.
(Şekil 14)
(Şekil 13)
(Şekil 14)

34
Hafıza Özellikleri
plusmed fasTTest Ölçüm Cihazı otomatik olarak en son 300 kan şekeri ölçümünü
tarih ve saatleri ile birlikte hafızasında tutar. Aynı zamanda, kan şekeri test
sonuçlarınızın ard arda 7/14/30 günlük ortalamasını da sunar.
1. Cihazın M düğmesine basın. LCD ekranın tüm segmentleri aktif hale
gelir. İlk önce tarih ve saat gözükür.
2. S düğmesine basın. Ekranda kontrol solüsyonu sonucu gözükür.
3. S düğmesine basın. Ardarda 7 günlük ortalama gözükür.
4. S düğmesine basın. Ardarda 14 günlük ortalama gözükür.
5. S düğmesine basın. Ardarda 30 günlük ortalama gözükür.
Not: Bu aşamada hiç test sonucu yok ise doğrudan en son test sonucu gözükür.

35
Hafıza Modundan Çıkış
1. Cihazı kapamak için M düğmesine basın.
2. Başka işlem yapılmadığında cihaz 3 dakika sonra kendiliğinden kapanır.
Not: Son 7/14/30 günlük sonuçlardan 7/14/30 günlük ortalama hesaplanır.
Sonuçları Kaydetme
Kayıtları rahat tutabilmeniz için bir kayıt defteri sunmaktayız. Sonuçları kaydetme
hakkında daha fazla bilgi için kayıt defterine bakınız.
6. S düğmesine basın. En son test sonucu gözükür. 14 günlük
ortalama sonucu durumunda, ekranda aynı anda gözükür.
S düğmesine her bastığınızda cihaz en son 300 test sonucunu
görüntüler. Hafıza dolduğunda en eski sonuçtan başlayarak siler
ve yeni sonucu kaydeder.
7. Hafızayı silmek için S düğmesine basılı tutun, “000” gözükür.
Daha sonra yeniden S düğmesine ve M düğmesine basarak
cihazı kapatabilirsiniz.

36
Test Sonuçlarının Bilgisayara Aktarılması
plusmed fasTTest Kan Şekeri Görüntüleme Sistemi ile, test sonuçlarınızı bilgisayara
aktarmak kolaydır. Şu basit talimatları uygulayın:
1. Aktarım için gereken özel ara kabloyu ve yazılımı edinin.
Yazılımı yüklemek için teknik servisimizi arayabilir veya websitemizi ziyaret
edebilirsiniz. www.trimpeks.com
2. Yazılımı bilgisayarınıza yükleyin.
Kurulum talimatları internet sitemizde mevcuttur.
3. Test sonuçlarını aktarmaya hazırlanın
Ara kabloyu bilgisayarınızın USB portuna bağlayınız. Daha sonra, kab lonun diğer ucunu cihazın yanında konumlu veri portuna takın, cihaz
kapalı olmalıdır. Ekranda “PC” gözüktüğünde cihaz bilgisayar ile iletişimde demektir.
4. Veri aktarımı
Sonuçları cihazdan bilgisayara aktarmak için yazılım içerisindeki talimatları izleyin.
Veri aktarımı tamamlandıktan sonra, cihazı kapamak için M tuşuna basın.
Not: İletişim modunda iken, kan şekeri testi yapamazsınız. Cihaz PC bağlantı mo-
dunda olmadığında, bilgisayarın komutlarına riayet etmez.

37
Bu cihazı birden fazla sayıda hastada kullanan sağlık profesyonelleri açısından, unutmayınız
ki insan kanı ile temas eden tüm elemanlar potansiyel biyo tehlikeler şeklinde göz önünde
tutulmalıdır. Kullanıcılar, Klinik Laboratuar Standartları Ulusal Komitesi, Laboratuar Çalışanlarının
Aletsel Biyo tehlikelerden ve Kan, Vücut Sıvıları ve Dokularla geçen Enfeksiyöz Hastalıklardan
Korunması, Onaylı Yönetmelik NCCLS dokümanı M29-A [ISBN 1-56238-339-6]’da tavsiye
edildiği üzere, potansiyel enfeksiyöz insan kanı örneklerine yönelik sağlık düzenlemelerinde
kanla iletilebilir hastalıkların önlenmesine dair ilkelere riayet etmelidir.
1. Cihaza özen gösteriniz. Cihazın düşürülmesi veya fırlatılması hasara neden olabilir.
2. Cihazı, Test Striplerini ve Kontrol Solüsyonunu aşırı koşullara mesela yüksek
neme, ısıya, dondurucu soğuğa veya toza maruz bırakmayın.
3. Cihazı ve Test Striplerini kullanmadan önce ellerinizi su ve sabun ile yıkayın ve
durulayın.
4. Cihazı temizlerken, dış yüzeyi haf nemli bir bez ile silin. Temizlik için ORGANİK
SOLVENT KULLANMAYIN.
5. Cihaz oda sıcaklığında, kuru ve temiz yerde saklanmalıdır. DOĞRUDAN GÜNEŞ
IŞIĞIĞINA MARUZ BIRAKILMAMALI VEYA YÜKSEK NEM VE/VEYA TOZLU
YERLERDE SAKLANMAMALIDIR. Cihazı ve aksesuarlarını birlikte verilen
taşıma çantasında saklamanızı öneririz.
Bakım ve Saklama

38
Ekran Mesajları
EKRAN ANLAMI ATILACAK ADIM
Cihazın tüm segmentlerinin
doğru çalıştığına dair sistem
kontrolü
Atılması gereken adım
bulunmamaktadır
Sistem kan örneği alınmasına
hazır
Kan örneği alabilirsiniz
Sistem Kontrol Solüsyonu
örneği almaya hazır
Kontrol Solüsyonu örneği
damlası uygulayabilirsiniz

39
EKRAN ANLAMI ATILACAK ADIM
Sonucun sağlık yönetiminde-
ki “HI alarm ayarı”ndan daha
yüksek olduğunu gösterir
Dikkat edebilir veya Sayfa
19-22’e göre, varsayılan
ayar değerini 180 mg/dL
değiştirebilirsiniz
Sonucun sağlık yönetimindeki
“LO alarm ayarı”ndan daha
düşük olduğunu gösterir
Dikkat edebilir veya Sayfa
19-22’e göre, varsayılan
ayar değerini 70 mg/dL
değiştirebilirsiniz
Cihaz, kan şekeri seviyesinin
600 mg/dL (33.3 mmol/L)
seviyesinden daha yüksek
olduğunu tespit etmiştir
Yüksek kan şekeri seviyesini
gösterir. Testi tekrarlayın.
Sonuç aynen devam ederse
derhal hekiminize başvurun.

40
Cihaz, kan şekeri seviyesinin 20 mg/dL (1.1 mmol/L)
seviyesinden daha düşük
olduğunu tespit etmiştir
Yüksek kan şekeri seviyesini
gösterir. Testi tekrarlayın.
Sonuç aynen devam ederse
derhal hekiminize başvurun.
Test prosedürü süresince
sıcaklık yüksek.
Sonuçlar daha büyük farklılıklar
sergileyebilir. Yeniden test
yapmadan önce daha serin bir
ortama geçin (10-40ºC) ve 15
dakika bekleyin.
Test prosedürü süresince
sıcaklık düşük.
Sonuçlar daha büyük farklılıklar
sergileyebilir. Yeniden test
yapmadan önce daha ılıman
bir ortama geçin (10-40ºC) ve
15 dakika bekleyin.
EKRAN ANLAMI ATILACAK ADIM

41
Testi gerçekleştirmek için
sıcaklık çok yüksek
Testi daha serin ortamda (1040ºC) tekrarlayın. Yeniden
testi gerçekleştirmeden önce
15 dakika bekleyin.
Testi gerçekleştirmek için
sıcaklık çok düşük
Testi daha ılıman ortamda
(10-40ºC) tekrarlayın. Yeniden
testi gerçekleştirmeden önce
15 dakika bekleyin.
Test Stribinde sorun
olduğuna dair hata mesajı
Talimatları izleyin ve yeni bir
Test Stribi ile tekrar deneyin.
EKRAN ANLAMI ATILACAK ADIM

42
Cihazda sorun olduğuna dair
hata mesajı
“Reset” düğmesine basın
ve cihazı test Stribi ile tekrar
deneyin. Sorun devam
ederse Müşteri Hizmetlerine
başvurun.
Pil gücü zayıf. Cihaz 50
ölçüm daha verir.
Yeni 3-Volt lityum pil (CR-
2032) takın.
Pil gücü bir sonraki kullanıma
yetmeyecek kadar zayıf.
Derhal yeni 3-Volt lityum pil
(CR-2032) takın.
EKRAN ANLAMI ATILACAK ADIM

43
Hafızadaki tüm test değerleri
gösterilmekte.
Kan şekeri testinin yapılması
gerektiğini hatırlatan alarm
çalmakta.
Cihazı kapamak için M veya
S düğmesine basın veya 3
dakika bekleyin.
Alarmı susturmak için M veya
S düğmesine basın veya 30
saniye bekleyin.
EKRAN ANLAMI ATILACAK ADIM

44
Ortaya çıkabilecek diğer sorunlar
Atılacak adım
Test Stribi cihaza doğru takılmamış
Talimatları izleyin ve Test Stribini doğru
şekilde takın (beyaz kısım yukarı bakacak)
Yeni Test Stribi temin edin
Testi yeni Test Stribi ile tekrarlayın
Cihaz otomatik olarak kapanır. Test
Stribini test portuna yeniden takın.
Teknik servisimize başvurun.
Test Stribi hatalı
Yetersiz kan örneği
Test Stribi test portu içerisinde test öncesinde 3 dakikadan fazla kalmış
Cihazın LCD ekranı test gerçekleştirmeye
çalışılırken hiçbir görüntü içermemekte.

45
Cihazın İşletim Koşulları
Sıcaklık 10°C - 40°C(50°F - 104°F)
Nem %10-90 Bağıl nem
Hematokrit %35 - 55
Test Örneği
Parmak ucu, avuç içi ve ön koldan kılcal tam kan
Örnek Hacmi >0.5 µl
Ölçüm Birimi mg/dL veya mmol/L
Ölçüm Aralığı 20-600 mg/dL (1.1-33.3 mmol/L)
Test Süresi 5 saniye
Hafıza Kapasitesi En son 300 sonuç
Ortalama 7/14/30 günlük ortalamalar
Harici Çıkış Standart RS232 PC arayüz
Güç kaynağı 3-volt lityum pil (CR-2032)
Pil ömrü Yakl. 1000 test
Boyutlar ve ağırlık 92 x58 x19 mm; 60 g
Teknik Özellikler

46
Üretici:
Trimpeks İth.İhr.Tur.ve Tic.A.Ş.
Eski Büyükdere Cad. Yunus Emre Sok. No:1/12 4. Levent,
34418 İstanbul /Türkiye
Tel +90 212 319 50 00, Faks +90 212 319 50 50
www.trimpeks.com
plusmed fasTTest Cihaz, plusmed fasTTest Test Stribi ve Kontrol
Solüsyonu, IVDD 98/79/EC’ye (İn Vitro Tanı Yönetmeliği) uygundur.
Lancetler ve
Delme aleti MDD 93/42/EEC’ye (Medikal Cihaz
Yönetmeliği) uygundur.
Üretici:
SteriLance medical (Suzhou) Inc.
No.68 Litanghe Road,
Xiangcheng Suzhou,
Jiangsu 215133 P.R.C
AB yetkili temsilcisi:
EMERGO EUROPE
Molenstraat 15, 2513 BH THe Hague,
Hollanda

47
Prosedür Sınırlamaları
plusmed fasTTest Test Stripleri parmak ucundan, avuç içinden ve ön koldan alınan
taze kılcal tam kan örnekleri ile kullanıma yönelik tasarlanmıştır. Şiddetli dehidrasyon, düşük tansiyon, şok veya hiperglisemik-hiperozmolar halde olunduğunda test
sonuçları hatalı olabilir. Yukarıdaki semptomlardan herhangi birine sahip olduğunuza
dair kuşkunuz varsa derhal bir hekime başvurunuz.
DİKKAT:
plusmed fasTTest Sistemi, sadece in vitro tanısal kullanıma yönelik tasarlanmıştır
ve yeni doğanlarda test yapmaya uygun değildir. Bir hekimin veya sağlık profesyonelinin izni ve tavsiyesi olmadan plusmed fasTTest kan şekeri test sonuçlarına
dayanan bir ilaç değişikliği veya uygulamasında bulunmayınız.

48
Servis ve Garanti
ÖNEMLİ:
Trimpeks rması, plusmed fasTTest Cihazı için tasarlananlar haricindeki Test Striplerinin kullanılması durumunda plusmed fasTTest Sisteminin performansını garanti
etmemektedir. plusmed fasTTest Sistemi üreticisinin garantisi yalnızca, Kullanım
Kılavuzunda verilen ilkelere uygun kullanılması durumunda geçerlidir ve hatalı şekilde
kullanıldığında bu garanti geçersiz olur.

49
Garanti
Trimpeks rması, bu cihazın ilk satın alma tarihinden itibaren iki yıl süre ile malzeme ve
işçilik kusurlarından arı olacağını garanti eder. Belirtilen iki yıllık süre zarfında rmamız,
kusurlu plusmed fasTTest Cihazı onaracak veya yenisiyle değiştirecektir.
Bu garanti kazara hasar gören, kurcalanan, hatalı kullanılan, modiye edilen veya
herhangi bir şekilde suiistimal edilen cihazları kapsamaz. Firmamız hiçbir durumda,
alıcıya veya başka bir kişiye karşı, plusmed fasTTest Cihazı ve parçalarının satın
alınması veya işletimi ile bağlantılı veya bundan doğan hiçbir arızi, dolaylı veya cezai
tazminat sorumluluğu taşımamaktadır.
Garanti hizmeti için alıcı Trimpeks rması ile irtibata geçmelidir.

50
Müşteri Hizmetleri
Bu ürün veya işletimi hakkında her tür sorunuz ve kaygınızı merkez teknik servisimizi
arayarak veya bize e-posta yoluyla iletebilirsiniz. Size yardımcı olmaktan memnun oluruz.
Teknik Servis
00 90 212 319 50 57
veya
teknikservis@trimpeks.com
web sayfası: www.trimpeks.com
Teknik servisimizi aradığınızda lütfen plusmed fasTTest Cihazını, plusmed fasTTest
Test Stribini ve diğer tüm malzemeleri yanınızda bulundurun. Böylece sorularınıza
hızlı ve verimli şekilde yanıt verebileceğiz.

51
Üretici
Avrupa yetkili temsilcisi
Ambalaj hasar görmüşse kullanmayınız
Isı sınırlaması
Dikkat! Dökümanları kontrol ediniz
Atık Elektrik ve Elektronik ekipman yönetmeliği
Vücut dışında kullanılan tıbbi tanı cihazıdır.
Kullanım öncesi talimatları okuyunuz
CE işareti
Ürünü kuru bir alanda saklayınız
Ürünü direk güneş ışığından koruyunuz
Seri numarası


User's Manual
Blood Glucose Monitoring System

Important Information ..............................................................................................56
Introduction ..............................................................................................................60
About the Product ......................................................................................................61
About the plusmed fasTTest Meter .......................................................... 62
About the plusmed fasTTest Meter Display ................................................64
About the plusmed fasTTest Test Strip ..................................................... 66
About the plusmed fasTTest Test Strip Vial ............................................... 67
Installing/Replacing the Battery ................................................................68
Setting Up the Meter .................................................................................................. 69
Setting Up the Date, Time .......................................................................... 69
Setting Up Alarm ....................................................................................... 70
Unit Selecton ............................................................................................ 73
Table of Contents

The Control Solution Test ........................................................................................ 74
Testing Your Blood Glucose Level ............................................................................ 78
Preparing the Test Strip ............................................................................... 79
Obtaining a Blood Sample ....................................................................... 80
Applying Blood Sample to the plusmed fasTTest Test Strip .................... 81
Memory Features ...................................................................................................... 84
Transfer Test Results to a Computer ..................................................................... 86
Care and Storage ..................................................................................................... 87
Display Messages ..................................................................................................... 88
Specications ........................................................................................................... 95
Limitations of the Procedure ..................................................................... 97
Service and Warranty ............................................................................................. 98
Customer Service .................................................................................................... 100
Self-Test Log Book .............................................................................................. 102

56
There are limitations for doing AST.
Please consult your healthcare professional before you do AST.
Available Alternate Sites Testing : Palm and Forearm.
Alternate Site Testing (AST) means you can use other parts of the body other than
your more sensitive ngertips to check your blood glucose levels.
The plusmed fasTTest Blood Glucose Monitoring System allows you to test on the
palm and the forearm with the equivalent results to ngertip testing.
Important Information
Palm
Forearm

57
Alternative site results differ from ngertip results when glucose levels are changing
rapidly such as after a meal, after taking insulin, during exercise, or when you are ill or
under stress. Use blood from a ngertip rather than an alternative site if:
• You think your blood glucose is low,
• You don’t regularly have symptoms when your blood glucose is low,
• How you feel doesn’t match the results from the alternative site,
• When you have just taken insulin, or any time during or after exercise,
• When there are unknown variables occurring in your day, such as illness,
• Whenever you are about to drive.
CAUTION:
1. Physical differences in the circulation between the nger and other test sites
like the forearm and palm may result in differences in blood glucose measurements from the other test sites and your ngertips. Changes in blood glucose
may be observed in nger blood samples sooner than blood samples from the
forearm and other alternate sites. Rub the alternate test sites about 20 seconds
before lancing. If you are testing for hypoglycemia (low blood glucose), or if you
suffer from hypoglycemia unawareness, we recommend that you test on your
ngertips.

58
2. Talk to your doctor to see if alternate site testing is right for you. With a little bit
of education, you can give your ngertips a rest and maybe test more often than
you do now. For people with diabetes, more frequent testing is a good thing. Just
remember: any time you want to be sure of an accurate, up-to-date blood glucose
reading, test on your ngertip.
3. We strongly recommend you do AST ONLY in the following intervals:
•
In a pre-meal or fasting state (more than 2 hours since the last meal).
• Two hours or more after taking insulin.
• Two hours or more after exercise.
DO NOT use AST if:
• You think your blood glucose is low.
• You are unaware of hypoglycemia.
• Your AST results do not match the way you feel.
• You are testing for hyperglycemia.
• Your routine glucose results are often uctuating.
• If you are pregnant.

59
• Low or high blood glucose readings can indicate a potentially serious medi
cal condition. If your blood glucose reading is unusually low or high, or if
you do not feel the way your reading indicates, repeat the test with a new test
strip. If your reading is not consistent with your symptoms or if your blood glu-
cose result is less than 60 mg/dL (3.3 mmol/L) or higher than 240 mg/dL
(13.3 mmol/L) you should contact your healthcare professional.
• Any change or administer of medication based on the plusmed fasTTest
blood glucose test results without the consent and advice of a physician or
healthcare professional is not recommended.
• Severe dehydration and excessive water loss may cause false low results. If
you believe you are suffering from severe dehydration, consult your physician
immediately.

60
Thank you for choosing the plusmed fasTTest Blood Glucose Monitoring System, the
latest advancement in biosensor technology.
Recognized for its ease of use and quick response time, the
plusmed fasTTest
Blood
Glucose Monitoring System is designed to process accurate results utilizing only a
small amount of blood for in vitro diagnostics. The plusmed fasTTest Blood Glucose
Monitoring System is intended for use in the home and in professional settings to
monitor whole blood glucose levels obtained from the ngertip, palm and forearm. This
is an over the counter (OTC) product.
Please read the entire User’s Manual carefully before using this product.
Introduction

61
Your plusmed fasTTest Blood Glucose Monitoring System is made up of several components. This booklet is designed to guide you through the operation of the system
with detailed directions and pictures. Your plusmed fasTTest Blood Glucose Monitoring System contains:
• plusmed fasTTest Meter
• One Lancing Device(optional)
• Lancets(10)
• One Carrying Case
• User manual (log book inside)
• Quick Reference Guide
• Insert for Lancing Device
About the Product

62
About the plusmed fasTTest Meter
Trimpeks İth.İhr.Tur.ve Tic.A.Ş.
Eski Büyükdere Cad. Yunus Emre Sok. No:1/12
4. Levent, 34418 İstanbul Tel +90 212 319 50 00
Fax +90 212 319 50 50, www.trimpeks.com
B04Q102167(03)
Rev. date: 10/2014
Battery/Pil:
Made in Taiwan
Tayvan'da üretilmiştir

63
1. Display Your test results are displayed here. The large, easy to read screen
guides you through the test by using numbers and symbols.
2. M Button The M (mode) button is used to set time, alarm, enters the memory
mode to show the consecutive 7/14/30-day average results and turns the Meter
on and off.
3. S Button The S (select/set) button is used to select year, month, day, time,
memory of results and control solution mode.
4. Test Port This is where you insert the Test Strip into the Meter.
5. Unit Switch Switch for mmol/L or mg/dL.1 mmol/L =18 mg/dL
6. Battery Cover
7. Label
8. Reset Button Press this button to re-set the system.
9. Data Port Connect interface cable to transfer data.

64
1. Date
2. Time
3. Control Solution Test
Appears when doing a control
solution test and marking the
result as a control solution test.
4. Memory Symbol
Indicates in memory mode.
5. Units of Measurement
Unit of mmol/L or mg/dL will
appear with the test result.
6. Battery Symbol
Appears when the battery is low
or must be replaced.
About the plusmed fasTTest Meter Display
5
2
7
10
13
6
8
11
3
1
4
9
12

65
7. Blood Drop Symbol
Flashes when it is ready to apply sample to Test Strip.
8. Warning Symbol
Appears when result is out of the range of your setting reference value.
9. Alarm Function Symbol
Appears when the clock alarm is set.
10. Test Strip Symbol
Appears to tell you when the meter is ready for test.
11. Day Average Symbol
Shows the average value of test results.
12. Test Result Area
Display test results.
13. Temperature Message
Appears if your meter is out of operating temperature range.

66
About the plusmed fasTTest Test Strip
The plusmed fasTTest Test Strip is used to perform
the blood glucose test in conjunction with the
plusmed fasTTest Meter.
Each strip can be used only once.
The Test Strip consists of the following parts:
1. Conrmation Window
This is where you can conrm that enough blood has
been applied to the target area.
2. Target Area
This is where blood is drawn into the Test Strip.
3. Contact Bar
This end of the Test Strip is inserted into the Test Port
to activate the Meter. (white side face up).
3
1
2

67
About the plusmed fasTTest Test Strip Vial
Control Solution Range
Lot Number
Expiration Date
VIAL LABE
LT
EST STRIP VIAL
Made in Taiwan
Tayvan'da üretilmiştir
www.plusmed-health.com
Trimpeks İth.İhr.Tur.ve Tic.A.Ş.
Eski Büyükdere Cad., Yunus Emre Sok., Topçu İş
Merkezi No:1/12, 4. Levent, 34418 İstanbul,Türkiye
Tel +90 212 319 50 00 Fax +90 212 319 50 50
www.trimpeks.com
B04Q102166(03)
Rev. date: 10/2014
Made in Taiwan
Tayvan'da üretilmiştir
www.plusmed-health.com
Trimpeks İth.İhr.Tur.ve Tic.A.Ş.
Eski Büyükdere Cad., Yunus Emre Sok., Topçu İş
Merkezi No:1/12, 4. Levent, 34418 İstanbul,Türkiye
Tel +90 212 319 50 00 Fax +90 212 319 50 50
www.trimpeks.com
B04Q102166(03)
Rev. date: 10/2014

68
When the battery is low, the Meter will show a warning signal.
When this display appears, it is time to replace a new battery.
When the low battery warning signal is shown, the Meter will pro-
vide accurate results for approximately 50 more measurements.
1. From the back of the Meter, gently lift the battery cover.
2. Insert a 3-Volt Lithium battery (CR-2032) with the “+” side facing up.
3. Close battery cover.
Installing/Replacing the Battery
How to Replace the Battery
1 2 3
Trimpeks İth.İhr.Tur.ve Tic.A.Ş.
Eski Büyükdere Cad. Yunus Emre Sok. No:1/12
4. Levent, 34418 İstanbul Tel +90 212 319 50 00
Fax +90 212 319 50 50, www.trimpeks.com
B04Q102167(03)
Rev. date: 10/2014
Battery/Pil:
Made in Taiwan
Tayvan'da üretilmiştir
Trimpeks İth.İhr.Tur.ve Tic.A.Ş.
Eski Büyükdere Cad. Yunus Emre Sok. No:1/12
4. Levent, 34418 İstanbul Tel +90 212 319 50 00
Fax +90 212 319 50 50, www.trimpeks.com
B04Q102167(03)
Rev. date: 10/2014
Battery/Pil:
Made in Taiwan
Tayvan'da üretilmiştir
Trimpeks İth.İhr.Tur.ve Tic.A.Ş.
Eski Büyükdere Cad. Yunus Emre Sok. No:1/12
4. Levent, 34418 İstanbul Tel +90 212 319 50 00
Fax +90 212 319 50 50, www.trimpeks.com
B04Q102167(03)
Rev. date: 10/2014
Battery/Pil:
Made in Taiwan
Tayvan'da üretilmiştir
Trimpeks İth.İhr.Tur.ve Tic.A.Ş.
Eski Büyükdere Cad. Yunus Emre Sok. No:1/12
4. Levent, 34418 İstanbul Tel +90 212 319 50 00
Fax +90 212 319 50 50, www.trimpeks.com
B04Q102167(03)
Rev. date: 10/2014
Battery/Pil:
Made in Taiwan
Tayvan'da üretilmiştir

69
Setting Up the Meter
Setting Up the Date & Time
To turn the Meter on, rst insert a battery, then press the reset button located at the
back of the Meter and proceed with the following instructions.
1. Press the M button to enter this mode. Press
and release S button to choose “24hr” or “12hr”
display. With your preferred clock mode, press
M button and the year setting will appear. Press
and release the S button until the correct year
appears. (Fig.1)
2. To set the year and move on to choose the
month, press the M button. To change the
month, press the S button. (Fig.2)
3. To set the month and move on to choose the
day, press the M button. To change the day,
press the S button. (Fig.3)
(Fig.1)
(Fig.2)
(Fig.3)

70
4. To set the day and move on to choose the hour setting, press
the M button. (Fig.3)
5. To change the hour, press the S button. To set the hour and
move on to change the minutes, press the M button. (Fig.4)
6. To change the minutes, press the S button. To set the minutes
and move on to choose the alarm setting, press the M button.
(Fig.4)
7. To set the rst alarm, press the M button (yes). If you press
S button (no), it will be moved on to health management
alarm setting (step 11). To change the hour, press S button.
To enter the hour and move on to change the minutes, press
M button. To change the minutes, press S button. To enter the
minutes and move on to choose the second alarm setting,
press the M button. (Fig.5)
Setting Up Alarm
(Fig.4)
(Fig.5)

71
8. To set the second alarm, press the M button (yes).
If you press S button (no), it will be moved on to health manage-
ment alarm setting (step 11). To change the hour, press S button.
To set the hour and move on to change the minutes, press M
button. To change the minutes, press S button. To set the minu tes and move on to choose the third alarm setting, press the M
button. (Fig.6)
9. To set the third alarm, press the M button (yes). If you press S
button (no), it will be moved on to health management alarm
setting (step 11). To change the hour, press S button. To set
the hour and move on to change the minutes, press M button.
To change the minutes, press S button. To set the minutes and
move on to choose the fourth alarm setting, press the M button.
(Fig.7)
(Fig.6)
(Fig.7)

72
10. To set the fourth alarm, press the M button (yes). If you press S
button (no), it will be moved on to health management alarm
setting (step 11). To change the hour, press S button. To set the
hour and move on to change the minutes, press M button. To
change the minutes, press S button. To set the minutes and move
on to health management “HI alarm setting” press the M button.
(Fig.8)
Note: When the alarm is ringing, press S or M button to turn off
the alarm or the alarm will turn off automatically after 30 seconds.
11. To change the “HI alarm setting” press the S button. To set the
‘HI alarm setting” and move on to “LO alarm setting” press M
button. (Fig.9)
12. To change the “LO alarm setting” press the S button. Further
press M button to enter the “LO alarm setting” and nish the
meter setting, turn off the meter. (Fig.9)
(Fig.8)
(Fig.9)

73
1. Select unit, mg/dL or mmol/L on the back.
Unit Selection
mmol/L mg/dL
Trimpeks İth.İhr.Tur.ve Tic.A.Ş.
Eski Büyükdere Cad. Yunus Emre Sok. No:1/12
4. Levent, 34418 İstanbul Tel +90 212 319 50 00
Fax +90 212 319 50 50, www.trimpeks.com
B04Q102167(03)
Rev. date: 10/2014
Battery/Pil:
Made in Taiwan
Tayvan'da üretilmiştir

74
The Control Solution Test
When to Perform a Control Solution Test
The Control Solution is used to check and ensure that the plusmed fasTTest Blood
Glucose Monitoring System and plusmed fasTTest Test Strip are working together
properly and that you are performing the test correctly.
1. When you are using your Blood Glucose Monitoring System for the rst time.
2. When you are using a new batch of Test Strips.
3. Anytime you question the performance of the system, or on a regular basis to
ensure accuracy, e.g. once a week.
4. When you adjust your diabetic medication plans.
5. When your blood glucose test result is lower or higher than your normal level.
Note:
There are three Control Solutions at different desired range of aqueous glucose
(Low, Normal or High). For more information about the Control Solution, please read
your Control Solution package insert. Two sets of control solution should be used, a
high level and a low level control solution of your choice. For order information, please
contact your dealer.

75
To Perform a Control Solution Test
1. Make sure the Control Solution is at room temperature (15°C to 35°C or 59°F
to 95°F) prior to testing.
2. Insert a Test Strip, white side face up with the Contact Bar end rst. Push all the
way into test port until meter automatically turns on. (Fig.10)
3. All segments of the LCD display will appear, a beep will sound and moving
dotted lines will appear followed by a ashing “
“ symbol. (Fig.11)
4. After the “
“ symbol appears, press the S button for 3 sec to switch control
solution mode. The “ ctl “ symbol indicates that the Meter will mark your current
test as a Control Solution test. Now you are ready to apply the Control Solution.
(Fig.12)
(Fig.11)
(Fig.12)
(Fig.10)

76
5. Discard the rst drop of Control Solution and squeeze a small
drop of Control Solution on a clean nonabsorbent surface (such
as a clean piece of wax paper). Do not apply Control Solution to
the Test Strip directly from the bottle.
6. Bring the tip of the Test Strip to lightly touch the drop of Control
Solution. Control Solution is automatically pulled into the strip
through the tip. Hold until the meter beeps. The meter will now
begin counting down from 5 to 1 and the Control Solution test
result will appear.
CAUTION:
Please remember that in order to prevent contamination, follow the above
instructions for performing the Control Solution test.

77
Comparing Control Solution Results
The plusmed fasTTest Blood Glucose Monitoring System is functioning properly if the
results fall inside the specied range printed on the Test Strip vial. If the test results fall
outside the specied range, repeat the test.
Results falling outside the specied range may be caused by
• Error in performing the test,
• Control solution temperature is lower than 15°C (59°F)
or higher than 35°C (95°F),
• Expired or contaminated Control Solution,
• Expired or contaminated Test Strips,
• Meter malfunction.
Note: The result will not be incorporated into the average in the Control Solution test
“ ctl “ mode. DO NOT use the system if the problem persists.
Please contact our central technical service.

78
Before testing blood glucose, you need the following items:
1. plusmed fasTTest Meter
2. plusmed fasTTest Test Strip
3. Adjustable Lancing Device
4. Sterile Lancet
Testing Your Blood Glucose Level
CAUTION:
To reduce the chances of infection:
• Never share a lancing device and lancet with another person.
• Always use a new and sterile lancet. Lancets are for single use only
• Always use a new Test Strip, Test Strips are for single use only.
• Do not get lotion, oil, dirt or debris in or on the lancet and lancing device.
79
Preparing the Test Strip
1. Wash hands using soap and warm water. Rinse and dry thoroughly.
2. Pull out a Test Strip from the vial and re-cap the vial immediately.
3. Insert a Test Strip, white side face up with the Contact Bar end rst. Push all the
way into test port until meter automatically turns on.
4. A beep will sound and the sort line moving clockwise will appear.
5. Now you are ready to obtain a blood sample.
1 3 4 52

80
Obtaining a Blood Sample
SAMPLE MAY BE OBTAINED FROM FINGER, PALM or FOREARM
For further instructions please see the insert provided with lancing device.
1. Unscrew and remove the endcap of the lancing device.
2. Insert the lancet into the lancet holder.
3. Twist and remove the protective lancet cover to expose the sterile needle tip.
4. Recapping and screwing the endcap to the body of the lancing device.
5. Pull back on the cocking mechanism until it comes to a stop.
6. Place the lancing device rmly against the nger tip and press the
release button.
7. After sampling, remove the endcap containing the used lancet carefully.
8. Remove the lancet from the lancing device. Discard the used lancet properly in
accordance with local, state, and federal law.

81
Applying Blood Sample to the plusmed fasTTest Test Strip
1. After obtaining a blood sample, place the drop onto the test well of the Test Strip.
Blood is automatically drawn into the Test Strip.
2. As soon as enough blood has lled the Conrmation Window (see picture) of the
Test Strip, the Meter will beep and begin counting down from 5 to 1. Your blood
glucose result will appear on the LCD display and will be stored into the Meter
memory automatically.
Note: To ensure accurate results, make sure the Conrmation Window of the Test
Strip is completely lled with your blood sample.

82
3. After the test result appears, if no further tests are performed, the Meter will
automatically shut off after 3 minutes. After nishing the test, we recommend
using a tissue to remove the used strip from the Meter for proper disposal.

83
HI and LO Readings
1. The test results range between 20 to 600 mg/dL (1.1 to 33.3
mmol/L). If a “HI” message appears on the display, your Meter
has detected that your blood glucose level is higher than 600
mg/dL(33.3 mmol/L). It is suggested that you review your test-
ing procedure and test again with a new Test Strip to conrm
the result. If the same result occurs, consult your healthcare
professional immediately. (Fig.13)
2. If a “LO” message appears on the display, your Meter has
detected that your blood glucose level is lower than 20 mg/dL
(1.1 mmol/L). It is suggested that you review your testing proce-
dure and test again with a new Test Strip to conrm the result.
If the same result occurs, consult your healthcare professional
immediately. (Fig.14)
(Fig.13)
(Fig.14)

84
Memory Features
The plusmed fasTTest Meter automatically stores the 300 most recent blood glucose
results with date and time in its memory. It also provides you with a consecutive
7/14/30-day average of your blood glucose test results.
1. Press M button to turn on the meter. All segments of the LCD
display will appear. The date and time will appear rst.
2.
Press S button, the result of control solution will appear on display.*
3.
Press S button, the consecutive 7-day average will be shown.*
4.
Press S button, the consecutive 14-day average will be shown.*
5.
Press S button, the consecutive 30-day average will be shown.*
Note: * If there is no test results during this stage, it will directly ap-
pear the most recent test result.

85
Exiting the Memory Mode
1. Press the M button to turn off the meter.
2. Meter will shut down automatically after 3 minutes with no further action.
Note: The consecutive 7/14/30-day average is calculated from the blood glucose
results obtained during the last consecutive 7/14/30-day.
To Record Your Results
We have provided a log book for your recording convenience. To learn more about
how to record your results, please refer to the log book for further instructions.
6. Press S button, the most recent test result will appear. If it has
14-day average result, it will show under the screen at the same
time. Each time you press the S button, the meter will recall the
last 300 test results accordingly. When the memory is full, the
oldest result is removed and replaced with the newest result.
7. Press and release the S button to the end of the memory, “000”
will show. Then press the S button again or press M button at
anytime to turn off the meter.

86
Transfer Test Results to a Computer
With the plusmed fasTTest Blood Glucose Monitoring System, it is easy to transfer
test results to your personal computer. Follow these simple instructions:
1. Obtain the required software and cable
For downloading the software please call our central technical service or visit website of
www.trimpeks.com
2. Install the software on your computer
Installation instructions will be provided with the software.
3. Get ready to transfer test results
Connect the interface cable to a serial port on your computer. Then con
nect the other end of interface cable to the data port located on the side
of the meter with the meter turned off. “PC” will appear on the display,
indicating that the meter is in the communication mode.
4. Transfer data
Follow the instructions provided in the software to download the results from the
meter. After nishing the data transfer, press M button to turn off the meter.
Note: While in the communication mode, you will be unable to perform a blood
glucose test. If the meter is not in the PC link mode, it will not respond to com-
puter commands.

87
For healthcare professionals using this system on multiple patient, please be aware that all
items that come in contact with human blood should be handled as potential biohazards.
Users should follow the guidelines for prevention of blood-borne transmittable diseases in a
healthcare setting for potentially infectious human blood specimens as recommended in the
National Committee for Clinical Laboratory Standards, Protection of Laboratory Workers from
Instrument Biohazards and Infectious Disease Transmitted by Blood, Body Fluids and Tissue:
Approved Guideline. NCCLS document M29-A [ISBN 1-56238-339-6].
1. Handle the meter with care. Dropping or throwing the meter may cause damage
to the device.
2. Do not expose the meter, Test Strips, and Control Solution to extreme conditions,
such as high humidity, heat, freezing cold or dust.
3. Always wash hands with soap and water and rinse and dry completely before
handling the meter and Test Strips.
4. When cleaning the meter, gently wipe the exterior surface using a damp soft
cloth. DO NOT USE ANY ORGANIC SOLVENT for cleaning.
5. The meter should be stored at room temperature in a dry and clean space. DO
NOT STORE IN DIRECT SUNLIGHT OR AREAS WITH HIGH HUMIDITY AND/
OR DUST. It is advised that you store the meter and its accessories into the
provided carrying case.
Care and Storage

88
Display Messages
DISPLAY WHAT IT MEANS ACTION
System check for verifying
that all segments of the meter are functioning.
No action necessary
The system is ready to accept a blood sample.
You may now apply a blood
sample.
The system is ready to
accept a Control Solution
sample.
You may now apply a drop
of Control Solution sample.

89
DISPLAY WHAT IT MEANS ACTION
Indicate the result is HIGHER
than the “HI alarm setting” of
the health management.
For your reference or you
can change the default
setting value 180 mg/dL according to page 69-72.
Indicate the result is LOWER
than the “LO alarm setting” of
the health management.
For your reference or you can
change the default setting
value 70 mg/dL according to
page 69-72.
Meter detects blood glucose
level is higher than 600 mg/
dL (33.3 mmol/L).
Indicates high blood glucose
level. Repeat test. If result still
occurs, consult your physician immediately.

90
Meter detects blood glucose
level is lower than 20 mg/dL
(1.1 mmol/L).
Indicates low blood glucose
level. Repeat test. If result
still occurs, consult your
physician immediately.
Temperature is high during
the test procedure.
Result may be larger
variation. Move to a cooler
environment (10 - 40˚C or 50
- 104˚F) and wait 15 minutes
before re-testing.
Temperature is low during
the test procedure.
Result may be larger
variation. Move to a warmer
environment (10 - 40˚C or 50
- 104˚F) and wait 15 minutes
before re-testing.
ACTIONDISPLAY WHAT IT MEANS

91
Temperature is too high to
perform the test.
Repeat the test in a cooler
setting (10 - 40°C or 50 -
104°F). Wait 15 minutes
before re-testing.
Temperature is too low to
perform the test.
Repeat the test in a warmer
setting (10 - 40°C or 50 -
104°F). Wait 15 minutes
before re-testing.
An error message indicating
a problem with the Test Strip.
Review the instructions and
try again with a new Test
Strip.
DISPLAY WHAT IT MEANS ACTION

92
An error message indicating
a problem with the meter.
Press “reset” button and
check the meter again with
the test strip. If the problem
persists, contact Customer
Service for help.
Battery power is low. Meter
will provide approximately 50
more measurements.
Replace with a new 3-Volt
lithium battery (CR-2032).
Battery power is too low for
further usage.
Replace with a new 3-Volt
lithium battery (CR-2032)
immediately.
ACTIONDISPLAY WHAT IT MEANS

93
All testing values recorded
in the memory have been
shown.
The setting alarm is ringing
to remind of doing the blood
glucose test.
Press M or S button or wait
for 3 minutes to turn off the
meter.
Press M or S button to shut
off or the alarm will turn off
automatically after 30 sec.
ACTIONDISPLAY WHAT IT MEANS

94
Other problems that may occur
Action
The Test Strip has not been inserted
into the meter properly.
Review the instructions and re-insert the
Test Strip correctly (white side face up).
Replace with a new Test Strip.
Repeat the test with new Test Strip.
Meter will automatically turn-off. Re-
insert the Test Strip to the test port.
Contact our central technical service
Defective Test Strip.
Insufcient blood sample.
Test Strip remains in the test port for
more than 3 minutes prior to testing.
LCD display on the meter is blank when
trying to perform a test.

95
Meter Operating Conditions
Temperature 10°C - 40°C(50°F - 104°F)
Humidity 10-90% RH
Hematocrit 35 - 55%
Test Sample
Capillary Whole Blood from Fingertip, Palm and Forearm
Sample Volume >0.5 µl
Measuring Unit mg/dL or mmol/L
Measuring Range 20-600 mg/dL (1.1-33.3 mmol/L)
Test Time 5 sec
Memory Capacity 300 most recent results
Average 7/14/30 days average results
External Output Standard RS232 PC interface
Power supply 3-Volt lithium battery (CR-2032)
Battery Life Approximately 1000 tests
Dimension and Weight 92 x58 x19 mm; 60 g
Specications

96
Manufacturer:
Trimpeks İth.İhr.Tur.ve Tic.A.Ş.
Eski Büyükdere Cad. Yunus Emre Sok. No:1/12
4. Levent, 34418 İstanbul/Turkey
Tel +90 212 319 50 00, Faks +90 212 319 50 50,
www.trimpeks.com
The plusmed fasTTest Meter, plusmed fasTTest Test Strip and
Control Solution are in conformity with the IVDD 98/79/EC.
The Lancets and Lancing Device are in conformity with the
MDD 93/42/EEC.
Manufacturer:
SteriLance medical (Suzhou) Inc.
No.68 Litanghe Road,
Xiangcheng Suzhou,
Jiangsu 215133 P.R.C
EU authorized representative:
EMERGO EUROPE
Molenstraat 15, 2513 BH THe Hague,
The Netherlands

97
Limitations of the Procedure
The plusmed fasTTest Test Strips are designed for use with fresh capillary whole blood
samples obtained from the ngertip, palm and forearm. False results may occur when
performing the test while severely dehydrated, severely hypotensive, in shock or in
a hyperglycemic-hyperosmolar state. If you believe you are suffering from any of the
above symptoms, consult a healthcare professional immediately.
CAUTION:
The plusmed fasTTest System is designed for in vitro diagnostic use only and is
not intended to test on newborns. Any change or administer of medication based
on the plusmed fasTTest blood glucose test results without the consent advice of
a physician or healthcare professional is not recommended.

98
Service and Warranty
IMPORTANT:
Trimpeks cannot endorse the performance of the plusmed fasTTest System when
used with Test Strips other than those designed for the plusmed fasTTest Meter. The
plusmed fasTTest System manufacturer warranty is valid only when used properly
within the guidelines of the provided User’s Manual and is invalid when the plusmed
fasTTest System and plusmed fasTTest Test Strip are used improperly.

99
Warranty
Trimpeks guarantees that this device will be free of defects in materials and workmanship for a period of two years from the date of original purchase. During the stated two-
year period, our company shall repair or replace any plusmed fasTTest Meter found
defective with a new plusmed fasTTest Meter.
This warranty does not apply to the performance of a plusmed fasTTest Meter that has
been accidentally damaged, altered, misused, tampered with or abused in any way.
In no event shall our company be liable to the purchaser or any other person for any
incidental, consequential, or punitive damages arising from or in any way connected
with the purchase or operation of the plusmed fasTTest Meter or its parts.
For warranty services, purchaser must contact Trimpeks for help.

100
Customer Service
If you have any questions or concerns regarding this product or its operation, please
call our central technical service line or email us. We are happy to assist you.
Technical Service Hotline
00 90 212 319 50 57
or
teknikservis@trimpeks.com
website: www.trimpeks.com
When you call our technical service, please have your plusmed fasTTest Meter,
plusmed fasTTest Test Strip and all other supplies available. This will allow us to
answer any of your questions with speed and efciency.
 Loading...