

Page 1
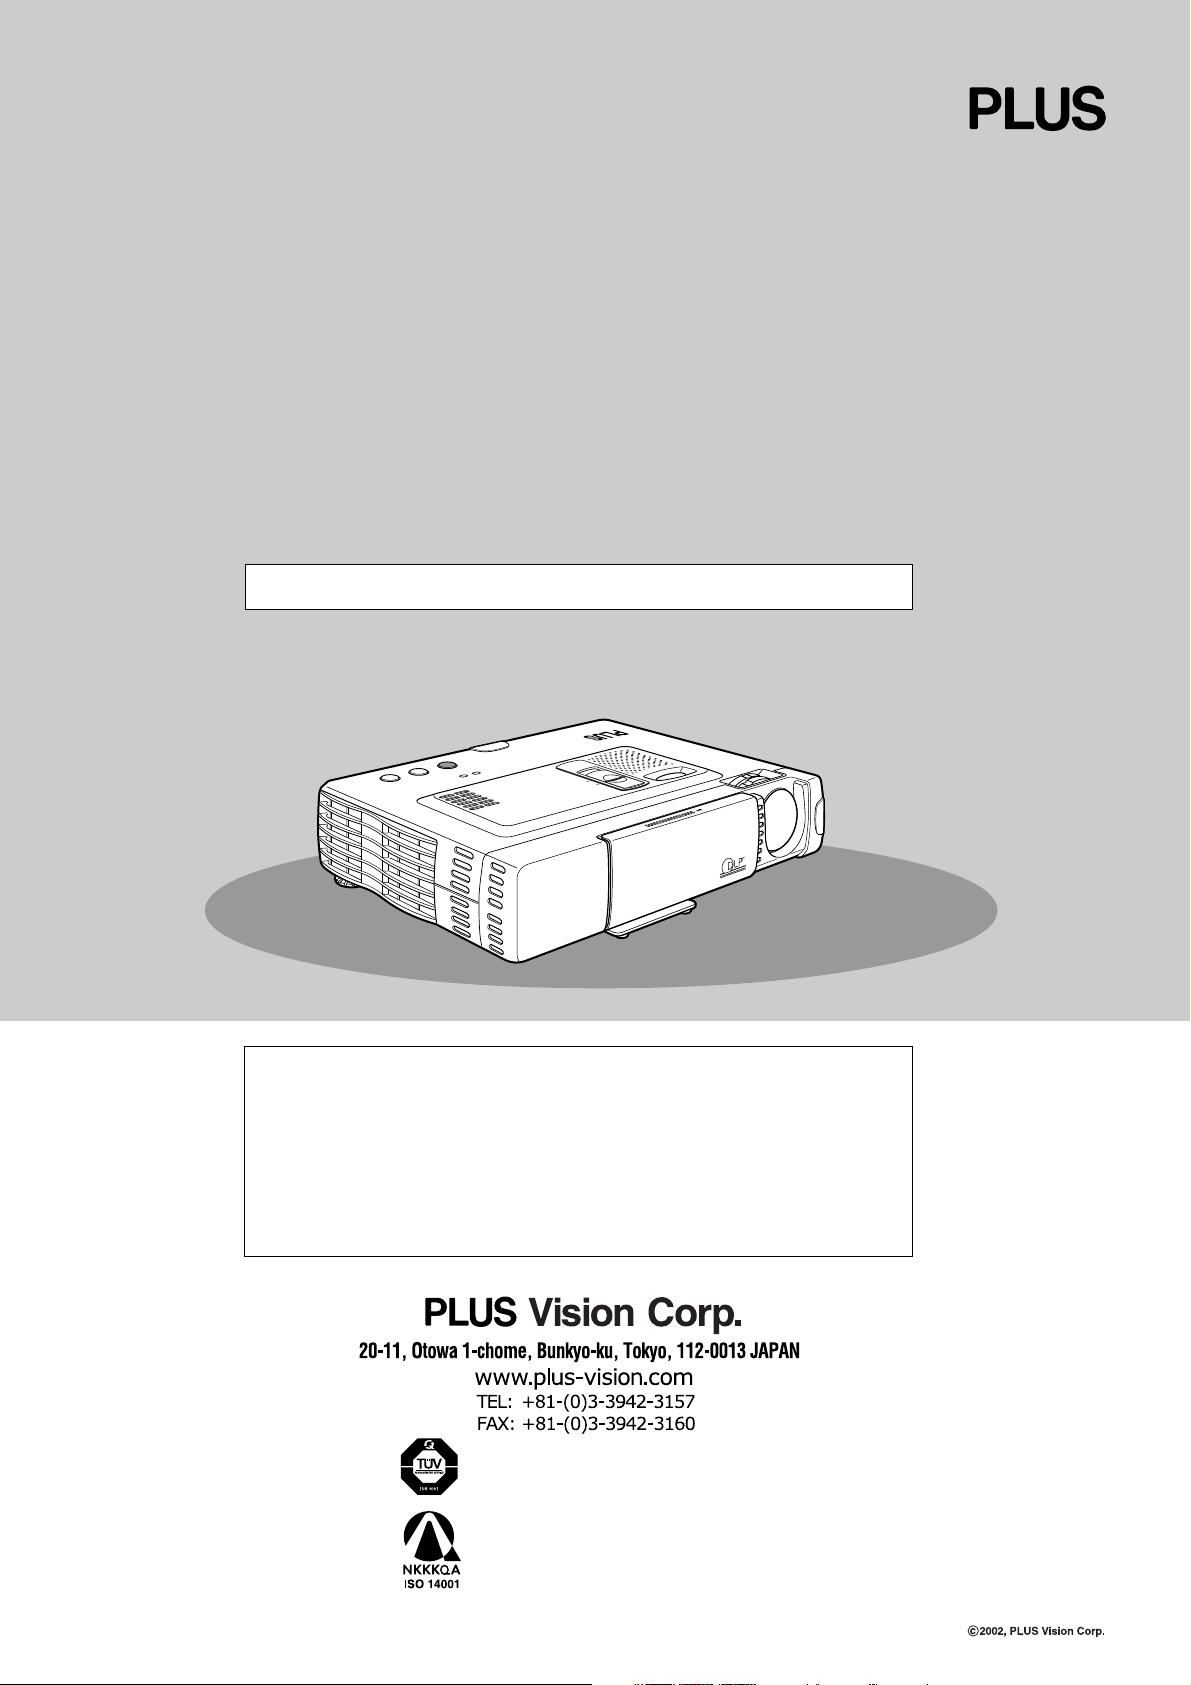
DATA PROJECTOR
U3-1100/U3-810
USER’S MANUAL
English
Applicable Models: U3-1100WZ, U3-1100W, U3-1100SF
U3-810WZ, U3-810W, U3-810SF
P
O
P
W
O
W
E
E
R
R
O
U
R
C
S
E
T
A
T
U
S
A
U
T
OS
PLUS
B / W
COLOR
O
P
EN
Digital Light Processing, DLP, Digital Micromirror Device and DMD are all trademarks of
IMPORTANT
Te xas Instruments.
Windows 98, Windows 95, and Windows 3.1 are registered trademarks in the United States
and other countries of Microsoft Corporation.
IBM is a registered trademark of International Business Machines Corporation.
Macintosh and MAC are trademarks of Apple Computer Inc.
Other names of companies and products mentioned are trademarks and registered trademarks of the respective companies.
TM
, ® and © marks are not used in this document.
PLUS Industrial Corporation is certified to ISO 9001.
Certificate No. Q1001219118017.
Otowa Head Office and PLUSLAND of PLUS Corporation
and PLUS Industrial Corporation are certified to ISO 14001.
Certificate No. NQE-9809008A.
* PLUS Vision Corp. is certified to ISO 14001 as a member of the
PLUS group.
Page 2
IMPORTANT SAFETY INFORMATION
Precautions
Please read this manual carefully before using your PLUS U3-1100WZ, U3-1100W, U3-1100SF, U3-810WZ, U3-810W, U3-810SF
Data Projector and keep the manual handy for future reference.
CAUTION
TO PREVENT SHOCK, DO NOT OPEN THE CABINET. NO USER-SERVICEABLE PARTS INSIDE.
REFER SERVICING TO QUALIFIED PLUS SERVICE PERSONNEL.
This symbol warns the user that uninsulated voltage within the unit may have sufficient
magnitude to cause electric shock. Therefore, it is dangerous to make any kind of contact with
any part inside of this unit.
This symbol alerts the user that important literature concerning the operation and maintenance of this unit has been included. Therefore, it should be read carefully in order to avoid
any problems.
The above cautions are given on the bottom of the product.
WARNING
TO PREVENT FIRE OR SHOCK, DO NOT EXPOSE THIS UNIT TO RAIN OR MOISTURE. DO
NOT USE THIS UNIT’S GROUNDED PLUG
WITH AN EXTENSION CORD OR IN AN OUTLET UNLESS ALL THREE PRONGS CAN BE
FULLY INSERTED. DO NOT OPEN THE CABINET. THERE ARE HIGH-VOLTAGE COMPONENTS INSIDE. ALL SERVICING MUST BE
DONE BY QUALIFIED PLUS SERVICE PERSONNEL.
WARNING
This is a class A product. In a domestic environment this
product may cause radio interference in which case the user
may be required to take adequate measures.
RF Interference
WARNING
The Federal Communications Commission does not allow
any modifications or changes to the unit EXCEPT those
specified by PLUS Technologies in this manual. Failure to
comply with this government regulation could void your
right to operate this equipment.
This equipment has been tested and found to comply with
the limits for a Class A digital device, pursuant to Part 15 of
the FCC Rules. These limits are designed to provide
reasonable protection against harmful interference when
the equipment is operated in a commercial environment.
This equipment generates, uses, and can radiate radio
frequency energy and, if not installed and used in
accordance with the instruction manual, may cause
harmful interference to radio communications. Operation
of this equipment in a residential area is likely to cause
harmful interference in which case the user will be required
to correct the interference at his own expense.
Important Safeguards
These safety instructions are to ensure the long life of the unit and to prevent fire and shock. Please read them carefully and heed all warnings.
Installation
•For best results, use the unit in a darkened room.
• Place the unit on a flat, level surface in a dry area away from dust
and moisture.
• Do not place the unit in direct sunlight, near heaters or heat
radiating appliances.
• Exposure to direct sunlight, smoke or steam can harm internal
components.
• Handle the unit carefully. Dropping or jarring can damage internal components.
•Do not place heavy objects on top of the unit.
Power Supply
• The unit is designed to operate on a power supply of 100 to 120
and 220 to 240 V 50/60 Hz AC. Ensure that your power supply
fits these requirements before attempting to use the unit.
•For PLUGGABLE EQUIPMENT, the socket-outlet shall be
installed near the equipment and shall be accessible.
• Handle the power cable carefully and avoid excessive bending. A
damaged cord can cause electric shock or fire.
•Disconnect the power cable (mains lead) from the power outlet
after using the unit.
Before disconnecting the power cable, make sure that the
POWER indicator lights in amber (not blinking or in green).
E – 2
Page 3

Table of contents
Cleaning
• Disconnect the power cable (mains lead) from the unit.
• Clean the cabinet of the unit periodically with a damp cloth. If
heavily soiled, use a mild detergent. Never use strong detergents
or solvents such as alcohol or thinner.
• Use a blower or lens paper to clean the lens, and be careful not to
scratch or mar the lens.
• Clean the ventilation slots and speaker grills on the unit
periodically using a vacuum cleaner. If accumulated dust blocks
the ventilation slots, the unit will overheat, which may cause the
unit to malfunction.
Use a soft brush attachment when using the vacuum cleaner. Do
not use a hard attachment, such as a crevice tool, to prevent the
damage to the unit.
Lamp Replacement
• Be sure to replace the lamp when the Status indicator comes on.
If you continue to use the lamp after 1000 hours of usage, the
lamp will turn off.
Fire and Shock Precautions
• Ensure that there is sufficient ventilation and that vents are
unobstructed to prevent the buildup of heat inside the unit. Allow
at least 10 cm (3 inches) of space between the unit and walls.
•Prevent foreign objects such as paper clips and bits of paper from
falling into the unit. Do not attempt to retrieve any objects that
fell into the unit. Do not insert any metal objects such as a wire or
screwdriver into the unit. If something should fall into the unit,
immediately disconnect the power cable from the unit and have
the object removed by a qualified PLUS service person.
• Do not place any liquids on top of the unit.
• Do not look into the lens while the unit is on. Serious damage
to your eyes could result.
Carrying around
When carrying the unit around, please use the carrying case that
comes with it and, to protect the lens from scratches, always shut
the sliding lens cap. Also, do not subject the unit to strong
mechanical shock.
IMPORTANT SAFETY INFORMATION ................................... 2
Table of contents ........................................................................ 3A
Basic information and preparations ........ 4
Features ......................................................................................... 4
Checking the supplied accessories ............................................... 4
Preparing the remote control ........................................................ 5
Parts and controls .......................................................................... 6
Installation ..................................................................................... 9
Connections ............................................ 10
Connecting video equipment ...................................................... 10
Connecting Video Equipment With Component Video Signal
(YCbCr) Output .......................................................................... 11
Connecting a PC or Macintosh ................................................... 12
Operation ................................................. 14
Using the unit .............................................................................. 14
Using the Remote Control (Input Selection) .............................. 16
Using the Remote Control as the PC Mouse .............................. 17
Various functions while using the unit ....................................... 18
Use as a High-Brightness Monochrome Projector .................. 19B
Menu operation....................................... 20
Menu Structure ............................................................................ 20
Adjusting the picture elements ................................................... 22
Adjusting the projected image from the computer .................... 23
Manual Adjustment of Personal Computer Images ................... 24
Resetting ...................................................................................... 25
Resetting the Lamp Hours of Usage ........................................... 25
Setting Narrow Images (Advanced Menu) ................................. 26
Setting in Accordance With Image Contents.............................. 27
Initial Settings ............................................................................. 28
Setting the Menu ......................................................................... 30
Others ....................................................... 31
Troubleshooting .......................................................................... 31
When the STATUS indicator lights or flashes ........................... 32
Replacing the lamp cartridge ...................................................... 33
Specifications .............................................................................. 34
E – 3A
Page 4
This User's Manual covers the following models: U3-1100WZ, U3-1100W, U3-1100SF,
U3-810WZ, U3-810W, and U3-810SF.
Depending on the projector that you purchased, the resolution may differ from another projector and some models
may not have an optical zoom function nor a high-brightness monochrome function. This manual provides a description of the U3-1100WZ (with a full complement of functions).
Please check the table below regarding the resolution and availability of functions for your projector.
Model Resolution (Full screen display)
U3-1100WZ 1024⳯768 (XGA) 嘷嘷
U3-1100W 1024⳯768 (XGA) ⳯嘷
U3-1100SF 1024⳯768 (XGA) ⳯⳯
U3-810WZ 800⳯600 (S-VGA) 嘷嘷
U3-810W 800⳯600 (S-VGA) ⳯嘷
U3-810SF 800⳯600 (S-VGA) ⳯⳯
Optical Zoom Function
High-Brightness Monochrome Function
嘷: With function ⳯: Without function
E – 3B
Page 5
Basic information and preparations
Checking the
Features
Congratulations On Your Purchase Of The U31100WZ, U3-1100W, U3-1100SF, U3-810WZ, U3810W, U3-810SF Data Projector
The U3-1100WZ, U3-1100W, U3-1100SF, U3-810WZ, U3-810W, U3810SF is one of the most spectacular data projectors available today. The
unit enables you to project precise images up to 200 inches across (measured diagonally) from your PC or Macintosh computer (desktop or notebook), VCR, document camera, laser disc player, DVD player, etc.
The unit can be placed on a tabletop or cart. The unit can also be used to
project images from behind the screen.*
* Consult your dealer for more information.
The other main features you’ll enjoy
• Compatible with following various color systems:
– NTSC (U.S. and Canada standard)
–PAL (Western Europe standard)
– SECAM (France and Eastern Europe standard)
– NTSC4.43 (Middle East standard)
• (U3-1100WZ, U3-1100W, U3-1100SF)
Superior brightness of 1000 ANSI lumens (In color mode) /2200
ANSI lumens (In B/W mode), small size, and weighing only about 1.5
kilograms/3.3 lbs.
(U3-810WZ, U3-810W, U3-810SF)
Superior brightness of 1000 ANSI lumens: In color mode/2200 ANSI
lumens: In monochrome mode, small size, and weighing only about
1.5 kilograms/3.3 lbs.
Using TI’s Digital Mirror Device (DMD) and our own optical design we
have developed a geometric effect that increases the light usage efficiency. By increasing the light usage efficiency we can better reproduce
the three basic colors (RGB) required for color reproduction on a single
DMD. This means superior brightness, smaller size, and lighter weight.
• Sharp, clear images
There is no RGB color separation, and the spaces between the individual
pixels are not noticeable. That means sharp and clear reproduction of
small characters and figures. Take a closer look and notice the difference
in quality!
• Outstanding sharp, clear, 3D like images with vivid colors when
reproducing DVD video and other high picture-quality data/video
sources
Accurate gray scale reproduction makes for more natural image displays.
DVD and other high quality image sources bring out the true image
display quality of the unit.
• Screen not distorted to a trapezoid (keystoning) when projecting to
the height of the line of vision
Because the projection position is already set to the height of the line of
vision, there is no keystoning effect.
Even when projecting above or under the height of the line of vision,
image distortion (if any) can be adjusted using the keystone correction
function.
• (U3-1100WZ, U3-1100W, U3-1100SF)
Fully compatible with true XGA; support for SXGA using advanced
intelligent compression technology
The advanced intelligent compression technology enables these projectors
to present clear compression SXGA images without any line omission.
(U3-810WZ, U3-810W, U3-810SF)
Fully compatible with true S-VGA; support for XGA using advanced intelligent compression technology
The advanced intelligent compression technology enables it to present clear
compression XGA images without any line omission.
•A remote control that can operate the PC or Macintosh
The supplied remote control both operates the unit and acts as a wireless
mouse control to operate the PC or Macintosh connected to the unit.
• The compact and easy to carry cabinet with its contemporary design
complements any office, board room, or auditorium.
• The Industry's First B/W Mode that Can Be Switched to Double
Brightness
When projecting data that is largely black and white such as documents
and spreadsheets, setting the top panel switch to B/W Mode will allow
double the brightness as compared to the color setting. Never before has
this function been incorporated in a projector, making the most of the
features of the high contrast ratio DLP system projector.
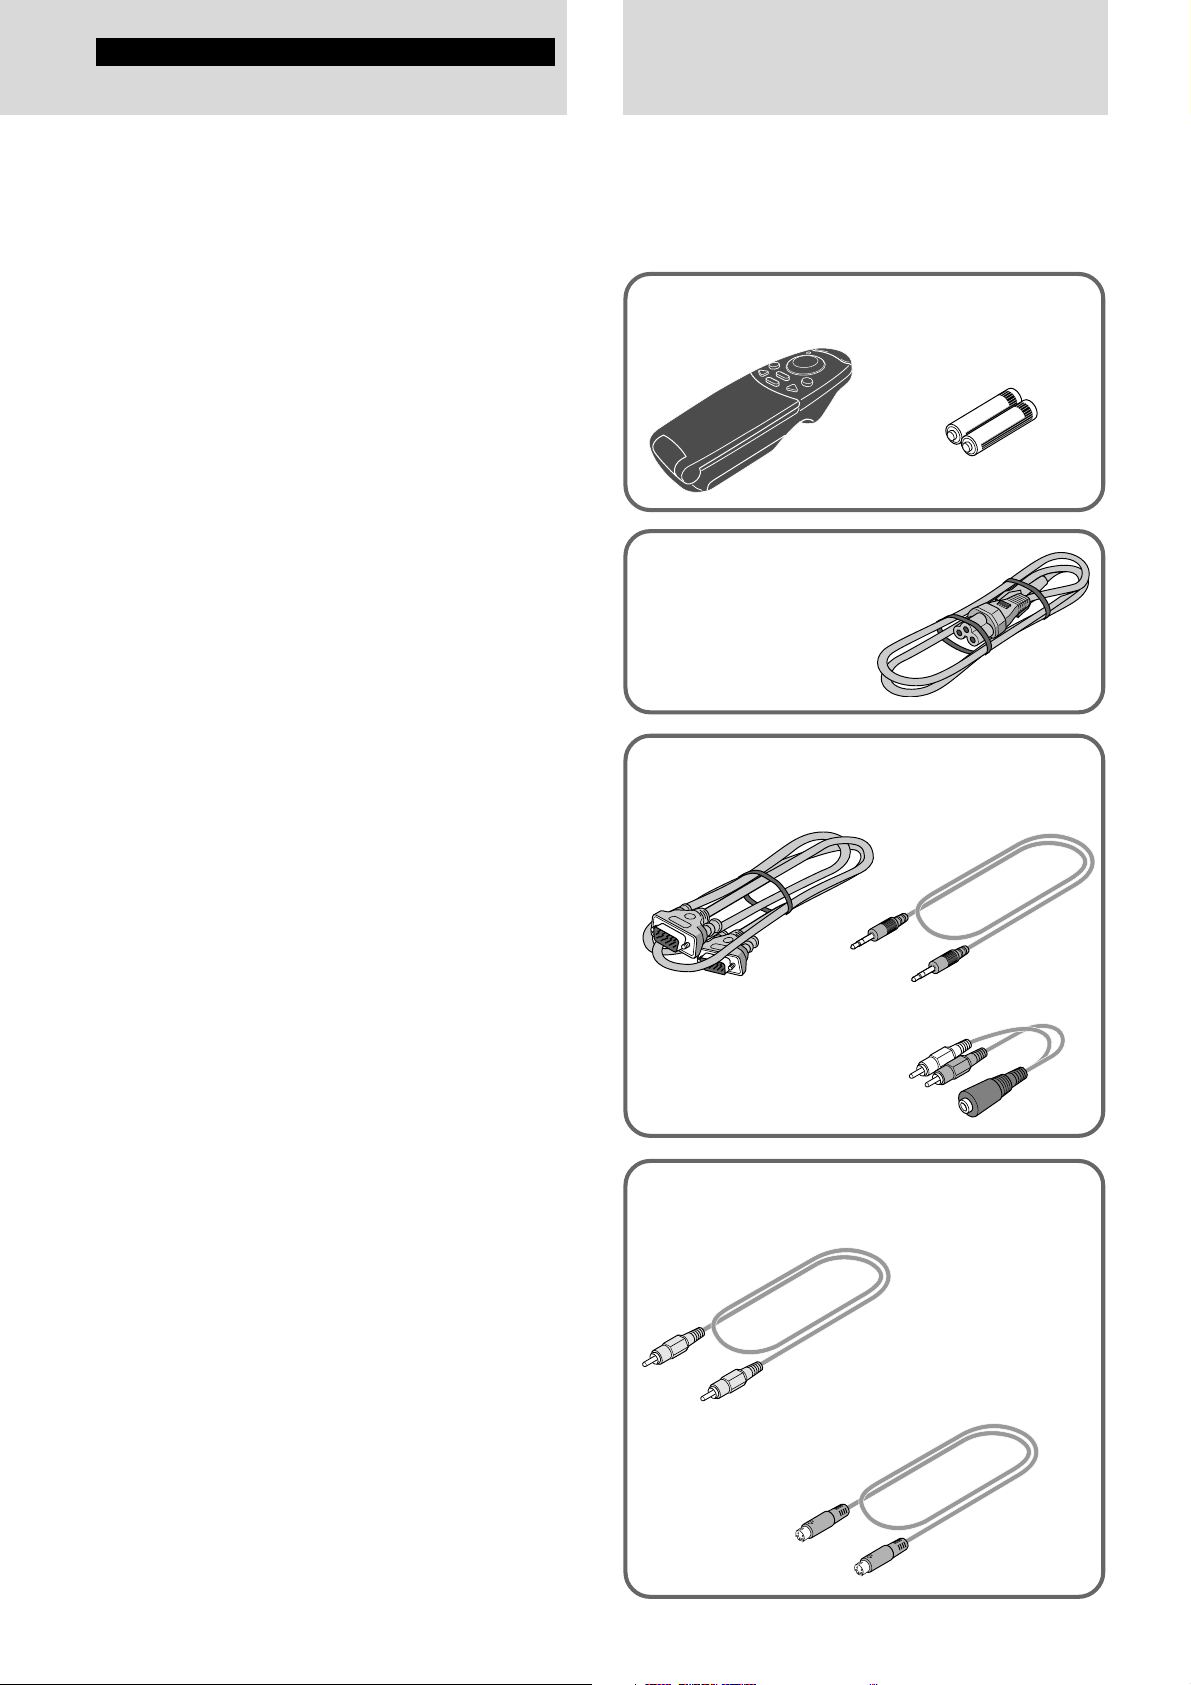
supplied accessories
Make sure your box contains everything listed below. If any
pieces are missing, contact your dealer.
Please save the original box and packing materials in case
you ever need to ship the unit.
The number of accessories is indicated in brackets.
For remote control
Remote control [1] Batteries (size AAA) [2]
Power cable (mains lead)
(1.8 m/5.9 ft.) [1]
The shape of the plug varies
depending on the region where
the unit is purchased.
For computer connection
RGB cable
(1 m/3.3 ft.) [1]
No. 770708000
Audio adaptor
(mini-jack pin conversion,
0.15 m/0.5 ft) [1]
No. 770704000
For video equipment connection
Video cable
(1 m/3.3 ft.) [1]
No. 770703000
S-video cable
(1 m/3.3 ft.) [1]
No. 770709000
Audio cable
(1 m/3.3 ft.) [1]
No. 770710000
E – 4
Page 6
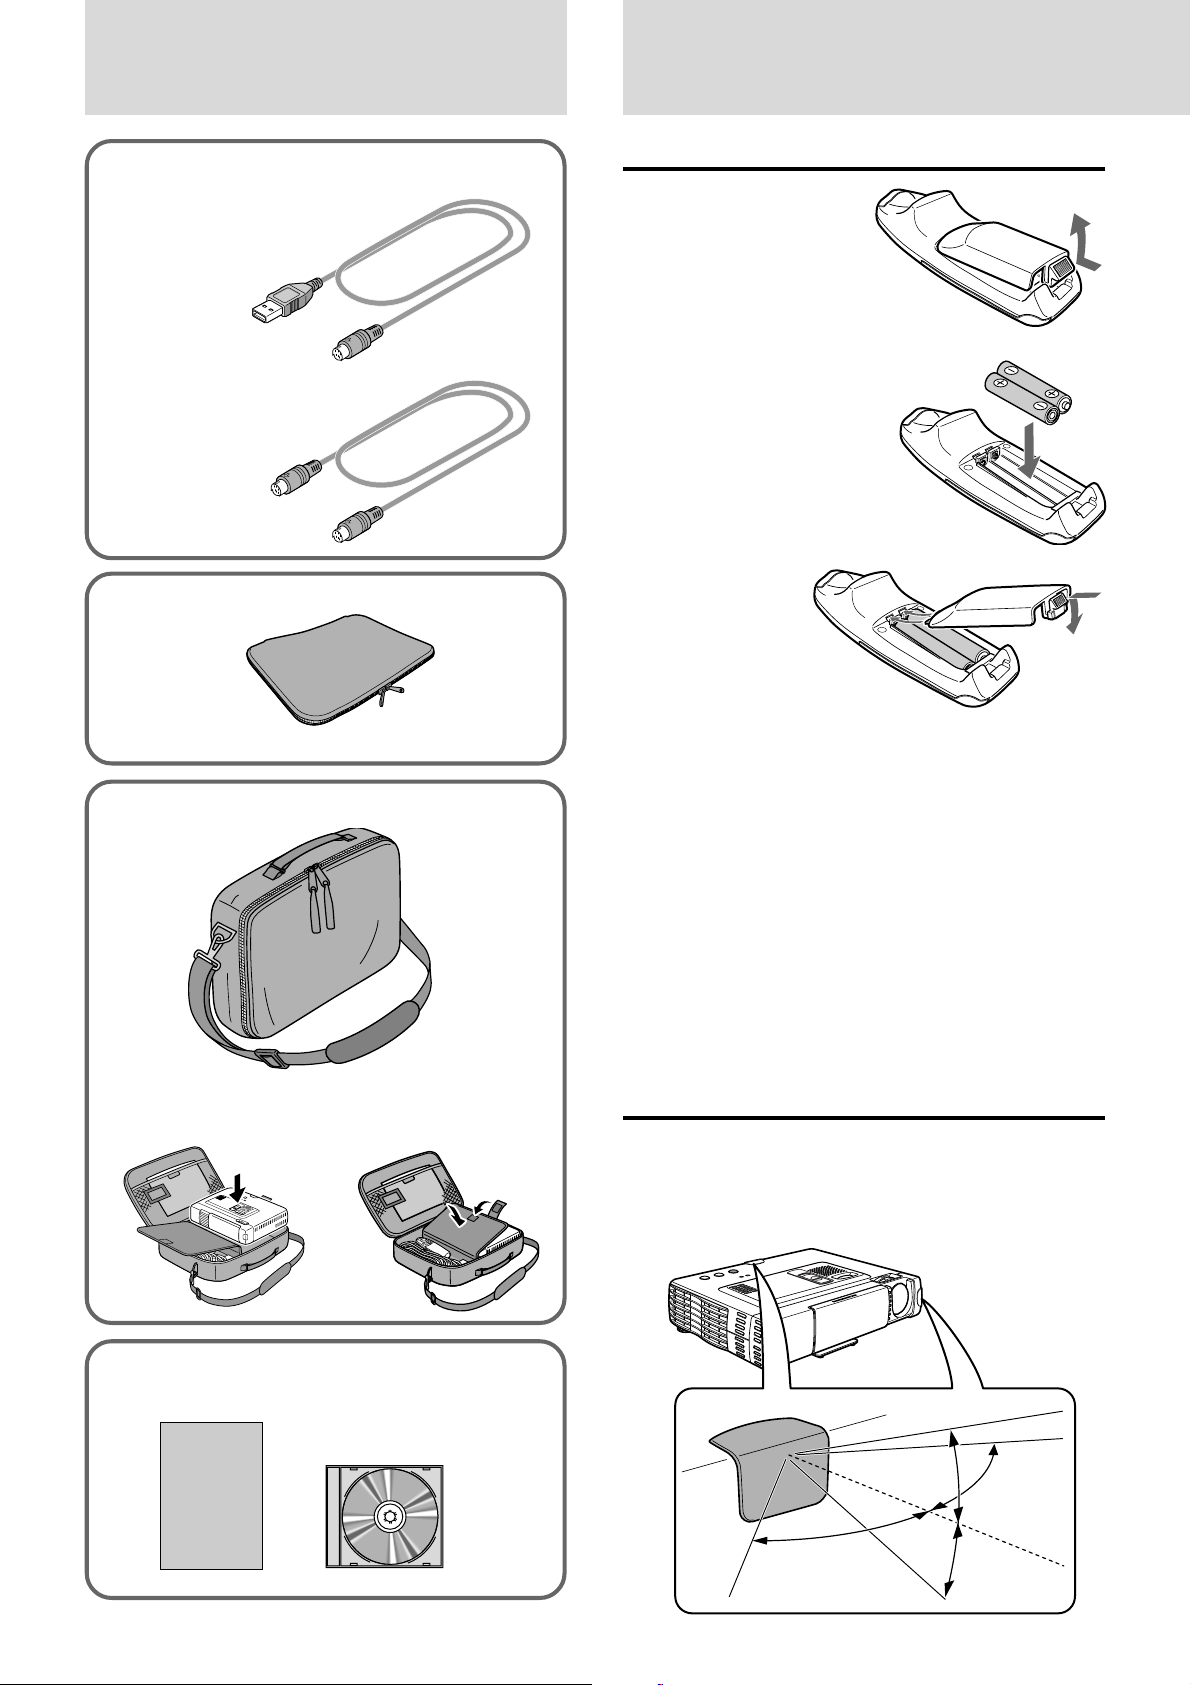
When using the remote control as computer
mouse
USB mouse cable (1 m/3.3 ft.) [1]
[for IBM / Macintosh]
No. 770707000
PS/2 mouse cable (1 m/3.3 ft.) [1]
[for IBM PS/2]
No. 770706000
Soft pouch [1]
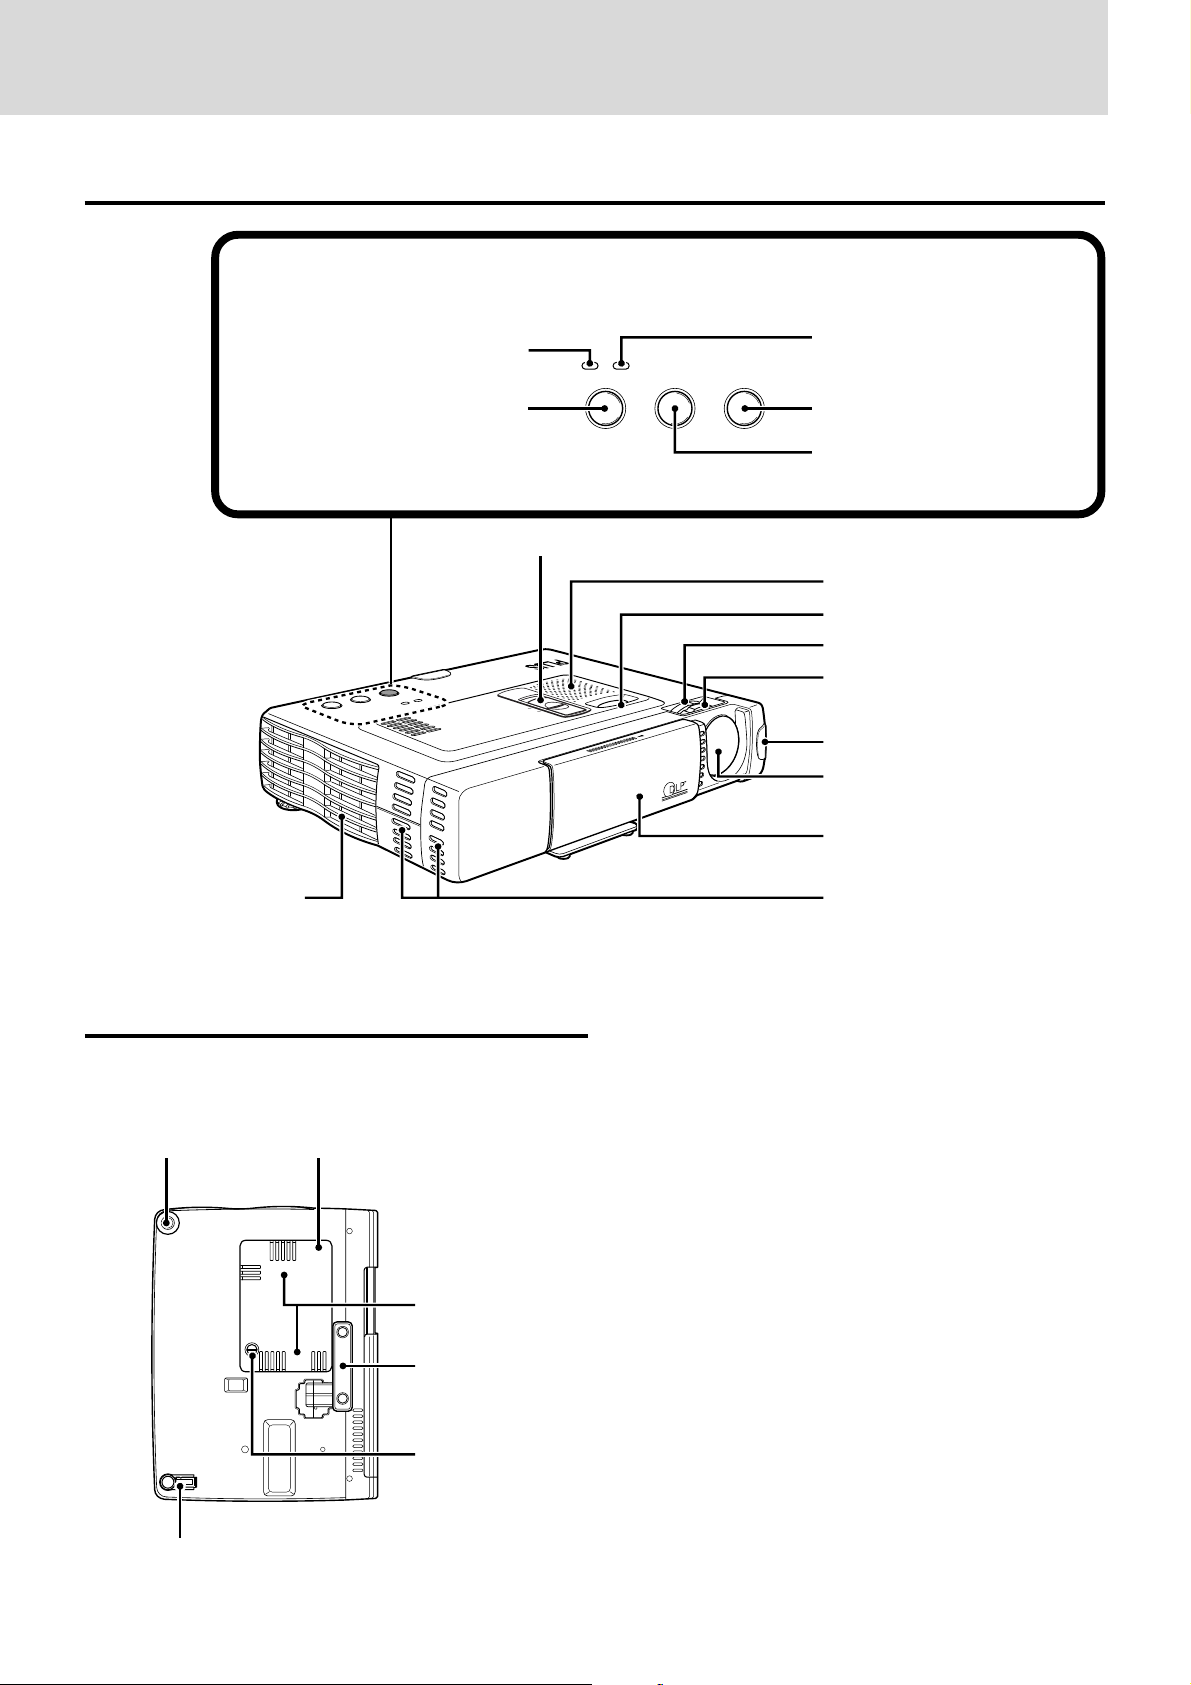
Preparing the remote control
Inserting the batteries
1 Press firmly and slide
the battery cover off.
2 Insert the two supplied
batteries (size AAA).
Ensure that the
polarities (+ and –) of
the batteries are aligned
correctly.
3 Slide the cover
back until it
snaps into
place.
Carrying case [1]
How to use the carrying case
Packing the unit
Packing the accessories
CAUTION
Danger of explosion if battery is incorrectly replaced. Replace only
with the same or equivalent type recommended by the manufacturer.
Dispose of used batteries according to the manufacturer’s instructions.
Notes
• If the remote control gets wet, wipe it dry immediately.
•Avoid excessive heat and humidity.
• If you will not be using the remote control for a long time, remove the
batteries.
• Do not mix new and old or different types of batteries.
• There are operations that can only be carried out by remote control.
Handle the remote control carefully.
Remote control effective range
The remote sensors are located on the front and back of the unit.
The controllable range is 50 degrees horizontally and 30 degrees
vertically relative to a line that is at a right angle to the remote
sensor. And the distance between the point of the remote control
and remote sensor must be shorter than four meters (13 feet).
USER’S MANUAL
(Simplified Edition) [1]
USER’S MANUAL
(CD-ROM Edition) [1]
E – 5
50˚
30˚
30˚
50˚
Page 7
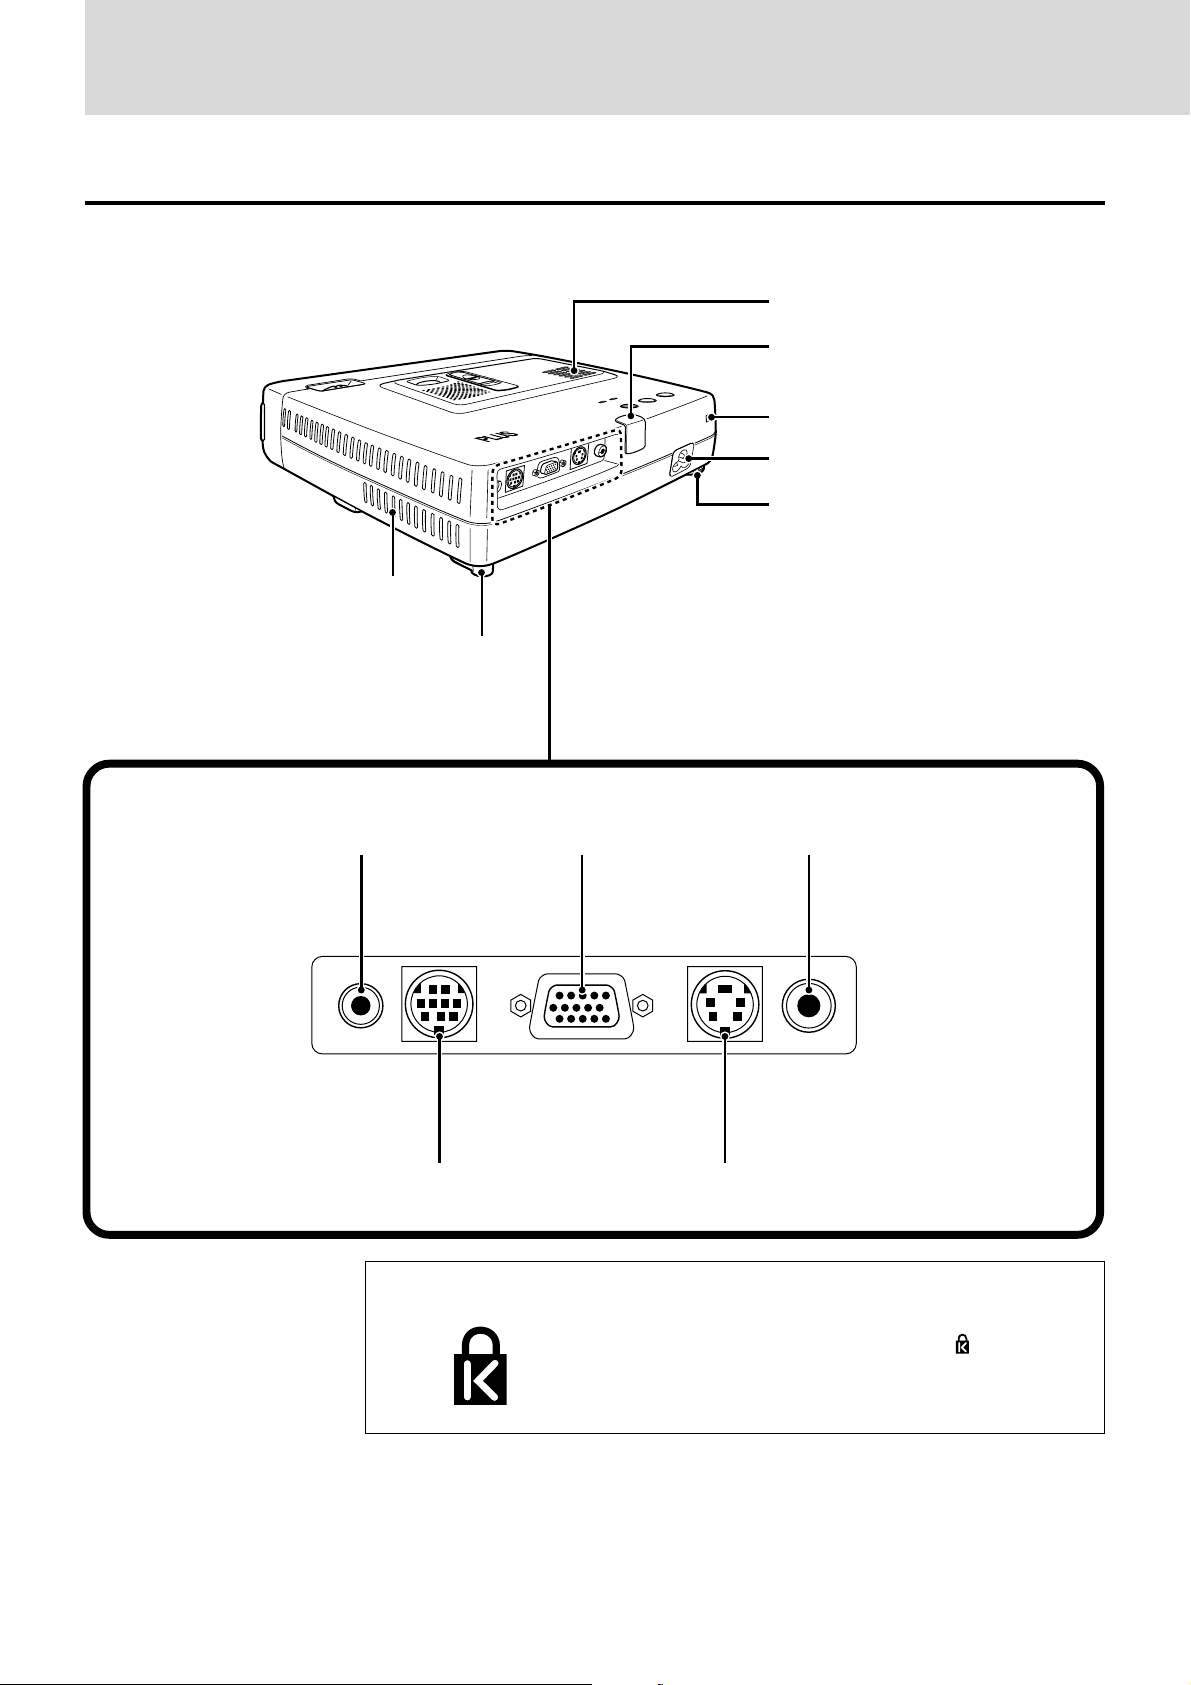
Parts and controls
For operational instructions, refer to the page indicated in brackets.
Top, front and side panel view
Control panel
Exhaust vents [3]
POWER indicator [14,16]
POWER button [14,16]
POWER
P
O
W
E
R
SOURCE
S
TA
T
U
S
AUTO
PLUS
POWER STATUS
POWER SOURCE AUTO
“COLOR” “B/W” switch*1 [19B]
B / W
COLOR
OPEN
STATUS indicator [32]
AUTO button [18]
SOURCE button [14, 16]
Speaker [10, 18]
Adjuster button [15]
Zoom ring*2 [15]
Focus ring [15]
Remote Sensor [5]
Lens [3, 9]
Sliding lens cap [3, 14]
Ventilation slots [3]
Bottom
Rear adjuster [15]
Lamp cover [33]
Ventilation slots [3]
Front adjuster [15]
Lamp cover screw [33]
*1Applicable models: U3-1100WZ, U3-1100W, U3-810WZ,
and U3-810W
2
U3-1100WZ and U3-810WZ
*
Adjustment foot [15]
E – 6
Page 8
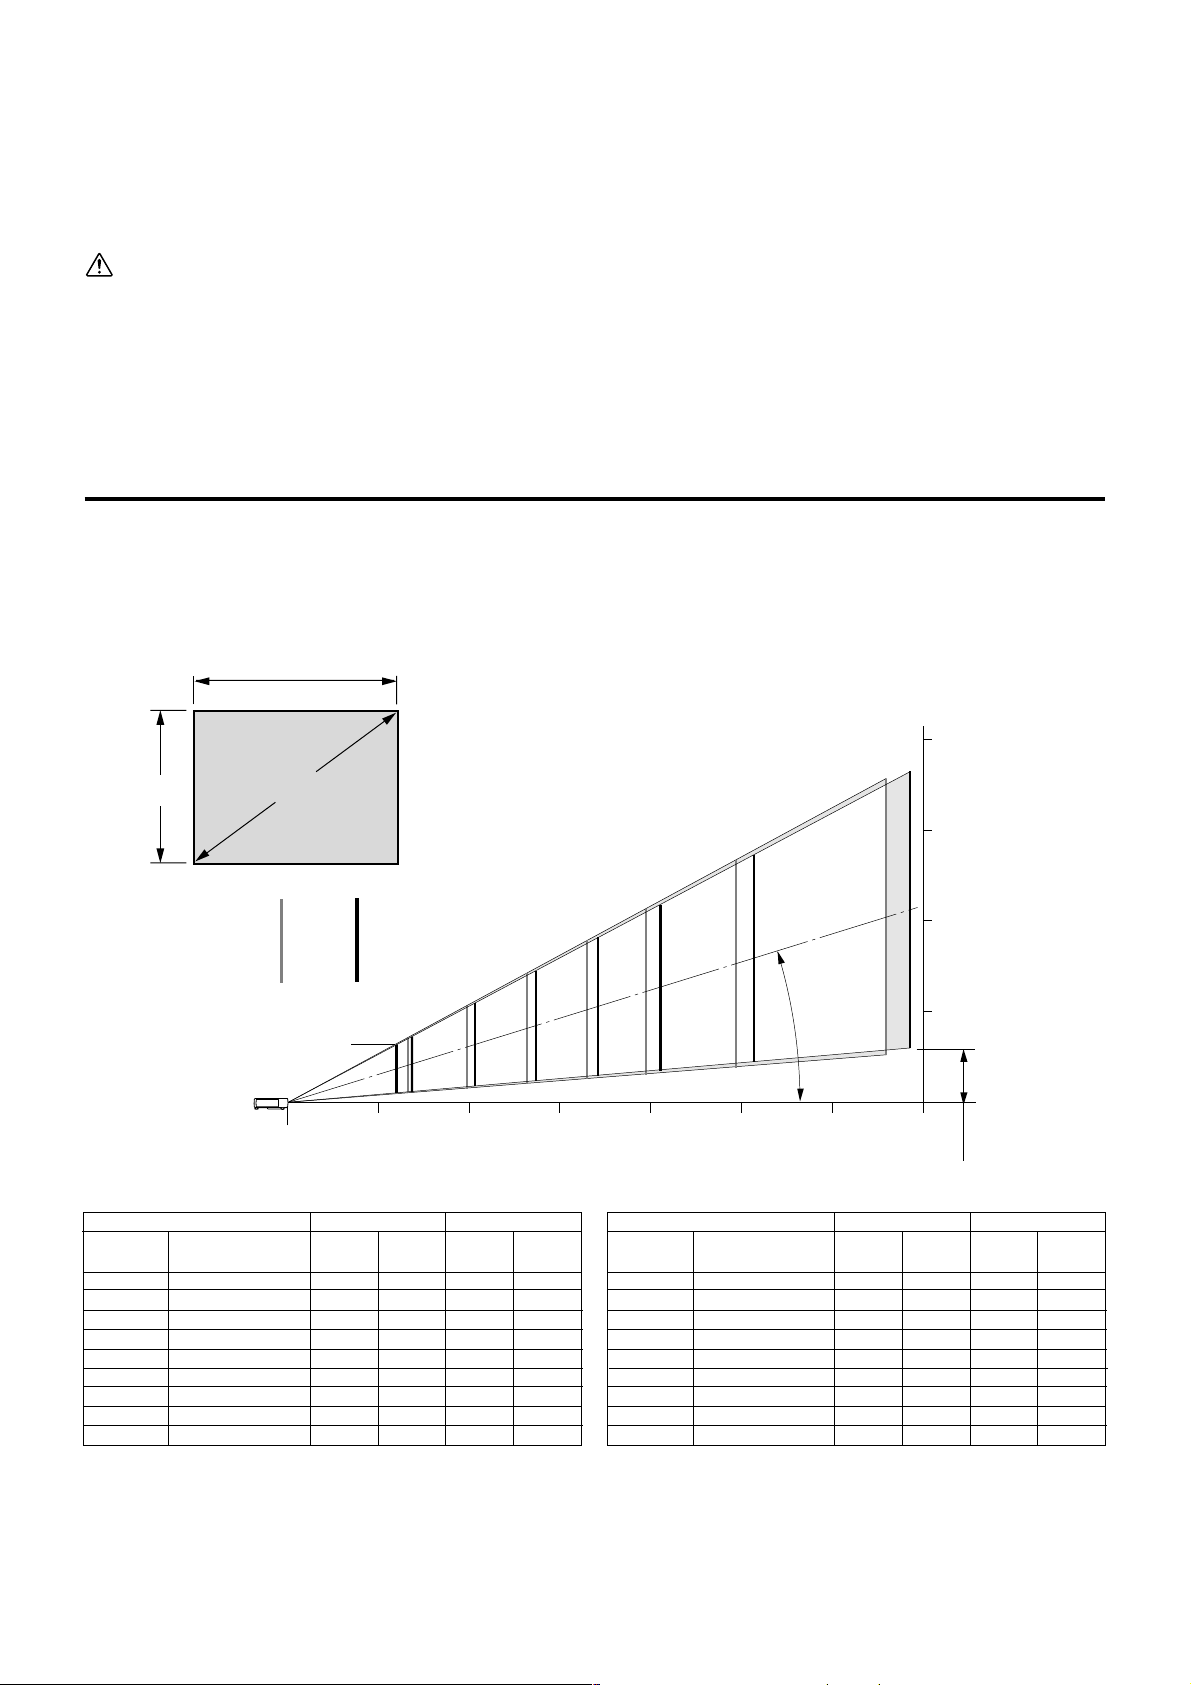
Rear and side panel view
Ventilation slots [3]
Terminal Panel
COLOR
B / W
R
E
W
O
P
TO
U
A
S
U
E
AT
C
R
ST
OU
S
ER
W
O
P
Built-in security slot [see below]
Remote sensor [5]
EO
ID
V
O
E
VID
S
bCr
B / YC
RG
USE
O
M
IO
UD
A
AC IN terminal [14]
Rear adjuster [15]
Ventilation slots [3]
Adjustment foot [15]
AUDIO jack [10, 11, 12] VIDEO jack [10]
RGB/YCbCr connector [11, 12]
AUDIO MOUSE RGB
MOUSE connector [17]
Built-in Security Slot
/
YCbCr
E – 7
VIDEOS-VIDEO
S-VIDEO jack [10]
This security slot supports the MicroSaver® Security
System. MicroSaver® is a registered trademark of
Kensington Microware Inc. The logo is trademarked and owned by Kensington Microware Inc.
Page 9

Parts and controls (continued)
Wireless Remote Control
ENTER button [17, 25]
LED
The red LED lights during
infrared sending.
Infrared transmitter [5]
POWER button [14, 16]
MOUSE button [17]
VIDEO button [16]
MENU button [20]
CANCEL button [17, 22]
RGB button [16]
MOUSE POWER
MENU
VIDEO
CANCEL
RGB
PLUS
MOUSE POWER
MENU
VIDEO
AUTO FREEZE MUTE
ZOOM VOLUMEKEYSTONE
CANCEL
RGB
Cursor key [17, 19A, 22]
AUTO button [18]
FREEZE button [18]
MUTE button [18]
VOLUME +/– button [18]
KEYSTONE +/– button [18]
ZOOM +/– button [19A]
FLIP COVER [18, 20]
Note
The remote controller supplied with this unit is a Class 1 LED
product.
E – 8
Page 10
Installation
The distance from the unit lens to the screen determines to the size of the projected image, therefore, you need to consider the place where you set
up the unit and screen before making connections. You also need to consider the screen size and height of the unit and screen as other important factors.
Tip
A non-glossy wall may be used as a substitute for a screen.
WARNING
• Carrying the unit
Always carry the unit in the carrying case. Ensure that the power cable and any other cables connecting to video sources are disconnected
before moving the unit. When moving the unit or when it is not in use, cover the lens with the sliding lens cap.
• Only use the unit on a solid flat level surface. If the unit falls to the ground, you may be injured and the unit may severely be damaged.
• Do not use the unit where temperatures vary greatly. The unit must be used at temperatures between 5°C (41°F) and 35°C (95°F).
• Do not expose the unit to moisture, dust, or smoke. This will harm the screen image.
•
Ensure that you have adequate ventilation around the unit to allow heat dissipation. Do not cover the vents on the bottom or the side of the unit.
Installation Guidelines (normal installation)
This section explains how to determine the screen size you use. Use the following table and charts as a guide.
Optimum focal point from the lens surface is as follows:
3.9 feet - 22.3 feet / 1.2 m - 6.8 m (U3-810W, U3-810SF) 3.9 feet - 21.6 feet / 1.2 m - 6.6 m (U3-1100W, U3-1100SF)
3.9 feet - 32.2 feet / 1.2 m - 9.8 m (U3-810WZ) 3.9 feet - 30.8 feet / 1.2 m - 9.4 m (U3-1100WZ)
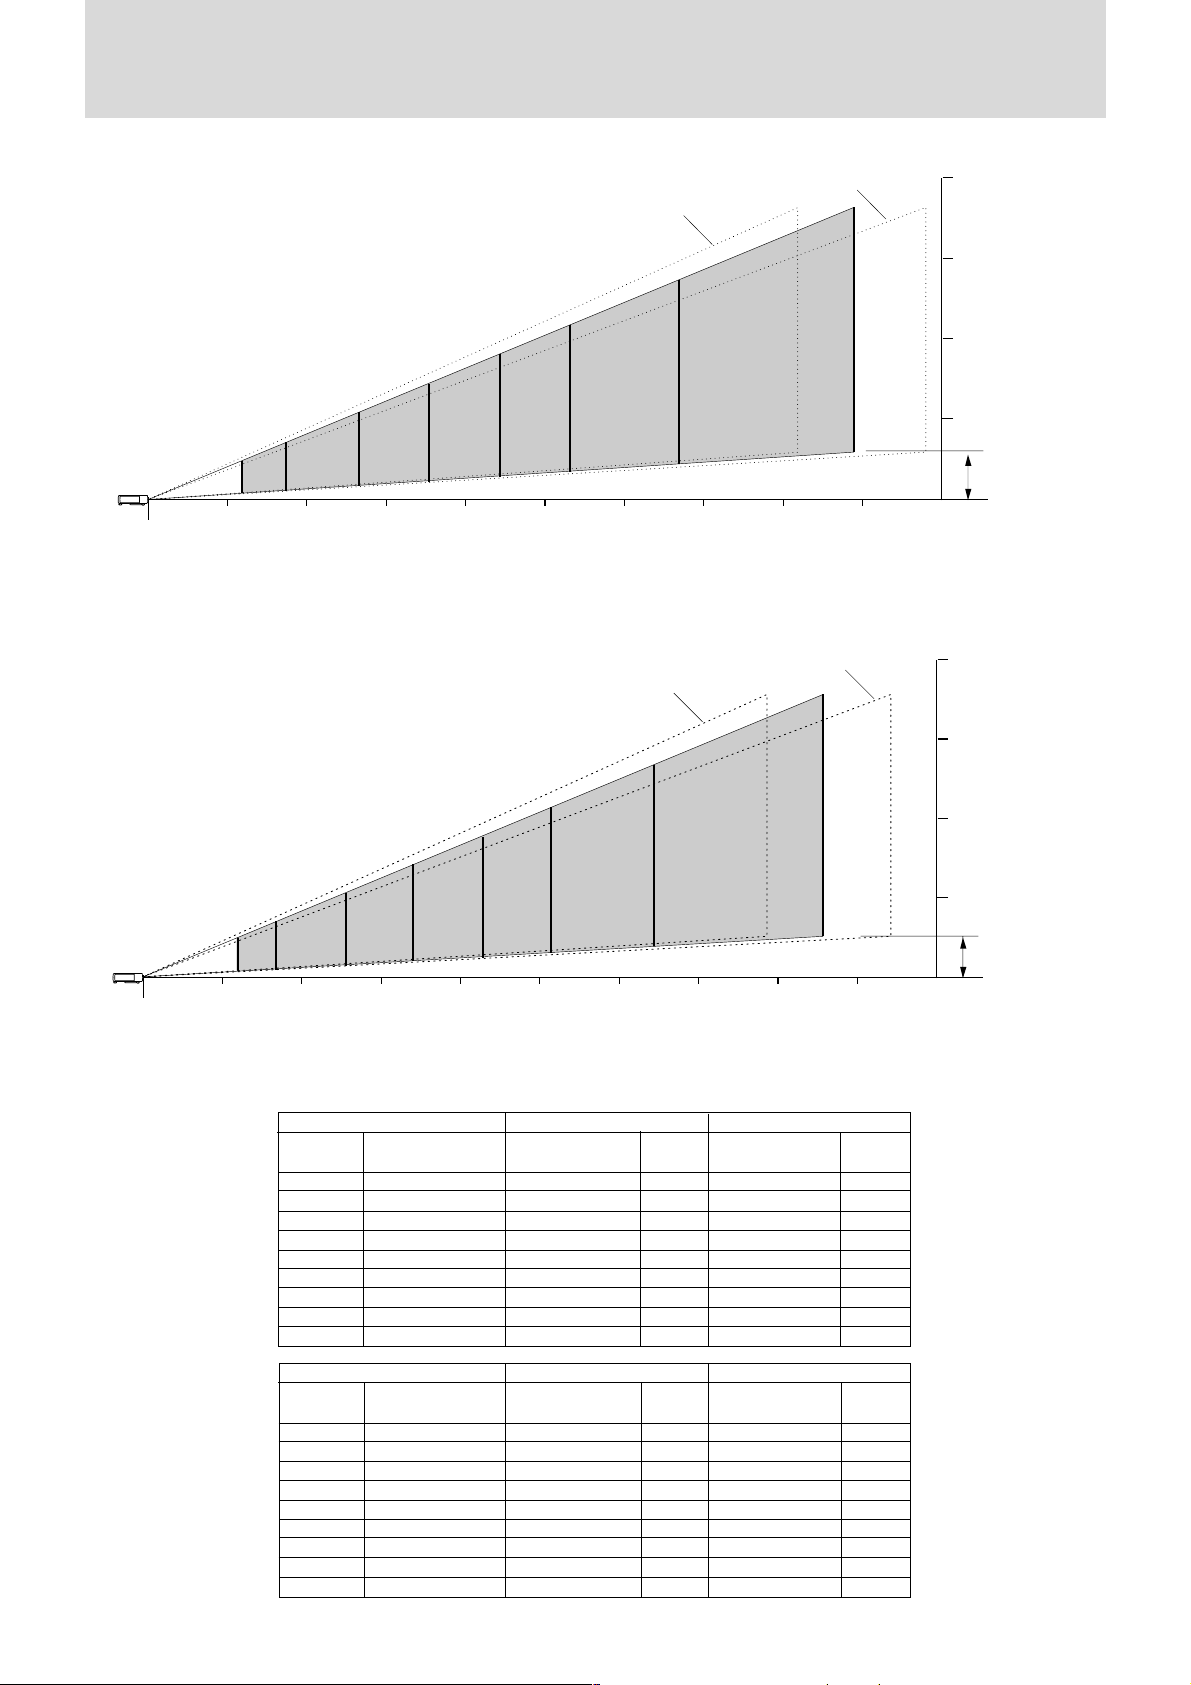
Distance and image size for U3-1100W, U3-1100SF, U3-810W and U3-810SF
Screen width
[Screen height]
4m (13.1 feet)
200"
Screen height
Screen size (diagonal)
150"
3m (9.8 feet)
[Screen size]
U3-810U3-1100
100"
80"
60"
U3-810 : 35"
U3-1100 : 36"
Lens surface
40"
1m
(3.3feet)2m(6.6 feet)3m(9.8 feet)4m(13.1 feet)5m(16.4 feet)6m(19.7 feet)7m(23.0 feet)
[Projection distance]
Screen
size (inch)
35”
36”
40”
60”
80”
100”
120”
150”
200”
Screen dimensions
width x height (cm)
71.1
X
73.2
81.3
121.9
162.6
203.2
243.8
304.8
406.4
53.3
X
54.9
X
61.0
X
91.4
X
121.9
X
152.4
X
182.9
X
228.6
X
304.8
Notes
• The range of error is +/- 5% because the distances are calculated values.
•Move the unit to the position where the projected image is horizontally centered to the screen.
• Do not use the unit where temperatures vary greatly. The unit must be used at temperatures between 5˚C (41˚F) and 35˚C (95˚F).
•To raise the projection position, place the unit on the stable table.
• If strong light falls on the remote sensor, the remote control may not function. Do not place the unit in direct lightning.
•For best results, do not expose the screen to direct sunlight or strong light.
U3-810W, U3-810SF U3-1100W, U3-1100SF
1.2
1.3
2.0
2.6
3.3
4.0
5.0
6.6
-
Height H
(cm)
-
9.8
10.4
15.7
20.9
26.1
31.3
39.2
52.2
Projection
distance (m)
1.2
1.2
1.4
2.1
2.7
3.4
4.1
5.1
6.8
Height H
(cm)
10.5
10.8
12.0
18.0
24.0
30.0
36.0
44.9
59.9
Projection
distance (m)
120"
Screen
size (inch)
35”
36”
40”
60”
80”
100”
120”
150”
200”
17.2˚
Distance from center of lens to lower edge of screen
Screen dimensions
width x height (inch)
28.0
X
X
X
X
X
X
X
X
X
21.0
21.6
24.0
36.0
48.0
60.0
72.0
90.0
120.0
28.8
32.0
48.0
64.0
80.0
96.0
120.0
160.0
2m (6.6 feet)
1m (3.3feet)
H
U3-810W, U3-810SF U3-1100W, U3-1100SF
Projection
distance (feet)
3.9
3.9
4.6
6.9
8.9
11.2
13.5
16.7
22.3
Height H
(inch)
4.1
4.3
4.7
7.1
9.4
11.8
14.2
17.7
23.6
distance (feet)
Center of lens
3.9
4.3
6.6
8.5
Height H
(inch)
-
3.9
4.1
6.2
8.2
10.3
12.3
15.4
20.6
Projection
10.8
13.1
16.4
21.6
-
E – 9A
Page 11
Distance and image size for U3- 810WZ and U3- 1100WZ
The drawings show the image sizes and distances for tele and wide.
Wide (max)
Tele (max)
200"
[Screen height]
4m (13.1 feet)
Lens surface
[Screen size]
120"
100"
80"
60"
40"
25"
1m
(3.3feet)2m(6.6 feet)3m(9.8 feet)4m(13.1 feet)5m(16.4 feet)6m(19.7 feet)7m(23.0 feet)8m(26.2 feet)9m(29.5 feet)
150"
[Projection distance]
Projection distance and screen height for U3-810WZ
Tele (max)
200"
26"
40"
60"
[Screen size]
100"
80"
Wide (max)
150"
120"
3m (9.8 feet)
2m (6.6 feet)
1m (3.3feet)
H
Center of lens
Distance from center of
lens to lower edge of
screen
[Screen height]
4m (13.1 feet)
3m (9.8 feet)
2m (6.6 feet)
1m (3.3feet)
Lens surface
1m
(3.3feet)2m(6.6 feet)3m(9.8 feet)4m(13.1 feet)5m(16.4 feet)6m(19.7 feet)7m(23.0 feet)8m(26.2 feet)9m(29.5 feet)
[Projection distance]
Projection distance and screen height for U3-1100WZ
U3-810WZ U3-1100WZ
Projection distance (m)
Wide - Tele
Height H
1.20
1.22
1.6 - 1.9
2.4 - 2.9
3.2 - 3.9
4.1 - 4.9
4.9 - 5.9
6.1 - 7.4
8.2 - 9.8
Projection distance (m)
(cm)
7.6
7.6
12.0
18.0
23.9
29.9
35.9
44.9
59.9
U3-810WZ U3-1100WZ
Projection distance (feet)
Wide - Tele
3.9
4.0
5.2 - 6.2
7.9 - 9.5
10.5 - 12.8
13.5 - 16.1
16.1 - 19.4
20.0 - 24.3
26.9 - 32.2
Projection distance (feet)
Height H
(inch)
3.0
3.0
4.7
7.1
9.4
11.8
14.1
17.7
23.6
Wide - Tele
–
1.2
1.5 - 1.9
2.3 - 2.8
3.1 - 3.7
3.9 - 4.7
4.7 - 5.6
5.9 - 7.1
7.9 - 9.4
Wide - Tele
–
3.9
4.9 - 6.2
7.5 - 9.2
10.2 - 12.1
12.8 - 15.4
15.4 - 18.4
19.4 - 23.3
25.9 - 30.8
Height H
(cm)
–
6.8
10.4
15.5
20.7
25.9
31.1
38.9
51.8
Height H
(inch)
–
2.7
4.1
6.1
8.1
10.2
12.2
15.3
20.4
Screen
size (inch)
25”
26”
40”
60”
80”
100”
120”
150”
200”
Screen
size (inch)
25”
26”
40”
60”
80”
100”
120”
150”
200”
Screen dimensions
width x height (cm)
50.8
52.8
81.3
121.9
162.6
203.2
243.8
304.8
406.4
Screen dimensions
width x height (inch)
20.0
20.8
32.0
48.0
64.0
80.0
96.0
120.0
160.0
38.1
X
39.6
X
61.0
X
91.4
X
121.9
X
152.4
X
182.9
X
228.6
X
304.8
X
15.0
X
15.6
X
24.0
X
36.0
X
48.0
X
60.0
X
72.0
X
90.0
X
120.0
X
H
Center of lens
Distance from center of
lens to lower edge of
screen
E – 9B
Page 12

Connections
Connecting video equipment
You can connect up to two pieces of video equipment to the unit following the illustrations below.
•You can switch the input source (picture) to VIDEO or S-VIDEO when you connect two pieces of equipment.
(The S-VIDEO connection provides more vivid color and higher resolution compared to the VIDEO connection.)
•You can output the sound of only one component through the unit speaker even when two components are connected.
When connecting two external units, the audio from either one of these units can be output from the speaker of this device. Audio can be
turned on and off for video related input (video, S-video) from the menu or RGB (or YCbCr) input. (see page 28)
Connection to the VIDEO jack of the unit
VCR/DVD player/laser disc player, etc.
(L) (R)
White Red Yellow
Audio cable (accessory)
Audio adaptor (accessory)
Rear panel jacks of this device
AUDIO MOUSE RGB
Connection to the S-VIDEO jack of the unit
VCR/DVD player/laser disc player, etc.
/
YCbCr
To video out jack
To audio out jack
Video cable (accessory)
VIDEOS-VIDEO
Audio cable (accessory)
Audio adaptor (accessory)
Rear panel jacks of this device
(L)
White
AUDIO MOUSE RGB
E – 10
(R)
Red Yellow
/
YCbCr
To S-video out jack
To audio out jack
S-video cable (accessory)
VIDEOS-VIDEO
Page 13

Connecting Video Equipment With Component Video Signal (YCbCr) Output
•Video equipment with component video signal (YCbCr) output can be connected to this projector by setting the RGB/YCbCr connector to
YCbCr (see page 27) from the menu.
Connection to the RGB/YCbCr connector
DVD player
(Cb)
(L)
White
(R)
(Y)
Red
Green Blue Red
(Cr)
To audio out jack
Audio adaptor (accessory)
Audio cable (accessory)
To component video (YCbCr) OUT jack
Component cable (option)
(Order code: 28-690)
Jacks: RCA × 3 mini D-Sub 15-pin
Rear panel jacks of this device
AUDIO MOUSE RGB
/
YCbCr
E – 11
VIDEOS-VIDEO
Plug in the connection cable
and tighten the screws.
Page 14

Connecting a PC or Macintosh
This projector can be used as a display for numerous applications by connecting the analog RGB output connector of a PC to the RGB/YCbCr
jack of this projector and setting the RGB/YCbCr connector to RGB (see page 27).
• Either read the instruction manual or contact the manufacturer concerning the method used to set your PC.
●● IBM PC/AT compatible
●● Macintosh mini D-sub 15-pin monitor output
connector.
To headphone jack
Audio cable (accessory)
Rear panel jacks of this device
AUDIO MOUSE RGB
/
YCbCr
Mini D-Sub 15-pin connector
RGB cable (accessory)
VIDEOS-VIDEO
Plug in the connection cable
and tighten the screws.
E – 12
Page 15

Changing the computer’s video
resolutions
Notebook computers and resolution
standards
Depending on your computer's graphics capability, you may be
able to select one of several resolutions. Generally a computereither a PC or Macintosh- with 1 MB VRAM will generally run:
640 × 480 at 16.7 million colors (24 bit true color)
800 × 600 at 65,000 colors.
1024 × 768 at 256 colors.
As the resolution increases, the number of colors you can run
decreases. With 2 MB VRAM a computer will generally run:
640 × 480 at 16.7 million colors (24 bit true color).
800 × 600 at 16.7 million colors (24 bit true color).
1024 × 768 at 65,000 colors.
1280 × 1024 at 256 colors.
Windows 98/Windows 95
There are two methods you can use to change your resolution.
Method 1
1Move your cursor to the background image and R-click.
2 In the “Properties” menu, select “Settings.”
3 Change your resolution and click “OK.”
4You may be asked to reboot for the changes to take effect,
or a message may appear saying that “Windows is about
to resize your display.” You’ll be asked if you want to
keep your settings. Select “Yes.”
Method 2
1 Click on your “My Computer” icon.
2 Open “Control Panel” and select “Display.”
3 Change your resolution and click “OK.” after the new
resolution is selected.
4You may be asked to reboot for the changes to take effect,
or a message may appear saying that “Windows is about
to resize your display.” You’ll be asked if you want to
keep your settings. Select “Yes.”
Windows 3.1
1 Click on the “Main” icon and open “Control Panel.”
2 Select “Change System Settings” and click on “Option.”
3 Choose “Change Display Settings.”
4 Select the resolution you want.
5 Choose the current or desired drive.
6 Restart Windows for the changes to take effect.
Macintosh
1 Under the Apple menu, select “Control Panels” and open
“Monitors.”
2 Click and open “Options.”
3 Select your new resolution and click “OK.”
(U3-1100WZ, U3-1100W, U3-1100SF)
The unit is designed to project industry standardized video such as
VESA (Video Electronics Standards Association) or XGA
(eXtended Graphics Array). Notebook computers do not use industry standards. They use whatever timing is necessary to match their
local LCD display. The end result is typically not standard. By
turning off your notebook's display, the timing parameters are a bit
more like the real VESA or XGA signal.
(U3-810WZ, U3-810W, U3-810SF)
The unit is designed to project industry standardized video such as
VESA (Video Electronics Standards Association) or VGA (Video
Graphics Array). Notebook computers do not use industry standards. They use whatever timing is necessary to match their local
LCD display. The end result is typically not standard. By turning off
your notebook display, the timing parameters are a bit more like the
real VESA or VGA signal.
Outputting Notebook Type Personal
Computer External Output Signals
When a notebook type personal computer is connected for use in
projecting, a certain amount of knowledge is necessary for cable
connection, startup and the succeeding operations. Please refer to
the instruction manual of your notebook type personal computer
when performing the following operations.
1. Make sure that this device is receiving signals
from your notebook type personal computer.
The external signal may not be output even though the LCD
screen of the notebook type personal computer indicates such
output. Check by using the INFORMATION menu displayed
by this device (page 20, 21).
If 0kHz is displayed, there is no external output signal from the
personal computer.
2. If the notebook type personal computer is not
outputting the external signal, perform the following operation.
For IBM PC/AT machines, press either the [Fn] key or one of
the [F1] - [F12] keys.
Note
When displayed on the LCD screen of a notebook type personal
computer and this device at the same time, the projected video
may not be correct even the LCD screen display is normal. In
such case, turn off the notebook type personal computer display
and try using only the external output mode. (In some cases,
external output only can be set by performing step 2 above or by
closing the LCD panel.)
E – 13
Page 16

Operation
C
O
L
O
R
B
/ W
POWER STATU
POWER SO
T
Using the unit
Before Using
Open the sliding lens cap.
1 Connect the power cable.
The POWER indicator will light amber, the exhaust fan will operate at slow speed and the
standby status will be activated.
Lights in amber
(Standby)
R
O
L
O
C
W
/
B
IO
D
U
A
Power cable
(supplied)
RGB / YCbCr
MOUSE
S VIDEO
O
T
U
A
S
U
T
E
A
C
T
R
S
U
O
S
R
E
W
R
O
E
P
W
O
P
VIDEO
1
To wall
outlet
2
2 Press POWER on the remote control, or
POWER on top of the unit, to turn on the
unit.
The POWER indicator on top of the unit turns to
green and starts flashing.
It takes one minute for the unit to be ready for use.
Wait until the indicator stops flashing and lights
steadily in green.
3 Turn on the connected source (computer,
VCR, DVD player, etc.).
If you use a video component, start playback for
screen/image adjustment.
4 Select the input by pressing either the
VIDEO or RGB button of the remote control, or the SOURCE button of this device
(refer to page 16).
MOUSE POWER
VIDEO
MENU
RGB
CANCEL
Notes
• If the blue or black screen (the background type differs
depending on the “BACKGROUND” setting. See page 28.)
is projected, check the following:
– Is the source properly connected to the unit?
– Is the source component or computer turned on?
– Are the video signals coming to the unit?
• The video resolution of the connected computer can be
changed. See page 13.
SOURCE
5 Adjust the position and height of the unit.
Move the unit to the position where the projected
image is horizontally centered to the screen.
• When the projected image is offset
horizontally
Adjust the position of the unit so that the unit is
square to the screen.
View from the top
Screen
MOUSE POWER
VIDEO
MENU
RGB
CANCEL
Green light flashes
(About one minute)
↓
Then lights steadily
POWER S
POWER
in green
Note
While the POWER indicator is flashing, the unit doesn’t turn
off even if you press POWER on the remote control, or
POWER on the unit.
E – 14
• When the projected image is offset ver-
tically
Adjust the height balance of the unit with the
adjusters. See next page.
Side view
Screen
(Continued on next page.)
Page 17

Adjuster Adjustment
O
O
P
EN
There are two adjusters: one on the right side of the back panel
and another in the front center of the main unit.
To raise the projection position:
1Use right hands to lift the front of the main unit to approxi-
mately the desired adjustment angle.
2Press the adjuster button on the front.
Loosen the adjuster legs and allow them to drop into position.
3Release the button.
The extended adjuster legs will be locked.
4Rotate the contact surfaces of the rear adjuster either clock-
wise or counterclockwise to accurately adjust the level.
2
1
3
Up
4
Down
The top and bottom of the projected image is
corrected, as shown below.
If a menu is being displayed, distortion of the
menu will not be corrected.
7
[U3-1100W, U3-1100SF, U3-810W, U3-810SF]
Adjust the image size to match the distance to the screen.
Next, use the focus ring to adjust the focus.
Focus ring
C
Up
Down
To lower the projection position:
Preparation: Lower the front adjuster.
1Raise the adjusting foot. If the image is too low, raise the
front adjuster to move up it.
2Rotate the contact surfaces of the rear adjuster either clock-
wise or counterclockwise to accurately adjust the level.
Down
2
1
AUDIO
MOUSE
RGB / YCbCr
S VIDEO
VIDEO
Up
6 When distortion of the projected image
cannot be corrected with the adjusters,
press the KEYSTONE +/– buttons of the
remote control to fine adjust (see page
18).
Using KEYSTONE to adjust projected image
distortion.
ZOOM VOLUMEKEYSTONE
Note
Maximum correction is 14 degrees (including optical correction).
[U3- 1100WZ, U3- 810WZ]
Adjust the image size to match the distance to the screen.
Use the zoom ring to adjust the image size. Next, use the
focus ring to adjust the focus.
Zoom ring
Focus ring
8 Change the unit setting to suit the
method and source selected in step 4.
• Select the “PROJECTION” appropriate
for the type of projector installation.
(See page 29)
If the image is projected reversed, vertically, or
horizontally, reset “PROJECTION”.
• In the case of video or S-video, select
the color system as necessary. (See
page 26)
Normally, it is not necessary to change the
factory settings. Also, set the RGB/YCbCr connector for component video (YCbCr). (See
page 27)
• In the case of RGB input, adjust the
video of the connected PC.
This projector automatically identifies the input
signal and selects the most appropriate resolution.
However, manually adjust the “PICTURE ADJ”
and “FINE PICTURE” (see page 24) when there
is flicker, noise, color offset, etc., and manually
adjust the vertical and horizontal position (see
page 24) when the image is not centered.
You can also choose to project the image at the
original size of the incoming signal resolution.
(see page 27). (Normally, the resolution is automatically sensed and the display is enlarged
or reduced.)
E – 15
(Continued on the next page.)
Page 18

T
Using the unit
Using the Remote Control
(continued)
9 Adjust the picture elements (see page
22), then select the picture type
according to the video content (see page
26).
10
Start using the unit.
The following functions are available while using
the unit:
• Adjusting the volume of the unit's speaker
(see pages 18 and 28),
•Turning off the image and muting the sound
temporarily (see page 18),
• Freezing a moving picture (see page 18),
• Enlarging the picture (see page 19A)
Note
• When there is no signal input for a period of 5 min. or more,
the power is automatically turned off and standby status is
activated. (see page 29)
After using the unit
(Input Selection)
MOUSE POWER
MENU
VIDEO button RGB button
VIDEO
CANCEL
RGB
Operating from the main unit
Inputs can be selected not only by operating the remote
control but also by using the main unit SOURCE button.
POWER STATUS
POWER SOURCE AUTO
SOURCE button
1 Press the VIDEO button.
The video signal (VIDEO, S-VIDEO) connected
to the input jack of this device will be detected
and projected automatically. If a video signal is
not detected, the message NO SIGNAL will be
displayed.
VIDEO
1 Press the POWER button of the remote
control or the POWER button of the main
unit for a few seconds.
The power will turn off and the POWER indicator
will blink amber for 1 min., then the standby
status will be activated. (The exhaust fan will
continue to run for a while for cooling purposes.)
Do not unplug the power cord while the indicator is blinking.
MOUSE POWER
VIDEO
Note
• The POWER switches of the remote control and main unit
will not operate until the blinking stops.
• After the standby status is activated, wait 1 min. or more
before turning the power on again. The power will not turn
on until the 1 min. interval has elapsed.
• The exhaust fan will continue to run even in standby status.
MENU
RGB
CANCEL
POWER S
POWER
Blinks amber
(1 min.)
↓
Lights amber
2 Press the RGB button.
The analog RGB signal connected to the input
connector of this device will be detected and
projected automatically.
(Component video will be detected if the RGB/
YCbCr connector is set (page 27) to YCbCr.) If a
video signal is not detected, the message NO
SIGNAL will be displayed.
RGB
Note
• All video signals input to this device will be detected if Auto
Source (page 29) is set.
3 Press the SOURCE button.
The video signal (RGB or YCbCr, VIDEO, SVIDEO) connected to the input jack of this device
will automatically be detected and projected. If a
video signal is not detected, the message NO
SIGNAL will be displayed.
SOURCE
2 Disconnect the power cord.
The POWER indicator will turn off.
The signals are sensed repeatedly in the sequence shown below.
→ RGB/YCbCr
S-VIDEO ← VIDEO
Note
• When Auto Source (see page 29) is set to ON, all signals
input to this projector will be sensed.
E – 16
Page 19

Using the Remote Control as the PC Mouse
The remote control of this projector can be used as the PC mouse (wireless mouse function) by connecting the MOUSE connector of this
projector and the PC.
Remote control mouse functions
• When the MOUSE button on the remote control is pressed, the button is lit in red.
This red light shows that the cursor key on the remote control operates the computer mouse
function.
When the MOUSE button is pressed again, the button's light goes off. In this condition the cursor
key operates the projector cursor function.
MOUSE button
• If a computer running Windows is connected, the ENTER button on the remote control operates
as the computer mouse left click button and the CANCEL button as the computer mouse right
click button.
• If a Macintosh computer is connected, the ENTER and CANCEL buttons operate in the same way as the computer mouse click button.
Connecting a PC and the MOUSE connector of this projector
Before connecting a PC
• Before connecting, turn off the PC power. Turn off the power of this projector if it is on.
• When connection is completed, turn on the power of this projector and then start the PC.
MOUSE POWER
MENU
VIDEO
CANCEL
RGB
USB Port Connection
Connect the supplied USB mouse cable directly to the USB
port (universal serial bus) of the personal computer, as
shown in the diagram.
MOUSE connector
IBM PS/2 Mouse Port Connection
Connect the supplied PS/2 mouse cable to the personal
computer, as shown in the diagram.
Personal computer
USB port
USB mouse cable (accessory)
AUDIO MOUSE RGB
/
YCbCr
VIDEOS-VIDEO
PS/2 mouse cable (accessory)
To PS/2 MOUSE
port
IBM PC/AT or
Macintosh
IBM PS/2 compatible
Note
• Depending on the personal computer, the mouse may not be recognized in some cases if not connected to the MOUSE connector before the personal
computer power is turned on.
• In the case of some notebook and laptop type personal computers, it may not be possible to use the standard pointing device (track ball, etc.) of the
personal computer when connected to the MOUSE connector. In such case, it will not be possible to use the pointing device until the personal
computer is rebooted, even if disconnected from the MOUSE connector.
E – 17
Page 20

Various functions while using the unit
The following operations can be performed by opening the FLIP COVER of the remote control.
FREEZE button
AUTO button
ZOOM +/– button
Automatic Screen Adjustment
Press the AUTO button.
AUTO
The position and size of the input image will be
adjusted automatically in accordance with the
resolution.
Note
Operation is the same as with the AUTO button of the main unit.
Freezing animated images
You can capture the desired frame of a moving picture.
Press FREEZE button.
A still image of the current frame is displayed. To
restore the present picture, press the button
again.
AUTO FREEZE MUTE
ZOOM VOLUMEKEYSTONE
MUTE button
VOLUME +/– button
KEYSTONE +/– button
Adjusting the Volume
Adjusting the volume of the unit's speaker.
Press VOLUME + to increase the volume
or – to decrease.
VOLUME
KEYSTONE Adjustment
When distortion of the projected image
cannot be compensated with the adjusters, press the KEYSTONE +/– button to
adjust accurately.
KEYSTONE
FREEZE
Tip
The still picture can also be enlarged (see page 19A).
Turning off the image and muting the
sound temporarily
Press MUTE button.
The image turns off and the sound is muted at the
same time. To restore the picture and sound,
press the button again.
MUTE
Using KEYSTONE button to adjust the top and
bottom of a projected image.
The top and bottom of the projected will be compensated, as
shown in the diagram. If the menu is displayed, distortion of
the menu itself will not be compensated.
Note
When keystone adjustment is used, whether or not the aspect
ratio of the image is to be maintained can be set from the menu
(see page 28).
E – 18
Page 21

To move to the desired portion of the
enlarged picture
Cursor key
ZOOM +/– button
The ZOOM +/- buttons are used
for the digital zoom function
which allows you to enlarge a
portion of the image.
To adjust the image size, enlarge
the image manually by using the
zoom ring. (available on U3810WZ and U3-1100WZ only)
MOUSE POWER
MENU
VIDEO
ZOOM VOLUMEKEYSTONE
CANCEL
AUTO FREEZE MUTE
RGB
Enlarging the picture
You can enlarge the picture up to ten times the original
size.
Press ZOOM + button.
While the button is pressed the picture is enlarged until it becomes ten times the original size.
Release the button at the desired size.
ZOOM
Original size
Ten times as large as
the original size
Press the desired portion of the cursor
key.
The available directions are indicated by the four
large triangle marks on the cursor key. The picture will move in the direction of the mark you are
pressing.
Move upward
Move leftward
Move downward
Note
Less than the original size of the picture cannot be moved
because the whole image is fully displayed.
Move rightward
Note
The quality of the enlarged picture deteriorates compared to
the original size picture.
Screen Reduction
Press ZOOM – button. When this button is
released, the screen will return to 90%
reduction.
ZOOM
Enlarged screen Standard screen
E – 19
90% reduction
screen
A
Page 22

Use as a High-Brightness Monochrome Projector
In monochrome mode, data that is largely black and white such as documents and spreadsheets can
be projected at double the brightness as compared to color projection.
Switching between monochrome and color images is possible even while projecting.
“COLOR” “B/W” switch
(Only on the U3-1100WZ, U3-1100W, U3-810WZ,
and U3-810W)
R
OLO
C
B / W
R
E
W
O
P
S VIDEO
RGB / YCbCr
MOUSE
AUDIO
Slide the “COLOR” “B/W” switch to
either the COLOR side or the B/W
side.
O
T
U
A
S
U
T
E
A
C
T
R
S
U
O
S
R
E
W
O
P
VIDEO
COLOR Side
Provides a color image.
B/W Side
Provides a high-brightness monochrome
image.
B / W
B / W
COLOR
COLOR
E – 19B
E – 20
Page 23

Menu operation
Menu Structure
The numerals in parentheses ( ) are reference page numbers.
The normal menu will be
displayed when the MENU
button is pressed with the
remote control FLIP COVER
closed.
MENU button
MOUSE POWER
MENU
VIDEO
RGB
CANCEL
PLUS
Normal menu
For VIDEO, S-VIDEO and component video (YCbCr) input
(22)
(22)
(22)
(22)
(22)
(25)
(25)
The advanced menu will be
displayed when the MENU
button is pressed with the
remote control FLIP COVER
open.
MENU button
MOUSE POWER
MENU
VIDEO
RGB
CANCEL
AUTO FREEZE MUTE
ZOOM VOLUMEKEYSTONE
Advanced menu
For VIDEO, S-VIDEO and component video (YCbCr) input
Common menu
(26)
(26)
(26)
(26)
(27)
(27)
(27)
(28)
(28)
(28)
(28)
(29)
(29)
(29)
Å
ı
Common menu
E – 20
(30)
(30)
(30)
(30)
(30)
Ç
Page 24

Normal menu
RGB input
(22)
(22)
(24)
(24)
(24)
(25)
(25)
Advanced menu
• The Advanced menu cannot be used unless the FLIP COVER of the supplied remote control is open.
RGB input
(26)
(26)
(27)
(27)
(27)
(28)
(28)
Å
ı
(26)
(26)
(26)
(29)
Ç
E – 21
(30)
Page 25

Adjusting the picture elements
The picture elements such as brightness, contrast, white
balance, and so on can be adjusted individually for each
input source. The adjustable items vary depending on the
input source.
(The elements marked with “ ” are adjustable.)
Input source
BRIGHTNESS
CONTRAST
COLOR –
TINT ––
SHARPNESS
The elements marked with " " are adjustable.
The element marked with " " is adjustable for NTSC and
NTSC4.43 only.
The elements marked with "-" are not adjustable.
VIDEO/S-VIDEO CONPONENT VIDEO RGB
––
1 Select the input source (see page 16)
2 Press the MENU button to display the
menu, hold down the cursor 왗 / 왘 keys or
the MENU button and then select “IMAGE”.
3 Press the cursor 왖 / 왔 keys to select
“BRIGHTNESS”.
The items that appear in the menu will differ
depending on the input.
4 Press the cursor 왗 / 왘 keys to adjust the
brightness.
5 Press the cursor 왖 / 왔 keys to select
“CONTRAST”.
6 Press the cursor 왗 / 왘 keys to adjust the
contrast.
Some elements are not adjustable for Video, SVideo and Component (YCbCr) signal in the
procedures from Step 7.
Elements that are not adjustable are not displayed.
7 Press the cursor 왖 / 왔 keys to select
“COLOR”.
8 Press the cursor 왗 / 왘 keys to adjust the
color.
9 Press the cursor 왖 / 왔 keys to select
“TINT”.
Note
This adjustment is not possible with color systems other than
NTSC and NTSC4.43.
10
Press the cursor 왗 / 왘 keys to adjust the
tint.
11
Press the cursor 왖 / 왔 keys to select
“SHARPNESS”.
Note
This adjustment is not possible with YCbCr signal.
12
Press the cursor 왗 / 왘 keys to adjust the
sharpness.
E – 22
To select other menu names
Press the MENU button. The cursor
will disappear and the menu selection
screen will be displayed.
To close the menu
Press the CANCEL button.
Page 26

Adjusting the projected image from the computer
The unit selects the most suitable resolutions as shown in the “Timing Chart” below according to the incoming signals from the RGB/YCbCr
connector. However, you may need manual adjustment depending on the computer. If you have any vertical banding, noise, dot interference,
or crosstalk on the projected picture, adjust the clock frequency with “PICTURE ADJ” then the clock phase with “FINE PICTURE” (see page
24). You can also adjust the horizontal and vertical position of the image (see page 24).
When adjusting manually, you can choose to project the image at the original size of the incoming signal resolution (see page 27). (Normally,
the image is enlarged or reduced to the most suitable size automatically.)
Timing Chart
Resolution H Sync. (kHz) V Sync. (Hz)
IBM PC/AT compatible machine 640 × 350 31.5 70.1
640 × 350 37.9 85.1
720 × 350 31.5 70.0
640 × 400 31.5 70.1
640 × 400 37.9 85.1
720 × 400 31.5 70.0
720 × 400 37.9 85.0
640 × 480 31.5 60.0
640 × 480 37.9 72.8
640 × 480 37.5 75.0
640 × 480 43.3 85.0
800 × 600 35.2 56.3
800 × 600 37.9 60.3
800 × 600 46.9 75.0
800 × 600 48.1 72.2
800 × 600 53.7 85.1
1024 × 768 48.4 60.0
1024 × 768 56.5 70.1
1024 × 768 58.1 72.0
1024 × 768 60.0 75.0
1024 × 768 68.7 85.0
1280 × 1024 64.0 60.0
1280 × 1024 80.0 75.0
1280 × 1024 91.1 85.0
Apple Macintosh 640 × 480 35.0 66.7
832 × 624 49.7 74.5
1024 × 768 60.2 74.9
1152 × 870 68.7 75.6
1280 × 1024 81.1 76.1
Sun 1152 × 900 61.8 66.0
1280 × 1024 81.1 76.1
SGI 1024 × 768 49.7 60.4
1280 × 1024 63.9 60.0
1152 × 900 71.7 76.1
HP 1280 × 1024 78.1 72.0
(U3-1100WZ, U3-1100W, U3-1100SF)
The resolution of the unit is 1024 × 768. Other resolution images (e.g. 1280 × 1024) are compressed into 1024 × 768. In such a case, projected letters
and lines might appear unevenly.
(U3-810WZ, U3-810W, U3-810SF)
The resolution of the unit is 800 × 600. Other resolution images (e.g. 1024 × 768) are compressed into 800 × 600. In such a case, projected letters
and lines might appear unevenly.
E – 23
Page 27

Manual Adjustment of Personal Computer Images
Adjusting Clock Frequency and Phase
1 Select RGB as the input (page 16).
2 Press the MENU button to display the
main menu and then press the cursor 왗 /
왘 keys to select the “IMAGE”.
3 Press the cursor 왖 / 왔 keys to select the
“PICTURE ADJ”.
4 Press the cursor 왗 / 왘 keys and adjust the
image width in relation to the screen.
Adjustment is performed in dot units. Adjust to
the position where vertical flicker disappears.
5 Press the cursor 왖 / 왔 keys and select
“FINE PICTURE”.
6 Press the cursor 왗 / 왘 keys and adjust to
minimize image noise, flicker, color variations, etc.
Adjusting the position of the image
If the image is offset up, down, left or right, adjust the
vertical and horizontal position.
1 Perform steps 1 - 6 for Adjusting the
Clock Frequency and Phase on this page.
2 Press the cursor 왖 / 왔 keys and select
“POSITION”.
3 Press the cursor 왖 / 왔, 왗 / 왘 keys and
adjust the horizontal and vertical position.
Reconnecting a separate personal computer or
other device to the RGB jack
Either press the AUTO button on the main unit or open the FLIP
COVER of the remote control and press the AUTO button there.
If no images appear during setting
Use the following procedure when no images appear during setting
because the clock frequency or phase is grossly inaccurate.
1Turn off the power of all devices connected.
The input signal will stop and either a blue or black background
(This depends on the Background setting. page 28) will be
projected.
2 Perform a reset (page 25).
3 Readjust the picture ADJ and fine picture
E – 24
To select other menu names
Press the MENU button. The cursor
will disappear and the menu selection
screen will be displayed.
To close the menu
Press the CANCEL button.
Page 28

Resetting the Lamp
Resetting
Resetting
All items can be reset to the standard settings except as
follows.
• Lamp usage time
• KEYSTONE adjustment values (including the KEY-
STONE setting value: page 28).
• SOURCE CHANGE
1 Press the remote control MENU button to
display the normal menu and then press
the cursor 왗 / 왘 keys to select “INFORMATION”.
2 When the INFORMATION menu appears,
press the cursor 왖 / 왔 keys select “RESET”, then press the ENTER button.
3 If the ENTER button is not used during
reset, press the CANCEL button.
Hours of Usage
Resetting the time the hours of lamp
usage
When the lamp is replaced (page 33), it is necessary to set
the lamp hours of usage from the menu.
1 Press the remote control MENU button,
use the cursor 왗 / 왘 keys to display the
“INFORMATION” menu and set the lamp
hours of usage.
2 Display the INFORMATION menu, use the
cursor 왖 / 왔 keys to select “LAMP USAGE
HOURS RESET” and then press the ENTER button.
3 If the ENTER button is not used during
reset, press the CANCEL button.
When the power will not turn on because
the lamp usage hours of has exceeded
1100 hours
The power will not turn on when the lamp hours of usage
has exceeded 1100 hours. The status light will be on
continually (page 32). Thus, the menu cannot be displayed.
In such case, replace the lamp housing, then use the
following procedure to reset.
1 Connect the power cord (page 14).
Standby status will be activated.
2 Press the SOURCE and AUTO buttons of
the main unit at the same time for 5 sec. or
more.
The lamp hours of usage will be reset. After
resetting, the Status indicator (page 32) that
turned on because 1100 hours had been exceeded will turn off.
E – 25
To select other menu names
Press the MENU button. The cursor
will disappear and the menu selection
screen will be displayed.
To close the menu
Press the CANCEL button.
Page 29

Setting Narrow Images (Advanced Menu)
Set the colors as desired in accordance
with the image contents.
Subtle color settings are possible, as desired. Setting is
possible for each input.
1 Select the image to be input (page 16).
2 With the FLIP COVER of the remote con-
trol open, press the MENU button to display the Advanced menu, then use the
cursor 왗 / 왘 keys to select “COLOR”.
3 Use the cursor 왖 / 왔 keys to select
“GAMMA”.
4 Use the cursor 왗 / 왘 keys to set the
“GAMMA”.
The following can be selected.
● Normal ● Natural ● Real ● Custom
Normal is standard settings; Natural stresses
coloring; Real stresses (brightness). Custom is
used to adjust freely as desired.
Setting the Cinema Mode
This is the setting for enjoying video in a dark or light
room.
This feature emphasizes the White which is available on
Video and S-Video input.
1 With the FLIP COVER of the remote con-
trol open, press the MENU button to display the Advanced menu, then use the
cursor 왗 / 왘 keys to select “COLOR”.
2 Use the cursor 왖 / 왔 keys to select “CIN-
EMA”.
3 Use the cursor 왗 / 왘 keys to set the
“CINEMA”.
The following can be selected.
"ON" is for a darkened room. Color around white
portion is natural and smooth.
"OFF" is for a bright-lit room. White is empha-
sized.
5 Use the cursor 왗 / 왘 keys to select “CUS-
TOM”, press the ENTER button to display
the sub-menu and then set the gamma
value. There are 31 index values.
Adjusting Color Balance
Color balance (white balance) can be set for each input.
1 Select the image to be input (page 16).
2 With the FLIP COVER of the remote con-
trol open, press the MENU button to display the Advanced menu, then use the
cursor 왗 / 왘 keys to select “COLOR”.
3 Use the cursor 왖 / 왔 keys to select
“COLOR TEMP”.
4 Use the cursor 왗 / 왘 keys to select the
“COLOR TEMP”.
Four different types of color balance can be set
beforehand: Low, Medium, Standard and High.
When the ENTER button is pressed, the
sub-menu will be displayed to enable fine
adjustment.
Selecting the Color System
The following color systems can be used with this device.
● NTSC 3.58 ● NTSC 4.43
● PAL ● PAL-M ● PAL-N ● PAL60
● SECAM
Only NTSC 3.58 and PAL can be used for component
video.
Selection is automatic when AUTO is used.
1 Select an input for the color system to be
selected (page 16).
2 With the FLIP COVER of the remote con-
trol open, press the MENU button to display the Advanced menu, then use the
cursor 왗 / 왘 keys to select “COLOR”.
3 Use the cursor 왖 / 왔 keys to select
“COLOR SYSTEM” and then press the
ENTER button.
4 Use the cursor 왖 / 왔 keys to select the
color system and then press the ENTER
button.
To select other menu names
Press the MENU button. The cursor will disappear and the menu
selection screen will be displayed.
To close the menu
Press the CANCEL button.
E – 26
Page 30

Setting in Accordance With Image Contents
Setting the RGB/YCbCr connector
The RGB/YCbCr connector can be switched and used as
the component video signal (YCbCr) input connector.
1 With the FLIP COVER of the remote con-
trol open, press the MENU button to display the Advanced menu, then use the
cursor 왗 / 왘 keys to select “COLOR”.
2 Use the cursor 왖 / 왔 keys to select
“SOURCE CHANGE”.
3 Use the cursor 왗 / 왘 keys to set the
“SOURCE CHANGE”.
The following can be selected.
● RGB ● YCbCr
When component video (YCbCr) input is used,
use the optional component video cable.
Setting the Display Frame
The display frame can be set individually for each input.
1 Select the input for image selection (page
16).
2 With the FLIP COVER of the remote con-
trol open, press the MENU button to display the Advanced menu, then use the
cursor 왗 / 왘 keys to select “VIEW”.
3 Display the frame, then use the cursor 왖
/ 왔 keys to select “ASPECT”.
4 Use the cursor 왗 / 왘 keys to set the
“ASPECT” ratio.
Any of the following four different settings can be
selected for images.
●REAL (input signal projection without pixel replacement)
●AUTO (projection after automatic input signal
zoom in/zoom out)
●DIRECT (the original aspect ratio of the image
is maintained at all times)
●4:3 → 16:9 (4:3 aspect ratio images are pro-
jected after conversion to 16:9 aspect ratio)
Setting Filter
This is used to set the sharpness during pixel conversion
(image compression/enlargement).
1 With the FLIP COVER of the remote con-
trol open, press the MENU button to display the Advanced menu, then use the
cursor 왗 / 왘 keys to select “VIEW”.
2 Display the frame, then use the cursor 왖
/ 왔 keys to select “FILTER”.
3 Use the cursor 왗 / 왘 keys to set the
sharpness.
To select other menu names
Press the MENU button. The cursor
will disappear and the menu selection
screen will be displayed.
E – 27
To close the menu
Press the CANCEL button.
Page 31

Setting in Accordance With
Image Contents (continued)
Setting Keystone
This is used to set the height for keystone adjustment.
Initial Settings
Audio Muting
Audio only can be muted for each input.
This function is convenient when multiple video units are
connected to this projector.
1 With the FLIP COVER of the remote con-
trol open, press the MENU button to display the Advanced menu, then use the
cursor 왗 / 왘 keys to select “VIEW”.
1 Select the input to be muted (page 16).
2 With the FLIP COVER of the remote con-
2 Display the frame, then use the cursor 왖
/ 왔 keys to select “KEYSTONE”.
3 Use the cursor 왗 / 왘 keys to select “NOR-
MAL” or “FULL”.
●Normal: normal keystone correction
3 Use the cursor 왖 / 왔 keys to select
Selecting the Background
Two different backgrounds can be selected for projection
when there is no signal input.
trol open, press the MENU button to display the Advanced menu, then use the
cursor 왗 / 왘 keys to select “SETUP”.
“SOUND MUTE”, then use the cursor 왗 /
왘 keys to set muting to ON or OFF.
●Full: In this mode, the image is enlarged to fill
the screen vertically and then Keystone correction is performed.
Setting the partial display position
Input a signal that is rated SXGA (XGA for the U3-810WZ,
U3-810W, U3-810SF) to RGB/YCbCr connector and then set
the partial display position with ASPECT (described later) set
to Real.
1 With the FLIP COVER of the remote con-
trol open, press the MENU button to display the Advanced menu, then use the
cursor 왗 / 왘 keys to select “VIEW”.
2 Display the frame, use the cursor 왖 / 왔
keys to select “PAN” and then press the
ENTER button.
3 Use the cursor 왖 / 왔, 왗 / 왘 keys to set the
display position.
1 With the FLIP COVER of the remote con-
trol open, press the MENU button to display the Advanced menu, then use the
cursor 왗 / 왘 keys to select “SETUP”.
2 Use the cursor 왖 / 왔 keys to select
“BACKGROUND”.
3 Use the cursor 왗 / 왘 keys to select one of
the following backgrounds.
● Blue ● Black
Auto Gain
Brightness and contrast are adjusted automatically.
1 Select the input to be set for auto gain
(page 16).
2 With the FLIP COVER of the remote con-
trol open, press the MENU button to display the Advanced menu, then use the
cursor 왗 / 왘 keys to select “SETUP”.
3 Use the cursor 왖 / 왔 key to select “AUTO
GAIN”, then use the cursor 왗 / 왘 keys to
set ON or OFF.
To select other menu names
Press the MENU button. The cursor will disappear and the menu
selection screen will be displayed.
To close the menu
Press the CANCEL button.
E – 28
Page 32

Auto Source Settings
Using the Power Saving Function
Automatically Searching The Input Signal
1 With the FLIP COVER of the remote con-
trol open, press the MENU button to display the Advanced menu, then use the
cursor 왗 / 왘 keys to select “SETUP”.
2 Use the cursor 왖 / 왔 keys to select “AUTO
SOURCE”, then use the cursor 왗 / 왘 keys
to set ON or OFF.
ON: All input signals are searched.
OFF: Remote control VIDEO button:
Video and S-video are searched.
Remote control RGB button:
RGB and YCbCr signals are searched.
Main unit SOURCE button:
All input signals are searched individually.
Selecting a Projection Type
If the projection type is not correctly set in accordance with the
installation conditions, images may be projected reversed, vertically, or horizontally.
When there is no signal input for a period of 5 min. or
more, the power is automatically turned off and standby
status is activated.
1 With the FLIP COVER of the remote con-
trol open, press the MENU button to display the Advanced menu, then use the
cursor 왗 / 왘 buttons to select “SETUP”.
2 When SETUP menu is displayed, use the
cursor 왖 / 왔 keys to select “AUTO
POWER OFF”.
3 Use the cursor 왗 / 왘 keys to set Power
Saving to ON or OFF.
1 With the FLIP COVER of the remote con-
trol open, press the MENU button to display the Advanced menu, then use the
cursor 왗 / 왘 keys to select “SETUP”.
2 When SETUP menu is displayed, use the
cursor 왖 / 왔 keys to select “PROJECTION”, then press the ENTER button.
3 Use the cursor 왖 / 왔 keys to select a
projection type in accordance with the
set conditions.
The setting items will change as shown below
each time a key is pressed.
Normal ⇔
⇔
Reversed vertically ⇔ Reversed horizontally
Reversed vertically+horizontally
⇔
To select other menu names
Press the MENU button. The cursor
will disappear and the menu selection
screen will be displayed.
E – 29
To close the menu
Press the CANCEL button.
Page 33

Setting the Menu
Selecting a Menu Language
Any one of eight different languages can be selected for
menu displays.
1 With the FLIP COVER of the remote con-
trol open, press the MENU button to display the Advanced menu, then use the
cursor 왗 / 왘 keys to select “OPTION”.
2 When OPTION menu is displayed, use the
cursor 왖 / 왔 keys to select “LANGUAGE”,
then press the ENTER button.
3 Use the cursor 왖 / 왔 keys to select one of
the following languages.
●English
●German
●French
●Italian
●Swedish
●Spanish
●Chinese
●Japanese
Setting the Menu Display Position
The menu display position can be set with this function.
Menu Viewing Settings
The menu viewing method can be set with this function.
1 With the FLIP COVER of the remote con-
trol open, press the MENU button to display the Advanced menu, then use the
cursor 왗 / 왘 keys to select “OPTION”.
2 When OPTION menu is displayed, use the
cursor 왖 / 왔 keys to select “MENU TYPE”.
3 Use the cursor 왗 / 왘 keys to select
“TRANSLUCENT” or “OPAQUE”.
Other Menu Settings
The time that the menu is displayed on the screen can be
set with this function.
1 With the FLIP COVER of the remote con-
trol open, press the MENU button to display the Advanced menu, then use the
cursor 왗 / 왘 keys to select “OPTION”.
2 When OPTION menu is displayed, use the
cursor 왖 / 왔 keys to select “DISPLAY
TIME”.
3 Use the cursor 왗 / 왘 keys to set a value
from 5 sec. to 30 sec.
1 With the FLIP COVER of the remote con-
trol open, press the MENU button to display the Advanced menu, then use the
cursor 왗 / 왘 keys to select “OPTION”.
2 When OPTION menu is displayed, use the
cursor 왖 / 왔 keys to select “MENU POSITION” and then press the ENTER button.
3 Use the cursor 왖 / 왔, 왗 / 왘 keys to set the
display position.
On-screen Display
This function is set to ON at the factory. When set to ON,
input will be projected onto the screen when the input is
switched with the remote control button. Also, the Input
menu will be displayed when the power is turned on to
indicate the selected input. In addition, status is displayed
on the menu bar when FREEZE, MUTE, ZOOM, KEYSTONE or VOLUME is set.
1 With the FLIP COVER of the remote con-
trol open, press the MENU button to display the Advanced menu, then use the
cursor 왗 / 왘 keys to select “OPTION”.
2 When OPTION menu is displayed, use the
cursor 왖 /왔 keys to select “ON SCREEN”.
3 Use the cursor 왗 / 왘 keys to set ON or
OFF.
To select other menu names
Press the MENU button. The cursor will disappear and the menu
selection screen will be displayed.
To close the menu
Press the CANCEL button.
E – 30
Page 34

Others
Troubleshooting
Please check the following before requesting repairs.
Symptom
The power will not turn on.
No image
Distorted images
Procedure
• Is the power plug connected to the power outlet?
• Is the lamp cover correctly installed?
• Is the internal temperature too high? A protective feature prevents the
power turning on when the internal temperature is too high.
• Has the lamp usage time exceeded 1100 hours? The power will not turn
on when 1100 hours have elapsed.
• Any high-tension noise to the power line with extremely high pulse can
stop the projector. If it happens, unplug the power cord from the outlet
once and then plug it again.
• Has the connected input been selected?
• Is the cable correctly connected to the input jack?
•Are the brightness and contrast set to minimum?
• Is the sliding lens cap closed?
• Is the lamp blown?
•Has the lamp usage time exceeded 1100 hours?
• If a notebook type computer is being used, was the computer power turned
on after the projector was connected? Is the computer set to disable output to the external RGB jack?
In many cases, when a notebook type computer is connected to the projector, a signal will not be output to the RGB OUT jack unless the computer power is turned on.
• Does the STATUS indicator blink?
• Is installation correct?
•Was the Keystone adjustment performed correctly?
Reference page
14
33
32
25, 32, 33
16, 18
10, 11, 12
22
14
33
25, 32, 33
12, 13
32
14
18, 28
Blurred images
Images are offset vertically or
horizontally and are not
correctly displayed
The remote control does not
work
The wireless mouse does not
work
The STATUS indicator blinks
• Is the lens properly focused?
•Are the screen and projector positioned at the correct angle?
• Does the projection distance place the screen outside the focus range?
• Is there condensation, dirt, etc., on the lens?
Condensation on the internal optical system is possible when the projector has been stored in a cool place and then is used in a warm place. In
such cases, wait several minutes for the condensation to evaporate.
• Correctly adjust the horizontal and vertical position of the screen.
• Is the clock frequency correctly adjusted?
•Are the resolution and frequency correct for the input signal? Check the
resolution of the personal computer.
• Does the send indicator (LED) light? If it does not light, the batteries are
exhausted. In such cases, replace with fresh batteries.
• Is there any obstacle between the remote control and the photoreceptor
of the main unit?
• Is the remote control being used outside its effective range?
• Is there a fluorescent light or other strong light source close to the photoreceptor?
• Is the MOUSE jack of the main unit and the personal computer correctly
connected?
•Was the personal computer started after being connected to the MOUSE
jack of the main unit?
• Check the STATUS indicator list.
15
14
9
—
24
24
23
5, 8
5
5
—
17
17
32
Flickering text or offset colors
with RGB input
There is no color
• Manually adjust the clock frequency and phase.
•Press the AUTO button.
• Set the “COLOR” “B/W” switch to the COLOR side.
(Only on the U3-1100WZ, U3-1100W, U3-810WZ, and U3-810W)
E – 31
24
19B
Page 35

When the STATUS indicator lights or flashes
STATUS indicator
POWER STATUS
POWER SOURCE AUTO
Status Light Messages
Condition
OFF
On Continually
Flashing Very Rapidly (On and off
in a cycle of 1 sec.)
Flashing Rapidly
(On and off in a cycle of 4 sec.)
Status
Normal
The lamp usage has exceeded 1000 hours of operation and should be replaced.
• The lamp cover is not correctly attached. Replace it correctly.
• The temperature protector has been triggered. If the room temperature is high,
move the unit to a cool location. If the temperature within the unit is high, check the
cooling fan ventilation slots and the ventilation slots on the bottom of the unit. If
any of the slots are blocked, remove whatever is blocking them.
• The temperature protector has been triggered. If you try to turn on the unit immediately after turning off, sometimes the power does not come on. If this happens, wait
at least one minute, then turn on the unit again.
• The lamp lighting voltage error detection protector has been triggered. Wait at
least one minute before turning on the unit again. If this does not solve the problem,
please contact your dealer.
Flashing Slowly (On and off in a
cycle of 8 sec.)
Flashing Very Slowly (On and off in
a cycle of 12 sec.)
The cooling fan has stopped. Contact your PLUS dealer for service.
The lamp is not turned on.
• The unit was turned on immediately after being turned off. Turn off the unit, wait at
least one minute, then turn on the unit again.
• The lamp is dead. Replace the lamp cartridge. (See page 33.)
E – 32
Page 36

Replacing the lamp cartridge
The rated lamp life is about 1,000 hours. The rated lamp life is the average
life of the lamps produced and tested (under the test conditions of our
company) for a long term, however, it may become shorter depending on
the conditions of usage.
After the lamp has been operating for 1000 hours or longer, the STATUS
indicator on the control panel will light and the “LAMP USAGE” icon
which shows hours of total lamp usage will be displayed on the screen.
When this happens, turn off the unit and replace the lamp cartridge with a
new one. The unit will not turn on after 1100 hours. (It will go off if it is in
use.)
CAUTION
• DO NOT TOUCH THE LAMP immediately after it has been
used. It will be extremely hot. Allow at least one hour for the
lamp to cool before handling.
• DO NOT LOOSEN ANY SCREWS except for those mentioned in the instructions below. There is danger of electric
shock.
Lamp cartridge replacement procedure
1 Disconnect the power cable.
Wait at least one hour for the lamp to cool.
2Turn the unit upside down carefully.
3 Loosen the lamp cover securing screw.
4 Remove the lamp cover.
Step 3
Step 4
Step 5
Step 6
Lamp Cover
Lamp cartridge
CAUTION: Do not use a lamp cartridge other than the PLUS
replacement lamp cartridge. Order this from your PLUS dealer
using the unit model number (see “Notes” below).
5 Loosen the three lamp cartridge securing screws.
(This unit has a safety switch.)
6 Hold the handle then pull the lamp cartridge upward to remove
it.
7 Install the new lamp cartridge.
8 Secure the lamp cartridge with the three screws.
9 Replace the lamp cover and secure it with the securing screw.
10 Return the unit to the normal position, connect the power cable,
and turn on the unit.
11 Reset “LAMP USAGE.” (See page 25).
Notes
• When the lamp usage time reaches 1100 hours, it becomes impossible
to switch on the power and menus are not displayed. In such a case,
see “If the unit doesn’t go on because lamp usage exceeds 1100
hours” on page 25.
• Obtain a replacement lamp cartridge at the store where the unit was
purchased. Please specify the following information when ordering a
replacement lamp cartridge:
– Model name : U3-130
– Product code : 28-390
Step 7
Step 8
Step 9
E – 33
Page 37

Specifications
Optical
TM
DMD
Lamp High Performance Compact Lamp 130W
Lens See below.
Image Size See below.
Projection Distance See below.
Light Output
Contrast Ratio 650 : 1
Electrical
Inputs Video (NTSC / PAL / PAL_M / PAL_N / PAL60 / SECAM / NTSC4.43)
Color Reproduction Full color, 16.7 million colors simultaneously.
Resolution
Power Requirement 100 to 120/220 to 240 V AC, 50/60 Hz
Power Consumption 180 watts
Input Current 1.8A / 1.0A
Mechanical
Dimensions Excluding Stand 23.0 cm (W)⳯4.8 cm (H)⳯17.7 cm (D) / 9.0 in.(W)⳯1.9 in.(H)⳯7.0 in.(D)
Weight Apploximately 1.5 kg / 3.3 lbs
Operational Temperatures Data projector: 5° to 35°C (41° to 95°F), 30 to 85% humidity
Regulations UL Approved (UL 1950, CSA 950)
Single Chip Digital Micro Device (DMDTM)
1024⳯768 dots (U3-1100WZ, U3-1100W, U3-1100SF) / 800⳯600 dots (U3-810WZ, U3-810W, U3-810SF)
1000 ANSI lumens (normally white) / See below for more details about the B/W mode.
RGB (H:15 to 91 kHz, V: 50 to 85 Hz)
U3-1100WZ, U3-1100W, U3-1100SF : SXGA (Compression), XGA(True), SVGA/VGA (Expansion/True)
U3-810WZ, U3-810W, U3-810SF : XGA (Compression), SVGA (True), VGA (Expansion/True)
Remote control: 0° to 60°C (32° to 140°F)
Meets FCC Class A requirements
Meets EMC Directive (EN55022, EN55024)
Meets Low Voltage Directive (EN60950)
U3-810W, U3-810SF U3-1100W, U3-1100SF U3-810WZ U3-1100WZ
Fixed focus Fixed focus Manual zoom (x1.2) Manual zoom (x1.2)
Lens
Image size
Lens
Image size
Manual focus Manual focus Manual focus Manual focus
F=2.4 f = 23 mm F = 2.4 f = 23 mm F = 2.4 - 2.6 f = 27.5 - 33.0 mm F = 2.4 - 2.6 f = 27.5 - 33.0mm
Minimum 35" Minimum 36" Minimum 25" Minimum 26"
(Projection distance 1.2m) (Projection distance 1.2m) (Projection distance 1.2m at tele) (Projection distance 1.2m at tele)
Maximum 200" Maximum 200" Maximum 200" Maximum 200"
(Projection distance 6.8m) (Projection distance 6.6m) (Projection distance 9.8m at wide) (Projection distance 9.4m at wide)
U3-810W, U3-810SF U3-1100W, U3-1100SF U3-810WZ U3-1100WZ
Fixed focus Fixed focus Manual zoom (x1.2) Manual zoom (x1.2)
Manual focus Manual focus Manual focus Manual focus
F=2.4 f = 0.9 inch F = 2.4 f = 0.9 inch F = 2.4 - 2.6 f = 1.1 - 1.3 inch F = 2.4 - 2.6 f = 1.1 - 1.3 inch
Minimum 35" Minimum 36" Minimum 25" Minimum 26"
(Projection distance 3.9 feet) (Projection distance 3.9 feet) (Projection distance 3.9 feet at tele) (Projection distance 3.9 feet at tele)
Maximum 200" Maximum 200" Maximum 200" Maximum 200"
(Projection distance 22.3 feet) (Projection distance 21.6 feet) (Projection distance 32.2 feet at wide) (Projection distance 30.8 feet at wide)
Applicable models to Color mode
Mode Select System
Brightness
D-Sub Pin Assignments
PC 15-Pin mini D-Sub
U3-810W, U3-810WZ, U3-1100W, U3-1100WZ
Selected with the switch on the top cabinet
2200ANSI lumens
Pin No.
1
2
3
4
5
6
7
8
9
10
11
12
13
14
15
Signal to be connected
Red
Green
Blue
GND
GND
Red GND
Green GND
Blue GND
No Connection
Digital GND
GND
SDA
Horizontal Sync
Ver tical Sync
SCL
E – 34
Page 38

Dimensions
U3-1100WZ, U3-810WZ
27 mm/
1.1″
230 mm/9.0″
POWER SOURCE AUTO
POWER SOURCE AUTO
POWER STATUS
POWER STATUS
B / W
COLOR
OPEN
OPEN
177 mm/7.0″
48 mm/
1.9″
U3-1100W, U3-810W
27 mm/
1.1″
230 mm/9.0″
POWER SOURCE AUTO
POWER STATUS
B / W
COLOR
11 mm/
0.4″
177 mm/7.0″
OPEN
48 mm/
1.9″
E – 35
11 mm/
0.4″
Page 39

U3-1100SF, U3-810SF
27 mm/
1.1″
230 mm/9.0″
POWER SOURCE AUTO
POWER STATUS
177 mm/7.0″
OPEN
48 mm/
1.9″
11 mm/
0.4″
E – 36
 Loading...