

PlumbNation JG STATPLUS/TS/V3, JG STATPLUS, JG STATPLTS, JG STATPLV3 Operating Instructions Manual
Page 1

Operating Instructions
Model:
JG STATPLUS/TS/V3
10/09 Revision 1
Ref: JGSTATPLUS/TS/V3
Page 2

the nation’s favourite for
PLUMBING & HEATING SUPPLIES
SECURE PAYMENTS
shop online with confidence
FREE SHIPPING
on all orders over £100 to mainland UK
FINANCE AVAILABLE
spread the cost with low interest rates
PRICE MATCH
always get the best deals available
Boilers
Radiators
Heating controls
Cylinders
Fires
Renewable energy
Bathroom suites
Kitchen sinks & taps
Showers
Wet rooms
Towel warmers
Bathroom furniture
& much more
HUGE REDUCTIONS
we have
ON THOUSANDS OF ITEMS
0844 800 3460
CALL US ON
visit our website
plumbnation.co.uk
Page 3

Page 4

1
Contents Page
Display Symbols Explained 7
Temperature Display 8
Setting the Clock 8
Comfort Levels Explained 9-11
Setting the Hotwater Switching Times 12-13
Locking the Keypad 13
Temperature Override 14
Temperature Hold 14
Howater Override 15
Holiday 16
Heat On/Off 17
Clean Screen 17
Factory Reset 18
Optional Feature Setup 19-23
Wiring Diagrams 24-25
Page 5

What is a programmable room thermostat ?
A programmable room thermostat is both a programmer
and a room thermostat. A programmer allows you to set
“On” and “Off” time periods to suit your own lifestyle. A
room thermostat works by sensing the air temperature,
switching on the heating when the air temperature falls
below the thermostat setting, and switching it off once this
set temperature has been reached.
So, a programmable room thermostat lets you choose what
times you want the heating to be on, and what temperature
it should reach while it is on. It will allow you to select
different temperatures in your home at different times of the
day (and days of the week) to meet your particular needs.
Turning a programmable room thermostat to a higher setting
will not make the room heat up any faster. How quickly
the room heats up depends on the design of the heating
system, for example, the size of the boiler and radiators.
Neither does the setting affect how quickly the room cools
2
Page 6

down. Turning a programmable room thermostat to a lower
setting will result in the room being controlled at a lower
temperature, and saves energy.
The way to set and use your programmable room
thermostat is to find the lowest temperature settings that
you are comfortable with at the different times you have
chosen, and then leave it alone to do its job.
The best way to do this is to set low temperatures first, say
18ºC, and then turn them up by one degree each day until
you are comfortable with the temperatures. You won’t have
to adjust the thermostat further. Any adjustment above
these setting will waste energy and cost you more money.
If your heating system is a boiler with radiators, there
will usually be only one programmable room thermostat
to control the whole house. But you can have different
temperatures in individual rooms by installing thermostatic
radiator valves (TRVs) on individual radiators. If you don’t
have TRVs, you should choose a temperature that is
reasonable for the whole house. If you do have TRVs, you
3
Page 7

can choose a slightly higher setting to make sure that
even the coldest room is comfortable, then prevent any
overheating in other rooms by adjusting the TRVs.
The time on the programmer must be correct. Some types
have to be adjusted in spring and autumn at the changes
between Greenwich Mean Time and British Summer Time.
You may be able to temporarily adjust the heating
programme, for example, “Override”, “Advance” or “Boost”.
These are explained in the manufacturer’s instructions.
Programmable room thermostats need a free flow of air
to sense the temperature, so they must not be covered
by curtains or blocked by furniture. Nearby electric fires,
televisions, wall or table lamps may prevent the thermostat
from working properly.
4
Page 8

Installation Procedure
DO’s
1. Do mount the thermostat at eye level.
2. Do read the instructions fully so that you get the best
from our product.
DON’Ts
1. Do not install near a direct heat source as this will affect
the workings of the thermostat.
2. Do not push hard on the LCD otherwise you will damage
the liquid crystal display and this is not repairable.
Installation
The thermostat is designed to be flush mount, a back
box of 35mm should have been sunk in the wall prior to
installation.
Step 1
Carefully separate the front half of the thermostat from the
back plate by placing a small flat head terminal driver in to
the slots on the bottom face of the thermostat.
5
Page 9

Step 2
Carefully unplug the ribbon connector which is plugged in to
the front half of the thermostat.
Place the thermostat front half somewhere safe. Terminate
the thermostat as shown in the diagrams at the back of this
booklet.
Screw the thermostat back plate on to the back box
Step 3
Re-connect the thermostat ribbon cable and clip the two
halves together.
6
Page 10
7
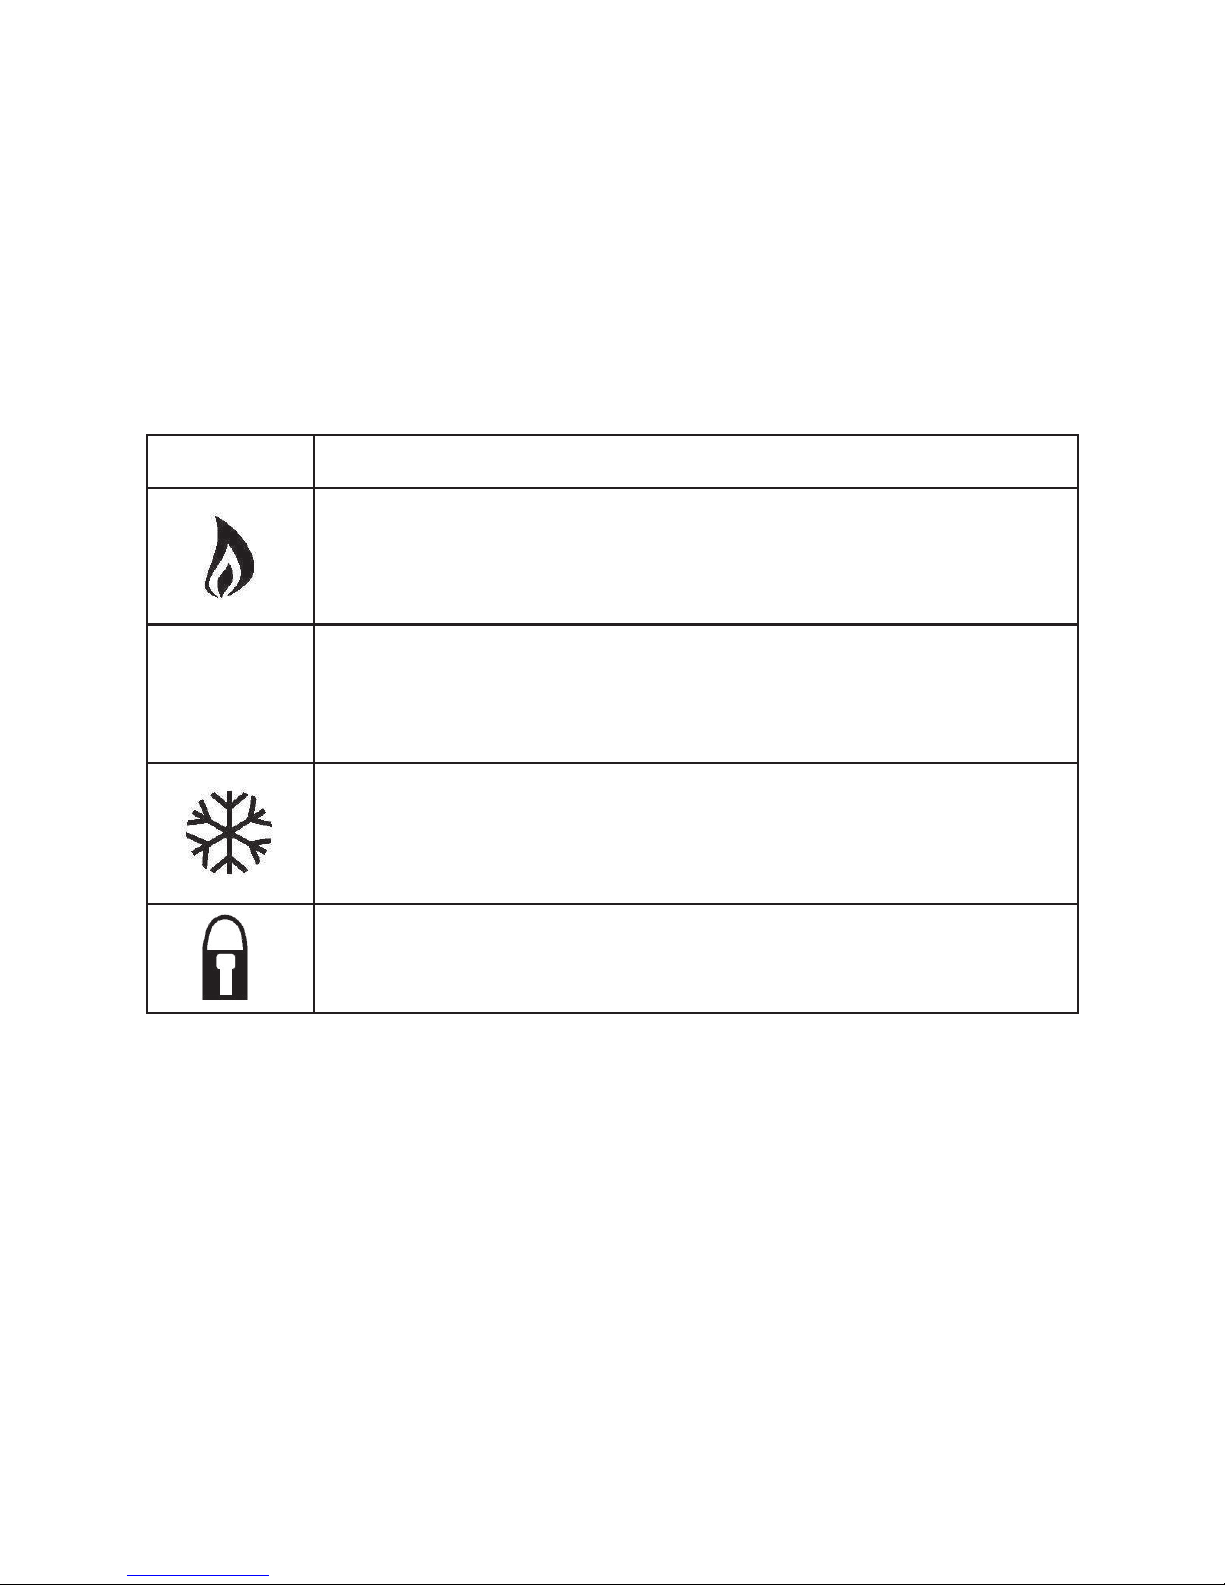
Display Symbols Explained
Symbol Description
Heat On Icon
Shown when the heating is On
Flashing When the optimum start is in operation.
HW ON HW ON / HW OFF
HW OFF Shown to indicate whether the hot water output
is on or off
Frost On Icon (Heating Off)
Shown when the heating is switched off and is
protecting against frost only
Keylock Icon
Shown when the keypad is locked
Page 11

Temperature Display
Room Temp
This is the current room temperature.
SET = This is the temperature you are trying to achieve in
your home.
HW ON / HW OFF = This is the status of the hot water.
Setting The Clock
To set the clock in your thermostat, follow the steps below:
• With the thermostat turned on, press PROG
• Press Clock
• Use to set the correct Time
• Press Day to set the correct Day
• Press Done to accept and store
8
Page 12

Comfort Levels Explained
Comfort levels allow you to set different temperatures
throughout the day. For example, you may want the home
warm in the morning when you are getting ready for work,
cooler during the day when the house is unoccupied and
then warmer in the evening when you are home relaxing.
The thermostat offers 5/2 Day Programming (4 levels for
the weekday, 4 for the weekend) and 7 day Programming (4
levels for each day). See pages 19-23 for details on how to
switch between these modes.
Tip ! If you don’t want to use all of the comfort levels, just
set the time to --.—and the thermostat will ignore this
setting.
9
Page 13

Factory Programmed Comfort Levels
The following comfort levels are programmed already,
however you can change them easily.
Weekday Level Time Temp
Wake 07.00 21°C
Leave 09.00 16°C
Return 16.00 21°C
Sleep 22.00 16°C
Weekend Level Time Temp
Wake 09.00 21°C
Leave 22.00 16°C
Return --.-- --°C
Sleep --.-- --°C
10
Page 14

Changing the Comfort Levels
• Press PROG and select Wake
• Use to set the time for the 1st Comfort level
• Use to set the temperature in °C
• You should now repeat for the Leave, Return & Sleep
levels.
• Press Day to select the next day. In 5/2 day mode the
thermostat will highlight “Sat Sun” prompting you to
program the temperature levels for the weekend. In 7 day
mode, the thermostat will highlight Tuesday.
• When complete, press Done to Store and Exit.
11
Page 15

Hot Water Timings Explained
The JGSTATPLUS/TS/V3 offers an additional timed output
for the hot water cylinder. The thermostat offers 5/2 Day
Programming (4 levels for the weekday, 4 for the weekend)
and 7 day Programming (4 levels for each day). See pages
19-23 for details on how to switch between these modes.
Factory Programmed Hot Water Times
The following hot water switching times are programmed
already; however you can change them easily.
Weekday On Time Off Time
Wake 07.00 09.00
Leave 16.00 20.00
Return --.-- --.--
Sleep --.-- --.--
Weekend Time Temp
Wake 07.00 09.00
Leave 16.00 20.00
Return --.-- --.-Sleep --.-- --.--
12
Page 16

Changing the Hot Water Times
• Press PROG and select Timer
• You will see TIME 1 and ON flash
• Use to set the on time for the 1st switching time
• Press Off and then use to set the off switching
time.
• You should now repeat for the Time 2-4
• Press Day to select the next day. In 5/2 day mode the
thermostat will highlight “Sat Sun” prompting you to
program the switching times for the weekend. In 7 day
mode, the thermostat will highlight Tuesday.
• When complete, press Done to Store and Exit.
Locking the Keypad
The thermostat has a keylock facility. To enable this press
the bottom right corner of the display and hold for 10
seconds.
When activated, you will see .
To cancel, repeat the steps above.
13
Page 17

Temperature Override
Using the keys allows you to adjust the set
temperature. When you press either of these keys, you will
see the word SET and the desired temperature. Press Done
to accept.
This set temperature is temporary and is held until the next
programmed comfort level.
Temperature Hold
The Temperature Hold function is ideal for parties or when
you will be going out for a number of hours. It allows you to
hold a temperature for a desired period.
• Press HOLD
• Set the desired Hold time and temperature
• Press Done
• To cancel a Hold time, reduce the time to 00.00
14
Page 18

Hot Water Override
The thermostat has an override function for the hot water
output allowing you to override the hotwater into the
opposite state.
• Press Hold
• Press Timer
• If the hotwater is already On – press Off
• If the hotwater is already Off – press On
You will then see the hotwater status change and the
hotwater output indication will flash to show it has been
overridden from the programmed setting.
The hotwater will remain in the override state until the next
programmed time. To cancel, repeat the steps above.
15
Page 19

Holiday
The Holiday function reduces the set temperature in your
home to the frost temperature setting. The thermostat will
maintain this temperature for the duration of the holiday and
will then automatically return to the program mode on your
return.
Assume you program a holiday on Monday for 1 day, the
holiday will start immediately, but the thermostat will count
the next day (Tuesday) as the holiday. The thermostat will
then revert back to its program at midnight Tuesday.
• Press HOLIDAY
• Enter the duration of your holiday
• Press Done
• To cancel a Holiday, reduce the Holiday time to 00 days.
During a holiday program the hot-water output is turned off.
16
Page 20

Heat On / Off
Frost Protect Mode: Pressing the Off button once will
place the thermostat in frost protect mode. In this mode,
the thermostat will display the frost icon and will only turn
the heating on should the room temperature drop below the
set frost temperature (see pages 19-23). Should the heating
be turned on whilst in frost mode, the flame symbol will be
displayed. To cancel the frost protect mode, press the On
button.
Thermostat Off: To turn the thermostat off completely,
press and hold the Off button. The display and heating
output will be turned off. To turn the thermostat back on,
press the On button.
Clean Screen
Pressing Clean Screen will disable all buttons, allowing you
30 seconds to wipe the screen clean.
17
Page 21

Factory Reset
The thermostat has a factory reset function. This will reset
all settings back to their factory default.
To perform a factory reset, follow these steps:
Turn off the thermostat by pressing the off button.
Press and hold the bottom left corner of the LCD for 10
seconds. You will see all the icons appear for 2 seconds
and then disappear. The thermostat has then been reset to
the factory defaults.
18
Page 22

THE FOLLOWING SETTINGS ARE OPTIONAL
AND IN MOST CASES NEED NOT BE ADJUSTED
Optional Features Explained
Feature 01 – Temperature Format: This function allows
you to select between °C or °F.
Feature 02 - Switching Differential: This function allows
you to increase the switching differential of the thermostat.
The default is 1°C which means the thermostat will switch
the heating on 0.5°C below the set temperature and will
turn it off 0.5°C above the set temperature. With a 2°C
differential, the heating will switch on 1.5°C below the
set temperature and will switch off 0.5°C above the set
temperature.
Feature 03 - Frost Protect: You can set whether the
thermostat will maintain the frost temperature when
the thermostat display is turned off. As a default, this is
enabled.
19
Page 23

Feature 04 – Frost Protect Temperature: This is the
temperature maintained when the thermostat is in frost
mode. The range is 07-17°C. The default is 12°C and is
suitable for almost all applications.
Feature 05 – Output Delay: To prevent rapid switching, an
output delay can be entered. This can be set from 00-15
minutes. The default is 00 which means there is no delay.
Feature 06 – Communication Address: This setting
is used when you have connected your thermostat to a
network system. Each thermostat on the network must have
a unique communication address. This can be set from
01-32.
Feature 07 – Temperature Up/Down Limit: This function
allows you to limit the use of the up and down temperature
arrow keys. This limit is also applicable when the thermostat
is locked and so allows you to give others limited control
over the heating system.
Feature 08 – Sensor Selection: This thermostat has a built
in air sensor only.
20
Page 24

Feature 09 – Floor Limit Sensor: This function is not used
on this model.
Feature 10 – Optimum Start: Optimum start will bring the
heating on early if needed, so the house is warm when you
wake up. This means you don’t need to allow any extra
heat up time when programming the comfort levels. The
thermostat will automatically learn the required heat up time
and will adjust itself, if required, throughout the year.
Feature 11 – Rate Of Change: This is the number of
minutes the thermostat has calculated it takes to raise your
building 1°C. The thermostat will continue to learn the heat
up time of your home and will adjust this setting to suit.
Feature 12 – 5/2 Day, 7 Day Programmable: This
function allows you to switch between 5/2 day or 7 day
programming. 5/2 day means you can program 4 comfort
levels for the weekday and 4 different levels for the
weekend. 7 day programming allows you to program 4
temperature levels for each day of the week.
21
Page 25

Adjusting the Optional Settings
To adjust the settings, follow these steps:
• With the thermostat turned on
• Press PROG
• Press SETUP
• Use the at the top of the screen to select the
feature number (shown on page 23) and then use the
keys in the centre adjust the setting.
• Press Done to accept and Store
22
Page 26
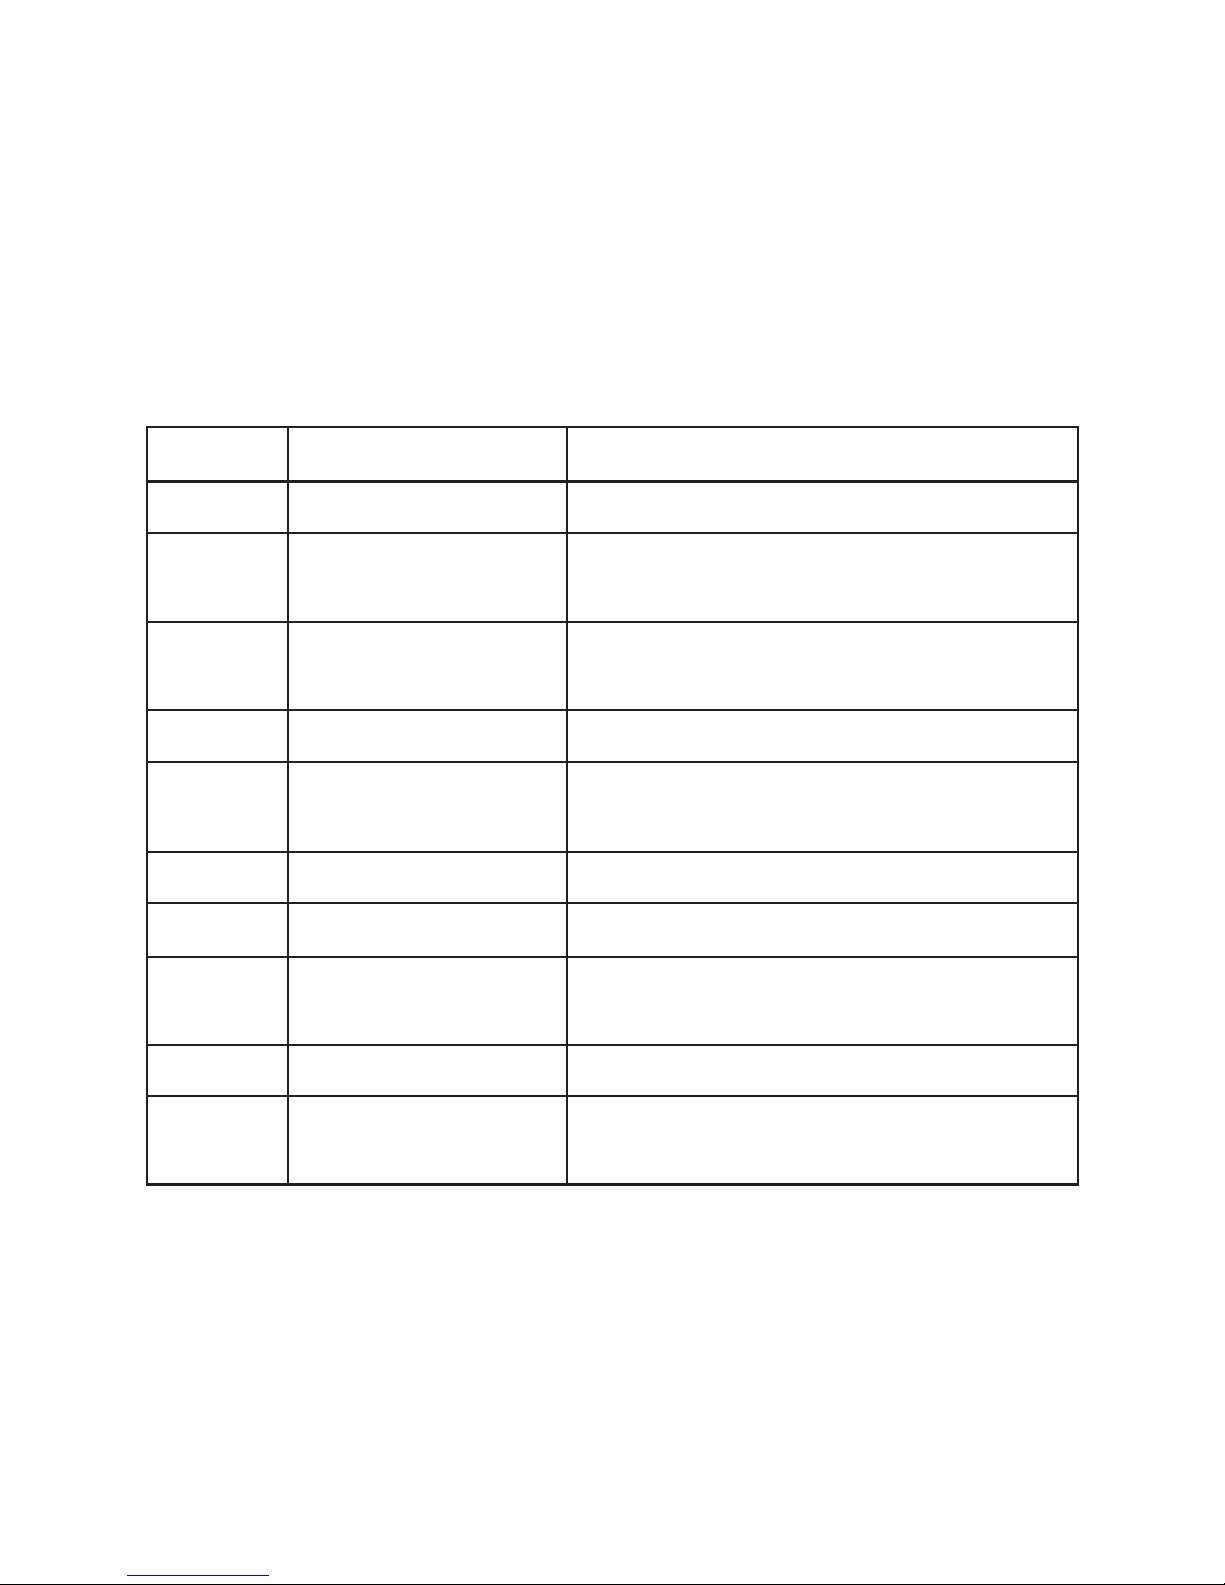
Feature Table
Feature Description Setting
01 °C / °F Temperature Format
02 Switching 01=1°C 02=2°C 3=3°C
Differential 1°C = Default
03 Frost Protect 00 = Disabled 01=Enabled
(01=Default)
04 Frost Temp 07-17°C (12=Default)
05 Output Delay Enter value
00-15 minutes (00=Default)
06 Comms # Enter number 01-32
07 Temp Limit 00 - 10°C
10 Optimum Start 00=Disabled (Default)
01=01hr 02=02hr 03=03hr
11 Rate of Change For information only
12 5/2 Day 00 Default
7 Day 01
23
Page 27
24
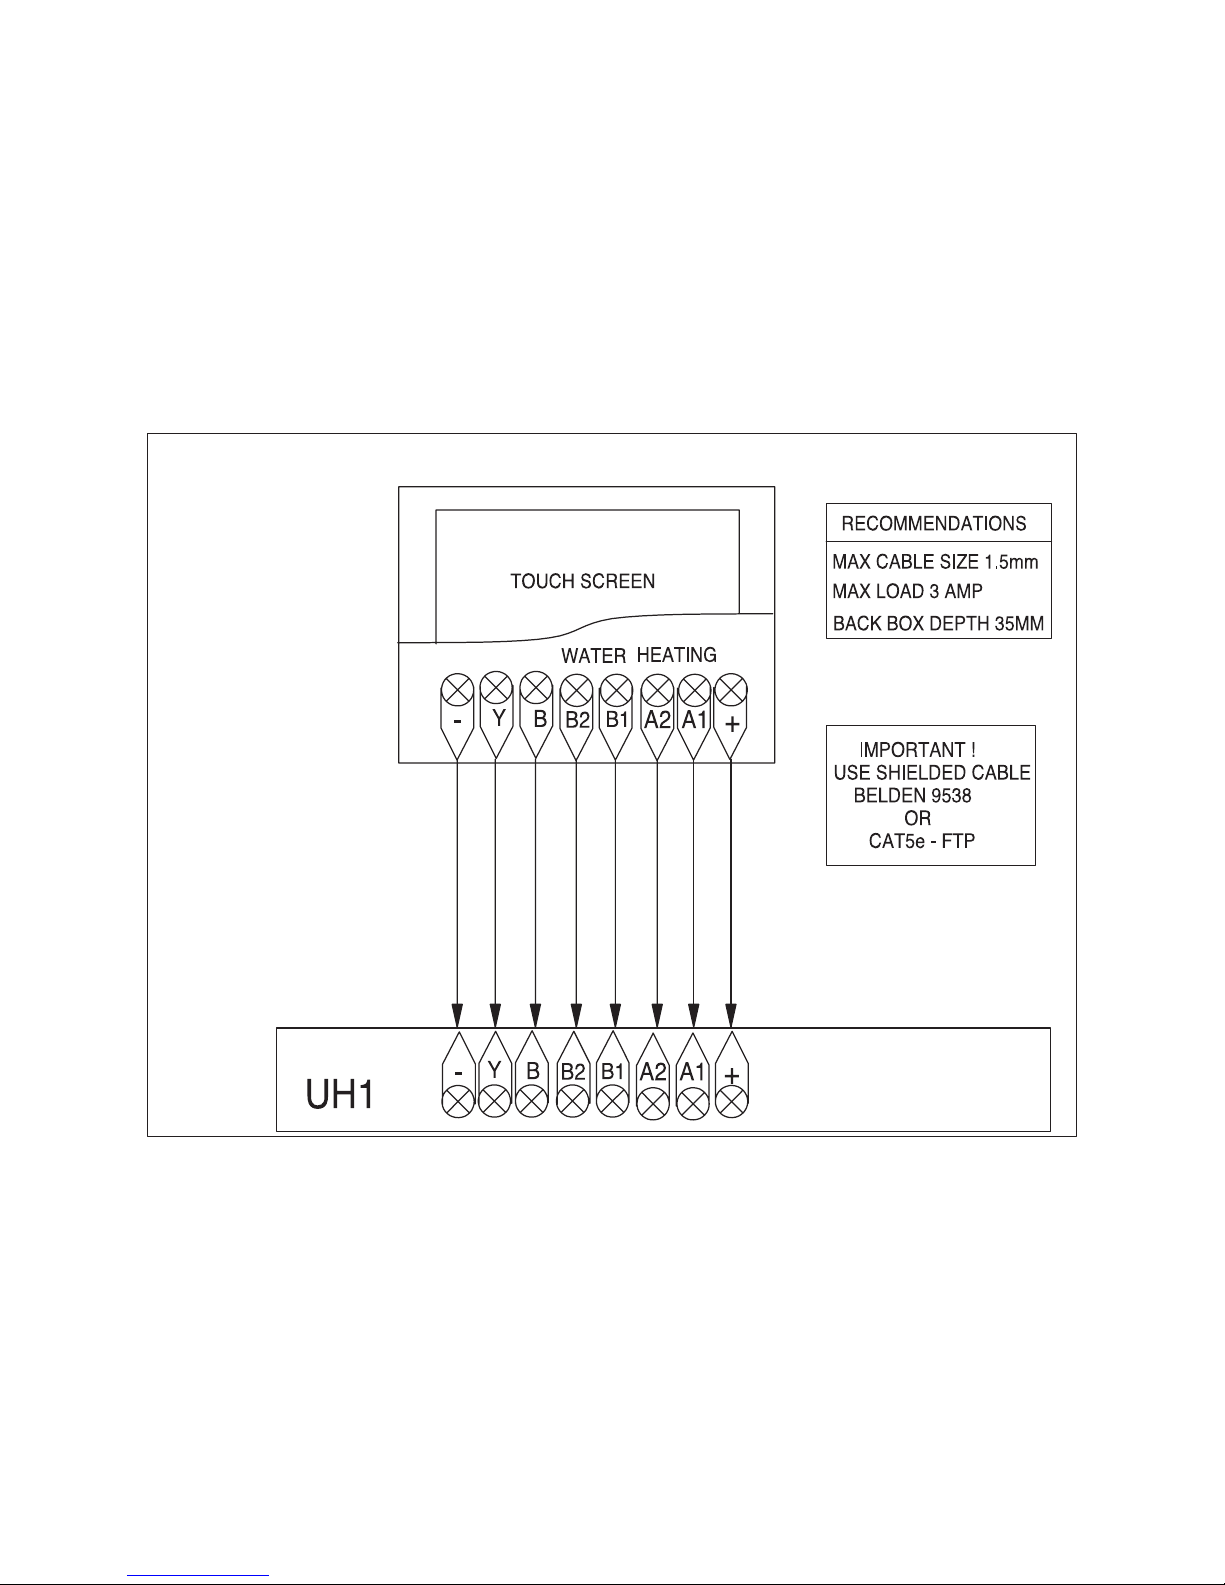
THE JGSTATPLUS/TS/V3
CONNECTED TO
THE UH1
JGSTATPLUS/TS/V3 Model
Page 28
25
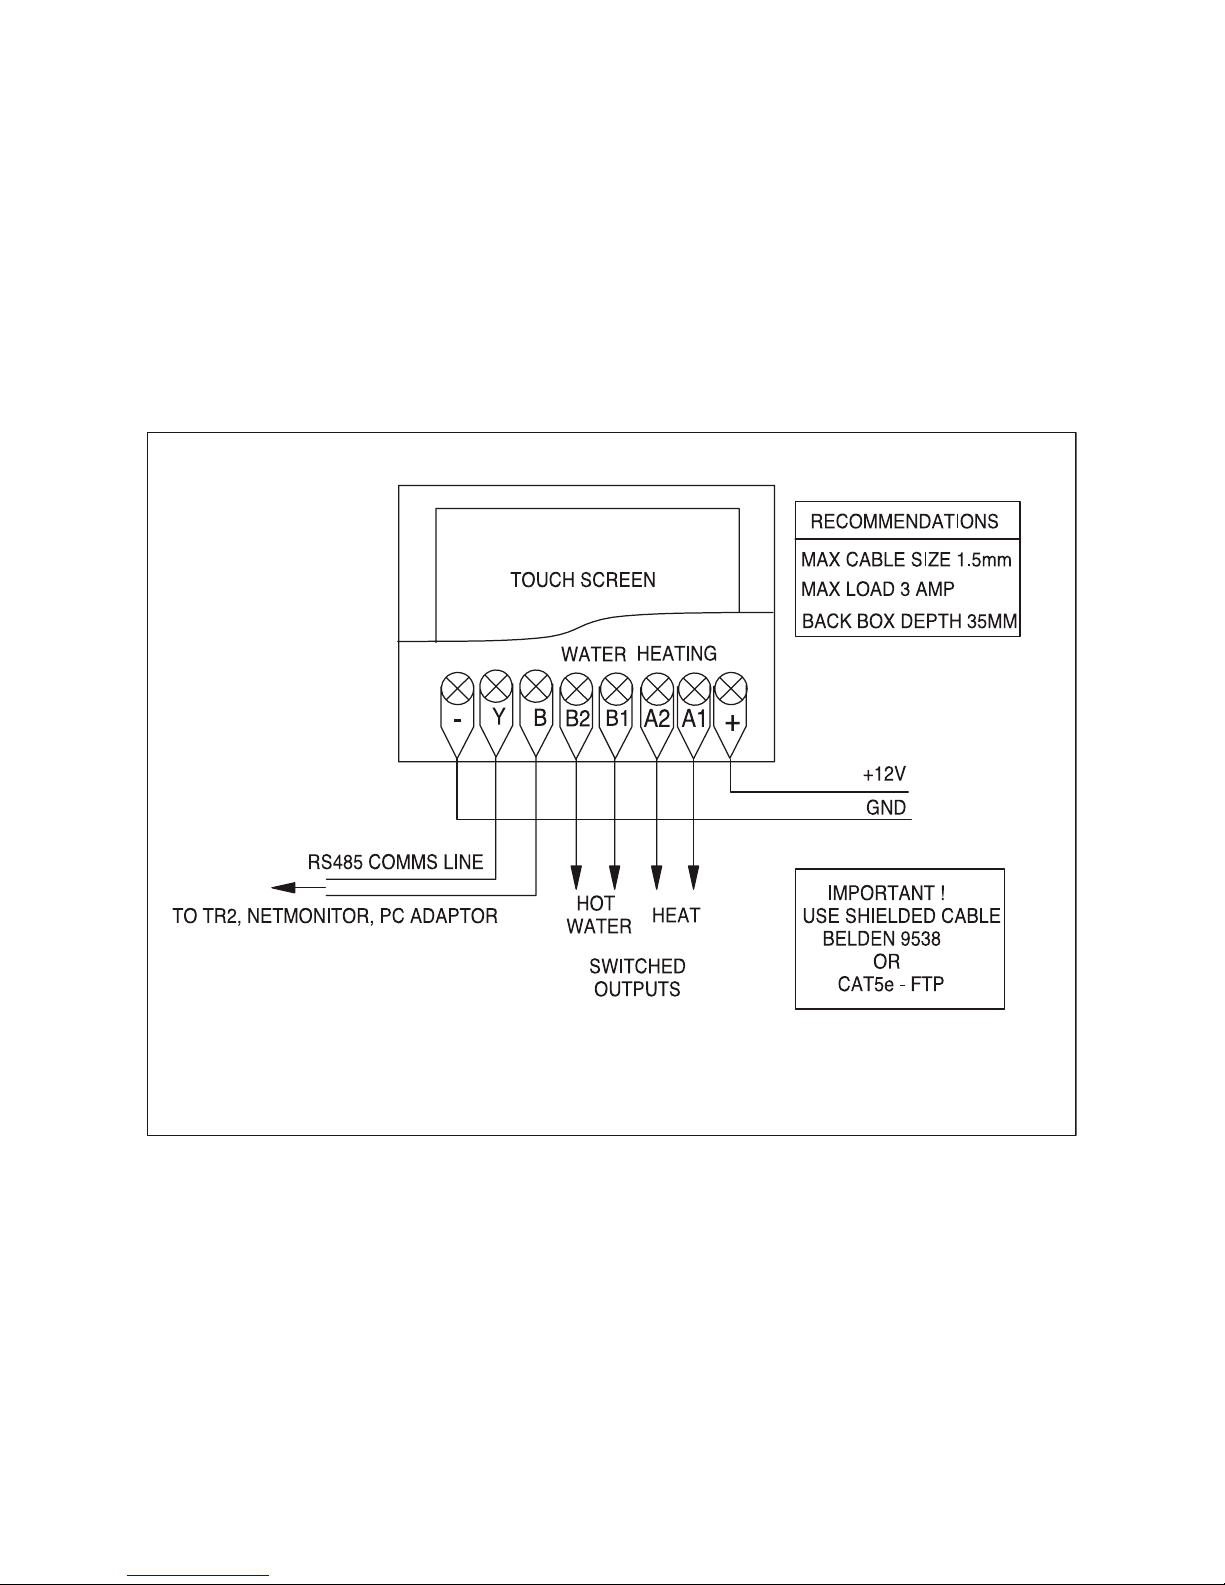
THE JGSTATPLUS/TS/V3
JGSTATPLUS/TS/V3 Model
Page 29

Support Tel: 01254 870303
 Loading...