

Page 1
WLAN
STATUS
LAN
Stretch 3
DA17-0200-00
Installation manual
105- 03
Nederla nds | English
Page 2

Nederlands
Inhoudsopgave
Voor je begint 3
Voorzorg en veiligh eid 4
Meer infor matie 4
In de verpakking 4
Installatie 5
1. Plaats de S tick in de Stretch 5
2. Plaats de S tretch 5
3. Verbind me t het netwerk 5
4. Netwerkverbinding controleren? 7
Niet gelukt via w i? 7
Het gedrag va n de lampjes 8
English
Table of contents
Before you s tart 9
Precaut ions and safety 10
More informa tion 10
In the packa ge 10
Installation 11
1. Place the Stick in the Stretc h 11
2. Place the Stretch 11
3. Conn ect to the networ k 11
4. Validate the network connection? 1 2
Having troubl e using WiFi? 13
Behaviour o f the lights 14
Page 3
Copyright 2 017, Plugwise .
Alle rechten vo orbehouden.
Dit docum ent bevat informatie over de
installatiep rocedure van dit produc t. Voor
meer informatie over de functionaliteiten
van het prod uct wordt verwezen n aar
online informatie en documentatie.
Plugwis e B.V. verklaar t hierbij dat dit
produc t voldoet aan de benodig de
vereisten van de desbetref fende
Europese ric htlijnen, waaronder 1999/5/
EC (R&TTE). Een exemplaar van de
Europese co nformiteitsverklaring is
beschikb aar op
www.plugwise.com/product- conformity.
Voor je begint
Dit is de korte ins tallatiehandleiding voor
de Plugw ise Stretch 3. De Stretch is de
gateway die sam enwerkt met de Plug wise
Circle of Stealth via h et Plugwise ZigBe e
protocol. D e Stretch is de bestuurder
binnen het Plugwise netwerk.
Met de Circle of Ste alth kun je het
elektriciteit sverbruik meten en apparaten
in huis aan- of uit schakelen.
In deze handleidin g beschrijven wij in het
kort hoe je d e Stretch installeert .
Omdat je een S tretch altijd gebruikt in
combinatie me t een Circle of Stealth,
lichten wij kort to e hoe je een goed
netwerk opbouw t met de Stretch en
Circles. De Stealth heef t dezelfde
functi onaliteiten als een Circle, maar in
tegenstelling tot de Circle die je in het
stopcont act steekt, is d e Stealth een
inbouwmodule*.
Uitleg symbolen:
Let op, waarschuwing!
Deze stap m oet je uitvoeren
Tip
NL
Oude elek trische en elektronisch e
apparaten b evatten vaak waardevolle
materialen. Plaats een afge dankt apparaat
dan ook nooit bij het gewone afval. L ever
altijd het app araat in bij een gemeentelijk
inzameldep ot voor elektrische en
elektronische apparatuur.
3 | Stretch 3
Wij advise ren je om de Stealth do or een
*
professionele installateur te laten installeren.
Page 4
Voorzorg en
veiligheid
Wees altijd voorzichtig als je de Plugwise
Stretch 3 inst alleert.
Maak geen gebr uik van het product
als deze is beschadigd of niet goe d
functioneert.
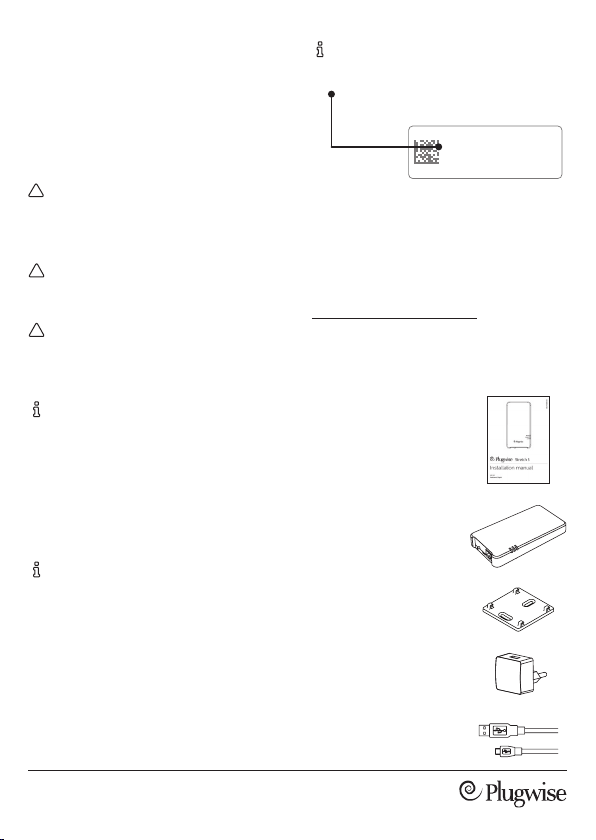
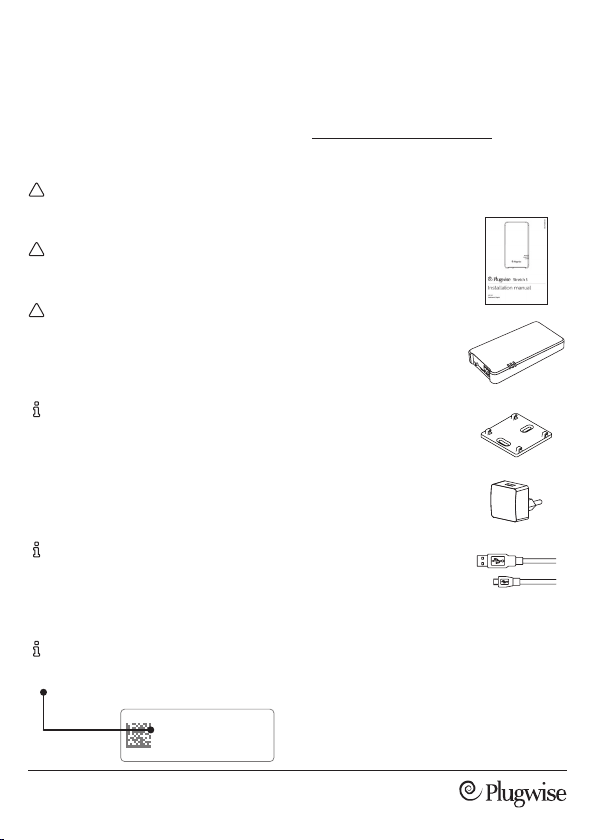
Zorg ervo or dat je het short ID van
de Stretch bij de ha nd hebt. Het shor t
ID is de achtlet terige code op de
sticker op de ac hterkant van de
Stretch.
stuvwxyz
ssid: stretch_abcdef
Meer informatie
Breng het pro duct nooit in conta ct
met water of ee n andere vloeistof.
Maak de behuizing van het prod uct
nooit open. Het pro duct bevat geen
onderdelen di e je zelf kunt herstellen.
Controleer vooraf de aanw ezigheid
en kwaliteit va n de wi-
netwerkverbinding daar waar je de
Stretch wilt plaat sen. Houd het
wachtw oord van het wi-n etwerk
waarmee je d e Stretch wilt verbinden
bij de hand.
Wil je de Stretch v erbinden met je
netwerk via een LAN-ka bel? Plaats
dan de Stretch binnen het bereik va n
de router.
4 | Stretch 3
Je vindt me er informatie over de Stretch
op onze website:
www.p lugwise.nl/stretch-3
In de verpakking
Deze korte
installatiehandleiding
Plugwis e Stretch 3
Gateway vo or de aansturing
van het Plug wise-net werk
Muurplaatje
Adapter
230VAC - 5W
Adapterkabel
Page 5
Installatie
De installati e bestaat uit 4 stapp en:
1. Plaats de Stick in de Stretch.
2. Plaats de Stretch.
3. Verbind de Stretch m et het netwerk.
4. Controleer de netwerkverbinding.
1. Plaats de Stick in de Stretch
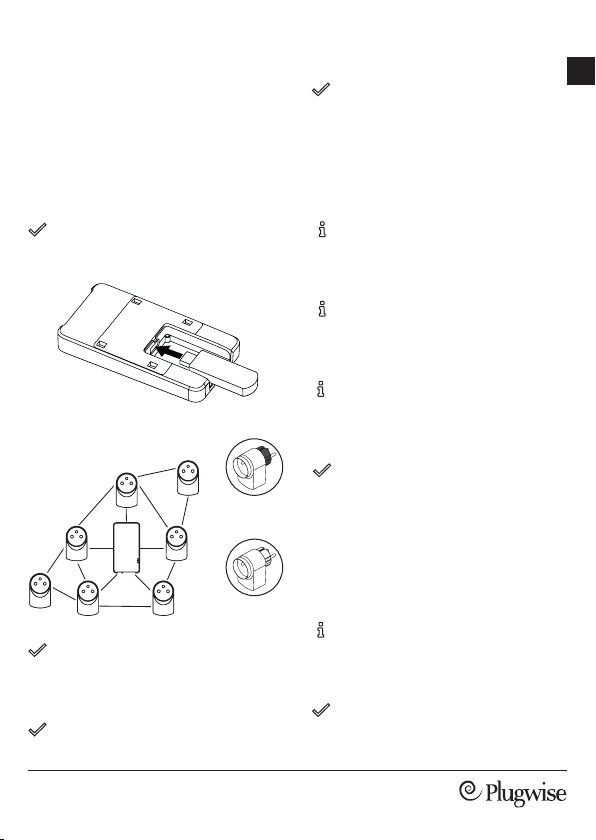
Verwijder het klepje van de
achterkant van de Stretch en plaat s
de Stick in de Stretc h.
2. Plaats de Stretch
Circle+
Circle+
mogelijk Circles .
Plaats de Circle + (de Circle met de
grijze achterkant) altijd op maximaal 5
meter afst and van de Stretch. D e
Circle+ gedra agt zich als een ‘router’
binnen het n etwerk. De Circle + is
altijd bereikbaa r voor andere Circles.
Een Circle moet al tijd binnen 5-10
meter van een a ndere Circle of van de
Stretch worden g eplaatst.
Betonnen muren en plafonds
verminderen h et bereik van het
netwerk.
Installee r zoveel mogelijk Circles voor
een snel werkend netwerk.
3. Verbind met het netwerk
Sluit de adapterkabel aan op d e
adapter en de St retch. Steek de
stekker in het sto pcontact. Wac ht tot
de Stretch is opge start: het bov enste
(WL AN) en middelste (S TATUS)
lampje knipperen langzaam.
NL
Plaats de Stretch op een centrale plek
in huis, bijvo orbeeld in de buurt va n
het trapga t op de eerste verdieping.
Zorg ervo or dat de Stretch
rechtst reeks verbonden is met zoveel
5 | Stretch 3
Circle
Wi via WPS?
Wi via WPS wo rdt alleen
onderste und via een speciale
WPS -knop op de router.
Druk 2 seco nden op de zwar te knop
op de Stretch . Wacht tot het bovenste
(WL AN) lampje snel en reg elmatig
Page 6
blijft knip peren.
Active er wi via WPS op de
wi-ro uter om te verbinden met het
wi-n etwerk. Wacht totdat de Stretc h
opnieuw is op gestart. A ls de Stretch is
verbonden met het netwerk branden
het bovens te (WLA N) en middelste
(S TATUS ) la mpje .
Navigeer in de we bbrowser van je
smartph one of tablet naar een
willekeurige webpagina. Omdat je
verbonden bent met het netwerk van
de Stretch zal de w ebpagina van de
Stretch autom atisch openen.
Ga rechts o nderin het scherm naar
instellingen .
Als de Stretch na 2 m inuten nog geen
verbinding heeft gemaakt met een
wi-n etwerk, wordt de Stretch
opnieuw in aa nmeldmodus gezet: h et
bovenste ( WLAN) en m iddelste
(STATUS) lampje knipperen langzaam.
Wi?
Wil je de Stretch
verbinden met wi en
maak je gebruik va n een
Android -toestel? Zoek
dan naar de Plug wise Connect -app in
de Google P laystore. De app beg eleidt
je tijdens het ve rbinden van de Stretch
met je wi- netwerk.
Geen An droid? Volg dan de onderst aande
stapp en om de Stretch te verbinden m et
het wi-netwerk .
Verbind je smar tphone of tablet me t
het wi- netwerk van de Stretch dat
begint met ‘st retch_’.
Voer als wacht woord het short ID i n.
6 | Stretch 3
Ga naar de wi-/ LAN-in stellingen.
Druk op ‘S can’ en selecte er je eigen
wi-netwerk .
Voer het wacht woord van je eigen
wi-n etwerk in en sla de instellingen
op. Wacht totdat d e Stretch opnieuw is
opgesta rt. Als de Stretch is ve rbonden
met het netwerk branden het
bovenste ( WLAN) en m iddelste
(S TATUS ) la mpje .
Netwerkkabel?
Sluit een ne twerkkabel aan tuss en de
router en de Stret ch.
Start de S tretch opnieuw op doo r de
stekker uit het st opcontact te halen e n
weer terug te s teken. Als de Stretch is
verbonden met het netwerk branden
het middelste ( STATUS) en o nderste
(LAN) lampje.
Page 7
4. Netwerkverbinding controleren?
Open de webp agina van de Stretch
Zorg ervo or dat je je smartphon e of
tablet weer verbindt met het (wi -)
netwer k waar je zojuist de Stretch mee
hebt verbo nden. Dit is ook nodig a ls je
de Stretch wilt to evoegen in de
Plugwis e app.
Ga naar connect.plugwise.net.
Log in met je sho rt ID. De webpagina
van de Stretch o pent als de
netwerkverbinding is gelukt.
Niet gelukt via wi?
Verwijder de netwerkinstellingen
Druk de z warte knop op de Stre tch 5
seconde n in: het middelste (STATUS)
lampje knipp ert 5 keer, het bovenste
lampje (W LAN) gaat v ervolgens snel
knipperen.
De netwerkinstellingen worden
verwijde rd. Wacht tot de Stretch wee r
is opgesta rt en probeer op nieuw met
het wi-n etwerk te verbinden.
Sluit eerst een netwerkkab el aan
Sluit een ne twerkkabel aan tus sen de
router en de Stret ch.
Volg de stappen “Netwerkverbinding
controleren? - Op en de webpagina van
de Stretch” e erder op deze pagina om
de webpagina v an de Stretch te openen .
Ga rechts o nderin het scherm naa r
instellingen .
Ga naar wi-/L AN-instellingen
Selec teer je eigen wi -netwerk, voer
het wachtw oord van het wi-netwerk
in en sla de instellingen op . Haal de
netwer kkabel uit de Stretch als dit
wordt aangegeven.
NL
Start de S tretch opnieuw op do or de
stekker uit het st opcontact te hal en en
weer terug te s teken.
7 | Stretch 3
Page 8
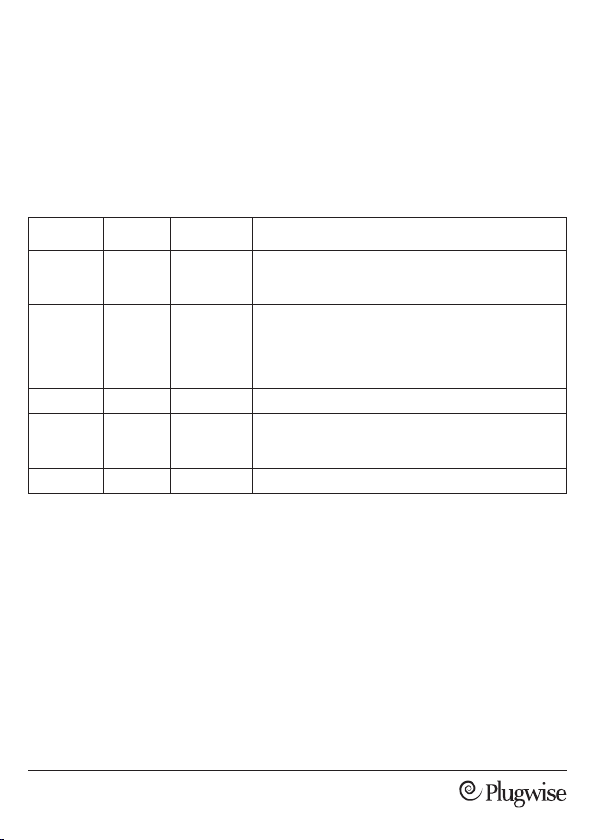
Het gedrag van
de lampjes
De Stretch he eft 3 LED-lam pjes. In
onderst aande tabel wordt het
belangrijks te gedrag van de lampjes van
de Stretch toeg elicht.
LED Kleur Patroon Omschrijving
STAT US Groe n Knipp ert
STAT US Groe n Knipp ert
WLAN Groen Knippert Communicat ie met het wi-net werk.
WLAN Groen Knippert
LAN Groen Knippert Communicat ie via de netwer kkabel met he t netwerk.
langzaam
langzaam,
daarna aan
langzaam
De Stretch w ordt opgest art. Wacht to t de Stretch geree d is.
Als de Stretc h in aanmeldmo dus staat knip peren de lampje s
WLA N en STATUS langza am.
De Stretch w ordt opgest art. Wacht to t de Stretch geree d is:
• als de Stretch v erbonden is via e en netwerk kabel,
branden d e lampjes STATUS en L AN.
• als de Stretch verbo nden is via wi, branden de lamp jes
STATUS en WL AN
Kan geen verbin ding maken met het wi-n etwerk. Is er iets
gewijzigd in d e instellingen van de r outer? Volg de stapp en
onder “niet geluk t via wi?”.
8 | Stretch 3
Page 9
Before you start
Copyright 2 017, Plugwise .
All rights reserved .
This docum ent contains informatio n
about th e installation procedure of t his
produc t. For more information about the
functi onalities of this produc t, we refer to
online information and documentation .
Plugwis e B.V. hereby de clares that this
produc t is in compliance with the
applicable essential requirements of th e
appropriate EC- Directives, in cluding
1999/5/EC (R&TTE ). A copy of the EU
declaration o f Conformity is available at
www.plugwise.com/product- conformity.
Old elec trical and electronic appliances
very of ten contain valuable materials .
Therefore , never dispose of discard ed
appliances with normal h ousehold waste.
Always hand in your old ap pliances at the
municipal collection points for elec trical
and elec tronic equipment.
This is the sho rt installation manual fo r
the Plug wise Stretch 3. The Stre tch is the
gateway that works togethe r with the
Plugwis e Circle or Stealth using the
Plugwis e ZigBee protocol. The Stretch is
the manager in t he Plugwise netw ork.
With the Circ le or Stealth you can
measure the el ectricity consum ption and
switch app liances on or off in your h ome.
In this manual we sh ortly describe ho w to
install the S tretch. Because yo u will always
use the Stretch in combination wi th a
Circle or Stealth , we also briey explain
how to set up a good netwo rk using the
Stretch and Circles. The Stealth has the
same fun ctionalities as the Circle , but
unlike the Circle that yo u plug into a
socket, th e Stealth is a built-in module*.
Explanation symbols:
Warning, be aware!
You must carr y out this step
Advice
We advise you to h ave the Stealth inst alled by
*
an installer.
EN
9 | Stretch 3
Page 10
Precautions
More information
and safety
We advise you to a lways be careful when
installing th e Plugwise Stretch 3.
Do not use th e product when it is
damaged or if it is m alfunctioning.
Avoid contac t with water or other
liquids.
Never open the casing of th e product.
The prod uct does not contain
compon ents that you can repair
yourself.
Check the a vailability and the qualit y
of the WiF i network beforeha nd near
the location where you w ant to install
the Stretch . Make sure you have the
password of t he WiFi network to
which you will co nnect the Stretch .
Do you want to c onnect the Stretch
to the net work using a LAN cab le?
Make sure you inst all the Stretch
nearby your router.
Keep the short ID of the Stretch at
hand. Th e short ID is the 8 letter
code on the s ticker on the back of the
Stretch.
stuvwxyz
ssid: stretch_abcdef
More informa tion about the Stretch c an
be found on our website:
www.plug wise.com/stretch-3
In the package
This shor t installation
manual
Plugwis e Stretch 3
Gateway to c ontrol your
Plugwise network
Wall plate
Adapter
230VAC - 5W
Adapter cab le
10 | Stretch 3
Page 11
Installation the Stretch wi th as many Circles as
possible.
The inst allation can be describ ed in 3 steps:
1. Place the S tick in the Stretch.
2. Place the S tretch.
3. Conne ct the Stretch to the ne twork.
4. Validate the net work connect ion.
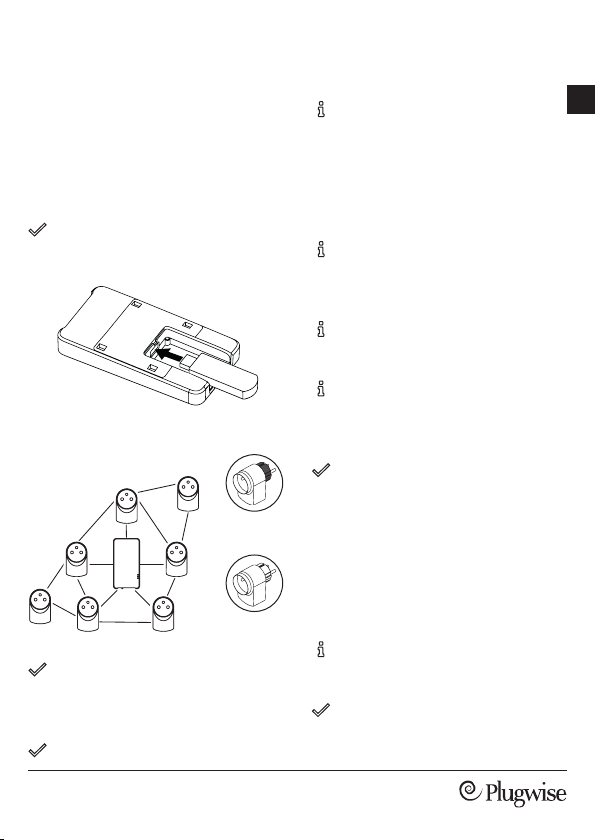
1. Place the Stick in the Stretch
Remove the cov er of the back of the
Stretch and pla ce the Stick in the
Stretch.
2. Place the Stretch
Circle+ Circle+
The Circle + (the Circle that contains a
grey back) sh ould always be place d
within a 5- meter range of the Stretch .
The Circle + behaves like a ‘router’ in
the net work. The Circle+ is al ways
reachable fo r other Circles.
All Circles sho uld be positioned at a
maximum dist ance of 5 to 10 meters of
at least on e other Circle or the Stretch .
Concrete walls a nd ceilings will reduce
the range of th e network.
For a highly resp onsive network ,
install as many C ircles as possible.
3. Connect to the network
Connec t the adapter cable to th e
adapter and t he Stretch and plug the
adapter into th e wall socket. Wait until
the Stretch has b ooted up: the upper
light (W LAN) and the lig ht in the
middle (STATUS) of the S tretch are
blinking slowly.
EN
Place the Stre tch centrally located i n
the house , for example near t he
stairw ell at the rst oor.
Make sure that there is dire ct contact of
11 | Stretch 3
Circle
WiFi via WPS?
WiFi via WP S is only supporte d via a
special WP S button on the route r.
Press the bla ck button on the Stretc h
for 2 secon ds. Wait until the upper
(WL AN) light is blinking quic kly and
Page 12
reg ularly.
Enable WP S on the WiFi router to
connec t to WiFi. Wait until the Stre tch
has booted u p: the upper light
(WL AN) and the light in t he middle
(STATUS) of the Stretc h are on when
connec ted to the network .
If after 2 min utes the Stretch has not
made a conn ection yet to your Wi Fi
networ k, the Stretch will return ba ck
to the acces s point mode: the upp er
(WL AN) light and the lig ht in the
middle (STATUS) are blinki ng slowly.
WiFi?
Do you want to c onnect
the Stretch to W iFi and
you have an An droid
smartph one or tablet?
Search for t he Plugwise Connect app
in the Goog le Playstore. The app w ill
guide you connecting the Stretch to
the WiFi n etwork.
smartph one or tablet and navig ate to
a random web a ddress. Because you
are connec ted to the network o f the
Stretch, yo u will be redirected to the
web page of the S tretch.
Go to the set tings via the button in
the botto m right of the web page .
Go to the Wi Fi/LAN settings.
Press ‘S can’ and select yo ur own WiFi
network.
Enter the pass word of you own WiFi
networ k and save the settings. Wait
until the Stretch h as booted up: the
upper light ( WLAN) an d the light in
the middle (S TATUS) of the St retch
are on when co nnected to the
network.
Network cable?
Connec t a network cable b etween
the router an d the Stretch.
No Android ? Follow the steps below to
connec t the Stretch to the WiFi n etwork.
Connec t your smartphon e or tablet
to the WiFi n etwork of the Stretch ,
starting with ‘stretch _’.
Enter the shor t ID as your password .
Open the w eb browser on your
12 | Stretch 3
Restar t the Stretch by plugging t he
adapter out a nd into the wall socket.
Wait until the Stretc h has booted up:
the light in the mi ddle (STATUS) a nd
the lower light (LAN ) are on when
connec ted to the network .
4. Validate the network connection?
Open the we b page of the Stretch
Make sure that your sma rtphone or
Page 13
tablet is reco nnected to the sam e
networ k as to which the Stretch is
connec ted to. This is also necess ary
when you wa nt to add the Stretch to
the Plug wise app.
Go to connect .plugwise.net.
Use your shor t ID to log in. You will
be redirec ted to the web page of the
Stretch when t he Stretch is
connec ted to the network .
Having trouble using WiFi?
Reset the network connection
Press the bla ck button on the Stretch
for 5 secon ds until the light in the
middle (STATUS) has blinked 5 times
and the upp er light (WL AN) starts to
blink rapidly.
The net work settings will be del eted.
Wait until the Stretc h has booted up,
then try to connec t the Stretch to
your WiFi n etwork again.
First connect the network cable
Connec t a network cable b etween
the router an d the Stretch.
the webpag e of the Stretch.
Go to the set tings via the button in
the botto m right of the web page .
Go to the Wi Fi/LAN settings.
Selec t your own WiFi net work, enter
the passw ord of your own WiFi
networ k and save the settings.
Disconne ct the Stretch from th e
networ k cable when instr ucted.
EN
Restar t the Stretch by plugging t he
adapter out a nd into the wall socket.
Follow the ste ps “Validate the net work
connec tion? - Open the web pag e of the
Stretch” o n the previous page to op en
13 | Stretch 3
Page 14
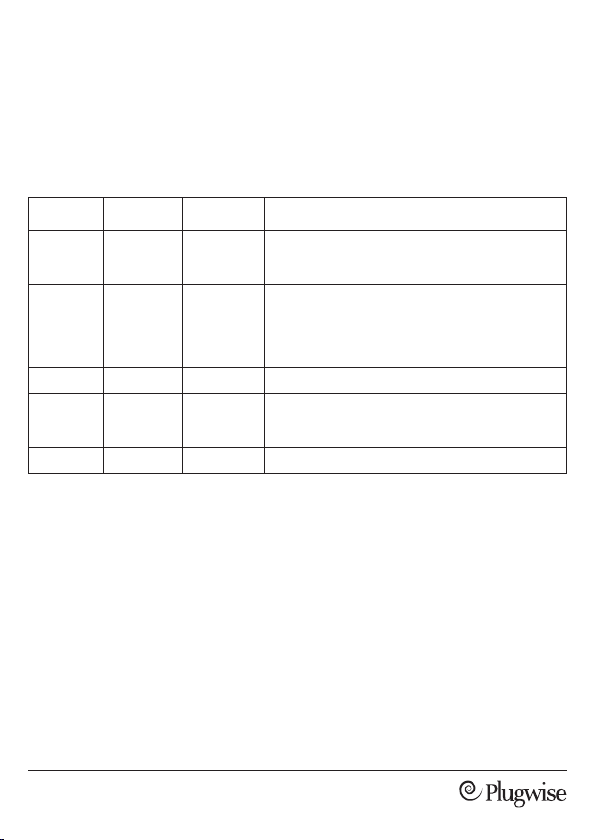
Behaviour of
the lights
The Stretch h as 3 LEDs. In the table b elow
the most im portant behavio ur of the lights
of the Stretch is e xplained.
LED Colour Pattern Description
STAT US Gree n Blink slowly T he Stretch is sta rting up. Wait unt il the Stretch is rea dy.
STAT US Gree n Blink slowly,
WLAN Green Blinking Co mmunication w ith the WiFi n etwork.
WLAN Green Blink slowly Cannot c onnect to th e WiFi netw ork. Has som ething
LAN Green Blinking Co mmunication w ith the netw ork via the net work cable .
then on
When in ac cess point mo de, the LEDs S TATUS and WLA N
are blinking sl owly.
The Stret ch is startin g up. Wait until the St retch is ready:
• when con nected via a n etwork cab le, the LEDs
STATUS and L AN are turne d on.
• when con nected to W iFi, the LEDs S TATUS and
WLA N are turned o n.
been cha nged in the route r settings? Follo w the steps
below “h aving trouble usin g WiFi? ”.
14 | Stretch 3
Page 15

Page 16

Plu gwise B .V.
Wattstraat 56
2171 TR Sassenheim
The Netherlands
www.plugwise.com
Support: www.plug wise.com/technical-conta ct
 Loading...