

Page 1
Quick Start CoolDing
Version 2.0
Firmware version 1.2 and higher
Page 2
2 | Nederlands
Content
Nederlands
Vooraf 3
Belangrijke informatie 3
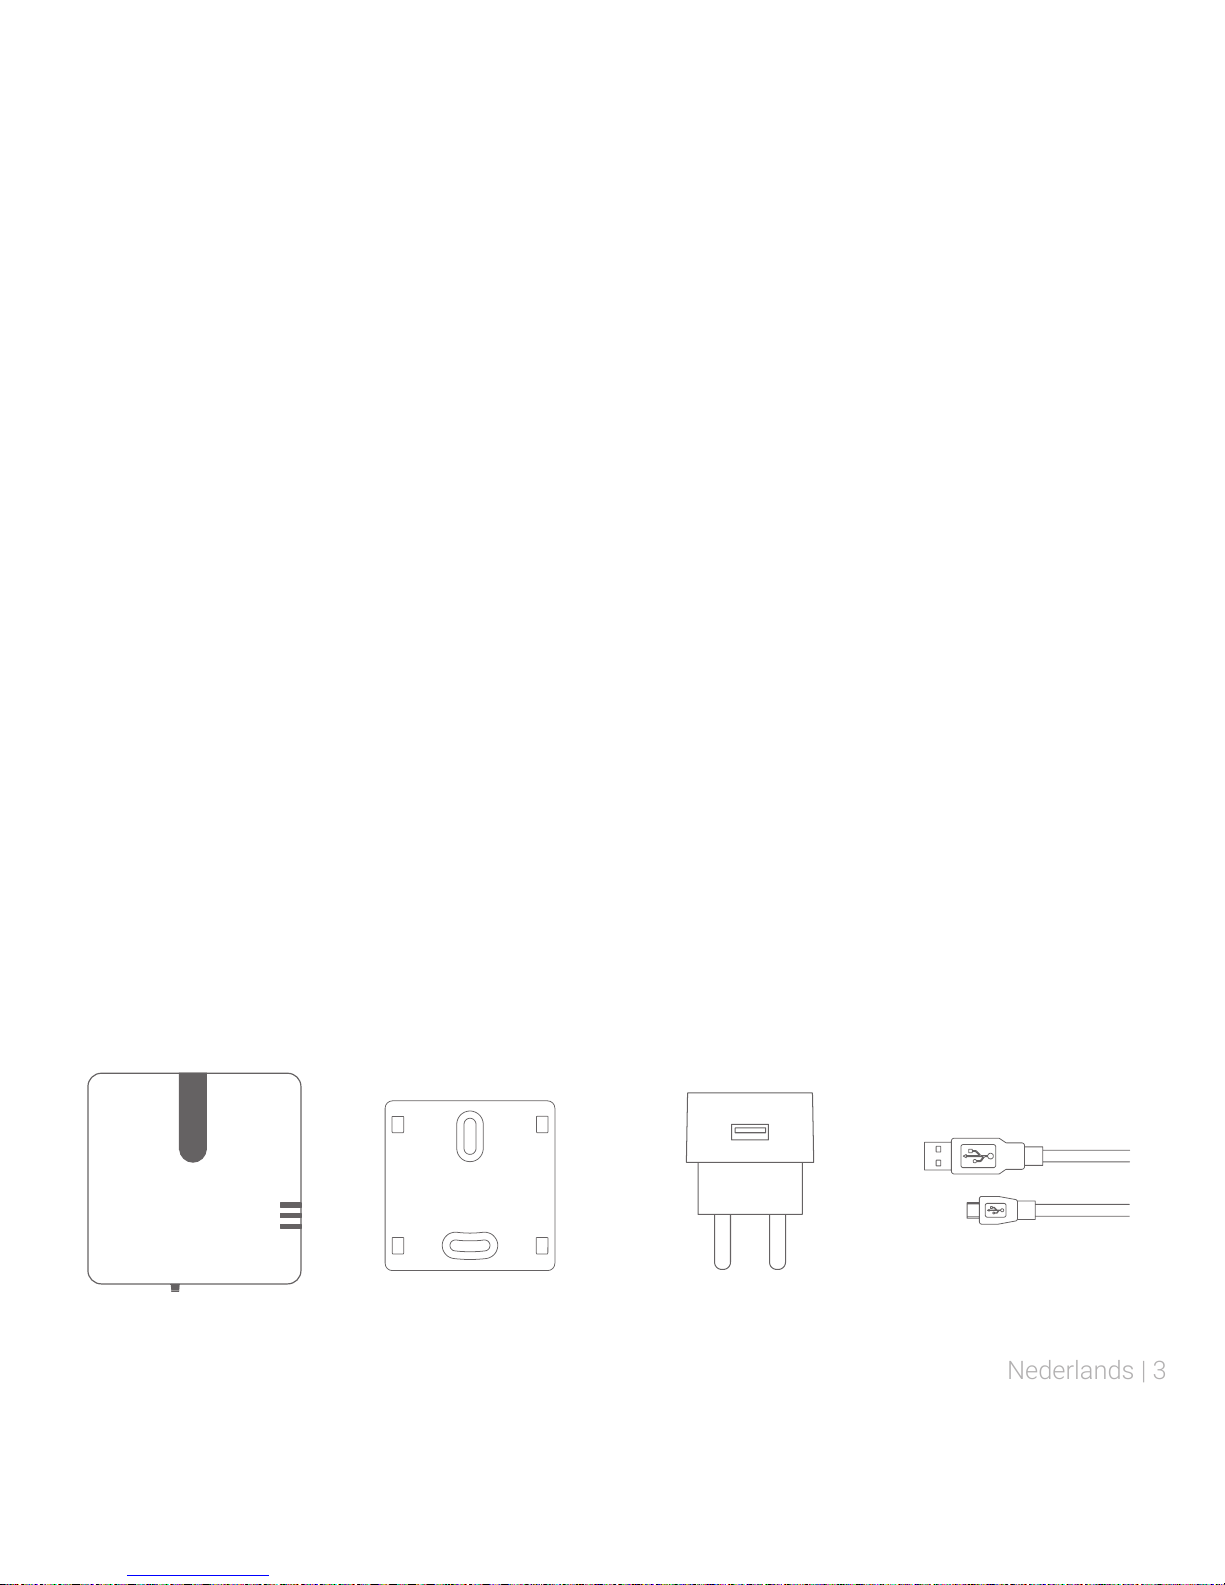
In het pakket van CoolDing 3
Installeer CoolDing in 4 stappen 4
De installatie 4
Verbind CoolDing met het netwerk 5
Controleren netwerkinstallatie 6
Installeer de app 6
Neem commando’s op 7
Plaats CoolDing 8
Milieu 8
Contact 8
English
Preface 9
Important information 9
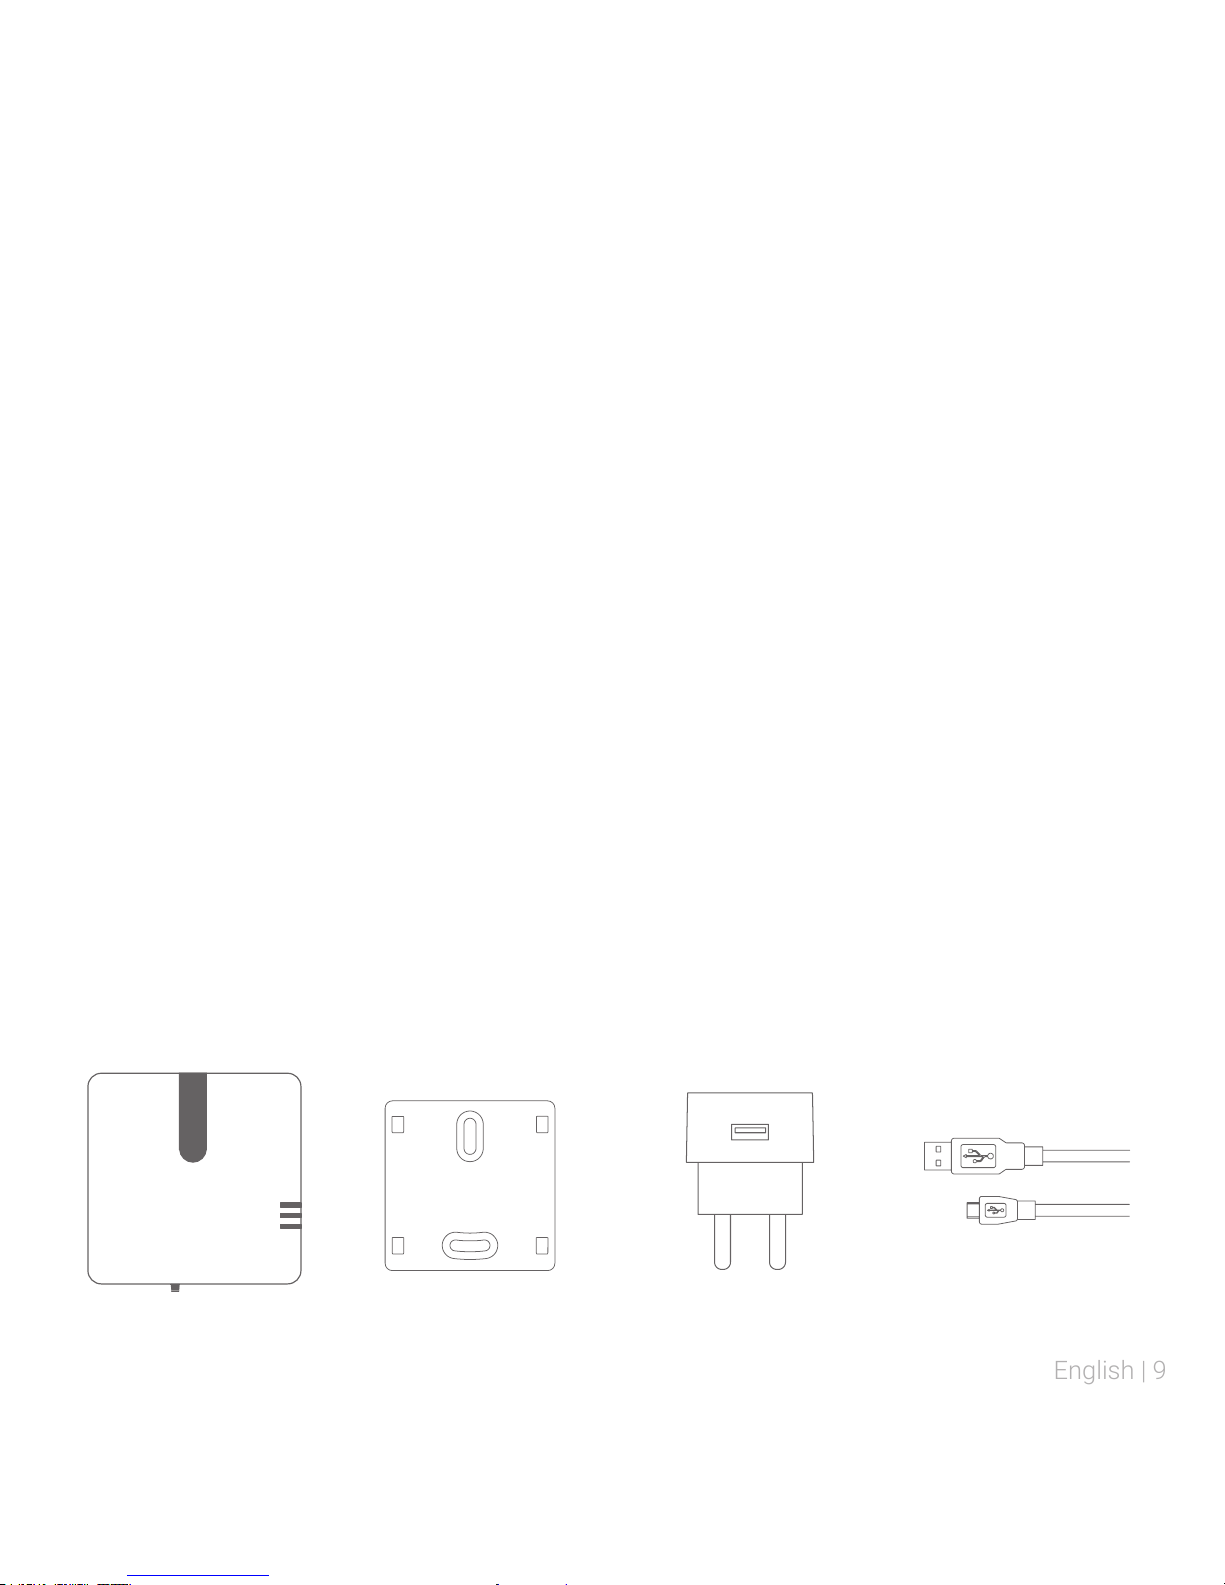
In the package of CoolDing 9
Install CoolDing in 4 steps 10
The installation 10
Connect CoolDing with your network 11
Check network installation 12
Install the app 12
Record command 13
Place CoolDing 14
Environment 14
Contact 14
Page 3
Nederlands | 3
U heeft een netwerkverbinding nodig.
Controleer vooraf de WiFi-verbinding en de
beschikbaarheid van een vrij stopcontact op de
plek waar u CoolDing wilt plaatsen.
U heeft een smartphone, tablet of computer
nodig om CoolDing met uw netwerk te
verbinden en in te stellen.
Vooraf
Dit is de Quick Start voor CoolDing. CoolDing is
een universele infrarood afstandsbediening die de
commando’s van de bestaande afstandsbediening
kan opnemen en met behulp van de bijbehorende
app kan afspelen. In deze handleiding wordt in 4
stappen uitgelegd hoe u CoolDing installeert.
Belangrijke informatie
Het zwarte (infrarood) schermpje van CoolDing
kan tot 8 meter recht tegenover het aan te
sturen apparaat worden geplaatst.
Als het zwarte schermpje van CoolDing
met een kleine afwijkingshoek tegenover
het apparaat moet worden geplaatst, is dit
mogelijk tot een hoek van 30º (max. afstand
naar het apparaat neemt af tot 2 meter). Let
op: hoe groter de hoek afwijkt, hoe kleiner de
afstand mag zijn van het zwarte schermpje
van CoolDing naar het aan te sturen apparaat.
We raden u aan om naast deze handleiding ook
onze website www.plugwise.nl te raadplegen. Hier
vindt u veelgestelde vragen en een uitgebreide
handleiding over de software.
In het pakket van CoolDing
CoolDing Bevestigingsplaatje Adapter Adapterkabel
Page 4
4 | Nederlands
1 2 43
Installeer CoolDing in 4 stappen
Verbind CoolDing
met het netwerk
Installeer de app Neem commando’s op Plaats CoolDing
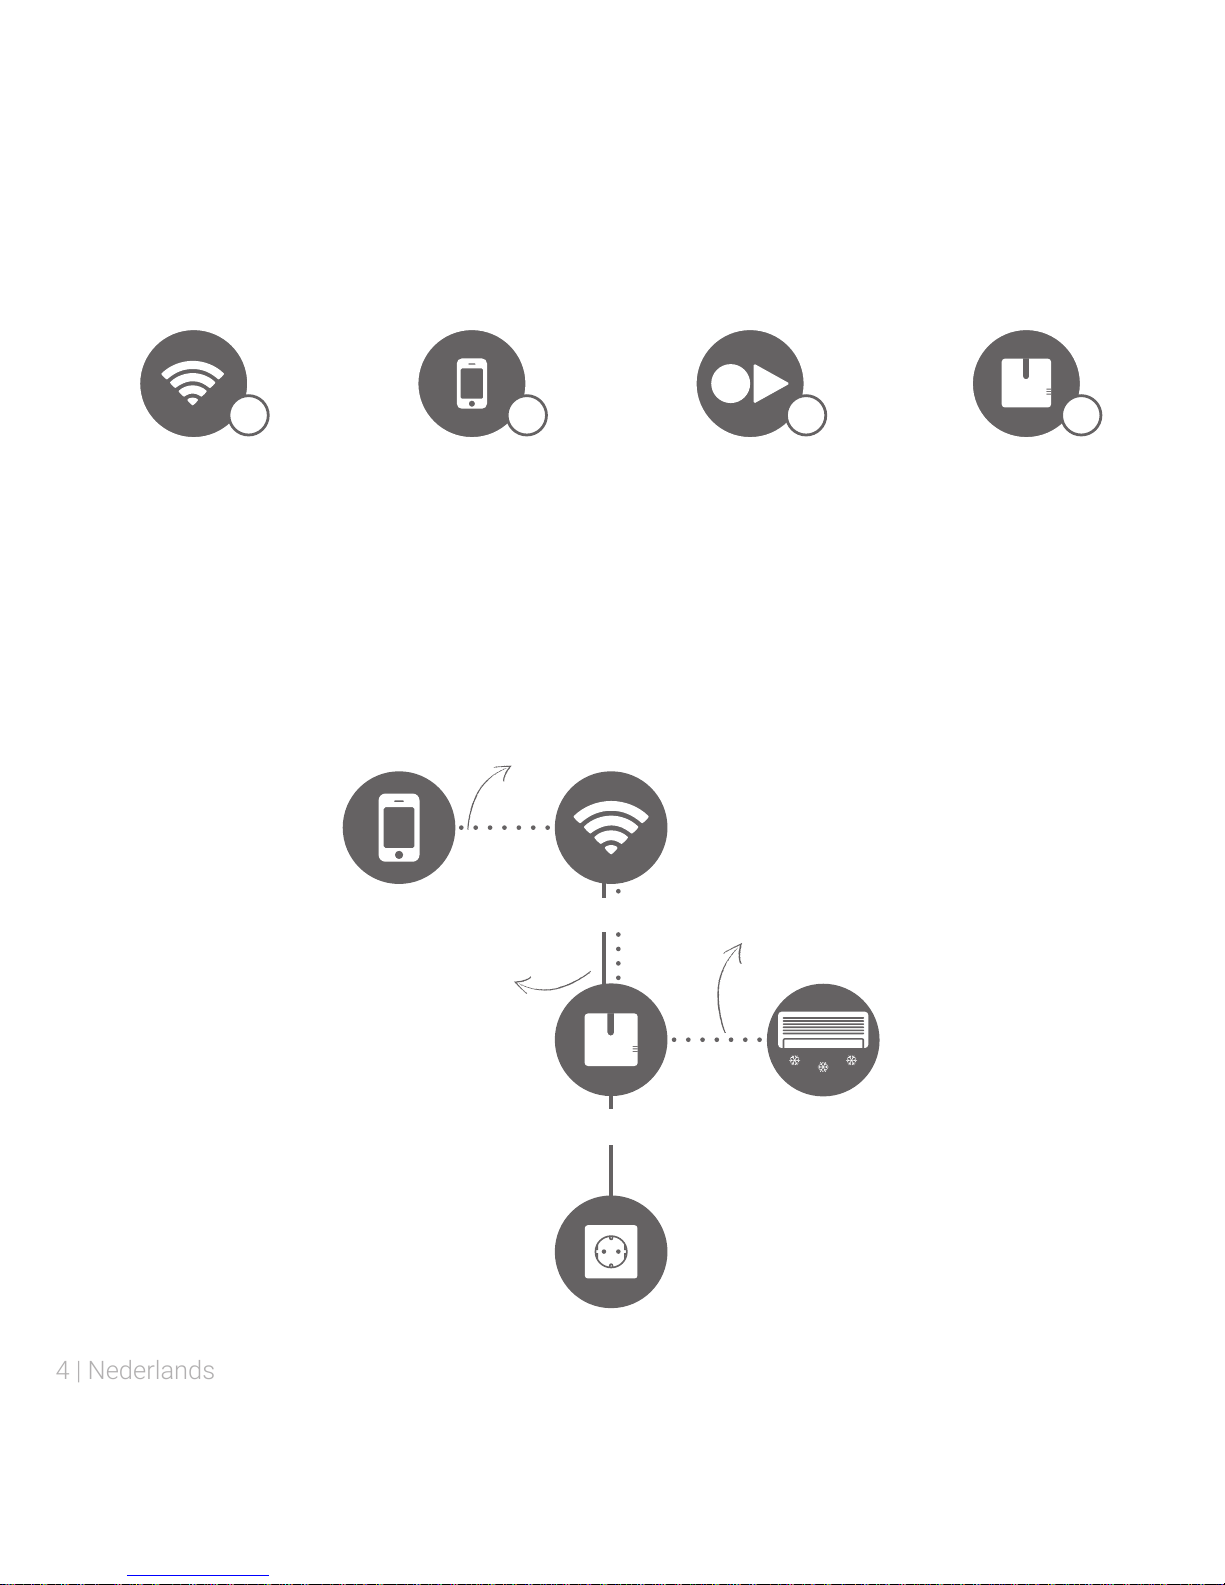
Met CoolDing slaat u de infrarood signalen van uw apparaat één voor één
op. Met de CoolDing app op uw smartphone of tablet kunt u de gekopieerde
signalen afspelen en zo uw infrarood apparaten bedienen.
De installatie
Smartphone
of tablet
Netwerkrouter
CoolDing
Extra stopcontact
IR aan te sturen
apparaat
WiFi
LAN
Infrarood (IR)
Page 5
Nederlands | 5
Verbind CoolDing met het netwerk
Sluit u CoolDing liever aan met een
netwerkkabel op uw router? Volg dan direct de
stappen rechts op voor de LAN-aansluiting.
Sluit de adapterkabel aan op de adapter
en CoolDing en steek de stekker in het
stopcontact. Wacht tot CoolDing is opgestart:
de lampjes “Status” en “WLAN” knipperen
langzaam om en om.
Sluit CoolDing aan op uw netwerk. Volg de
stappen op van de door u geselecteerde
netwerkaansluiting.
WiFi via WPS wordt alleen ondersteund via
een speciale WPS-knop op (de webpagina van)
de router.
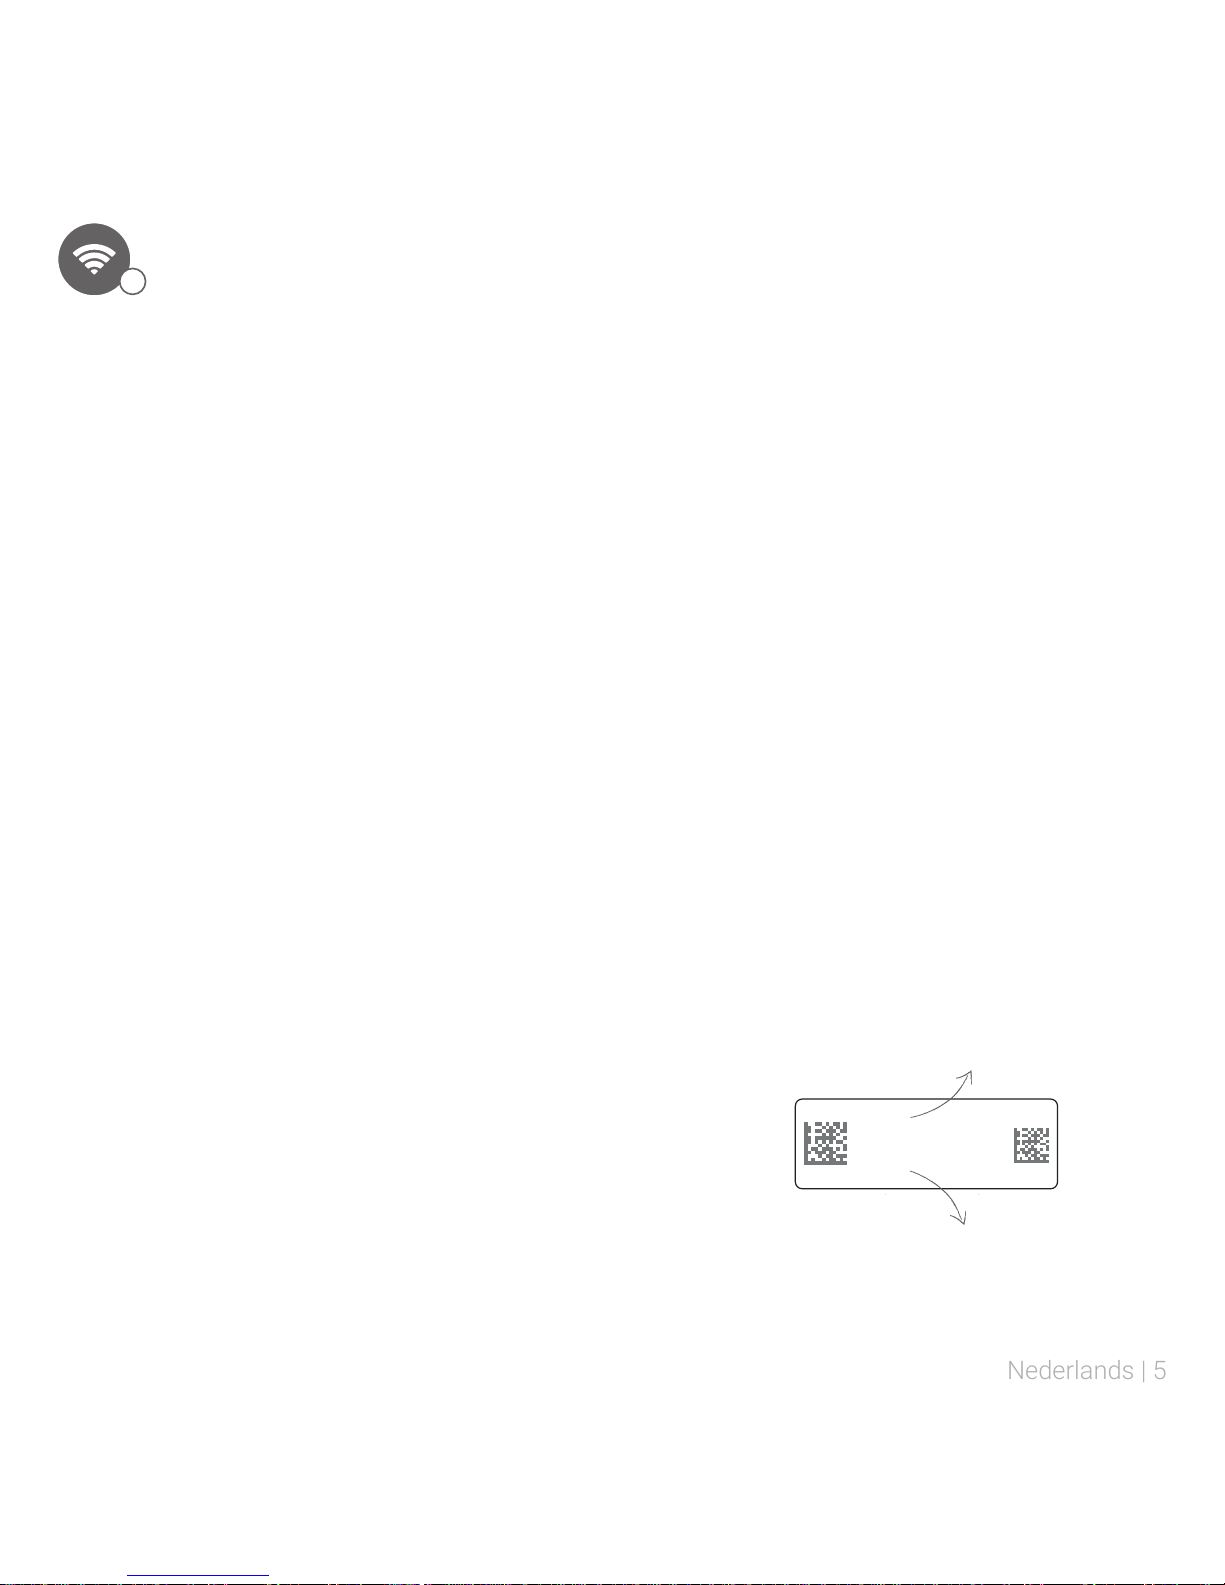
Het Short ID (8 kleine letters) en de
netwerknaam (achter ssid) vindt u op de
sticker op de voorkant van CoolDing
WiFi
Verbind uw smartphone of tablet met het
netwerk dat begint met “Smile_”.
Voer als wachtwoord het Short ID in.
Ga in de webbrowser naar
http://192.168.40.40. De pagina
“Netwerkinstellingen” verschijnt automatisch.
Druk op “Scan” en selecteer uw eigen WiFinetwerk.
Voer het wachtwoord in van uw eigen WiFinetwerk. Sla de instellingen op.
CoolDing wordt verbonden met het netwerk. De
lampjes “Status” en “WLAN” branden wanneer
de verbinding is gelukt.
stuvwxyz
ssid: smile_abcdef
WiFi via WPS
Druk 2 seconden op de zwarte knop op
CoolDing.
Wacht totdat het lampje “WLAN” snel en
regelmatig blijft knipperen.
Druk op de WPS-knop van de WiFi-router om te
verbinden met WiFi.
CoolDing wordt verbonden met het netwerk. De
lampjes “Status” en “WLAN” branden wanneer
de verbinding is gelukt.
Wanneer CoolDing na 2 minuten nog geen
verbinding heeft gemaakt met uw WiFi-netwerk
wordt CoolDing opnieuw in de aanmeldmodus
gezet.
LAN
Sluit een netwerkkabel aan tussen de router en
CoolDing voordat u de stekker van CoolDing in
het stopcontact steekt.
CoolDing wordt verbonden met het netwerk. De
lampjes “Status” en “WLAN” branden wanneer
de verbinding is gelukt.
1
Short ID (in het voorbeeld “stuvwxyz”)
Netwerknaam (achter ssid)
Page 6
6 | Nederlands
Controleer of u CoolDing juist met uw netwerk
heeft verbonden. Gebruik hiervoor een
smartphone of tablet die verbonden is met
hetzelfde netwerk waarmee nu ook CoolDing
is verbonden.
Ga naar https://coolding.plugwise.net, vul uw
Short ID in en log in. Wanneer CoolDing goed
met uw netwerk is verbonden opent de lokale
HTML-interface van CoolDing.
Niet gelukt via WiFi?
Druk dan op het zwarte knopje op CoolDing
totdat het lampje “Status” 5 keer heeft
geknipperd en het lampje “WLAN” snel gaat
knipperen. De netwerkinstellingen worden
gewist. Wacht totdat CoolDing weer is
opgestart en probeer opnieuw CoolDing met
uw WiFi-netwerk te verbinden (stap 1).
Niet gelukt via LAN?
Haal de stekker van CoolDing uit het
stopcontact. Controleer of de netwerkkabel
goed is aangesloten op CoolDing. Start
CoolDing weer op door de stekker van
CoolDing in het stopcontact te steken.
Controleren netwerkinstallatie
Download en installeer de app op uw
smartphone of tablet. U vindt de app in de
App Store of op Google Play onder de naam
“CoolDing”, of via
www.plugwise.nl/coolding-app.
Start de app. Vul de details van CoolDing in
en sla dit op door op de pijl links bovenin het
scherm te drukken.
Installeer de app
Buitenshuis
Wilt u ook buitenshuis kunnen schakelen? Om
buitenshuis te kunnen schakelen is er voor
CoolDing een Cloud-service beschikbaar. Om
hier gebruik van te kunnen maken hebben wij
uw toestemming nodig om uw data te mogen
opslaan. U houdt controle over uw eigen
data. Plugwise belooft dat uw meetgegevens
anoniem blijven.
2
Page 7
Nederlands | 7
Neem commando’s op
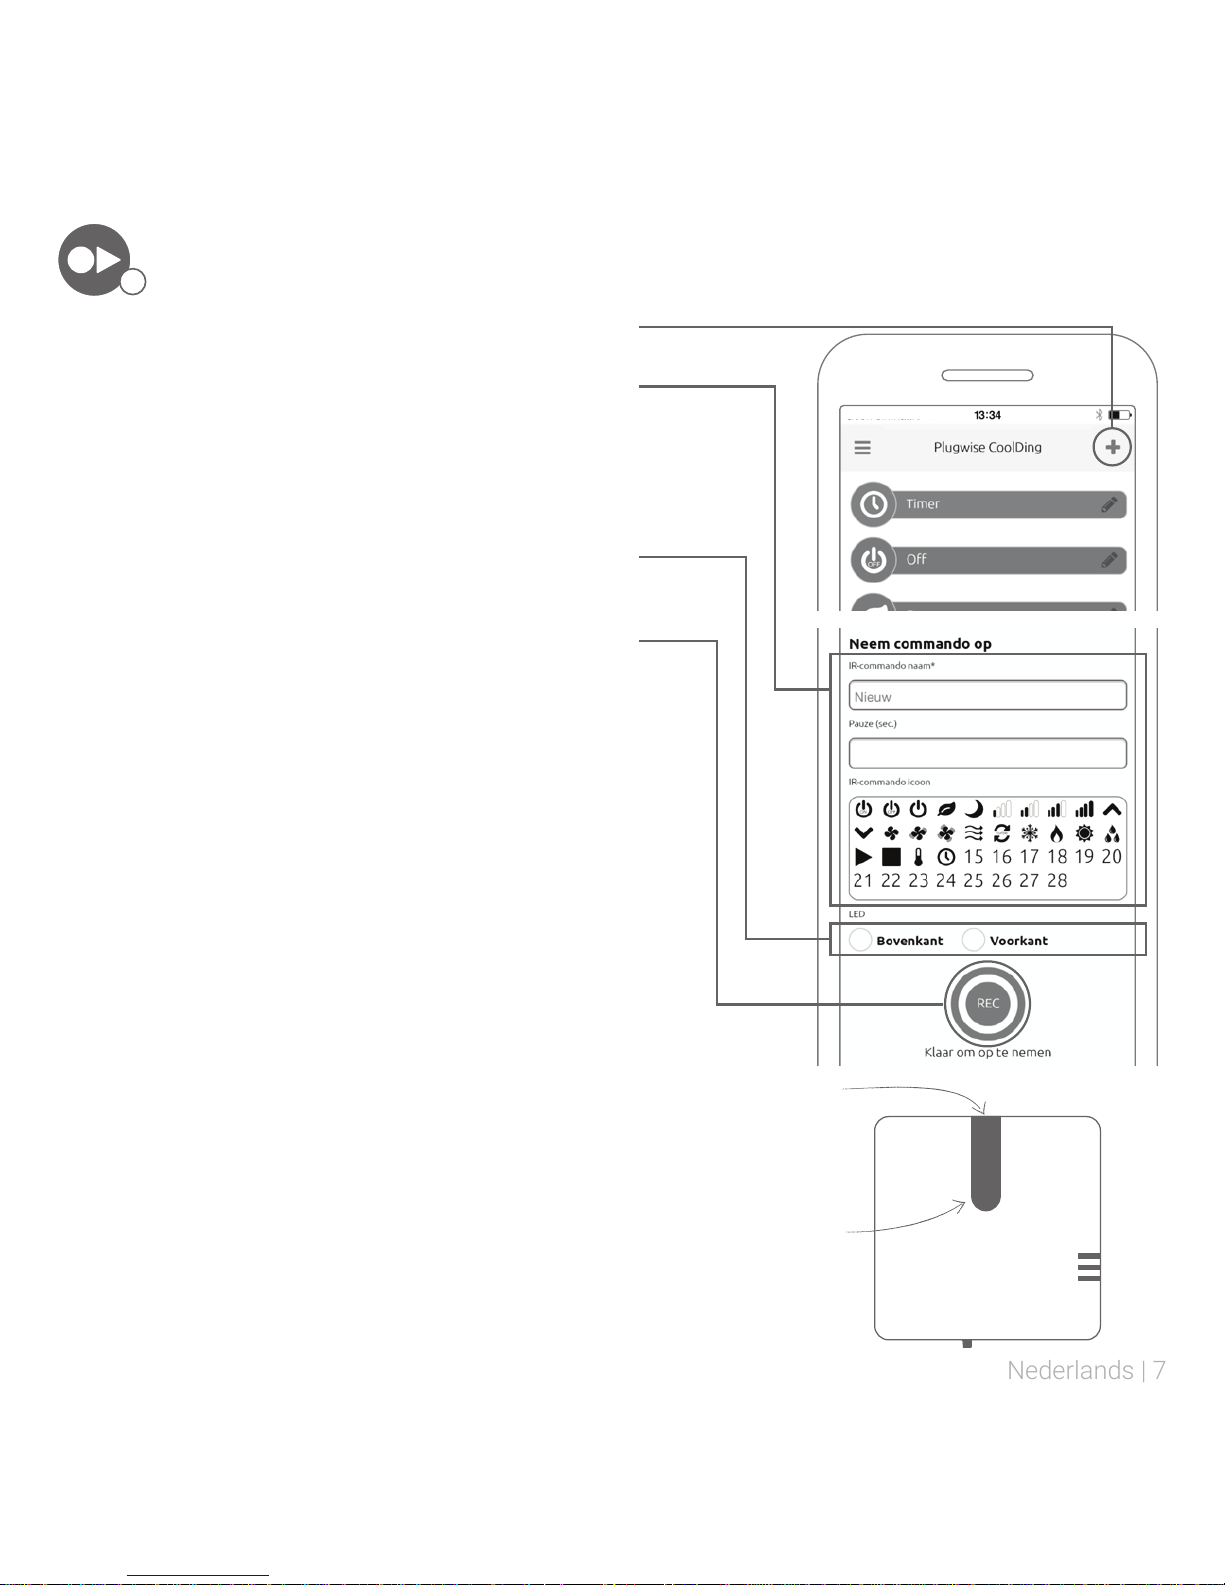
Klik op het teken rechts bovenin het scherm.
Geef het commando een naam. Als u meerdere
commando’s achter elkaar wilt afspelen kunt u
een tijd van rust nemen tussen de verschillende
commando’s: vul dan “Pauze” in. Kies een icoon
dat past bij het commando dat u op wilt nemen.
Kies welke kant van het zwarte schermpje van
CoolDing u straks richt op het apparaat.
Druk op de rode knop in de app om het
commando op te nemen.
Richt de afstandsbediening van het apparaat
op de bovenkant van het zwarte schermpje van
CoolDing.
Speel het commando dat u wilt kopiëren af met
de afstandsbediening. Als het commando goed is
opgenomen komt u in de app automatisch in het
afstandsbedieningsscherm terecht.
Wilt u meerdere commando’s achter elkaar
afspelen?
Klik in het afstandsbedieningsscherm op een
bestaand commando om te bewerken. U kunt nu
eenvoudig een commando toevoegen door op
“Neem commando op” te drukken, onderin het
scherm. Het bovenliggende commando bevat nu
meerdere commando’s die achter elkaar worden
afgespeeld. Voor meer informatie raadpleeg de
uitgebreide software handleiding via
www.plugwise.nl/handleidingen.
voorkant
bovenkant
3
Page 8
8 | Nederlands
Plaats CoolDing
Bepaal de positie van CoolDing bij het apparaat
dat u wilt aansturen. Houd hierbij rekening met
waar CoolDing moet komen te hangen ten
opzichte van het stopcontact en het apparaat.
Monteer het bevestigingsplaatje van CoolDing
aan de muur of het plafond.
Plaats CoolDing op het bevestigingsplaatje.
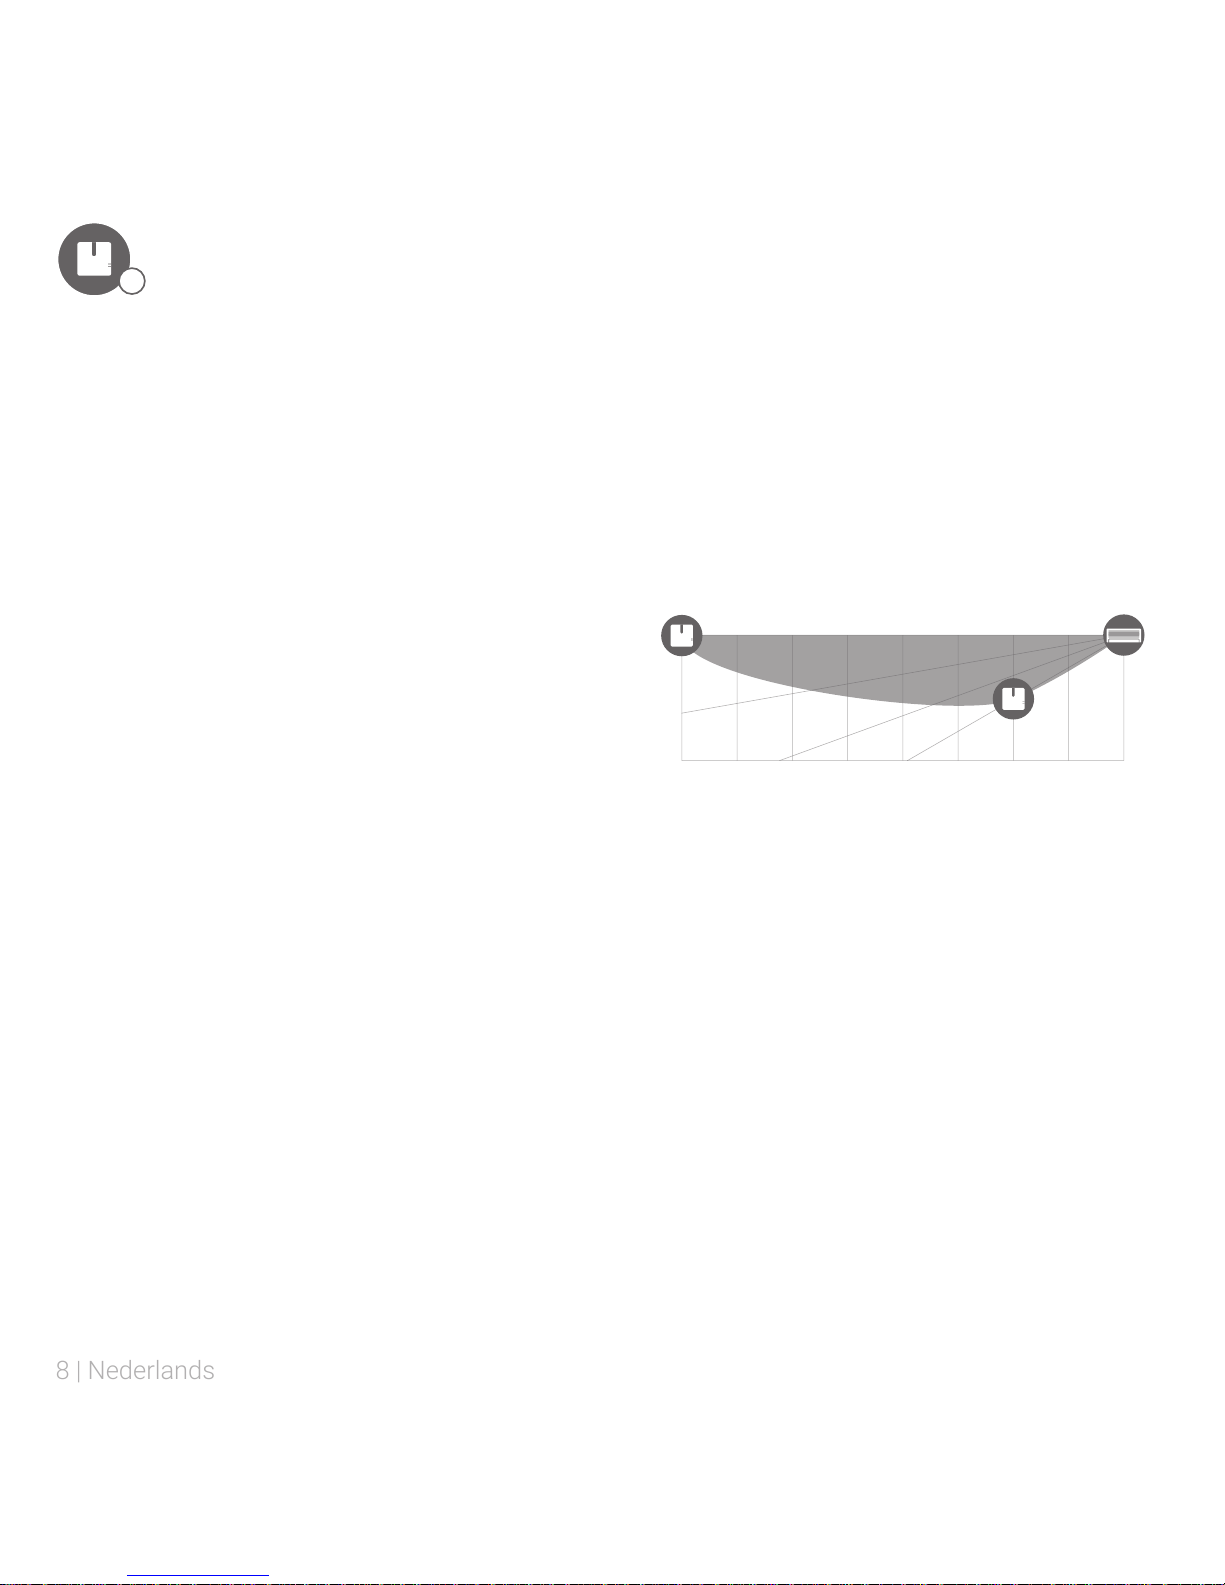
Het zwarte (infrarood) schermpje van CoolDing
kan tot 8 meter recht tegenover het aan te
sturen apparaat worden geplaatst.
Als het zwarte schermpje van CoolDing
met een kleine afwijkingshoek tegenover
het apparaat moet worden geplaatst, is dit
mogelijk tot een hoek van 30º (max. afstand
naar het apparaat neemt af tot 2 meter). Let
op: hoe groter de hoek afwijkt, hoe kleiner de
afstand mag zijn van het zwarte schermpje
van CoolDing naar het aan te sturen apparaat.
1m
2m3m4m5m6m7m8m
300
200
100
4
Milieu
Oude elektrisch en elektronische apparaten
bevatten vaak waardevolle materialen. Plaats een
afgedankt apparaat dan ook nooit bij het gewone
afval.
Contact
Komt u er niet helemaal uit? Kijk eerst op
www.plugwise.nl. Hier staan veelgestelde vragen
en een software handleiding. U kunt ook het
contactformulier invullen:
www.plugwise.nl/technisch-contact.
Lever het apparaat in bij een gemeentelijk
inzameldepot voor elektrische en elektronische
apparatuur.
Page 9
English | 9
You will need a network connection. Check
the WiFi connection beforehand and check if a
free power socket is available near the location
where you want to place CoolDing.
You will need a smartphone, tablet, or
computer to connect CoolDing to your
network.
Preface
This is the Quick Start of CoolDing. CoolDing is a
universal infrared remote control that can record
the commands of your existing remote control
and can play them back with the accompanying
app. This manual explains in 4 steps how to install
CoolDing.
Important information
The black (infrared) display of CoolDing can
be placed up to 8 meters right in front of the
device you want to control.
If the black display of CoolDing must be placed
with a small deviation angle towards the
device, this is possible up to an angle of 30º
(max. distance to the device decreases to 2
meters). Keep in mind, the larger the deviation
of the angle, the shorter the distance of the
black display to the device you want to control.
We advise you to also consult our website
www.plugwise.com beside the manual. Here
you will nd frequently asked questions and an
extensive manual about the software.
In the package of CoolDing
CoolDing Mounting frame Adapter Adapter cable
Page 10
10 | English
1 2 43
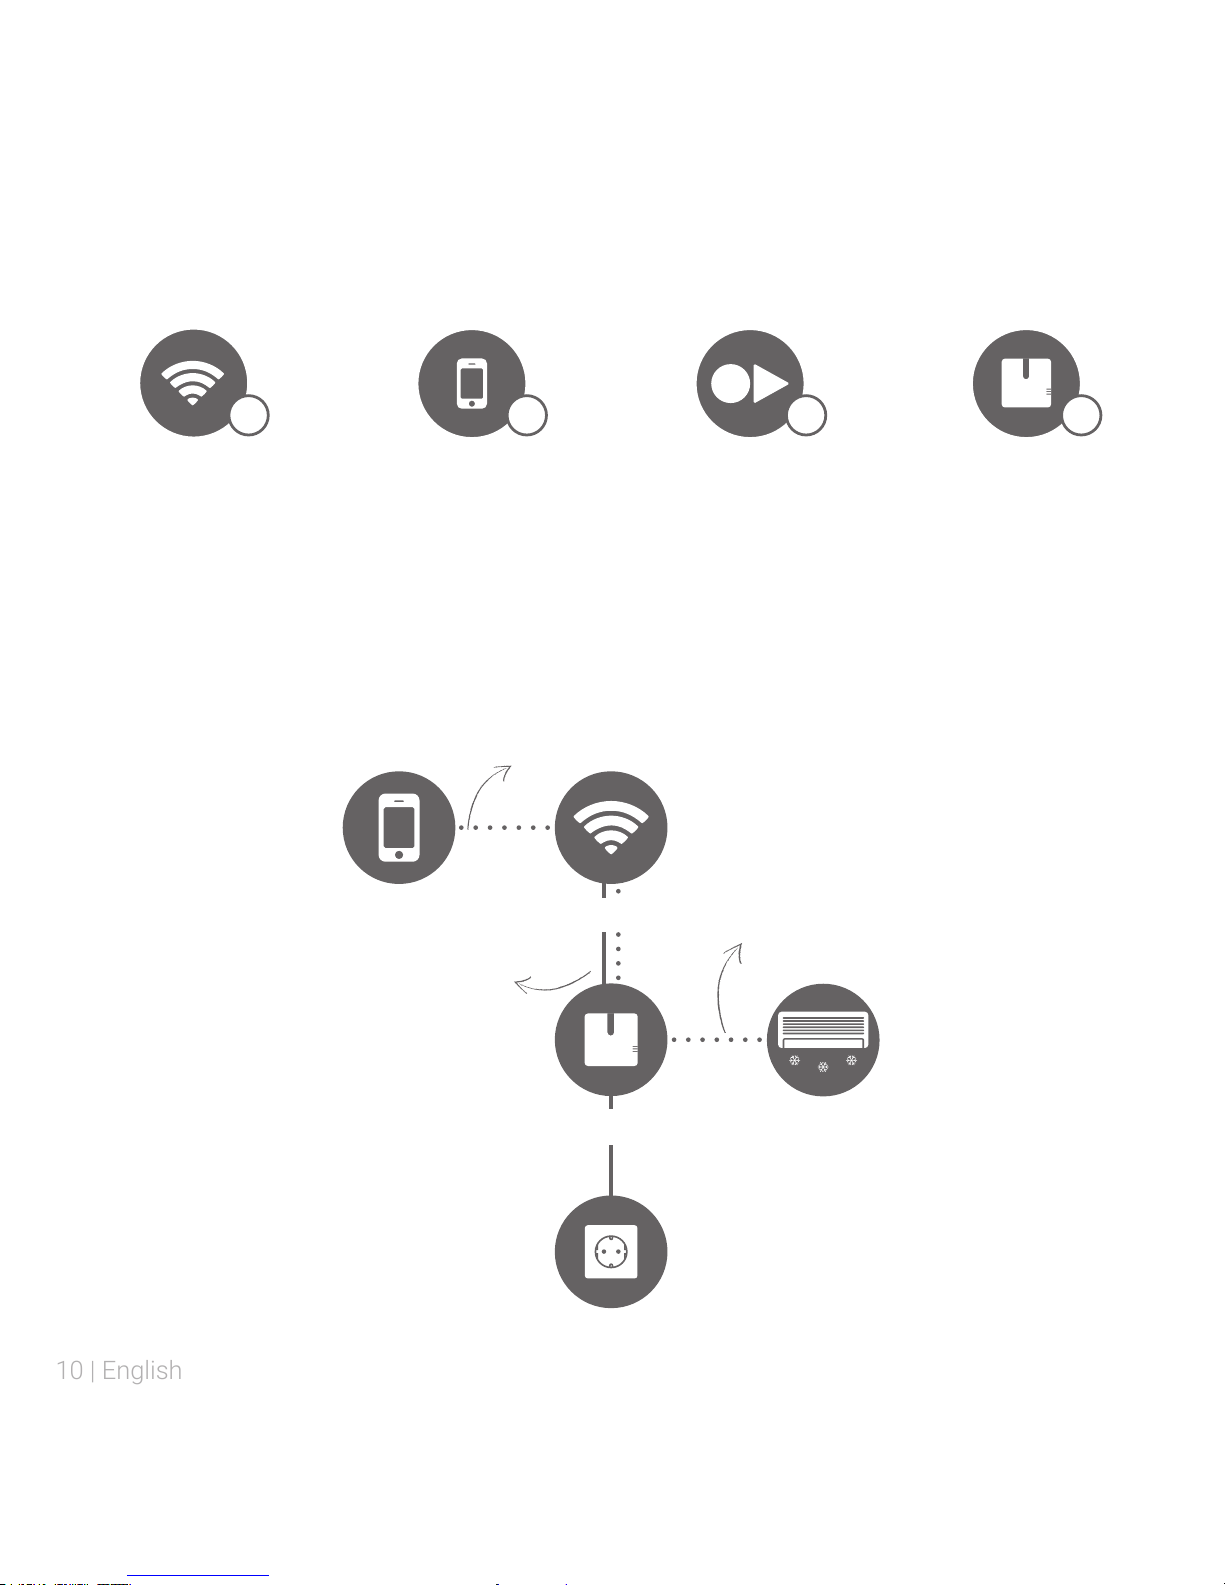
Install CoolDing in 4 steps
Connect CoolDing
with your network
Install the app Record commands Place CoolDing
With CoolDing you store the infrared commands of your device one by one.
With the CoolDing app on your smartphone or tablet you can control your
infrared device by playing the recorded commands.
The installation
Smartphone
or tablet
Network router
CoolDing
Extra socket
IR device
WiFi
LAN
Infrared (IR)
Page 11
English | 11
Connect CoolDing with your network
Do you rather connect CoolDing with a network
cable (UTP-cable) to your router? Then directly
follow the steps on the right for the LAN
connection.
Connect the adapter cable to the adapter and
CoolDing, and plug the plug in the socket. Wait
until CoolDing has booted: the lights “Status”
and “WLAN” are blinking slowly.
Connect CoolDing to your network. Follow
the steps that are applicable to your selected
network connection.
WiFi via WPS is only supported via the special
WPS-button on (the webpage of) the router.
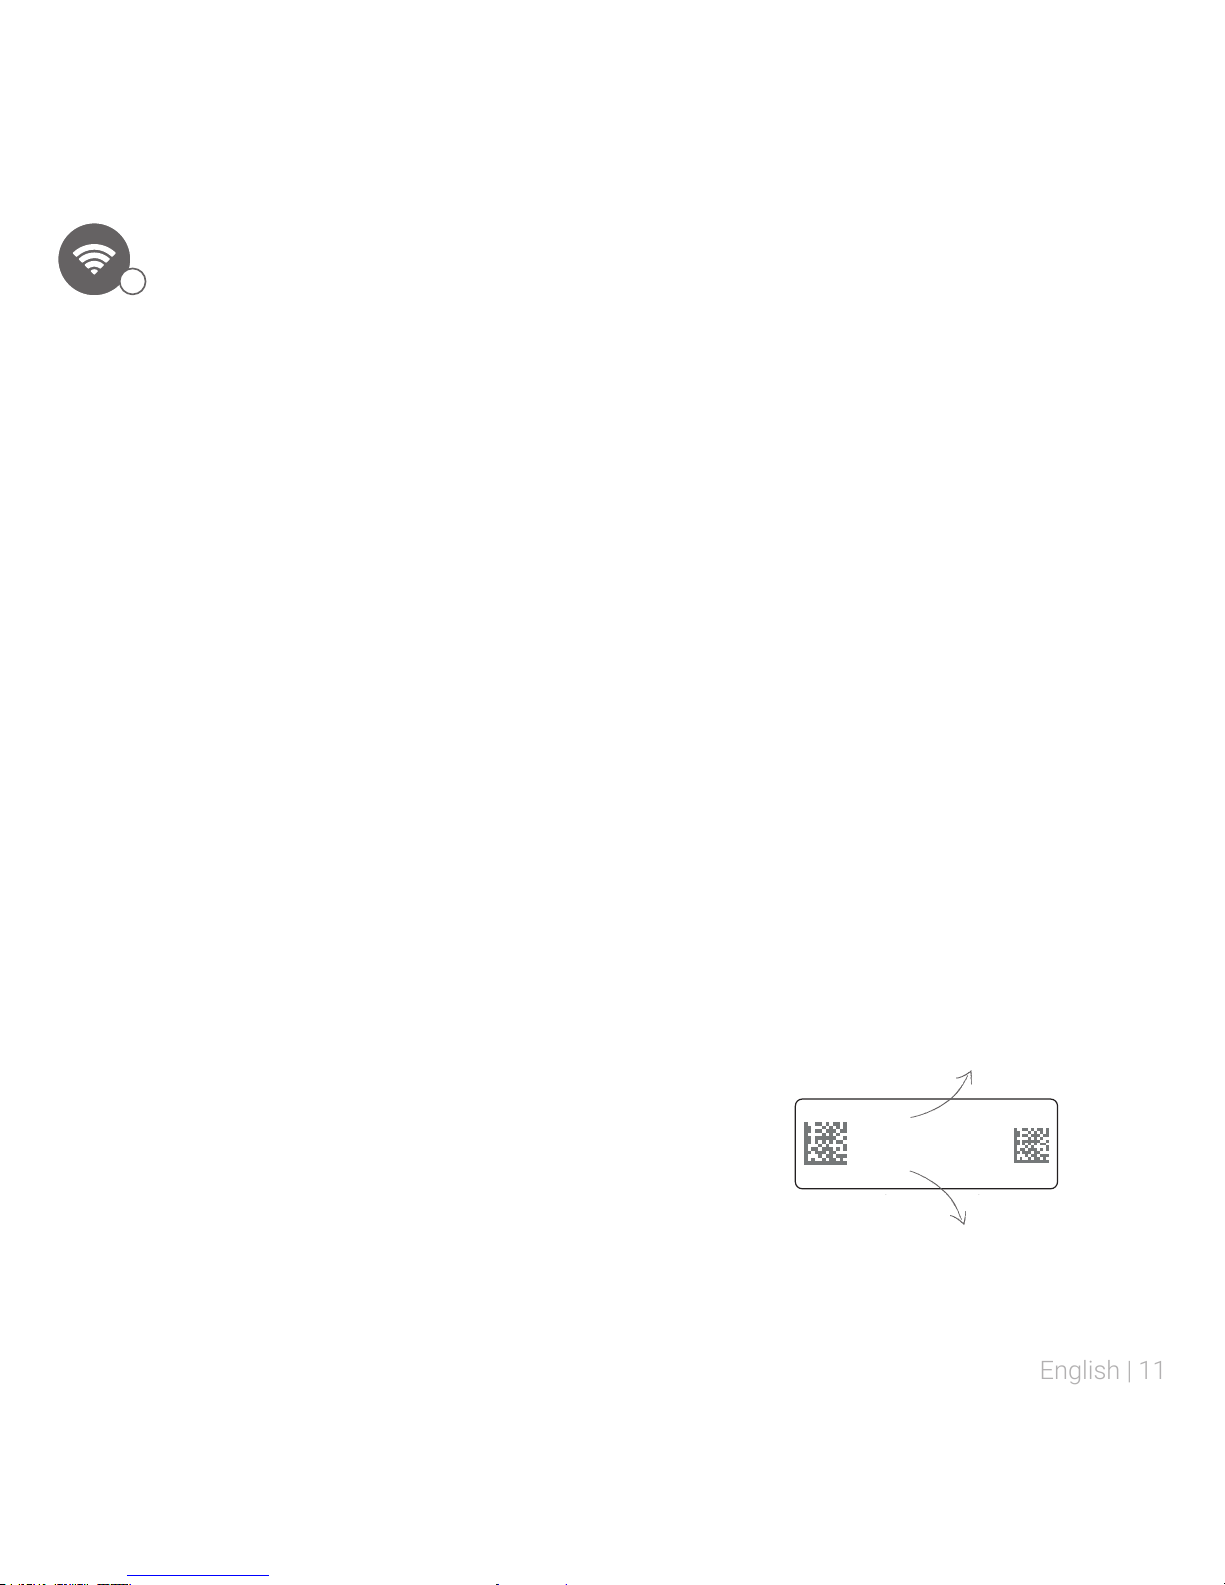
You nd the Short ID (8 lowercase characters)
and the network name (behind ssid) on the
sticker on the front of CoolDing.
WiFi
Connect your smartphone or tablet to the
network that starts with “Smile_”.
Enter the Short ID as your password.
Go to http://192.168.40.40 in the web browser.
The page “Network settings” will appear
automatically.
Press “Scan” and select your own WiFi
network.
Enter the password of your own WiFi network.
Save the settings.
CoolDing is connected to the network. The
lights “Status” and “WLAN” will be on when the
connection is successful.
stuvwxyz
ssid: smile_abcdef
WiFi via WPS
Press the black button on CoolDing for 2
seconds
Wait until the light “WLAN” is blinking quickly
and regularly.
Press the WPS-button on the WiFi router to
connect with WiFi.
CoolDing is connected to the network. The
lights “Status” and “WLAN” will be on when the
connection is successful.
If after 2 minutes CoolDing has not made a
connection to your WiFi network yet, CoolDing
will be recalled to the starting position.
LAN
Connect a network cable between the router
and CoolDing before plugging the plug of
CoolDing in the socket.
CoolDing is connected to the network. The
lights “Status” and “WLAN” will be on when the
connection is successful.
1
Short ID (in the example “stuvwxyz”)
Network name (behind ssid)
Page 12
12 | English
Check if you have properly connected CoolDing
to your network. To do this, use a smartphone
or tablet that is connected to the same
network to which CoolDing is currently also
connected.
Go to https://coolding.plugwise.net, enter your
Short ID in and log in.
When CoolDing is properly connected with
your network, the local HTML interface of
CoolDing will open.
Failed for WiFi?
Press the black button on CoolDing for 5
seconds until the “Status” light blinks 5 times
and the “WLAN” light blinks rapidly. The
network settings are being erased. Wait until
CoolDing has restarted and try to reconnect
CoolDing with the WiFi-network (step 1).
Failed for LAN?
Unplug CoolDing from the power outlet. First,
check if your network cable is connected
correctly to CoolDing. Reconnect CoolDing’s
plug to the power outlet.
Check network installation
Download and install the app on your
smartphone or tablet. You can nd the app
in the App Store or in Google Play under the
name “CoolDing”, or via
www.plugwise.com/coolding-app.
Start the app. Fill in the details of CoolDing
and save them by pressing the arrow in the left
top corner.
Install the app
Switching outdoors
Do you also want to switch outdoors? Plugwise
uses a ‘Cloud service’ to make remote
operation possible. To be able to use this
service, we require your approval to store your
data. You stay in control of your data. Plugwise
promises that your measurement data stay
anonymous.
2
Page 13
English | 13
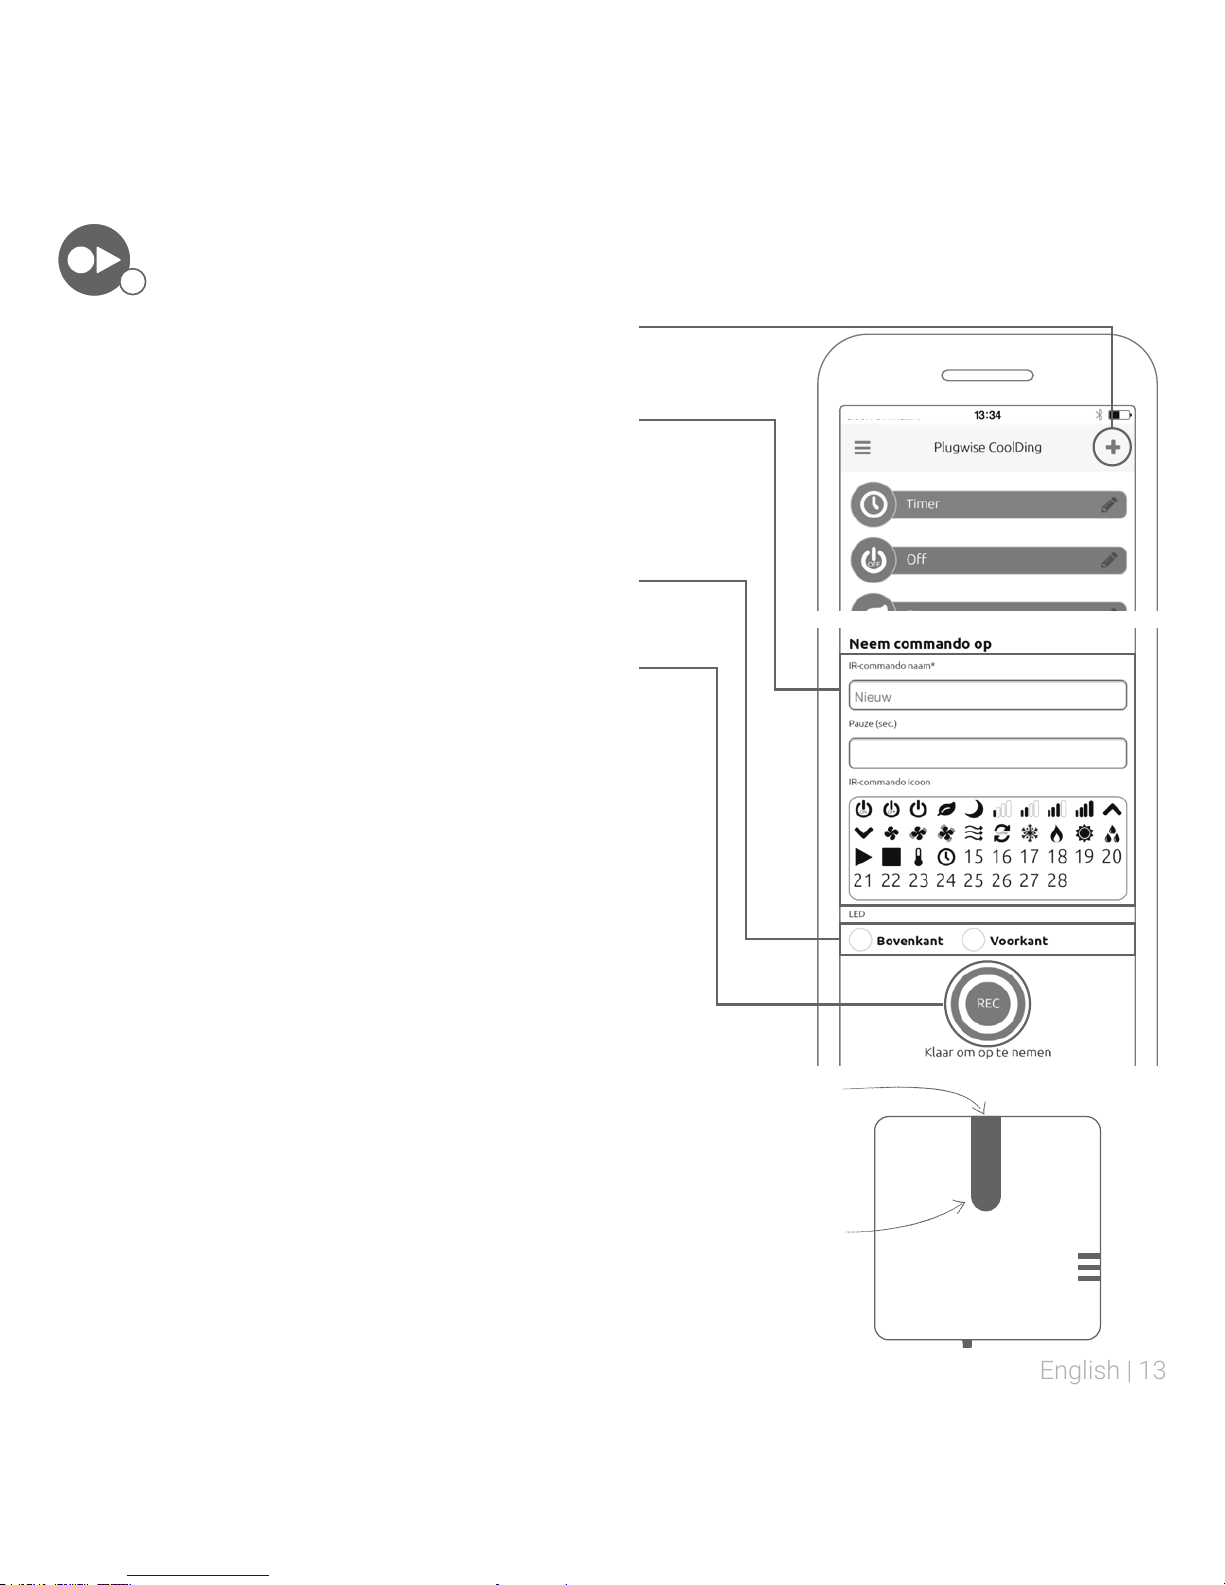
Record command
Click on the icon in the right top corner of the
screen.
Give the command a name. If you want to play
multiple commands after each other you can
insert a pause between the different commands:
enter “Pause”. Choose a tting icon for the
command you will record.
Choose a side of the black display of CoolDing
that will be pointing towards the device.
Press the red button in the app to record the
command.
Point the remote control on the top of the black
display of CoolDing.
Play the command you want to record with the
remote control. If the command is recorded
correctly it will automatically appear in the
“Remote” screen.
Would you like to record multiple commands
after each other?
Click on an existing command in the “Remote”
screen to edit. You can easily add a command
by pressing “Record command” at the bottom
of the screen. The overlying command now
contains multiple commands that will be played
sequentially. For more information consult the
extended software manual via
www.plugwise.com/manuals.
front
top
3
Page 14
14 | English
Place CoolDing
Determine the position of CoolDing to the
device. To this end, please keep in mind the
location where CoolDing will be positioned in
relation to the socket and the device.
Fix the mounting frame of CoolDing to the wall
or the ceiling.
Click CoolDing onto the mounting frame.
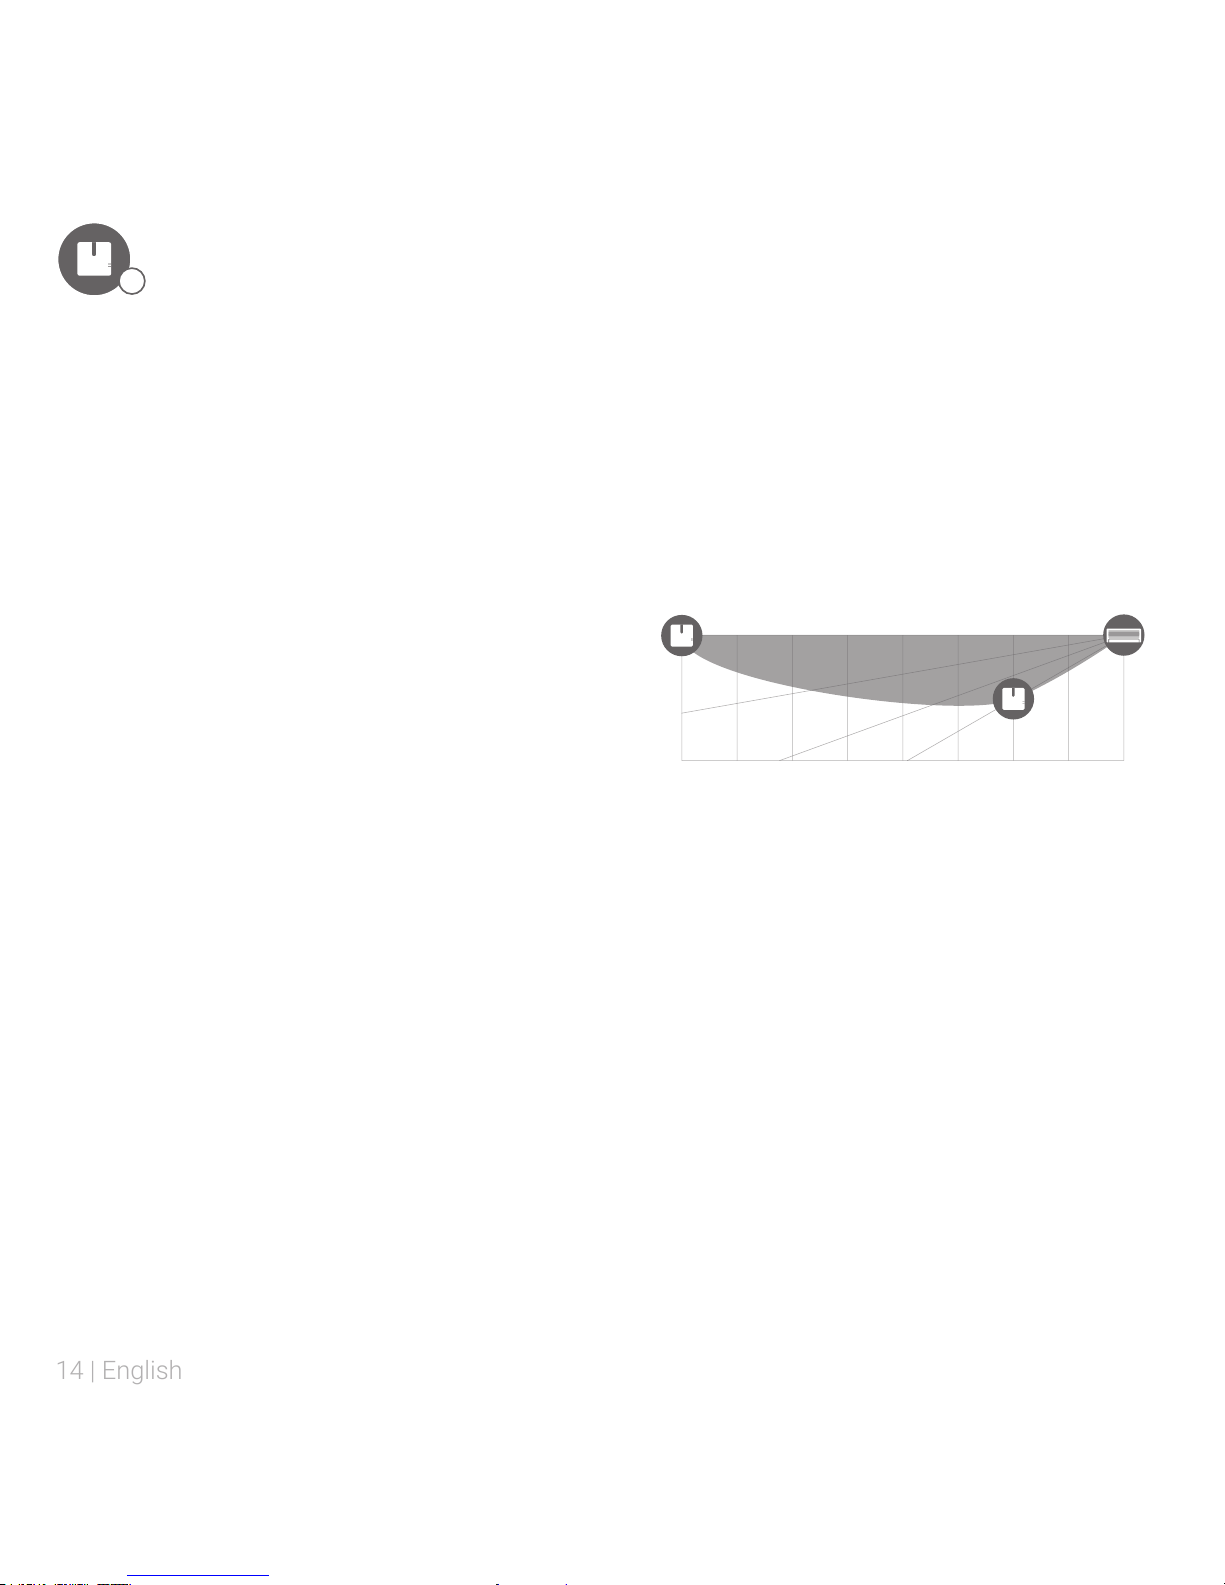
The black (infrared) display of CoolDing can
be placed up to 8 meters right in front of the
device you want to control.
If the black display of CoolDing must be placed
with a small deviation angle towards the
device, this is possible up to an angle of 30º
(max. distance to the device decreases to 2
meters). Keep in mind, the larger the deviation
of the angle, the shorter the distance of the
black display to the device you want to control.
1m
2m3m4m5m6m7m8m
300
200
100
4
Environment
Old electrical and electronic appliances very
often contain valuable materials. Therefore,
never dispose discarded appliances with normal
household waste.
Contact
Having trouble? Please visit our website at
www. plugwise.com.
Here you will nd frequently asked questions and
additional digital manuals. You can also ll in the
contact form:
www.plugwise.com/technical-contact
Hand your old appliances in at the municipal
collection points for electrical and electronic
equipment.
Page 15
Nederlands | 15
Europese CE conformiteitsverklaring
Plugwise B.V. verklaart hierbij dat dit product voldoet aan de benodigde vereisten van de
desbetreffende Europese richtlijnen, waaronder 1999/5/EC (R&TTE). Een exemplaar van de
Europese conformiteitsverklaring is beschikbaar op
www.plugwise.nl/product-conformity.
EU Declaration of Conformity
Plugwise B.V. hereby declares that this product is in compliance with the applicable essential
requirements of the appropriate EC-Directives, including 1999/5/EC (R&TTE). A copy of the EU
declaration of Conformity is available at
www.plugwise.com/product-conformity.
Page 16
Plugwise B.V.
Wattstraat 56
2171 TR Sassenheim
The Netherlands
www.plugwise.com
DA14-0200-02
 Loading...