

Page 1

Plug
Installation manual
Model 16 0-01
Nederla nds | English
DA16-0400-01
Page 2
Installatiehandleiding
Dit docum ent bevat informatie over de
installatiep rocedure en de
functi onaliteiten van dit product .
De besch ikbare functionaliteiten binnen
jouw zigbe e Home Automation-systeem
Plugwis e B.V. verklaart hier bij dat dit
produc t voldoet aan de benodig de
vereisten van de desbetref fende
Europese ric htlijnen, waaronder
1999/5/EC (R&TTE ). Een exemplaar van
de Europese c onformiteitsverklarin g is
beschikb aar op
www.plugwise.nl/product- conformity.
2 | Plug
zijn afhankelijk van de g ateway waarop
de Plug is aangem eld.
Copyright 2 018, Plugwise.
Alle rechten vo orbehouden.
Oude elek trische en elektronisch e
apparaten b evatten vaak waardevolle
materialen. Plaats een afge dankt
apparaat da n ook nooit bij het gewon e
afval . Lever altijd het apparaat in b ij
een gemeentelijk inzameldep ot voor
elektrisch e en elektronische
apparatuur.
Page 3
Vooraf
De Plug kan elek trische apparaten
schakelen, het energieverbruik meten en
doorgeven aa n andere zigbee Home
Automation producte n, zoals een
gat eway.
De Plug kun je installeren binn en jouw
bestaa nde zigbee-net werk. De Plug
communice ert volgens de zigbee standaard “ Home Automation 1 .2”.
Controleer vooraf hoe j e de Plug moet
toevoegen aan jouw sys teem. Gebruik
hiervoo r de handleiding van het sys teem
waarop je de Plug wilt aanmelden .
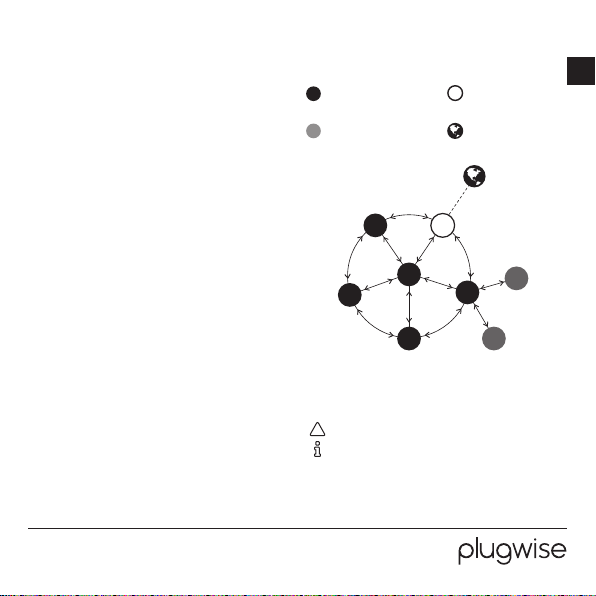
zigbee-router
zigbee-end-device
zigbee-gateway
Internet
NL
Het netwerk
De Plug gedra agt zich als een “zigbee router”. Een zigbee -router is altijd
bereikbaar vo or andere zigbee- modules.
Bovendien ve rgroot de Plug de kwaliteit
van het zigbee-netwerk .
3 | Plug
Symbolen
Let op, waarschuwing!
Tip
Deze stap m oet je uitvoeren
•
Page 4

Voorzorg en
Installatie
veiligheid
Het maximaal toegelaten vermogen
van de Plug is 36 80 Watt (max.
strooms terkte 16 A).
Maak geen gebr uik van het product
als deze is beschadigd of niet goe d
functioneert.
Breng de Plug nooit in contact met
water of een an dere vloeistof.
Meer informatie
Meer infor matie over de Plug vind je op
onze website: w ww.plug wise.com /plug.
4 | Plug
Stap 1: Plaats de Plug
Plaats de Plug in h et stopcontac t
•
Stap 2:
Voeg toe aan het zigbee-netwerk
Gebruik vo or de juiste procedure de
handleiding va n het zigbee-sys teem
waaraan je de Plug wilt toevoegen.
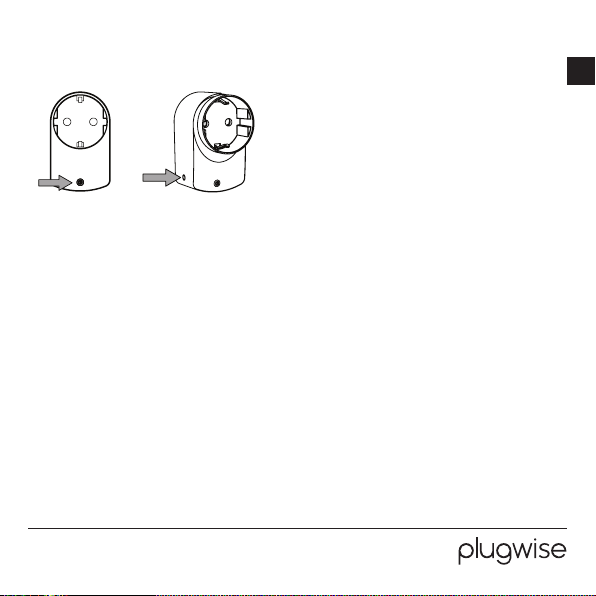
Op de zijkant van d e
Plug zit een drukknop
met de tekst “ join/
leave”.
Druk kort o p de knop zodat de Plug
•
zichtbaar wordt voor het zigb eenetwerk. De LED op d e voorkant van
de Plug knipp ert langzaam groen als
de Plug zich prob eert aan te melden
op het netwerk.
Page 5
Bediening
eenvoudig de seconden meetellen.
Verwijder de Plug uit het
netwerk
Druk de kno p op de zijkant 5
•
seconde n in en laat los.
NL
Drukknop voorkant Drukknop zijkant
Drukknop voorkant
De drukkn op op de voorkant van de Pl ug
gebruik je om de P lug aan of uit te
schakelen.
Drukknop zijkant
De knop op d e zijkant van de Plug gebruik
je voor verschillende doeleinden. De LED
in de knop op de v oorkant van de Plug
geeft je te rugkoppeling. In de tab el op de
volgende pag ina vind je het gedrag van de
LED terug .
De LED knippert elke seco nde dat je de
knop ingedrukt houd t rood. Zo kun je
5 | Plug
De LED bran dt 5 seconden rood om a an
te geven dat de Plug h et netwerk verlaat.
Knopcombinatie niet herkent
Als de Plug de co mbinatie die wordt
ingedruk t met de knop niet herkent, z al
de LED een 0 ,5 seconde kort aan g aan.
Page 6
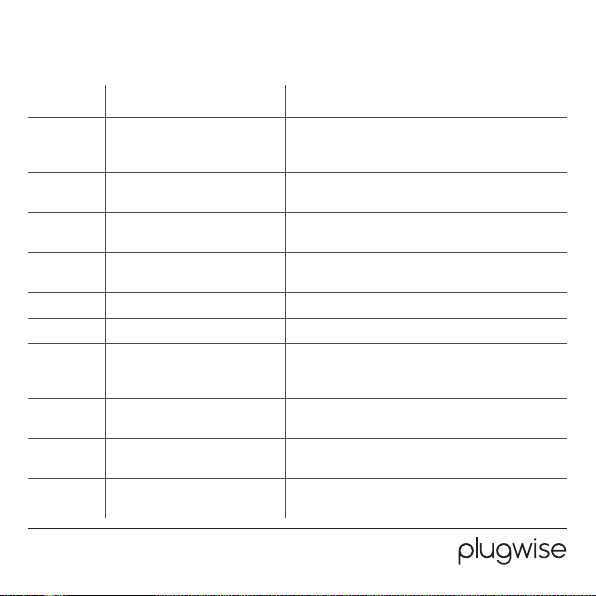
Het gedrag van de LED
Kleur Patroon Beschrijving
Groen 5 sec. Het is geluk t om de Plug toe te voeg en aan het
Groen Knippert langzaam De Plug pro beert zich aan te m elden op het
OranjeGroen
OranjeRood
Oranje Knippert langzaam Er vindt ee n update plaats.
Oranje 0,1 se c./sec . Identi catieproces is b ezig.
Oranje Aan De overbe lastingsbeveilig ing is van kracht . Om te
Rood 5 sec. Het is misluk t om aan te melden op he t netwerk, of
Rood 1 keer knipp eren (0,5 sec .) De Plug begrijp t het patroon niet da t wordt
Rood Snel knip peren
6 | Plug
2 sec. af wisselend Het aange sloten apparaat o p de Plug schakelt aan .
2 sec. af wisselend Het aange sloten apparaat o p de Plug schakelt uit .
(aan: 0 ,1 sec./ sec.)
netwe rk of de Plug is al aan het n etwerk
toegevoegd.
netwerk.
resette n: haal de Plug uit het s topcontac t en plaats
deze terug .
de netw erkinstellingen zijn ge wist.
ingedruk t met de knop.
De knop is in gedrukt.
Page 7
Installation manual
This docum ent contains the installation
procedure a nd functional des cription of
this produc t.
The provided func tionalities within your
zigbee Home Automatio n system depend
on the gateway to which the Plu g is
connected.
Copyright 2 018, Plugwise .
All rights re served.
EN
Plugwis e B.V. hereby declare s that this
produc t is in compliance with the
applicab le essential requirement s of the
appropriate EC- Directives, in cluding
1999/5/EC (R&TTE ). A copy of the EU
declaration o f Conformity is available a t
www.plugwise.com/product- conformity.
7 | Plug
Old elec trical and electro nic appliances
very of ten contain valuable materials .
Therefore , never dispose discard ed
appliance s with normal househ old waste.
Always ha nd in your old appliances a t the
municipal collection points for elec trical
and elec tronic equipment.
Page 8
Preface
The Plug c an switch electrical devices,
measures th eir energy usage and
communic ate this to other zigbee Home
Automation product s, such as a gateway.
The Plug c an be added to your exist ing
zigbee net work. The Plug co mmunicates
via the zigbe e-standard “Home
Automation 1.2”. Plea se consult the
manual of the s ystem you want to conne ct
the Plug to, in order to nd the right
procedure .
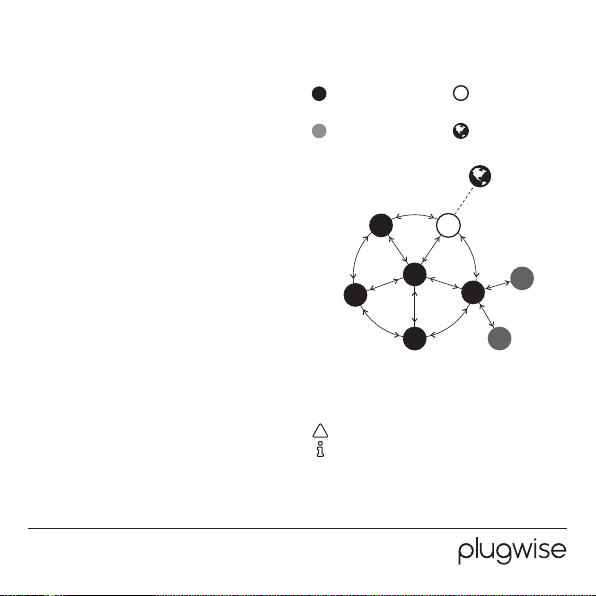
The network
The Plug will b ehave like a “zigbee router”.
A zigbee route r has the advantage that i t
is always reac hable for other zigbee
modules . In addition, the Plug will improve
the mesh quality of the zigb ee network.
8 | Plug
zigbee router
zigbee en d device
Symbols
Warning, be aware!
Advice
You must carr y out this step
•
zigbee gateway
Internet
Page 9
Precautions
Installation
and safety
The maxim um power allowed
through th e Plug is 3680 Watt (max .
current 16A ).
Do not use this p roduct when it is
damaged or if it is m alfunctioning.
Avoid contac t with water or other
liquids.
More
information
More informa tion about the Plug ca n be
found on ou r website:
ww w.plugwis e.com/plu g
9 | Plug
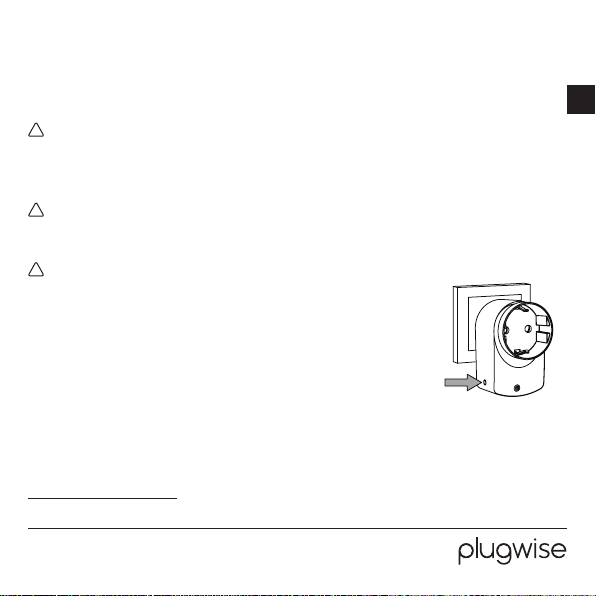
Step 1: Place the plug
Place the Plug in the elect rical
•
socke t.
Step 2:
Join the zigbee network
Please cons ult your zigbee system’s
manual to conn ect it with the Plug .
The Plug co ntains a
push button on the
side with the text
“join /leave”.
Press the bu tton briey allowing the
•
Plug to be visible fo r the zigbee
networ k. The LED will blink slowl y
green when the Plug is joining th e
network.
EN
Page 10
Controls
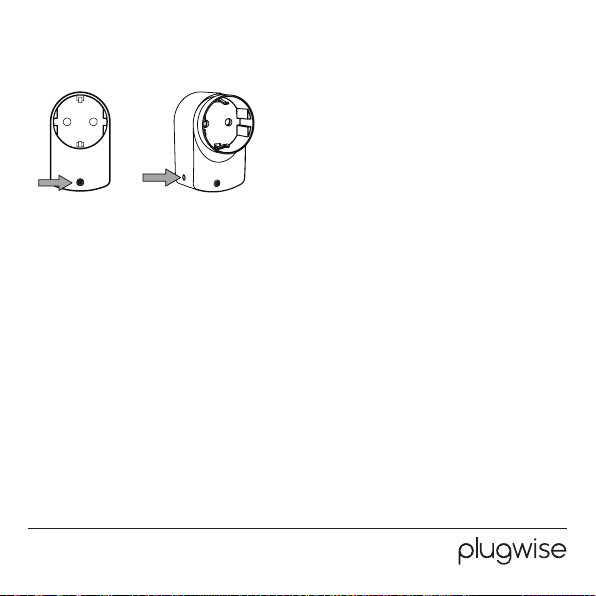
Top button
Top button
The push b utton on top can be use d for
switching th e Plug on and off.
Side button
The but ton on the side of the Plug is use d
for various p urposes. The L ED in the push
button on top shows you fe edback.
An overview of the dif ferent LED
behaviour s is provided in the table on t he
next pa ge of this manual.
The LED will ash red every se cond while
the button is pressed . This helps you
counting the seconds.
10 | Plug
Side button
Removing the Plug from the
network
Press and hold the but ton on the side
•
for 5 secon ds and release.
After yo u have released the but ton, the
LED will burn so lid red for 5 seconds: the
Plug has lef t the network.
Button sequence not recognized
When the P lug does not underst and the
button pattern, th e LED will ash red for
0,5 seconds.
Page 11
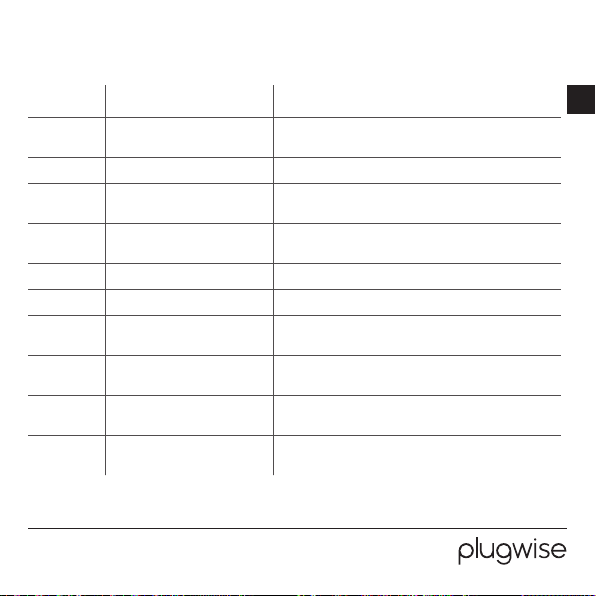
LED behaviour
Colour Pattern Description
Green 5 sec . The Plug ha s successfull y joined the net work or has
Green Slowly blinking The Plug is j oining a network ( in progress).
OrangeGreen
OrangeRed
Orange Slowly blinking Update in progres s.
Orange 0,1 se c./sec . Identif y operation in p rogress.
Orange Solid Overloa d has been trigg ered. To reset: remove t he
Red 5 sec. Joining th e network has fa iled or the netw ork
Red 1 blink (0, 5 sec.) The Plug d oes not unders tand the patte rn that has
Red Briey b linking (on: 0,1 sec ./
11 | Plug
2 sec. alternating The devi ce connecte d to the Plug switch es on.
2 sec. alternating The devi ce connecte d to the Plug switch es off.
sec.)
already jo ined the netw ork.
Plug from th e socket and place i t back.
setting s have been erase d.
been pressed.
The but ton is pressed .
EN
Page 12
Plu gwise B .V.
Wattstraat 56
2171 TR Sassenheim
The Netherlands
www.plugwise.com
Support: www.plug wise.com/technical-conta ct
 Loading...