

Page 1
PlugLink® AV 9560 Wireless Adapter
User’s Guide
PL9560-WAP
Q
UICK
Contact Information
Getting Help
F
IND
L
OCATOR
Table of Contents
Installation
66-0327-00Rev.001
Page 2

© 2008 Asoka USA Corporation
ALL RIGHTS RESERVED
Notice: No part of this publication may be reproduced or transmitted in any form or by any means, electronic
or mechanical, including photocopying and recording, or stored in a database or retrieval system for any
purpose without the express written permission of Asoka USA Corporation.
Asoka USA Corporation reserves the right to make changes to this user’s guide at any time without notice and
assumes no responsibility for its use. Asoka USA products and services can only be ordered under the terms
and conditions of Asoka USA Corporation's applicable agreements. All of the features described in this user’s
guide may not be currently available. Refer to the most recent product announcement for information about
feature and product availability.
This user’s guide contains the most current information available at the time of publication. When new and/
or revised information becomes available, this entire user’s guide is updated and distributed to all registered
users.
Asoka, PlugLink, and the Asoka logo are registered trademarks or trademarks of Asoka USA Corporation.
All company and product names mentioned herein are trademarks of their respective companies. Mention of
third-party products is for informational purposes only and constitutes neither an endorsement nor a
recommendation. Asoka USA Corporation assumes no responsibility with regard to the performance or use of
these products.
Revision Date Description
66-0327-00Rev.001 January 2008 Preliminary Release
Changes in This Revision
• Not applicable (preliminary release)
ii
PlugLink® AV 9560 Wireless Adapter User’s Guide
Page 3

Contact Information
For more information about the PlugLink AV 9560 Wireless Adapter or any of Asoka’s other
leading-edge solutions, please contact us using any of the following methods:
• Voice calls: We welcome your calls Monday through Friday, from 9:00 am to 5:00 pm
Pacific Time at (650) 286-1700. Voice mail is available during non-business hours.
• Email: If you prefer, you can send information requests to our e-mail address:
• Fax calls: You can also send your requests for information to our 24-hour fax number: (650)
286-1790.
• Web site: Our Web site contains valuable information about our products, solutions, and
services. We encourage you to visit us at
http://www.asokausa.com.
Getting Help
Asoka USA backs its products with unparalleled customer service and technical support for our
valued customers.
Customer Service
Customer service, the customer-satisfaction arm of Asoka USA, is available Monday through
Friday, from 9:00 am to 5:00 pm Pacific Time, by calling (650) 286-0300 or through email at
Technical Support
Technical support is available Monday through Friday, from 6:00 am to 6:00 pm Pacific Time, by
calling (888) 276-5287 or through email at
Please provide the following information about the problem:
• Product name, model number, part number (if applicable) and serial number
• System configuration, including a description of the devices connected to your PlugLink AV
9560 Wireless Adapter
• The circumstances surrounding the error or failure
• A detailed description of the problem and what has been done to try to solve it
iii
Page 4

iv
PlugLink® AV 9560 Wireless Adapter User’s Guide
Page 5

Table of Contents
1 Simple Installation.............................................................................. 1-1
Package Contents.......................................................................................... 1-1
Planning the System...................................................................................... 1-1
Simple Installation......................................................................................... 1-2
2 Advanced Configuration
(For Advanced Users Only)...................................................................... 2-1
Installing the Software................................................................................... 2-1
Basic Setup................................................................................................... 2-2
3 Network Management........................................................................ 3-1
Using the Web-Based User Interface .............................................................. 3-1
System Details .............................................................................................. 3-2
Configuring the LAN IP .................................................................................. 3-3
Configuring Wireless Settings ......................................................................... 3-3
Basic Wireless Settings ............................................................................ 3-4
Advanced Wireless Settings...................................................................... 3-5
Wireless Security........................................................................................... 3-6
Configuring Wireless Security ................................................................... 3-7
Setting Administrative Login Information......................................................... 3-8
Rebooting the PL9560-WAP ........................................................................... 3-9
Restoring Factory Default Settings................................................................ 3-10
Backing Up and Restoring Configuration Files ................................................ 3-10
Updating Firmware...................................................................................... 3-11
Viewing System Logs................................................................................... 3-12
Powerline Device Scan................................................................................. 3-13
A . Specifications.............................................................................. A-1
B . Components ................................................................................B-1
C . Declarations of Conformity........................................................... C-1
D . Warranty.................................................................................... D-1
E . FCC Notice ..................................................................................E-1
v
Page 6

vi
PlugLink AV 9560 Wireless Adapter User’s Guide
Page 7

1
This chapter provides information on installing and setting up the
PlugLink AV 9560 Wireless Adapter.
NOTE: Do not connect the PlugLink AV 9560 Wireless Adapter into a power
strip, extension cord, un-interruptible power supply (UPS), or surge
protector. Doing so may prevent the unit from working properly or
degrade the network performance.
Package Contents
• PlugLink AV 9560 Wireless Adapter (PL9560-WAP)
• Quick Installation Guide
• Installation Resource CD
• Warranty and Support Information Card
If any of the parts are incorrect, missing, or damaged, contact the
retailer where you made your purchase. Keep the carton, including
the original packing materials, in case you need to return the unit
for repair.
Simple Installation
Planning the System
The PlugLink AV 9560 Wireless Adapter lets you set up an instant
wireless hotspot using your existing electrical outlets. It can also
easily compliment your existing network by connecting to any
device with a 10BaseT/ 100BaseT Ethernet-capable device.
To connect the PlugLink AV 9560 Wireless Adapter with a PlugLink
9660 Ethernet Adapter, all you will need are:
• One (1) PL9560-WAP device
• One (1) PL9660-ETH device (sold separately)
• Standard Cable/ DSL gateway (provided by your ISP)
Simple Installation 1–1
PlugLink AV 9560 Wireless Adapter User’s Guide
Page 8
Simple Installation
CAUTION! Do not connect the PlugLink AV 9560 Wireless Adapter to a power
strip, extension cord, uninterruptible power supply (UPS), or surge
protector. This may prevent the unit from working property or degrade the
network performance.
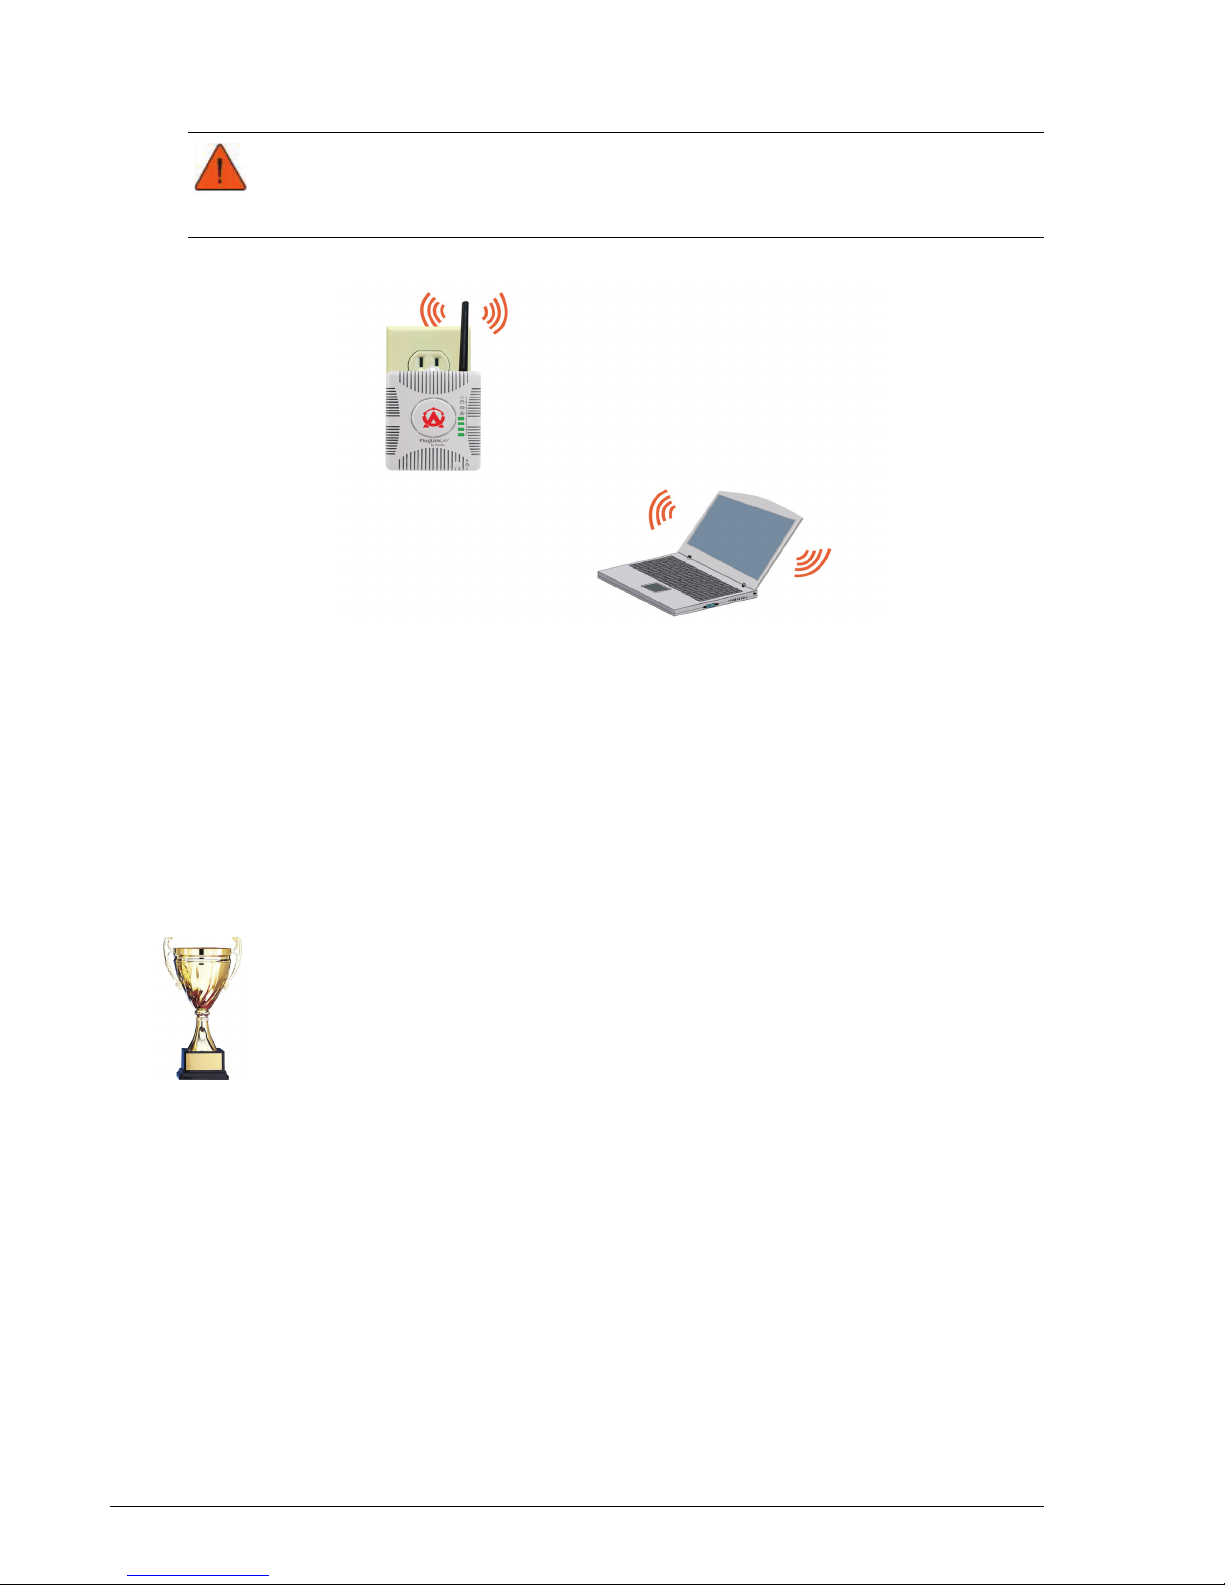
1. Plug a PL9660 and PL9560 into electrical outlets. It takes one minute for
the top three LEDs on the PlugLink AV 9560 Wireless Adapter to light
up.When the LEDs are illuminated, your wireless computer can connect
and communicate with the Router.
2. Connect a wireless laptop computer to the PL9560. The laptop computer
will prompt you for a WEP key. Enter the WEP key at the prompt. The WEP
key is the serial number of the PL9560. The WEP key is printed on the
PL9560, which is also the last 10 digits of the serial number.
You can also connect a desktop PC to the PL9560 with an Ethernet cable.
Congratulations Installation is complete.
1–2 Simple Installation
PlugLink AV 9560 Wireless Adapter User’s Guide
Page 9
2
(For Advanced Users Only)
The Power Manager utility allows you to manually configure a
PlugLink AV 9560 Wireless Adapter that is directly connected to
your personal computer or to any PlugLink AV 9560 Wireless
Adapters that are remotely residing on your PlugLink Powerline
network.
Installing the Software
1. Connect an Ethernet Cable from your PC to the Ethernet port
of the PlugLink AV 9560.
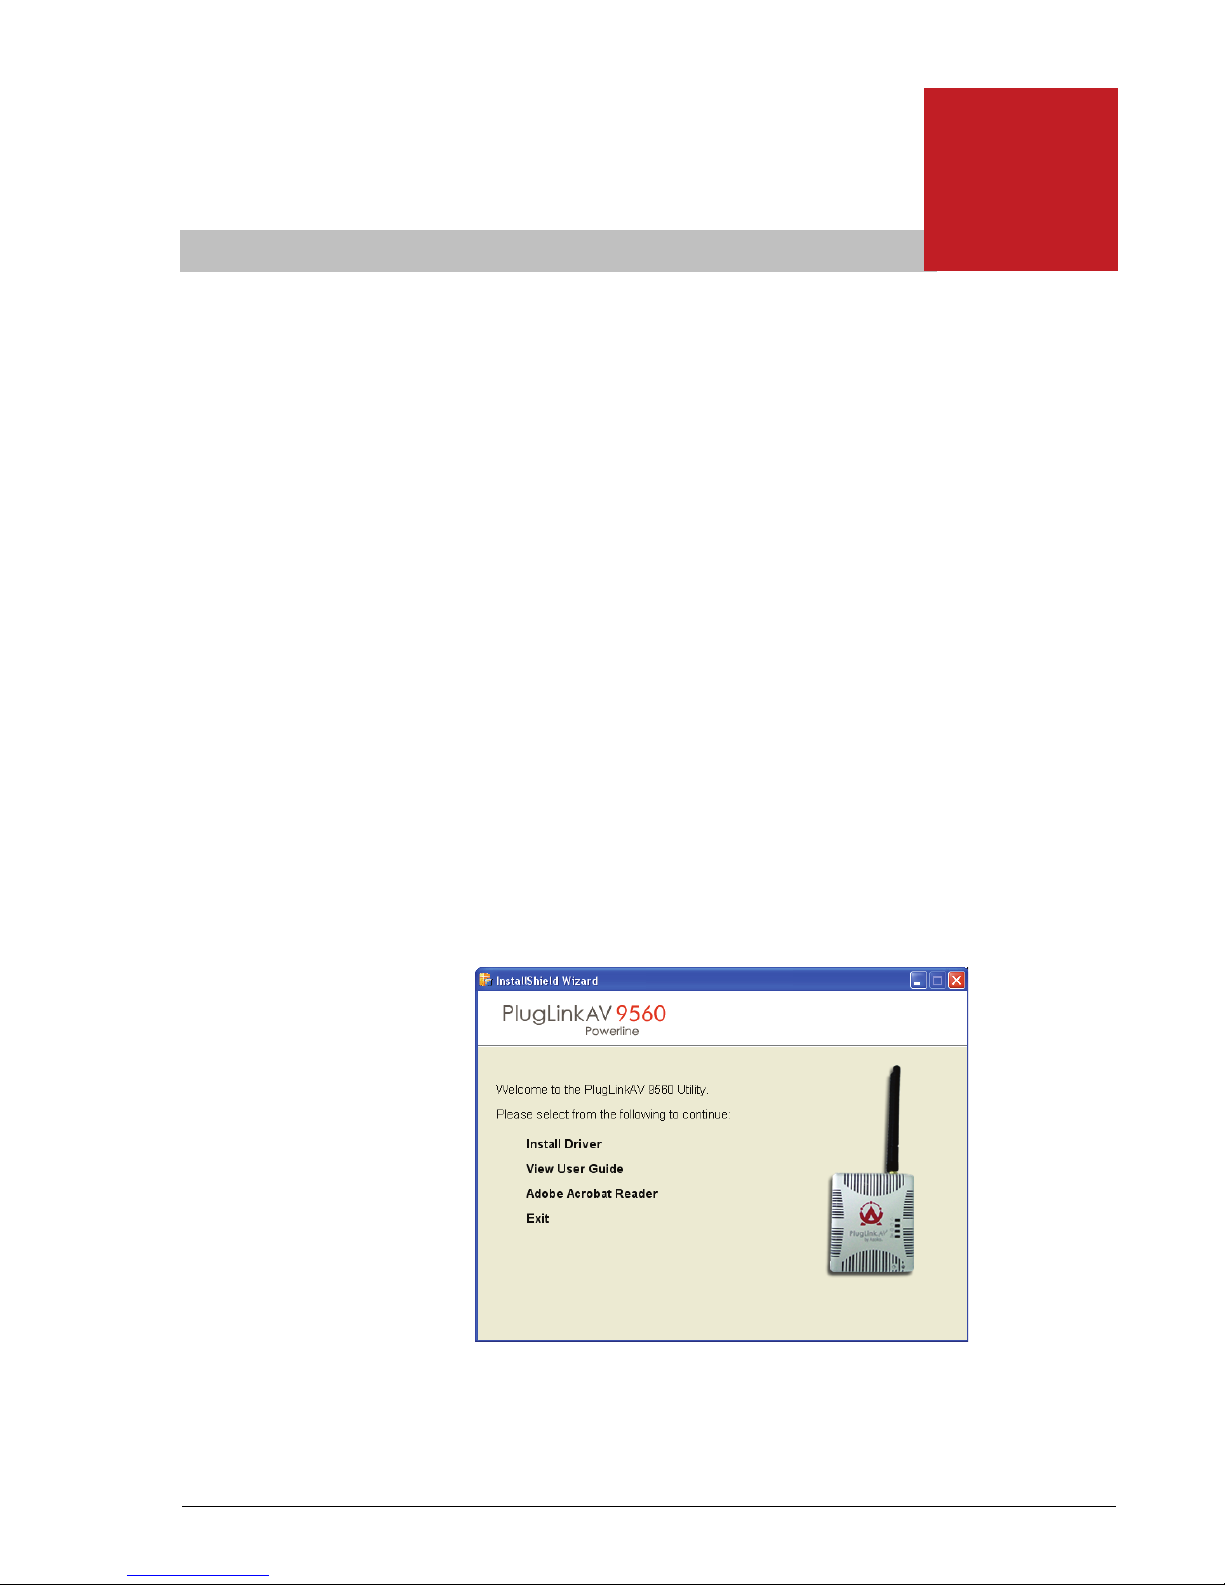
2. Insert the enclosed Installation Resource CD into your CD-ROM
drive. If the The PlugLink AV 9560 Wireless Adapter Installation
Utility does not appear within 30 seconds, select your CD-ROM
drive and double-click on the icon named "Setup.exe" to initiate
the Installation Utility. The Installation wizard appears.
Advanced Configuration
Advanced Configuration (For Advanced Users Only) 2–1
PlugLink AV 9560 Wireless Adapter User’s Guide
Page 10
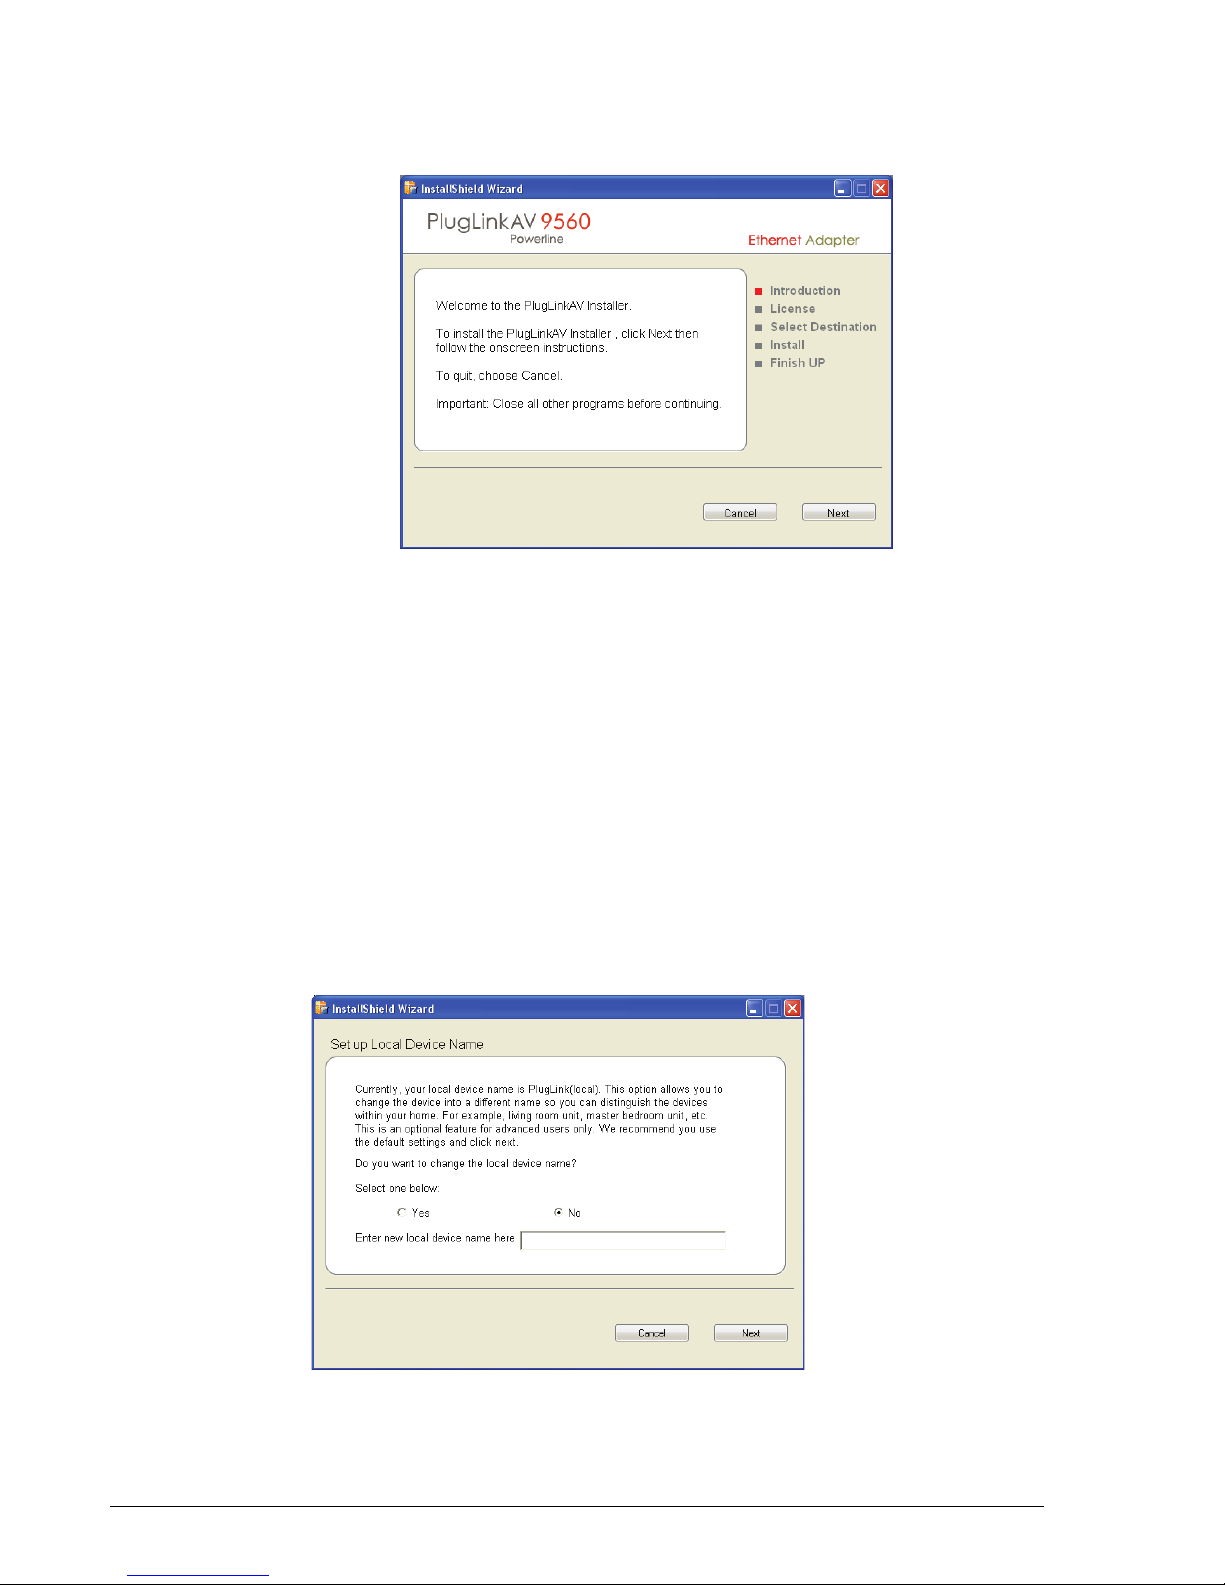
3. Click Install Driver. In the following screen, click Next, and follow the
Basic Setup
After installing the drivers and utility software, the Setup Assistant loads
automatically. The Setup Assistant allows you to do some basic configuration
of the PlugLink AV 9560.
prompts to install the PlugLink AV 9560 drivers and utility software.
1. When the Setup Assistant is loaded, the software attempts to detect the
PlugLink AV 9560 device. When the device is detected, the following
screen appears. The software lists all of the devices on the network.
Select the device you wish to configure and click the Next button.
2. The next screen allows you to change the device name. Select Yes to enter
a device name. The device name is a unique identifier for the PlugLink AV
9560 when using the Admin Utility. This name can be Living Room,
Bedroom, or some other name that reflects its location. Click the Next
button to proceed to the next step.
2–2 Advanced Configuration (For Advanced Users Only)
PlugLink AV 9560 Wireless Adapter User’s Guide
Page 11
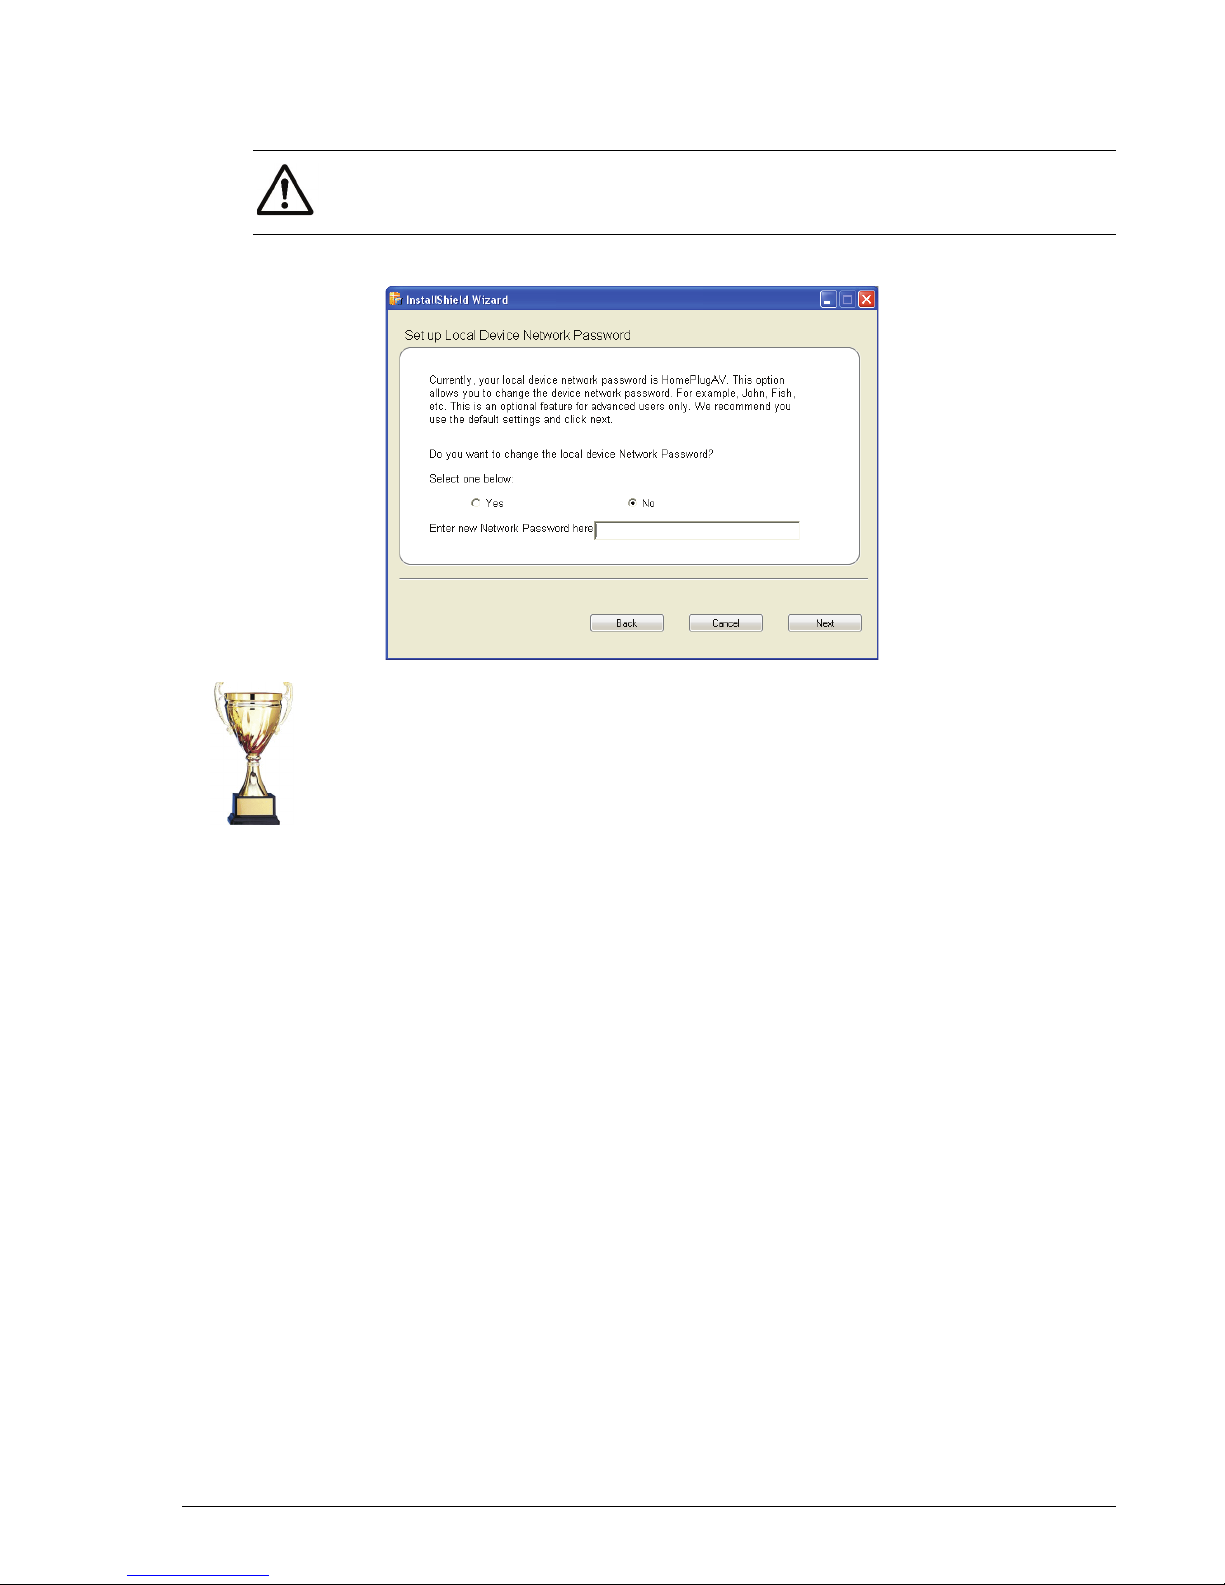
3. Use the Setup Local Device Network Password screen to change the
password. The default password of all Asoka devices is “HomePlugAV.”
NOTE: All devices within your power line network must share the same
password. Any changes made to the password of one device should be made to
others as well.
4. CONGRATULATIONS! You have successfully configured your PlugLink AV
9560. If you wish to make further changes, you may click the Admin
Utility button. Otherwise, you may click Finish to close the utility.
To make more changes to your PlugLink AV 9560, login to the Web GUI.
Advanced Configuration (For Advanced Users Only) 2–3
PlugLink AV 9560 Wireless Adapter User’s Guide
Page 12

2–4 Advanced Configuration (For Advanced Users Only)
PlugLink AV 9560 Wireless Adapter User’s Guide
Page 13
3
Advanced Configuration
(Advanced Users Only)
Using the Web-Based User Interface
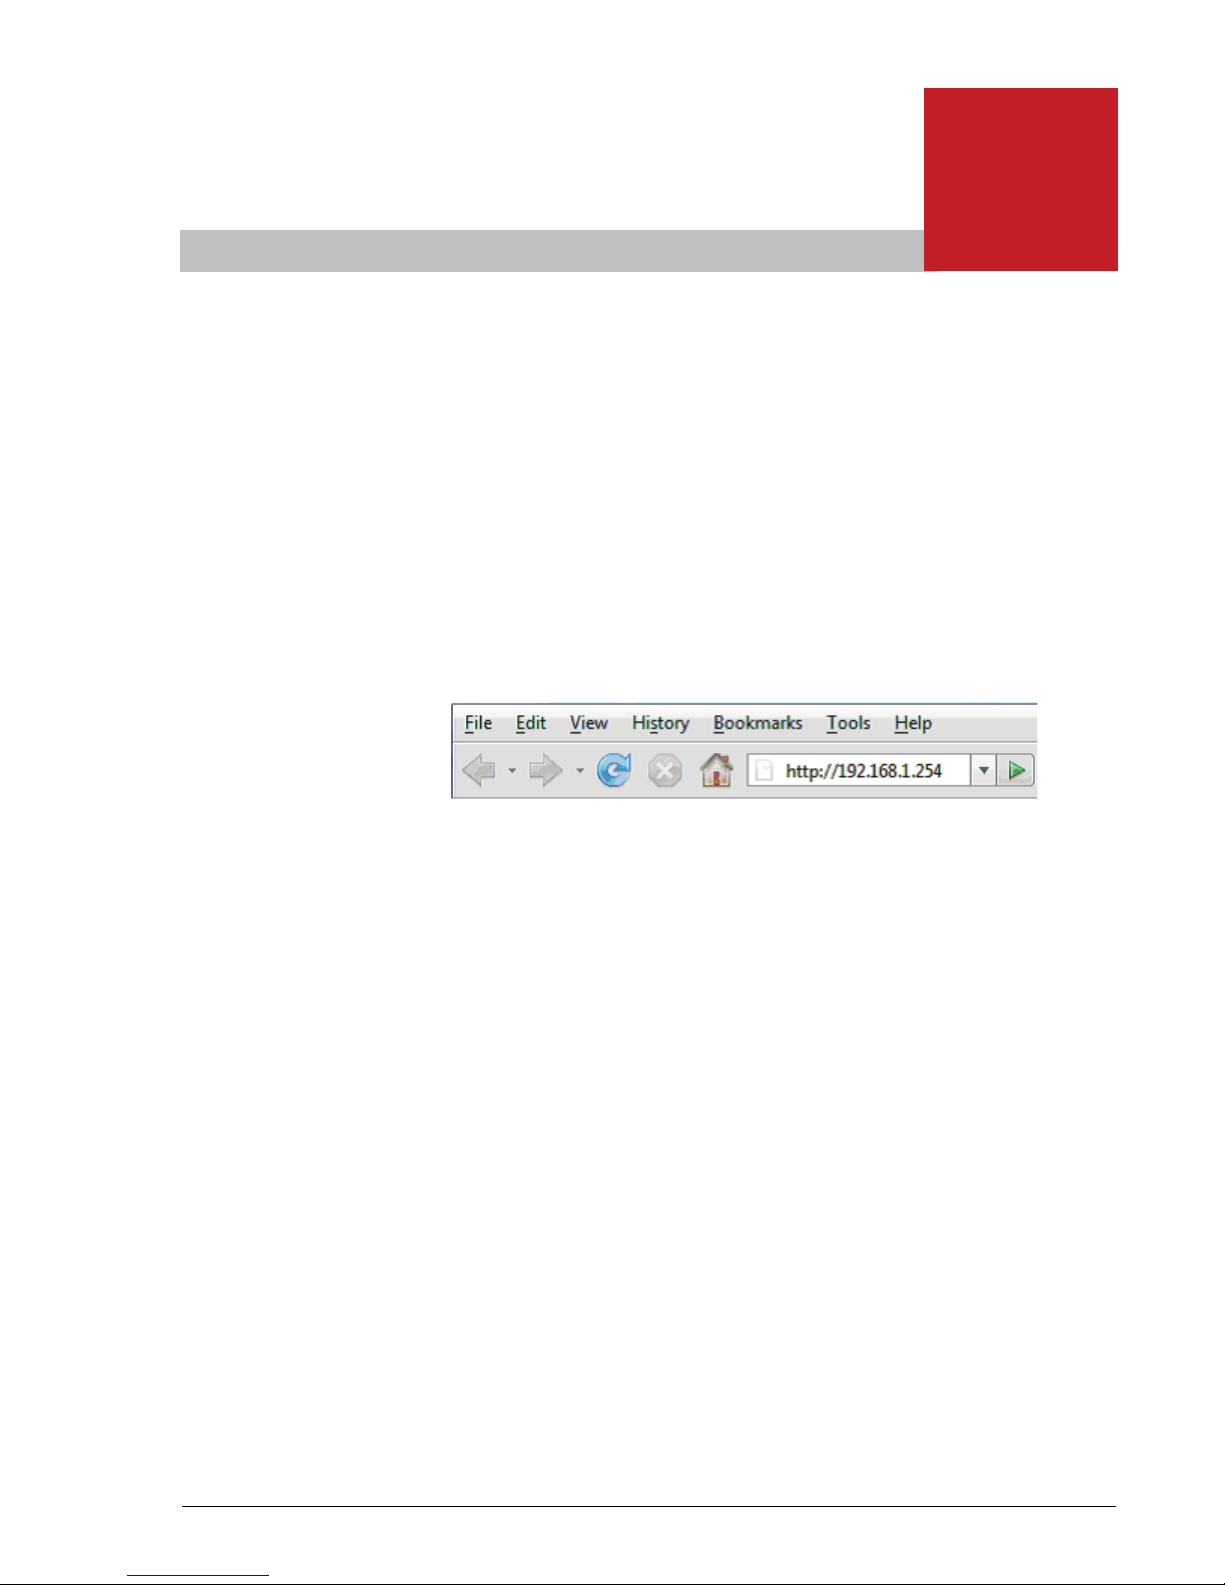
1. Open a web browser application (Internet Explorer or Mozilla
Firefox).
2. In the address or navigation field, type 192.168.1.254 and press
Enter.
For security, the PL9560-WAP has its own user ID and password.
When prompted, enter admin for the user ID, welcome for the
PL9560-WAP password, both in lower case letters, and press
Login.
After you enter the user ID and password, your web browser
should find and display the PL9560-WAP.
Advanced Configuration (Advanced Users Only) 3–1
PlugLink AV 9560 Wireless Adapter User’s Guide
Page 14
System Details
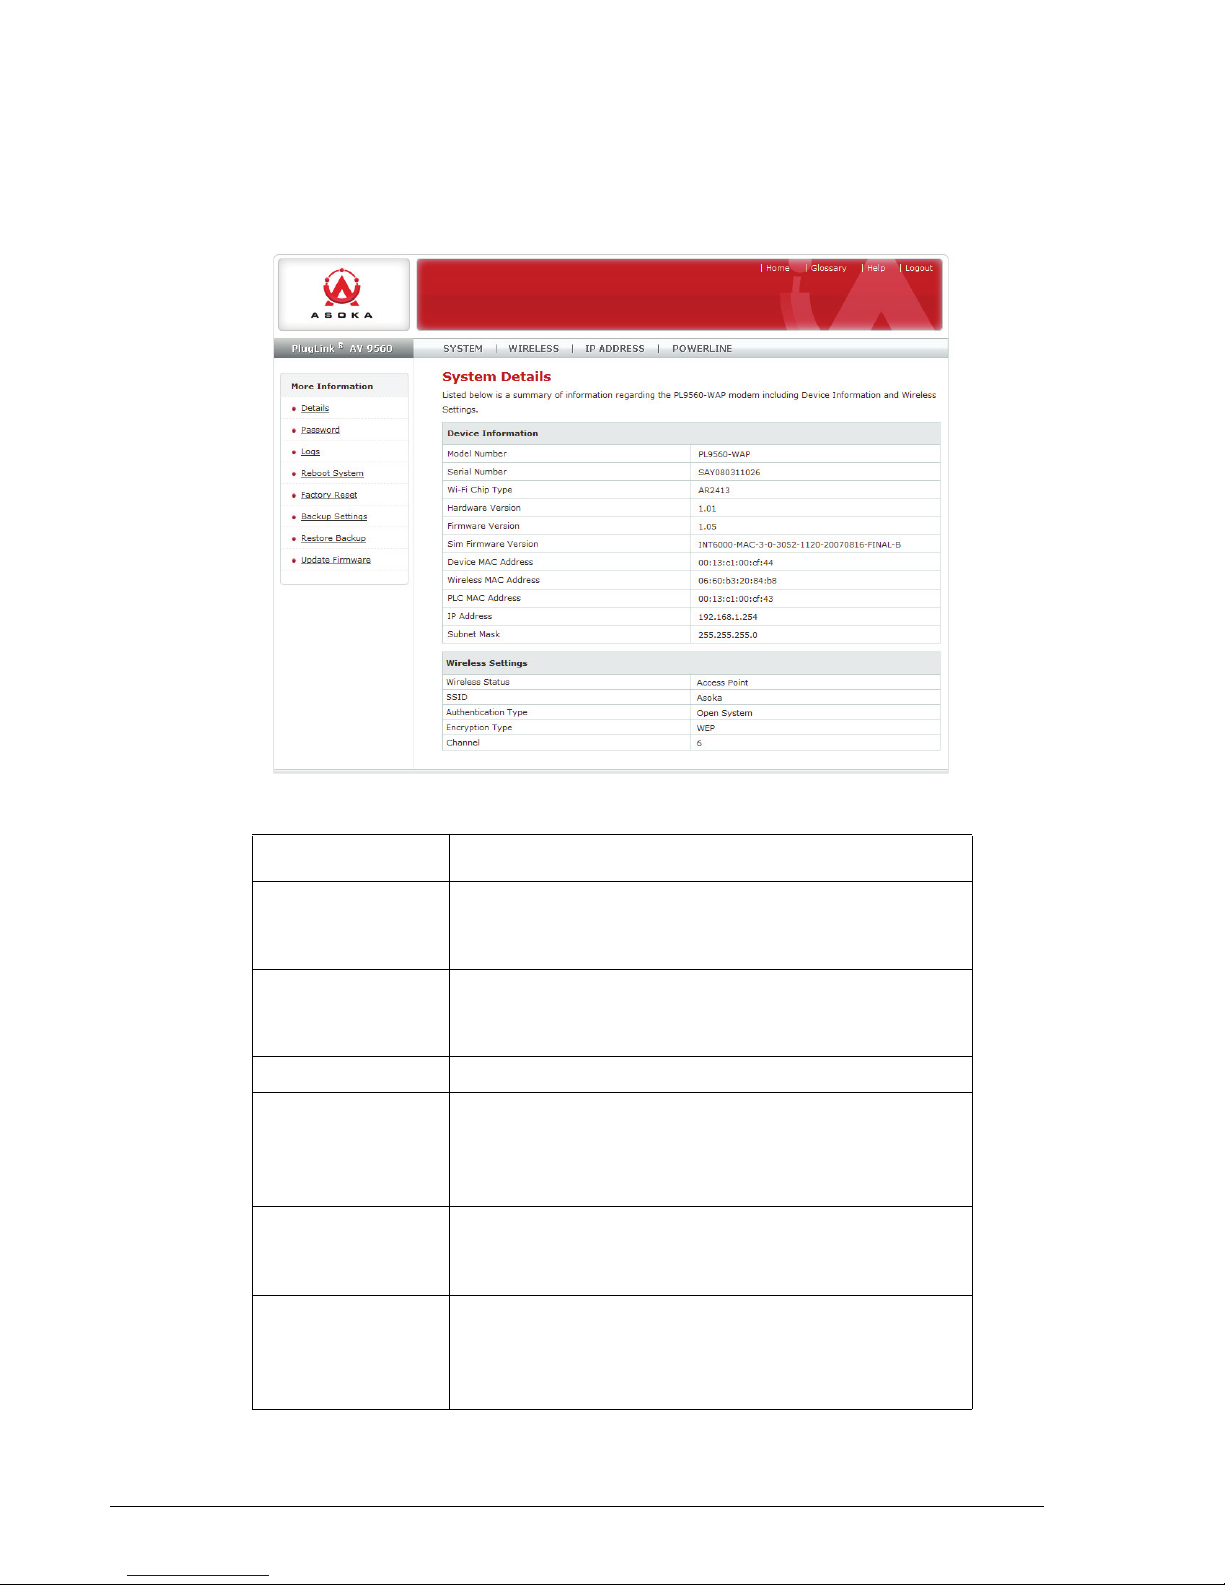
When you access the web-based user interface, the System Details page is the
first page you will s ee. The System Details page shows you a quick view of the
PL9560-WAP's status and settings. All setup pages can be reached from this
page by selecting the links in the left column of the page.
The following table describes the details of the Web-based user interface:
Item Description
Quick Main
Navigation Links
Quick Sub
Navigations links
Page Name Page you are on is identified by its Page Name
Detailed
Information
Home Button Home button is available on every page of the UI.
Glossary Button Glossary button is available on every page of the UI.
User Interface (UI) is divided into four main logical
sections and you can navigate directly to any of the
four sections by clicking on either of these links
When you enter into each of the four main logical
sections, a sub navigation link that corresponds to
the main logical section will appear
Shows you detailed information about the PL9560WAP that includes: model number, firmware version,
hardware version, serial number, MAC address, IP
address and subnet mask
Pressing this button will take you back to the home
page, which is the System Details page
Pressing this button will take you to a glossary page
that defines many of the technical terms used in this
UI
3–2 Advanced Configuration (Advanced Users Only)
PlugLink AV 9560 Wireless Adapter User’s Guide
Page 15
Item Description
Help Button Help button is available on every page of the UI.
Pressing this button will take you to a help page that
provides detailed explanations and steps for configuring your PL9560-WAP
Logout Button Logout button is available on every page of the UI.
Pressing this button logs you out of the PL9560-WAP
Configuring the LAN IP
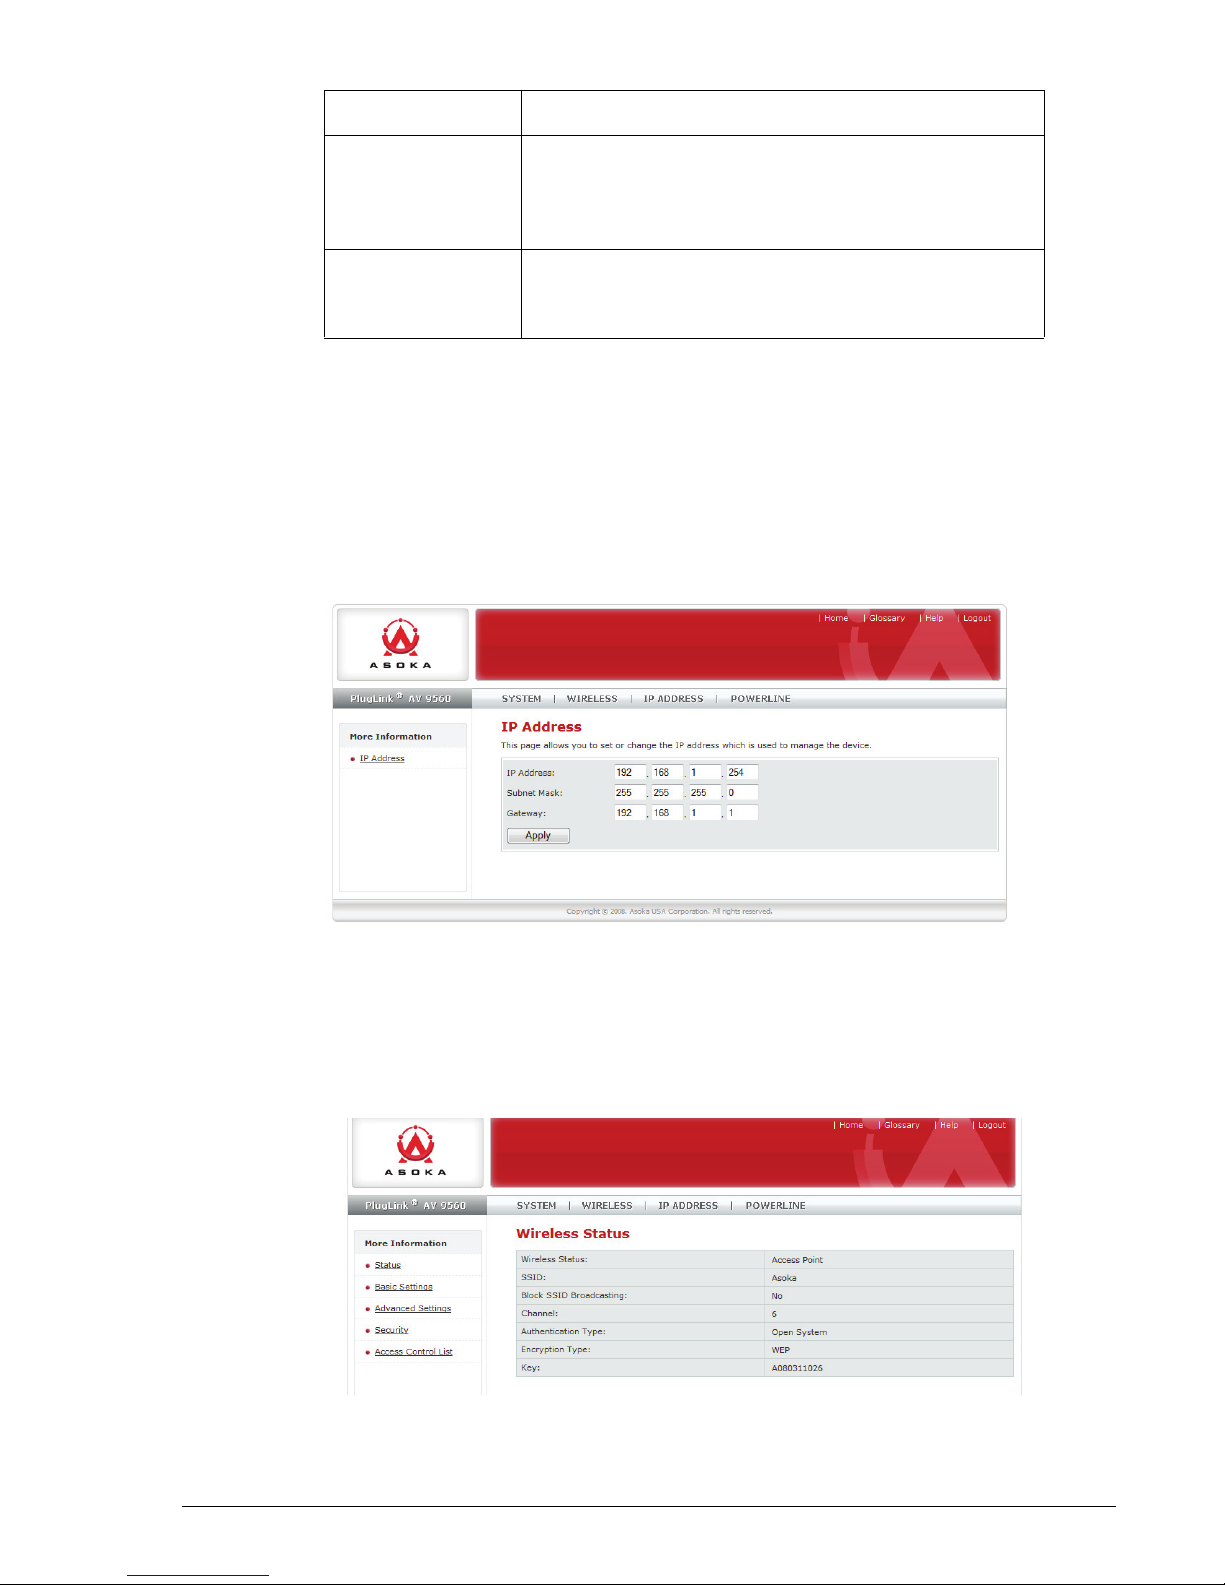
Use the IP Address link in the Main menu to set up the LAN IP. Select this
option to configure the IP address of the PL9560-WAP.
By default, the PL9560-WAP is configured with the following addresses:
• IP address: 192.168.1.254
• Subnet address: 255.255.255.0.
Configuring Wireless Settings
To configure the wireless settings of the PL9560-WAP, click the Wireless link
in the Main menu. The Wireless Settings link appears in the sub menu. The
first page that appears is the Wireless Status page. To return to the status
page, select Status in the left menu:
Advanced Configuration (Advanced Users Only) 3–3
PlugLink AV 9560 Wireless Adapter User’s Guide
Page 16
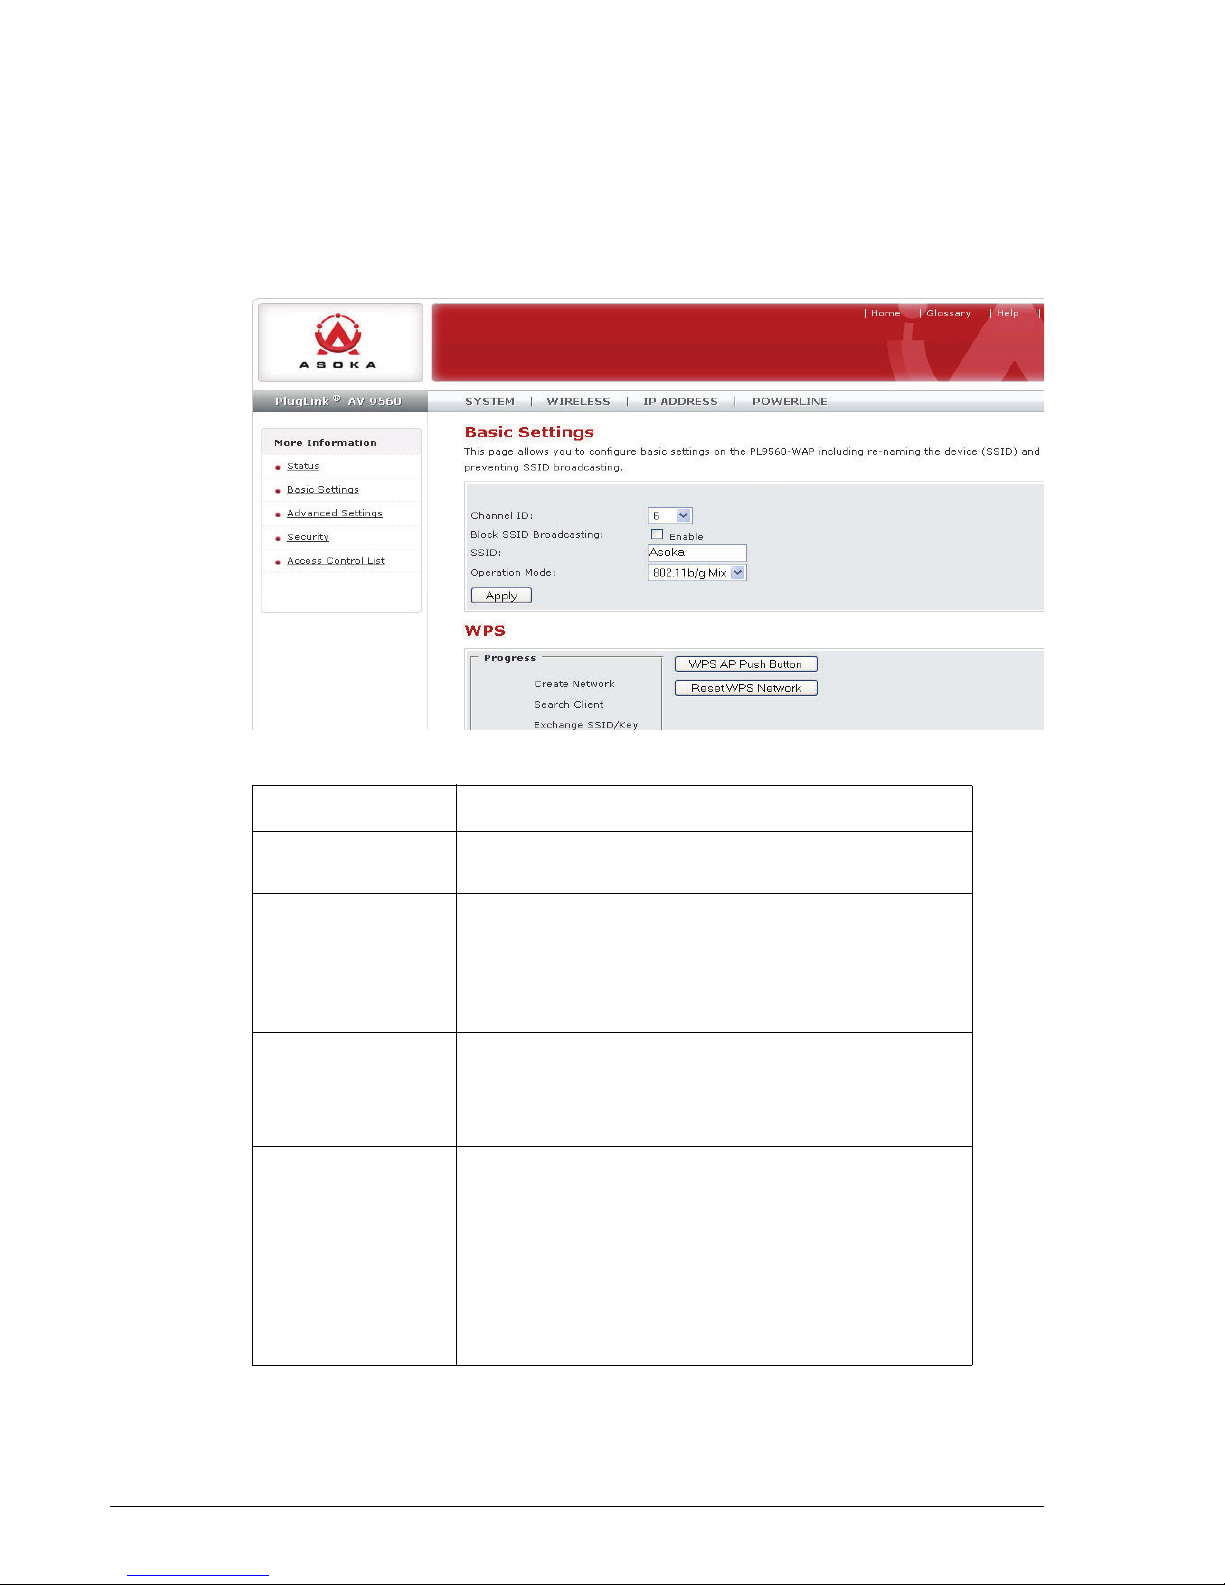
Basic Wireless Settings
To configure the basic wireless settings, follow these steps:
1. Select Wireless tab in the top menu.
2. Select Basic Settings in the left menu
3. Enter the appropriate information in the fields, described in the table
below, and click Apply.
The following table describes the basic wireless settings:
Item Description
Wireless Status The WLAN interface allows you to enable and dis-
able the wireless part of the device
Channel ID This field determines which operating frequency will
be used. It should not be necessary to change the
wireless channel unless you notice interference
problems with another nearby access point. By
default, the PL9560-WAP is set to channel 6
Block SSID Broadcasting
SSID The SSID is also known as the Wireless Network
Blocking SSID Broadcasts prevents your PL9560WAP from transmitting the SSID. The PL9560-WAP
will still respond to clients that want to connect as
long as they have the matching SSID
Name. Enter a value of up to 32 alphanumeric characters. In a setting where there is more than one
wireless network, different wireless network names
provide a means for separating the traffic. Any
device you want to participate in a particular wireless network will need to use this SSID for that network. The PL9560-WAP default SSID is Asoka
3–4 Advanced Configuration (Advanced Users Only)
PlugLink AV 9560 Wireless Adapter User’s Guide
Page 17
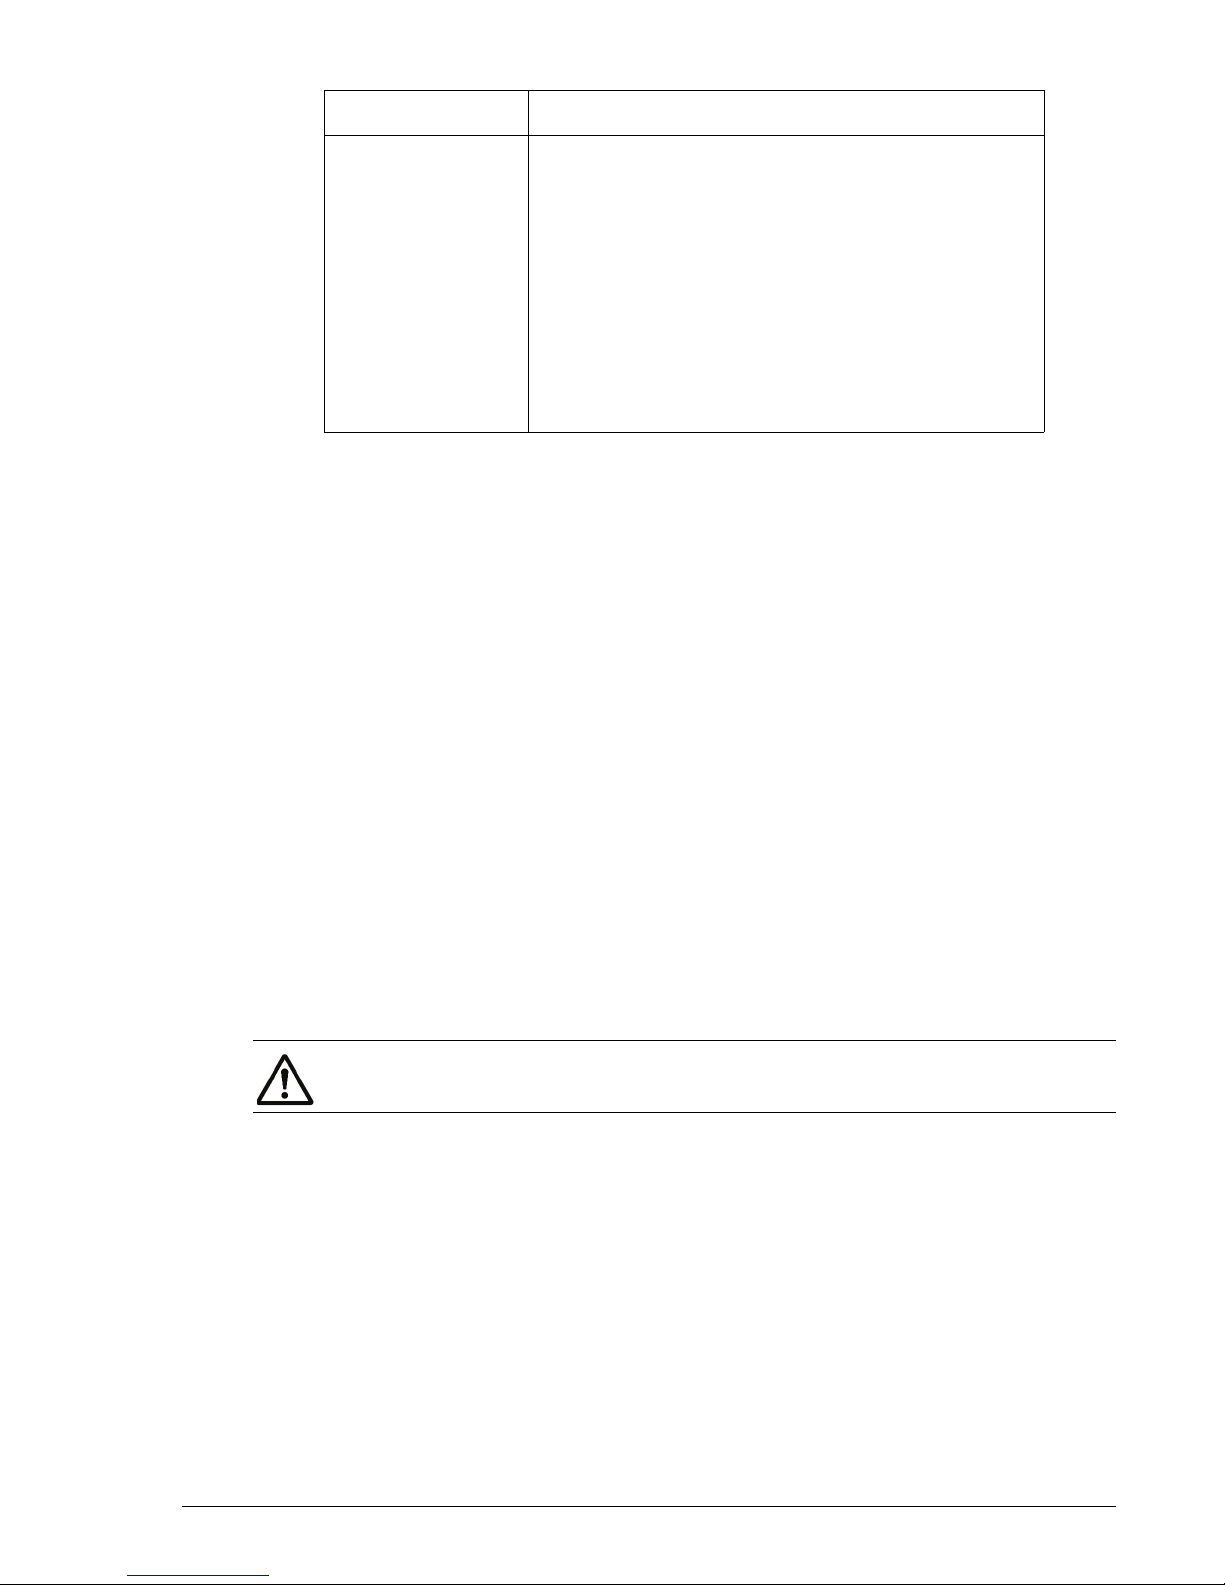
WPS Buttons
Item Description
Operation Mode This field determines which data communications
protocol will be used. You can select 802.11g only,
802.11b only, or b/g mixed mode. 801.11g only dedicates the PL9560-WAP to communicating with the
higher bandwidth 801.11g wireless devices exclusively. 802.11b only dedicates the PL9560-WAP to
communicating with the lower bandwidth 802.11b
wireless devices exclusively. The b/g mixed mode
provides backward compatibility with the slower
802.11b wireless devices while still enabling
802.11g communications
In the web interface of the PL9560 (default IP address of 192.168.1.254),
under Wireless > Basic Settings, there are two software push buttons. The
software push buttons are equivalent to the WPS Wireless Security hardware
push button. Below is a description of the software push buttons:
• WPS AP Push Button - Press this button to allow a client to join an
existing WPS Network or have the PL9560 create a brand new WPS
wireless network with a random SSID, random wireless password using
the WPA2-Personal-AES security algorithm if the existing network was not
created by WPS.
• Reset WPS Network - Press this software push button to make the
PL9560 reset an existing WPS network and create a new network with a
random SSID, random wireless password using the WPA2-Personal-AES
security algorithm. THe PL9560 will then wait for 2 minutes for a client
to join and access the network.
Advanced Wireless Settings
Advanced Wireless Settings allows you to configure Tx Preamble Type, Beacon
Interval, RTS Threshold, and Fragmentation Threshold.
NOTE: This section is recommended for advanced users only
Advanced Configuration (Advanced Users Only) 3–5
PlugLink AV 9560 Wireless Adapter User’s Guide
Page 18
The following table describes the advanced wireless settings:
Item Description
Tx Preamble Type Limits the data packet size during transmission. The
choices are Long Preamble, Short Preamble, and
Auto. By default, the PL9560-WAP is set to long preamble.
.Beacon Interval Keeps power management in check. For example, if
a client does not receive a beacon within a certain
time period, it goes to sleep. You can set the Beacon
Interval value from 25 to 500, but too low or too high
value is not recommended. The default Beacon
Interval is set to 100.
RTS Threshold Minimizes collisions among hidden stations.The
RTS Threshold range can be configured between 1
to 2312 bytes. By default, the PL9560-WAP is set to
2312.
Fragmentation
Threshold
Wireless Security
To v iew o r con fi gure wire le ss security settings, click on the Security link under
Wireless submenu.
Determines the size of the packet that will be transmitted in fragments. It is recommended to fragment
the packet when the link quality is bad. The Fragmentation Threshold can be configured between
256 to 2312 bytes. The default is 2312.
3–6 Advanced Configuration (Advanced Users Only)
PlugLink AV 9560 Wireless Adapter User’s Guide
Page 19

The PL9560-WAP provides the following levels of security:
•WEP
•WPA-Personal
•WPA-Enterprise
•WPA2-Personal
• WPA2-Enterprise
Field Description
Disable No wireless security
WEP WEP offers the following options:
• Open System
With Open Network Authentication and 64or 128-bit WEP data encryption, the
PL9560-WAP does perform 64- or 128-bit
data encryption but does not perform any
authentication
• Shared Key
Shared Key authentication encrypts the
SSID and data. Choose the encryption
strength (64- or 128-bit data encryption).
Manually enter the key values. Manually
entered keys are case sensitive
WPA-PSK WPA-Pre-shared Key performs authentication, uses
128-bit data encryption, and dynamically changes
the encryption keys, making it nearly impossible to
circumvent.
• W PA/ WPA 2 -Pe rs on al : S e le ct se cu ri t y
algorithms TKIP or AES
• WPA/WPA2-Enterprise: Select the Radius
Server IP, Port, and Secret (pass code)
Note: Not all wireless adapter configuration utilities
support WPA. Furthermore, client software is
required on the client. Windows XP, Windows 2000,
and Windows Vista with Service Pack 3 include the
client software that supports WPA. Nevertheless,
the wireless adapter hardware and driver must also
support WPA.
Configuring Wireless Security
By default, the PL9560-WAP security options are enabled. The default is set
to WEP and Open System. The other security options should be configured by
advanced users. To change the security option, follow the steps below. The
WEP Key is the last 10 digits of the serial number.
Advanced Configuration (Advanced Users Only) 3–7
PlugLink AV 9560 Wireless Adapter User’s Guide
Page 20
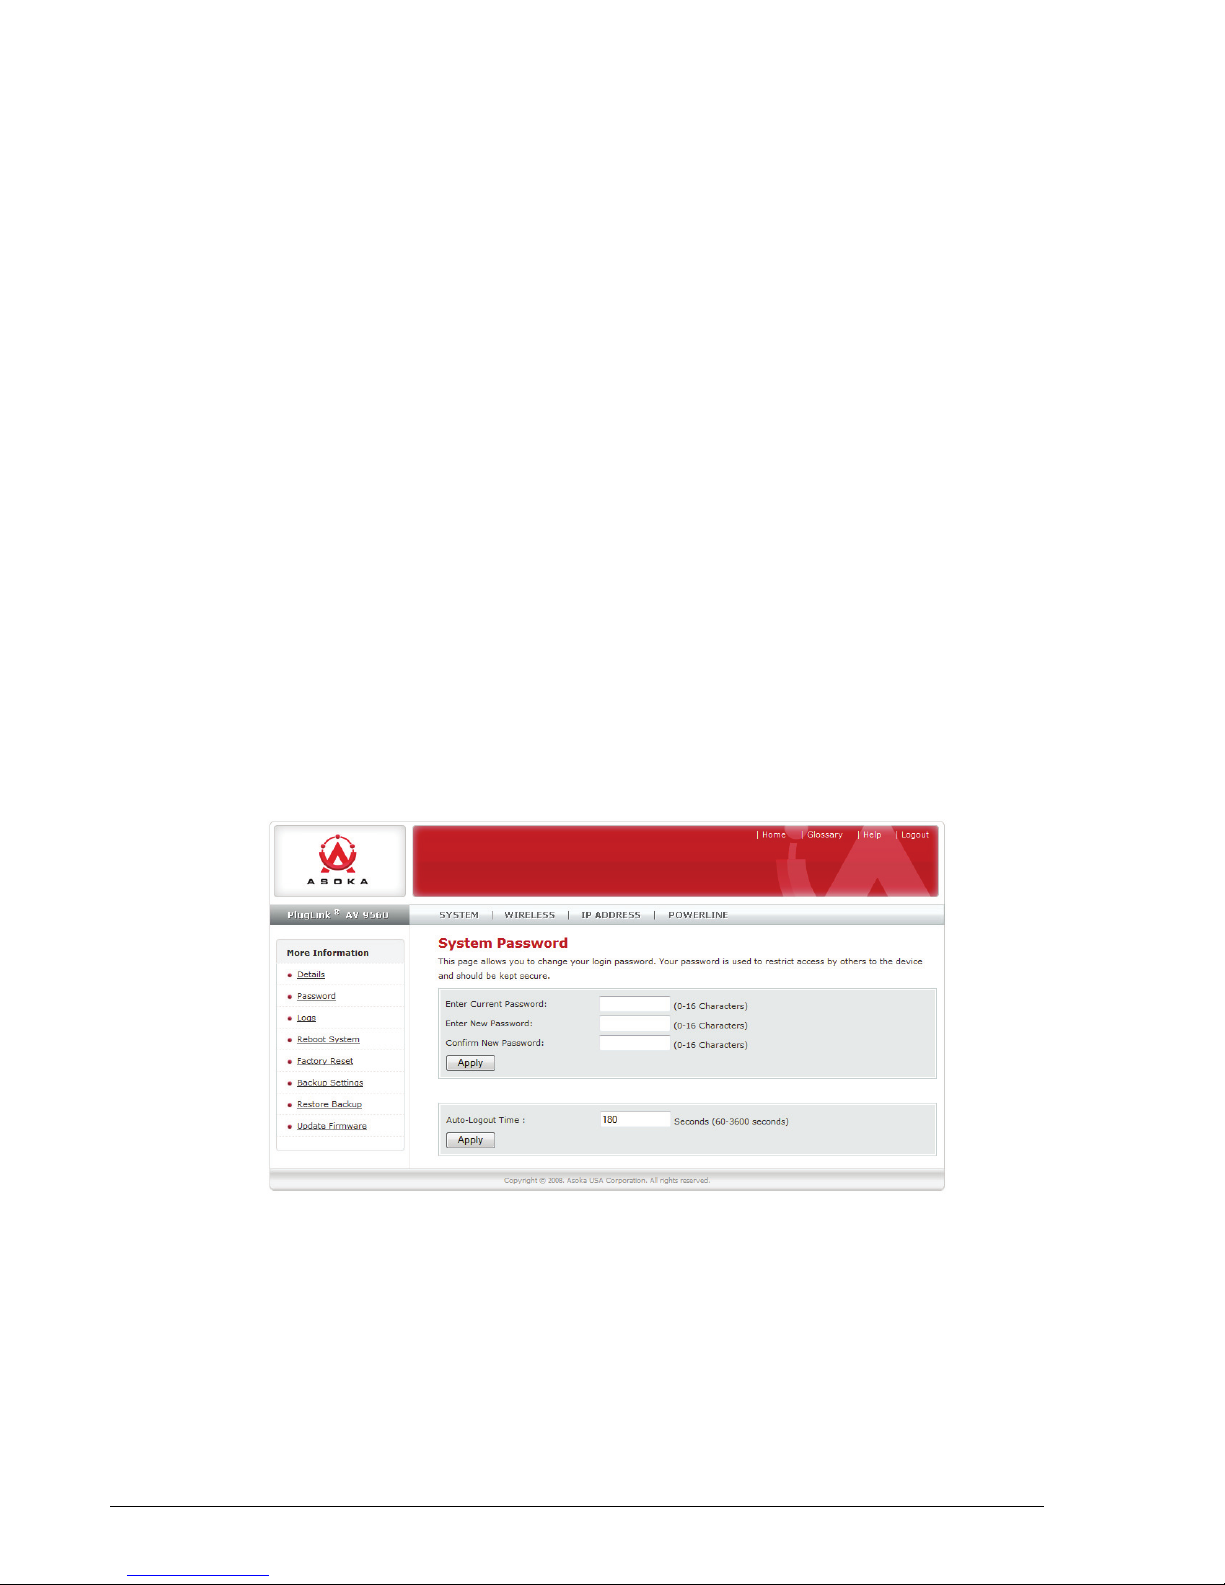
1. In the Advanced Settings dialog, select Wireless.
2. Click the Security link. The Security dialog appears.
3. Under Encryption Type, select WEP.
4. Under Authentication Type, select Open System.
5. Clear the Key 1 field and enter a 10 digit HEX number.
Note: Make note of this key information and store it in a safe and secure
location.
6. Click Apply.
7. In the prompt, click OK to confirm. A confirmation message will appear.
8. Reboot your PL9560-WAP by selecting System at the top menu and clicking
Reboot System. After clicking the Reboot button, click OK to confirm.
After you configure the wireless security, configure your computer's
wireless adapter. The default SSID of the PL9560-WAP is “Asoka.” Enter
the key you configured in the PL9560-WAP when prompted
Setting Administrative Login Information
The PL9560-WAP ships with a default user ID (admin) and default password
(welcome). If you wish to change the password, you can set a password here.
Write down your password and keep it in a safe place, as you will need it to
log into the PL9560-WAP in the future. You can also set your auto-logout time
in the provided field.
3–8 Advanced Configuration (Advanced Users Only)
PlugLink AV 9560 Wireless Adapter User’s Guide
Page 21
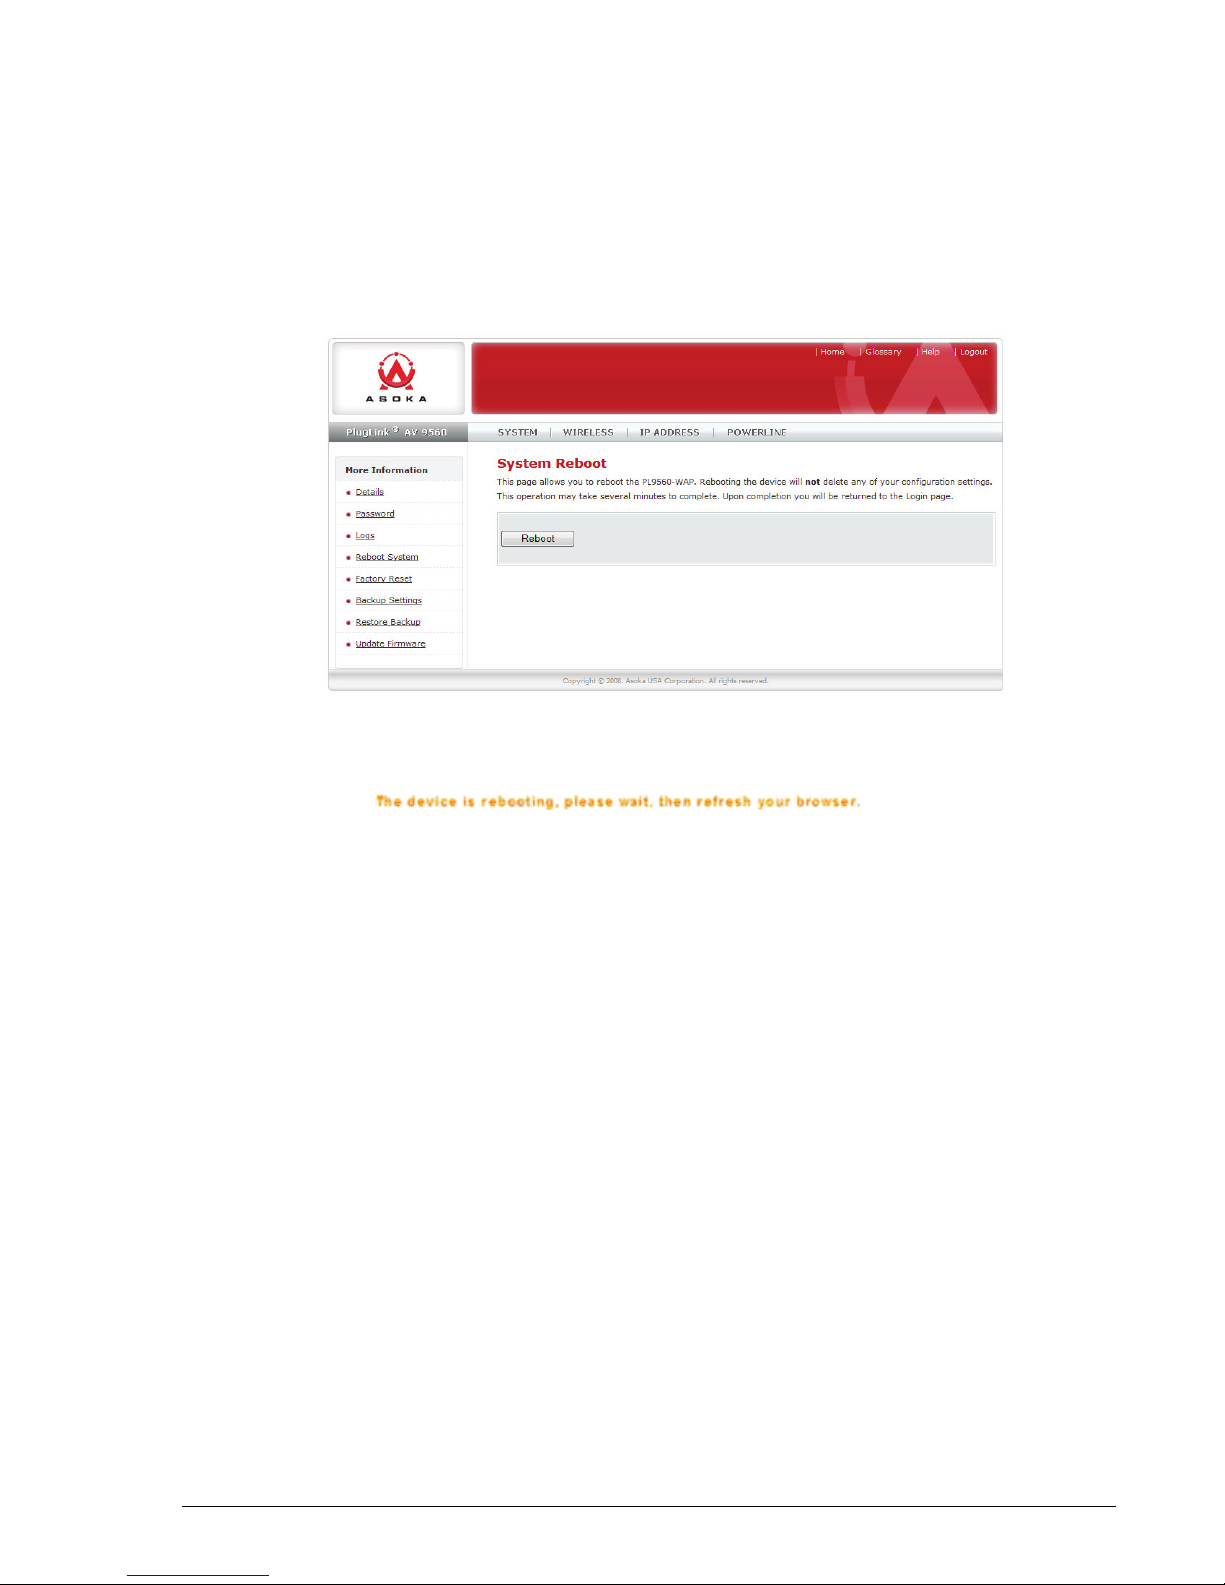
Rebooting the PL9560-WAP
Som etimes it may be necessary to reboot t he PL9560-WAP if it begins working
improperly. Rebooting the PL9560-WAP will NOT delete any of your
configurations. To reboot, follow these instructions:
1. Select System in the top menu.
2. In the left menu, click Reboot System.
3. Click the Reboot button.
4. In the confirmation pop-up, click OK. A message appears indicating the
device is rebooting:
When the PL9560-WAP reboots, the login page appears automatically. If it
does not appear, type in the PL9560-WAP's address (default = 192.168.1.254)
into the address or navigation bar of your web browser.
Advanced Configuration (Advanced Users Only) 3–9
PlugLink AV 9560 Wireless Adapter User’s Guide
Page 22
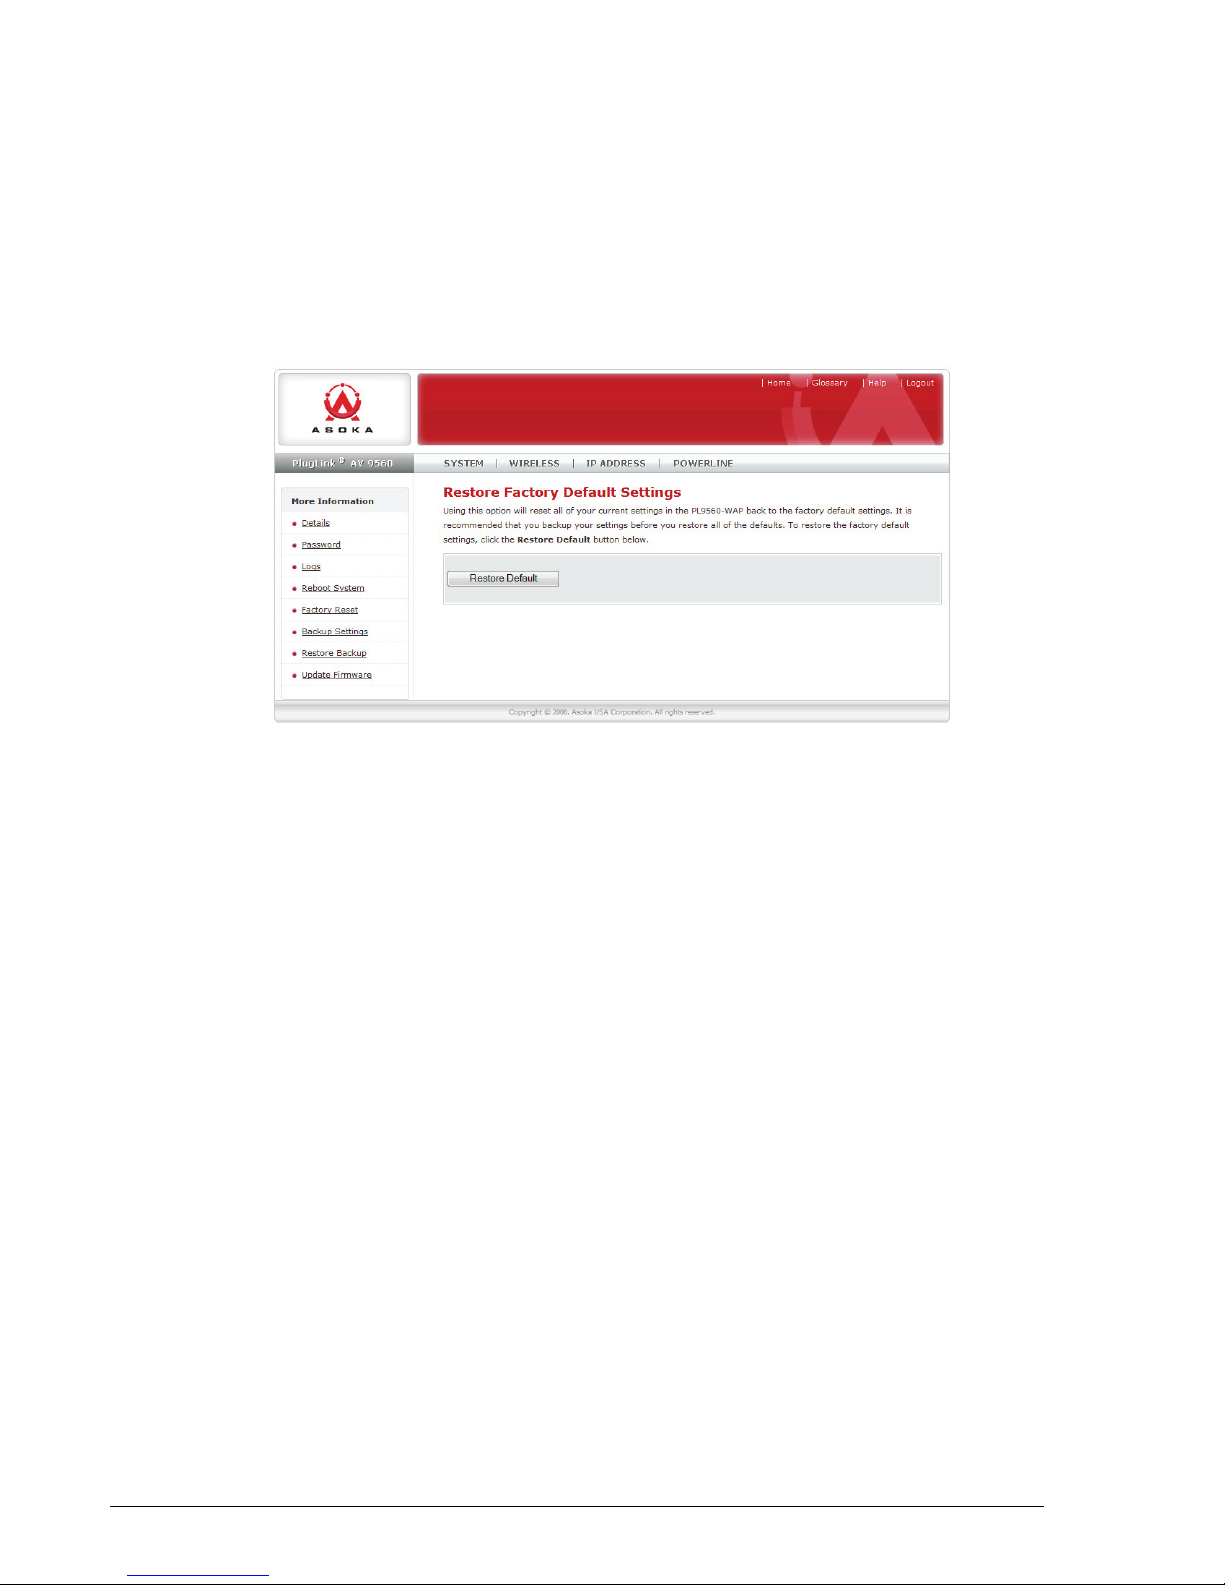
Restoring Factory Default Settings
Use this option to restore all of the settings in the PL9560-WAP to the factory
default settings. It is recommended that you back up your settings prior to
restoring to factory default settings. To restore factory default settings,
follow these instructions:
1. Select System in the top menu.
2. In the left menu, click Factory Rest.
3. Click the Restore Default button.
4. In the confirmation pop-up, click OK.
Backing Up and Restoring Configuration Files
The configuration settings of the PL9560-WAP are stored within the wireless
device in a configuration file. This file can be saved (backed up) to a user's
PC or retrieved (restored) from the User's PC.
To Back Up Settings
1. Select System on the top menu.
2. Click Backup Settings.
3–10 Advanced Configuration (Advanced Users Only)
PlugLink AV 9560 Wireless Adapter User’s Guide
Page 23
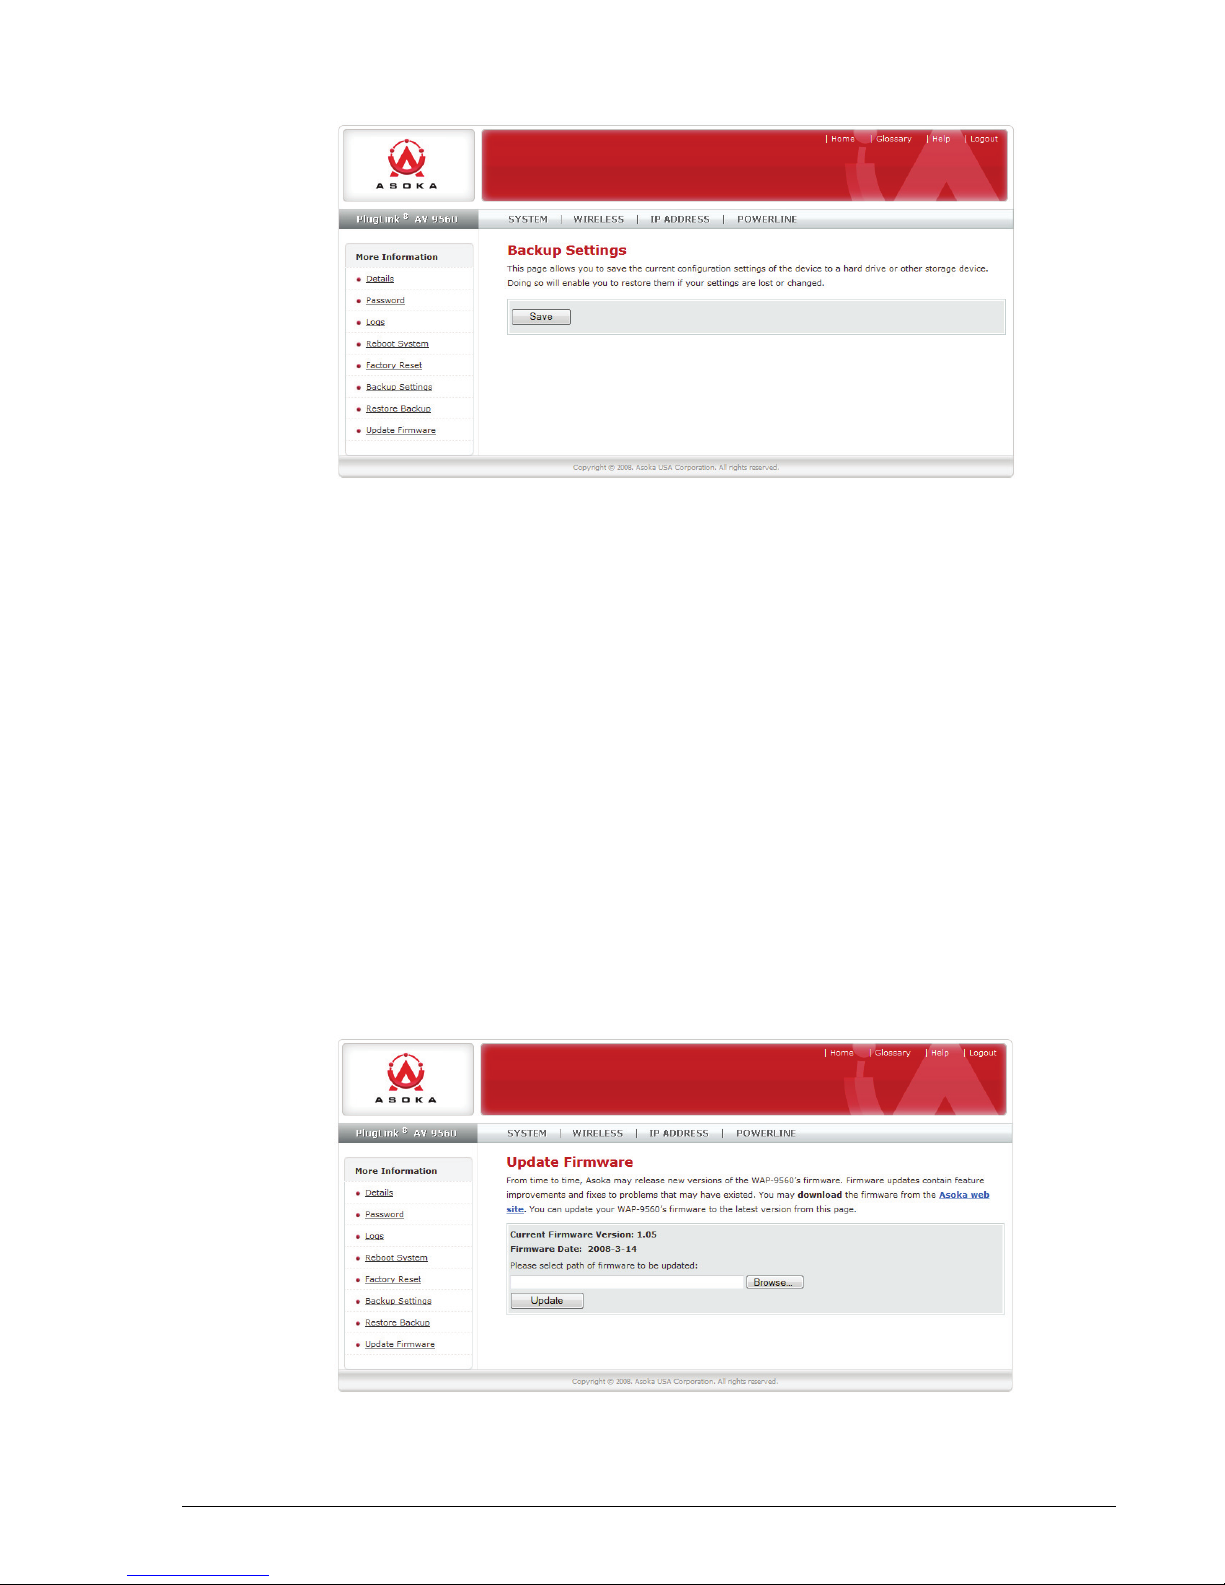
3. Click Save.
To Restore Settings
To retrieve (restore) an old PL9560-WAP configuration file from a previous
backup, follow these instructions:
1. Select System in the top menu.
2. Select Restore Backup.
3. Click Browse.
4. Locate and double-click the old wireless configuration file.
5. Click Restore.
Updating Firmware
Periodically, firmware updates will become available. Firmware updates
contain feature improvements and fixes to problems that may have existed.
When Asoka releases new firmware, you can download from
http://www.asokausa.com and update your PL9560-WAP's firmware to the
latest version.
Advanced Configuration (Advanced Users Only) 3–11
PlugLink AV 9560 Wireless Adapter User’s Guide
Page 24

To Upload a New Firmware Upgrade
1. Select System in the Main menu.
2. In the Sub menu, select Update Firmware.
3. Click Browse to locate the new firmware upgrade file downloaded from
the web site. The box next to the Browse button will display the location
and name of the firmware file you selected.
4. Click Update.
5. In the confirmation pop-up, click OK. A message appears indicating that
WAP may not respond while the firmware is loaded into the wap and the
WAP is rebooted
6. Click OK.
When the firmware upgrade is complete, the PL9560-WAP home page appears
automatically. If it does not, type in the WAP's address (default -
192.168.1.254) into the address or navigation bar of your web browser.
Note: After an erase, the WAP's username will be admin, the password will be
welcome and the wireless security is disabled.
Viewing System Logs
The PlugLink AV 9560 Wireless Adapter maintains a System Log that displays
potential security threats and system information. This log can be viewed
with a browser using the WAP's web management interface, or it can be
automatically sent to an email address for convenience and archiving. Each
log entry contains the date and time of the event and a brief message
describing the event. It is possible to copy the log entries from the web
management interface and paste into a report.
To View a System Log
1. Select System in the top menu.
3–12 Advanced Configuration (Advanced Users Only)
PlugLink AV 9560 Wireless Adapter User’s Guide
Page 25
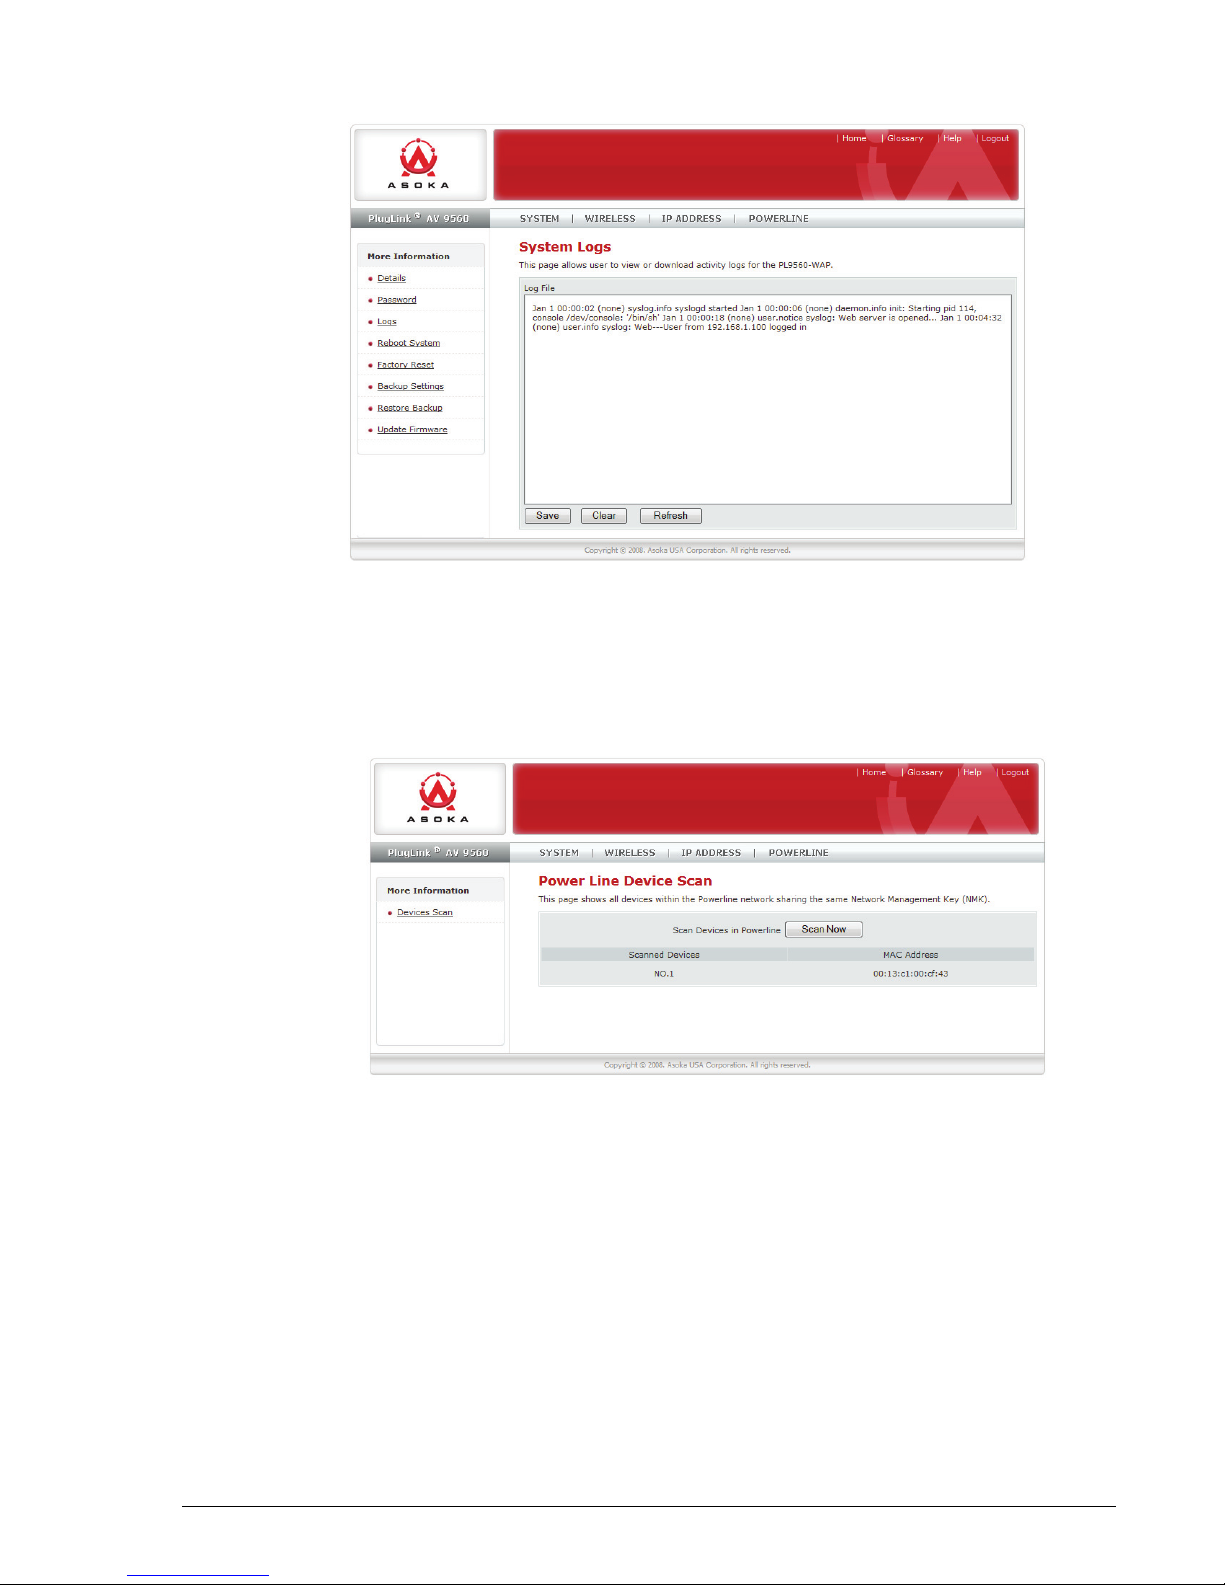
2. In the left menu, select Logs.
Powerline Device Scan
Rescanning refreshes the information on all devices using the same password.
1. Select Powerline in the top menu.
2. In the left menu, select Scan.
Advanced Configuration (Advanced Users Only) 3–13
PlugLink AV 9560 Wireless Adapter User’s Guide
Page 26

3–14 Advanced Configuration (Advanced Users Only)
PlugLink AV 9560 Wireless Adapter User’s Guide
Page 27
A
Specifications
This appendix lists the specifications for your PlugLink AV 9560
Wireless Adapter.
Standards
Compliance:
Software Utility System
Requirements:
Distance
(Range):
•HomePlug® AV
• IEEE 802.3, IEEE 802.3x, IEEE 802.3u
®
Microsoft Windows
systems
Up to 328 feet (100 meters)
98 SE, 2000, ME, XP, and Vista operating
Modulation
Schemes:
EMI and Safety: • FCC Part 15 Class B
Frequency: • 4 to 21 MHz over Powerline
Bandwidth:
Network Protocol: HomePlug AV
Network Interface • One 10/100 Base-T Ethernet (RJ45)
Electromagnetic
Emissions:
• Orthogonal Frequency Division Multiplexing (OFDM)
• QAM10214/256/64/16
•QPSK
•BPSK
•UL (US and Canada)
•CE
• 2.4GHz over wireless
PLC 200 Mbps
• IEEE 802.3 Ethernet
• IEEE 802.3x Flow Control
• IEEE 802.11b/g Wireless Network
Standard
• IEEE 802.11i Wireless Network Security
• IEEE 802.1x client support
• IEEE 802.3u
•TCP/IP
• HomePlug® Power Line 1.01 802.11 b/g AP mode
• FCC Part 15 Class B
•UL (US and Canada)
Specifications A–1
PlugLink AV 9560 Wireless Adapter User’s Guide
Page 28
Additional
Protocols:
Surge Protection:
Power Supply: • US Version: 100-120VAC
Environmental
Specifications:
Power
Rating:
• Forward Error Correction (FEC)
• Automatic Channel Adaptation
4KV
• UK/EU Version: 220-240VAC
• Operating temperature:
32°F to 131°F (0°C to 55°C)
• Operating humidity:
10% to 85% Non-condensing
• Storage temperature:
-4°F to 158°F (-20°C to 70°C)
• Storage humidity:
5% to 90% Non-condensing
• US Version: 100-120VAC 15A max, 60Hz
• UK/EU Version: 220-240VAC 10A max, 50H
Powerline Security:
Wireless Security:
Quality of Service
(QoS):
Warranty:
128-bit AES Encryption
64b/128b WEP, WPA, & WPA2
•TOS
• 802.1q
• TDMA (supported in the future)
1-year limited
A–2 Specifications
PlugLink AV 9560 Wireless Adapter User’s Guide
Page 29
B
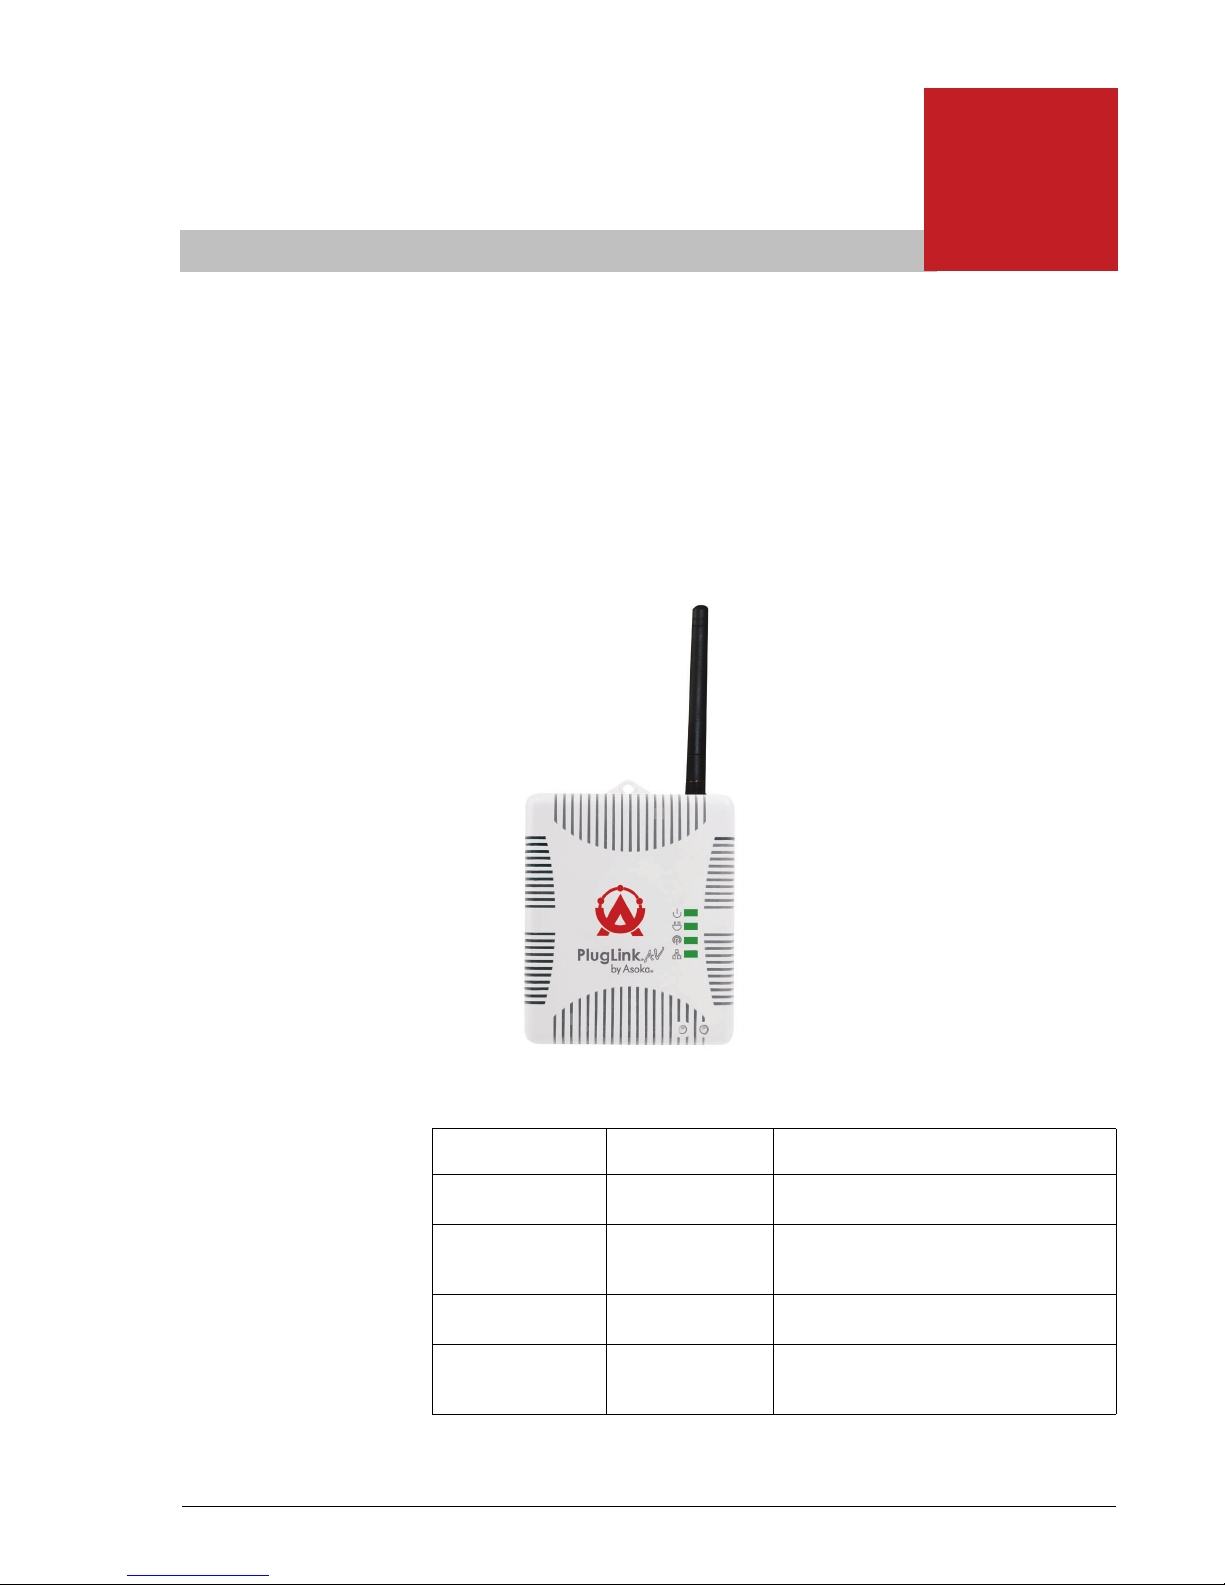
Front Panel
Components
Use the status lights on the front panel to verify connections.
The following table describes the status light functions in the front panel:
Status Light State Indication
Power Illuminated
Off
PLC Activity Blinking
Off
Wireless Blinking
Off
Eth Link Illuminated
Blinking
Off
Components B–1
PlugLink AV 9560 Wireless Adapter User’s Guide
Device is powered on
Devices has no power
Activity on powerline
No activity on powerline
(should blink intermittently)
Broadcasting signal
Not broadcasting
Ethernet connectivity
Ethernet traffic
No ethernet connectivity
Page 30
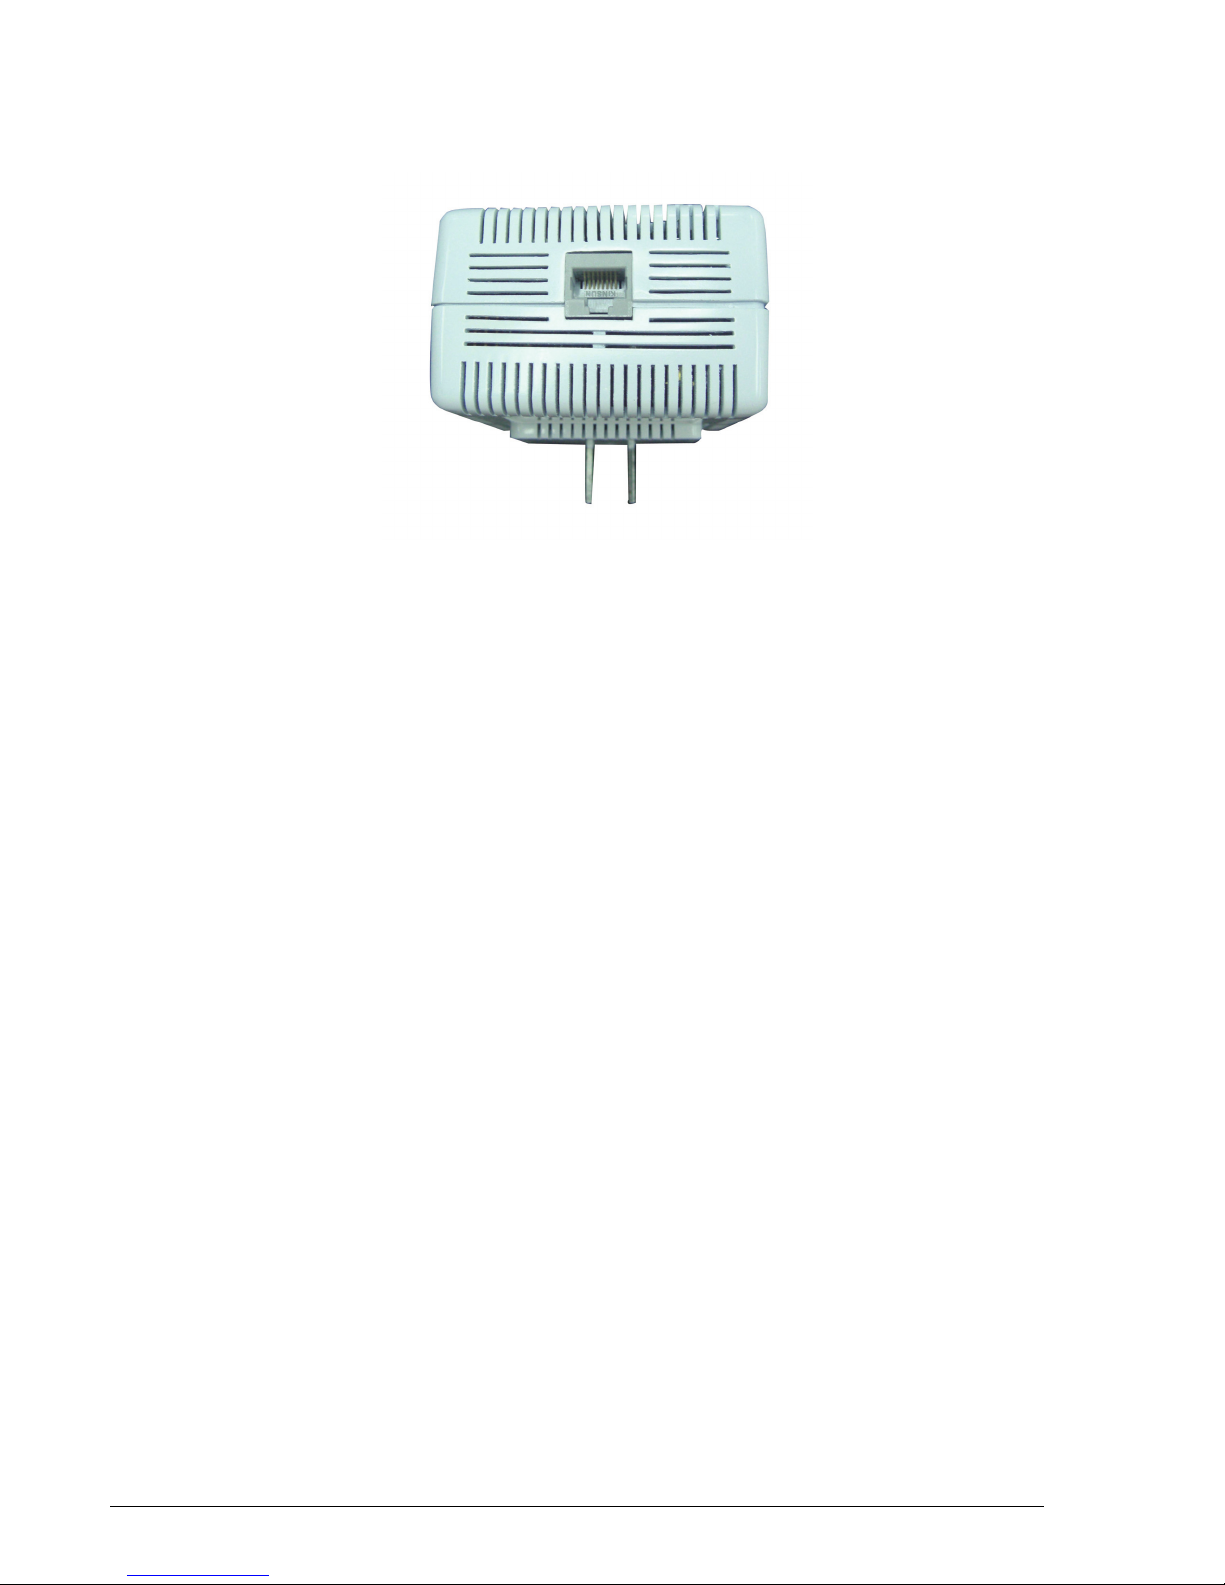
Bottom Panel
The bottom panel of the PL9560-WAP contains one RJ-45 Ethernet port.
Buttons
The PlugLink AV 9560 device has two push buttons:
• SW1 (Left) Button / Powerline Security - The NID button allows you to set
a randomized Network Encryption Key (NEK) by pressing on it. You can
then have additional units use the same randomized NEK by using their
respective NID buttons.
• SW2 (Right) Button / WPS Wireless Security - This button allows you to do
wireless security by simply pushing a button. This requires software and
a network card that supports this feature.
Following is an example of how the NID button can be used:
1. Select a PlugLinkAV 9560 device in your network. Press and hold the NID
button for 10 seconds. After about 10 seconds, the lights on your device
will blink off briefly and come back on immediately. This will change the
existing Network Encrpytion Key (NEK) to a randomized NEK.
2. On the PlugLinkAV 9560 (#1) device from Step #1, press and hold the NID
button for about 3 seconds. The power light on the device will begin
flashing. This unit has now been set to allow other units to join the
network and be assigned the same password. This unit will remain in
"adder" mode for about 3 minutes.
3. Before the three minutes are up from Step #2, select another PlugLink AV
device from your network. Press and hold the NID button for about 3
seconds. The power light on the device will blink as well. The two devices
will communicate and the second device will have it's NEK set to the NEK
of the first device. This should happened in about 15 to 20 seconds. Once
the process has been completed, you can then test if the two devices are
communicating.
B–2 Components
PlugLink AV 9560 Wireless Adapter User’s Guide
Page 31
4. If you add units at a later time, you only need to perform Step #2 (using
any device in the network) and Step #3 (any new devices). Step #1 is not
necessary unless you wish to change your NEK.
Following is a basic description of how the WPS-Push Button can be used:
1. Press WPS/sw2 for more than 10 seconds. (or click Reset WPS network
button on the web interface’s wireless-basic-settings tab). This will create
a new wireless network with random SSID, random wireless password and
WPA2-Personal-AES security algorithm. The PL9560 will wait 2 minutes for
a client to join the wireless network by pushing the client’s WPS button.
2. Press WPS/sw2 for less than 3 seconds (or click WPS AP Push Button
button on the web interface’s wireless-basic-settings tab).
a) If the current wireless network was not created by WPS:
Pressing the WPS/sw2 button will create a new wireless network with a
random SSID, random wireless password using the WPA2-Personal-AES
security algorithm. After the new wireless network is created, the PL9560
will wait 2 minutes for a client to join the wireless network by pushing the
client’s WPS button.
b) If the current wireless network was created by WPS:
The PL9560 will use the current SSID/wireless password and retain the
current clients’ connections in the wireless network. The PL9560 will wait
2 minutes for any new clients to join the wireless network by pushing the
client’s WPS button.
The SSID and wireless password can be checked from web interface’s wireless-status
tab. Users can also use this information and manually connect to the wireless
network.
3. If you have multiple clients that wish to join the wireless network, you will
have to press the WPS/sw2 button for 3 seconds (or less) for every client.
The user will then have to press the WPS button to join the network.
Following is an example to make your network:
1. Press and hold the SW2 (Right) button for more than 10 seconds. This will
reset the current wireless network and create a new wireless network
with random SSID, random wireless password and WPA2-Personal-AES
security algorithm. The PL9560 will wait 2 minutes for a client to join the
wireless network by pushing the client’s WPS button.
2. Before the 2 minutes have elapsed, push a client’s WPS button. The client
will join the network created at Step 1.
Components B–3
PlugLink AV 9560 Wireless Adapter User’s Guide
Page 32
3. If there are additional clients that wish to join the WPS network, push the
SW2 (Right) button for less than 3 seconds and push a client’s WPS button,
this will add one connection. Repeat for every client that needs to join
the WPS network.
4. For clients without WPS push button capabilities, you can make a manual
connection using the WPA2-Personal-AES security algorithm and inputting
the SSID and wireless password information which is available from the
web-interface’s wireless-status tab.
Web Interface/Software Push Buttons
In the web interface of the PL9560 (default IP address of 192.168.1.254),
under Wireless > Basic Settings, there are two software push buttons. The
software push buttons are equivalent to the WPS Wireless Security hardware
push button. Below is a description of the software push buttons:
• WPS AP Push Button - Pressing this software push button will allow a
client to join an existing WPS Network or have the PL9560 create a brand
new WPS wireless network with a random SSID, random wireless
password using the WPA2-Personal-AES security algorithm if the existing
network was not created by WPS.
• Reset WPS Network - Pressing this software push button will have the
PL9560 reset an existing WPS network and create a new network with a
random SSID, random wireless password using the WPA2-Personal-AES
security algorithm. THe PL9560 will then wait for 2 minutes for a client
to join and access the network.
NOTE: The laptop computer must have WPS software installed and be
configured to wireless WPS.
CAUTION! Do not attempt to manually change this password on the
laptop computer.
B–4 Components
PlugLink AV 9560 Wireless Adapter User’s Guide
Page 33
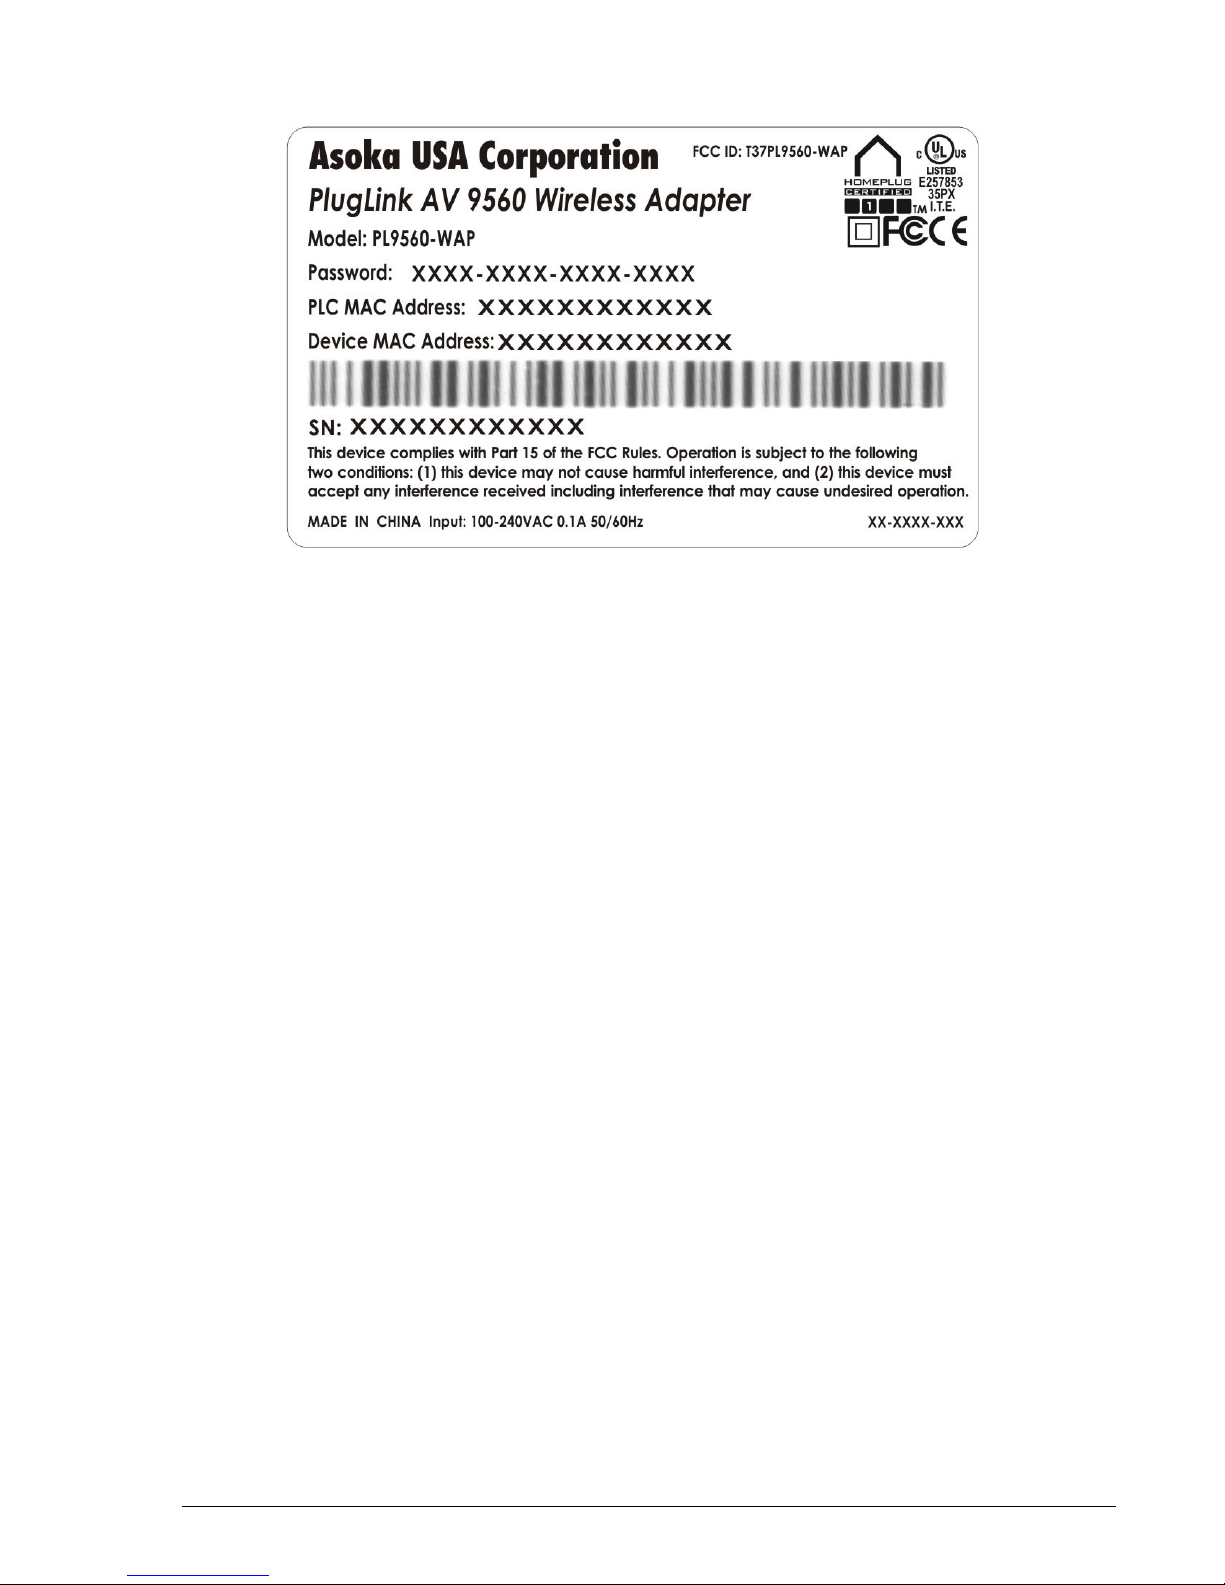
Label
Components B–5
PlugLink AV 9560 Wireless Adapter User’s Guide
Page 34

B–6 Components
PlugLink AV 9560 Wireless Adapter User’s Guide
Page 35

C
Declarations of Conformity
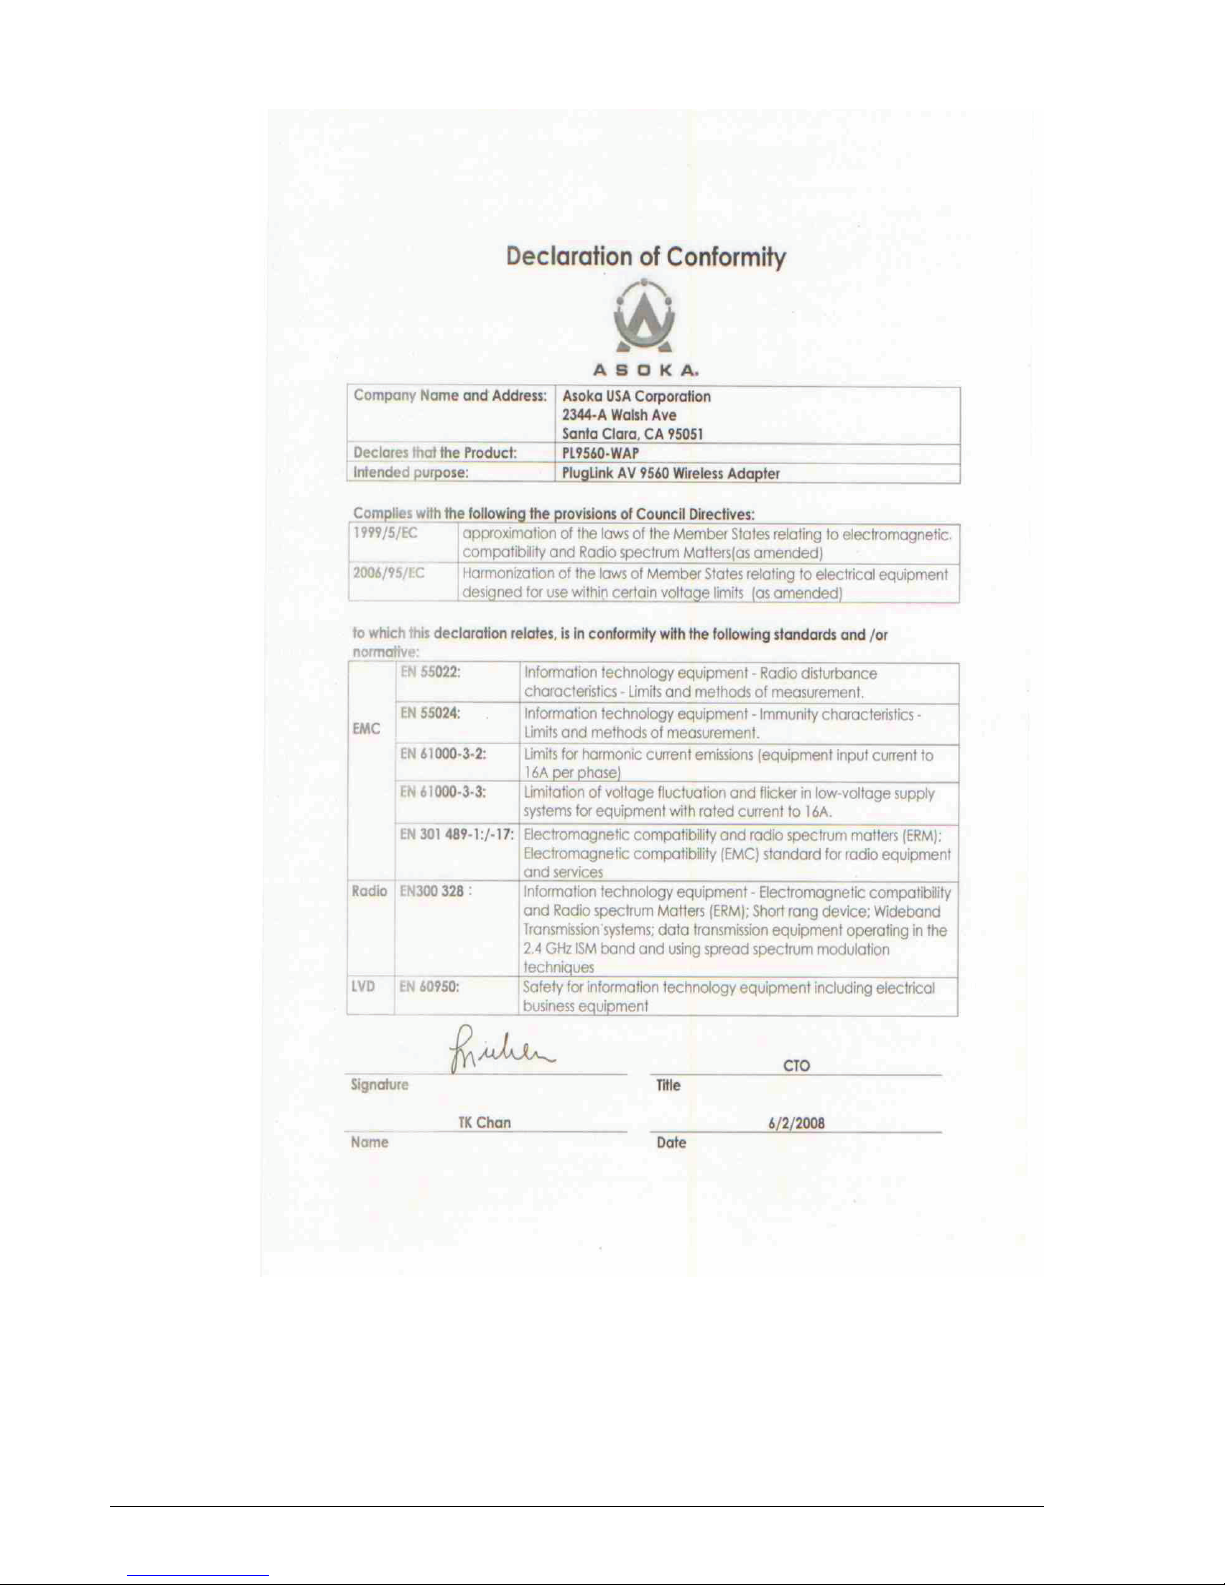
This appendix lists the declarations of conformity for your PlugLink
AV 9560 Wireless Adapter
Declarations of Conformity C–1
PlugLink AV 9560 Wireless Adapter User’s Guide
Page 36
C–2 Declarations of Conformity
PlugLink AV 9560 Wireless Adapter User’s Guide
Page 37

D
Warranty
Asoka warrants that (a) the hardware components of the product
will be free from defects in materials and workmanship under
normal use for one (1) year from the date of purchase when used
within the limits set forth in the Specifications section of the User
Guide, and (b) the software components will perform substantially
in accordance with Asoka's published specifications for ninety (90)
days from the date of purchase, but does not warrant that the
software will be error-free or free of all defects.
Should a product fail to perform as described in the User Guide
within the warranted period, it will be repaired or replaced with
the same or functionally equivalent product by Asoka, at its
discretion, free of charge provided that you: (a) return the failed
product to an Asoka designated repair facility with shipping charge
prepaid, and (b) provide Asoka with proof of the original date of
purchase. Repaired or replacement products will be returned to
you with shipping charges prepaid. Asoka warrants any replaced or
repaired product or component for the remainder of the initial
warranty period whichever is longer. Replacement products may be
refurbished or contain refurbished materials or components. If
Asoka, by its sole determination, is unable to restore the product
to proper operating condition, it will refund the depreciated
purchase price of the product.
This warranty extends only to you, the original purchaser and is not
transferable to any subsequent purchasers.
This warranty does not apply if, in the judgment of Asoka, the
product fails due to damage from shipment, handling, storage,
acc ident, abuse, misapplication or m isuse, or if it has been used or
maintained in a manner not conforming to product manual
instructions, has been modified in any way, or has had any serial
number removed or defaced. Repair by anyone other than Asoka or
an approved agent will void this warranty. The maximum liability
of Asoka under this warranty is limited to the purchase price of the
Warranty D–1
PlugLink AV 9560 Wireless Adapter User’s Guide
Page 38

product covered by the warranty. Prior to returning any defective product,
the purchaser or the authorized merchant from whom the purchaser originally
bought the product must obtain a Return Material Authorization (RMA)
number from Asoka. All defective products should be returned to Asoka with
shipping charges prepaid. Asoka will not accept collect shipments.
WHILE ASOKA HAS MADE EVERY EFFORT TO PROVIDE CLEAR AND ACCURATE
TECHNICAL INFORMATION ABOUT ITS PRODUCTS, ASOKA ASSUMES NO
LIABILITY FOR ANY EVENTS ARISING OUT OF THE USE OF THE TECHNICAL
INFORMATION OR THE PRODUCT, EXCEPT AS SPECIFICALLY PROVIDED IN THIS
AGR EEME NT OR AS REQU IRED BY LAW. THE WARRANTIES AND REMEDIES STATED
ABOVE ARE EXCLUSIVE AND IN LIEU OF ALL OTHERS, ORAL OR WRITTEN,
EXPRESS OR IMPLIED. ANY AND ALL OTHER WARRANTIES, INCLUDING IMPLIED
WARRANTIES OF MERCHANTABILITY, FITNESS FOR A PARTICULAR PURPOSE AND
NON-INFRINGEMENT OF THIRD PARTY RIGHTS ARE EXPRESSLY EXCLUDED.
ASOKA SHALL NOT BE LIABLE, UNDER ANY CIRCUMSTANCES, TO ANY PERSON
OR ENTITY FOR ANY SPECIAL, INCIDENTAL, INDIRECT OR CONSEQUENTIAL
DAMAGES, INCLUDING WITHOUT LIMITATION, DAMAGES RESULTING FROM THE
USE OR MALFUNCTION OF THE PRODUCTS, LOSS OF PROFITS OR REVENUES,
BUSINESS INTERRUPTION, OR COSTS OF REPLACEMENT GOODS, EVEN IF ASOKA
IS INFORMED IN ADVANCE OF THE POSSIBILITY OF SUCH DAMAGES.
D–2 Warranty
PlugLink AV 9560 Wireless Adapter User’s Guide
Page 39

E
FCC Statement
FCC Notice
This equipment has been tested and found to comply with the
limits for a Class B digital device, pursuant to part 15 of FCC Rules.
These limits are designed to provide reasonable protection against
harmful interference in a residential installation. This equipment
generates and can radiate radio frequency energy and, if not
installed and used in accordance with the instructions, may cause
harmful interference to radio communications. However, there is
no guarantee that interference will not occur in a particular
installation. If this equipment does cause harmful interference to
radio or television reception, which can be determined by turning
the equipment off and on, the user is encouraged to try to correct
the interference by one or more of the following measures:
• Reorient or relocate the receiving antenna.
• Increase the separation between the equipment and receiver.
• Connect the equipment into an outlet on a circuit different
from that to which the receiver is connected.
• Consult the dealer or an experienced radio/TV technician for
help.
This device complies with Part 15 of FCC Rules.
Operation is subject to the following two conditions:
1. This device may not cause harmful interference, and
2. This device must accept any interference received, including
interference that may cause undesired operation.
Caution:
The manufacturer is not responsible for any radio or tv
interference caused by unauthorized modifications to this
equipment. Such modifications could void the user’s authority
to operate the equipment.
FCC Notice E–1
PlugLink AV 9560 Wireless Adapter User’s Guide
Page 40

FCC RF Radiation Exposure Statement
This equipment complies with FCC RF radiation exposure limits set forth for
an uncontrolled environment. This equipment should be installed and
operated with a minimum distance of 20 centimeters between the radiator
and your body.
E–2 FCC Notice
PlugLink AV 9560 Wireless Adapter User’s Guide
Page 41

PlugLink AV 9560 Wireless Adapter User’s Guide
13
Page 42

Asoka USA Corporation
558 Pilgrim Drive
Suite H
Foster City, California 94404
USA
Phone: (650) 286–1700
Fax: (650) 286–1790
www.asokausa.com
66-0327-00Rev.001
 Loading...