

Operating and installation instructions
Manuel d‘utilisation et d‘installation
www.pluggit.com
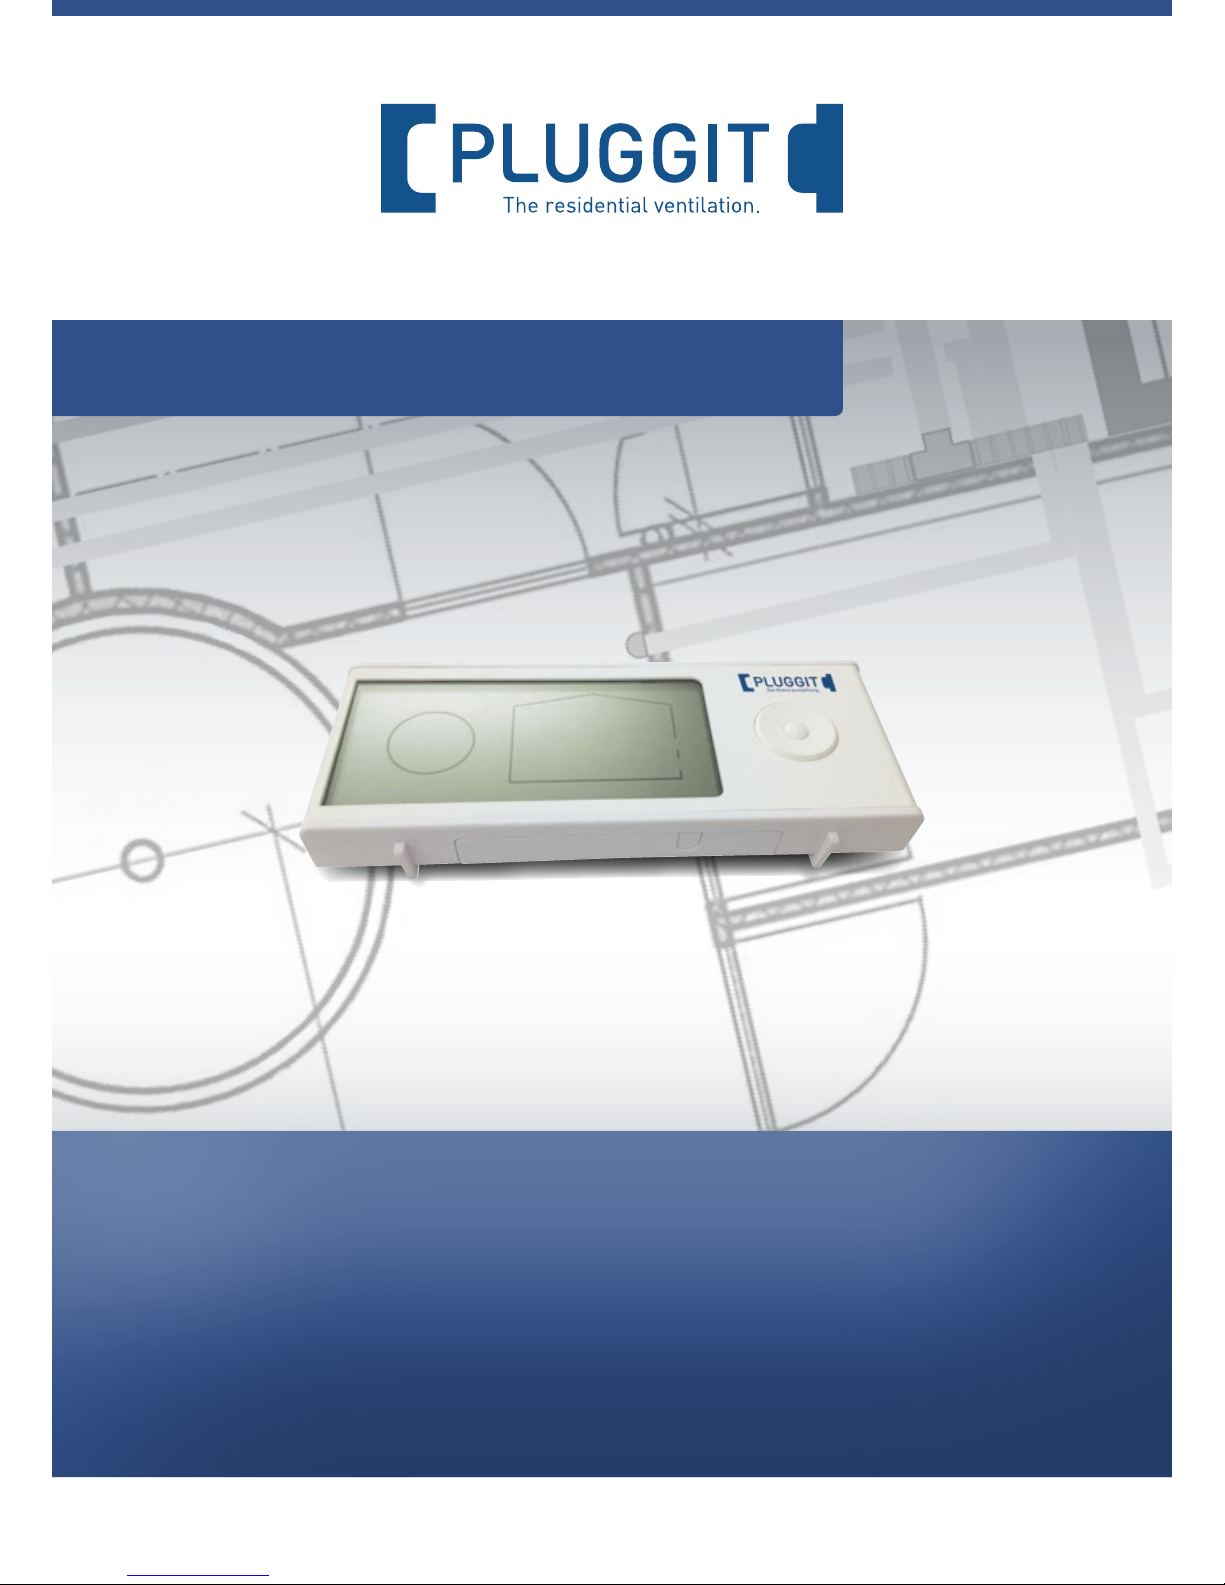
Radio remote APRC
Télécommande APRC
for / pour Pluggit Avent AP190 / AP310 / AP460

The technology makes the difference.
Pluggit's value-added innovations for man and the environment.
Appetite for fresh air? You can get more information on the company,
the intelligent technology of Pluggit comfort ventilation systems,
references and regional contacts at
www.pluggit.com or as an on-line dialogue at www.lueftungsblog.de
The air conduct being installed invisibly in the floor and an ideal
positioning of the air outlets make for perfectly aligned transverse
ventilation. Displacement ventilation means that the fresh air is
supplied to the room almost without causing any draughts and
disturbing noise, without pressure and preheated during the
cold months.
Fresh air and heat supply in one - quicker, more flexible and more
energy saving than common heating systems.
allfloor – in ceilings, walls, above or under concrete and screed the Pluggit system design offers maximum flexibility with regard to
the installation of the ventilation ducts and thus is ideal for the use
in new buildings as well as for the refurbishment of
existing buildings.
This innovative technology allows for the supply of exactly the
required or desired amount of fresh air thanks to a highly sensitive
sensor system and control. Cost and time saving, the unit adapts to
the system characteristics at the touch of a button after the
installation and automatically calibrates itself consistently at
regular intervals.
Energy efficiency - a high heat supply rate alone makes a ventilation
system seem effective and energy efficient only at first glance.
The decisive factor for an assessment is rather the ratio of the
energy spent to the attained heat recovery rate - the so-called
electrical energy efficiency. Due to a high tightness, a consumptionoptimised device design and the latest heat exchanger technology,
our ventilation systems attain excellent ratings in terms of heat
recovery and energy efficiency.
The CleanSafe principle guarantees a very low pollution potential of
our distribution system due to smooth surfaces and a trouble-free
cleaning concept, the convincing results of which have been
confirmed by an independent testing institute.
Appetite for fresh air in your building?
The unique comfort ventilation system for the energetic
refurbishment of existing buildings.
2Q
allfloor
ServoFlow
CleanSafe

1
OI remote control for Pluggit Avent
1. General safety information ............................................................................................................... 3
2. General notes ................................................................................................................................... 3
2.1. Intended use ...................................................................................................................................... 3
2.2. Unintended use .................................................................................................................................. 3
2.3. Warranty ............................................................................................................................................. 3
3. Operation .......................................................................................................................................... 3
3.1. Overview ............................................................................................................................................. 3
3.1.1. Shortcuts navigation button .................................................................................................... 5
3.2. Syncronising the remote control ....................................................................................................... 5
3.3. Setting the time .................................................................................................................................. 6
3.4. Switching on/off preset weekly programme or automatic programme ........................................... 6
3.4.1. Operating parameters weekly programmes .......................................................................... 7
3.5. Selecting ventilator level manually ................................................................................................. 13
3.6. Switching on/off holiday mode ........................................................................................................ 13
3.7. Setting, switching on/off night setback ........................................................................................... 13
3.8. Switching on/off the fire booster ..................................................................................................... 14
3.9. Setting/switching on baypass (optional) .......................................................................................... 14
3.9.1. Setting automatic bypass ...................................................................................................... 14
3.9.2. Manually switch on and off bypass ....................................................................................... 14
3.10. Reset filter alarm ........................................................................................................................... 15
3.11. Switching on/off installer menu .................................................................................................... 15
3.11.1. Switching on installer menu ............................................................................................... 16
3.11.2. Readout software versions .................................................................................................. 16
3.11.3. Readout rotational speeds of supply and exhaust ventilators ........................................... 16
3.11.4. Reading out/setting set points of the preheating(optional) ................................................ 16
3.11.5. Setting temperatures for the bypass (optional) .................................................................. 17
3.11.6. Setting sensitivity of the humidity sensor (optional) .......................................................... 17
3.11.7. Setting the sensitivity of the VOCs sensor (optional) .......................................................... 17
3.12. Troubleshooting ............................................................................................................................. 18
3.12.1. Errors .................................................................................................................................. 18
3.12.2. Error codes .......................................................................................................................... 18
4. Technical data ................................................................................................................................. 19
5. Decommissioning/disposal ............................................................................................................. 19
5.1. Decommissioning in cas of dismantling ......................................................................................... 19
5.2. Packaging ......................................................................................................................................... 19
5.3. Old appliance ................................................................................................................................... 19
TABLE OF CONTENTS

2
OI remote control for Pluggit Avent
1. Consignes générales de sécurite .................................................................................................... 21
2. Consignes générales ....................................................................................................................... 21
2.1. Utilisation conforme ........................................................................................................................ 21
2.2. Utilisation non conforme ................................................................................................................. 21
2.3. Garantie ............................................................................................................................................ 21
3. Commande ...................................................................................................................................... 21
3.1. Apercu .............................................................................................................................................. 21
3.1.1. Raccourci de la touche de navigation ................................................................................... 23
3.2. Synchronisation de la télécommande ............................................................................................. 23
3.3. Réglage de l’heure ........................................................................................................................... 24
3.4. Activation et désactivation d’un programme hebdomadaire ou automatique prédéfini ................ 24
3.4.1. Paramètres de fonctionnement concernant les programmes hebdomadaires .................. 25
3.5. Sélection manuelle du niveau de ventilation ................................................................................... 31
3.6. Activation et désactivation du mode vacances ................................................................................ 31
3.7. Réglage/activation et désactivatiom de l’abaissement de nuit ...................................................... 31
3.8. Activation et désactivation de l’amplificateur de combustion ........................................................ 32
3.9. Activation et désactivation du bypass (disponible en option) .......................................................... 32
3.9.1. Réglage du bypass automatique ........................................................................................... 32
3.9.2. Activation et désactivation manuelles du bypass ................................................................. 32
3.10. Réinitialisation de l’alarme des filtres .......................................................................................... 33
3.11. Activation et dèsactivation du menu d’installateur ....................................................................... 33
3.11.1. Activation du menu d'installateur ....................................................................................... 34
3.11.2. Lecture des versions logicielles ......................................................................................... 34
3.11.3. Lecture des vitesses de rotation des ventilateurs d'air frais et d'air vicié ........................ 34
3.11.4. Lecture et réglage des valeurs de consigne du préchauffage (disponible en option) ....... 34
3.11.5. Réglage des températures pour le bypass (disponible en option) ..................................... 35
3.11.6. Réglage de la sensibilité du capteur d'humidité (disponible en option) ............................ 35
3.11.7. Réglage de la sensibilité du capteur COV (disponible en option) ....................................... 35
3.12. Dépannage ..................................................................................................................................... 36
3.12.1. Dysfonctionnements ............................................................................................................ 36
3.12.2. Codes d'erreur ..................................................................................................................... 36
4. Données techniques ........................................................................................................................ 37
5. Mise hors service/élimination ........................................................................................................ 37
5.1. Mise hors service lors du démontage ............................................................................................. 37
5.2. Conditionnement .............................................................................................................................. 37
5.3. Appareil usagé ................................................................................................................................. 37
SOMMAIRE
3
OI remote control for Pluggit Avent
English
2.1. INTENDED USE
The remote control is intended for controlling the
Avent P190/P310/P460 room ventilation units. The latter
has a wireless connection with the room ventilation system.
The range is approx. 30 m. It even reaches through floors
and light ceiling constructions.
Up to five remote controls can be connected to one room
ventilation unit. All connected remote controls are on an
equal footing. Thus, the last change of the operating mode
or of a set point is always taken over.
To ensure easy accessibility, the remote control should be
placed on a shelf or fixed to a wall in the kitchen or in the
living room.
The power save function of the remote control switches off
the display after 2 minutes. When pressing the navigation
button it switches on again.
2.2. UNINTENDED USE
Any use of the remote control other than that described in
"Intended use" shall not be permissible.
2.3. WARRANTY
In order to preserve your full statutory warranty claim, the
technical guidelines in these operating instructions must be
observed.
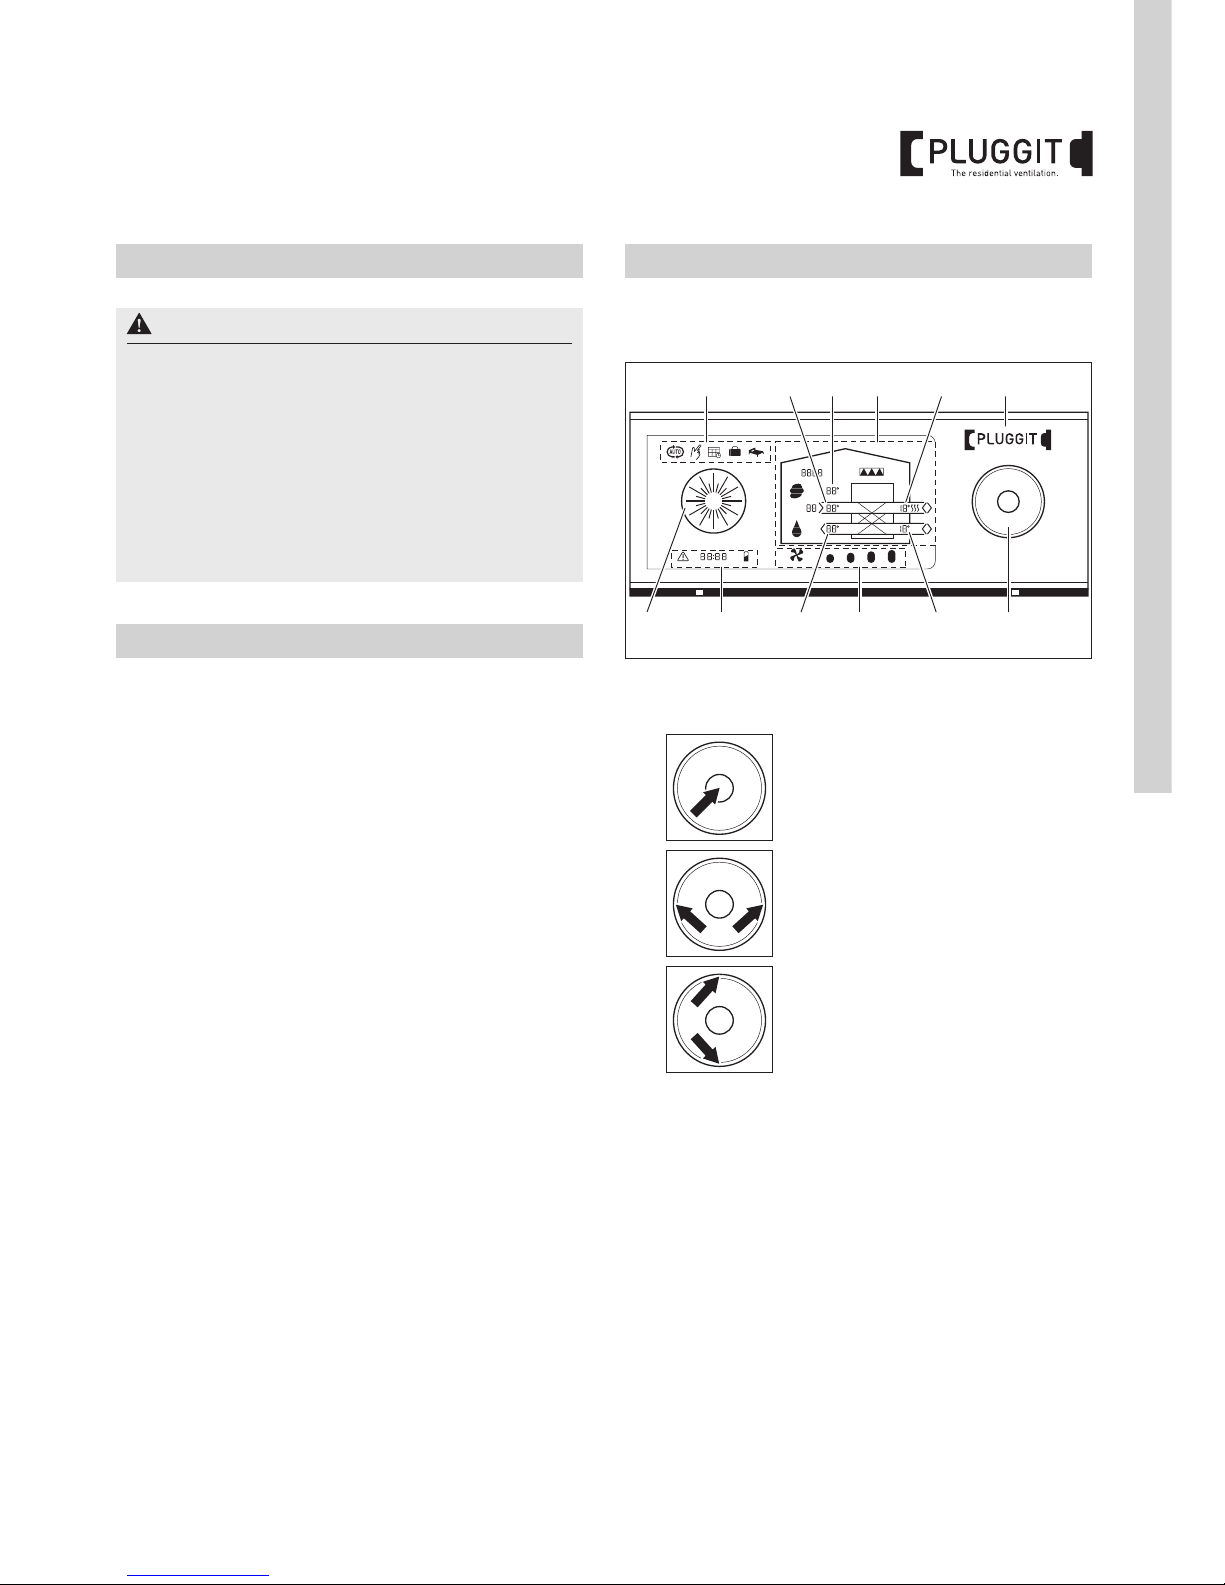
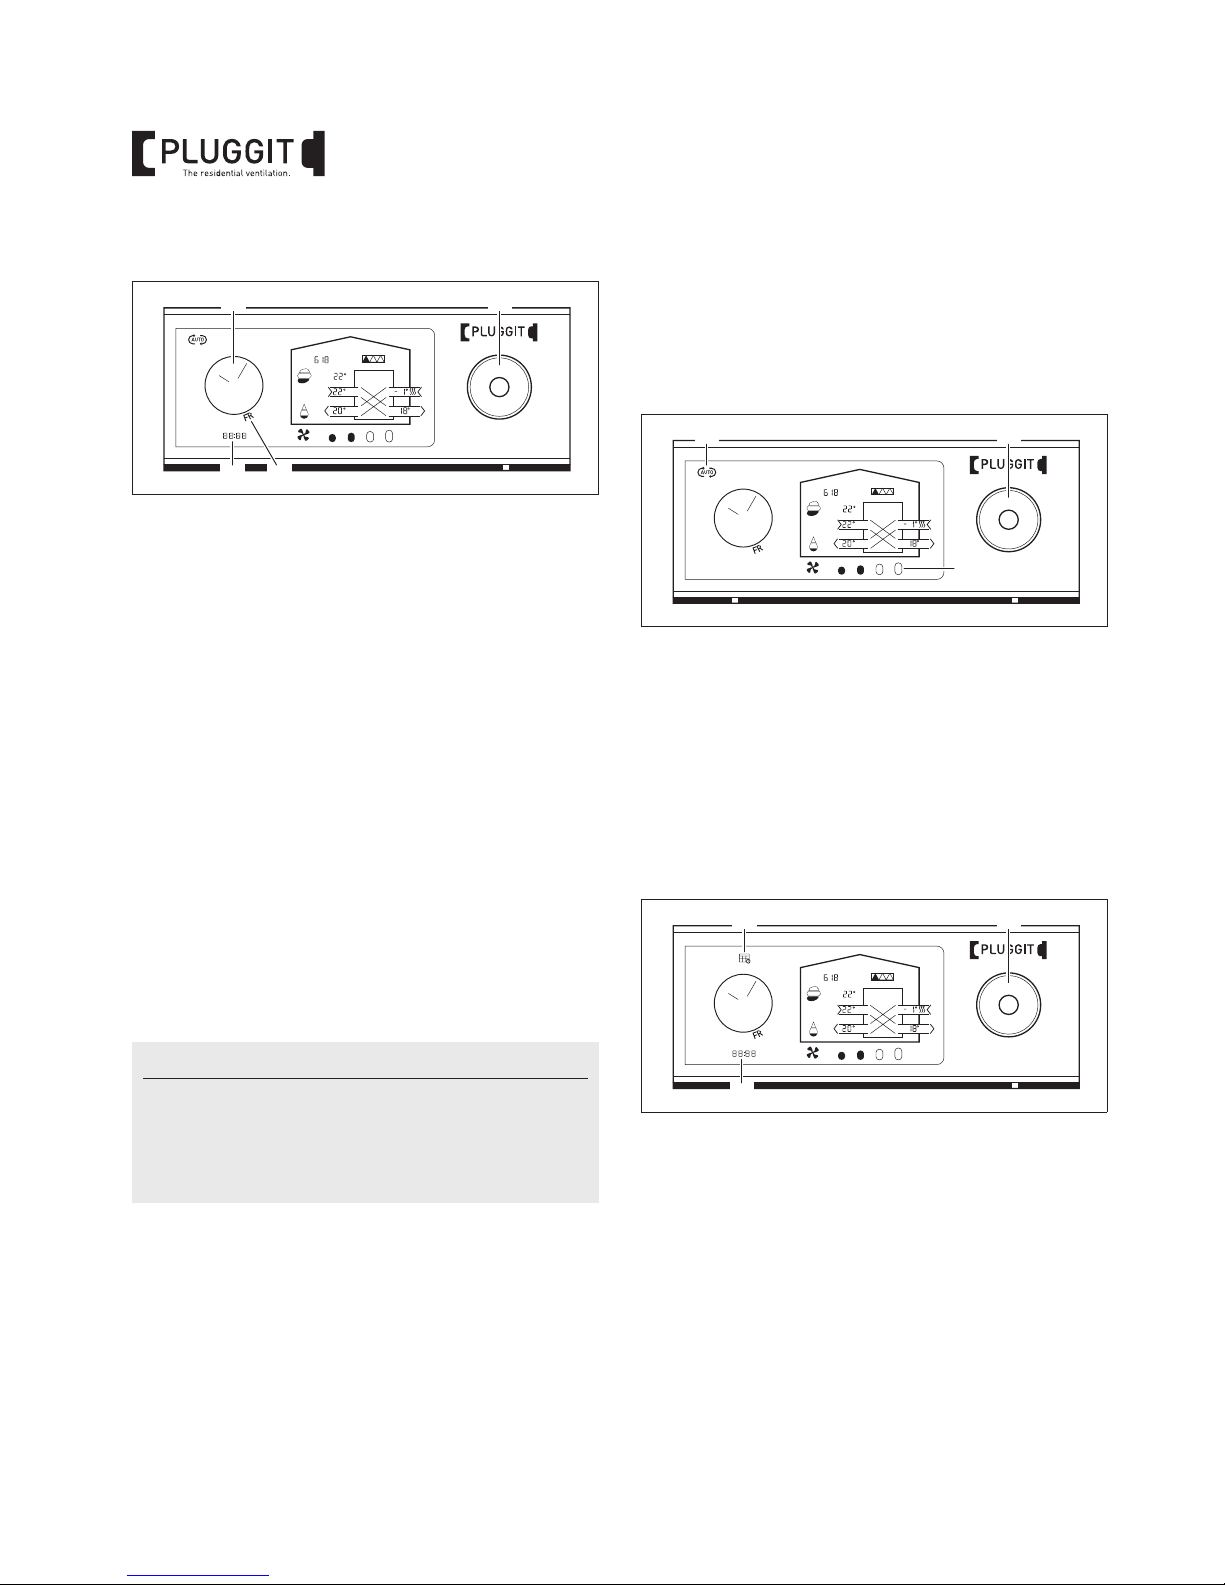
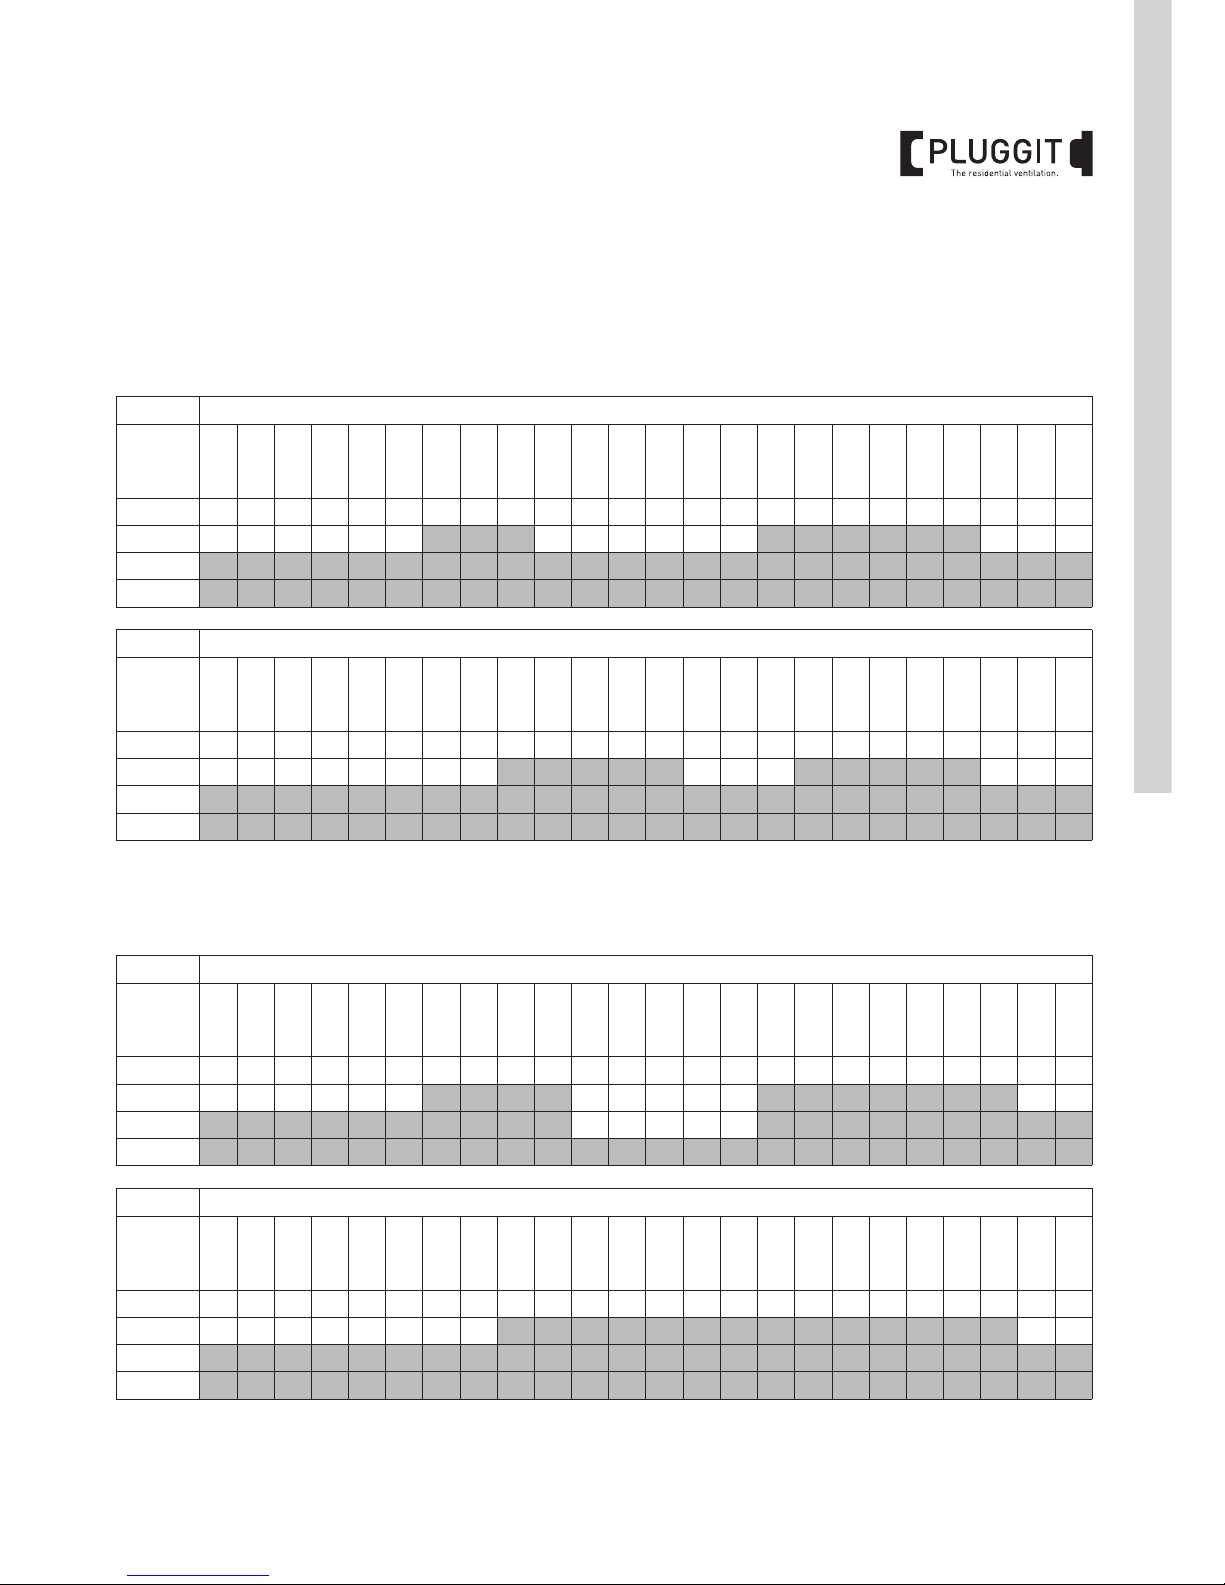
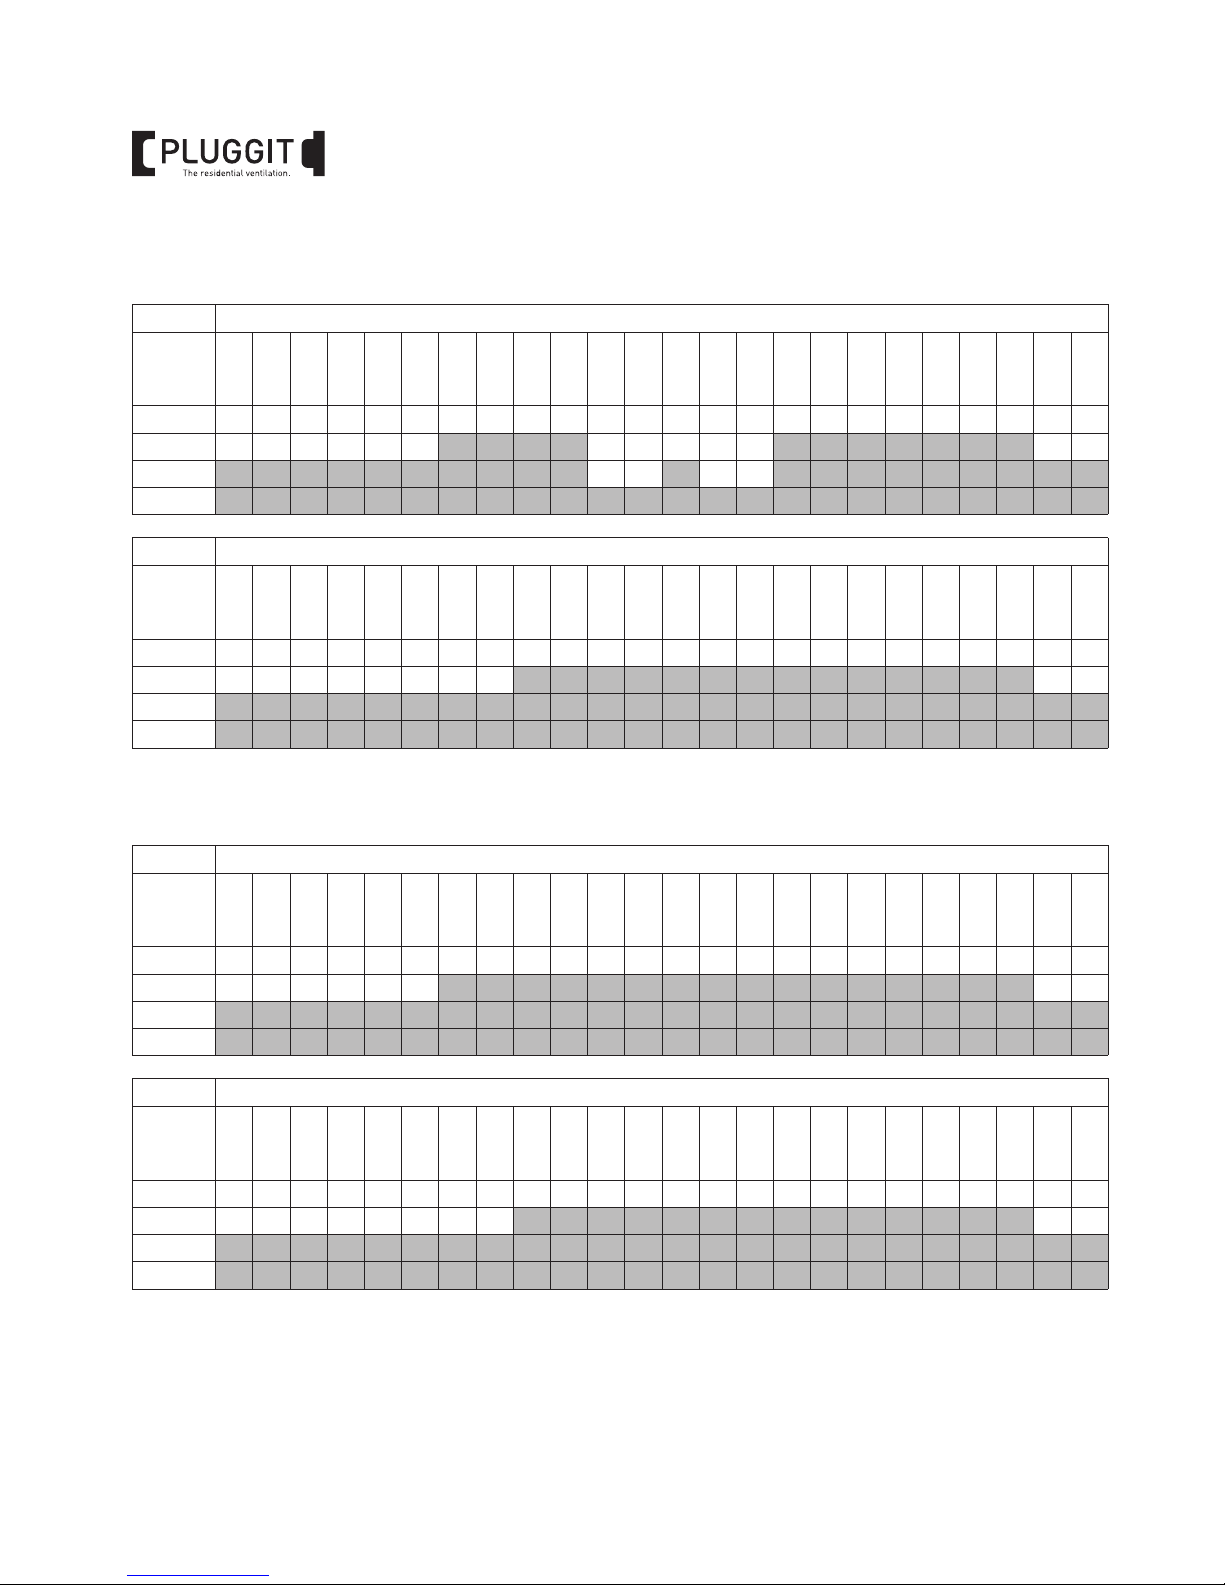
3.1. OVERVIEW
1 Remote control
2 Navigation button
3 Ventilator levels 1-4
The current ventilator level is always displayed.
1. GENERAL SAFETY INFORMATION
Warning:
The following safety instructions must be observed,
since damage and injury may otherwise result:
z Please read these operating instructions care-
fully before starting to operate the remote control.
z Damages resulting from inappropriate storage
of the product, improper handling or unintended
use are excluded from any liability.
z Technical changes reserved.
2. GENERAL NOTES
3. OPERATION
• Selection of a menu item
• Confirmation of a setting
Switch between menu items
Increase or decrease default
values
Die Wohnraumlüftung
M
O
T
U
W
E
T
H
F
R
S
A
S
U
RH%
6 1
2345T4T2
7 T1T5T3
M+P-26A-0943
4
OI remote control for Pluggit Avent
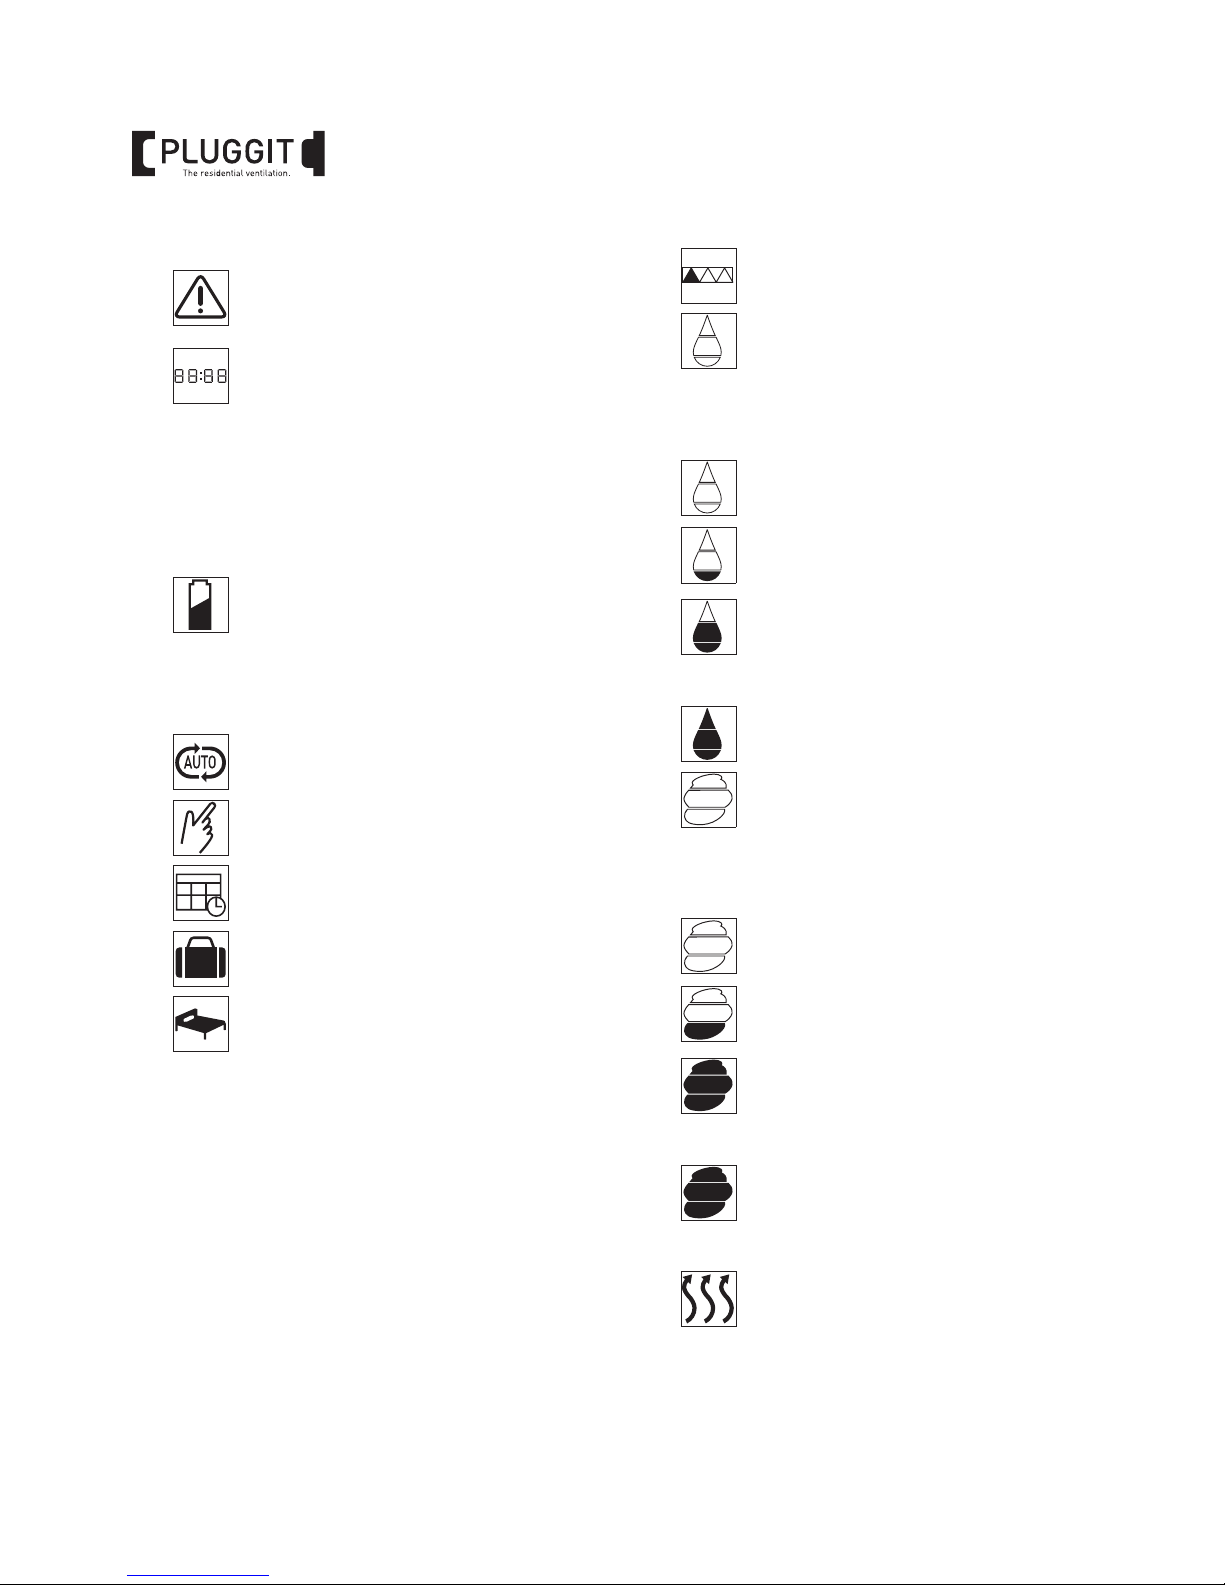
4 Info line
5 Time/weekday
Controlling the week timer and night setback
6 Operating modes
7 Operating data
• Outdoor temperature (T1)
• Supply air temperature (T2)
• Exhaust air temperature (T3)
• Outgoing air temperature (T4)
• Indoor air temperature (T5)
Alarm
Room ventilation unit error in connection
with the display of an error code.
Information on functions, programmes and
error codes
A1 Automatic programme
P1, P2... Weekly programme
BYP6, BYP5...Manual bypass switched on.
FP7, FP6... Fire booster switched on
DEF Defrost function
E1, E2... Error codes
Niedriger Batteriestatus
Automatic programme
Manually select ventilator level
Selecting weekly programme
Switching on/off holiday mode
Switching on/off night setback
Filter change
Reset filter alarm
Relative air humidity of the exhaust air
(optional)
A humidity sensor must be installed and the
automatic mode must be switched on to control the room ventilation unit depending on the
relative air humidity.
<24 % relative humidity
Very dry air, ventilator level 1
25-34 % relative humidity
Dry air, ventilator level 1
35-45 % relative humidity
Comfort range, ventilator level 1-3
46-65 % relative humidity
Comfort range, ventilator level 3
>66 % relative humidity
Humid air, ventilator level 3
VOC content of the air
(optional)
A VOC sensor must be installed and the automatic mode must be switched on to control
the room ventilation unit depending on the
VOC content.
<600 ppm
Clean air, ventilator level 1
600-850 ppm
Clean air, ventilator level 1-2
850-1100 ppm
Sufficient air quality, ventilator level 2-3
1100-1200 ppm
Sufficient air quality, ventilator level 3
1200-1600 ppm
Slightly polluted air, ventilator level 3
>1600 ppm
Polluted air, ventilator level 4
Preheat temperature
(optional)
5
OI remote control for Pluggit Avent
English
3.1.1. Shortcuts navigation button
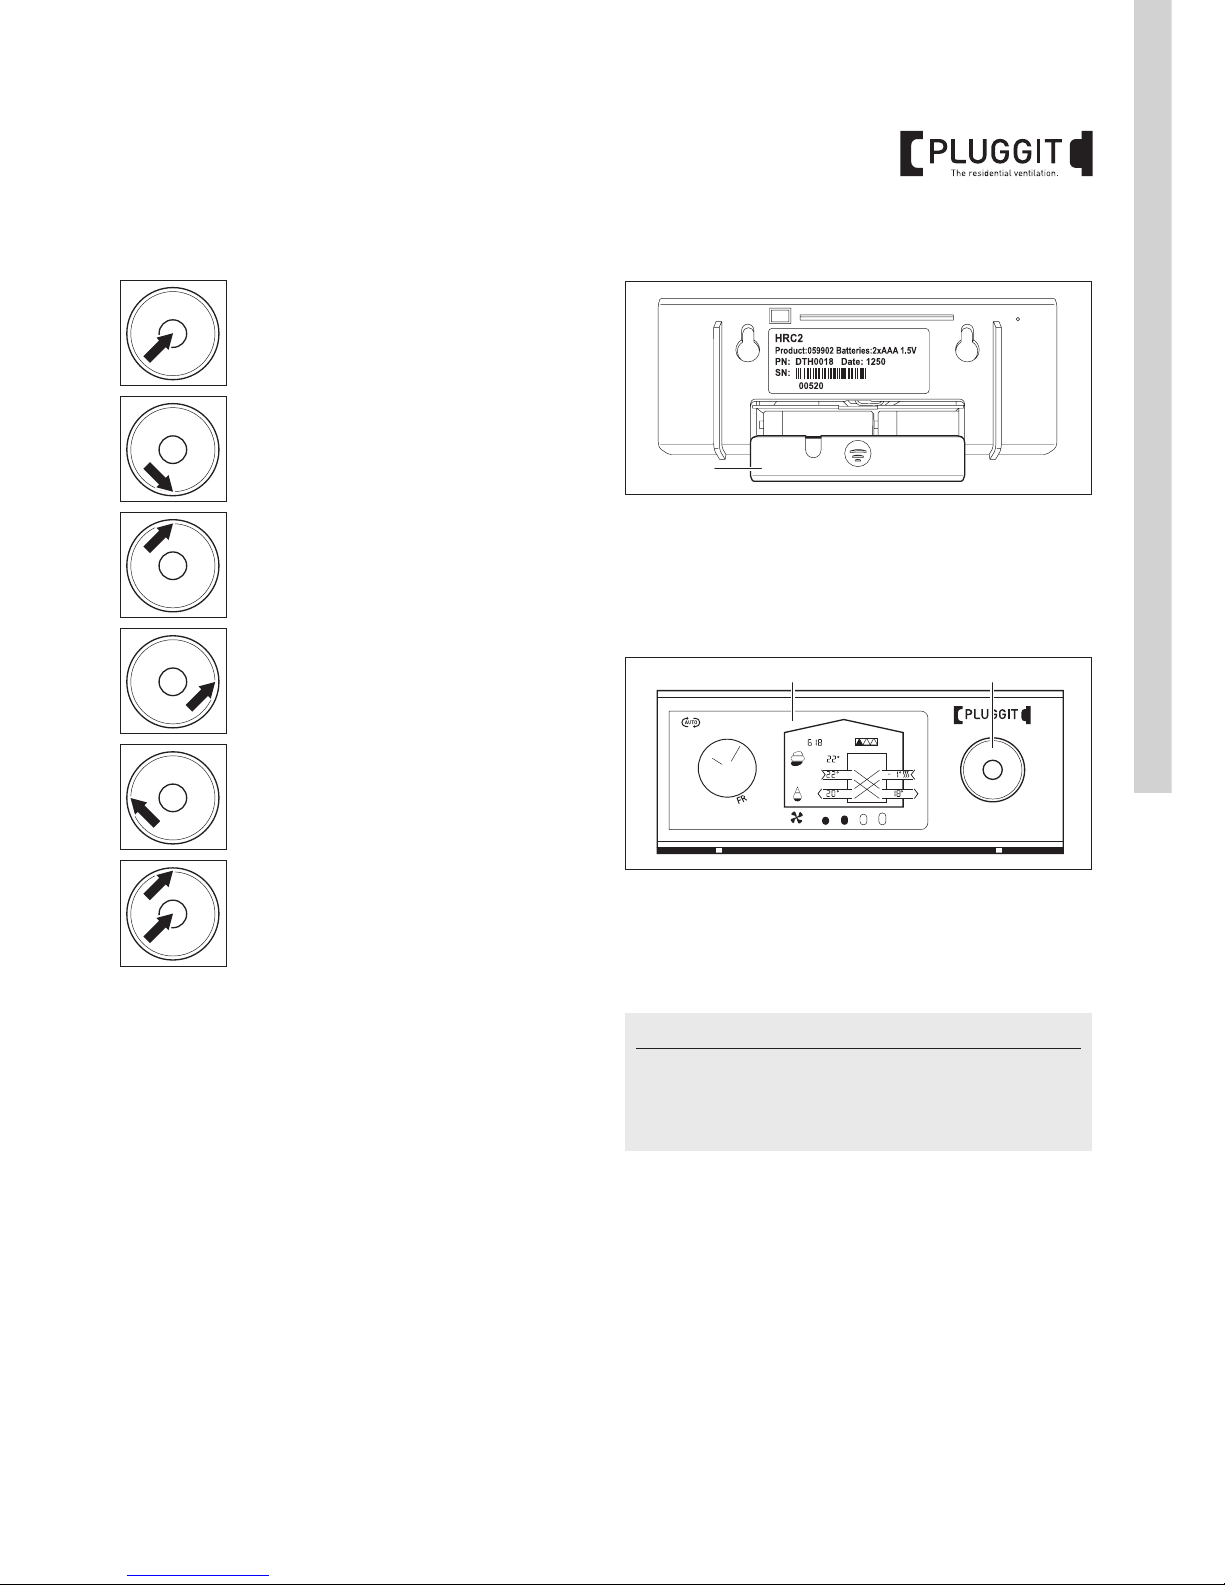
3.2. SYNCRONISING THE REMOTE CONTROL
1. Disconnect all poles of the room ventilation unit from
the power supply system.
2. Remove the cover (1) and insert the supplied batteries
(2x AAA).
3. Replace cover (1).
4. Reconnect all poles of the room ventilation unit to the
power supply system.
A connection between the remote control and the room
ventilation system will be established within 60 seconds.
The operating data appears on the display (2).
5. To reset the remote control, hold down button (3) at the
left for approx. 10 seconds until the display and all symbols on the display (2) start flashing.
The remote control is ready for a new synchronisation.
Press centre of the button for approx.
3 seconds to exit a menu and to switch
to the default display
Press bottom of button for approx.
5 seconds to switch on/off bypass (accessory) for 6 hours, see page 13.
Press top of the button for approx.
5 seconds to switch on the fire booster
(accessory) for 7 minutes, see page 13.
Press button at the right for approx.
10 seconds to switch on the installer
menu, see page 14.
Press button at the right for approx.
10 seconds to reset the remote control.
Hold down the top left of button for approx. 10 seconds to reset all settings
and set points to factory settings.
Only possible in the installation menu.
Note:
It is also possible to establish a constant power supply
using a mini USB cable (accessory). The connector is located on the back of the remote control behind the
cover (1).
1
M+P-26A-0966
Die Wohnraumlüftung
RH%
2 3
M+P-26A-0967
6
OI remote control for Pluggit Avent
3.3. SETTING THE TIME
1. Press the centre of button (1) to activate the operating
mode line. The current operating mode flashes
2. Press button (1) at the right until the hands of the
clock (2) start flashing.
3. Press the bottom of button (1) and the current time
starts flashing on the display (3).
4. Hold down top or bottom of button (1) until the time is
set.
5. Press centre of button (1).
The setting is saved and the weekday (4) starts flashing.
6. Press top or bottom of button (1) until the weekday (4) is
set.
7. Press centre of button (1).
The setting is saved.
3.4. SWITCHING ON/OFF PRESET WEEKLY
PROGRAMME OR AUTOMATIC PROGRAMME
You can choose between a total of 10 preset weekly programmes or one automatic programme (freely selectable).
In automatic mode the room ventilation unit automatically
switches between the different ventilator levels. The room
ventilation unit maintains the air quality with regard to the
relative air humidity and the VOC content at the same the
same level of comfort.
In high humidity the demand increases and the room ventilation unit switches to ventilator level 3.
In low humidity the room ventilation unit turns to
ventilator level 1.
If a humidity sensor (accessory) and a VOC sensor (accessory) are installed, the room ventilation unit turns to
ventilator level at high VOC levels.
In the preset weekly programme the ventilator levels
change depending on the stored times, see page 7.
Automatic programme
1. Press the centre of button (1) to activate the operating
mode line. The current operating mode flashes.
2. Repeatedly press button (1) at the right until the
display (2) illuminates.
The ventilator level (3) which has just been set will be
displayed.
3. Press centre of button (1).
The setting is saved.
Preset weekly programme
1. Press the centre of button (1) to activate the operating
mode line. The current operating mode flashes.
2. Repeatedly press button (1) at the right until the
display (2) starts flashing.
The current weekly programme (3) is displayed.
3. Press the bottom of button (1).
The weekly programme (3) starts flashing.
4. Press top or bottom of button (1) until the desired
weekly programme (3) is selected.
5. Press centre of button (1).
The settings are saved.
Note:
One preset weekly programme or the automatic programme must be selected when commissioning the
unit. For further information, please refer to the operating and installation instructions of the room ventilation unit.
Die Wohnraumlüftung
RH%
2
43
1
M+P-26A-0968
Die Wohnraumlüftung
RH%
2
3
1
M+P-26A-0969
Die Wohnraumlüftung
RH%
2
3
1
M+P-26A-0970
7
OI remote control for Pluggit Avent
English
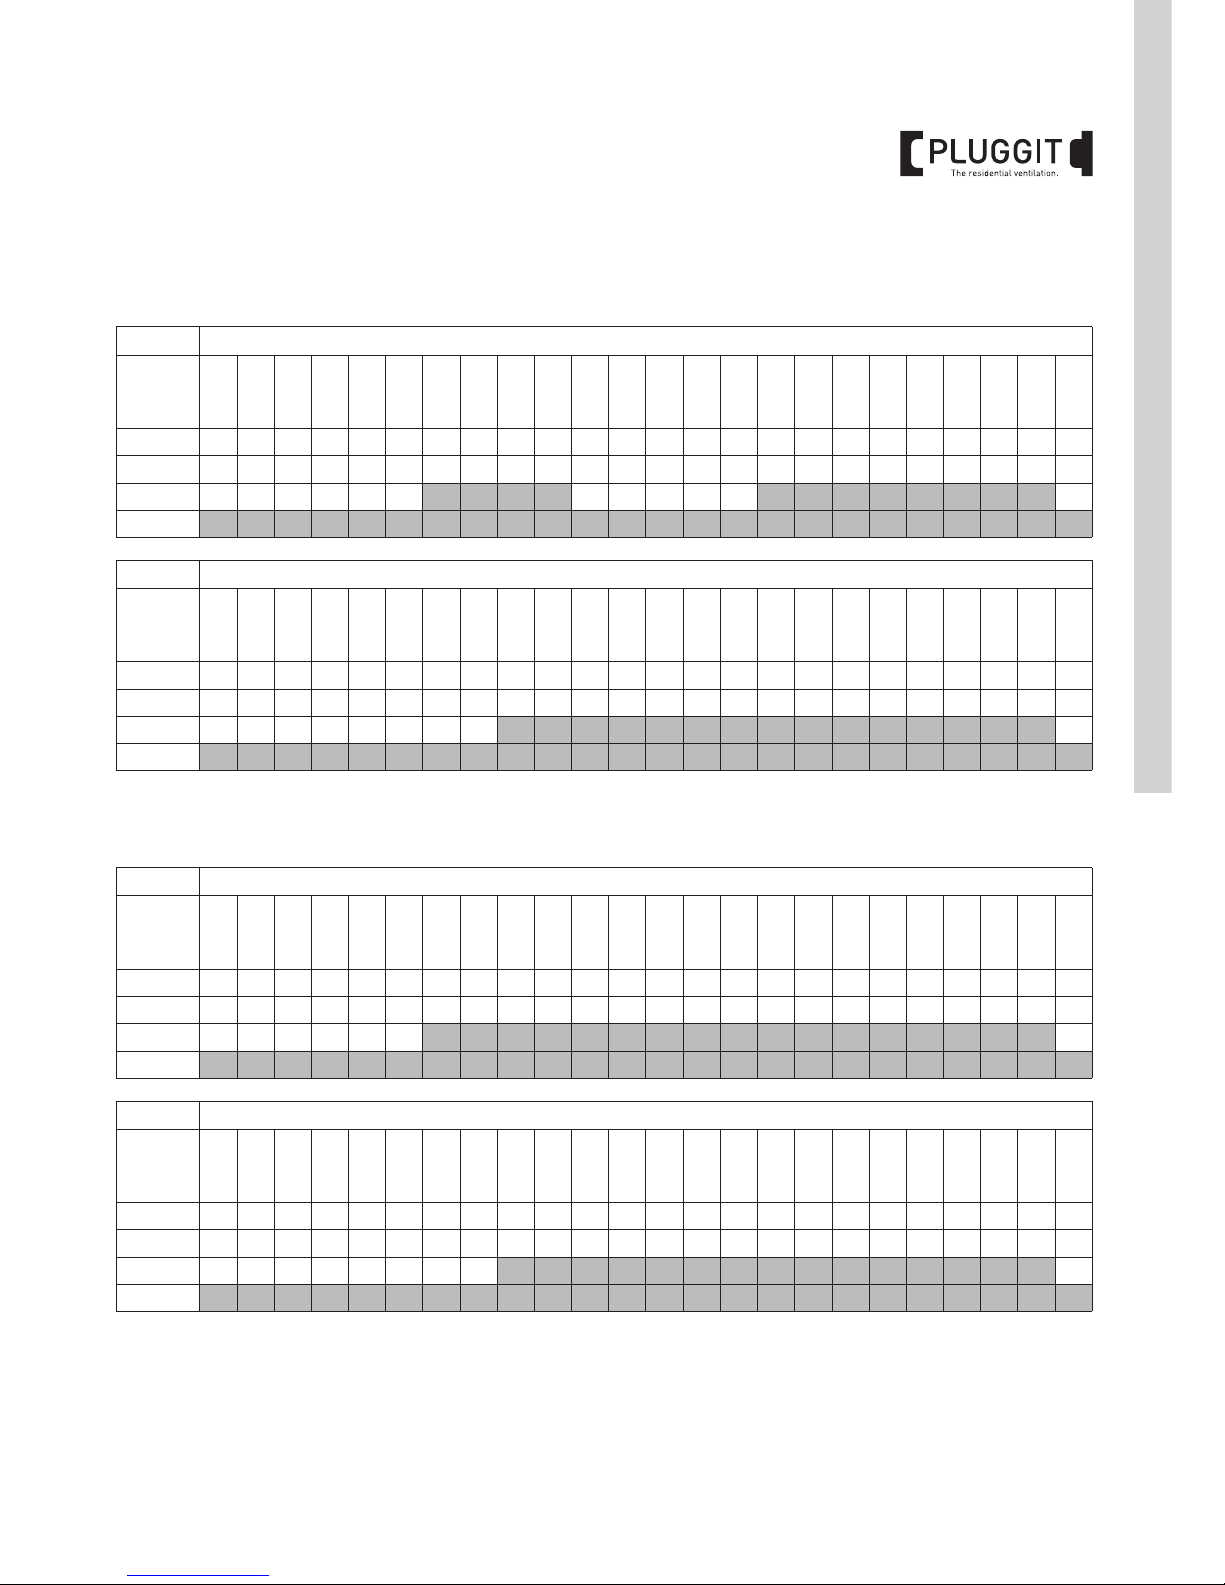
3.4.1. Operating parameters weekly programmes
The weekly programmes 1-10 are preset with the following
operating parameters as default:
Weekly programme P1
Family with children, both parents work during the day.
Weekly programme P2
Family with children, both parents work during the day.
During lunchtime all are absent.
Monday-Friday
Time /
level
0
-
1
1
2
2
3
3
4
4
5
5
6
6
7
7
8
8
9
9
-
10
10
-
11
11
-
12
12
-
13
13
-
14
14
-
15
15
-
16
16
-
17
17
-
18
18
-
19
19
-
20
20
-
21
21
-
22
22
-
23
23
-
24
4
3
2
1
Weekend
Time /
level
0
-
1
1
2
2
3
3
4
4
5
5
6
6
7
7
8
8
9
9
-
10
10
-
11
11
-
12
12
-
13
13
-
14
14
-
15
15
-
16
16
-
17
17
-
18
18
-
19
19
-
20
20
-
21
21
-
22
22
-
23
23
-
24
4
3
2
1
8
OI remote control for Pluggit Avent
Weekly programme P3
Family with children, one parent works during the day.
Weekly programme P4
Family with children, both parents stay at home.
Monday-Friday
Time /
level
0
1
1
-
2
2
3
3
-
4
4
5
5
6
6
7
7
8
8
9
9
-
10
10
-
11
11
-
12
12
-
13
13
-
14
14
-
15
15
-
16
16
-
17
17
-
18
18
-
19
19
-
20
20
-
21
21
-
22
22
-
23
23
-
24
4
3
2
1
Weekend
Time /
level
0
1
1
-
2
2
3
3
-
4
4
5
5
6
6
7
7
8
8
9
9
-
10
10
-
11
11
-
12
12
-
13
13
-
14
14
-
15
15
-
16
16
-
17
17
-
18
18
-
19
19
-
20
20
-
21
21
-
22
22
-
23
23
-
24
4
3
2
1
9
OI remote control for Pluggit Avent
English
Weekly programme P5
Small family/couple without children, both work during
the day.
Weekly programme P6
Small family/couple without children, both work at night.
Monday-Friday
Time /
level
0
-
1
1
2
2
3
3
4
4
5
5
6
6
7
7
8
8
9
9
-
10
10
-
11
11
-
12
12
-
13
13
-
14
14
-
15
15
-
16
16
-
17
17
-
18
18
-
19
19
-
20
20
-
21
21
-
22
22
-
23
23
-
24
4
3
2
1
Weekend
Time /
level
0
-
1
1
2
2
3
3
4
4
5
5
6
6
7
7
8
8
9
9
-
10
10
-
11
11
-
12
12
-
13
13
-
14
14
-
15
15
-
16
16
-
17
17
-
18
18
-
19
19
-
20
20
-
21
21
-
22
22
-
23
23
-
24
4
3
2
1
10
OI remote control for Pluggit Avent
Weekly programme P7
Small family/couple without children, both work
at weekends at night.
Weekly programme P8
Single person, works during the day.
Monday-Friday
Time /
level
0
1
1
-
2
2
3
3
-
4
4
5
5
6
6
7
7
8
8
9
9
-
10
10
-
11
11
-
12
12
-
13
13
-
14
14
-
15
15
-
16
16
-
17
17
-
18
18
-
19
19
-
20
20
-
21
21
-
22
22
-
23
23
-
24
4
3
2
1
Weekend
Time /
level
0
1
1
-
2
2
3
3
-
4
4
5
5
6
6
7
7
8
8
9
9
-
10
10
-
11
11
-
12
12
-
13
13
-
14
14
-
15
15
-
16
16
-
17
17
-
18
18
-
19
19
-
20
20
-
21
21
-
22
22
-
23
23
-
24
4
3
2
1
11
OI remote control for Pluggit Avent
English
Weekly programme P9
Single person, works at night.
Weekly programme P10
Single person, works at weekends.
Monday-Friday
Time /
level
0
-
1
1
2
2
3
3
4
4
5
5
6
6
7
7
8
8
9
9
-
10
10
-
11
11
-
12
12
-
13
13
-
14
14
-
15
15
-
16
16
-
17
17
-
18
18
-
19
19
-
20
20
-
21
21
-
22
22
-
23
23
-
24
4
3
2
1
Weekend
Time /
level
0
-
1
1
2
2
3
3
4
4
5
5
6
6
7
7
8
8
9
9
-
10
10
-
11
11
-
12
12
-
13
13
-
14
14
-
15
15
-
16
16
-
17
17
-
18
18
-
19
19
-
20
20
-
21
21
-
22
22
-
23
23
-
24
4
3
2
1

12
OI remote control for Pluggit Avent
Weekly programme P11
The freely selectable programme can be individually adjusted when commissioning the unit. The operating parameters are to be marked in these tables accordingly.
Note:
The user can adjust the operating parameters using the
Pluggit iFlow and the app.
For further information on Pluggit iFlow, please refer to
the operating and installation instructions of the room
ventilation unit.
Monday-Friday
Time /
level
0
1
1
-
2
2
3
3
-
4
4
5
5
6
6
7
7
8
8
9
9
-
10
10
-
11
11
-
12
12
-
13
13
-
14
14
-
15
15
-
16
16
-
17
17
-
18
18
-
19
19
-
20
20
-
21
21
-
22
22
-
23
23
-
24
4
3
2
1
Weekend
Time /
level
0
1
1
-
2
2
3
3
-
4
4
5
5
6
6
7
7
8
8
9
9
-
10
10
-
11
11
-
12
12
-
13
13
-
14
14
-
15
15
-
16
16
-
17
17
-
18
18
-
19
19
-
20
20
-
21
21
-
22
22
-
23
23
-
24
4
3
2
1

13
OI remote control for Pluggit Avent
English
3.5. SELECTING VENTILATOR LEVEL MANUALLY
You can choose between ventilator level 0-4.
The ventilator level 0 is a stand-by mode and can be turned
on for a maximum of 1 hour.
The ventilator level can only be turned on for a maximum of
4hours.
After the time has expired, the room ventilation unit automatically switches back to the last operating mode.
1. Press the centre of button (1) to activate the operating
mode line. The current operating mode flashes.
2. Repeatedly press button (1) at the right until the
display (2) illuminates.
3. Press centre of button (1).
4. Repeatedly press button (1) at the right until the desired
ventilator level (3) is selected.
3.6. SWITCHING ON/OFF HOLIDAY MODE
During periods when the building is unoccupied and is not
used for other purposes, the holiday mode can be switched
on.
In holiday mode, the room ventilation unit runs at a minimum level. This means that 2/3 of the time
ventilator level 1 (protection against moisture) and 1/3 of
the time ventilator level 0 are switched on.
Switching on
1. Press the centre of button (1) to activate the operating
mode line. The current operating mode flashes.
2. Repeatedly press button (1) at the right until the
display (2) illuminates.
Switching off
Press the centre of button (1).
The display (2) turns off.
3.7. SETTING, SWITCHING ON/OFF NIGHT SETBACK
With the night setback switched on, the room ventilation
unit runs at ventilator level 1.
This feature can be switched on and off with the automatic
programme, when manually operated and with the preset
weekly programme.
Switching on
1. Press the centre of button (1) to activate the operating
mode line. The current operating mode flashes.
2. Repeatedly press button (1) at the right until the
display (2) starts flashing.
3. Press centre of button (1).
The setting is saved.
Die Wohnraumlüftung
RH%
2 1
3
M+P-26A-0971
Die Wohnraumlüftung
RH%
2 1
M+P-26A-0972
Warning:
Switch off holiday mode as soon as the building is
used again, otherwise moisture damage may
result.
Note:
The holiday mode is automatically switched off after
28 days. The room ventilation unit automatically
switches back to the last operating mode.
Die Wohnraumlüftung
RH%
2 1
3
M+P-26A-0973

14
OI remote control for Pluggit Avent
Setting the period
1. With the night setback switched on, press the bottom of
button (1).
The display (3) starts flashing and the starting time can
be set.
2. Press top or bottom of button (1) until the desired
starting time is selected.
3. Press centre of button (1).
The setting of the starting time is saved and the end time
appears on the display (3).
4. Press top or bottom of button (1) until the desired end
time is selected.
5. Press centre of button (1).
The setting of the end time is saved.
Switching off
Press centre of button (1).
The display (2) turns off.
3.8. SWITCHING ON/OFF THE FIRE BOOSTER
When initiating a fireplace, such as a fireside, the fire
booster can be switched on.
With the fire booster switched on, the supply air ventilator is
set to level 3. The room ventilation unit operates at the
nominal volume flow rate. The supply air ventilator operates at a speed of 100 % and the exhaust air ventilator at a
speed of 50 %.
If the supply air temperature (T2) falls below 9 °C before the
period of 7 minutes has expired, the room ventilation unit
automatically switches back to the last operating mode. The
unit operates again at the speed of the previous operating
mode.
Hold down the top of button (1) for approx. 5 seconds until
FP7 appears on the display (2).
The fire booster will be switched on for 7 minutes and the
display (2) counts down (FP6...FP01).
After the time has expired, the room ventilation unit automatically switches back to the last operating mode.
3.9. SETTING/SWITCHING ON BAYPASS (OPTIONAL)
The bypass is available as an accessory. It allows bypassing
the heat exchanger and thus, the cooler outside air is not
heated.
There are two versions of the bypass available.
• Version A is an exhaust air bypass. The exhaust air bypasses the heat exchanger and thus, the supply air is not
heated.
• Version B is a supply air bypass. The supply air bypasses
the heat exchanger and thus, the supply air is not
heated.
3.9.1. Setting automatic bypass
The automatic bypass can be used at night in summer for
example. The outside temperature must be higher than
15 °C , but must be lower than the room air temperature.
In the installer menu, the temperatures can be set from
T
min
and T
max
, see page 17.
T
min
indicates the lower operating limit for the functioning
of the bypass. Thus, any draughts in the rooms and condensate formation are avoided.
T
max
indicates the functioning of the bypass with regard to
the exhaust air temperature at which the bypass opens for
cooling (summer mode).
The bypass is automatically activated when:
• the outside air is 2 °C lower than the supply air and
•T
min
is exceeded and
•T
max
is exceeded.
3.9.2. Manually switch on and off bypass
At lower outside temperatures, e.g. in spring or autumn, the
building can be cooled down by manually switching on the
bypass, without a heat recovery being used.
The bypass will then be activated for 6 hours, as long as thetemperature difference of 2 °C between of the outside air
and the supply air continues to be present.
Die Wohnraumlüftung
RH%
2
1
M+P-26A-0974
Note:
The fire booster cannot be operated at outside temperatures below -13 ° C. For this purpose, installing a preheating is required (accessory).

15
OI remote control for Pluggit Avent
English
Hold down the bottom of button (1) for approx. 5 seconds
until BYP6 appears on the display (2).
The room ventilation unit cools for 6 hours and on the
display (3) the air ducts run in parallel.
After the time has expired, the room ventilation unit automatically switches back to the last operating mode.
3.10. RESET FILTER ALARM
Thanks to the integrated filter the supplied outside air and
exhaust air is cleaned of dirt particles and soiling of the unit
is avoided.
If the room ventilation unit is operated without a filter, the
hygiene requirements are not met.
The filter alarm must be reset after each filter change.
The black triangles on display (1) show the remaining useful
life of the filter. If all triangles are completely black, the
display (1) flashes and the filters must be replaced.
1. Press the centre of button (2) to activate the operating
mode line. The current operating mode flashes.
2. Repeatedly press button (2) at the right until the
display (1) starts flashing.
The display (3) shows e.g. -25. This means that there are
25 days left until the filter change is due.
3. Press the bottom of button (2).
The preset interval value for the filter change flashes on
the display (3), e.g. 360.
4. Press top or bottom of button (2) until the desired interval value for the filter change is reached.
5. Press centre of button (2).
The setting is saved.
3.11. SWITCHING ON/OFF INSTALLER MENU
In the installer menu, the following values and settings can
be displayed and adjusted:
• Readout the software version of the room ventilation
unit, the remote control and the accessories
• Readout rotational speed of the supply air ventilator
• Readout rotational speed of the exhaust air ventilator
• Readout set points of the preheating (accessory)
• Adjust set points of the preheating (accessory)
• Readout temperatures from T
min
and T
max
for the by-
pass (accessory)
• Set temperatures from T
min
and T
max
for the bypass (ac-
cessory)
• Set sensitivity of the humidity sensor (accessory)
• Set sensitivity of the VOC sensor (accessory)
Note:
For further information on replacing the filters, please
refer to the operating and installation instructions of the
room ventilation unit.
Die Wohnraumlüftung
RH%
2 3
1
M+P-26A-0975
Die Wohnraumlüftung
RH%
1
M+P-26A-0976
Warning:
The installer menu must only be used by qualified
expert personnel, otherwise damage may result.
Die Wohnraumlüftung
RH%
3
21
M+P-26A-0977

16
OI remote control for Pluggit Avent
3.11.1. Switching on installer menu
Hold down button (1) at the right for approx. 10 seconds
until the displays (2) and (3) start flashing and the
ventilator level 3 (4) appears.
The installer menu remains active for one hour or until you
press the button (1) again for 10 seconds.
3.11.2. Readout software versions
1. Switching on installer menu, see page 16.
2. Press button (1) at the left.
The display (2) shows the software version of the room
ventilation unit.
3. Press the bottom of button (1).
The display (2) shows the software version of the remote
control.
4. Press the bottom of button (1).
The display (2) shows the software version of an accessory.
If you have more than one accessory installed, press the
bottom of button (1) again.
5. Hold down button (1) at the right for approx. 10 seconds.
The installer menu is closed.
3.11.3. Readout rotational speeds of supply and exhaust
ventilators
1. Switching on installer menu, see page 16.
2. Press button (1) at the right until the display (2) and the
supply air duct (3) start flashing.
The rotational speed of the supply air ventilator appears
on display (4).
3. Press the bottom of button (1) until the display (2) and
the exhaust air duct (5) start flashing.
The rotational speed of the exhaust air ventilator appears on display (4).
4. Hold down button (1) at the right for approx. 10 seconds.
The installer menu is closed.
3.11.4. Reading out/setting set points of the preheating
(optional)
1. Switching in installer menu, see page 16.
2. Press button (1) at the right until the display (2) and the
temperature (3) start flashing.
3. Press centre of button (1).
4. Press top or bottom of button (1) until the desired set
point is reached.
5. Press centre of button (1).
The setting is saved.
6. Hold down button (1) at the right for approx. 10 seconds.
The installer menu is closed.
Die Wohnraumlüftung
RH%
2 3
4
1
M+P-26A-0978
Die Wohnraumlüftung
RH%
2
1
M+P-26A-0979
Die Wohnraumlüftung
RH%
4 2 3
15
M+P-26A-0981
Die Wohnraumlüftung
RH%
2
13
M+P-26A-0982

17
OI remote control for Pluggit Avent
English
3.11.5. Setting temperatures for the bypass
(optional)
1. Switching on installer menu, see page 16.
2. Press button (1) at the right.
The set points for the outside air temperature T1 (2) and
the exhaust air temperature T3 (3) start flashing.
3. Press centre of button (1).
The set point for T1 (2) flashes quicker.
4. Press top or bottom of button (1) until the desired set
point (8-15 °C) is reached.
5. Press centre of button (1).
The setting is saved and the set point for T3 (3) flashes
quicker.
6. Press top or bottom of button (1) until the desired set
point is reached.
7. Press centre of button (1).
The setting of the set point is saved and the new set
points for T1 (2) and T3 (3) are displayed.
8. Hold down button (1) at the right for approx. 10 seconds.
The installer menu is closed.
3.11.6. Setting sensitivity of the humidity sensor
(optional)
If a humidity sensor (accessory) is used, the sensitivity can
be adjusted for the automatic programme.
If the set point for the relative air humidity is set too low, this
may cause impairments of the inhabitants' well-being and
may cause certain materials in the building to dry out.
However, if the set point is set too high, this may cause
moisture damage in the structure of the building and may
as well impair the inhabitants' well-being.
1. Switching on installer menu, see page 16.
2. Press centre of button (1).
The most recently selected automatic programme (2)
flashes.
3. Press centre of button (1). The most recently selected
set point (3) will flash.
4. Press top or bottom of button (1) until the desired set
point is reached.
5. Press centre of button (1).
The setting is saved.
6. Hold down button (1) at the right for approx. 10 seconds.
The installer menu is closed.
3.11.7. Setting the sensitivity of the VOCs sensor
(optional)
If a VOC sensor (accessory) is used, the sensitivity can be
adjusted for the automatic programme using the
Pluggit iFlow.
Die Wohnraumlüftung
RH%
123
M+P-26A-0983
Note:
For further information on handling the Pluggit iFlow,
please refer to the operating and installation instructions of the room ventilation unit.
Low sensitivity
Degree of pollution (ppm) 600 900 1200
Medium sensitivity
Degree of pollution (ppm) 550 800 1000
High sensitivity
Degree of pollution (ppm) 500 750 800
Die Wohnraumlüftung
RH%
2
13
M+P-26A-0980

18
OI remote control for Pluggit Avent
3.12. TROUBLESHOOTING
3.12.1. Errors
3.12.2. Error codes
Error
Synchronising the remote control no longer functions.
Cause Correction
The distance to the control unit of the room ventilation
system is too great.
Reduce distance.
The remote control has already been synchronised with another room ventilation unit.
Reset remote control, see page 5.
Note:
If an error code is displayed, contact the customer
service of the specialised company.
Code Alarm/error
E1 Exhaust air ventilator
E2 Supply air ventilator
E3 Bypass flap
E4 Outdoor air temperature sensor (T1)
E5 Supply air temperature sensor (T2)
E6 Exhaust air temperature sensor (T3)
E7 Outgoing air temperature sensor (T4)
E8 Indoor air temperature sensor (T5)
E9 Humidity sensor (accessories)
Is located in the exhaust air duct of the room ventilation unit
E10 Outdoor temperature <-13 °C
E11 Supply air temperature <15 °C
E12 Fire alarm if one the temperature sensors measures a temperature above 70 °C.
E13 Communication error
E14 Fire alarm, triggered by the fire detector (accessory) installed in the duct
E15 VOCs sensor (accessories)

19
OI remote control for Pluggit Avent
English
5.1. DECOMMISSIONING IN CAS OF DISMANTLING
Decommissioning must only be carried out by qualified personnel.
• Disconnect the unit from power supply.
• Disconnect all poles of the unit from the power supply
system.
5.2. PACKAGING
The transport and protective packaging are usually manufactured from reusable materials.
All packaging material must be disposed of according to
local laws and regulations.
5.3. OLD APPLIANCE
The remote control contains valuable materials and substances which should be kept separate from residual waste.
The old appliance can be delivered to the local recycling
company for recycling.
4. TECHNICAL DATA
Factory settings Min Max
Relative air humidity in the automatic programme 45 % 35 % 65 %
Automatic bypass
T
min
outside air temperature (T1) 15 °C 8 °C 15 °C
T
max
exhaust air temperature (T3) 24 °C 22 °C/OFF 30 °C
Preheating
T1/SET (electrical preheating) -2 °C -2 °C/OFF -10 °C
T1/SET (geothermal preheating) 0 °C
Ventilator settings
Fan OFFSET (Gears between levels 1 - 2- 3) 25 gears 10 gears 30 gears
Maximum speed of the ventilator (level 4) 100 % like level 3 100 %
Filter timer
Filter change intervals 360 days 90 days 360 days
5. DECOMMISSIONING/DISPOSAL

20
Manuel d’utilisation de la télécommande pour Avent P190/P310/P460
1. Consignes générales de sécurite .................................................................................................... 21
2. Consignes générales ....................................................................................................................... 21
2.1. Utilisation conforme ........................................................................................................................ 21
2.2. Utilisation non conforme ................................................................................................................. 21
2.3. Garantie ............................................................................................................................................ 21
3. Commande ...................................................................................................................................... 21
3.1. Apercu .............................................................................................................................................. 21
3.1.1. Raccourci de la touche de navigation ................................................................................... 23
3.2. Synchronisation de la télécommande ............................................................................................. 23
3.3. Réglage de l’heure ........................................................................................................................... 24
3.4. Activation et désactivation d’un programme hebdomadaire ou automatique prédéfini ................ 24
3.4.1. Paramètres de fonctionnement concernant les
programmes hebdomadaires ......................................................................................................... 25
3.5. Sélection manuelle du niveau de ventilation ................................................................................... 31
3.6. Activation et désactivation du mode vacances ................................................................................ 31
3.7. Réglage/activation et désactivatiom de l’abaissement de nuit ...................................................... 31
3.8. Activation et désactivation de l’amplificateur de combustion ........................................................ 32
3.9. Activation et désactivation du bypass (disponible en option) .......................................................... 32
3.9.1. Réglage du bypass automatique ........................................................................................... 32
3.9.2. Activation et désactivation manuelles du bypass ................................................................. 32
3.10. Réinitialisation de l’alarme des filtres .......................................................................................... 33
3.11. Activation et dèsactivation du menu d’installateur ....................................................................... 33
3.11.1. Activation du menu d'installateur ....................................................................................... 34
3.11.2. Lecture des versions logicielles ......................................................................................... 34
3.11.3. Lecture des vitesses de rotation des ventilateurs d'air frais et d'air vicié ........................ 34
3.11.4. Lecture et réglage des valeurs de consigne du préchauffage (disponible en option) ....... 34
3.11.5. Réglage des températures pour le bypass (disponible en option) ..................................... 35
3.11.6. Réglage de la sensibilité du capteur d'humidité (disponible en option) ............................ 35
3.11.7. Réglage de la sensibilité du capteur COV (disponible en option) ....................................... 35
3.12. Dépannage ..................................................................................................................................... 36
3.12.1. Dysfonctionnements ............................................................................................................ 36
3.12.2. Codes d'erreur ..................................................................................................................... 36
4. Données techniques ........................................................................................................................ 37
5. Mise hors service/élimination ........................................................................................................ 37
5.1. Mise hors service lors du démontage ............................................................................................. 37
5.2. Conditionnement .............................................................................................................................. 37
5.3. Appareil usagé ................................................................................................................................. 37
SOMMAIRE

21
Manuel d'utilisation de la télécommande pour Avent P190/P310/P460
Français
2.1. UTILISATION CONFORME
La télécommande est conçue pour l'utilisation des systèmes de ventilation résidentiels Avent P190/P310/P460.
Elle est connectée sans fil avec le système de ventilation résidentiel. La portée est de 30 m environ. Elle fonctionne
également à travers les murs et les plafonds légers.
Un nombre maximal de cinq télécommandes peut être connecté au système de ventilation résidentiel. Toutes les télécommandes connectées agissent de la même manière. La
dernière modification du mode de fonctionnement ou d'une
valeur de consigne est ainsi toujours effectuée.
Pour être facilement accessible, la télécommande doit être
installée sur une étagère ou au mur dans la cuisine ou le
salon.
Avec la fonction Économie d'énergie de la télécommande,
l'écran s'éteint au bout de 2 minutes. Appuyer sur la touche
de navigation pour le rallumer.
2.2. UTILISATION NON CONFORME
Toute utilisation de la télécommande autre que celle
décrite au point << Utilisation conforme >> n'est pas
autorisée.
2.3. GARANTIE
Les consignes techniques indiquées dans le présent manuel d'utilisation doivent être respectées afin de faire valoir
pleinement le droit à la garantie légale.
3.1. APERCU
1 Télécommande
2 Touche de navigation
3 Niveaux de ventilation 1 à 4
Le niveau de ventilation actuel est toujours affiché.
1. CONSIGNES GÉNÉRALES DE SÉCURITE
Avertissement :
Les consignes de sécurité suivantes doivent être
respectées ; dans le cas contraire, des blessures ou
des dommages peuvent être entraînés :
z Avant de commencer à utiliser la télécommande,
lire attentivement le présent manuel d'utilisation.
z Toute responsabilité est déclinée en cas de dom-
mages résultant d'un stockage non conforme au
produit et d'une utilisation incorrecte ou non
conforme aux dispositions.
z Sous réserve de modifications techniques.
2. CONSIGNES GÉNÉRALES
3. COMMANDE
• Sélection d'un élément de
menu
• Confirmation d'un paramètre
Basculer entre les éléments de
menu
Augmenter ou diminuer les valeurs
de réglage
Die Wohnraumlüftung
M
O
T
U
W
E
T
H
F
R
S
A
S
U
RH%
6 1
2345T4T2
7 T1T5T3
M+P-26A-0943

22
Manuel d'utilisation de la télécommande pour Avent P190/P310/P460
4 Ligne d'informations
5 Heure / Jour de la semaine
Commande de la minuterie hebdomadaire et de
l'abaissement de nuit
6 Modes de fonctionnement
7 Données relatives au fonctionnement
• Température extérieure (T1)
• Température de l'air amené (T2)
• Température de l'air vicié (T3)
• Température de l'air d'échappement (T4)
• Température de l'air ambiant (T5)
Alarme
Dysfonctionnement du système de ventilation résidentiel associé à l'affichage du code
d'erreur.
Informations relatives aux fonctions, aux
programmes et aux codes d'erreur
A1 Programme automatique
P1, P2... Programme hebdomadaire
BYP6, BYP5...Bypass activé manuellement.
FP7, FP6... Amplificateur de combustion
activé
DEF Fonction de dégivrage
E1, E2... Codes d'erreur
Niveau de batterie faible
Programme automatique
Sélectionner manuellement le niveau de
ventilation
Sélectionner un programme automatique
Activer et désactiver le mode Vacances
Activer et désactiver l'abaissement de nuit
Remplacement de filtres
Réinitialisation de l'alarme des filtres
Humidité relative de l'air vicié
(disponible en option)
Un capteur d'humidité doit être installé et le
mode automatique doit être activé afin de
commander le système de ventilation résidentiel en fonction de l'humidité relative de
l'air.
Humidité relative inférieure à 24 %
Air très sec, niveau de ventilation 1
Humidité relative comprise entre
25 % et 34 %
Air sec, niveau de ventilation 2
Humidité relative comprise entre
35 % et 45 %
Confort, niveau de ventilation 1 à 3
Humidité relative comprise entre
46 % et 65 %
Confort, niveau de ventilation 3
Humidité relative supérieure à 66 %
Air humide, niveau de ventilation 3
Teneur en COV de l'air
(disponible en option)
Un capteur COV doit être installé et le mode
automatique doit être activé afin de commander le système de ventilation résidentiel
en fonction de la teneur en COV.
<600 ppm
Air propre, niveau de ventilation 1
600-850 ppm
Air propre, niveau de ventilation 1-2
850-1100 ppm
Qualité d'air suffisante, niveau de
ventilation 2-3
1100-1200 ppm
Qualité d'air suffisante, niveau de ventilation 3
1200-1600 ppm
Air légèrement impur, niveau de ventilation 3
>1600 ppm
Air impur, niveau de ventilation 4
Température de préchauffage
(disponible en option)

23
Manuel d'utilisation de la télécommande pour Avent P190/P310/P460
Français
3.1.1. Raccourci de la touche de navigation
3.2. SYNCHRONISATION DE LA TÉLÉCOMMANDE
1. Débrancher le système de ventilation résidentiel sur
tous les pôles.
2. Retirer le couvercle (1) et insérer les piles fournies
(2xAAA).
3. Mettre le couvercle (1).
4. Rebrancher le système de ventilation résidentiel sur
tous les pôles.
Une connexion est établie entre la télécommande et le
système de ventilation résidentiel dans un délai de
60 secondes. Les données relatives au fonctionnement
sont affichées à l'écran (2).
5. Pour réinitialiser la télécommande, maintenir la
touche (3) de gauche enfoncée pendant 10 secondes environ jusqu'au clignotement de la zone d'affichage et de
tous les symboles à l'écran (2).
La télécommande peut être synchronisée de nouveau.
Maintenir la touche du milieu enfoncée
pendant 3 secondes environ pour
quitter le menu et basculer à l'affichage
par défaut.
Maintenir la touche du haut enfoncée
pendant 5 secondes environ afin d'activer le bypass (accessoire) pendant 6
heures (cf. page 32).
Maintenir la touche du haut enfoncée
pendant 5 secondes environ afin d'activer l'amplificateur de combustion (accessoire) pendant 7 minutes (cf.
page 32).
Maintenir la touche de droite enfoncée
pendant 10 secondes environ afin d'activer le menu d'installateur (cf.
page 33).
Maintenir la touche de gauche enfoncée
pendant 10 secondes environ afin de
réinitialiser la télécommande.
Maintenir la touche du haut et du milieu
enfoncée pendant 10 secondes environ
afin de réinitialiser tous les paramètres
et toutes les valeurs de consigne au réglage d'usine.
Uniquement possible dans le menu
d'installation.
Remarque :
Une alimentation électrique fixe peut également être
établie par un câble mini-USB. Le port de connexion se
trouve au dos de la télécommande derrière le
couvercle (1).
1
M+P-26A-0966
Die Wohnraumlüftung
RH%
2 3
M+P-26A-0967

24
Manuel d'utilisation de la télécommande pour Avent P190/P310/P460
3.3. RÉGLAGE DE L’HEURE
1. Appuyer sur la touche (1) du milieu pour activer la ligne
relative aux modes de fonctionnement. L'état de fonctionnement actuel clignote.
2. Maintenir la touche (1) de droite enfoncée jusqu'à ce que
le pointeur de l'horloge (2) clignote.
3. Appuyer sur la touche (1) du bas pour que l'heure actuelle clignote dans la zone d'affichage (3).
4. Maintenir la touche (1) du haut ou du bas enfoncée
jusqu'à ce que l'heure soit réglée.
5. Appuyer sur la touche (1) du milieu.
Le paramètre est enregistré et le jour de la semaine (4)
clignote.
6. Maintenir la touche (1) du haut ou du bas enfoncée
jusqu'à ce que le jour de la semaine (4) soit réglé.
7. Appuyer sur la touche (1) du milieu.
Le paramètre est enregistré.
3.4. ACTIVATION ET DÉSACTIVATION D’UN
PROGRAMME HEBDOMADAIRE OU
AUTOMATIQUE PRÉDÉFINI
Un nombre maximal de 10 programmes hebdomadaires
prédéfinis ou un programme automatique peut être sélectionné.
En mode automatique, le système de ventilation résidentiel
bascule automatiquement entre les différents niveaux de ventilation. Par rapport à l'humidité relative de l'air et à la teneur
en COV, la qualité de l'air est maintenue à un niveau confortable par le système de ventilation résidentiel.
En cas d'humidité élevée de l'air, le besoin augmente et l'appareil de ventilation résidentiel bascule au niveau de
ventilation 3.
En cas d'humidité relative de l'air, le système de ventilation résidentiel se met au niveau de ventilation 1. En cas d'installation
d'un capteur d'humidité (accessoire) et d'un capteur COV (accessoire), le système de ventilation résidentiel bascule au niveau de ventilation 4 lorsque la teneur en COV est élevée. Dans
le programme hebdomadaire prédéfini, les niveaux de ventilation sont changés conformément aux heures indiquées (cf.
page 25).
Programme automatique
1. Appuyer sur la touche (1) du milieu pour activer la ligne relative aux modes de fonctionnement. L'état de fonctionnement actuel clignote.
2. Appuyer sur la touche (1) de droite autant de fois que cela
est nécessaire jusqu'à ce que la zone d'affichage (2) s'allume. Le niveau de ventilation actuellement activé (3) est
affiché.
3. Appuyer sur la touche (1) du milieu.
Le paramètre est enregistré.
Programme hebdomadaire prédéfini
1. Appuyer sur la touche (1) du milieu pour activer la ligne relative aux modes de fonctionnement. L'état de fonctionnement actuel clignote.
2. Appuyer sur la touche (1) de droite autant de fois que cela
est nécessaire jusqu'à ce que la zone d'affichage (2) clignote. Le programme hebdomadaire actuel (3) est affiché.
3. Appuyer sur la touche (1) du bas.
Le programme hebdomadaire (3) clignote.
4. Maintenir la touche (1) du haut ou du bas enfoncée jusqu'à
ce que le programme hebdomadaire (3) souhaité soit réglé.
5. Appuyer sur la touche (1) du milieu.
Les paramètres sont enregistrés.
Remarque :
Un programme hebdomadaire prédéfini ou le programme automatique doivent être mis en service.
Consulter le manuel d'utilisation et d'installation du
système de ventilation résidentiel afin d'obtenir de plus
amples informations.
Die Wohnraumlüftung
RH%
2
43
1
M+P-26A-0968
Die Wohnraumlüftung
RH%
2
3
1
M+P-26A-0969
Die Wohnraumlüftung
RH%
2
3
1
M+P-26A-0970

25
Manuel d'utilisation de la télécommande pour Avent P190/P310/P460
Français
3.4.1. Paramètres de fonctionnement concernant les
programmes hebdomadaires
Les programmes hebdomadaires 1 à 10 sont prédéfinis à
l'usine avec les paramètres de fonctionnement suivants :
Programme hebdomadaire P1
Famille avec enfants, les deux parents exercent une activité
professionnelle pendant la journée.
Programme hebdomadaire P2
Famille avec enfants, les deux parents exercent une activité
professionnelle pendant la journée.
À l'heure du déjeuner, tout le monde est absent.
Lundi-Vendredi
Heure /
Niveau
0
-
1
1
2
2
3
3
4
4
5
5
6
6
7
7
8
8
9
9
-
10
10
-
11
11
-
12
12
-
13
13
-
14
14
-
15
15
-
16
16
-
17
17
-
18
18
-
19
19
-
20
20
-
21
21
-
22
22
-
23
23
-
24
4
3
2
1
Week-end
Heure /
Niveau
0
-
1
1
2
2
3
3
4
4
5
5
6
6
7
7
8
8
9
9
-
10
10
-
11
11
-
12
12
-
13
13
-
14
14
-
15
15
-
16
16
-
17
17
-
18
18
-
19
19
-
20
20
-
21
21
-
22
22
-
23
23
-
24
4
3
2
1

26
Manuel d'utilisation de la télécommande pour Avent P190/P310/P460
Programme hebdomadaire P3
Famille avec enfants, un parent exerce une activité
professionnelle pendant la journée.
Programme hebdomadaire P4
Famille avec enfants, les deux parents sont à la maison.
Lundi-Vendredi
Heure /
Niveau
0
1
1
-
2
2
3
3
-
4
4
5
5
6
6
7
7
8
8
9
9
-
10
10
-
11
11
-
12
12
-
13
13
-
14
14
-
15
15
-
16
16
-
17
17
-
18
18
-
19
19
-
20
20
-
21
21
-
22
22
-
23
23
-
24
4
3
2
1
Week-end
Heure /
Niveau
0
1
1
-
2
2
3
3
-
4
4
5
5
6
6
7
7
8
8
9
9
-
10
10
-
11
11
-
12
12
-
13
13
-
14
14
-
15
15
-
16
16
-
17
17
-
18
18
-
19
19
-
20
20
-
21
21
-
22
22
-
23
23
-
24
4
3
2
1

27
Manuel d'utilisation de la télécommande pour Avent P190/P310/P460
Français
Programme hebdomadaire P5
Petite famille / couple sans enfant, les deux personnes
exercent une activité professionnelle pendant la journée.
Programme hebdomadaire P6
Petite famille / couple sans enfant, les deux personnes
exercent une activité professionnelle pendant la nuit.
Lundi-Vendredi
Heure /
Niveau
0
-
1
1
2
2
3
3
4
4
5
5
6
6
7
7
8
8
9
9
-
10
10
-
11
11
-
12
12
-
13
13
-
14
14
-
15
15
-
16
16
-
17
17
-
18
18
-
19
19
-
20
20
-
21
21
-
22
22
-
23
23
-
24
4
3
2
1
Week-end
Heure /
Niveau
0
-
1
1
2
2
3
3
4
4
5
5
6
6
7
7
8
8
9
9
-
10
10
-
11
11
-
12
12
-
13
13
-
14
14
-
15
15
-
16
16
-
17
17
-
18
18
-
19
19
-
20
20
-
21
21
-
22
22
-
23
23
-
24
4
3
2
1

28
Manuel d'utilisation de la télécommande pour Avent P190/P310/P460
Programme hebdomadaire P7
Petite famille / couple sans enfant, les deux personnes
exercent une activité professionnelle de nuit pendant le
week-end.
Programme hebdomadaire P8
Personne seule exerçant une activité professionnelle
pendant la journée.
Lundi-Vendredi
Heure /
Niveau
0
1
1
-
2
2
3
3
-
4
4
5
5
6
6
7
7
8
8
9
9
-
10
10
-
11
11
-
12
12
-
13
13
-
14
14
-
15
15
-
16
16
-
17
17
-
18
18
-
19
19
-
20
20
-
21
21
-
22
22
-
23
23
-
24
4
3
2
1
Week-end
Heure /
Niveau
0
1
1
-
2
2
3
3
-
4
4
5
5
6
6
7
7
8
8
9
9
-
10
10
-
11
11
-
12
12
-
13
13
-
14
14
-
15
15
-
16
16
-
17
17
-
18
18
-
19
19
-
20
20
-
21
21
-
22
22
-
23
23
-
24
4
3
2
1

29
Manuel d'utilisation de la télécommande pour Avent P190/P310/P460
Français
Programme hebdomadaire P9
Personne seule exerçant une activité professionnelle
pendant la nuit.
Programme hebdomadaire P10
Personne seule exerçant une activité professionnelle
pendant le week-end.
Lundi-Vendredi
Heure /
Niveau
0
-
1
1
2
2
3
3
4
4
5
5
6
6
7
7
8
8
9
9
-
10
10
-
11
11
-
12
12
-
13
13
-
14
14
-
15
15
-
16
16
-
17
17
-
18
18
-
19
19
-
20
20
-
21
21
-
22
22
-
23
23
-
24
4
3
2
1
Week-end
Heure /
Niveau
0
-
1
1
2
2
3
3
4
4
5
5
6
6
7
7
8
8
9
9
-
10
10
-
11
11
-
12
12
-
13
13
-
14
14
-
15
15
-
16
16
-
17
17
-
18
18
-
19
19
-
20
20
-
21
21
-
22
22
-
23
23
-
24
4
3
2
1

30
Manuel d'utilisation de la télécommande pour Avent P190/P310/P460
Programme hebdomadaire P11
Le programme au choix peut être paramétré de manière
individuelle lors de la mise en service. Les paramètres de
fonctionnement doivent être indiqués en conséquence
dans lestableaux suivants.
Remarque :
Les paramètres de fonctionnement peuvent être ajustés
par l'utilisateur avec Pluggit iFlow et APP. Consulter le
manuel d'utilisation et d'installation du système de ventilation résidentiel afin d'obtenir de plus amples informations concernant Pluggit iFlow.
Lundi-Vendredi
Heure /
Niveau
0
1
1
-
2
2
3
3
-
4
4
5
5
6
6
7
7
8
8
9
9
-
10
10
-
11
11
-
12
12
-
13
13
-
14
14
-
15
15
-
16
16
-
17
17
-
18
18
-
19
19
-
20
20
-
21
21
-
22
22
-
23
23
-
24
4
3
2
1
Week-end
Heure /
Niveau
0
1
1
-
2
2
3
3
-
4
4
5
5
6
6
7
7
8
8
9
9
-
10
10
-
11
11
-
12
12
-
13
13
-
14
14
-
15
15
-
16
16
-
17
17
-
18
18
-
19
19
-
20
20
-
21
21
-
22
22
-
23
23
-
24
4
3
2
1

31
Manuel d'utilisation de la télécommande pour Avent P190/P310/P460
Français
3.5. SÉLECTION MANUELLE DU NIVEAU DE
VENTILATION
Le niveau de ventilation 0 à 4 peut être sélectionné. Le niveau de ventilation est un mode en veille et peut être activé
pendant une heure maximum.
Le niveau de ventilation peut être activé pendant 4 heures
seulement.
Après, le système de ventilation résidentiel rebascule automatiquement au dernier état de fonctionnement.
1. Appuyer sur la touche (1) du milieu pour activer la ligne
relative aux modes de fonctionnement. L'état de fonctionnement actuel clignote.
2. Appuyer sur la touche (1) de droite autant de fois que
cela est nécessaire jusqu'à ce que la zone d'affichage (2)
s'allume.
3. Appuyer sur la touche (1) du milieu.
4. Maintenir la touche (1) de droite jusqu'à ce que le niveau
de ventilation souhaité (3) soit sélectionné.
3.6. ACTIVATION ET DÉSACTIVATION DU MODE
VACANCES
Pour les périodes pendant lesquelles le logement est inhabité et n'est pas utilisé à d'autres fins, le mode Vacances
peut être activé.
En mode Vacances, le système de ventilation résidentiel
fonctionne au minimum. Cela signifie que le niveau de ventilation 1 (Protection contre l'humidité) est activé
pendant 2/3 du temps et le niveau de ventilation 0 est activé
pendant 1/3 du temps.
Activation
1. Appuyer sur la touche (1) du milieu pour activer la ligne
relative aux modes de fonctionnement. L'état de fonctionnement actuel clignote.
2. Appuyer sur la touche (1) de droite autant de fois que
cela est nécessaire jusqu'à ce que la zone d'affichage (2)
s'allume.
Désactivation
Appuyer sur la touche (1) du milieu.
La zone d'affichage (2) s'éteint.
3.7. RÉGLAGE/ACTIVATION ET DÉSACTIVATIOM DE
L’ABAISSEMENT DE NUIT
Lorsque l'abaissement de nuit est activé, le système de ventilation résidentiel fonctionne au niveau de ventilation 1.
Cette fonction peut être activée et désactivée avec le programme automatique, en mode manuel et avec le programme hebdomadaire prédéfini.
Activation
1. Appuyer sur la touche (1) du milieu pour activer la ligne
relative aux modes de fonctionnement. L'état de fonctionnement actuel clignote.
2. Appuyer sur la touche (1) de droite autant de fois que
cela est nécessaire jusqu'à ce que la zone d'affichage (2)
clignote.
3. Appuyer sur la touche (1) du milieu.
Le paramètre est enregistré.
Die Wohnraumlüftung
RH%
2 1
3
M+P-26A-0971
Die Wohnraumlüftung
RH%
2 1
M+P-26A-0972
Avertissement :
Désactiver le mode vacances dès que le logement
est réutilisé ; dans le cas contraire, cela peut
entraîner des dommages dus à l'humidité.
Remarque :
Après 28 jours, le mode Vacances est désactivé automatiquement. Le système de ventilation résidentiel rebascule automatiquement au dernier état de fonctionnement.
Die Wohnraumlüftung
RH%
2 1
3
M+P-26A-0973

32
Manuel d'utilisation de la télécommande pour Avent P190/P310/P460
Réglage d'une période
1. Lorsque l'abaissement de nuit est activé, appuyer sur la
touche (1) du bas. La zone d'affichage (3) clignote et le
moment de démarrage peut être ajusté.
2. Maintenir la touche (1) du haut ou du bas enfoncée
jusqu'à ce que le moment de démarrage souhaité soit
réglé.
3. Appuyer sur la touche (1) du milieu. Le paramètre relatif
au moment de démarrage est enregistré et le moment
de fin est indiqué dans la zone d'affichage (3).
4. Maintenir la touche (1) du haut ou du bas enfoncée
jusqu'à ce que le moment de fin souhaité soit réglé.
5. Appuyer sur la touche (1) du milieu.
Le paramètre relatif au moment de fin est enregistré.
Désactivation
Appuyer sur la touche (1) du milieu.
La zone d'affichage (2) s'éteint.
3.8. ACTIVATION ET DÉSACTIVATION DE
L’AMPLIFICATEUR DE COMBUSTION
Au démarrage d'un foyer (ex. une cheminée), l'amplificateur de combustion peut être activé
Lorsque l'amplificateur de combustion est activé, le ventilateur d'air frais est activé au niveau de ventilation 3. Le système de ventilation résidentiel fonctionne avec le débit nominal. La vitesse du ventilateur d'air frais est de 100 % et
celle du ventilateur d'air vicié est de 50 %.
Dans le cas où la température de l'air frais (T2) descend en
dessous de
9 °C avant la fin du délai de 7 minutes, le système de ventilation résidentiel rebascule automatiquement au dernier
état de fonctionnement. Le système refonctionne à la vitesse du dernier état de fonctionnement.
Maintenir la touche (1) de droite enfoncée pendant 5 secondes environ jusqu'à ce que FP7 apparaisse dans la zone
d'affichage (2).L'amplificateur de combustion est activé
pendant 7 minutes et un compte à rebours est indiqué dans
la zone d'affichage (2) (FP6...FP01).
Après, le système de ventilation résidentiel rebascule automatiquement au dernier état de fonctionnement.
3.9. ACTIVATION ET DÉSACTIVATION DU BYPASS
(DISPONIBLE EN OPTION)
Le bypass est disponible comme accessoire. Il sert à contourner l'échangeur thermique sans réchauffement de l'air
extérieur plus froid.
Il existe deux variantes du bypass.
• Comme variante A, le bypass est un bypass d'évacuation
de l'air. L'air vicié passe devant l'échangeur thermique
et l'air frais n'est donc pas réchauffé.
• Comme variante B, le bypass est un bypass d'alimenta-
tion en air. L'air frais passe devant l'échangeur thermique et n'est donc pas réchauffé.
3.9.1. Réglage du bypass automatique
Le bypass automatique peut être utilisé, par exemple, la
nuit en été. La température extérieure ne doit pas dépasser
15 °C, mais elle ne doit pas être inférieure à la température
ambiante.
Dans le menu d'installateur, les températures de T
min
et
T
max
peuvent être ajustées (cf. page 35).
T
min
indique la limite inférieure d'utilisation pour la fonction
du bypass sans qu'il ne puisse y avoir des courants d'air
dans les pièces ni une formation de condensation.
T
max
indique la fonction du bypass pour la température de
l'air vicié où le bypass s'ouvre pour le refroidissement
(mode été).
Le bypass est activé automatiquement dans le cas où :
• la température de l'air extérieur est inférieure à 2 °C par
rapport à celle de l'air frais et
•la valeur T
min
est dépassée et
•la valeur T
max
est dépassée.
3.9.2. Activation et désactivation manuelles du bypass
En cas de basses températures extérieures (ex. au printemps ou an automne), le logement peut être refroidi en activant manuellement le bypass sans utiliser une récupération de chaleur.
Le bypass est alors activé pendant 6 heures tant qu'une différence de température de 2 °C est présente entre l'air extérieur et l'air ambiant.
Die Wohnraumlüftung
RH%
2
1
M+P-26A-0974
Remarque :
L'amplificateur de combustion ne peut pas être activé à
une température extérieure qui est inférieure à -13 °C.
Pour cela, il est nécessaire d'installer une batterie de
préchauffe (accessoire).

33
Manuel d'utilisation de la télécommande pour Avent P190/P310/P460
Français
Maintenir la touche (1) du bas enfoncée pendant 5 secondes
environ jusqu'à ce que BYP6 apparaisse dans la zone
d'affichage (2).
Le système de ventilation résidentiel refroidit pendant
6 heures et les gaines d'air fonctionnent en parallèle dans
la zone d'affichage (3).
Après, le système de ventilation résidentiel rebascule automatiquement au dernier état de fonctionnement.
3.10. RÉINITIALISATION DE L’ALARME DES FILTRES
Grâce aux filtres installés, l'air extérieur alimenté et l'air
vicié est nettoyé pour enlever les particules de saleté et la
pollution du système de ventilation résidentiel est empêchée.
En cas de fonctionnement du système de ventilation résidentiel sans filtre, les exigences en matière d'hygiène ne
sont pas respectées.
L'alarme des filtres doit être réinitialisée après chaque
remplacement de filtres.
Les triangles noirs dans la zone d'affichage (1) indiquent la
durée de vie restante du filtre. Lorsque tous les triangles
sont remplis, la zone d'affichage (1) clignote et les filtres
doivent être remplacés.
1. Appuyer sur la touche (2) du milieu pour activer la ligne relative aux modes de fonctionnement. L'état de fonctionnement actuel clignote.
2. Appuyer sur la touche (2) de droite autant de fois que cela
est nécessaire jusqu'à ce que l'affichage (1) clignote.
La zone d'affichage (3) indique -25 par exemple. Il reste encore 25 jours avant le remplacement des filtres.
3. Appuyer sur la touche (2) du bas. La zone d'affichage (3) clignote avec la valeur prédéfinie de l'intervalle de temps
pour le remplacement de filtres, par exemple 360.
4. Maintenir la touche (2) du haut ou du bas enfoncée jusqu'à
ce que la valeur souhaitée de l'intervalle de temps pour le
remplacement des filtres soit réglée.
5. Appuyer sur la touche (2) du milieu.
Le paramètre est enregistré.
3.11. ACTIVATION ET DÈSACTIVATION DU MENU
D’INSTALLATEUR
Dans le menu d'installateur, les valeurs suivantes peuvent être
indiquées et les paramètres suivants peuvent être ajustés :
• Lire la version logicielle du système de ventilation résidentiel, de la télécommande et des accessoires
• Lire la vitesse du ventilateur d'air frais
• Lire la vitesse du ventilateur d'air vicié
• Lire les valeurs de consigne du préchauffage (accessoire)
• Régler les valeurs de consigne du préchauffage (accessoire)
• Lire les températures de T
min
et T
max
pour le bypass (ac-
cessoire)
• Régler les températures de T
min
etT
max
pour le bypass (ac-
cessoire)
• Régler la sensibilité du capteur d'humidité (accessoire)
• Régler la sensibilité du capteur COV (accessoire)
Remarque :
Consulter le manuel d'utilisation et d'installation du
système de ventilation résidentiel afin d'obtenir de plus
amples informations concernant le remplacement des
filtres.
Die Wohnraumlüftung
RH%
2 3
1
M+P-26A-0975
Die Wohnraumlüftung
RH%
1
M+P-26A-0976
Avertissement :
Le menu d'installateur doit être utilisé uniquement
par du personnel spécialisé et qualifié ; dans le cas
contraire, cela peut entraîner des dommages.
Die Wohnraumlüftung
RH%
3
21
M+P-26A-0977

34
Manuel d'utilisation de la télécommande pour Avent P190/P310/P460
3.11.1. Activation du menu d'installateur
Maintenir la touche (1) de droite enfoncée pendant
10 secondes environ jusqu'à ce que les zones
d'affichage (2) et (3) clignotent et le niveau de
ventilation 3 (4) soit indiqué.
Le menu d'installateur est actif pendant une heure ou
jusqu'à ce que la touche (1) soit maintenue de nouveau enfoncée pendant 10 secondes pour un redémarrage.
3.11.2. Lecture des versions logicielles
1. Activer le menu d'installateur (cf. page 34).
2. Appuyer sur la touche (1) de gauche.
Dans la zone d'affichage (2), la version logicielle du système de ventilation résidentiel est indiquée.
3. Appuyer sur la touche (1) du bas.
Dans la zone d'affichage (2), la version logicielle de la télécommande est indiquée.
4. Appuyer sur la touche (1) du bas.
Dans la zone d'affichage (2), la version logicielle d'un accessoire est indiquée.
En cas de montage de plusieurs accessoires, appuyer de
nouveau sur la touche (1) du bas.
5. Maintenir la touche (1) de droite enfoncée pendant
10 secondes environ. Le menu d'installateur est fermé.
3.11.3. Lecture des vitesses de rotation des ventilateurs
d'air frais et d'air vicié
1. Activer le menu d'installateur (cf. page 34).
2. Appuyer sur la touche (1) de droite jusqu'à ce que la zone
d'affichage (2) et la gaine d'alimentation en air (3) clignotent.
Dans la zone d'affichage (4), la vitesse du ventilateur
d'air frais est indiquée.
3. Appuyer sur la touche (1) du bas jusqu'à ce que la zone
d'affichage (2) et la gaine d'évacuation de l'air (5) clignotent.
Dans la zone d'affichage (4), la vitesse du ventilateur
d'air vicié est indiquée.
4. Maintenir la touche (1) de droite enfoncée pendant
10 secondes environ. Le menu d'installateur est fermé.
3.11.4. Lecture et réglage des valeurs de consigne du
préchauffage (disponible en option)
1. Activer le menu d'installateur (cf. page 34).
2. Appuyer sur la touche (1) de droite jusqu'à ce que la
zone d'affichage (2) et la température (3) clignotent.
3. Appuyer sur la touche (1) du milieu.
4. Maintenir la touche (1) du haut ou du bas enfoncée
jusqu'à ce que la valeur de consigne souhaitée soit réglée.
5. Appuyer sur la touche (1) du milieu.
Le paramètre est enregistré.
6. Maintenir la touche (1) de droite enfoncée pendant
10 secondes environ. Le menu d'installateur est fermé.
Die Wohnraumlüftung
RH%
2 3
4
1
M+P-26A-0978
Die Wohnraumlüftung
RH%
2
1
M+P-26A-0979
Die Wohnraumlüftung
RH%
4 2 3
15
M+P-26A-0981
Die Wohnraumlüftung
RH%
2
13
M+P-26A-0982

35
Manuel d'utilisation de la télécommande pour Avent P190/P310/P460
Français
3.11.5. Réglage des températures pour le bypass
(disponible en option)
1. Activer le menu d'installateur (cf. page 34).
2. Appuyer sur la touche (1) de droite.
Les valeurs de consigne relatives à la température de
l'air extérieur T1 (2) et à la température de l'air vicié
T3 (3) clignotent.
3. Appuyer sur la touche (1) du milieu.
La valeur de consigne relative à T1 (2) clignote plus rapidement.
4. Maintenir la touche (1) du haut ou du bas enfoncée
jusqu'à ce que la valeur de consigne souhaitée
(8 à 15 °C) soit réglée.
5. Appuyer sur la touche (1) du milieu.
Le paramètre est enregistré et la valeur de consigne relative à T3 (3) clignote plus rapidement.
6. Maintenir la touche (1) du haut ou du bas enfoncée
jusqu'à ce que la valeur de consigne souhaitée soit réglée.
7. Appuyer sur la touche (1) du milieu.
Le paramètre relatif à la valeur de consigne est enregistré et les nouvelles valeurs de consigne relatives à
T1 (2) et T3 (3) sont affichées.
8. Maintenir la touche (1) de droite enfoncée pendant
10 secondes environ. Le menu d'installateur est fermé.
3.11.6. Réglage de la sensibilité du capteur d'humidité
(disponible en option)
Pour le programme automatique, la sensibilité peut être
ajustée en cas d'utilisation d'un capteur d'humidité (accessoire).
Une valeur de consigne trop basse concernant l'humidité
relative de l'air peut porter atteinte au bien-être des habitants et provoquer un assèchement de certains matériaux
dans le logement.
En revanche, une valeur de consigne trop élevée peut entraîner des dommages dus à l'humidité dans le bâtiment et
porter atteinte au bien-être des habitants.
1. Activer le menu d'installateur (cf. page 34).
2. Appuyer sur la touche (1) du milieu.
Le dernier programme automatique sélectionné (2) clignote.
3. Appuyer sur la touche (1) du milieu.
La dernière valeur de consigne sélectionnée (3) clignote.
4. Maintenir la touche (1) du haut ou du bas enfoncée
jusqu'à ce que la valeur de consigne souhaitée soit réglée.
5. Appuyer sur la touche (1) du milieu.
Le paramètre est enregistré.
6. Maintenir la touche (1) de droite enfoncée pendant
10 secondes environ. Le menu d'installateur est fermé.
3.11.7. Réglage de la sensibilité du capteur COV
(disponible en option)
Pour le programme automatique, la sensibilité peut être
ajustée avec Pluggit iFlow en cas d'utilisation d'un capteur
COV (accessoire).
Die Wohnraumlüftung
RH%
123
M+P-26A-0983
Remarque :
Consulter le manuel d'utilisation et d'installation du
système de ventilation résidentiel afin d'obtenir de plus
amples informations concernant l'utilisation de
Pluggit iFlow.
Basse sensibilité
Degré de pollution (ppm) 600 900 1200
Sensibilité moyenne
Degré de pollution (ppm) 550 800 1000
Haute sensibilité
Degré de pollution (ppm) 500 750 800
Die Wohnraumlüftung
RH%
2
13
M+P-26A-0980

36
Manuel d'utilisation de la télécommande pour Avent P190/P310/P460
3.12. DÉPANNAGE
3.12.1. Dysfonctionnements
3.12.2. Codes d'erreur
Dysfonctionnements
La synchronisation de la télécommande ne fonctionne pas.
Cause Solution
La distance par rapport à l'unité de commande du système
de ventilation résidentiel est trop éloignée.
Réduire la distance.
La télécommande est déjà synchronisée avec un autre système de ventilation résidentiel.
Réinitialiser la télécommande (cf. page 23).
Remarque :
Lors de l'affichage d'un code d'erreur, s'adresser auservice client de l'entreprise spécialisée.
Code Alarm/Fehler
E1 Ventilateur d'air vicié
E2 Ventilateur d'air frais
E3 Clapet de bypass
E4 Capteur de température de l'air extérieur (T1)
E5 Capteur de température de l'air amené (T2)
E6 Capteur de température de l'air vicié (T3)
E7 Capteur de température de l'air d'échappement (T4)
E8 Capteur de température de l'air ambiant (T5)
E9 Capteur d'humidité (accessoire)
Il se trouve dans la gaine d'évacuation de l'air du système de ventilation résidentiel.
E10 Température extérieure <-13 °C
E11 Température de l'air amené <15 °C
E12 Alarme incendie lorsqu'un des capteurs de température mesure une température supérieure à 70 °C.
E13 Problème de communication
E14 Alarme incendie qui est déclenchée par le détecteur d'incendie connecté dans la gaine (accessoire)
E15 Capteur COV (accessoire)

37
Manuel d'utilisation de la télécommande pour Avent P190/P310/P460
Français
5.1. MISE HORS SERVICE LORS DU DÉMONTAGE
La mise hors service doit être effectuée uniquement par du
personnel spécialisé et qualifié.
• Mettre l'installation hors tension.
• Débrancher l'installation complète sur tous les pôles.
5.2. CONDITIONNEMENT
L'emballage de transport et de protection est fabriqué largement à base de matières recyclables.
Tous les matériaux d'emballage doivent être éliminés conformément aux dispositions locales.
5.3. APPAREIL USAGÉ
La télécommande contient des matières et des substances
précieuses qui ne doivent pas être jetées avec les déchets
non recyclables.
L'appareil usagé peut être remis à une société de récupérationlocale pour être recyclé.
4. DONNÉES TECHNIQUES
Paramètres par
défaut
Min Max
Humidité relative de l'air avec le programme automatique
45 % 35 % 65 %
Bypass automatique
T
min
Température de l'air extérieur (T1) 15 °C 8 °C 15 °C
T
max
Température de l'air vicié (T3) 24 °C 22 °C/OFF 30 °C
Préchauffage
T1/SET (préchauffage électrique) -2 °C -2 °C/OFF -10 °C
T1/SET (préchauffage géothermique) 0 °C
Paramètres des ventilateurs
Fan OFFSET (vitesses entre le niveau 1 - 2- 3) 25 vitesses 10 vitesses 30 vitesses
Vitesse maximale des ventilateurs (niveau 4) 100 % comme le niveau 3 100 %
Minuterie des filtres
Intervalle de remplacement des filtres 360 jours 90 jours 360 jours
5. MISE HORS SERVICE/ÉLIMINATION

38
Manuel d'utilisation de la télécommande pour Avent P190/P310/P460
....................................................................................................................................................................................................
....................................................................................................................................................................................................
....................................................................................................................................................................................................
....................................................................................................................................................................................................
....................................................................................................................................................................................................
....................................................................................................................................................................................................
....................................................................................................................................................................................................
....................................................................................................................................................................................................
....................................................................................................................................................................................................
....................................................................................................................................................................................................
....................................................................................................................................................................................................
....................................................................................................................................................................................................
....................................................................................................................................................................................................
....................................................................................................................................................................................................
....................................................................................................................................................................................................
....................................................................................................................................................................................................
....................................................................................................................................................................................................
....................................................................................................................................................................................................
....................................................................................................................................................................................................

39
Manuel d'utilisation de la télécommande pour Avent P190/P310/P460
Français
....................................................................................................................................................................................................
....................................................................................................................................................................................................
....................................................................................................................................................................................................
....................................................................................................................................................................................................
....................................................................................................................................................................................................
....................................................................................................................................................................................................
....................................................................................................................................................................................................
....................................................................................................................................................................................................
....................................................................................................................................................................................................
....................................................................................................................................................................................................
....................................................................................................................................................................................................
....................................................................................................................................................................................................
....................................................................................................................................................................................................
....................................................................................................................................................................................................
....................................................................................................................................................................................................
....................................................................................................................................................................................................
....................................................................................................................................................................................................
....................................................................................................................................................................................................
....................................................................................................................................................................................................

40
Manuel d'utilisation de la télécommande pour Avent P190/P310/P460
....................................................................................................................................................................................................
....................................................................................................................................................................................................
....................................................................................................................................................................................................
....................................................................................................................................................................................................
....................................................................................................................................................................................................
....................................................................................................................................................................................................
....................................................................................................................................................................................................
....................................................................................................................................................................................................
....................................................................................................................................................................................................
....................................................................................................................................................................................................
....................................................................................................................................................................................................
....................................................................................................................................................................................................
....................................................................................................................................................................................................
....................................................................................................................................................................................................
....................................................................................................................................................................................................
....................................................................................................................................................................................................
....................................................................................................................................................................................................
....................................................................................................................................................................................................
....................................................................................................................................................................................................

La technologie fait la différence.
Les innovations de Pluggit représentent une valeur ajoutée pour l'homme et l'environnement.
Vous avez envie d'air frais ? Vous trouverez de plus amples informations
concernant l'entreprise, la technique intelligente des systèmes de
ventilation de confort, des références et les partenaires régionaux sur
www.pluggit.com ou sous forme de dialogue sur www.lueftungsblog.de
La pose du conduit d'air de manière invisible dans le sol et un positionnement
idéal des sorties d'air permettent une ventilation transversale parfaitement
orientée. La ventilation à déplacement d'air signifie que l'air frais est amené
dans la pièce presque sans courants d'air ni bruits parasites, sans pression et
de façon préchauffée en hiver.
Air frais et apport de chaleur : le tout-en-un - plus rapide, plus flexible et plus
énergétique que les systèmes de chauffage traditionnels.
allfloor - dans les plafonds, les murs sur ou sous le béton et la chape : le système conçu par Pluggit offre une flexibilité maximale concernant la pose des
conduites de ventilation et est ainsi idéal pour une utilisation dans les bâtiments neufs comme lors de la rénovation de bâtiments déjà construits.
Cette technologie innovante permet une alimentation en air frais avec la quantité exacte nécessaire ou souhaitée grâce à des capteurs et à une commande
hautement sensibles. Après l'installation, le système est réglable par une
simple pression sur la caractéristique de l'installation, permettant d'économiser du temps et des frais, et se recalibre toujours automatiquement à des
intervalles de temps réguliers.
Économie d'énergie - un haut taux de récupération de chaleur permet au
système de ventilation de paraître performant et énergétique uniquement de
manière superficielle. Le rapport entre l'énergie consommée et le taux de
récupération de chaleur, ce que l'on appelle l'efficacité énergétique électrique, est beaucoup plus déterminant pour une appréciation. Avec une haute
étanchéité, un design optimisé en matière de consommation et la dernière
technologie d'échangeur thermique, nos systèmes de ventilation obtiennent
d'excellentes valeurs en ce qui concerne la récupération de chaleur et l'efficacité énergétique.
Le principe de CleanSafe garantit un potentiel de pollution pratiquement
impossible de notre système de distribution grâce aux surfaces lisses ainsi
qu'un concept de nettoyage sans difficultés dont les résultats convaincants
d'un organisme de contrôle indépendant sont confirmés.
Vous avez envie d'air frais dans un bâtiment déjà construit ?
Le système de ventilation de confort unique pour la rénovation
énergétique de bâtiments déjà existants.
2Q
allfloor
ServoFlow
CleanSafe

Fresh air with style –
perfect!
PluggLine Designer covers
The fl ush-mount designer fl oor air outlet for all fl oors
• Winner of the iF product design award 2013
• For all fl oor installation heights ranging from 130 mm up to 190 mm
• Premium-quality stainless steel design
www.pluggit.com
A WORLD‘S
FIRST
PluggLine standard covers
For premium-quality supply and exhaust air outlets
• Different designs for every style of interior decor.
• Square or rectangular format depending on the area of use and amount of air
• Quick and uncomplicated installation
Fresh air with style –
ravishingly beautiful!
NEW
www.pluggit.com
Most healthy air
for your home
Air treatment due to ionisation and photo-oxidation
• Drastically reduces incoming harmful substances
• Ideal for allergy sufferers
• Directly combinable with Pluggit Avent ventilation units
www.pluggit.com
PluggVoxx air treatment
A WORLD‘S
FIRST
PluggFlex R round ventilation pipes
The breakthrough
in round ventilation pipes
A WORLD‘S
FIRST
The fi rst real round ventilation pipe for the installation of
room ventilation systems
• Installation in concrete ceilings
• Sound insulation thanks to patented PLUGGIT wave profi le
• Fire protection class B1
• Food-safe
www.pluggit.com
PLUGGIT GmbH | Valentin-Linhof-Straße 2 | 81829 Munich
Telephone +49 89 411125-0 | Fax +49 89 411125-100
PLUGGIT GmbH | Valentin-Linhof-Straße 2 | 81829 Munich
Téléphone +49 89 411125-0 | Fax +49 89 411125-100
www.pluggit.com
PluggLine – Designer covers for your home
Caches design pour votre maison
PluggLine – Flush-mount standard covers
Caches standard à surface plane
PluggFlex R – Round ventilation pipes for
installation in wet concrete
Conduits d’aération ronds pour une installation
dans du béton mouillé
PluggVoxx – The most healthy air for your home
L’air le plus sain pour votre maison
Further good ideas of
D‘autres bonnes idées de
01/13 M-BIA-FB-190-460-E/F
 Loading...