

Page 1

Universal Docking Station
User’s Manual
Questions? We’re here to help!
Visit http://plugable.com/support/
Or email [email protected]
More product info & tips at
http://plugable.com/products/ud-160-a/
Page 2

Page 3

Docking Station with Video User’s Manual
i
ABOUT THIS MANUAL
This manual is designed for use with the Docking Station with Video. Information in this document has been
carefully checked for accuracy; however, no guarantee is given to the correctness of the contents. The
information in this document is subject to change without notice. The manufacturer does not make any
representations or warranties (implied or otherwise) regarding the accuracy and completeness of this
document and shall in no event be liable for any loss of profit or any commercial damage, including but not
limited to special, incidental, consequential, or other damage.
SAFETY INSTRUCTIONS
Always read the safety instructions carefully:
Keep this User’s Manual for future reference
Keep this equipment away from humidity
If any of the following situation arises, get the equipment checked by a service technician:
z The equipment has been dropped and damaged.
z The equipment has obvious sign of breakage.
z The equipment has not been working well or you cannot get it to work according to the User’s Manual.
COPYRIGHT
This document contains proprietary information protected by copyright. All right are reserved. No part of this
manual may be reproduced by any mechanical, electronic or other means, in any form, without prior written
permission of the manufacturer.
TRADEMARKS
All trademarks and registered trademarks are the property of their respective owners or companies.
Page 4

Table of Contents
ii
Table of Contents
1. Introduction.......................................................................................................1
Features.............................................................................................................................2
Package Contents..............................................................................................................2
System Requirements........................................................................................................2
Assembly and Disassembly ..............................................................................................3
Front Panel........................................................................................................................4
Rear Panel......................................................................................................................... 5
2. Installation.........................................................................................................6
A. On Windows® 2000 / Windows® XP / Windows Vista®........................................................6
B. On Windows® 7
.............................................................................................................9
C. Connecting the Docking Station to Computer........................................................................12
D. Connecting Devices to the Docking Station
.....................................................................12
Connecting Ethernet network device.....................................................................................12
Connecting DVI Monitor.......................................................................................................12
Connecting USB Devices ......................................................................................................13
Connecting Microphone and Speaker/Headphones...............................................................13
3. Using t he D ock i ng S t ati o n w ith Video..............................................................14
USB 2.0 Ports..................................................................................................................14
Audio Ports ..................................................................................................................... 14
Configuring Windows Audio Device.......................................................................................14
Configuring Instant Messaging Software Audio Device.........................................................15
Ethernet Port ................................................................................................................... 15
Video Port ....................................................................................................................... 16
Display Modes.........................................................................................................................16
Adjusting Resolution, Color Depth and Refresh Rate.............................................................19
Disconnecting the Docking Station .........................................................................................21
How Standby or Hibernate Mode Affects Devices Attached to the Docking Station.....22
External Monitors....................................................................................................................22
Other Devices ..........................................................................................................................22
4. Uninstalling the Drivers..................................................................................23
Uninstalling the USB or Ethernet Display Adapter........................................................23
5. Specifications..................................................................................................24
Page 5

Docking Station with Video User’s Manual
iii
6. Regulatory Compliance..................................................................................27
FCC Conditions ..............................................................................................................27
CE ...................................................................................................................................27
WEEE Information ......................................................................................................... 27
Page 6

Page 7
Docking Station with Video User’s Manual
1
1. Introduction
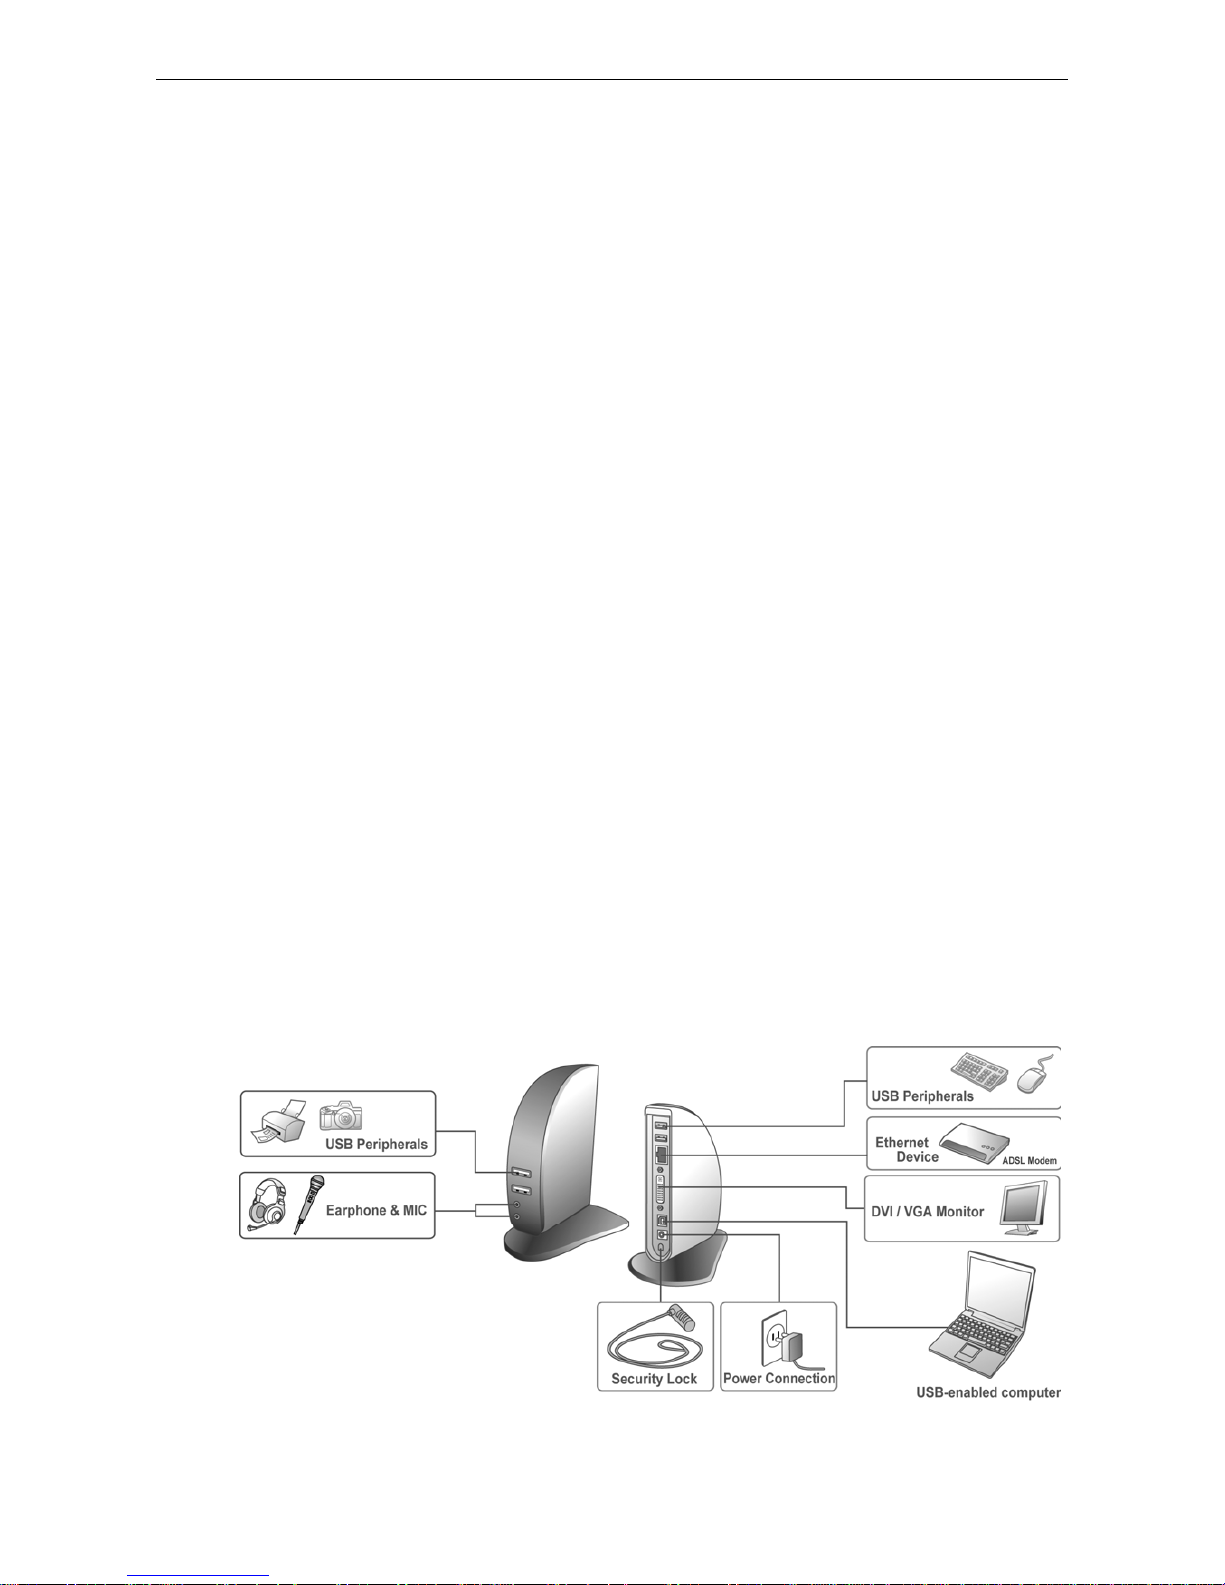
The Docking Station with Video is a unique expansion unit designed for computers
that have extra connectivity demands. Just with one USB port on the computer, its
connection can be extended not only to USB peripherals, Ethernet network,
speaker, microphone but also an additional monitor. It also offers desktop computer
users the convenience of accessing the peripherals within the reach, eliminating
the hassle of connect or disconnect the peripherals from the rear of a computer.
With the video port your computer can be connected to one more monitor, LCD or
projector. The connected monitor can be configured to either mirror your primary
screen, or extend the Windows desktop allowing visibility of more applications at
the same time. No more stacking windows within the confines of a single display.
As to the housing, aside from the impressive sailboat-like appearance, the upright
design of the body helps to spare your desktop space. Most peripherals are
connected behind while two USB ports and audio outputs are implemented on the
front panel for easier accessibility. An industry standard security lock is also
provided for anti-theft purpose.
Enhanced expansion capability plus the stylish appearance, surely this docking
station with video is the most versatile accessory that also complements your home
or office space.
Page 8

Docking Station with Video User’s Manual
2
Features
Great expansion unit for computers with extra connectivity demand
Extends connectivity to USB peripherals, Ethernet network, speaker,
microphone, and even an additional monitor
Creative appearance complements any home or office space
Industry-standard security lock slot for anti-theft purpose
Windows Vista® compatible
Plug-and-Play
Hot pluggable; add or remove devices without system reboot
Resumes from hibernation and suspend modes
Package Contents
Docking Station with Video x1
Base Plate x1
USB 2.0 Cable x1
Power Adapter x1
CD (Driver and User’s Manual) x1
Quick Installation Guide x1
DVI to VGA Adapter (for DVI model only) x1
System Requirements
With CPU at 1.6 GHz Atom, Celeron or higher processor clock. Intel®
Pentium®/Celeron family, or AMD K6/Athlon/Duron family, or compatible
processor
512 MB of RAM
USB 2.0 port
30MB of available disk space
Windows® 2000, Windows® XP 32-bit, Windows Vista
®
32/64-bit,
Windows
®
7 32/64 bit
To play DVD on the add-on monitor, in addition to the requirements above, the
following requirements should also be met:
With dual core CPU at 2.0 GHz processor clock
The adapter screen resolution be set to 800x600 with 16bit color
Page 9
Docking Station with Video User’s Manual
3
Assembly and Disassembly
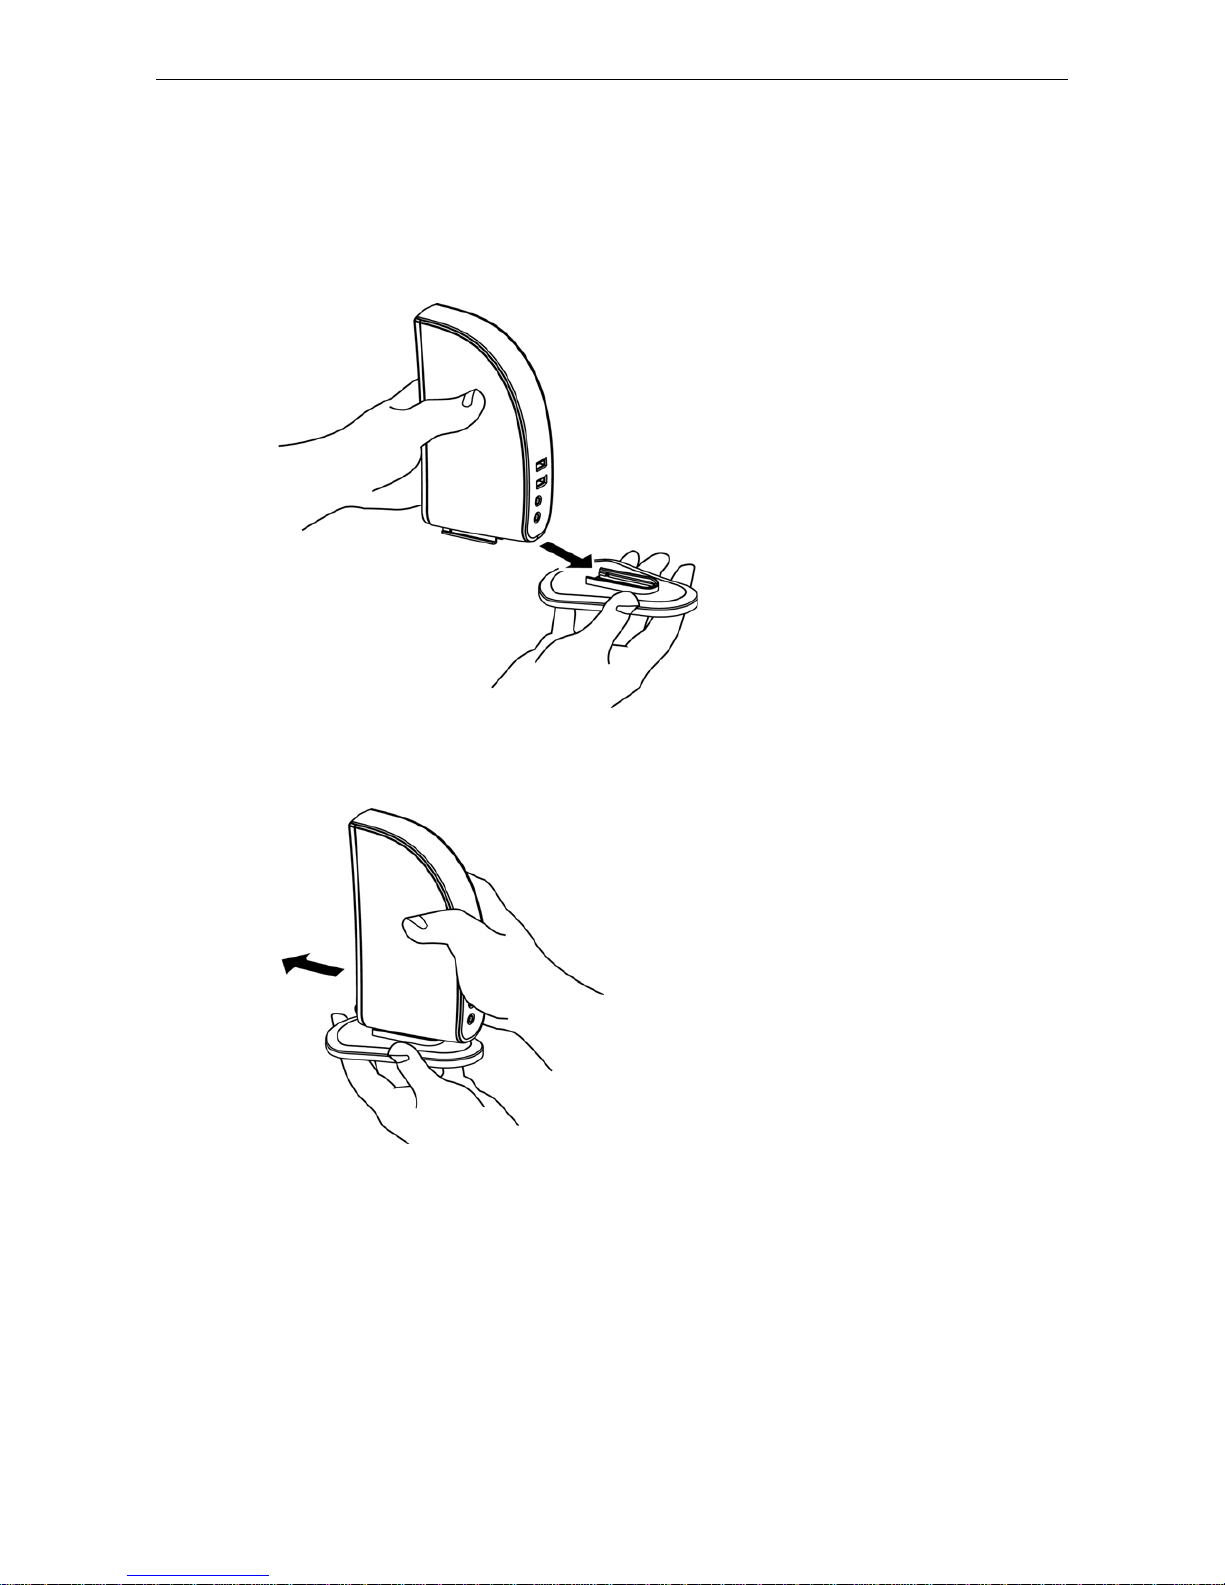
The docking station comes with a base plate to make it self-standing. To assemble
the docking station, slide the body of the docking station firmly as shown below.
Make sure a click is heard to ensure the body snaps into place.
To disassemble the docking station, hold the base with one hand and then use
another hand to push the docking station firmly as shown below.
Page 10
Docking Station with Video User’s Manual
4
Front Panel
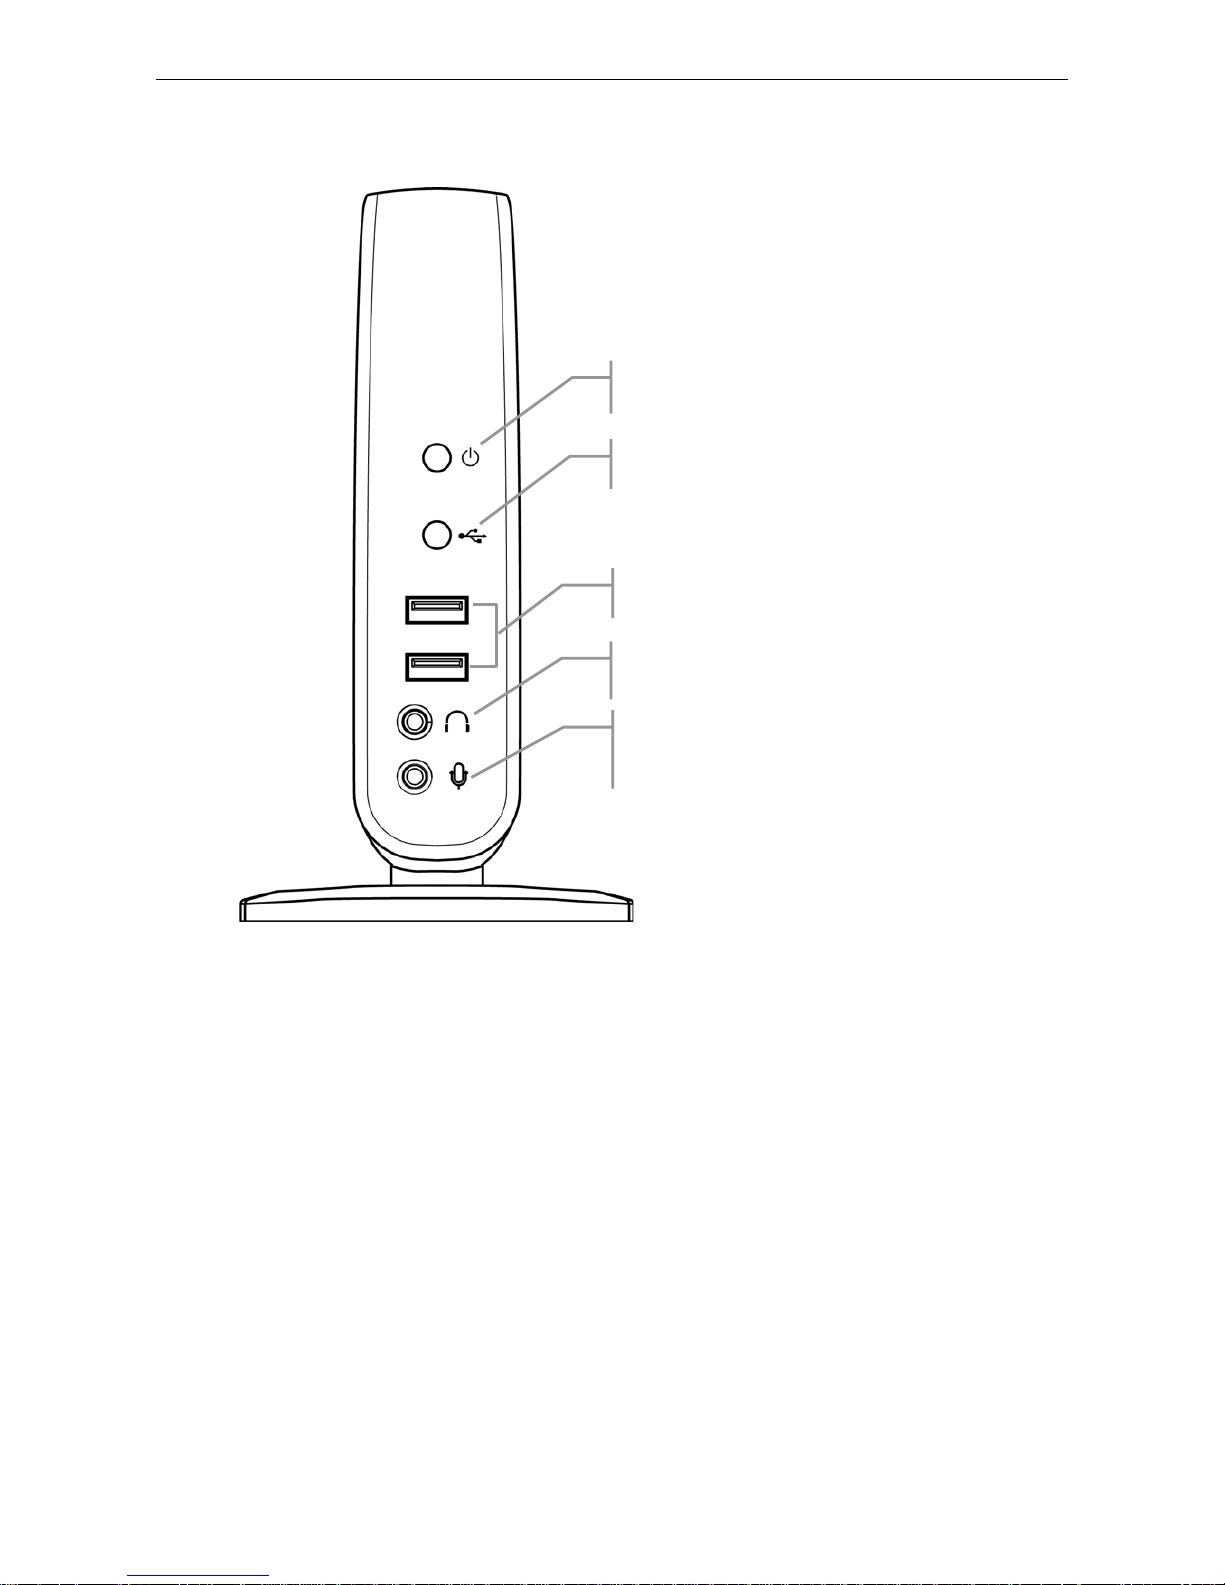
Power LED: Glows when the docking station is
powered.
2 USB 2.0 downstream ports: For connection to
USB peripherals.
3.5 mm stereo microphone input port: For
connection to an external microphone for
recording.
3.5 mm stereo audio output port: For connection
to stereo headphones or speakers.
USB Hub LED: Glows when any of the four USB
downstream ports is connected to a USB device.
Page 11
Docking Station with Video User’s Manual
5
Rear Panel
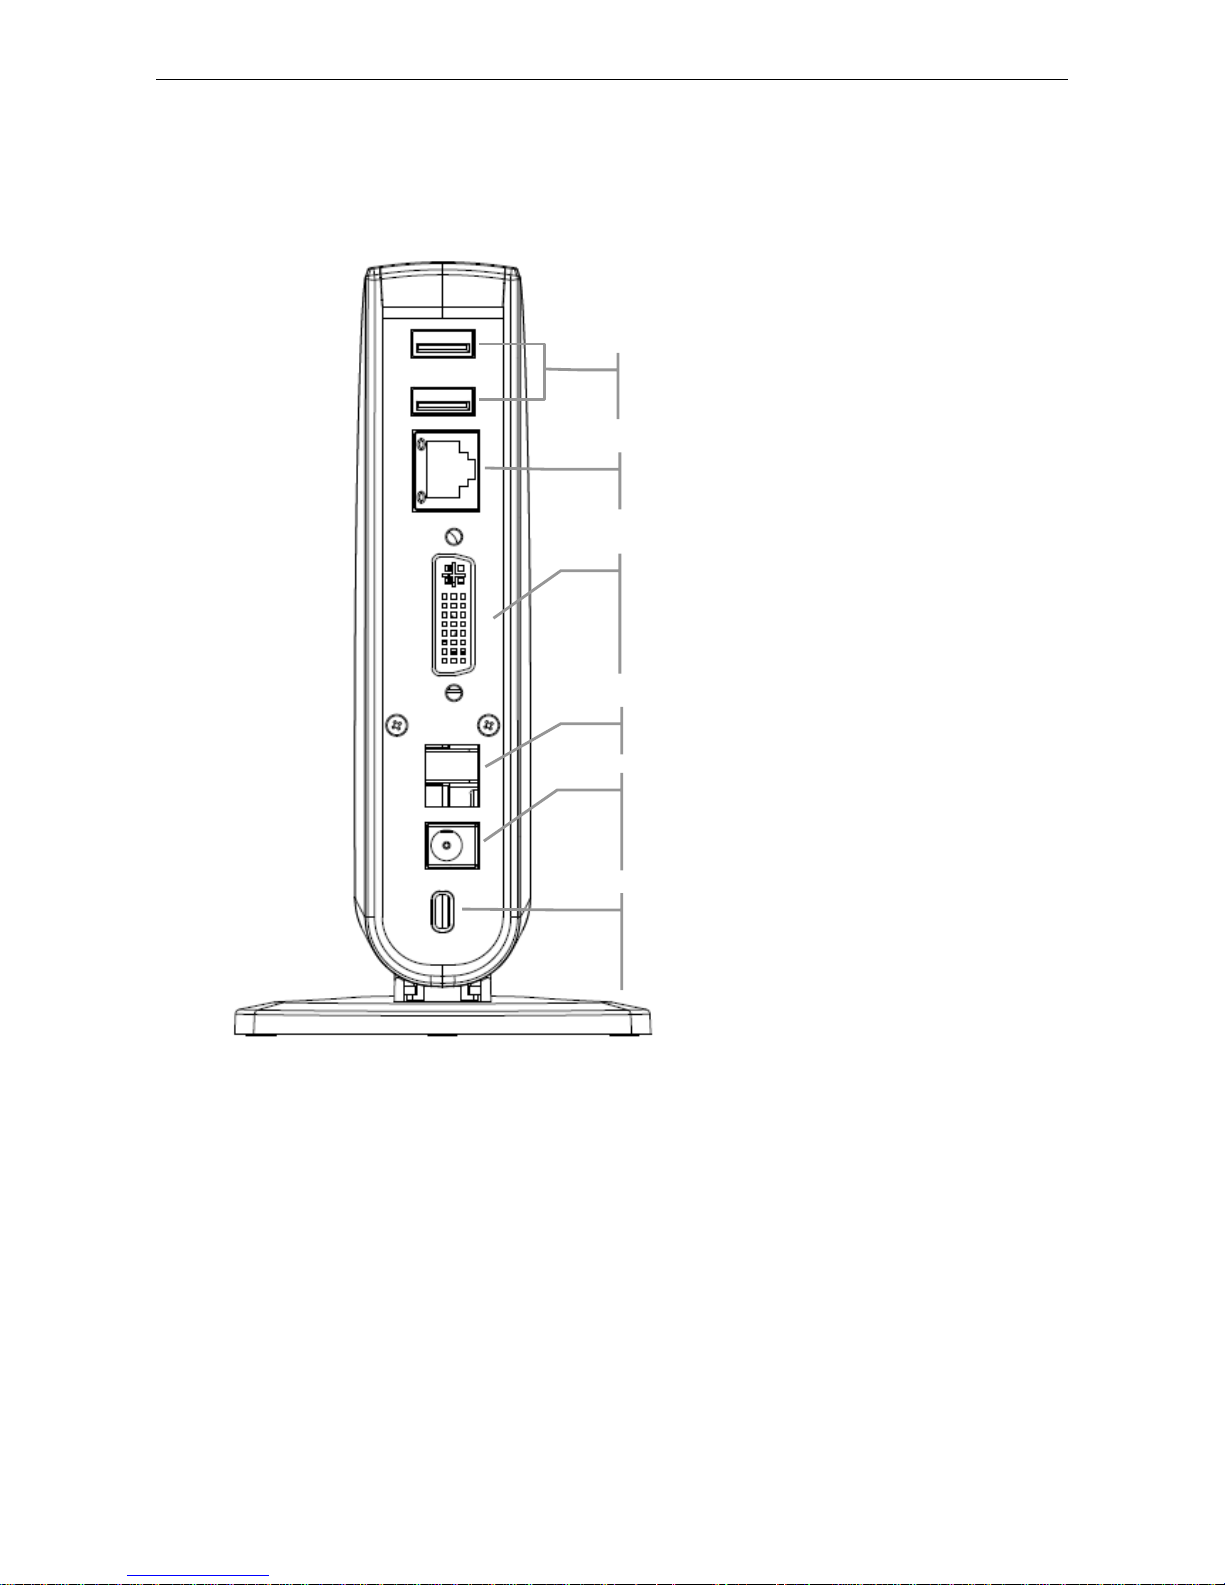
4 USB 2.0 downstream ports (A type female
connector): For connection to USB peripherals.
10/100 Mbps Ethernet port: For connection to the
Ethernet network via a network cable (not provided).
DVI video output port: For connection to a VGA or
DVI monitor.
For DVI model, if you want to connect to a VGA
monitor, use the provided DVI to VGA adapter for
connection.
USB upstream port: For connection to the USB port o
f
the host computer.
Power jack: For connection to the provided power
adapter. The Docking Station always needs external
power supply for operation, as it does not take power
from the USB bus.
Security lock slot: Industry-standard Kensington®
security slot for connection to a security lock (not
provided). Insert the lock’s locking end into the slot and
turn the key to lock the docking station.
Page 12
Docking Station with Video User’s Manual
6
2. Installation
As the docking station with video comprise several components and some
components require specific installation procedure, please follow the steps
described in this manual to install the drivers first and then make the connection.
A. On Windows® 7 with Windows Update Enabled
Using an existing network connection, connect the docking station’s power adapter and
devices, and simply connect the docking station to your PC to allow Windows to
automatically detect, download, and install the latest drivers.
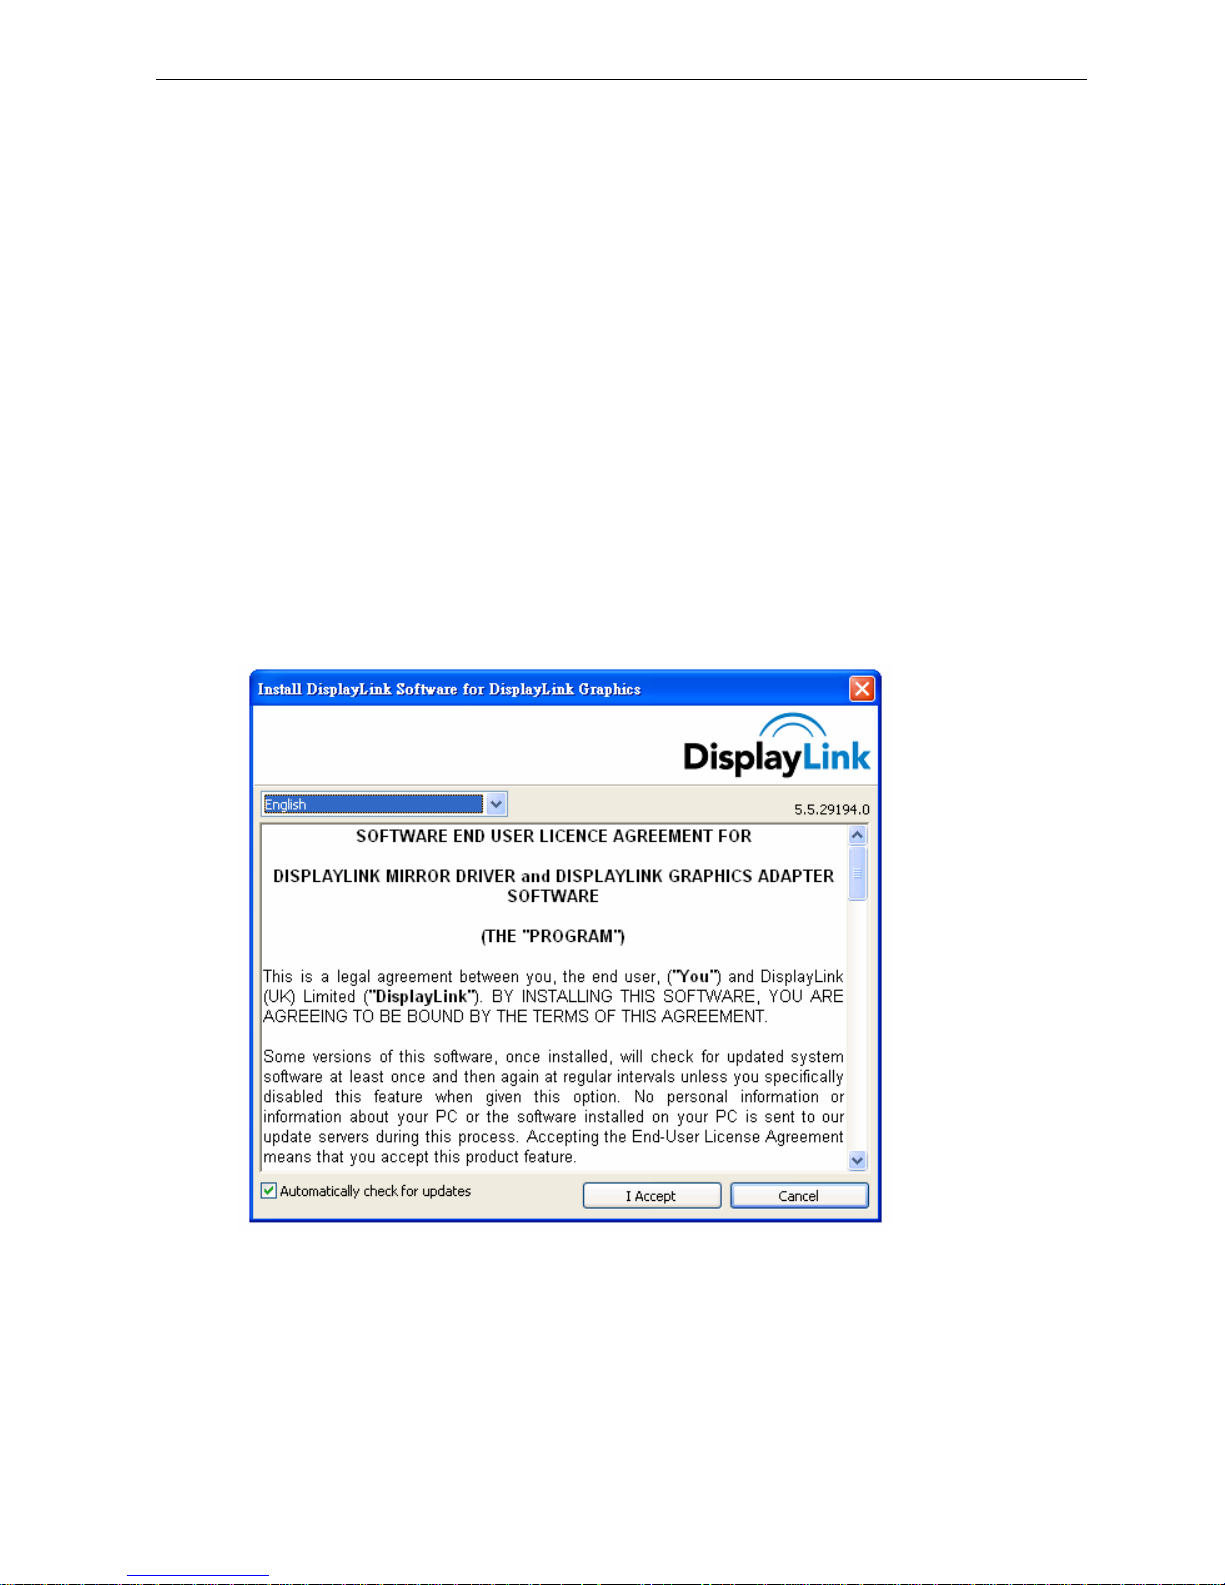
1. Please click I Accept after reading the statement of “SOFTWARE END USER
LICENCE AGREEMENT FOR DISPPLAYLINK MIRROR DRIVER and
DISPLAYLINK GRAPHICS ADAPTER SOFTWARE”.
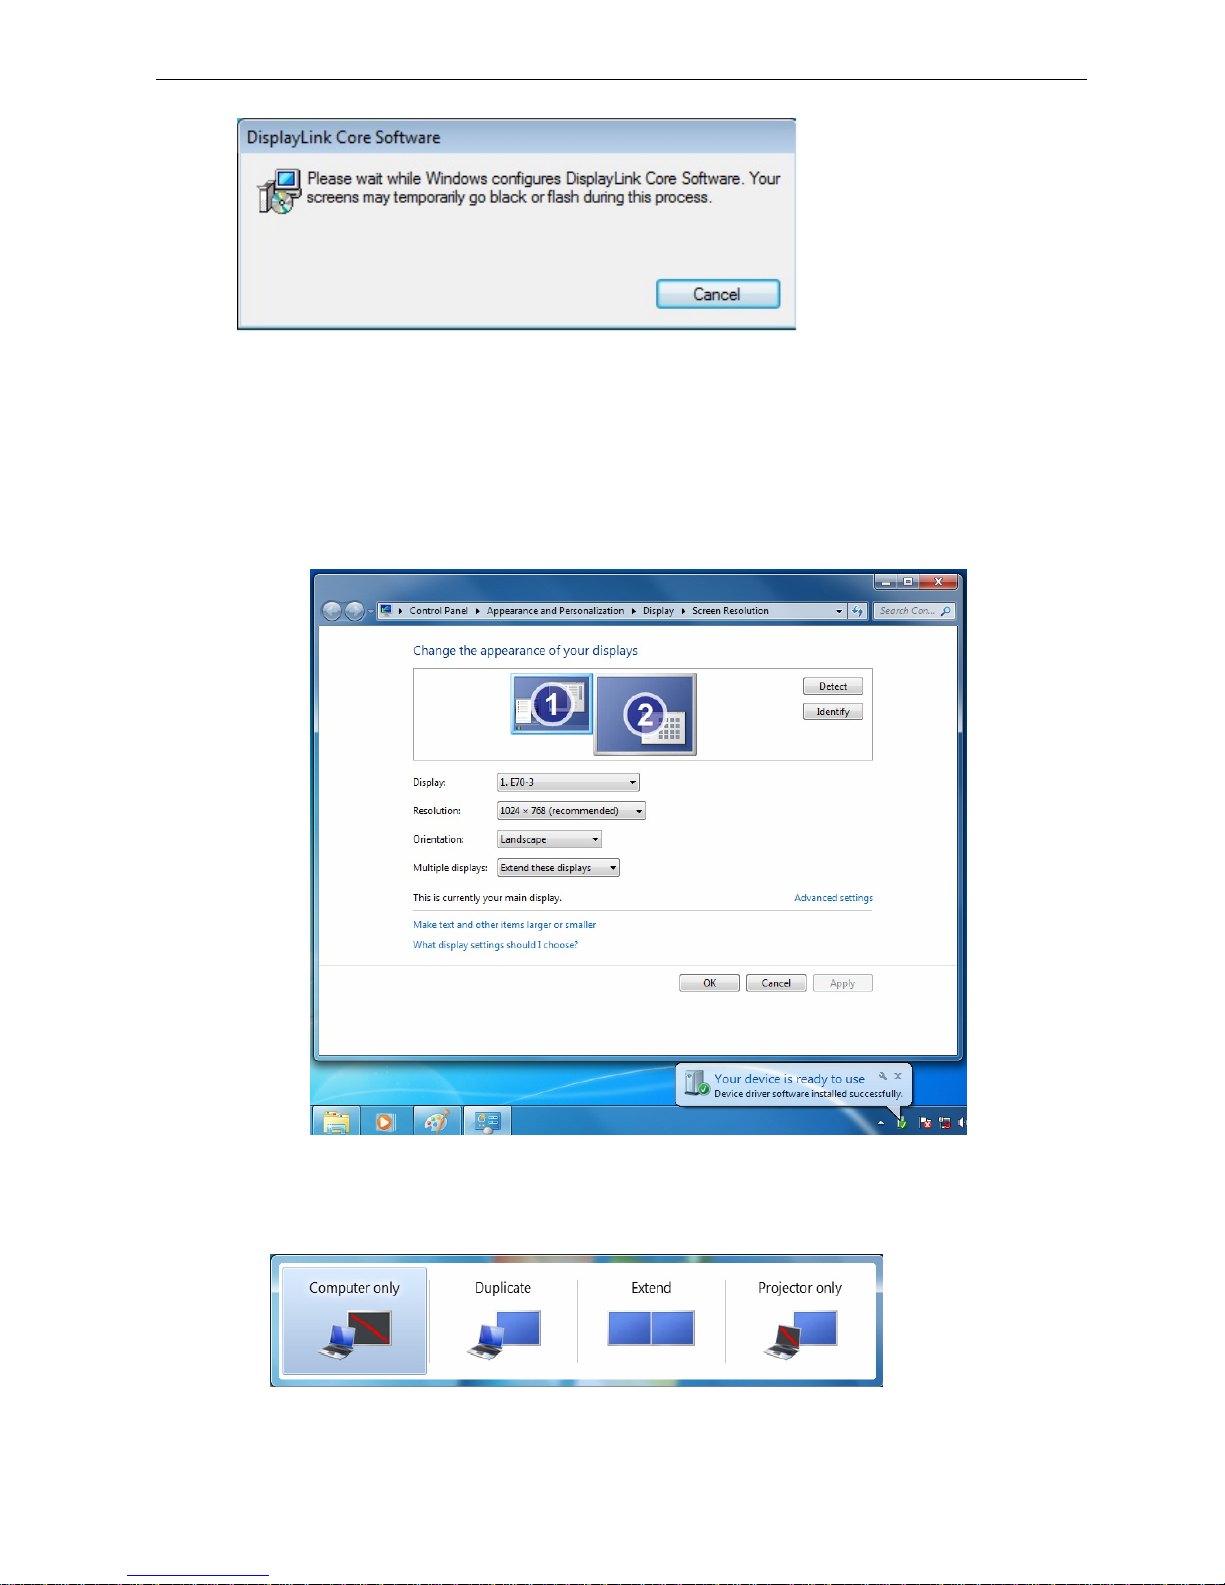
2. Please wait while Windows configures DisplayLink Core Software. Your screens may
temporarily go black or flash during this process.
Page 13
Docking Station with Video User’s Manual
7
3. After the installation is completed, the following Window will pop up. You can change
the appearance of your displays through the Window. In particular, move the
monitors pictured in the control panel to match how the monitors are physicaly
positioned on your desk. Additional controls are available in Windows® 7: Orientation
(Portrait, landscape, rotated portrait, rotated landscape)
4. To control the behavior of an attached DisplayLink device (or screen), it is possible to
use Windows Key+P to display a menu (and cycle through it) to allow: Disconnect
Projector, Duplicate, Extend, Projector Only.
*Actual strings depend on your operation system. These scree n shots are from Windows® 7 and
might vary slightly for each operation system.
Page 14
Docking Station with Video User’s Manual
8
B. On Mac OS X
® 10.4+
Drivers for the Mac are beta level, with significant limitations including disabling of the
network interface on the docking station. Limitations may change or improve over time.
We recommend downloading and installing the latest drivers from http://displaylink.com/
C.
On Windows® XP / Windows Vista
®
For legacy Windows 2000 drivers and for the latest XP and Vista drivers, we
recommend visiting http://displaylink.com/ for the latest graphic drivers and
http://www.asix.com.tw/download.php (choosing “USB to Fast Ethernet” family and
“AX88772” product) for the latest networking drivers. To instead use the drivers
provided on CD:
1. Insert the provided CD into your disc drive, find the Asix Network Driver, and click
setup.exe to install drivers for the network function of the dock.
2. Now, locate and double-click the DisplayLink Windows driver installer to install
drivers for the DVI/VGA graphics function of the dock.
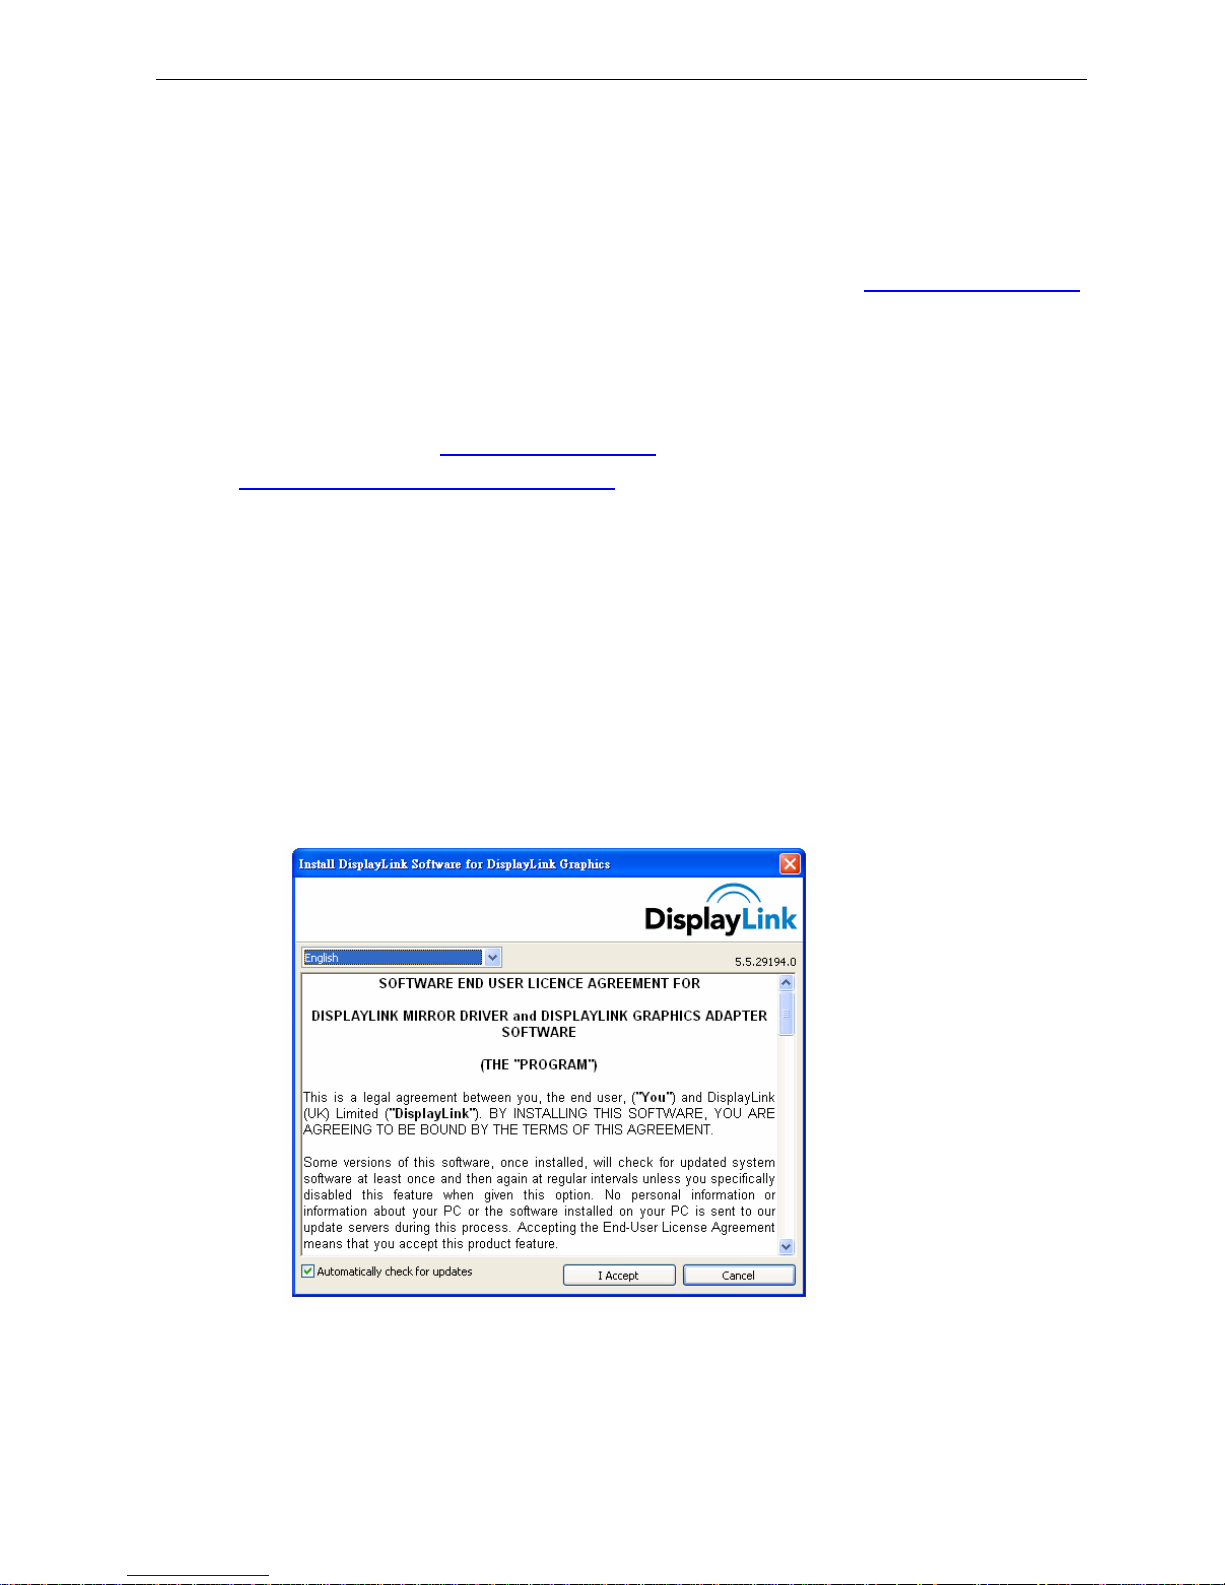
3. Please click I Accept after reading the statement of “SOFTWARE END USER
LICENCE AGREEMENT FOR DISPPLAYLINK MIRROR DRIVER and
DISPLAYLINK GRAPHICS ADAPTER SOFTWARE”.
Do not connect the docking station to your computer at this stage. Please
proceed to next section to continue with the video component installation.
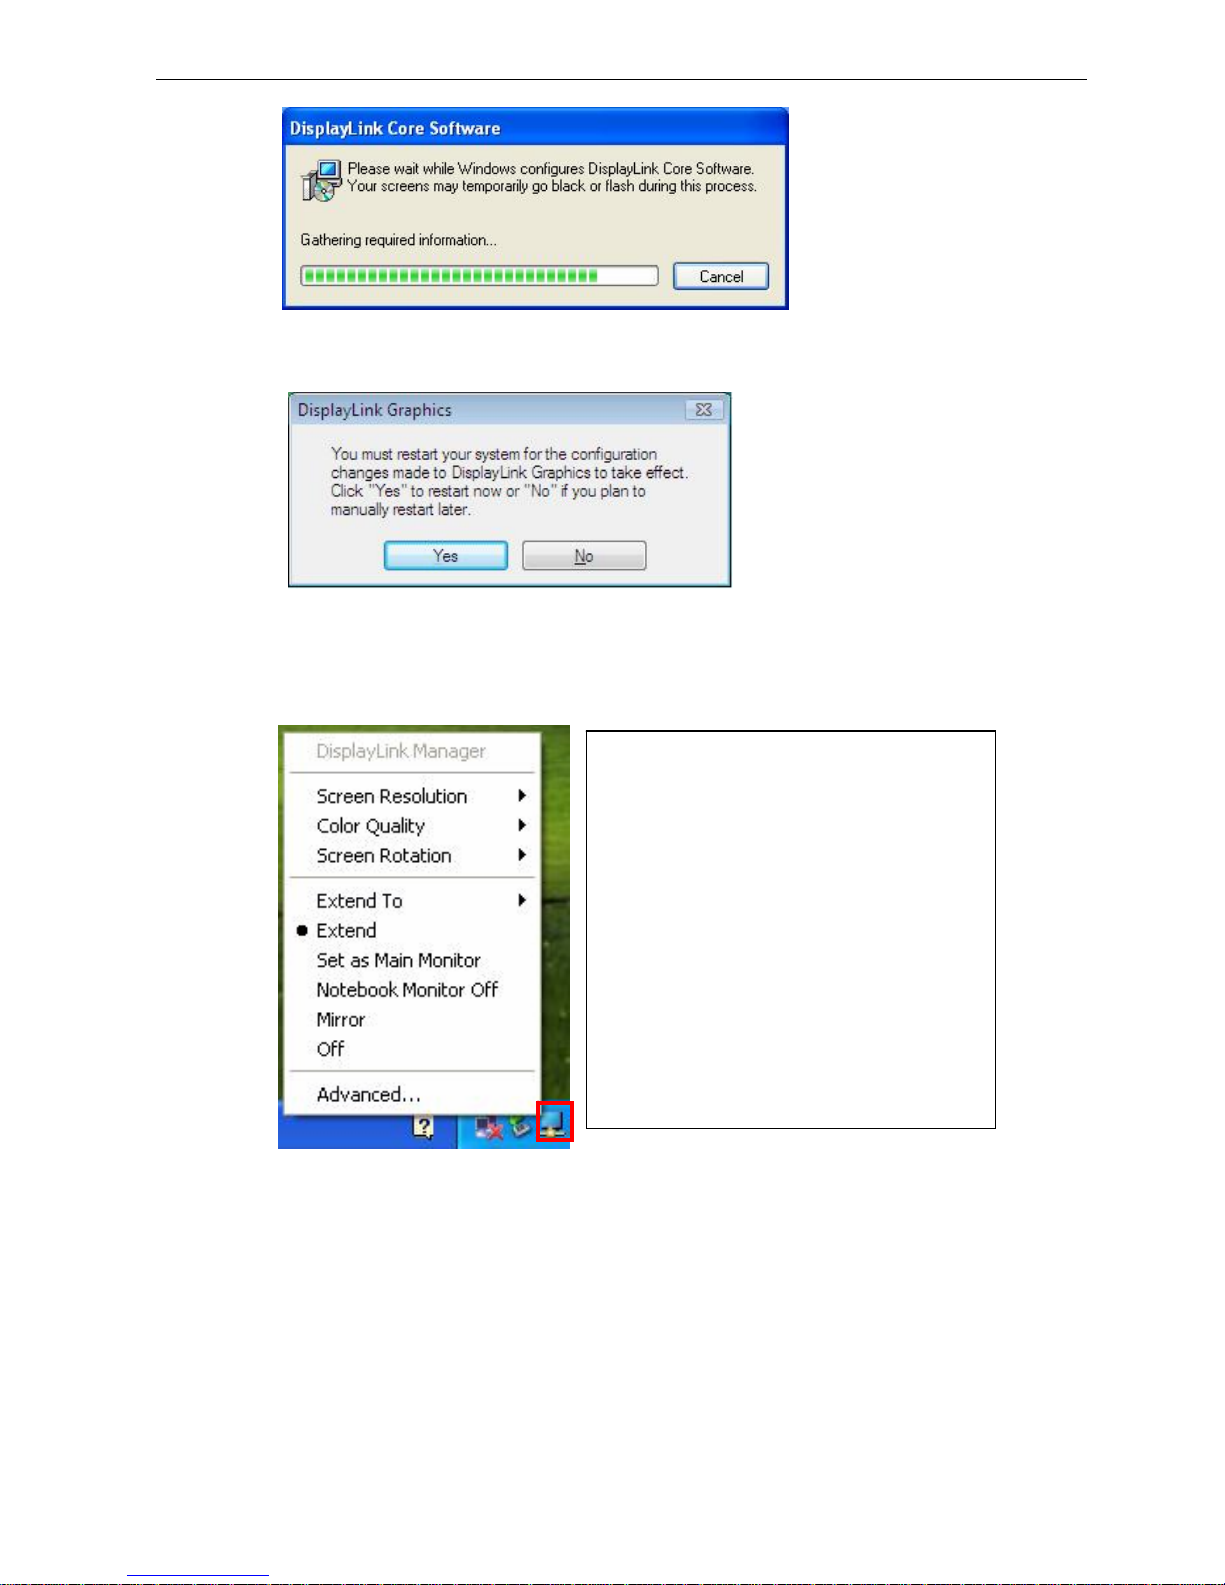
4. Please wait while Windows configures DisplayLink Core Software. Your screens
may temporarily go black or flash during this process.
Page 15
Docking Station with Video User’s Manual
9
Note: You may need to restart your system for the configuration changes made
to DisplayLink Graphics to take effect.
5. After the installation is completed, you will see the DisplayLink Manager Icon in
System Tray that looks like a monitor as below. Click on the icon to bring up the
menu.
*Actual strings depend on your operation system. These screen shots are from Windows
®
XP SP2 and
Windows Vista® , it might vary slightly for each operation system.
-Extend Mode: The screen is part
of the extended desktop.
-Mirror Mode: The screen copies
the contents of the primary screen.
-Off Mode: The screen is black.
-Set as Main Monitor: The screen
is the primary screen.
-Notebook monitor off: The
Notebook screen is black and the
DisplayLink screen is the primary
screen.
Page 16

Docking Station with Video User’s Manual
10
B. Connecting the Docking Station to Computer
1. Assemble the docking station by sliding the main body onto the base plate to
make it self-standing.
2. Plug the power cord of the power adaptor into the DC IN jack on the back of the
docking station and then connect the power adapter to a working electrical outlet.
The Power indicator on the front panel glows when the docking station is
powered on.
3. Plug the square end of the USB cable into the USB upstream connector at the
back of the docking station.
4. Plug the other end of the USB cable into an available USB 2.0 port on your
computer.
Upon the USB connection, your computer will automatically complete the remaining
installation, including installing Windows built-in drivers for the USB hub.
A pop-up message will appear in the notification area indicating the installation status.
Wait for the final message indicating the driver software installation is successful.
Then the docking station is ready for use.
C. . Connecting Devices to the Docking Station
Now the installation is complete. You can connect the peripherals/monitor to
appropriate ports on the docking station as required. If required, you can connect and
disconnect the peripherals/monitor any time without disconnecting the docking
station from the USB port on your computer.
Connecting Ethernet network device
1. Connect an Ethernet cable to the Ethernet port on the docking station.
2. Connect the other end of the Ethernet cable to your network hub, switch or
router.
Connecting VGA/DVI Monitor
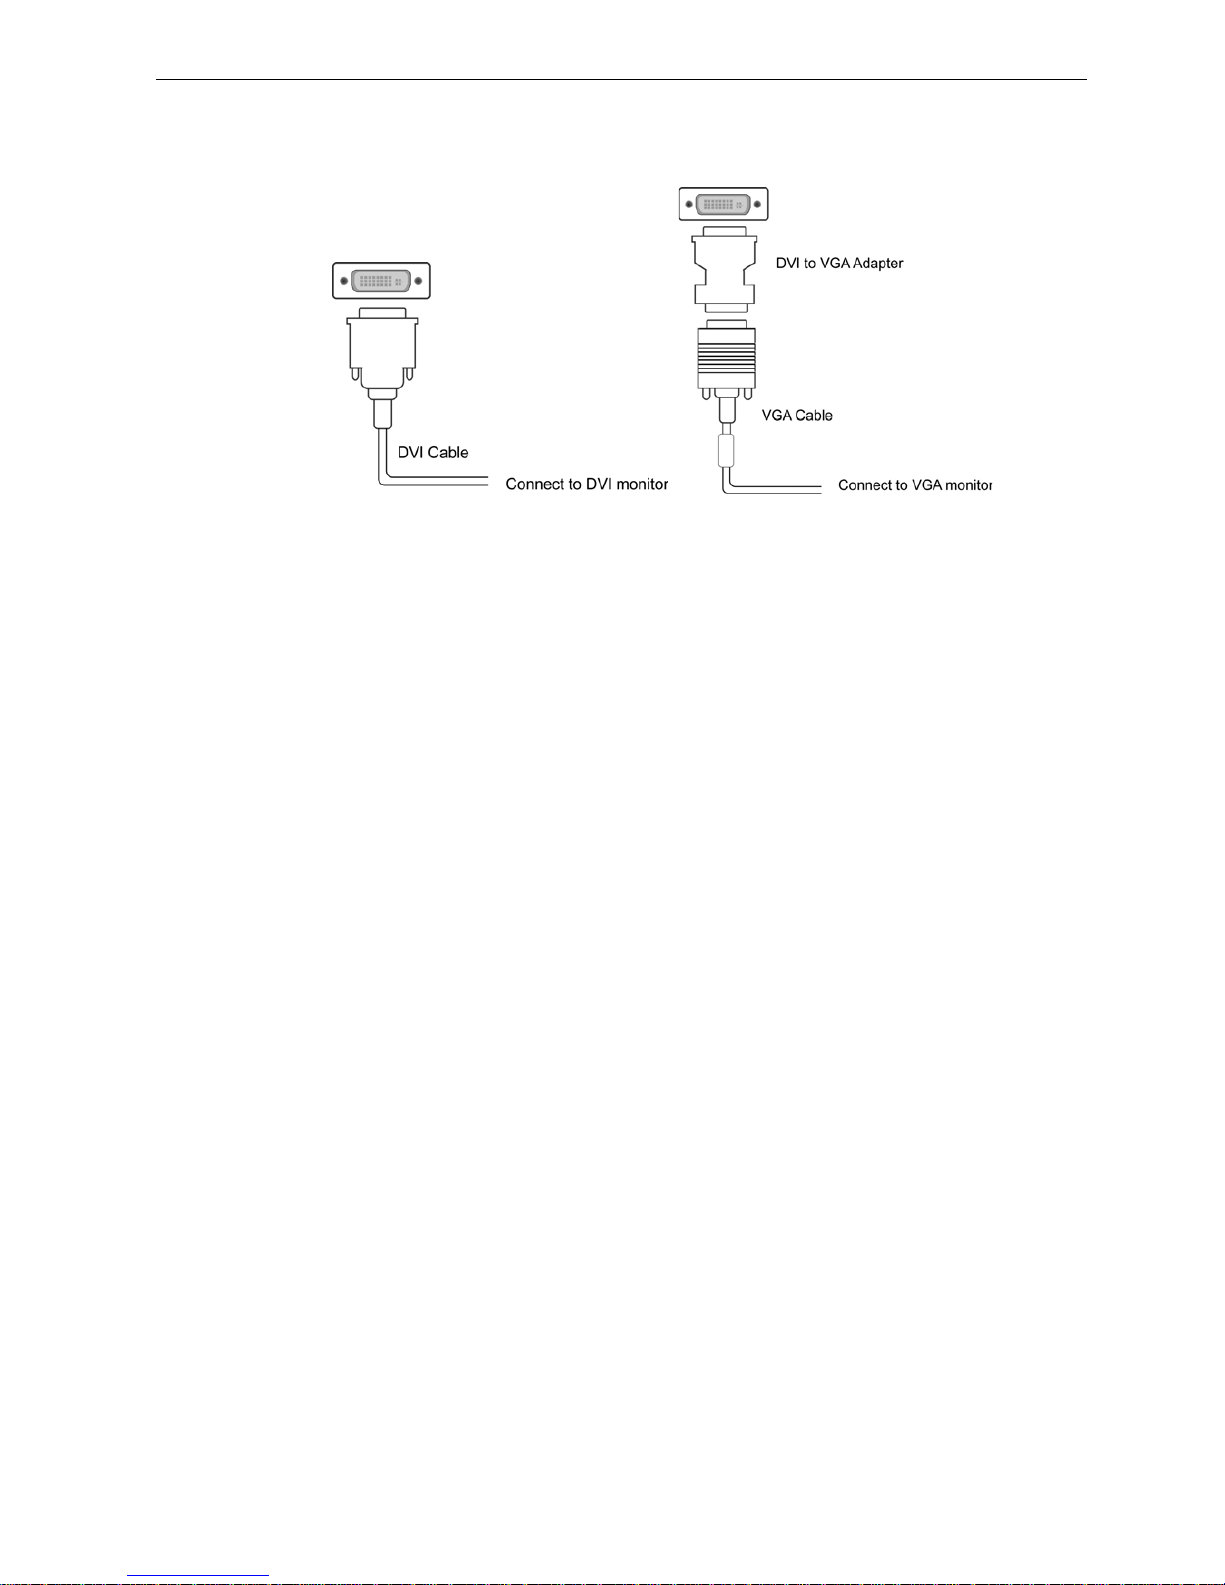
For DVI model: The equipped DVI-I (DVI-Integrated) connector transmits both
the digital and analog signals. This means it supports either of these two
connection types:
• It can be connected to a DVI-D (digital) monitor using a DVI cable (not
provided)
Page 17
Docking Station with Video User’s Manual
11
• Or, it can be connected to an analog VGA monitor using the privided DVI-I
to VGA adapter and a VGA cable (not provided).
Upon the connection it’s normal that the screen flicks black a couple of times. Once
the connection is done, an extended screen will appear on the add-on monitor.
Sometimes it takes time for the add-on monitor to show the video. Please wait for
while.
For Windows Vista®, if the add-on monitor has been blank for a while, please
reboot your system again.
To change the display mode, see next chapter for instructions.
Connecting USB Devices
Connect your USB devices to the USB ports on the docking station. As long as one
USB device is connected to the port and the connection works properly, the USB
LED glows green (on). When no USB device is connected to the port, the LED light is
off.
If your USB device, such as a printer or optical drive, etc., came with its own AC
adaptor, make sure that it is plugged into the device and a working electrical outlet.
Connecting Microphone and Speaker/Headphones
To connect your speaker/headphones, insert the plug to the green hole on the front of
the docking station.
To connect a microphone, insert the plug to the pink hole on the front of the docking
station.
Page 18

Docking Station with Video User’s Manual
12
3. Using the Docking S tation with Video
USB 2.0 Ports
The four USB ports on the docking station function just like the ports on a USB hub.
Just connect any USB device to the docking station’s USB ports when required.
All the four USB ports provide power when the computer is either off,
suspended or hibernated. This means you can use the USB port for power
charging purpose.
The USB port supports hot-plug feature. You may plug and unplug an USB
device from the docking station at any time when required.
Some USB devices, e.g., printers and optical drives, require higher power to
operate. To use these devices, the power adapter shipped with the device
should be plugged into the device and the mains.
Audio Ports
Prior to using the speaker/microphone connected to the docking station, you have
to correctly configure your application to use USB (Multimedia) Audio Device, i.e.,
the audio components of the docking station.
When the docking station is connected to your computer, the audio devices named
USB (Multimedia) Audio Device are automatically installed and may override
Windows default audio settings. The most obvious effect is that your original
music playback will be re-directed to the speaker connected to the docking station.
However, it’s possible that users may want to use original sound card for music
playback and use the docking station’s audio ports for chatting via instant
messaging software (such as MSN messenger, Yahoo messenger or Skype). In
such cases users have to manually configure required audio device for each
application.
Configuring Windows Audio Device
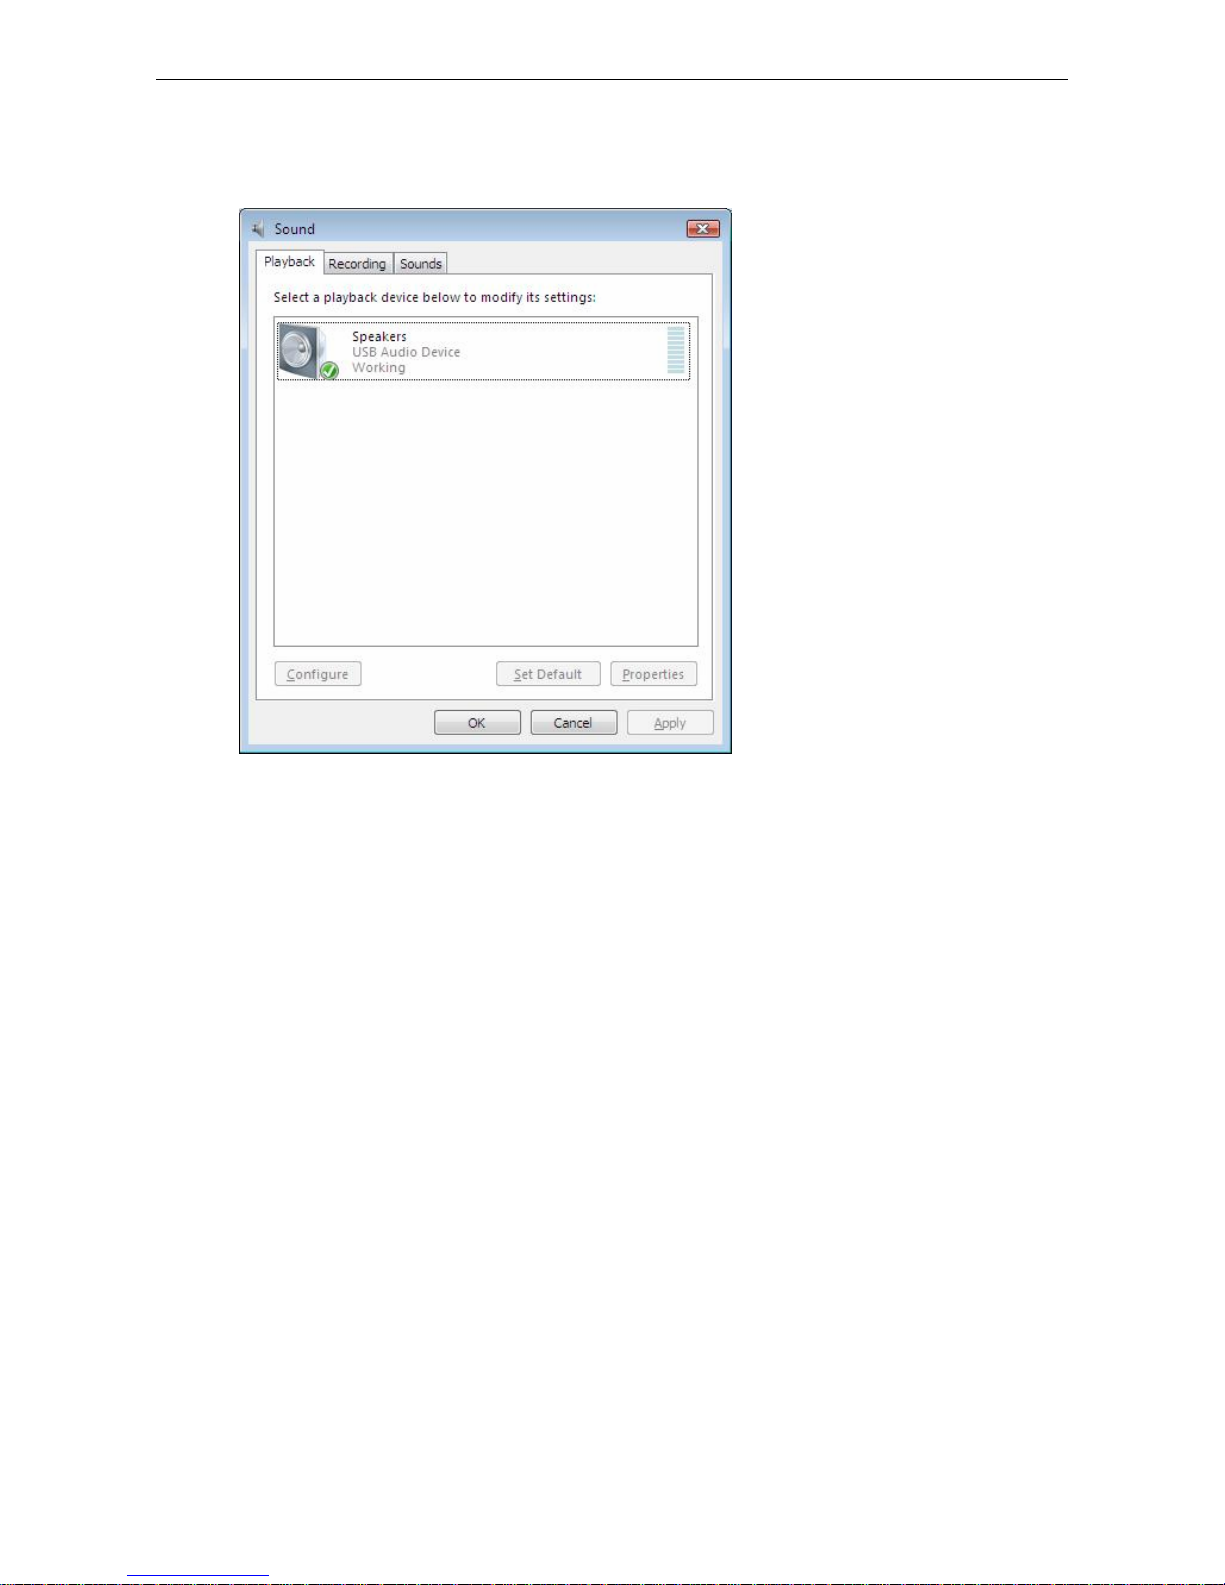
To specify a sound device for music playback in Windows, open Control Panel and
double-click the sound or audio icon. Then select a desired device in the playback
Page 19
Docking Station with Video User’s Manual
13
section. If you want to use your original sound card for music playback, make sure
to select it instead of USB (Multimedia) Audio Device.
Configuring Instant Messaging Software Audio Device
To chat via instant messaging software using the headphone and microphone
connected to the docking station, make sure the instant messaging software, such
as MSN messenger, Yahoo messenger or Skype, are configure to use USB
(Multimedia) Audio Device as the audio in and out devices.
Ethernet Port
The Ethernet port supports Ethernet 10/100 Mbps function. To connect your
computer to a network through the docking station, attach one end of a network
cable (not provided) to the Ethernet port on the docking station and the other end
to your network hub, switch or router for network access.
Page 20
Docking Station with Video User’s Manual
14
Video Port
Display Modes
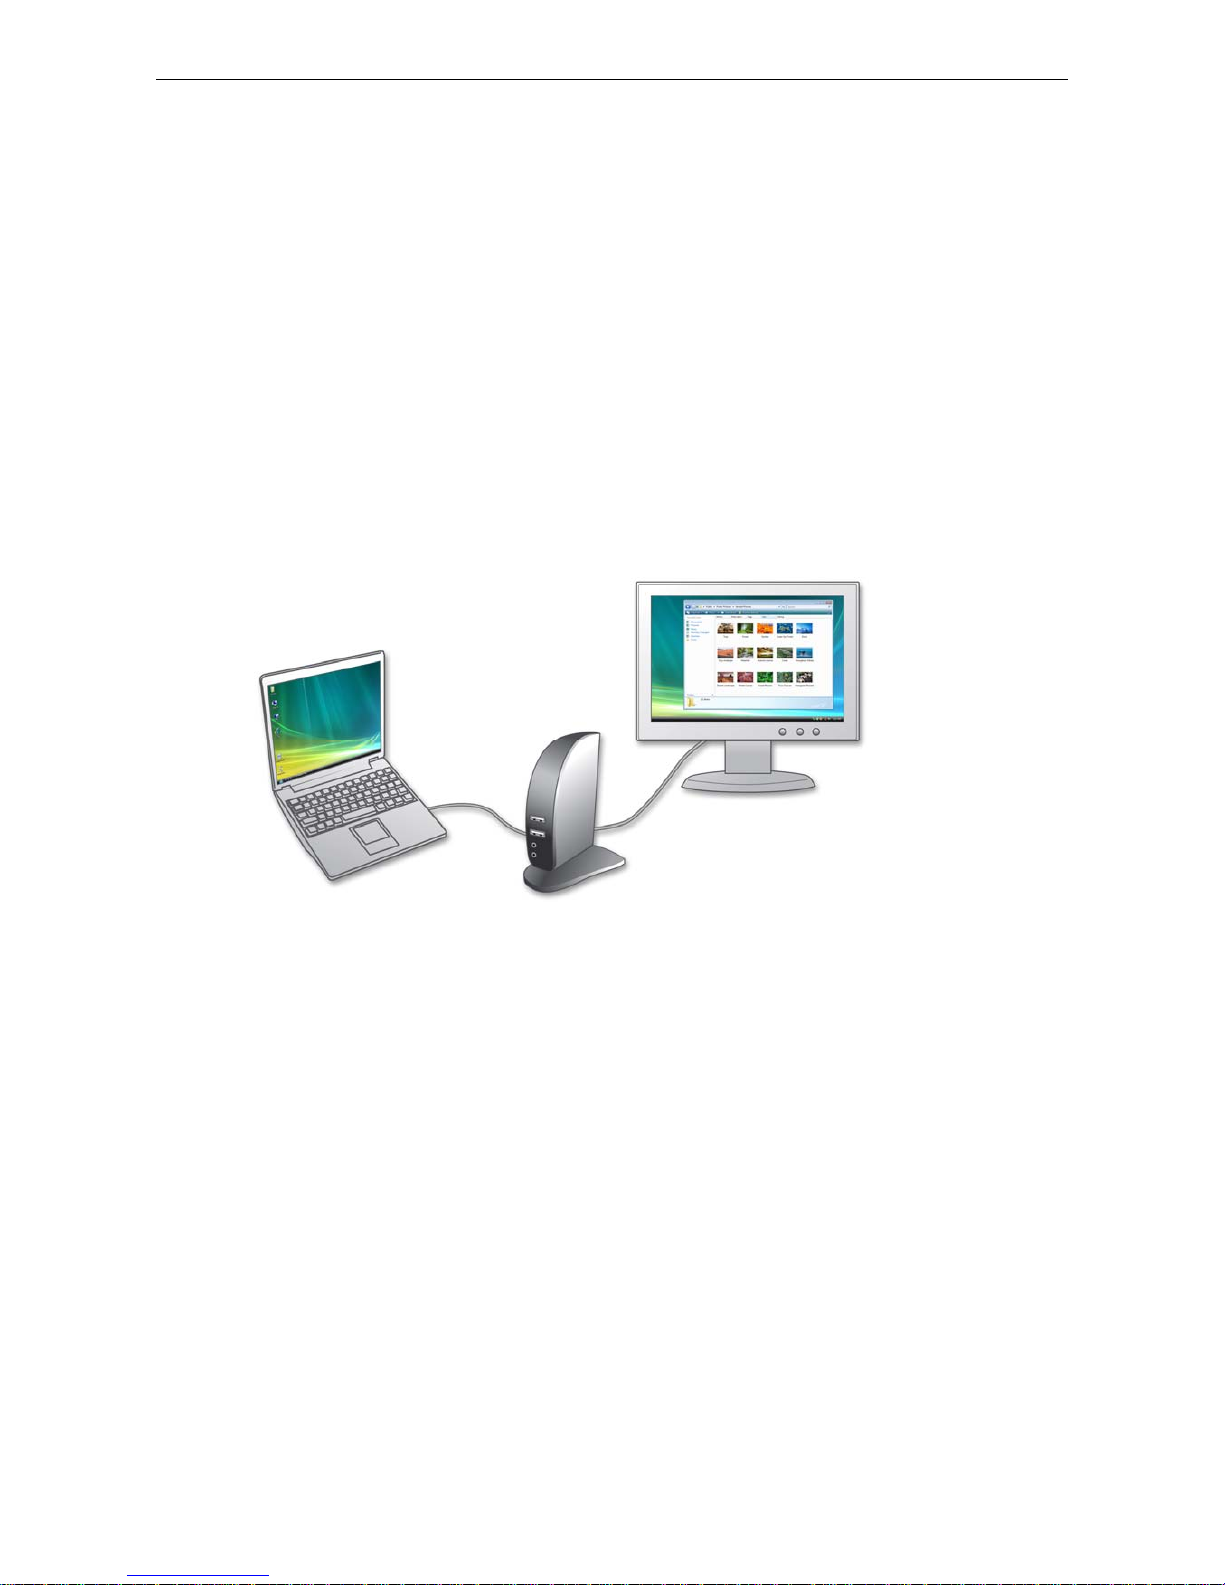
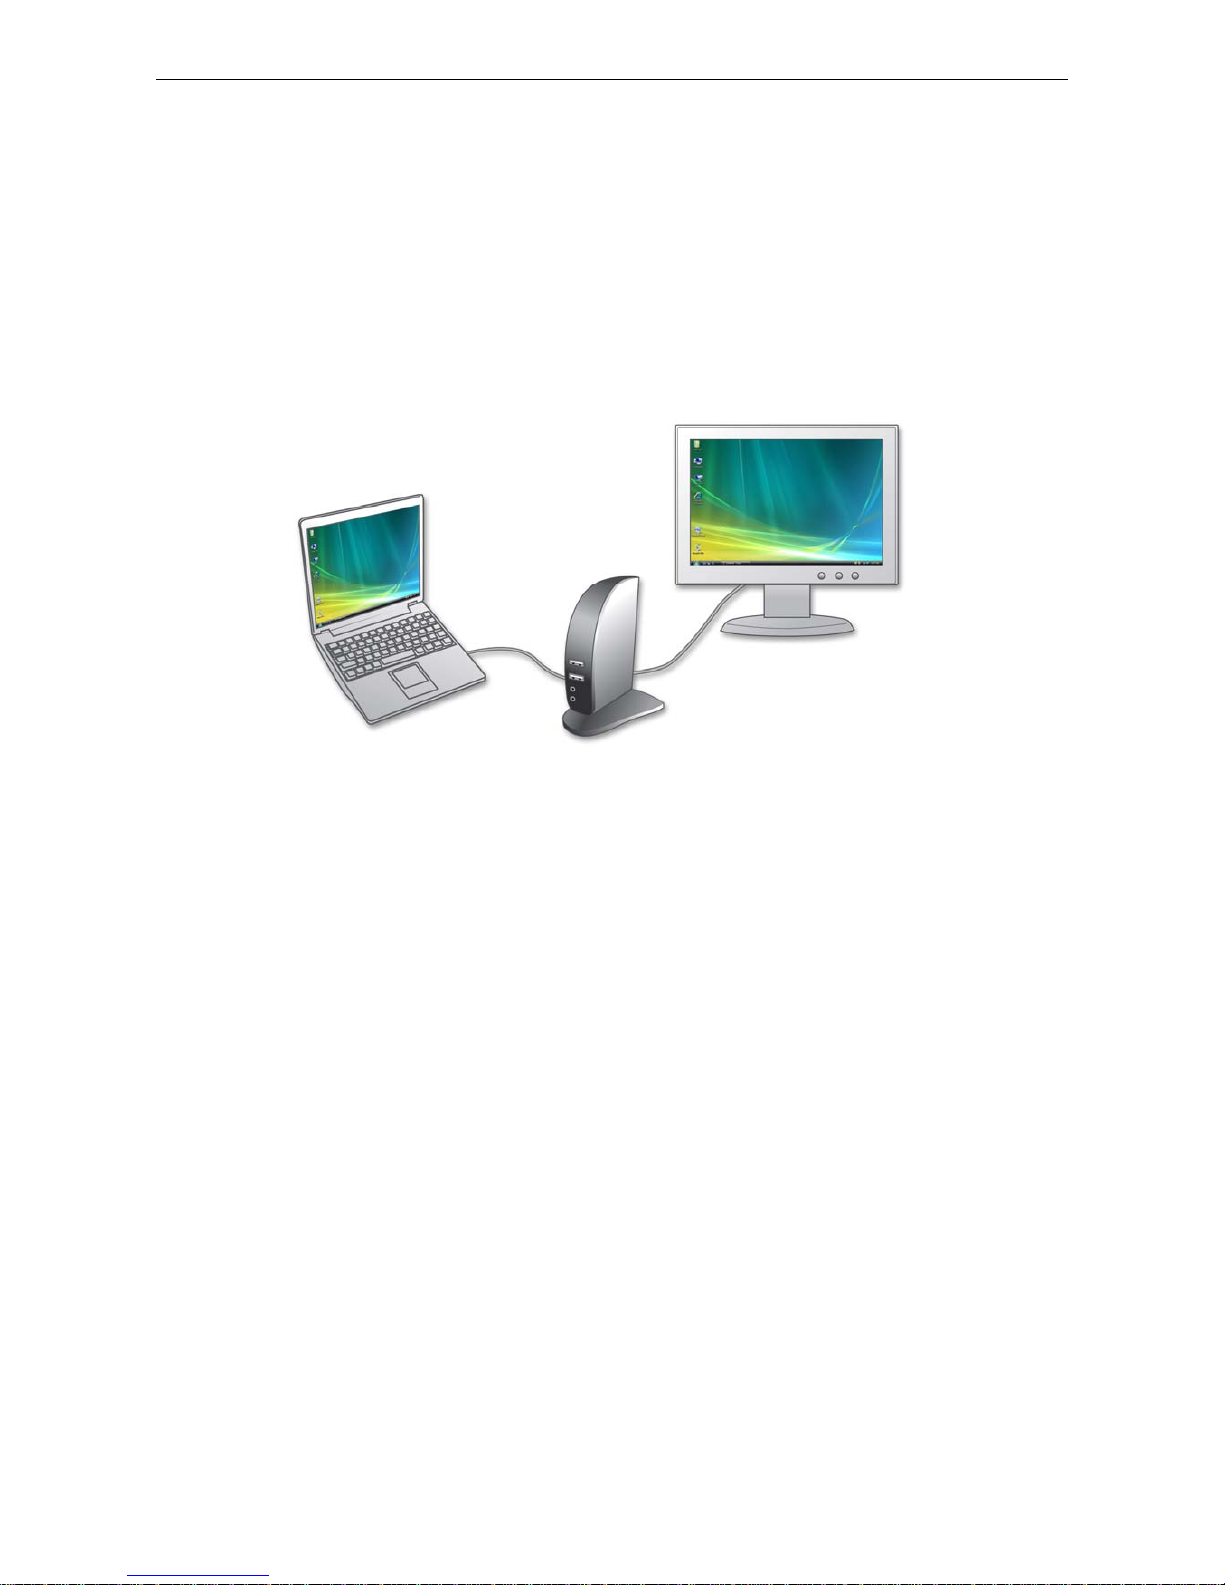
There are several ways you can utilize the monitor attached on the docking station.
The add-on monitor can be configured to use either “mirror mode”, “extended
mode” or be the primary display as described in this section.
Extend Your Windows Desktop to Add-on Monitor (Default)
In this so-called “extended mode”, your display will be spread over the add-on
monitor(s). This mode allows you to perform multiple tasks more effectively without
overlapping windows.
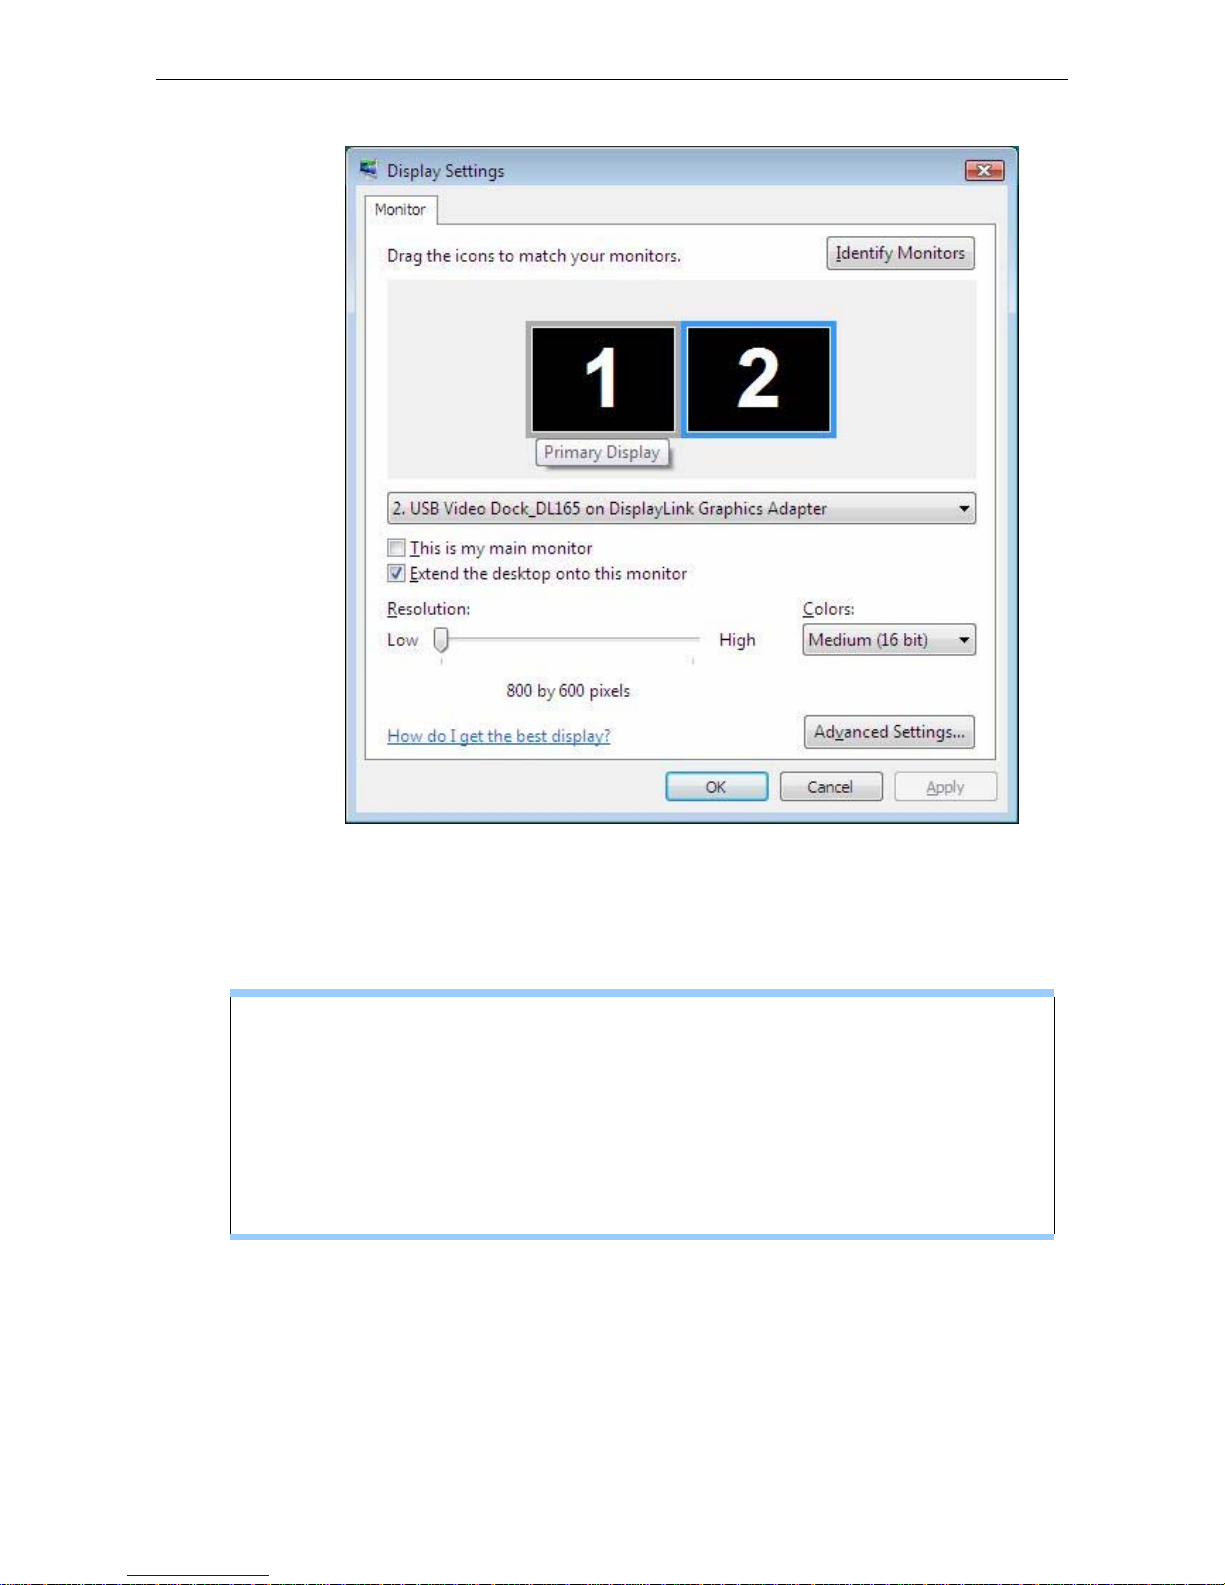
Extended mode is the default setting. To set up the video component to use or
restore extended mode, follow these steps:
1. Position the mouse anywhere on your computer desktop, right-click and select
Screen Resolution on Windows® 7, Personalize > Display Settings on
Windows Vista
®
or Properties > Settings on Windows
®
XP/ Windows® 2000.
2. In the Display drop-down menu, select the option with the string “DisplayLink
Graphics Adapter”.
3. Check the Multiple Displays> Extend these displays on Windows
®
7,
Extend the desktop onto this monitor box on Windows® Vista or Extend my
Windows desktop onto this monitor box on Windows
®
XP/ Windows® 2000.
4. Drag the icons in the window at the top of the screen to match the physical
arrangement of your primary monitor and add-on monitor.
The add-on monitor connected to the docking station may be identified as
either "2" or “3”, depending on your computer, although there may not be a total
of 3 screens connected.
Page 21
Docking Station with Video User’s Manual
15
5. Click OK to close the settings screen.
Once the setting is done, to use your extended desktop, simply drag and
drop your open windows over to your second monitor. However, note
that some applications may not support display on the extended
desktop.
Cursor disappeared ?
If you’re in extneded mode but the add-on monitor is not connected, the desktop
still pans to the add-on monitor and it’s possible that your cursor has moved to
the extended desktop so that you cannot find it on the primary display. To solve
the problem in such a case, connect the add-on monitor to the docking station or
keep moving your mouse to try or unplug the docking station first to restore the
cursor.
Page 22
Docking Station with Video User’s Manual
16
Video and DVD Playback in Extened Mode
On Windows Vista® with extended mode, it’s suggested that you run video or DVD
playback programs on your primary monitor instead of the add-on monitor to
ensure the playback performance.
Mirror Your Windows Desktop
This mode is referred to as “mirror” or “clone” mode. In this mode, your original
screen (the primary display) will be mirrored to the add-on monitor.
In mirror mode, the video component will automatically select the settings (screen
resolution, color quality and refresh rate) for the add-on monitor. But you can
manually adjust the settings as required. However, the settings of the add-on
monitor are limited by that of the primary monitor. For example, even though your
add-on monitor supports a resolution of up to 1680x1050, you can only configure it
to use 1280x1024 due to the primary monitor only supports a resolution of up to
1280x1024.
If you change the video output to extended mode and then want to switch back to
mirror mode, follow these steps:
1. Position the mouse anywhere on your computer desktop, right-click and select
Screen Resolution on Windows® 7, Personalize > Display Settings on
Windows Vista
®
or Properties > Settings on Windows
®
XP/ Windows® 2000.
2. In the Display drop-down menu, select the option with the string “DisplayLink
Graphics Adapter”.
3. Check the Multiple Displays> Duplicate these displays on Windows
®
7,
uncheck the Extend the desktop onto this monitor on Windows Vista
®
or
Extend my Windows desktop onto this monitor on Windows
®
XP/
Windows® 2000.
4. Click OK to close the settings screen.
Page 23

Docking Station with Video User’s Manual
17
Be the Primary Monitor
To make the add-on monitor the primary display:
1. Position the mouse anywhere on your computer desktop, right-click and select
Screen Resolution on Windows® 7, Personalize > Display Settings on
Windows Vista
®
or Properties > Settings on Windows
®
XP/ Windows® 2000.
2. In the Display drop-down menu, select the option ends with DisplayLink
Graphics Adapter.
3. Check the This is my main monitor box on Windows Vista
®
/ Windows® 7 or
Use this device as the primary monitor box on Windows
®
XP/
Windows® 2000.
On some PCs and laptops it is necessary to disable the main display (i.e.
uncheck the Extend the desktop onto this monitor or Extend my Windows
desktop onto this monitor box for the main display) as part of the same
settings change.
4. Click OK to close the settings screen.
The add-on monitor stays primary if the PC enters hibernate or suspend mode
or is rebooted. If the add-on monitor is unplugged, the main display becomes
primary again.
Adjusting Resolution, Color Depth and Refresh Rate
There are three components that make up the screen mode:
Resolution: In common usage, this refers to the number of pixels displayed on
screen horizontally and vertically.
Color Depth: This defines the number of different colors that can be shown on the
screen at the same time.
Refresh rate: Measures the speed that the entire screen is rescanned. Higher
frequencies reduce flicker.
Some monitors advertise the supported modes through the video connector. If this
is the case, the video component identifies the supported modes from the monitor.
If the monitor does not advertise the supported modes, the video software chooses
a set of common screen modes for the monitor.
Page 24
Docking Station with Video User’s Manual
18
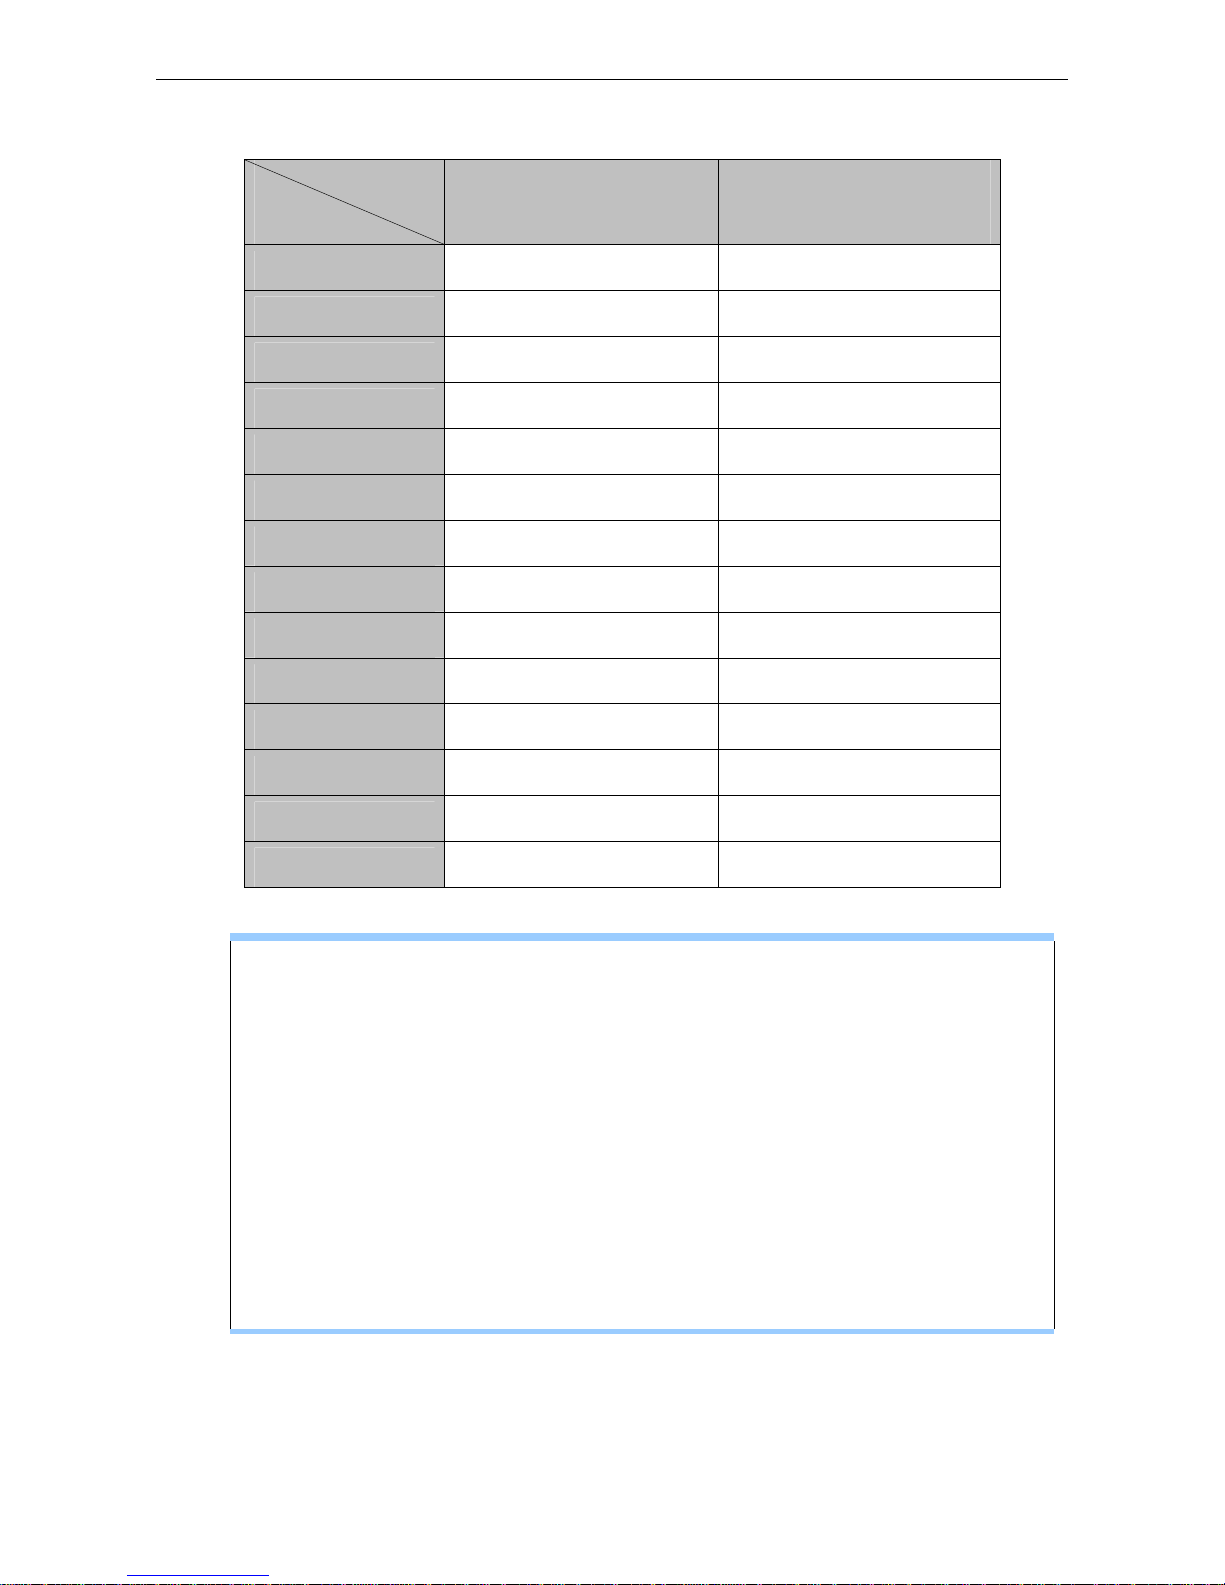
The software supports the modes listed below.
Color Depth
Resolution
Refresh rates available at
16 bit color quality
Refresh rates available at
32 bit color quality
640x480
60 72 75 85 60 72 75 85
800x600
56 60 72 75 85 56 60 72 75 85
1024x768
60 70 75 85 60 70 75 85
1280x960
60 85 60 85
1280x1024
60 75 60 75
1360x768
60 60
1366x768
50 60 50 60
1368x768
60 60
1400x1050
60 75 85 60 75 85
1440x900
60 60
1600x1200
60 60
1680x1050
60 60
1920x1080
60 50 60 50
1920x1200
60 60
About the resolutions and refresh rates available to users
The resolutions and refresh rates available to the user through Windows are a
comprise of the support from the following elements:
■ The video component of the docking station
■ The primary monitor and the add-on monitor
■ The primary video card on your computer and installed drivers
Therefore, for example, if your monitor doesn’t support a resolution of
1600x1200, then 1600x1200 is not possible though your dokcing station’s video
component supports 1600x1200. This ensures that the monitor cannot be put
into an unsupported mode, which might damage it.
If cloning the primary display, the video component will try to use the preferred
monitor mode. In some cases, this may not be the most appropriate mode for the
Page 25

Docking Station with Video User’s Manual
19
cloned desktop. It is recommended that the primary display resolution be changed
to closer match the default resolution of the add-on monitor.
To configure the three components (resolution, color depth and refresh rate) of a
screen mode, follow these steps:
1. Position the mouse anywhere on your computer desktop, right-click and select
Screen Resolution on Windows® 7, Personalize > Display Settings on
Windows Vista
®
or Properties > Settings on Windows
®
XP/ Windows® 2000.
2. In the Display drop-down menu, select the option ends with DisplayLink
Graphics Adapter.
3. To change the screen resolution or color quality, select those options on the
screen. Be sure to select one of the supported resolutions and color quality
numbers in the table above. For an add-on monitor, you can also select any
resolution or color quality supported by that monitor.
4. To change the refresh rate, click Advanced… and then click Monitor.
5. Select a refresh rate from the Screen refresh rate drop-down list and then click
Apply.
6. Click OK to close the settings screen.
Disconnecting the Docking Station
If the docking station is unplugged from the computer, the add-on monitor goes
blank. All windows and icons move to the primary screen.
On reconnection of the docking station, the docking station returns to the same
mode as it was before disconnection. However, windows and icons that were
previously on the screen will not be moved back.
Page 26

Docking Station with Video User’s Manual
20
How Standby or Hibernate Mode Affects Devices
Attached to the Docking Station
External Monitors
When the docking station is connected to a computer and an external monitor, if the
computer goes into standby or hibernate mode, the external monitor display goes
blank.
When the computer returns to an active state, the external monitor display keeps
the same settings it had before the computer went into standby or hibernate mode.
However, if the add-on monitor was set for extended mode, windows that were
previously on the external monitor will not move back to that secondary monitor.
Also, if the add-on monitor is in extended mode and the computer requires a login
after standby or hibernate mode, the login screen appears on the primary computer
monitor, not the external monitor.
If the computer is shut down, restarted and logged in, again the add-on monitor
returns to the same mode as it was before shutdown.
Other Devices
If another device is connected to a port on the docking station and the computer
goes into standby or hibernate mode, that device will not function. For example, if
you are using the Ethernet port for high-speed network access, network access will
not be available until the computer returns to an active state.
Page 27
Docking Station with Video User’s Manual
21
4. Uninstalling the Drivers
Uninstalling the Driver
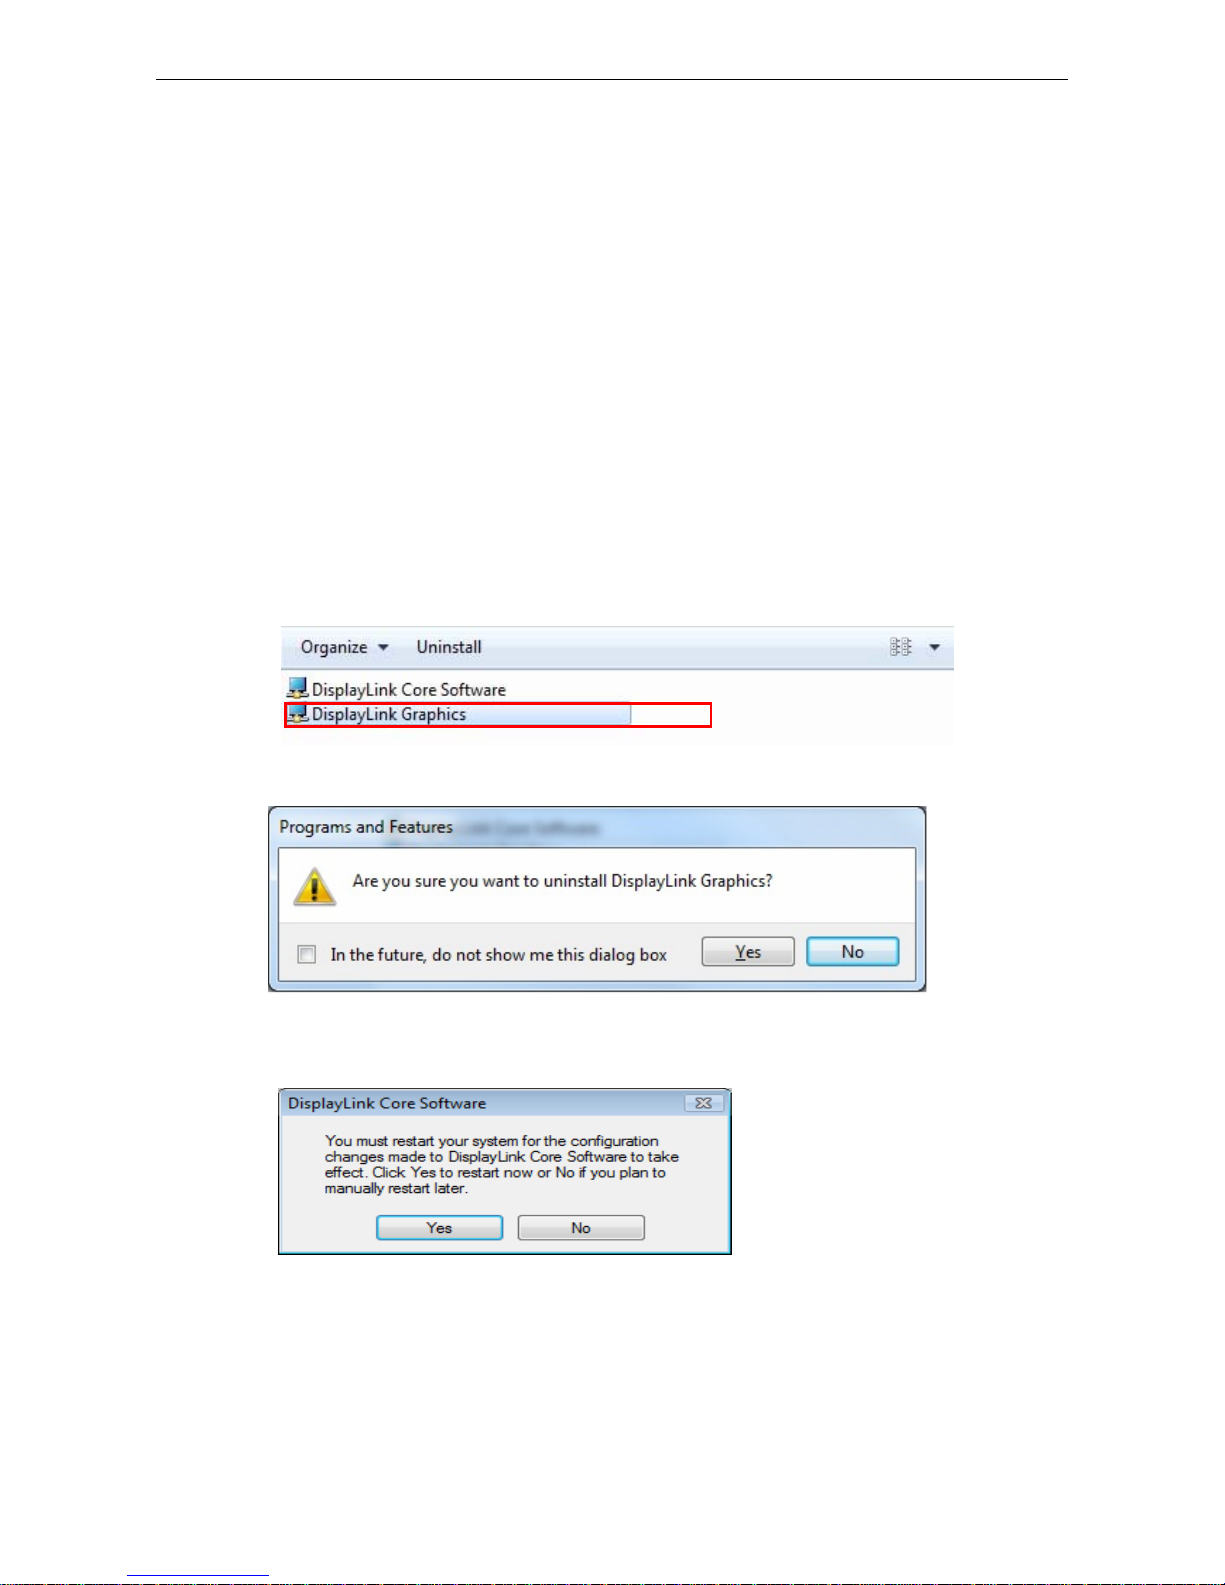
Please take these steps to uninstall Drive:
1. Open the Control Panel and double-click Uninstall a Program on Windows
®
7, Programs and Features on Windows Vista® or Add or Remove Programs
on Windows® 2000/ Windows® XP.
2. Select DisplayLink Graphics…and click Uninstall or Remote
3. Click Yes to confirm the removal.
4. Click Yes to restart your computer. You can also disconnect the video
connection now.
Page 28

Docking Station with Video User’s Manual
22
5. Specifications
General
Host Interface
USB 2.0
Operating System
Support
Windows® 2000 SP4, Windows® XP SP2,
Windows Vista® (32/ 64 bit) and Windows® 7 (32/64 bit).
Ports and Connectors
Upstream
1 x Upstream USB 2.0 Port (Type B female Connector)
USB Hub Downstream
4 x Downstream USB 2.0 Port (Type A female connector)
Ethernet
1 x Ethernet Port (10/100 Base-T Ethernet RJ-45 connector)
Video
1 x DVI-I Port (24pin + 5pin Female Connector)
Audio
1 x microphone (3.5 mm stereo audio in)
1 x headphones/speaker (3.5 mm stereo audio out)
Security Lock Slot
Industry-standard Kensington® security slot
LED
Power LED (Blue)
On: Power is supplied to the docking station.
Off: No power is supplied to the docking station.
USB Hub LED (Green)
On: Any of the four USB downstream ports is connected to a
USB device.
Off: No USB device is connected.
Power
Power Adapter
Input: AC 100-240V, 50~60 Hz
Output: DC 5V / 2.5A
Power Mode
Self-powered
Ethernet Component
Page 29
Docking Station with Video User’s Manual
23
Network Standards
IEEE 802.3: 10Base-T
IEEE 802.3u: 100Base-T
Data Transfer Rates
Ethernet: 10Mbps/20Mbps (Half/Full Duplex)
Fast Ethernet: 100Mbps/200Mbps (Half/Full Duplex)
RAM
Embedded 16KB SRAM for RX packet buffering and 8KB
SRAM for TX packet buffering
Video Component
Supported Modes
Extended Desktop (Default), Mirrored Desktop, Primary
Display
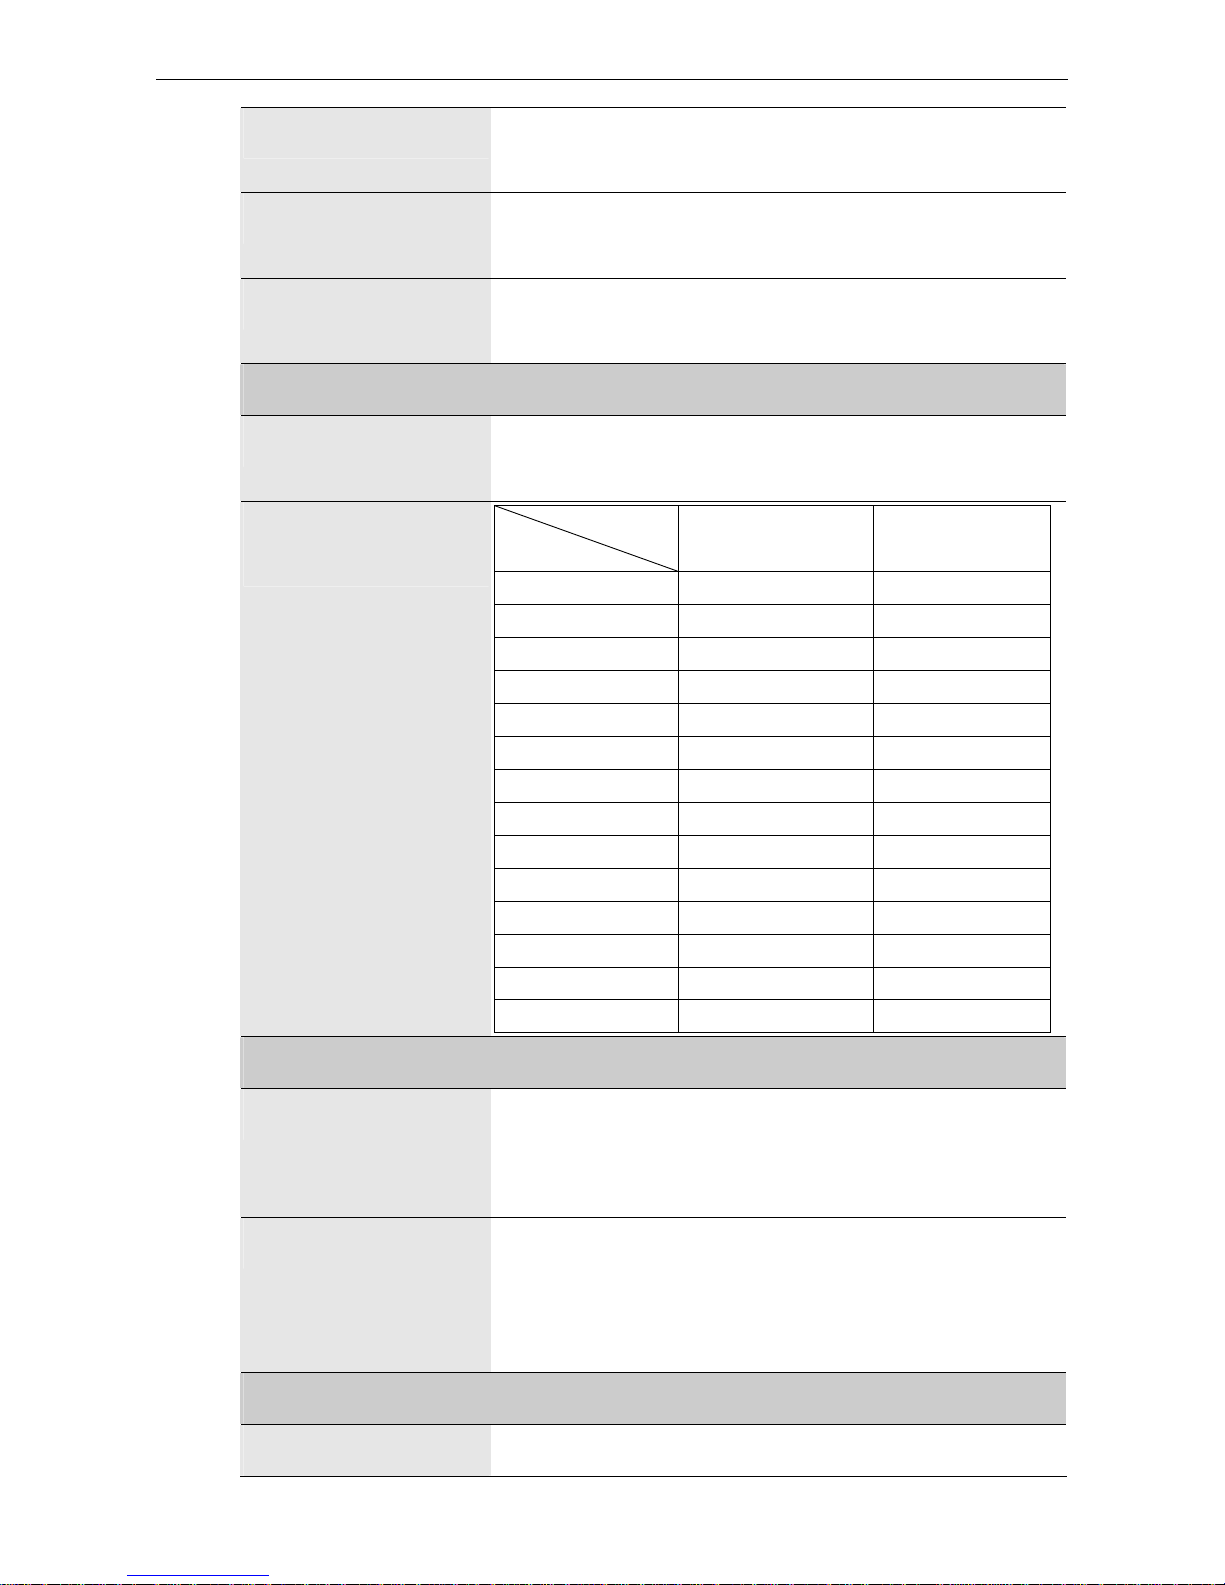
Resolutions, Refresh
Rate and Color Depth
Color Depth
Resolution
Refresh rates at 16
bit color quality
Refresh rates at 32
bit color quality
640x480
60 72 75 85 60 72 75 85
800x600
56 60 72 75 85 56 60 72 75 85
1024x768
60 70 75 85 60 70 75 85
1280x960
60 85 60 85
1280x1024
60 75 60 75
1360x768
60 60
1366x768
50 60 50 60
1368x768
60 60
1400x1050
60 75 85 60 75 85
1440x900
60 60
1600x1200
60 60
1680x1050
60 60
1920x1080
50 60 50 60
1920x1200
60 60
Audio Component
Output
z 2 CH DAC output
z DAC sampling rate from 8KHz, 16KHz, 44.1KHz to 48KHz
with 16-bit resolution
z Earphone buffer driving for output
Input
z 2 CH ADC Input
z
A
DC sampling rate from 8KHz, 16KHz, 44.1KHz to 48KHz
with 16-bit resolution
z Digital Linear Microphone Gain Control function
(-6db~33db)
Physical Specifications
Housing Material
ABS (Plastic)
Page 30
Docking Station with Video User’s Manual
24
Dimensions
Main body without base: 36.5 (W) x 92 (D) x 154 (H) mm
Main body with base: 86 (W) x 110 (D) x 162 (H) mm
Weight
Approximately 285g (including base)
Environmental Specifications
Operating Temperature
10-40°C
Storage Temperature
-10~80°C
Relative Humidity
< 85% non-condensing
Regulatory Compliances
Safety, EMI
FCC, CE
RoHS
RoHS compliant
* Specification is subject to change without further notice
Page 31

Docking Station with Video User’s Manual
25
6. Regulatory Compliance
FCC Conditions
This equipment has been tested and found to comply with Part 15 of the FCC
Rules. Operation is subject to the following two conditions:
(1) This device may not cause harmful interference
(2) This device must accept any interference received. Including interference that
may cause undesired operation.
CE
This equipment is in compliance with the requirements of the following regulations:
EN 55 022: CLASS B
WEEE Information
For EU (European Union) member users:
According to the WEEE (Waste electrical and electronic equipment) Directive, do not
dispose of this product as household waste or commercial waste.
Waste electrical and
electronic equipment should be appropriately collected and recycled as required by
practices established for your country. For information on recycling of this product,
please contact your local
authorities, your household waste disposal service or the shop
where you purchased the product.
Page 32

Docking Station with Video User’s Manual
26
 Loading...