

BOOKLET MAKER SR90
Operating instruction
Stapler folder reference
Read this manual carefully before you use this product and keep it handy for future
reference.
For safety, please follow the instructions in this manual.

Page intentionally blank

TABLE OF CONTENTS
What You Can Do with This Machine ............................................................................... 5
Guide To Components ...................................................................................................... 7
Booklet Maker ............................................................................................................................... 7
Options ............................................................................................................................. 10
Trimmer ...................................................................................................................................... 10
Cover Feeder .............................................................................................................................. 12
Control Panel ...................................................................................................................13
1. Basics ............................................................................................... 15
Docking / Undocking ...................................................................................................... 15
Docking the Booklet Maker ......................................................................................................... 15
Undocking the Booklet Maker...................................................................................................... 16
Turning On / Off the Main Power .................................................................................... 17
Booklet Maker and Trimmer........................................................................................................ 17
Staple cartridge and stapler head .................................................................................. 18
Removing staple cartridge .......................................................................................................... 18
Installing staple cartridge ............................................................................................................ 18
Removing stapler head ............................................................................................................... 19
Installing stapler head / clearing staple jam ................................................................................ 19
Emptying the trim bin ...................................................................................................... 20
2. Making Booklets .............................................................................. 21
Changing settings ........................................................................................................... 21
General procedure ...................................................................................................................... 21
Setting Paper Size ...................................................................................................................... 21
Selecting standard paper sizes ............................................................................. 21
Custom paper size .................................................................................................. 22
Fine adjustments of selected paper size .............................................................. 22
Stapling ....................................................................................................................................... 23
Selecting stapling On or Off ................................................................................... 23
Trimming..................................................................................................................................... 24
Selecting trimming On or Off .................................................................................. 24
Adjusting the cutting margin.................................................................................. 24
Covers ........................................................................................................................................ 25
Selecting Cover Feeder On or Off .......................................................................... 25
Loading covers ....................................................................................................... 25
On-line/Off-line ................................................................................................................. 26
Off-line mode .............................................................................................................................. 26
On-line mode .............................................................................................................................. 26
Begin On-line Production ............................................................................................... 27
3. Tools ................................................................................................. 29
The Tools Screen ............................................................................................................ 29
Units ........................................................................................................................................... 29
Software version ......................................................................................................................... 29
Language .................................................................................................................................... 30
Air Separation Fan ...................................................................................................................... 31
Double Sheet Detection .............................................................................................................. 31
Service access ........................................................................................................................... 32
3

4. Jobs .................................................................................................. 33
Storing and deleting jobs ............................................................................................... 33
Storing a new Job ....................................................................................................................... 33
Recalling a Job ........................................................................................................................... 34
5. Clearing Misfeed(s) ......................................................................... 35
Booklet Maker .................................................................................................................. 35
Clearing misfeed(s) .................................................................................................................... 35
Inside the Booklet Maker ........................................................................................ 35
Trimmer ............................................................................................................................ 36
Clearing misfeed(s) .................................................................................................................... 36
Clearing misfeed in input area ............................................................................... 36
Clearing misfeed in exit area .................................................................................. 37
Cover Feeder ................................................................................................................... 38
Clearing misfeed(s) in vertical transport area ............................................................................. 38
6. Troubleshooting .............................................................................. 39
Fault codes ...................................................................................................................... 39
General fault codes..................................................................................................................... 39
Misfeed..................................................................................................................... 39
Booklet maker fault codes .......................................................................................................... 40
Check staples.......................................................................................................... 40
Trimmer fault codes.................................................................................................................... 40
Trim bin full .............................................................................................................. 40
Cover feeder fault codes ............................................................................................................ 40
Misfeed..................................................................................................................... 40
Double feed ............................................................................................................. 40
Load covers ............................................................................................................ 40
7. REMARKS ........................................................................................ 41
Do’s And Don’ts ............................................................................................................... 41
Where to put Your Machine............................................................................................ 42
Machine environment .................................................................................................................. 42
Power connection ....................................................................................................................... 42
Access to machine ..................................................................................................................... 43
Maintaining Your Machines............................................................................................. 44
Cover Feeder .............................................................................................................................. 44
Cleaning feed rollers and paper separator pad .................................................... 44
8. Specification .................................................................................... 45
Machine Specifications ................................................................................................... 45
Booklet Maker SR90 ................................................................................................................... 45
Trimmer TR90 (option) ............................................................................................................... 46
Cover Feeder CF90 (option) ....................................................................................................... 46
INDEX.................................................................................................... 47
4

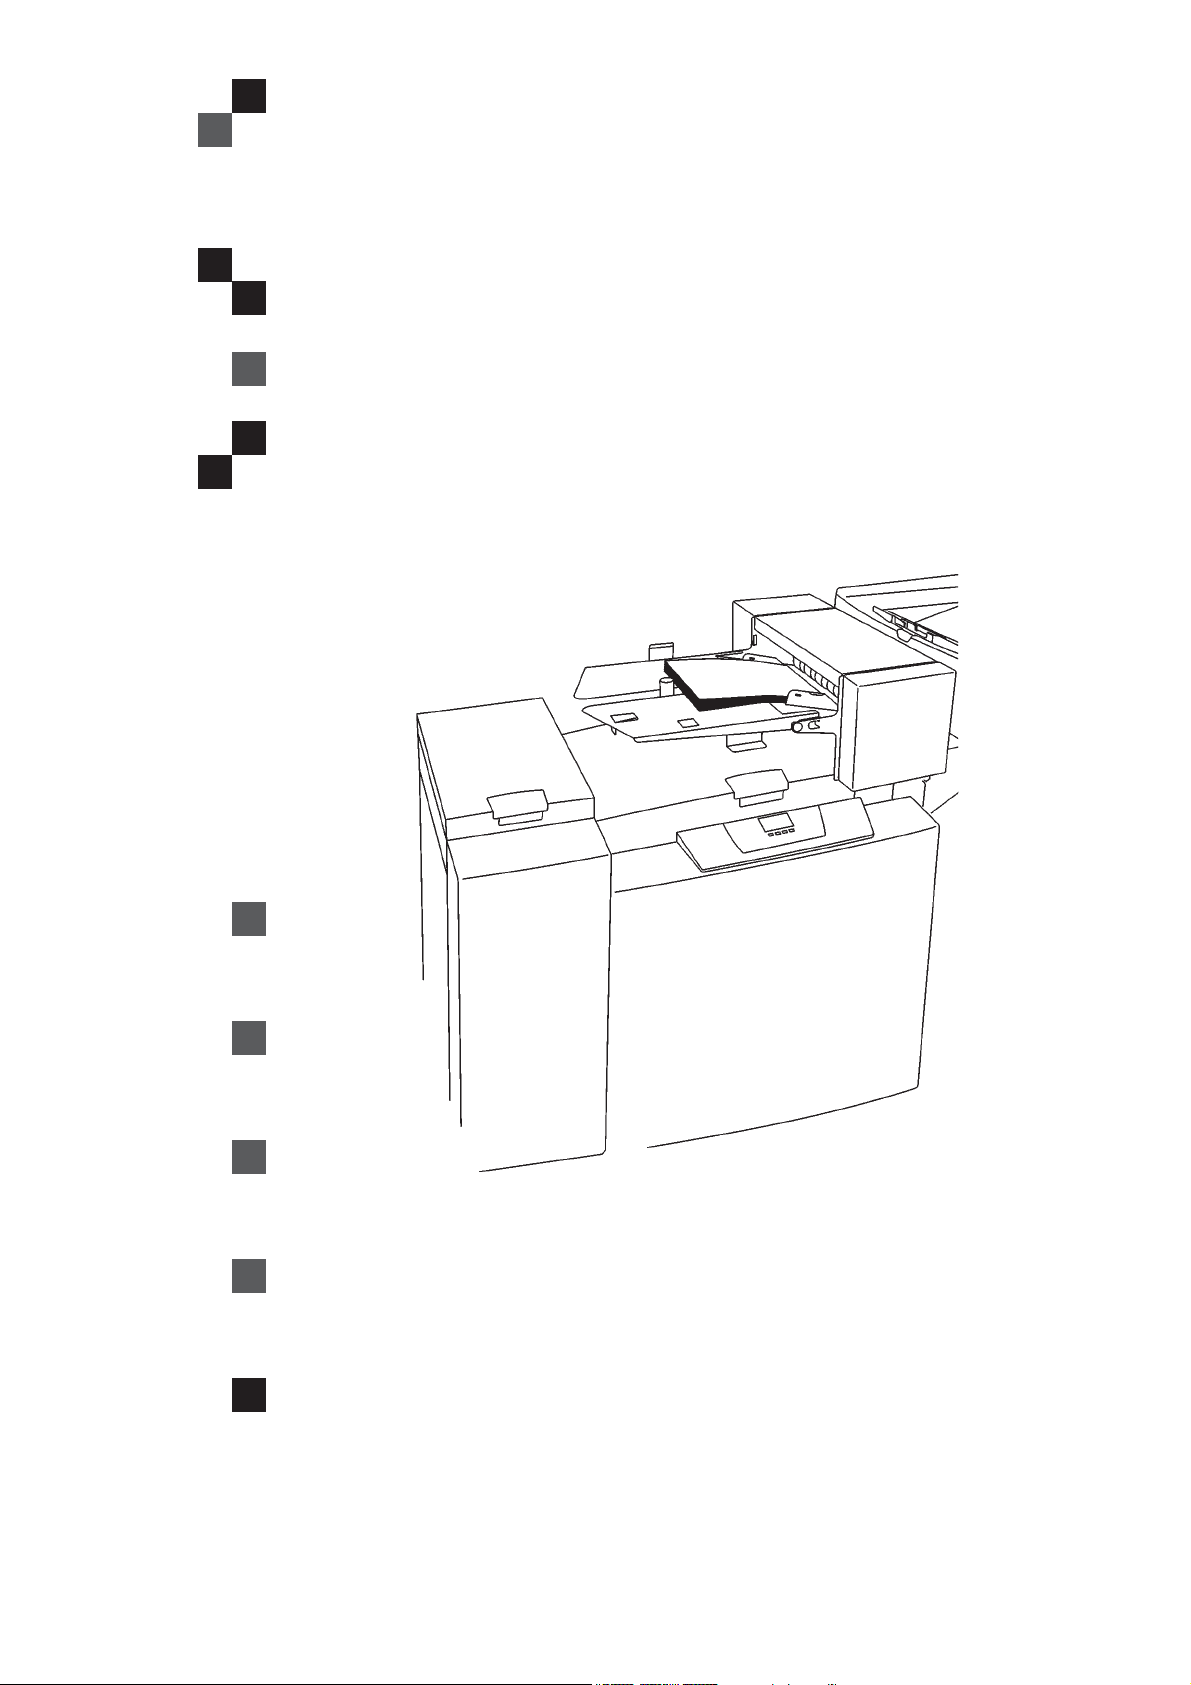
What You Can Do with This Machine
CF90 Cover Feeder
(option)
TR90 Trimmer
(option)
SR90 Booklet Maker
Rail (option)
The Booklet Maker SR90, Trimmer TR90 and Cover Feeder CF90 forms a booklet making
system that works online with the Bellini C2a/b, Martini and Bellini C1a/b.
The print-outs from the Bellini C2a/b are collected in the finisher and then transported into
the SR90 Booklet Maker to the staple area. From the CF90 Cover Feeder (optional), if
present, any type of covers, colored or black and whites, can be added to the printed set. The
Booklet Maker now jogs and then staples the set. The set is then transported further to the
folding area where the set is folded to a booklet and then fed onto the belt stacker. When a
larger number of sheets are folded an effect called creeping occurs. In order to rectify creep,
the TR90 Trimmer (optional) can be attached after the Booklet Maker. The booklets are then
transported from the Booklet Maker into the Trimmer where the trail edge will be cut off. The
booklets are then fed onto the Belt Stacker.
To facilitate undocking, a Rail (optional) can be installed under the Booklet Maker. Undocked,
or off-line, the Booklet Maker can be used as a stand-alone unit for hand feeding.
5

The booklet making system is controlled from a single control panel on the Booklet Maker.
The control panel has only four buttons which will allow you to easely set up, adjust and
operate the complete system.
The Ready screen.
When the system power is switched on the Ready
screen will be shown. Here you will find information
showing the actual set up. From this screen you can
also access other screens, that will help you operate
the complete booklet making system.
arrow button
change button
tools button
jobs button
Changing settings.
To change or adjust settings; Select an item in the
Ready screen with the [arrow] button and press the
[Change] button. For example you can change the
paper size, fine adjust the trimming or turn off the
cover feeder. Explore all settings more thoroughly in
section 2. Making Booklets.
The Tools screen.
Pressing the [Tools] button in the Ready screen takes
you to the tools screen. Here you will find all the
necessary tools for a troublefree operation. From
here you can change the display language, set units
from millimeters to inches and more. See section 3.
Tools. for how to get around in the Tools screen.
The Jobs screen.
Pressing the [Jobs] button in the Ready screen opens
the Jobs screen. From here you can load, customize
and save job settings. These procedures are
described in section 4. Jobs.
6

The Processing screen.
This screen is shown when the machine is busy working.
If the machine is used in off-line mode you do not have
to wait for the Ready screen before handfeeding the
next set.
The Please wait screen.
While the machine sometimes needs time to perform
changes in settings, the Please wait screen will be
shown. The machine will automatically return to the
Ready screen after changes has been implemented.
7
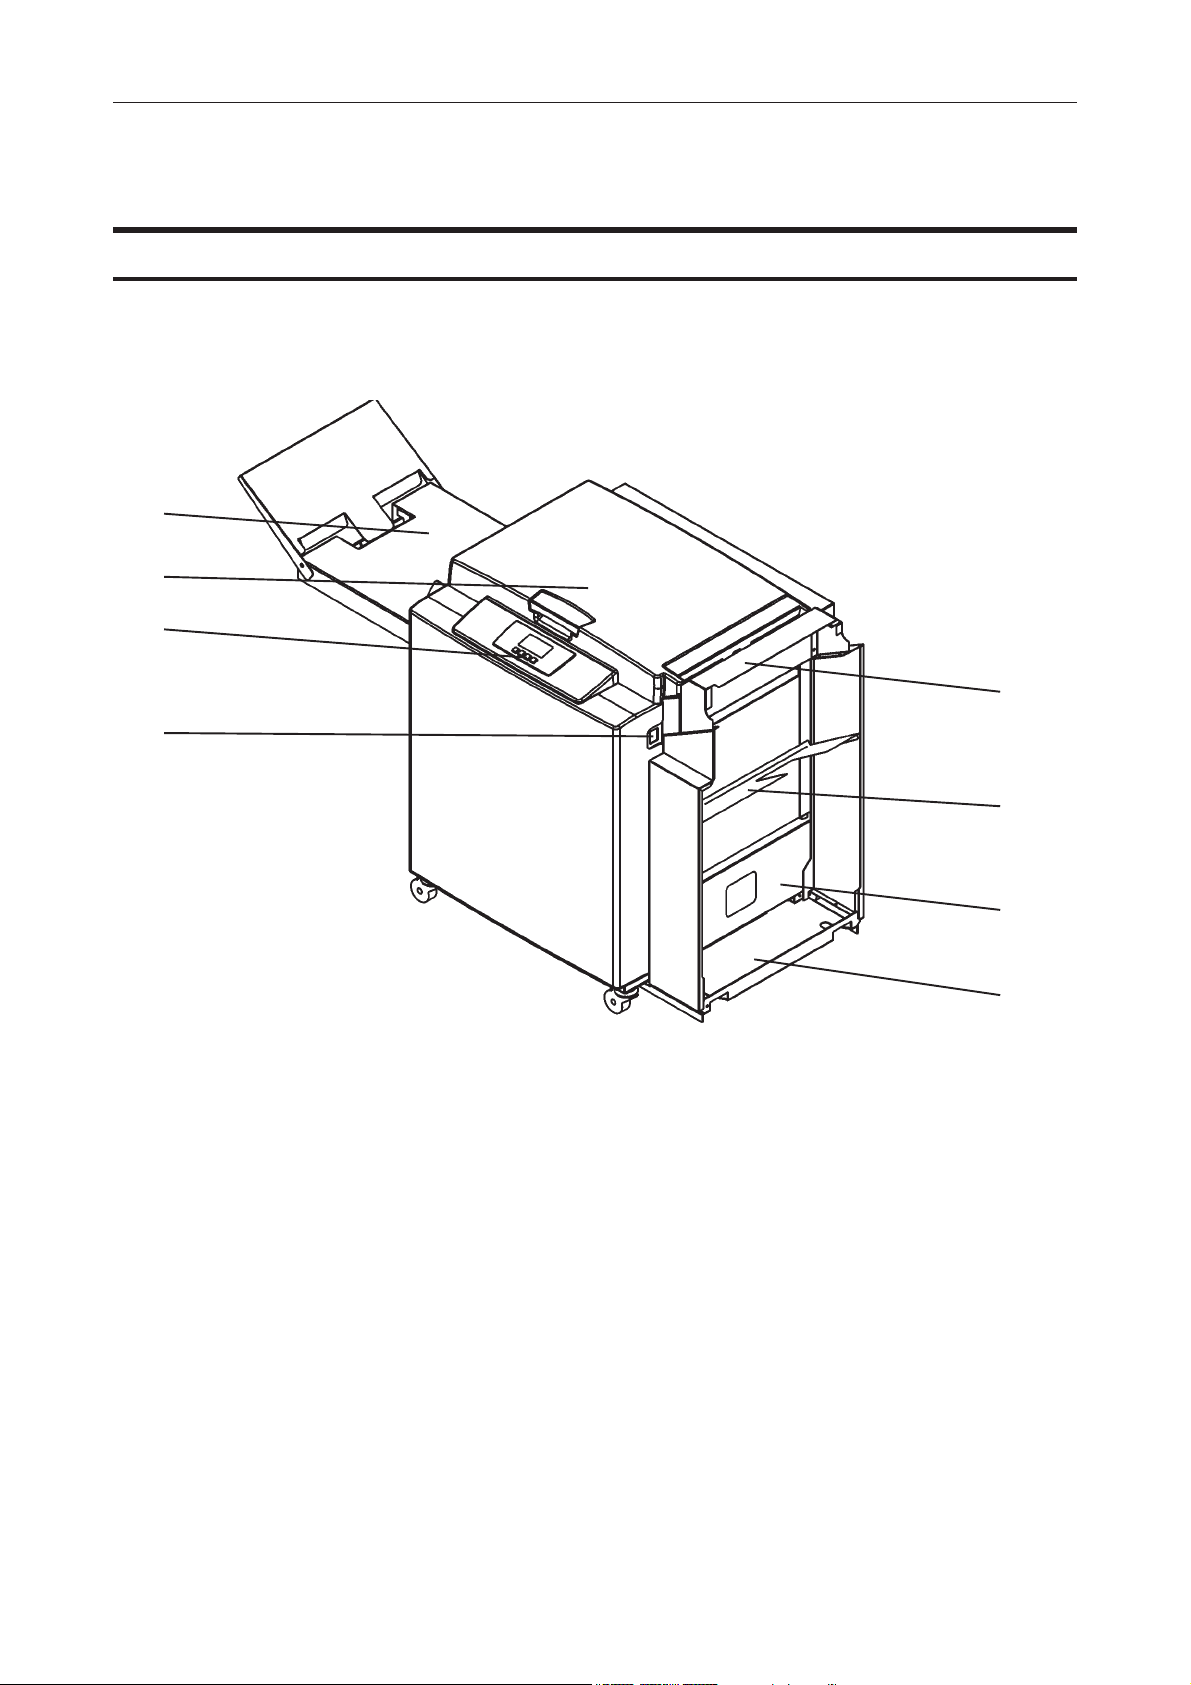
Guide To Components
Booklet Maker
1
2
3
5
4
1 Belt stacker
2 Top cover
3 Control panel
4 Infeed assembly
6
7
8
5 Main power switch
6 Shift tray storing shelf
7 Base
8 Docking assembly
8

Booklet Maker, continues
8
9
8 Connections
9 Fold stop gate
Main Power
Stacker
POW CF90 POW TR90
COM TR90COM CF90
COM Copier
9

Booklet Maker, continues
1
6
2
3
4
5
1 Stapler head (2x)
2 Staple cartridge (2x)
3 Cartridge locking lever
4 Stapler release latch
5 Staple detection lead
6 Hand feeding paper guides
10

Options
Trimmer
1
2
3
4
1 Top cover
2 Connections
3 Trim bin
4 Base
Stacker
POW TR90
TerminatorCOM TR90
11

Trimmer, continues
The Trimmer interior has parts that you will come in contact with if a misfeed occur.
1234
5
12
67 89 10
1 Exit compressing brackets
2 Outfeed latch
3 Transport belt
4 Trimmer stop
5 Set counter
6 Infeed latch
7 Upper knife
8 Upper knife beam
9 Outfeed paper path
10 Infeed roller shaft

Cover Feeder
1
2
3
4
5
6
1 Rear side guide
2 Paper separator pad
3 Bin extension plate
4 Adjustable air nozzle
5 Paper orientation label
7
8
9
6 Length adjustment handle
7 Feed roller assembly
8 Loading capacity mark
9 Adjustable side guide and
Loading handle
1110 14 15
12 13
10 Terminator
11 COM CF90
12 Bin extension plate connector
13 POW CF90
14 Upper paper path
15 Jam clearance baffle
13

Control Panel
Button: 1 2 3 4
The booklet making system is operated from a single
control panel on the Booklet Maker. All settings are
done using the four buttons below the LCD display
panel. These buttons are multi functional, meaning that
the function of each button depends on the information
displayed. For example: Pressing button 3 from the
Ready screen takes you to the Tools screen.
Example 2: In this screen, button 3 has no function.
Button: 1 2 3 4
Button: 1 2 3 4
Example 3: Pressing button 3 here will load the stored
Job (4).
Example 4: In this screen pressing button 3 will save
the current settings for job No 1. The asterisk on the
first row shows that the settings for Job (1) has been
changed, but not yet saved.
14

1. Basics
Docking / Undocking
Docking the Booklet Maker
Turn the Copier off.
Make sure the Booklet Maker is turned off.
Lift up the exit arm catcher and set the exit paper
arm in the upper position.
Turn the Copier on, the shift tray will now go down
to the lower position.
Remove the shift tray from the Finisher and put it on
the shelf on the Booklet Maker
Turn the Copier off.
Move the Booklet Maker up to the copier and dock it.
First turn the Booklet Maker on then turn the Copier
on.
Note
It is important to turn the machines on in the right
order.
The Copier is now in booklet maker mode and a staple
icon is now present in the Copier display panel.
15

Basics
Undocking the Booklet Maker
First turn the Booklet Maker off, then turn the
Copier off.
1
Push in the latch on the docking assembly.
Move the Booklet Maker away from the Copier.
Note
Be careful not to damage the communication cable
Lift up the exit arm catcher and move the exit paper
arm to the lower position.
Take the shift tray from the shelf on the Booklet
Maker, and install it on the Finisher .
Turn the Copier on, the shift tray will now go up to
the upper position.
The Copier is now in standard Copier mode.
16

Turning On / Off the Main Power
Turning On / Off the Main Power
Booklet Maker and Trimmer
Plug the Booklet Maker into the wall outlet.
Set ON/OFF switch (1) on Booklet Maker to ON
position.
1
1
The main power switch also controls the Trimmer
(optional) and the Cover Feeder (optional) since they
are powered from the Booklet Maker.
17

1
Basics
Staple cartridge and stapler head
Removing staple cartridge
The staple cartridges, containing approximately 5000
staples per cartridge, can be replaced without
removing the stapler head. Cartridge may be removed
either for renewal or for jam clearance.
Open the booklet maker top cover.
Remove the set of paper.
A
Installing staple cartridge
Raise the handle (A) on the staple cartridge locking
lever.
Remove the staple cartridge from the stapler head
by sliding it away from the stapler head.
Renewing or reinstalling the staple cartridge, pull
25 mm (1 inch) of staples out of the cartridge and
tear the staples downward starting at one side
pulling away from you. The staple tear line is indicated by an arrow on the side of the cartridge.
Insert the cartridge into the stapler head with the
end of the staples facing toward the head of the
stapler mechanism. Push it firmly ahead.
18
Hold the staple cartridge firmly in place and push
down the cartridge locking lever.
Note
Keep holding (pushing) the staple cartridge in place
while pushing down the cartridge locking lever.
Close the top cover. Hand feed a four sheet set of
paper. The booklet maker will automatically cycle
and advance staples until both stapler heads are
driving staples. If not and/or error message persists, remove and reinstall stapler head according
to procedure (see next page).

Staple Cartrigde and Stapler Head
Removing stapler head
Open the top cover.
Disconnect the staple indication lead (A) from the
socket.
Hold the stapler head in place, press the release
latch (B) to release the rear end of the stapler head
and lift up this end.
Lift out the head, allowing it to rotate around the
front end. The stapler assembly is spring loaded
and will follow the rotation of the stapler.
AB
Installing stapler head / clearing staple jam
Remove stapler cartridge. Look inside stapler
head to locate jammed staples by eject point.
Remove staples if any.
Position the stapler head on the edge of a firm
surface (for example the top of a table).
1
While securely holding the head, actuate the Stapler
up and down through full travel. Perform this operation first without staple cartridge then with staple
cartridge. Repeat this a few times to ensure that the
staples are ejected at each down movement.
Reinstall the stapler head by inserting the pin at the
top of the stapler head into the stapler retraction
swing arm (C).
While rotating the stapler head, insert the pin
located at the rear end of the stapler head into the
slots in the frame of the stapler head assembly.
Press down the rear end of the stapler head until
the release lever snaps into place, locking the
stapler head in position.
Press down the front end of the stapler head until it
snaps in position under the frame assembly.
C
Reconnect the staple indication lead (A).
Close the top cover. Hand feed a two sheet set.
The booklet maker will automatically cycle and
advance staples until both stapler heads are driving
staples. If not and/or error message persists,
repeat procedure.
19

1
Basics
Emptying the trim bin
Remove the trim bin by lifting it and pulling it out.
20
trim bin
2. Making Booklets
Changing settings
General procedure
Changing of settings can be performed in two ways. Temporary, which means that the
changes will remain until a new job is loaded or permanent, which means that the changes
will be stored as a job. This job can later be recalled.
Procedure for temporary changes:
From the Ready Screen, select the option you wish to change and press the [Change] button.
Confirm changes by pressing the [OK] button.
Procedure for permanent changes:
From the Ready Screen, press the [Jobs] button to reach the Jobs screen. Select the Job you
want to change by pressing the [Next] button and then press the [Change] button. Select the
option you wish to change and press the [Change] button. After confirming your changes by
pressing the [OK ]button you can press the [Save] button to store your job settings.
Note
Choose either of the above mentioned procedures when changing size, stapling, trimming or
covers as follows.
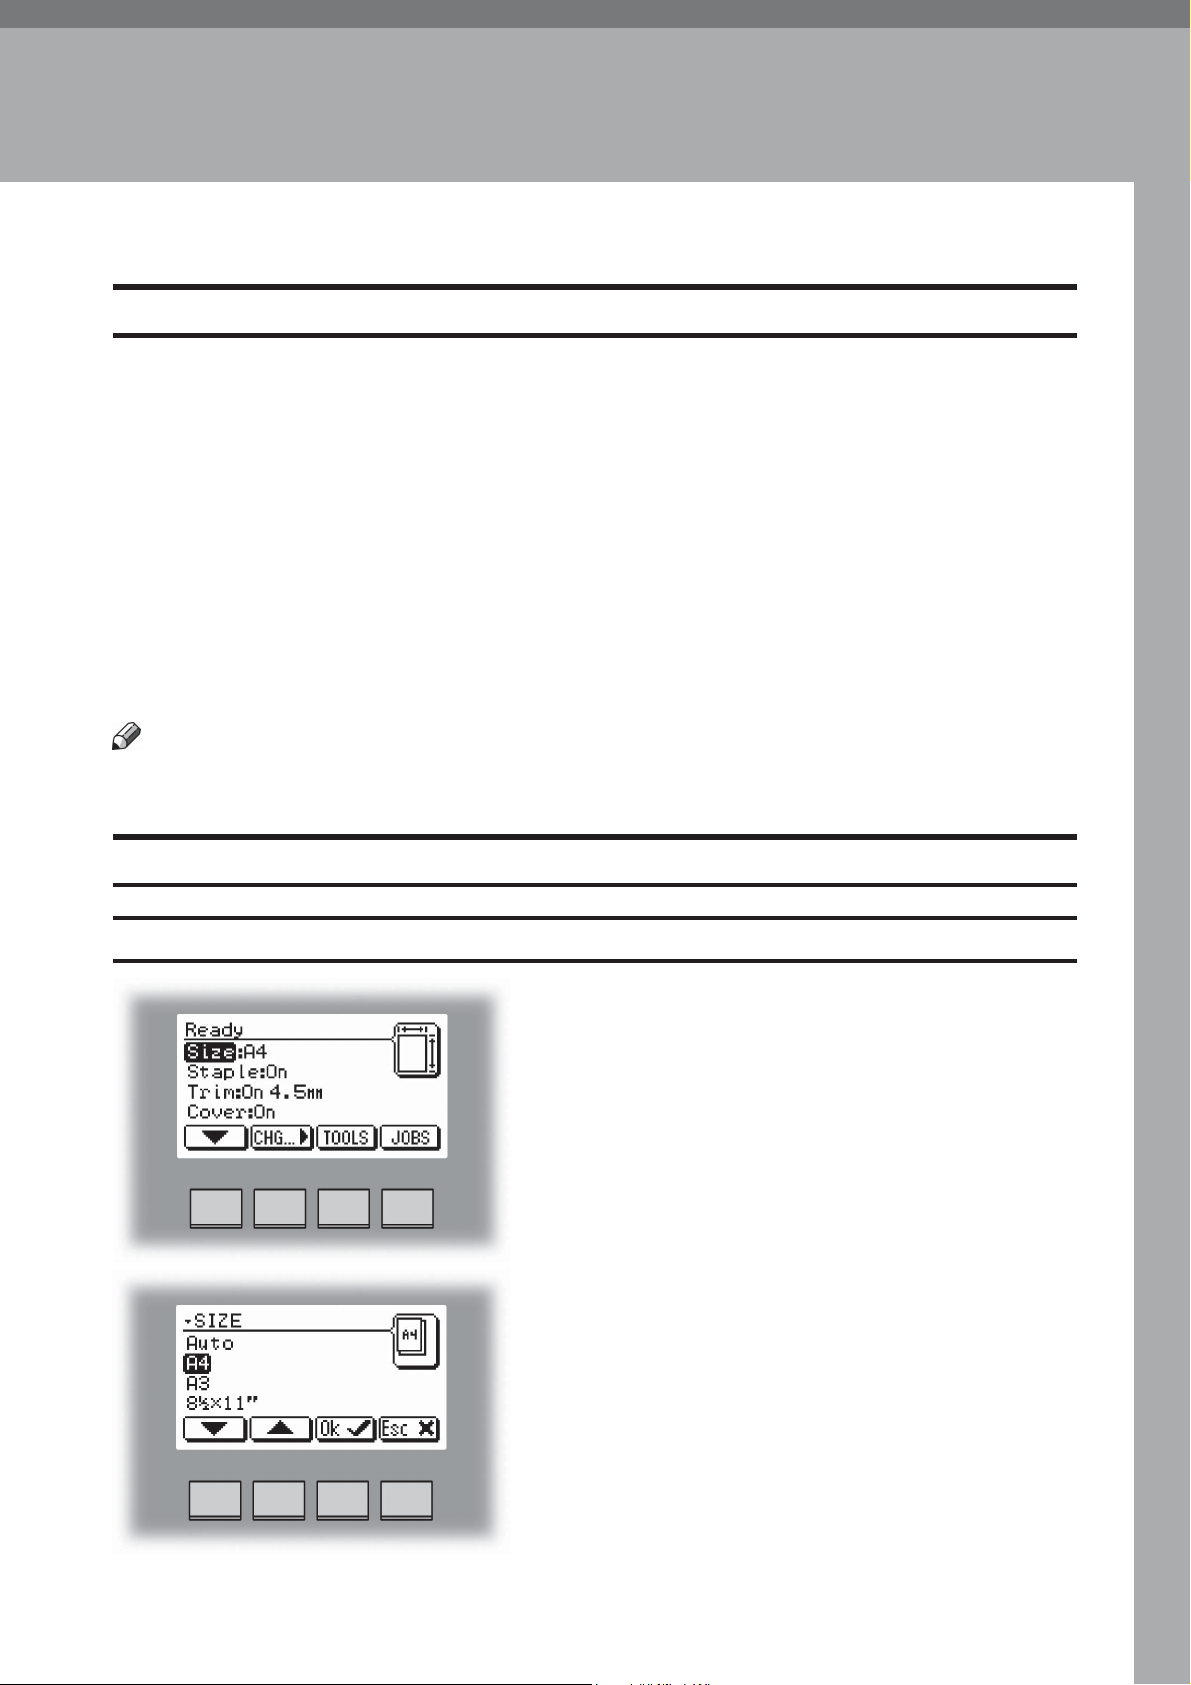
Setting Paper Size
Selecting standard paper sizes
From the Ready screen, select Size and press the
[Change] button.
Select Auto or any standard paper size with the [arrow]
button and press the [OK] button. Selecting Auto
means that the booklet maker will automatically adjust
to the same paper size (A4, A3, 8.5”x11” or 11”x17”) as
the copier.
For other paper sizes, follow “Custom paper size” as
described on the next page.
21

2
Making Booklets
Custom paper size
Select Size and press the [Change] button to display
the preprogrammed paper sizes.
Scroll down to Custom sizes, by pressing the [arrow]
button, and press the [OK] button. Select the custom
paper size you want to use and press the [OK] button.
If you want to adjust, select the custom paper size you
want to change and press the [Change] button. Select
Width or Length with the [arrow] button and press the
[Change] button.
The paper size can now be changed in increments of 1
mm or 0.08 inches. Press the [OK] button to confirm.
Two different custom paper sizes can be stored.
Fine adjustments of selected paper size
Select Size and press the [Change] button to display
the preprogrammed paper sizes. Scroll down to Fine
adjust, by pressing the [arrow] button, and then
pressing the [OK] button.
22

Changing settings
Fine adjustments of selected paper size, continues
Select Width or Length with the [arrow] button and
press the [Change] button.
Press the [+] or [-] buttons to fine adjust in increments
of 0.1 mm or 0.01 inches. Press the [OK] button to
confirm.
2
Stapling
Selecting stapling On or Off
Fine adjustment can be made while the machine is
running.
From the Ready screen, select Staple and press the
[Change] button.
If stapling was On, the first choice will be Off and vice
versa.
Select On or Off with the [arrow] button and press the
[OK] button.
23

2
Making Booklets
Trimming
Selecting trimming On or Off
From the Ready screen, select Trim and press the
[Change] button.
If trimming was On, the first choice will be Off and vice
versa.
Select On or Off with the [arrow] button and press the
[OK] button.
Adjusting the cutting margin
Select Trim and press the [Change] button. Select Trim
length and press the [OK] button. Press the [+] or [-]
buttons to fine adjust in increments of 0.5 mm or 0.02
inches. The trimmed booklet size and waste are
displayed. Press the [OK] button to confirm.
24

Changing settings
Covers
Selecting Cover Feeder On or Off
From the Ready screen, select Cover and press the
[Change] button.
Select On if you want the cover feeder to automatically
feed one cover to each set from the copier. Select Off if
no covers are to be fed. Press the [OK] button to
confirm.
2
Loading covers
ACB
Make sure that the cover sheets are well fanned to
avoid misfeeds or double-feeds.
Align the cover sheets well to achieve a reliable
feeding operation and good finishing results.
When using printed covers make sure that the ink
has completely dried, to avoid smearing.
Load the covers into the paper bin.
Move the adjustable side guide (C) up against the
sheets until there is no clearance. Move the adjustable air nozzle (A) using the length adjustment
handle (B), so that the green stripe on the air nozzle
bracket is level with the paper stack.
25

2
Making Booklets
On-line/Off-line
The booklet maker can be operated in two modes. On-line mode, when used together with
the copier, or off-line mode, working as a stand-alone unit.
Off-line mode
Follow “Undocking the Booklet maker” in section 1. Basics.
Adjust the hand feeding paper guides to the correct paper size.
Turn on the booklet maker.
The booklet maker is now in stand-by and will start automatically when a set is fed into the
booklet maker. If settings need to be changed, follow “Changing settings” earlier in this
section.
On-line mode
Follow “Docking the Booklet maker” in section 1. Basics.
26

Begin On-line Production
Begin On-line Production
Make sure that the [staple icon] is present on the copier control panel.
If not, turn the copier and the booklet maker Off. First turn the booklet maker On and then
turn the copier On.
Make sure that the booklet maker is set to auto paper size. Selecting Auto means that the
booklet maker will automatically adjust to the same paper format (A4, A3, 8.5”x11” or
11”x17”) as the copier.
Select [Paper tray] (A).
Select [Staple icon] (B).
Select [Dup / Combine / Series] (C).
Select [Book] (D).
2
Select [1 Sided] (E) if your originals are only printed on one side or [2 Sided] (F) if they
are printed on both sides.
Select [Magazine] (G).
Press the Start key (H).
A. Paper tray
B. Staple icon
C. Dup / Combine / Series
D. Book
E. 1 Sided
F. 2 Sided
G. Magazine
H. Start key
27

Page intentionally blank

3. Tools
The Tools Screen
The Tools screen.
From the Ready screen, press the [Tools] button to get to the Tools screen. Here you will find
all the necessary tools for a troublefree operation.
Units
From this screen you can change units between
millimeters and inches. Select Units with the [arrow]
button and press the [OK] button.
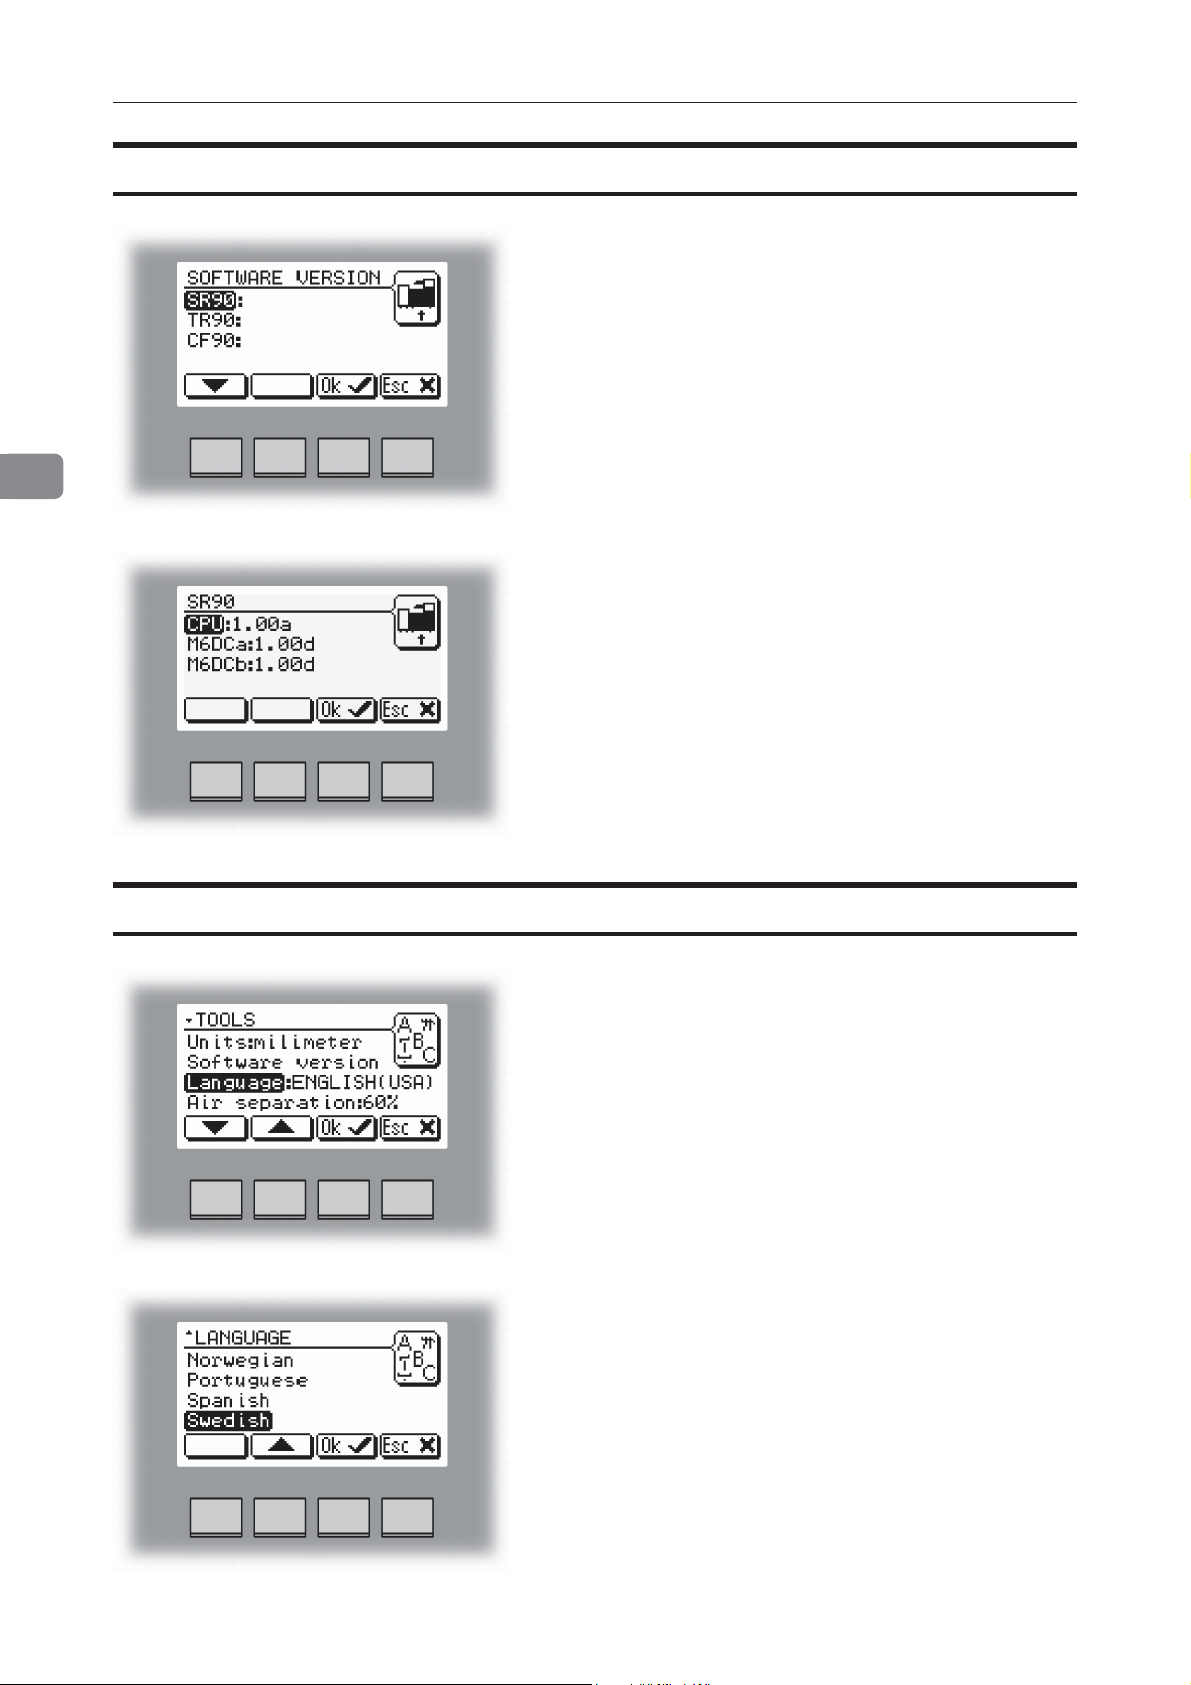
Software version
Select the millimeters or inch units and then press the
[OK] button.
Select Software version with the [arrow] button and
press the [OK] button. This screen, and sub screens
show the software version for the different modules in
the booklet making system.
29
3
Tools
Software version, continues
Select the module in the system for which you want to
check the software version and press the [OK] button.
This screen will show software version(s) in the
selected module.
Language
From this screen you can change the language in the
user interface.
Select Language with the [arrow] button and press the
[OK] button.
Select desired language with the [arrow] button and
press the [OK] button.
30

The Tools Screen
Air Separation Fan
From this screen you can change the speed of the air
separation fan. This screen will only be shown if a
cover feeder is present. Select Air separation with the
[arrow] button and press the [OK] button.
3
You might want to increase the speed of the air
separator fan when running thick, heavy covers.
Set the desired speed in increments of 10% with the
[+] or [-] buttons and press the [OK] button. Normal user
(default) setting is 60%.
Double Sheet Detection
From this screen you can turn the double sheet
detection On or Off. Select Double sheet det. with the
[arrow] button and press the [OK] button.
Normally double sheet detection should be set to On.
However, if you experience “false double sheet feeds”,
for example when running covers that are thick, with
dark print or with mixed prints on the covers, the double
sheet detection can be set to Off.
31

3
Tools
Service access
This screen is for authorized service personnel only
and is password protected.
32

4. Jobs
Storing and deleting jobs
The booklet maker has a maximum storage capacity of 10 different jobs. It is not possible to
delete jobs, therefore when you need to store a new job, an old job must be overwritten. To
make temporary changes in the actual job settings or temporary changes of a stored job, see
section 2 Making Booklets.
Storing a new Job
To store a new job or add new settings to an existing
job you need to start from the Jobs screen. From the
ready screen press the [Jobs] button to enter the Jobs
screen.
Select an already stored job by pressing the [Next]
button. Then press the [Change] button.
Select the option you want to change with the [arrow]
button and then press the [Change] button. See section
2. Making Booklets for how to set up each separate
option.
After changing the options press the [OK] button to
accept the changes you just made.
Continued on next page.
33

Jobs
Storing a new Job, continues
To store the job, press the [Save] button.
4
If you want to run the actual job, press the [Load] button.
The booklet maker will then automatically setup that
specific job and return to the Ready screen.
Recalling a Job
To recall a stored job press the [Jobs] button from the
Ready screen to enter the Jobs screen.
Select the desired job by pressing the [Next] button.
Then press the [Load] button. The booklet maker will
then automatically setup that specific job and return to
the Ready screen.
34

5. Clearing Misfeed(s)
Booklet Maker
Clearing misfeed(s)
Inside the Booklet Maker
To clear a misfeed indicated in Area A
Open the top cover.
Remove misfed sheets.
Close the top cover.
To clear a misfeed indicated in Area B
Open the top cover.
Close top cover.
If misfeed condition remains:
Switch off the main power.
Switch on the main power.
If misfeed condition remains:
Switch off the main power.
If a Trimmer is installed, first remove the trim bin to
get access to the fold stop. By hand, pull down the
fold stop (page 8, item 9).
Remove misfed sheets.
Push the fold stop back into the upper position.
Switch on the main power.
35

5
Clearing Jams
Trimmer
Clearing misfeed(s)
The upper trimmer blade on the trimmer is protected by a knife protection plate that moves
away during the cutting stroke. Jams can occur in the input area or the exit area.
WARNING:
Never put fingers or other parts of the body between the upper and lower trimmer knives.
Clearing misfeed in input area
Lift up the infeed roller shaft (A).
Secure under latch (B)
Remove the misfed sheets in the infeed area.
After the misfed sheets are removed, lift up the latch (B) and place the infeed roller
shaft into operating position.
A
B
36

Trimmer
Clearing misfeed(s), continues
Clearing misfeed in exit area
Lift the exit compressing brackets (A).
Secure them under the latch (B).
Remove the misfed sheets from the exit area.
After the misfed sheets are removed, lift up the latch (B) and place the compressing
brackets in operating position.
5
A
B
37

5
Clearing Jams
Cover Feeder
Clearing misfeed(s) in vertical transport area
Undock the Bookletmaker.
Lift up the upper paper path (spring loaded) (A).
Release the jam clearance baffle (B). If neccessary, the jam clearance baffle can be
removed.
Remove the misfed cover.
Put the jam clearance baffle back in normal position (C) and lock it with the upper paper
path.
Upper paper path
Jam clearance baffle
38
A: Lift upper paper path
B: Upper paper path lifted and
releasing jam clearance baffle
C: Normal
position

6. Troubleshooting
Fault codes
When there is a misfeed or fault condition in the booklet maker system, a message will be
displayed on the booklet maker. In case there is a problem that can be rectified by the
operator, a fault code and an explanation will be displayed.
Fault codes that can be rectified by the operator:
Booklet maker: BM-201 to BM-210 and BM-401
Trimmer: TR-201 to TR-204 and TR-401
Cover feeder: CF-201 to CF-205, CF-401 and CF-501
Note
If procedures in this manual do not rectify the problem an authorized technician will be
needed.
General fault codes
Misfeed
In general, fault codes indicate a misfeed condition.
When a misfeed occurs, the message “Clear
Misfeed(s)”, a code and the jam area will be displayed.
See section 5. Clearing Misfeeds, for how to clear a
misfeed.
39

Troubleshooting
Booklet maker fault codes
Check staples
This message will be displayed when a staple cartridge is empty or when stapling could not
be performed. Check in the following order:
– If a staple cartridge is empty, replace according to section 1. Basics.
– If staple cartridges are OK; remove the set and check that the number of sheets is within
specifications.
– If staple cartridges are OK and set is within specifications; remove and check stapler head
according to section 1. Basics.
Trimmer fault codes
6
Trim bin full
This message will be displayed when the trim bin is full or when a trim strip, due to static
electricity, is prevented from falling down into the trim bin. Empty the trim bin and remove
loose trim strips from inside the Trimmer. See section 1. Basics for how to remove the trim
bin.
Cover feeder fault codes
Misfeed
This message will be displayed when the cover feeder could not feed a cover from the paper
bin. Check cover loading according to section 2. Making Booklets. If problem persists, clean
separator pad according to section 7. REMARKS.
Double feed
This message will be displayed when the Cover Feeder detects that more than one cover
was fed from the cover bin. If more than one cover was fed, check cover loading according to
section 2. Making Booklets. If the covers that are fed are thick, with dark print or with mixed
prints on the covers, double feeding may be displayed even if that is not the case. Turn off
double sheet detection according to section 3. Tools.
Load covers
This message will be displayed when the paper bin is running low or is empty. Reload paper
bin according to section 2. Making Booklets.
40

7. REMARKS
Do’s And Don’ts
• Always follow all warnings marked on, or supplied with, the equipment.
• Always exercise care in moving or relocating the equipment.
CAUTION:
• Unplug the powercord from the wall outlet and machine before you move or relocate
the equipment.
• Do not remove the covers or guards that are fastened with screws.
• Do not override or bypass electrical or mechanical interlock devices.
• Do not operate the equipment if you notice unusual noises or odours. Disconnect the
powercord from the power source and call your authorized technician to
correct the problem.
WARNING:
• Do not put fingers or other parts of the body between the upper and lower trimmer
knives.
• Do not switch off the main power switch while machine is running. Make sure machine
cycle has ended.
• Do not open covers while machine is running.
• Do not move machine while machine is running.
41

REMARKS
Where to put Your Machine
Machine environment
• Always locate the equipment on a solid support surface with adequate strength for the
weight of the machine.
• Always keep magnets and all devices with strong magnetic fields away from the
machine.
If the place of installation is air-conditioned or heated, do not place the machine where it
will be:
• Subjected to sudden temperature changes.
7
• Directly exposed to cool air from air-conditioner.
• Directly exposed to heat from heater.
Power connection
• Always connect the equipment to a properly grounded power source. If in
doubt, have the power source checked by a qualified electrician.
• WARNING: Improper grounding of the equipment can result in electrical shock.
• Never connect the machine to a power source that lacks a ground connection terminal.
42

Where to put Your Machine
Access to machine
Place the machine near the power source, providing clearance as shown.
1
2
1. Left: more than 400 mm / 15 3/4”.
2. Front: more than 555 mm / 21 7/8”
3. Right: more than 400 mm / 15 3/4” (off-line use).
3
7
43

REMARKS
Maintaining Your Machines
Never attempt any maintenance function that is not specifically described in this documentation.
Cover Feeder
Cleaning feed rollers and paper separator pad
The Feed rollers need to be cleaned regularly when in use, and if the unit has not been used
for a period of time. How often this should be done, depends on the paper type and print
quality.
An increasing number of misfeeds, or double feeds, is one indication of the need to clean.
Remove the feed roller assembly by pressing it to the front of unit (A). The left end of
the feed roller assembly will now be released (B) and the assembly can be removed.
7
Clean the Feed rollers and the Paper separator pad with water and a clean lint free
cloth.
Lift out this
side
Press toward front.
A
Paper separator pad
44
B
Feed rollers

8. Specification
Machine Specifications
Booklet Maker SR90
snoitacificepsrojaM
snoitacificepSskrameR
deepSmumixaM(enihcamdetcennocfotuptuosehctaM
)mpp501
seziSrepaPdradnatS"71x11&"41x5.8,"11x5.8,3A,4A elbaliavaerasezismotsuC
)muminiM(thgieWrepaPdnoB.bl71/msg46
)mumixaM(thgieWrepaPrevoC.bl09/xednI.bl531/msg042
steehStuptuO/tupnI )tnelaviuqe,dnoB.bl02/msg08(steehS02-2delpatS
steehStuptuO/tupnIsteehS2gnidloFdelpatSnoN
esUenil-ffOelbissoP )selpats2(dloF/elpatS
thgieWsselro.bl6.871/gk18
)DxHxL(snoisnemiD 61/742x8/713x61/5135/mm026x018x0731rekcatSdnaesaB.lcnI
ecruoSrewoPzH06-05032/022/721/511/011/001%01±
noitpmusnocrewoPsselroW052snoitarepOsuounitnoC
deepsenigneniatniaM
45

Specification
Trimmer TR90 (option)
deepS09RSsaemaS
seziSrepaPdradnatS09RSsaemaS elbaliavaerasezismotsuC
htgnelmirttluafeD)"46/11(/mm5,4elbatsujdA
gnimmirtmuminiM)"46/1(/mm5,0
gnimmirtmumixaM)"2/1(/mm5,21
)muminiM(thgieWrepaP09RSsaemaS
)mumixaM(thgieWrepaP09RSsaemaS
steehStuptuO/tupnI09RSsaemaS
steehStuptuO/tupnI09RSsaemaS
esUenil-ffOrekaMtelkooBotdetcennocnehw,seY )selpats2(dloF/elpatS
snoitacificepSskrameR
8
thgieWsselro.bl7.521/gk75
)DxHxL(snoisnemiD "8/513x8/543x61/341/mm026x088x063ylnoremmirT
Cover Feeder CF90 (option)
snoitacificepSskrameR
deepSmumixaM09RSsaemaS
seziSrepaPdradnatS09RSsaemaS
)muminiM(thgieWrepaPdnoB.bl81/msg07
)mumixaM(thgieWrepaP09RSsaemaS
yticapaCredeeFrevoC2m/rg08fosteehs002.xorppA.)"61/31(mm02
)dnoB.bl02fosteehs002(
esUenil-ffOrekaMtelkooBotdetcennocnehw,seY )selpats2(dloF/elpatS
46
thgieWsselro.bl65.72/gk5.21
snoisnemiD61/122x61/77x8/352/mm065x881x546ylnoredeefrevoC

INDEX
A
Access to machine 43
Air Separation Fan 31
B
Basics 15
Begin On-line Production 27
Booklet Maker 35, 45
C
Changing options 10
Changing settings 21
Check staples 40
Cleaning feed rollers and paper separator pad 44
Clearing Misfeed(s) 35
Clearing misfeed(s), Booklet Maker 35
Clearing misfeed(s), Cover Feeder 38
Clearing misfeed(s), Trimmer 36
Components, guide to 7
Cover Feeder 44, 46
Cover Feeder On or Off 25
Covers 25
Custom paper size 22
D
Docking / Undocking 15
Docking the Booklet Maker 15
Do's and Don'ts 41
Do’s And Don’ts 41
Double Feed 40
Double Sheet Detection 31
F
Fault codes 39
Fault codes, Booklet Maker 40
Fault codes, Cover Feeder 40
Fault codes, general 39
Fault codes, Trimmer 40
Feed rollers 44
G
Guide To Components 7
Guide To Components, Booklet Maker 7
Guide To Components, Control Panel 13
Guide To Components, Cover Feeder 12
Guide To Components, Trimmer 10
I
Inches to millimeters 29
J
Job, recalling 34
Job, storing a new 33, 34
Jobs 33
Jobs, storing and deleting 33
L
Language 30
Load covers 40
M
Machine environment 42
Machine, positioning 42
Machine Specifications 45
Main power. See Turning On / Off the Main Power
Maintaining Your Machines 44
Major specifications 45
Making Booklets 21
Millimeters to inches 29
Misfeed 39, 40
Misfeed(s), clearing 35
O
Off-line mode 26
On-line mode 26
On-line/Off-line 26
Options. See Changing options
P
Paper Size, custom 22
Paper Size, fine adjustments 22
Paper Size, setting 21
Paper Sizes, selecting standard 21
Power connection 42
R
REMARKS 41
S
Separator pad 44
Service access 32
Setting Paper Size 21
Software version 29
Specification 45
Standard paper sizes, selecting 21
Staple cartridge, installing 18
Staple cartridge, removing 18
Stapler Cartrigde 18, 19
Stapler Head 19
Stapler head, installing 19
Stapler head, removing 19
Stapling 23
Stapling On or Off 23
T
Tools 29
Tools Screen 29
Trim bin, emptying 20
Trim bin full 40
Trimme 46
Trimmer 36
Trimming 24
Trimming On or Off 24
Troubleshooting 39
Turning On / Off the Main Power 17
U
Undocking 15
Undocking the Booklet Maker 16
Units 29
W
What You Can Do with This Machine 5
Where to put Your Machine 42
47

Page intentionally blank
 Loading...