


User Manual ver1.1
PLK Technologies.,Co.Ltd.
ADAS CAM

Crash-Avoidance ADAS CAM
Thank you for purchasing 『OPTIAN』.
The manual contains the functional explanation and operating method of OPTIAN.
Please read the instructions carefully before attempting to operate.
The manual may be subject to change without any prior notice
Copyright and Trademark/ PLK technologies Co., Ltd.
This manual is under the protection of copyright law and all the rights are legally
protected. Except in some legally acceptable cases based on the copyright law , it is
restricted to copy , modify and translate this manual without any prior consent .
『 ADAS 』 or Advanced Driver Assistance System is an advanced safety assist system that can help
a driver to realize and avoid potential risks of collisions with the utilization of warning signals

Features
Main Features of OPTIAN!!
FCW ( Forward Collision Warning )
LDW (Lane Departure Warning )
FCDA ( Front Car Departure Alert )
DVR ( Driving Recorder )
Full HD Clear Display
Touch LCD Monitor
Event/ Motion Detection CCTV Recording in Parking Mode
Battery Discharge Prevention
GPS Track Recording

Contents
Safety
Caution
Warning & Caution
Components
Check Components
Main Body & Functions
Rear Camera & Functions
Installation
Precautions
Installation Method
Main
Functions
Forward Collision Warning
Lane Departure Warning
Front Car Departure Alert
DVR
Manual Guide
Video Playback
Configuration
Data Manager
Program Installation Method
Screen Composition
Button Explanation
Maintenance
SD Card Format
Troubleshooting
Appendix
Specification
Settings
Angle Adjustment
Vehicle Type Setting
Start
Booting up
Screen Types & Explanation
Manual
Guide
Basic Menu
ADAS CAM
DVR

Safety Caution
!
Warning!
ADAS functions are designed to assist the driver, however, it is not a substitute for careful
driving and we take no responsibility for any damage caused by careless driving . Drivers
should comply with local traffic regulations and should not rely on the ADAS CAM
completely but use the system to assist only.
! Do not use modified power-supply
cables , use only genuine products
supplied by the manufacturer .
Modification may cause vehicle damage
or physical injury due to explosion or fire.
! Apply only the rated voltage otherwise
it may cause vehicle damage or physical
injury due to explosion or fire.
! Do not install the product in a location
where it interferes with driver‟s vision.
! Do not configure the product while
driving .
! Do not disconnect the power supply
cable randomly as it may damage the
product. Contact your installer for
support .
! It is important to remove the SD card
and download any important data as
soon as possible after an accident to
avoid loss of recorded data
! Do not use force to operate
! Do not press the LCD display with sharp
objects as it may damage the LCD
surface or touch panel.
! Insert and remove the SD card only
when the recording function is turned off
! The Micro SD card is a consumable
product. Errors may occur if used for long
periods. It is necessary to format data
and replace the SD card periodically.

!
Warning!
ADAS functions are designed to assist the driver, however, it is not a substitute for careful
driving and we take no responsibility for any damage caused by careless driving . Drivers
should comply with local traffic regulations and should not rely on the ADAS CAM completely
but use the system to assist only.
! If the Micro SD card is damaged or the product is
powered off prematurely, it may result in accidental data
loss
! The ADAS functions only work when the speed rete
received from GPS signal exceeds the set speed value .
The ADAS functions are not a substitute for the driver‟s
care and attention, the functions are an assistance to the
driver only.
! Under following conditions the ADAS functions may not
perform properly:
• Extreme weather
• Extremely curved roads
• Roads without painted lanes
• When the camera image is compromised due to
reflected light from an object on the dashboard .
• When installed incorrectly
• When the horizon line calibration is incorrect
! Keep the camera lens and windscreen
clean to ensure clear video and proper
ADAS functions.
! Tinted windscreens will affect the
brightness and definition of recorded
videos. OPTIAN may not receive GPS
signal if the windscreen has a tinted
metallic film . Try to attach to the area
without metallic film.
! Do not disassemble or modify OPTIAN
as it will result in data loss, damage and
will void the warranty cover.
Safety Caution
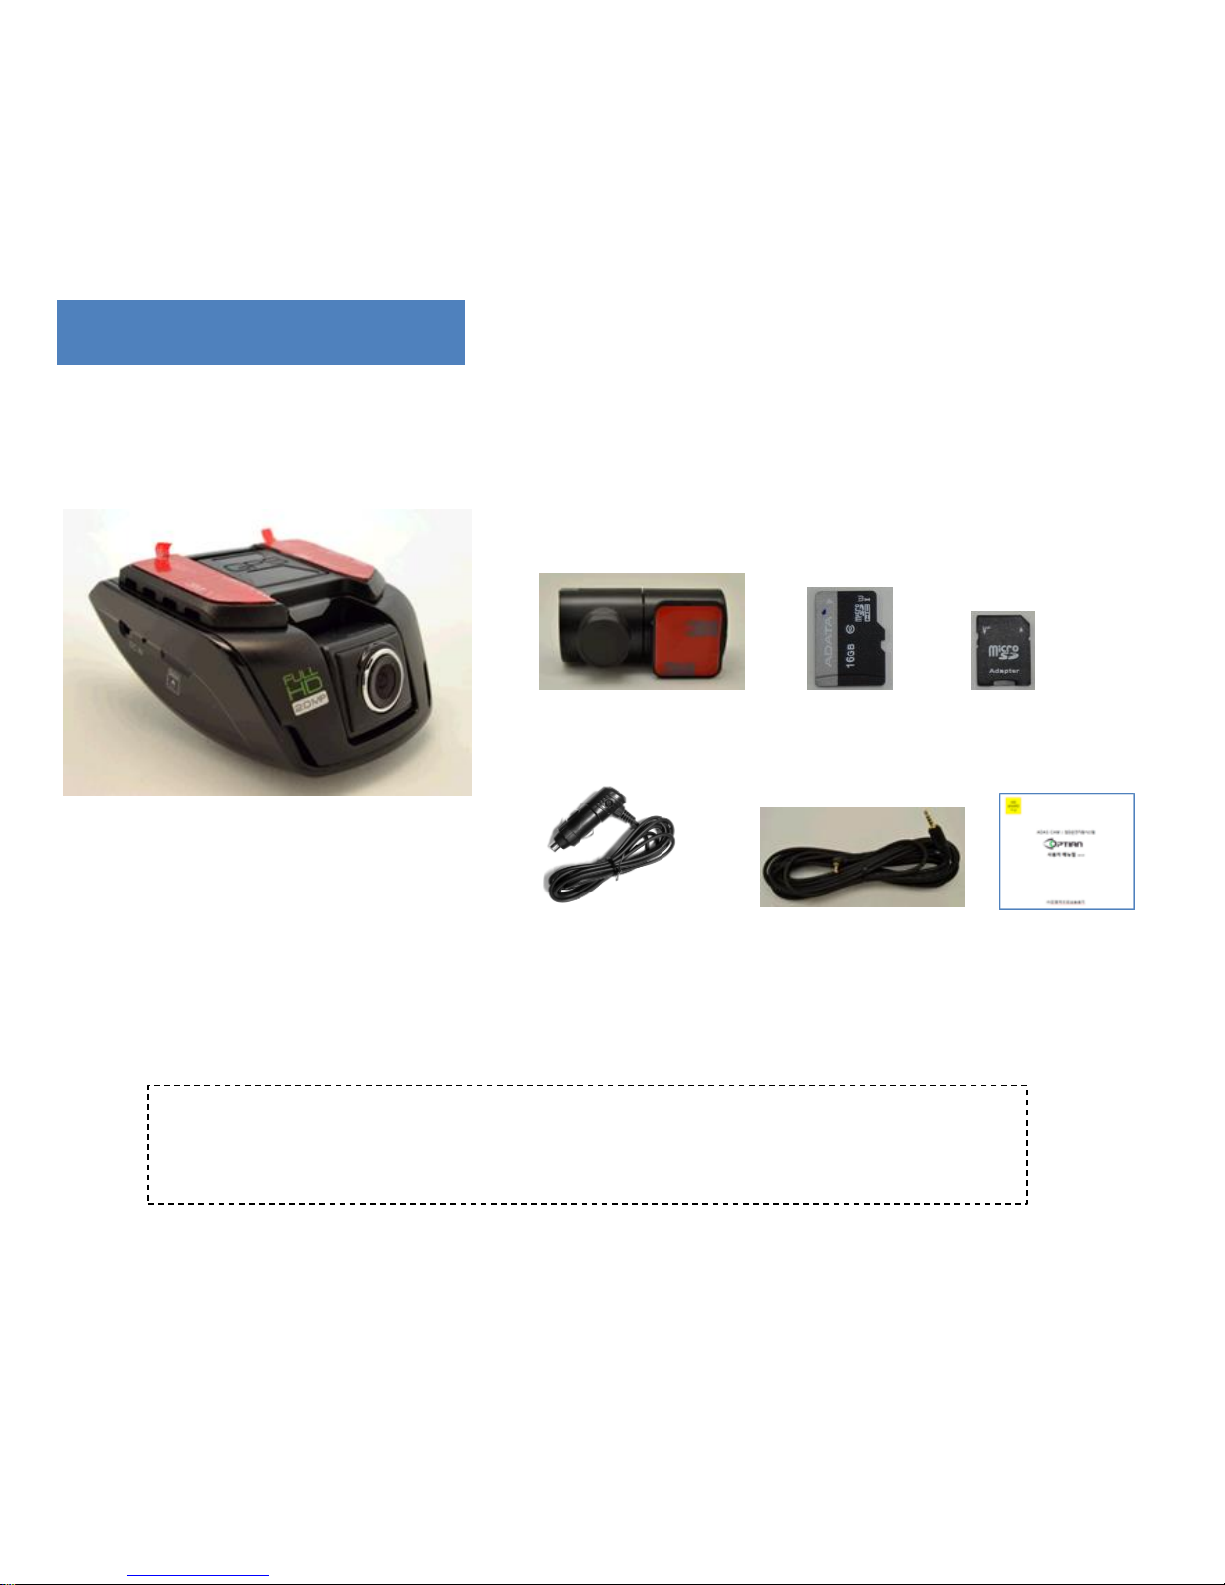
Components
Rear camera
Connection Cable
Main Body
Cigar Jack /
Power Supply Cable
Rear Camera
Micro SD
card
User Manual
SD Card Adapter
• Specifications of the above components are subject to change according to the
components supply.
• Above images are just to help user‟s understanding and actual components may look a
little different .

Front
Camera
(Full HD)
Internal GPS
Detachable
Bracket
Main Body
Security
LED
Volume
Adjustment
Button
Menu
Button
Touch
LCD
Manual
Recording
Button (REC)
Camera
Angle
Adjuster
MIC
DC power port
(3.5 pi)
Micro
SD Card
Socket
Rear Camera Connection
Continuous
Power Supply
Connection

Rear Camera / Internal Camera
Rear Camera
(VGA)
Integral bracket
Indication
LED
DC Power-supply Port
• When attaching the rear camera to
the rear window glass , please make
sure the bracket is on the right side.
* the rear camera angle can be adjusted
by rotating the main body

FCW (Forward Collision Warning)
1. FCW function generates a warning signal when there is a potential risk of collision to the vehicle
ahead .
2. The collision risk is evaluated through TTC ( Time To Collision ) and it is classified by 3 phases.
• TTC : The calculated value of the distance and the relative speed between a front vehicle and the
host vehicle
• Sensitive : TTC 0.9sec / Normal : TTC 0.7sec / Insensitive : TTC 0.5 sec
• Secondary Warning : TTC 0.4 sec
• The TTC sensitivity can be adjusted from the menu.
3. FCW function works when the vehicle is moving at the speed rate which is above the set speed
value.
• Default Speed Setting: 30km/h
• ADAS operating speed value can be adjusted from 20 to 80(km/h) in the menu.
4. FCW can help avoid accidents caused by careless driving behaviors such as adjusting air conditioning
or other distractions.
Main Functions
ADAS functions are designed to assist the driver, however, it is not a substitute for careful driving and we take no responsibility for
any damage caused by careless driving . Drivers should comply with local traffic regulations and should not rely on the ADAS CAM
completely but use the system to assist only.

1. LDW function generates an audible signal if the vehicle departs from the lane while
driving above the set speed in the menu.
2. LDW function works when the vehicle speed rate from internal GPS signal is over the
set speed value.
• Default Speed Setting : 60km/h
• LDW activating speed can be adjusted from 40 to 80(km/h) in the menu.
• Sensitivity of LDW can be changed in the 「Smart Car」 menu.
3. LDW function activates when the vehicle moves for more than 2 seconds in the lane .
4. LDW will help avoid any lane departure accidents caused by drowsiness or carelessness
on the road.
LDW (Lane Departure Warning)
ADAS functions are designed to assist the driver, however, it is not a substitute for careful driving and we take no responsibility for
any damage caused by careless driving . Drivers should comply with local traffic regulations and should not rely on the ADAS CAM
completely but use the system to assist only.

FCDA or Beep & Watch ( Front Car Departure Alert )
1. FCDA function is activated only when the vehicle is stationary on the road.
2. FCDA can detect the movement of a vehicle in front while waiting for the traffic light to
change and will inform the driver of any front movement through a warning tone.
3. FCDA generates a warning tone when the host vehicle starts to move closer to the front
vehicle while waiting in a traffic jam.
4. The function only activates when the speed rate from internal GPS becomes 0 .
5. FCDA is a helpful function especially while waiting at traffic lights or in traffic congestion.
ADAS functions are designed to assist the driver, however, it is not a substitute for careful driving and we take no responsibility for
any damage caused by careless driving . Drivers should comply with local traffic regulations and should not rely on the ADAS CAM
completely but use the system to assist only.

DVR ( Driving Video Recorder )
1. DVR function can record data with the Full-HD front camera and the VGA rear ( if equipped )
camera.
2. Types of Recording
• Continuous Recording: Records data into Normal folder continuously by generating files in
30sec intervals.
• Event Recording: Records data automatically into the Event File folder when a detected impact
value is over the set detection value.
• Manual Recording: Records the event data when pressing the external REC button .
• CCTV ( Parking Event Recording Guide ): Will inform the driver the number of recorded parking
events through a voice message when the ignition is turned on.
3. Parking Mode
• Parking Mode is activated when the vehicle is turned off and will be deactivated while the
ignition is turned on.
• If an impact is detected when parked , OPTIAN will record the event into an <Event> folder
• If motion is detected when parked , it will record the video into a <Parking> folder
• Vehicle Protection
- Battery Discharge Prevention: In order to prevent battery discharge, OPTIAN will shut down when
the vehicle voltage drops below a certain voltage.
- High Temperature Cut-off Function: In order to prevent damage , the system will be
automatically cut off when the internal temperature of the vehicle exceeds excessive temperature.

Start Process
[Booting]
When the ignition is turned on , the introduction image and the loading screen will
appear followed by a <Welcome> voice message.
Intro Screen Loading
* The loading time depends on the age and amount of data on the Micro SD card
After booting up , OPTIAN will start to record automatically by generating the
“start recording” voice message .

[ Screen Type and Explanation]
Video Monitoring Screen
ADAS Display Screen
• When the user presses the Video Monitoring Screen , it will
switch to the ADAS Display screen.
• ADAS display screen shows TTC information as well as the
detection of a front vehicle and lane lines via UI.
• When the user presses ADAS display screen a second time, the
monitor will go into power-saving mode and if user presses
again , it will switch to the Video Monitoring Screen.
• The DVR function works while in both screen modes.
∙ REC
shows the video is being recorded
Center
Number
If
a front vehicle is detected, it will indicate TTC. (1.2) and
generates the FCW signal ,the TTC will turn red .
Left
Number
shows the vehicle speed rate from the GPS signal
The horizon guideline
shows the lane lines are being detected. When OPTIAN
generates LDW signal, the lane lines will turn red.
Home Button: Switches
to the main menu
Camera
Button: will change between Front and Rear camera
views
FCW Button
: turns ON/OFF FCW function.
LDW Button
: turns ON/OFF LDW function.
FCDA(
Beep & Watch) Function : turns ON/OFF FCDA function.

Manual Guide
[Basic Menu]
• Basic Menu screen will appear when the user
presses the side M button or touches the
<Home> button while viewing the video
monitoring screen.
• When the user touches each icon in < Basic
Menu >, it will enter into each relative setting
menu.
• It is not possible to record video while in the
menu mode.
1) ADAS CAM (Smart Car) : Turn ADAS functions On/Off and configure operations.
2) DVR( Black Box) : Change basic settings, monitoring settings and resolution settings.
3) Video Play (Play Movie) : View recorded videos.
4) Configuration : Change settings of system volume , voice warnings ,operational configuration
and format SD card.
5) Vehicle Type (Install) : Configure the vehicle type and the installation position of OPTIAN.
6) Exit : Return to Video Monitoring Screen and start video recording function.
User can enter into each function setting menu via the basic menu screen.

[Smart Car]
Changing the settings of ADAS functions
1) Operation Settings
• Turn On/Off each function
• Touch the button to change between On and Off
2) FCW( Forward Collision Warning )
• Operating Speed: press the left & right arrows to adjust
- Default Value is 30km/h, Possible to adjust from 20 to 80(km/h)
• Second Alarm : to give second warning at TTC 0.4 . Touch button ON/OFF
• Warning Level (Sensitivity) : Alarm will react faster on more sensitive setting.
3) LDW( Lane Departure Warning )
• Operating Speed : Press the left and right arrows to adjust
- Default Value 60km/h, can be changed from 40 to 80(km/h)
• Lane Warning Sensitivity : 5 is the middle(default)value , when the set value
increases , the alarm will react sooner .
* : Return to the previous menu

[DVR/Black Box]
Changing the settings of DVR functions
1) Basic Setup
• It is possible to turn continuous recording On/Off.
(If it is turned Off, it will record only when an impact is detected )
• It is possible to turn voice recording On/Off.
( If it is turned Off, it will record without sound. )
• Sensitivity ( Impact Level ) : To adjust the impact detecting sensitivity
- Sensitive : will detect and record a minor impact.
- Insensitive : will only detect and record a strong impact .
2) CCTV Setup
• Discharge Prevention Voltage : In order to prevent battery discharge , OPTIAN
will be turned off when the vehicle voltage drops below the set voltage.
-The battery deterioration or any causes of voltage decreasing can possibly turn off the product.
• Motion Level : Adjusts motion detecting sensitivity.
3) Resolution
• Changes the recording resolution of the front camera.
• Stored data has allocated capacity on the Micro SD card.
The number of recorded files vary according to the capacity of Micro SD card.
* : Return to the previous menu
Resolution CCTV Event Parking
Full HD 100min 30min 15min
HD 180min 50min 30min
VGA 700min 200min 100min
*2 Channel / Micro SD card (16GB )
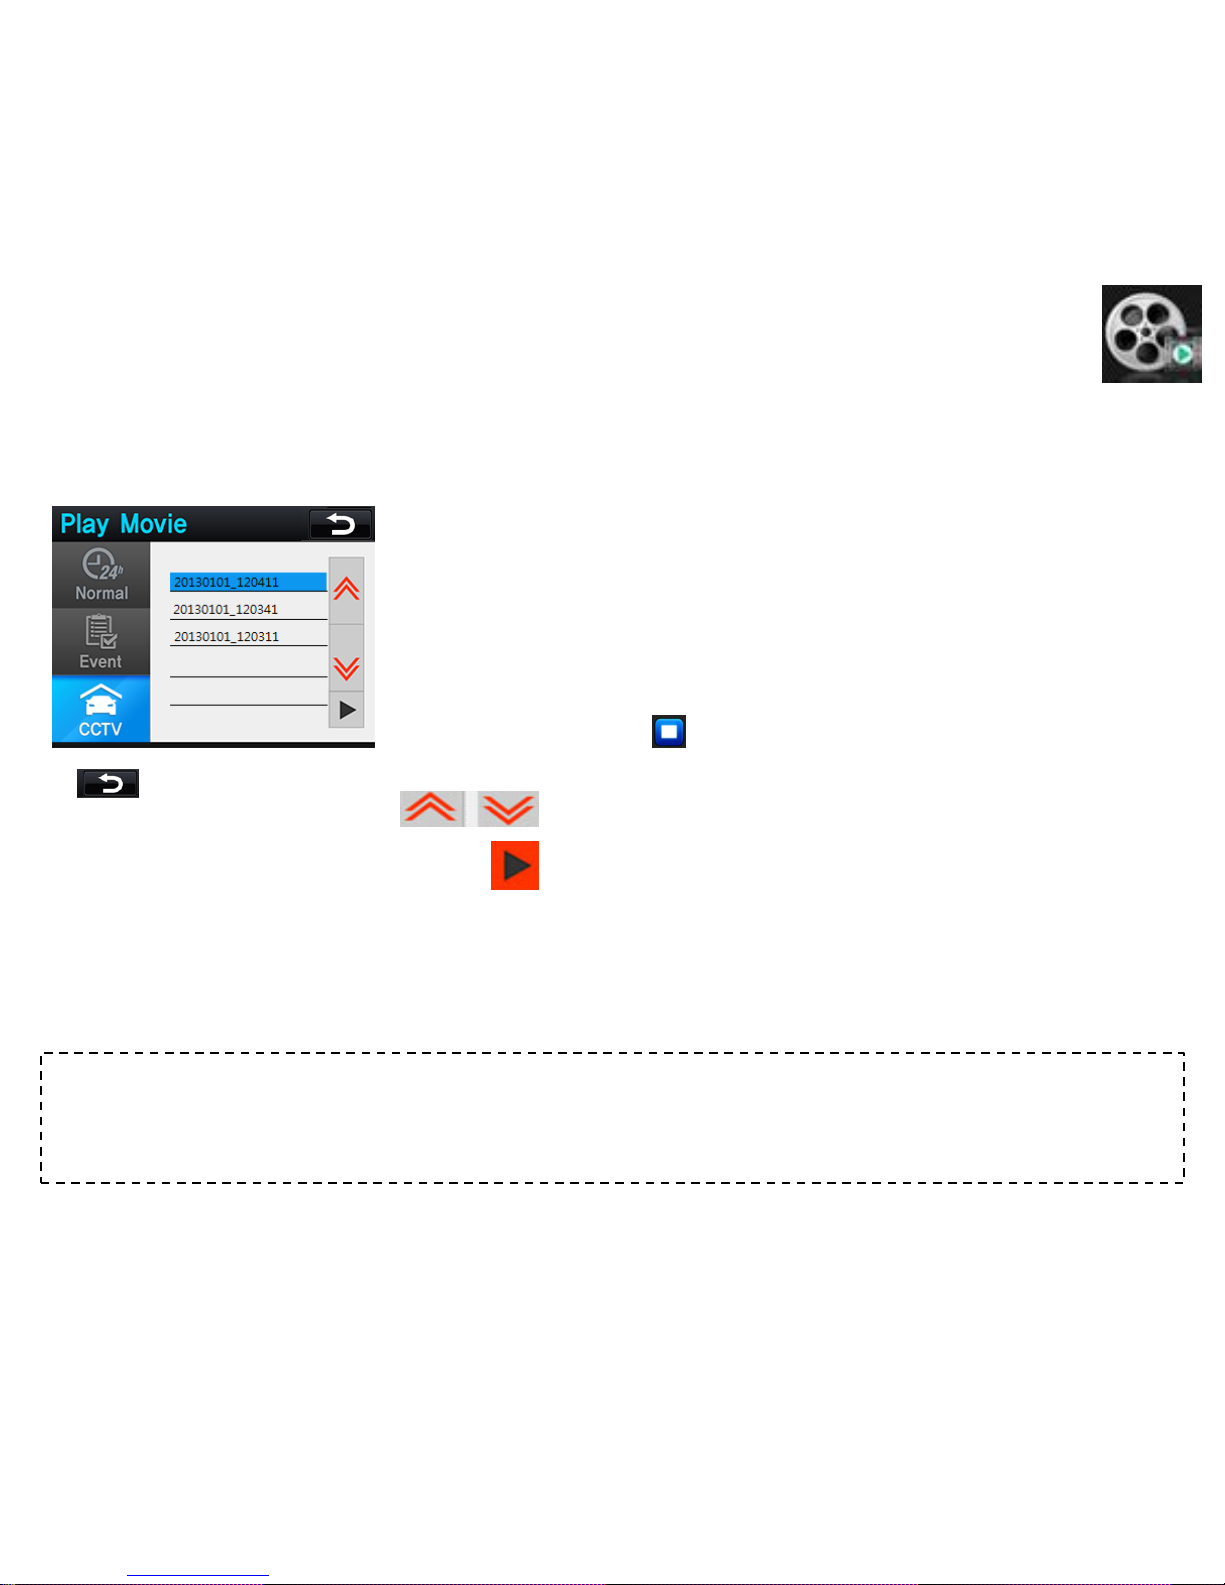
[Video Playback]
Playback of recorded video files from Continuous , Event and Parking modes.
1) Continuous/ Event /Parking
• Continuous (Normal) : Select and play continuously recorded files
• Event : Select and play recorded event files
• Parking( CCTV ): Select and play the files recorded while parked
• Touch to select the desired video file, then press the play arrow icon to play
the video
• If user presses STOP button, it will return to the file selecting page.
: move up and down to change pages
: play the selected files
* User can check recorded video files with clear definition in a wider screen via the exclusive Data
Manager program. In addition, it is possible to check acceleration data , vehicle coordinate and other
information via the ADAS desktop Data Manager program.
* : Return to the previous menu

Manual Guide
[Configuration]
Configure operating functions.
1) Volume Control
• Speaker Volume Control: controls speaker output volume (0~15)
• MIC Volume Control: controls input MIC volume (0~15)
2) Voice Alarm
• Event Recording: If on , OPTIAN will alarm with the voice announcement – start
event recording.
• FCW : If on, OPTIAN will alarm with the voice saying - Watch out !!
• LDW: If on , OPTIAN will alarm with the voice saying - Be careful of your
left/right lane.
• FCDA (Beep & Watch): If on , OPTIAN will alarm with the voice -Be careful !
* Even when the voice alarms are turned off, OPTIAN will still alert with the beeping sound.
* : Return to the previous menu.
3) Format SD card
• Deletes all the recorded files of Micro SD card by clearing up the system .
* Data format will delete all the recorded data , Save important files separately in PC before
formatting data .
* User should format data via the exclusive data manager or configuration menu . The usual format
method may not work properly on OPTIAN . Formatting the SD card via PC may damage
recording file structure if the Data Manager Program is not used.

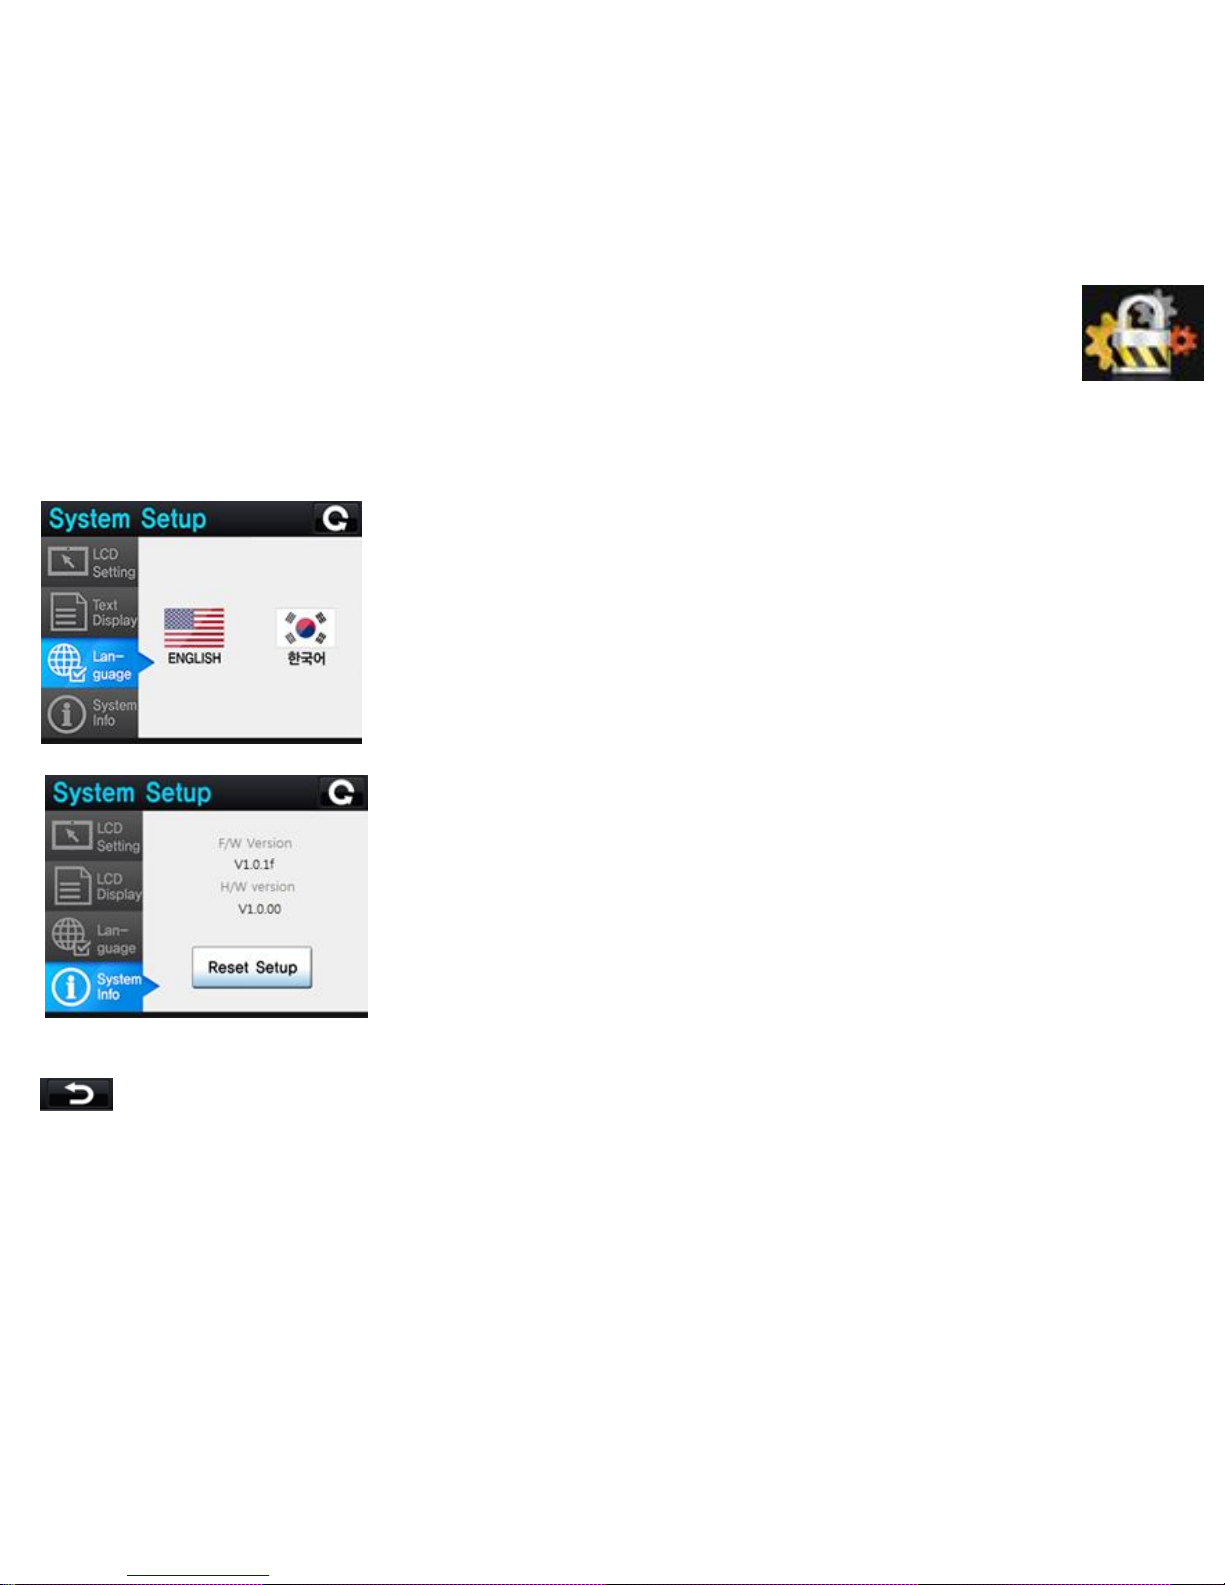
4) System Setup
• LCD Setting : Changes the settings of the screen view and the power saving
mode.
• LCD Display: Turns On/Off the signs of speed, speed unit ,smart UI and the
horizon line screen data.
• Language Setting : Changes LCD Text and voices to different languages. ( In
the B2B Model, only a certain language will be provided )
• System Info: System check and system reset function .
4-1) LCD Setting
Display View : Sets the LCD display viewing method.
- Front : Front camera images only.
- Rear : Rear camera images only.
- PIP : Both front and rear images at the same time..
Screen Save
- It can set LCD viewing status. LCD will be turned on if user touches the LCD when it is at
the off status .
- user can touch the monitoring LCD screen to switch to the power saving mode
* : Return to the previous menu.
4-2) LCD Display
• Speed : If on , the speed will show on the LCD
• Speed Unit : Select between km/h and mph
• Smart Car : If on, the ADAS UI overlay will appear on the video display screen.
• Horizon: If on , the horizon guide line will appear on the video display screen.
[Configuration]
* : Return to the previous menu
4-3) Language
Language voice guidance and text will be in the selected language
4-4) System Information
• Shows the version information of firmware and hardware .
• User can initialize the system by pressing the reset button.

Installation of Data Manager Program
Through the data manager program , users can view FHD videos in a wider screen. In
addition, users can check information such as vehicle GPS data and acceleration data.
1) Install the exclusive OPTIAN viewer in PC ( Ask
manufacturer for the data manager program )
2) When the installation completes, the OPTIAN
viewer program icon will appear on the desktop
* Recommended PC Specification
- Computer OS : XP(32bit), Vista(32bit), Window7(32/64bit),
window8(32/64bit)
- Computer H/W : Pentium4 2.8GHz or above / 1G RAM or above
- Internet Browser: Microsoft Internet Explorer 7.0 or above
- Direct X version : Direct X 9.0 or above
OPTIAN Data Manager
Screen Composition
①
②
③
⑤
④
⑫
⑪
⑨ ⑩
⑦
⑧
⑥
⑬
⑭
⑮
1) Main Screen
2) Sub Screen
3) GPS Location on the map
4) (ADAS) Display Screen
5) OPTIAN Manager Menu bar
6) Video Play Bar
7) Video Play Time
8) Video Volume
9) Speed Indication
10) Compass
11) Recording Date & GPS co-ordinates
12)Acceleration sensor data; impact level & speed graph
13) File List window Open/Close button
14) File List window
15) Classification of Normal, Event or Parking modes

Open file
Stop
Open SD card
Play
Previous File
Zoom in on the video playing
screen
Play
Button
Zoom
out of the video playing screen
Pause
Switch
between the main screen video and sub screen video
Play Next File
Format SD card
Normal
playing speed
Configuration
Quick Play
x 2
Print
OPTIAN manager screen
Description of Main Buttons
View Acceleration/Impact
/ Speed graph in detail
Switching between acceleration and G
-sensor buttons
Switch
between Google and naver maps
Press the G
-sensor impact button to change to speed
button
CC
TV File List
Press the
speed button to change to acceleration button
Automatic/ Manual/ Parking
event file list
Copy
the playing videos to a selected folder
Recorded Motion Detection File List
OPTIAN manager version
information
* It is
convenient to play recorded videos via the OPTIAN manager
OPTIAN Data Manager

!
SD Card Maintenance
SD card is a consumable product. If it is not maintained well, errors may occur and it
may not be able to record videos properly .
SD Card Insert/Remove
When inserting or removing the SD card , make sure the power is turned off .
Regular Data Formatting
SD card is a consumable product. If user formats data every 1 week or 2 weeks, it can decrease
the probability of SD card errors and extend the lifecycle of SD card .
SD Card Format Method
Please format the data via the configuration setting or via the data manager program
Regular Check
When the video is being recorded properly, there will be a blinking REC sign on the video
monitor or ADAS display mode. If the REC sign does not appear , it means there is an error in
Micro SD card and user will need to replace or format the Micro SD card.
Data Backup
The recorded data may be deleted as time passes . it is necessary to record important data
separately or store the SD card separately .
Maintenance

Troubleshooting
Q. There is No power on the product
• Check the power state of vehicle battery
• Start the vehicle , check the fuses
Q. The product does not boot up
• Check SD is inserted properly
• Check whether the Micro SD is a faulty unit ,
format the data of SD card
Q. No sound after booting up .
• Check the volume control setting
Q. No response from the screen image
• Check whether the SD card works properly
• For the product safety , OPTIAN will stop
recording at high temperatures , please check
the temperature of the product and vehicle.
Q. ADAS functions do not work
• Check whether it is turned off in the setting
menu
• Check whether it receives GPS signal properly
and the actual speed rate is over the set warning
speed threshold
• Check whether the vehicle type setting and the
horizon calibration of camera is correct.
Q. The warning timing is too slow or too fast
• Check the horizon line and vehicle type setting
• Check sensitivity settings of each function
Q. Not possible to read Micro SD card in PC
• Check whether Micro SD card adapter or reader
works properly
Maintenance

1. Please adjust the angle while vehicle is parked on flat ground . In order to match with the horizon correctly, it is
recommended adjusting the angle when the driver has a good view of horizon
2. Open the camera angle adjuster cover
3. Turn gear inside the adjuster and match the horizon guide line of LCD with the actual horizon
4. After matching the line, please close the cover to firmly fix the camera
Open the cover of camera angle
adjuster and turn gear to adjust
the angle
•Correct Angle Adjustment
: Horizon guide line matches with the
actual horizon.
Good
•Camera angle is wrongly adjusted
: Guide line is above the horizon
Bad
•Camera angle is wrongly adjusted
: Guide line is below the horizon
Bad
! images above are just for explanations.
Only adjust the camera angle while your vehicle is parked in a safe area
Main body camera angle adjustment
To perform stable ADAS functions, it is necessary to match the green guide line of LCD with
the horizon.
!
Setup

Vehicle Type Setting
It is necessary to set „Vehicle Type ‟ for stable performance of ADAS functions.
( 1 ) After booting up, press the side M button or the
<Home> button in the Video Monitoring Mode to enter into
the menu screen.
( 2 ) . Press the „Install‟ menu
( 3 ) Choose driver‟s vehicle type in the 「Vehicle
Setting」menu
Type Height Width
Passenger
Vehicle
1.3 1.8
Compact
Vehicle
1.3 1.6
SUV 1.5 1.9
RV 1.7 1.9
Bus 1.6 2.5
Truck 2.5 2.5
* If user selects a vehicle type, the values of Width and Height will be
automatically set in 「Dimensions」 menu. For more accurate warning, it
is recommended to input actual values of Width or Height in
「Dimensions」 menu.
[Menu Button]
[Home Button]
!

(4)Press 「Attached Pos」menu button
(5) Choose installation position of OPTIAN in menu.
(6) Press「Dimensions」menu
Attached Position(Center: 0cm)
* Attached position is based on the driver‟s view inside the vehicle.
* If the product is attached to the right or left side of the
windscreen, please select the applicable position and input the
measured distance from the center of the windscreen.
* Please input the actually measured values of Height and Width ,by pressing the
left and right arrows, to perform more accurate functions.
(7) Turn signals (Blinker )*
After installation, check the side arrows in the display mode . If the
arrows are blinking , please change the High /Low options in the
Dimensions menu .
Height
Width
!
Installation
.
!
Installation Method
Basic components are for connection to the continuous power-supply cable and turn signals, and should be
professionally installed.
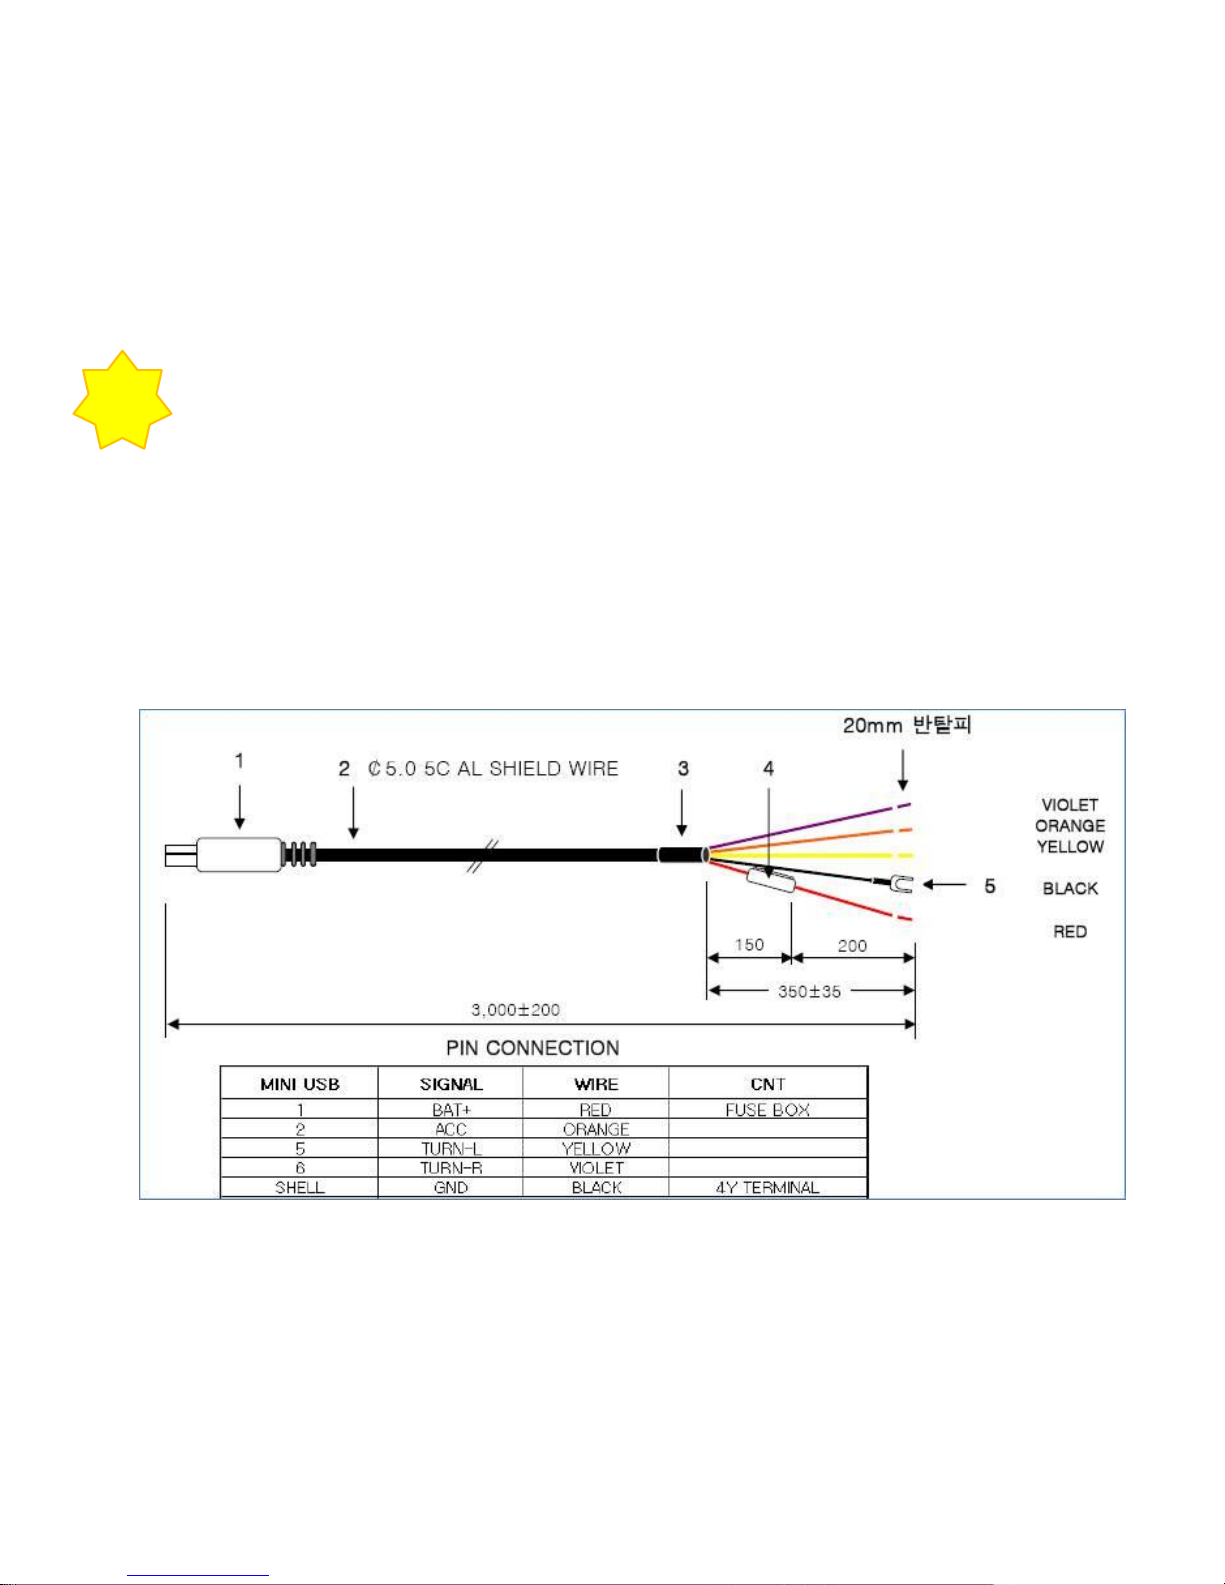
For the power-supply wire connection and turn signal ( Blinker ) wire connection, refer to the pin map guide .
Pin Map Guide

1
Clean installation
surface of windscreen
5
Rear Camera: Avoid
heat wires in glass when
attaching ,
the bracket should be
on the right side .
2
Remove tape off
bracket and install in
suitable place
horizontally
6
Plug the power-supply
cable into DC port
3
Arrange cables when
the power-supply cable
is connected to DC
port
7
Connect the rear
camera cable to the
main body
4
Find the suitable
installation place on
rear window and wipe
clean
8
Connect power-supply
cable to the vehicle
wiring.
!
Installation Method
Basic components are for connection to the continuous power-supply cable and turn signals, and should be
professionally installed.

* Make sure the power is off while connecting
cables
* Note that recorded image quality of rear
camera may not be as good as expected due
to rear window tinting .
* Rear camera bracket should be on the right
side while attaching. Otherwise rear-view
image will be reversed
9 Front images will
appear with voice
messages after
booting up
Adjust the rear
camera angle by
checking rear video
images.
Adjust settings for
ADAS and DVR
functions
Match the horizon
guide line while
parked on the flat
safe road
10
11
12
• Install near the rear vision mirror if the vehicle type is RV or Passenger car
• Install near bottom area of windscreen if the vehicle type is Bus ( Not mandatory)
• Install to near top of windscreen if the vehicle type is Truck .
If camera lens is affected by the reflecting lights of
the objects on the dash board, it will not perform
well. Thus do not put any objects on the dashboard.
Especially at night , the camera could be affected by
the navigational product of your vehicle .

!
Installation Method
In order to match with the horizon accurately, it is recommended to reset camera after installation.
Reset Camera
• In case OPTIAN is re-installed to a different
vehicle type, it is important to reset camera first
for more accurate warning functions.
• In case OPTIAN has a delay in warning
functions, reset camera to calibrate
automatically while driving on the flat road at
the speed rate over 60 Km/H.
Notice ! <Reset camera only when on the flat road !>

Specification
Name
OPTIAN
Front Camera
Full HD(1920 x 1080)
100 x 82 x 42 (mm)
Operating
Voltage
12V,
24V
Rear Camera
VGA(640 x 480)
54 x 31 x 25 (mm)
Mini
mum
Operating
Voltage
9V
LCD
2.4” QVGA TFT Panel
Maximum
Operating
Voltage
32V
Recording
Mode
CCTV, Event, Manual,
Parking , Motion Detection
Maximum
Electric
Consumption
5.6W
SD card type
Micro SDHC card Class10
(up to 32GB)
Storage
Temperature
-
40℃~85℃
Recording
Frame
Front 27fps/Rear 30fps
Operating
Temperature
-
20℃~70℃
Video
H.264 / extension – AVI
Minimum
Operating
Illumination
1lux
Voice
Recording
Sensitive internal
condenser MIC
Weight
155g

ADAS CAM
OPTIAN
www.plk.co.kr
 Loading...