

Page 1

Models: PX-W1210TS (Internal SCSI)
PX-W1210TSe (External SCSI)
Congratulations!
Thank you for purchasing the PlexWriter 12/10/32S, a reliable, high-performance
CD rewriter, recorder and reader. We appreciate the confidence you have shown in
us. Our goal is to put you—and keep you—on the leading edge of CD technology.
To get you there, we first have to help you install your PlexWriter d r ive prop erly and
operate it correctly. After that, the responsibility is yours to seek the applications tha t
make rewritable CD such a powerful and exciting addition to your system.
Page 2

Ü
FCC NOTICE
This equipment has been test ed and found to comply wi th the limits for a Class B digital device, pursuant
to Part 15 of the FC C Rules. These limits are designed to provide reasonable protecti o n against harmful
interference in a residential installation. This equipment generates, uses, and can radiate radio frequency
energy, and, if not insta lled and used in accordance with the instructions, may cause har mful interferen ce
to radio communications. However, there is no guarantee interference will not occu r in a particular
installation. If this equipment causes harmful interference to radio or television reception, which can be
determined by turning the eq uipment off and on, the user is encouraged to try to correct the interference
by one or more of the following measures:
Reorient or relocate the receiving antenna.
•
Increase the separation between the equipment and receiver.
•
Connect the equipment into an outlet on a circuit different from that to which the receiver is
•
connected.
Consult the dealer or an experienced radio/TV technician for help.
•
Any changes or modifications should be approved by the party responsible for compliance of FCC Rules;
otherwise, the user loses authority to operat e the equipment.
CAUTION
specified herein may result in hazardous radiation exposure.
The laser beam emitted from the optical pickup is invisible. Accordingly:
•
•
: Use of controls or adjustments or performance of procedures other than those
Do not open the optical pickup housing.
Obtain service only from Plextor-a uthorized personnel.
LASER INFORMATION
These produ cts have been designed and manufactured according to IEC 825-1 on th e Safety of Laser
products. This p roduct comes under “Class 1 Laser Products.” A Laser Caution Marking is attached on the
top of the internal drive model: “Caution: Invisible laser radiation when open. Avoid direct exposure to
beam.”
CAUTION
: To disconnect the CD drive from an electrical current, pull out the power plug.
VORSICHT
Zur Einhaltung der Funk-Entstörung von nicht selbständig betreibbaren
Hochfrequenzgeräten (periphere Anlagenkomponenten).
Dieses Gerät entspricht als Einzelgerät den Funk-Entstöranforderungen der
Postverfügung Nr. 243/1991.
Wird das Gerät innerhalb einer Anlage zusammen mit anderen Geräten
betrieben, so muss bei Inanspruchnahme der “Allgemeinen (Betriebs-)
genehmigung” nach der BMPT-AmtsblVfg Nr. 243/1991 die gesamte
Anlage folgenden Richtlinien entsprechen:
•
•
Dies ist bei der Zusammensetzung einer Anlage (z.B. Computersystem) aus nur einzeln geprüften Geräten
nicht immer erfüllt.
: DIE TRENNUNG VOM NETZ ERFOLGT DURCH ZIEHEN DES NETZSTECK ERS.
G-Vfg.243
Grenzwertklas se B der EN55022
Auflagen nach § 2 der BMPT-AmtsblVfg 243/1991
Page 3

Table of Contents
1. Getting Started................................................................................................. 1
About this Manual.............................................................................................. 1
Meet Your PlexWriter 12/10/32S ......................................................................1
What the PlexWriter 12/10/32S Does............................................................ 1
What You Can Do with the PlexWriter 12/10/32S........................................ 2
Save Your Box!.............................................................................................. 3
What’s in the Box .............................................................................................. 3
PlexWriter Drive Features and Controls............................................................ 5
Front Panel—Internal SCSI Drive .................................................................5
Front Panel—External SCSI Drive ................................................................ 5
Rear Panel—Internal SCSI Drive .................................................................. 7
Rear Panel—External SCSI Drive ................................................................. 8
About Software.................................................................................................. 9
Mastering Software........................................................................................ 9
Packet Writing Software................................................................................ 9
Duplication Software ..................................................................................... 9
Precautions......................................................................................................... 10
2. Installing Your PlexWriter SCSI Drive ......................................................... 11
Quickstart SCSI Installation—For Experienced PC Users Only.................... 11
Set SCSI Drive Switches or Jumpers................................................................. 12
Do I Have to Change My PlexWriter’s SCSI ID Number?............................ 12
Do I Have to Change My PlexWriter’s SCSI Termination Setting?.............. 13
Do I Have to Change Other PlexWriter SCSI Settings?................................ 15
Setting Jumpers on a PlexWriter Internal SCSI Drive................................... 15
Setting Switches on a PlexWriter External SCSI Drive................................. 18
Install a SCSI Interface Board............................................................................20
How to Choose a SCSI Board........................................................................ 20
Install the SCSI Board....................................................................................20
Install a PlexWriter Internal SCSI Drive............................................................22
Record the Serial Number..............................................................................22
Mount the PlexWriter Internal SCSI Drive.................................................... 23
Install a PlexWriter External SCSI Drive...........................................................28
Connect a Single SCSI Drive......................................................................... 29
Connect Multiple SCSI Drives....................................................................... 30
Using Sound Boards and Audio Cables............................................................. 31
3. Installing and Using Software......................................................................... 33
Quick Installation in Windows 95, 98, and ME................................................. 33
Install or Update SCSI Controller Support.........................................................34
Install Device Drivers ........................................................................................ 35
Install Plextor Applications Software ................................................................ 36
Plextor Manager 2000....................................................................................36
CD Res-Q....................................................................................................... 36
Other Applications Software.............................................................................. 37
PlexWriter 12/10/32S Operation Manual
iii
Page 4

Table of Contents
4. Using Your PlexWriter.................................................................................... 39
What Media to Use.............................................................................................39
Tray Loading and Operation..............................................................................39
Handling CD Media....................................................................................... 40
Cleaning Discs ...............................................................................................40
Playing Audio CDs ............................................................................................ 41
Writing to CD-R and CD-RW Media.................................................................42
Advantages of BURN-Proof Technology..........................................................43
5. Maintenance and Troubleshooting.................................................................45
Upgrading Firmware..........................................................................................45
Troubleshooting .................................................................................................46
Troubleshooting: General...............................................................................46
Troubleshooting: Reading from a Disc..........................................................48
Troubleshooting: Playing an Audio Disc....................................................... 50
Troubleshooting: Writing to Discs.................................................................51
Troubleshooting SCSI Problems....................................................................56
Troubleshooting for Macintosh Users............................................................ 58
6. Frequently Asked Questions about Recording..............................................59
Appendix A: PlexWriter 12/10/32S SCSI Drive Specifications........................61
Appendix B: Installing a SCSI Drive in Windows.............................................65
Installing SCSI Drivers in Windows 95, 98, and ME........................................65
Install Hardware.............................................................................................65
Install SCSI Drivers for Windows 95/98/ME ................................................ 65
Troubleshooting Windows 95, 98, and ME SCSI Installations......................66
Installation of a SCSI Drive in Windows 2000.................................................. 69
Install Hardware.............................................................................................69
Getting Drivers for Your SCSI Board............................................................69
Install SCSI Drivers for Windows 2000.........................................................69
Troubleshooting Windows 2000 SCSI Installations ...................................... 70
Installation of a SCSI Drive in Windows NT.....................................................71
Install Hardware.............................................................................................71
Getting Drivers for Your SCSI Board............................................................71
Install SCSI Drivers for Windows NT...........................................................71
Troubleshooting Windows NT SCSI Installations......................................... 72
Appendix C: Technical Support .........................................................................73
How to Contact Us............................................................................................. 73
Before You E-mail/Log On/FAX/Call............................................................... 74
Returns...............................................................................................................74
Appendix D: Helpful Contacts............................................................................ 75
Contacts for Hardware and Software.................................................................75
Contacts for PC Vendors....................................................................................76
Index......................................................................................................................77
iv
PlexWriter 12/10/32S Operation Manual
Page 5

1. Getting Started
This manual explains how to install and use your internal or external SCSI
PlexWriter 12/10/32S drive. For those of you with PCs, the installation pr ocess may
seem a bit complicated (Mac people have it easy). Fear not. We have successfully
walked through the installation process with millions of customers who previously
had lived in mortal terror of the innards of their computer.
About this Manual
Please read this manual carefully and keep it handy for easy reference. Use the
manual for installation, operation and troubleshooting. See your dealer or call
Plextor’s Technical Support Department should your drive require repair or service.
In this manual you should find all the information you need to successfully install,
operate and troubleshoot your drive. If you run into a problem that doesn’t seem to
be covered, however, please contact us. (See “Appendix C: Technical Support” for
the different ways you can contact us). You will be connected to our friendly, helpful
tech support staff, engineers who know their stuff. What might seem like an
uncooperative drive to you could very well be a 30-second fix to them. But we will
never know unless yo u co ntact us.
Meet Your PlexWriter 12/10/32S
The PlexWriter 12/10/32S is a CD-ReWritable drive that provides professional
quality CD performance for writing, rewriting and reading. It is available as an
internal or external drive, and is available for computers with an internal or external
SCSI interface.
What the PlexWriter 12/10/32S Does
The PlexWriter 12/10/32S writes to CD-R (recordable CD) media at up to 12X
speed, and it writes to new high-speed CD-RW (rewritable CD) media at up to 10X
speed. (Naturally, the drive can also write to conventional CD-RW media at 2X and
4X speeds.) It reads all CD-ROM and CD-R media at a maximum of 32X speed with
an average access time of 150 milliseconds. Maximum read speed of CD-RW media
is 24X.
Reliable writing is virt ually guara nt eed, thanks to unique circuitry that automatically
detects the type of media being recorded and adjusts the PlexWriter 12/10/32S to
provide the optimum laser power and length of burn. The PlexWriter 12/10/32S has
an interface that supports SCSI commands, including special commands for CD-R.
PlexWriter 12/10/32S Operation Manual 1
Page 6

Section 1. Getting Started
The PlexWriter 12/10/32S is fully MMC-compliant, supporting writing features such
as Disc-at-Once, Track-at-Once and Session-at-Once, as well as variable and fixed
packet writing. It also supports the UDF file system implemented through packet
writing.
The PlexWriter 12/10/32S supports running OPC and is compatible wit h Windows
Plug and Play. Flash memory allows upgrading the PlexWriter 12/10/32S to the
latest firmware revision (available from the Plextor web site ) without opening the
drive. New BURN-Proof™ technolog y
*
reduces b uffer underrun errors, making the
writing of CDs even more robust. And Plextor backs up this re markable drive with a
one-year full warranty on parts and labor, and unlimited toll-free tech support.
What You Can Do with the PlexWriter 12/10/32S
Just look at some of the things you can do with your PlexWriter 12/10/32S:
•
Record data or audio onto writable or rewritable CD media.
•
Play music CDs.
•
Save photos and other images on rewritable or writable CDs.
•
Create a “CD sneakernet” to share information with colleagues—just use
software such as Adaptec DirectCD to Drag and Drop files onto CD-R or
CD-RW media, then continue adding files and sharing the same CD disc.
•
Archive images and video to CD.
•
Master new software programs on CD.
•
Periodically back up your computer’s hard disk, including oper ating system,
hardware configuration, registry, program files and data. Plextor’s CD Res-Q™
software makes this easy! You can even make a bootable CD. Information on CD
Res-Q can also be found at:
http://www.plextor.com/english/products/cd_resq.html
If You Don’t Have CD Res-Q
CD Res-Q is provided free of charge when the PlexWriter 12/10/32S drive is
purchased as a retail kit. If you purchased a non-Plextor retail box and
CD Res-Q was not included, you can purchase this software directly from
Plextor.
Get CD Res-Q Directly from Plextor!
To purchase CD Res-Q by phone, please call us at 408-980-1838, extension 3.
To purchase CD Res-Q by email, send your request to sales@plextor. com
*
BURN-Proof is a licensed technology from Sanyo Electric Ltd.
2
PlexWriter 12/10/32S Operation Manual
Page 7

What’s in the Box
What you find in your Pl ext o r bo x
depends on what the company that
sold you the box put in—or took
out—while the Plextor drive was in
their possession.
Plextor currently sells its PlexWriter
12/10/32 SCSI drive in these retail
package configurations:
•
Internal SCSI drive with software
kit
•
External SCSI drive with software
kit
Each drive kit includes the
PlexWriter drive with CD-R and
CD-RW media, and with bundled
software, such as:
•
CD-mastering software for PC
•
Packet writing software for PC
•
CD Res-Q, Plexto r’s own
software for hard disk backup and
disaster recovery
•
Plextor Manager 2000, Plextor’s
software suite for getting the best
performance from your
PlexWriter drive, especially with
audio applications
•
Other utilities, which may be
added as needed
The configuration you received is
indicated by stickers applied to your
box. Your drive may also have been
integrated into a computer system or
subsystem sold by a third party.
Section 1. Getting Started
Save Your Box!
Be sure to save the box after you have
installed your PlexWriter drive. The
box and its packaging material were
designed and drop tested to ensure your
PlexWriter can endure rough treatment
and still arrive in working order.
Please save the tray insert that was used
to protect the delicate internal
components during shipping. If you
ship the PlexWriter, place this insert on
the tray inside the drive.
If you have to ship your drive back to
us, it’s best to send it packaged in the
original box. Some of our customers
have not held on to their boxes and have
had to resort to less-than-secure
methods to get drives back to us.
We cannot assume liability for any
damage your drive sustains during
shipment. Therefore, please ship your
drive in the safest manner possible.
Before shipping your drive, refer to the
Plextor web site for pointers. The web
site is at: http://www.plextor.com
If you did not receive a box (for
example, your drive came pre-installed
in a computer), we recommend you pay
a packaging store (such as Mail Boxes
Etc.) to ship your drive. If you don’t
have a packaging store in your area, ask
for packaging pointers when you
contact us to get an RMA number
before returning any drive. You can
contact our RMA Department at
rmasupport@plextor.com; or by calling
us at 800-886-3935, option 3; or by fax
at 408-727-1522.
PlexWriter 12/10/32S Operation Manual 3
Page 8

Section 1. Getting Started
NOTE:
If the security sticker on top of your box is cut, there may be a good reason;
for example, a dealer may have added other components or software. Carefully check
the contents to ensure nothing has been removed. If something is missing, contact
the party from whom you purchased the box for an explanation.
Here’s What Should Be In Your P lexWriter Box
Item PX-W1210TS
Internal SCSI
Drive with
Software Kit
CD-RW drive X X
4 mounting screws X
Approved high-speed
CD-RW media (1 piece)
Approved
CD-R media (1 piece)
Plextor CD with bundled software, Plextor
Manager 2000, and CD Res-Q
Quick install guide X X
Power cable X
Drive operation manual X X
Warranty registration card X X
Plextor Manager 2000 manual X X
CD Res-Q manual X X
Extra jumpers for setting drive switches X
X X
X X
X X
PX-W1210TSe
External SCSI
Drive with
Software Kit
See Appendix D for locations to purchase additional or replacement accessories.
NOTE
: If your drive came pre-installed, some or all of the parts shown in the table
may have been installed and may not be separately availab l e.
4
PlexWriter 12/10/32S Operation Manual
Page 9
Section 1. Getting Started
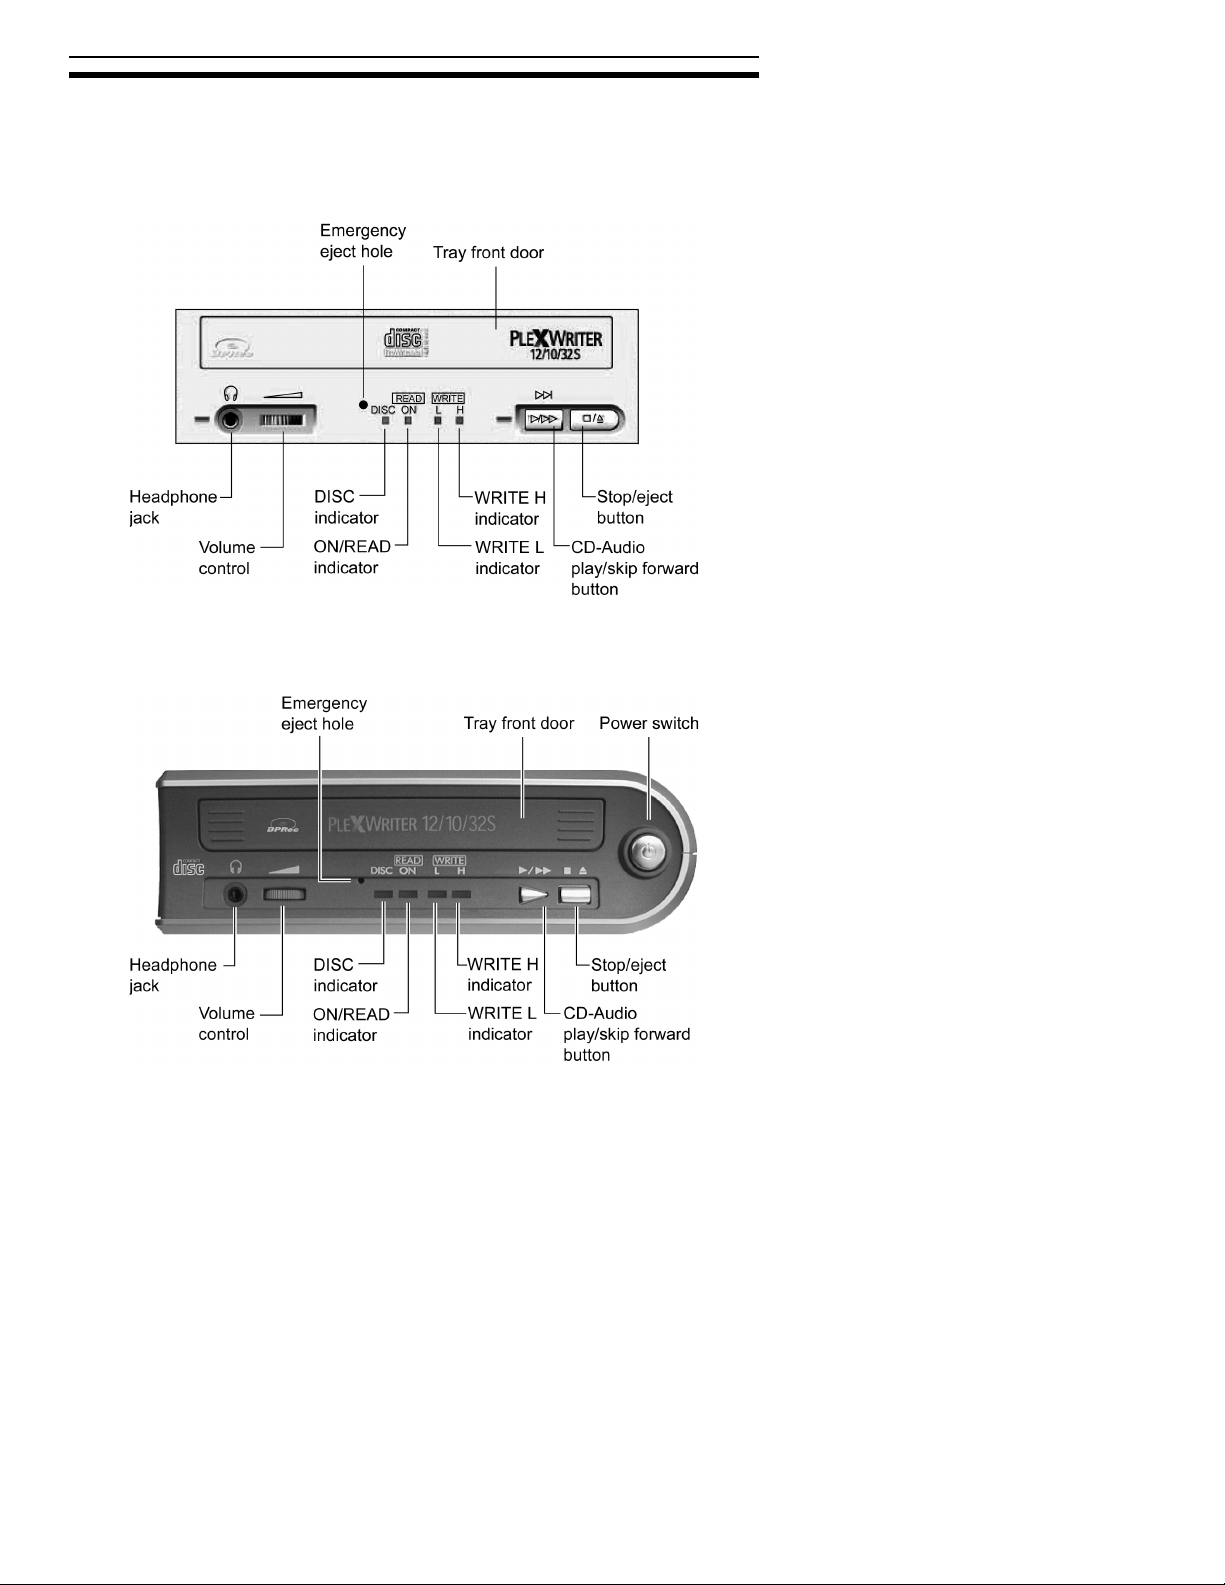
PlexWriter Drive Features and Controls
Before proceeding, become familiar with the controls and features of your
PlexWriter drive. Match the parts of your drive to the illustrations below.
Front Panel—Internal SCSI Drive
Figure 1: Front Panel of the PlexWriter 12/10/32S Internal Drive
Front Panel—External SCSI Drive
Figure 2: Front Panel of the PlexWriter 12/10/32S External Drive
PlexWriter 12/10/32S Operation Manual 5
Page 10

Section 1. Getting Started
•
Tray front door: Attached to tray drawer.
•
Headphone jack: Stereo mini-jack for headphones and powered speakers.
•
Volume control: Controls volume of headphone jack. This control has no effect
on the rear panel audio outputs.
•
Emergency eject hole: Insert emergency eject stick, paper clip, or other thin,
rigid object to eject tray if automatic eject button does not work. Turn OFF power
before usi ng this feature.
•
DISC indicator: Green when disc is in the drive and power is ON.
•
ON/READ indicator: Green when power is ON and no disc is in drive. Green
flashing when disc is bei ng accessed.
•
WRITE L indicator: Orange when recording CD-R discs at 1X, 4X, or 8X
speed, or low-speed CD-RW discs at 2X or 4X speed.
•
WRITE H indicator: Orange when recording CD-R discs at 12X speed. Both
WRITE H and WRITE L indicators are turned on when recording CD-RW discs
at 4X, 8X or 10X speed with high-speed CD-RW media..
•
CD-Audio play/skip forward button: With an audio CD in the drive, push once
to put the drive in CD-Audio play mode. Push button multiple times during CD
play mode to skip tracks (e.g., press three times to reach track 3). Push and hold
down this button more than one second to fast forward.
•
Stop/Eject button: Push to eject tray. During CD play mode, press once to stop
playback; press twice to eject the disc.
•
Power switch (external drive): To turn power the drive’s power ON or OFF.
6
PlexWriter 12/10/32S Operation Manual
Page 11

Rear Panel—Internal SCSI Drive
Section 1. Getting Started
Figure 3: Rear Panel of the PlexWriter 12/10/32S Internal SCSI Drive
•
Audio output connector: Outputs stereo analog signal. Use to connect to sound
board or audio amplifier. Use standard MPC-3 type, 4-pin connector.
•
Jumpers: Use to select SCSI ID, parity, SCSI termination, or block size. Leave
these jumpers at their factory settings unless one or more of the following
situations pertains to you:
SCSI ID: If you are using more than one SCSI peripheral, you may have to
change your SCSI ID number; see page 12 for details.
PRTY: Parity. In some cases, you may need to turn parity off; see page 15.
TERM: SCSI ter mination. In some situations, you may need to set this
jumper to turn the PlexWriter’s SCSI termination off; see page 13 for details.
TEST: For factory use only. Do not change this setting.
BLOCK: Block size. Yo u may need to change this setting if you are
working in a UNIX environment and want to boot from your PlexWriter; see
page 15.
SPDIF: Sony/Philips digital interface (digital audio out). If your sound
board supports the Sony/Philips digital interface, you can connect it here.
•
SCSI interface connector: Connects to SCSI interface board using
50-pin-to-50-pin flat ribbon SCSI cable.
•
Power connector: Connects to your computer’s power supply to provide
DC +5V and +12V to the PlexWriter.
PlexWriter 12/10/32S Operation Manual 7
Page 12
Section 1. Getting Started
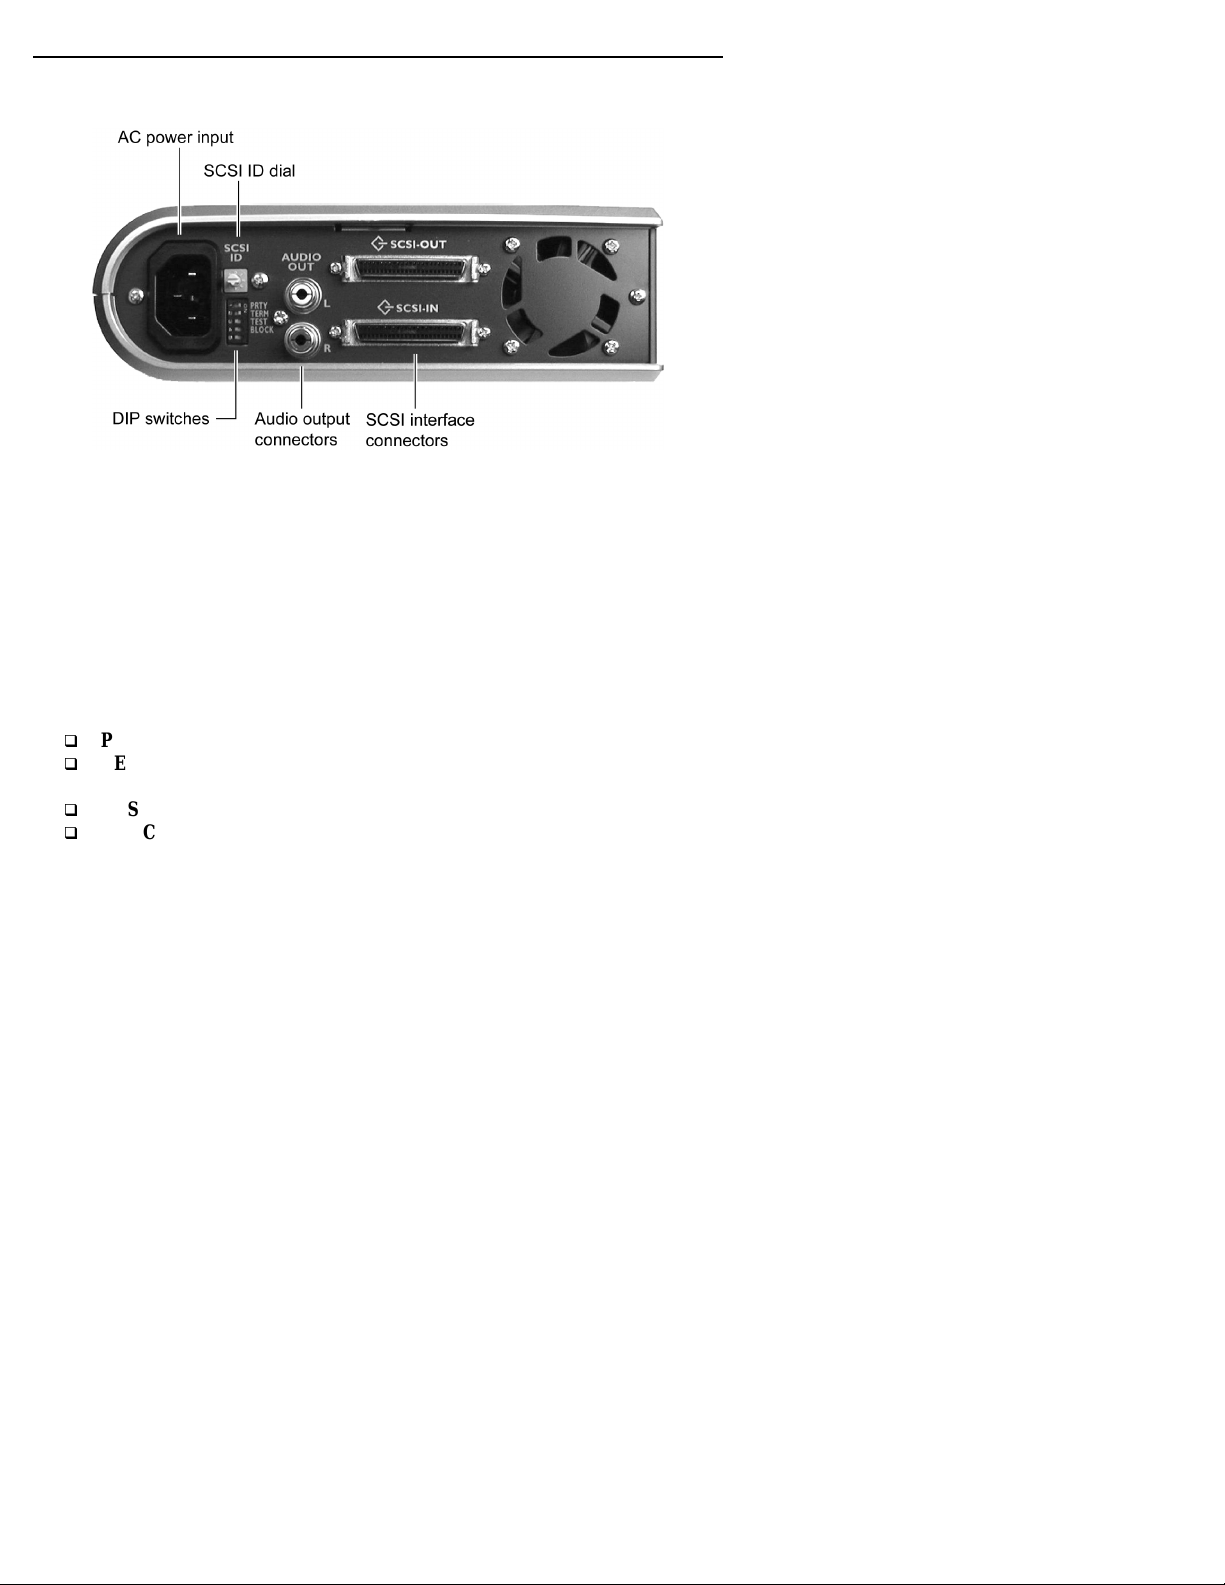
Rear Panel—External SCSI Drive
Figure 4: Rear Panel of the PlexWriter 12/10/32S External SCSI Drive
•
AC power input: Use the power cord supplied with your drive.
•
SCSI ID dial: Use this dial to designate SCSI ID numbers. Rotate the dial to
change the number. If you are using more than one SCSI peripheral, you may
need to change your SCSI ID number; see page 12.
•
DIP switches: Use to select parity, SCSI termination or block size. Leave these
switches at their factory settings unless one or more of the following situations
pertains to you:
PRTY: Parity. In some cases, you may need to turn parity off; see page 15.
TERM: SCSI termination. In some situations, you may need to set this
jumper to turn the PlexWriter’s SCSI termination off; see page 13 for details.
TEST: For factory use only. Do not change this setting.
BLOCK: Block size. Yo u may need to change this setting if you are
working in a UNIX environment and want to boot from your PlexWriter; see
page 15.
•
Audio output connectors: Output stereo analog signal. Use to connect to sound
board or audio amplifier. Use standard RCA jack connectors.
•
SCSI-In and SCSI-Out interface connectors: Use one connector to link your
PlexWriter to your SCSI interface board. Use the other to link your PlexWriter to
another SCSI peripheral in a chain; see page 30. You may use either connector
for either purpose.
8
PlexWriter 12/10/32S Operation Manual
Page 13

Section 1. Getting Started
About Software
In order to create CD-R and CD-RW discs you will need to have mastering or other
software installed on your computer system. There are many different software
packages on the market. You can check our web site (www.plextor.com
updated list of software that supports your drive. We provide mastering software kits
in retail packaging for your convenience. Without such software, your CD-RW drive
can only be employed as a reader, using your computer operating system’s generic
software drivers.
Mastering Software
Mastering software is used to create specific disc formats such as data, audio, video,
mixed mode, etc. An example of such software is Easy CD Creator.
Packet Writing Software
Another type of software writes packets. This software is allows you to format a CD
(similar to the procedure used with floppy disks). Then you can drag and drop files
straight to a CD, use the Send To function on your computer, or use copy and paste
to place files on the CD-R or CD-RW disc. This type of software turns your
CD-R/RW disc into a giant floppy. An example of such software is DirectCD.
Duplication Software
Yet another type of software copies from CD to CD. An example of this software is
DiscDupe 2000 in Plextor Manager 2000, or CD Copier in Easy CD Creator.
However, not all CDs can be duplicated. CDs created with packet writing software
can not be replicated with duplication software. (The packet writing technology used
to create those discs limits this function. It is not the fault of the duplication software
or your hardware.)
For more details on the various software packages for writing to CD-R or CD-RW,
please visit the web sites of the companies whose software you are interested in,
refer to their user’s manuals, or look at the help option within the software. A list of
various software packages that you can use with your Plextor drive can be found in
the support/compatibility section of www.plextor.com
.
) for an
PlexWriter 12/10/32S Operation Manual 9
Page 14

Section 1. Getting Started
Precautions
Like the rest of your computer system, your PlexWriter requires reasonable care in
its installation and use.
•
Do not put your computer monitor (or anything weighing more than 30 lbs.) on
top of a PlexWriter external drive.
•
Keep the area around your drive clean from dust, smoke, and other contaminants.
•
Use a soft, dust-free cloth for cleaning your drive. Do not allow moisture or
liquids, including water or cleaning fluids, t o touch the drive. Thinner, benzene,
or alcohol-based solvents can mar your drive’s surface.
•
Do not drop or jolt the drive.
•
Do not attempt to open the drive and service it yourself. Removin g the cover may
expose you to harmful electrical voltages or the laser beam. For your safe ty,
entrust service to Plextor-authorized service personnel only.
•
Keep your CD discs free of dirt or other contaminants, by storing them in jewel
cases. Use only industry-standard discs. Do not insert dirty, warped, poorly
balanced, or cracked discs into the drive.
•
Do not clean discs using a circular motion. Instead, use a radial motion: start at
the center of the disc and proceed to the outer edge.
CAUTION
performance in a vertical position.
: Install your PlexWriter horizontally. Plextor does not guarantee the drive’s
10
PlexWriter 12/10/32S Operation Manual
Page 15

2. Installing Your PlexW riter SCSI Drive
This chapter explains how to
physically install your PlexWriter
SCSI drive.
This chapter illustrates how to install
the SCSI drive in your computer
(internal drive), or how to attach the
PlexWriter (external drive) to the
SCSI interface. The steps you’ll need
to do are as follows:
1. Turn OFF your computer system.
2. Set the SCSI ID for your new
PlexWriter drive.
3. Set the PlexWriter’s termination.
(By default, termination is
enabled.)
4. If you have a new PCI SCSI
interface board, insert it into an
available PCI slot in your
computer.
5. If you have an inter nal mod e l
Plextor drive, mount the drive into
an available drive bay inside the
computer system.
6. Make all necessary cabling
connections: SCSI cable, power
cable, and audio cable.
7. Turn your computer s ystem ON.
The following pages give more
details for this procedure.
Quickstart SCSI
Installation—For
Experienced PC Users Only
If you’ve installed computer peripherals
before, you’re in luck with the
PlexWriter drive. Use this “quickstart”
installation designed to get you up and
running quickly.
Scenario 1: You purchased a Plextor
PlexWriter drive, the PlexWriter is your
only SCSI peripheral, and you have
Windows operating system.
What to do: Purchase and install a
Plug-and-Play SCSI board (with SCAM
support). After it is properly installed
and configured, plug in the PlexWriter,
and go. Windows 9x, ME and 2000 will
automatically recognize the board and
prompt you for the SCSI board drivers.
(In Windows NT you will need to
install the drivers manually through
Control Panel/SCSI Adapters.) After the
SCSI board drivers are installed and the
board is functioning correctly, set the
PlexWriter drive to a unique SCSI ID
and plug it in. The drivers for your CDRW drive will automatically be
installed by the operating system.
NOTE: Most newer SCSI controllers
are Plug-and-Play-compliant.
PlexWriter 12/10/32S Operation Manual 11
Page 16

Section 2. Installing Your PlexWriter SCSI Drive
Set SCSI Drive
Switches or Jumpers
Your PlexWriter SCSI drive needs to
be flexible enough to work with the
variety of computer systems and a
number of other SCSI peripherals. To
provide this flexibility, Plextor lets
you specify the drive’s settings before
it is installed. On an internal SCSI
drive, you determine settings by the
position of jumpers on the jumper
block at the rear of the drive. On an
external drive, you determine settings
by the position of DIP switches and
the rotary dial on the rear panel of the
drive.
Your drive ships from our factory
with its jumpers, switches, and/or dial
set to work in the most commonly
found environment. You should leave
those switches and jumpers at their
factory settings, unless: 1) you plan to
use another SCSI peripheral (e.g.,
CD-ROM, hard disk, scanner) with
your computer system in addition to
your PlexWriter; or 2) you find it
necessary to change the block size
setting (most likely in an older UNIX
system).
Quickstart Installation
(Continued)
Scenario 2: You have a Plug-andPlay/SCAM SCSI board installed
already, the PlexWriter is your only
SCSI peripheral, and you have a
Windows operating system.
What to do: Plug in the PlexWriter,
and go. Windows will recognize the
drive and install the correct drivers
automatically.
Scenario 3: You have a SCSI board that
is not Plug-and-Play/SCAM-capable,
and you have a Windows ope rating
system.
What to do: Set a unique SCSI ID
number for the PlexWriter, and make
sure all other peripherals have their own
SCSI numbers. Set the termination of
each peripheral OFF; except set the
termination of the last peripheral
devices on each side of the chain to ON.
Other scenarios, or if you have
problems: Better take a closer look at
this chapter and at “Appendix B:
Installing a SCSI Drive in Windows.”
Do I Have to Change My PlexWriter’s SCSI ID Number?
Your PlexWriter SCSI drive is shipped fro m the factory with its SCSI ID number set
to 4. The SCSI interface lets you chain several SCSI peripheral devices to a single
SCSI interface board, or to the SCSI port of an Apple computer, with no loss of
performance.
NOTE:
The cable length of all SCSI chain cables should not exceed 1.5 meters.
Shorter cable lengths are better, especially when using multiple devices or faster
SCSI interfaces, such as Ultra, Ultra Wide, and others.
12
PlexWriter 12/10/32S Operation Manual
Page 17

Section 2. Installing Your PlexWriter SCSI Drive
However, each peripheral must have a unique SCSI ID number—your PlexWriter
can have any of 8 numbers (0-7). SCSI ID 7 is typically reserved by the SCSI
interface board.
You probably don’t need to physically set the SCSI ID if:
•
Your PlexWriter drive is the only SCSI peripheral: In this case, don’t change
the SCSI ID. Leave it set to the original factory setting of 4.
•
You have a SCAM-compliant SCSI bo ard: Your Plextor drive is also SCAMcompliant, so if you have Windows 95, 98, 2000, or ME, you don’t have to worry
about setting SCSI ID numbers. (SCAM means that when you turn on your
computer, the SCSI interface board will detect whether there is SCSI ID conflict
between multiple devices. Because your PlexWriter also suppor ts SCAM, the
drive automatically resets its SCSI ID internally to avoid any conflict with other
devices.) SCAM overrides any hardware settings.
You may have to physically set the SCSI ID if you have mor e than one SCSI
peripheral device and:
•
Your SCSI board is not SCAM-compliant: If you separately purchased or
already own a SCSI interface board, it may not be SCAM-compliant. In this case,
you should determine the SCSI IDs of all peripheral devices and change the
PlexWriter’s ID to a unique number.
•
You don’t know if your SCSI board is SCAM-compliant: In this case, to be on
the safe side, determine the SCSI IDs of all peripheral devices and change the
PlexWriter’s ID to a unique number.
•
You may have an older driver: Since SCAM was not a requirement when Plugand-Play specifications were written, original Windows 95 CDs may not include
a SCAM-compliant driver for your SCSI interface board. In this case, you should
determine the SCSI IDs of all peripheral devices and change the PlexWriter’s ID
to a unique number.
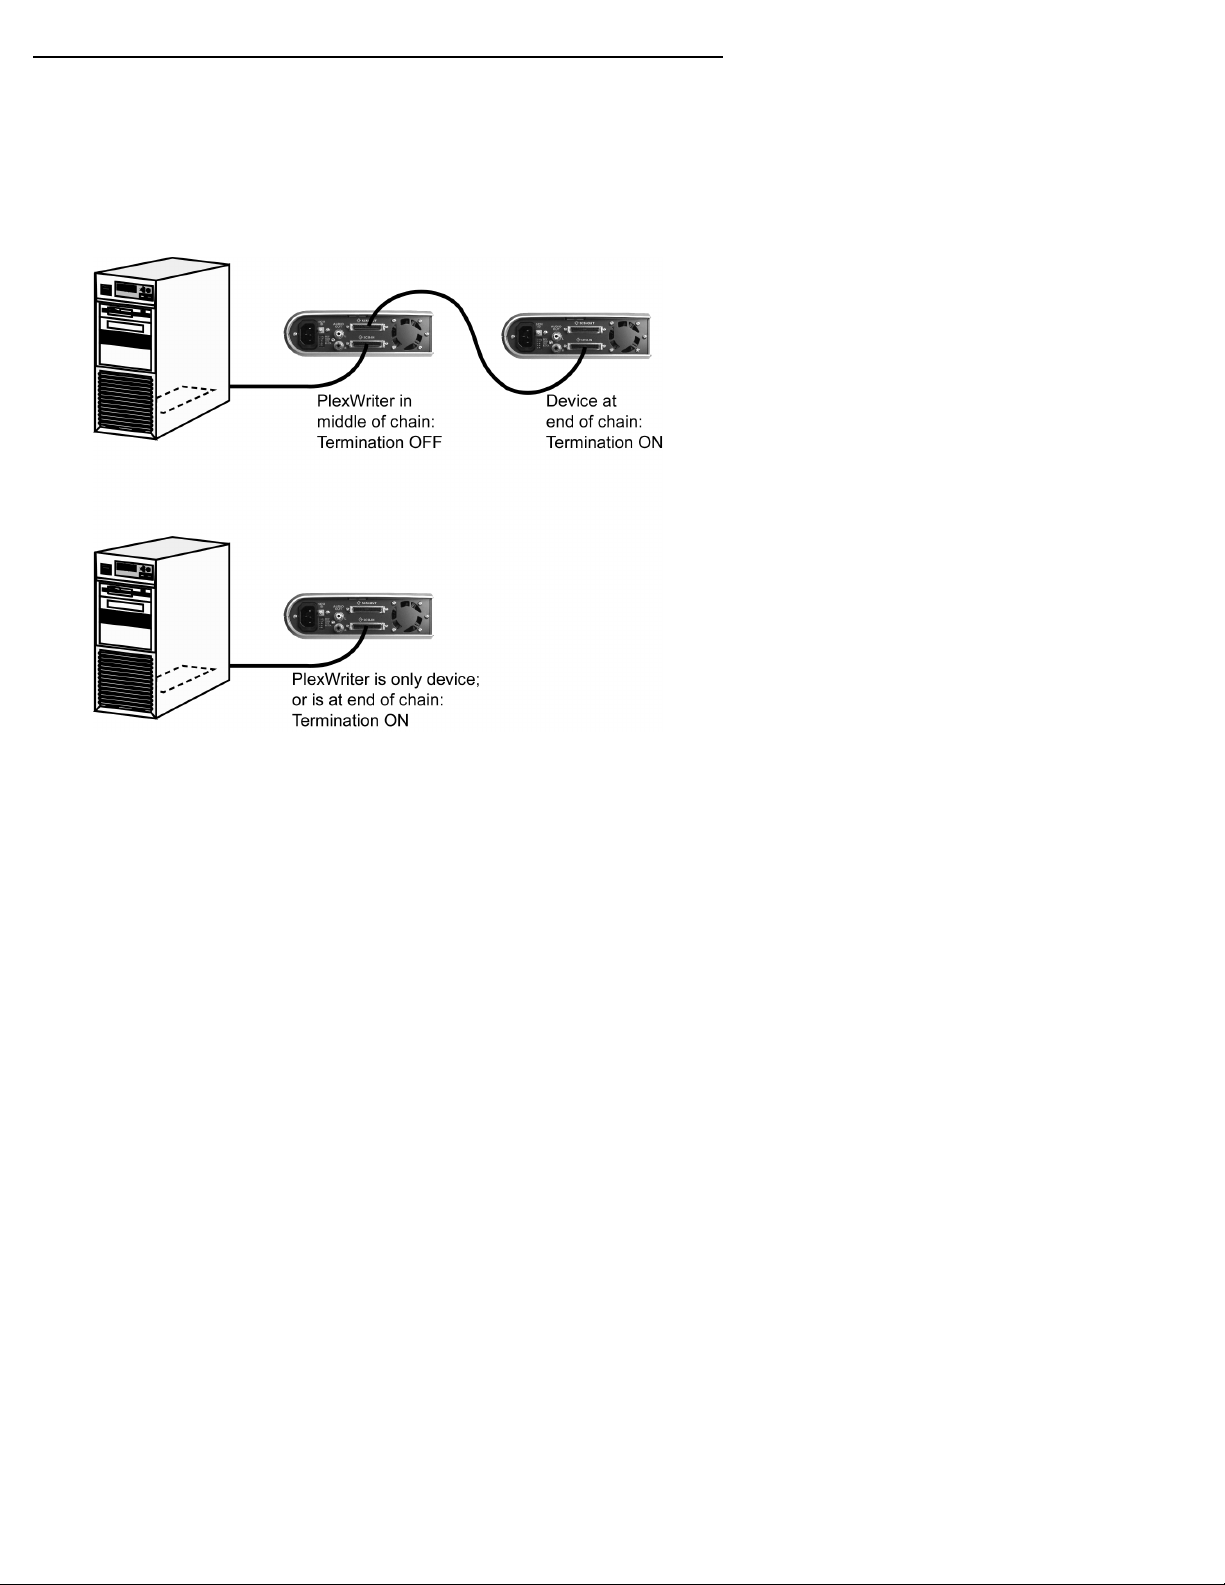
Do I Have to Change My PlexWriter’s SCSI Termination
Setting?
The PlexWriter is shipped from the factory with its S CSI termination set ON.
You can leave the PlexWriter’s SCSI termination setting to ON if:
•
Your PlexWriter drive is the only SCSI peripheral: In this case, don’t change
the SCSI termination setting. Leave it set to the original factory setting of ON.
•
Your PlexWriter drive is the last peripheral in a chain: If you are using
multiple SCSI peripherals with your computer and the PlexWr iter is positioned as
the last peripheral in a chain, don’t change the PlexWriter’s termination setting.
Leave it set to ON.
NOTE
: The PlexWriter uses active termination.
PlexWriter 12/10/32S Operation Manual 13
Page 18
Section 2. Installing Your PlexWriter SCSI Drive
You should change the PlexWriter’s SCSI termination setting to OFF if:
•
Your PlexWriter is in the middle of a chain: If you have multiple SCSI
peripherals and the PlexWriter drive is not the last device in the chain, set its
SCSI termination to OFF. (In this case, remove, disable, or turn off termination
for all devices between the SCSI board and the last peripheral on the opposite
end of the chain. Set the termination of the last device in the chain to on.)
Figure 5: What Termination Settings to Use
REMEMBER
enabled. If you have any SCSI devices chained after your PlexWriter, you must
disable or turn OFF the PlexWriter’s SCSI termination using the instructions later in
this chapter.
: Only the last SCSI peripheral in the chain should have termination
Termination Power
Some interface boards and peripherals have the ability to disable and enable
termination power. This should not be co nfused with termination itself. Termination
power can and should be provided by at least one device attached to your SCSI
interface board. Your Plextor drive automatically supplies termination power. Any
additional devices supplying termination po wer will not cause any prob lems.
14
PlexWriter 12/10/32S Operation Manual
Page 19

Section 2. Installing Your PlexWriter SCSI Drive
Do I Have to Change Other PlexWriter SCSI Settings?
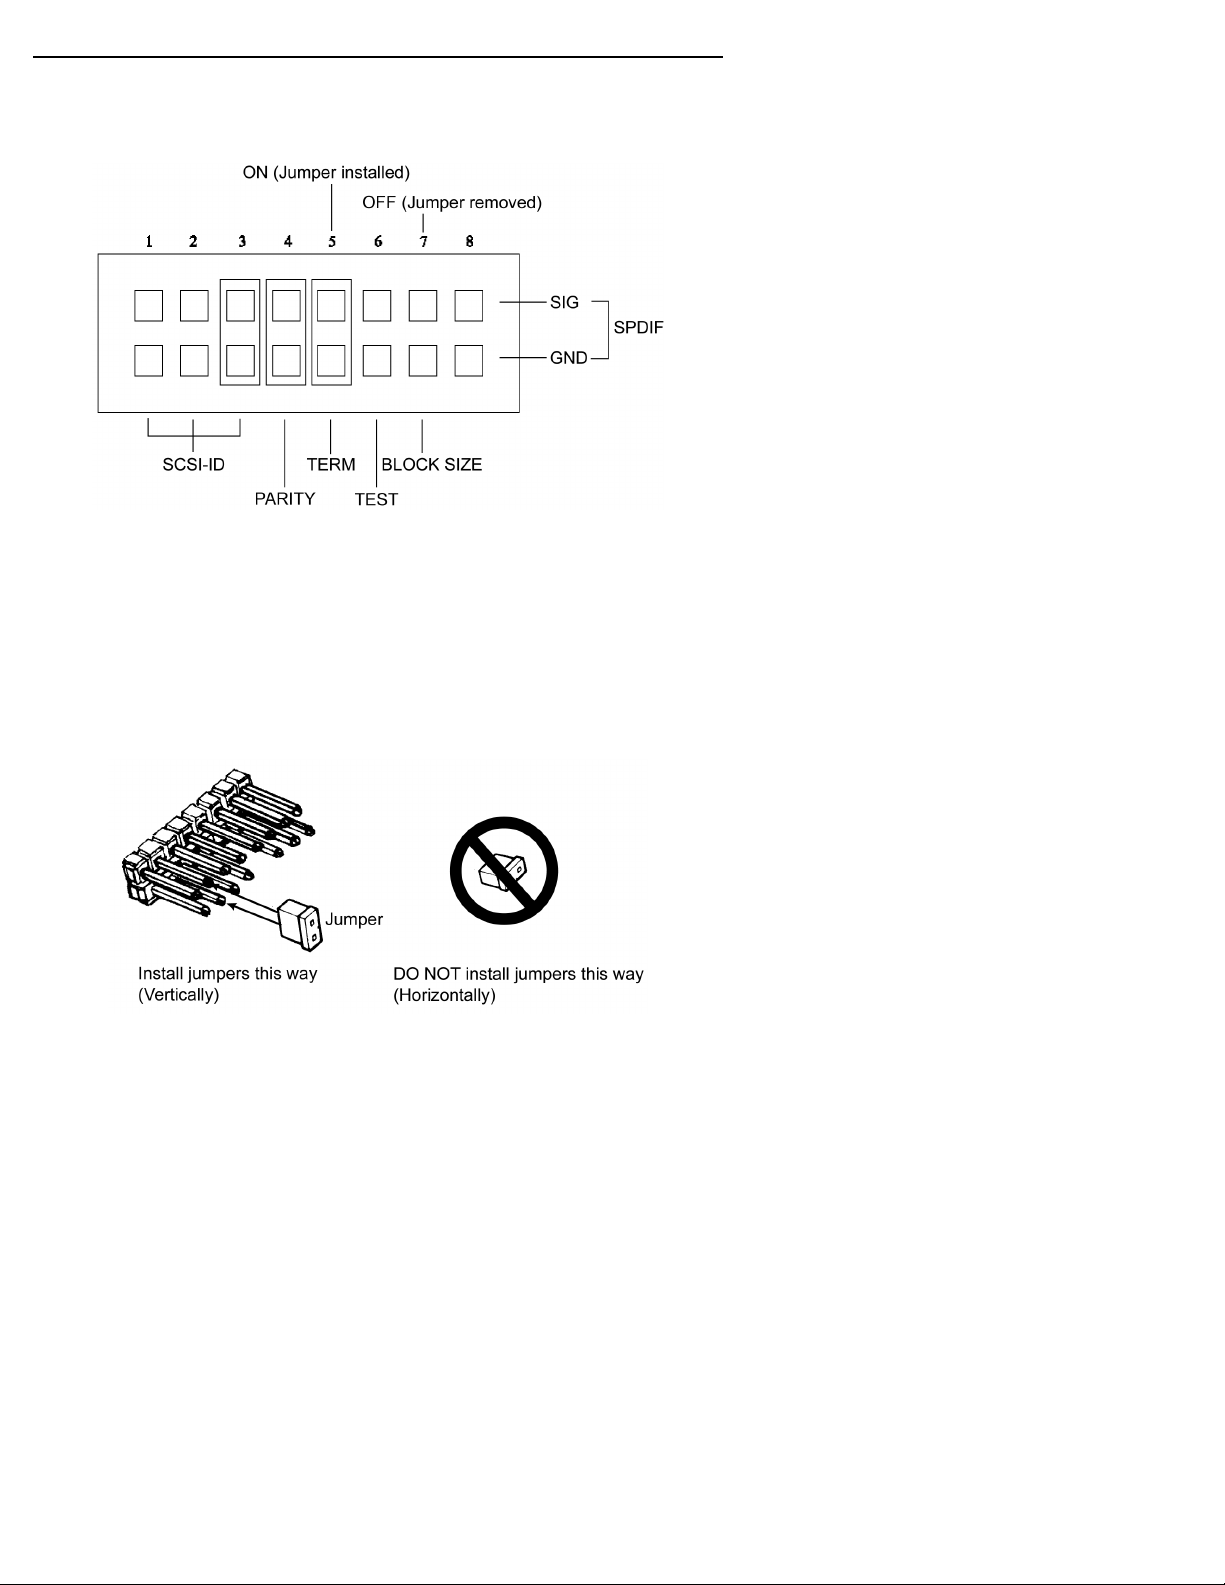
You probably won’t have to change any o f the other se t tings on your PlexWriter
SCSI drive’s switches or ju mpers. Use this table to help decide.
SCSI Switch
or Jumper
Setting
PRTY Parity setting. Leave this ON. The parity check provided by the
ON setting enhances the reliability of the SCSI bus. Set to OFF
only if your computer system or SCSI interface board specifically
requests that parity be disabled.
TERM Termination setting. This enables or disables (turns ON or OFF)
SCSI termination. Factory setting is enabled (ON). See page 13
for an explanation of SCSI termination and to determine if you
need to change this setting.
TEST Leave this OFF. It is for factory use only.
BLOCK Block size. Leave this OFF, unless you are working in a UNIX
environment and want to boot from your PlexWriter drive. If so,
set this switch/jumper ON.
SPDIF Sony/Phillips Digital Interface Format (digital audio out). If your
sound board supports SPDIF or Digital In, use an SPDIF cable
(not supplied) to connect it to these pins.
Where to Set It
Setting Jumpers on a PlexWriter Internal SCSI Drive
Use this procedure if you have a PlexWriter internal SCSI drive. (However, if you
already have a SCSI board installed, an internal PlexWriter is the only SCSI
peripheral you will use with your computer, and you do not need to change any
settings, skip now to “Install a PlexWriter Internal SCSI Drive” on page 22.)
PlexWriter 12/10/32S Operation Manual 15
Page 20
Section 2. Installing Your PlexWriter SCSI Drive
Factory SCSI Jumper Setting s
Figure 6 shows the factory settings of the SCSI jumpers. The functions shown are
ON if the jumpers are installed and OFF if the jumpers are removed.
Figure 6: Factory Settings for Jumpers at the Rear of the Internal SCSI Drive
Changing SCSI Jumper Settings
To remove a jumper, pull it off with your fingers or a pair of needle-nose pliers.
CAUTION
: Ensure power to the drive is OFF before installing or removing jumpers.
To add a jumper, push it onto the jumper pins. In addition to the three jumpers
already installed at the factory, extra jumpers are supplied with the PlexWriter drive.
Figure 7: Install Jumpers Across Vertical Pairs of Pins
CAUTION
pin switch to another by installing the jumpers lengthwise (horizontally). Doing so
could result in damage to the drive.
: Install jumpers across each pin as shown (vertically). Do
not
connect one
16
PlexWriter 12/10/32S Operation Manual
Page 21

Section 2. Installing Your PlexWriter SCSI Drive
Changing the SCSI ID
If you already have another SCSI peripheral whose SCSI ID is set to 4, you must
change the SCSI ID number of either that peripheral or that of the PlexWriter drive.
(But see “Do I Have to Change My PlexWriter’s SCSI ID Number?” on page 12
before proceeding.)
The SCSI ID number of the internal PlexWriter drive is determined by the placement
of jumpers on Pins 1, 2, and 3. (To find the location of Pin 1, Pin 2, and Pin 3, refer
to the jumper diagram above.) To change the SCSI ID number, follow the chart
below.
Jumper Installed Across
SCSI ID Number Pin 1 Pin 2 Pin 3
0 OFF OFF OFF
1 ON OFF OFF
2 OFF ON OFF
3 ON ON OFF
4 (Factory setting) OFF OFF ON
5 ON OFF ON
6 OFF ON ON
7 ON ON ON
For example, the factory setting for SCSI ID 4 is made by installing a jumper across
Pin 3 of the jumper block, leaving Pin 1 and 2 uncovered. To set the SCSI ID at 3,
you would install a jumper across Pin 1, another jumper across Pin 2, leaving Pin 3
uncovered. To set the SCSI ID at 2, you would install a jumper across Pin 2, leaving
Pins 1 and 3 uncovered.
Changing the SCSI Termination Setting
The PlexWriter internal drive is shipped from the factory with its SCSI termination
enabled (ON).
If you have to disable (turn O FF) SCSI termination on your P l exWriter drive,
remove the jumper from Pin 5. Factory setting is enabled (ON). See page 12 for an
explanation of SCSI termination and to determine if you need to change this setti ng.
If your drive is already installed in your computer, be sure to turn off your computer
before removing (or reinstalling) the jumpers. We recommend that you retain the
jumpers so you can reinsert them onto the termination pins if you later need to turn
the drive’s SCSI termination ON.
If you have inte rnal SCSI peripherals only, then you shoul d be using an i nt ernal
ribbon cable. In this case, all devices between the SCSI host adapter and the last
peripheral on the opposite end of the ribbon cable should have their termination
removed, disabled, or turned off.
PlexWriter 12/10/32S Operation Manual 17
Page 22

Section 2. Installing Your PlexWriter SCSI Drive
If you have both internal and external SCSI peripherals (both the internal and
external connectors of your host adapter are used), then the termination of your SCSI
interface board should be removed, disabled or turned OFF. The last peripheral on
your internal cable and the last peripheral on your external SCSI chain should retain
their termination (have it set ON). All other SCSI peripherals connected to the host
adapter should have their termination removed, disabled, or turned off.
NOTE:
The SCSI interface board that is bundled in the Plextor kits has Auto
Termination, so turning off its termination is unnecessary. However, you still must
sometimes specify termination ON or OFF on the PlexWriter drive, as discussed on
page 13.
Setting Switches on a PlexWriter External SCSI Drive
Use this procedure if you have a PlexWriter external SCSI drive. (However, if you
already have a SCSI board installed, an external PlexWriter is the only SCSI
peripheral you will use with your computer, and you do not need to change any
settings, skip now to “Install a PlexWriter External SCSI Dr ive” on page 28.)
Factory SCSI Switch Settings
A rear-panel rotary dial controls the SCSI ID setting of the external PlexWriter drive,
and other settings are controlled by DIP switches. Figure 8 shows the factory settings
of the rear-panel dial and switches.
Figure 8: Factory Settings for Dial and DIP Switches on External SCSI Drive
CAUTION
dial or the DIP switches.
: Turn the drive’s power OFF before changing the setting of the SCSI ID
18
PlexWriter 12/10/32S Operation Manual
Page 23

Section 2. Installing Your PlexWriter SCSI Drive
Changing the SCSI ID
If you already have another SCSI peripheral whose SCSI ID is set to 4, you must
change the SCSI ID number of either that peripheral or that of the PlexWriter drive.
(But see “Do I Have to Change My PlexWriter’s SCSI ID Number?” on page 12
before proceeding.)
To change the SCSI ID number of the external PlexWriter drive, rotate the dial’s
arrow to a different SCSI ID number.
Changing the SCSI Termination Setting
The PlexWriter external drive is shipped from the factory with its SCSI termination
enabled (ON). If you have to disable SCSI termination on yo ur PlexWriter drive, set
DIP switch 2 (TERM) to OFF.
If you are using external SCSI peripherals only, then you should be using an external
SCSI cable (or cables). In this case, all devices between the SCSI host adapter and
the last peripheral on the end of your SCSI chain, should have their termination
removed, disabled, or turned off.
If you have both internal and external SCSI peripherals (both the internal and
external connectors of your host adapter are used), then the termination of your SCSI
host adapter should be removed, disabled or turned OFF. The last peripheral on your
internal cable and the last peripheral on your external SCSI chain should retain their
termination (have it set ON). All other SCSI peripherals connected to the host
adapter should have their termination removed, disabled, or turned off.
NOTE:
Most newer SCSI interface boards have Auto Termination, so turning off its
termination is unnecessary. However, you still must specify termination ON or OFF on
the PlexWriter drive.
PlexWriter 12/10/32S Operation Manual 19
Page 24

Section 2. Installing Your PlexWriter SCSI Drive
Install a SCSI Interface Board
By itself, your PlexWriter is incapable of communicating with your computer. You
must use a hardware link that enables your drive to “talk” with the rest of your
computer. The PlexWriter SCSI drive uses a SCSI interface as its link.
SCSI board already installed? Even if you already have a SCSI board in your
computer, it may not be adequate for use with your high-performance PlexWriter
drive. See “How to Choose a SCSI Board” below for more details. Then, if your
SCSI board is suitable, you can go directly to “Install a PlexWriter Internal SCSI
Drive” on page 22; or to “Install a PlexWriter External SCSI Drive” on page 28.
How to Choose a SCSI Board
Plextor’s technical support engineers have developed these recommendations for
choosing and installing a SCSI board that gives the best performance with your
PlexWriter drive:
•
Use a high performance PCI bus-mastering SCSI interface board.
•
Connecting the PlexWriter to a parallel-to-SCSI interface, or to the SCSI
interface on a sound board will slow the PlexWriter’s performance and is not
recommended. With this configuration, you will not be able to achieve maximum
rated writing or reading speed.
•
If you have a desktop PC, do not connect your PlexWriter drive to a non-busmastering interface board (PIO). You will not be able to achieve maximum rated
writing speed with this configuration.
•
If you have a laptop computer, you can use a PIO PCMCIA card; however, these
cards allow for writing at 4X speed at best. To achieve full writing performance,
use a CardBus PCMCIA card.
Install the SCSI Board
This is a PlexWriter installation and operatio n manual—it is not a SCSI interface
board oper a tio n manual . U n for tuna tely, we have no way of knowing which typ e of
board you elect to use. There are dozens of SCSI interface boards on the market, and
each is installed somewhat differently.
Use the instructions for this section only as guidelines. For more detailed instructions
on how to properly install your SCSI interface board, refer to the operation manual
you received when you purchased the board.
CAUTION
killer. Just a small jolt to one of the chips on your interface board may render it
useless with no apparent damage. To guard against static electricity, position your
computer in a location without a carpet underfoot. Also, use common sense—for
example, don’t walk on a carpeted floor in stocking feet just before you install your
SCSI board or PlexWriter drive.
20
: Be very careful not to cause static electricity. Static electricity is a silent
PlexWriter 12/10/32S Operation Manual
Page 25

Section 2. Installing Your PlexWriter SCSI Drive
To install the SCSI board:
1. Before proceeding, make sure the power to your computer and any external
peripherals is OFF and your computer is UNPLUGGED from its power source.
Figure 9: Removing a Typical Computer’s Cover
2. Remove your computer’s cover, following the directions provided by your
computer’s manufacturer. Typically, this invol ves loosening or removing several
screws on the back panel of your computer and sliding off the cover.
See Figure 9 for details.
3. Carefully remove the SCSI interface board from its packaging.
CAUTION
grounded object to discharge any static electricity you may have on your body.
: Before you remove the SCSI interface board from its packaging, touch a
4. Select a vacant slot in your computer where you will install the board (refer to the
manual packaged with your interface board for instructions as to which slot in
your system to use). If your PlexWriter is an internal drive, try to pick a slot that
is closest to where the drive will be installed.
PlexWriter 12/10/32S Operation Manual 21
Page 26
Section 2. Installing Your PlexWriter SCSI Drive
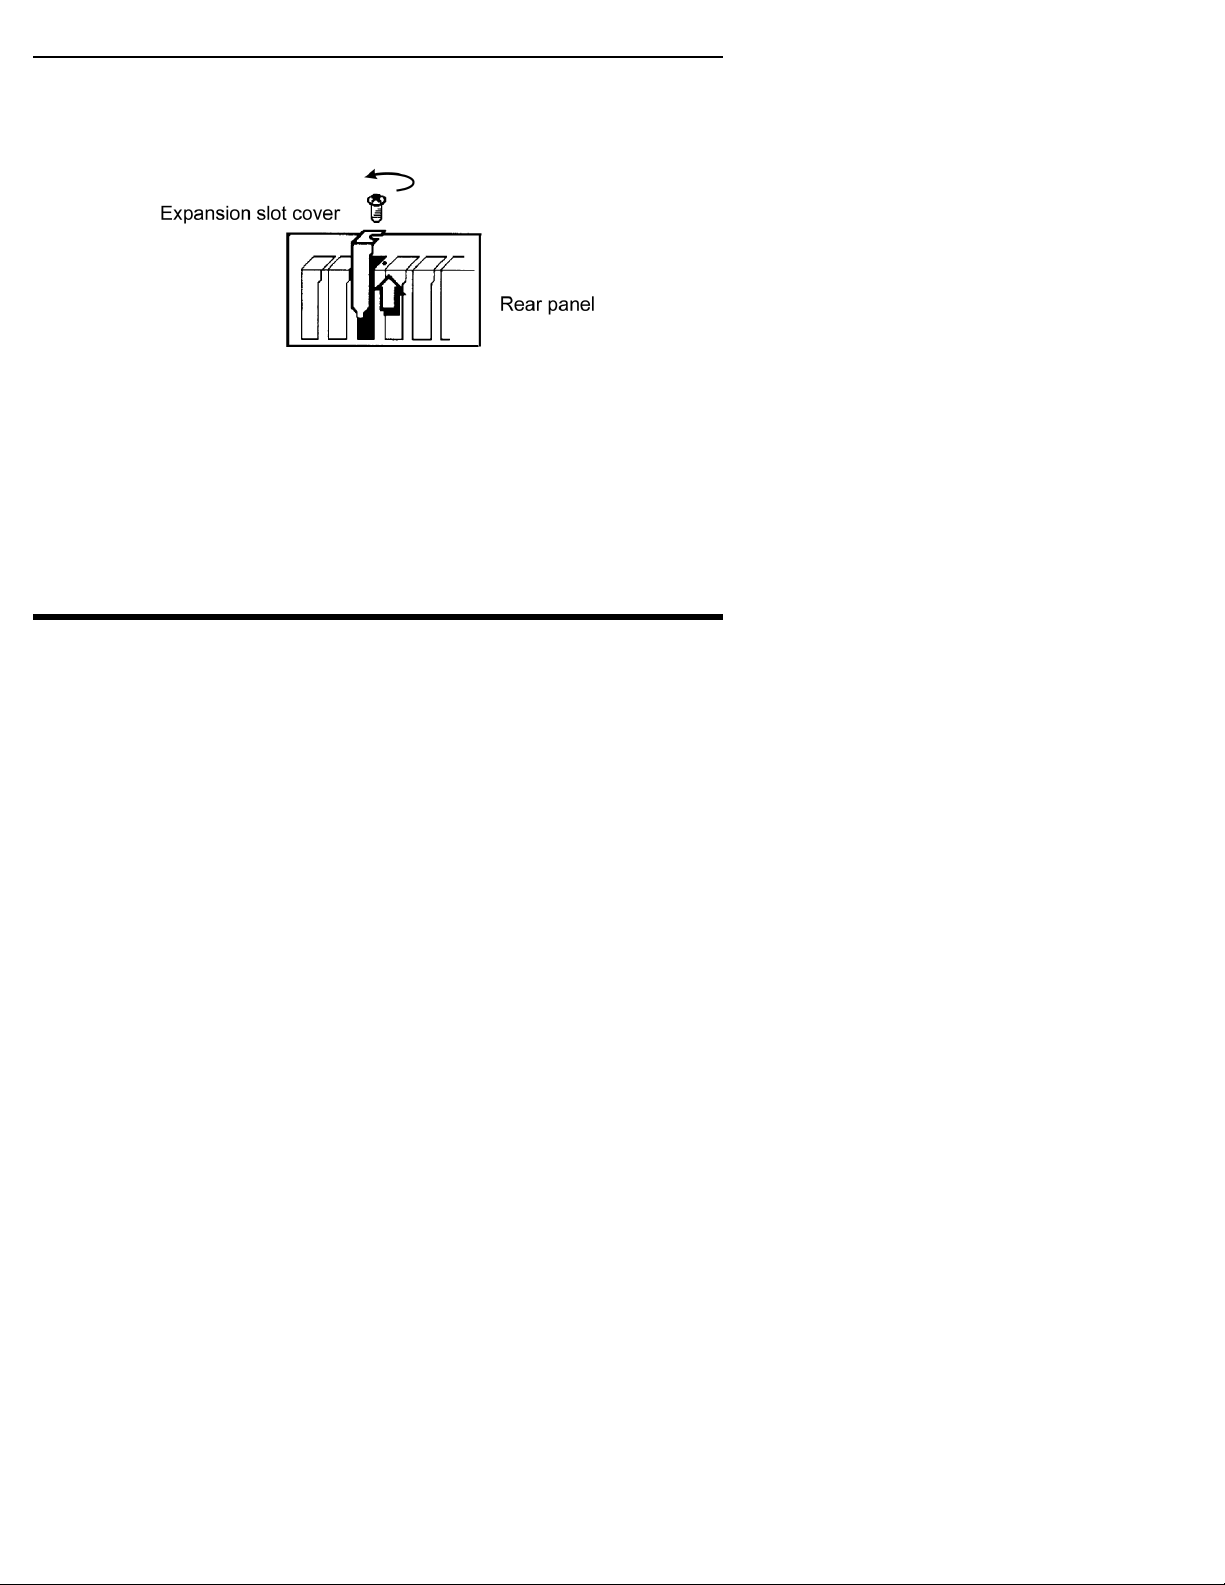
5. Remove the cover plate for this slot from the back panel of your computer. Keep
the screw from the cover plate nearby, as you will need it in a moment. Save the
cover plate in case you need it at a later date.
Figure 10: Removing the Cover Plate
6. Plug the SCSI interface board into the slot you have selected. Rock the board
from end to end to ensure that it seats firmly in the slot. Don’t force it. If you
cannot push the board down completely into the slot, remove the board and try
again.
7. Once you have successfully inserted the board, fasten it in place using the cover
plate screw that you removed earlier.
Install a PlexWriter Internal SCSI Drive
This section explains how to install a PlexWriter internal SC SI drive in a PC. If you
have an external SCSI drive, go to the section titled “Install a PlexWriter External
SCSI Drive” on page 28.
Before proceeding, double-check your SCSI number setting, SCSI termination
setting, and other jumper-controlled settings.
Record the Serial Number
Record the serial number and TLA code of your drive on the inside front cover of
this manual.
22
PlexWriter 12/10/32S Operation Manual
Page 27
Section 2. Installing Your PlexWriter SCSI Drive
Mount the PlexWriter Internal SCSI Drive
You can mount your internal PlexWriter drive in any available bay. You must
remove the small panel that covers the bay that you want to use.
CAUTION
performance in a vertical position.
You must make a minimum of two cable connections to your PlexWriter. The two
cable connections that you must make are:
•
•
There are also two optional cable connections:
•
•
Choose a SCSI Ribbon Cable
The SCSI cable you will need is a standard 50-pin flat-ribbon cable. The cable may
have a termination on it.
: Install your PlexWriter horizontally. Plextor does not guarantee the drive’s
SCSI cable
Power cable
A cable connection if you are using a sound board in your computer and plan to
connect the PlexWriter’s audio output to the audio connector on the sound board.
A cable connection if the sound board is equipped with SPDIF and you wish to
use the SPDIF digital audio output from your PlexWriter.
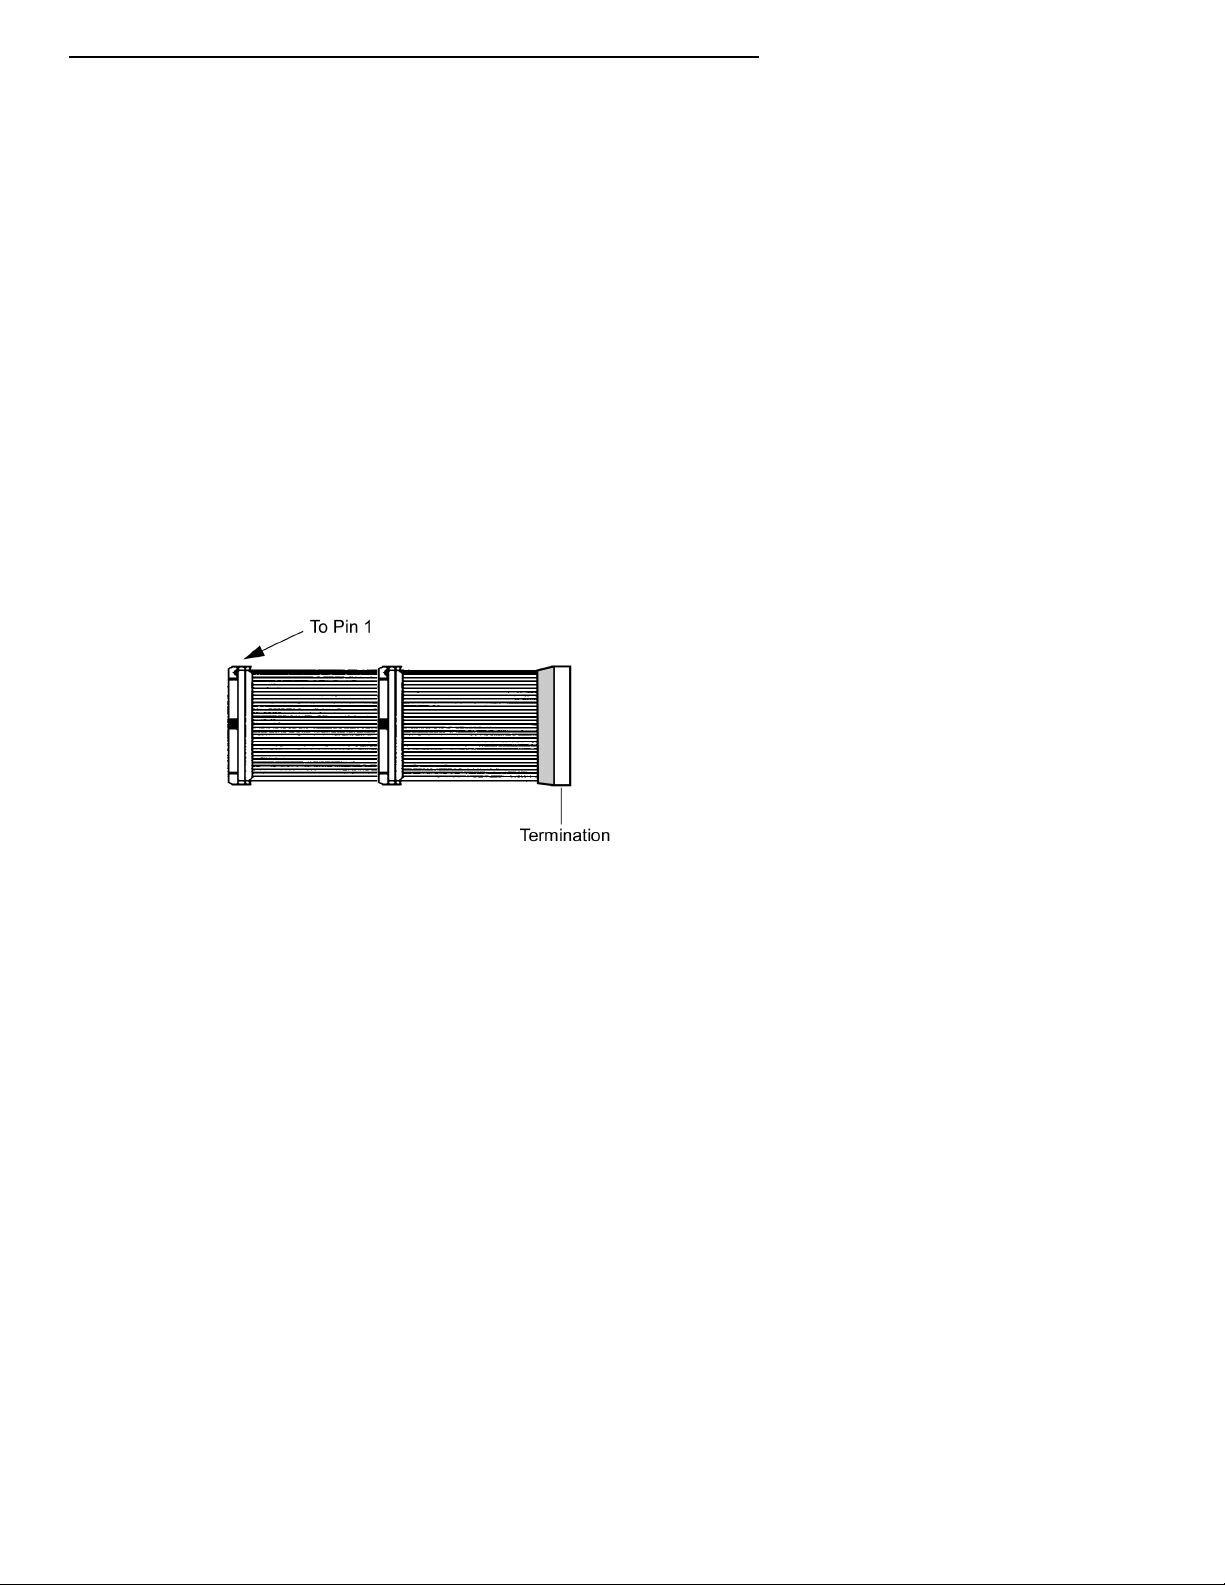
Figure 11: Internal SCSI Ribbon Cable
You may need to add or change a SCSI ribbon cable. Use these guidelines to help
decide on what internal SCSI cable you will use.
•
You purchased a SCSI interface board with a cable: Use the SCSI cable that
came with your SCSI interface board.
•
The SCSI cable in your PC has a free connector: Use that SCSI cable.
•
The SCSI cable in your PC does not have a free connector: If you already
have one other SCSI periphe ral (such as a hard disk) and your existing cable has
only two connectors, remove the cable and replace it with a cable with additional
connectors. You will need to purchase this cable.
PlexWriter 12/10/32S Operation Manual 23
Page 28

Section 2. Installing Your PlexWriter SCSI Drive
Do You Need a Power Cable?
In most computers, you will find free power connectors in the computer that are
ready for your use. When you open the computer, check the cable running from your
power supply to your hard disk and see if it has extra connectors on it. If so, you can
plug one of these into the power connector found on the rear panel of the PlexWriter.
If you do not find any additional connectors (either because they were not supplied
or they are all in use), you will have to buy a “splitter” or a “Y-connector.” These
can also be found at most retail and mail-order computer stores.
To mount the PlexWriter internal SCSI drive:
1. Make sure the power to your computer and any external peripherals is OFF and
your computer is UNPLUGGED from its power source.
2. If you haven’t already removed your computer’s cover, remove it now, following
the directions provided by your computer’s manufacturer. Typically, this
involves loo s ening or removing severa l screws on the b ack panel of your
computer and sliding off the cover. See Figure 12 for details.
3. Remove the cover panel from the bay that will hold the PlexWriter drive. To
remove the cover panel, pop it out by pressing outward lightly. (In some older
computers, you may have to remove screws that hold the panel in place.)
Figure 12: Removing the Cover Panel from a Bay
4. Determine if you must install mounting rails on the sides of your drive. To do so,
insert the drive into the open bay. If the drive fits tightly with little or no
clearance on either side of the drive, you will not have to use mounting rails. The
drive can be mounted directly into your computer. Go to step 6.
24
PlexWriter 12/10/32S Operation Manual
Page 29

Section 2. Installing Your PlexWriter SCSI Drive
NOTE:
Plextor does not provide rails. If you need rails, you can obtain them from the
computer manufacturer or from a computer supply retail or mail-order store. Most rail
kits are specific to a particular type of PC case. Check with the computer
manufacturer to make sure you get the correct rail kit.
5. If you must use mounting rails, fasten the rail s to the lower pair of holes as
shown in Figure 13. (In some instances, you may need to fasten the rails to the
upper set of holes.) After fastening the rails, check their positioning by sliding the
drive into the bay before you mount the drive or connect any cables.
Figure 13: Installing Mounting Rails (if Needed)
6. Plug a free connector on the SCSI cable into the SCSI connector on the rear panel
of the drive before you insert the drive into your computer. Then thread the cable
through the front of the open bay you plan to use and back toward the SCSI
interface board. The drive should slide smoothly into the bay. If it does not,
check for obstructions in the bay and ensure the side rails (if needed) are attached
properly.
PlexWriter 12/10/32S Operation Manual 25
Page 30

Section 2. Installing Your PlexWriter SCSI Drive
7. If not already connected, attach one end of the SCSI ribbon cable to the
connector on the SCSI board.
Figure 14: Connecting the SCSI Ribbon Cable
CAUTION
both your drive and SCSI interface board. Be sure you match the red stripe along one
side of the SCSI cable to Pin 1 on the interface board and Pin 1 on the drive. Each
connector on the ribbon cable has a “key” in the middle. This key should fit into a slot
in the middle of each connector of the SCSI interface board, your PlexWriter, and any
other internal SCSI peripherals.
: It is easy to accidentally plug your SCSI ribbon cable upside down into
8. Double-check your work. You must ensure the side of the SCSI cable with the
red stripe is matched to Pin 1 on the interface board and on the drive.
9. Connect a power cable from the computer to the DC INPUT connector of the
PlexWriter drive. In most computers, you will find free power connectors that are
ready for your use.
Check the cable running from your power supply to your hard disk and see if it
has extra connectors on it. If so, you can plug one of these into the power
connector found on the rear panel of the PlexWriter.
26
PlexWriter 12/10/32S Operation Manual
Page 31

Section 2. Installing Your PlexWriter SCSI Drive
10. Connect the audio cable if you want to use a sound board in your system. This
cable runs from the four-pin audio output connector on the rear panel of your
PlexWriter drive to your sound board. See “Using Sound Boards and Audio
Cables” on page 31 for more information about audio cables.
Figure 15: Installing the Optional SPDIF Cable
11. Connect the SPDIF cable if your sound board is equipped with SPDIF and you
wish to use the SPDIF digital audio output from your PlexWriter. T his cable r uns
from the right-most set of pins on the jumper panel to the sound board. Figure 15
shows how the optional SPDIF cable is connected to the jumper pane l. (The
SPDIF cable is not supplied by Plextor.)
12. Before completing the installation, check your cable connections against Figure
16.
PlexWriter 12/10/32S Operation Manual 27
Page 32

Section 2. Installing Your PlexWriter SCSI Drive
Figure 16: Power, SCSI, and Optional Connections
for an Internal PlexWrite r Drive
13. Mount the PlexWriter drive in the computer using the four screws that were
supplied with your drive. Use only these screws.
CAUTION:
supplied by Plextor. You may damage the drive if you insert screws that are too long.
Do not mount your drive in your computer using screws other than those
SCSI Cable Connection Hints
If you have more than one peripheral device (the PlexWriter drive and one other
peripheral), connect the two peripherals to the other two connectors. The device
farthest from the SCSI must have its termination set to ON. (Refer to page 13 of this
manual for information about SCSI terminatio n.)
Install a PlexWriter External SCSI Drive
To install a PlexWriter external SCSI drive, decide which cables you use, and
whether you need to change the switch, dial, and terminator settings on your
PlexWriter and other peripherals.
CAUTION
performance in a vertical position.
Before proceeding, double-check your SCSI number setting, SCSI termination
setting, and other switch-controlled settings.
: Install your PlexWriter horizontally. Plextor does not guarantee the drive’s
28
PlexWriter 12/10/32S Operation Manual
Page 33

Section 2. Installing Your PlexWriter SCSI Drive
Connect a Single SCSI Drive
If you are installing a single PlexWriter external SCSI drive, connect it as shown in
Figure 17.
Figure 17: Connecting a Single PlexWriter External SCSI Drive to a PC
PlexWriter 12/10/32S Operation Manual 29
Page 34

Section 2. Installing Your PlexWriter SCSI Drive
Connect Multiple SCSI Drives
If you are installing more than one PlexWriter external SCSI drive (or one
PlexWriter and other external SCSI peripherals), connect them as shown in Figure
18.
Figure 18: Connecting Multiple External SCSI Drives or Peripherals
NOTE
: Performance of SCSI devices may suffer if total cable length in the SCSI
chain plus cabling in the external case exceeds 1.5 meters. (Assume cabling in the
external case equals about 20 cm when adding up total cable length.) Quality of
cabling is also important. Use shielded cables when possible. Also, keep cable length
as short as possible, especially when using faster interfaces such as Ultra SCSI, Ultra
Wide SCSI, and others.
30
PlexWriter 12/10/32S Operation Manual
Page 35

Section 2. Installing Your PlexWriter SCSI Drive
Using Sound Boards and Audio Cables
Whichever category your sound board falls into, you will find that the best source of
information about installing the sound board in your co mputer is the board’s manual.
Once you have successfully installed the sound board in your computer, you can
continue below for a description of the different cable connections that need to be
made.
NOTE:
board to control your PlexWriter. You may not be able to utilize high speed recording
(12X) due to the performance of the board.
When using Plextor drives with Plextor Manager 2000 software (if it was provided
with your drive), an audio cable is not necessary. Plextor Manager 2000’s player,
MVP 2000, plays Audio CDs digitally, eliminating the need for an analog cable
connection. (Plextor Manager 2000 can be purchased directly from Plextor if it was
not included with your drive.)
If you do need audio cables, you will have to purchase them. Refer to the table
below. A list of several vendors who of fer audio cables is in Appendix D of this
manual.
Plextor strongly suggests you not use the SCSI connection on your sound
Your PlexWriter Kit Audio Cables You May
Need to Purchase
Internal Drive with
Software Kit
1 Sound Blaster-
External Drive with
Software Kit
1 MPC-compliant audio
cable
compatible audio cable
1 RCA audio cable Connect one end to the
How to Connect Audio
Connect to MPC audio
source, and to audio output
connector at the rear of the
PlexWriter.
Connect to Sound Blastercompatible audio board
and to audio output
connector at the rear of the
PlexWriter (Figure 16).
sound board Line In
connector or to an audio
amplifier, and the other end
to the audio output
connectors at the rear of
the PlexWriter. (Figure 19)
PlexWriter 12/10/32S Operation Manual 31
Page 36

Section 2. Installing Your PlexWriter SCSI Drive
Figure 19: Connecting Audio Cables to a PlexWriter External SCSI Drive
32
PlexWriter 12/10/32S Operation Manual
Page 37

3. Installing and Using Software
There’s one more step before you can begin to use your PlexWriter drive: you need
to install special software on your computer. There are two software types:
•
Device driver: Software program that allows your computer to interact with the
PlexWriter drive. Drivers are included in Windows 95, 98, ME, 2000, and NT
that let you operate your PlexWriter as a CD-ROM device (reader). The device
driver is automatically installed by the operating system.
•
Application software : Software programs for specific tasks, such as mastering
CDs, backing up your hard disk or files, capturing audio, duplicating CDs, and
more. Some of these applications are supplied with your PlexWr iter if it was
purchased as a kit from Plextor, while others are available from other vendors.
If you have any problems at all, our technical support staff will help you.
Quick Installation in Wind ows 95, 98, and ME
Use this section for a quick installation of your PlexWriter drive in a Windows 95,
Windows 98, or Windows ME system. If you encounter any problems, refer to
“Appendix B: Installing a SCSI Drive in Windows.”
Windows 95/98 and ME should automatically recognize and support your interface
board and PlexWriter drive. Microsoft has included a generic CD-ROM device
driver in the operating system, and this driver supports the PlexWriter as a reader.
Microsoft has also included numerous SCSI controller-specific drivers on the
Windows CD-ROM. However, we advise that you check your SCSI controller
manufacturer’s web site to make sure you are using the latest available drivers.
•
PlexWriter SCSI drive and previously installed SCSI interface board: If you
connect your PlexWriter drive to a previously installed and operating SCSI
interface board, Windows 95, 98, and ME will recognize the PlexWriter
automatically.
•
PlexWriter SCSI drive and new SCSI interface board: Install the SCSI
interface board using the instructions provided by the manufacturer of the board .
Then connect your PlexWriter drive to the SCSI interface. The PlexWriter will be
detected automatically.
NOTE
: You will need to install additional software to use the PlexWriter as a CD-R or
CD-RW recorder. If recording software was not included with your PlexWriter bundle,
the software is available from third parties.
You will soon be using the highest performance CD-RW drive around. If you have
any problems at all, our technical support staff will help you.
PlexWriter 12/10/32S Operation Manual 33
Page 38

Section 3. Installing and Using Software
Install or Update SCSI Controller Support
The software that allows yo ur SCSI board to operate d epends on your operating
system. The Plextor drive kit does not include a SCSI interface board. If you already
have a SCSI board installed in your computer, or you are purchasing one separately,
you may need to make sure the SCSI driver is up to date.
•
If you have Windows 95, 98, or ME: You need a mini-port driver file (.MPD)
that allows your SCSI board to operate with Windows 95/98 or ME. Many miniport drivers are included right along with the oper ating system. H owever, if your
SCSI board was released recently, it may not be supported by your version of
Windows 95/98 or ME. In this case, see the SCSI board manufacturer’s web site
for the required .MPD file.
•
If you have Windows NT or 2000: You need a .SYS file that allows your SCSI
board to operate with Windows NT or 2000. Some .SYS files are included with
Windows NT and Windows 2000. However, if your SCSI board was released
recently, it may not be supported; in this case, see the SCSI board manufacturer’s
web site for the required .SYS file.
•
If you have DOS or Windows 3.x: You need an ASPI manager file for
DOS/Windows 3.x to support your SCSI board. ASPI managers are provided by
SCSI board manufacturers. Even if you have an ASPI manager file, it may need
to be updated to work with your PlexWriter drive. See the SCSI board
manufacturer’s web site for the latest driver version.
Note that some manufacturers have stopped supporting the DOS operating
system, and the PlexWriter is not supported as a recorder in DOS. If you have a
DOS or Win 3.x operating system, you can use your PlexWriter only as a reader.
To install or update SCSI suppo rt for an existing SCSI board:
1. Try using the SCSI interface with your PlexWriter drive. If it works, you
probably don’t need to install or update the SCSI driver. However, companies
continuously improve drivers or fix problems that are found after product
releases. We highly recommend that you check with the manufacturer and update
the SCSI board driver if a newer one is available.
2. If you need to install or update SCSI support in your computer, follow the
installation instructions supplied by the SCSI manufacturer.
34
PlexWriter 12/10/32S Operation Manual
Page 39

Section 3. Installing and Using Software
Install Device Drivers
Your PlexWriter SCSI drive acts as a “CD-ROM Drive” for purposes of installation
and setup. In some cases, you will need to install additional so ft ware to make use of
all of the features of the PlexWriter.
•
Using the PlexWriter on a PC:
As CD-ROM reader: The computer’s operating system, whether it is
Windows 95, Windows 98, Windows ME, Windows NT, or Windows 2000,
supplies a generic CD-ROM device driver that allows the PlexWriter to
function as a standard CD-ROM drive. You don’t need to install anything
else.
As a CD-R or CD-RW device: In order to write to CD-R or CD-RW media,
you will need additional software. If you purchased a kit from Plextor,
software is supplied.
•
Using the PlexWriter on a Macintosh: Whether using the PlexWriter as a
standard CD-ROM or as a CD-R or CD-RW device, you will need additional
drivers or software besides those that are part of the Macintosh operating system.
You will need to purchase this software separately. The compatibility list is
available from Plextor’s web site at www.plext or.com
Before installing any software, check that all the cable connections between your
PlexWriter and computer are correct, that any jumpers are set properly, and the
PlexWriter is recognized by your system.
.
PlexWriter 12/10/32S Operation Manual 35
Page 40

Section 3. Installing and Using Software
Install Plextor Applications Software
Windows 95, 98, ME, 2000 and NT can immediately operate your PlexWriter drive
as a CD-ROM device (reader) and permit the drive to be recognized by the
computer’s operating system. In order to take advantage of the PlexWriter’s ability
to record on CD-R or CD-RW media, however, you will also need packet writing
and mastering applications software on your PC. You can also check the
compatibility list on the Plextor web site at www.plextor.com
supports the PlexWriter under other operating systems. You will need to purchase
this software separately.
If you purchased your PlexWriter as part of a Plextor kit and you have a PC, much of
the software you need is included. Plextor has develo ped several utilities to help you
get the most from your PlexWriter drive.
Plextor Manager 2000
This unique suite of audio management and drive control applications puts you in the
CD driver’s seat. A variety of distinctive modules allow you to listen to, record and
even create your own playlists using a standard and digital audio file formats. Rip the
finest quality audio using digital audio extraction at high speed. Need to make a
duplicate CD? A simple mouse click and you’re done. Control every aspect of the
drive from spinup and spindown timeout to eject lock. Plextor Manager 2000 also
gives you information on the drive’s configuration and the media inserted into it. See
the Plextor Manager User’s Manual for details.
, for software that
CD Res-Q
For backup and disaster recovery, CD Res-Q lets you create an image of your hard
disk drive on secure, reliable CD-R media. By spanning CDs, you can back up your
entire hard drive. Additional features include making a CD bootable, choice of
compression, hard drive or image file integrity verification, and more.
NOTE:
CD Res-Q backup works only with Plextor CD-R and CD-RW drives. You can
restore from any drive.
If You Don’t Have CD Res-Q
CD Res-Q is provided free of charge when the PlexWriter 12/10/32S drive is
purchased as a retail kit. If you purchased a non-Plextor retail box and CD ResQ was not included, you can purchase this software directly from Plextor.
Get CD Res-Q Directly from Plextor!
To purchase CD Res-Q by phone, please call us at 408-980-1838, extension 3.
To purchase CD Res-Q by email, send your request to sales@plextor. com.
36
PlexWriter 12/10/32S Operation Manual
Page 41

Section 3. Installing and Using Software
Other Applications Software
Other valuable applications software—which may already be included if you
purchased a kit from Plextor—lets you use your PlexWriter drive in exciting new
ways.
•
Packet writing software: This type of application lets you use your PlexWriter
as an enormous floppy drive. You can drag and drop files straight to a CD-R or
CD-RW disc.
•
Mastering software: In conjunction with your PlexWriter drive, mastering
software lets you create discs in specific formats, such as audio, data, mixed
mode, and others..
NOTE
: Discs that are created with packet writing software cannot be used by
mastering or duplication software and vice versa. Moreover, many older CD-ROM
drives manufactured before 1997 cannot read packet-written discs
PlexWriter 12/10/32S Operation Manual 37
Page 42

Section 3. Installing and Using Software
This page intentionally left blank.
38
PlexWriter 12/10/32S Operation Manual
Page 43

4. Using Your PlexWriter
This chapter explains how to use your PlexWriter drive and how to load, handle and
care for your CDs.
CAUTION
guarantee the drive’s performance in a vertical position.
: Ensure your PlexWriter is in a horizontal position. Plextor does not
What Media to Use
Use the right media! Your PlexWriter drive’s capabilities change depending on
which type of compact disc you use. It currently supports these types:
•
CD-ROM: You can immediately play or read prerecorded discs, such as audio
CDs and data discs.
•
CD-R: Recordable CD. You can record on these discs, but only once. You can
also read them.
•
CD-RW: High-Speed ReWritable CD. These discs allow recording and rerecording (up to 1,000 times). You can also read them. CD-RW discs are rated
for specific recording and rewriting speeds—for example, 2X and 4X. Your
PlexWriter drive will automatically detect the disc’s write speed rating and will
write at that speed.
To achieve 10X writing speed you must use high-speed RW media. You can
write to high-speed RW discs only on drives that support this new media. Drives
that are capable of writing to high-speed RW media, such as the PlexWriter
12/10/32S, are identified by a “Compact Disc ReWritable High Speed” logo.
Tray Loading and Operation
To load and unload the tray:
1. While the PlexWriter drive is powered up, push the Stop/Eject button on the front
panel. The tray drawer slides out in 3–4 seconds.
2. If this is the first time the drive is used, remove the tray insert.
3. Lay a blank CD in the depression in the tray, label side up. The CD should lie flat
in the tray.
PlexWriter 12/10/32S Operation Manual 39
Page 44

Section 4. Using Your PlexWriter
Figure 20: Loading the Tray
4. Press the Stop/Eject button again and the tray slides shut within seconds.
NOTE
: Always use the Stop/Eject button to close the tray in a smooth and secure
manner. Closing the tray by pressing the front of the drawer by hand is not
recommended and risks damage or premature wearing of the mechanism.
Handling CD Media
Take care when handling blank CD-R and CD-RW media. Dust, scratches, and
fingerprints on the data side of the disc can cause write errors during recording.
When picking up or holding blank media you can either place your fingers along the
outer edge of the disc, or place one finger through the center hole and one finger on
the outer edge. Once you have finished creating a disc, label it by writing on the top
using per manent ink.
NOTE:
We do not recommend placing self-sticking CD-R labels on the disc. The
weight of the label may unbalance the disc and cause write errors during recording or
read errors during reading.
Cleaning Discs
For proper read and write performance, your CD-R, CD-RW, and CD-ROM discs
must be clean. Trying to record on a dirty disc may result in a failed session and ruin
the disc.
To clean the disc, wipe the disc using a clean, soft cotton cloth to remove surface dirt
such as fingerprints. Use a straight-line motion, wiping fro m the center out. Do not
wipe the disc in a circular motion.
40
PlexWriter 12/10/32S Operation Manual
Page 45

Section 4. Using Your PlexWriter
Figure 21: Wipe the Disc from the Center Outward
HINT:
Keep your frequently used discs in jewel cases at all times to prevent them
from becoming dirty or damaged.
Playing Audio CDs
In order to listen to an audio CD, connect an audio cable to the analog audio
connector on the rear of the drive and connect the other end to your sound board.
There are two types of audio you may encounter:
•
CD-Audio: This comes from audio discs (like the ones used by your home
stereo) that are translated directly by your PlexWriter into sound. Although, in
most cases a sound board and speakers are used to hear this audio, you can also
listen to it by simply plugging a set of headphones or powered speakers into the
headphone jack on the front of your drive, as shown in Figure 22. You can
control audio playback through software.
Figure 22: Connections for Playing Audio Using the Headphone Jack
PlexWriter 12/10/32S Operation Manual 41
Page 46

Section 4. Using Your PlexWriter
•
Sound board audio: This co mes from data files that may be present on a disc,
such as a WAV, WMA or MP3 files, that are transferred from the CD to your
computer via the SCSI interface. The sound board translates the data from the
digital files into analog sound. If you do not have a sound board, you will not be
able to hear this form of audio from your PlexWriter.
To listen to music through the computer’s sound board, you can control volume
with the volume control on the Windows Taskbar. You can also mute the sound
on your sound board and listen to music through headphones or self-powered
speakers.
NOTE
: The volume control on the front panel of your drive adjusts only the sound
level of the headphone jack. It has no impact on the volume level of the rear panel
audio outputs.
Playing a CD Using Plextor Manager
For PC users, Plextor Manager 2000 software provides several unique and powerful
capabilities for playing audio. For installation and oper a ting instructions, refer to the
separate Plextor Manager 2000 User’s Manual and README files.
Playing a CD Using Other Utilities
Other alternatives for playing CDs include audio utilities d esigned into your
operating system (Media Player or CD Player in Windows, for instance) or various
other utilities that can be purchased commercially.
Playing a CD On a Macintosh
Mac users can run a program such as CDT Remote (which is typically included with
FWB’s CD-ROM toolkit).
Writing to CD-R and CD-RW Media
In conjunction with your PlexWriter drive, mastering and packet writing software
such as EasyCD Creator and DirectCD allow you to write audio, video, data, or other
information to writable (CD-R) or rewritable (CD-RW) media. The PlexWriter
12/10/32S writes to new high-speed CD-RW media, as well as to conventional
CD-RW media.
IMPORTANT
conventional and the new high-speed CD-RW discs. Drives manufactured before
1997 cannot read CD-RW discs.
Plextor CD-ROM drives beginning with the 12/20PleX and newer can read CD-RW
discs, including the new, high speed discs.
42
PlexWriter 12/10/32S Operation Manual
: Most CD-ROM drives manufactured since 1997 can read both
Page 47

Section 4. Using Your PlexWriter
Advantages of BURN-Proof Technology
The PlexWriter 12/10/32S incorporates BURN-Proof (Buffer UnderRuN Proof )
technology, which guarantees that you can
write discs at high speed, and still use your
computer for other tasks while you’re
writing.
The Problem: When you use a CD Recordable or CD ReWritable drive to write to a
CD-R or CD-RW disc, the disc needs a constant, steady flow of data to make a
successful write. If this flow is interrupted, you wind up with a d isc that is unusable.
You’ve just created a coaster for your table!
To prevent the interruption of data, every CD-R/RW drive has a buffer, a memory
chip that acts as a kind “holding area.” (Typically, the buffer size is 2 MB or 4 MB.)
However, this buffer can be emptied quickly when you write at high speeds. It can
also be emptied if you use other applications (like surfing the Internet or playing
games or watching movies) while writing; or if your so urce drive cannot read data
fast enough because of its read ability or because the source disc is poor quality and
read errors slow down the data streaming. Any of these factors can produce what is
known as “buffer underrun error.” Simply put, the buffer is drained of data, the flow
to the disc is interrupted—and you wind up with a useless disc.
The Solution—BURN-Proof: This revolutionary technology compensates for any
interruption in data flow to the disc. BURN-Proof technology “remembers” where
writing stopped on the disc when the data flow was interrupted, then restarts writing
once the data is available again. The result is that your disc is written successfully.
What BURN-Proof Means to You: BURN-Proof technology in your PlexWriter
12/10/32S means you can safely use your computer for other things while you’re
writing to a CD-R or CD-RW disc. It reduces the dreaded “coaster effect,” and lets
you multitask freely and easy without bringing the burn to a screeching halt. All of
this is done seamlessly, so you successfully create CDs on the first attempt.
PlexWriter 12/10/32S Operation Manual 43
Page 48

Section 4. Using Your PlexWriter
This page intentionally left blank.
44
PlexWriter 12/10/32S Operation Manual
Page 49

5. Maintenance and Troubleshooting
This chapter explains maintenance and troubleshooting procedures for your
PlexWriter drive.
With proper maintenance, you can prevent problems. If problems arise, you can
often solve many simple problems on your own, rather than wait for assistance from
a Plextor representative.
TIP
: Read all of this section that pertain to you (PC or Macintosh). Many of the
problems discussed happen only rarely, and others may seem as if they do not
pertain to you. However, if you are familiar with the variety of problems that can
occur, you will be better prepared to deal with them if they do occur.
Upgrading Firmware
Plextor creates firmware revisions to meet the peculiar needs of large computer
manufacturers. It is rare that these will impact the performance or operation of your
PlexWriter drive. However, we advise that our customers always update drives with
latest available firmware. Before troubleshooting a possible problem with your drive
please make sure to visit our web site at www.plextor.com
latest firmware.
To obtain new firmware for your PlexWriter drive:
1. Go to the Plextor web site at www.plextor.com
2. Look for firmware upgrades in either the Support area, on the Downloads page.
There is a description of the latest firmware revision and its i ntended u se.
3. Download the firmware to your computer.
To upgrade firmware:
1. Run the executable file that you downloaded from Plextor’s web site.
2. Accept all defaults by continuing to click on the “Next” button until you see the
message:
Firmware update has completed.
.
to check if you have the
PlexWriter 12/10/32S Operation Manual 45
Page 50

Section 5. Maintenance and Troubleshooting
Troubleshooting
If you have problems during or right after installation of your PlexWriter drive, use
these tips to help find the problem. You can also use these charts to help find
problems that develop in existing installatio ns.
•
Start here if you’re a PC user.
•
If you’re a Mac user, start with page 58. Then come back here if you don’t find
the answer.
Troubleshooting: General
Symptoms
PlexWriter drive not recognized by computer and/or its operating system.
Possible Cause #1
•
SCSI cable is not connected properly.
Solution #1
•
Ensure SCSI cable is connected.
•
Verify that connectors on motherboard and drive do not have bent pins.
Possible Cause #2
•
Power connector is not attached to PlexWriter or does not work.
Solution #2
•
Ensure the computer’s power cable is securely attached to the PlexWriter’s
power connector.
•
When the computer’s power is ON, confirm that the PlexWriter’s indicator LED
is illuminated briefly, then is extinguished.
•
Connect a different power cable to PlexWriter.
Possible Cause #3
•
SCSI controller not properly installed.
Solution #3
•
Ensure the SCSI controller is correctly installed, recognized, and operating.
•
Ensure that the latest driver is used for the SCSI controller.
•
Ensure there are no resource conflicts (such as IRQ’s) with another device.
46
PlexWriter 12/10/32S Operation Manual
Page 51

Section 5. Maintenance and Troubleshooting
Symptoms
PlexWriter does not respond (e.g., lights or eject button are not ope r a tio nal).
Possible Cause #1
•
No power.
Solution #1
•
Ensure the power cable is connected securely to the PlexWriter’s power
connector.
•
Try a different power cable.
Possible Cause #2
•
SCSI cable isn’t connected properly.
Solution #2
•
Ensure that the SCSI cable is securely inserted, and is not damaged.
•
Check the connector pins to ensure they are not bent.
Symptoms
Cannot eject tray.
Possible Cause #1
•
Tray is locked by Plextor Manager 2000 software.
Solution #1
•
Refer to Plextor Manager 2000 manual on how to unlock the eject feature.
Possible Cause #2
•
CD was not properly set into tray and is stuck.
Solution #2
•
At the PlexWriter’s front panel, insert a thin object such as a paper clip into the
emergency eject hole and eject the tray.
Possible Cause #3
•
Other software has control of the drive and has locked the tray.
Solution #3
•
Close all programs that are running. Then try ejecting the tray again.
•
Restart the computer, then try ejecting the tray again.
PlexWriter 12/10/32S Operation Manual 47
Page 52

Section 5. Maintenance and Troubleshooting
Troubleshooting: Reading from a Disc
Symptoms
PlexWriter drive has read errors, may not respond when accessed from My
Computer or Explorer, or cannot run a program.
Message “Not Ready Reading Drive (X)” or “Error accessing drive”.
Possible Cause #1
•
Defective CD-ROM, CD-R, or CD-RW disc.
•
A fingerprint , contaminants, or scratches on the disc’s surface may prevent the
drive from reading or writing data.
Solution #1
•
Clean the disc as detailed on page 40.
•
Try a different disc.
Possible Cause #2
•
Disc is badly manufactured.
Solution #2
•
Try a different disc.
Possible Cause #3
•
Bad connection between the PlexWriter drive and the motherboard, or between
the PlexWriter drive and the SCSI board.
Solution #3
•
Inspect the SCSI cable and drive for recessed, broken, or bent pins.
•
Inspect the SCSI ribbon cable for any signs of distress, such as kinking.
Possible Cause #4
•
CD-Audio disc in the drive. Audio CDs do not have computer data, so typing
computer commands in DOS while an audio disc is in your drive gives an error
message.
Solution #4
•
Use a data CD in the PlexWriter drive.
Possible Cause #5
•
Disc is inserted upside down.
Solution #5
•
Eject the disc and load it with the label or text side up.
Possible Cause #6
•
Blank CD-R or CD-RW disc is inside the drive.
Solution #6
•
Remove the disc from the drive and test it by using another disc
48
PlexWriter 12/10/32S Operation Manual
Page 53

Section 5. Maintenance and Troubleshooting
Possible Cause #7
•
PlexWriter drive set for test mode.
Solution #7
•
Test mode is for factory use only. Set DIP switch (on external drive) or jumpers
(internal drive) to switch test mode off.
Possible Cause #8
•
Improper or no SCSI bus termination.
Solution #8
•
Ensure that only the peripheral at the end of the internal SCSI cable and/or the
last peripheral in a SCSI chain of external devices is terminated. See page 13.
•
Some peripherals have a setting marked “Termination Power” instead of
“Terminator.” Ensure that termination power switches are set correctly.
•
Note that a lack of termination or too many terminations in a chain may cause
intermittent problems.
Possible Cause #9
•
SCSI controller driver is old and needs to be updated.
Solution #9
•
Obtain the latest available SCSI controller driver fro m the SCSI board’s
manufacturer or the manufacturer’s web site. Then install the updated driver in
your computer.
Symptoms
Cannot use other CD-ROM drives to initialize or read CD-R or CD-RW discs written
by PlexWriter.
Possible Cause #1
•
Trying to read a CD-RW disc in a CD-ROM drive that does not support it.
Solution #1
•
Use the PlexWriter to read CD-RW discs or use a different CD-ROM drive. Only
CD-ROM drives manufactured after 1997 can read CD-RW discs.
Possible Cause #2
•
UDF reader is not installed on the system to read CD-RW or packet-written discs
from a CD-ROM drive.
Solution #2
•
Refer to your packet writing software manual for how to obtain a UDF reader
and install it on the computer where you need to access these discs.
Possible Cause #3
•
Session was left open on a CD-R disc and does not have a Table of Contents.
Solution #3
•
Place this disc back into PlexWriter and use the same software originally used to
write to it. Then close the session/disc.
PlexWriter 12/10/32S Operation Manual 49
Page 54

Section 5. Maintenance and Troubleshooting
Symptoms
Excessive noise.
Excessive vib r ati o n.
Slow read performance.
Possible Causes
•
CD is poorly balanced. Poorly manufactured discs or discs with poorly
distributed ink on labeling cause significant vibration at high speeds because they
are out of balance. Read errors may also occur.
•
If the disc label (especially adhesive labels) adds more weight to one area of the
disc than another it can also cause the disc to be out of balance.
Solution
•
Clean the disc as detailed on page 40.
•
In Windows 95, 98, ME, NT or 2000 use Plextor Manager 2000 to lower the
drive speed.
•
If there is no foreign substance on the disc, contact the disc manufacturer for a
replacement.
Symptoms
Can read only the last session of a multisession CD-R or CD-RW disc.
Possible Cause
•
“Import previous session” or a similar feature was not enabled when the
multisession disc was created.
Solution
•
Use CD-R or CD-RW mastering soft ware to import session(s). Such features
may vary in name depending on the software being used. Please refer to t he
appropriate manual regarding this feature.
Troubleshooting: Playing an Audio Disc
Symptoms
When playin g an audio CD, you do not hear sound even though everyt hing appears
to be functi oning nor mally.
Possible Causes
•
Sound board volume too low.
•
Mixer settings for sound board se t too low.
•
Need sound board.
•
Need audio cable connection.
•
Sound board not properly configured.
50
PlexWriter 12/10/32S Operation Manual
Page 55

Section 5. Maintenance and Troubleshooting
Solutions
•
Each sound board has a different setting for each input source, including one for
CD-Audio. Run your sound board’s mixer program and verify that the volume is
turned up or not muted. You can do this by double-clicking on the speaker icon
on your computer ’s ta sk bar.
•
Check your system configuration to see if the sound board settings (such as IRQ,
memory, etc.) are conflicting with other devices on the system.
•
Check if all the necessary drivers and multimedia devices required by your sound
board are installed.
•
Make sure the audio cable is properly connected between PlexWriter and sound
board.
Symptoms
Low sound level from PlexWriter drive.
Possible Cause #1
•
Improper audio cable connection between PlexWriter drive and sound board.
Solution #1
•
Check the cable connection from PlexWriter to sound board.
Possible Cause #2
•
Low levels from audio mixer.
Solution #2
•
Check the master, CD and line levels of all audio mixers.
Troubleshooting: Writing to Discs
Symptoms
Cannot write to CD-R or CD-RW disc.
Possible Cause #1
•
You are using authoring software other than that bundled with your PlexWriter.
Solution #1
•
Use the authoring software provided with the PlexWriter.
•
To use other types of authoring software, contact the supplier and ensure the
software supports the PX-W121032T CD-RW drive. Supported software lists can
also be found on the Plextor web site at www.plextor.com
Possible Cause #2
•
CD-R or CD-RW media is not supported.
Solution #2
•
Use CD-R or CD-RW media recommended by Plextor. Supported media lists can
also be found on the Plextor web site at www.plextor.com
PlexWriter 12/10/32S Operation Manual 51
.
.
Page 56

Section 5. Maintenance and Troubleshooting
Possible Cause #3
•
Disc inserted upside down.
Solution #3
•
Eject the disc from tray and load it with the label side up.
Possible Cause #4
•
Lack of hard disk capacity.
This varies with different software packages. Contact the software vendor or
check their documentation for recommendations.
Solution #4
•
Delete other files from your hard disk to free up sufficient space; or use another
hard disk.
Symptoms
CD-R or CD-RW software cannot detect PlexWriter.
Possible Cause #1
•
Power connector is not attached to PlexWriter.
Solution #1
•
Ensure the computer’s power cable is securely attached to the PlexWriter’s
power connector.
•
When the computer’s power is turned ON, confirm that the PlexWriter’s
indicator LED is illuminated briefly, then is extinguished.
•
Try connecting another power cable to the PlexWriter.
Possible Cause #2
•
SCSI cable isn’t connected properly.
Solution #2
•
Ensure that the SCSI cable is securely inserted, and is not damaged. Check the
connector pins to ensure they are not bent.
Possible Cause #3
•
You are using authoring software other than that bundled with your PlexWriter.
Solution #3
•
Use the authoring software provided with the PlexWriter.
•
To use other types of authoring software, contact the supplier and ensure the
software supports the PX-W121032T CD-RW drive. Supported software lists can
also be found on the Plextor web site at www.plextor.com
.
52
PlexWriter 12/10/32S Operation Manual
Page 57

Section 5. Maintenance and Troubleshooting
Symptoms
Writing error occurs.
Buffer underrun.
Does not record at 12X.
Possible Cause #1
•
Network is being used.
•
Mouse was moved or Windows screensaver activated while writing.
•
Other applications are running.
•
Power save mode is active.
•
Source drive is not fast enough to stream data to the recorder.
Solution #1
•
If necessary, enable BURN-Proof in the recording software. (Some software
packages, such as Adaptec’s Easy CD Creator 4.02, have BURN-Proof support
for the PlexWriter drive permanently on, while other software allows the user to
select whether it is on or off.)
•
If your software does not support BURN-Proof and problems occur when
writing, reduce the load on CPU resources. Some ways to do this are:
Log off from the net work.
Don’t use the mouse.
Disable the screensaver or power save mode.
Exit all other applications.
Possible Cause #2
•
Shortage of PC memory. If there is insufficient main memory in the PC, data
may be swapped to the hard disk, and this can cause a buffer underrun.
Solution #2
•
If necessary, enable BURN-Proof in the recording software. (Some software
packages, such as Adaptec’s Easy CD Creator 4.02, have BURN-Proof support
for the PlexWriter drive permanently on, while other software allows the user to
select whether it is on or off.)
•
If your software does not support BURN-Proof, increase the PC’s main memory
capacity.
Possible Cause #3
•
Automatic thermal recalibration triggered. (Some high-speed hard disks are
equipped with an automatic thermal re-calibration function..)
Solution #3
•
Use another hard disk in this case.
Possible Cause #4
•
Defective CD-R or CD-RW media. CD-R or CD-RW media may be dirty,
scratched, or damaged.
PlexWriter 12/10/32S Operation Manual 53
Page 58

Section 5. Maintenance and Troubleshooting
Solution #4
•
ReWrite using another CD-R or CD-RW disc. (If possible, use a disc from a
different manufacturer; sometimes all discs in a box of media may be defective.)
Possible Cause #5
•
Use of media that is not supported by the PlexWriter.
Solution #5
•
Try writing at a lower speed.
•
Check Plextor’s web site, www.plextor.com
, for a list of recommended media.
Symptom
Cannot add information to CD-R or CD-RW disc.
Possible Cause #1
•
The CD-R or CD-RW disc was originally written usi ng other software. If the
software is different, incompatibility errors may occur.
Solution #1
•
Always use the same authoring software to add content to a disc.
Possible Cause #2
•
Not enough disc capacity.
Capacity of a standard 74-minute CD is limited to 650 MB.
Solution #2
•
Use different CD-R or CD-RW media if the capacity is insufficient.
Possible Cause #3
•
The disc is written with on a CD-R or CD-RW drive from another vendor.
Solution #3
•
Use a different CD-R or CD-RW disc.
•
Try to use same drive to add more data to CD-R or CD-RW disc.
Symptoms
Cannot write at higher speeds, such as 8X and 12X.
Possible Cause #1
•
Using poor quality media.
Solution #1
•
Use the CD-R/RW media recommended by Plextor. Supported media lists can
also be found on the Plextor web site at www.plextor.com
.
Possible Cause #2
•
Buffer underrun occurring.
54
PlexWriter 12/10/32S Operation Manual
Page 59

Section 5. Maintenance and Troubleshooting
Solution #2
•
If necessary, enable BURN-Proof in the recording software. (Some software
packages, such as Adaptec’s Easy CD Creator 4.02, have BURN-Proof support
for the PlexWriter drive permanently on, while other software allows the user to
select whether it is on or off.)
•
If your software does not support BURN-Proof, reduce the load on CPU
resources. Some ways to do this are:
Log off from the net work.
Disable the screen saver or power save mode.
Quit all other applications except the authoring software.
Possible Cause #3
•
Using CD-RW media. This drive does not support 12X speed with CD-RW
media. It supports up to 10X CD-RW recording.
Solution #3
•
Use CD-R media for 12X recording.
Possible Cause #4
•
Defective CD-R media.
Solution #4
•
CD-R media may be dirty, scratched or damaged. Rewrite using another CD-R
disc. (If possible, use a disc from a different manufacturer; sometimes all discs in
a box of media may be defective.)
Possible Cause #5
•
Using authoring software other than that bundled with the PlexWriter.
Solution #5
•
To use other types of authoring software, contact the supplier and ensure the
software supports the PX-W121032T CD-RW drive. Supported software lists can
also be found on the Plextor web site at www.plextor.com
.
Possible Cause #6
•
CD-ROM drive used cannot read data fast enough to record at higher speeds,
such as 8X and 12X.
Solution #6
•
If necessary, enable BURN-Proof in the recording software. (Some software
packages, such as Adaptec’s Easy CD Creator 4.02, have BURN-Proof support
for the PlexWriter drive permanently on, while other software allows the user to
select whether it is on or off.)
•
If your software does not support BURN-Proof, record to the hard disk, then
record from the hard disk to the PlexWriter.
PlexWriter 12/10/32S Operation Manual 55
Page 60

Section 5. Maintenance and Troubleshooting
Symptoms
Message “CDR103—Not High Sierra Format.”
Possible Cause #1
•
Incorrect BLOCK jumper setting.
Solution #1
•
Ensure BLOCK jumper (internal drive) or DIP switch (external drive) is OFF.
Possible Cause #2
•
Incorrect version of Microsoft CD-ROM extensions. (PC installatio n.)
Solution #2
•
Version 2.00 or higher of MSCDEX.EXE is required to read a High Sierra or
ISO 9660 format disc.
Troubleshooting SCSI Problems
Symptoms
Error messages such as the following upon initial installation of the PlexWriter drive
and device driver software:
•
“Invalid device specification”
•
“No device found”
•
“No SCSI interface board found”
•
“No response from SCSI interface board”
•
“No drives in use”
Possible Cause #1
•
Improper SCSI device driver installation. Your computer needs a SCSI device
driver to link the SCSI interface board to the PlexWriter drive.
Solution #1
•
Obtain the latest available SCSI device driver from the SCSI bo a rd’s
manufacturer or the manufacturer’s web site. Then install the updated driver in
your computer.
•
Remove device support from the operating system and attempt to re-install the
SCSI device driver.
•
Make sure there are no hardware conflicts with another board in the system. Such
hardware conflicts can prevent the SCSI device driver from loading.
Possible Cause #2
•
Improper SCSI bus termination.
Solution #2
•
Ensure that only the peripheral at the end of the internal SCSI cable and/or the
last peripheral in a SCSI chain of external devices is terminated. See page 13.
•
Some peripherals have a setting marked “Termination Power” instead of
“Terminator.” Ensure that termination power switches are set correctly.
56
PlexWriter 12/10/32S Operation Manual
Page 61

Section 5. Maintenance and Troubleshooting
Possible Cause #3
•
Hardware, memory, or IRQ conflict.
Solution #3
•
Try to change these settings in Windows 95/98 or ME: right-click on My
Computer, select Properties, and select Device Manager, then change the
settings.
•
Remove the SCSI board from its slot in your PC and place it into a different PC
slot.
•
Try to set the PCI slot you are using to a specific IRQ in your motherboard’s
BIOS, if your motherboard has this feature.
Possible Cause #4
•
SCSI board not properly seated.
Solution #4
•
Ensure the SCSI interface board is seated securely in your computer.
Possible Cause #5
•
Driver fails to recognize the SCSI interface board.
Solution #5
1. Do a hard reboot: that is, turn the power switches on the PlexWriter drive and the
computer OFF, then ON. This complete shutdown should fu lly reset the drive
and computer.
2. If the driver still fails to recognize the SCSI interface board, disconnect all SCSI
devices from the SCSI controller board and reboot.
3. If the driver now recognizes the SCSI interface board, check the SCSI
configuration of all devices to make sure all settings are correct.
4. If device configuration is correct, plug in one SCSI device at a time to determine
if a particular device causes the problem.
PlexWriter 12/10/32S Operation Manual 57
Page 62

Section 5. Maintenance and Troubleshooting
Troubleshooting for Macintosh Users
Symptoms
Drive will not operate as CD-ROM, CD-R or CD-RW devic e .
Possible Cause
•
Whether using the PlexWriter as a standard CD-ROM, CD-R or CD-RW device,
you will need additional software and device drivers that are not par t o f the
Macintosh o perating system.
Solution
•
You will need to purchase additional software from the manufacturer o r from a
third party. Supported software lists can be found on the Plextor web site at
www.plextor.com
.
Symptoms
Drive not responding.
Possible Cause #1
•
Bad connection between PlexWriter drive and SCSI interface.
Solution #1
•
Check the cable to ensure it is seated properly and has no bent pins.
Possible Cause #2
•
Conflicts with other software.
Solution #2
1. Disable all extensions that are currently being loaded, with the exception of your
mastering software.
2. Restart your Macintosh.
3. Enable extensions one at a time to determine which extension conflicts with the
PlexWriter software.
NOTE
: In addition to the troubleshooting hints shown here for the Macintosh, refer to
all the possible causes and solutions shown on preceding pages. Most apply not only
to personal computers but to the Macintosh as well.
. (Note that Plextor does not supply or sell this software.)
58
PlexWriter 12/10/32S Operation Manual
Page 63

6. Frequently Asked Questions about Recording
What media should I use for my PlexWriter?
Supported media lists can also be found on the Plextor web site at www.plextor.com.
When can I use CD-RW media?
CD-RW media can only be used for writing in ReWritable drives. It is readable only
in ReWritable drives or newer MultiRead CD -ROM s with UDF readers installed.
UDF readers are available from software companies that develop packet writing
software. With CD-RW media you can:
Use as if it were a large-capacity floppy disc.
Transport files to and from work.
Copy your important data periodically.
Store large projects as you develop them.
What writing speed can I expect with CD-RW media?
The PlexWriter 12/10/32S supports new high-speed CD-RW media, and can write to
this media at speeds from 4X to 10X. You can also use conventional CD-RW media
in this PlexWriter; in this case, the drive writes at 2X to 4X speed.
When should I use CD-R media?
CD-R media can be read in most CD-ROM, CD-Recordable or CD-ReWritable
drives. Use CD-R media to:
Permanently archive important data.
Copy your music to CD for personal use.
Create specific format discs.
Create discs for distribution to others.
Share non-editable presentations
PlexWriter 12/10/32S Operation Manual 59
Page 64

Section 6. Frequently Asked Questions about Recording
Why doesn’t CD-Copier work?
Some possible reasons are:
Some CD-ROM drives are not fast enough for direct copying to the
PlexWriter. They cannot stream data fast enough to record at 12X or are not
capable of digital audio extraction at high speed.
The CD-R disc being used is poor quality, scratched, badly manufactured, or
has oily fingerprints.
Some CDs have copy prevention or other feature that does not allow direct
CD-to-CD duplication.
Software may not support that disc format.
You are trying to copy packet-written discs, which is not possible because of
the difference in technology between packet writing and mastering.
Why am I getting buffer underrun errors?
Recording CDs requires a source device to provide an uninterrupted stream of data.
A buffer underrun occurs when the data stream is interrupted. This can occur if:
You do not ha ve BURN-Proof enabled in your software or your software
does not support this feature.
Another application interrupts the writing process.
The write speed is set higher than the source drive can supply data.
The computer has insufficient RAM (random-access memory).
You are using poor quality discs, scratched discs, discs with fingerprints, or
badly manufactured discs.
Buffer underrun errors are seldom a problem with the PlexWriter 12/10/32S, thanks
to its remarkable BURN-Proof technology. To eliminate buffer underrun errors,
simply make sure BURN-Proof is enabled in the recording software. Some software
packages, such as Adaptec’s Easy CD Creator 4.02, have BURN-Proof support for
the PlexWriter drive permanently on, while other software allows the user to select
whether it is on or off.
60
PlexWriter 12/10/32S Operation Manual
Page 65

Appendix A: PlexWriter 12/10/32S SCSI Drive
Specifications
Disc Specifications
Useable Formats CD-DA; CD-ROM (Mode 1); CD-ROM XA (Mode 2: form
1 or form 2 and mixed form); CD-ROM (Mixed Mode);
Photo CD; VideoCD; CD-I (MPEG movies);
CD-Extra (CD-Plus); CD+G; CD Text
Recording Modes Track-at-Once, Disc-at-Once, Session-at-Once,
Multisession, incremental packet writing, fixed and
variable packet writing
Disc Diameter 12 cm diameter (Recording time 74 min, 79 min)
Recommended Media
CD-R: 12X, 8X, 4X,
1X
CD-RW: 10X–4X Ricoh, Mitsubishi Chemicals
CD-RW: 4X–2X Mitsubishi Chemicals, Ricoh, TDK
Taiyo Yuden, TDK, Ricoh, Mitsui Chemicals, Kodak, Fuji
Photo Film, Sony, Imation, Philips, Maxell, Mitsubishi
Chemicals, Pioneer
(All are rewritable up to 1,000 times.)
(All are rewritable up to 1,000 times.)
PlexWriter 12/10/32S Operation Manual 61
Page 66

Appendix A: PlexWriter 12/10/32S Specifications
Performance Specifications
Sustained Read Stamp, CD-R:
14X – 32X CAV: 2.1 – 4.8 MB/sec
(Mode 1, XA Mode 2, Form 1)
14X – 24X PCAV: 2.1 – 3.6 MB/sec (CD-DA)
10X–24X CAV: 1.5 – 3.6 MB/sec (XA Mode 2, Form 2)
8X CLV: 1.2 MB/sec
4X CLV: 600 KB/sec
1X CLV: 150 KB/sec
CD-RW:
10X–24X CAV: 1.5 – 3.6 MB/sec
(Mode 1, XA Mode 2, Form 1)
10X–24X CAV: 1.5 – 3.6 MB/sec (CD-DA)
8X CLV: 1.2 MB/sec (XA Mode 2, Form 2)
4X CLV: 600 KB/sec
1X CLV: 150 KB/sec
Sustained Write 12X CLV: 1.8 MB/sec (CD-R)
10X CLV: 1.5 MB/sec (CD-RW)
8X CLV: 1.2 MB/sec (CD-R, CD-RW)
4X CLV: 600 KB/sec (CD-R, CD-RW)
2X CLV: 300 KB/sec (CD-RW)
1X CLV: 150 KB/sec (CD-R)
Burst Read/Write 20 MB/sec (read)
20 MB/sec (write)
Average Access Time,
150 ms (32X CAV speed)
Random Read
Data Buffer 4 MB
Spindle Motor Brushless
Error Rate Mode 1: 1 Block/10
12
Bits
Mode 2: 1 Block/109 Bits (Average)
62
PlexWriter 12/10/32S Operation Manual
Page 67

Appendix A: PlexWriter 12/10/32S Specifications
Front Panel
Eject Auto Eject; Manual Emergency Eject
Lights Disc In; On/Busy; High Speed Write; Normal Write; RW
Write
Disc Loading Auto load/auto eject
Headphone Jack Stereo mini-jack, 0.8V +/- 0.2V at 32 ohms
Volume Control Wheel knob
CD-Audio Controls Play/Track Advance; Stop/Eject
Rear Panel
Power Supply
Power Switch
Interface Connector
SCSI Termination
Audio Connector
Jumper Switches
DIP Switches
Rotary Switch
Internal SCSI Drive
External SCSI Drive
External SCSI Drive
Internal SCSI Drive
External SCSI Drive
density
Internal SCSI Drive
External SCSI Drive
Internal Drive
External Drive
Internal SCSI Drive
block size, SPDIF (connector)
External SCSI Drive:
External SCSI Drive
: DC +5V and DC +12V
: AC 100-250V 50/60 Hz
: Tumbler type; 3A, 250V
: SCSI bus, 50-pin flat ribbon type
: SCSI bus, two (2) 50-pin high
: Jumper switches
: DIP switches
: Analog output, Molex connector
: Analog output, RCA jacks
: SCSI ID, parity, termination, test,
Parity, termination, test, block size
: SCSI ID
Environmental Conditions
Operating Temperature 0 to 45 degrees Celsius
Performance Guarantee 5 to 40 degrees Celsius
Operating Humidity
Storage Temperature –40 to 60 degrees Celsius
20% to 80% (non-condensing)
Storage Humidity 20% to 95% (non-condensing)
Transportation Humidity 20% to 95% (non-condensing)
PlexWriter 12/10/32S Operation Manual 63
Page 68

Appendix A: PlexWriter 12/10/32S Specifications
Dimensions and Weight
Dimensions (W/H/D)
Weight
Internal SCSI Drive
(146mm x 41.3mm x 202mm)
(without front panel)
External SCSI Drive
(181mm x 59.4mm x 308mm)
Internal SCSI Drive
External SCSI Drive
: 5.78" x 1.64" x 7.95"
: 7.13” x 2.34” x 12.15”
: 2.5 lbs. (1.2 kg)
: 5.8 lbs. (2.65 kg)
Reliability
MTBF 60,000 Power On Hours (POH)
Tray Loading 200,000 Load Cycles
64
PlexWriter 12/10/32S Operation Manual
Page 69

Appendix B: Installing a SCSI Drive in Windows
This appendix contains more detailed explanations of installation of a PlexWriter
SCSI drive in Windows 95, 98, ME, 2000, or NT, whether you have new or older
hardware and software.
Installing SCSI Drivers in Windows 95, 98, and ME
This section explains how to install drivers that let your SCSI interface board work
with the Windows 95/98 and ME operating system. If you have any problems at all,
our technical support staff will help you.
Install Hardware
Before installing software drivers, install the SCSI interface board and PlexWriter
hardware. Check that all the cable connections between your PlexWriter drive and
PC are correct and that all switches, dials, and termination are set properly. If you are
using a PlexWriter external drive, turn the power switch to OFF. Once the drive
installation is complete, remember to turn the drive’s power ON before turning your
computer on.
Install SCSI Drivers for Windows 95/98/ME
After your CD drive and SCSI interface board are installed, it is time to make the
right software file available to complete your installation.
To install SCSI drivers for a new SCSI board installation:
1. Turn on your computer. Your system should automatically detect and configure
your SCSI interface board. When you start Windows 95, 98, or ME, it will then
recognize that it does not have a driver installed for your new SCSI interface
board. You see a New Hardware Found dialog box, followed immediately by a
dialog box named Insert Disk.
2. Click OK in the Insert Disk dialog box. You see a second New Hardware Found
dialog box, asking you to insert the Windows 95, 98, or ME disk or CD. Don’t do
it!
3. Insert the disk supplied by the manufacturer of your SCSI interface board, rather
than inserting the Windows 95/98 or ME disk. If a disk was not provided, please
get the latest driver revision from the web site of the SCSI boar d manufacturer.
CAUTION
have), you can try using the files provided by Windows 95/98 or ME, but we cannot
guarantee you will get the most recent version of the driver that will work properly.
Manufacturers constantly release improvements and updates to their products. Since
the Windows operating system disk was probably manufactured long time ago, there
may be old drivers with problems included.
: If you do not have this disk (or cannot find it among all the other disks you
PlexWriter 12/10/32S Operation Manual 65
Page 70

Appendix B: Installing a SCSI Drive in Windows
4. After inserting the disk with the correct driver, select Browse in the dialog box
and then select the appropriate drive letter, and path. The Windows configuration
process should select the correct file from the disk and copy it to the correct
Windows 95, 98, or ME subdirectory on your hard drive.
5. When the driver is installed you will be prompted to reboot your system.
To upgrade SCSI drivers for an existing SCSI board installation:
New SCSI drivers for your SCSI board may have been made available since your
board was installed and configured. We highly recommend that you upgrade your
SCSI drivers, because manufacturers are constantly improving and fixing bugs in
these drivers.
To upgrade, you will first need to obtain the latest available drivers from the web site
of your SCSI board’s manufacturer. Then download the driver onto a floppy or your
hard disk. Once you have the drivers, use the following procedure to upgrade:
1. Select Control Panel in My Computer.
2. Double-click on System.
3. Click on the tab called Device Manager at the top of the window.
4. In the new window of devices, double-click on SCSI Controllers. This displays
all the SCSI interface boards currently installed in your system.
5. Double-click on the SCSI controller for the PlexWriter.
6. Go to the Driver tab.
7. Click on Update Driver.
8. Click on Next.
9. Click on Other Locations.
10. Use the Browse button and go to the floppy or the folder of the hard disk.
11. Highlight the driver listed.
12. Click on OK
13. When the driver is updated you will be prompted to reboot your system.
To reboot your computer after installation:
1. Select Shut Down from the Start button.
2. In the Shut Down dialog box, select Restart the Computer and select Yes.
This will reboot your computer with the new configuration.
Troubleshooting Windows 95, 98, and ME SCSI Installations
If you followed the previous instructions, you should be up and running without any
problems.
•
If you have difficulty getting Windows 95, 98, or ME to recognize your CD-RW
drive and SCSI interface board, confirm that all of your hardware is operating
properly. This is best done by using a boot floppy disk with CD-ROM support, or
by simply installing DOS with the appropriate SCSI ASPI layer support and CDROM drivers.
66
PlexWriter 12/10/32S Operation Manual
Page 71

Appendix B: Installing a SCSI Drive in Windows
•
If your system does not work under DOS, you probably have a hardware problem
that needs to be resolved before you can go any further.
•
If your system works under DOS, but not Windows 95, 98, or ME, review your
device driver installation and verify that the SCSI interface board device driver
and CD-ROM drive support are loaded correctly.
If things are not working correctly, there are a few likely causes.
Is your SCSI interface board recognized by Windows 95/98 or ME?
When Windows 95/98 or ME starts, an icon for a CD-RW drive will appear in My
Computer. If it does not, then there are a couple of likely possibilities:
•
The SCSI cable is missing or not properly connected.
•
The support for your SCSI interface board has probably not loaded correctly. In
this case, make sure you use d the SCSI man ufa c tur er ’s lates t driver as detailed
below.
Even if you get the CD-ROM icon, you may want to check that the Windows 95/98
or ME 32-bit driver is working properly. To confirm its operation:
1. Select Control Panel in My Computer.
2. Double-click on System.
3. Click on the tab called Device Manager at the top of the window.
4. In the new window of devices, double-click on SCSI Controllers. This displays
all the SCSI interface boards currently installed in your system.
5. Confirm that the Driver Status box displays This Device Is Working Properly. If
you get this message , yo u can now make full use of your CD -RW dri ve wit h the
Windows 95/98 or ME 32-bit support.
Did you use the latest available SCSI driver f or your board?
You might have overlooked our instructions to use the latest driver support for your
SCSI interface board. If you used the Windows 95, 98, or ME disk or CD, or if you
simply have o l der drivers fr om a previous i nstallation, the configur ation process may
have copied the wrong, or incompatible driver. To solve this problem:
1. Obtain the latest available driver from your SCSI board manufacturer’s web site.
2. Download the driver to a floppy or a hard disk.
3. Select Control Panel in My Computer.
4. Double-click on System.
5. Click on the tab called Device Manager at the top of the window.
6. In the new window of devices, double-click on SCSI Controllers. This displays
all the SCSI interface boards currently installed in your system.
7. Double-click on the SCSI controller for the PlexWriter.
8. Go to the Driver tab.
9. Click on Update Driver.
10. Click on Next.
11. Click on Other Locations.
PlexWriter 12/10/32S Operation Manual 67
Page 72

Appendix B: Installing a SCSI Drive in Windows
12. Use the Browse button and go to the floppy drive or the folder of the hard disk
that contains the driver.
13. Highlight the driver listed.
14. Click on OK
15. When the driver is updated you will be prompted to reboot your system.
Reboot and everything should work fine.
Do you have Plug and Play enabled?
Another likely cause of p roblems is tha t your motherboard ma y not have a Plug-andPlay-capable BIOS, or your Plug-and-Play SCSI interface board is not Plug-andPlay-compliant. To solve this problem:
1. Restart your computer.
2. Check your motherboard BIOS (CMOS) o r your SCSI controller BIO S to
confirm that Plug and Play is enabled. If it is disabled then enable Plug and Play.
3. If either your motherboard or your SCSI interface board does not support Plug
and Play, review the hardware installation procedures beginning on page 11 of
this manual. Make sure termination is set properly on your interface board and all
devices attached to it.
4. Restart your computer.
Do you have a SCSI ID conflict?
In this case, you simply need to deal with SCSI ID selection, as follows:
1. Turn o ff your comput er.
2. Review the discussion of SCSI ID selection in your drive’s operation manual.
3. Check the physical selection of SCSI ID on your PlexWriter drive and any other
SCSI devices connected to your interface board. Make sure that all devices are
physically set to unique IDs.
4. Your board also may not have automatic termination. If it does not have
automatic termination, you will also need to make sure the termination of your
board is set properly.
If you have both internal and external devices attached, the termination on
your SCSI interface board should be disabled. Review the interface board’s
documentation to determine how to do this.
If you have only internal devices, or only external devices, termination of
your SCSI interface board should remain enabled.
5. After the SCSI IDs and termination are set prope r ly, restart your system.
Is your SCSI interface board being supported by Windows?
It is possible that your previously or separately purchased SCSI interface board is not
being supported properly by Windows 95/98 or ME. If you had to use the Windows
95/98 or ME disk or CD to get support for the interface board, the driver file may not
have existed, or the operating system may have loaded an older or incompatible
version of the file.
68
PlexWriter 12/10/32S Operation Manual
Page 73

Appendix B: Installing a SCSI Drive in Windows
If the file did not exist, or if Windows 95/98 or ME couldn’t load a driver, contact
the manufacturer of the SCSI interface board for assistance in properly configuring
your SCSI configuration.
Installation of a SCSI Drive in Windows 2000
This section gives some details about software installation in Windows 2000.
Install Hardware
Before installing software drivers, install the SCSI interface board and PlexWriter
hardware. Check that all the cable connections between your PlexWriter drive and
PC are correct and that all switches, dials, and termination are set properly. If you are
using a PlexWriter external drive, turn the power switch to OFF. Once the drive
installation is complete, remember to turn the drive’s power ON before turning your
computer on.
Getting Drivers for Your SCSI Board
To install Windows 2000 support for your SCSI board from your 2000 CD-ROM
disc, you first need to verify that your SCSI interface board is supported by 2000.
Check your Windows 2000 manual for information on which SCSI interface board
2000 supports.
If your SCSI interface board is not on 2000’s list of supported hardware, and the
necessary drivers are not the 2000 disc, contact your board’s manufacturer and
request a Windows 2000 software device driver for the board. The files you obtain
need to be added to the 2000 installation floppy disk(s) that came with your 2000
CD-ROM disc. Your SCSI interface board manufacturer will provide you with
specific installation instructions.
Install SCSI Drivers for Windows 2000
1. Turn on your computer. Your system should automatically detect and configure
your SCSI interface board. When you start Windows 2000, it will then recognize
that it does not have a driver installed for your new SCSI interface board. You
see a New Hardware Found dialog box, followed immediately by a dialog box
named Insert Disk.
2. Click OK in the Insert Disk dialog box. You see a second New Hardware Found
dialog box, asking you to insert the Windows 2000 disk or CD. Don’t do it!
3. Insert the disk supplied by the manufacturer of your SCSI interface board, rather
than inserting the Windows 2000 disk. The driver provided by the manufacturer
is typically newer than those that are on the Windows CD. If a disk was not
provided, please get the latest driver revision from the SCSI controller
manufacturer web site.
PlexWriter 12/10/32S Operation Manual 69
Page 74

Appendix B: Installing a SCSI Drive in Windows
CAUTION
have), you can try using the files provided by Windows 2000, but we cannot
guarantee you will get the most recent version of the driver that will work properly.
Manufacturers constantly release improvements and updates to their products. Since
the Windows operating system disk was probably manufactured long time ago, there
may be old drivers with problems included.
: If you do not have this disk (or cannot find it among all the other disks you
4. After inserting the disk with the correct driver, select Browse in the dialog box
and then select the appropriate drive letter, and path. The Windows 2000
configuration process should select the correct file from the disk and copy it to
the correct Windows 2000 subdirectory on your hard drive.
When the driver is installed you will be prompted to reboot your system.
Troubleshooting Windows 2000 SCSI Installations
If you have difficulty getting 2000 to recognize your CD-RW drive and SCSI
interface board, confirm that all of your hardware is operating properly. This is best
done by using a boot floppy disk with CD-ROM support, or by simply installing
DOS with the appropriate SCSI ASPI layer support and CD-ROM drivers.
•
If your system does not work under DOS, you probably have a hardware problem
that needs to be resolved before you can go any further.
•
If your system works under DOS, but not Windows 2000, review your device
driver installation and verify that the SCSI interface board device driver and CDROM drive support are loaded correctly.
To upgrade SCSI drivers for an existing SCSI board installation:
New SCSI drivers for your SCSI board may have been made available since your
board was installed and configured. We highly recommend that you upgrade your
SCSI drivers, because manufacturers are constantly improving and fixing bugs in
these drivers.
To upgrade, you will first need to obtain the latest available drivers from the web site
of your SCSI board’s manufacturer. Then download the driver onto a floppy or your
hard disk. Once you have the drivers, use the following procedure to upgrade:
1. Select Control Panel in My Computer.
2. Double-click on System.
3. Click on the tab called Hardware at the top of the System properties window.
4. Click on t he Device Manager button in the midd l e of the Hardware window.
5. In the new window of devices, double-click on SCSI Controllers. This displays
all the SCSI interface boards currently installed in your system.
6. Double-click on the SCSI controller for the PlexWriter.
7. Go to the Driver tab.
8. Click on Update Driver.
70
PlexWriter 12/10/32S Operation Manual
Page 75

Appendix B: Installing a SCSI Drive in Windows
9. Click on Next.
10. Click on Other Locations.
11. Use the Browse button and go to the floppy or the folder of the hard disk.
12. Highlight the driver listed.
13. Click on OK
14. When the driver is updated you will be prompted to reboot your system.
Installation of a SCSI Drive in Windows NT
This section gives some details about software installation in Windows NT.
Install Hardware
Before installing software drivers, install the SCSI interface board and PlexWriter
hardware. Check that all the cable connections between your PlexWriter drive and
PC are correct and that all switches, dials, and termination are set properly. If you are
using a PlexWriter external drive, turn the power switch to OFF. Once the drive
installation is complete, remember to turn the drive’s power ON before turning your
computer on.
Getting Drivers for Your SCSI Board
To install Windows NT support for your SCSI board from your NT CD-ROM disc,
you first need to verify that your SCSI interface board is supported by NT. Check
your NT manual for information on which SCSI interface board NT supports.
If your SCSI interface board is not on NT’s list of supported hardware, and the
necessary drivers are not the NT disc, contact your board’s manufacturer and request
an NT software device driver for the board. The files you obtain need to be added to
the NT installation floppy disk(s) that came with your NT CD-ROM disc. Your SCSI
interface board manufacturer will provide you with specific installation instructions.
Install SCSI Drivers for Windows NT
To add CD-RW drive support after NT has already been installed:
1. In Windows NT, choose Start | Settings | Contr ol Panel | SCSI Adapters to add
support for your SCSI interface board.
2. Select Add/Remove SCSI Adapters from the menu.
3. Choose your SCSI interface board from the list or add the driver you obtained
from your SCSI interface board manufacturer.
4. Shut down your system and connect your PlexWriter to the SCSI interface board.
5. Turn ON your computer and your PlexWriter drive should now be visible to the
system.
PlexWriter 12/10/32S Operation Manual 71
Page 76

Appendix B: Installing a SCSI Drive in Windows
Troubleshooting Windows NT SCSI Installations
If you have difficulty getting NT to recognize your CD-RW drive and SCSI interface
board, confirm that all of your hardware is operating properly. This is best done by
using a boot floppy disk with CD-ROM support, or by simply installing DOS with
the appropriate SCSI ASPI layer support and CD-ROM drivers.
•
If your system does not work under DOS, you probably have a hardware problem
that needs to be resolved before you can go any further.
•
If your system works under DOS, but not NT, review your device driver
installation and verify that the SCSI interface board device driver and CD-ROM
drive support are loaded correctly.
72
PlexWriter 12/10/32S Operation Manual
Page 77

Appendix C: Technical Support
Store Plextor’s email, web site, phone, and fax numbers in a convenient location.
Keep your drive’s serial number and a copy of your sales receipt handy as well.
If you experience a problem while installing or operating your PlexWriter drive,
please refer first to the relevant sections of this manual regard ing se tup and
installation (Chapters 1–3). If you do not uncover the solution there, please refer next
to the maintenance and troubleshooting chapter that begins on page 45. It contains
solutions to the most common types of problems fielded by our technical support
staff. You may also wish to refer to the Frequently Asked Questions (FAQ) section
of our web site to assist you in troubleshooting the problem on your own.
NOTE
: We encourage you to go the Plextor web site (www.plextor.com) before
attempting to contact Technical Support. The answers to the most common questions
callers ask can be found quickly in the support area. Select PlexHelper for online
troubleshooting or FAQs for common questions.
If you have not been successful in your quest, our Technical Support Department
will help you solve problems that relate specifically to your PlexWriter drive. In
many cases, a problem that appears to be caused by your PlexWriter actually
originates in another part of your computer. In such instances, our technical support
staff will try to help you identify the part at fault and will refer you to the
manufacturer of that part for further assistance.
How to Contact Us
There are several ways for you to contact Plextor’s Technical Support Department:
•
Visit our web site (www.plextor.com
Questions.
•
Send us e-mail at support@plextor.com
Technical Support Department at 408-986-1010. Include your telephone number
and the hours during which you can be reached. Be as detailed as possible in
describing your problem. Please include system configuration, hardware and
software, as well as versions of drivers used.
•
Call 800-886-3935 and select option 2.
) for answers to Frequently Asked
, or send a fax to the attention of the
PlexWriter 12/10/32S Operation Manual 73
Page 78

Appendix C: Technical Support
Before You E-mail/Log On/FAX/Call
Please gather as much of the following information as possible before contacting us.
•
The serial number and TLA number of your PlexWriter. Your serial number can
be found both on the warranty card that accompanied the drive and on a label on
the drive itself. The TLA number appears both on the drive label and on a sticker
at the rear of internal drives.
•
The version of Plextor Manager you are using, if ap plicable.
•
The latest version of firmware you loaded onto the drive, if applicable.
•
The version of the Windows, Mac, or UNIX operating system you are using.
•
The brand name and model number of your computer (e.g., Dell 466/NP, Micron
P66PCI Powerstation, ALR Evolution V, Apple Macintosh, Performa 575, etc.).
•
The type of VGA, Super VGA, or other graphics board you use.
•
Brand name and model number of any other peripherals you have installed or
connected to your computer (e.g., CD-ROM, scanner, fax board, network board).
•
For PlexWriter SCSI drives, the name and model number of your SCSI interface
board (e.g., Adaptec AHA-2940, Advansys ABP-930UA).
•
For PlexWriter SCSI drives, the version of the software device drivers, if any,
that came with your SCSI interface board (this typically is found on the label of
the floppy disk which contains the device drivers).
Returns
You must obtain an RMA (Returned Materials Authorization) number before any
Plextor drive can be returned for repair or replacement. Any drive sent to Plextor
without an RMA number will not be accepted.
You can contact our RMA Department and request an RMA number and RMA
forms at rmasupport@plextor.com
Drives must b e sent postage prepaid . We recommend that you insure your ship ment,
as Plextor cannot be held responsible for any damage that may occur during
shipment.
74
PlexWriter 12/10/32S Operation Manual
, or by fax at 408-727-1522.
Page 79

Appendix D: Helpful Contacts
Use the contacts below for CD-R and CD-RW software and components, SCSI
boards, cables and hardware, and for PC vendors.
Contacts for Hardware and Software
Company Phone Fax Product Web
Address
Adaptec 408-945-8600 408-262-2533 CD-R software www.adaptec.
com
Advansys 800-525-7443 408-383-9612 SCSI interface
boards
AMC 800-832-3475 425-861-8391 Devices,
cables, acc.
Bason
Comp.
CeQuadrat 650-843-3780 650-843-3799 CD-R software www.
Creative
Labs
Creative
Digital
Research
Diamond 800-468-5846 408-325-7408 Sound boards www.
DPT 407-830-5522 407-260-5366 SCSI interface
DTC 408-474-0868 408-474-0828 SCSI interface
FWB 415-345-4300 415-345-4358 Mac device
Pacific
Inter
Connects
Plextor 408-980-1838 408-986-1010 Recommend
Testa CD
Labs
800-238-4453 818-727-9064 SCSI interface
boards
405-742-6622 405-742-6633 Sound boards www.
408-244-7007 408-244-7077 Windows,
UNIX CD-R
software
boards
boards
drivers
800-934-2839 408-982-9329 Audio cables www.piccable.
boards, audio
cables, all
other technical
support needs
520-531-1880 CD-Tach
performance
benchmarks
www.
advansys.com
www.amcdirect.
com
www.
basoncomputer
.com
cequadrat.com
creativelabs.
com
www.cdr.com
diamondmm.
com
www.dpt.com
www.
datatechnology.
com
www.fwb.com
com
www.plextor
.com/tech.htm
www.tcdlabs
.com
PlexWriter 12/10/32S Operation Manual 75
Page 80

Appendix D: Helpful Contacts
Contacts for PC Vendors
Company Web Address
IBM http://ibm.com
Dell http://dell.com
Gateway http://www.gw2k.com
Compaq http://compaq.com
Hewlett Packard http://www.hp.com/
Intel http://intel.com
ASUSTeK Computer http://www.asus.com.tw/
GIGA-BYTE http://www.giga-byte.com/
ABIT http://www.abit-usa.com/
Aopen http://www.aopen-usa.com/
EPOX http://www.epox.com/
SOYO Computers http://www.soyousa.com/
Tekram http://www.tekram.com/
FIC http://www.fic.com.tw/
Micro-Star International http://www.msi.com.tw/
I Will http://www.iwill.com.tw /
Elitegroup Computer Systems http://www.ecs.com.tw/
Free Computer Technology http://www.freetech.com/
76
PlexWriter 12/10/32S Operation Manual
Page 81

Index
A
AC power input · 8
applications software · 38
ASPI manager · 36
audio
playing · 6, 43
sound board · 44
audio cable · 32
connecting to extern al drive · 33
audio output connector · 7, 9
audio, troubleshooting · 52
B
BLOCK
external drive switch setting · 9
internal drive jumper setting · 7
setting · 16, 58
box
contents of · 3, 4
shipping · 3
buffer underrun · 45, 55, 62
BURN-Proof · 45
C
cable
audio · 32
power for internal drive · 25
SCSI · 24
cable connections
external drive · 30
internal drive · 29
cannot add information to CD-R, CD-RW
· 56
CD
playing · 6
playing on Macintosh · 44
reading · 1
writing · 1
CD Copier, troubleshooting · 62
CD Res-Q · 38
ordering · 2, 38
CD-Audio · 43
error messages · 50
play/skip forward button · 6
CD-R
requirements for · 37
CD-R media · 41
using · 61
CD-R/RW
writing to · 44
CDR101 message · 50
CDR103 message · 58
CD-ROM
requirements for using · 37
CD-ROM media · 41
CD-RW
requirements for · 37
CD-RW media · 41, 61
using · 61
cleaning
disc · 42
drive · 10
connector
audio output · 7
contacts · 79
hardware and software · 79
PC vendors · 81
controls
front-panel · 5, 65
rear panel · 7, 8, 65
D
device driver · 35
SCSI · 36
digital audio · 7, 16
connections · 28
dimensions · 66
DIP switch · 8
disc
cannot write to · 53
cleaning · 42
ejecting · 6
troubleshooting · 50
DISC indicator · 6
disc specifications · 63
drive does not read CD-R, CD-RW discs ·
51
drive does not respond · 49
drive does not respond to DIR · 50
drive has read errors · 50
drive not detected by software · 54
PlexWriter 12/10/32S Operation Manual 77
Page 82

Index
drive not recognized · 48
Drive with PCI SCSI Kit
SCSI ID and · 14
drive with software kit · 3
SCSI support · 36
drivers
installing · 37
duplication software · 10
E
emergency eject hole · 6
environmental conditions · 65
external drive
audio cable connection · 33
connecting a single drive · 30
connecting multiple drives · 31
factory switch settings · 19
installing · 29
F
firmware
revision · 2
upgrading · 47
front-panel controls · 65
external drive · 5
internal drive · 5
H
headphone jack · 6
High Sierra format · 58
high-speed CD-RW media · 41, 61
I
installation · 12
device drivers · 37
external drive · 29
internal drive · 23
internal drive audio cable · 28
quickstart · 12
SCSI board · 22
Windows 2000 · 71
Windows NT · 74
internal drive
audio cable connection · 28
installing · 23
jumpers · 17
mounting · 24
SPDIF cable connection · 28
invalid device speci ficat ion · 58
ISO 9600 format · 58
J
jumpers · 7
factory settings · 17
setting on internal drive · 17
L
low sound level · 53
M
Macintosh
playing CD on · 44
SCSI support · 37
troubleshooting · 60
maintenance · 10, 47
mastering software · 9, 39
media · 41
care and handling · 42
CD-RW · 61
recommended · 63
supported · 61
mini-port driver file · 36
MPD file · 36
MSCDEX.EXE · 58
MS-DOS
SCSI support · 36
multisession disc
only last session read · 52
N
no device found · 58
no drives in use · 58
no response from SCSI · 58
no SCSI interface board found · 58
no sound · 52
noise, troubleshooting · 52
O
ON/READ indicator · 6
P
packet writing software · 9
packet-writing software · 39
parity
setting · 16
setting for internal drive · 7
78
PlexWriter 12/10/32S Operation Manual
Page 83

Index
performance
SCSI cable length and · 31
specifications · 64
playback, stopping · 6
playing a CD · 6
playing audio CDs · 43
Plextor Manager
audio utilities · 44
Plextor Manager 2000 · 38
Plug and Play
disabling · 70
power cable · 25
power connector · 8
power switch · 6
precautions · 10
PRTY
external drive switch setting · 8
internal drive jumper setting · 7
setting · 16
Q
quickstart installation · 12
R
read
only last session · 52
reading
slow performance · 52
reading a CD · 1
rear panel controls · 65
external drive · 8
internal drive · 7
recording · 6
frequently asked questions · 61
reliability · 66
returns · 78
RMA number · 78
S
SCSI
termination · 51
troubleshooting · 58
SCSI board
choosing · 21
installing · 21, 22
non-SCAM-compliant · 14
SCAM-compliant · 14
SCSI cable · 24
performance and · 31
SCSI connection
sound board and · 32
SCSI connectors
external drive · 9
SCSI drivers
installing in Windows 2000 · 72
installing in Windows 95/98/ME · 67
installing in Windows NT · 74
SCSI ID number
changing · 13
changing on external d rive · 20
Drive with PCI SCSI Kit and · 14
non-SCAM-compliant SCSI board and
· 14
SCAM-compliant SCSI board and · 14
selecting · 71
setting for external drive · 8
setting for internal drive · 7
setting on internal drive · 18
SCSI interface connector · 7
SCSI ribbon cable
connecting · 27
SCSI support
Macintosh · 37
MS-DOS · 36
software · 36
Windows 2000 · 36
Windows 3.1 · 36
Windows NT · 36
SCSI termination
changing on intern al drive · 19
improper · 58
setting · 14, 16
setting on external drive · 8, 20
security sticker · 4
serial number · 23
shipping your drive · 3
slow read performance · 52
slow write performance · 55
software
application · 35
device drivers · 35
duplication · 10
installing · 35
mastering · 9
packet writing · 9
SCSI support · 36
Sony/Philips digital interface · 7, 16
connections · 28
sound board · 32
audio · 44
drive performance and · 21
SCSI connection and · 32
PlexWriter 12/10/32S Operation Manual 79
Page 84

Index
SPDIF · 7, 16
connections · 28
specifications
disc · 63
speed
reading · 1
writing · 1
Stop/Eject button · 6
support · 77
switch
factory settings for external drive · 19
SYS file · 36
T
technical support · 77
TERM
external drive switch setting · 8
internal drive jumper setting · 7
setting · 16
termination
automatic · 71
improper · 58
setting · 14, 16
setting on external drive · 7
termination power · 16, 51, 59
TEST · 16
external drive switch setting · 8
internal drive jumper setting · 7
test mode · 51
TLA code · 23
tray
ejecting · 6
front door · 6
loading and unloading · 41
tray does not eject · 49
troubleshooting · 48
audio problems · 52
disc problems · 50
general problems · 48
Macintosh installation · 60
SCSI installations in Windows 2000 ·
73
SCSI installations in Windows
95/98/ME · 69
SCSI installations in Windows NT · 75
SCSI problems · 58
writing discs · 53
settings for · 7, 9 , 16
upgrading · 2
upgrading firmware · 47
V
vibration, troubleshooting · 52
volume control · 6, 44
W
weight · 66
Windows 2000
installation in · 71
installing SCSI drivers in · 72
SCSI support · 36
troubleshooting SCSI installations · 73
Windows 3.1
SCSI support · 36
Windows 95/98
installing SCSI drivers in · 67
quick installation in · 35
SCSI support · 71
troubleshooting SCSI installations · 69
Windows ME
installing SCSI drivers in · 67
quick installation in · 35
SCSI support · 71
troubleshooting SCSI installations · 69
Windows NT
installation in · 74
installing SCSI drivers in · 74
SCSI support · 36
troubleshooting SCSI installations · 75
WRITE H indicator · 6
WRITE L indicator · 6
writing
errors · 55
frequently asked questions · 61
slow · 55
troubleshooting · 53
writing a CD · 1
writing speed · 41, 61
writing to CD-R and CD-RW · 44
U
UNIX
80
PlexWriter 12/10/32S Operation Manual
Page 85

Notes
PlexWriter 12/10/32S Operation Manual
81
Page 86

Notes
82
PlexWriter 12/10/32S Operation Manual
Page 87

Notes
PlexWriter 12/10/32S Operation Manual 83
Page 88

Notes
84
PlexWriter 12/10/32S Operation Manual
 Loading...