

Page 1
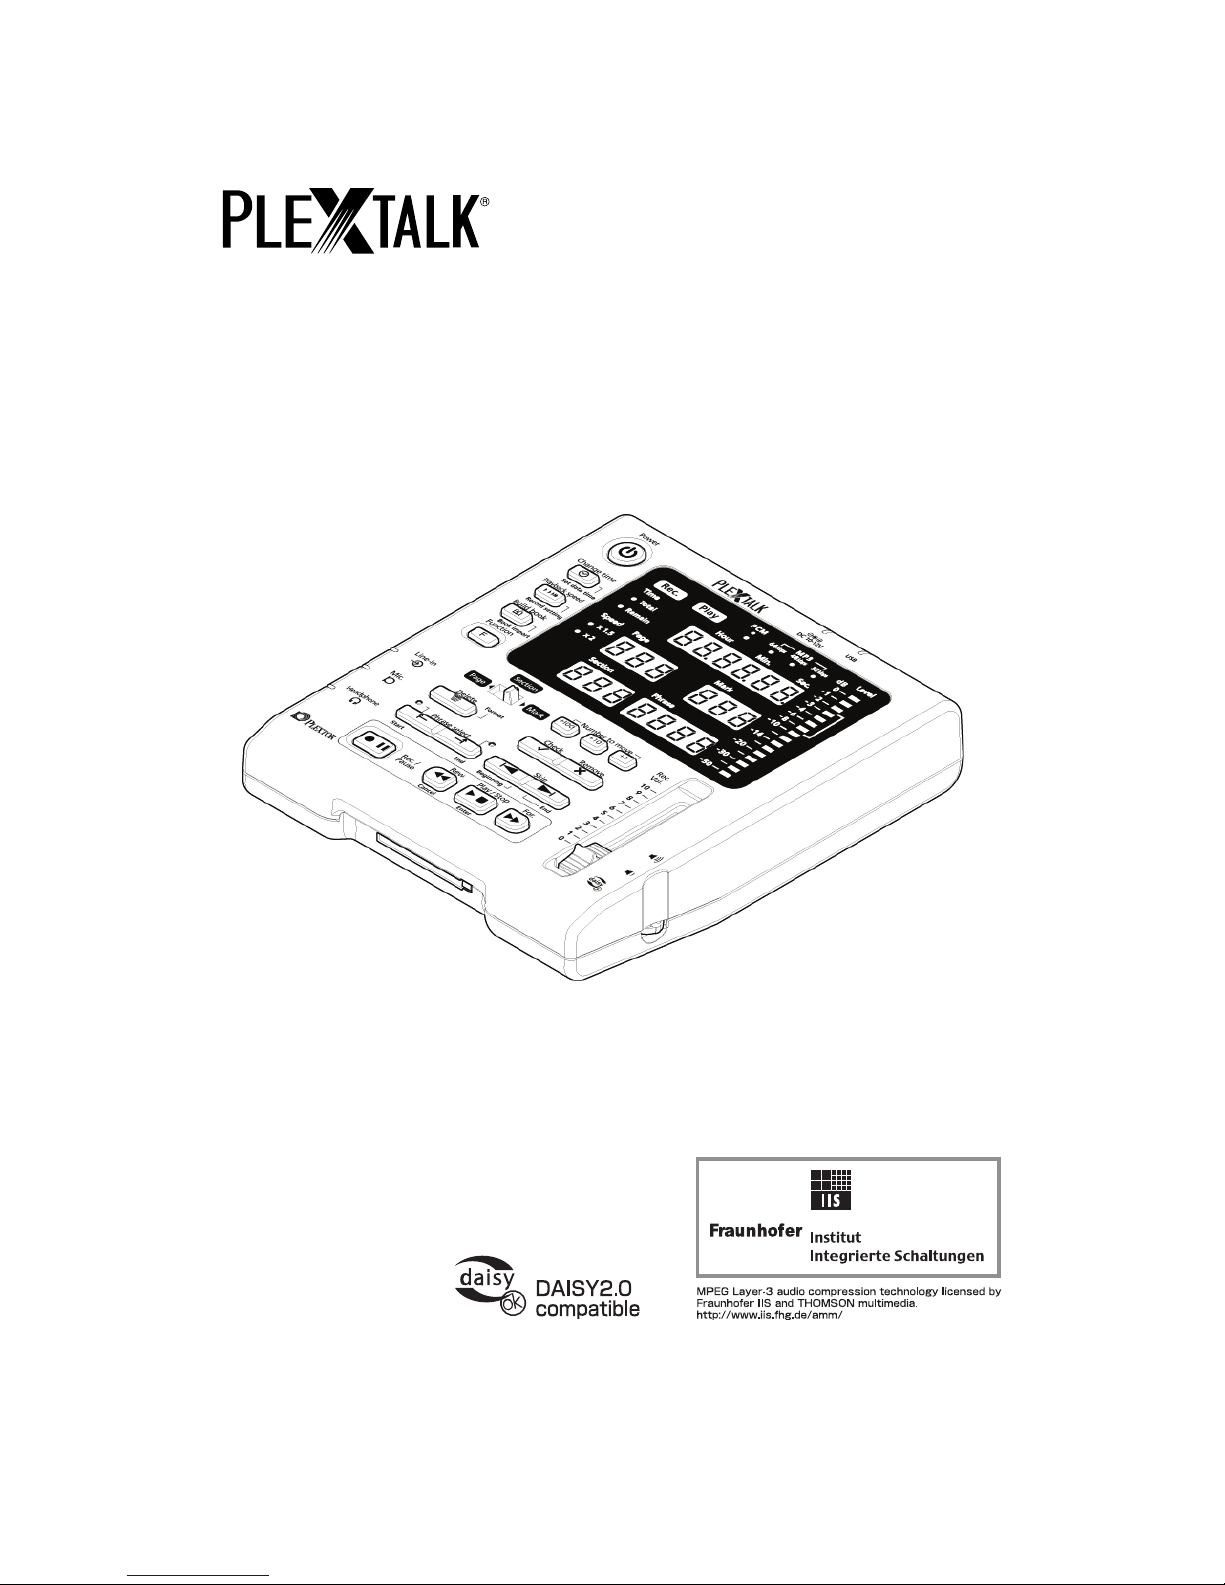
Digital Recorder
DR-1
User’s Guide
This User’s manual includes important information and explains proper product handling
to prevent an accident. Please read this manual to use DR-1 safely.
Please keep it in the place in which it is always seen.
©2007 Shinano Kenshi Co.,Ltd.
Page 2

2
Application of Council Directives: 2006/95/EC, 2004/108/EC
Manufacturer’s Name: Shinano Kenshi Co.,Ltd.
Manufacturer’s Address: 6-15-26 Chuo, Ueda-Shi,
Nagano-Ken, 386-0012 JAPAN
Importer’s Name: PLEXTOR S.A./N.V.
Importer’s Address: Excelsiorlaan 9,
1930 Zaventem, Belgium
Tel: +32.2.725.55.22 FAX: +32.2.725.94.95
Type of Equipment: PLEXTALK Digital Recorder
Models: DR-1
Conforms to the following standards: EMC: EN 55022:2006
EN 55024:1998+A1+A2:2003
EN 61000-3-2: 2000+A2:2005
EN 61000-3-3: 1995+A1+A2:2005
SAFETY: EN 60950-1:2001
I, the undersigned, hereby declare that the equipment specified above
conforms to the above directive (s) and standard (s).
Place: Zaventem Date: 1 September, 2007
PLEXTOR S.A./N.V.
Signature: Position: General Manager
Masahiko Takao
Page 3

3
IMPORTANT
FCC NOTICE
Declaration of Conformity
Model Number: DR-1
Trade Name:
Responsible party: PLEXTOR LLC
Address: 830 Hillview Court, Suite 210 Milpitas, CA 95035 U.S.A.
Telephone Number:1.408.719.3000
This device complies with Part 15 of the FCC Rules, Operation is subject to the following two
conditions :
(1) This device may not cause harmful interference, and (2) This device must accept any
interference received, including interference that may cause undesired operation.
This equipment has been tested and found to comply with the limits for a Class B digital
device, pursuant to part 15 of the FCC Rules. These limits are designed to provide
reasonable protection against harmful interference in a residential installation. This equipment
generates, uses and can radiate radio frequency energy and, if not installed and used in
accordance with the instructions, may cause harmful interference to radio communications.
However, there is no guarantee that interference will not occur in a particular installation. If
this equipment does cause harmful interference to radio or television reception, which can be
determined by turning the equipment off and on, the user is encouraged to try to correct the
interference by one or more of the following measures:
_ Reorient or relocate the receiving antenna.
_ Increase the separation between the equipment and receiver.
_ Connect the equipment into an outlet on a circuit different from that to which the receiver is
connected.
_ Consult the dealer or an experienced radio / TV technician for help.
CAUTION:
Any changes or modification not expressly approved by the party responsible for compliance
could void the user’s authority to operate the equipment.
Canadian Department of Communications Statement
This digital apparatus does not exceed the Class B limits for radio noise emissions from digital
apparatus set out in the Radio Interference Regulations of the Canadian Department of
Communications.
This class B digital apparatus complies with Canadian ICES-003.
Cet appareil numerique de la classe B est conforme a la norme NMB-003 du Canada.
Page 4

4
Table of Contents
Safety Information ·········································································6
Safety terms and symbols used in this guide ··························································································· 6
Legal and copyright Information··················································································································· 8
Chapter 1 Introduction··································································9
What you get in the box?·····························································································································10
What is a Digital Recorder “DR-1”?···········································································································11
What is DAISY? ·············································································································································12
What is a DAISY book?···························································································································12
Flow of DAISY book production·············································································································12
Terms of DAISY ········································································································································13
Part names and functions····························································································································14
DR-1 top layout (Operation panel)········································································································14
Input/output connectors ···························································································································15
Display panel··············································································································································16
Chapter 2 Setting up to get started········································· 17
Prepare a CF card·········································································································································18
About a CF card ········································································································································18
How to insert a CF card?·························································································································19
How to eject a CF card?··························································································································20
Connecting a microphone and a headphone ·························································································21
Plug in a microphone ·······························································································································21
Connecting a headphone························································································································ 21
Connecting a power adaptor ······················································································································22
Power ON / OFF············································································································································22
Display panel while booting-up, processing, and finishing operation, etc.·······································23
Setting the date and time·····························································································································24
Chapter 3 Basic Operation of DR-1········································ 27
Recording ························································································································································28
How to record? ··········································································································································28
Stop recording············································································································································30
Playback······················································································································································ 31
Adjusting audio volume of playback ·····································································································32
Appending Page/Section·························································································································33
Correcting························································································································································34
Three (3) methods of correcting recording··························································································34
Navigation ……<Navigating from beginning to end>·······································································36
Navigation……<Phrase navigation>····································································································37
Navigation…… <Skip navigation>········································································································38
Page 5

5
Navigation……<Navigating by specified number>···········································································39
Marking························································································································································40
Overwrite recording (Rerecord while recording)················································································41
Insert recording··········································································································································42
Punch-in recording STEP 1 (Specify range) ······················································································43
Punch-in recording STEP 2 (Replacing correction)··········································································44
Delete phrases···········································································································································45
Chapter 4 Other Useful Features············································ 47
Displaying the total time & remaining time ······························································································48
Changing the playback speed····················································································································49
Changing the beep sound ···························································································································50
Change the recording setting ·····················································································································51
Building the book ···········································································································································54
Importing (DAISY import) ····························································································································55
Deleting all contents stored in the CF card (Format) ············································································56
Checking DR-1 version ································································································································57
Transferring data to a PC ····························································································································58
Connecting DR-1 to a PC ·······················································································································58
Connecting a card reader to a PC ········································································································60
Connecting a PC card adaptor for CF card to a PC ·········································································61
Contents list in a CF card························································································································62
Data transferring to PRS ·························································································································62
Restore PLEXTALK project file··················································································································63
Chapter 5 Main Specifications················································· 65
Main specifications········································································································································66
Product specifications ······························································································································66
Audio characteristics ································································································································ 67
Card drive specifications ·························································································································67
Recommended CF cards & microphones ·······························································································68
Recommended CF cards························································································································68
Recommended microphones·················································································································68
Chapter 6 Troubleshooting······················································· 69
When DR-1 does not operate well ············································································································70
When an error is displayed ·························································································································73
Chapter 7 Glossary / Index······················································· 77
Glossary···························································································································································78
Index·································································································································································80
Page 6

6
Safety Information
The following gives you information about how to operate your DR-1
safely, including information about the operating environment and
about safe handling of the rechargeable battery. It is essential that
you read this information carefully as failure to take note of it may
invalidate your guarantee and could cause serious injury to yourself
or others.
Safety terms and symbols used in this guide
The following terminology and associated symbols, relating to safety
and points of note, has been used throughout the guide:
DANGER:
A danger notice warns you of “Cautions” (including “Warning”) that must
pay special attention that could cause serious personal injury. Failure to follow the
precautions highlighted in this way could result in serious injury or death, fire, or
electrical shock.
WARNING: A warning notice denotes “Prohibition” (Don’ts) that could result in
personal injury
.
CAUTION: A caution notice denotes “Strict Observance” you must follow that
could lead to damage or destroy the PLEXTALK product, destroy the recording
media, destroy or affect your data or computer configuration.
WARNING!
Please take careful note of all the following points regarding general safe
use of DR-1. Inappropriate handling may lead to serious physical injury
to human body.
Do not allow any foreign matters, such as clips, coins, and staples from the clearance of
DR-1. It is very dangerous that it may cause short-circuit and may lead to fire, electric
shock and breakdown.
Do not disassemble, repair, and remodel DR-1. It may lead to a cause of fire, electric
shock and product damage, and it is very dangerous.
Do not use DR-1 other than supplied AC power adaptor and power cord. It may lead to
a cause of fire, electric shock and product damage.
Do not use DR-1 in the bathroom and the place where rain hits and high moisture
exists. It may lead to a cause of fire, electric shock and product damage.
Do not get DR-1 wet. It may cause electric shock. If water penetrates in the product,
immediately unplug the power cord out of the electrical outlet and contact the store you
purchased DR-1.
Page 7
7
Do not pull out the power plug from the electrical outlet with wet hands. It may cause
electric shock.
Do not place any thermal appliances near the power adaptor and the power cord.
Coating may melt, and it may cause fire and electric shock.
Do not damage the power adaptor and the power cord. If you place something heavy
on DR-1 and tuck DR-1 into something, it gets damaged and may lead to a cause of fire
and electric shock.
When you unplug the power adaptor and the power cord, do not hold the cable to pull it
out. The cable may cut off, and it may lead to a cause of fire and electric shock.
Take the dust off from the plug of the power cord regularly. Dust may lead to a cause
of fire.
Do not connect many loads on one electrical outlet. If the product is used with
exceeding rated current, and it may lead to a cause of fire and product breakdown.
If any product damages or abnormalities, such as smoke, offensive odor, breakdown
from dropping are found, stop using the product urgently. It may cause of fire and
electric shock. Unplug the power cord immediately and contact the store you
purchased DR-1.
Do not put anything on DR-1 or cover DR-1 with cloth or plastic sheet. Do not place
DR-1 anywhere does not allow air to pass through easily. Product internal cooling
system becomes insufficient, and it may cause fire or electric shock.
Do not expose DR-1 to dusty areas, direct sunlight, close to the heating appliances,
cellular phones, audio amplifier, microwave oven, toaster, and hair dryer, and other
places where heat or heat and electric wave is generated. It may cause fire or electric
shock.
CAUTION!
Please observe the following safety precautions. Failure to use DR-1
may cause physical injury to human body or physical damage.
Place DR-1 near the power supply outlet for easy reach to the power supply adaptor.
Always pull out the power plug from the outlet when you move DR-1 to prevent the
electric shock accident and the breakdown.
Always unplug the power plug from the electric outlet when not using DR-1 for a long
time.
Be careful not to drop or jolt DR-1 when you move. It may cause breakdown to a
precise part in the device.
Using the headphone for a long time may exert a harmful influence to hearing sense.
Page 8
8
To wipe dust and dirt off, prepare tightly squeezed damp soft and clean cloth with water
or soap water.
Do not use thinner, benzine and any alcohols solvent that damages on the surface of
DR-1.
Insert the CF card in the correct direction. If inserting it in the wrong direction, it leads to
a cause of damage. Never add excessive power.
Legal and copyright Information
Copyright information about this guide
Shinano Kenshi reserves the right to modify the products described in this guide
at any time without prior notice.
Shinano Kenshi makes no representation or warranties with respect to the
contents hereof and specifically disclaims any implied warranties of
merchantability or fitness for any particular purpose. Further, Shinano Kenshi
Co., Ltd. reserves the right to revise this guide and to make changes in its content,
without obligation to notify any person or organization of such revision or change.
This guide is copyright. All right reserved. It may not be copied, photocopied,
translated, or reduced to any electronic medium or machine-readable form
without Shinano Kenshi's prior permission.
Manual copyright 2007 Shinano Kenshi Co., Ltd.
Licenses and trademarks
All licenses and trademarks are property of their respective owners.
Page 9

9
1
Chapter 1
Introduction
What you get in the box?········································10
What is a Digital Recorder “DR-1”?·······················
·
11
What is DAISY?·····················································
·
12
What is a DAISY book? ···································
·
12
Flow of DAISY book production·······················
·
12
Terms of DAISY ···············································
·
13
Part names and functions······································
·
14
DR-1 top layout (Operation panel) ···················
·
14
Input/output connectors····································
·
15
Display panel····················································
·
16
Page 10
10
What you get in the box?
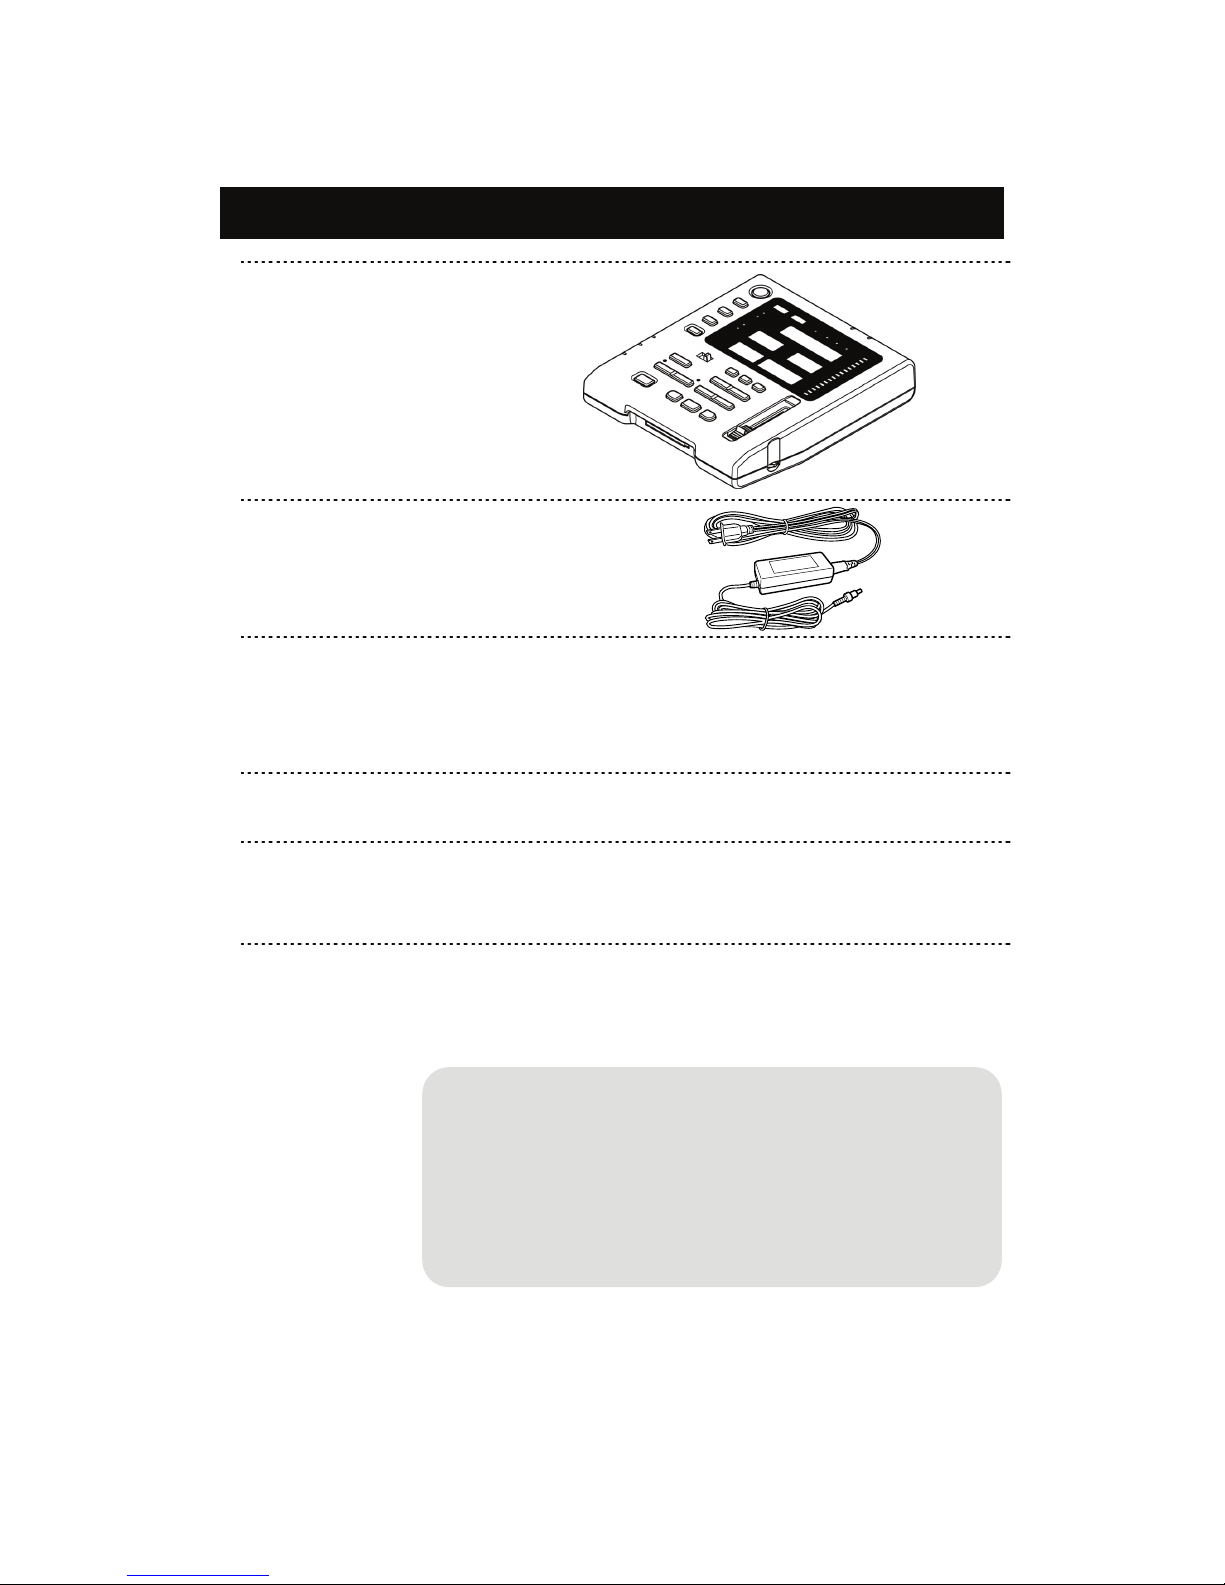
Digital Recorder DR-1
1
Power Cord 1
Power Adaptor 1
PLEXTALK Recording
Software (PRS) Installation
CD
1
PLEXTALK Recording Software (PRS) is bundled
with DR-1. Designed for Windows PCs, it is a
simple DAISY recording and editing tool with voice
guidance to make it accessible to people who are
blind or partially sighted.
Quick manual
1
User’s manual
(This manual)
1
Accessories NOT included in this package
Below listed accessories are not included in this package.
These items are available and can be purchased separately at the
electronics retail stores.
CF card, Microphone, Headphone,
USB cable
Page 11
11
1
What is a Digital Recorder “DR-1”?
“DR-1” is a digital recorder that can perform the work of
"Recording", "Proofreading", and "Correction" in DAISY book
production.
Features of DR-1
1. No complicated setup is required.
You can start recording after just inserting the CF card and
connecting the microphone. (*)
2. DR-1 makes DAISY book creation easy and
simple.
It has not only recording but also simple editing function such as
breaking section or page.
3. Bigger keys and display help you operate easily.
Easily understand the recording status by displaying the elapsed time,
remaining recordable time, the number of phrases, the mark that can
be inserted at any position.
(*) CF card and microphone are not included in DR-1 package.
Please purchase them separately.
A
s for the work
of DAISY book
production,
refer to "Flow o
f
DAISY book
production
(p.12)."
Page 12
12
What is DAISY?
What is a DAISY book?
DAISY, which is an abbreviation for Digital Accessible Information
System, is a standard of a digital recording book that was developed
for a visually impaired person or people who have a difficulty reading
ordinary printed materials.
DAISY’s format was developed is being developed as the international
standard for digital talking books.
Advantages of DAISY book
1. Available a long-time recording on a single CD.
2. Ability to skip directly to a specific pages, sections, and chapters.
3. Sound quality does not deteriorate even after repeated hearing.
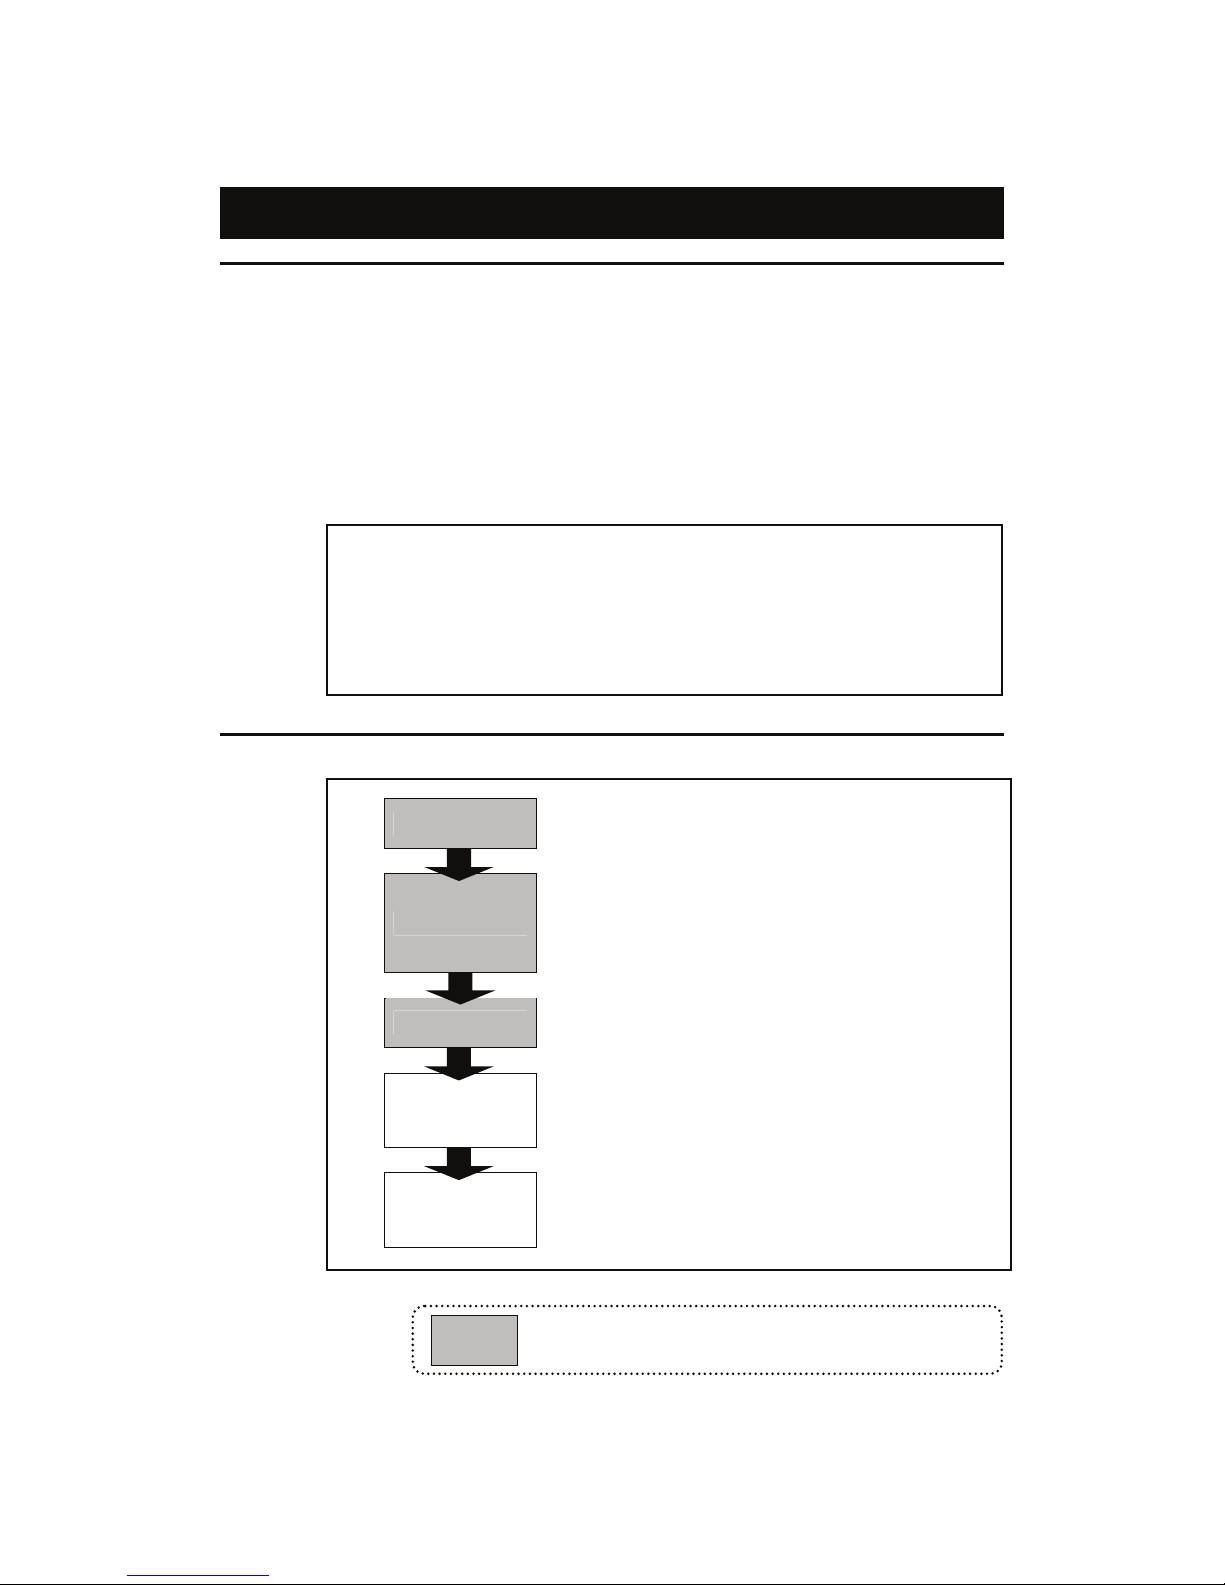
Flow of DAISY book production
Recording
Reading of books
Correction of reading errors, etc.
Proofreading
Comparison between original book and
recorded audio
Check a mark on points where require
correction
Correction
Reviewing check-marked points
Correction of reading errors, etc.
Editing Daisy
Setting of pages, sections, and chapters, etc.
Work with editing software, such as
PRS, etc.
CD Creation
Burning data on CD
Producing CD by PC and other media
burning device
= Production process that can be done with DR-1
Page 13
13
1
Terms of DAISY
1) What is a “Phrase”?
When the book is being recorded, the audio files are automatically divided
into segments called "phrases". The recording software will decide on
where a phrase starts and ends based on the amount of silence between
one piece of audio and the next. The length of silence permitted before a
new phrase is created is called the "pause time" and can be adjusted by
the person making the DAISY recording. In order to detect the audio up into
phrases that are not too long or short, a fast reader might require a short
pause time and a slower reader a longer pause time. When the recording is
finished, the reader can use the phrases as an additional navigation
feature.
Once upon a time, (pause) a queen was doing needle work (pause) while staring
outside her window at the beautiful snow. (pause)
2) What is a “Section”?
A Section refers to the segment of audio between one heading and the
next. A section is generally made up of a number of phrases but can have
as few as one phrase. Each section has a heading and an associated
navigation level. Do not get confused between sections in a DAISY
recording and sections of this guide.
When you cannot detect phrases as desired, please refer to “Change the recording
setting (p.51)” to adjust it.
Phrase 1
Phrase 3
Phrase 2
[Example]
Page 14
14
Part names and functions
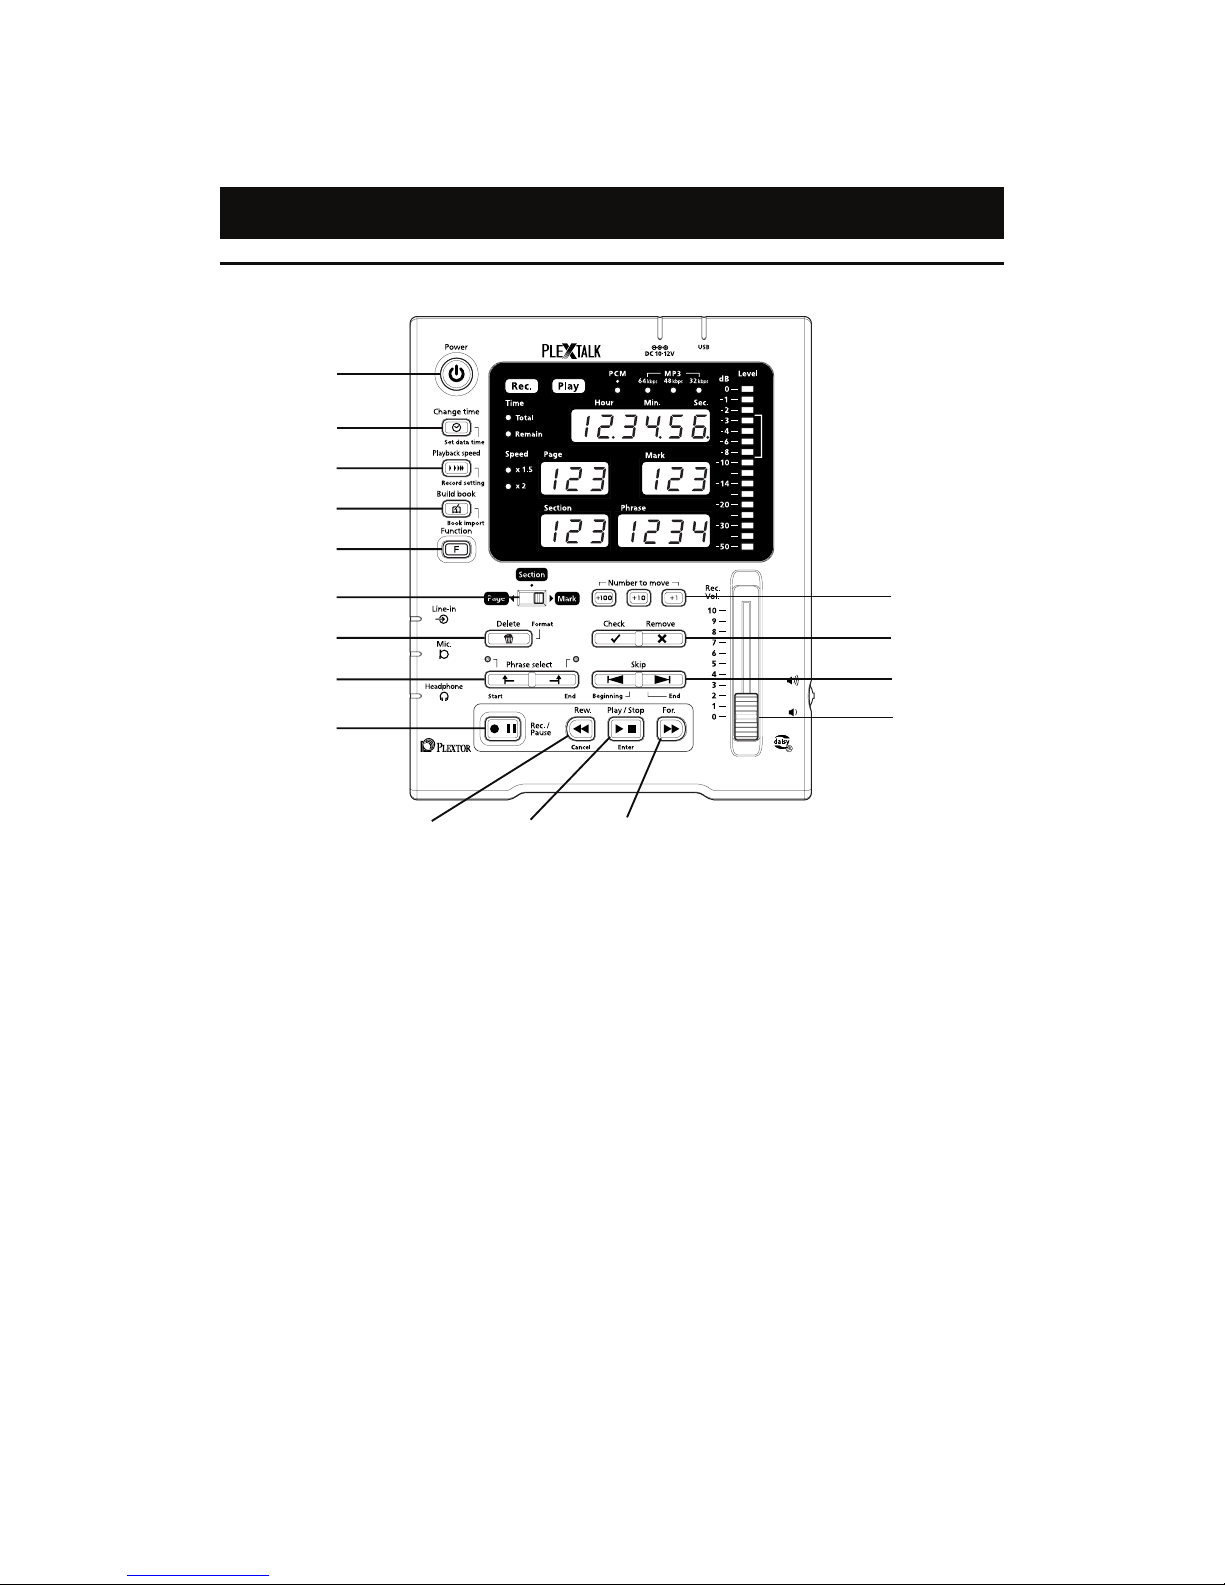
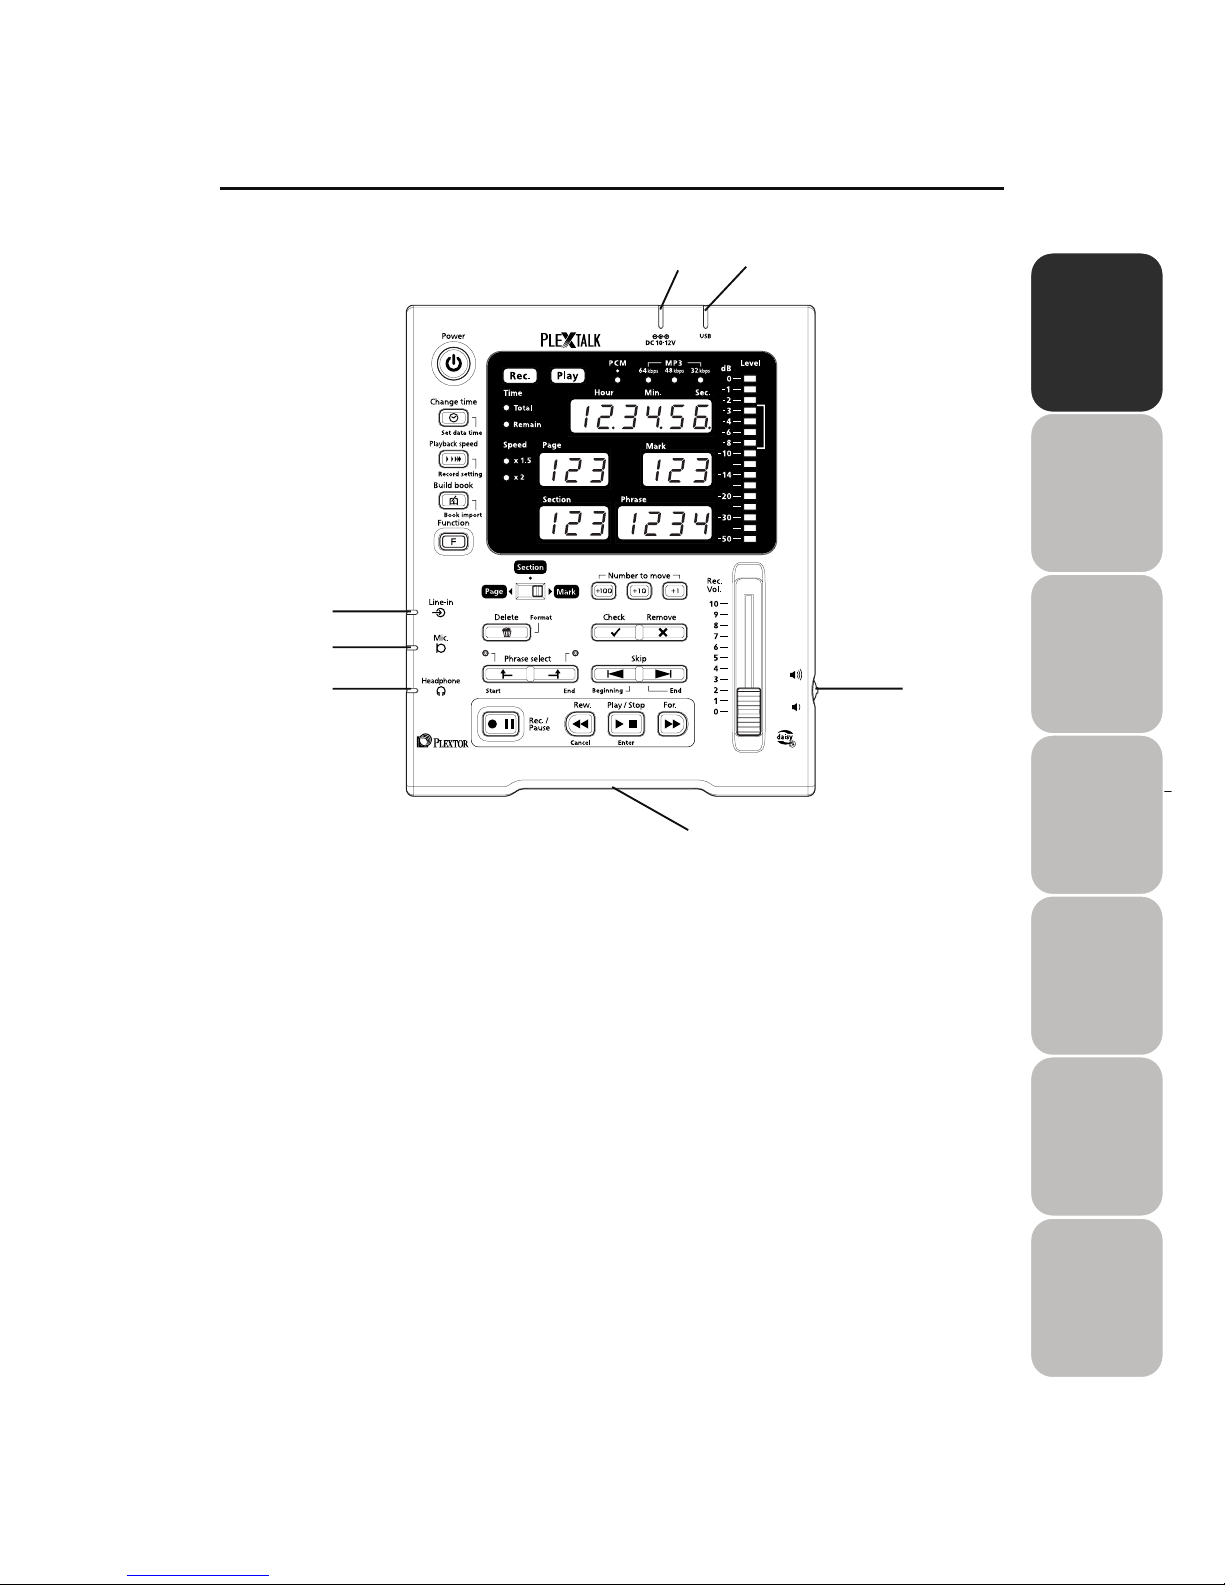
DR-1 top layout (Operation panel)
1) Power
Turn the power ON/OFF.
2) Change time
Change time display and set time.
3) Playback speed
Change playback speed and specify
recording setting.
4) Build book
Execute build book and import functions.
5) Function
Use together with another key to execute
some functions.
6) Select switch
Change switch setting.
7) Delete
Delete recorded contents.
8) Phrase select
Select the range of phrase.
9) Rec. / Pause
Record/ pause recording.
10) Rew.
Rewind /Jump backwards by the phrase
unit.
11) Play / Stop
Play/stop playback.
12) For.
Jump forwards by the phrase unit.
13) Number to move
Set the jumping destination position.
14) Check, Remove
Set/Remove pages, sections, and marks.
15) Skip
Skip by the selected skipping unit.
16) Recording volume slider
Adjust recording volume.
1)
2)
4)
5)
6)
7)
8)
9)
10) 12)
13)
14)
15)
16)
11)
3)
Page 15
15
1
Input/output connectors
1) Line input terminal
Connect the output terminal of VCR, etc.
2) Microphone input terminal
Connect the output terminal of the
microphone.
3) Headphone output terminal
Connect the input terminal of the
headphone.
4) DC input terminal
Connect the power adaptor.
5) USB cable connector
Connect the terminal of PC.
6) Volume shuttle
Adjusting playback volume.
7) CF card loading slot
Insert a CF card.
1)
2)
3)
4)
5)
6)
7)
Page 16

16
Display panel
1) ”Play” lamp
Flash during playback.
2) ”Rec.” lamp
Flash at “Rec./Pause” and the light comes
up during recording.
3) ”Time” lamp
Display present elapsed time, total time, or
the remaining time.
4) ”Speed” lamp
Display the state of playback speed.
5) ”Sound quality” lamp
Display selected sound quality.
6) Recording level
Display recording level.
7) Hour Min. Sec.
Display the state of time presently
showing.
8) Page
Display the present page.
9) Mark
Display the present mark.
10) Section
Display the present section.
11) Phrase
Display the present phrase.
1)
2)
3)
4)
5)
6)
7)
8) 9)
10) 11)
Page 17
17
2
Chapter 2
Setting up to get started
Prepare a CF card·················································18
About a CF card··············································
·
18
How to insert a CF card? ································
·
19
How to eject a CF card? ·································
·
20
Connecting a microphone and a headphone·······
·
21
Plug in a microphone ······································
·
21
Connecting a headphone ·······························
·
21
Connecting a power adaptor································
·
22
Power ON / OFF ··················································
·
22
Display panel while booting-up, processing, and
finishing operation, etc. ········································
·
23
Setting the date and time ·····································
·
24
Page 18
18
Prepare a CF card
About a CF card
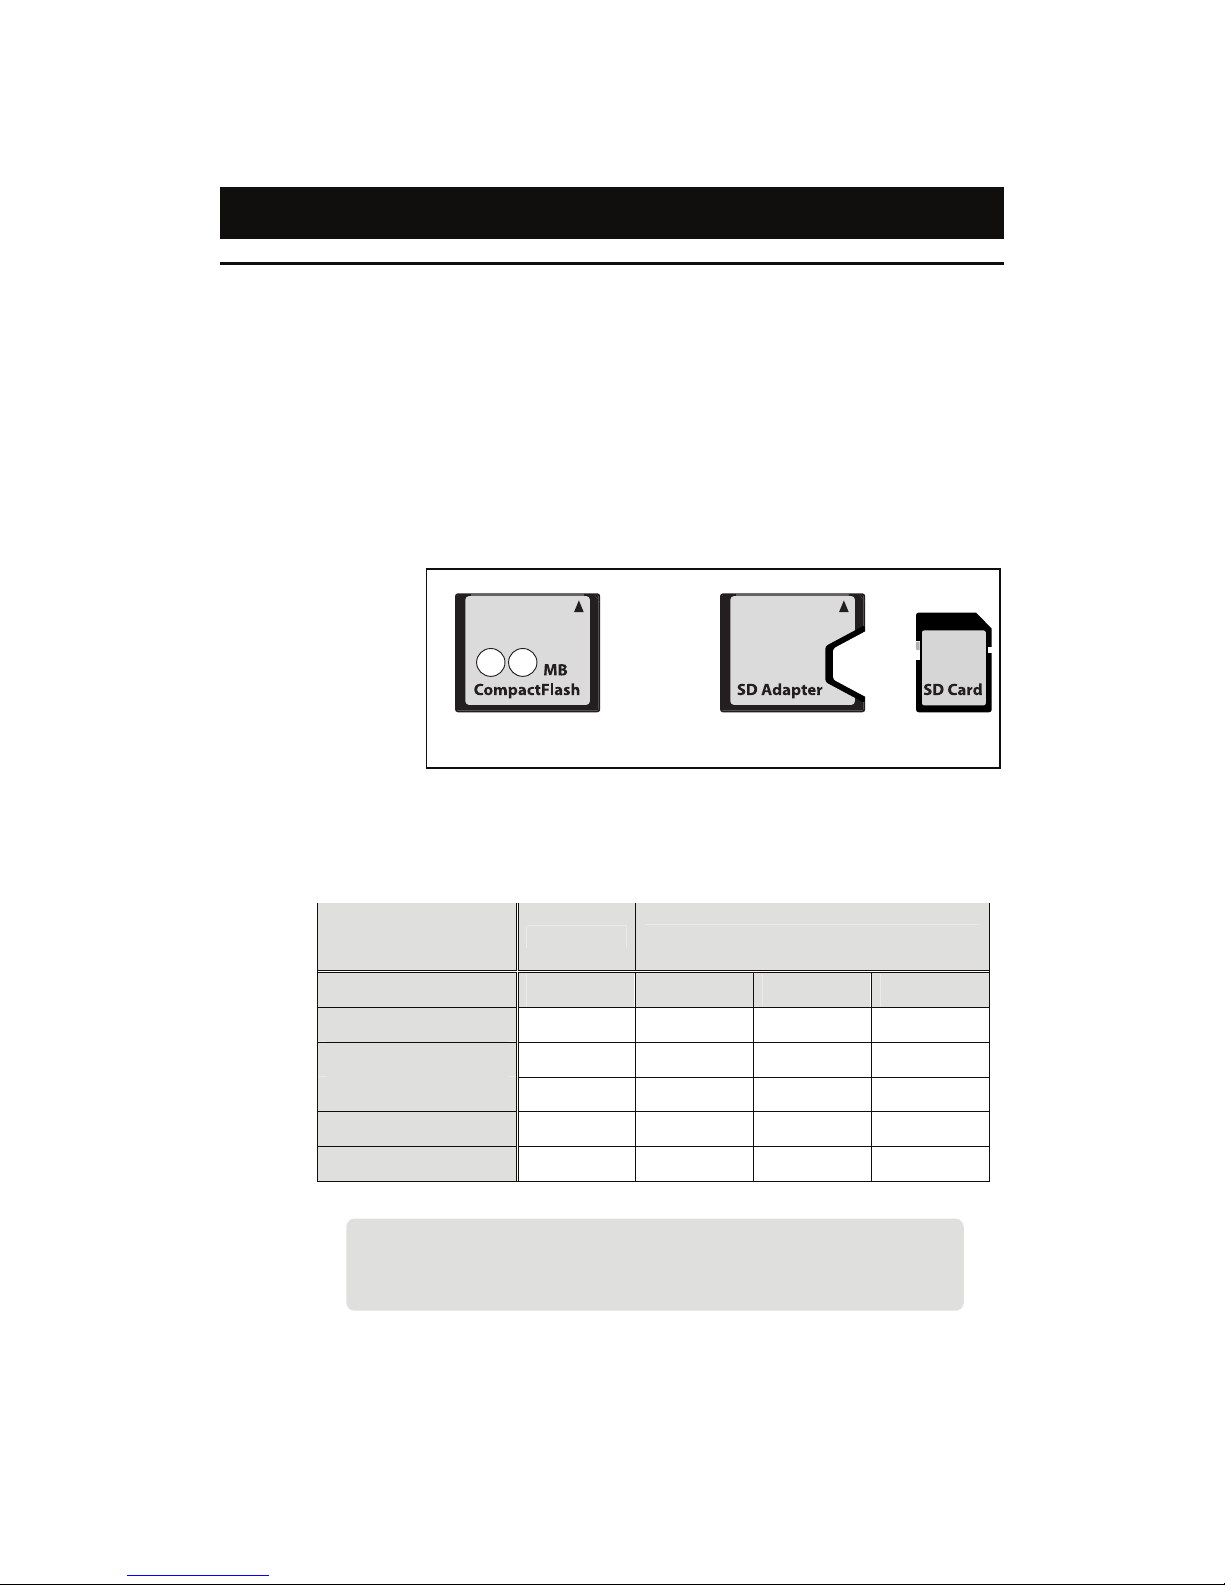
There are mainly two types of CF (Compact Flash*) card; one is a hard
disc type and the other is a memory type (Type I & Type II: 2 sub-types).
DR-1 is able to use the memory type of Type I CF card only. Type II CF
card cannot be used with DR-1. However, the SD card can be used
through the adaptor of the CF card type.
You can use the CF card with up to 8GB capacity and the SD cards with
up to 2GB capacity.
* CompactFlash is a registered trademark of SanDisk.
CF Card Adaptor SD card
● Recording capacity and standard recording time of CF card
Recording
Format
PCM*
MP3*
Sound Quality 22.05kHz 64kbps 48kbps 32kbps
512MB 2.5 15 20 30
1 GB 6 30 40 60
2 GB 12 60 80 120
4 GB 24 120 160 240
8 GB 48 240 320 480
Even if you correct a recording error, the audio file physically remains.
Therefore, you will need a CF card that has approximately twice large
capacity than the capacity indicated in the above table.
* Unit of Recording time: Hours
Page 19
19
2
How to insert a CF card?
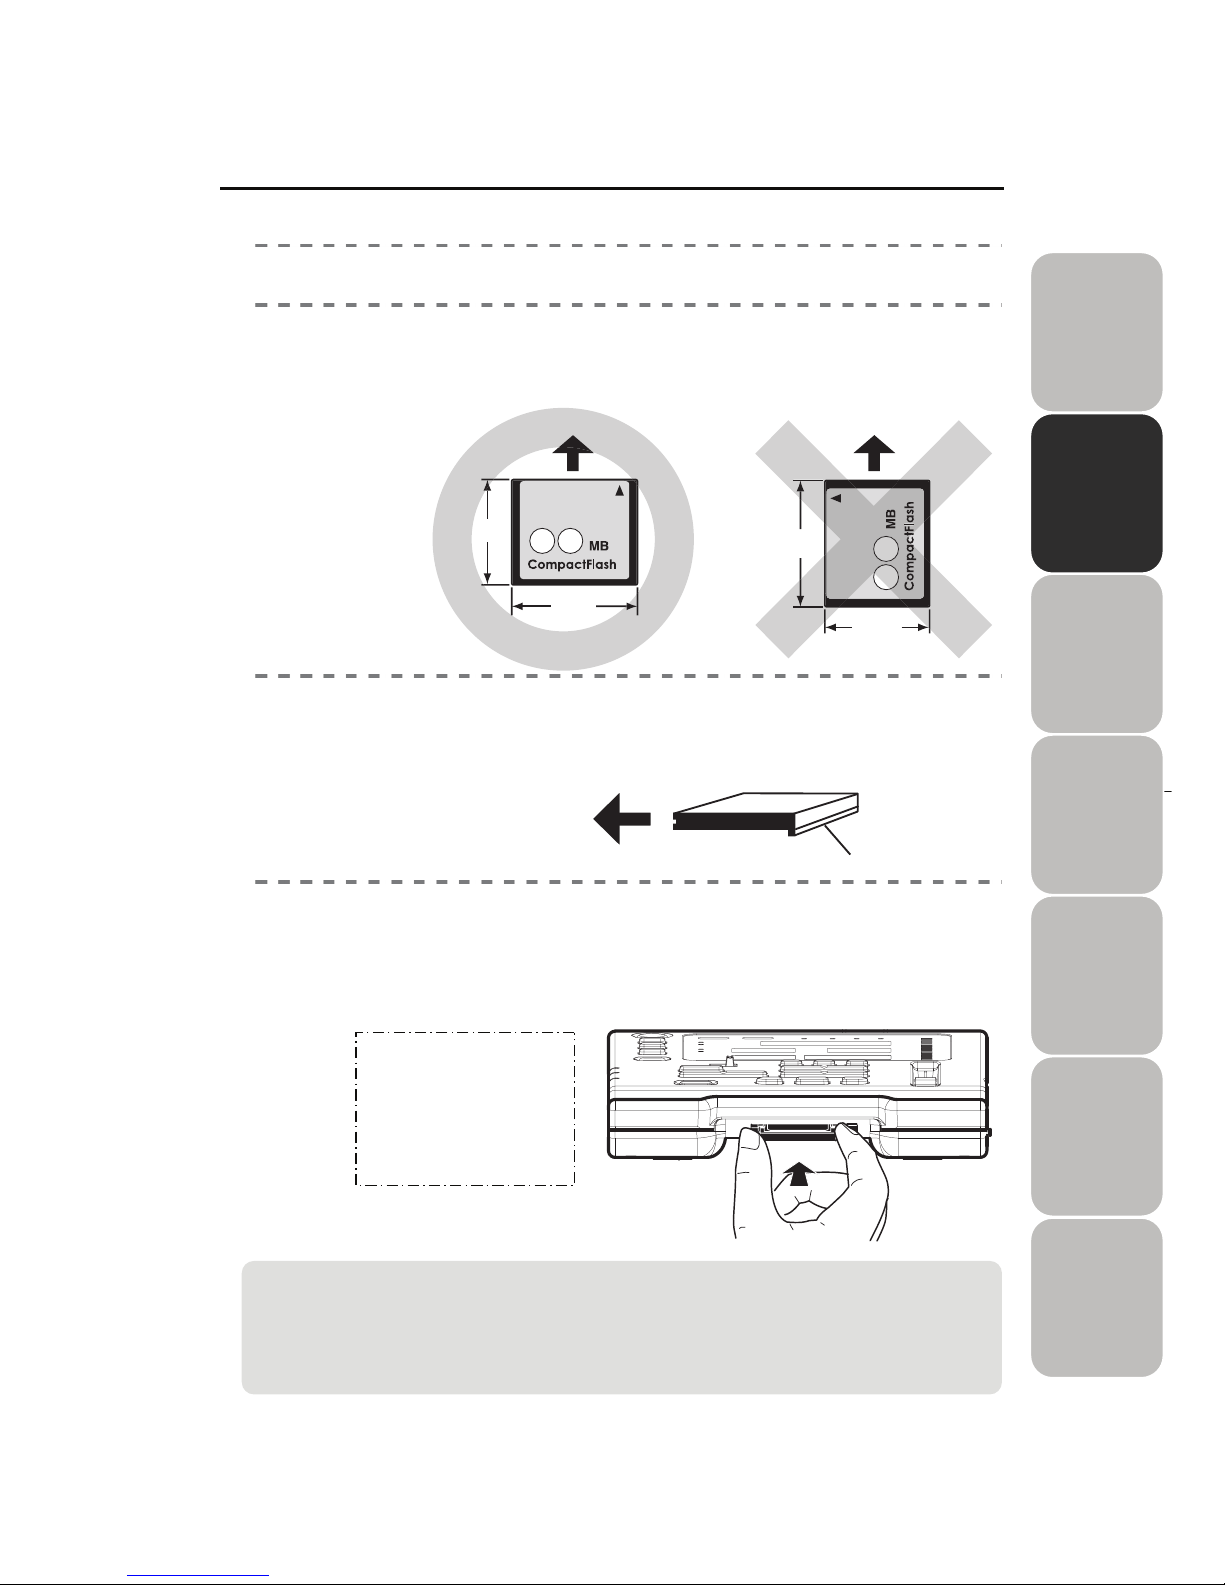
1)
Turn OFF the power.
2)
Hold the CF card correctly as shown on the left below
figure.
(The long sideways of the card goes into the card slot, not the short sideways.)
3)
There is a very small ridge on the front edge of the CF
card. This ridge should be towards you and facing
downwards when the card is inserted.
4)
Gently align the CF card with the slot and push it carefully
in until it is fully home. A slightly firmer push is required
at the last part of this process to ensure that it is properly
inserted.
.
CAUTION!
■
Use of the CF card with label, etc. adhered leads to a cause of the label peel-off at
the card insertion and also may trigger a defect when inserting/ejecting the card.
■ Always insert / eject the CF card in the state of the power-off.
NOTE:
Never be tempted to
use excess force as
you may cause
damage to the CF card
or DR-1.
Page 20

20
How to eject a CF card?
1)
Turn OFF the power.
2)
Press the eject key which is located on the right of the CF
card slot.
3)
Carefully grip the CF card and pull it out of the slot.
CAUTION!
■ Before ejecting the CF card, ensure that the power of DR-1
is turned off. If the CF card is ejected in the state of
power-on, stored data in the card may be destroyed.
Page 21
21
2
Connecting a microphone and a headphone
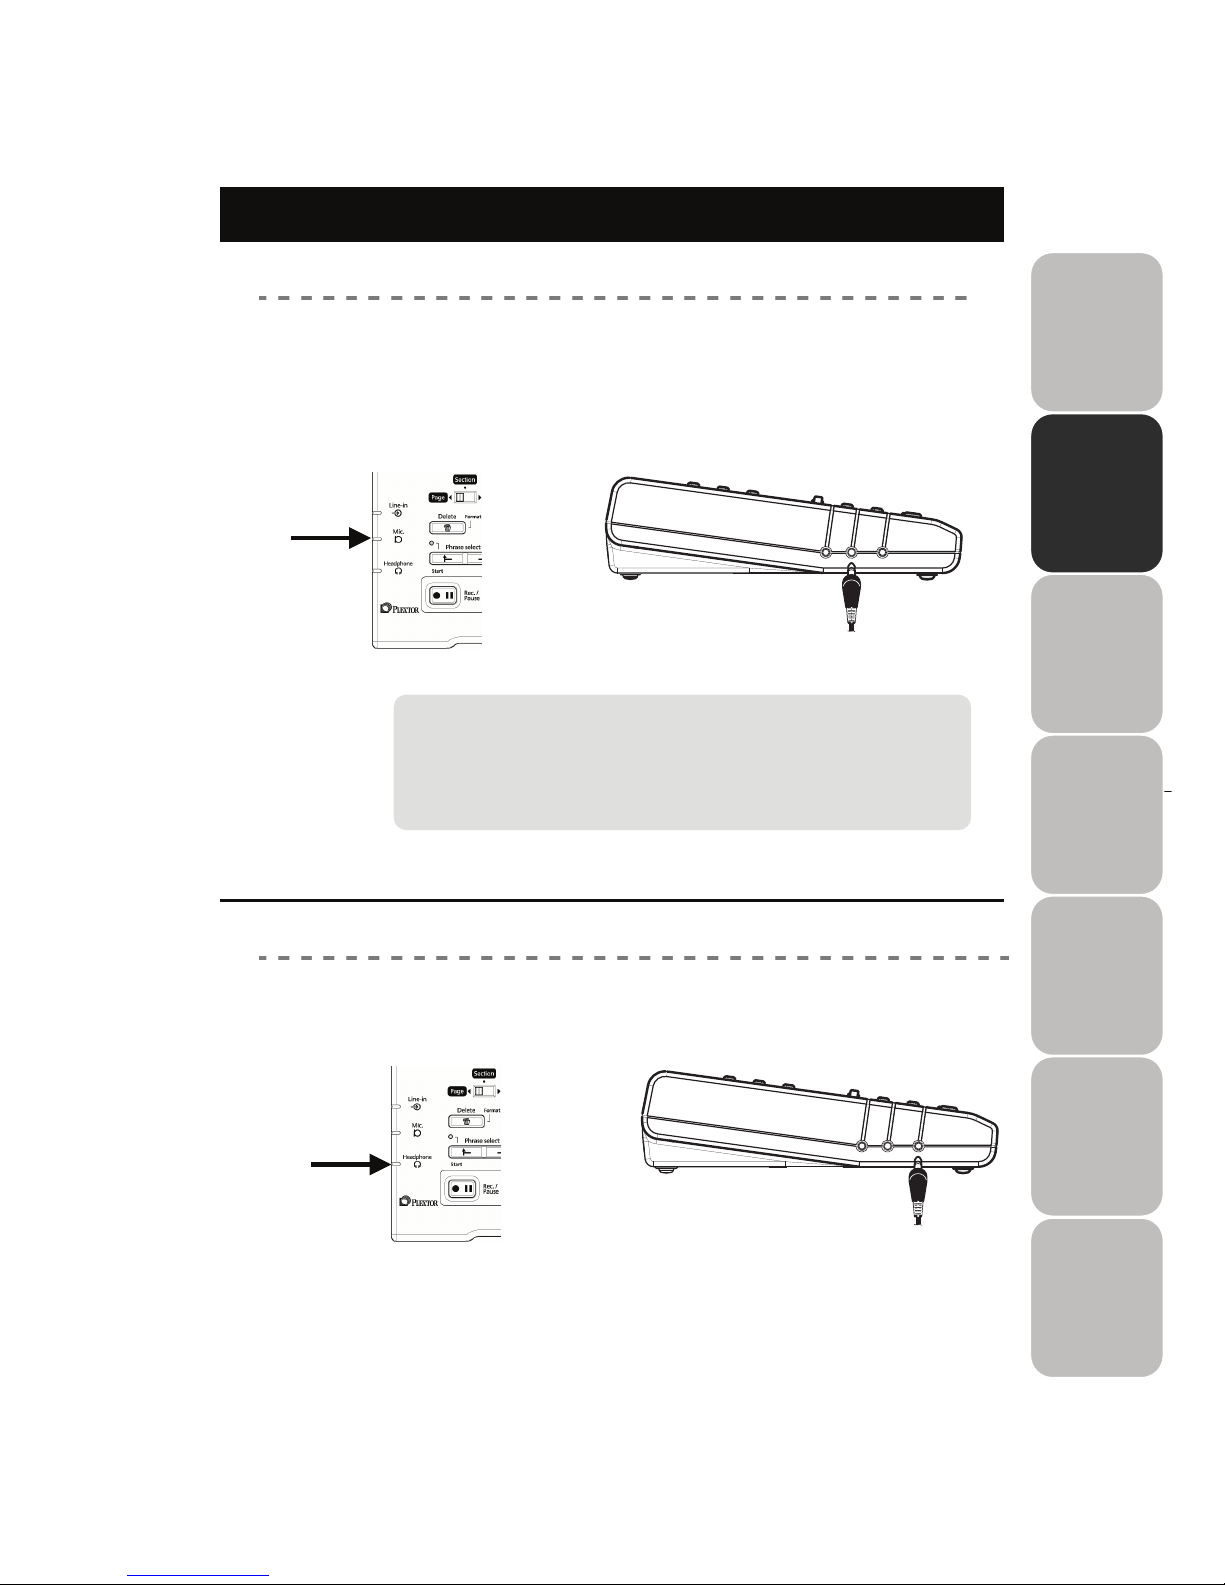
Plug in a microphone
Plug in the microphone connector into the input terminal
located on the left side of the DR-1.
When the line input and the microphone input were connected simultaneously,
the microphone input has a priority of the connection. However, the audio of
plug-in the line input is not recorded at this time.
Connecting a headphone
Plug in the headphone connector into the output terminal located
on the left side of the DR-1.
The microphone that can be used with DR-1 is a dynamic
microphone or a condenser microphone with batteries.
DR-1 is not compatible with the plug-in power microphone.
Please refer to “Recommended microphones (p.68)” for the
types of microphone for useable microphone with DR-1.
Page 22
22
Connecting a power adaptor
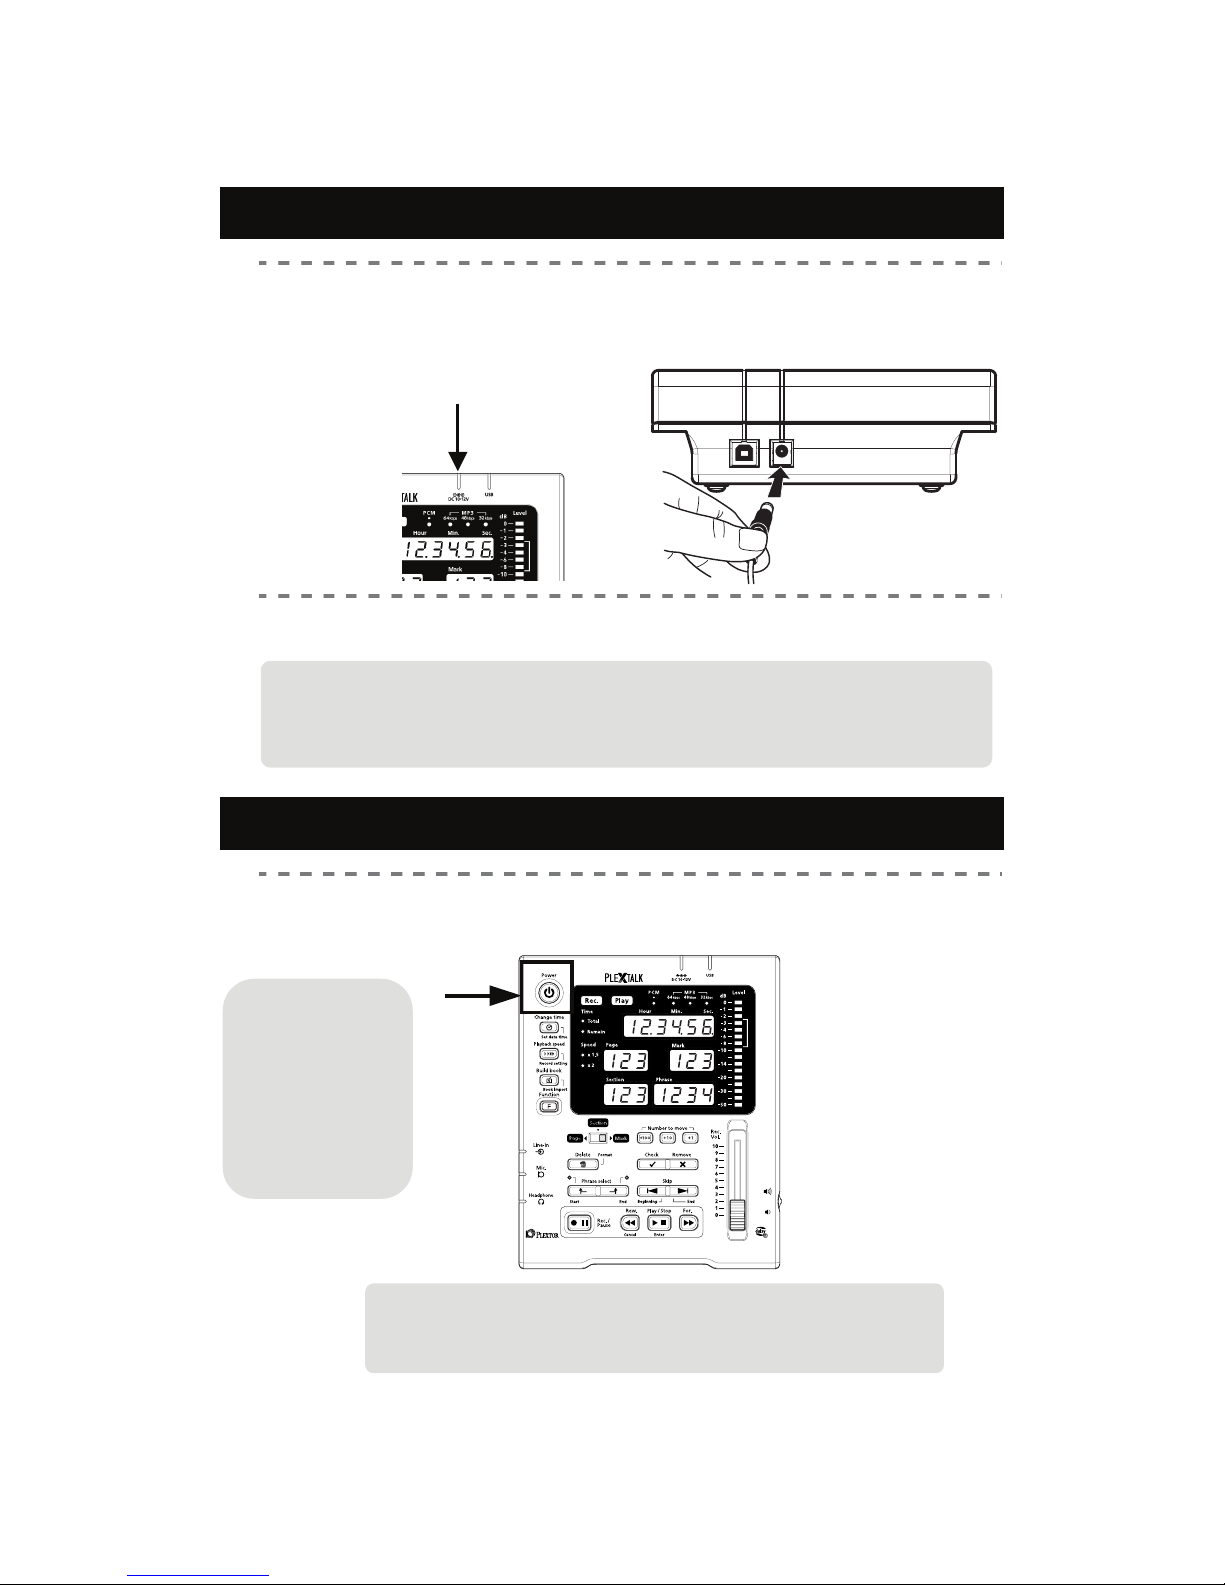
Plug in the power cord into the DC connector located in
the back face of the DR-1.
Do not use the power adaptors other than the attachment.
1)
2)
Plug the power cord into the electric outlet.
Power ON / OFF
Press the main POWER button located on the top surface.
Power is turned ON and OFF every time the power button is pressed.
When turning on
the power first
time, it is
necessary to set
time. Refer to
“Setting the date
and time (p.24) "
for the procedure.
DR-1 automatically memorize the final position where the power is
turned off. When the power is back on again, it enables to start
playback from the previously stopped position.
WARNING!
■ Do not use the power adaptor other than the attachment. It
may cause fire or electric shock.
Page 23
23
2
Display panel while booting-up, processing, and
finishing operation, etc.
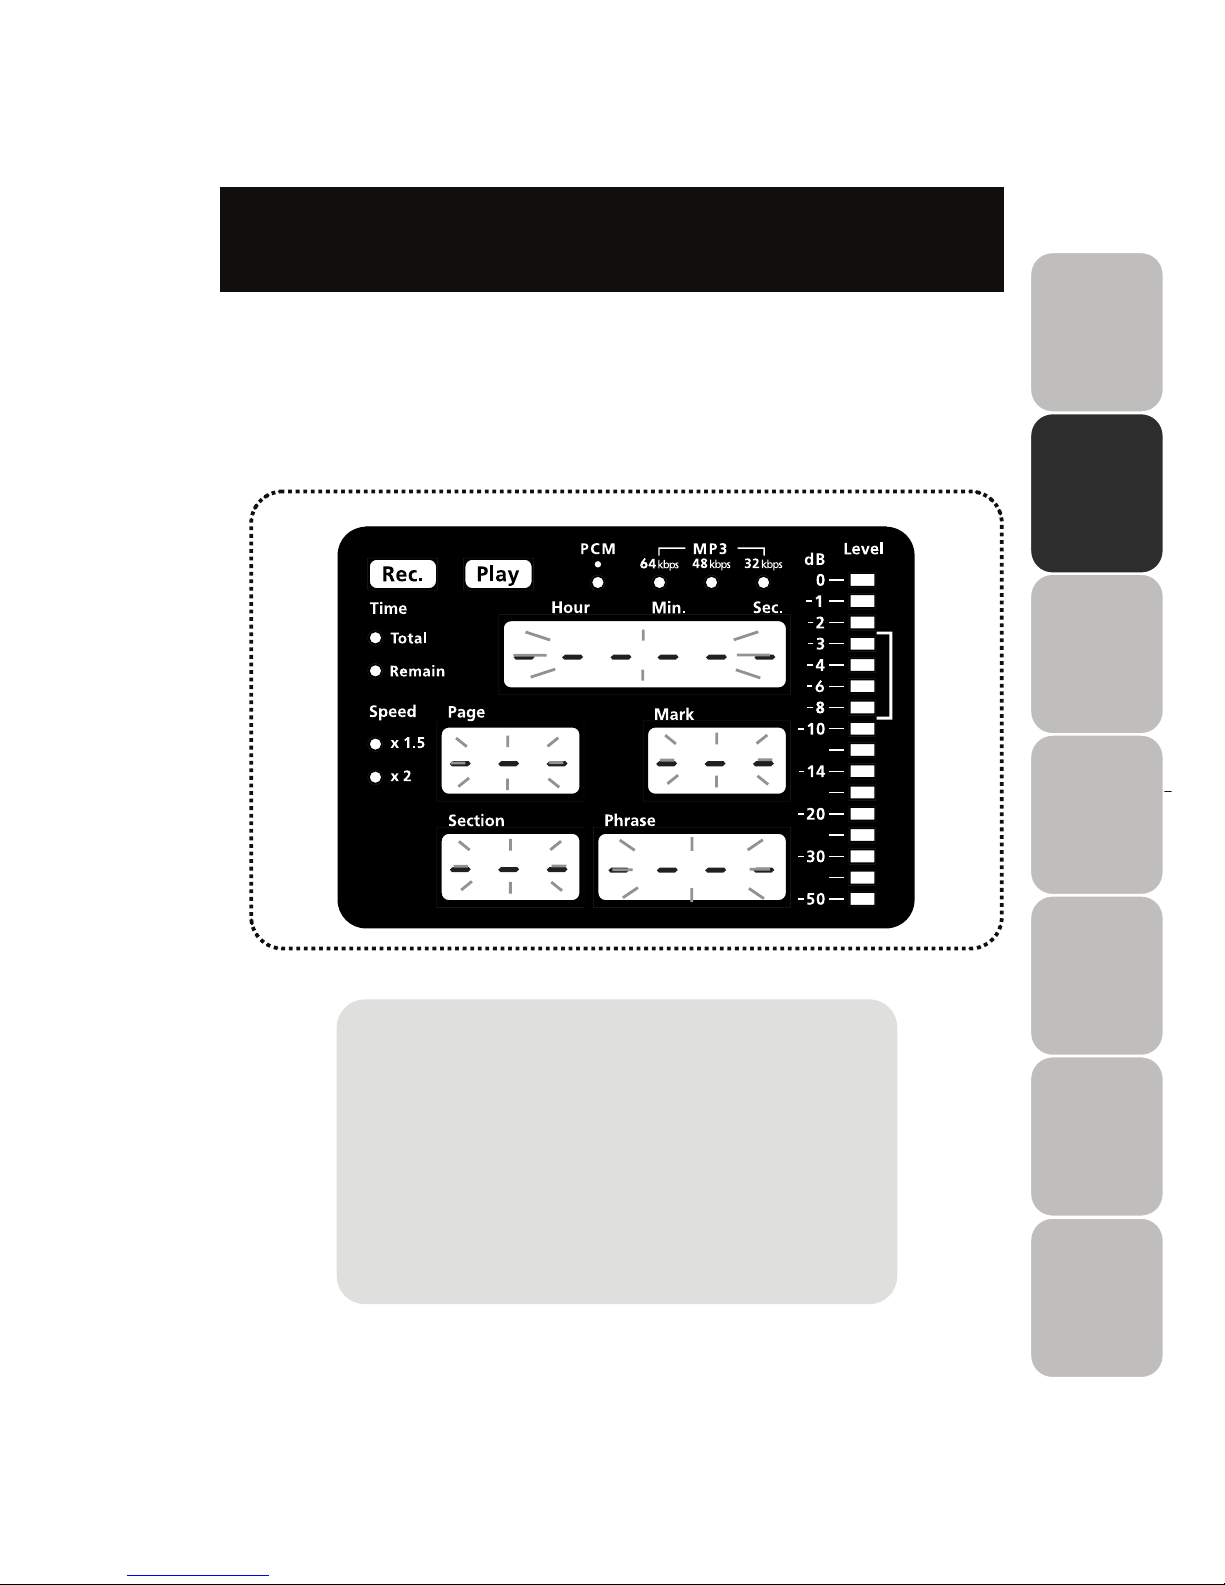
On a display panel of DR-1, while booting-up, finishing operation, and
processing time consuming tasks, the green lamps from the time display
part to the phrase display part flashes like one line in side as shown in the
below figure. Please wait for a while flashing.
CAUTION!
While flashing the lamps as shown above,
do not attempt the following actions:
■ Turn off the power.
■ Unplug the power adaptor.
■ Plug in the USB cable.
■ Eject the CF card.
Page 24
24
Setting the date and time
Current time information is required for DR-1 internal file management.
When DR-1 saves and stores the recorded data (the project), information on
time is used.
When using DR-1 for the first time or not using it for a long time, it automatically
enters the state of setting date and time after power is on.
Time setting is saved by built-in rechargeable back-up batteries. When using for the first
time or not using it for a long time, please energize for 24 hours or more and charge it
full.
Please set the clock regularly when the difference with accurate time becomes large.
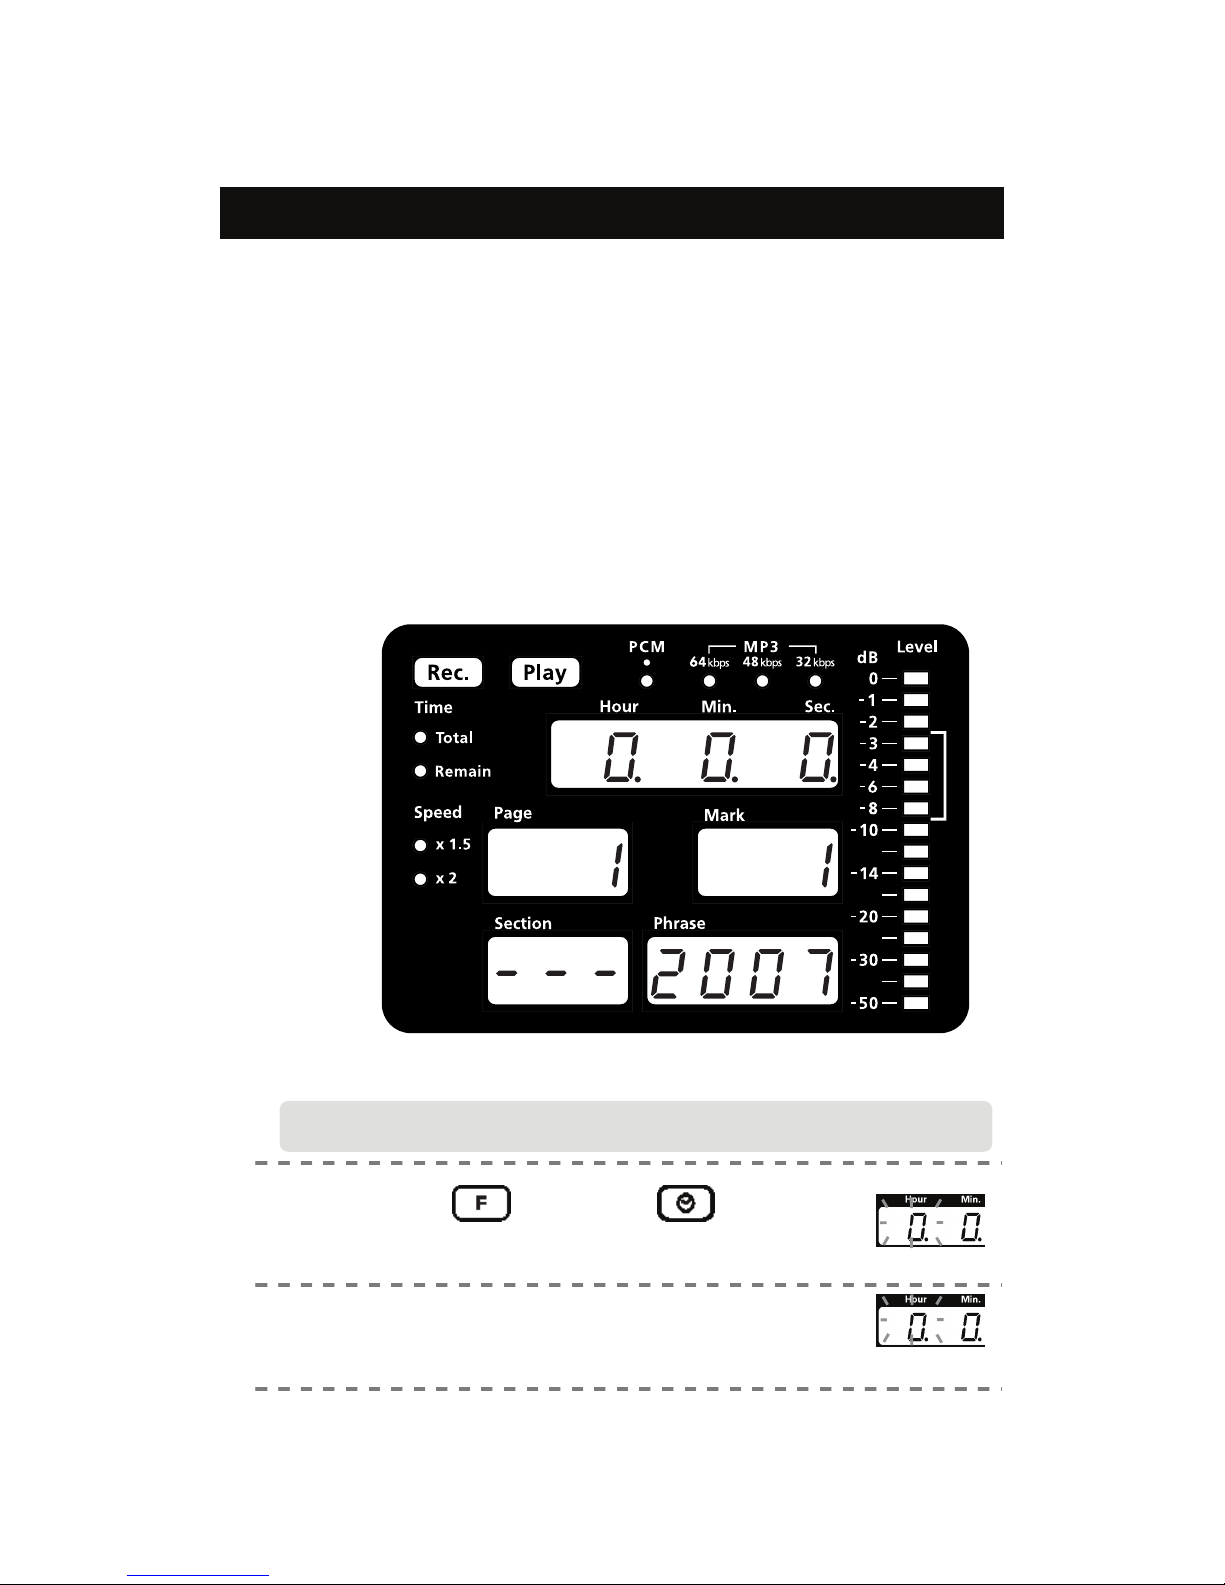
When you turn on the power of DR-1 as a first time, you can see as shown
below on the display panel.
NOTEActual display may differ from the above sample display depending on
the time of purchase of DR-1.
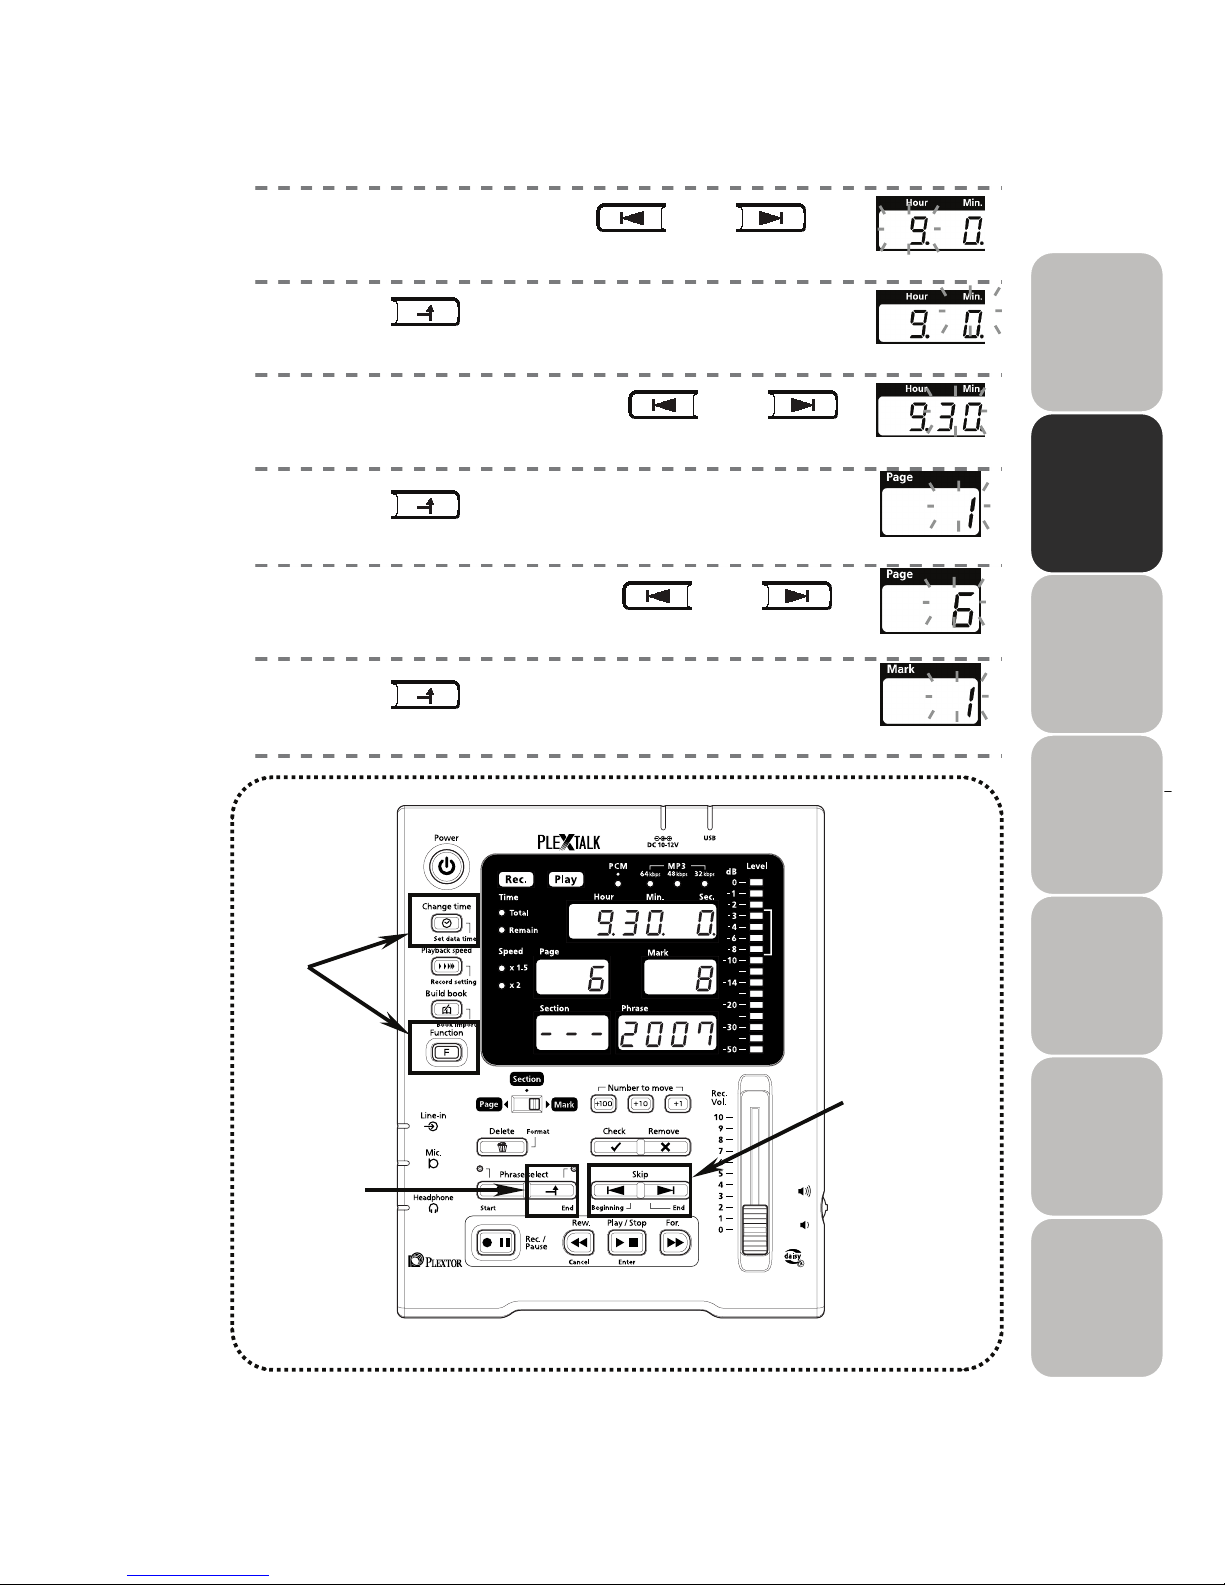
1)
Hold down and press .
When first turning the power on, above action is not necessary.
2)
Confirm the flash in the display panel.
“Hour” lamp flashes in the “time display window.”
F
unction
Let’s set 9:30AM of June 8, 2007 in the following example,
S
et data time
Flash
Flash
Page 25
25
2
3)
Set “time” by pressing and .
4)
Press to complete setting.
“Minute” lamp flashes.
5)
Set “minute“ by pressing and .
6)
Press to complete setting.
“Month” lamp flashes.
7)
Set “month“ by pressing and .
8)
Press to complete setting.
“Date” lamp flashes.
4)6)8)
3)5)7)
1)
Beginni
ng
End
Flash Flash
Flash
Flash
Flash
Flash End End
End
Beginni
ng
Beginni
ng
End End
Page 26
26
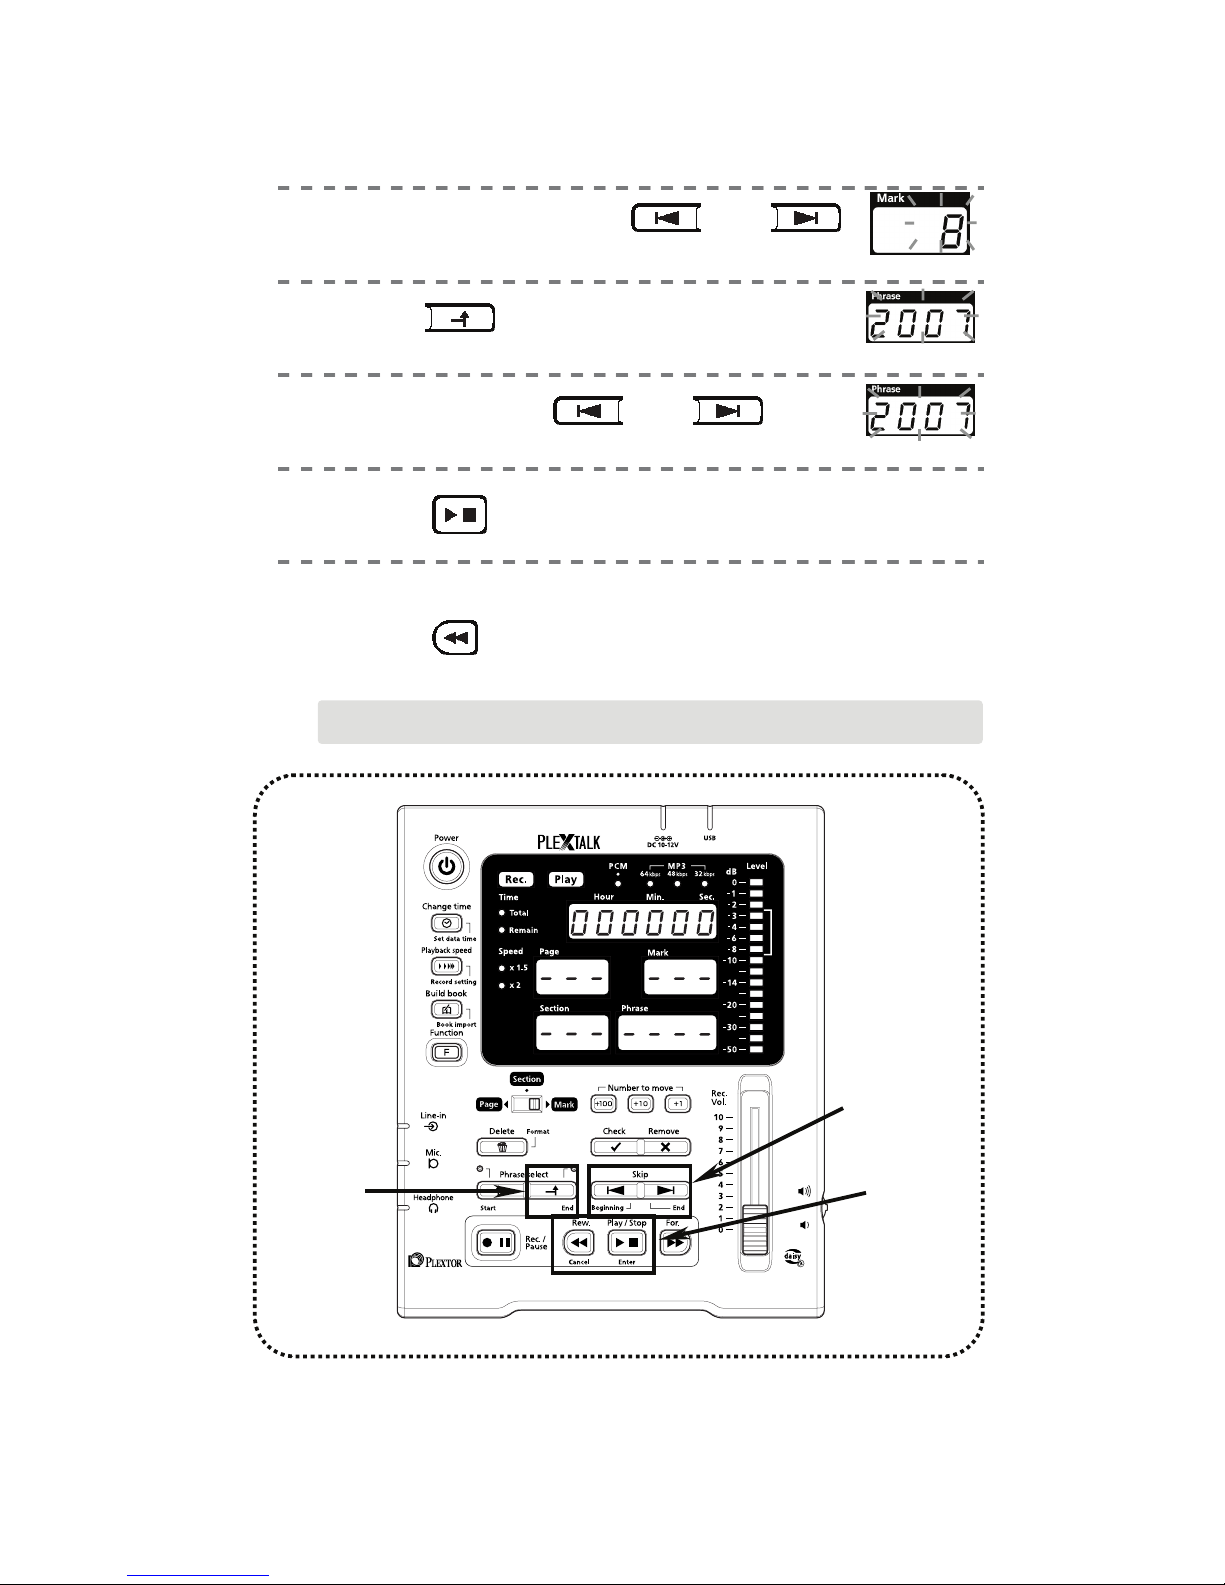
9)
Set “Date“ by pressing and .
10)
Press to complete setting.
“Year” lamp flashes.
11)
Set by pressing and .
12)
Press to complete setting.
In case of canceling:
Press to cancel.
Play/Stop
Rew.
Cancel
The time setting cannot cancel when the power is on as the first time.
10)
12)
9)11)
Flash
Flash
Flash End
End
Beginni
ng
Beginni
ng
End
Enter
Page 27
27
3
Chapter 3
Basic Operation of DR-1
Recording······························································· 28
How to record? ··················································· 28
Stop recording ···················································· 30
Playback····························································· 31
Adjusting audio volume of playback···················· 32
Appending Page/Section···································· 33
Correcting······························································· 34
Three methods of editing recording ··················· 34
Navigation<Navigating from beginning to end> 36
Navigation<Phrase navigation> ························· 37
Navigation<Skip navigation>······························ 38
Navigation<Navigating by specified number> ··· 39
Marking······························································· 40
Overwrite recording (Rerecord while recording) 41
Insert recording ·················································· 42
Punch-in recording STEP 1 (Specify Range) ···· 43
Punch-in recording STEP 2 (Replacing
correction ) ························································ 44
Delete phrases ··················································· 45
Page 28
28
Recording
How to record?
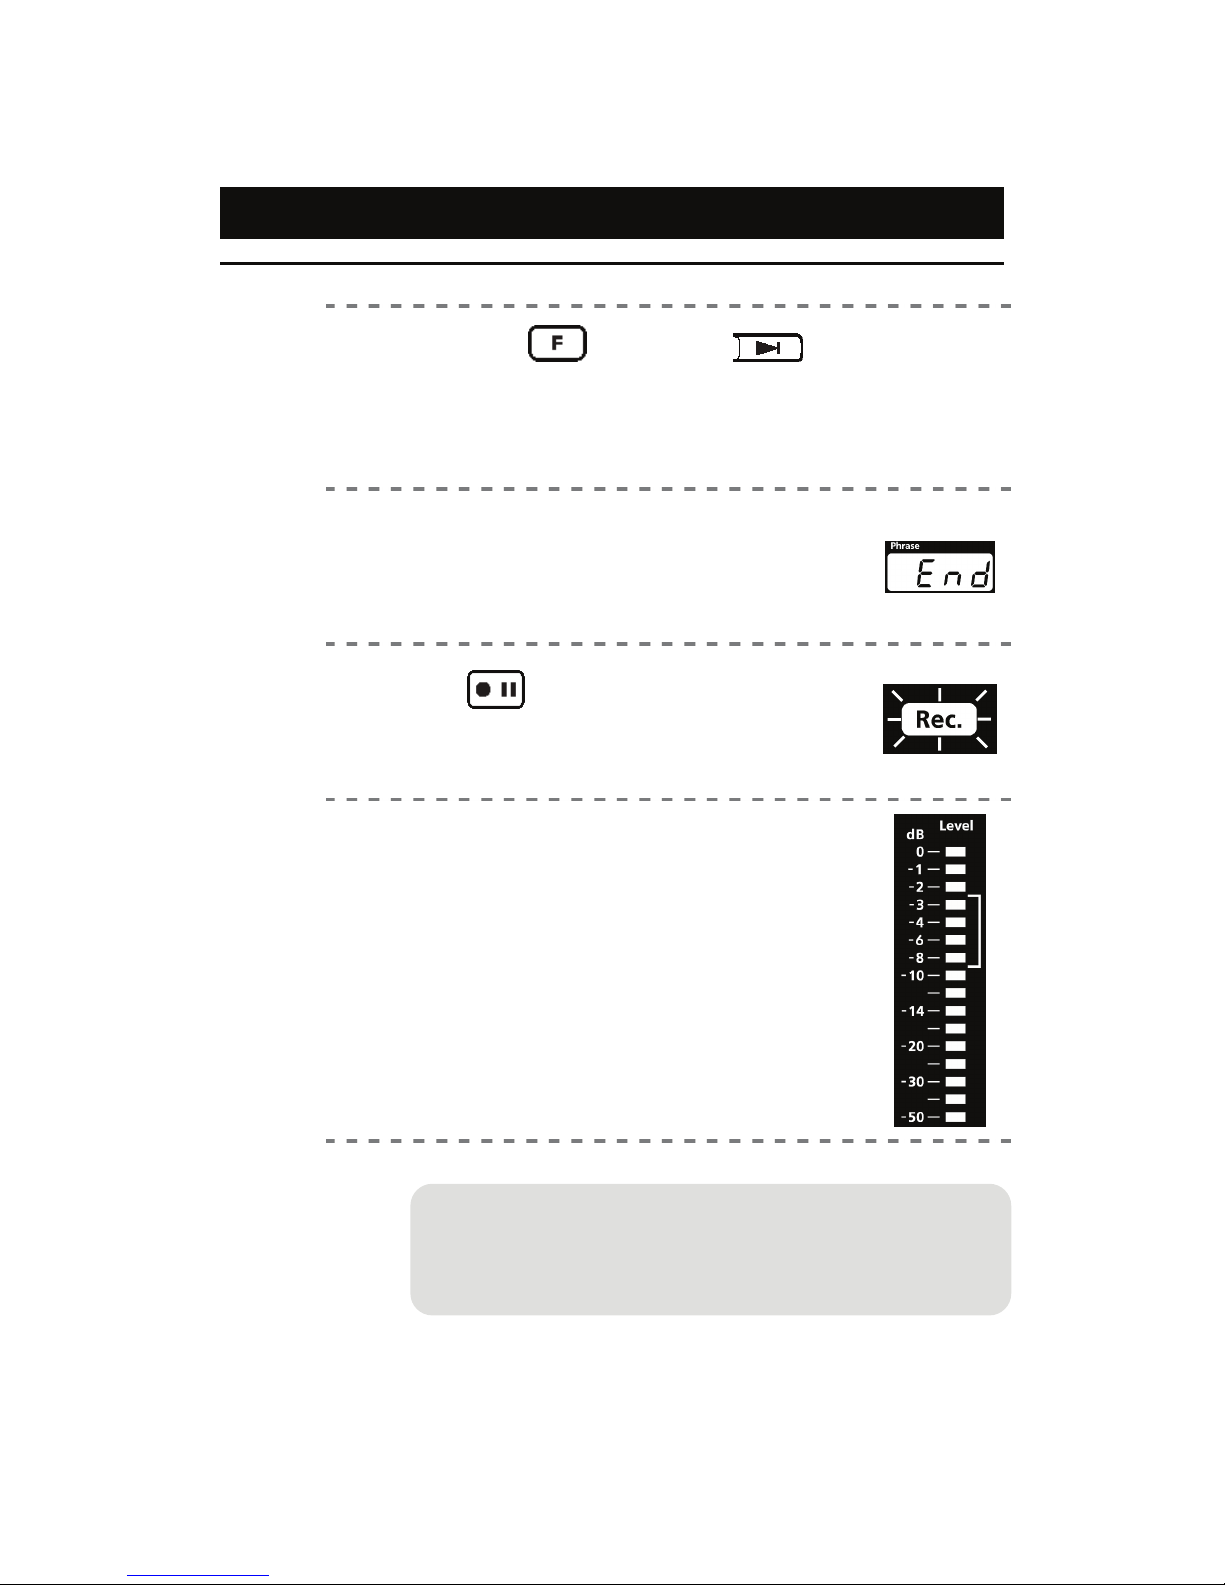
1)
Hold down and press to
move to the end.
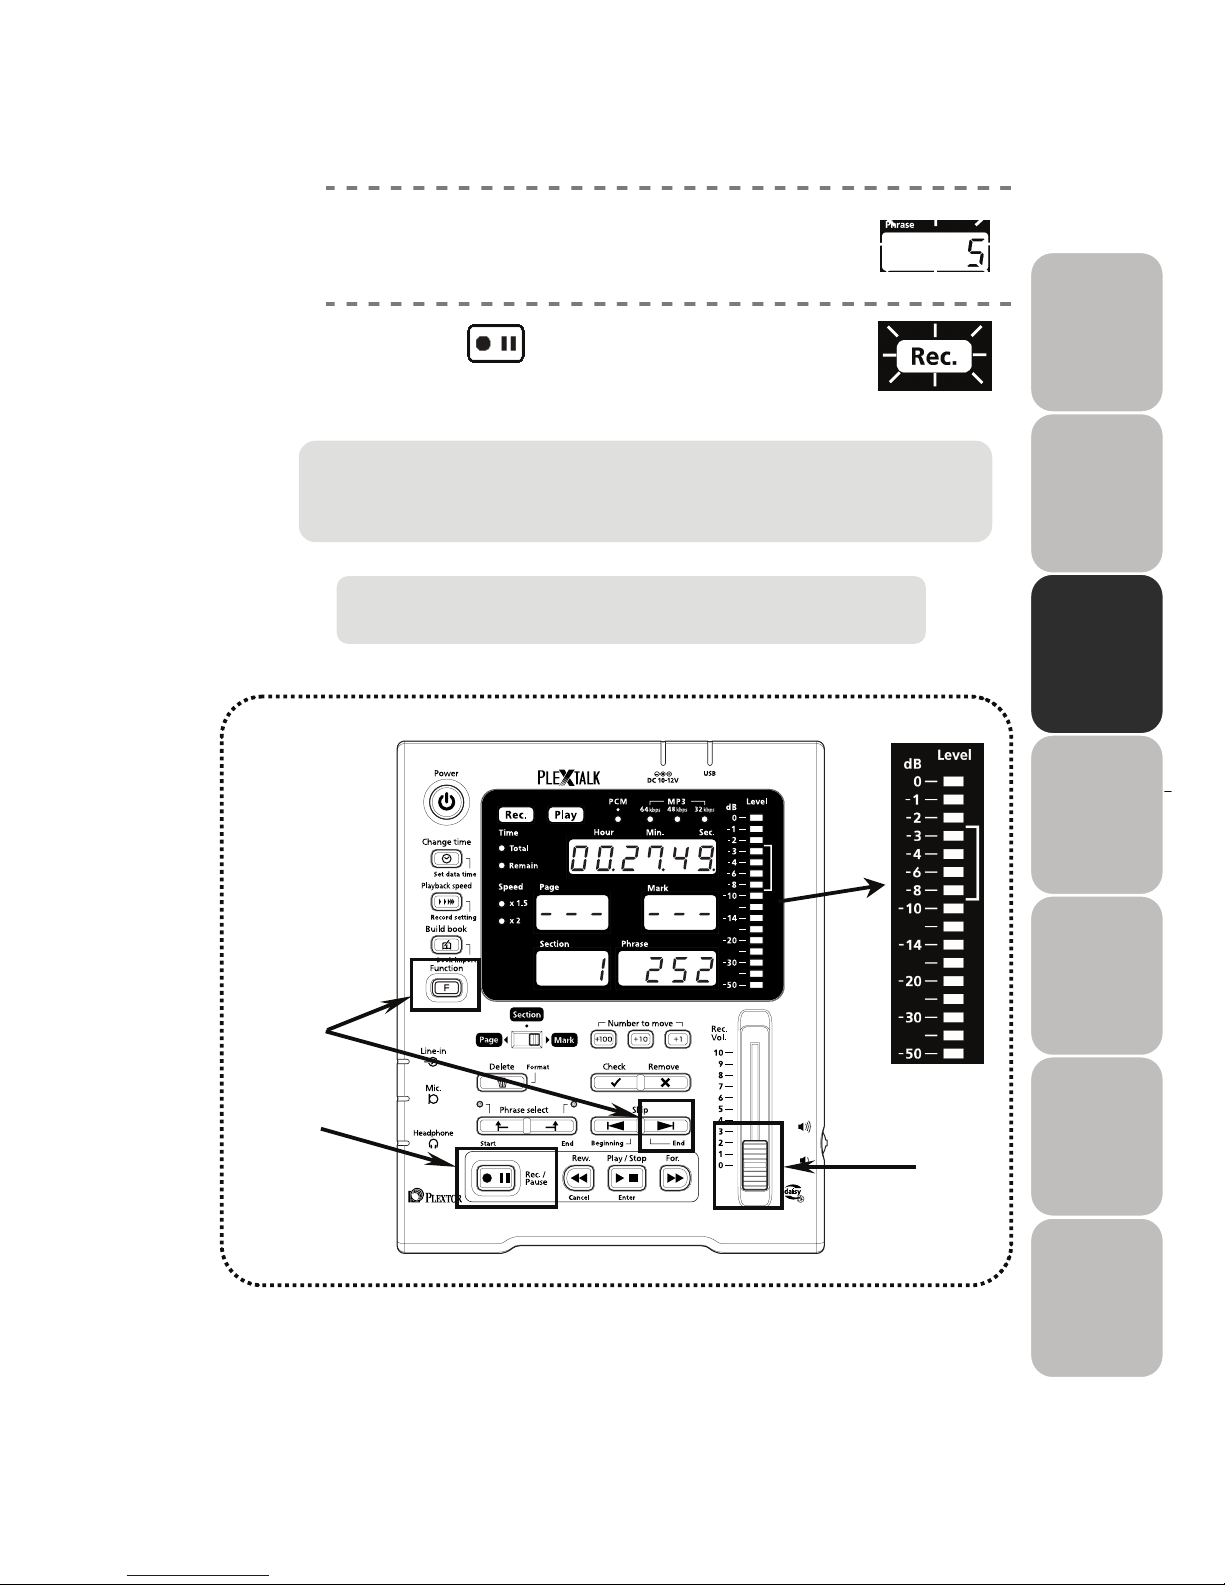
Note) The default recording mode of DR-1 is “Insert
recording (p. 42).” Therefore, you should navigate to the
end of project before start he recording.
2)
Confirm the display showing “ End ”
under the phrase display window.
Display “End” means the end of DAISY book.
If the CF card does not contain any data, the phrase
display window shows “- - - -.”
3)
Press to go into the record /
pause state.
“Record” lamp starts flashing.
4)
Adjust the recording volume slider.
Adjust the recording level while speaking by the same
voice volume and the pitch when you read aloud
toward the microphone.
Adjust the maximum volume to become - 8dB.
The recording volume may momentarily become very
loud while actually recording. Please be cautious
that the audio volume does not exceed - 3dB.
Rec./Pause
■ The recording setting can be used by the initialization.
■ When you change the recording setting responding to the
surrounding environment, refer to “Change the recording setting
(p.51).”
F
unction
End
Flash
Page 29
29
3
5)
Check “phrase”.
Every time “Pause time” is left, check the number of
phrase increases.
6)
Press to start recording.
“Recording” lamp lights up.
4)
3)6)
1)
If you cannot delimit the phrase as desired, refer to “Change
the recording setting (p.51)” to make an adjustment.
Note: In order to prevent the sound of key operation being
recorded, the recording begins 0.5 seconds after pressing
the Rec./Pause key.
Rec./Pause
Flash
Light on
Page 30
30
Stop recording
■
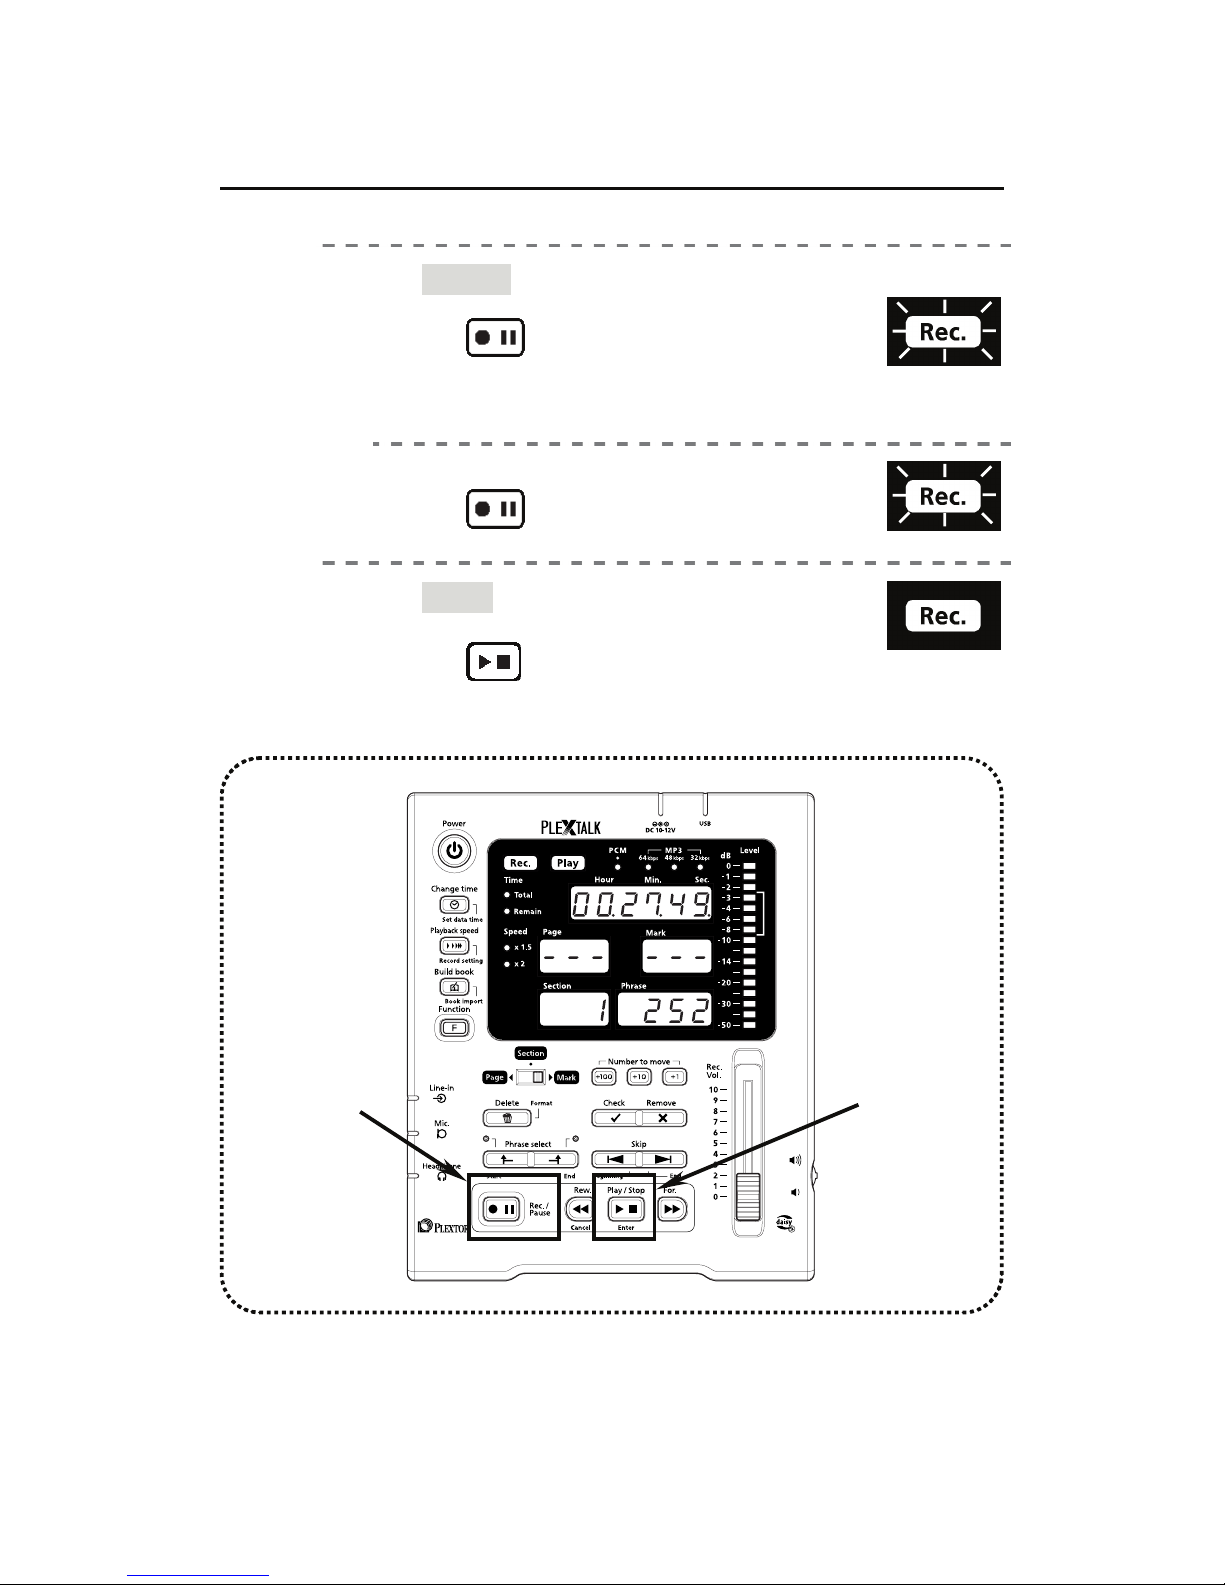
To PAUSE the recording,
Press to go into the record /
pause state.
To restart recording from the record / pause state,
Press to start recording again.
■
To STOP recording,
Press to go into the stop state.
STOP
Light off
PAUSE
Light on
Rec./Pause
Rec./Pause
Play/Stop
Flash
Page 31
31
3
Playback
1)
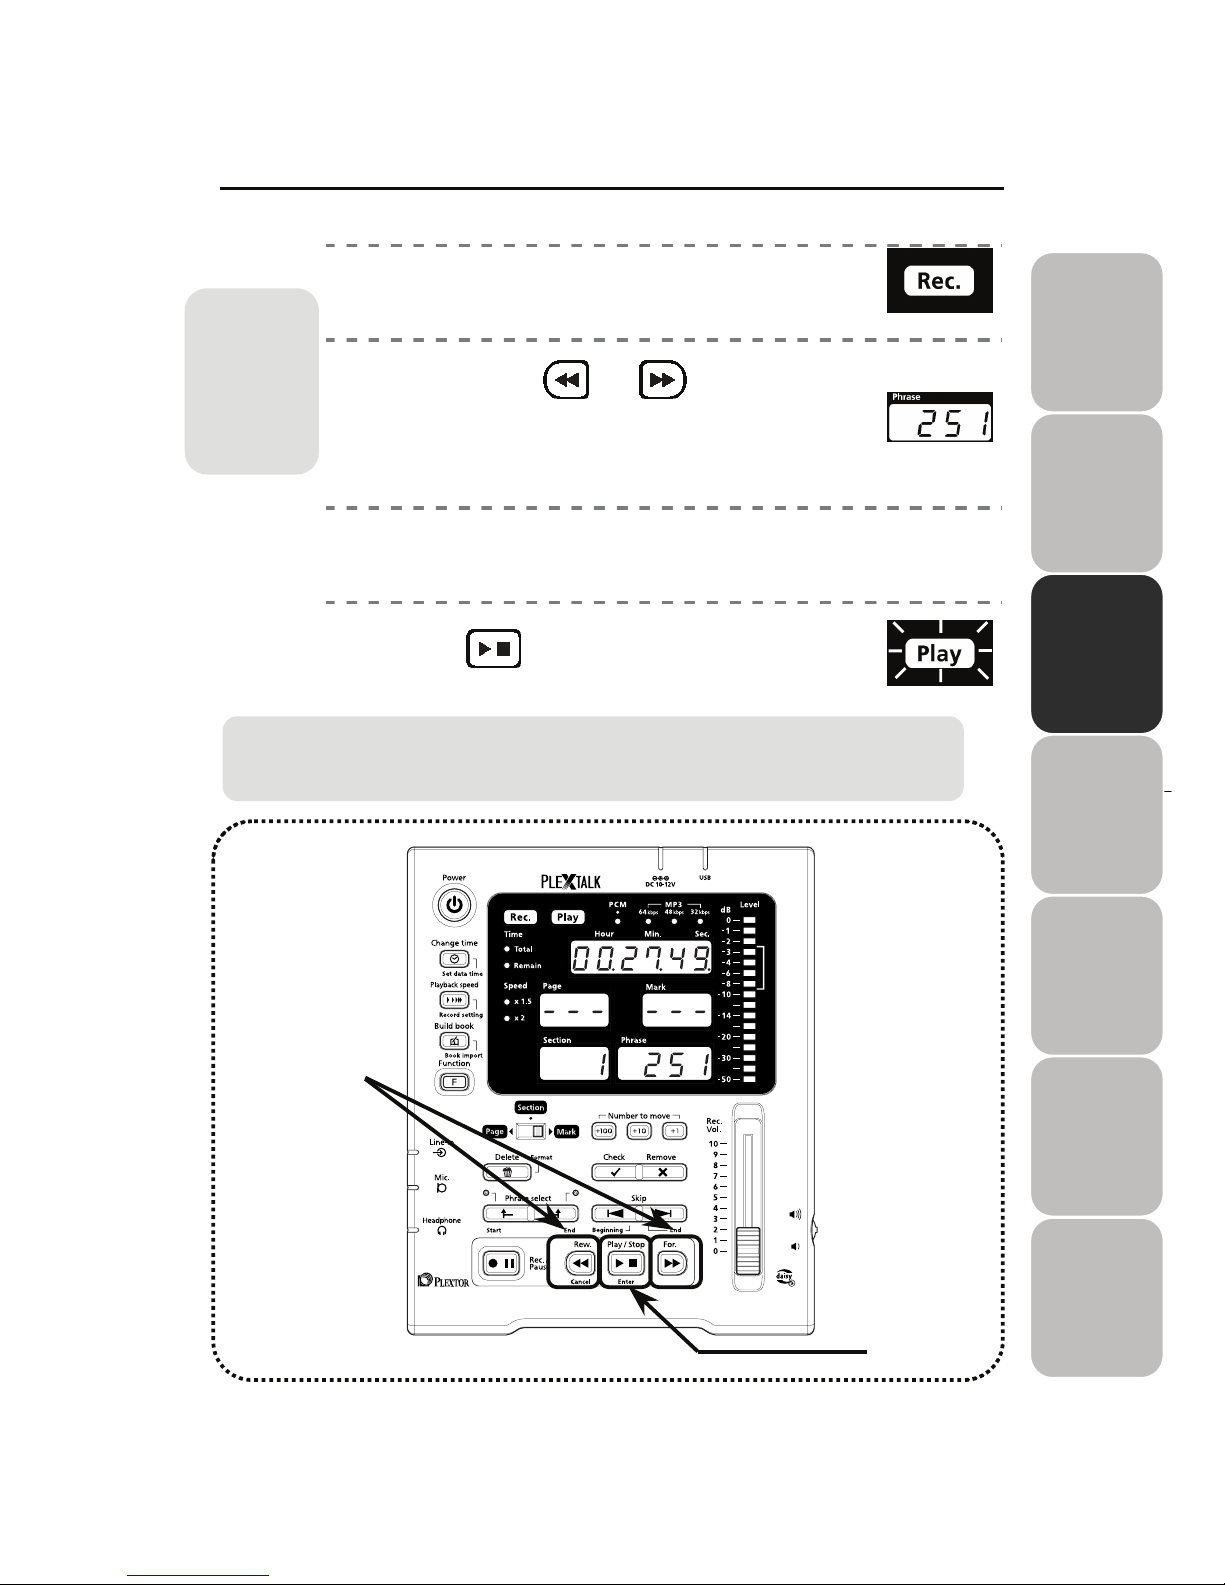
Confirm that DR-1 is in the STOP state.
Confirm that “Record” mark is turned off.
2)
Press either or to jump the
position you want to listen.
Jump one phrase by pressing once.
Move at high speed while holding down the key.
3)
Release the key. (*)
Automatically stops after playing back one phrase.
4)
Press to play.
For other
“Navigation/
Jumping”
methods,
refer to
“Navigation
(p.36-39).”
2)
4)
Rew.
(*) When the position is jumped to either the heading or the end, either “toP” or
“End” is displayed in the window under the Phrase.
Also
,
it stops without playback.
Play/Stop
Light on
Light off
Page 32
32
Adjusting audio volume of playback
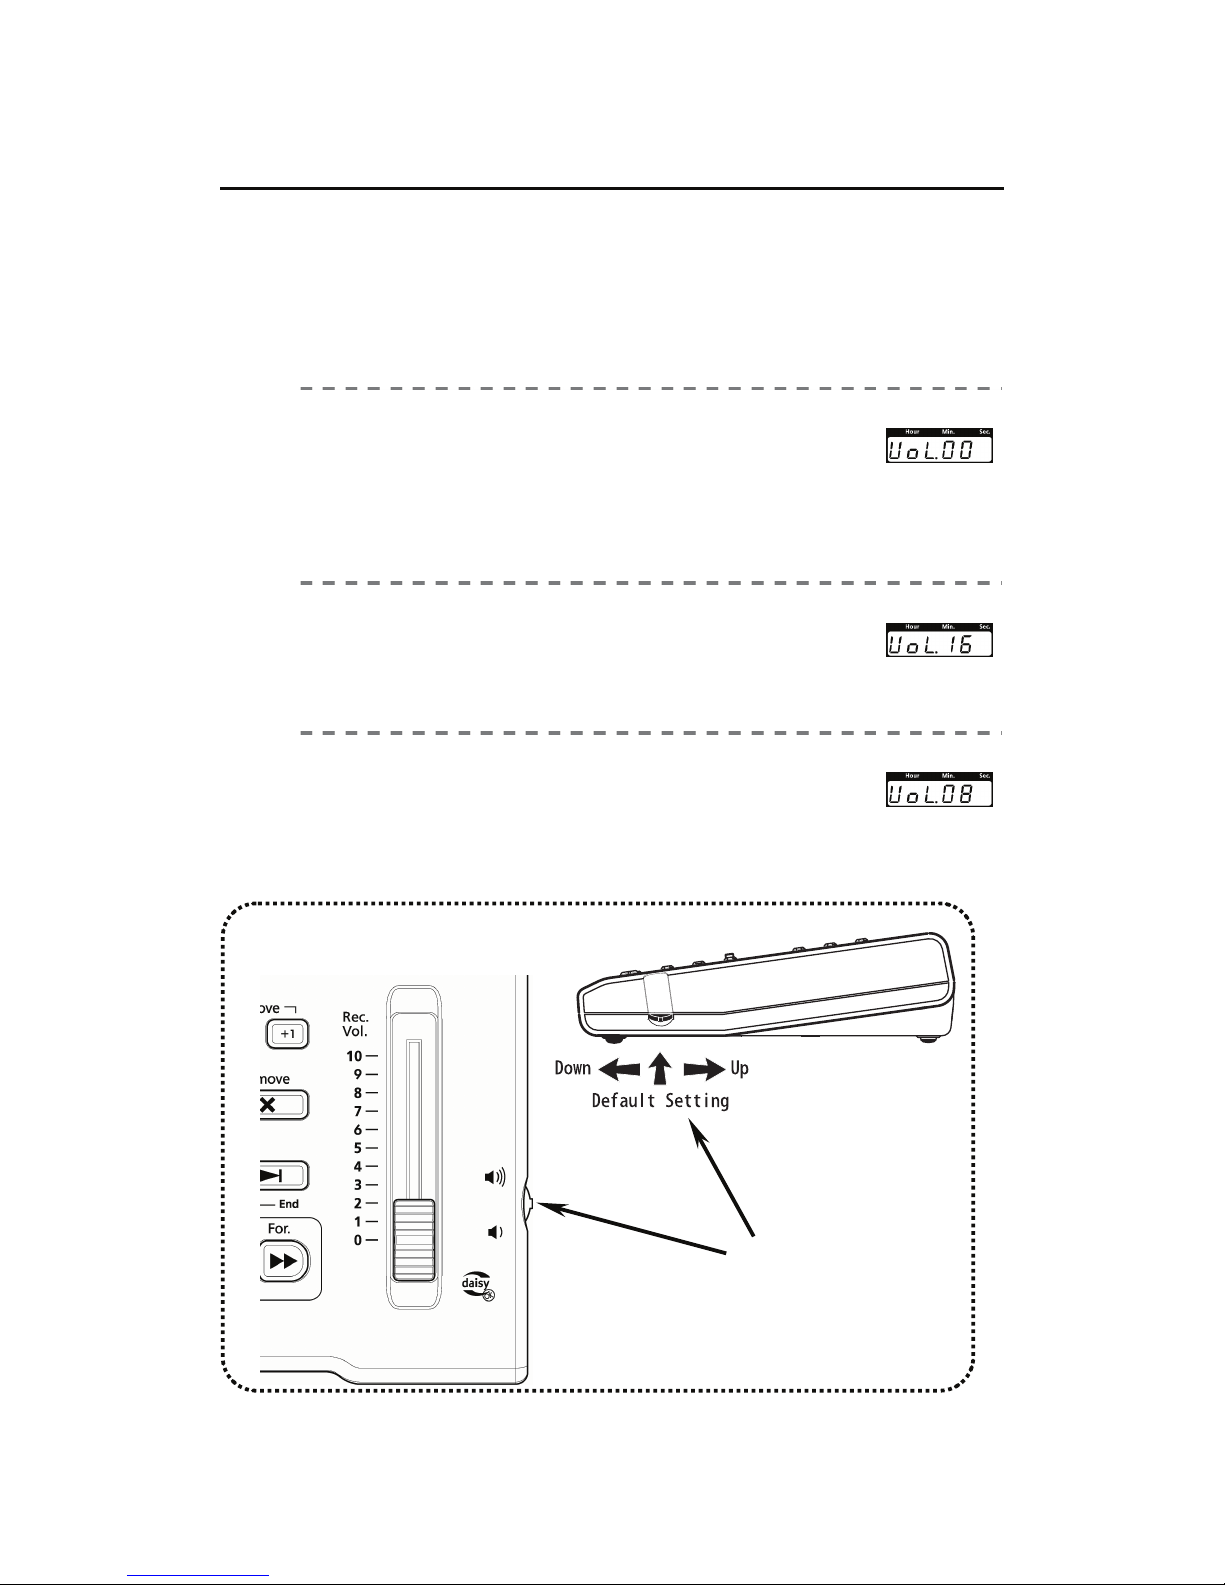
To adjust the audio volume, use the “Volume Shuttle” located on the right
side of the DR-1 body. The range of the audio volume is from 0 to 16.
The volume level of zero (0) becomes the mute state (silent pause).
The default setting volume is eight (8).
Putting the volume down,
Pull the “volume shuttle” forward by the
finger.
Volume level is momentarily displayed on the top of the display
panel when the volume shuttle is pulled forward or backward as
shown on the right example figure.
Putting the volume up,
Push the “volume shuttle” backward by the
finger.
Volume level is displayed on the top of the display panel.
Putting the volume level back to the default setting of 8,
Push the “volume shuttle” in straight towards
DR-1 body.
Volume level is displayed on the top of the display panel.
Volume Shuttle
M
ute
Default
Max
Page 33
33
3
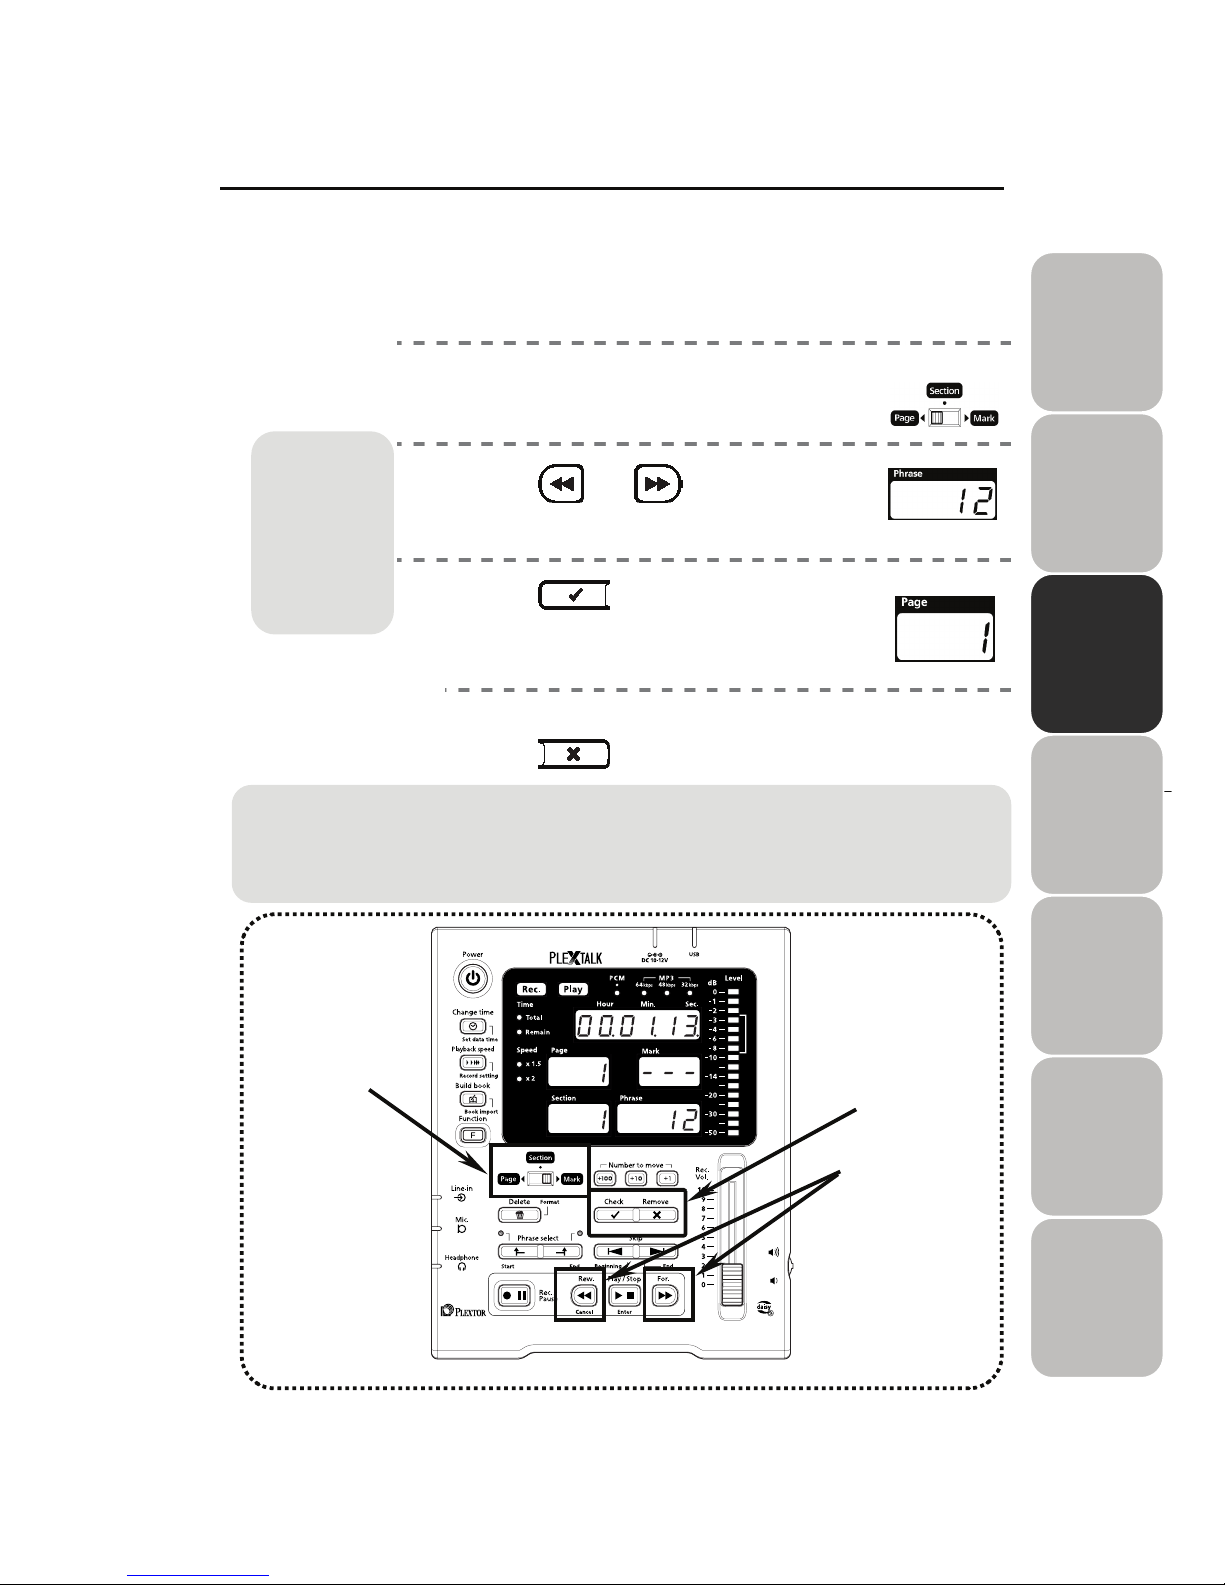
Appending Page/Section
DR-1 enables you to add navigation information such as page and sections
that are required by DAISY books. It improves the efficiency of following
DAISY book editing works.
Below example explains how to add the 1st page to the 12th phrase.
1)
Select by the “Select Switch.”
Select “page” or “section.”
2)
Press or .
Move the phrase where to add the “page” or
“section.”
3)
Press .
Confirm that the number in the page and
section displayed in the window increases
every time you press the “Check” key.
Release “page” and “section.”
Press .
1)
2)
Check
Remove
3)
Page/section can be appended not only during stopping, but also during recording,
playing-back, and pause.
When you add the page/section during pause, the lamp of the page/section display
panel flashes and it is appended to the first phrase where recording started.
For other
“Moving/
Jumping”
methods,
refer to “
Navigation
(p.36-39).”
Rew.
For.
Page 34
34
Correcting
Three (3) methods of correcting recording
In the recording, etc. of the reading, correcting the mistakenly read part often
happens.
There are three methods of correcting the recording: 1) “Overwrite” recording, 2)
“Insert” recording, and 3) “Punch-in” recording.
Features of these 3 recording methods are described below. For each detailed
operation method, please refer to the following pages in this guide: 1) “Overwrite
recording (p.41)”, 2) “Insert recording (p.42)”, and 3) “Punch-in recording
(p.43-44)”.
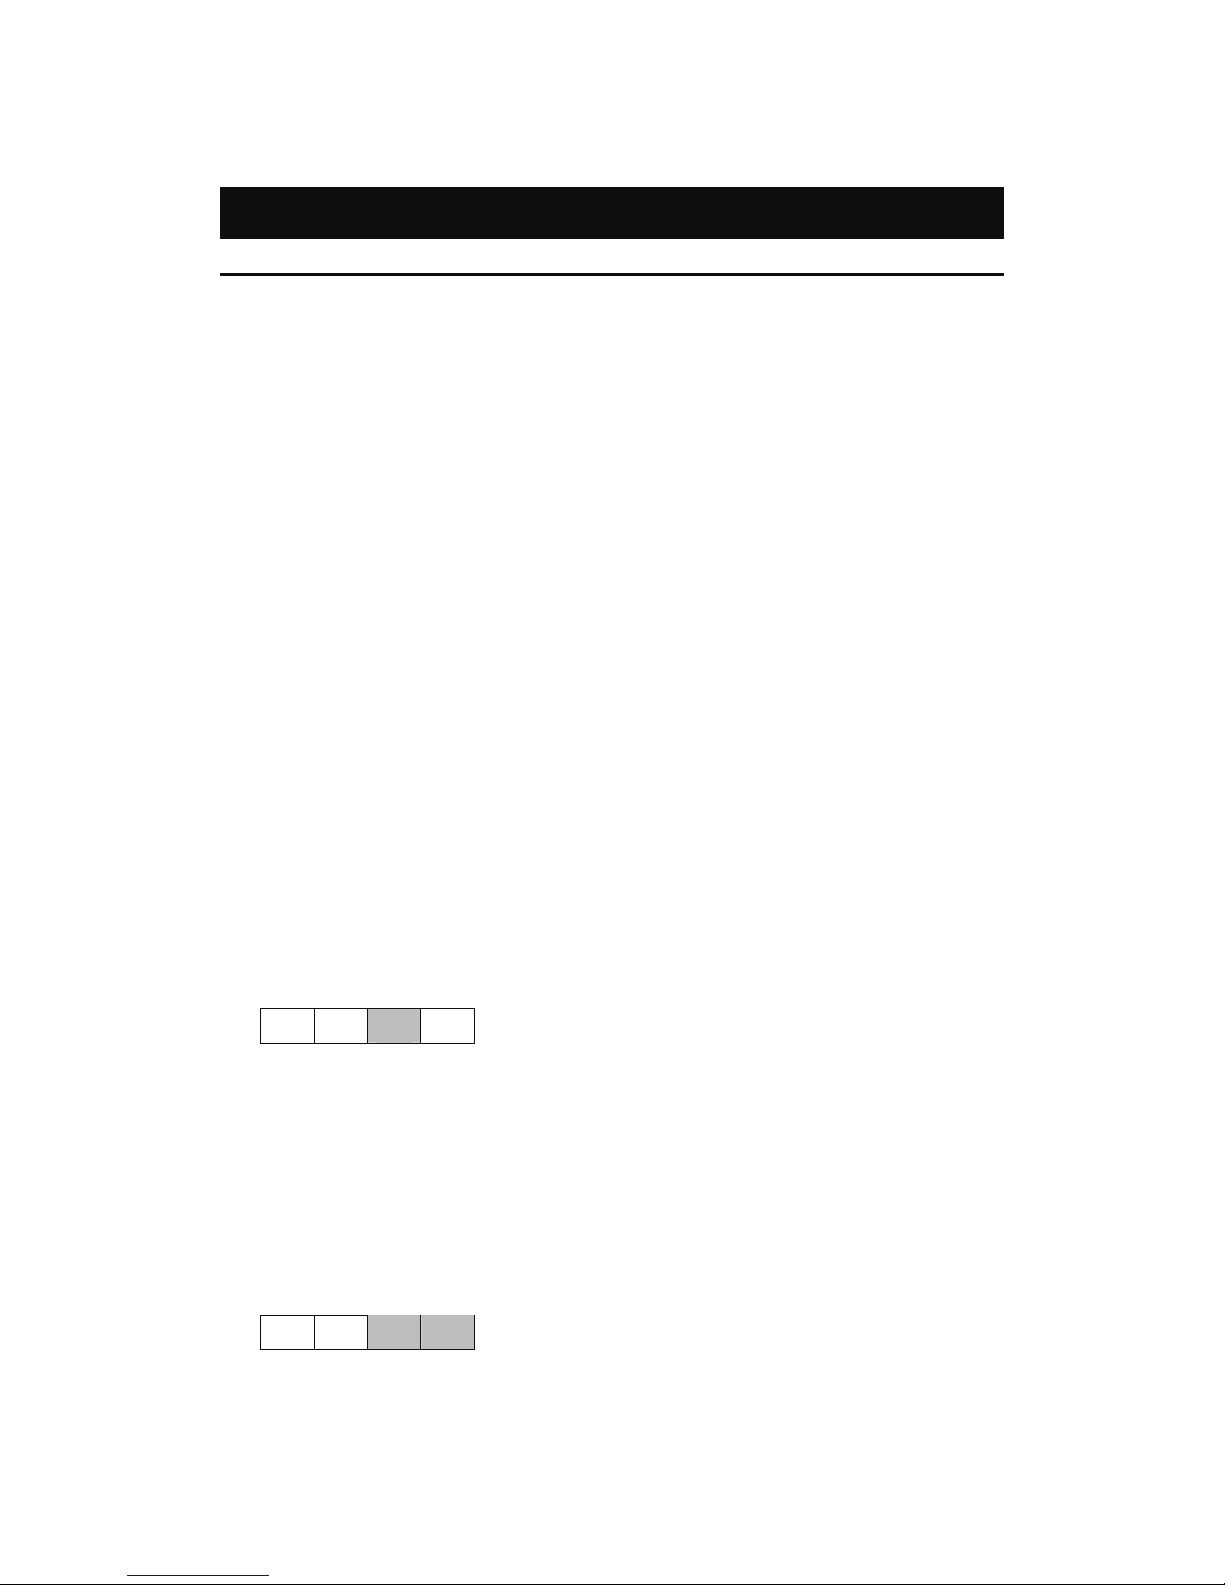
To explain easily in the following, the recording phrase is shown by the character
such as "A,B,C,……", and the number above the character "1,2,3,……" show
the phrase number.
1) Overwrite recording
“Overwrite recording” enables you to correct mistakes during the
recording process.
For example,
1 2 3 4
A B C D
1) During recording, when you notice an error at phrase C, press the Record key
once to pause recording.
2) Repeatedly press the Back key to move to the location of the first phrase C to
be rerecorded.
3) Press the Record key to start recording again. Phrases C and D is replaced
by new phrases E and F.
1 2 3 4
A B E F
The sequential order will be changed as shown above.
Page 35
35
3
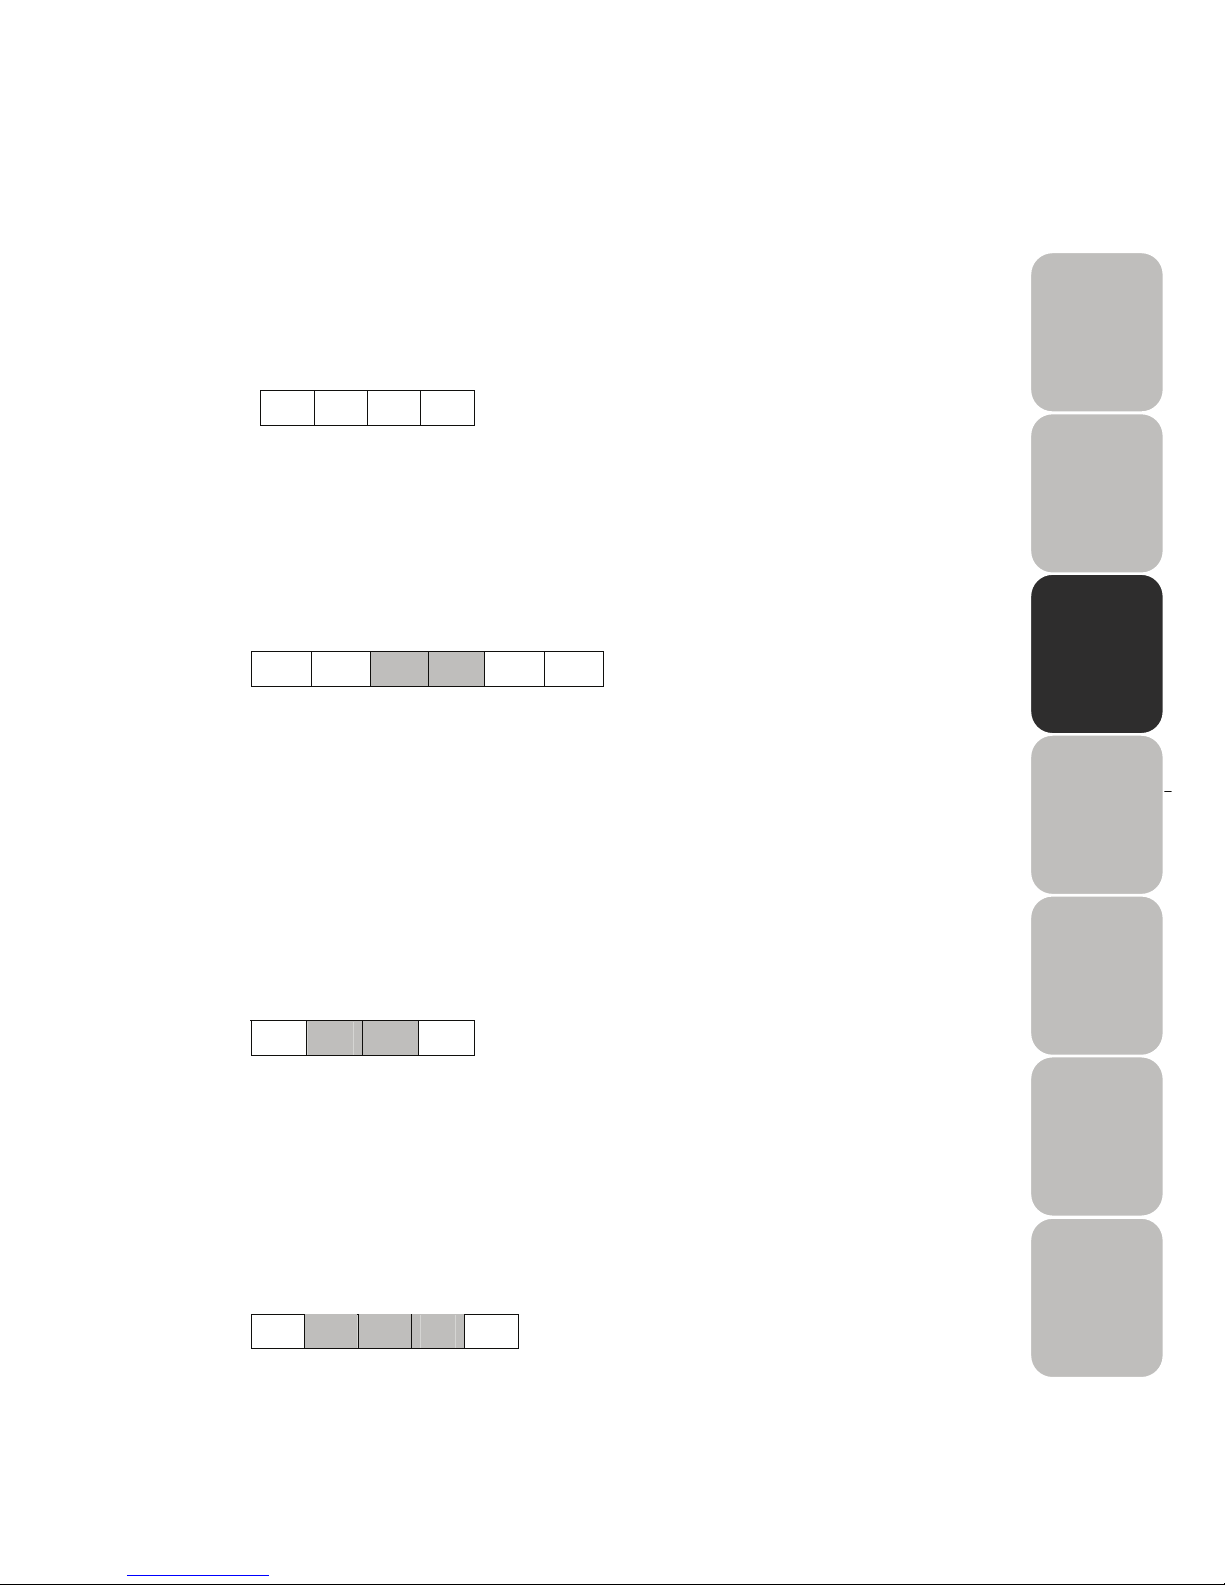
2) Insert recording
After the recording is completed, “Insert recording” enables you to
insert new audio at any point in your existing recording
.
For example,
1 2 3 4
A B C D
1) Navigate, in your exiting recording, to the location phrase B where you wish to
insert the new audio. It is important that you move to the correct location prior
to recording
2) Press the Record key twice to start recording.
3) When you have recorded the new audio phrases E and F, press the
Play/Stop key to stop recording.
1 2 3 4 5 6
A B E F C D
The sequential order of phrases will be changed as shown above.
3) Punch-in recording
After recording is completed, “Punch-in recording” allows you to
delete a mistaken part in the existing project and replace with the
correct audio. It does not matter whether the audio length before and
after replacement is different.
For example,
1 2 3 4
A B C D
1) Navigate, in your exiting recording, to the location phrase B where you wish to
insert the new audio.
2) Press the Start key of Phrase select, then navigate to the location phrase C
where you wish to cut, then press the End key of Phrase select.
3) Press the Record key twice to start recording.
4) When you have recorded the new audio phrases E, F and G, press the
Play/Stop key to stop recording.
1 2 3 4 5
A E F G D
The sequential order of phrases will be changed as shown above.
Page 36
36
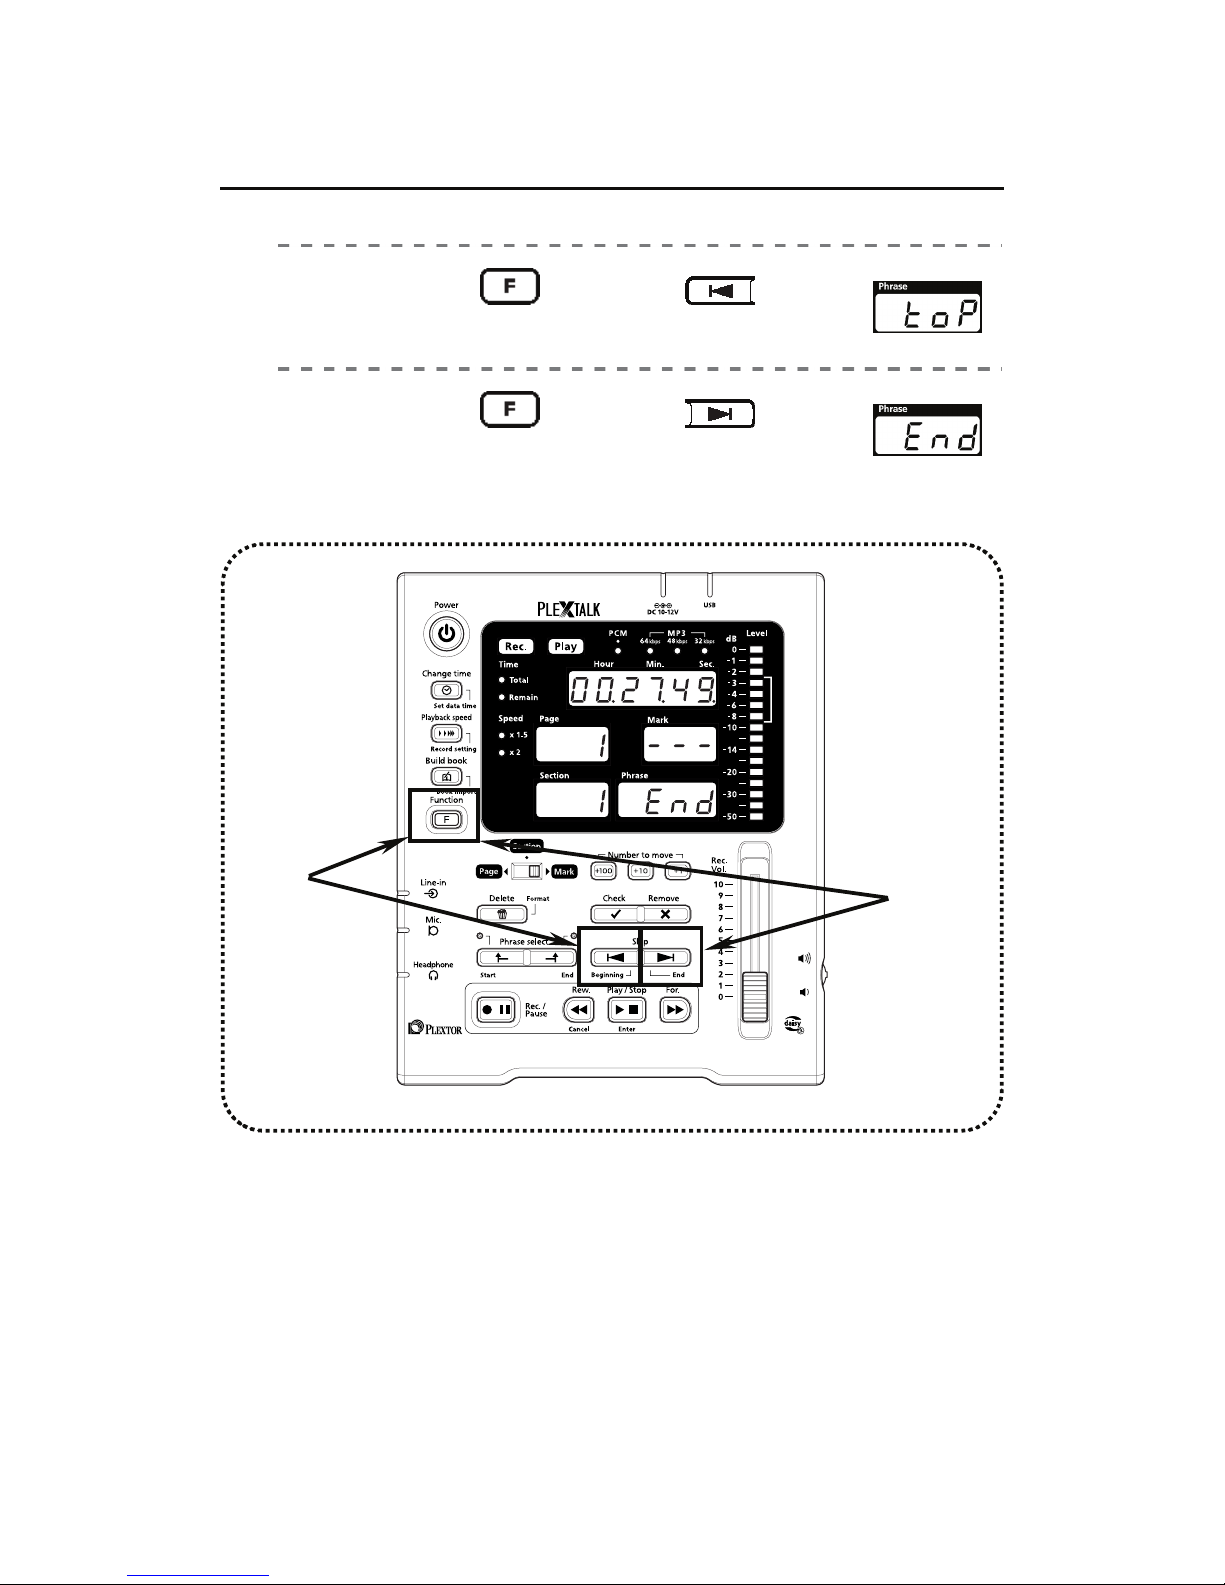
Navigation ……<Navigating from beginning to end>
1)
Hold down and press to
move the “phrase” up to the “toP”.
2)
Hold down and press to
move the “phrase” down to the “End.”
1)
2)
F
unction
F
unction
Beginni
ng
End
Page 37
37
3
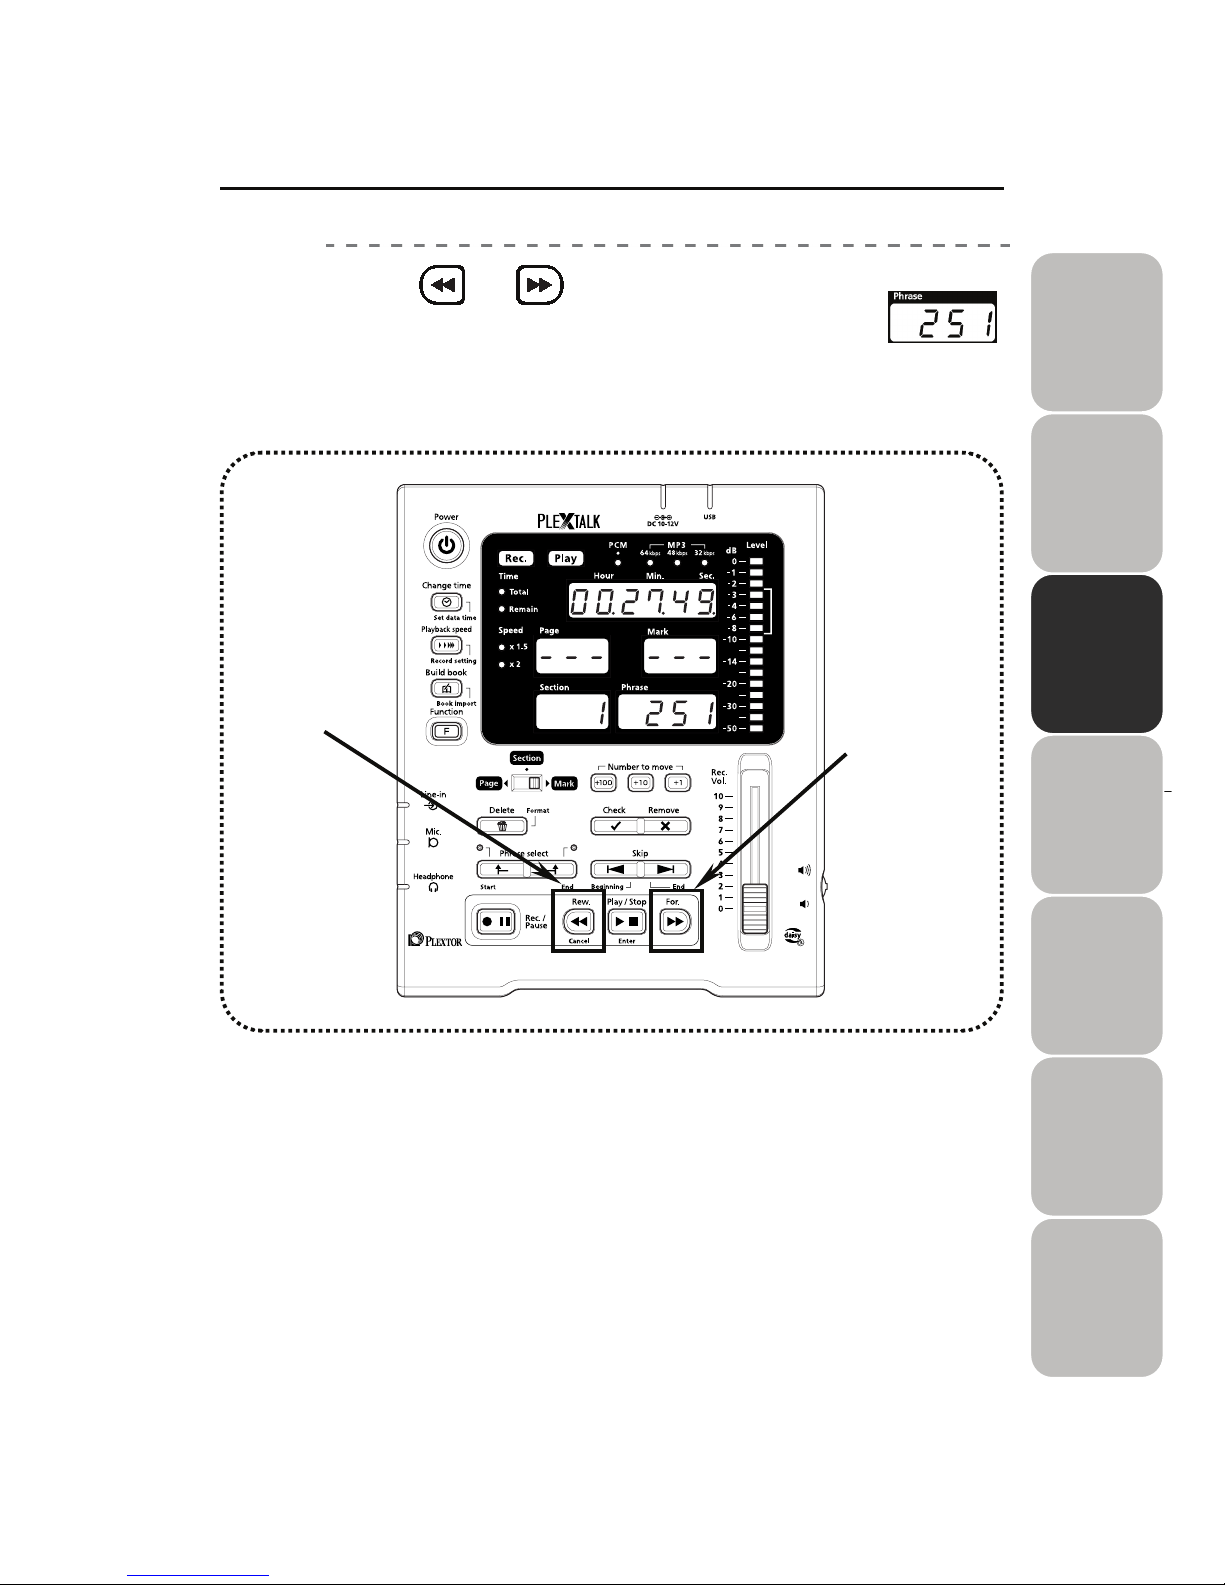
Navigation……<Phrase navigation>
Press or .
Jump one phrase by pressing once.
Move at high speed while holding down the key.
After releasing the key, playback one phrase and stop.
Rew.
Page 38
38
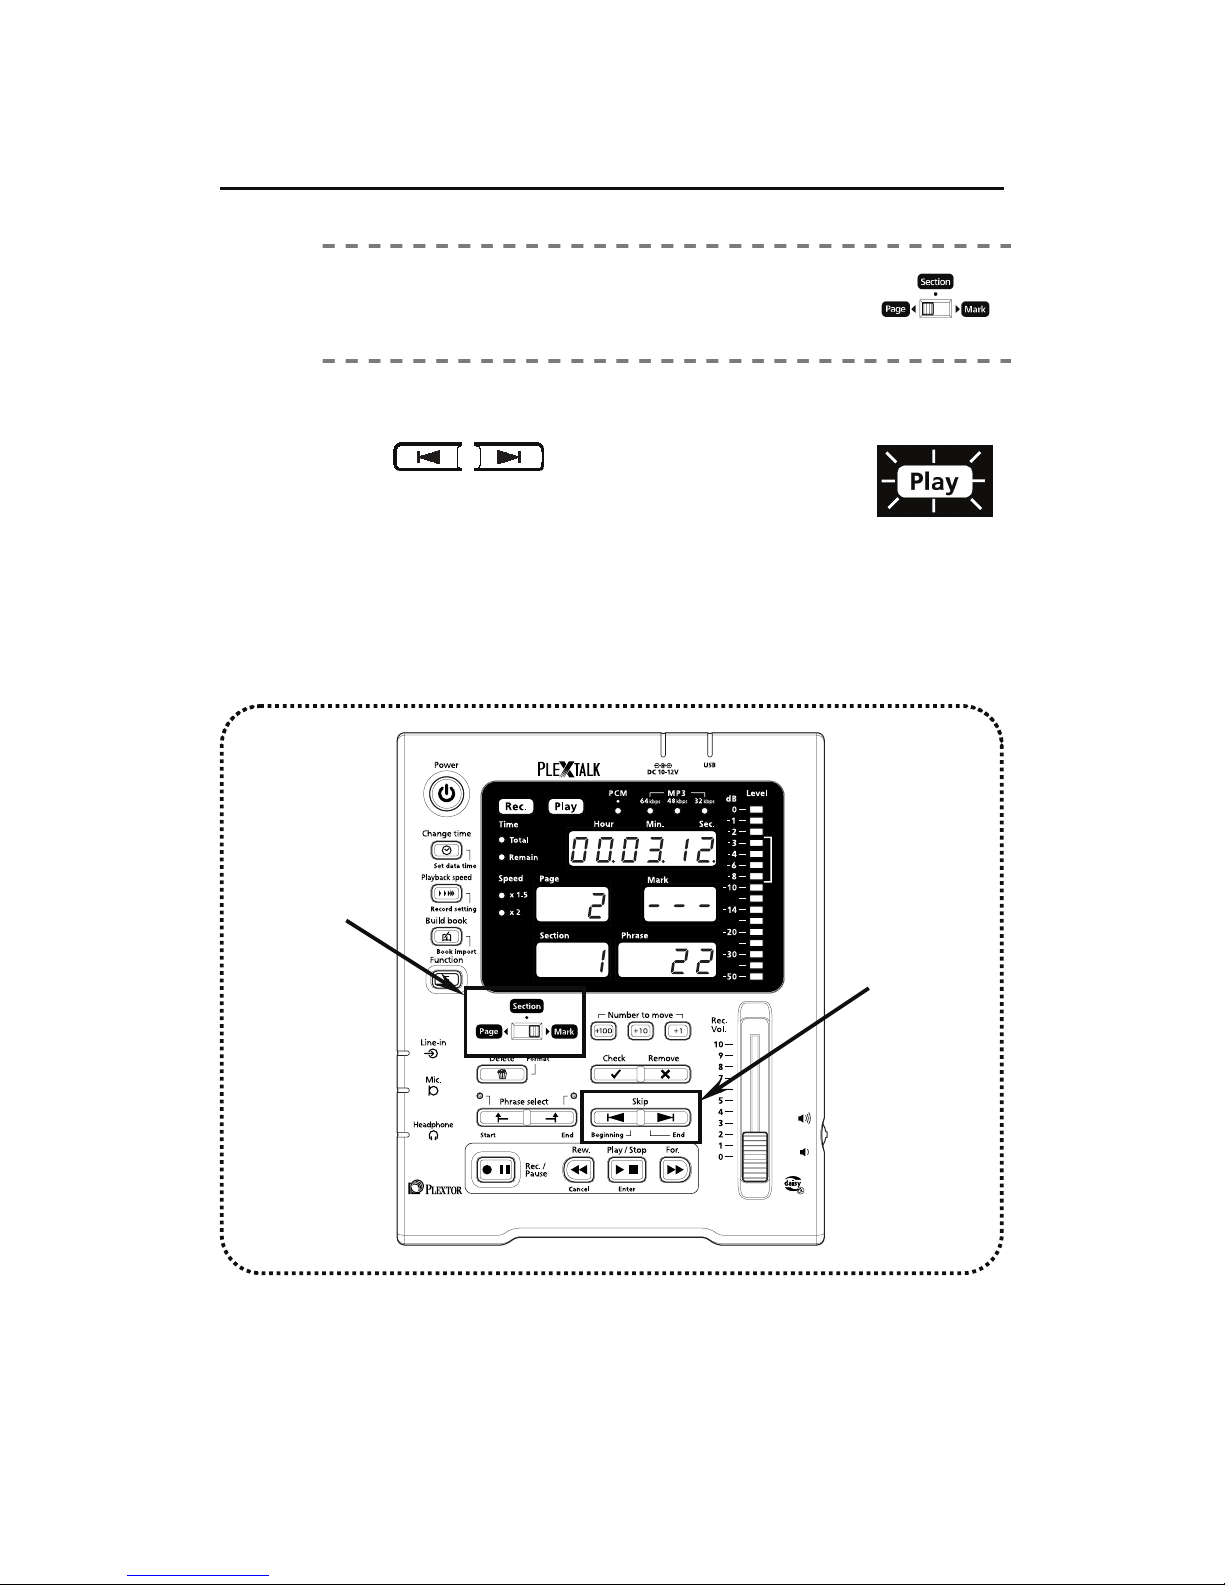
Navigation…… <Skip navigation>
1)
Select with the “Select switch.”
Select the unit of navigation (page/section/mark).
2)
Move back and forth by pressing
keys.
Move when pressing once by one unit by the selected
unit (page/section/mark).
Move at high speed while holding down the key.
After releasing the key, playback one phrase and stop.
1)
2)
Skip
Light on
Page 39
39
3
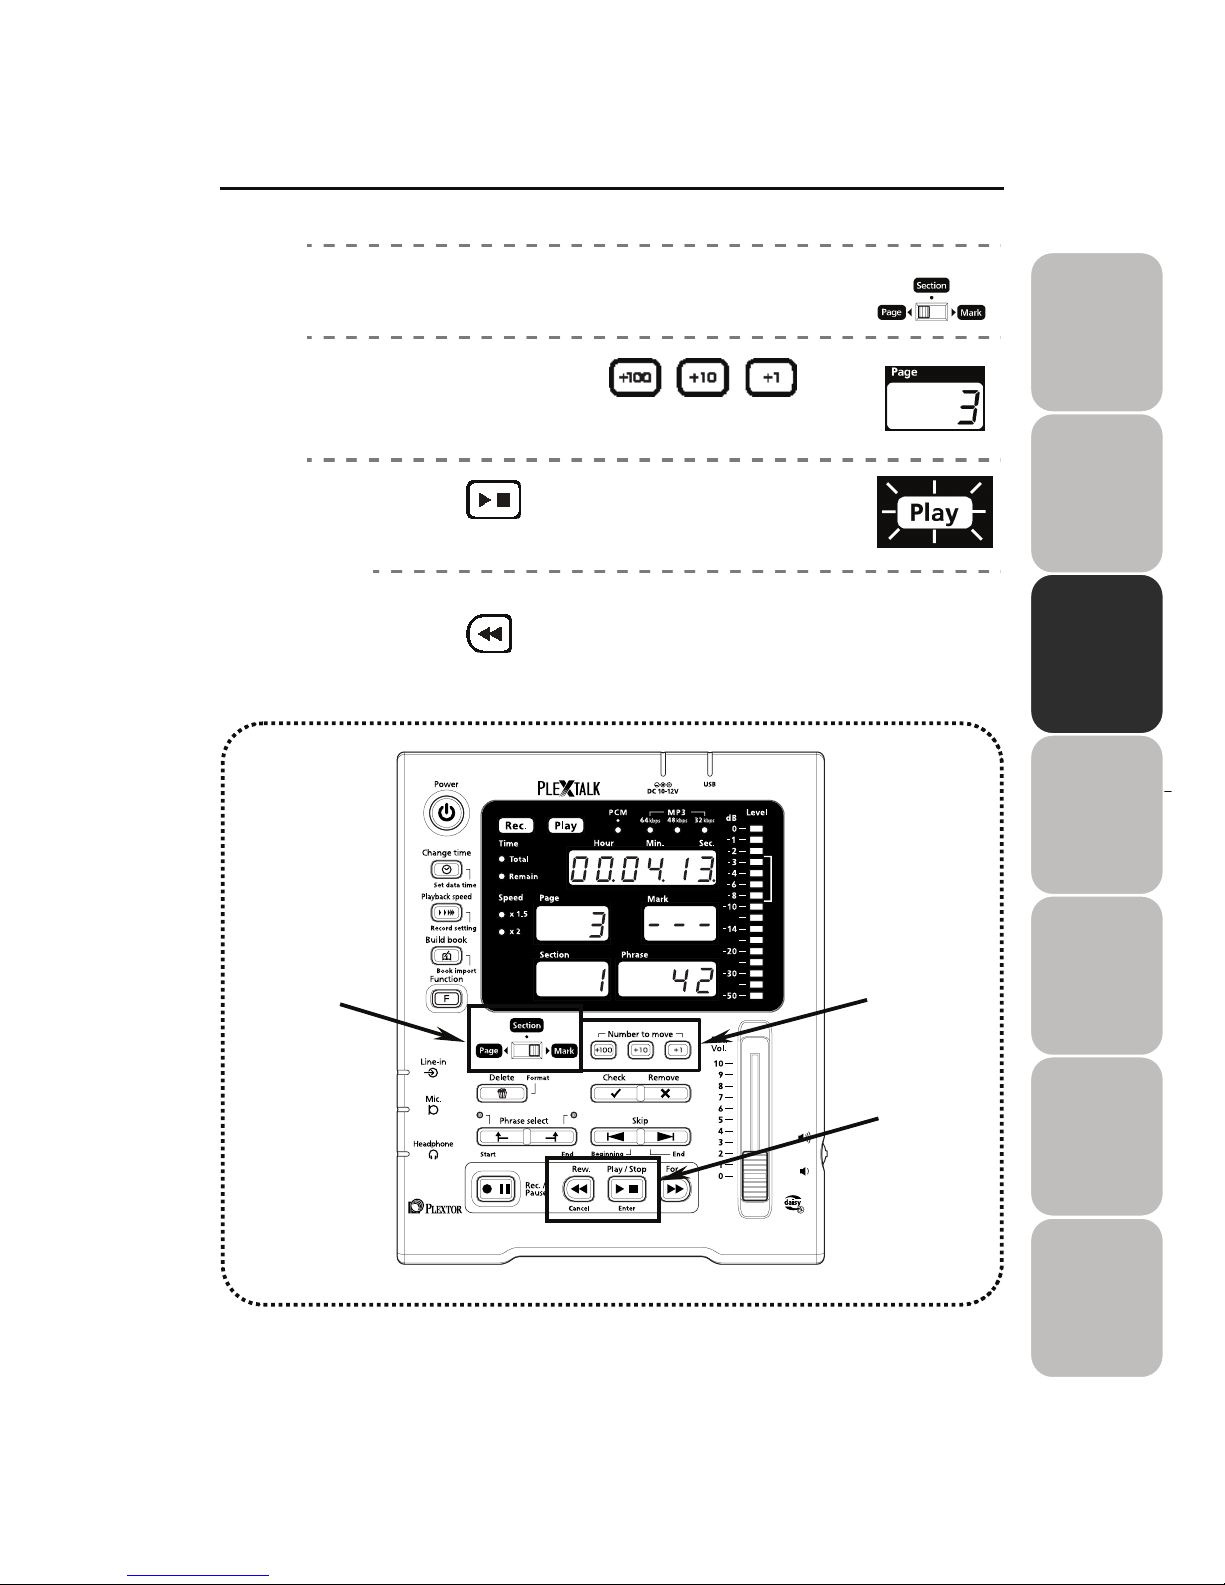
Navigation……<Navigating by specified number>
1)
Select with the “Select switch.”
Select the unit of navigation (page/section/mark).
2)
Input by pressing .
Input the number of the navigating destination.
Input the value of each every digit with each key.
3)
Press to enter.
When canceling,
Press to cancel.
1)
2)
3)
Number to move
Play/Stop
Enter
Rew.
Cancel
Light on
Page 40
40
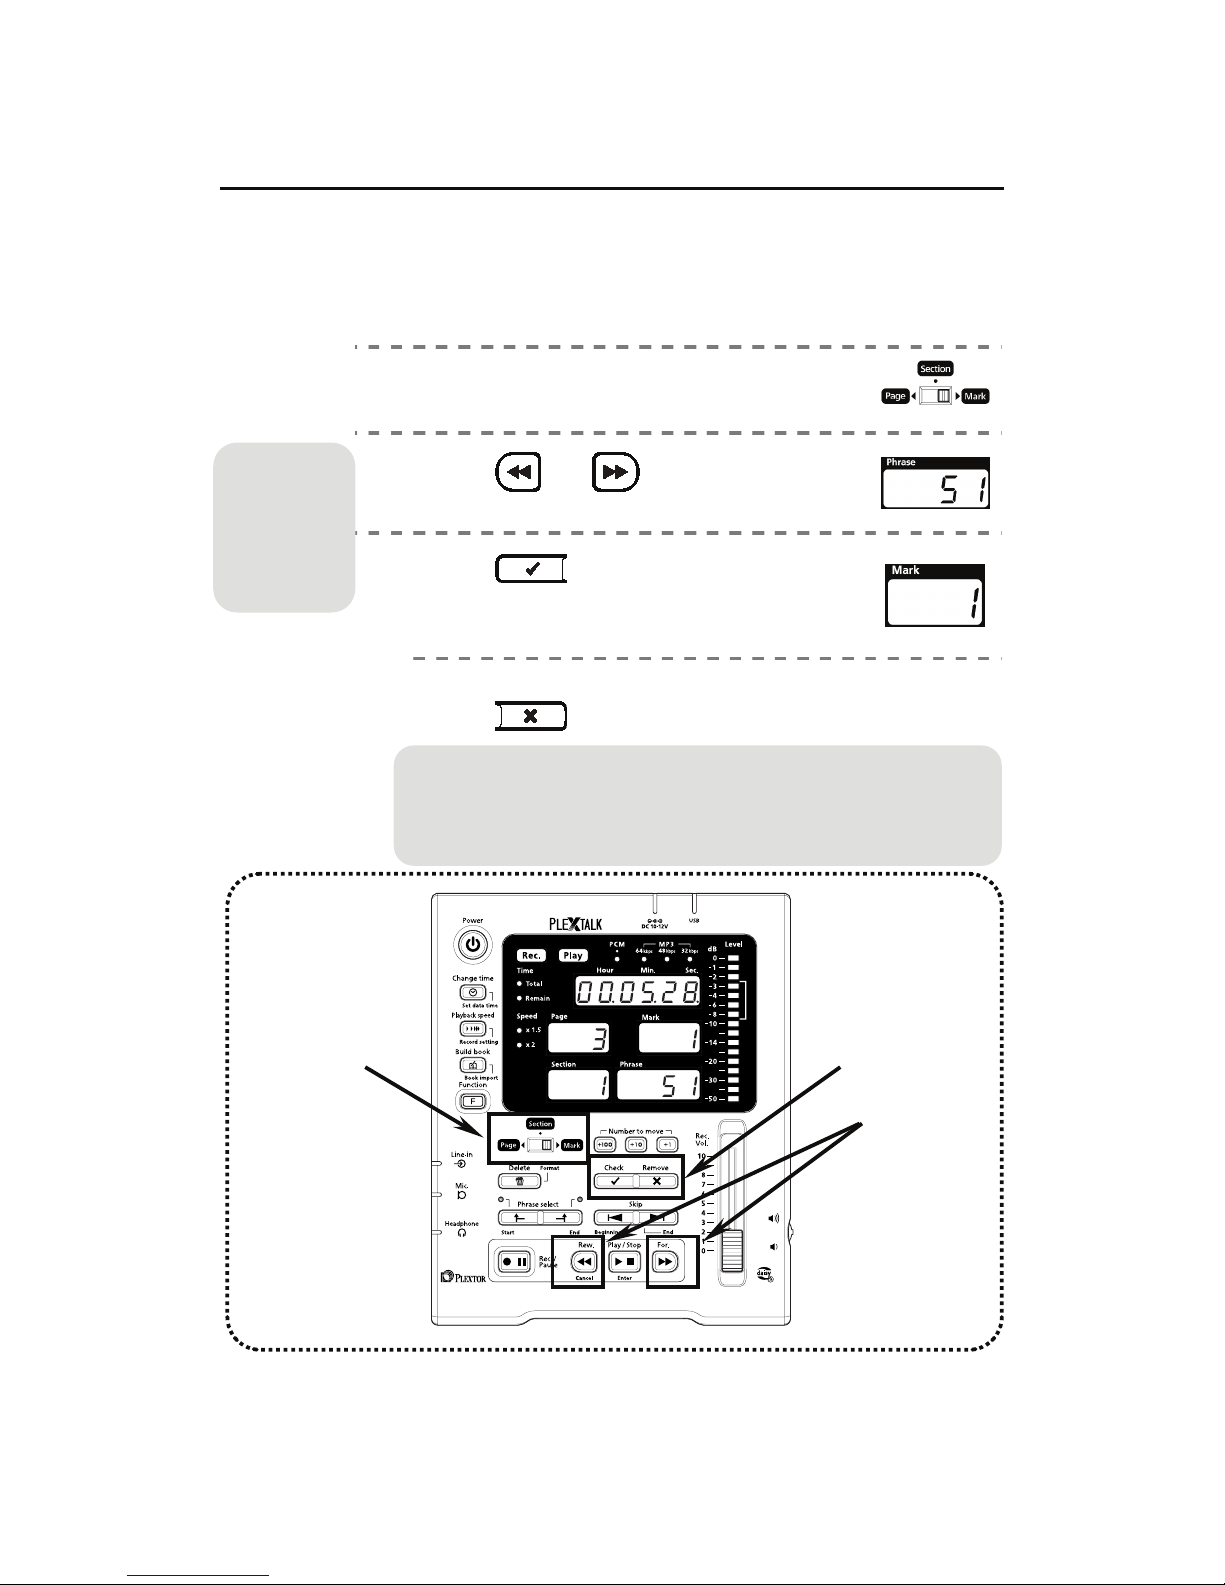
Marking
When you noticed any mistakes of the reading contents that you want to
check later, DR-1 enables to make a mark in the project. The mark can be
used in the proofreading and the editing work with either DR-1 or PRS.
1)
Move the “Select switch” to “Mark.”
Select “Mark.”
2)
Press or .
Navigate to the phrase that puts the mark.
3)
Press .
Confirm the figure displayed under the “Mark”
increases whenever pressing.
When releasing Mark,
Press .
1)
3)
2)
Adding a mark can be done not only during stopping but also
during recording, playback, and pause. When adding the mark
during pause, the mark display flashes and can be appended
to the first
p
hrase that begins recording.
For the
navigation
procedure,
refer to
"Navigation
(P.36-39).”
Rew.
Check
Remove
Page 41
41
3
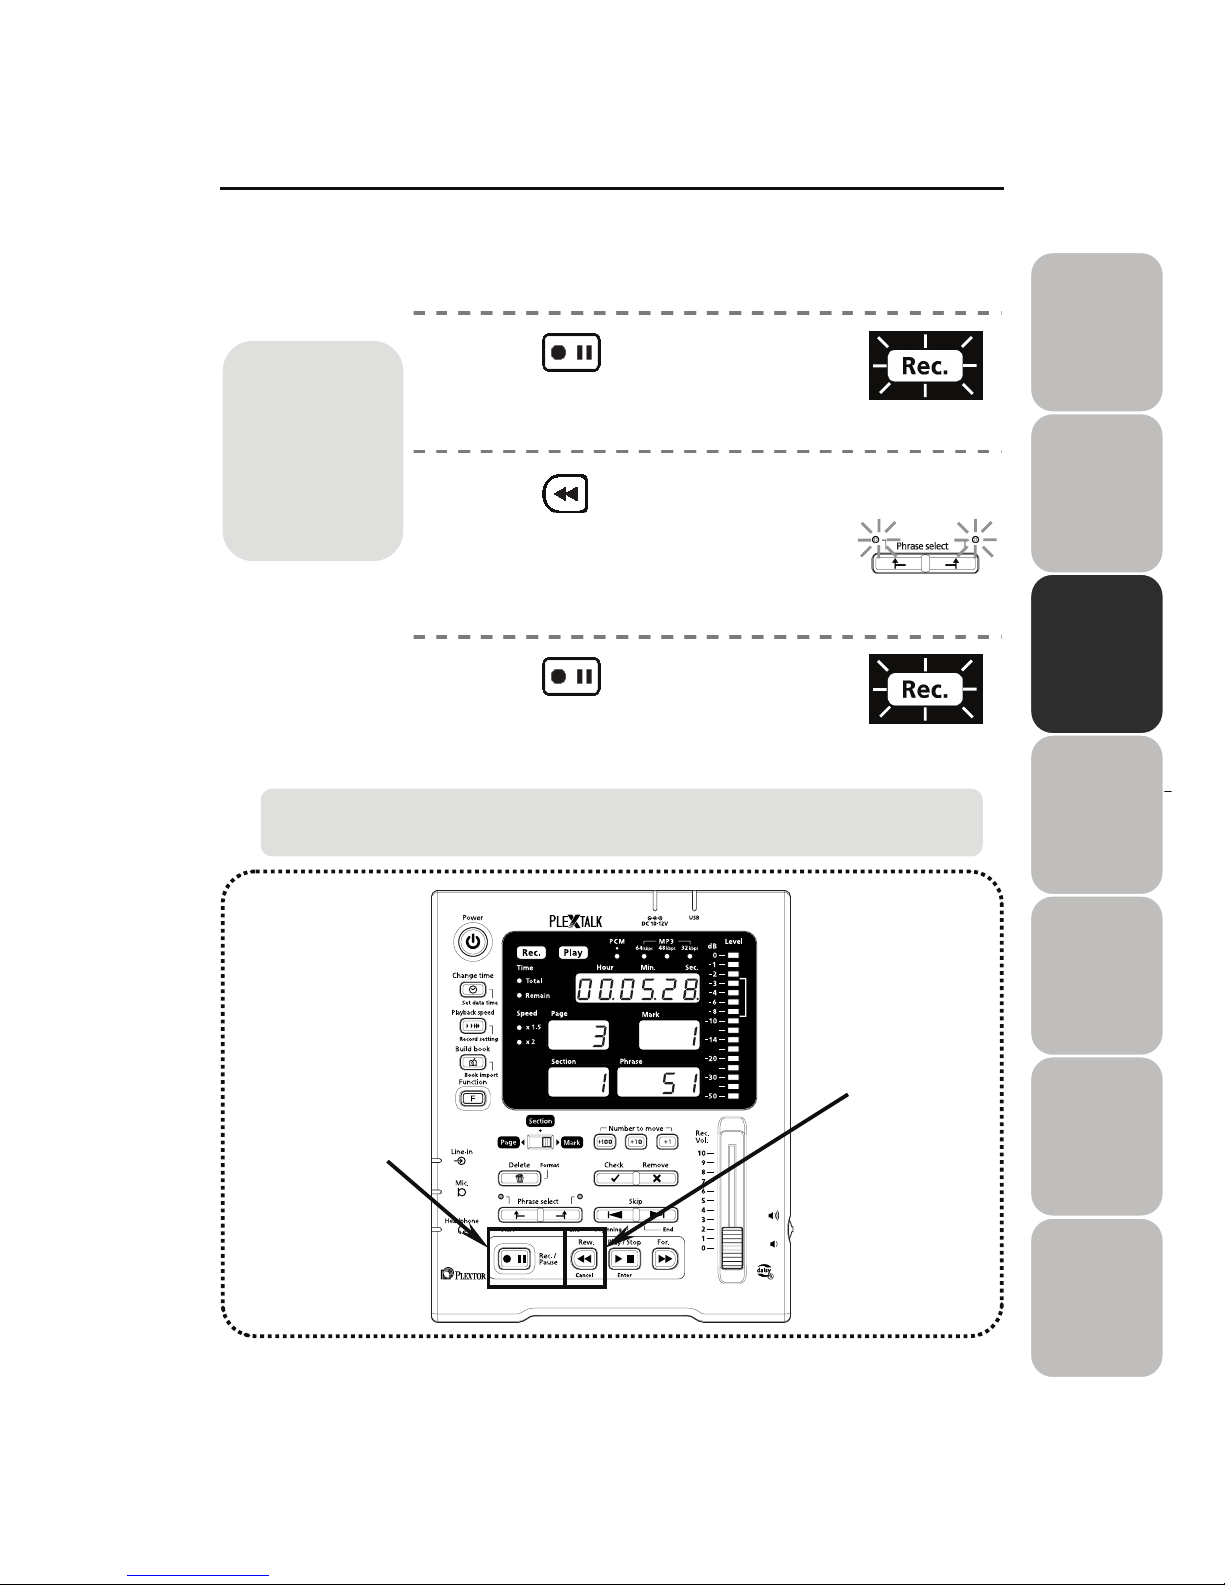
Overwrite recording (Rerecord while recording)
When you noticed any mistakes while recording, do the following operation in
the middle of recording and correct the mistaken parts.
1)
Press during recording.
Go into the record / pause state.
Note) If the stop key is pressed, the overwrite
recording cannot be done.
2)
Press .
Repeatedly press the Rew. Key to move the
location of the first phrase to be recorded.
Note) Returnable ranges are 20 phrases, but
not returnable prior to the recording
starting point.
3)
Press .
The recording starts.
Selected phrases are replaced by new
phrases.
1)3)
2)
For the correction
procedure afte
r
stop,
refer to "Inser
t
recording (P.42) "
and "Punch-in
recording
(P.43-44)."
When the overwrite recording is done by PCM audio, the corrected audio is a
utomatically deleted, and it enables to save the capacity used in the CF card.
Rec./Pause
Rew.
Rec./Pause
Flash Flash
Light on
Page 42
42
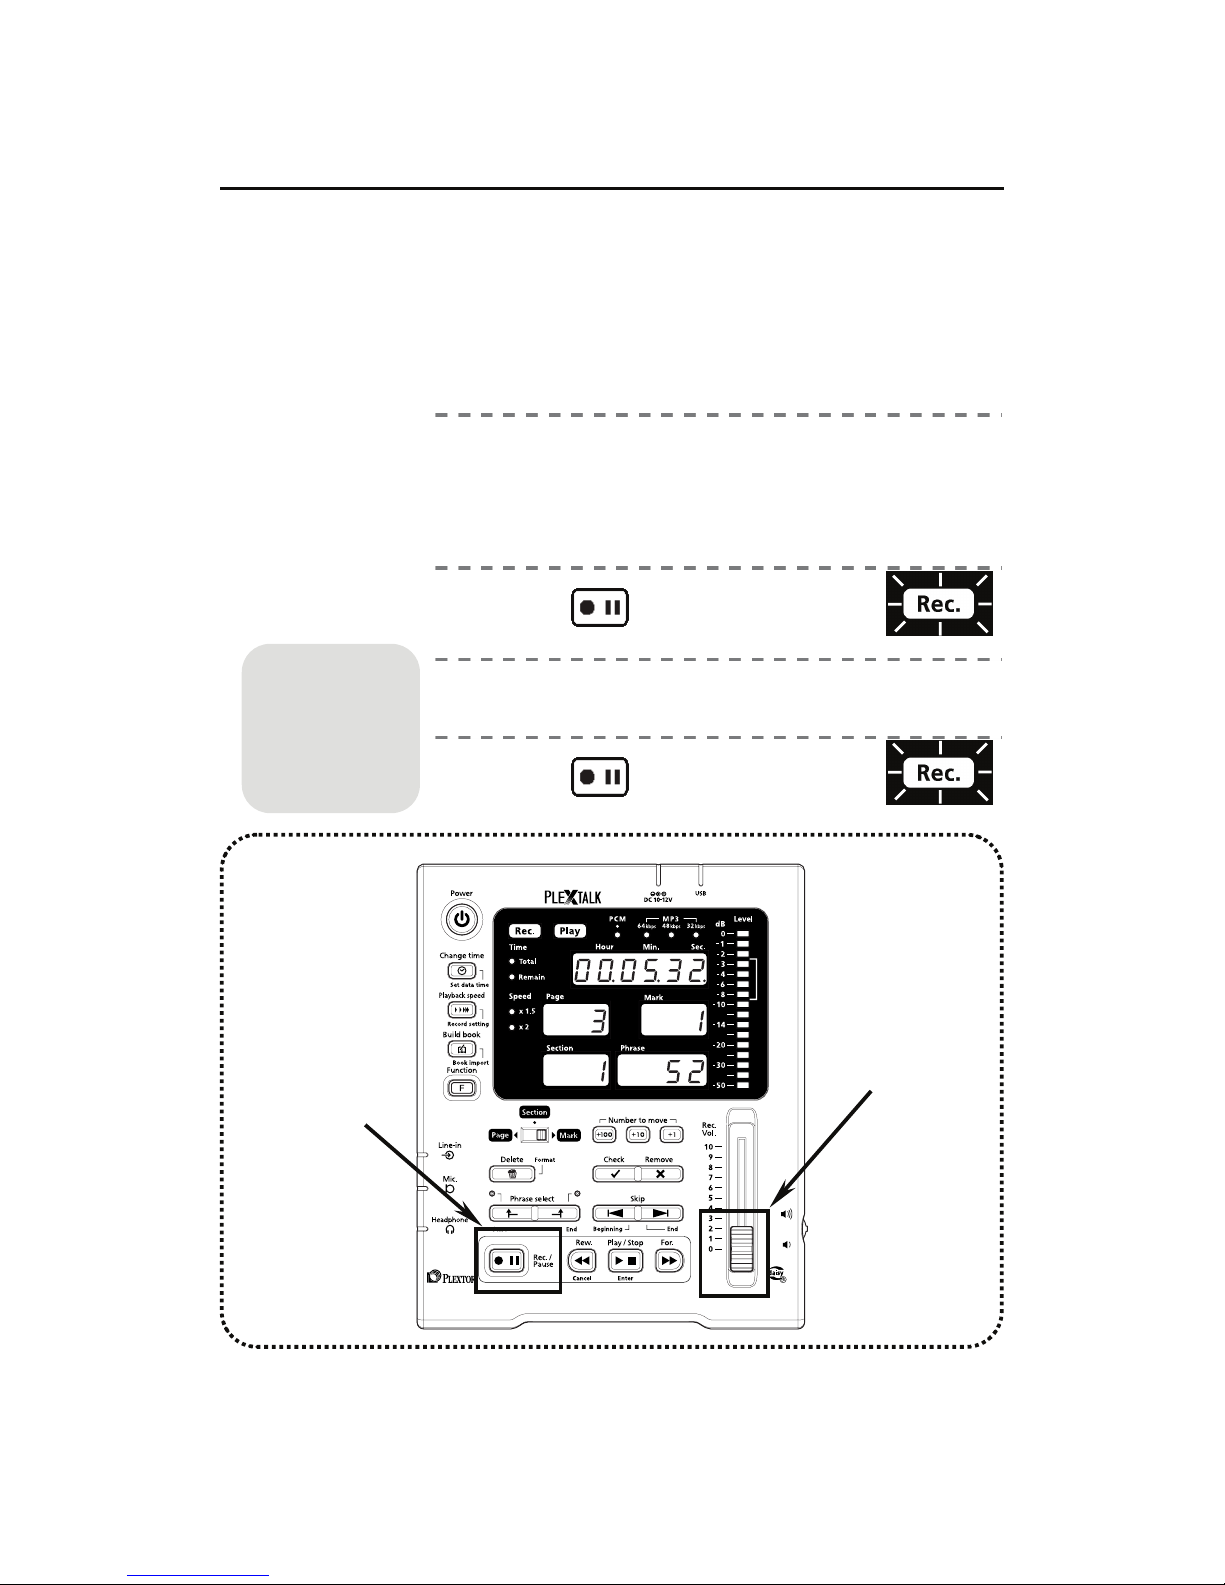
Insert recording
“Insert recording” enables you to insert the additional audio when you forget
to read and record some part after completion of recording.
An additionally recorded audio is inserted after displaying phrase in the panel
window. Even if “Insert recording” is done, any part of existing project will
never be deleted.
1)
Navigate to the phrase where
you wish to insert. The new
audio will be inserted right
after this designated phrase.
2)
Press .
Go into the record / pause state.
3)
Adjust the recording volume.
Make an adjustment if necessary.
4)
Press to start recording.
2)4)
3)
For the
procedure of the
recording volume
adjustment, refer
to "How to
record?(P.28)."
Rec./Pause
Rec./Pause
Flash
Light on
Page 43
43
3
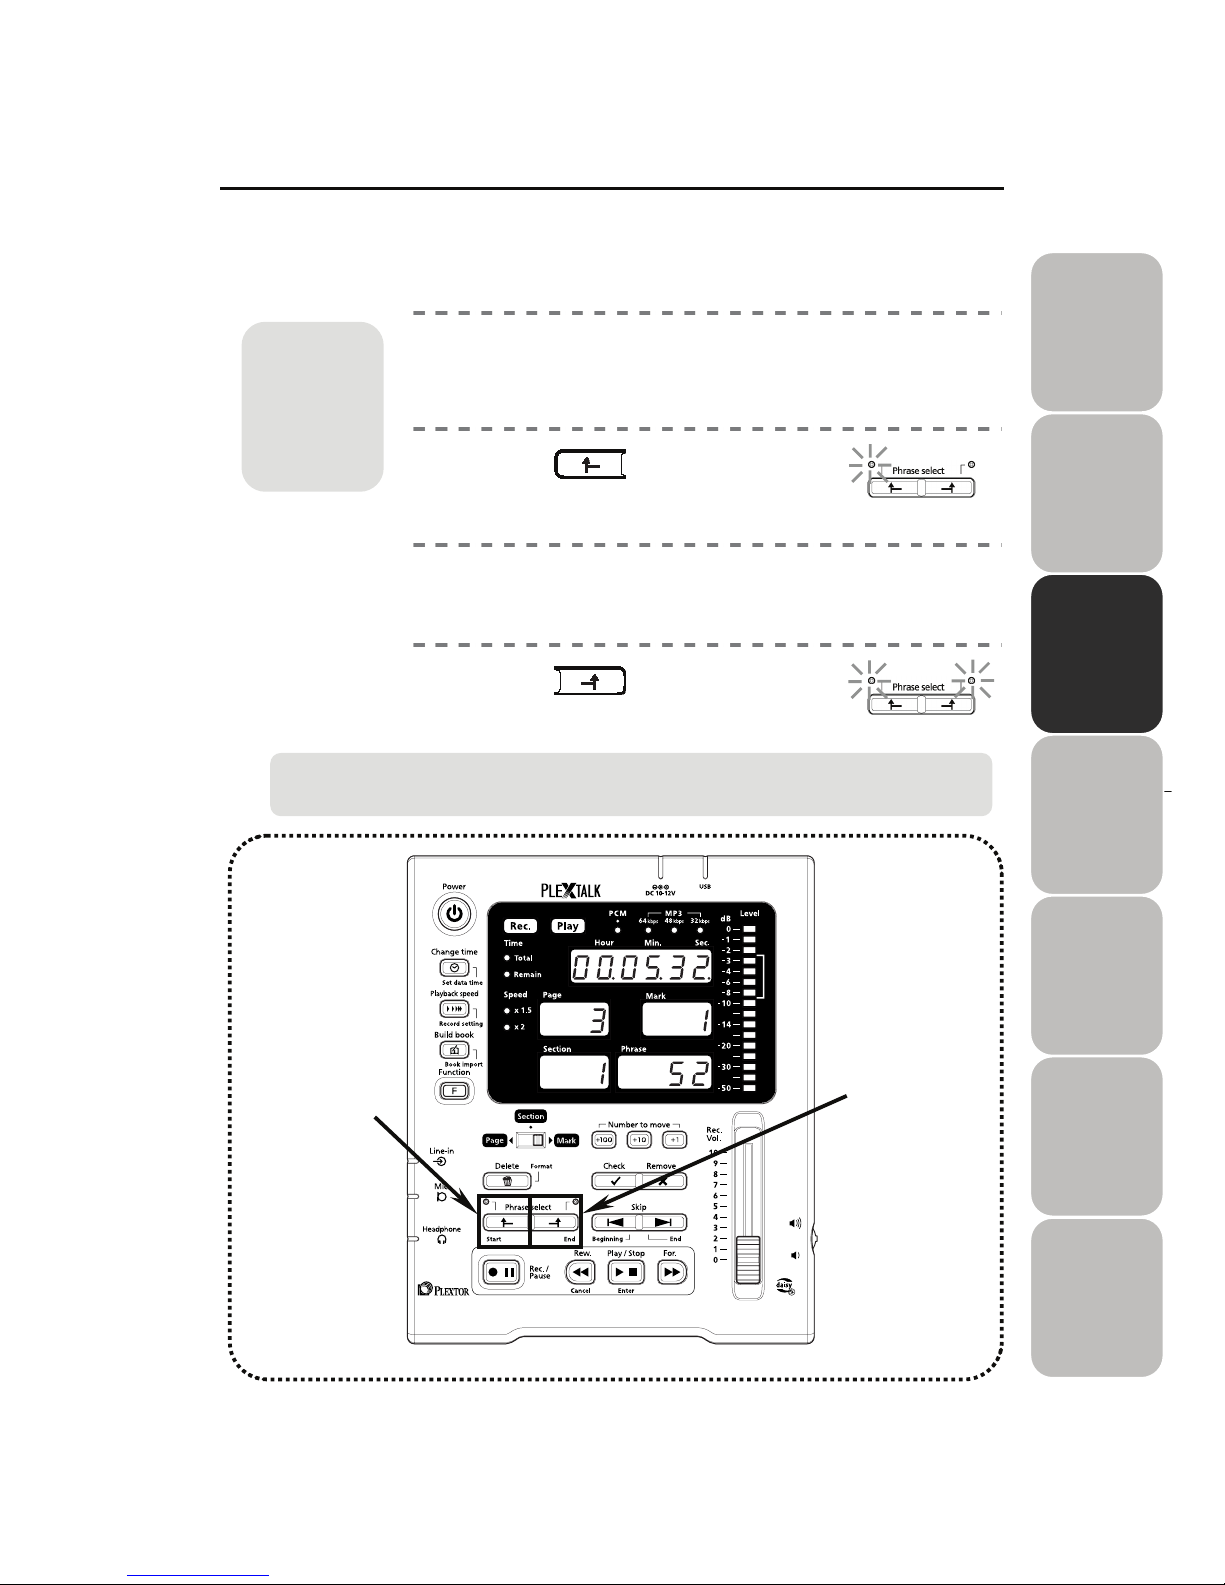
Punch-in recording STEP 1 (Specify range)
“Punch-in recording”, you should specify the range to be erased in the
existing project.
1)
Navigate to location where
you wish to insert the new
audio.
2)
Press .
Specified the beginning phrase in the
range.
3)
Navigate to the location
where you wish to cut.
4)
Press .
Specified the end phrase in the range.
2)
4)
To cancel the specified range, press the key one more time. Then the lamp
turned down, and the specified range is cancelled.
Start
End
Light on
Light on
For the
navigation
procedure,
refer to
"Navigation
(P.36-39).”
Page 44
44
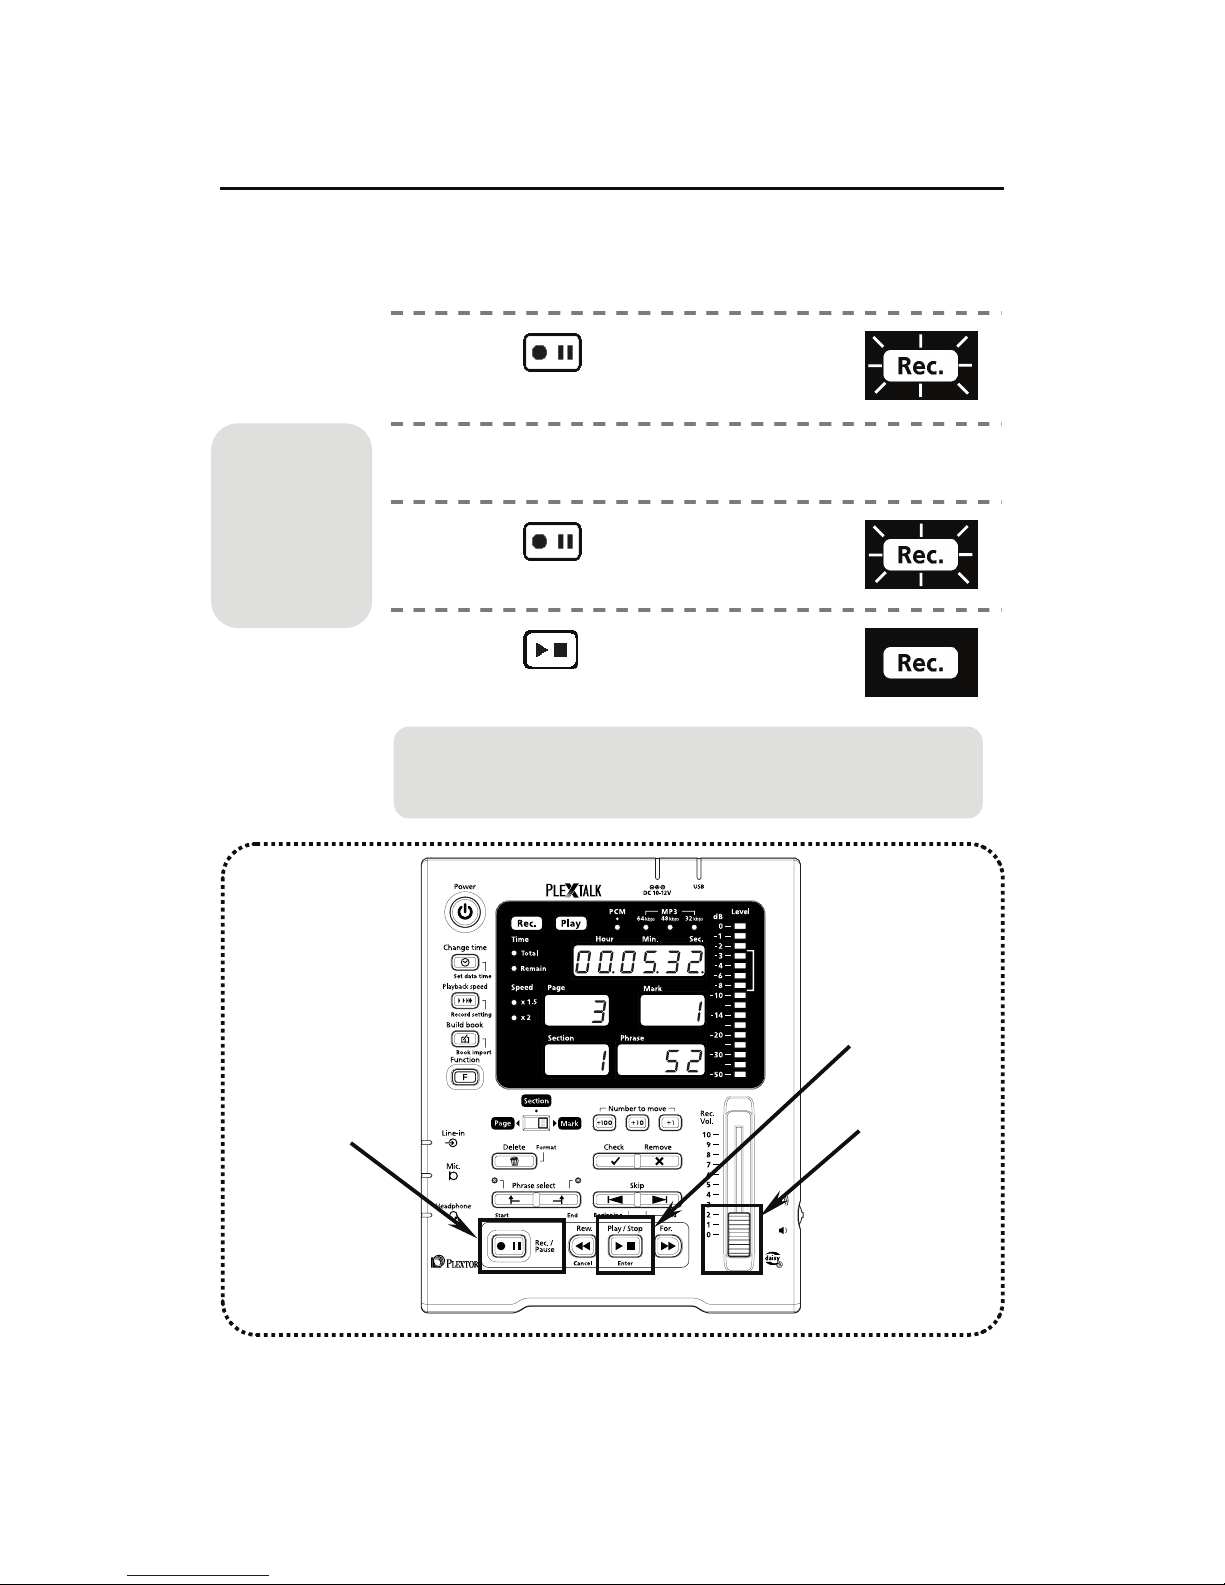
Punch-in recording STEP 2 (Replacing correction)
“Punch-in recording” allows you to correct the mistaken parts by
recording again to replace the mistakes.
1)
Press .
Go into the record/pause state.
2)
Adjust the recording volume.
Make an adjustment if necessary.
3)
Press to start recording.
Record again the specified range.
4)
Press to stop recording.
The specified range is replaced.
4)
For the
procedure of
the recording
volume
adjustment,
refer to " How
to record?(P.
28
)
."
1)3)
2)
Please note that even if the mistake is corrected by the punch-in
recording, files are not physically deleted. Thus, the remaining time
does not increase.
Rec./Pause
Play/Stop
Flash
Light on
Light off
Page 45
45
3
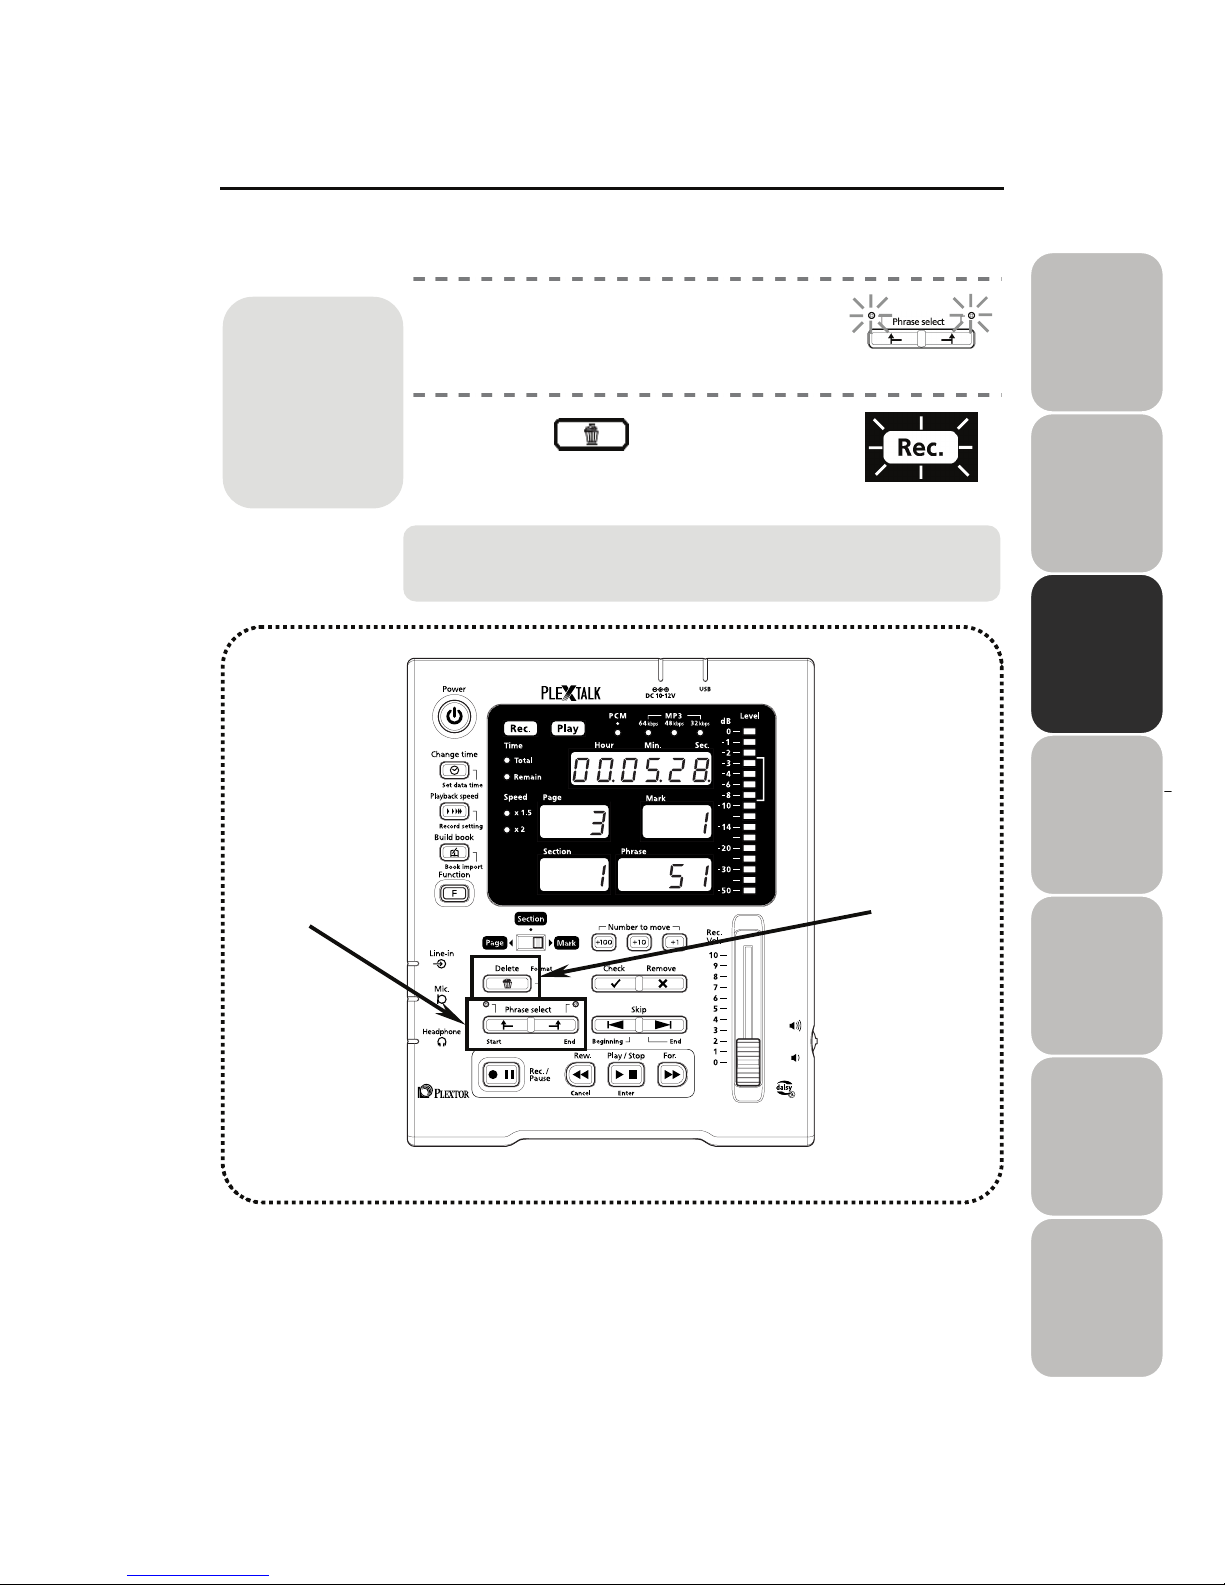
Delete phrases
Delete phrases allows you to erase a mistaken part.
1)
Specify the range.
2)
Press .
The specified range is deleted.
1)
2)
For the procedure
of specifying
range, refer to
"Punch-in
recording STEP 1
(Specify range)
(P.43)."
Please note that even if the specified range is deleted, files are no
t
physically deleted. Thus, the remaining time does not increase.
Delete
Flash
Light on
Page 46

46
MEMO
Page 47
47
4
Chapter 4
Other Useful Features
Displaying the total time & remaining time ············ 48
Changing the playback speed ······························· 49
Changing the beep sound······································ 50
Change the recording setting································· 51
Building the book ··················································· 54
Importing (DAISY import)······································· 55
Deleting all contents stored in the CF card
(Format) ································································· 56
Checking DR-1 version·········································· 57
Transferring data to a PC······································· 58
Connecting DR-1 to a PC································· 58
Connecting a card reader to a PC···················· 60
Connecting a PC card adaptor for CF card to a
PC····································································· 61
Contents list in a CF card ································· 62
Data transferring to PRS ·································· 62
Restore PLEXTALK project file······························ 63
Page 48
48
Displaying the total time & remaining time
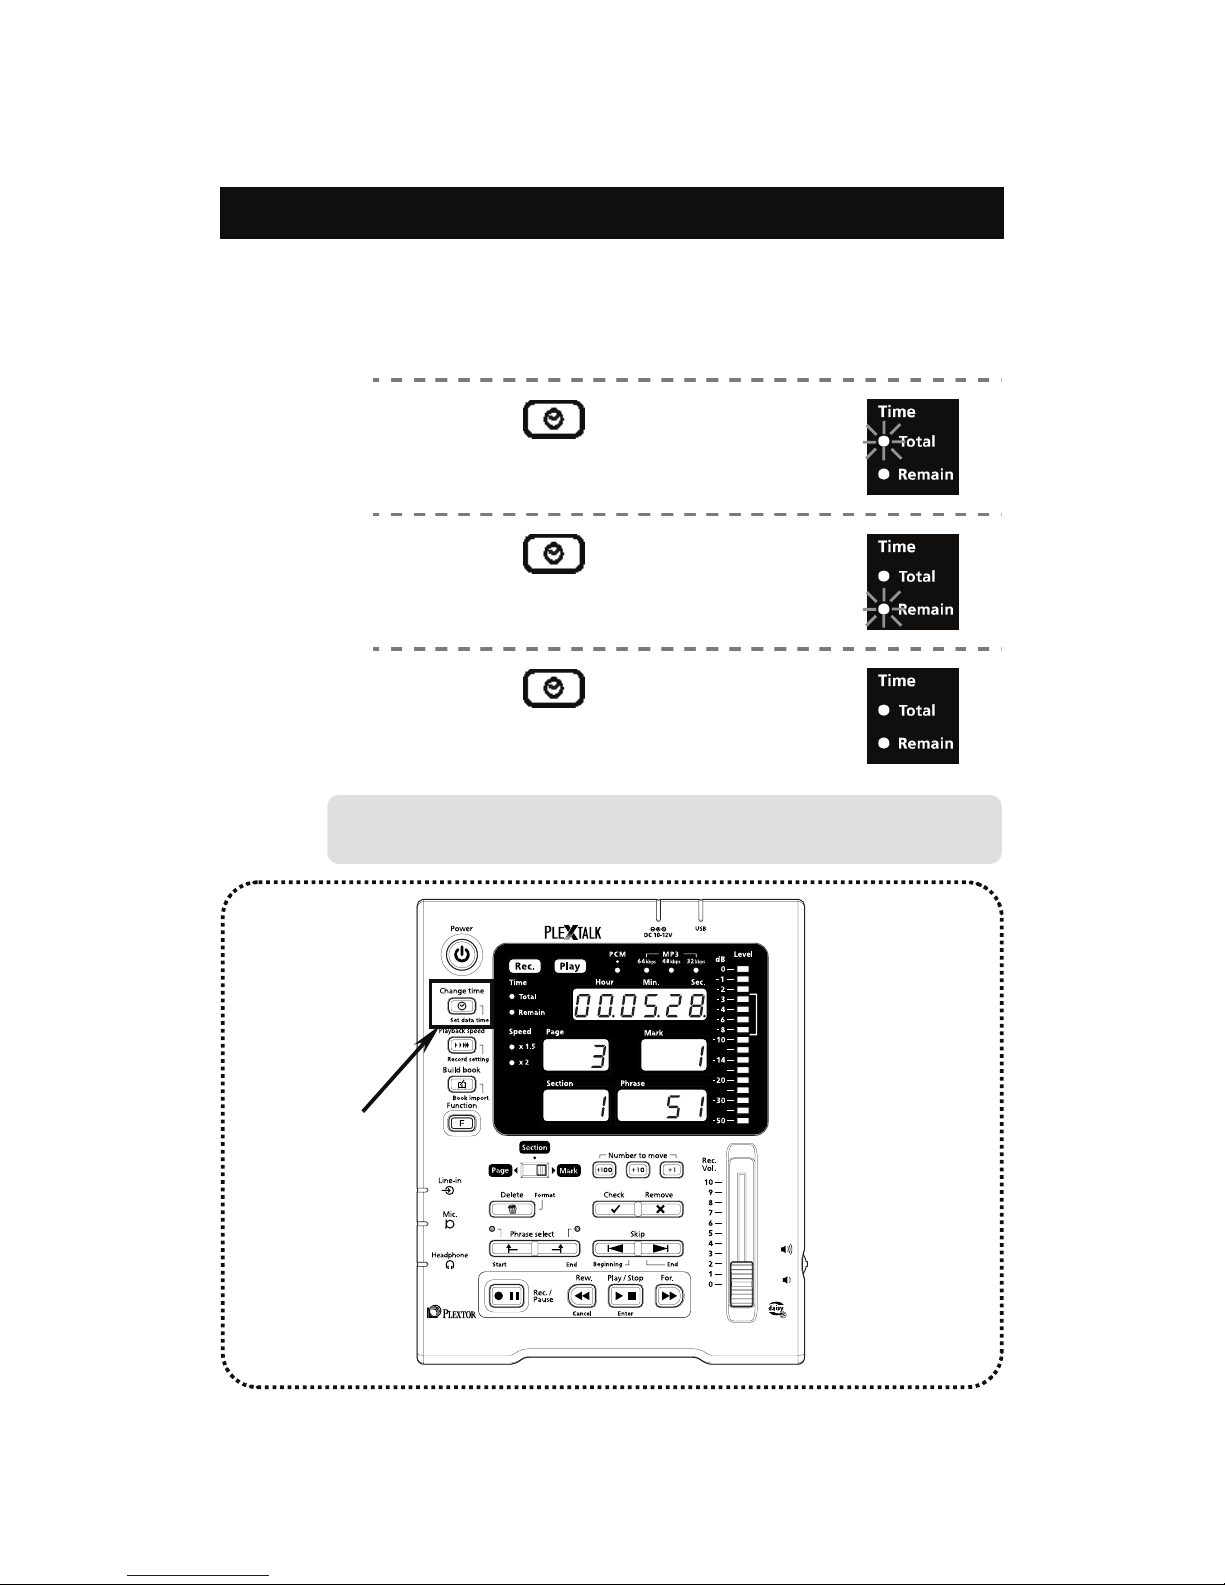
Time display window normally shows the elapsed time. Whenever you
press the “Change time” key, the display changes in order of total time
remaining time elapsed time.
1)
Press .
Displays “total time.”
2)
Press .
Displays “remaining time.”
3)
Press .
Displays “elapsed time.”
1)2)3)
The remaining amount of time changes by the recording tone quality.
Present recording tone quality can be confirmed with the tone quality lamp.
Change time
Change time
Change time
Light on
Light on
Light off
Page 49
49
4
Changing the playback speed
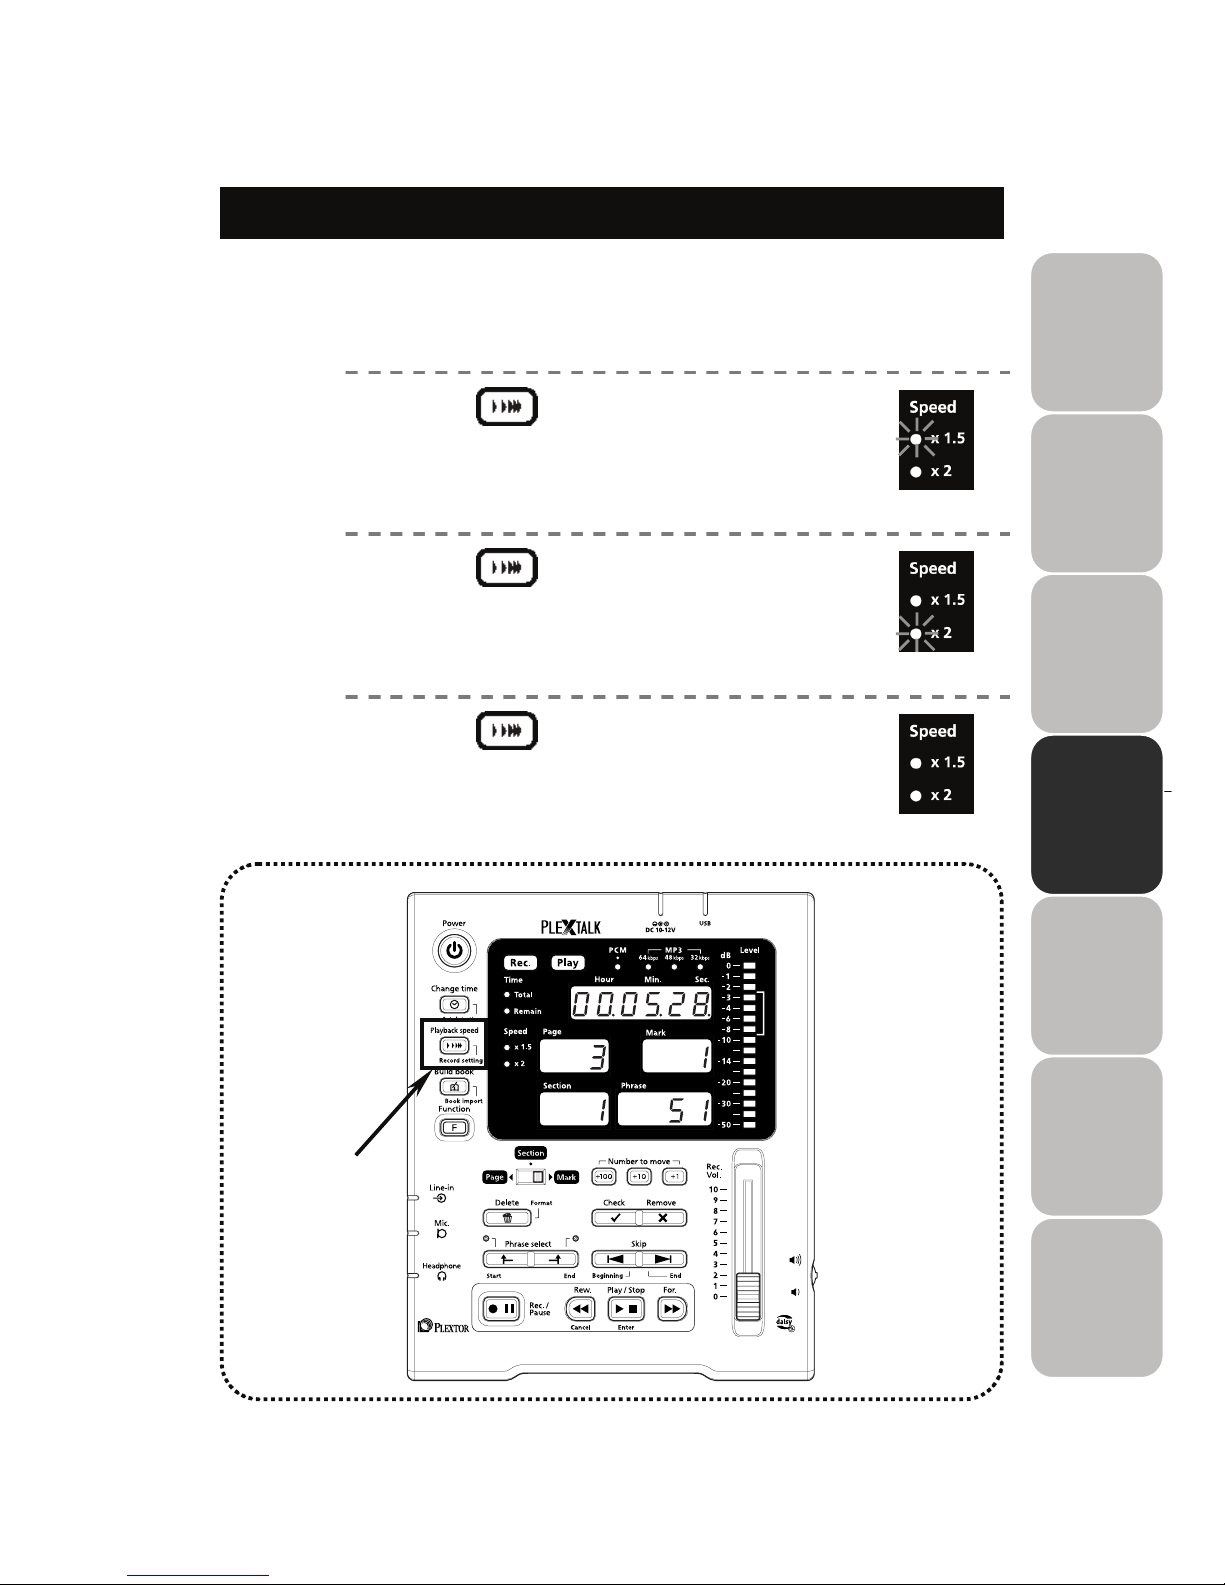
Playback speed normally playbacks at the normal speed. Whenever
you press the “Playback speed” key, lighting up the small lamp changes
in order of x1.5 x2 normal speed.
1)
Press to change the playback
speed to x1.5.
Confirm that the lamp located on the left of speed
indicator x1.5 on the display panel is lighted up.
2)
Press to change the playback
speed to x2.
Confirm that the lamp of speed indicator x2 on the
display panel is lighted up.
3)
Press to change the playback
speed to the normal speed.
Confirm that the above both lamps are OFF.
The playback speed is back to the normal speed.
1)2)3)
Playback speed
Playback speed
Playback speed
Light on
Light on
Light off
Page 50
50
Changing the beep sound
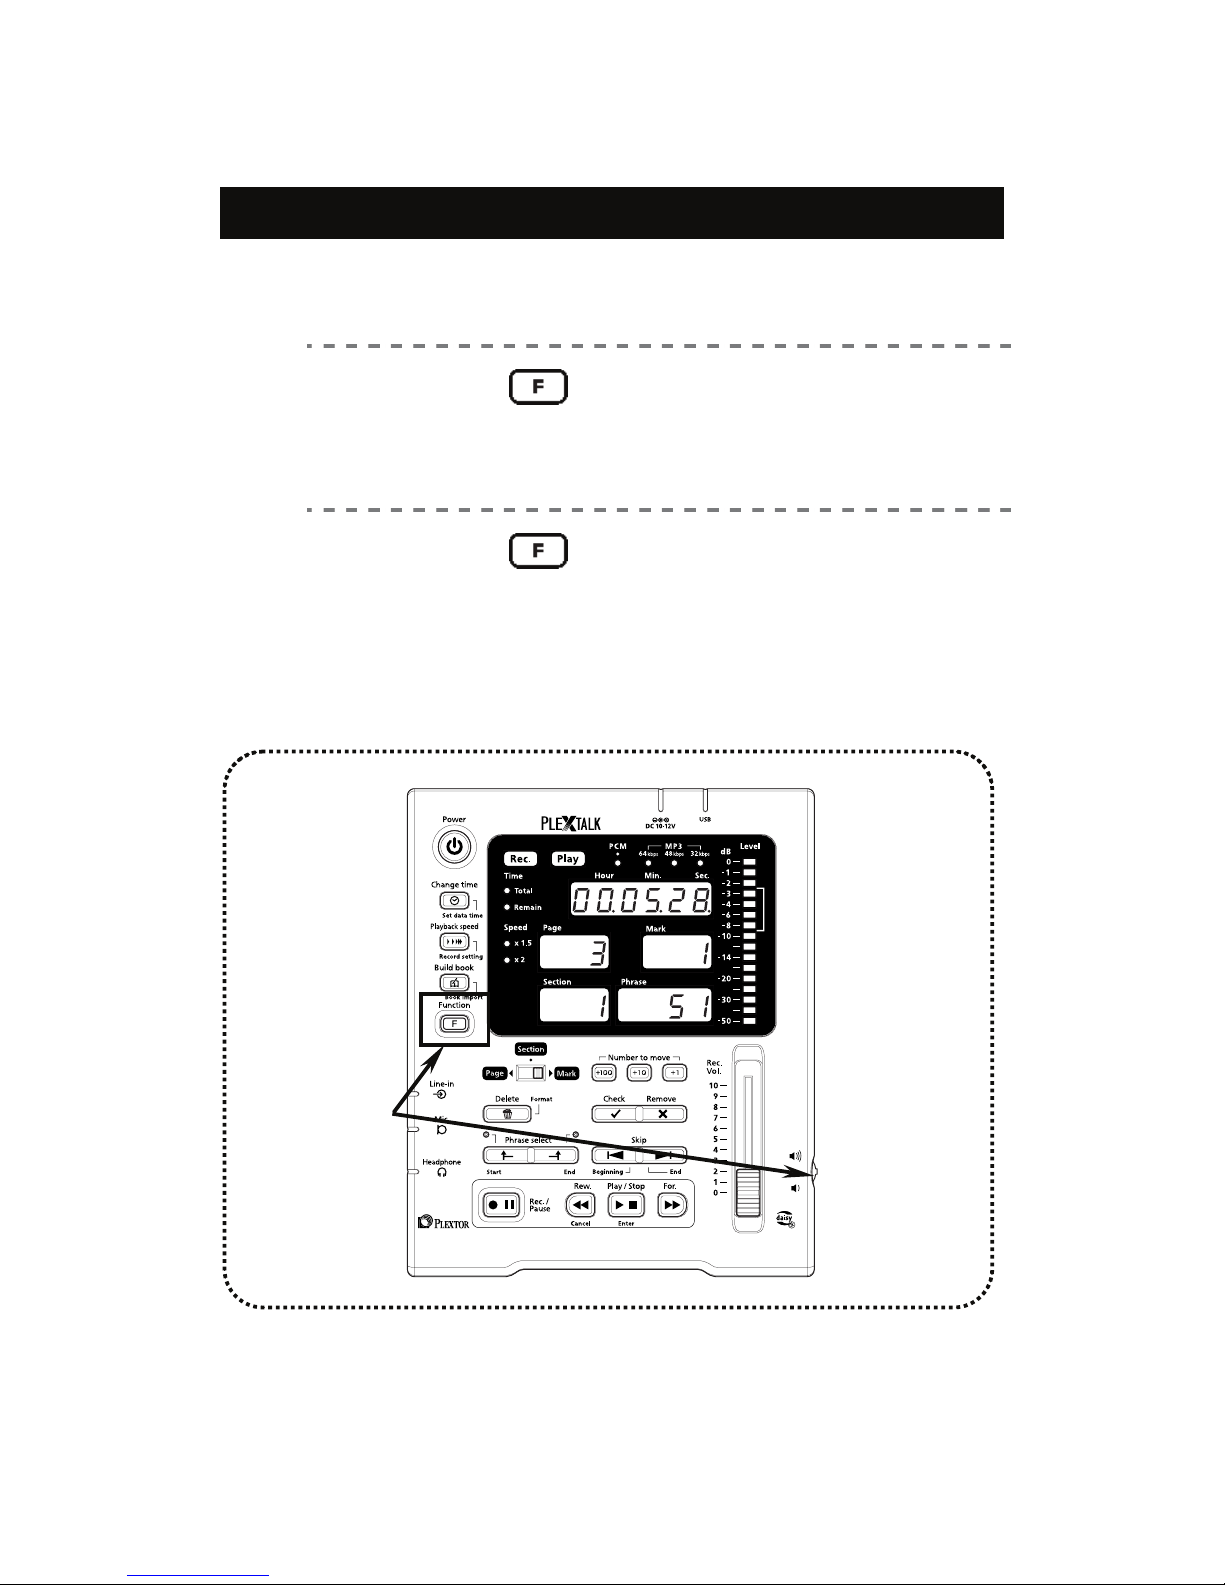
Turn ON / OFF the beep sound, do the following by holding down the
Function key.
■
Hold down and pull the "volume
shuttle" forward by the finger.
Audio beep sound set “ON.”
■
Hold down and push the "volume
shuttle" backward by the finger.
Audio beep sound set “OFF.”
Hold down the
“Function” key
and operate the
“Volume
Shuttle”
simultaneously.
Volume Shuttle
(Right side of the
DR-1 body)
F
unction
F
unction
Page 51
51
4
Change the recording setting
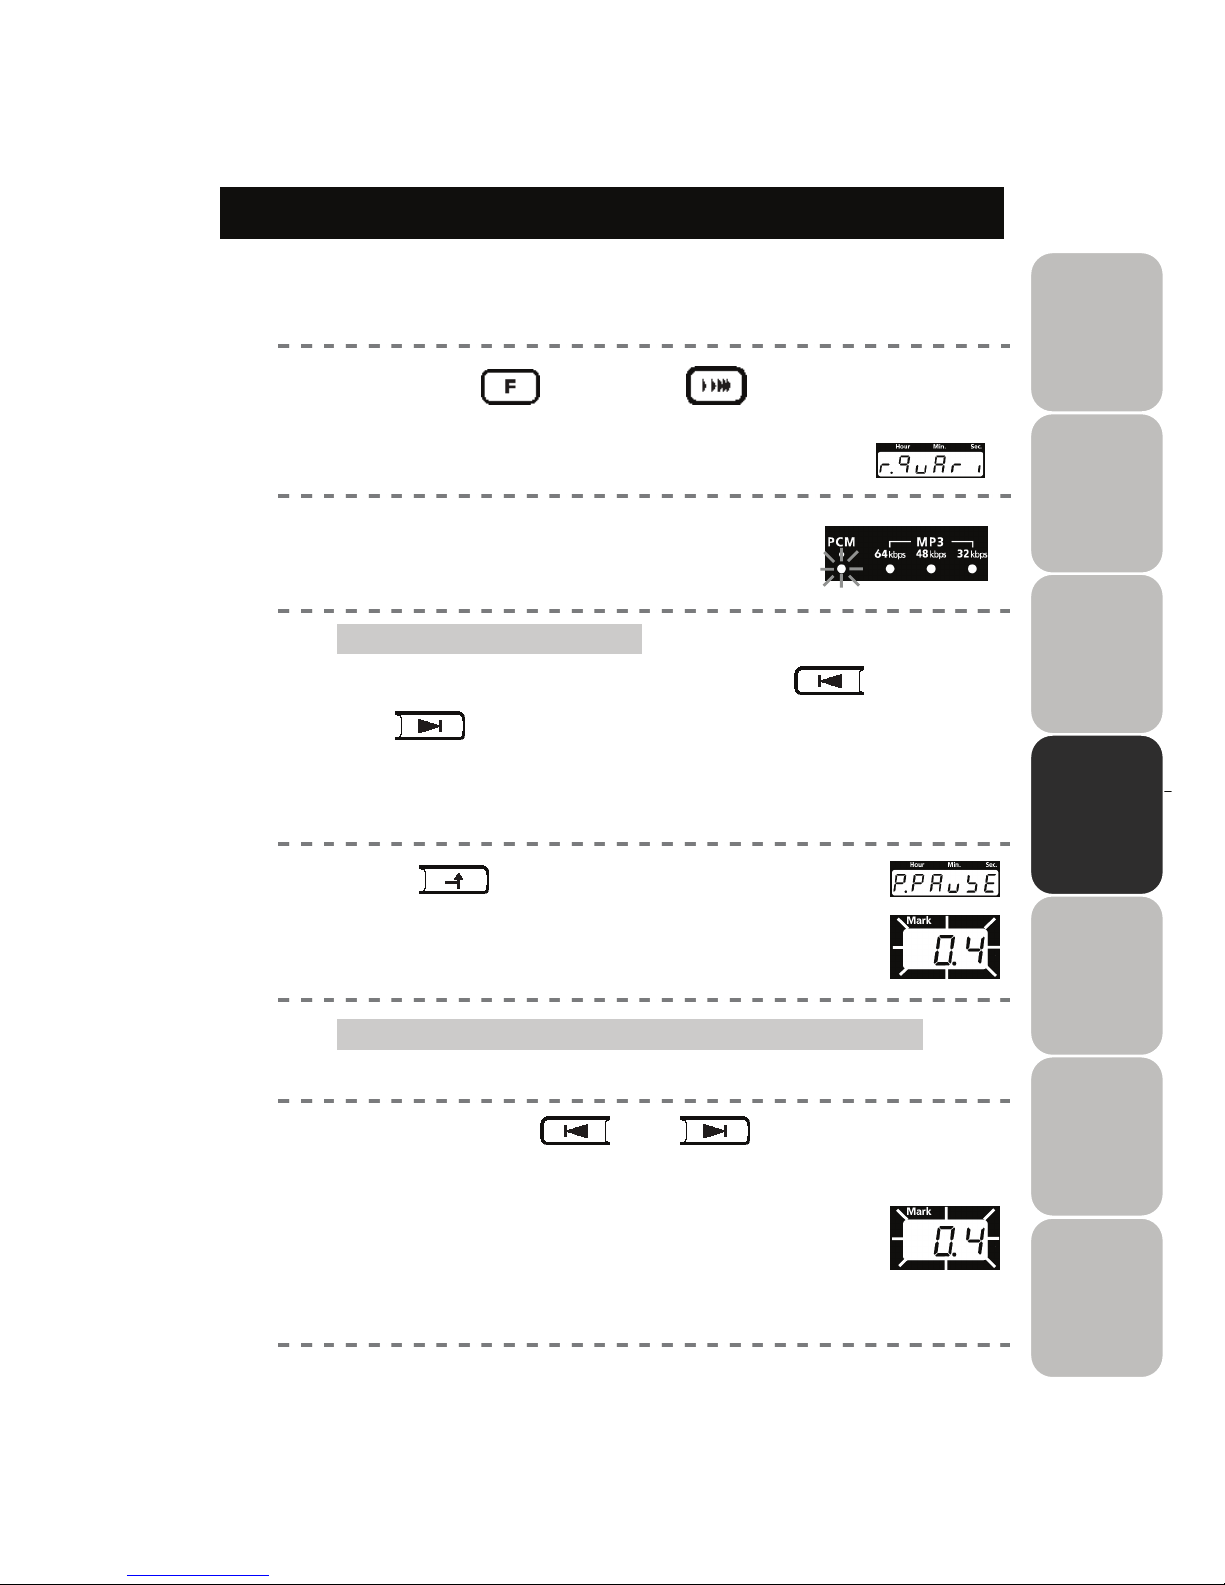
“Recording setting” enables to set sound quality, phrase pause time, and
noise level.
Hold down and press .
1)
It changes to the “Recording Setting” mode.
“r.quAri “ is displayed in the time panel window on the
display panel.
2)
Confirm the flashing light under
“PCM” as shown on the right.
Audio lamp flashes.
3)
Setting the sound quality
Select the sound quality by pressing
and
.
Four (4) format types of selectable recording audio are
“PCM,” “MP3 64k, ”MP3 48k,” “MP3 32k.”
The default setting of DR-1 is ’“PCM.”
4)
Press to enter.
“P.PAuSE” is displayed in the time display window.
The display under the “Mark” flashes and goes on to the
next operation.
5)
Setting the “phrase pause time” (detection time)
In a DR-1 recording, the length of the silence to be detected before creating a new
phrase is called the “phrase pause time.”
Set by pressing and to select
desirable time.
While recording, if the time is left more than the set “pause
time,” the phrase is automatically detected.
The setting range is from 0.2 to 1.0 seconds, and the setting
can be done at every 0.1 second.
The default “pause time” setting is 0.4
seconds.
F
unction
Record setting
Beginni
ng
Beginni
ng
Flash Flash
Page 52
52
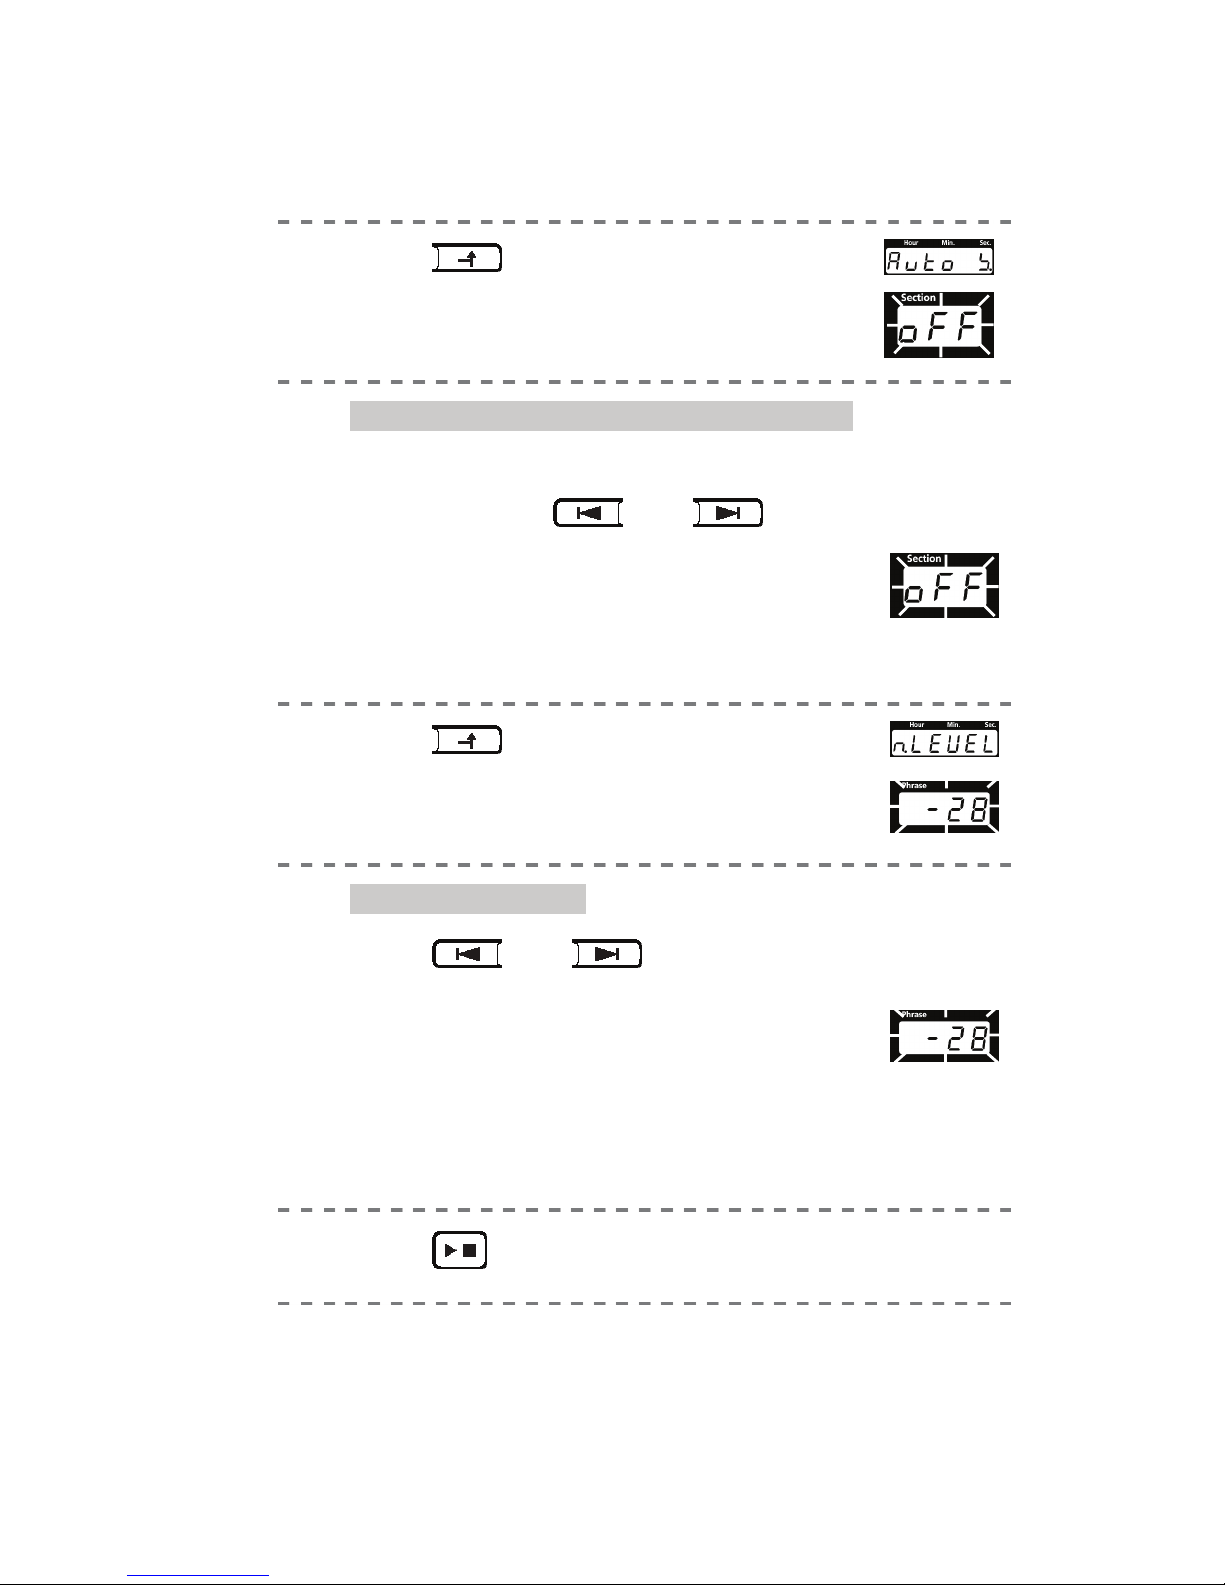
6)
Press to enter.
“Auto S” is displayed in the time panel window.
The display under the “Section” flashes and goes on to the
next operation.
Section pause time (Auto section setting)
In a DR-1 recording, after a specified amount of time with no audio input, DR-1
can be automatically created a new section.
7)
Set by pressing and to
select desirable time.
While recording, if the time is left more than the set “pause
time,” new section is automatically detected.
The setting range is from the OFF state, 1 second … up to 5
seconds. The setting can be done at every 1 second.
The default setting is OFF.
8)
Press to enter.
“n.LEVEL ” is displayed in the time display window.
The display under the “Phrase” flashes and goes on to the
next operation.
9)
Setting Noise Level
Press
and to set noise level.
While recording, if the recording volume is lower than that of
setting value, ” the phrase is detected.
The setting range is from - 20 to - 40dB , and the setting can
be done at every 2dB.
The default setting is -28dB.
If you are recording in a low noise level environment, such
as a studio, use a "low" setting value close to - 40.
Reversely, If your recording in a high noise level
environment, such as a conference or lecture, use the
"High" setting value close to - 20.
10)
Press to enter.
Beginni
ng
Beginni
ng
Play/Stop
Ente
r Flash Flash Flash Flash
Page 53
53
4
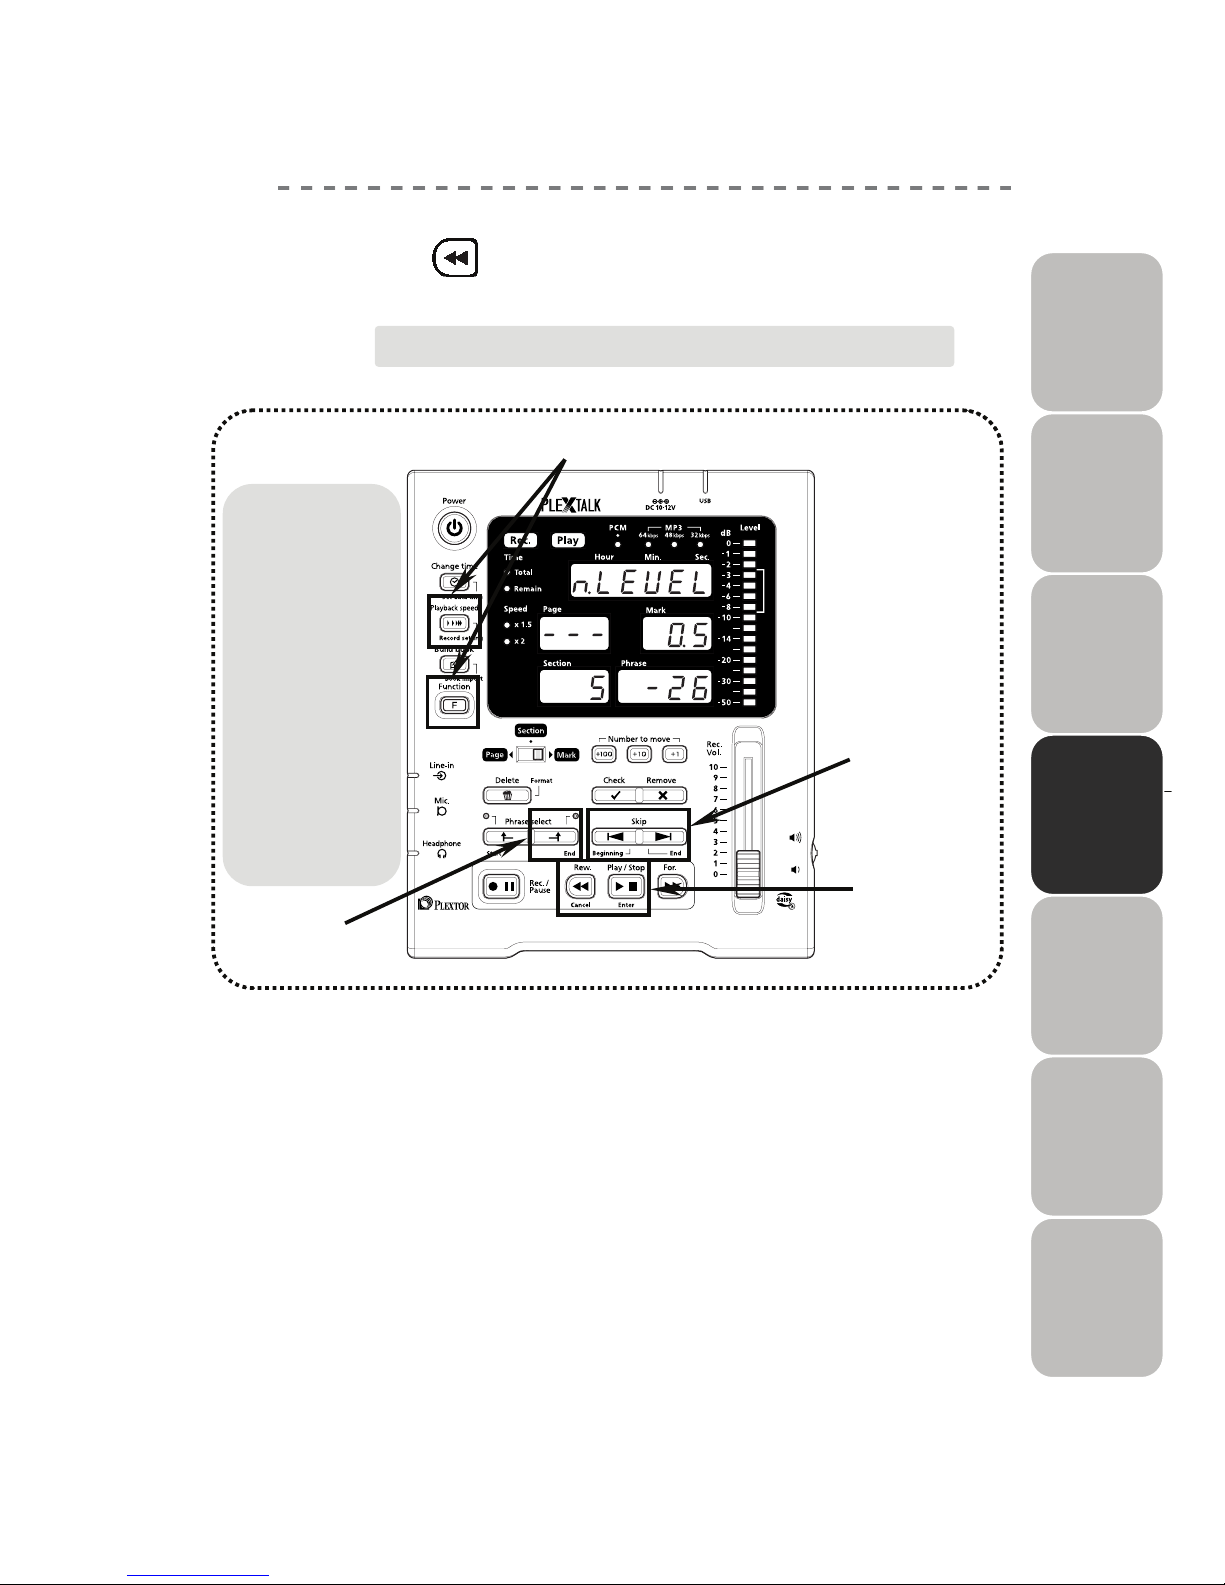
In case of canceling:
Press to cancel the setting.
The recording setting is saved in the DR-1.
4)6)8)
3)5)7)9)
10)
The example on
the right
described the
case where the
respective value
is set to:
1) the phrase
pause time is
0.5 second,
2) the section
pause time is
5 seconds,
and
the noise
level is
-26dB.
Rew.
Cancel
1)
Page 54
54
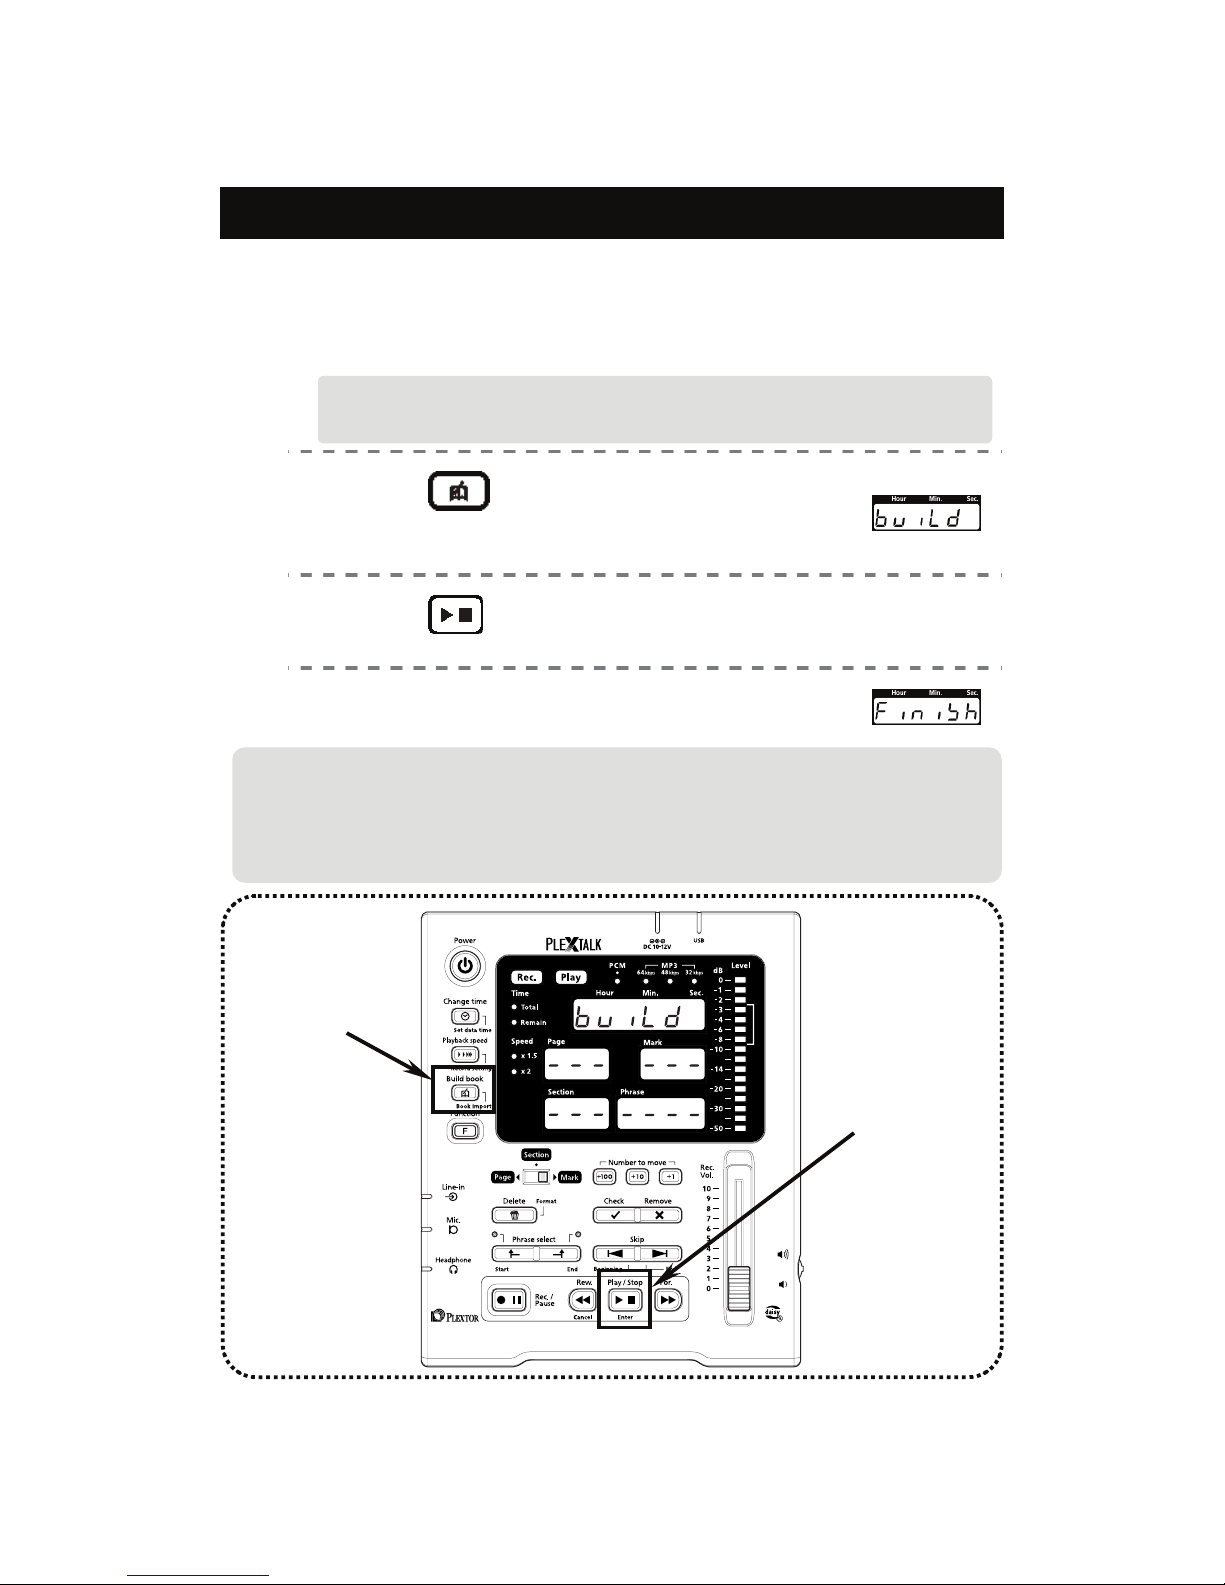
Building the book
Having completed the entire recording and editing of the project, there is one
final process that must be carried out before handing out the project to the
next person. "Build Book" process makes the project as DAISY 2.02
compliant book.
1)
Press .
“buiLd” is displayed and flashes in the
time panel window on the display panel.
2)
Press .
The display of “buiLd” flashes.
3)
Confirm that “FiniSh” is displayed.
“Build Book” is completed.
If you apply Plextalk family, such as PRS and PTR2 for advanced editing, the
following process of “building the book” is not necessary.
1)
2)
The progress status is displayed in the phrase display window in percentage (%).
It might take one hour or more for the "Build Book" process.
When the cancellation key ("Rew." key) is pressed, processing is discontinued.
Unnecessary parts in the audio file cannot be deleted with the "Build Book" process.
The audio export processing on PRS is needed to delete unnecessary parts.
Build book
Play/Stop
Enter
Page 55
55
4
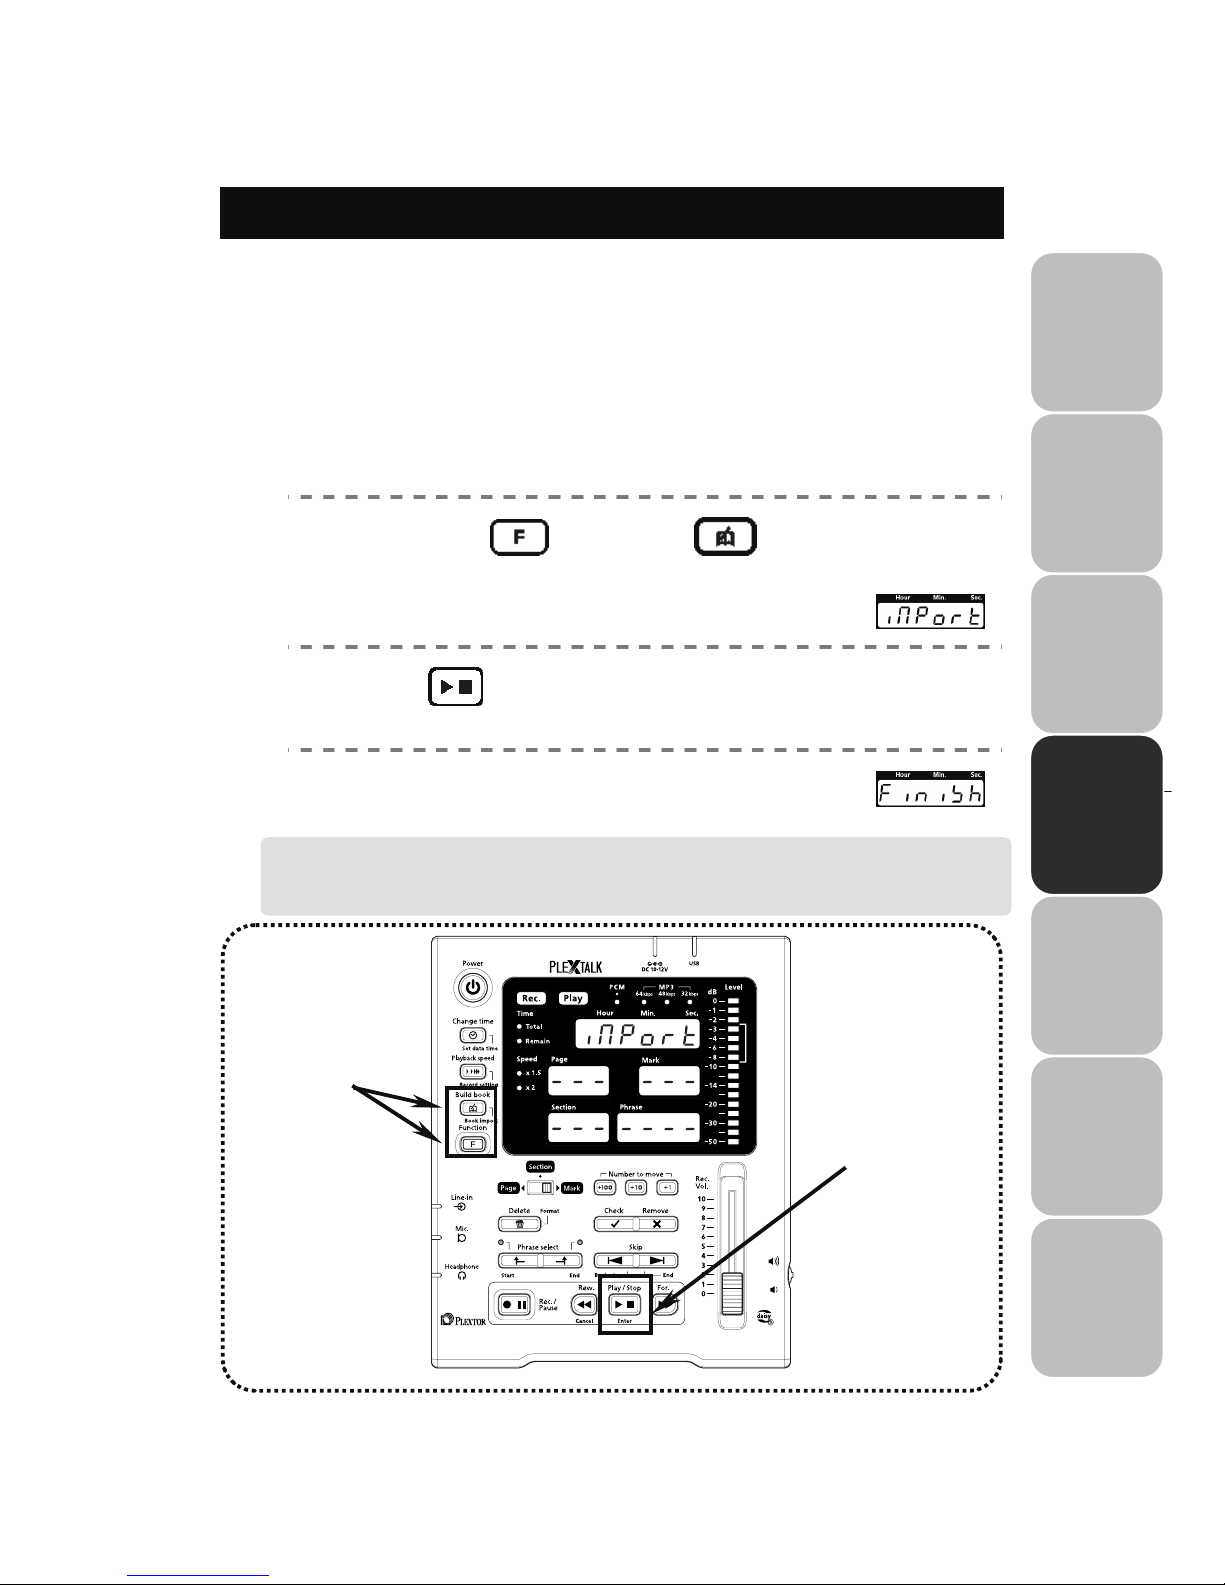
Importing (DAISY import)
On occasion you may wish to work on a DAISY book that you prepared
earlier or that has been supplied to you by someone else. You may want to
edit the content, modify the structure or update the DAISY content from
DAISY2.0 to DAISY2.02 format.
When you read in any DAISY book by DR-1, you need to do “Importing”
process. By importing, you can customize DAISY to PLEXTALK project.
When the CF card that contains only DAISY is inserted, DR-1 automatically
displays the following 1) "iMPort", and you can continue importing.
Hold down and press .
1)
" iMPort " is displayed and flashes in the time panel
window on the display panel.
2)
Press .
The display of “iMPort” flashes.
3)
Confirm that “FiniSh” is displayed.
“Importing” is completed.
1)
2)
The progress status is displayed in the phrase display window in percentage (%).
It might take about 10 minutes for the "importing" process.
When the cancellation ke
y (
"Rew." key) is pressed, processing is discontinued.
F
unction
Book import
Play/Stop
Ente
r
Page 56
56
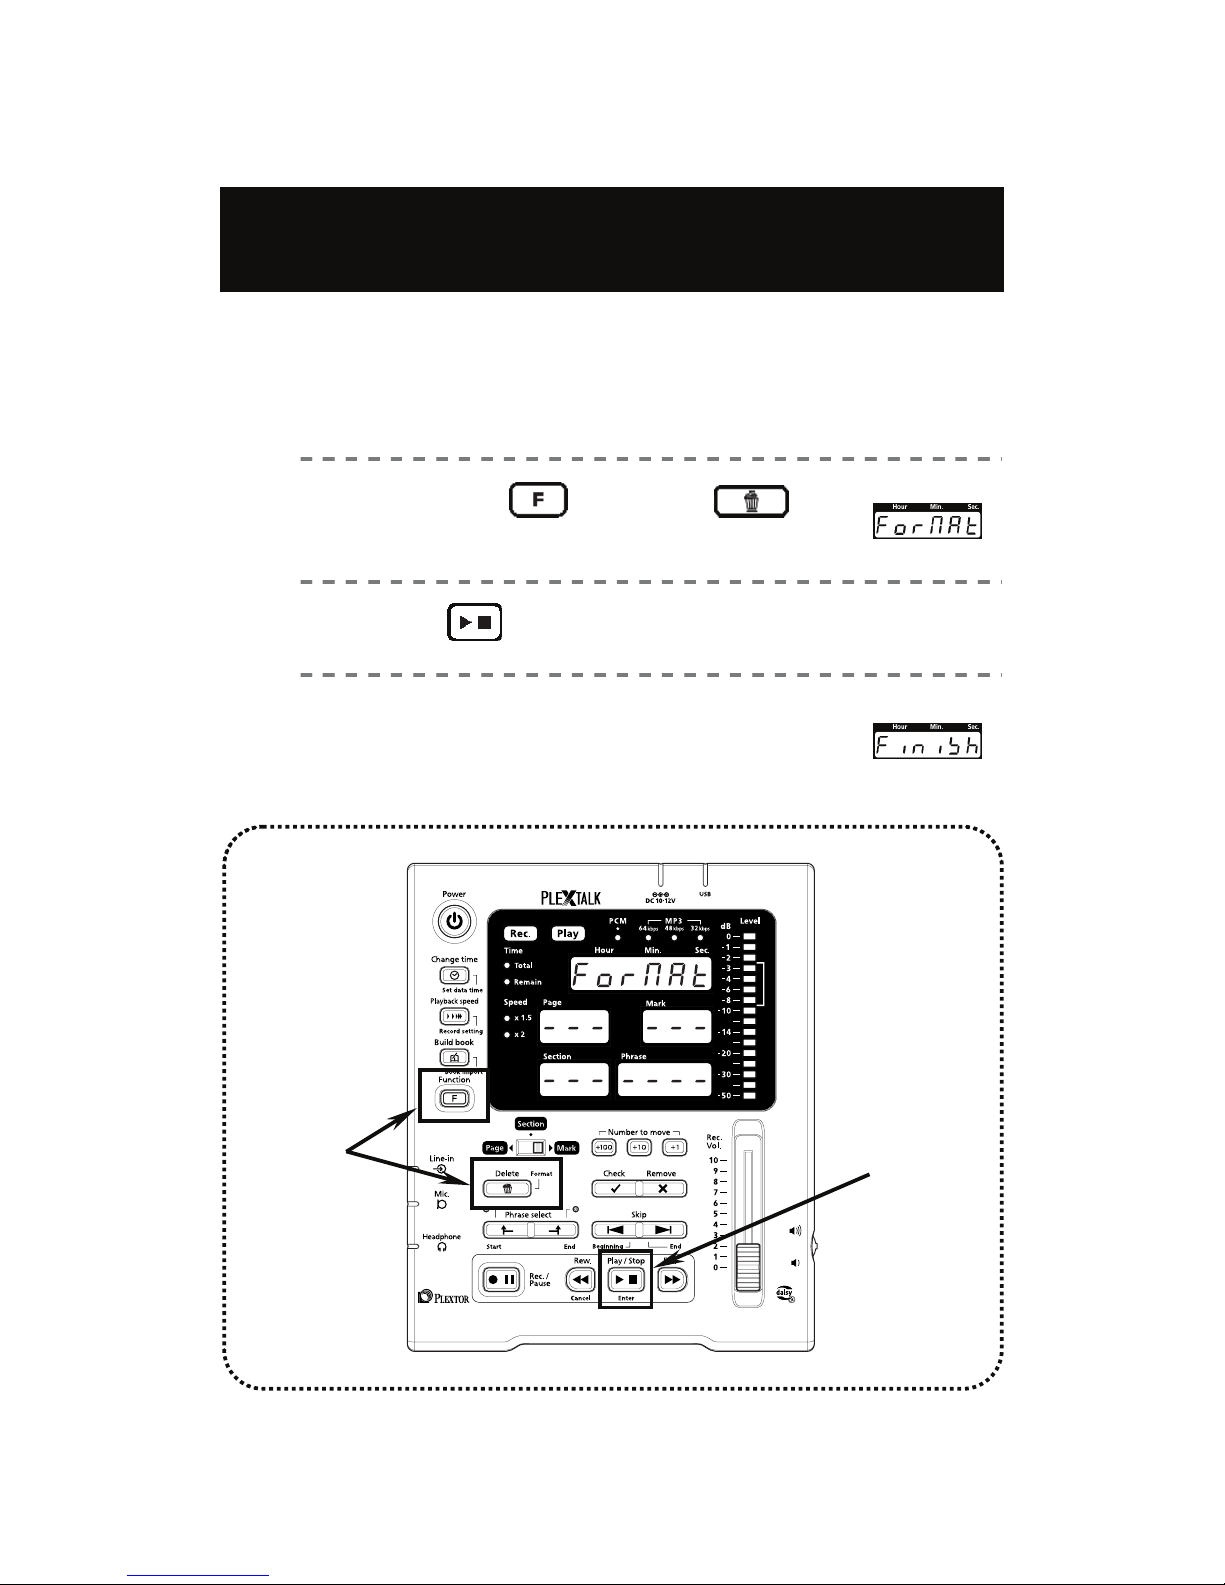
Deleting all contents stored in the CF card
(Format)
When recording with this product, information files, etc. besides the audio
files are created. Please reformat the CF card when you want to delete all
files and information once stored in the card for the purpose of producing a
new book or a project.
1)
Hold down and press .
" ForMAt " is displayed and flashes in the time panel
window on the display panel.
2)
Press to enter.
The display under the flashes “ForMAt” flashes.
3)
Confirm that “FiniSh” is displayed in
the time panel window.
Deleting all data is completed.
1)
2)
F
unction
Format
Play/Stop
Ente
r
Page 57
57
4
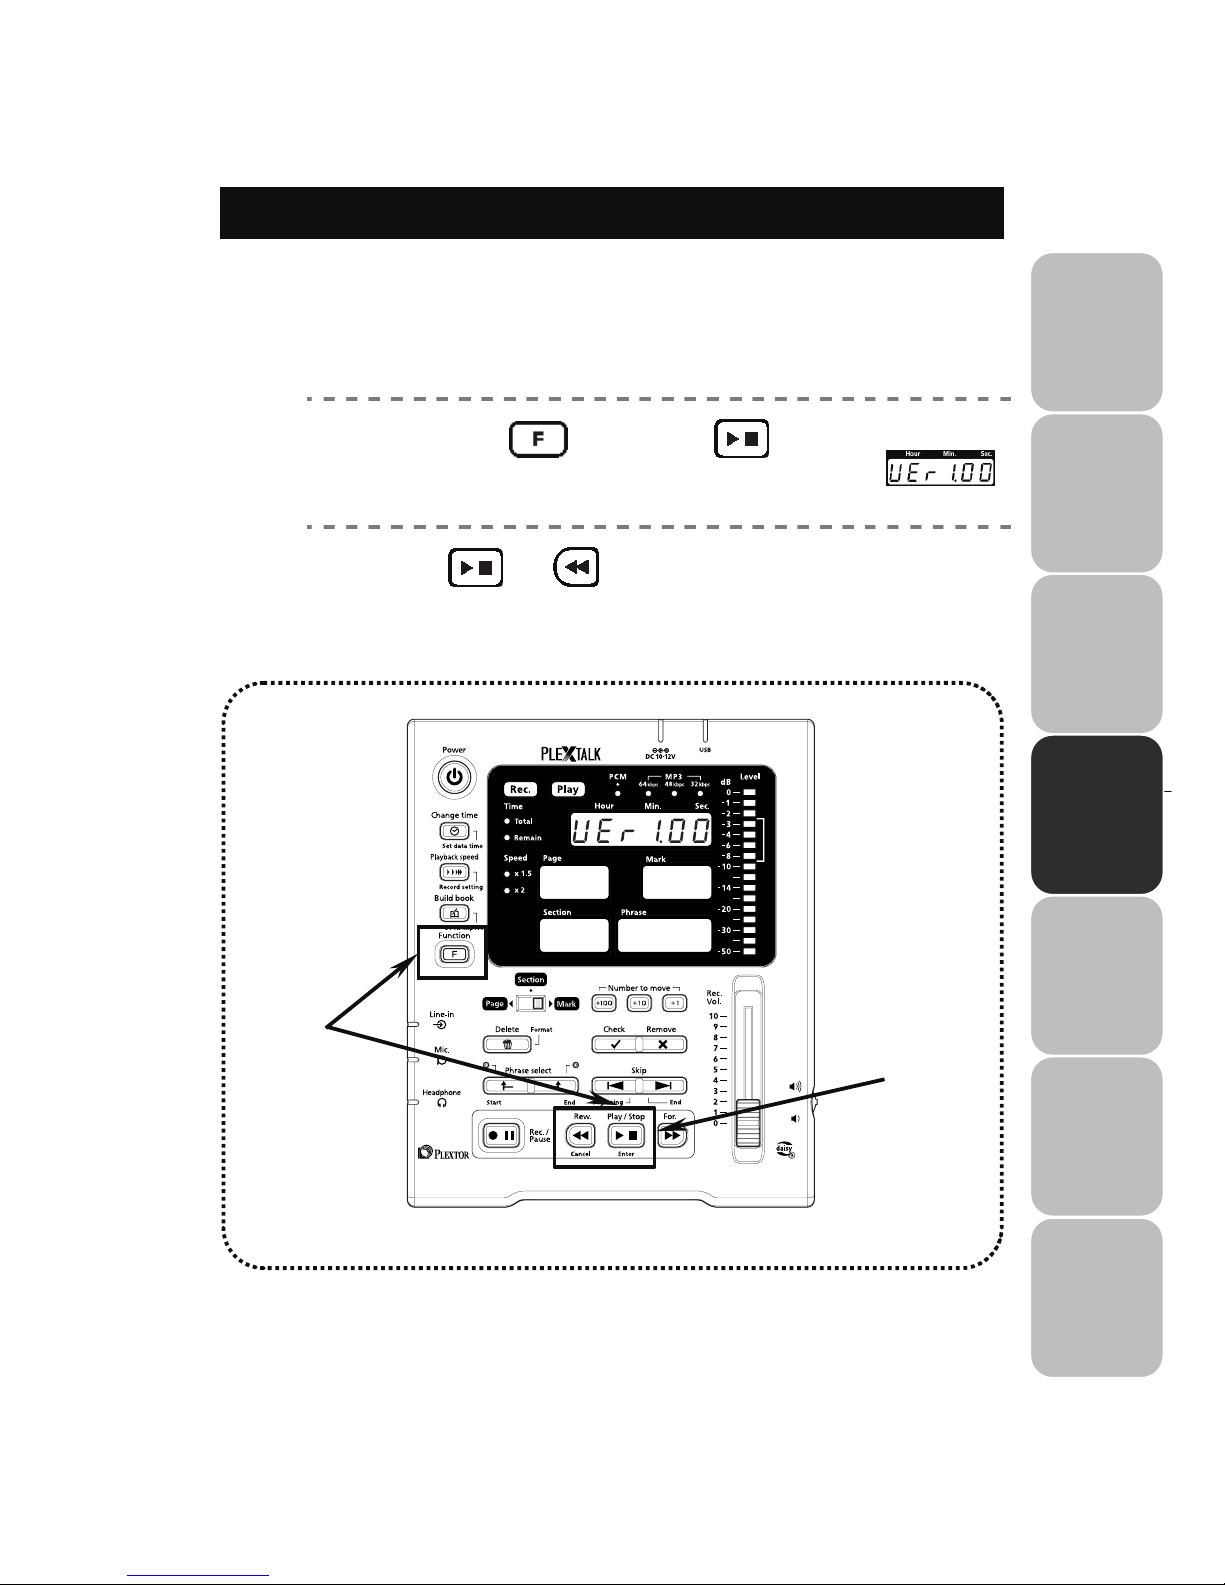
Checking DR-1 version
When you call our local dealer to inquire our products or the trouble etc., most
likely we may be ask you the product version. Please confirm the version of
DR-1 by following below steps.
1)
Hold down and press .
Product version is displayed in the time panel window.
Please check the number following “Ver”.
2)
Press or .
Go back to the original display.
1)
2)
F
unction
Play/Stop
Play/Stop
Ente
r
Rew.
Cancel
Page 58
58
Transferring data to a PC
There are three ways to transfer data to a PC.
1. After connecting DR-1 and a PC with the USB cable, read data from the CF
card into the PC.
2. Remove the CF card from DR-1 and read the data from the CF card into the
PC using the “card reader.”
3. Remove the CF card from DR-1 and read the data from the CF card into the
PC using the “PC card adaptor for CF card.”
Details of the above methods are explained in the following. Also, a list of files
that is transferred (“Contents list in a CF card”) and how to transfer data to PRS
(“Data transferring to PRS”) are explained in the following.
Connecting DR-1 to a PC
By connecting DR-1 to a PC with the USB cable, DR-1 enables you to use as
an external card drive of the PC, and the data stored in the CF card can be
read and written from the PC.
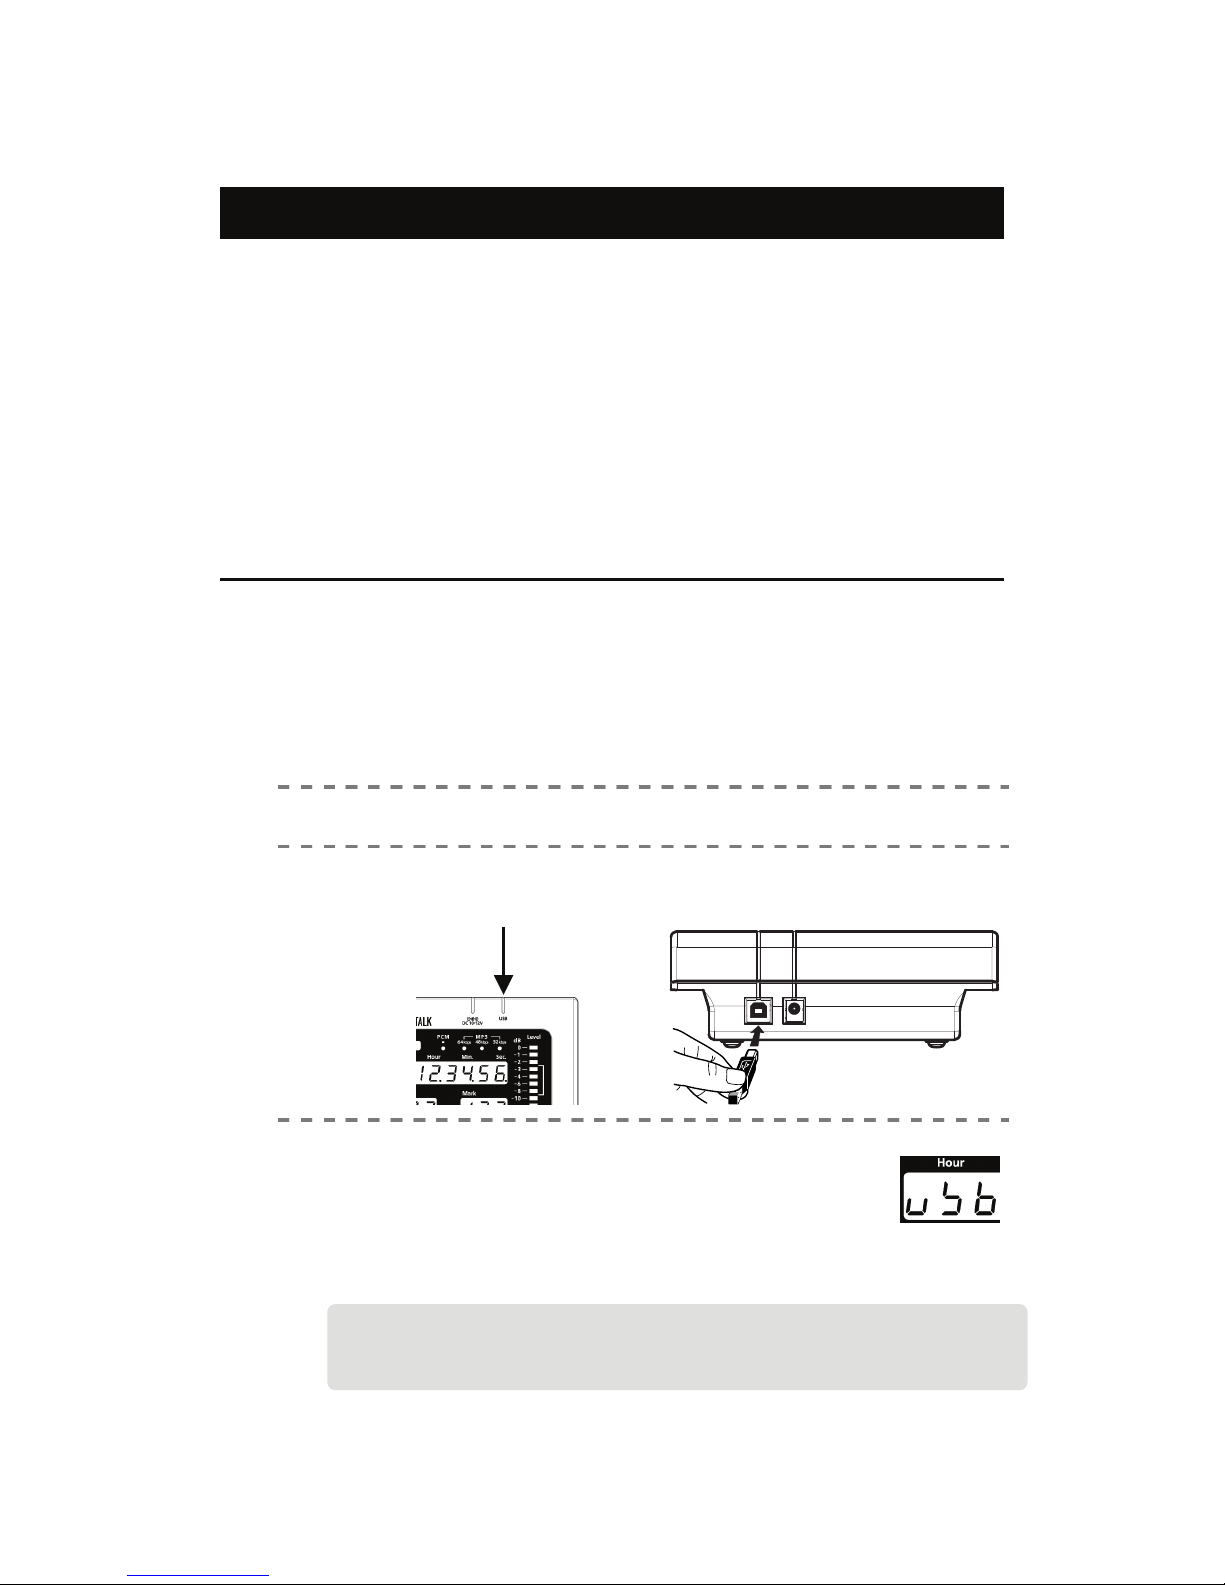
1) Connecting to a PC
1
Turn on your PC and DR-1.
Connect your PC and DR-1 with the USB cable.
2
3
DR-1 is recognized on the PC.
It takes a while until the recognition of DR-1.
" uSb " is displayed in the time panel window on the display
panel.
When the PC accesses the CF card, the recording lamp lights
up.
If the CF card has not been inserted in DR-1, it is not recognized to the PC.
The USB cable is an optional and is available for purchase.
The USB cable that can be used for the USB connection is USB1.1.
Page 59
59
4
2) Disconnecting from the PC
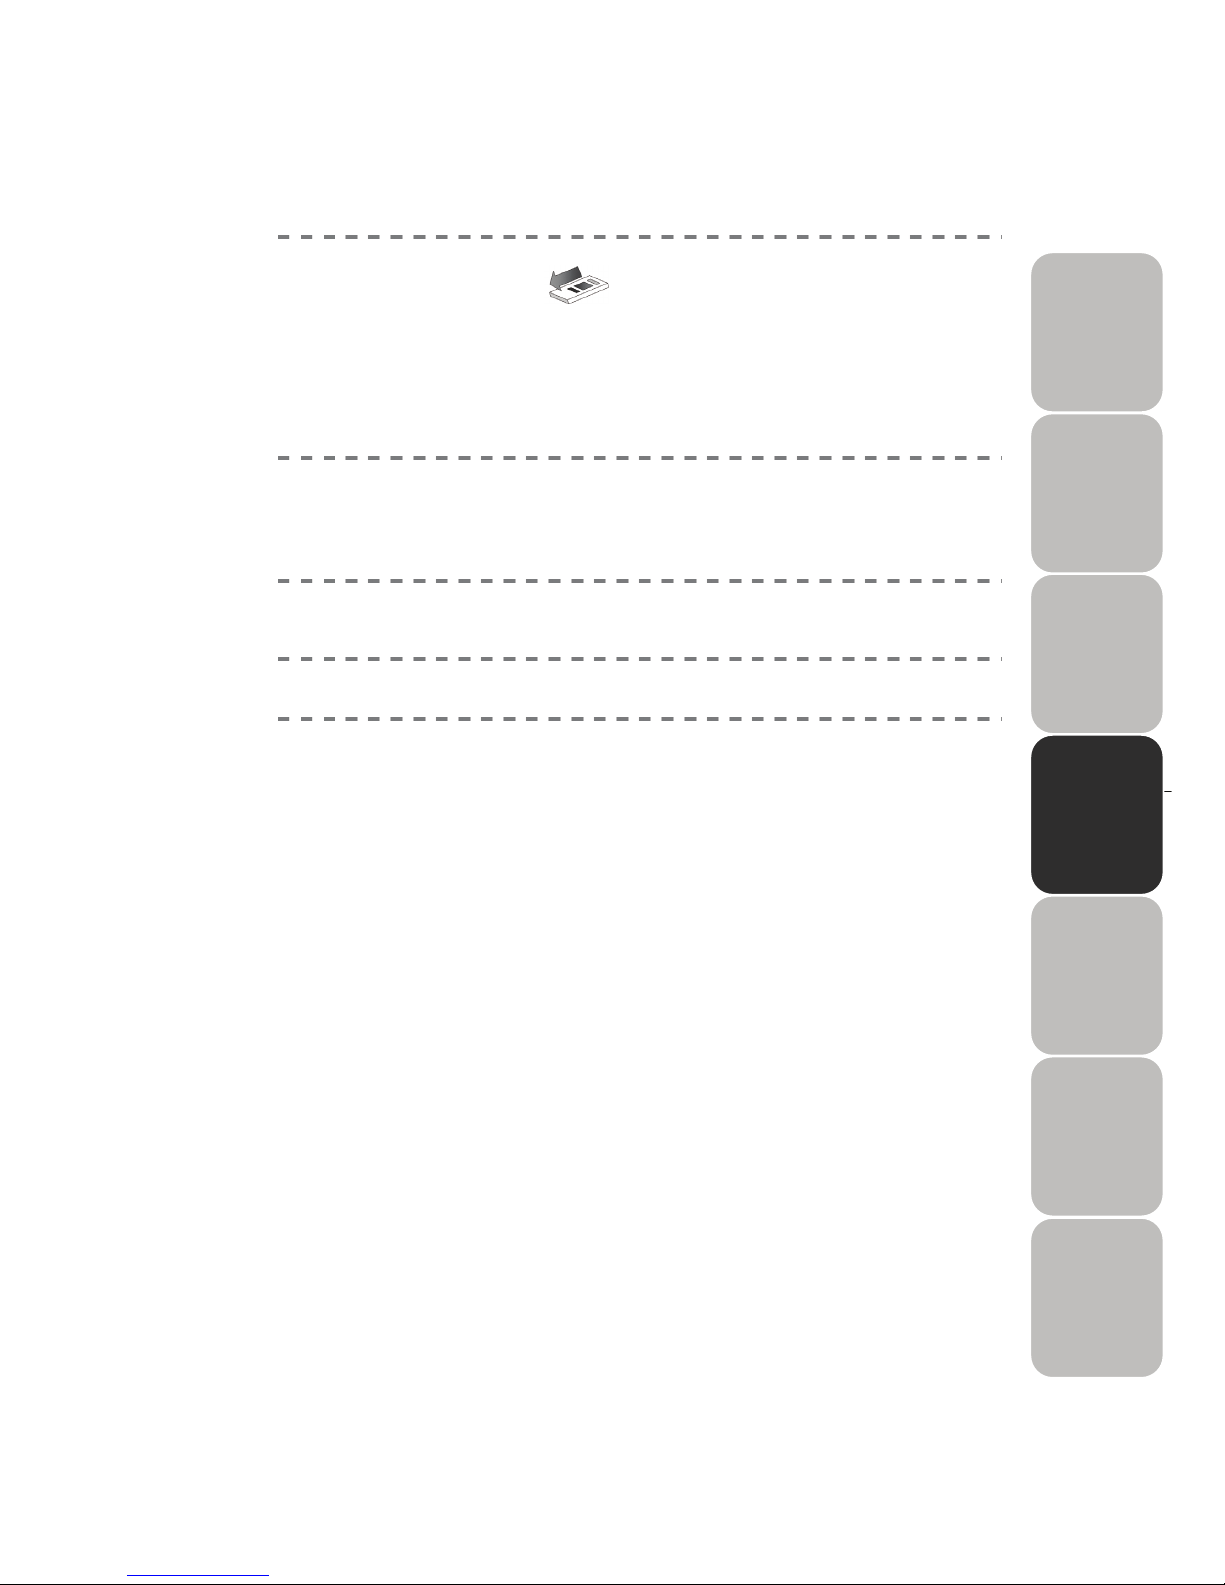
1
Left click on an icon (*1) located on the task
bar on the right lower corner on the PC monitor.
The task bar may be hidden, so please click on arrow says, “Display hidden
indicators” to display all hidden icons to locate the above shown icon.
(*1) Left-click on the icon saying “Safety removal of hardware”, and then a
dialog box pops up on the icon.
2
After first clicking, a dialog balloon pops up instead.
You will see a message in the dialog balloon such as “Safely remove (stop)
USB mass-storage system device – Drive X:.” [In the Drive X], the drive
name that is most suitable to your computer environment is displayed.]
3
Click on “OK” or “X” button to close the dialog balloon.
“Hardware removal” dialog balloon is closed.
4
Turn OFF the power of DR-1.
5
Confirm the power is off and remove the USB cable.
Page 60
60
Connecting a card reader to a PC
The card reader by the USB connection is explained here.
1) Connecting the card reader
1
Insert a CF card into the card reader.
2
Connect the card reader to your PC.
The card reader is recognized as the USB mass-storage system device.
2) Disconnecting the card reader
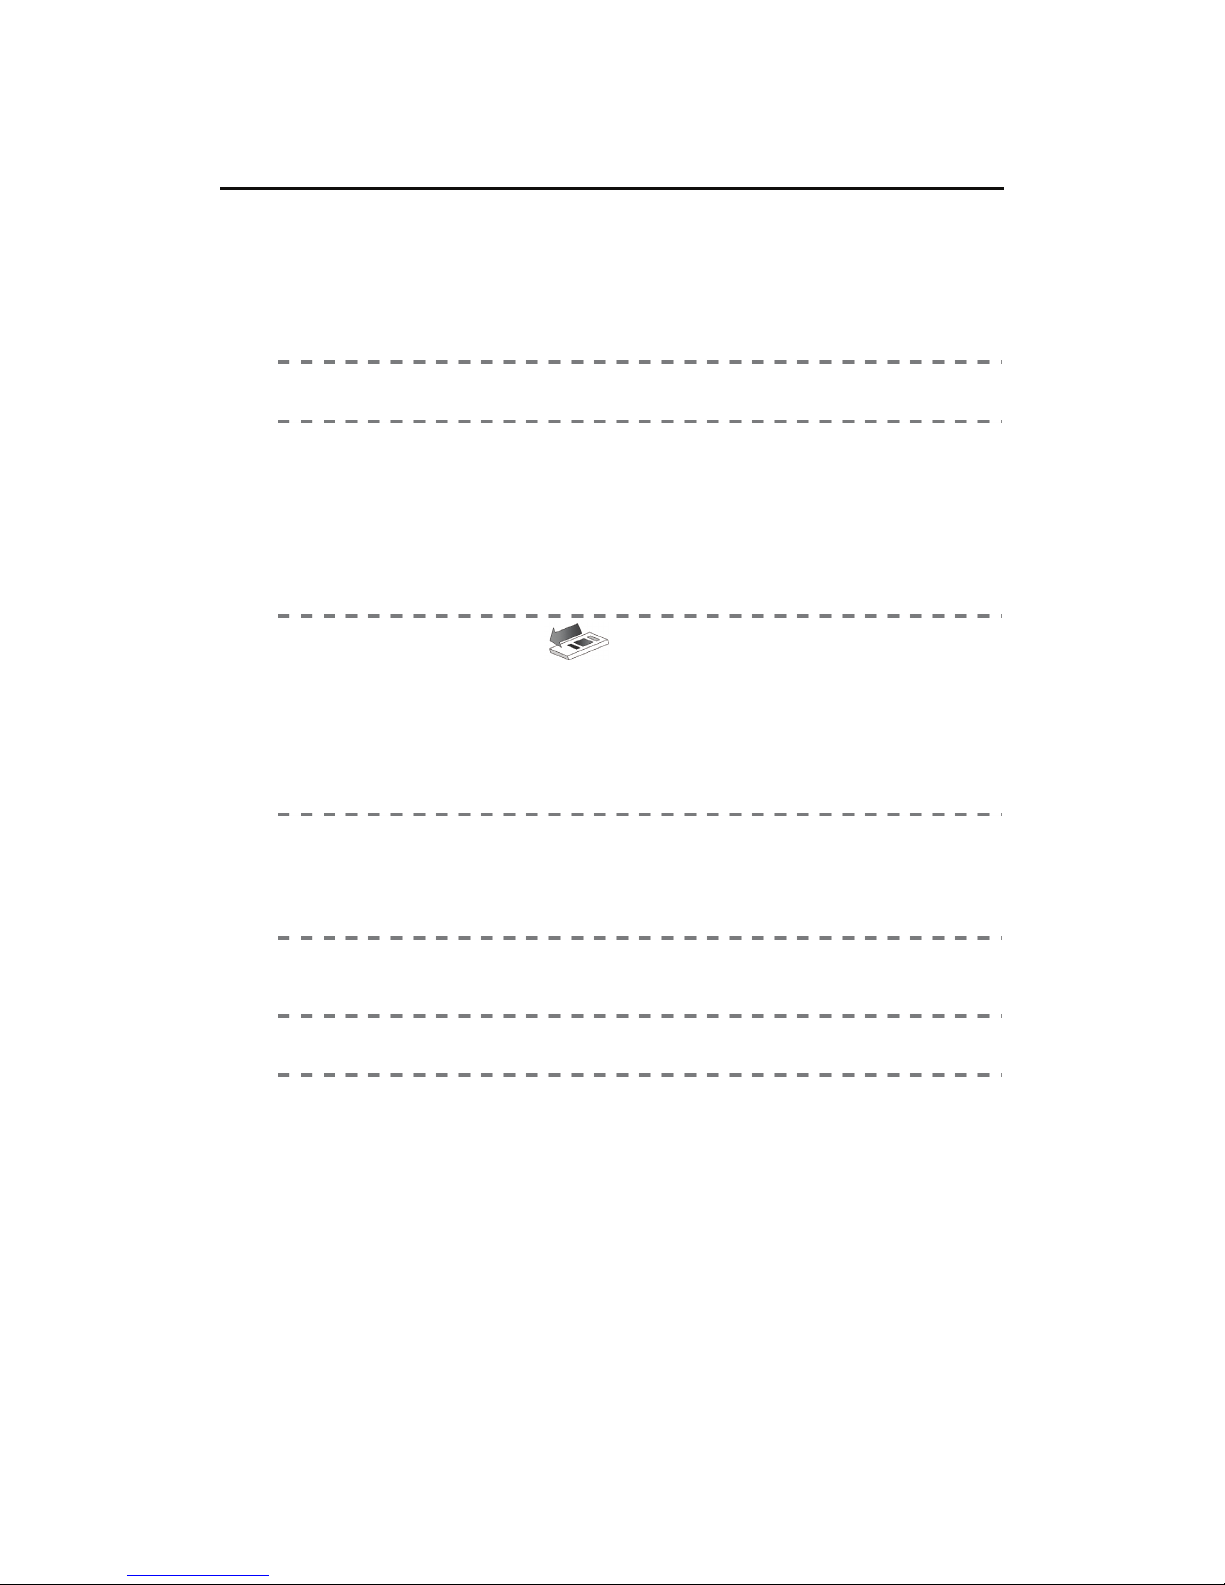
1
Left click on an icon (*1) located on the task
bar on the right lower corner on the PC monitor.
The task bar may be hidden, so please click on arrow says “Display hidden
indicators ” to display all hidden icons to locate the above shown icon.
(*1) Left-click on the icon saying “Safety removal of hardware”, and then the
dialog box pos up on the icon.
2
After first clicking, a dialog balloon pops up instead.
You will see a message in the dialog balloon such as “Safely remove (stop)
USB mass-storage system device – Drive X:.” [In the Drive X], the drive
name that is most suitable to your computer environment is displayed.]
3
Click on “OK” or “X” button to close the dialog balloon.
“Hardware removal” dialog balloon is closed.
4
Remove the card reader from your PC.
5
Remove the CF card from the card reader.
Page 61
61
4
Connecting a PC card adaptor for CF card to a PC
1) Connecting the PC card adaptor for CF card
1
Insert the CF card into the PC card adaptor for CF
card.
2
Insert the PC card adaptor for CF card into your PC.
2) Disconnecting the PC card adaptor for the CF card
1
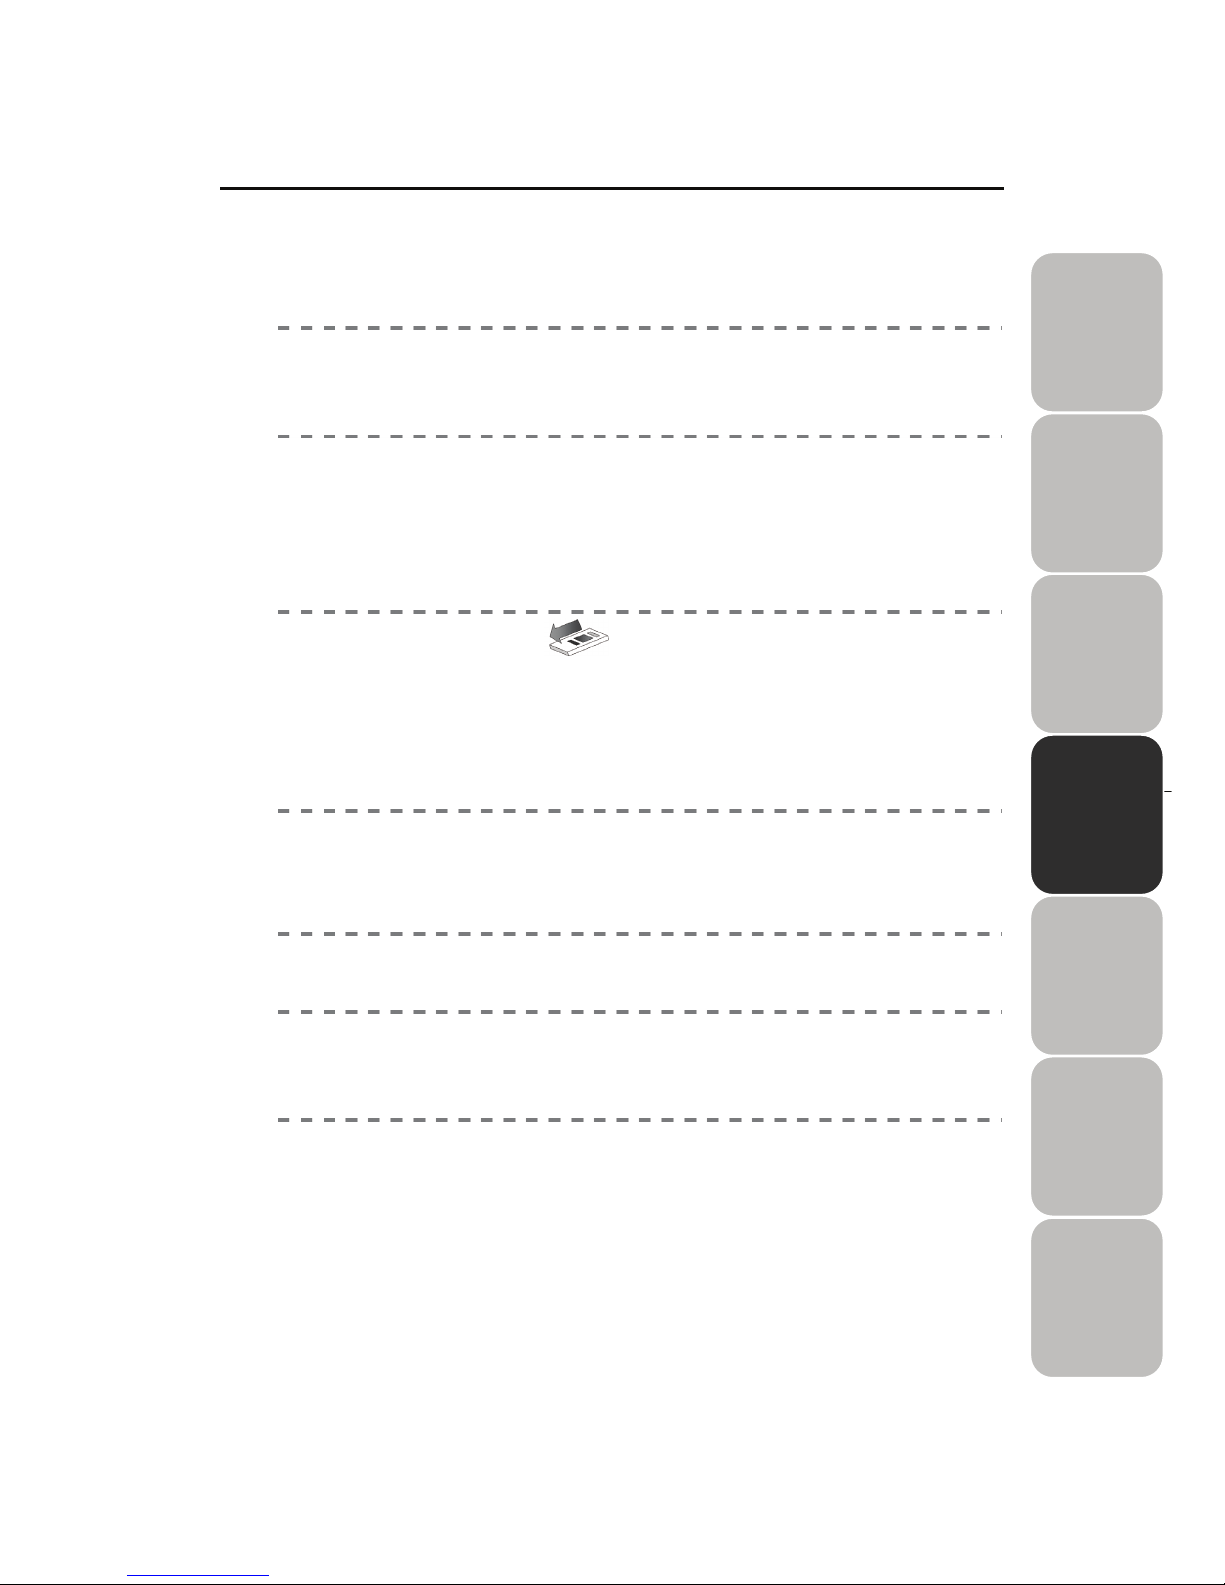
Left click on an icon (*1) located on the task
bar on the right lower corner on the PC monitor.
The task bar may be hidden, so please click on arrow says “Display hidden
indicators ” to display all hidden icons to locate the above shown icon.
(*1) Left-click on the icon saying “Safety removal of hardware”, and
then a dialog box appears right above the icon.
2
After first clicking, a dialog balloon appears instead.
You will see a message in the dialog balloon such as “Safely remove (stop)
PCMCIA IDE/ATAPI Controllers – Drive X:.” [In the Drive X], the drive
name that is most suitable to your computer environment is displayed.]
3
Click on “OK” or “X” button to close the dialog balloon.
“Hardware removal” dialog balloon is closed.
4
Remove the PC card adaptor for CF card from your
PC.
5
Remove the CF card from the PC card adaptor for CF
card.
Page 62
62
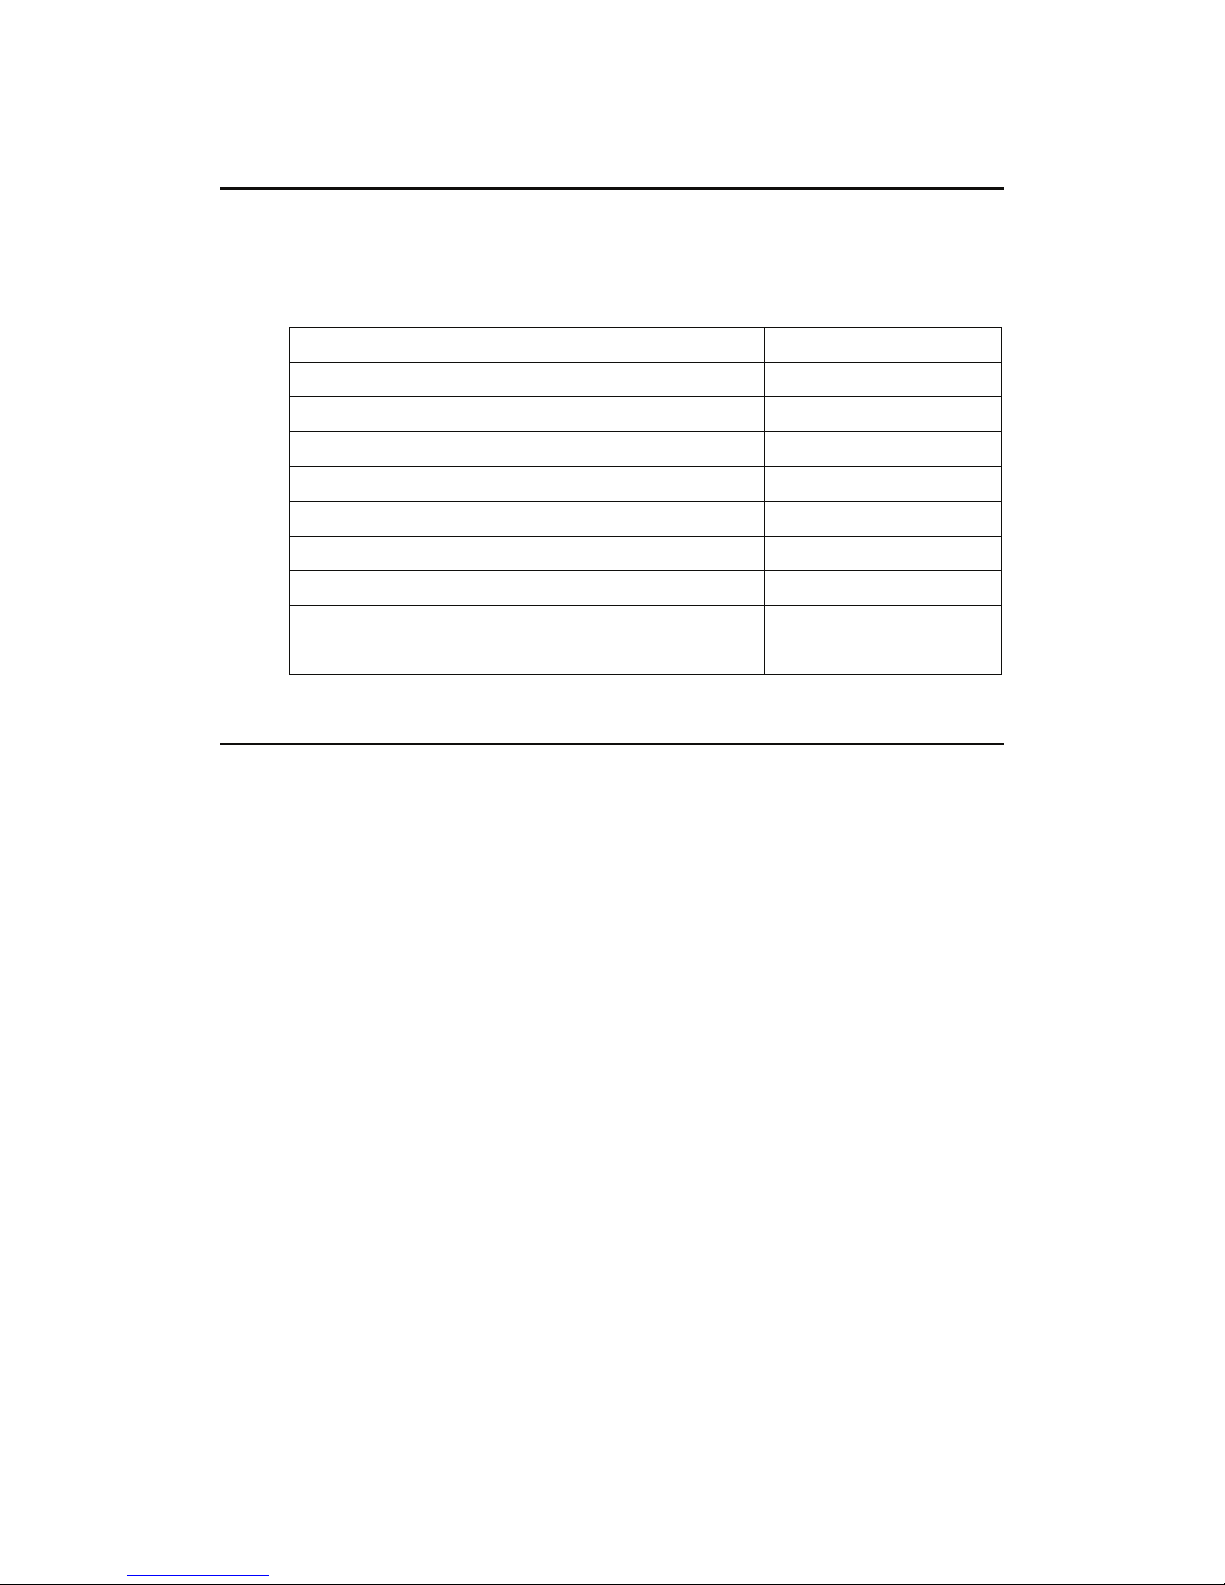
Contents list in a CF card
The following is a list of files that are created in the CF card while being
recorded by DR-1.
PTRInfo.html Plextalk project file
Discinfo.html (after Build Book) DAISY file
Bookdir0 Folder
Ncc.imdn Plextalk project file
Ncc.html (after Build Book) DAISY file
ImdPhrInfo.imph Plextalk project file
ImdTxtTabl.imtt Plextalk project file
*.wav, *.mp3 Audio files
*.smil
(after Build Book)
DAISY files
Data transferring to PRS
When performing a DAISY editing using PRS after recording completion by
DR-1, data is transferred as it is without doing build book.
Opening the “Ncc.imdn” file in the Bookdir0 folder using PRS enables you to
perform the DAISY editing.
However, please do build book and the DAISY import when you put the
content of multiple cards together in one book with PRS.
Page 63
63
4
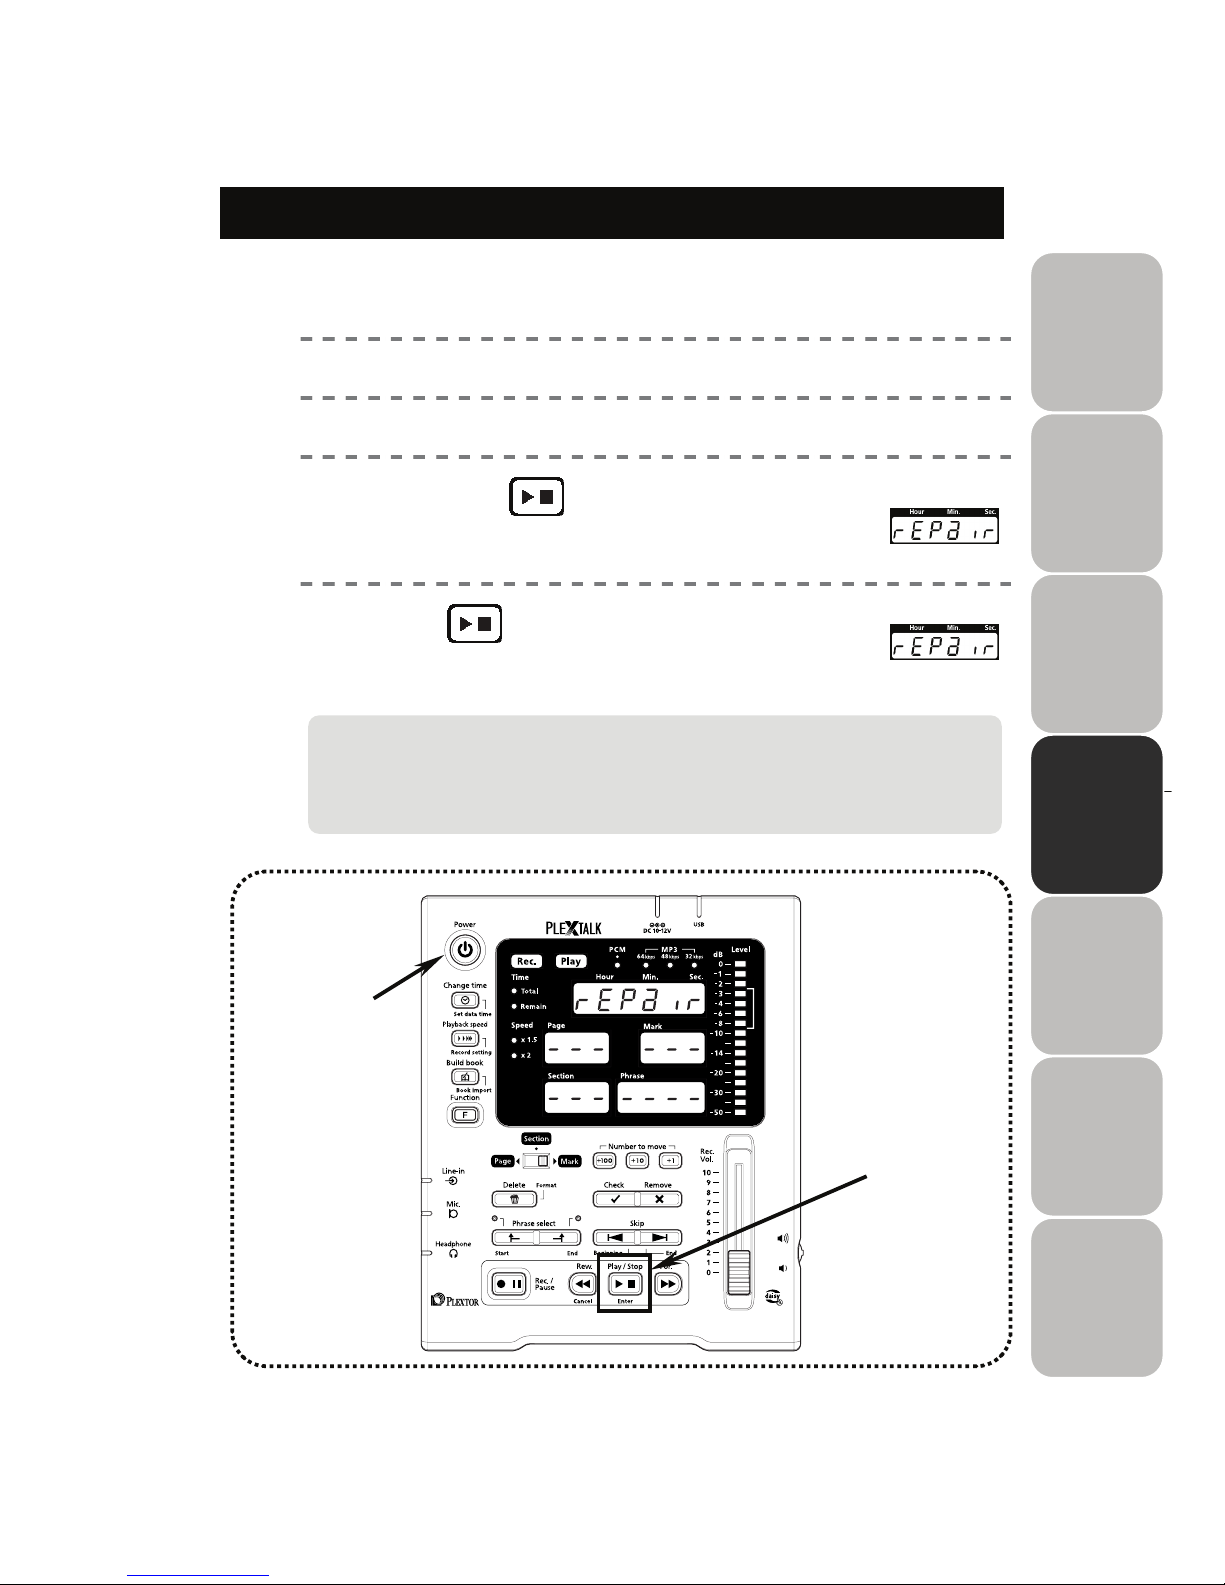
Restore PLEXTALK project file
When you cannot open your DAISY project (error 308, etc.), you can restore
PLEXTALK project file.
1)
Turn OFF the power.
2)
Insert the CF card into the card slot.
3)
Hold down and turn ON the power.
“rEPair” is displayed and flashes in the time panel window
on the display panel.
4)
Press .
Restoring of your DAISY project starts.
3)4)
1)3)
This function is restored based on backup information of PLEXTALK project
file automatically created when book is opened. The contents of the recording
and the editing work after the book has opened at the last are not restored.
When restoring was implemented, please confirm the book contents.
Play/Stop
Ente
r
Play/Stop
Enter
Page 64

64
MEMO
Page 65
65
5
Chapter 5
Main Specifications
Main specifications ················································66
Product specifications·····································
·
66
Audio characteristics·······································
·
67
Card drive specifications·································
·
67
Recommended CF cards & microphones············
·
68
Recommended CF cards································
·
68
Recommended microphones ·························
·
68
Page 66
66
Main specifications
Product specifications
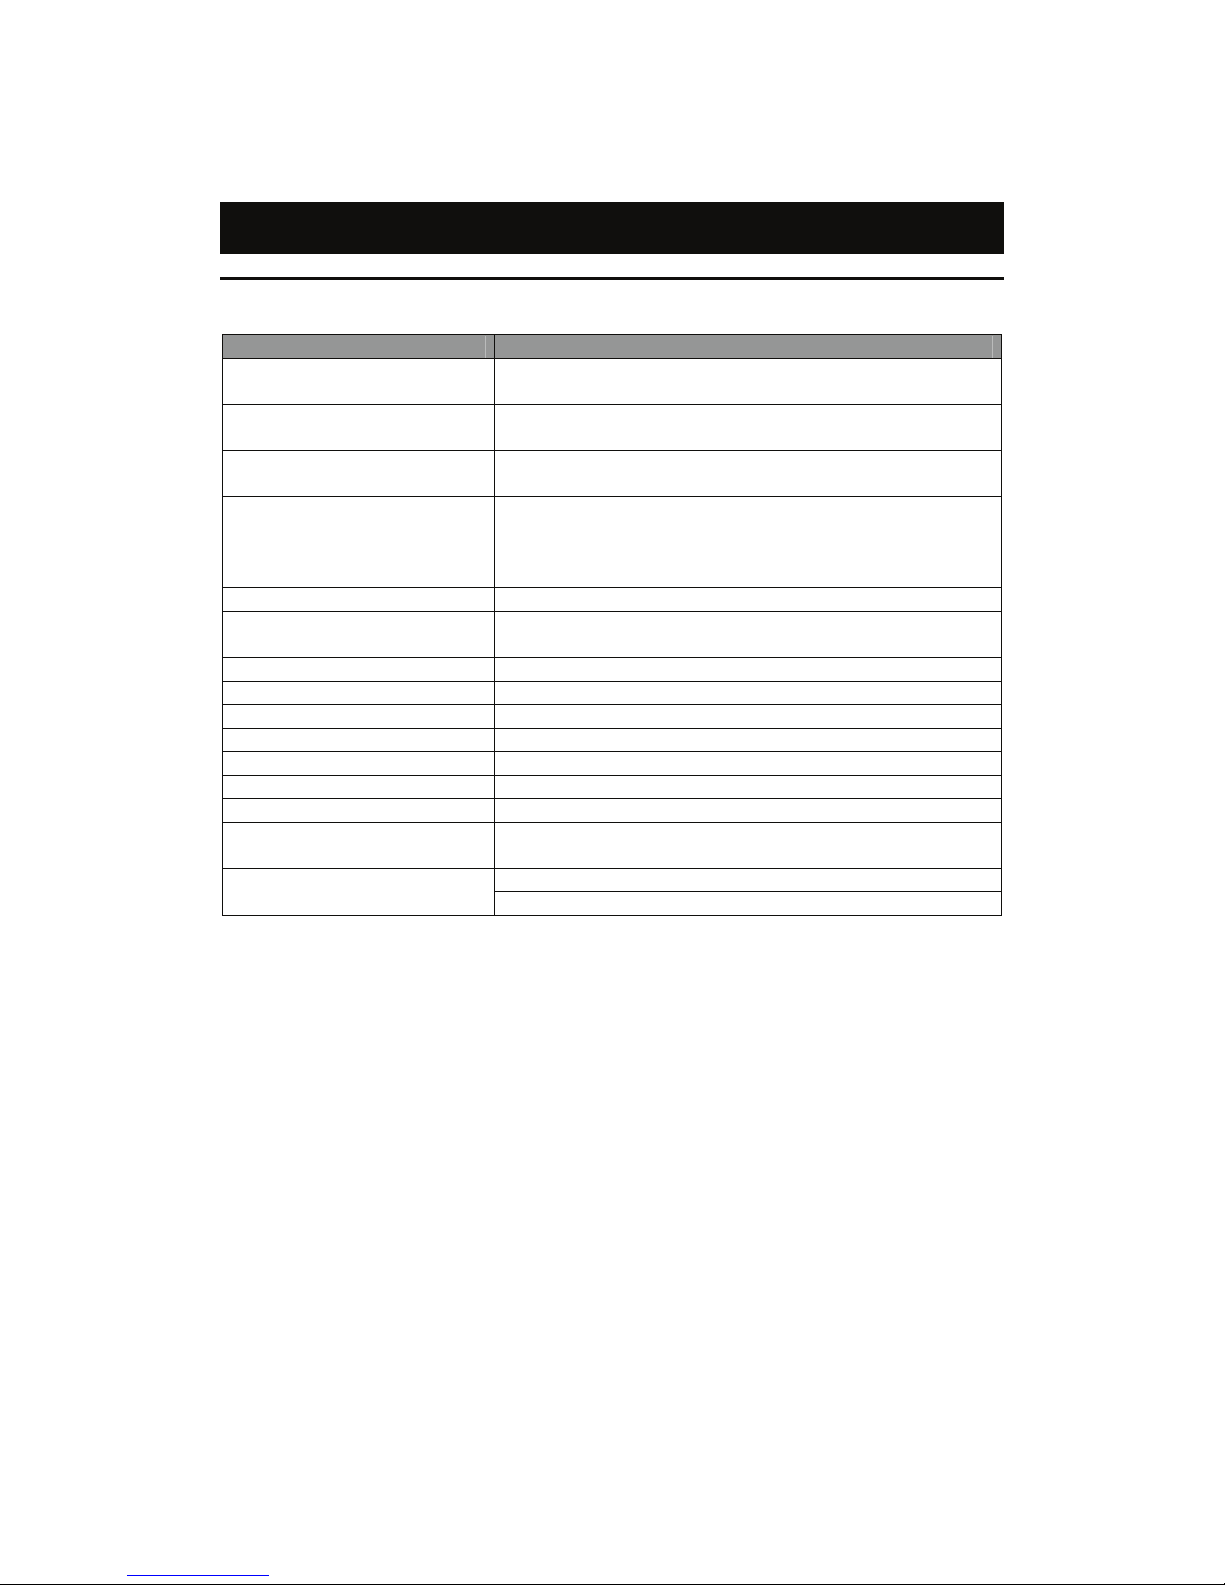
Item Specifications
Recording Media CF card
SD card (via AC adaptor)
Playable sound quality
(DAISY standard book)
MP3, PCM
Recording method DAISY2.02 format
PLEXTALK Project format
Recording sound quality
(DAISY format)
PCM 22.05kHz 16bits Mono
MP3 64kbps Mono
MP3 48kbps Mono
MP3 32kbps Mono
Audio output Headphone output terminal (Stereo)
Audio input Line input connector (Mono)
External microphone connector (Stereo)
Externally connected terminal USB1.1
CF card slot Compact Flash Association card
Clock precision Approx. plus / minus 60 seconds per month
Power source AC adaptor, AC 100 to 240V 50 / 60Hz
Dimensions 173(W) x 210 (D) x 57 (H) mm
Weight Approx. 610g
Power consumption Max. 20W (at AC adaptor 100V)
Operating temperature 5 to 40 C degree, 40 to 104 F degree
(
Without condensation)
Max page number: 9999 pages DAISY editing function
Max section number: 9999 sections
Page 67
67
5
Audio characteristics
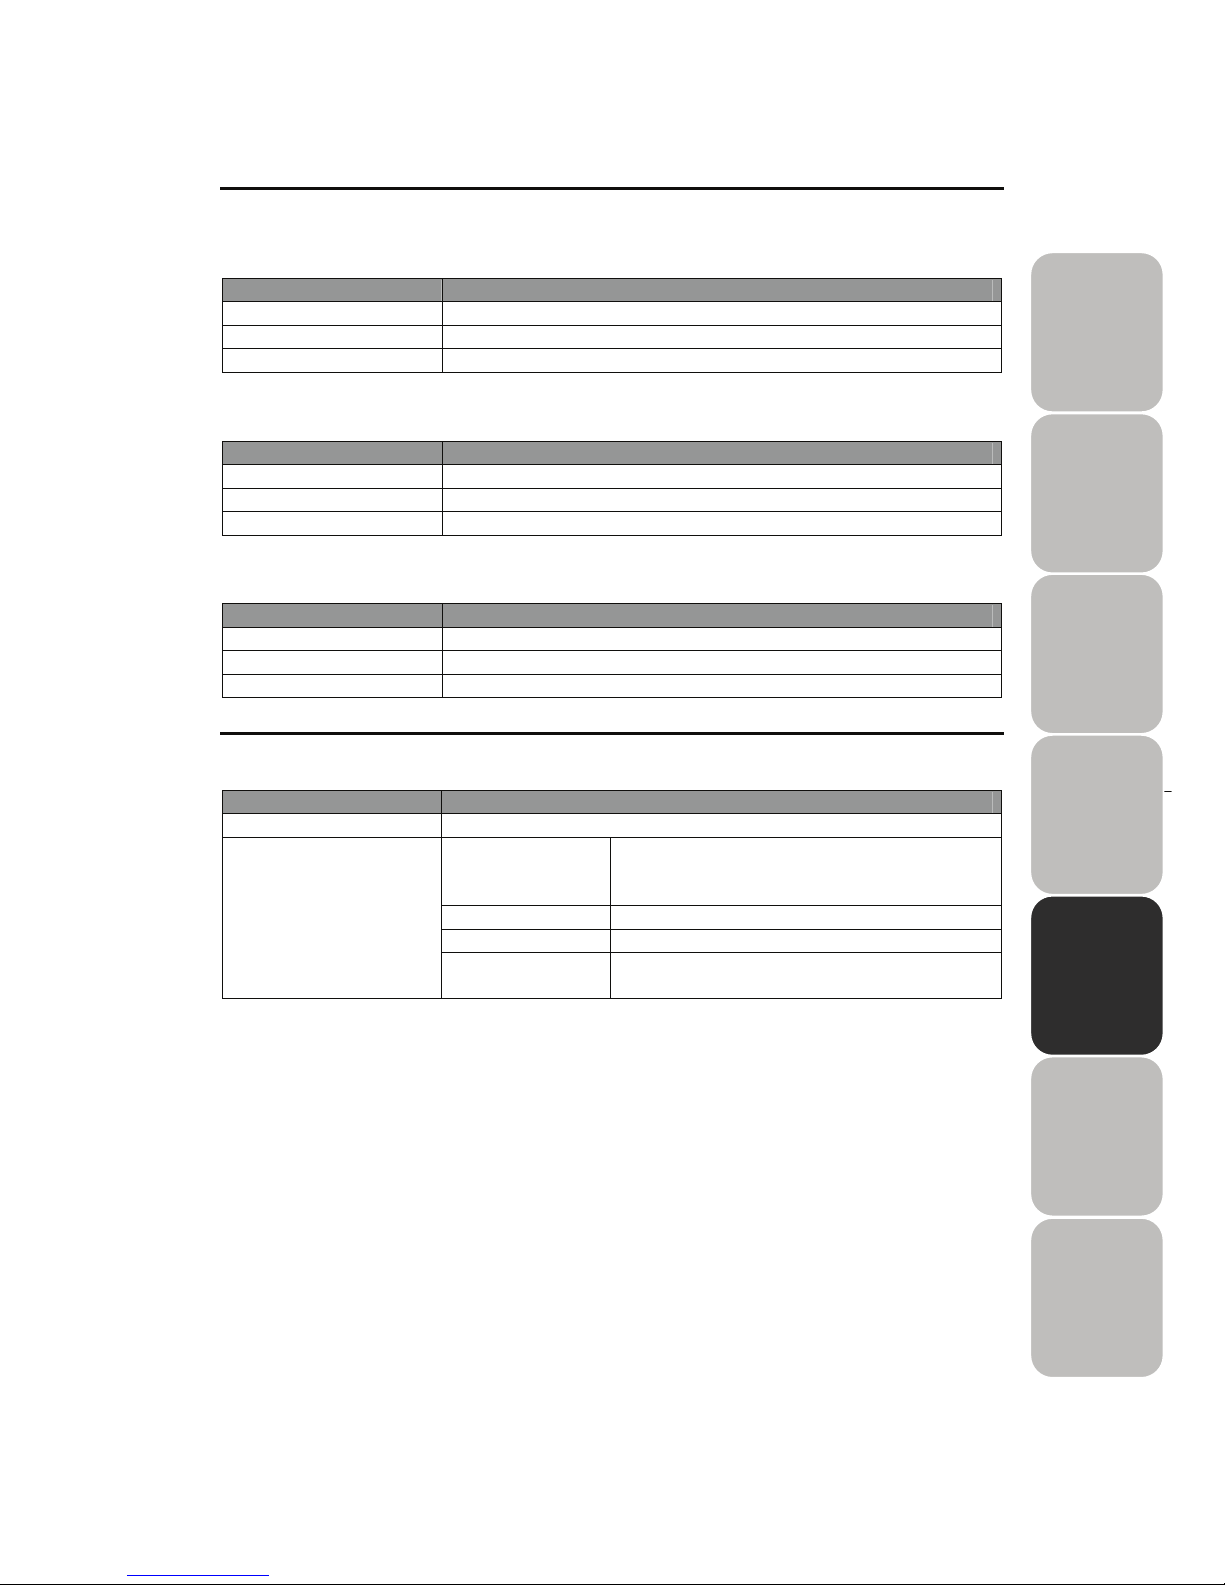
● Headphone output connector
Item Characteristics
Impedance adaptation 32k ohm unbalanced
Connector 3.5 mm diameter stereo mini connector
Output voltage 0.4Vrms(plus / minus 0.15Vrms)
●Line input connector
Item Characteristics
Input impedance 20k ohm unbalanced
Connector 3.5 mm diameter stereo mini connector
Input sensitivity - 11dBV or lower
●External microphone input connector (Not compatible with plug-in power)
Item Characteristics
Input impedance 2.2k ohm unbalanced
Connector 3.5 mm diameter stereo mini connector
Input sensitivity - 55dBV
Card drive specifications
Item Specifications
Card Slot Compact Flash Association card, Type
OS Windows 2000
XP (32 bit)
Vista (32 bit)
CPU Celeron 400MHz or larger
Memory 128MB or lager
Recommended
operation environment
Interface USB1.1
Connector:TypeB
Page 68
68
Recommended CF cards & microphones
Caution:
Operation check
Products on the market are subject to change without notice due to the specification
change. Therefore, there are cases that the commercial products may not become
available to use with our products. From such circumstances, we cannot guarantee the
products that have already checked the operation before shipment.
Compatibility with other manufacturers’ product
The product may not be operated correctly due to the compatibility of DR-1 and products
manufactured by other companies. We cannot guarantee or correspond to defect
caused by the compatibility with the other companies products including
operation-checked products. Please acknowledge it beforehand.
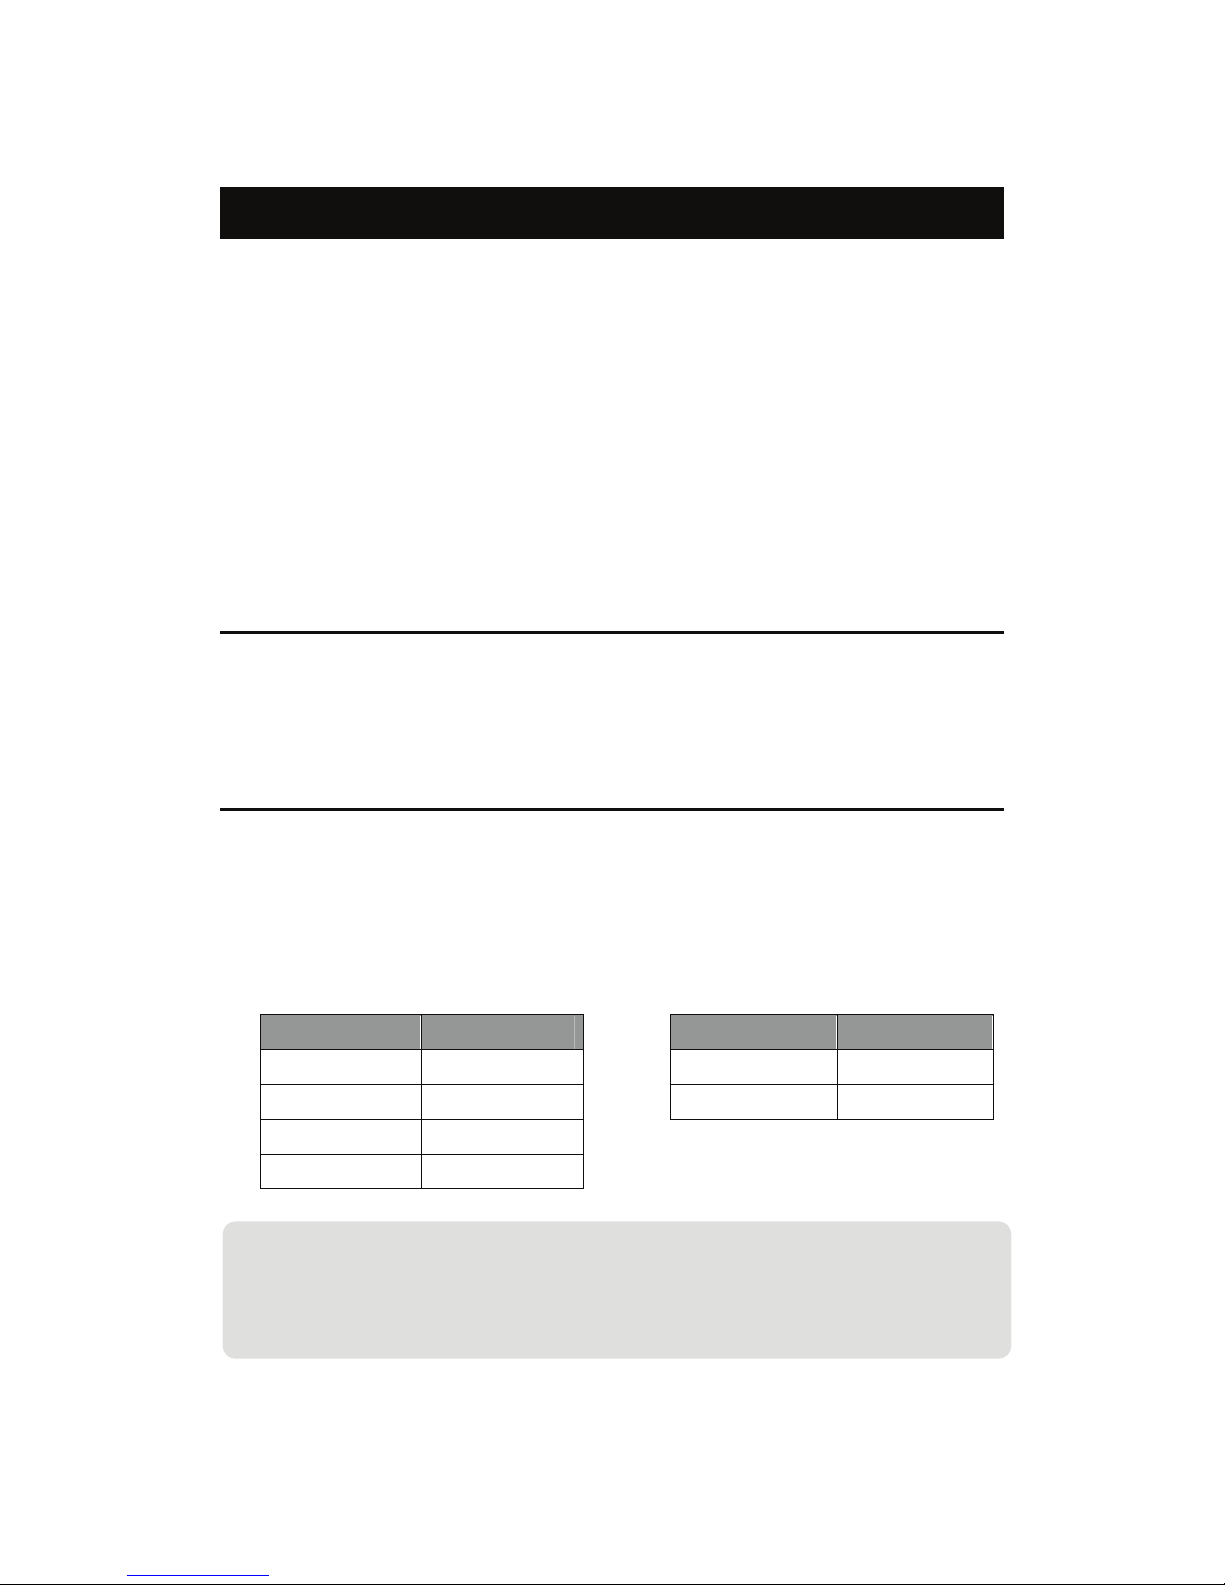
Recommended CF cards
Please confirm latest information in our webpage or inquire our customer support
center when purchasing it.
PLEXTALK webpage: http://www.plextalk.com/in/index.html
Recommended microphones
With DR-1, you can use either dynamic or condenser microphones that are
commercially available. (Compatible only models with power supply, not
compatible with the plug-in power)
Information as of April 2007
Dynamic microphone
Manufacturer Model number
audio-technica ATH-30COM
SHURE SM58
SONY F-V420
SONY F-V620
Condenser microphone
Manufacturer Model number
audio-technica AT9440
audio-technica AT9820X
CAUTION!
■ When you use a condenser microphone, it must have a power supply.
Please read the microphone manual carefully before use.
Page 69
69
6
Chapter 6
Troubleshooting
When DR-1 does not operate well························70
When an error is displayed ··································
·
73
Page 70
70
When DR-1 does not operate well
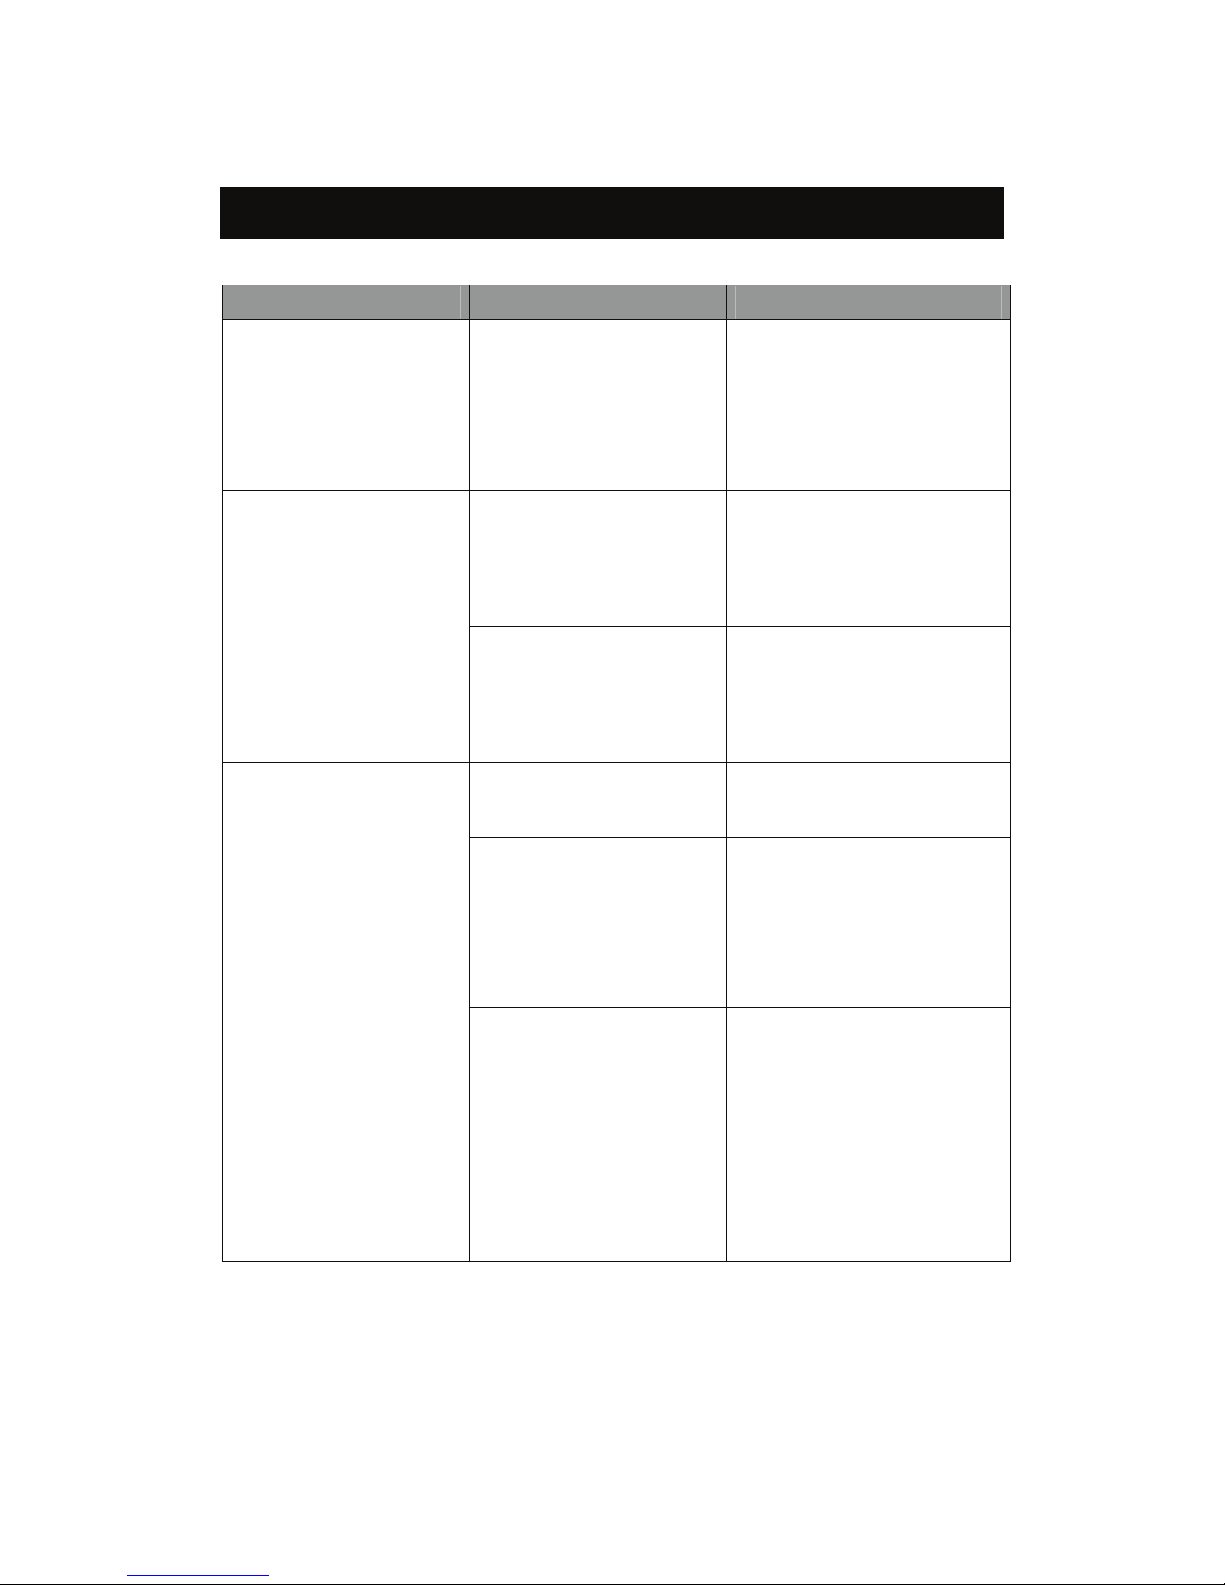
Symptoms Possible cause Solution
You turn on the Power
Switch, but the power
does not come on.
Loose or unconnected
power cord or AC
adaptor. Connector is
not plugged in firmly.
Firmly reinsert the mains
power cable into the outlet
and the AC adaptor and
ensure that the mains plug
is firmly inserted.
You are tying to insert
the CF card of TypeⅡ
that cannot be used with
DR-1.
CF card of TypeⅡcannot
be used. Use Type Ⅰ
card.
CF card cannot be
inserted into DR-1.
The direction that inserts
the CF card is wrong.
Reinsert the CF card
referring to “How to insert a
CF card (p.19) ”of this
guide.
CF card is not inserted. Insert the CF card into the
card slot.
The CF card that cannot
record/playback with
DR-1 is used.
Before use, check the
usable CF card with DR-1
in our webpage
http://www.plextalk.com
/in/index.html.
Recording and
playback cannot be
done.
CF card is not formatted
before use.
Format your CF card
before recording/ playback.
Please note that all the
recorded data is deleted
when the CF card is
formatted.
Page 71
71
6
You thought you
pressed the recording
key but actually DR-1
was in a “Pause” state.
Check with the recording
lamp. The lamp is on during
“Recording”, and the lamp
flashes during “Pause.”
Recording cannot be
done.
Remaining amount
time of the CF card was
very little.
Check the remaining time
of your CF card referring
“Displaying the total time &
remaining time (p.48)” of
this guide. When the
remaining time is very little,
please insert with a new CF
card.
The microphone
connector is plugged
into a wrong terminal.
Check the terminal for
connection referring to
“Plug in a microphone
(p.21)” in this guide. Then
correctly plug in the
microphone connector to
the correct terminal.
The microphone that is
not compatible with
DR-1 is used.
Use the usable microphone
with DR-1 referring
to ”Recommended
microphones (p.68)” in this
guide.
The recording was
done when the volume
of “Volume shuttle" was
positioned to Zero.
Record by an appropriate
recording volume referring
to "How to record? (p.28)"
in this guide.
The meter indicates the
recording level does
not go up during
recording.
Or, when playback the
recorded audio file, you
hear no sound or very
small sound.
"Volume shuttle" on the
right side of DR-1 is a
position of volume 0.
Playback by an appropriate
volume referring to "Adjust
audio volume of playback
(p.32) " in this guide.
Page 72
72
You cannot navigate to
the position where you
want to playback.
Because punch-in
recording or deleting
specifies the range, the
position where you
want to playback is
outside the range.
Cancel the specified range.
"E." is displayed in the
time, section, mark,
and phrase display
panel.
Exceeding maximum
displayable digits.
It is not a malfunction.
When the display of time,
section, mark, and phrase
exceeds the maximum
displayable digits, "E." is
displayed.
You cannot
cancel ”iMPort” display.
Inserted the CF card
that contains only
DAISY.
When the CF card that
contains only DAISY is
inserted, you cannot
proceed the next work
without importing.
Always import step first.
The reaction of the
phrase navigation and
the playback is slow.
The number of phrases
included in one section
is too many.
It is not a malfunction.
When the number of
phrases included in one
section exceeds several
thousand, the reaction of
the navigation operation,
etc. becomes slow. Thus,
please split the section at a
suitable position.
Page 73
73
6
When an error is displayed
The error message is displayed in the time panel; the error number is displayed in
the mark display panel.
Error message /
Error number
Meaning of error
message
Solution
“CARD FULL” / “101” Empty space of the
card is insufficient.
Continue recording with
another card. The card with
which empty space is filled
can delete the content by all
Deletions (format). [*1]
“DAISY FULL / “301” Capacity of
PLEXTALK project
file is too large.
Maximum capacity of
PLEXTALK project file that
can be handled by DR-1 is
exceeded. Please record
and edit it with PRS, etc. [*2]
“CARD ERR” / “103” The card cannot be
recognized.
It is a card that cannot be
recognized with DR-1. Please
do all deletion (format).
“PAGE FULL” / “302” The page number
exceeds the
maximum.
The page number is the
maximum. The book for the
page number to exceed 9999
cannot be opened with DR-1.
Moreover, the 9999th pages
or more cannot be set. [*3]
“COM ERR” /
“H01” or “H02”
An internal error is
occurring.
Turn off power, and plug in
the power supply adaptor
again.
“NO DAISY” / “306” DAISY that should be
imported does not
exist.
Change the CF card that
includes DAISY data.
“READ ERR” / “104” Failed to read in the
card.
Please reread the part where
the error occurred and
correct it. [*4]
Page 74
74
“WRITE ERR / “105” Failed to write in the
card.
Check whether the part
where the error has occurred
is correctly stored. When it
is not stored, reread and
correct it. [*4]
“NOPAGE” / “307” No specified page
number exits.
There is no specified page
number. Move specifying the
page in the back and forth,
and reconfirm the page.
The book created other than
DR-1; the page number might
be not consecutive.
“BOOK ERR” / “308” The content of
PLEXTALK project
file has some errors.
The problem occurs in the
content of PLEXTALK project
file or necessary audio file
has lost. When this error
occurs in the playback and
Build book, reread the part
where the error occurred to
correct it. In other cases,
restore PLEXTALK project
file. [*4]
“SOUND ERR” / “309” The audio file is other
than the supported
files by DR-1.
It is books of the audio form
not supported with DR-1.
This book cannot be
recorded and be edited with
DR-1.
“RANGE ERR” / “310” When the range is
selected, DR-1 does
not allow moving
outside the range.
Change the number specified
by number specified
navigation. Or, release the
selected range.
“REPAIR ERR” / “311” PLEXTALK project
file cannot be
restored.
Because the backup of
PLEXTALK project file does
not remain, the restoration is
impossible.
Page 75
75
6
“ERR” / “999” An unexpected error
occurred.
Reconfirm the operation
done immediately before the
error occurred. Especially,
when recording and editing,
confirm data is correctly
stored. When the data is
not stored, reread and correct
it. [*4]
Remarks
*1 Empty space of 30MB or more is necessary to record with DR-1.
(Necessary empty space increases along with the size of books.)
*2 PRS allows you to create a PLEXTALK project file that is larger than the
maximum capacity that DR-1 can handle. The size of PLEXTALK project
file that can be edited with DR-1 is up to 7MB.
*3 If the DAISY edit software is used, the page that exceeds 9999 might be
created.
*4 When occurring frequently, the card used may have a problem.
Page 76

76
MEMO
Page 77
77
7
Chapter 7
Glossary / Index
Glossary ································································78
Index·····································································
·
80
Page 78
78
Glossary
Terms Meaning
DAISY
DAISY is a standard of digital recording books that were
developed for a visually impaired person or people who
have a difficulty reading ordinary printed materials.
DAISY book is the produced book in compliance with
the international standard for digital talking books.
PRS It is a DAISY book production tool that we are selling in
the market. Books produced with DR-1 can be edited
in DAISY.
PTR1 / PTR2 These are DAISY recording/playback devices that we
are selling in the market. DAISY book has functions
not only to playback but also to record and edit.
Import
(DAISY import)
PLEXTALK project is produced from DAISY book.
Section The role of the chapter in books is played. One or more
phrases are included in one section.
Noise level (Phrase
detection volume)
One of settings to detect phrase. It is a volume that
distinguishes the audio and the noise.
Punch-in recording Editing method to use when you noticed a mistake while
checking the already recorded project. An
unnecessary phrase is deleted, and, instead, the phrase
newly recorded is inserted. Without being limited to the
number and the length of the deleted phrase, it is
possible to replace the phrase with the desired length.
Build book To produce a DAISY book from PLEXTALK project.
Phrase Audio minimum unit in DAISY. It is a short sentences
that can be read by one breath. In DR-1, when the
audio is detected in the beginning of the sentence, it is a
starting point of the phrase. After a certain time with
silent pause (phrase detection time) is passed, point
where the audio in the next sentence is detected is an
ending point.
Page 79
79
7
Phrase pause
period (Phrase
detection volume)
One of settings to detect a phrase. When silent pause
time continues more than the phrase detection time, the
phrase is detected.
PLEXTALK project DAISY information suitable for recording and editing. It is
an original PLEXTALK format that does not conform to
the DAISY2.02 standard format. The product that
can use PLEXTALK project are PTR1, PTR2, PRS, and
MyStudioPC. In addition to DAISY information on the
page and the section, etc., it can be shared convenient
information for proofreading of the mark etc. with PRS.
Page The role of the page in book is played. In DR-1, the page
is set to the phrase.
Mark When noticing any mistakes of reading content or
checking a certain parts after recording, you can make a
mark as a bookmark. In DR-1, the mark is set to the
phrase. The mark is a function not included in the DAISY
standard, and the function that can be used with DR-1,
PRS, and MyStudioPC.
Overwrite recording Editing method that allows you to record over gain at
once when noticing any mistakes during recording.
The recording is stopped temporarily at the stage where
you noticed recording mistake, and return several
phrases and restart recording. The phrase within the
returned range is deleted, and replace with the newly
recorded phrase.
Insert recording Editing method of insert and recording to the content
already recorded. It allows you to insert recording with
the desired length in the favorable position.
Page 80

80
Index
All delete 56
Build book 54, 78
CF card 18, 19, 20, 56, 68, 70, 71,
72, 73
Checking DR-1 version 57
Connecting DR-1 to a PC 58, 60-61
Connectors 15
DAISY 12, 13, 54, 55, 72, 73, 75, 78,
79
Data transfer 58-62
Delete phrases 45
Disconnecting DR-1 from a PC 59-61
Display panel 16
Elapsed time 16, 48
Format 56, 70, 73
Headphone 21
Import 55, 72, 73, 78
Input/output list 15
Insert recording 35, 42, 79
Mark 38, 39, 40, 79
Microphone 21, 68, 71
MP3 18, 51
Navigation 36-39
Navigation by specified number 39
Operation panel 14
Overwrite recording 34, 41, 79
Page 33, 38, 39, 79
PCM 18, 51
Phrase 13, 78
Phrase Navigation 37
Playback 31
Playback speed 49
Playback volume 32
PLEXTALK project 55, 62, 63, 73,
74, 75, 79
Power adaptor 10, 22
PRS 12, 54, 62, 73, 78
Punch-in recording 35, 43-44, 78
Recording
28-30, 34-35, 41, 42, 43-44
Recording setting 51-53
Recording volume (Recording level)
28, 71
Remaining time 16, 48
Restore 63
SD card 18
Section 13, 33, 38, 39, 78
Skip navigation 38
Sound quality 51
Specifying range 43
Stop/Pause 30
Time setting 24-26
Total time 16, 48
USB 15, 58, 59, 60
Page 81
81
7
MEMO
Page 82

82
MEMO
Page 83
83
7
MEMO
Page 84
Shinano Kenshi Co., Ltd.
6-15-26, Chuo, Ueda-shi
Nagano-ken, 386-0012 JAPAN
Fax: +81-268-22-5476
E-mail: [email protected]
URL: http://www.plextalk.com/
127-3798900 2007/11 Printed in Japan
 Loading...