

Page 1

UP
User Guide
Page 2
Welcome to the PLEVO family
www.plevo.co
Page 3
Table of Contents
Product
01- Product external parts
Removable battery
02- Parts and features
03- Installation
04- Extraction method
Removable wheels
05- Installation
06- Dismantling
Mobile application and electronic lock
07- Components
08- Electronic lock (Morse code)
09- Electronic lock (Face ID/Touch ID)
10- Digital Scale
11- GPS
Airplane mode
12- Activation and disabling method
Communication
13-15- Lights and alerts indicators
Garment bag System
16- Components
17-19- Operation
UP
Page 4

PRODUCT
1
Page 5
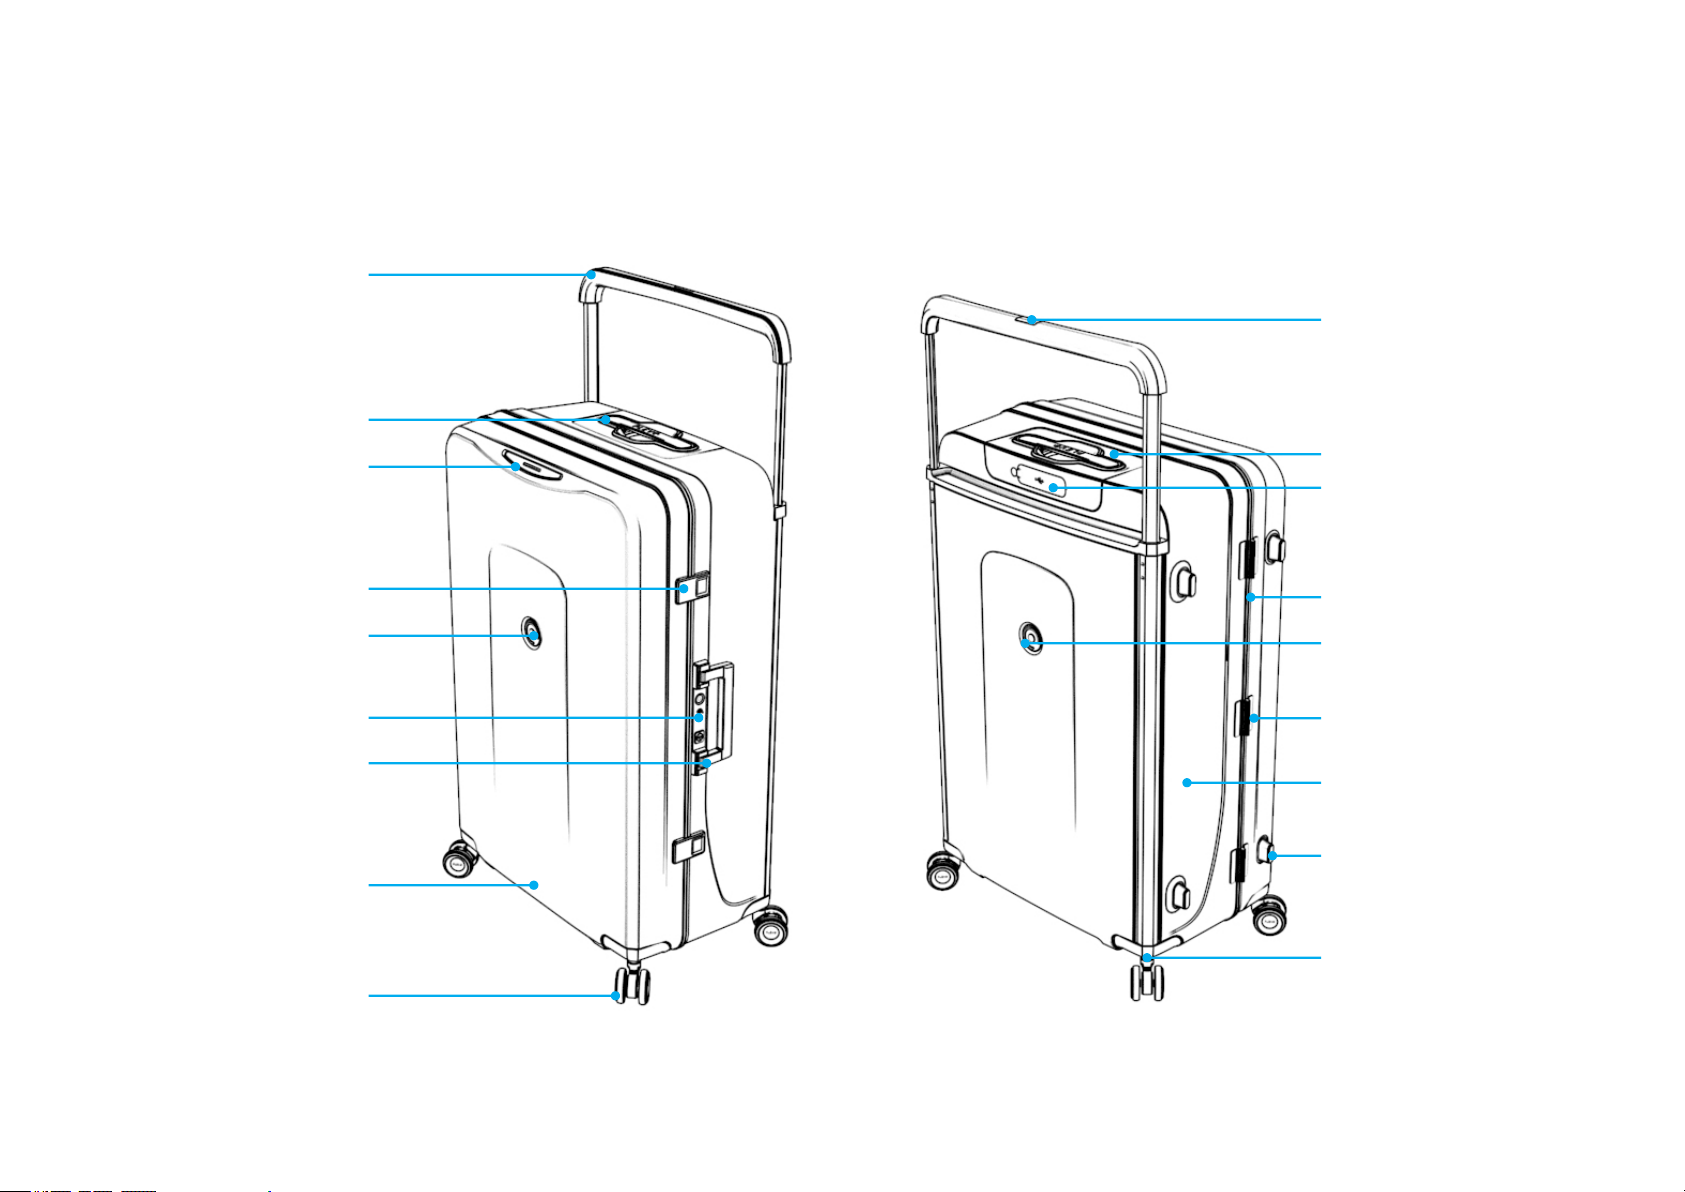
Outer parts of the suitcase
Main handle
Secondary handle
Button
Front light indicator
Front lock flaps
Frontal logo
Electronic lock
Side handle
Front cover
Removable wheel
Dashboard
Battery access cover
Aluminum frame
Rear logo
Hinged
Body
Support plugs
Wheel holder
The images in this manual are illustrative and can vary with actual model.
01UP User Guide
Page 6

REMOVABLE
BATTERY
Page 7
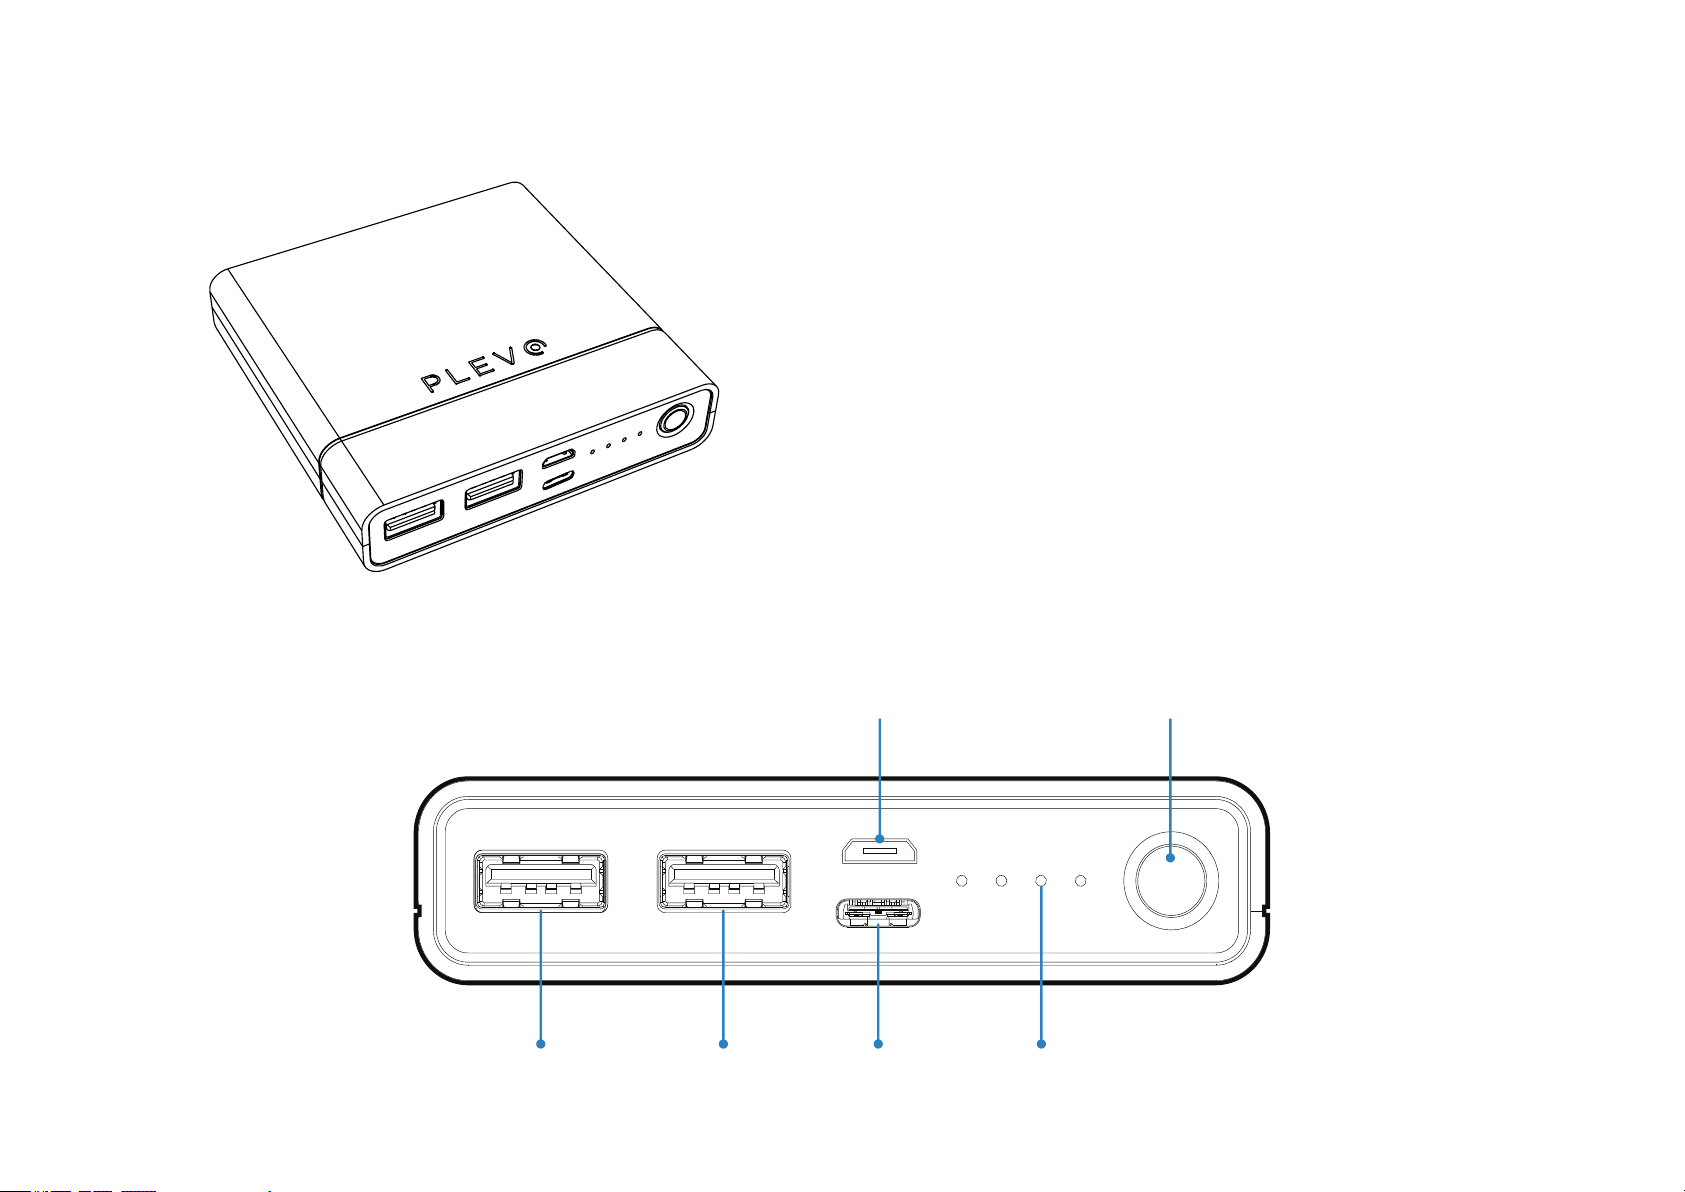
Parts and characteristics
Characteristics:
Our energy bank with lithium-ion battery (8,000
mah) is fully removable from PLEVO baggage.
-Dimensions: 85.5 x 84 x 21 mm
-Capacity: 8000 Mah/29.6 WH
-Input (Micro): 5v/3a 9v/2a
-Input (C-type): 5v/3a 9v/2a
-type-C output 5v/3a 9v/2a 12v/1.5 A-QC 3.0 output:
5v/3a 9v/2a 12v/1.5 A
-USB output: 5v/3a
-Total output: 18w MAX
Micro USB
USB 3.0 USB USB-C
Power button
Battery
lights
02UP User Guide
Page 8
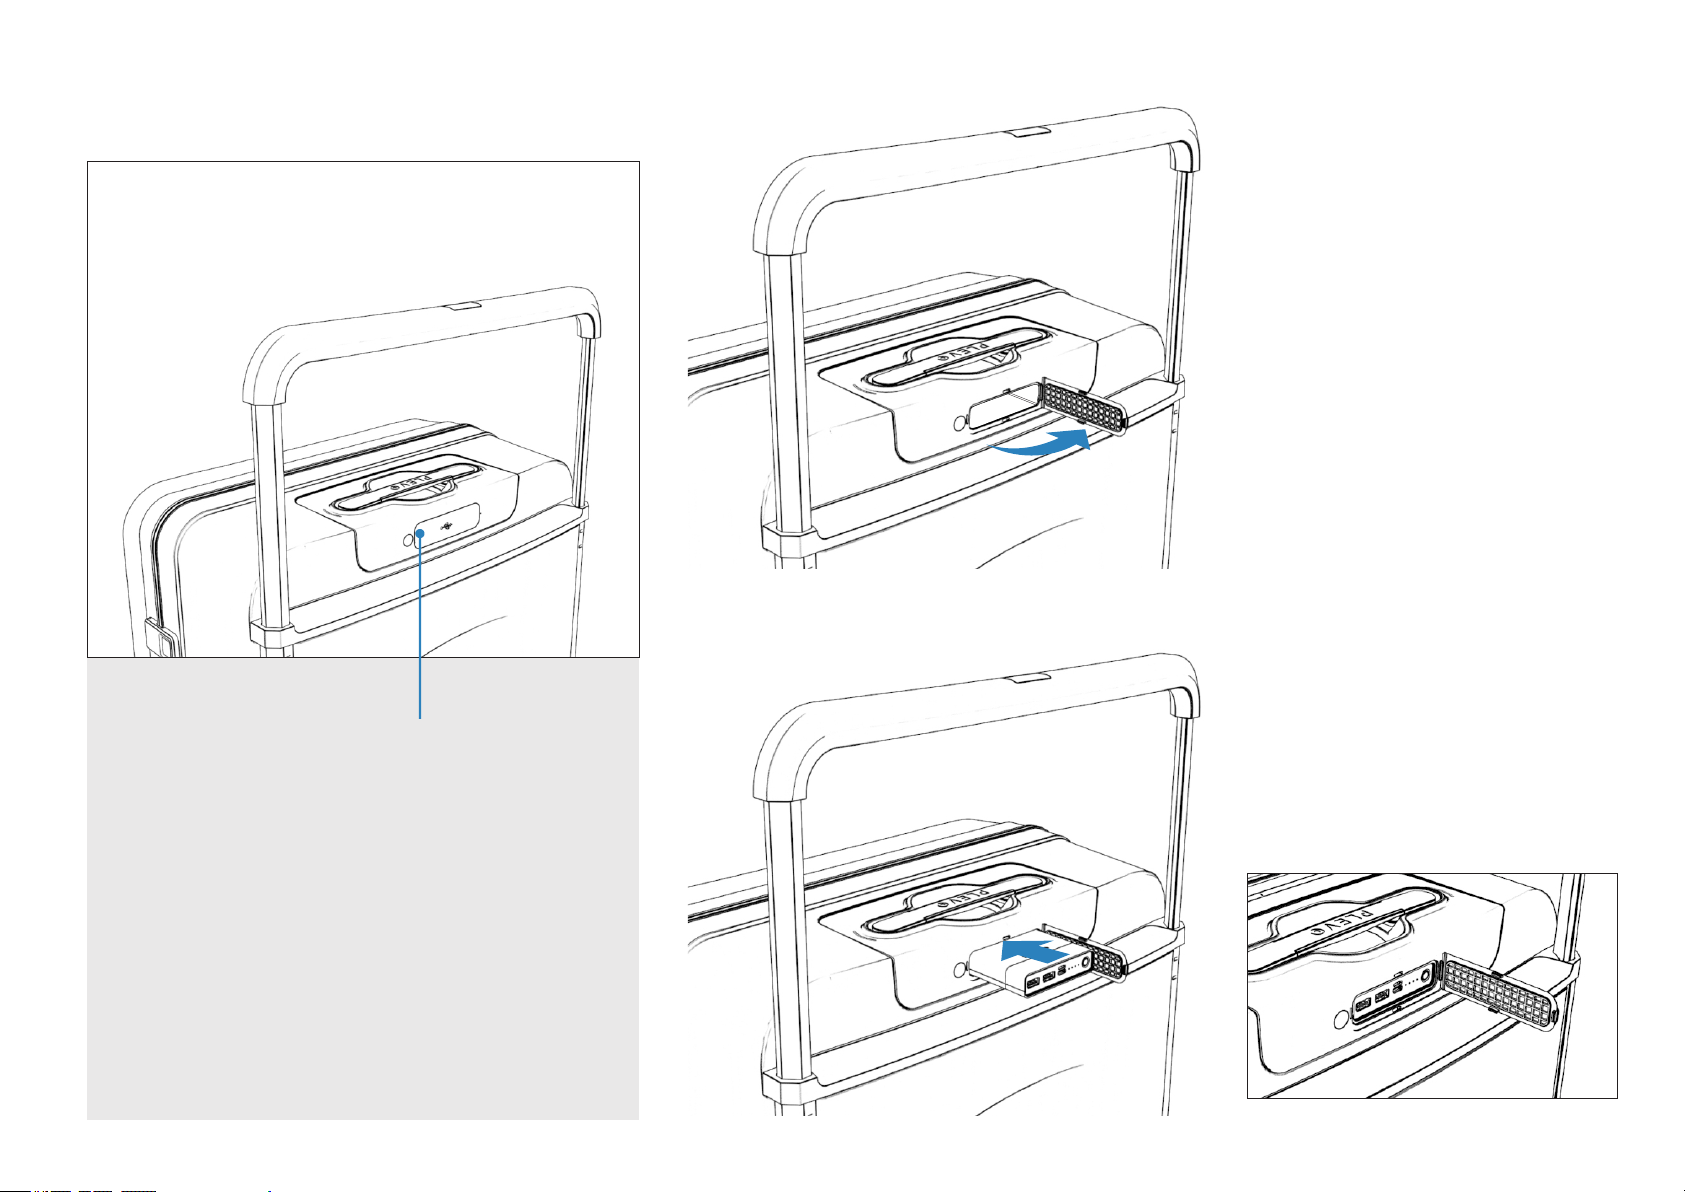
Installation
Picture 1
Open the rubber cover to the right
to access the internal compartment
of the board .
A
To install the energy bank, it is necessary
to access the "A" cover on the back of
the board and open it by rotating it
downwards. This cover protects internal
components from shocks, dust, and
water so it is recommended that it is
always closed while the battery is not in
use.
Picture 2
Position the battery horizontally and
press forward until the mechanism
locks and the element is anchored.
03UP User Guide
Page 9
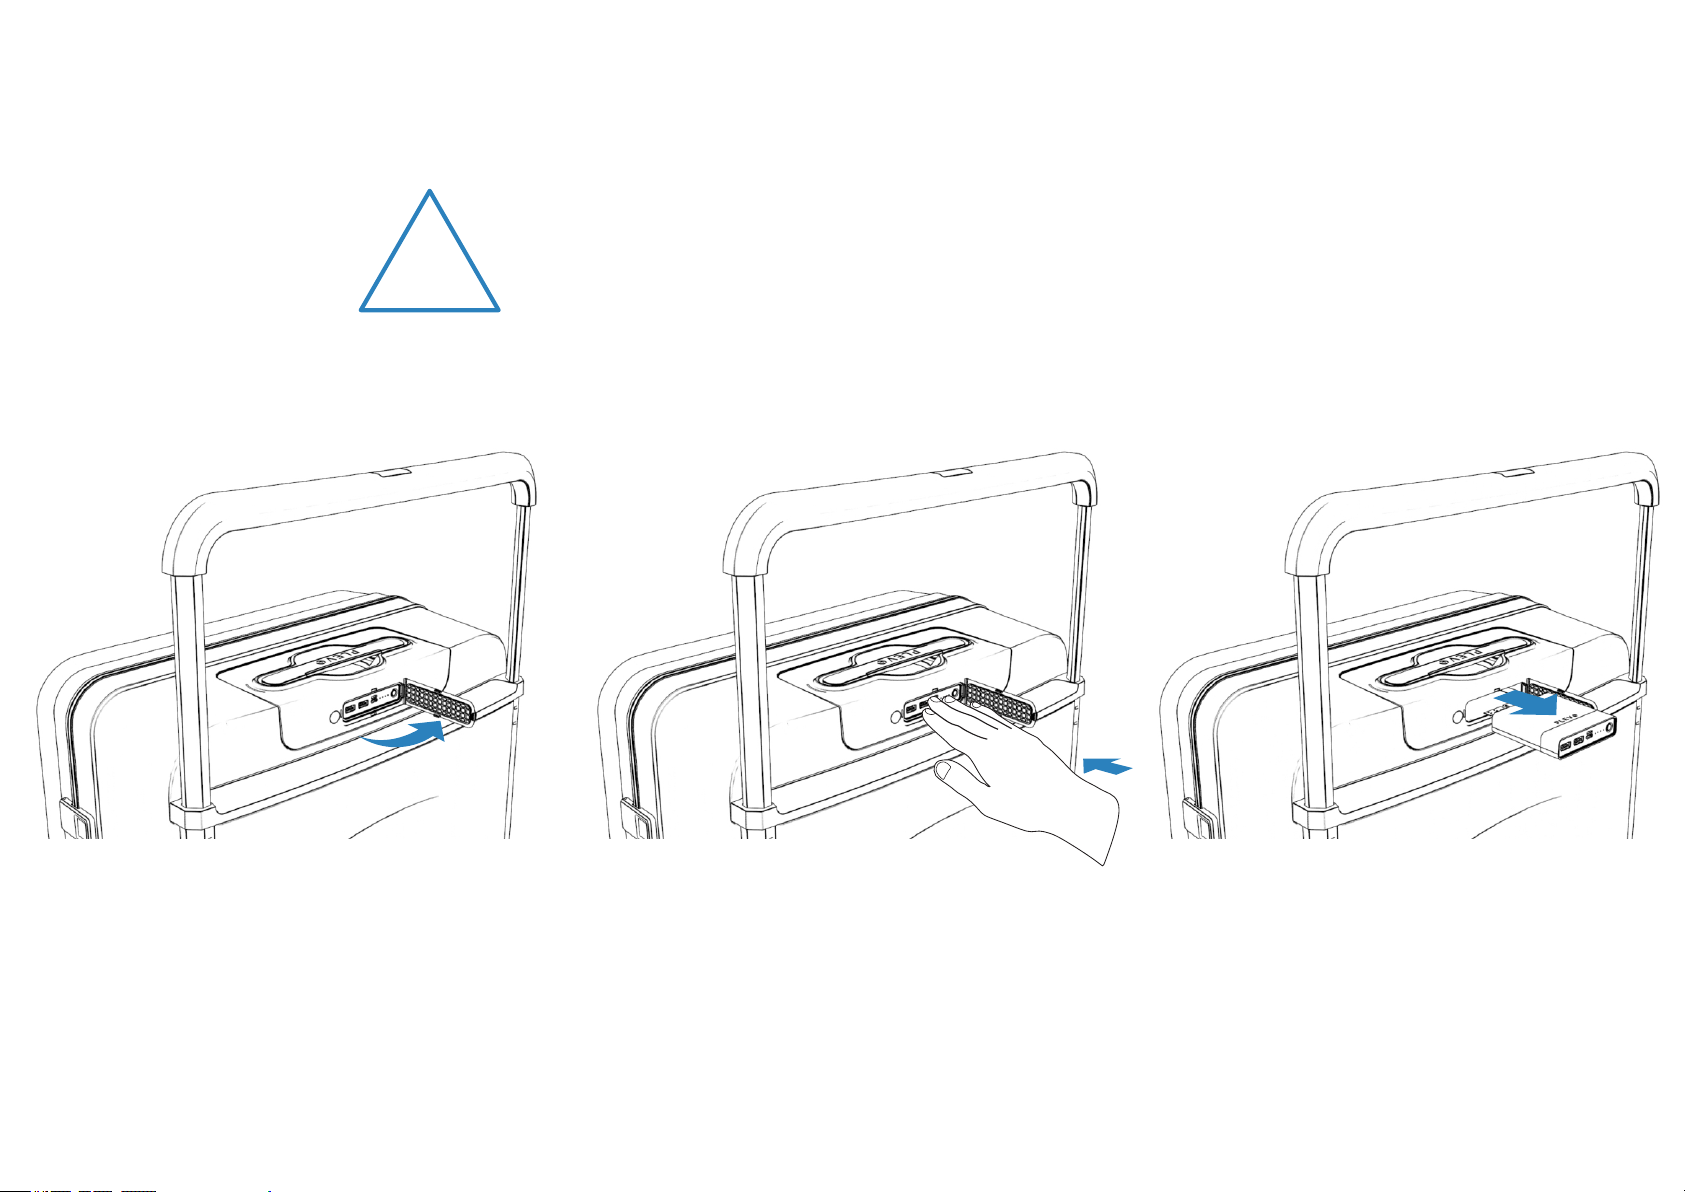
Extraction method
BATTERY BACKUP
Our system has a nickel-ion back-up battery of less than 600mAh and its
weight is 39g (2.16 Wh). This battery feeds THE WHOLE suitcase when the
!
removable battery is not installed on it.
Open the sticky cover to the right to access
1 2 3
the battery.
Press forward slightly until the ejection
mechanism is released.
Remove the battery horizontally forward,
without making any upward or lateral
pressure.
04UP User Guide
Page 10
REMOVABLE
WHEELS
Page 11
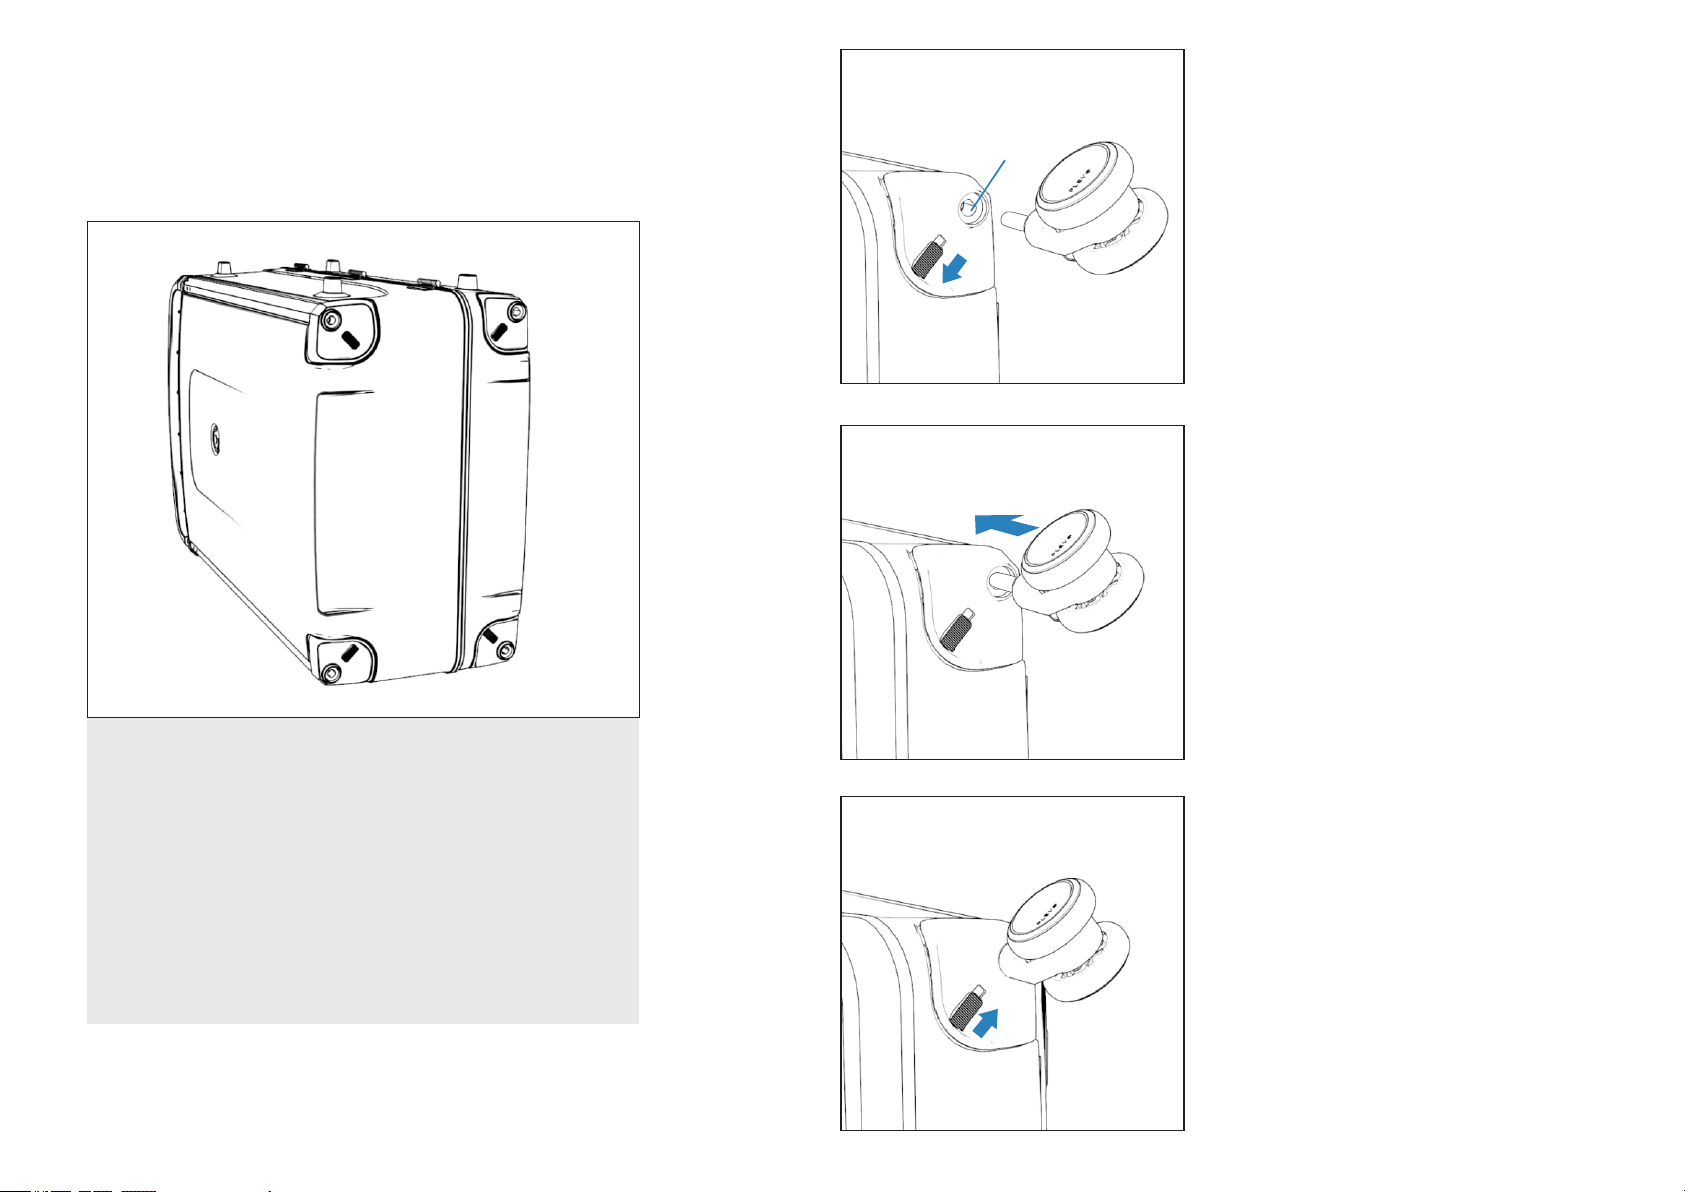
Installation
1
B
Hold the latch button down and
place the wheel bolt into orifice B.
A
A
To be able to set each of the wheels
it is necessary to get access to the
four "A" locks placed in the lower
part of the suitcase. Follow steps 1-3
A
A
2
Make pressure on the wheel until it
fully snaps into the orifice.
3
to remove the latch and install the
wheels.
Release the safety button so that
the final adjustment is done.
05UP User Guide
Page 12
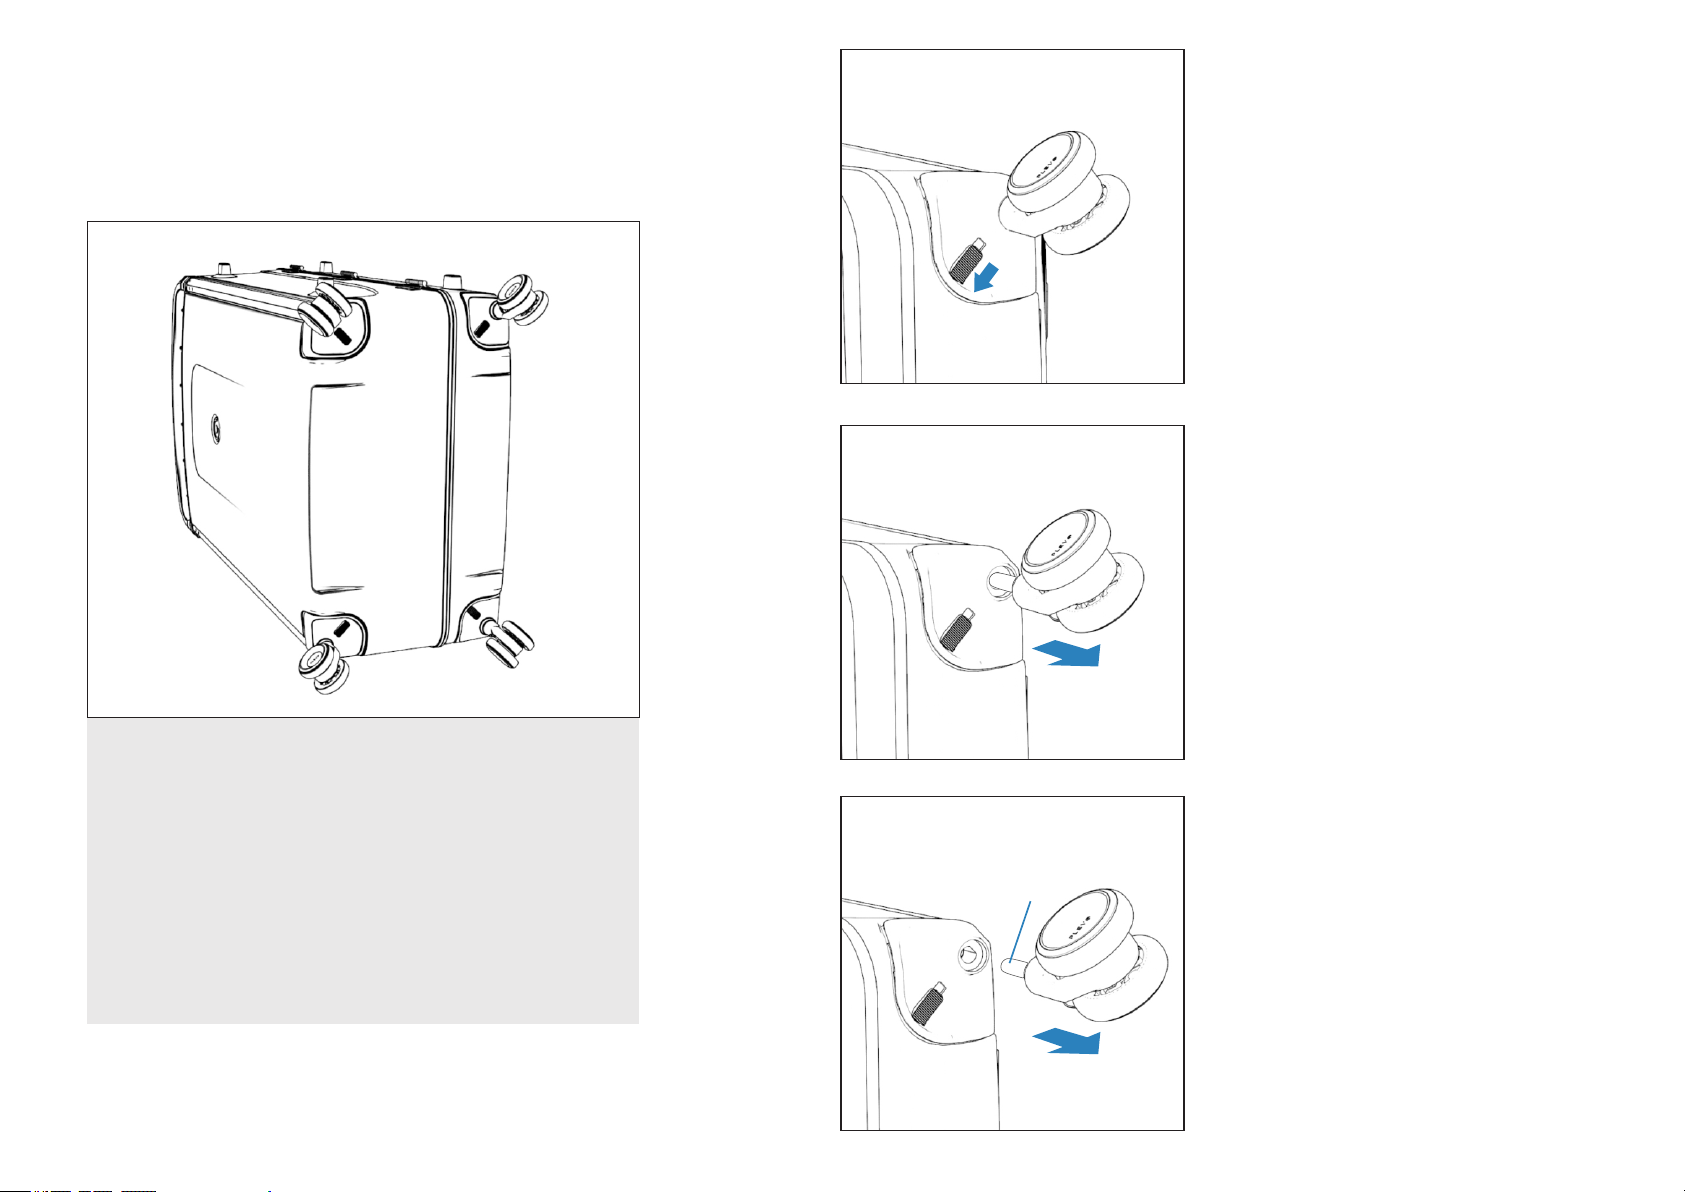
Disassembly
1
Hold the button back to release
the latch.
A
A
A
A
To remove each one of the wheels, it
is necessary to access the four "A"
locks located in the lower part of the
bag. Follow steps 1-3 to remove the
safe and extract the wheels.
2
Pull the wheel backwards while
holding down the button.
3
C
The wheel is released once the
"C" Bolt is completely out from
the orifice.
06UP User Guide
Page 13
MOBILE
APPLICATION AND
ELECTRONIC LOCK
Page 14
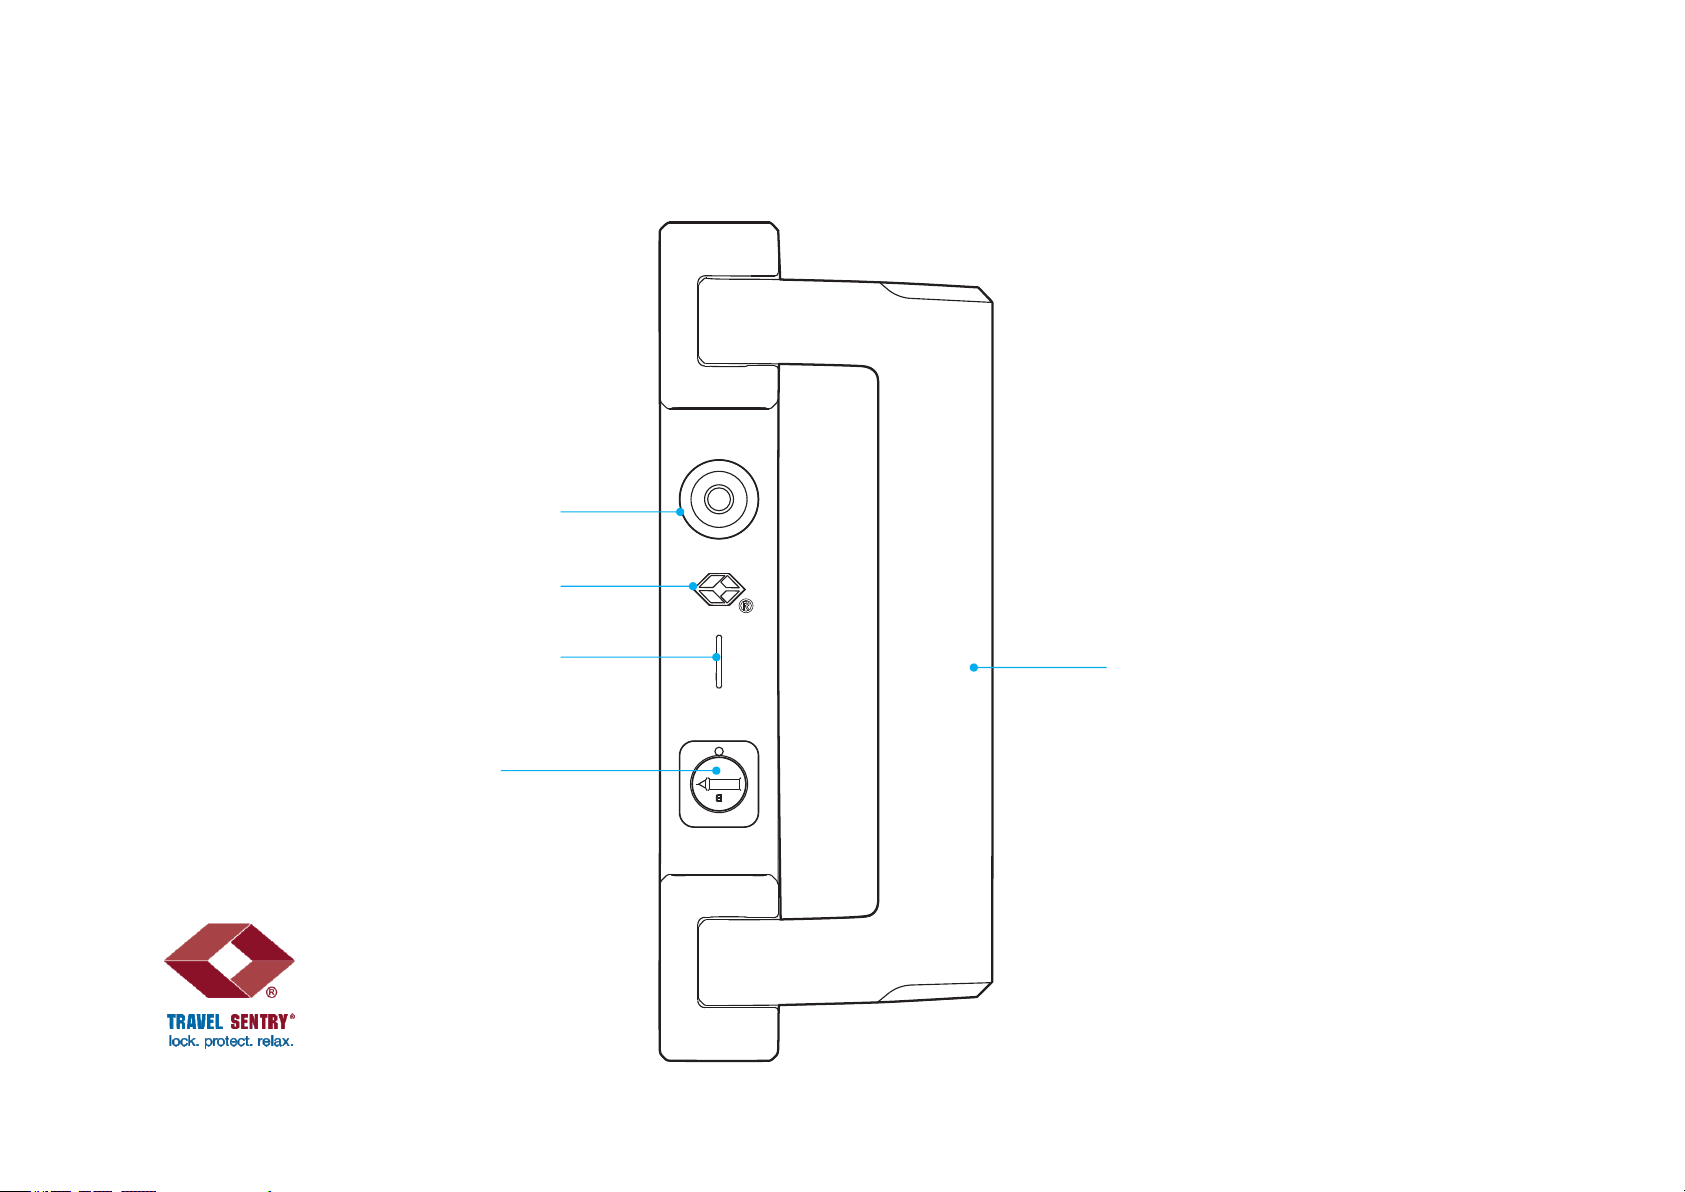
COMPONENTS - Electronic lock
Morse code
button
TSA logo
Indicator light
TSA Lock
Using Travel Sentry Approved lock allows your
luggage to be unlocked and inspected by security
authorities without damage.
Secondary handle
07UP User Guide
Page 15
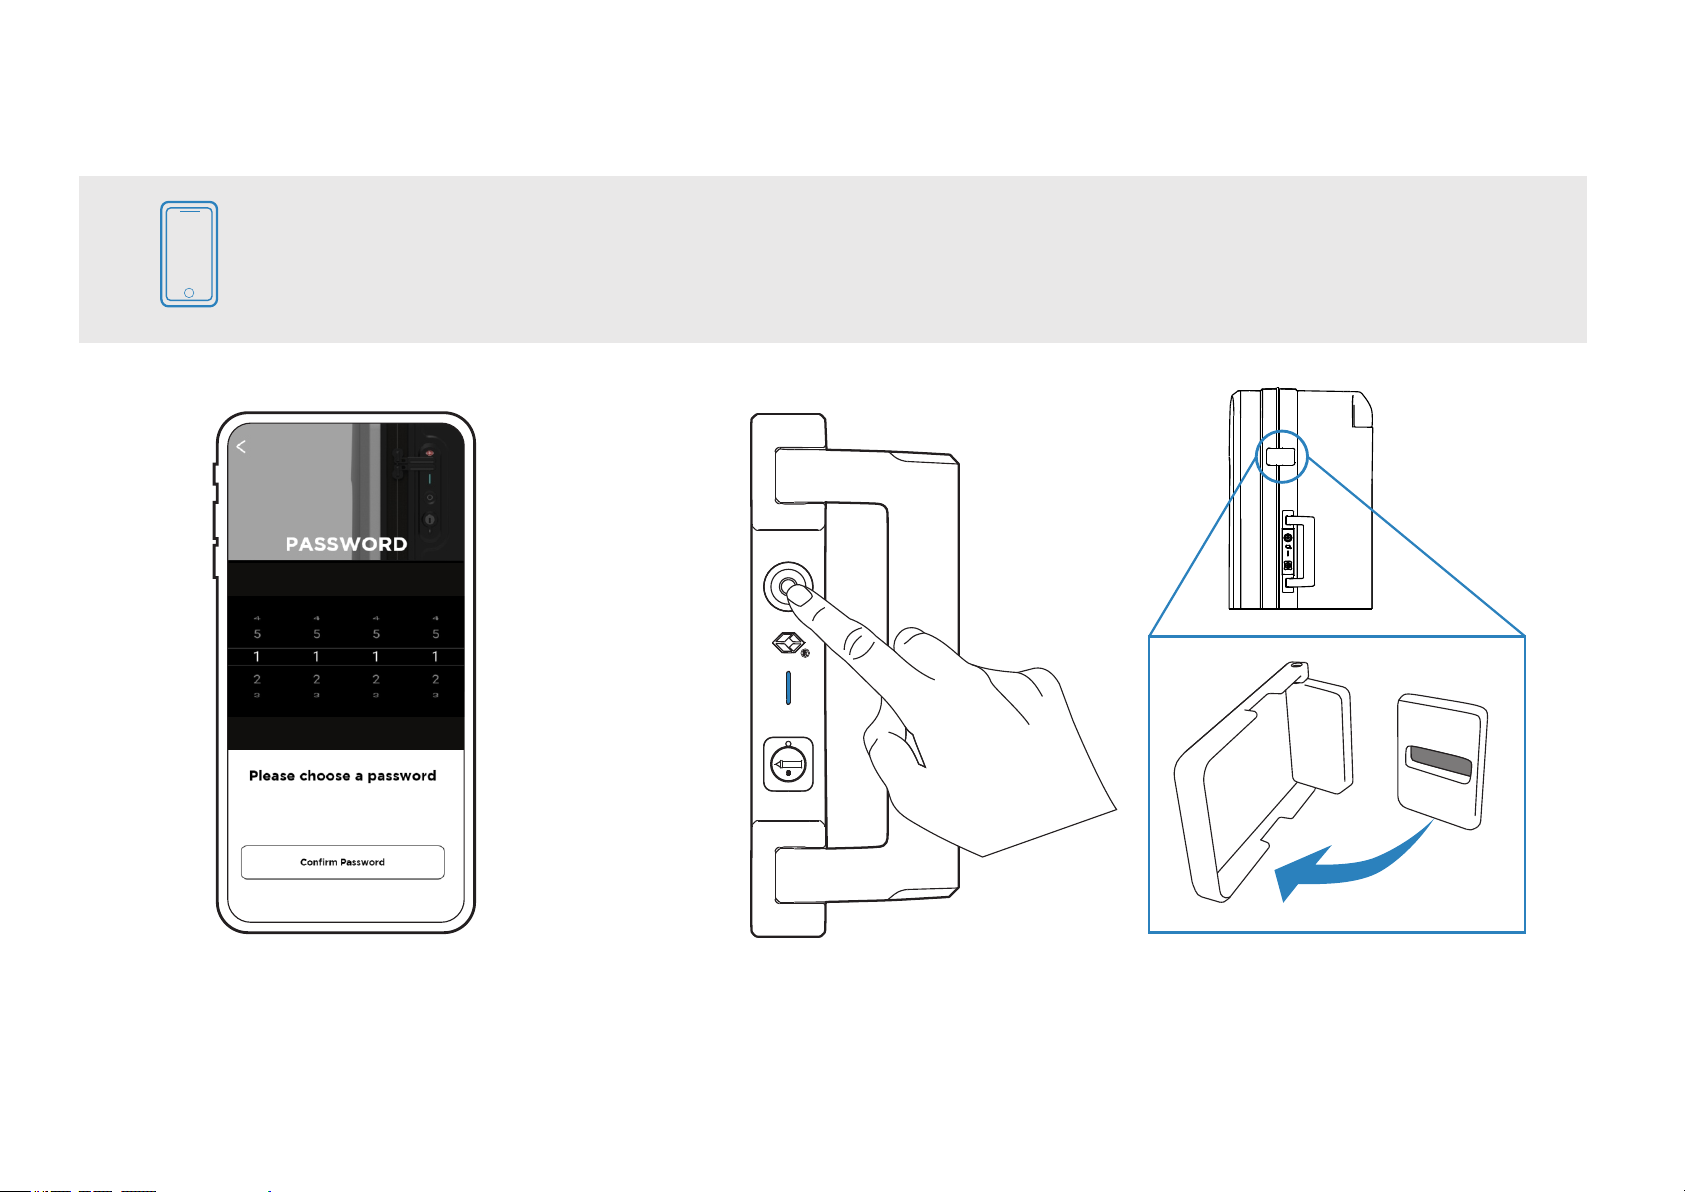
Electronic lock (Morse code)
All PLEVO bags have an alternate Morse code closure system that replaces the old padlocks. Only onetime code configuration is required, and it will be ready for use at any time without depending on the
battery or mobile phone.
B
Configure the code from our
1 2
mobile application. You must
select 4 digits. Allowed numbers:
1 to 5. For example: 1234.
A
To open the bag, it is necessary
to press the digit button. Doing
so will turn the light (A) red on
and the action will be taken as a
number. So, if you press once, it
will be 1, if you press three
consecutive times, it is 3.
B
If the Morse code has entered
3
3
correctly, the flaps "B", located
up and down the closing, will
open automatically releasing the
latch.
08UP User Guide
Page 16
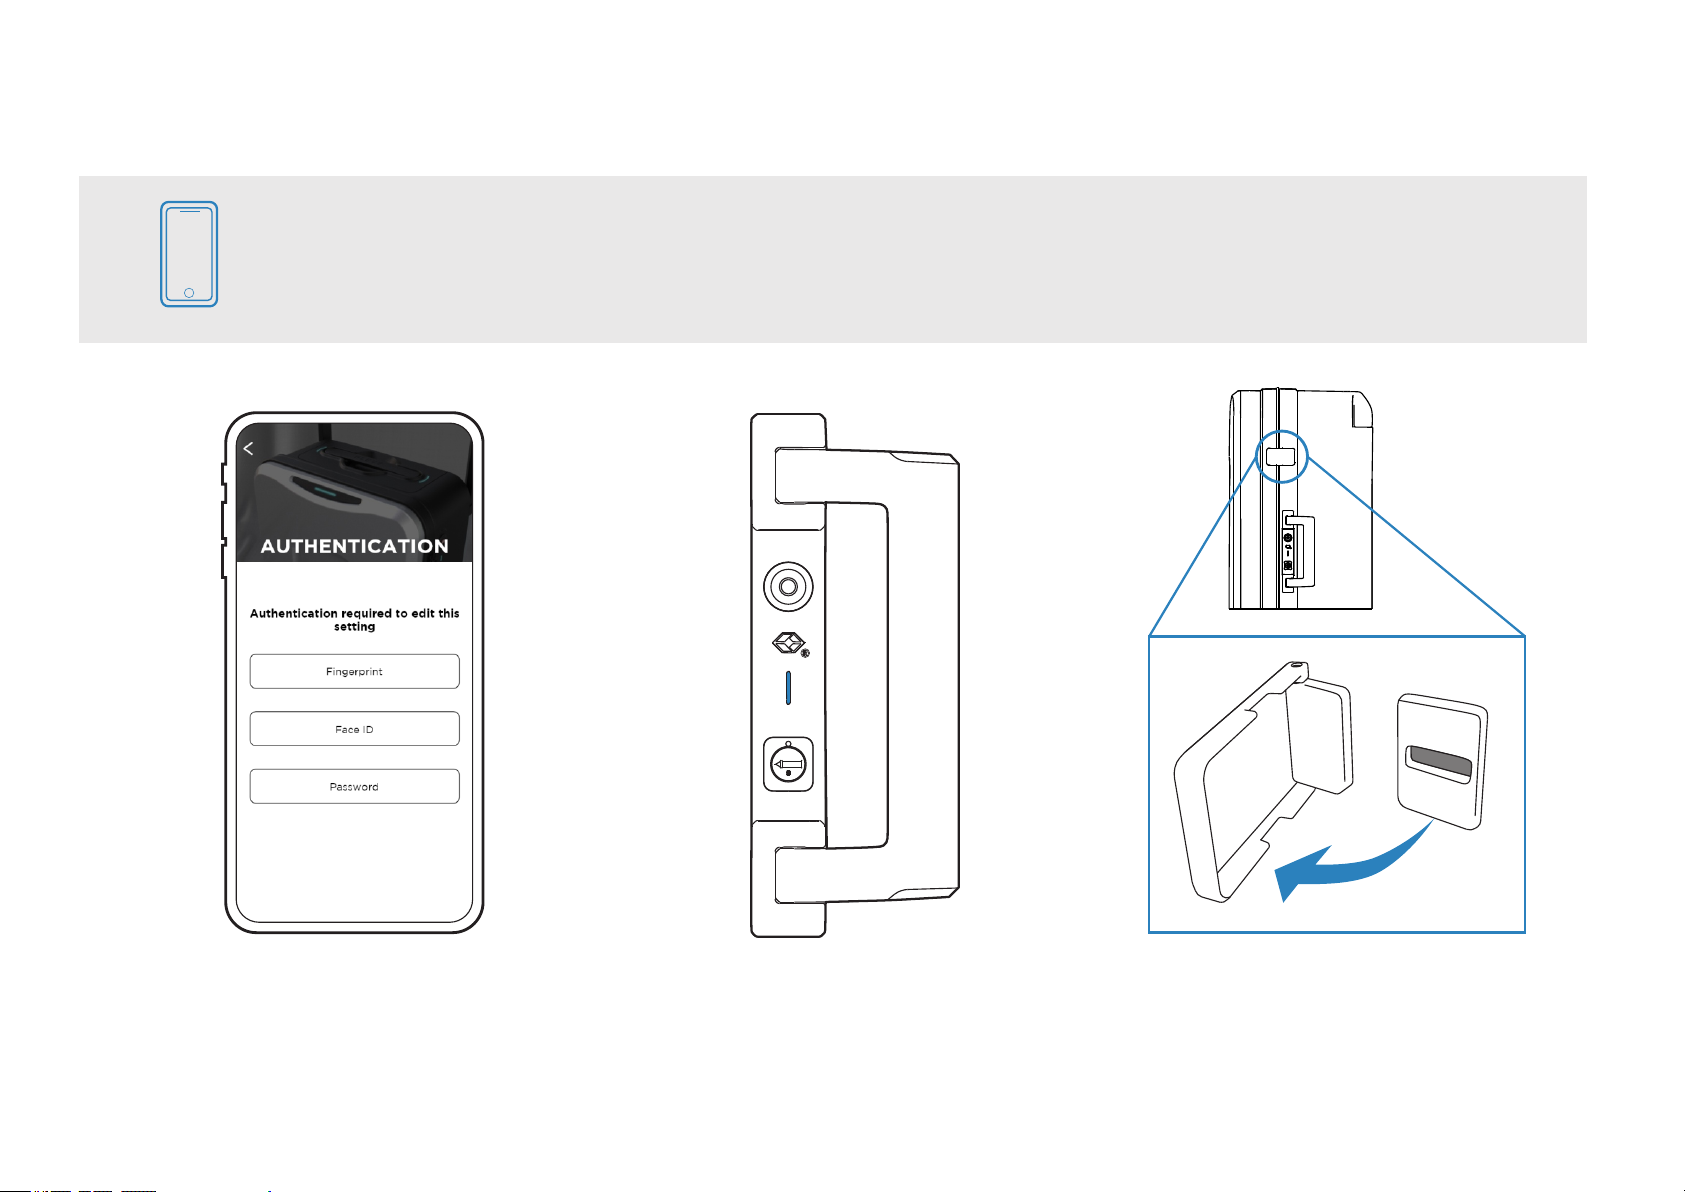
Electronic lock (Face ID/Touch ID)
It is possible to open or close the bag by means of biometrics by using our mobile application. Depending
on the smartphone model used you can choose to use facial recognition or fingerprint. In order to perform
this action, it is necessary to follow the steps 1-3
B
It is necessary to activate the
1 2
opening method within the
application depending on the
device used. (In some cases, the
selection is automatic)
A
If the input by face ID or by
Touch ID has been correct the
"A" light will light in CYAN color
for 3 seconds, otherwise it will be
in red color communicating the
error.
B
Immediately turn on the CYAN
3
light the flaps "B", located up and
down the closing, will open
automatically releasing the latch.
09UP User Guide
Page 17
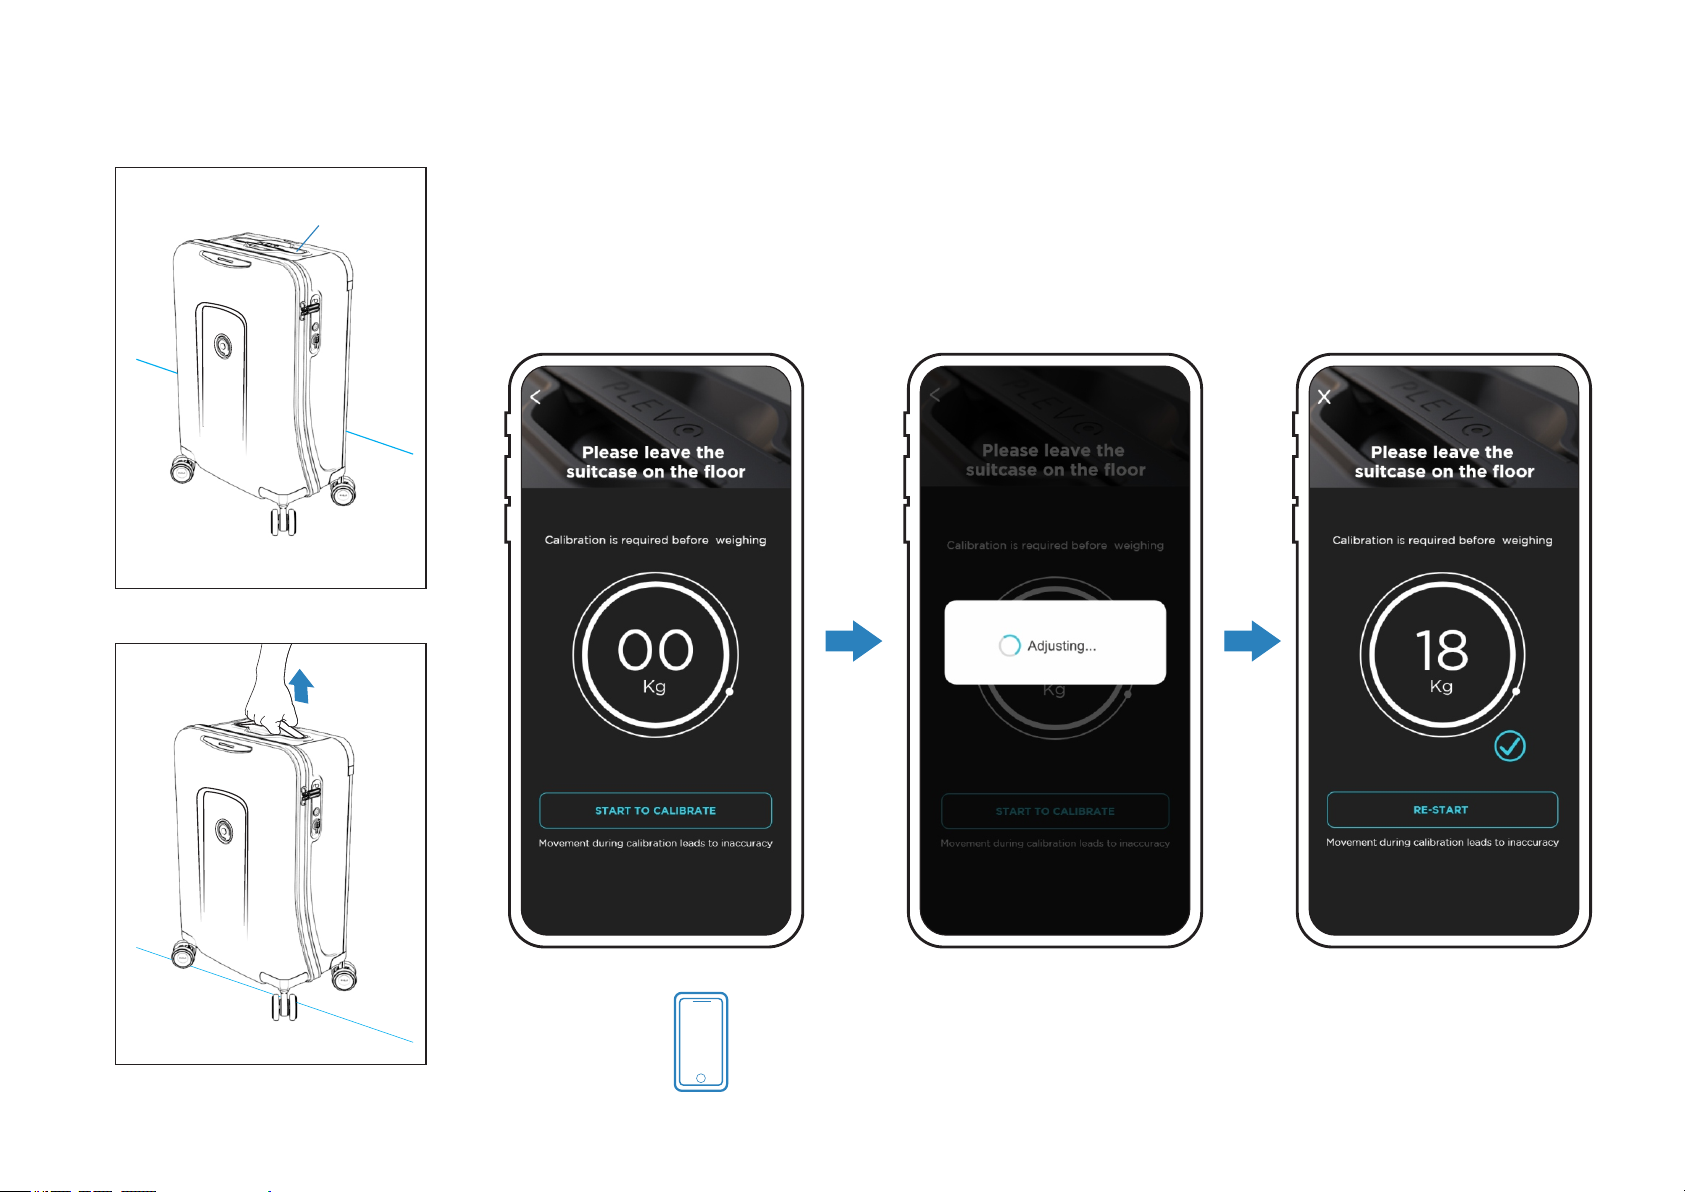
Digital scale
1
A
While holding luggage with handle A, you will be able to view the weight of the baggage using
our mobile device application.
Important: Before weighing the bag, it is necessary to start a calibration from the Application.
This lasts a few seconds -click on "START TO CALIBRATE"-. The system will then be ready, and
the exact weight of the load will be displayed.
2
Lift the suitcase from the floor
using the "A" handle to
activate the sensors
You will be able to monitor the weight of your baggage on
your mobile device through our application.
10UP User Guide
Page 18
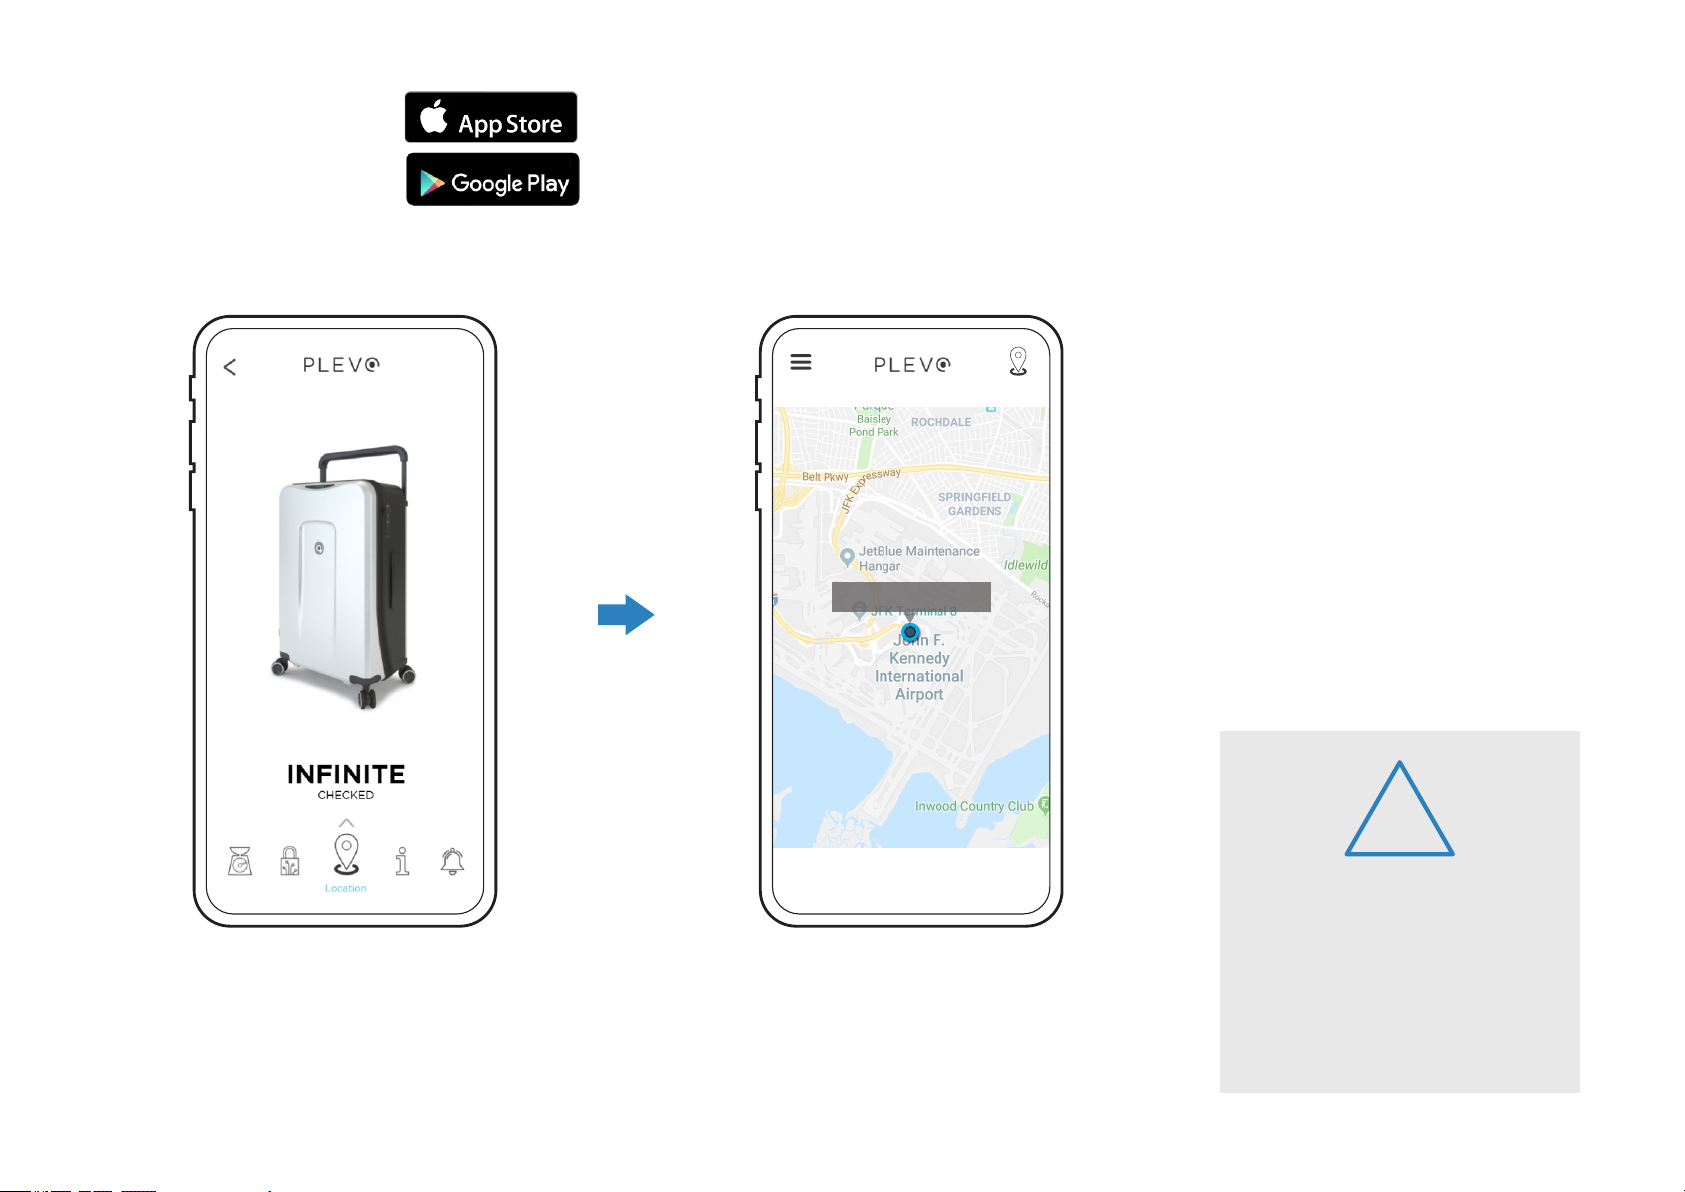
GPS
PLEVO INFINITE
Available on the
ANDROID APP ON
The PLEVO UP model features a GPS tracking system that will allow you
to locate the bag anywhere by using our mobile device application. In
order to use this feature, you need to install the APP on your device,
register and link the system with your luggage PLEVO.
Select the GPS function icon in
the lower bar of our app and
slide it to activate the system.
New York, United States
<
Our system will load the map of
the site where your baggage is
located, showing you the exact
location.
!
The application for PLEVO
devices has automatic
distance alerts to warn you
immediately when baggage is
removed from the owner.
11UP User Guide
Page 19
AIRPLANE
MODE
Page 20
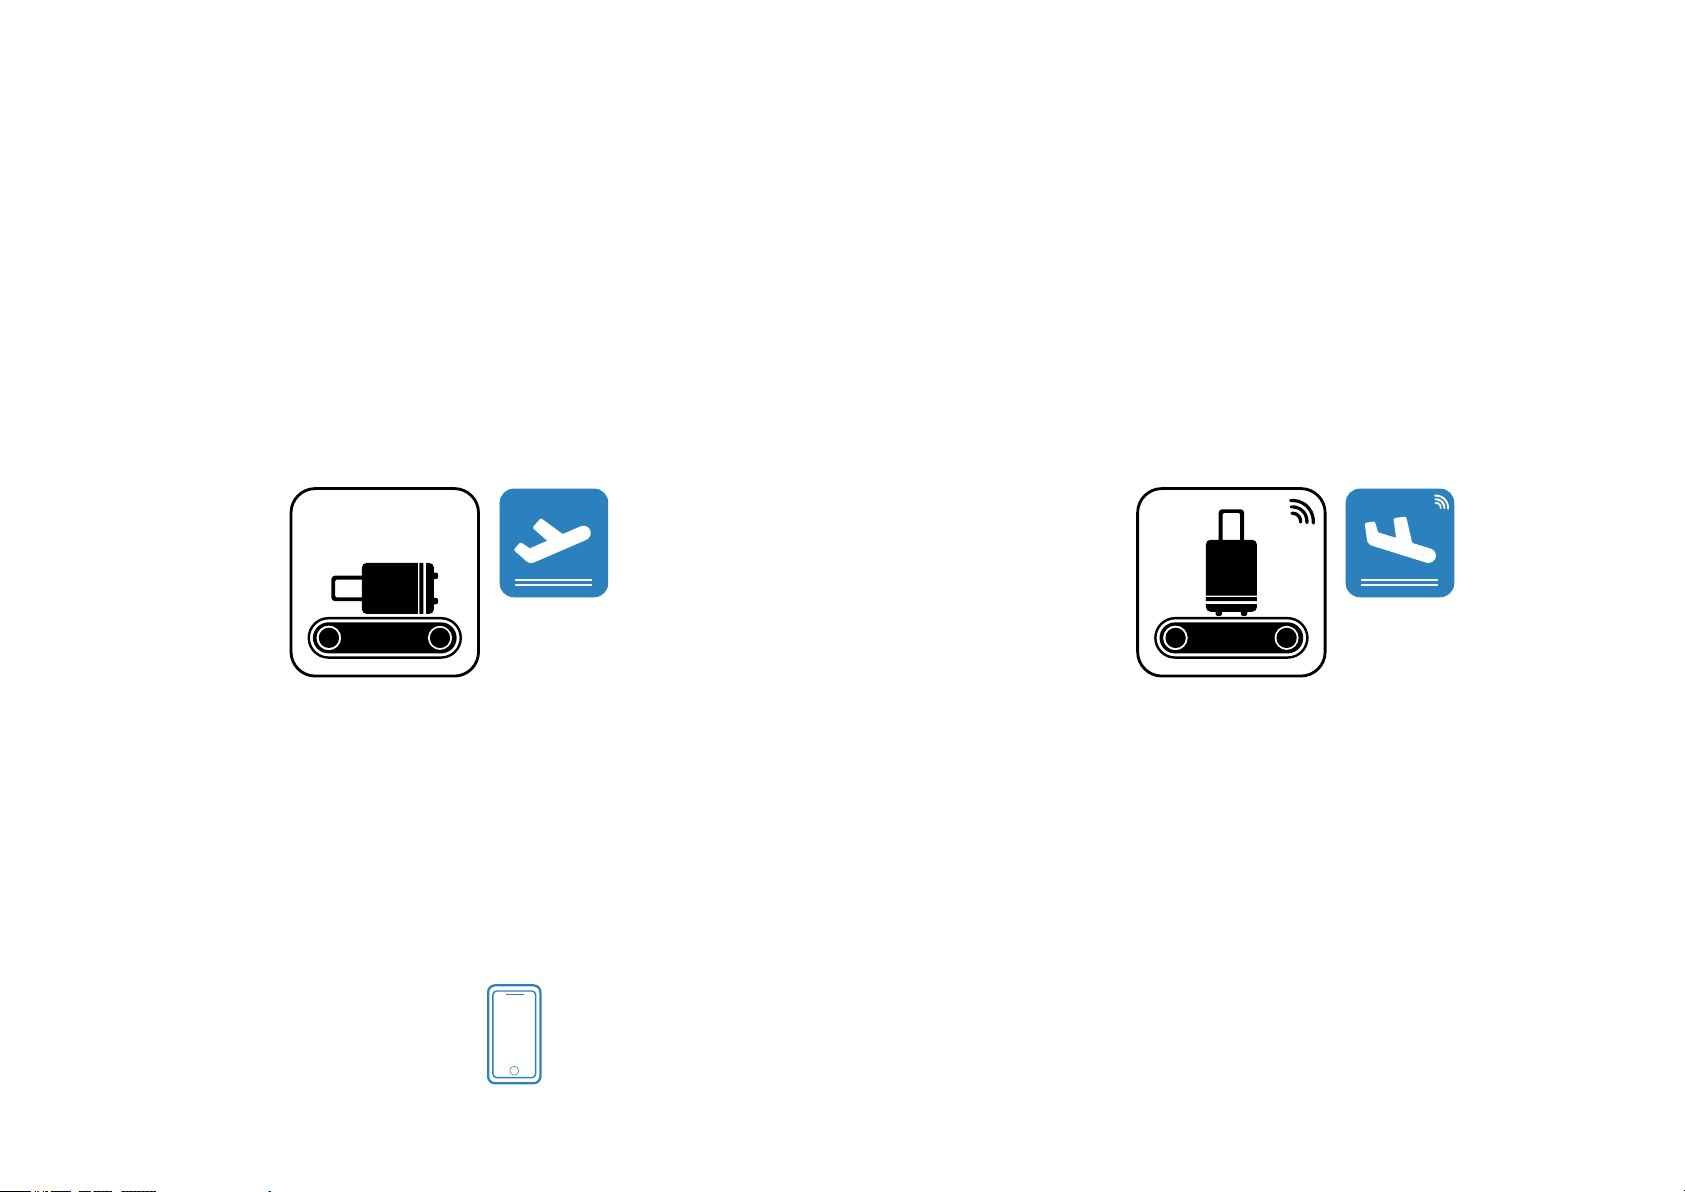
How to activate/deactivate airplane mode
AIRPLANE MODE
Our PLEVO bags are developed using a system of sensors that
allow to detect what is happening and adjust the condition of
the baggage according to the norms established by the FAA,
IATA, DOT & EASA.
At the moment the suitcase is placed in horizontal
mode the sensors that work with the GPS detect the
location and go into airplane mode to completely
disable, automatically, all the suitcase functions.
You can monitor the activation and deactivation of
your baggage on your mobile device through our
application.
When landing, these sensors contact the GPS and
in case of being at the airport, they automatically
disable the airplane mode to re-connect all the
functions of the bag. In this way a safe product is
achieved that respects all the regulations in force.
12UP User Guide
Page 21
COMMUNICATION
Page 22
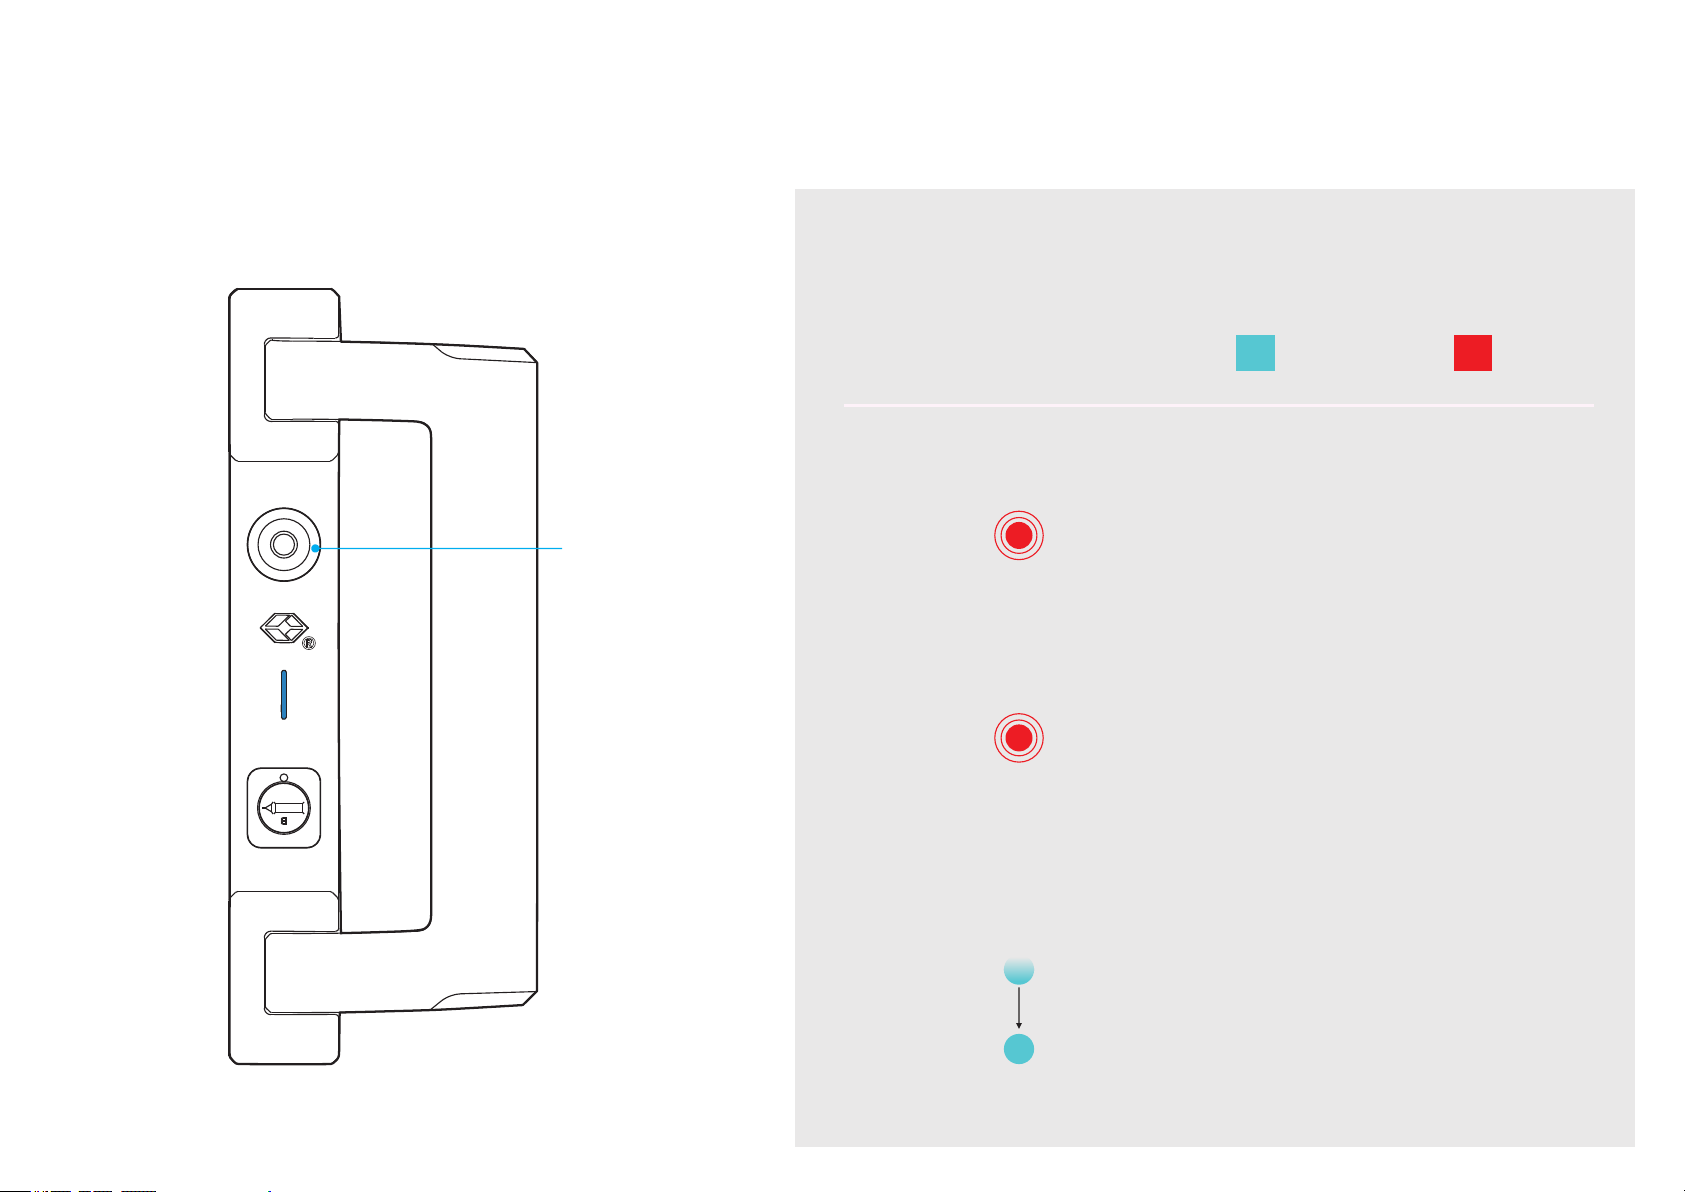
Indicator lights and alerts (electronic lock)
Electronic lock
A
Morse Code
button
Our electronic locks have a light (A) that show the different
states of the bag.
Can be presented at:
FUNCTIONS
Flashing red light each time the
Morse code button is pressed.
Three flashes when Morse
code is incorrectly entered or
when an error occurs in the
Face ID/Touch ID
CYAN RED
A slow flash in CYAN color that
will remain 3 seconds when the
bag is opened or closed correctly
by Face ID/Touch ID or Morse
code.
13UP User Guide
Page 23
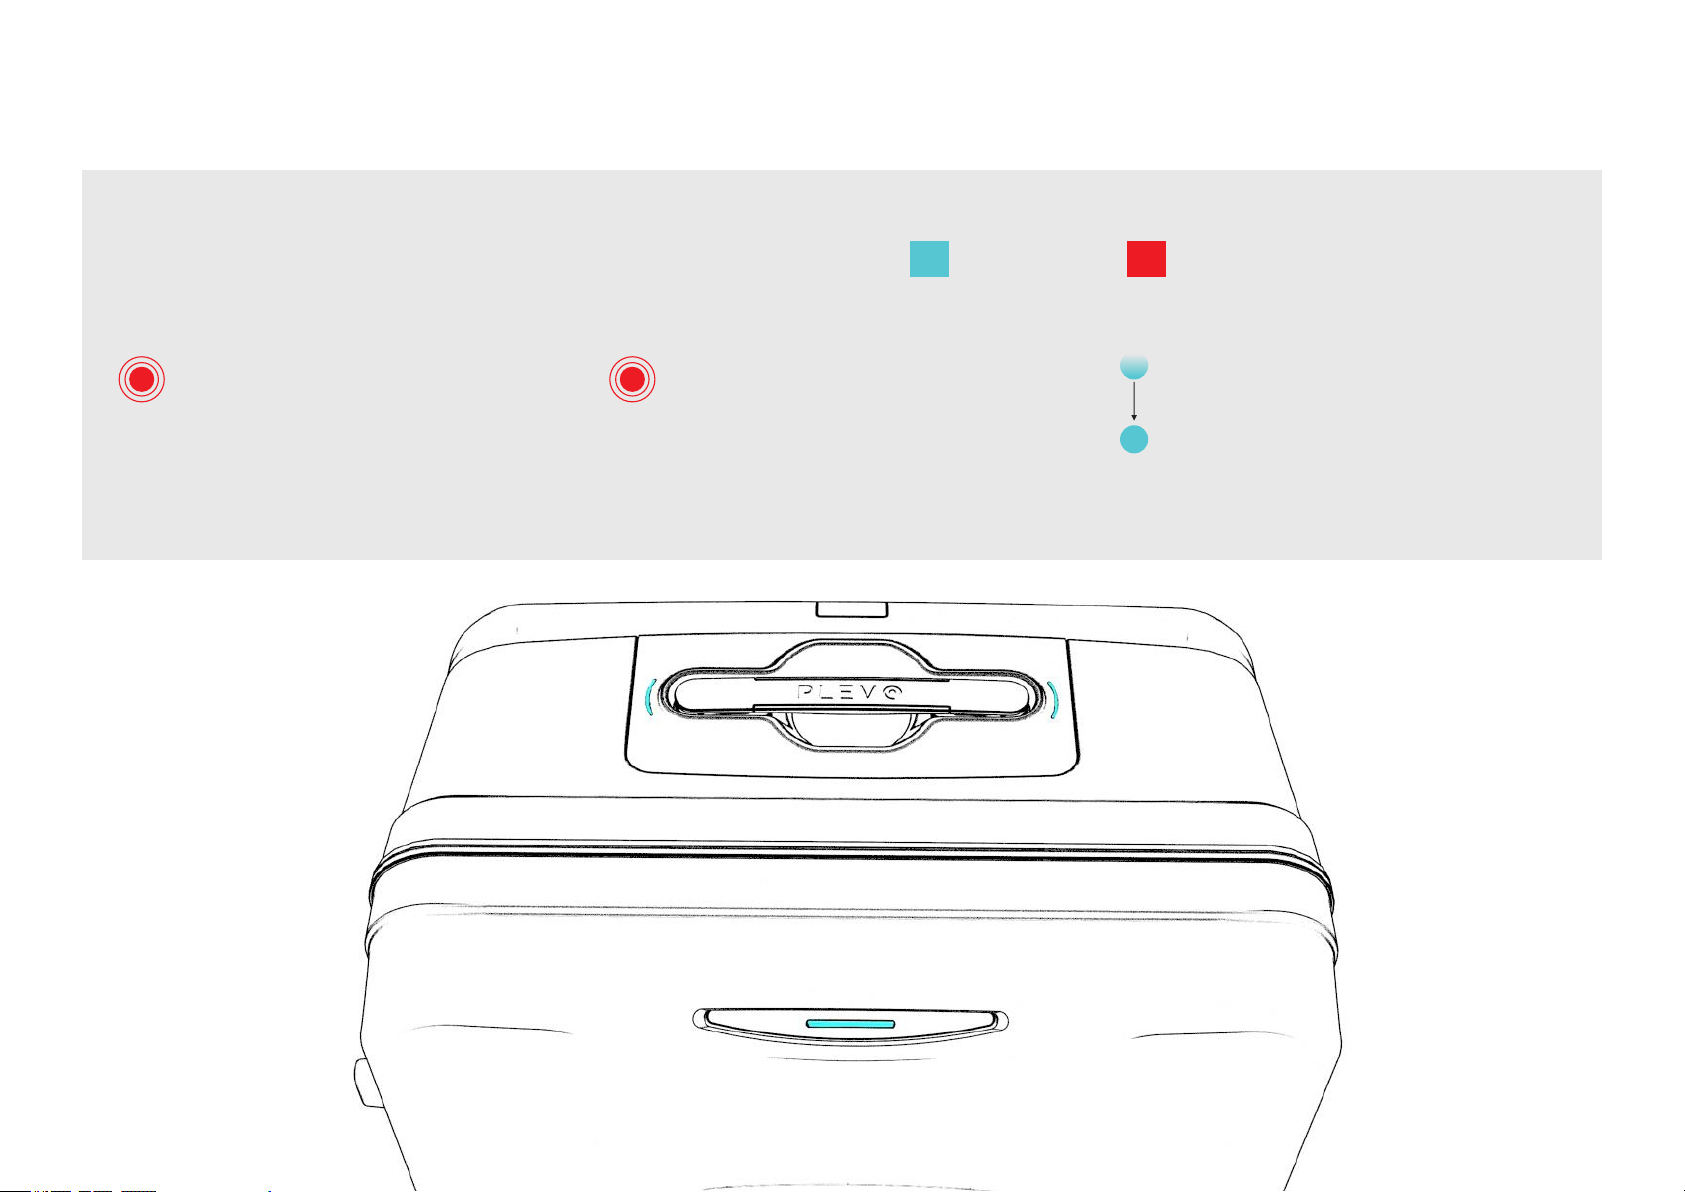
Indicator lights and alerts (dashboard)
The suitcase has a luminous indicator board (B) that communicates the different states of the bag.
Red light flashes each time the
Morse code button is pressed.
Can be shown as:
Three flashes when Morse code
is incorrectly entered or when
opening by Face ID/Touch ID
fails
CYAN RED
B B
A slow flash in CYAN color that
will remain 3 seconds when the
bag is opened or closed
correctly by Face ID/Touch ID or
Morse code.
14UP User Guide
Page 24
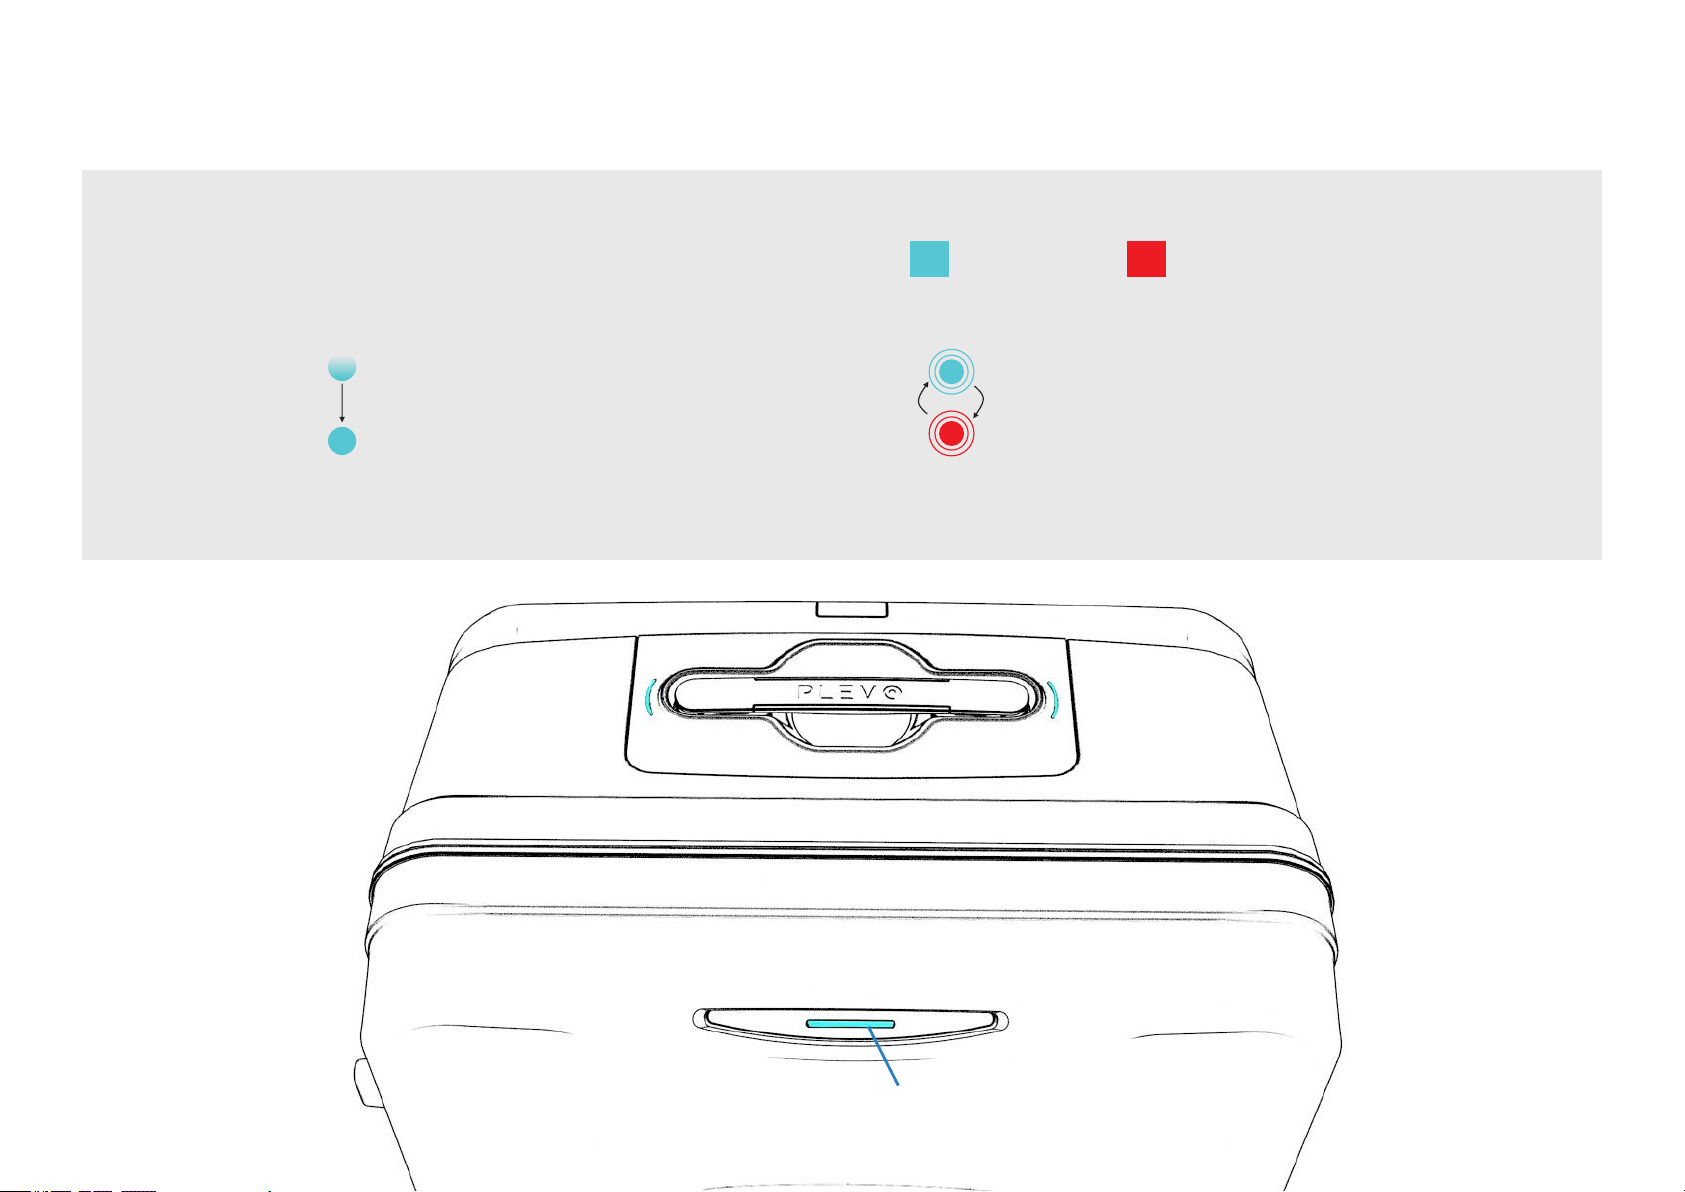
Indicator lights and alerts (frontal panel)
The bag has a front light (C) that communicates the closing condition of the bag and the pairing with devices.
Can be shown as:
A slow flash in CYAN color that will
remain 3 seconds when the bag is
opened or closed correctly by Face
ID/Touch ID or Morse code.
CYAN ROJO
Intermittent flashes in Red and
cyan when the bag is finding a
device to connect.
C
15UP User Guide
Page 25
GARMENT BAG
SYSTEM
Page 26
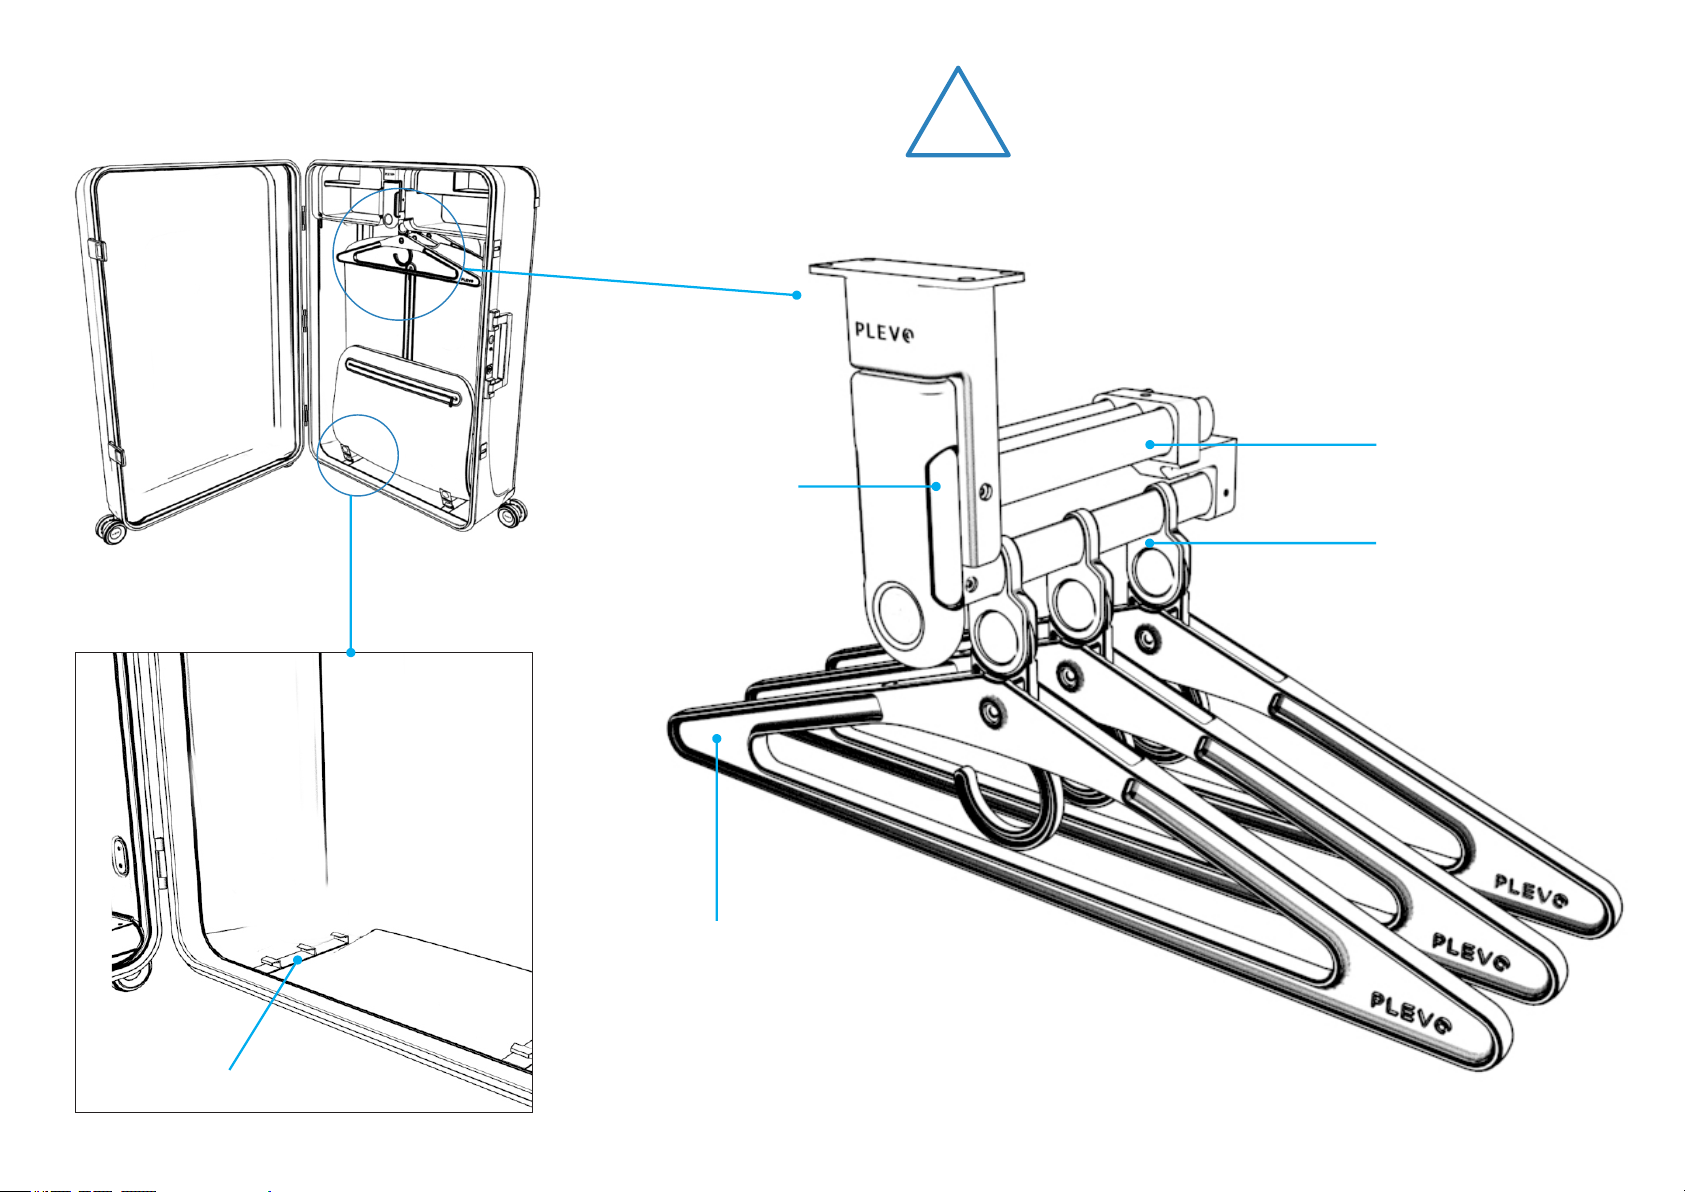
Components
A
Actuator
system
!
The system, the universal hangers and the
suit-rack are included only in our model
B
Holders
Hangers
B
spouts
Hooks
D
Hangers
C
16UP User Guide
Page 27
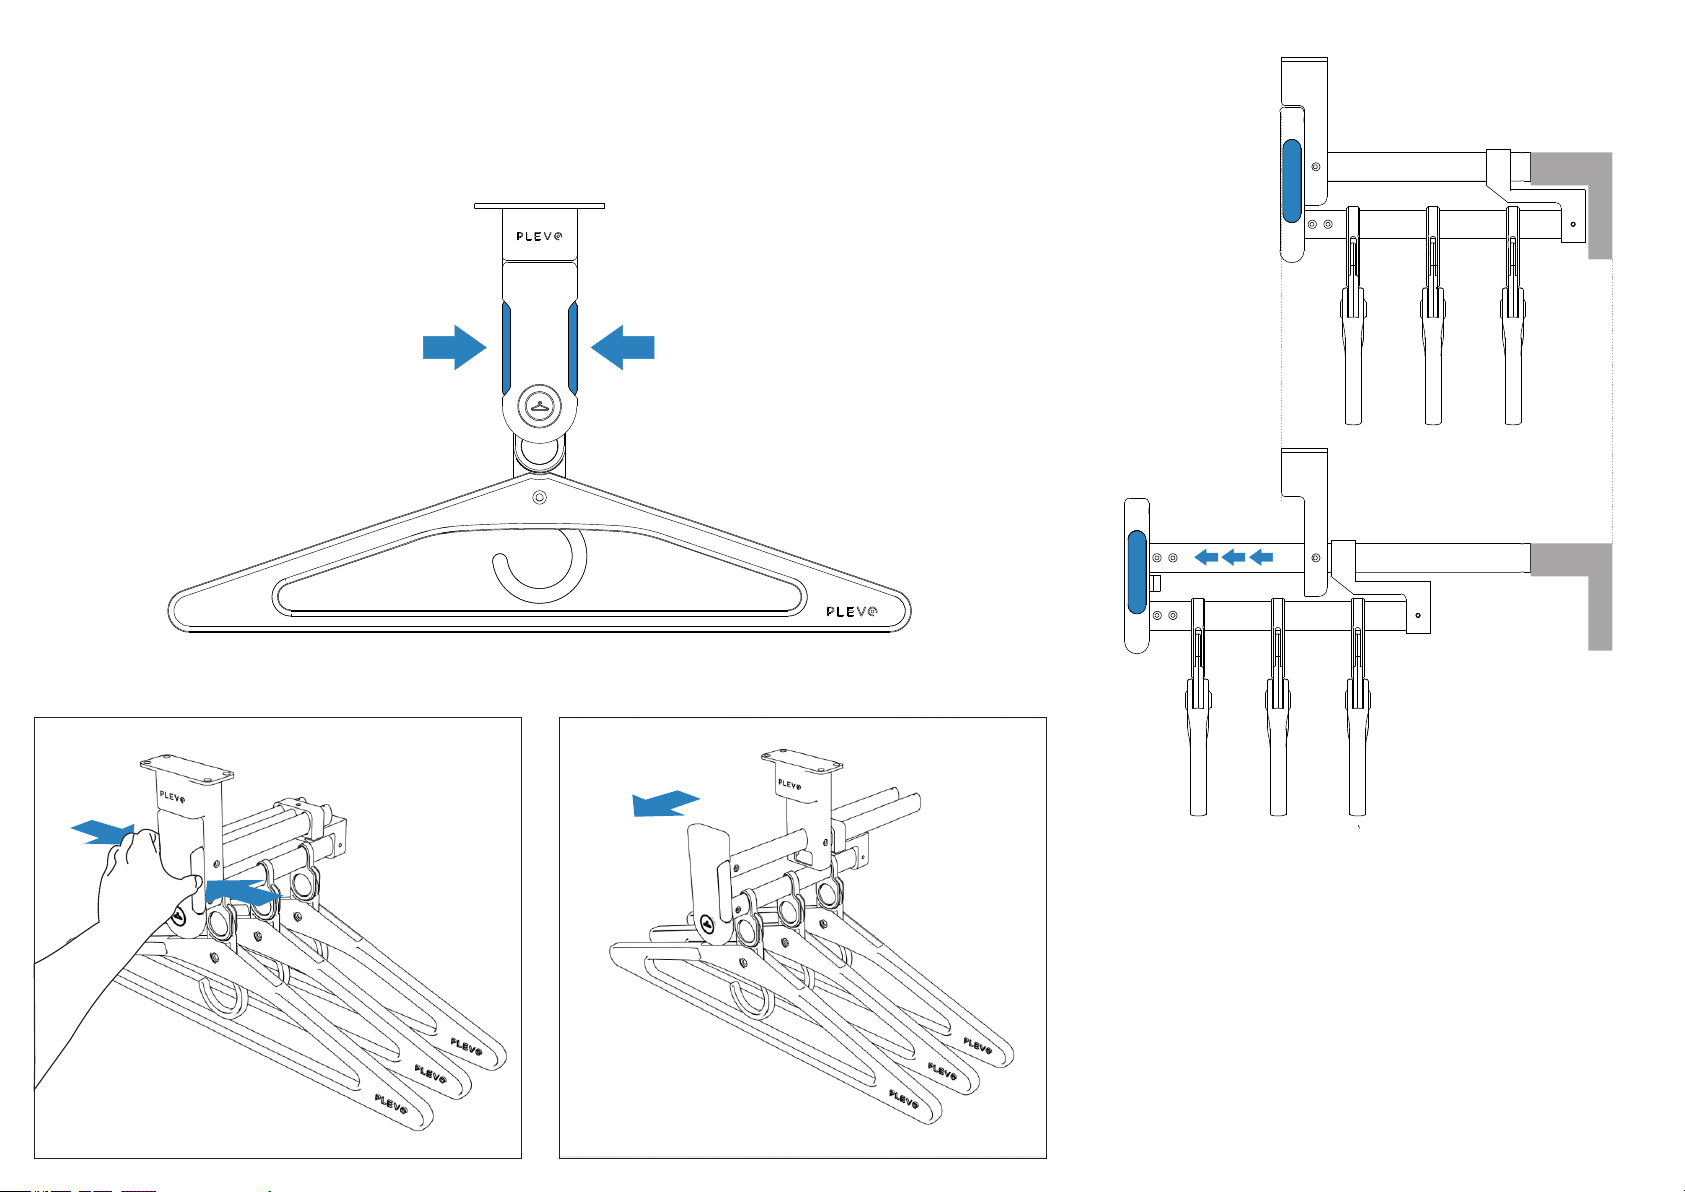
Operation
COMPACT
A
DEPLOYED
1 2
To Deploy the system and access the hangers,
press the command buttons inward releasing the
latch (Figure 1).
Then it will be necessary to slide back the
command to finish deploying the system
(Figure 2).
17UP User Guide
Page 28
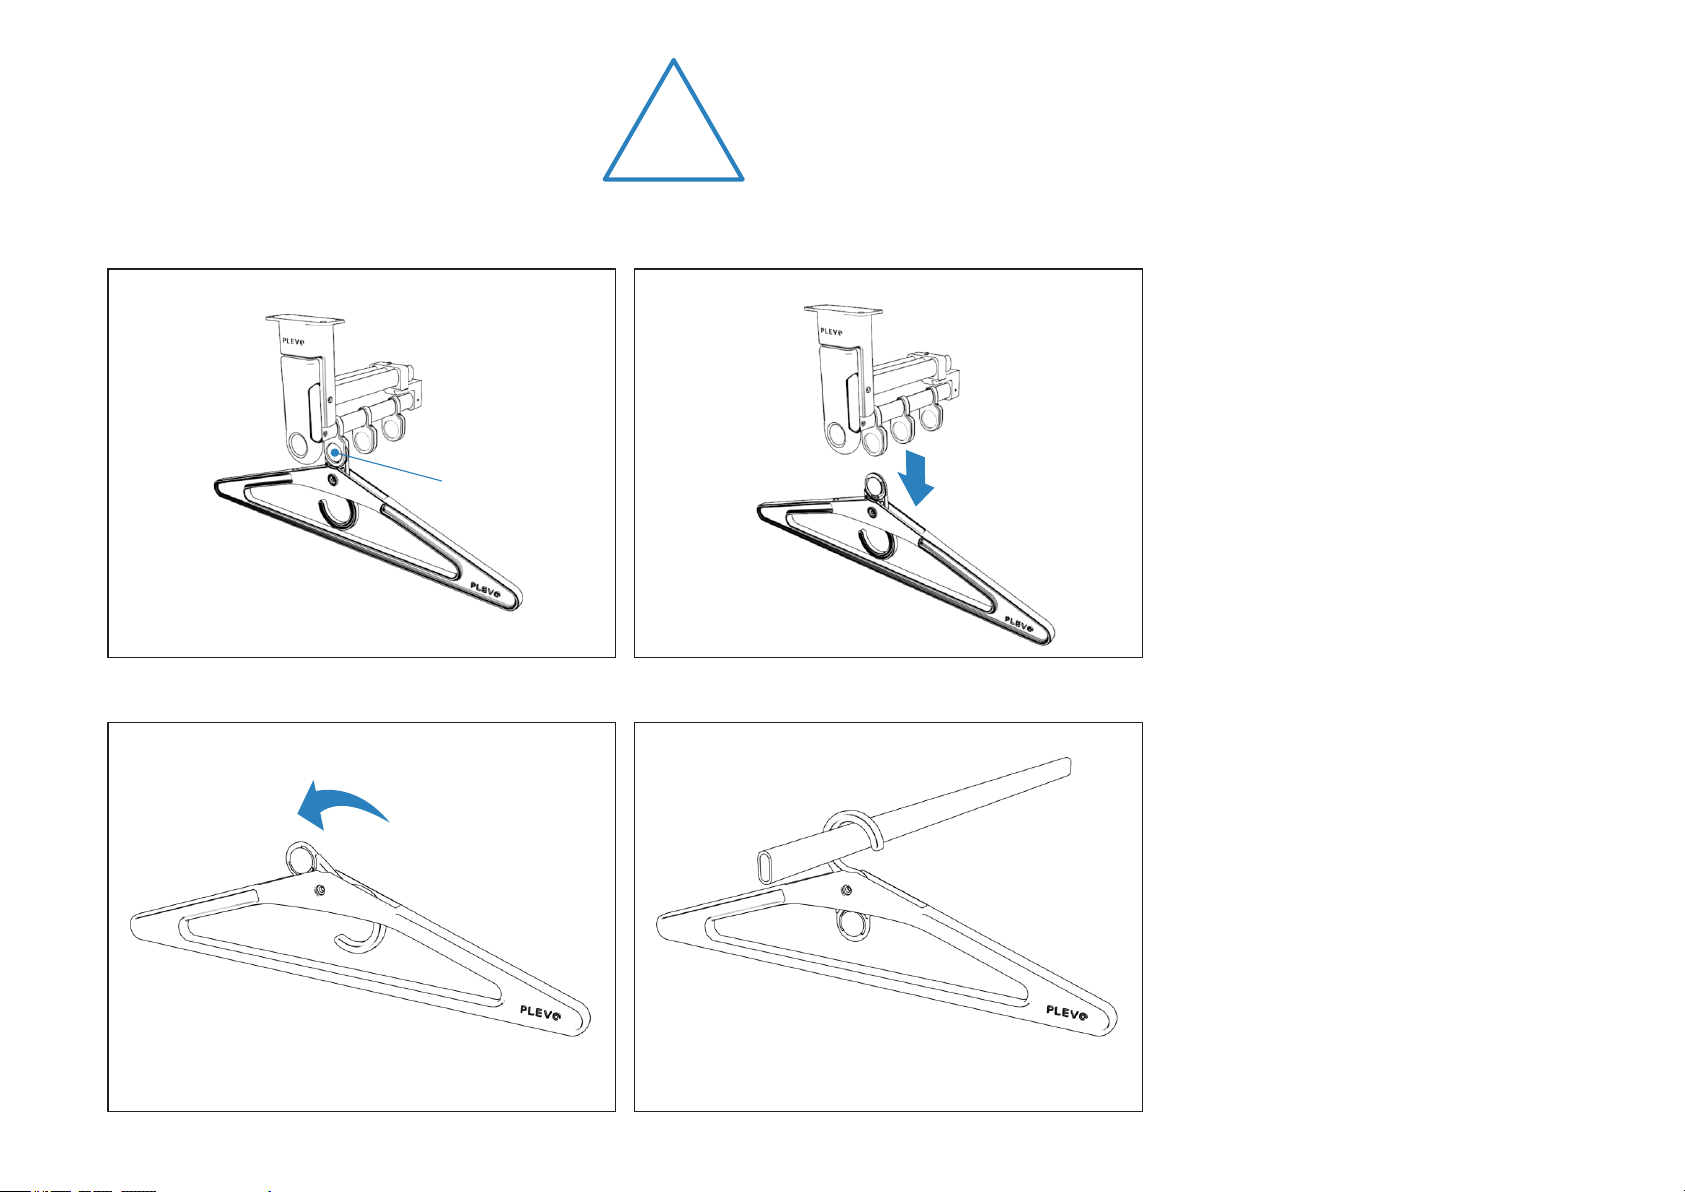
Operation
-Hangers-
1
E
2
!
UNIVERSAL HANGERS
Our system has a set of plastic hangers adaptable to different supports.
In this way it can be used in both a PLEVO and a standard furniture
when the garment is moved.
2
1-
To remove a hanger it is necessary to
press the E button (Figure 1) and then
slide it downwards to make the
workpiece unadjusted.
3-4
Rotate part F (Figure 3) to release the
hook that allows the hanger to be held
43
in different types of supports (Figure 4).
18UP User Guide
Page 29
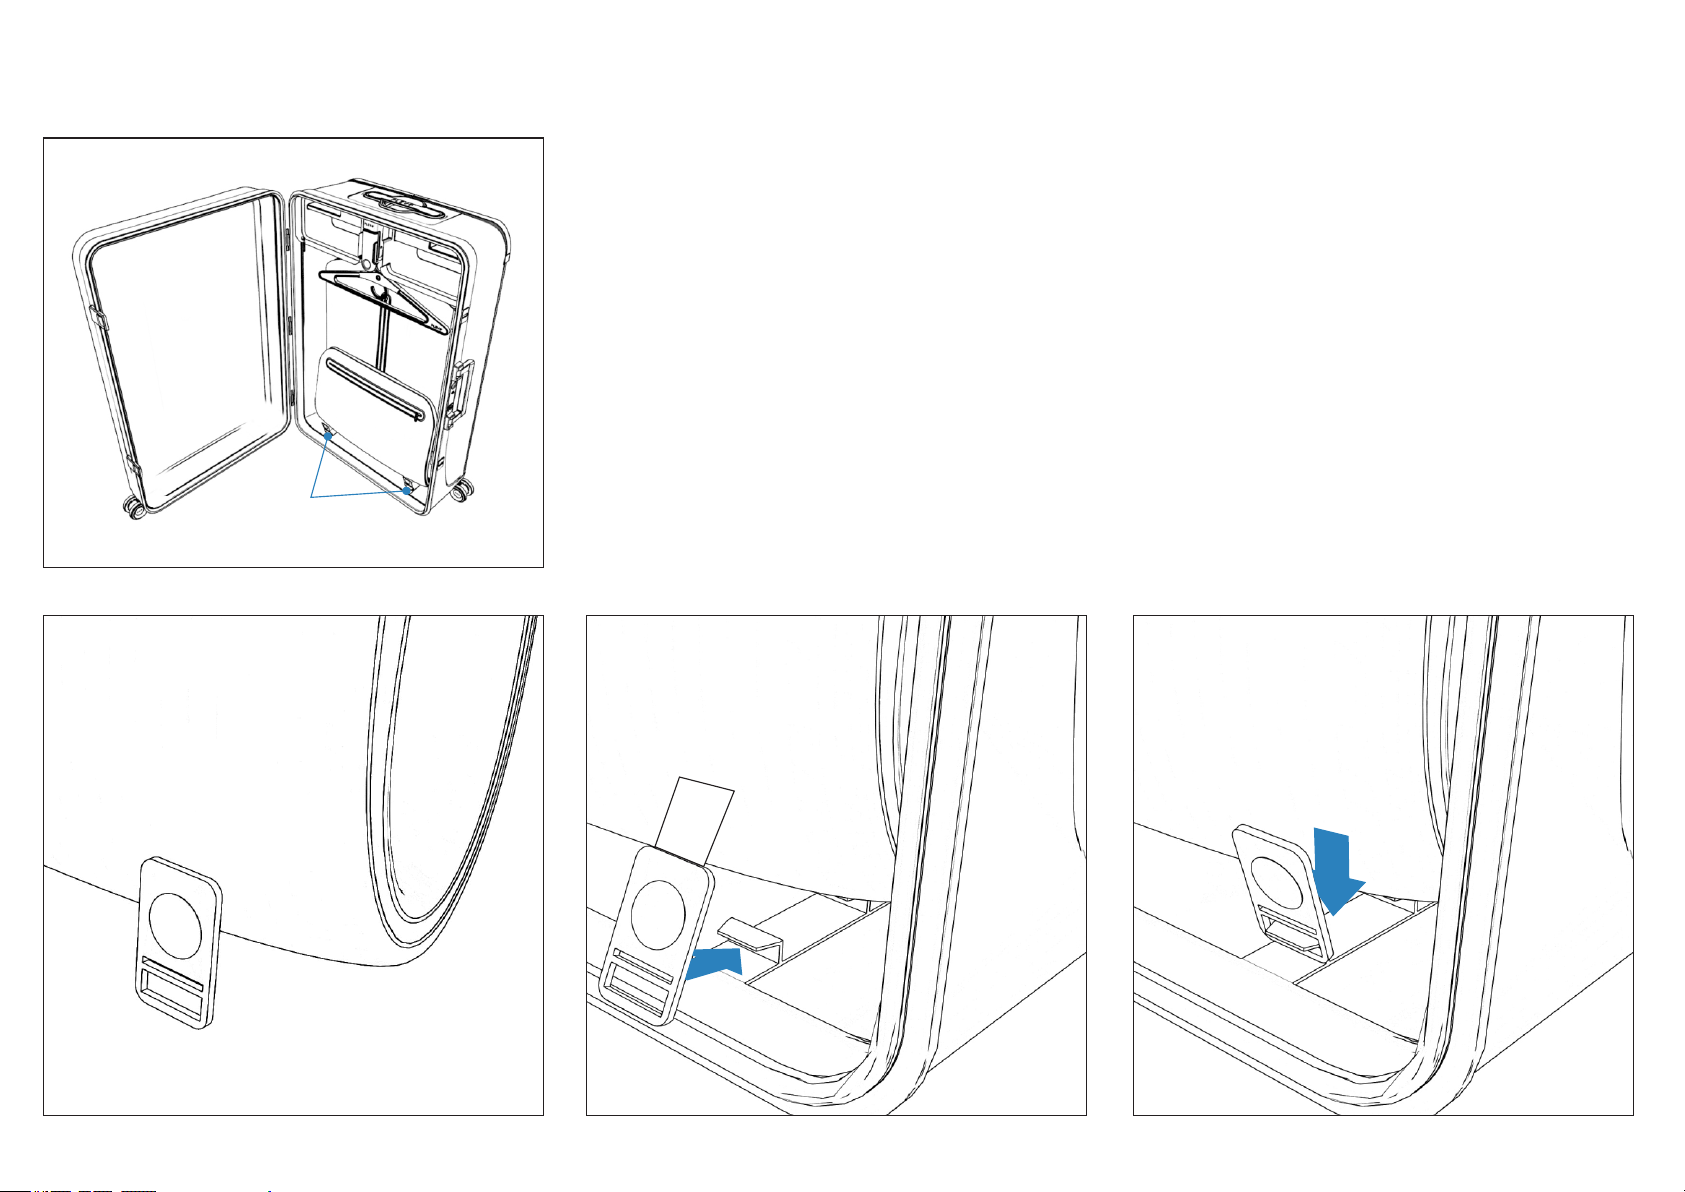
Operation
F
In the lower part of the inside of the UP model there
are two metal strips of hooks necessary for the
anchorage of the trunks.
To make the adjustment it is necessary to extend the
plastic part G (Figure 1) to the corresponding hook
and to anchor it to improve the fastening of the suit
holder (figures 2 and 3)
1 2 3
19UP User Guide
19UP User Guide
Page 30

www.plevo.co
Page 31

FCC STATEMENT :
This device complies with Part 15 of the FCC Rules. Operation is subject to the following
two conditions:
(1) This device may not cause harmful interference, and
(2) This device must accept any interference received, including interference that may
cause undesired operation.
Warning: Changes or modifications not expressly approved by the party responsible for
compliance could void the user's authority to operate the equipment.
NOTE: This equipment has been tested and found to comply with the limits for a Class B
digital device, pursuant to Part 15 of the FCC Rules. These limits are designed to provide
reasonable protection against harmful interference in a residential installation. This
equipment generates uses and can radiate radio frequency energy and, if not installed
and used in accordance with the instructions, may cause harmful interference to radio
communications. However, there is no guarantee that interference will not occur in a
particular installation. If this equipment does cause harmful interference to radio or
television reception, which can be determined by turning the equipment off and on, the
user is encouraged to try to correct the interference by one or more of the following
measures:
Reorient or relocate the receiving an tenna.
Increase the separation between the equipment and receiver.
Connect the equipment into an outlet on a circuit different from that to which the
receiver is connected.
Consult the dealer or an experienced radio/TV technician for help.
FCC Radiation Exposure Statement:
This equipment complies with FCC radiation exposure limits set forth for an
uncontrolled environment. This equipment should be installed and operated
with minimum distance 20cm between the radiator & your body.
 Loading...