

PlenOptika QuickSee Directions For Use Manual

QuickSee
Model QS1.0-B
Directions for Use
P/N 2018-10B Rev A 6– Release


Table of Contents
PlenOptika QuickSee 2
Intended Use 2
Indications for Use 2
Box Contents 3
Device Description 4
Terminology – Device Details 4
Basic Care 5
Warnings 6
Screening Environment 7
Getting Started 8
Charging 8
Powering the QuickSee On and Off 9
Power-Saving Modes 10
User Operation 11
Home Screen 11
Patient Information Screen 13
Patient Log 15
Screening a Patient (Binocular Mode) 17
Monocular Mode 20
Results Screen 21
Notice Messages 22
Basic Settings 24
Bluetooth Printer 26
Advanced Settings 27
QuickSee Companion App 31
Installing the Companion App 31
Pairing the QuickSee 32
Download Patient Data 34
Updating Firmware 35
Companion App Drop Down Menu 36
Basic Troubleshooting 37
System Restart 37
System Freeze 37
Bluetooth Printer Issues 37
Environmental Protection 38
EMC Information 38
Electromagnetic Compatibility 39
EMC Table 40
FCC Compliance Statement 43
Specifications 44
User Interface Symbols 45
Safety Symbols 46
Limited Warranty 47
Contact PlenOptika 50
1P/N 2018 - 10 B Rev A 6 – Release

PlenOptika QuickSee
Congratulations on purchasing the PlenOptika QuickSee!
The Directions for Use are designed to assist you, the user, in making the most of
your experience with the QuickSee.
Intended Use
The QuickSee is intended to measure the refractive power of the eye by measuring
light from the retina using the optical technique of wavefront aberrometry. It is
intended for use on subjects 5 years of age and up.
Indications for Use
The QuickSee is indicated for use by healthcare professionals or under the direction of a healthcare professional to screen for or measure an individual’s refractive
errors associated with poor vision.
2 P/N 2018 - 10 B Rev A 6 – Release
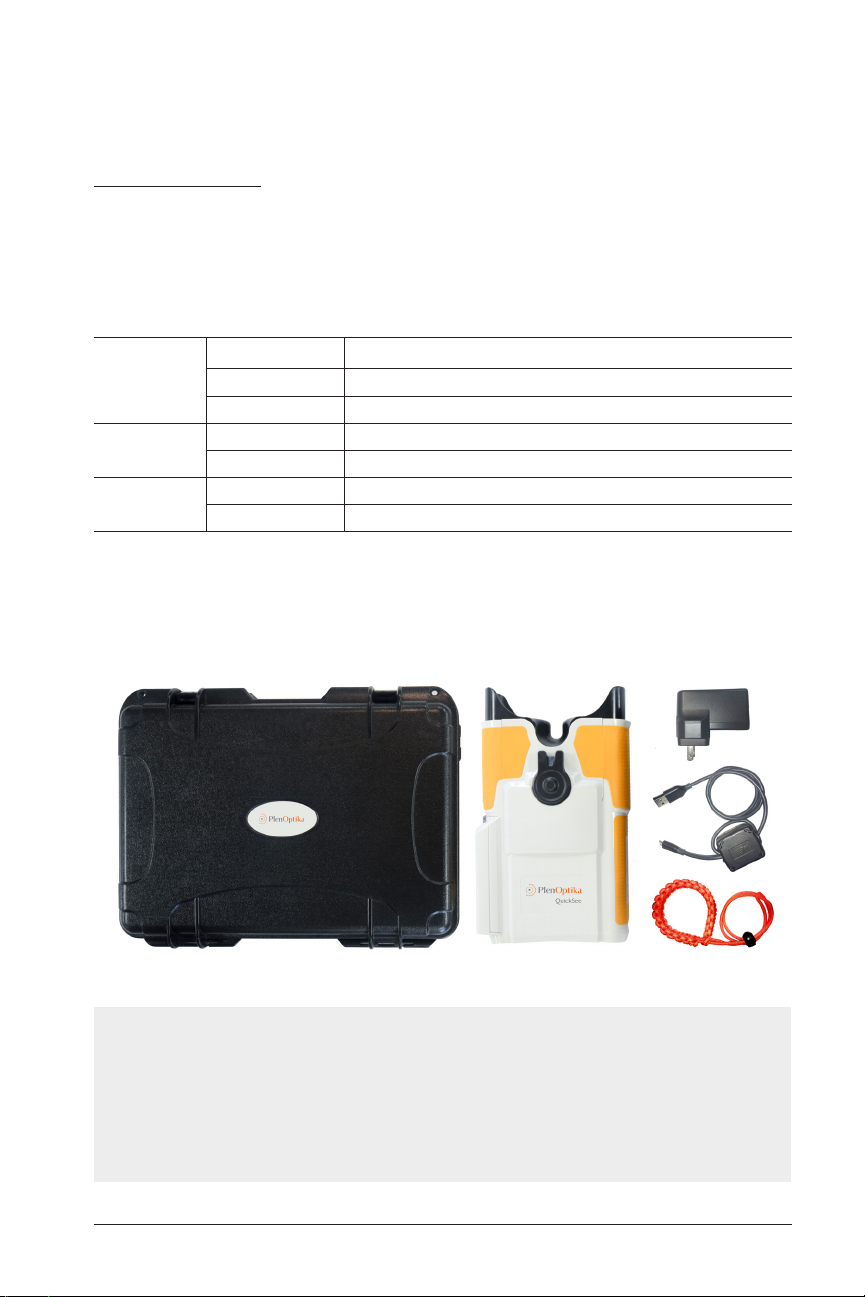
Box Contents
The shipping packaging contains:
1. Hardshell case
2. Binocular QuickSee
3. Mean Well 12I05-USB Medical grade AC Power Supply
Input Voltage AC 80 – 264 V AC
INPUT
OUTPUT
PROTECTION
4. USB A to Micro USB cord (1 m long) with ferrite core
5. Lanyard / wrist strap
6. User manual
Frequency 47 – 63 Hz
AC Current 0.2 A / 230 V 0.4 A / 115 V
Output Voltage DC 5.0 V
Output Current 0 – 2.4 A
Overload 110 – 200% rated output power
Over Voltage 110 – 140% rated output voltage
PlenOptika QuickSee
NOTE: Please do not discard the box and packaging foam. Damages incurred
for shipping the device in non-approved packing material will void the limited
warranty (see page 47 for warranty details).
NOTE: When transporting the QuickSee, place the QuickSee within the hardshell case for safe transport. DO NOT store your QuickSee in the cardboard
shipping box or hardshell case while the power cord is plugged in.
3P/N 2018 - 10 B Rev A 6 – Release
Device Description
The QuickSee is a hand-held wavefront aberrometer with a binocular form factor
that provides ease of alignment for the subject. Operation is as simple as having
the subject look at a distant object through the device. The device provides a quick
measurement of a subject’s refractive error. Each measurement provides binocular
assessment and allows for simple data collection.
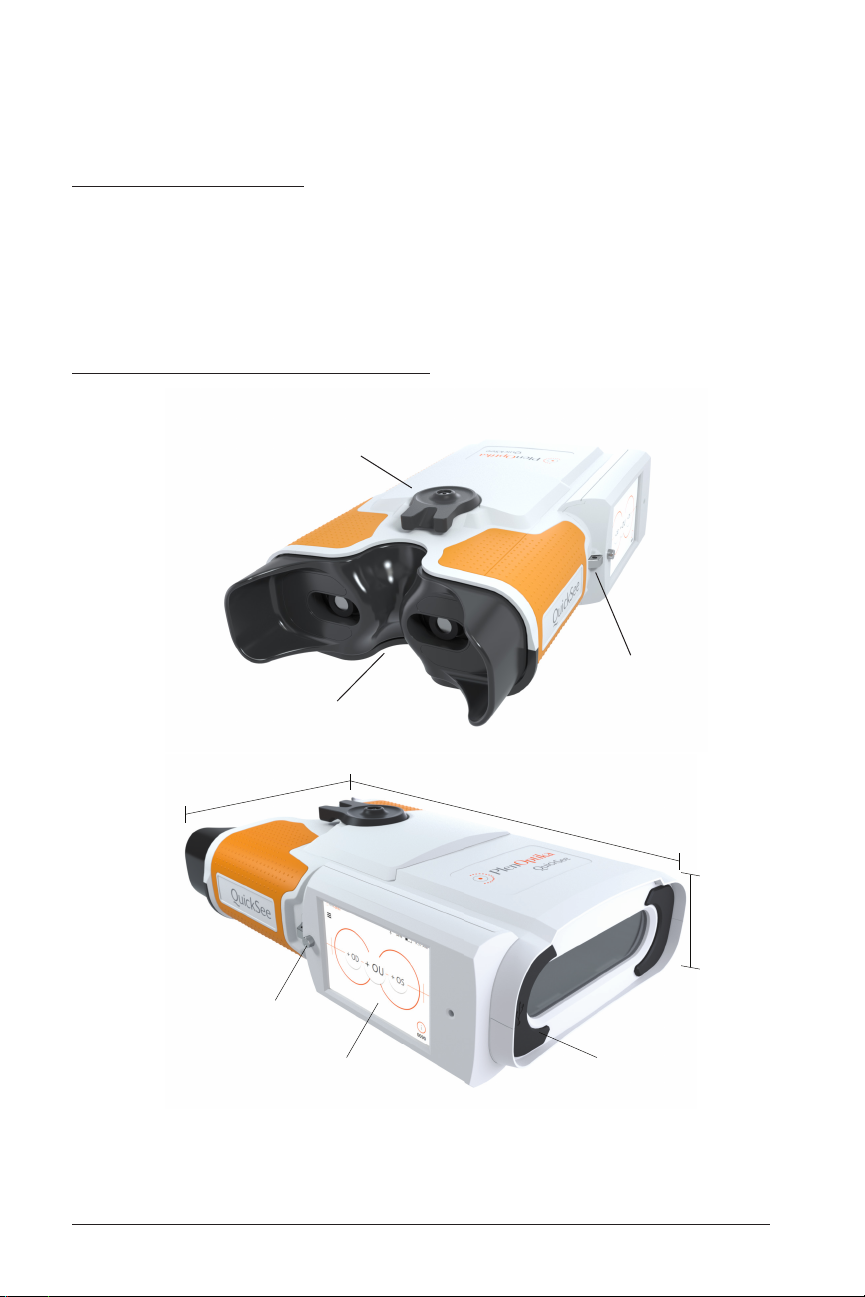
Terminology – Device Details
Interpupillary adjustment
Strap hook
Open view eyepiece
6.5” / 16.5cm
11” / 28cm
3.25” /
8.25cm
Power button
Touchscreen display
4 P/N 2018 - 10 B Rev A 6 – Release
Charging port (USB)

PlenOptika QuickSee
Basic Care
1. The QuickSee is a precision instrument. DO NOT drop or subject it to physical
shock. If device is dropped or suffer a physical shock functionality may be affected. To ensure proper functionality of the device after any non-negligible physical
shock the device needs to be inspected by PlenOptika.
2. The QuickSee is NOT waterproof. If you accidentally drop it into liquid or liquid
is spilled on the device, contact PlenOptika Support immediately. If minor water
droplets are found on the device, wipe off with a soft dry cloth.
3. DO NOT leave the QuickSee in excessive heat, such as in a car or in direct sun-
light. High temperatures can cause the device to malfunction.
4. The QuickSee contains precision electronic circuitry. NEVER attempt to disas-
semble the QuickSee or remove the battery; this may result in bodily harm and
will void any warranty.
5. DO NOT use cleaners that contain organic solvents to clean the QuickSee’s body,
LCD screen, eye lenses or back viewing lens.
6. Use a microfiber cloth for cleaning and for stubborn stains use with a small
amount of water or a non-abrasive cleaner. Always keep the back viewing lens
free of fingerprints, dirt, and dust.
7. When plugging the AC power connector into the QuickSee, DO NOT force the
power connector into the device as this may cause damage and will not be covered under warranty.
8. DO NOT store the QuickSee in its case with the power cord plugged in, this could
cause damage to both the power cord and the device. If plugged in, store in a
location with no interference with the power cord.
9. DO NOT swing the device on the lanyard to avoid unnecessary collisions and
incidental damage.
10. DO NOT push or scratch the touchscreen display surface with anything stiff or
rigid. A stylus is acceptable for use with the device if desired.
11. DO NOT spill liquids on the QuickSee. Please wipe off drops of liquid like saliva
and water on LCD panel surface immediately.
12. The device is NOT intended to be used in conjunction with any flammable gases
or liquids.
13. Electrically-powered medical devices connected to the electrical network in
which the QuickSee is connected should meet EMC standards.
14. The device is NOT intended to be used in intense electromagnetic environments,
check EMC specifications of the device in this document (immunity guidance
table).
5P/N 2018 - 10 B Rev A 6 – Release

15. The main applied parts of the device (eyecup and grips) are made of appropriate
materials to minimize the probability of patient to patient contamination (smooth
non-porous plastic and textured rubber, respectively). It is recommended to
clean regularly the aforementioned applied parts. Both can be wiped with an alcohol wipe to clean and disinfect them, as is normal procedure with most clinical
optometric equipment. The eyecup can be easily removed for further disinfection
as needed (magnetic attachment system).
Warnings
1. Changes or modifications not expressly approved by PlenOptika could void the
user’s authority to operate the equipment.
2. The supplied AC power supply should be used exclusively. Replacement or sub-
stitution may only be done with an approved unit supplied by PlenOptika.
3. If the power cord or external power supply becomes damaged or its integrity is
suspect, or the building power receptacle outlet is ungrounded, then the QuickSee shall only be used with the internal battery power until replacement parts or
a grounded power receptacle become available.
4. The device does not have essential performance functions. However, if user sus-
pects damage and device enters a fault case as listed below, contact PlenOptika
Support if device does not return to normal operation as outlined in the following.
NOTE: Device is designed to emit laser radiation (wavelength 785 nm, power
< 50 uW per eye, circular beam) within the Acceptable Emission Limit (defined in the IEC 60825-1) during normal use and fault conditions. Under fault
and damaged conditions (and contingent on the severity of the damage), the
device will ensure the basic safety of patients, operators and others by:
• Restarting and rechecking all the functional subsystems. If all the systems
are functional, the device will start normally.
• Turning off to ensure basic safety as well as the safety of the components of
the device. If all the systems are functional, pressing the ON/OFF button will
power on the device normally.
• Entering into safe mode in which recovery of the device is required by performing a force shut down (long press of the ON/OFF Button). After a force
shut down, if the device passes internal tests and is able to ensure basic
safety of patients, operators and others, pressing the ON/OFF button will
power on the device normally.
Severe fault conditions which can cause faulty responses from the device
include high electro-static discharges, fast transient changes in the supply
when the wall adapter is connected or failure of device electronic subsystems. Contact PlenOptika Support if device does not power on normally as
described after an episode of damage.
6 P/N 2018 - 10 B Rev A 6 – Release

PlenOptika QuickSee
5. The device, if used as specified, shall not require any special maintenance func-
tions to ensure basic safety with regard to electromagnetic disturbances during
its lifetime. However, if the user suspects any damage in the device that may
result in EMI problems, contact Plenoptika Support.
6. The device contains a rechargeable Lithium Ion Polymer Battery cell (IEC62133:
2012 certified, Ratings: 3.7 V, 8000 mAh, 29.6 Wh). Replacement or substitution of this battery may only be performed by PlenOptika service engineers. If you experience an issue with the battery contact please PlenOptika
Support.
Screening Environment
The QuickSee can be used indoors or outdoors. Be sure to eliminate or block any
sources of sunlight and/or incandescent light from reflecting directly into the subject’s field of view.
NOTE: A minimum pupil size of 2 mm is required for screening to occur and may
be difficult to achieve in a room or environment with a bright light source. For best
results, subject’s pupils should be 2 mm or greater.
The device is designed to work in the following environmental conditions:
• Ambient temperature range: -10ºC to +40 ºC. (with battery charging, 0 to 50 ºC)
• Relative humidity range: 30-90%
• Atmospheric pressure: 800 to 1060 hpa
NOTE: If the device is used continuously in environmental conditions in which
the temperature is 40 ºC or higher, some parts of the device may surpass 41
ºC. During such situations, the expected maximum temperature of the following parts (as determined by IEC 60601-1 testing) are:
• Thumb wheel: Maximum expected temperature < 48 ºC
• Grips: Maximum expected temperature < 52 ºC
• Eyecup: Maximum expected temperature < 55 ºC
Under these conditions, the device does not represent a safety risk for the
patient, operator, or environment. However, it is recommended to reduce the
temperature of the device in order to avoid an unpleasant experience for the
patient. To accomplish this we recommend:
• Turning off the device until the temperature of these parts is reduced.
• Avoiding exposure to a heat source (i.e. sunlight) to reduce the temperature
of the aforementioned parts.
NOTE: The measurement time is 10 to 25 seconds (According to IEC 60601-1
the exposure limit is 60 ºC for 60 seconds or less).
7P/N 2018 - 10 B Rev A 6 – Release
Getting Started
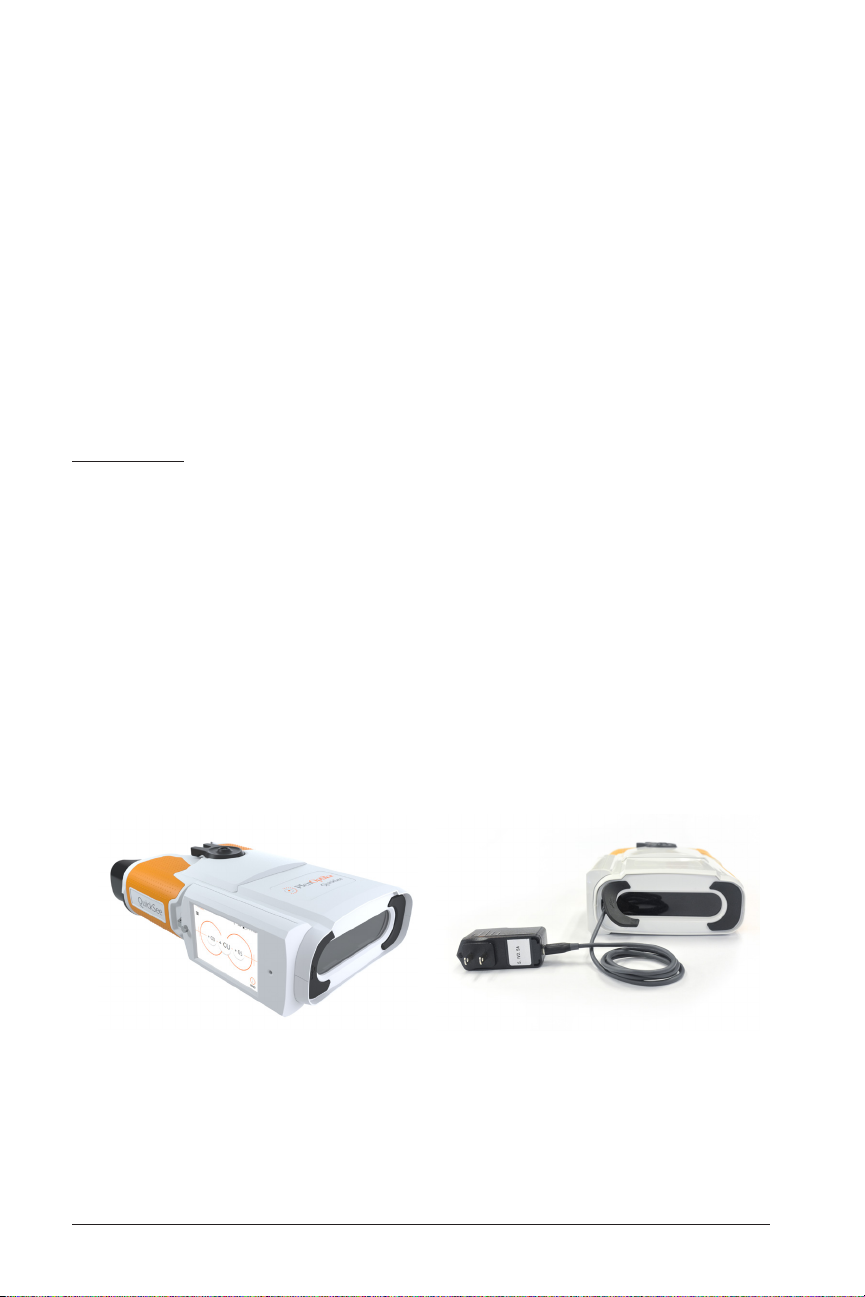
Charging
1. Connect provided AC cord set and power supply/charger together.
2. Gently lift the back of the QuickSee USB rubber panel to view the available
connection.
3. Locate the USB power connector on the QuickSee and connect the power sup-
ply/charger. The USB power connector on the power supply/charger will easily
insert into the USB power connector on the QuickSee. Using excessive force to
connect the power charger can damage the device and will void the warranty.
4. Plug the AC power cord into an available AC wall outlet to charge the device –
the blue LED next to the display will light up when charging.
5. Charging to 100% takes 6 hours. The unit can be used while charging. Ensure
unit is charged fully before first use by charging for 8 hours initially.
QuickSee Rear View QuickSee with AC Charger Plugged In
8 P/N 2018 - 10 B Rev A 6 – Release
Getting Started
Power off
Interpupillary
adjustment
Eyepiece
Power buttonLanyard mount
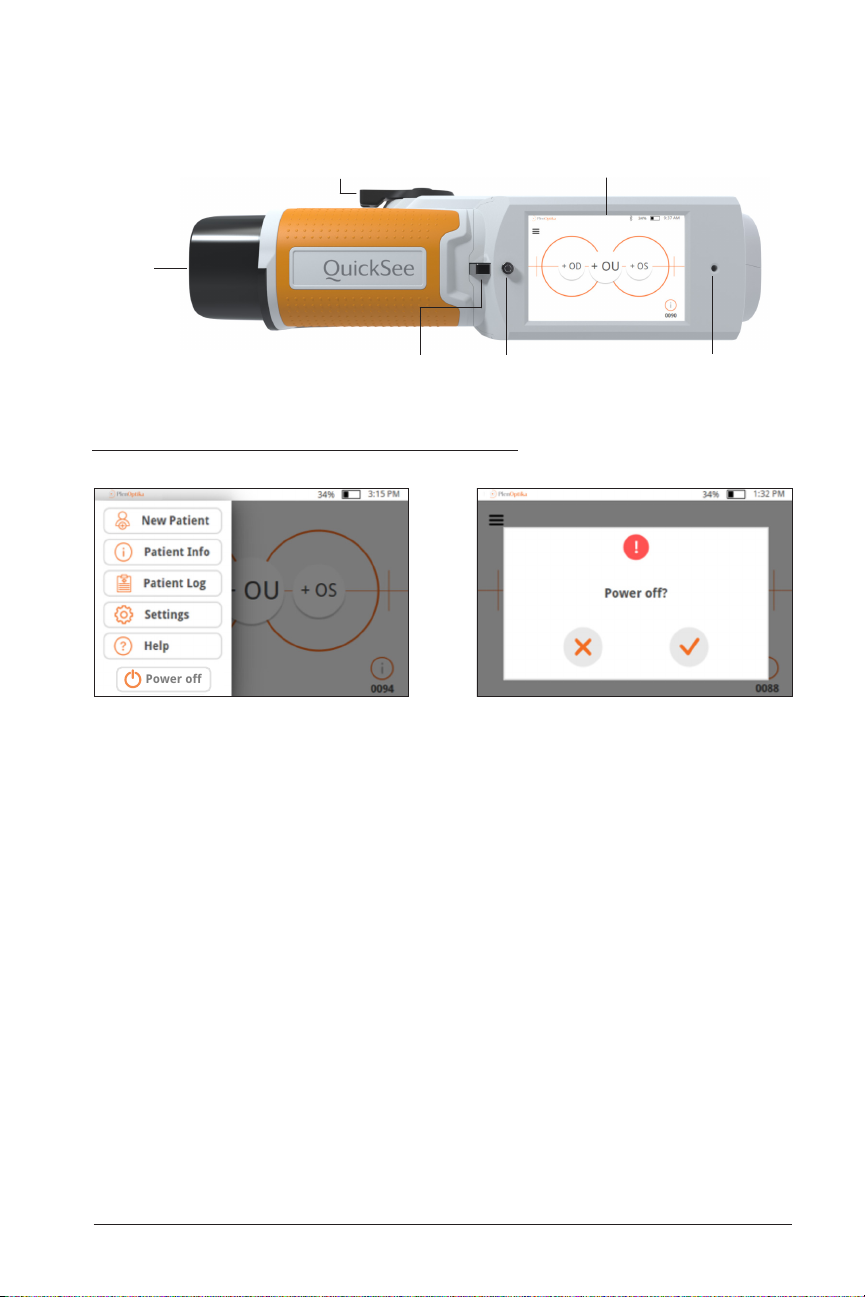
Powering the QuickSee On and Off
Touchscreen display
Charging LED
1. To turn the QuickSee on, press the power button for a half second and release
(start-up process takes approximately 30 seconds). Once powered on you will
see the Main Menu (“Home Screen”).
2. To turn the device off, go to the top right drop down menu, select “Power off” and
confirm by pressing the check mark.
• Avoid Powering Off via the power button when handling device– be mindful to
not press into the power button continuously for 7 seconds, as this force shuts
down the device. Force shut down may lead to data loss or corruption and should
only be used if the device freezes and shut down via the drop down menu is not
possible.
• Battery lasts for up to 8 hours of continuous use when fully charged.
9P/N 2018 - 10 B Rev A 6 – Release
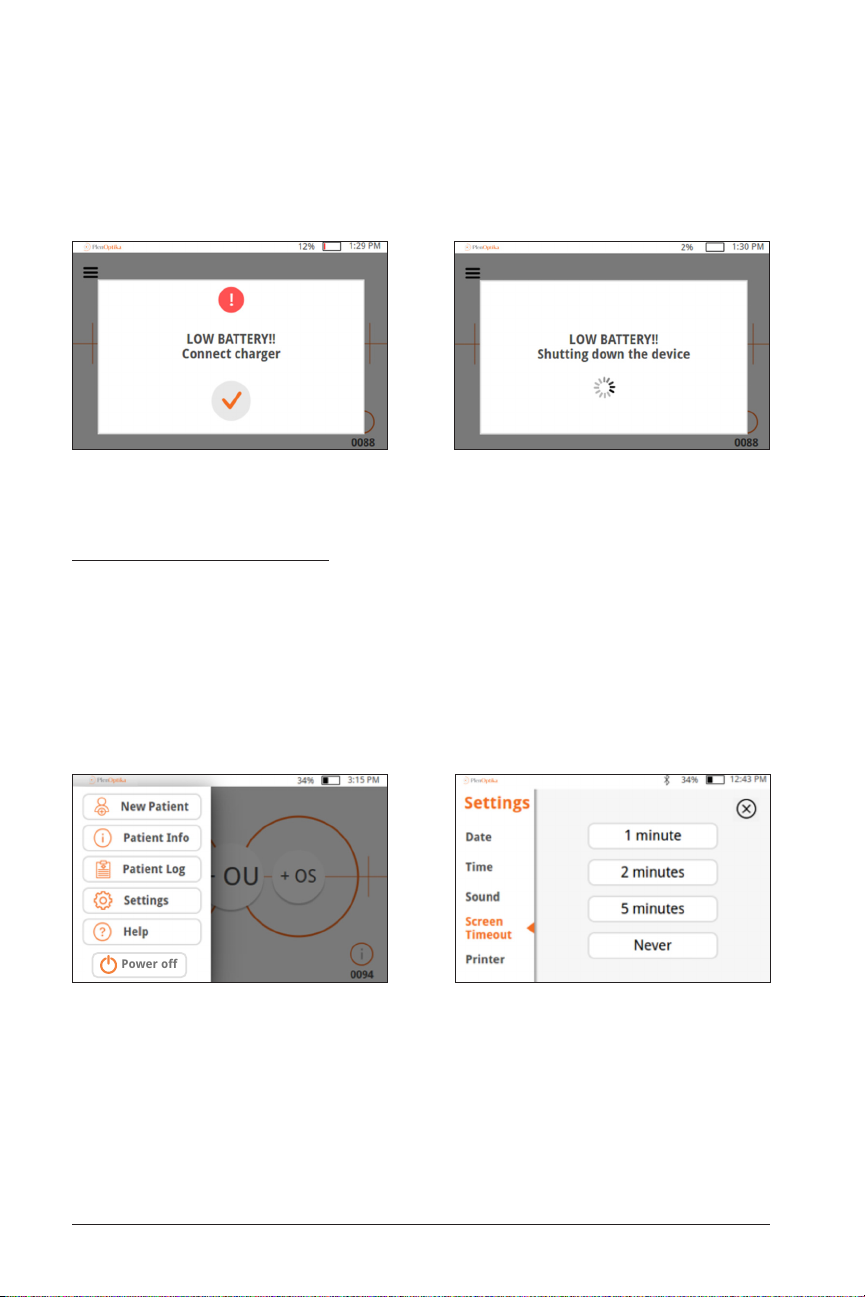
• Low battery – When the battery level reaches a very low level, a warning message
Power off
will show up. If no power cable is inserted shortly after, the device will automatically shut down due to the low voltage of the battery.
Power-Saving Modes
• Pressing and releasing the power button briefly will put the device into
Power-Saving Mode. In Power-Saving Mode.
— In Power-Saving Mode, the screen is off and less battery is consumed.
— Device is instantly operational when power button is pressed
• Screen timeout – set the amount of time without activity after which the QuickSee automatically goes into Power-Saving Mode in the Settings: Screen Timeout
menu.
10 P/N 2018 - 10 B Rev A 6 – Release

User Operation
Home Screen
Drop Down Menu
Measure
right eye
Bluetooth
Measure
both eyes
Active
Battery
Status
Patient
number
Time
Measure
left eye
Patient Information
Menu
When the QuickSee is powered on, the Main Menu or “Home Screen” will appear. If
Bluetooth connectivity is turned on, the Bluetooth enabled icon will be visible in the
top right corner. Bluetooth is disabled by default when the device powers on; it can be
turned on in the Basic Settings menu.
Start: To begin the data entry and screening/measurement process, select the
button. This will allow you to:
• Enter subject information, such as Patient ID (auto-fills unless specified), Age,
Gender, Inter-Pupillary Distance (PD), and current eyeglass prescription if available.
• Begin the screening process (Monocular and Binocular available)
OR
11P/N 2018 - 10 B Rev A 6 – Release

• To begin screening instantly, with no personal subject data, press +OS, +OD, or
+OU icon to start screening the left, right, or both eyes. You will be able to enter
subject data even after the screening if desired.
Icons on screen
• Drop Down Menu goes to menu for new Patient, Patient Info, Patient Log,
Settings, Help, and Power Off.
• Patient Infomation goes to Patient Information Screen.
12 P/N 2018 - 10 B Rev A 6 – Release
User Operation
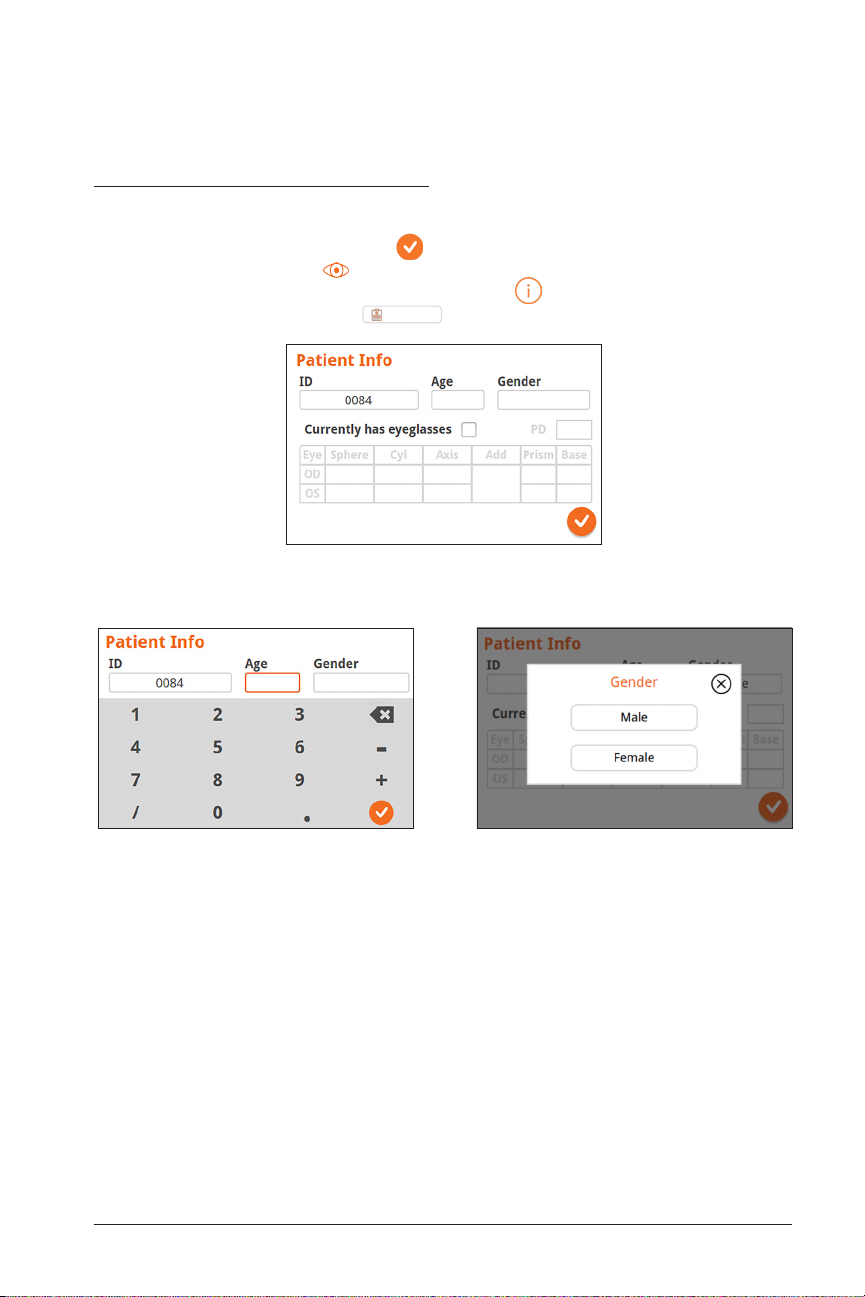
Patient Information Screen
On the Patient Information Screen, confirm that all entered data match the patient
being assessed. You can modify information by touching the field you wish to change.
After the change is completed select to save information and return to the Home
Screen. Alternatively, select to return to the Home Screen. There are two ways to
access the Patient Information Screen: through the icon on the bottom right of
the Home Screen or through the
Patient Information Screen - Partially filled
Patient Log
button in the drop down menu.
Enter Age Enter Gender
13P/N 2018 - 10 B Rev A 6 – Release
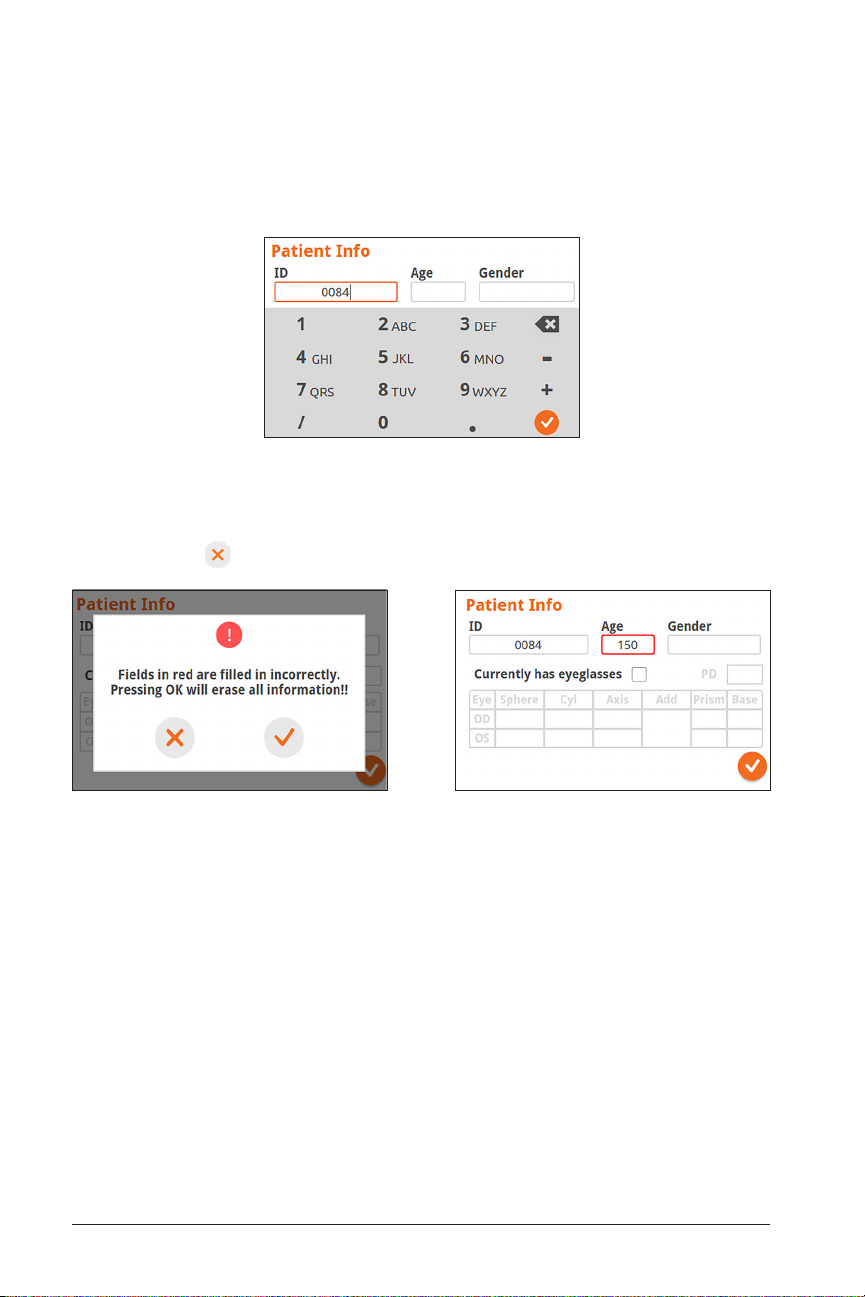
When editing the Patient ID Number, text can also be entered with the alpha-numeric
keypad. For example, the letter “A” can be entered by hitting “2” 2 times in quick succession and the letter ”B” can be entered by hitting “2” 3 times in quick succession.
Change Patient ID Number
Once Patient Information is entered, any incorrect entries will be highlighted. If this
happens, select and edit the highlighted field:
Incorrect Information Detected Incorrect Information (Age) Highlighted in Red
14 P/N 2018 - 10 B Rev A 6 – Release
 Loading...