

Plenio VXA-5000, VXA-4300 Owner's Manual
(4.1 Version)
Thank you for purchasing our product.
This user manual is designed to support convenient usage of the navigation system and safe driving.
Please read the entire manual carefully before using the product.
The contents of this manual may vary depending on the navigation software version.
The user interface, functions and performance of the device and the contents of this manual are subject
to change without prior notice.
Please follow all safety guidelines listed in this manual for your safety.
Please comply with the following important instructions to ensure safe driving.
Warning
Do not set or search for a destination while you are driving. Park your car at a safe place
before inputting addresses or searching for a destination.
Warning
Warning
Voice guidance and map route can be different from actual road conditions.
Always be sure to comply with actual road signs/signals and local traffic regulations for safe driving.
It is very dangerous to operate the device, or to look at the screen while you are driving.
Always be fully aware of the surrounding traffic conditions and nearby pedestrians when you
are in your car.
1

2
CHOOSING AND FINDING LOCATIONS .............................
NAVIGATING .....................................................................
PLANNING A ROUTE ..........................................................
SETTINGS ............................................................................
EXTRA SERVICES..................................................
FREQUENTLY ASKED QUESTIONS .......................................
MULTIMEDIA MODE...............................................
MULTIMEDIA MODE OVERVIEW ..........................................
AUDIO PLAYER ....................................................................
VIDEO PLAYER ....................................................................
IMAGE VIEWER ...................................................................
GAME MODE ......................................................................
MOBILE PHONE MODE .......................................................
SYSTEM CONFIGURATION..................................
SYSTEM SETTINGS OVERVIEW ............................................
CUSTOMIZING USER PREFERENCES .....................................
SYSTEM MAINTENANCE AND USER SUPPORT......
USING YOUR VXA-5000/4300 SAFELY ...............................
CLEANING THE VXA-5000/4300 ........................................
TROUBLESHOOTING THE VXA-5000/4300 ..........................
FAQS ..................................................................................
CUSTOMER SUPPORT ..........................................................
SYSTEM SPECIFICATIONS...................................
HARDWARE FEATURES ..........................................
GPS SPECIFICATIONS .............................................
SOFTWARE SPECIFICATIONS .................................
DESIGN AND ERGONOMICS .................................
ENVIRONMENTAL SPECIFICATIONS .......................
REGULATORY INFORMATION ................................
Table of Contents
Table of Contents
ABOUT NAVIGATION SYSTEM...................
DIRECTIONS BEFORE USING THIS PRODUCT ....................
COMPONENTS .......................................................
VXA-5000/4300 FEATURE HIGHLIGHTS ...................
FIRST THINGS FIRST..........................
SYSTEM TOUR .........................................................
PERIPHERALS TOUR ..................................................
VXA-5000/4300 SETUP ...........................................
VXA-5000/4300 FUNDAMENTALS..............
HARDWARE INTERFACE ...............................
COMMAND INTERFACE ..........................................
NAVIGATION MODE ..............................................
STARTING THE NAVIGATION APPLICATION ...........
TYPOGRAPHIC CONVENTIONS.................
ICONS............................................................
INTRODUCTION...........................................
KEY FEATURES ........................................................
GETTING STARTED.....................................
CHOOSING A LANGUAGE .....................................
SETTING THE TIME ZONE ........................................
SAFETY PRECAUTIONS ............................................
GPS CONNECTION .................................................
MAIN ELEMENTS.........................................
MAIN MENU ...........................................................
MAP ........................................................................
NAVIGATION SCREEN ............................................
MAIN FEATURES.........................................
3
3
6
7
8
8
12
12
19
19
22
24
25
26
27
28
28
29
29
29
29
30
31
31
32
34
35
35
45
47
50
54
54
55
55
55
60
62
64
65
71
71
72
77
78
78
78
82
84
85
85
86
87
87
89
89
Directions before using this product
Please read through this section for important safety tips before using this product.
Usage directions
3
Warning
Refrain from operating the device while the car is in motion. Please park the car at a safe
location before operating the device to minimize the danger of a traffic accident.
Voice guidance and map routes can be different from actual road conditions. Always be sure
to comply with actual road signs/signals and local traffic regulation for safe driving.
Warning
Please do not modify the car in any way to install this device. Doing so may negatively affect
the safety devices on your vehicle.
Warning
Warning
The manufacturer will not be liable for any accident or damages arising out of the use of this
product. The user will bear sole responsibility.
Warning
The suction cup mount may become dislodged from the windshield due to vibration, sudden
temperature changes, or unexpected shock, resulting in damage to the device or your car.
Please mount the device in a secure location (refer to the installation section for more details).
Caution
Do not keep this product powered for a long time after stopping the engine. This can cause
the vehicle battery to drain.
About Navigation System
Directions before using this product
Installation directions
4
Caution
Only use the cables provided with the device. Always make sure that the device power is off
before connecting any external cables. Connecting external cables with the device powered
may cause damage to the device.
Caution
Never attemp to disassemble the device yourself. Avoid applying shock to the device.
Caution
Operate the touch screen with a round object or your fingertip. Using a sharp hard object may
damage the display.
Caution
When cleaning the screen, turn off the power and use a soft clean dry cloth. Never use water
or chemical substance like detergent or solvent.
Caution
Please do not remove the SD card while data is being accessed from it. It will cause the device
to become unstable and freeze. This includes anytime the device is in the Audio player, the
Video player, the Image Viewer, or the navigation application. If the device freezes, turn off
the system and reboot.
Warning
Please follow the instructions in the Installing Product section for connecting all wires and cables
to avoid malfunction.
Warning
Do not install the product in a location where driving can be impaired or where the
driver’s view of the road is blocked.
Warning
Install the product in a position that does not interfere with the operation of vehicle safety devices
such as air bags.
About Navigation System
Directions before using this product

5
Caution
Use only the cables provided with the product to ensure stable system operation.
Caution
This product must be used with 5V power only.
Caution
Please power down the device before connecting any audio / video cables, otherwise the
product can be damaged.
Caution
Do not install the product in a place with water, humidity, vapor, dust, oil, or smoke.
Caution
For the first time the device is taken out of the box, and any time the device hasn’t been used
for a long time, or after a cross country flight, it may take 5~10 minutes to obtain GPS
position.
Caution
Do not put any objects that may interfere with the GPS signal reception near the device. Most
problematic are any metallic objects that are located near the GPS antenna.
Caution
Do not install other electronic devices that generate heavy electromagnetic waves (such as radio
transmitters) near the GPS antenna.
Caution
GPS reception can be blocked if the car windshield is specially tinted.
About Navigation System
Directions before using this product

Components
6
Navigation System unit
Installation DiscStylus Pen
Cradle
Dashboard disc
Cigar Jack
Quick Start GuideAC Adapter
About Navigation System
Components
ž Specifications and design and contents are subject to change without notice.
Suction Cup Mount
Quick Start Guide
Owner’s Guide Disc
Spacer Monitor

VXA-5000/4300 feature highlights
Powerful system
• Microsoft Windows CE .NET 4.2 operating system
• Samsung S3C2410 266 MHz application processor
• SiRF Star III GPS
• High-density rechargeable 2200 mAh Lithium Ion battery
Wide and accurate GPS coverage
• TeleAtlas digital map database
• Integrated patch antenna for optimum satellite pick up at every angle
Mobile design
• Compact and lightweight body makes it easy for users to carry it anywhere while driving or hiking
• Car mount kit for multi-vehicle usage (windshield or dashboard mounting)
• On-the-road recharging options via the car charger
Ergonomic features
• 4.3-inch 200-nit QVGA TMR LCD touch-sensitive screen
• Accessible control hot keys with backlight illumination
• Simple, easy-to-use user interface with large icons and command buttons
• Multi-language support for user interface
• Advanced power-saving options
Entertainment programs
• Audio player for musical entertainment
• Video player for moving pictures
• Image viewer for digital pictures
• Enjoyable game
Serviceable program
• Mobile phone mode using Bluetooth (valid in VXA-5000 only)
7
About Navigation System
VXA-5000/4300 feature highlights
This chapter describes the hardware interface of the VXA-5000/4300 and its peripherals. Instructions for setting up
the device and some basic system operations are also discussed.
System tour
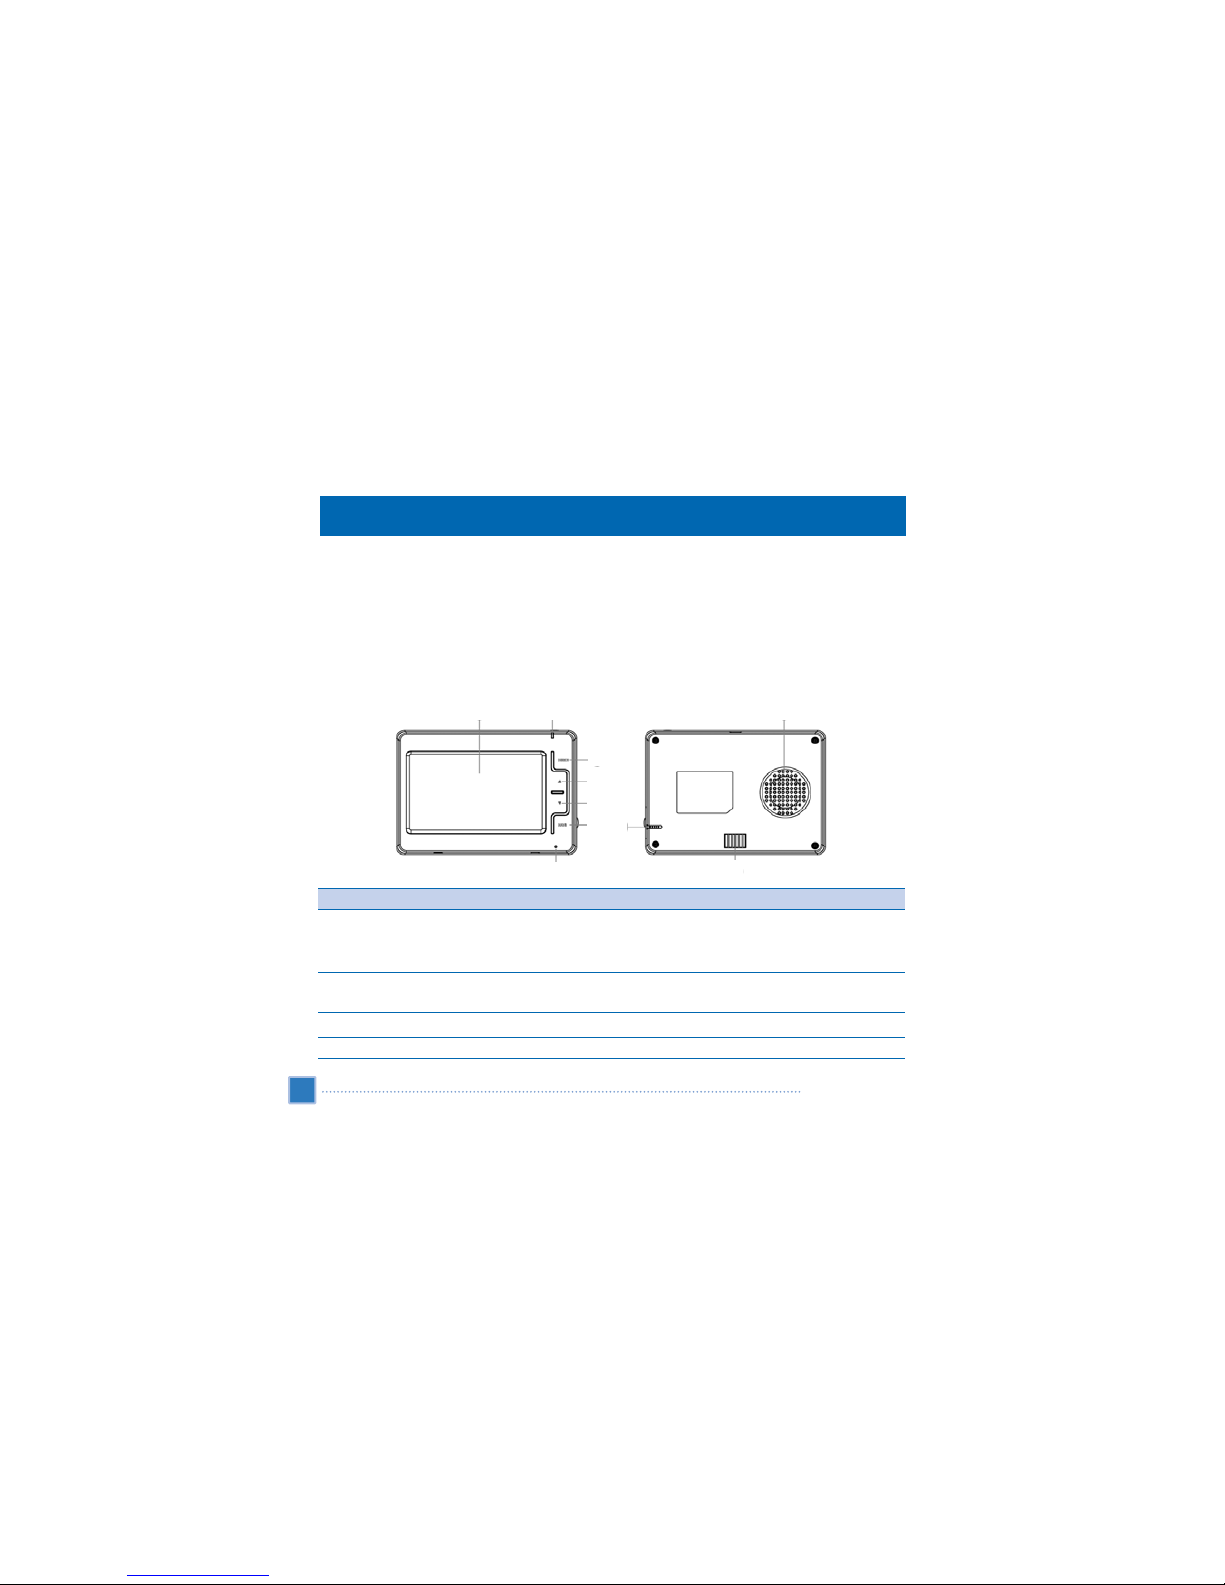
This section describes operation of the device hardware interface.
Rear and front panels
8
First things first
No.
1
2
3
4
Component
Power status LED indicator
Touch screen
Main Menu hot key
Volume up hot key
Description
Indicates the battery power status.
• Green — The device is running on battery power and battery charged.
• Orange — Battery charging
Displays the applications, data, and map images available on your
device. It is touch-sensitive and responds to finger taps.
Displays the Main Menu panel; also called the Home panel.
Press to increase volume.
System tour
ڡڢ
ڣ
ک
ڨ
ڧ
ڦ
ڥ
ڤ
ڪ

Right and left panels
No.
5
6
7
8
9
10
Component
Volume down hot key
Navigation hot key
Microphone
Speaker
Stylus pen
Cradle interface
Description
Press to decrease volume.
Displays the Navigation panel.
Receives user’s sounds (valid in VXA-5000 only).
Emits system sounds.
Stylus pen for touch screen.
Connection pins for cradle.
9
First things first
System tour
ګ
ڭ
ڬ
No.
11
12
13
14
Component
Power connector
SD slot
TMC
Earphone jack
Description
Connects the device to an AC power outlet.
(This connect must be used with 5V power only)
Accepts SD storage cards. (All application data are read from SD card,
including map.)
Reserved for future use.
Connects to audio line-out devices (earphones/headphones).
ڮ

Top and bottom views
10
No.
15
16
17
Component
Power button/
backlight control
USB slave port
Reset
Description
As a power button:
• If the device is off, press the button to turn it on. The power LED indicator on the
front panel lights up green.
• If the device is on, press the button to turn it off. The power LED indicator also
turns off.
As a backlight control:
• Press and hold to activate or deactivate the screen backlight.
Not in use. (Only used at service center for repairs)
Press to perform a soft reset if the device freezes (i.e., device no longer responds to
the buttons on the screen).
First things first
System tour
ױ
گ
װ
Read and front cradles - Cradle only use in the car.
11
First things first
System tour
No.
18
19
20
Component
System interface
External antenna
Power connector
Description
Interface for system unit connection.
Interface for an external GPS aerial interface. (Is not use)
Connects to an AC adaptor.(This connector must be used with 5V power only)
ײ
׳
״
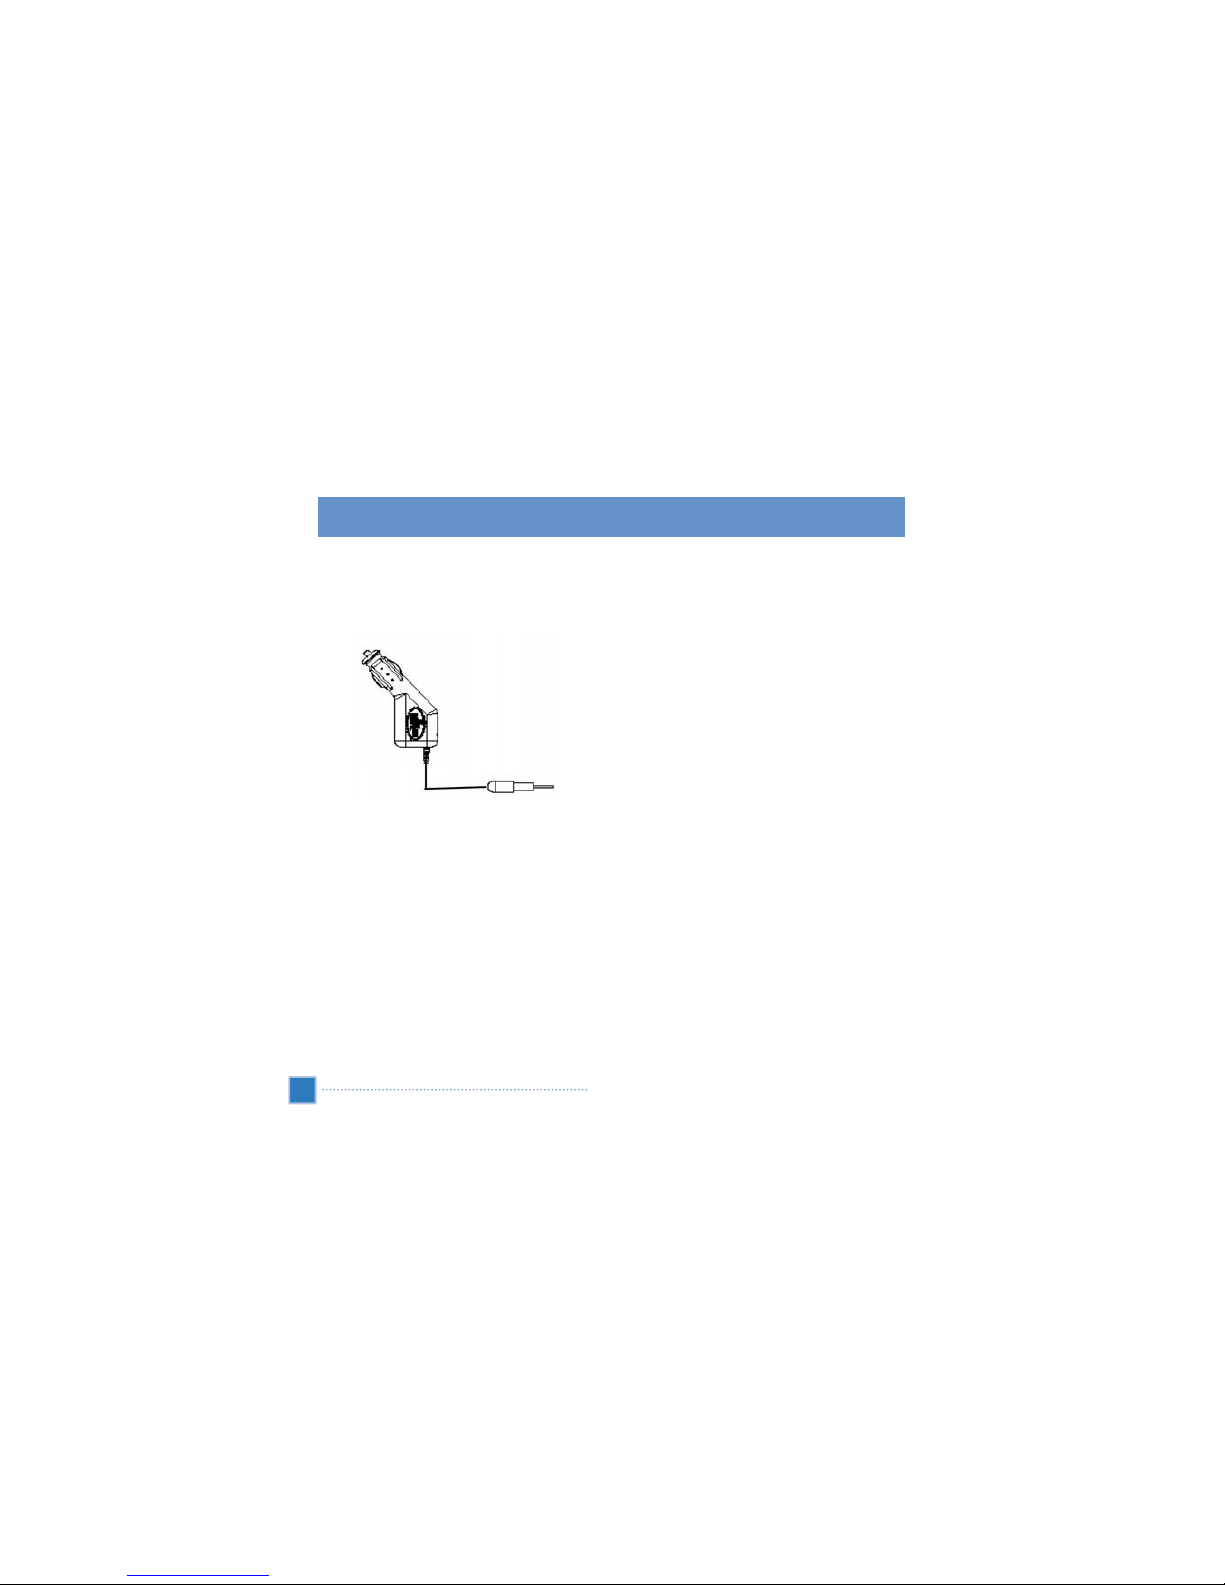
Peripherals tour/VXA-5000/4300 setup
Peripherals tour
This section describes the peripherals bundled with the VXA-5000/4300.
Car charger
VXA-5000/4300 setup
Using the new VXA-5000/4300 is a snap. Unpack, mount, turn on, and it’s ready to go. Perform the following easy
installation tasks to start using the device straight out of the box:
1. Unpack the device.
2. Set up the device on a vehicle.
3. Insert provided SD card.
Turn on and configure the device.
Setup the VXA-5000/4300 on a vehicle
The VXA-5000/4300 comes with a car mount kit and a car charger which you can set up the device on a vehicle.
Choose a location for the car mount kit on the windshield using the suction cup, or on the dashboard using the selfadhesive disc plate (adhesive to dashboard and smooth surface to suction cup).
12
First things first

Some countries prohibit mounting of any electronic device on the vehicle dashboard. Be sure to check your
local laws for acceptable mounting areas before installing the car mount bracket.
Some newer vehicle models may have a heat reflective shield embedded in the windshield. This may in some
cases obstruct the GPS signal reception. If you encounter this problem in your vehicle, you need to purchase
an external GPS antenna.
Car mount installation reminders
Install the car mount on the surface of a vehicle:
• That is smooth, flat and free of dirt and oil
• Where the driver can easily view/reach it without taking his/her eyes off the road
• Where the device will not obscure vehicle operation nor restrict driver's view of the road
• Far from the air bag deployment area
To set up the device on a vehicle:
This section shows how to install the car mount kit in a vehicle’s windshield using the suction cup. For dashboard
installation procedure using the self-adhesive power disc connector, refer to the VXA-5000/4300 Portable Navigator
Starter Guide.
1. Clean the mounting surface with a glass cleaner and a clean cotton cloth.
2. If the ambient temperature is below +15°C (60°F) warm the mounting area and the suction cup (e.g. with a hair
dryer) to ensure a strong suction bond.
3. Install the car mount on the selected area.
a. Mount the suction cup to the selected area with the locking lever away from the mounting surface.
b. Flip the locking lever towards mounting surface to create a vacuum between the suction cup and the mounting surface.
13
First things first
VXA-5000/4300 setup
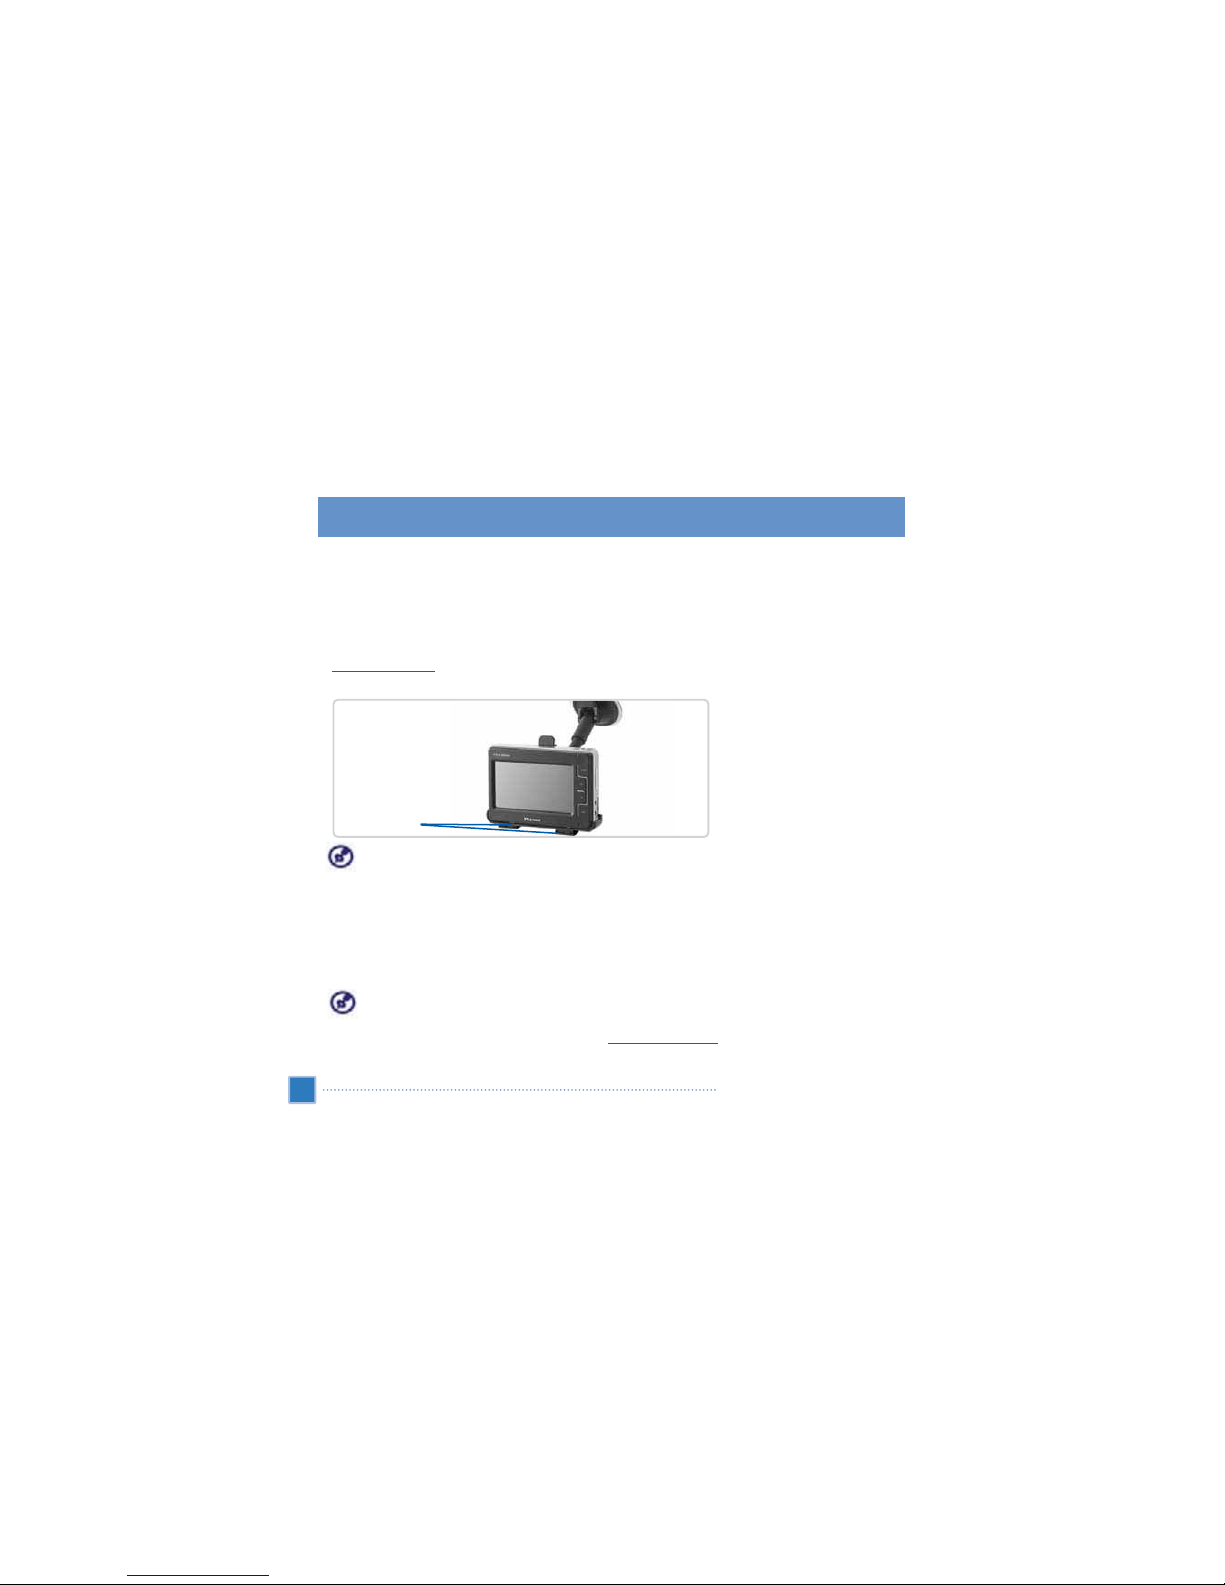
c. Make sure that the suction bond is strong enough before proceeding to the next step.
d. Insert the pegs into holes in back of cradle and then move the cradle downwards while holding mounting arm
firmly until both parts are locked in place.
4. Dock the device on the cradle.
5.
Adjust the car mount
for the best viewing angle.
6. After setting up the device on the car mount, connect the car charger.
If the car engine is turned off, you may need to switch the vehicle ignition back into the Accessories position.
Consult your vehicle owner’s manual.
7. Connect the car charger to the power connector on the cradle.
8. Plug the other end of the car charger to your vehicle’s cigarette lighter.
9. The power LED indicator lights up orange during charging. The hot keys backlight is also lit up.
The device comes with the battery pre-charged to at least 30% capacity. You can start using it once it is
mounted in your vehicle and connected to the cigarette lighter. However, for maximum usage time you need
to charge your device to full capacity. Go to the “
Recharging the device
” section for instructions.
14
First things first
VXA-5000/4300 setup
Spacer Monitor
Start up the VXA-5000/4300
After mounting the VXA-5000/4300 on a vehicle it is ready to be used.
Power Up
Turn on the device by pressing the
POWER
button on the top right panel of the device. The Main Menu panel
displays. This is also referred to as the Home panel.
Calibrate touch screen:
Before using the device, calibrate the touch screen. Touch screen calibration option is under SYS INFO. as
Calibration.
To calibrate touch screen, follow the instruction displayed after selecting “
Calibration
”. For detailed procedure, see
“
System Maintenance and User Support section
”.
After screen calibration, proceed to system settings configuration
15
First things first
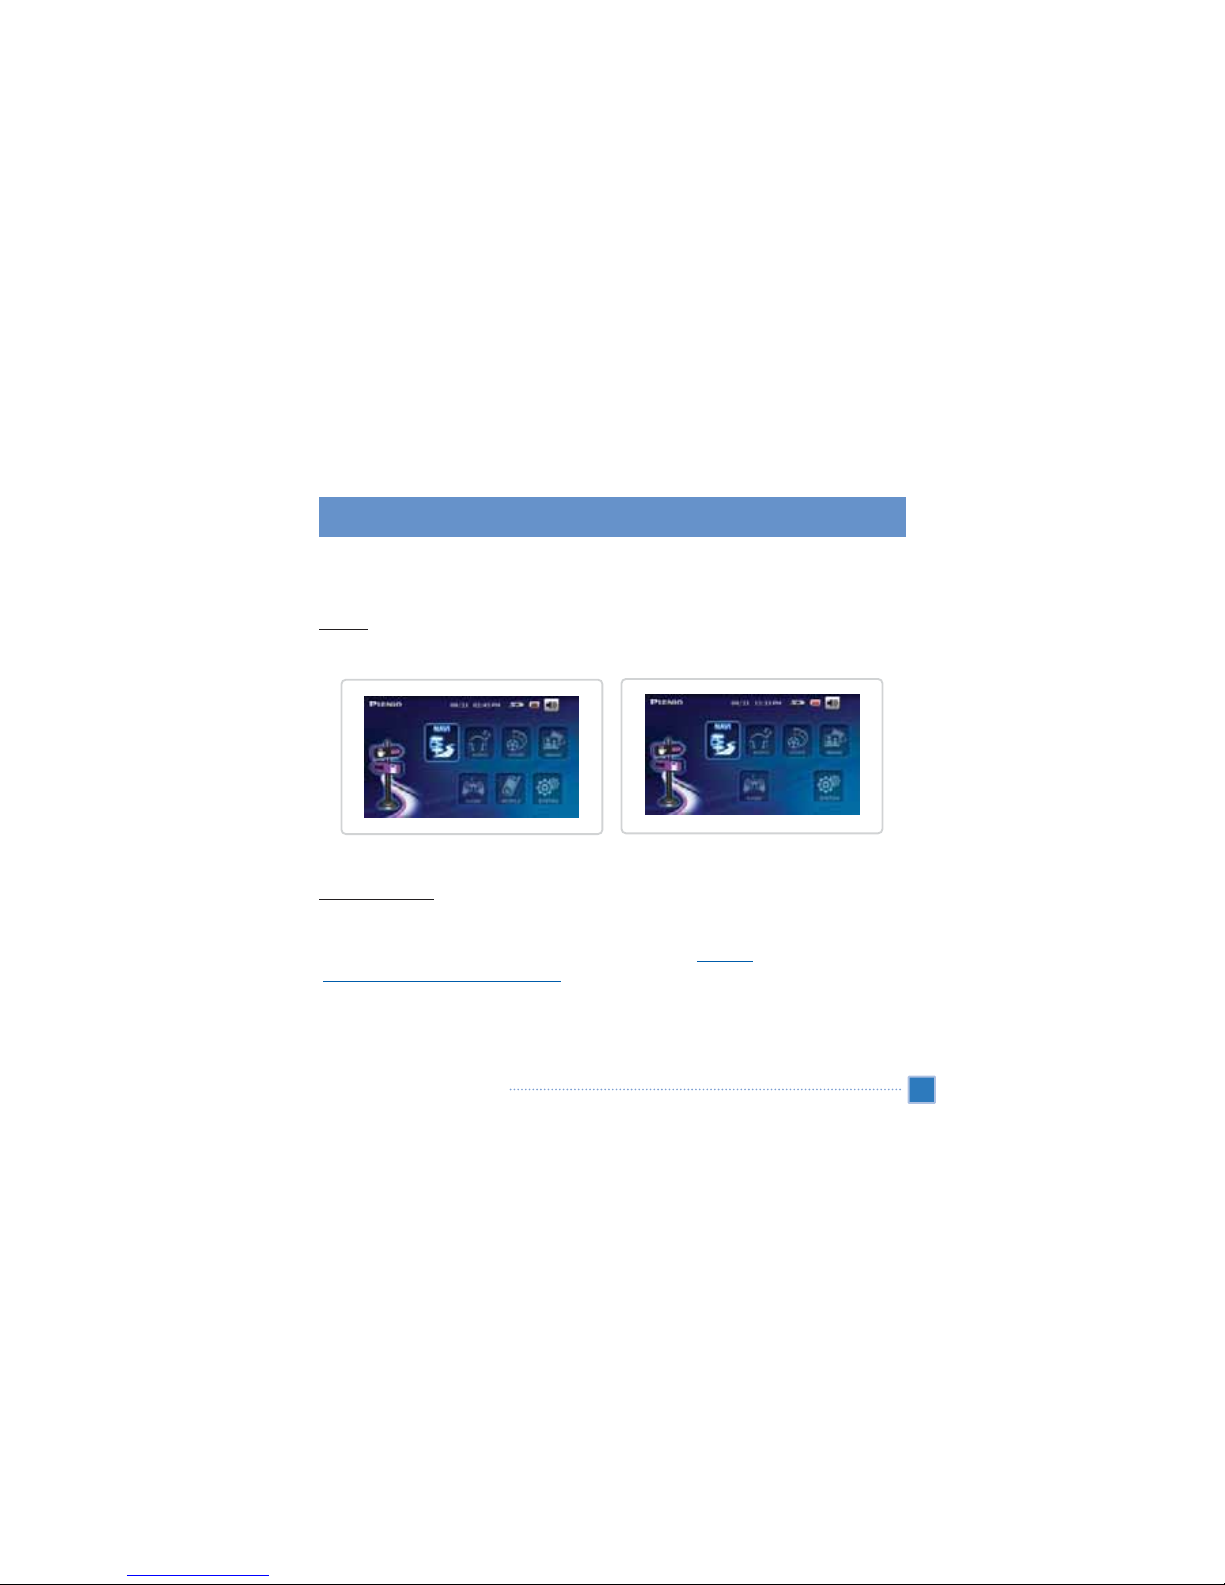
VXA-5000
VXA-4300
VXA-5000/4300 setup
To configure system settings:
We recommend configuring the language and date/time settings first. The rest of the user preferences can be set up later.
1. Tap On the
Main Menu
panel.
2. To set the system language settings, tap (LANGUAGE).
Tap / next to the
Text
and
Voice
boxes until the language ice is displayed.
Tap to apply language setting.
Main menu language setting only applies to main menu display. Navigation mode language setting only
applies to navigation mode.
16
First things first
VXA-5000/4300 setup
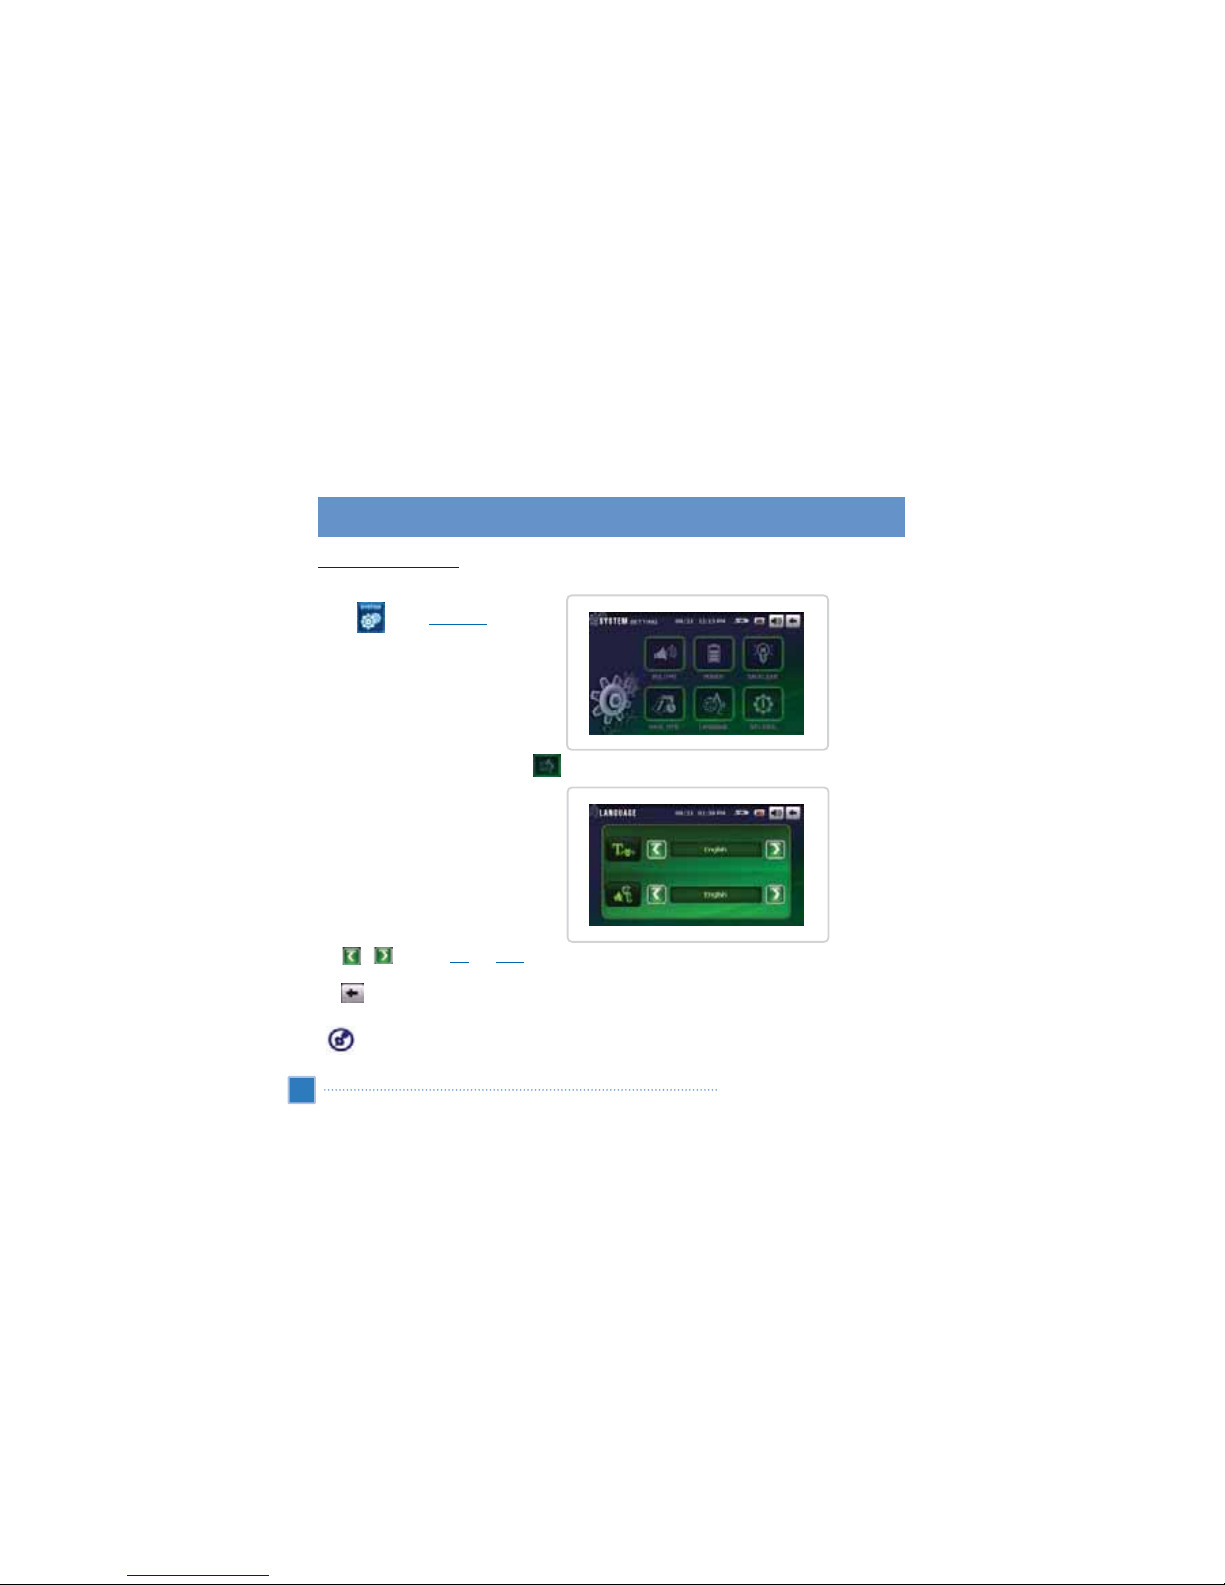
3. To set the system date and time, tap (DATE TIME).
4. Tap .
Tap / next to the
Year, Month
and
Day
boxes to set the date.
Tap to apply date setting.
17
First things first
VXA-5000/4300 setup
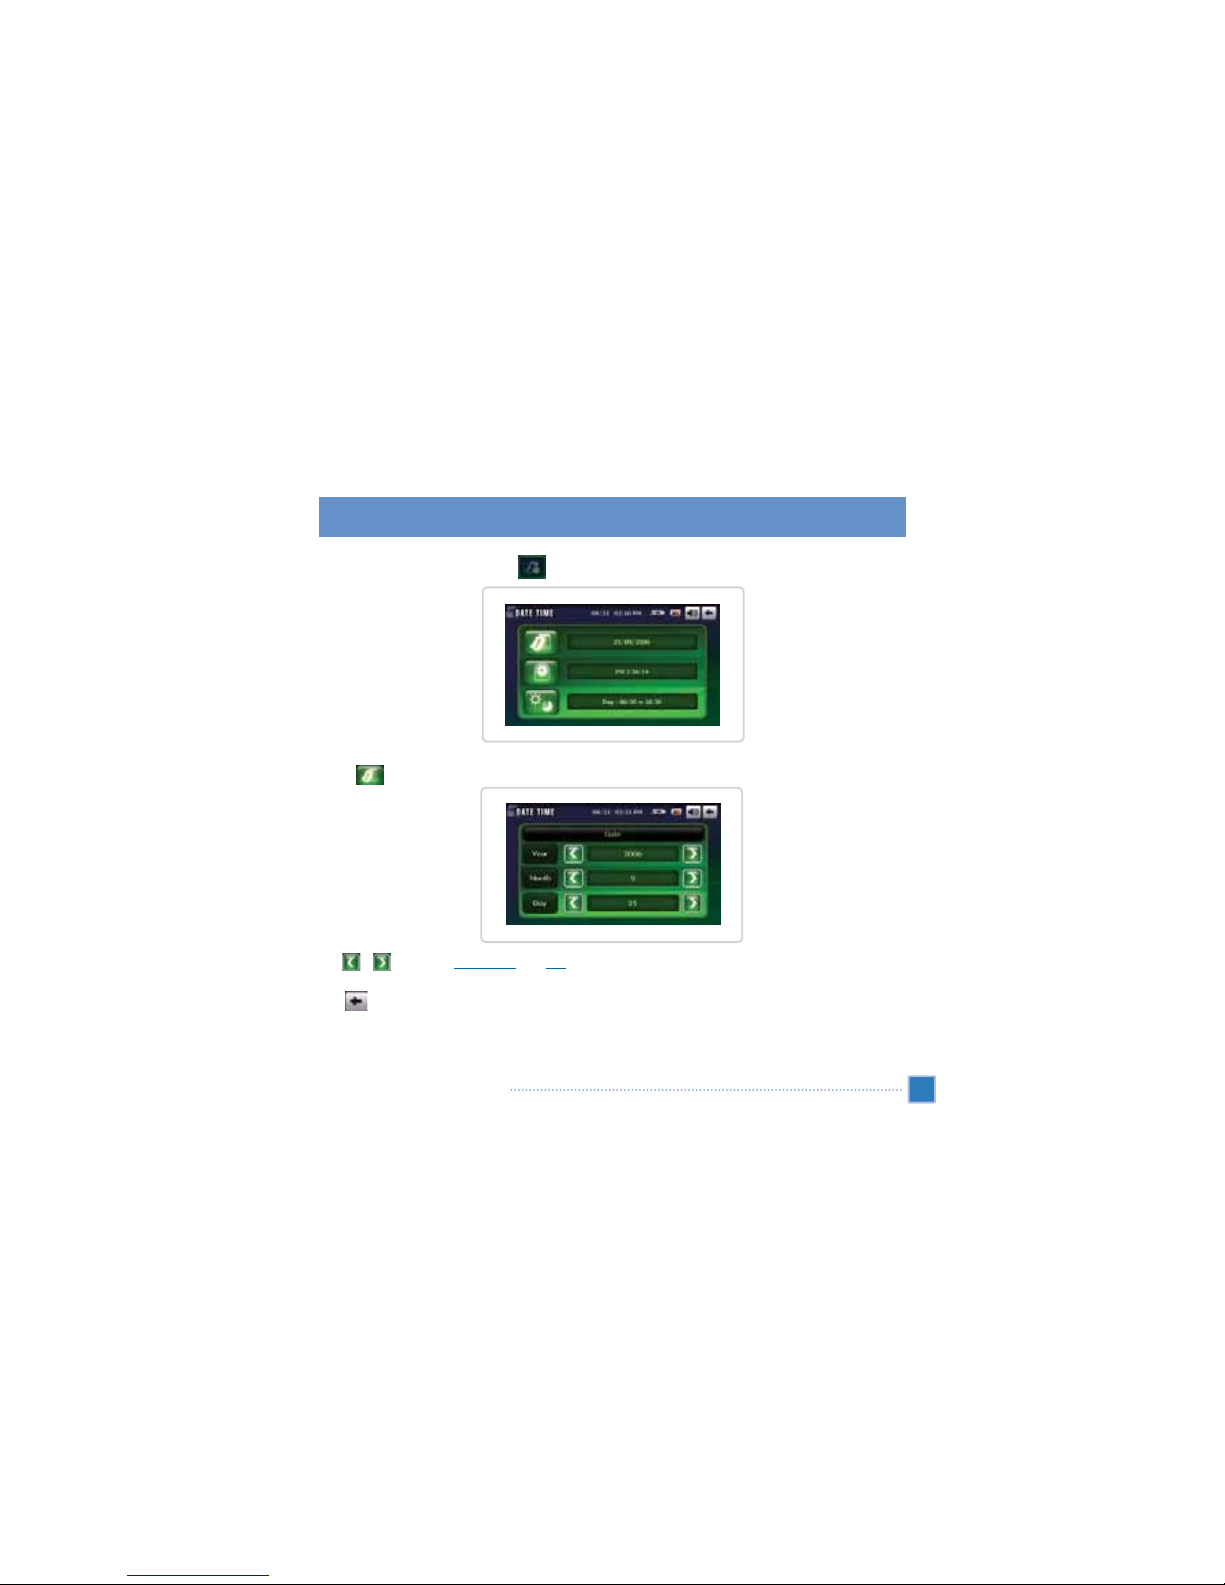
5. Tap .
Tap / next to the
Hour
and
Minute
boxes to set the time.
Tap to apply time setting.
6. Tap .
Check this box to enable automatic day/night backlight settings
Tap / next to the
Day Start
and
Day End
boxes to set the day/night time.
Tap to apply day/night settings.
For more information on the rest of the system configuration options, go to “
System configuration
”.
Congratulations! Your new VXA-5000/4300 is now ready for use. Proceed to “
VXA-5000/4300 fundamentals
” for
more information on the device’s user interface.
18
First things first
VXA-5000/4300 setup

This chapter describes basic hardware procedures for VXA-5000/4300. Information on the device’s command
interface is also discussed.
Hardware interface
Using the touch screen backlight
Under some lighting conditions, viewing the information on the device maybe difficult. If this is the case use the
backlight to illuminate the touch screen.
To activate the touch screen backlight:
• Press and hold the
POWER
button until the backlight turns on.
To turn off the touch screen backlight:
• Press and hold the
POWER
button until the backlight turns off.
Using the SD slot
VXA-5000/4300 has an SD slot compatible with a range of SD storage card that you can use to back up or transfer
files and data.
To insert a storage card:
• Hold the device securely, and then push the card into the slot until you hear an audible system sound; this will
signal that the card is properly seated within the slot. The card is secure when it is not protruding from the slot. If
the located on the top side of the menu panel appears highlighted , the system has successfully detected
the SD card memory.
19
VXA-5000/4300 fundamentals
Hardware interface

To remove a storage card:
1. Hold the device securely, and then push against the top of the card, as if you were pushing it further into the slot,
letting the card spring out. An audible system sound will signal that the card has been released.
2. Gently remove the card from the slot.
Recharging the VXA-5000/4300
VXA-5000/4300 uses a high-density rechargeable 2200 mAh Lithium Ion battery. The status icon located on the top
right corner of the Main Menu panel indicates the level of the device’s battery power.
• - Battery full charged
• - Battery charging
• - Battery level low
• - Battery level very low, recharging required
• - Battery power depleted, device will automatically turn off; recharging required
If the battery level becomes low in the course of normal use, recharge the device. If possible, please use the AC
adapter to recharge the VXA-5000/4300. However, this may be difficult when there’s no available AC power outlet.
If battery is drained while on the road, you can still recharge the device by using the car charger cable. Recharging
time from empty to full capacity is about six (6) hours in all cases.
If the battery level reaches very low status, the device will automatically turn off. At this stage, you have
about 12 hours to recharge your device or you risk losing all data in the device's internal memory. In the
case when all data is lost, the next power up will prompt you to restore the data.
20
VXA-5000/4300 fundamentals
Hardware interface

To recharge the device using the AC adapter:
1. Plug the AC adapter into any AC current outlet.
2. Connect the AC adapter cord to the power connector on the left panel of the device.
The power LED indicator lights up orange during charging. The backlight for hot keys also lights up.
3. Once charging is complete, as indicated by green light on power LED, disconnect the AC adapter cord from the device.
To recharge the device using the car charger:
Use the car charger to recharge the device while it is mounted in the vehicle. Perform step 7 of the “
To set up the
device on your vehicle
” section for instructions.
21
VXA-5000/4300 fundamentals
Hardware interface

Command interface
Using the hot keys
The hot keys on the VXA-5000/4300 allow users to:
•
HOME
: Launch the Main Menu panel
• Ƈ /Ɖ : Control the volume level of system sounds
•
NAVI
: Launch the Navigation panel
All four hot keys light up when pressed, for easier operation under low light conditions.
Using the VXA-5000/4300 touch screen
The VXA-5000/4300 touch sensitive screen allows convenience of entering information into the device by using
fingers instead of a stylus; no more wasted time searching for a lost stylus or fumbling with an awkwardly shaped
one! In this Guide, the tap and hold-and-drag actions are done by:
•
Tap
- Touch the screen once with your finger to open items and select options.
•
Hold and drag
- Tap a slider icon and drag it across the screen. In IMAGE VIEWER mode, hold and drag the
image to pan it in different directions.
•
Return
- Tap to apply any change in settings and/or revert to the previous screen.
Using the Main menu panel
When the device turned on for the first time each day, you’ll see the Main Menu panel, also called the Home panel.
From any other screen, you can revert to it by pressing the Main Menu hot key
HOME
.
22
VXA-5000/4300 fundamentals
Command interface
The panel’s title bar displays the panel name, the current time, the SD memory card detection icon, and the battery power
status icon. Go to the “
Recharging the device
” section for more information on the battery power status icon.
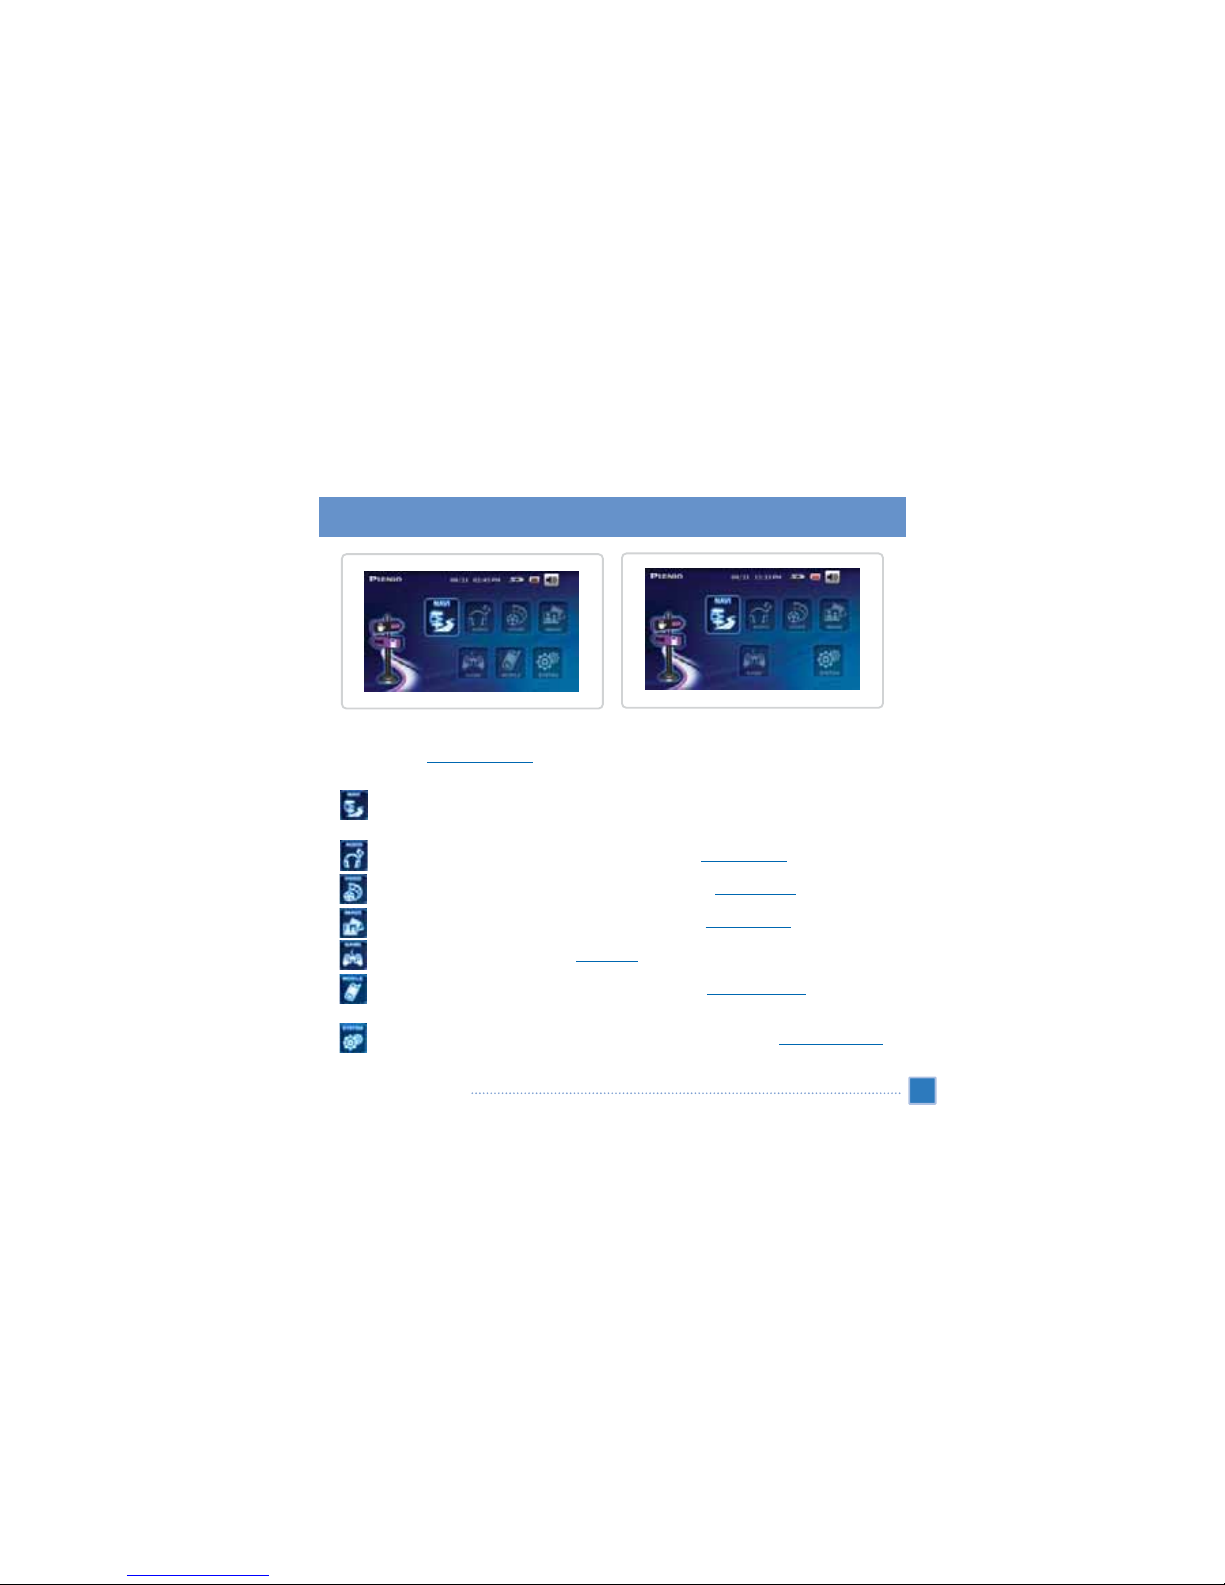
There are seven program icons on the Main Menu panel.
• - Tap to display the Navigation panel. Refer to the Gate 5 User’s Guide for more information on how to
use the device in navigation mode.
• - Tap to launch AUDIO PLAYER for music mode operation. Go to “
Multimedia mode
” for more information.
• - Tap to launch VIDEO PLAYER for moving picture mode operation. Go to “
Multimedia mode
” for more information.
• - Tap to launch IMAGE VIEWER for picture mode operation. Go to “
Multimedia mode
” for more information.
• - Tap to launch Cuty Cuty game. Go to “
Game mode
” for more information.
• - Tap to launch MOBILE for mobile phone mode operation. Go to “
Mobile Phone mode
” for more
information. (this is valid in VXA-5000 only)
• - Tap to open the System panel to configure the device’s user preferences. Go to “
System configuration
” for
more information.
23
VXA-5000/4300 fundamentals
Command interface
VXA-5000
VXA-4300

Navigation mode
Starting Navigation application
• The SD card must be inserted into the unit to launch the Navigation application. Please make sure that the SD
card is not write protected (the slide knob on the left side of the SD card must be in the up/unlock position). The
SD card is inserted into the device with the gold contacts facing you. Push the SD card all the way into the slot until
you feel a click. When properly inserted, the SD card should be flush with the opening of the slot.
• Switch on the unit, and tap in the Main Menu.
• When the navigation application is launched for the first time and if more than one language is loaded on your
SD card, you will be prompted to choose your language. (Multiple languages files are available on the provided
DVD or CD)
• Before the application loads, an important safety warning disclaimer will be displayed. Please read carefully. You
can choose to hide this screen for subsequent start ups by checking the “
Hide at startup
” box before proceeding.
When the device is powered on for the first time, the GPS receiver needs to find strong signals to download the
necessary data before a position solution can be calculated. Please have your car parked in a location with a clear
view of the sky for this initial data download. Depending on conditions, this may take up to 5 minutes before a GPS
position is captured. After this initial procedure, subsequent start ups should provide position in less than 1 minute.
However, if you have not used the unit for more than a few days, or if you are far away from where you last powered
down the unit, it may take up to 5 minutes again to receive the necessary data again.
Refer to the Gate 5 User’s Guide for more information on how to use the device in navigation mode.
24
VXA-5000/4300 fundamentals
Navigation mode

This chapter describes the entertainment programs bundled with your VXA-5000/4300.
If the battery level reaches very low status, the device will automatically turn off. In this case, you have about
12 hours to recharge your device after which you risk losing all data on the device's internal memory. In
case all data is lost, the next time you power on the device you will be prompted to restore the data.
Starting the Navigation application
• The SD card must be inserted into the unit to launch the Navigation application. Please makesure that the SD card
is not write protected (the slide knob on the left side of the SD card mustbe in the up position). The SD card is
inserted into the device with the gold contacts facing you. Push the SD card all the way into the slot untill you feel a
click. When properly inserted, the SD card should be flush with the opening of the slot.
• Switch on the unit, and tap on the NAVIGATION icon in the main menu.
• When the navigation application is launched for the first time, if more than one language is loaded on your SD
card, you will be prompted to choose your language. (Multiple languages files are available on the provided DVD)
• Before the application loads, an important safety warning disclaimer will be displayed. Please read carefully. You
can choose to hide this screen for subsequent start ups by checking the “Hide at startup” box before proceeding.
When the device is powered on for the first time, the GPS receiver needs to find strong signals to download the
necessary data before a position solution can be calculated. Please have your car parked in a location with a clear
view of the sky for this initial data download. Depending on conditions, this may take up to 5 minutes before a GPS
position is captured. After this initial procedure, subsequent start ups should provide position solution in less than 1
minute. However, if you have not used the unit for more than a few days, or if you are far away from where you last
powered down the unit, it may take up to 5 minutes again to receive the necessary data again.
25
VXA-5000/4300 fundamentals
Starting the Navigation application

Bold
Items you must select, such as menu options, command buttons or items in a list.
• Bullet
Step-by-step procedures. You can follow these instructions to complete a specific task.
Comment
Especially important or noteworthy information.
Monospace
Information that you must type, or information like folders and filenames.
CAPITALS
Names of keys on the keyboard. For example, SHIFT, CTRL or ALT.
Typographic Conventions
26
Typographic Conventions
The following icons are used throughout the application:
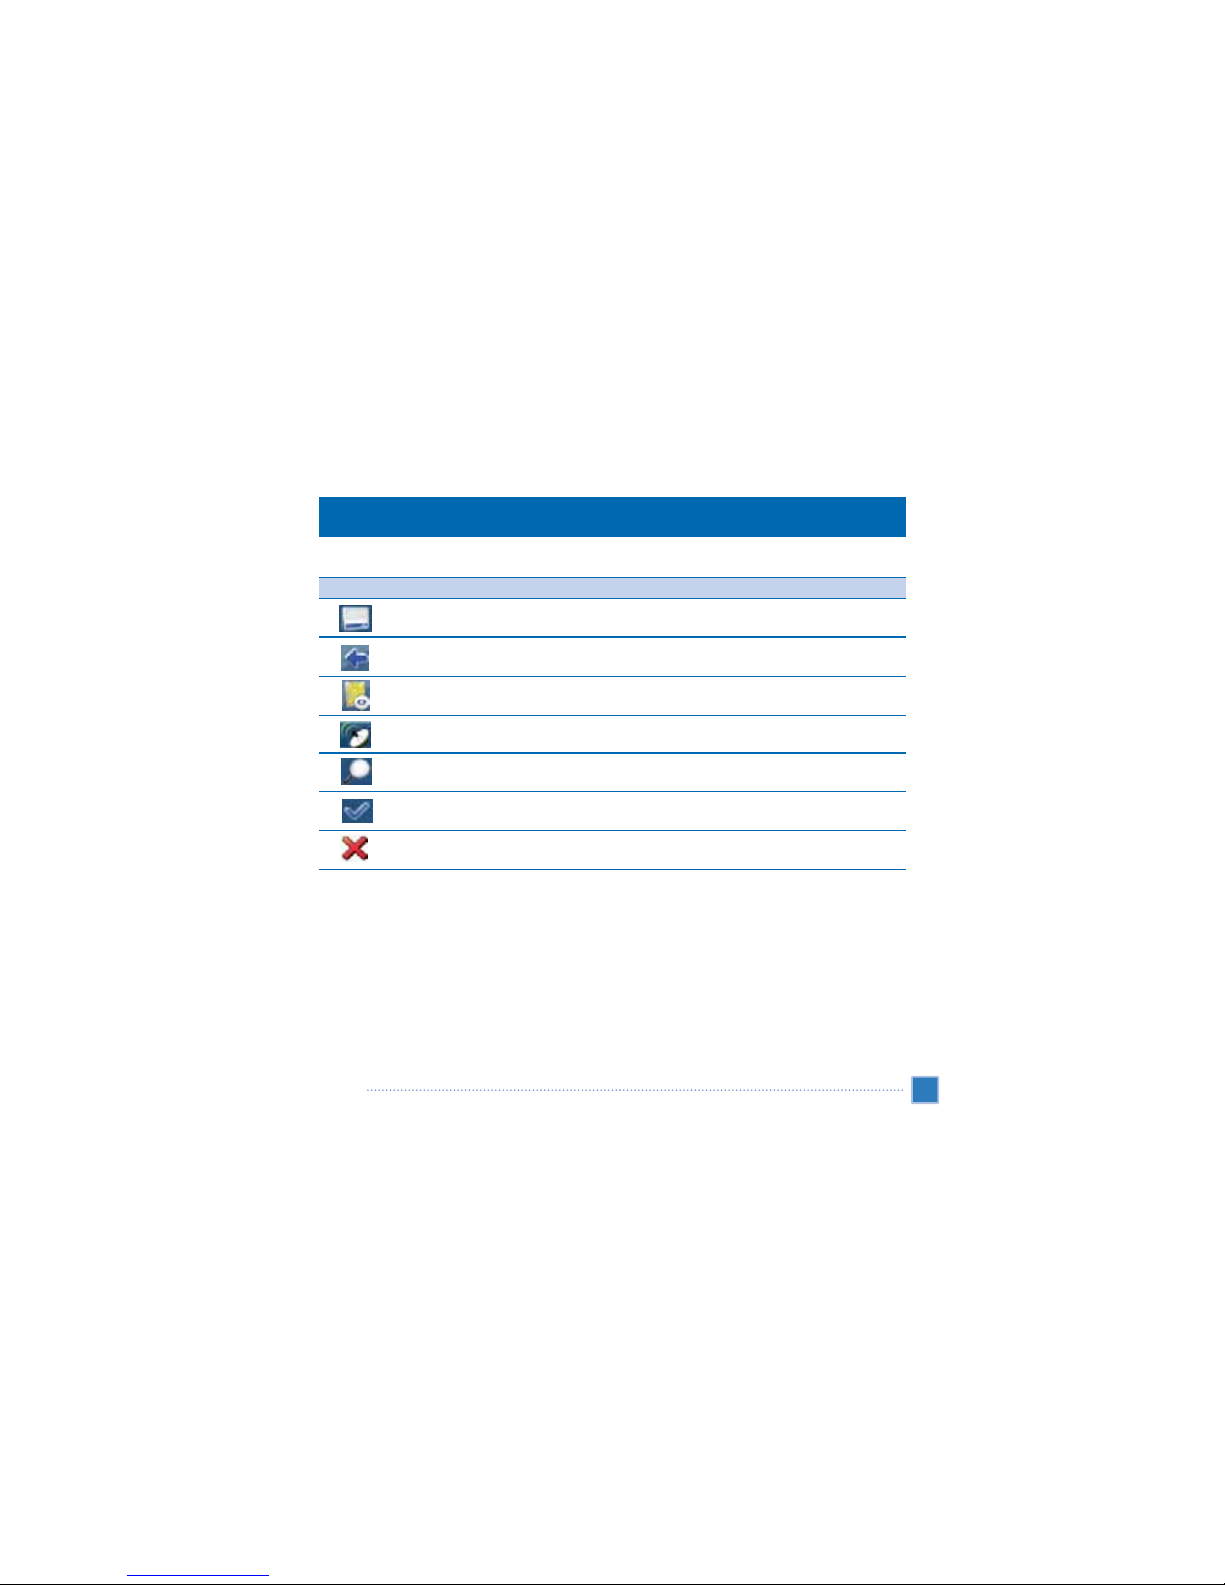
27
Icons
Icons
Icon Name
Menu icon
Back icon
Navigation icon
GPS icon
Search icon
Confirmation icon
Cancel icon
Function
Open a menu containing various options.
Go back to the previous screen.
Start navigation.
Availability/strength of GPS signal.
Open a search screen.
Apply settings. Select/deselect all.
Cancel route calculation.

You have chosen a cutting-edge navigation system. Congratulations! Please enjoy using it. This navigation system
leads you straight to your destination, whether you are traveling by car or on foot. You can navigate and plan your
route with an easy-to-use and intuitive interface, just by using your finger. You can also use this application to plan
your trip to suit your personal preferences and interests and to save interesting destinations before you set off on your
journey. This manual leads you through the main features of the system.
Key Features
• Real pedestrian mode
• Trip planning
• Look-ahead search function
• Map Browsing
• Unique night mode
• Improved guidance engine
Key Features
28
Introduction
 Loading...