

Page 1
Plecter Labs is in no way affiliated, associated, licensed or endorsed by Disney or Lucasfilm Ltd., Industrial Light
and Magic or any of their associates.All brands and trademarks listed are the exclusive property of their respective
Owners.
1
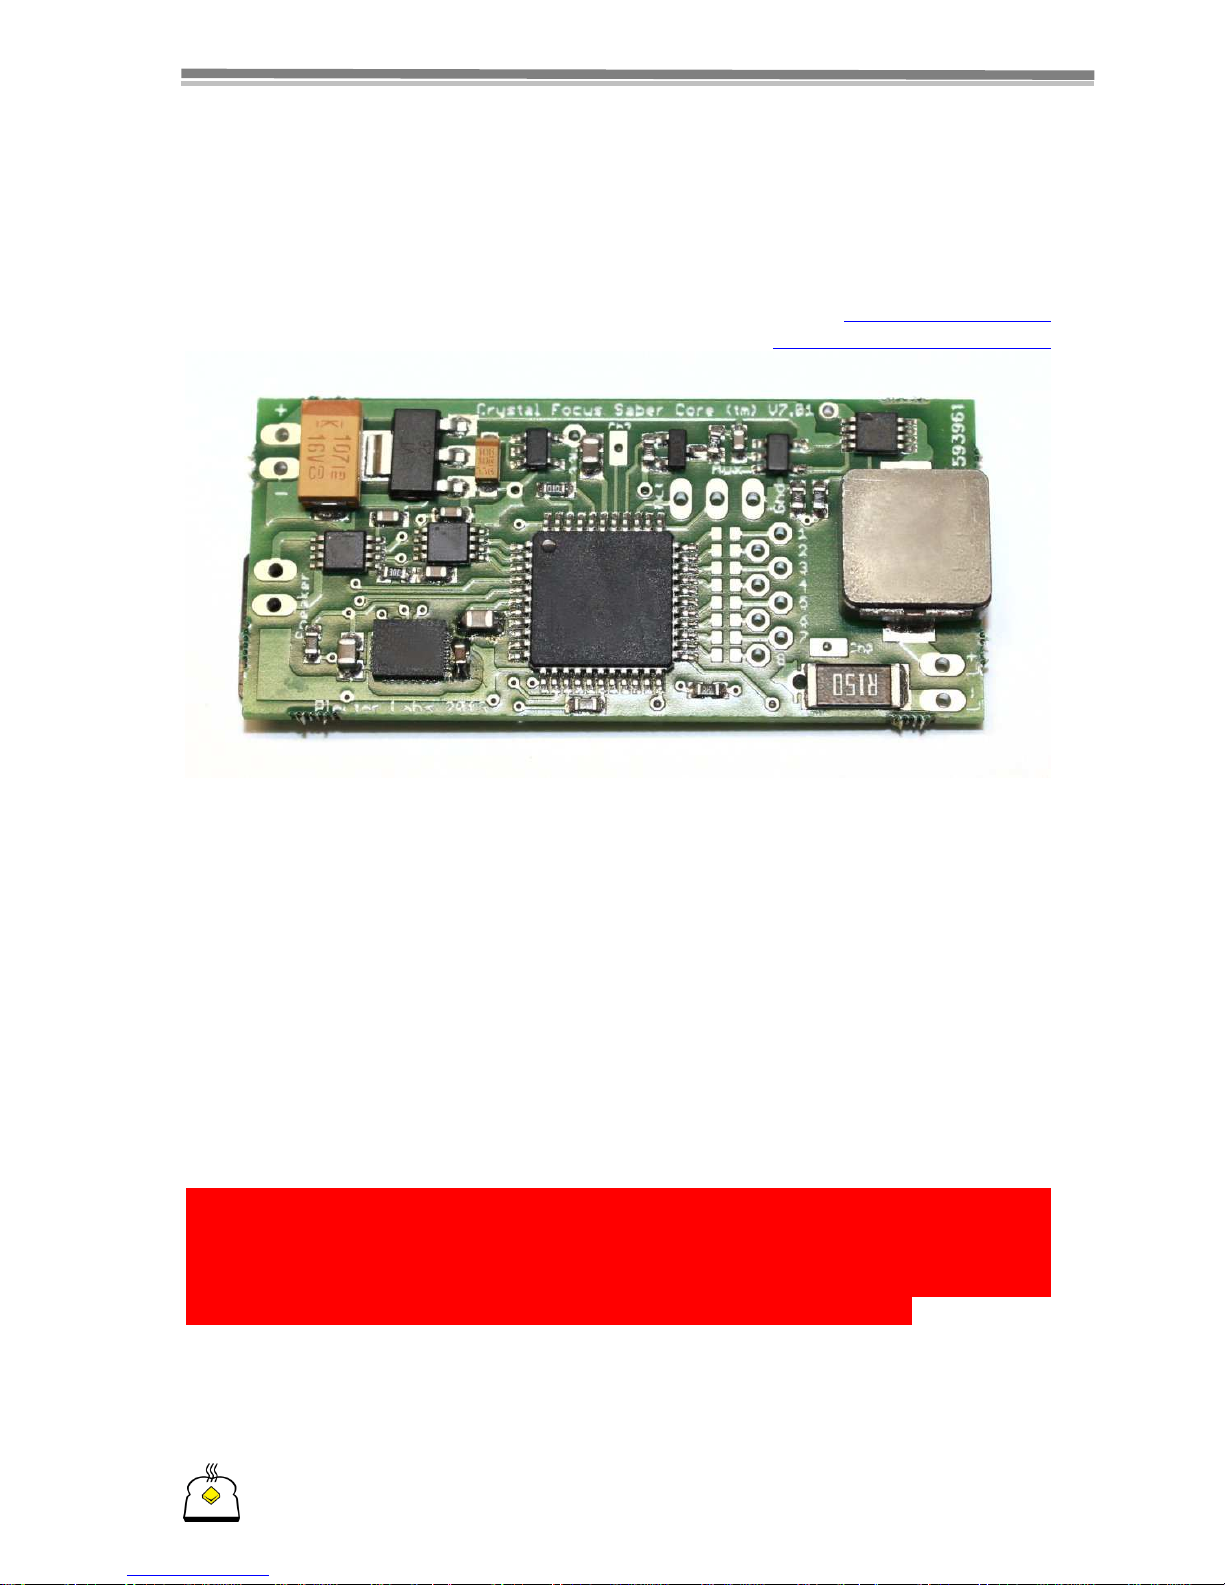
Crystal Focus Saber Core™ V7.5
Illuminated Saber Controller Pro – User’s manual
© Erv’ - Plecter Labs – v 7.5
Edition 1.0 - January 2015
erv@plecterlabs.com
http://www.plecterlabs.com
Important release information
- Board is compatible with FAT and FAT32
- MacOS is supported
- Dual Motion sensor with Motion Fusion™
- Simplified gesture recognition settings
- Improved gesture recognition dynamic range and resolution
- StabFx™, SpinFx™ & ComboFx™
- Color mixing with the FlexiBlend™ engine on 4 channels
- On-the-fly Color profiles change
- Audio output up to 1W/8 ohm or 2W/4 ohm
- LED current up to 3A
- Supports luxeon III, V, rebel (old or new), seoul LEDs, Ledengin, tri-rebels, tri-
Cree, Quads.
We spent a lot of time writing this manual to ensure all the important
information is provided for proper use of that board. If you are new to saber
building, to the use of Crystal Focus boards, or simply to electronics in
general, we highly recommend you print a copy of that document and keep
it with you during the whole process of installing CF in your hilt.
Modification, copies or distribution of that document is strictly prohibited
© Plecter Labs / Erv’ Plecter 2005-2015
Page 2

Plecter Labs is in no way affiliated, associated, licensed or endorsed by Disney or Lucasfilm Ltd., Industrial Light
and Magic or any of their associates.All brands and trademarks listed are the exclusive property of their respective
Owners.
2
Index
CRYSTAL FOCUS SABER CORE™ V7.5 1
I
MPORTANT RELEASE INFORMATION
1
I
NTRODUCTION
5
High-Power LEDs (aka Luxeon™) 5
Sound section 6
Features & Maximum Ratings 7
Placement & Installation 8
T
OOLS AND PARTS REQUIRED TO INSTALL/OPERATE THE MODULE
9
H
OW DOES IT WORK
? 9
SD
CARD CONTENTS, SOUND BANKS AND SLOTS
10
U
SER’S NOTES
11
B
OARD OVERVIEW
12
G
ETTING STARTED WITH CRYSTAL FOCUS
12
W
IRING AND OPERATING THE MODULE
12
General Power Switch & Recharge Port 13
General wiring 14
U
SER’S NOTES
15
Animated Accent LEDs 16
Calculating resistors for LEDs 16
C
ONFIGURATION FILES
18
T
HE PREFERENCES FILE
19
P
ARAMETERS AND FINE TUNING THE SABER
20
M
OTION & GESTURE DETECTION PARAMETERS
: 20
G
ESTURE TYPES
20
G
ESTURE FLOWS & PRIORITIES
: 21
S
OUND PARAMETERS
: 21
H
IGH-POWER
LED
PARAMETERS
: 25
U
SER'S NOTES
: 26
T
HE SABER OVERDRIVE PROTECTION
27
C
OMBOS
27
C
OLOR PROFILES
28
Profiles definition 28
Profiles vs. standard blade color definition 28
Profiles editing in R.I.C.E. 28
Profiles browsing 29
R
ESONANT CHAMBER
30
B
ROWSING THE SOUND BANKS – REBOOTING THE SABER
30
C
REATING YOUR OWN SOUNDS
31
I
NSTALLING A SOUND FONT ON THE SD CARD
31
A
UDIO PLAYER – ISABER
32
C
LASHES, SWINGS & BLASTER (RANDOM) SELECTION MODES
33
ADVANCED WIRING & USAGE 35
W
IRING A TACTILE FEEDBACK MOTOR AND A PROGRESSIVE POWER ON
LED 35
Page 3

Plecter Labs is in no way affiliated, associated, licensed or endorsed by Disney or Lucasfilm Ltd., Industrial Light
and Magic or any of their associates.All brands and trademarks listed are the exclusive property of their respective
Owners.
3
W
IRING A GENERAL POWER-ON INDICATOR / ACCENT
LED 37
S
IMPLE FLASH ON CLASH™ / FOC™ EFFECT
(CFV5
LEGACY MODE
) 37
COLOR MIXING 39
P
SEUDO COLOR MIXING (WITHOUT THE COLOR XTENDER™ BOARD
) 39
A
CCURATE COLOR MIXING (USING THE COLOR XTENDER™ BOARD
) 40
U
SING ALL THE 4 COLOR CHANNELS
41
4
CHANNEL WIRING WITH THE CEX (DUAL-CELL RECOMMENDED
) 41
4
CHANNEL WIRING WITHOUT THE CEX (SINGLE-CELL RECOMMENDED
) 41
F
LASH ON CLASH™ MIXING TECHNIQUES
42
O
RIENTATION CONTROL OF THE LOCKUP COLOR
44
A
DD A CRYSTAL CHAMBER TO YOUR SABER
44
U
SING
PWM
DRIVING SIGNALS
44
U
SING THE MAIN DRIVER AND COLOR EXTENDER POWER OUTPUTS
45
CONVERTING THE CRYSTAL FOCUS TO SINGLE CELL USE 46
ACCENT LEDS SEQUENCER 47
S
TAGES & DELAYS
48
D
EEP SLEEP FLASHING
LED 49
A
CCENT
LED
S AS A BARGRAPH : POWER ON/OFF SEQUENCES &
PLI 49
PLI
TIPS & TRICKS
50
S
PECIAL ACCENT MODE FOR
LEDS #5
TO
#8 51
H
ALF DISPLAY / HALF BARGRAPH
51
S
ABER WITH 4 ACCENT
LED
BARGRAPH AND ILLUMINATED CRYSTAL CHAMBER
52
S
ABER WITH 8 ACCENT
LED
S SPLIT OVER
PLI
AND ANIMATED ACCENTS
52
B
ANK MENU SPECIAL SETTINGS
53
B
OOT DIAGNOSTIC & DEBUGGING
54
U
SING
R.I.C.E. 54
U
SING THE BARGRAPH DEBUG
55
“F
ORCE PUSH” EFFECT
56
M
OTION ACTIVATED IGNITION: POWER ON MOVE / POWER ON FORCE
56
I
GNITION SOUND ANGULAR SELECTION
57
M
ULTIPLE POWER-OFF SOUNDS
57
P
RE POWER-ON AND POST POWER-OFF SOUNDS
58
P
OWER SAVING MODES & USAGE SCENARIOS
58
Idle Mode 58
Deep Sleep Mode 58
Scenarios & Usage 59
M
UTE-ON-THE-GO
™ 60
M
UTE-ON-THE-BOOT
™ 60
U
SER’S NOTES
60
USING R.I.C.E.(REAL-TIME INTERNAL CONFIGURATION EDITOR) 61
G
ETTING STARTED WITH
R.I.C.E. 61
Page 4

Plecter Labs is in no way affiliated, associated, licensed or endorsed by Disney or Lucasfilm Ltd., Industrial Light
and Magic or any of their associates.All brands and trademarks listed are the exclusive property of their respective
Owners.
4
R
EADING THE CURRENT SETTINGS
63
C
HANGING SETTINGS
63
D
ISCARDING SETTINGS
63
S
AVING THE SETTINGS
64
U
SING
R.I.C.E.
AS A DEBUG TOOL
64
C
OLOR SETUP & COLOR MIXING
64
Reference Current 65
Rough color setup 65
Color fine tuning 65
Manual color setup 65
Flash On Clash™ / FoC™ 66
Lockup Color 66
Color mixing specific issues 66
U
SER’S NOTES
67
T
ROUBLESHOOTING &
FAQ 68
Page 5
Plecter Labs is in no way affiliated, associated, licensed or endorsed by Disney or Lucasfilm Ltd., Industrial Light
and Magic or any of their associates.All brands and trademarks listed are the exclusive property of their respective
Owners.
5
Introduction
Our new Saber Controller Pro is the union of our newest evolution of our saber
sound module and our luxeon driver board that we designed back in 2005. Driven by
a single processor, this module features a perfect synchronization between light and
sound effects with the possibility to setup each effect with parameters stored on our
SD-Config
™ technology. Crystal Focus Saber Core V7 has, of course, a lot of new
features and capabilities compared to V1-V6, including 16 bit sound playback, WAV
format support, and now up to 12 different sound banks, blaster blocking, force push
effects and more!
Warning: You’ve just acquired an electronic board containing parts
sensitive to ESD. Final wiring & assembly is under the responsibility of the
user with the appropriate tools and ESD protection.
If you’re not familiar with ESD, please visit :
http://en.wikipedia.org/wiki/Electrostatic_discharge
Plecter Labs can not be held responsible for improper use or assembly of
the Crystal Focus board.
High-Power LEDs (aka Luxeon™)
DIY illuminated sabers have suffered for too long from the lack of a terrific and
impressive blade retraction/ignition effect. EL wire technology did not allow this effect
since it fades in and out in a homogeneous way all along its length, because of the
phosphor composing the wire coating. MR/Hasbro Fx sabers found a workaround by
using a 64 LED strip on a flexible PCB which makes the retraction effect by switching
the LEDs by group of 8 but this setup remains very fragile.
The high-power LED technology allows a realistic ignition/retraction effect of the blade
while keeping it almost empty and therefore not fragile when hit.
To achieve this effect, the high-power LED current must be driven very accurately.
Guided by the special film, the light “climbs” progressively along the polycarbonate
tubing and produces the desired effect.
Moreover, our SMPS high-power LED driver has the key feature of heating much less
compared to other systems, and is really different from the use of a simple resistor or
voltage chopping drivers to power the LED. The driver also maintains the brightness of
the blade whenever the batteries become depleted, which is impossible to obtain with
a resistor.
An additional feature of the luxeon driving section is the configurable generation of a
flickering effect of the blade brightness. It’s a random alteration of the light produced
by the high-power LED suggesting energy variations for a more realistic result which is
pretty close to the sabers seen in the movies. The effect is not a constant pulse but is
more like a “candle effect”. We also added a core pulse effect that can be combined
Page 6
Plecter Labs is in no way affiliated, associated, licensed or endorsed by Disney or Lucasfilm Ltd., Industrial Light
and Magic or any of their associates.All brands and trademarks listed are the exclusive property of their respective
Owners.
6
with the flickering, providing interesting behaviors of the high-power LED for non
conventional or non-saber related props like an Electric Staff or a Light Whip.
The Plecter Labs high-power LED driver embedded on the Crystal Focus Board can
now drive up to 3A and works with any high power LED featuring a forward voltage
(Vf) lower or equal to 10V. Luxeon, Rebel, Seoul, Prolight, Cree and Ledengin branded
LEDs have been tested successfully. Please note that as we’re writing this manual, we
cannot guarantee the use with ANY kind of high-power LEDs appearing in the market
in the future.
Warning : High-power LEDs (such as the Luxeon brand LED, which is
mentioned in this document) are
extremely bright
. They are considered
"class 2 lasers"! You should neither look directly to the beam nor point
someone with it when the blade is not attached to the hilt, just like a
powerful lamp or flashlight. Plecter Labs could not be held responsible for
any bad use of high-power LEDs.
To avoid injuries and retina damage due to the high brightness of those
high-power LEDs, simple “emitter plugs” can be built using a piece of blade
tubing ended with some decorative greeblies.
Sound section
The Plecter Labs sound board is unique. It has been developed with the purpose of
improving the quality of DIY sabers’ sound FX in a significant way. For too many
years, sound modules were obtained from sacrificed toys and remained low quality.
Master Replica FX sabers broke the line with better sounds and good dynamics.
However, the low resolution motion sensors used as well as closed electronics made
those boards impossible to adjust in term of sensitivity or sound contents.
We have monitored several attempts for building an embedded sound module playing
custom & changeable sounds, often based on chipcorders. Using bulky parts, those
were often unreliable and hard to fit in a hilt. Not to add those chipcorders were
designed for digital answering machines, and therefore feature a bad restitution
quality (voice sample rate).
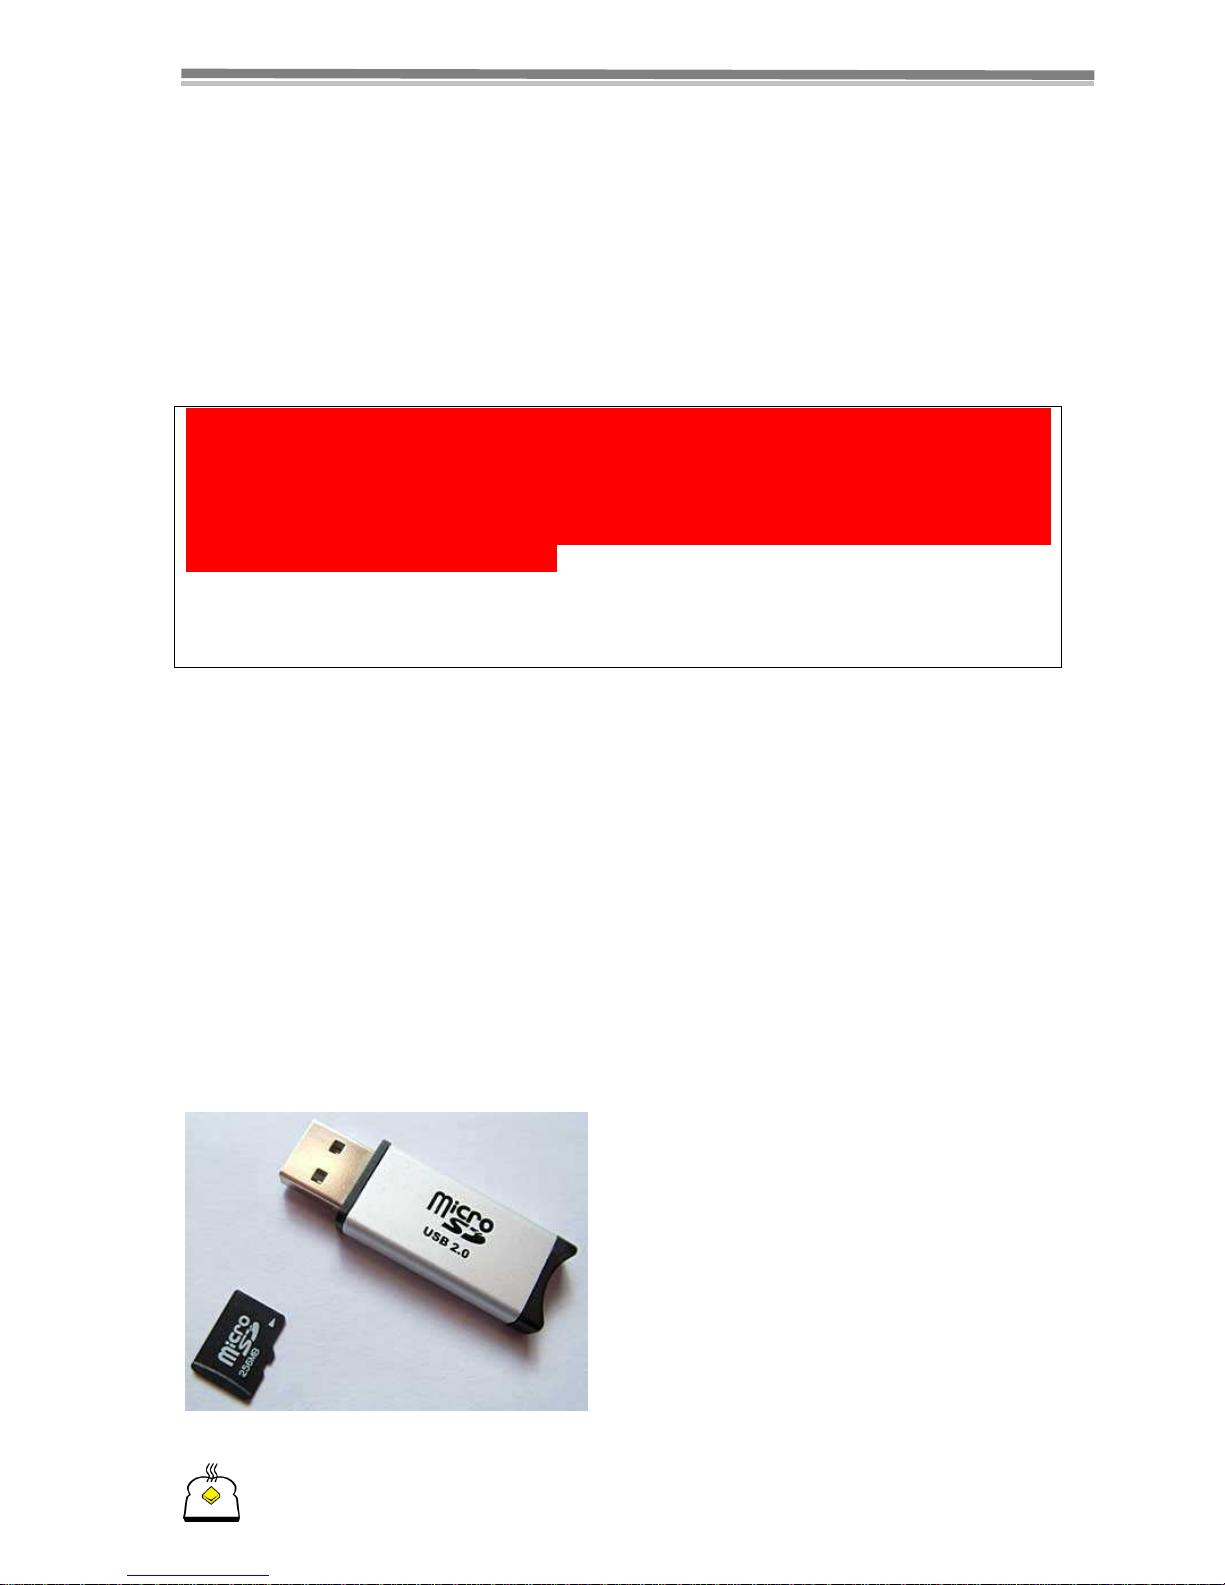
Plecter Labs decided to process the internal motion sensors and the sound generation
on the same board which requires some non-volatile memory. Second, we needed a
simple way to upload or download sound
contents or configuration of the saber
through a simple and standard way.
To avoid any plugging problem with a small
connector and an easy-to-lose cable, we
opted for a high-end flash memory card in
the SD format (now microSD).
Inserted in a USB card reader like one we
sell, the card is seen as a USB storage key
and it takes a few seconds only to transfer
files to or from the card, on Mac or PC,
without the need of any custom piece of
software.
Page 7

Plecter Labs is in no way affiliated, associated, licensed or endorsed by Disney or Lucasfilm Ltd., Industrial Light
and Magic or any of their associates.All brands and trademarks listed are the exclusive property of their respective
Owners.
7
Features & Maximum Ratings
- Dimensions: 53x23.5x7.5 mm (with the microSD card).
- Power supply: 5.5 to 11 V / 3.5A (with the High-power LED). 2 li-ion cells
(18650 or 14500) batteries recommended.
- Idle current consumption : 10 mA (deep sleep mode)
- Speaker: 4 to 8 ohm.
- Audio output Power : 2W
- Accent LEDs : 8
- Accent LEDs pad current source : 18 mA max per pad
- On-board PLI
- Blade mirroring accent LEDs
- Handles momentary or latching for blade activation
- Up to 12 selectable sound banks via audio menu
- Blaster Blocking, Force, Force Clash™ and Lockup Fx
- StabFx™, SpinFx™ & ComboFx™
- Blade Flickering & Core pulse Fx
- Blade Shimmering on Clash
- Blaster Sounds
- Up to 4 boot sounds
- Up to 16 swing and 16 clash sounds
- Flash on Clash™ (FoC™)
- Anti Power On / Off technology (A-POP™)
- Blaster Move™
- Power on Force™
- Hilt Angle Ignition Sound Selection
- Mute-on-The-Boot™
- Alternate Power Off sounds (motion vs no motion)
- Configurable Idle mode & power saving timer
- Wake-up on motion with WakeOnMove™
- Motion-triggered Ignition
- 32 stage accent LED sequencer
- Crystal Chamber specials
- WAV file support
- True 16 bit, 22.050 kSamples/sec crystal clear DAC
-
iSaber
Audio Player, up to 99 WAV tracks, play/pause/shuffle
- SD card support: up to 16GB, FAT16 or FAT32. Sandisk brand preferred.
- FlexiBlend™ powered Color Mixing on 4 channels using the satellite board
- Configurable normal blade, FoC & Lockup colors
- Real Time Configuration Editor (R.I.C.E.™)
Page 8
Plecter Labs is in no way affiliated, associated, licensed or endorsed by Disney or Lucasfilm Ltd., Industrial Light
and Magic or any of their associates.All brands and trademarks listed are the exclusive property of their respective
Owners.
8
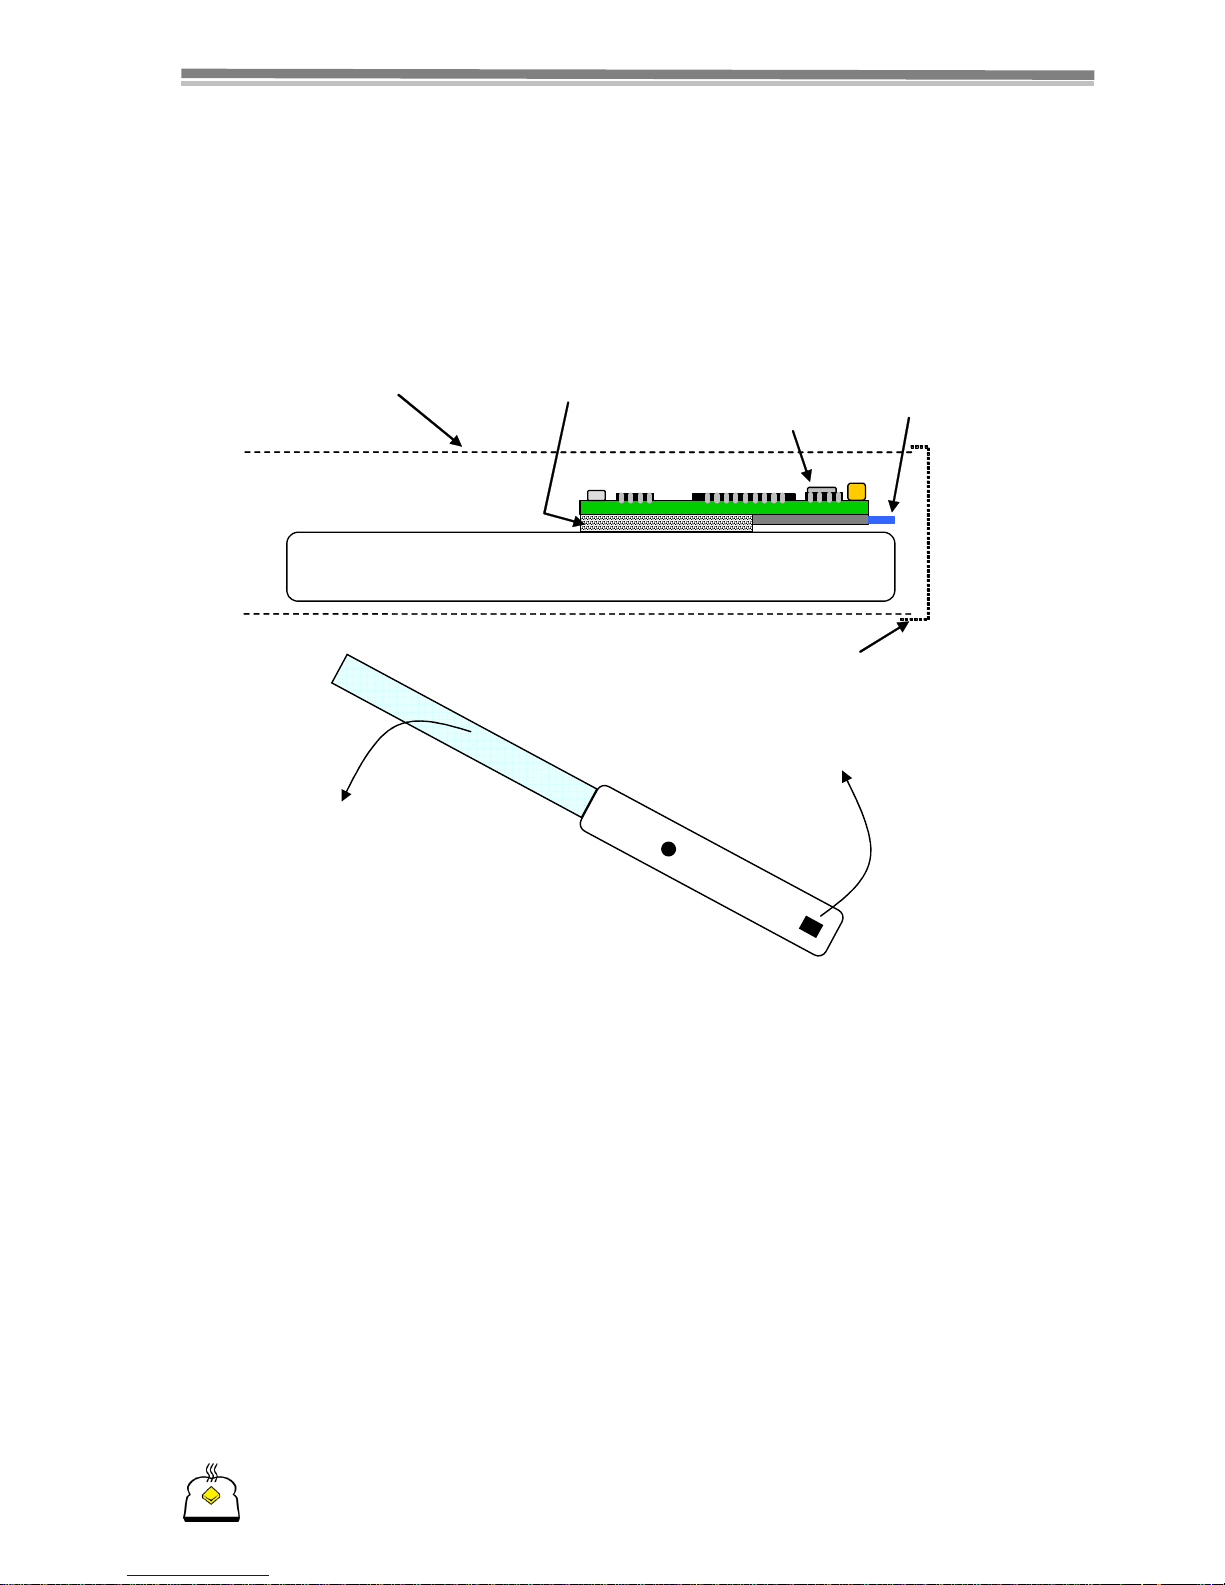
Placement & Installation
Ideally, the module is placed in the hilt so that:
- the motion sensor is at 1” or more from the spinning center of the hilt
- the SD card remains easily accessible.
Usually the pommel area is a good choice, however hilts made of 2 halves can have
the board installed in the top side of the saber.
Securing the board can be done using double sided foam tape or a velcro strap.
With this new version, along with Motion Fusion™, board placement in the hilt is less
critical. Smart placement remains important though, to guarantee a proper SD card
access.
Rechargeable battery pack
Motion sensor
µSD Card
Hilt
Foam Tape
Pommel
Hand
Page 9

Plecter Labs is in no way affiliated, associated, licensed or endorsed by Disney or Lucasfilm Ltd., Industrial Light
and Magic or any of their associates.All brands and trademarks listed are the exclusive property of their respective
Owners.
9
Tools and Parts required to install/operate the module
- an ESD safe soldering station & soldering wire (60/40, 1mm OD or eq.)
- pliers (flat and cutting)
- a Digital Multimeter / DMM (strongly advised, so useful)
- a latching or momentary switch for the blade ignition, and a momentary switch
for the auxiliary switch.
- wire & heat shrink
- rechargeable Batteries
- recharge port (canon 2.1mm socket)
- appropriate Battery charger
- a USB SD card reader accepting micro SD card or a regular SD card reader with
a micro to regular SD card adapter.
- a computer
- a digital audio editor software handling WAV files if you wish to create your
own sound fonts (audacity, for instance).
How does it work?
The two main effects of the saber is the production of a sound when the blade is
cutting the air (swing, producing a sort of Doppler effect) and the impact between two
blades (clash). The motion sensor we use is capable of detecting rotation movement
and shocks. The main difficulty is to make the proper difference between the two
classes of movements. The sensor is digitized by a microcontroller, then analyzed in
real-time and compared to a modelization of clash and swing gestures using low
latency DSP techniques (now down to 6 ms).
The algorithm has many trimming parameters in order to be adjusted to the fighting
style of each user or fighter, and also to each saber hilt design. As a matter of fact,
each saber is unique and various interaction scenarios can be desired. A setup allows
the ability to change the sensitivity of the swing and the clash, depending on
whether the user wants a really verbose saber, or casual sound FX. As the different
versions evolved we improved our gesture recognition algorithms which now have
semi automated parameterization, the user selecting only basic thresholds and the
general sensitivity. Moreover, default settings usually suit most users.
The swing gesture is a rotation of the blade leading it to cut the air at an
average speed. The clash gesture is a sudden shock of the blade on an
obstacle, or a hard shake of the hilt.
The saber setup is located on the SD card which also stores the sounds. A
configuration text file is editable with a simple text editor such a windows notepad.
Page 10

Plecter Labs is in no way affiliated, associated, licensed or endorsed by Disney or Lucasfilm Ltd., Industrial Light
and Magic or any of their associates.All brands and trademarks listed are the exclusive property of their respective
Owners.
10
SD card contents, Sound Banks and Slots
Sounds are stored in the WAV format (16 bits, 22050 samples per second).
[The previously used RAW format is no longer supported since CFv5]
WAV sound files must comply with the format above or they will be skipped
during the boot, leading to sound gaps or board failure.
Crystal Focus Version has 12 sound banks. This allows storing different “styles” in the
same saber. Each sound bank is stored on the SD card in the sub-directories (or
folders) bank1 to bank12. The contents of a bank is called a Sound Font
In the root directory of the SD card, you’ll find the sound bank selection menu files:
a sound announcing the bank selection menu (menu.wav)
a background sound for the menu (menubgnd.wav)
In addition, we are aiming to “skin” the sound board, therefore the root directory also
contains extra sound files played during interaction with the user, during the reboot
process (beep.wav) or provide an audio diagnostic of an action (saving the current
configuration with the R.I.C.E. editor) with ok.wav and cancel.wav.
Important change with CFv7:
The bank selection menu now mixes in real-time the menu background track with the
font description file which is now stored in each bank directory, as font.wav.
The sounds played by the saber are stored into (up to) 12 sub-directories or folders.
During the selection of the sound bank (see further in this document), the latter is
identified with a descriptive sound (font.wav) which can of course be customized.
The user can record their own voice and describe the contents of the sound font/bank
from the simplest manner like saying “bank one” to something really descriptive like
“dark side font”, or by naming the weapon, the character or the font theme.
Each sound bank has 61 sound slots split as below:
a font/bank description sound (font.wav)
up to 4 boot sounds (boot[2-4].wav)
4 power on sounds (poweron.wav to poweron4.wav)
Power on Force (poweronf.wav)
2 power off sounds (poweroff.wav and pwroff2.wav)
continuous humming (hum.wav)
up to 16 clash sounds (clash1.wav to clash16.wav)
up to 16 swing sounds (swing1.wav to swing16.wav)
4 blaster blocking sounds (blaster.wav to blaster4.wav)
1 blade lockup sound (lockup.wav)
2 force effect sounds (force.wav and force2.wav)
up to 4 spin sounds (spin1.wav to spin4.wav)
up to 4 stab sounds (stab1.wav to stab4.wav)
up to 4 combo sounds (combo1.wav to combo4.wav)
Page 11
Plecter Labs is in no way affiliated, associated, licensed or endorsed by Disney or Lucasfilm Ltd., Industrial Light
and Magic or any of their associates.All brands and trademarks listed are the exclusive property of their respective
Owners.
11
Optional sounds
Many of the sounds above have a scalable number or can be optional. For instance,
it’s recommended to have at least one boot sound, even if it contains only a few 100
ms of silence if you don’t want to hear it.
However, we have added new (optional) sound slots for in this version of CF.
Pre-power on sounds (preon1 to 4.wav). Those sounds will be chosen
randomly prior to the ignition power-on sounds. It allows the ability to add any
type of sound (unmixed) prior to powering on the blade. It can be an iconic /
character sound if that matches the saber “theme” or it can be a mechanical
sound highlighting the activation switch, if the sounds are present in the font.
To disable the feature, simply remove the sounds from the sound bank.
Post-power off sounds (pstoff1 to 4.wav). Same as above, but played at
the end of the power off sound. Essentially these are there to add a quote after
having the saber turned off. While it can be simply tailed to the power off
sound, having it separated provides more flexibility.
When the power supply voltage is applied to the board, it “boots” and plays a little
logo sound to notify the user, just like a digital camera. This little logo makes sure the
Crystal Focus Saber Core started properly and it gives a special identity to the saber
and to the loaded sound font. This sound can be of course customized. If the boot
sound boot.wav is not on the SD card, a little beep is played instead. If you don’t
want any sound when powering the module, create a WAV sound file with 100 ms of
silence. If several boot sounds are present in the sound font, one will be selected
randomly in the available array of sounds.
The important sounds must be all there on the SD card and be named properly
(lower case) to have the module operating properly. Same thing for the configuration
files (.txt). In case of file loss, the original package of sounds and configuration file
are available from Plecter Labs website in the download section. We advise the user to
keep all its sound and configuration files in specific folders on the hard disk on the
computer so that changing the saber’s contents remains easy. Use some explicit
naming of the folders so that you can easily remember what the sound font and
configuration files are doing, for instance [very_sensitive_dark_lord_saber].
User’s Notes
Page 12

Plecter Labs is in no way affiliated, associated, licensed or endorsed by Disney or Lucasfilm Ltd., Industrial Light
and Magic or any of their associates.All brands and trademarks listed are the exclusive property of their respective
Owners.
12
Board Overview
Getting Started with Crystal Focus
The board has been designed so that the user can enjoy an “out of the box”
experience. The default package of the SD card contains 12 sound banks with ready
made configuration files and accent led sequence files.
The switch parameter is set to 1 by default, which corresponds to a normally
closed (NC) latching switch. This way, the user doesn’t need to hook up a switch
to the board, the open contact on the activation pad tells the boards to start just after
power up, allowing the user to test the board with a minimal soldering job of 6
connections: power supply, speaker, high-power LED.
Further install of the board in the hilt and customization of the CF board will require
the user to change the parameters in the configuration files. Keep in mind that,
especially if this is your first CF, and due to the high configurability of the board, you’ll
spend quite some time on adjusting the parameters to reach the desired look & feel.
The SD card slot should remain accessible during this process and possibly once the
saber is completed too.
Wiring and Operating the Module
The board must be powered with an appropriate battery pack. We highly recommend
the use of good quality li-ion battery packs made of 14500 or 18650 cells and
including protection PCBs. The AW and Panasonic brands make superior quality
batteries while the Ultrafire brand remains a cost effective solution.
Unless you have a convenient way to open the hilt and access the inside of the saber
(Graflex base for instance), we strongly recommend the use of a directly connected
battery pack (with a “recharge port”) vs. removable cells. Moreover, for dueling
High
-
Power
LED Pads
Speaker Pads
Motion Sensor
MCU
Accent LED
Pads
Aux. Switch Ignition Switch
Power Supply
Pads
µSD
Page 13

Plecter Labs is in no way affiliated, associated, licensed or endorsed by Disney or Lucasfilm Ltd., Industrial Light
and Magic or any of their associates.All brands and trademarks listed are the exclusive property of their respective
Owners.
13
sabers, directly wired battery packs have more reliable connections compared to
spring action battery holders.
A 2-cell li-ion will provide a nominal voltage of 7.4V to the board. The board isn’t
compatible with a 3-cell solution without some modifications of the electronics.
Ni-MH battery packs are simply not recommended since they have a bigger energy
storage/volume ratio and the cost of li-ion cells isn’t an issue anymore.
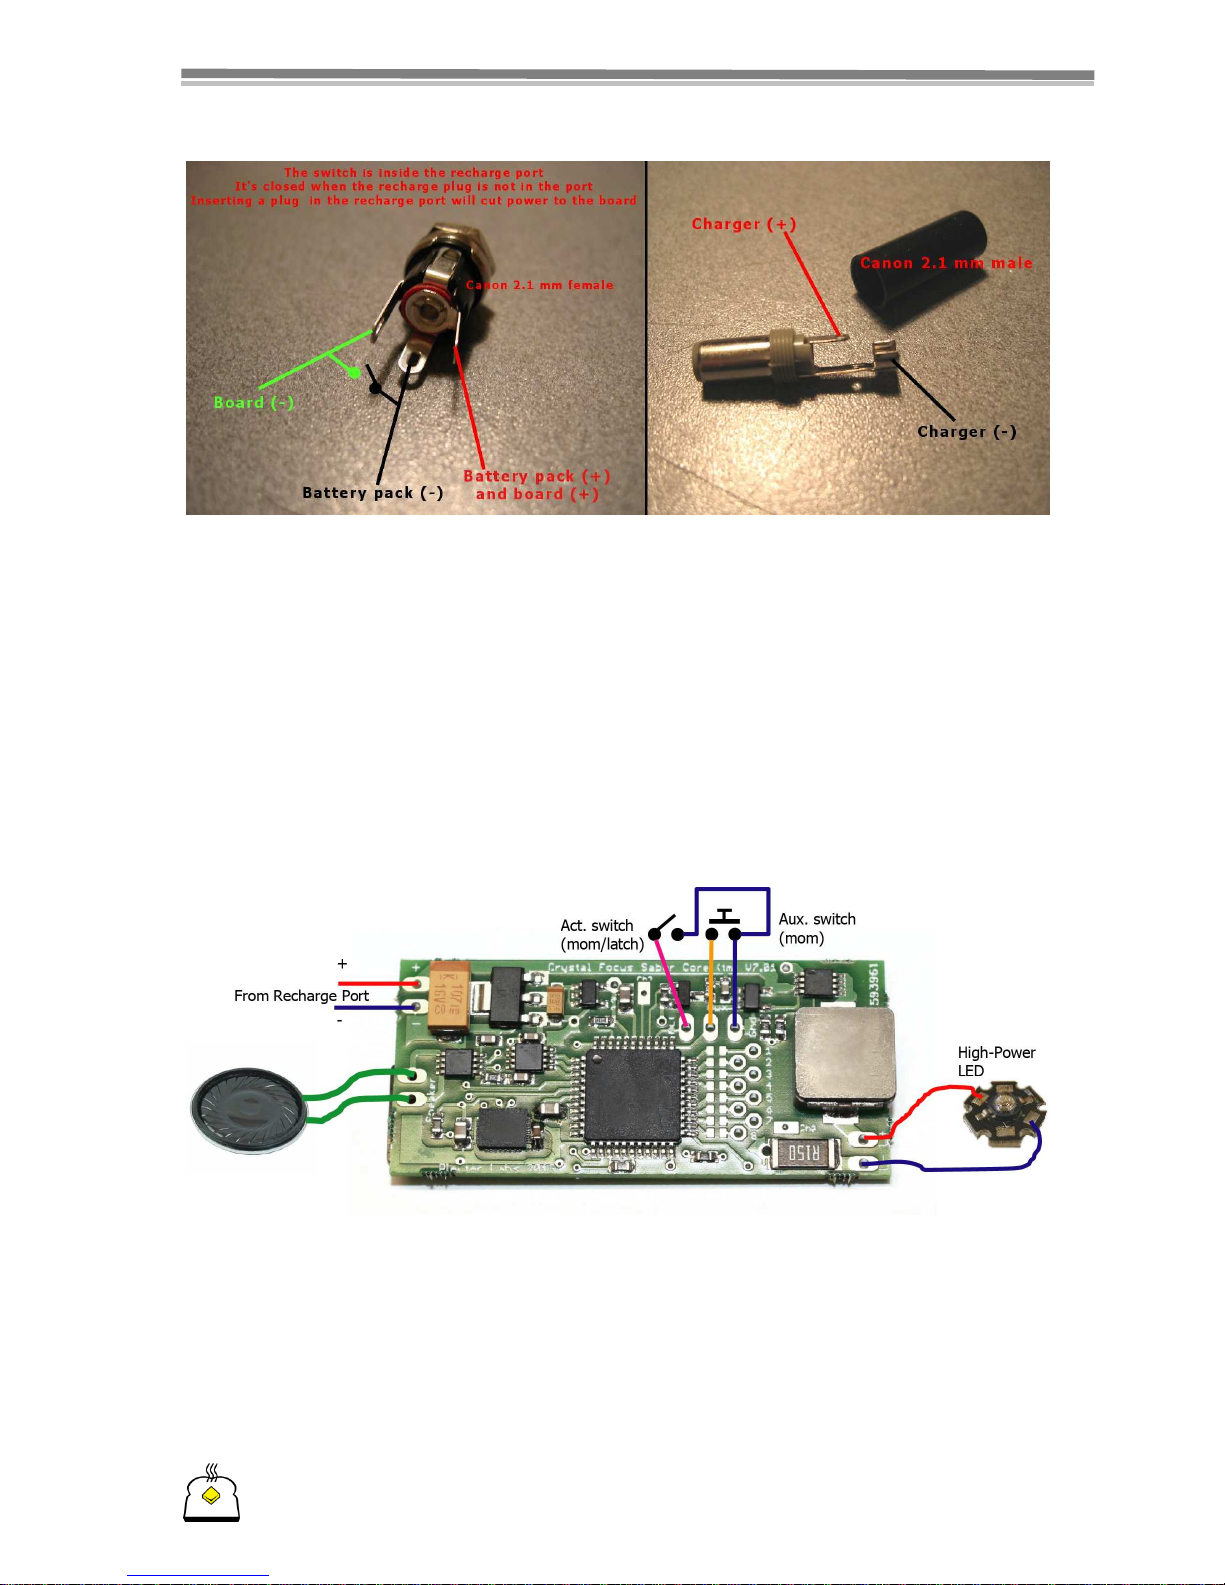
General Power Switch & Recharge Port
Despite that the CF board has a very low idle current use when the blade is off and
board is in deep sleep mode, long term storage of the hilt on a shelf or display case
requires the electronics to be fully shut off. To avoid the use of an additional general
power switch, we use the recharge port for that very purpose. 2.1mm or 1.3mm
“Canon” sockets are popular choices. Two of those pins are connected internally when
nothing is inserted in the socket. Contact is disrupted when a plug is inserted.
Along the years, the “kill key” technique has been developed: a fake plastic plug is
decorated to look like an actual part of the hilt. When inserted, it cuts the power
supply to the board in the recharge port. Of course, the port recharges the internal
battery pack when an actual charger plug is inserted.
Below, an example of a decorative kill key (July 2010)
The Kill Key must be made out of a non-conductive material (PVC, Nylon, Delrin etc).
Here’s the usual wiring of the recharge port. Please note that not all recharge ports
have the exact same pinout. User must understand the principle of wiring a recharge
port and must be able to identify the different pins of a socket.
The idea is fairly simple: the positive of the battery pack goes to the recharge port
central pin (referred as tip) and then to the positive of the board. It’s not affected by
the kill key. The negative of the battery pack goes to the pin of the recharge port that
is connected to the outer sleeve of the socket. The last pin, referred as switched
negative pin goes to the negative of the board.
Page 14
Plecter Labs is in no way affiliated, associated, licensed or endorsed by Disney or Lucasfilm Ltd., Industrial Light
and Magic or any of their associates.All brands and trademarks listed are the exclusive property of their respective
Owners.
14
When nothing is inserted in the port, the negative of the battery pack is internally
connected to the switched negative tab, hence powering the board. When a Kill Key is
inserted in the port, the negative of the board is no longer connected to the negative
of the battery pack: the board is fully powered down. When a charger plug is inserted
in the recharge port, the charging voltage is reaching both leads of the battery pack
while the negative of the board is still unconnected from the circuit, preventing
damages to the electronics and ensuring only the battery pack is connected to the
charger for proper charge.
In the previous picture the green-black drawn switched doesn’t need to be wired per
say, it only illustrates the recharge socket internal switch.
General wiring
The board doesn’t need many connections for basic operation. Aside from the
recharge port / power supply detailed above, only a pair of switches, the high power
LED and the speaker are required to be soldered to get 80% of the features the CF
board proposes.
Page 15

Plecter Labs is in no way affiliated, associated, licensed or endorsed by Disney or Lucasfilm Ltd., Industrial Light
and Magic or any of their associates.All brands and trademarks listed are the exclusive property of their respective
Owners.
15
User’s Notes
Page 16

Plecter Labs is in no way affiliated, associated, licensed or endorsed by Disney or Lucasfilm Ltd., Industrial Light
and Magic or any of their associates.All brands and trademarks listed are the exclusive property of their respective
Owners.
16
Animated Accent LEDs
There are many ways to “pimp” your saber hilt using additional small LEDs further
referred in this document as Accent LEDs.
Crystal Focus features a 32 stage sequencer that allows the user to setup a blinking
animated sequence for up to 8 LEDs. The board outputs 3.3V / 18mA max per accent
LED pad. User must ensure the used accent LEDs have a forward voltage (Vf) lower or
equal to 3.3V.
As a space saver CF embeds the footprints for SMT resistors. The footprint is made for
0402 resistors like Farnell reference # 1357998 (22 ohm value provided as an
example, user must do the math for the actually used accent LEDs – see below). 0603
resistors will also fit and are easier to solder.
To install those resistors on the board, pre-tin one pad only, then grab the resistor
with a pair of sharp tweezers, slide it against the pre-tinned pad, heat up the joint,
wait for it to cool down, then solder the other side of the resistor.
If the user prefers to use classic resistor with leads, the SMT footprint must be
bridged: tin both pads first then add a bit of solder while the soldering iron tip is right
in the middle of the pads. Some stripped wrapping wire or one strand of wire can also
be used to achieve the bridged connection. Another solution is to use 0 ohm straps in
0402 or 0603 package.
On the picture above, the red arrows point to the positive pads of the accent leds, use
small gauge wire to send those signals to the positive of the LEDs. Flat/Ribbon cable
can be very handy for that purpose. Then all negatives of the LEDs return to a single
pad pointed by the blue arrow (ground return). The main negative of the board can
be also used as the accent led ground return.
Calculating resistors for LEDs
R = (Vsupply – Vled) / LedCurrent
Page 17

Plecter Labs is in no way affiliated, associated, licensed or endorsed by Disney or Lucasfilm Ltd., Industrial Light
and Magic or any of their associates.All brands and trademarks listed are the exclusive property of their respective
Owners.
17
In our case, Vsupply is the voltage the board provides to power the accent LEDs, ie
3.3V. The Vled is the forward voltage of the LED, usually referred as Vf in the
datasheet. The led current has to be decided by the user, depending on the
brightness and the maximum rating of the used LED. 5 to15 mA are fairly common for
most accent LEDs.
As an example, let’s consider a 1.6 volt LED (red) at 10 mA
R = (3.3 – 1.6) / 0.01 = 170 ohm ( 150 ohm in the classic E12 resistor series)
Be sure not to drive too much current in the LED (18 mA max). If you wish a good
brightness with a low current, use high efficiency LED (generally coming in a
transparent “crystal” casing).
Please see further in this document for the sequencing of the accent LEDs.
Page 18

Plecter Labs is in no way affiliated, associated, licensed or endorsed by Disney or Lucasfilm Ltd., Industrial Light
and Magic or any of their associates.All brands and trademarks listed are the exclusive property of their respective
Owners.
18
Configuration Files
There are 2 different types of configuration files. One is the config.txt
configuration file which is stored in the sound bank folder and contains font
dependant parameters such as blade color, flash on clash color and timing, flicker
effect. Another configuration file is named override.txt which is located in the root
directory of the card and stores parameters defining the behavior of the saber in
general (sleep mode, switch setup, motion sensing parameters).
That version better separates both types of parameters, some of them having really
no meaning in the font context but only in the hilt context. However, the user can
always decide to have hilt parameters moved to the config.txt of each font to
have them defined per font. A good example is the sleep parameter, which one might
like to have short to enter sleep mode quickly in font A but also want it rather long in
font B to enjoy the idle mode accent LED sequence.
Conversely, a font parameter can be moved to the override.txt file which is the
primary and former use of that configuration file. Any parameter present in that file
(even if also defined in the config.txt) will be overridden.
Both are simple text files which can be edited with windows notepad.
Parameters must all be present in the configuration files otherwise, the module will
use default parameters for the missing parameters.
The text files accept comments on a stand alone line (not mixed with a parameter
line). The comment symbol is the C language double slash ‘//’ as the very first
characters of the line.
CF now also has another style of comments using the Emacs script syntax '##'.
To "comment" has 2 kinds of use. One is to disable a line like in the example below:
## switch=2
switch=1
The other use is to leave a comment or a note to remember something about the
configuration or the soundbank, like in this example.
## beware, current should not exceed 750 mA
led1=700
the double slash '//' comment is now reserved as the single comment exported to the
Real Time Configuration Editor (R.I.C.E.™). Use the // comment to name the
configuration to reflect its "theme" like:
// Bank1 - Novastar sound font
Certain parameters are integers, others are floating point numbers. Format must be
respected: even for a round value like ‘1’ for a floating point parameter, ‘1.0’ has to be
entered.
To modify the file, insert the SD card in the USB card reader, and then browse the
contents with windows file explorer (on
E: for instance). Double-click on file
Page 19

Plecter Labs is in no way affiliated, associated, licensed or endorsed by Disney or Lucasfilm Ltd., Industrial Light
and Magic or any of their associates.All brands and trademarks listed are the exclusive property of their respective
Owners.
19
config.txt: the notepad opens. You can directly save the file on the SD card. Once
the configuration is over, simply remove the card from the reader after having it
“ejected” (right click on the reader device in windows explorer, contextual menu,
eject). Put the card back in the saber and test your new setup!
Make sure you have no space characters at the beginning of the line, or
between the ‘=’ sign and the value of a parameter.
The preferences file
Since CF v4, another file named prefs.txt is used and stored in the root directory of
the SD card. It stores the latest soundbank used and also now defines the maximum
currents of each color channel to avoid damaging the LED. See further in this
document for more details about LED current maximum settings.
Page 20

Plecter Labs is in no way affiliated, associated, licensed or endorsed by Disney or Lucasfilm Ltd., Industrial Light
and Magic or any of their associates.All brands and trademarks listed are the exclusive property of their respective
Owners.
20
Parameters and fine tuning the saber
The configuration file includes a set of parameters dedicated to the sound section of
the controller and the gestural / motion detection (both being linked). A second set of
parameters handles the behavior of the high-power LED. Some parameters influence
both categories, since visual and sound effects are in tight relationship intrinsically. All
parameters are lowercase.
Certain parameters involve time / duration / delay. We tried to normalize
those parameters to a single unit: a multiple of 2ms. Unless otherwise
indicated, that’s what is used to define those timing parameters and it
matches the internal clock of CF. As an example, such a parameter set to
500 is equivalent to 1000 ms or 1 second.
Motion & Gesture detection parameters:
Motion recognition is processed using complex low latency DSP algorithms; however,
most of the parameters used for those are internally computed so the user only has to
setup a few thresholds as high-level parameters.
CF has 4 motion classes: swing, clash, stab and spin. Each class is defined by a
specific threshold (hswing, hclash, hstab and hspin) above which the associated sound
is triggered. Most thresholds are defined between 0 and 1023 for a maximized
accuracy in the motion calculation and for an improved resolution in the motion
settings.
Finally, there’s a motion gate parameter to define the minimum quantity of motion
required to activate the motion engine. This value isn’t critical but can be adjusted in
the case of excess of vibrations due to the proximity of speaker or rumbling motor.
gate [0-200]: minimum motion quantity required to start the motion
recognition engine. Base value between 15 to 50 works fine (default: 20)
hswing [0-1023]: swing threshold (120).
hclash [0-1023]: clash threshold (550).
hstab [0-1023]: stab threshold (80-200).
hspin [0-32000]: spin threshold (200-1000).
Gesture types
A swing gesture is a rotation of the hilt. A clash is a general purpose shock occurring
on the blade (or the hilt). A spin detection is engaged after the hilt has gone in
continuous rotation long enough (above, hspin). A stab a horizontal thrust of the hilt
ending with a shock.
Page 21

Plecter Labs is in no way affiliated, associated, licensed or endorsed by Disney or Lucasfilm Ltd., Industrial Light
and Magic or any of their associates.All brands and trademarks listed are the exclusive property of their respective
Owners.
21
Gesture flows & priorities:
Our gesture analysis is so fast that sounds could be chained one after the other at
light speed! We therefore have to slow down the motion engine because too many
swing sounds played in a short time are not so realistic. For that reason we implement
gesture flow limiters for swing and clash sounds.
Clash sounds generally have the priority over all other sounds except in the following
cases:
- lockup is engaged : no other sound will be triggered until the aux. switch is
released
- a blaster sound is triggered. Swings cannot interrupt it. A clash can interrupt it
if the blaster priority parameter (blastp) is set to 0.
A clash sound can interrupt a swing sound even if the swing flow limiter is engaged
(just after a swing was triggered).
A clash sound cannot interrupt a previously triggered clash sound if the clash flow
limiter is still engaged (delay for triggering another one hasn’t expired).
A swing sound cannot interrupt a previously triggered swing sound if the swing flow
limiter is still engaged (delay for triggering another one hasn’t expired).
A swing sound can never interrupt a clash sound if the clash flow limiter is still
engaged, and whether or not the swing rate limiter is engaged.
If the clash flow limiter has expired, and even if the clash sound is still playing, a
swing sound can interrupt it.
swing [0-500]: swing rate flow limiter. Delay during which swings cannot be
furthermore triggered.
clash [0-500]: clash rate flow limiter. Delay during which clashes cannot be
furthermore triggered.
Sound parameters :
random [0-4]: set the selection mode for reading the clash and swing
sounds. With value 0, random play is active: when a clash or swing occurs, the
sound is randomly chosen in the available slots (up to 16). The motion
detection engine will determine the main axis of the gesture and will pick a
sound either in the first half of the sound set (first axis) or in the second set
(second axis).
With value 1, the sound is played in sequence (slot 1, then 2 etc.). If the user
requires a single sound, simply duplicate 8 times the same sound in the 8 slots.
In this very case, the random flag will have no effect. We’ve added another
mode of sound selection activated by the gesture itself.
With the random mode set to 2, the hardness of a clash or a swing is
measured and scaled from 1 to the max number (n) of clash or swing sounds.
Ordering your sounds from 1 to (n) as well, from soft to hard, and the
measured gesture hardness will pick the corresponding sound! With the
random mode set to 3 we get a random mode that ensures no triggering the
Page 22

Plecter Labs is in no way affiliated, associated, licensed or endorsed by Disney or Lucasfilm Ltd., Industrial Light
and Magic or any of their associates.All brands and trademarks listed are the exclusive property of their respective
Owners.
22
same sound twice in a sequence of (n) gestures (in 99% of cases). Finally, with
mode 4, it’s the time elapsed between 2 consecutive movements that will
decide which sound is played (see parameters gtsl et gtsh for more details
on this mode)
randb [0-1-3]: same as above but for the selection of blaster blocking
sounds
vol [0-4] : digital volume setup. 0 mutes the sound output, 4 is the
maximum volume.
beep [0-127] : Sets the volume of the system beeps emitted by the unit
(reboot, iSaber).
shft [0-100] : sound effect modifying the playback speed of the sounds
(and therefore their pitch) with the tilt of the saber. The saber sounds more or
less menacing depending on the orientation of the blade/hilt. This effect is also
applied during the movements of the saber. The parameter specifies a
percentage (%) of the playback speed alteration. When set to 0, the effect is
disabled.
grav [+1000;-1000] : parameter to be used with the shft parameter. It
defines the « zero » of the tilt at which the playback speed is unmodified. To
be set around mid-scale (-500 is the usual default value) depending of the
desired effect. Not used when parameter shft is set to zero.
dyshft [0-100] : sound effect modifying the playback speed of the swing
sound only. A slow swing will have a deeper sound than a fast sound (played at
normal speed and pitch). The parameter specifies a percentage (%) of the
playback speed alteration. When set to 0, the effect is disabled.
shmrd [10-500]: duration of the shimmering effect of the high-power LED
during a clash. Make sure this duration is not too much longer than the
associated sound to keep a nice result.
shmrp [5-25]: periodicity of the light bursts during the clash effect. A slow
period will produce tight bursts.
shmrr [0-25]: random value applied to the periodicity of the light burst
during a clash effect. Allows having bursts that are not regularly spaced in time
which increases the realism. For instance, a period shmrp of 20 and a random
value shmrr of 10 will produce a period between two bursts varying between
20 and 30 (ie 40 and 60 ms).
shmr% [0-100],[0-100] : shimmer effect depth. Defines how the shimmer
will "dig" the defined brightness during a clash or a lockup effect. A static flash
is achieved by leaving that value to 0,0. That parameter is actually composed
of 2 numbers separated by a comma to define the range to apply to the
brightness modification during the shimmer. 50,90 will for instance dig the
brightness of the main blade color of a random selection between 50 and 90%.
focd [0-500]: Flash on Clash™ (FoC™) duration. Used when an extra LED
die is wired to the board with a Power Xtender™ circuit and the Flash on
Clash™ Pad.
focp [5-25]: periodicity of the light bursts during the Flash on Clash™
effect. A slow period will produce tight bursts. Similar to the shmrp parameter.
Page 23

Plecter Labs is in no way affiliated, associated, licensed or endorsed by Disney or Lucasfilm Ltd., Industrial Light
and Magic or any of their associates.All brands and trademarks listed are the exclusive property of their respective
Owners.
23
focr [0-25]: random value applied to the periodicity of the light burst during
a Flash on Clash™ effect. Similar to shmrr but applied to FoC™.
foc% [0-100] ,[0-100]: Flash on Clash effect depth. Defines how deep
the FoC brightness is dug for “on-top” (or non-mixed) FoC di(c)e. Also
composed of 2 comma-separated numbers, like the shimmer depth (see
above).
focl [0-1]: defines if the Flash on Clash™ is enabled during Blade Lockup
effect.
focb [0-1]: defines if the Flash on Clash™ is enabled during Blaster Blocking
effect.
focf1 [0-1]: defines if the Flash on Clash™ is enabled during the Force
effect
focf2 [0-1]: defines if the Flash on Clash™ is enabled during the
Force Clash™ effect.
focf3 [0-1]: defines if the Flash on Clash™ is enabled during the StabFx™
effect.
gtsl [100-300]: low boundary of the Gesture Time Scale used by the
random mode 4. Refer to the Sound Selection Modes paragraph for more
details.
gtsh [200-800]: high boundary of the Gesture Time Scale used by the
random mode 4. Refer to the Sound Selection Modes paragraph for more
details.
switch [0-2]: selects if the saber is activated by a normally-open or a
normally-closed switch. Certain “push-on push-off” switches are more practical
and more reliable when released for activating the saber. Other switches might
simply have an “inverted” logic (normally closed contact). When the switch is
set to 1, the saber lights up when the electrical contact of the switch is closed
and conversely when switch is set to 0. If you wish to use a momentary
switch for the blade activation, set switch to 2.
offp [0-1]: Anti power off protection (A-POP). To avoid accidentally
powering off the saber, especially when using a momentary button for
activation, we added a power off protection. When this parameter is set to 1,
the user must press the activation button and confirm with the auxiliary button.
It is not necessary to press both buttons at the same time, keep the activation
switch pressed first, then press the auxiliary switch: the blade goes off.
offd [0-65535]: Anti power-off delay. An alternative to A-POP™ defining
how long the user must press the activation switch before the blade goes off. A
value of 65535 corresponds to 2min12, which is useful if you just upgraded an
ultrasound saber with a CF and you're feeling some power-off scheme
nostalgia. Values from 70 to 200 (140 to 400 ms) are relevant and very
efficient for just ensuring the saber won't be turned off accidentally. Set to zero
if you use an anti power off protection with parameter offp.
Page 24

Plecter Labs is in no way affiliated, associated, licensed or endorsed by Disney or Lucasfilm Ltd., Industrial Light
and Magic or any of their associates.All brands and trademarks listed are the exclusive property of their respective
Owners.
24
onp [0-1]: same idea as above but for ignition. If the parameter is set to on,
you must press the aux. button after pressing / cycling the activation switch in
order to ignite the blade.
qon [0-3000]: “quick-on”. Allows having the blade ignited in a specific
amount of time rather than matching the duration of the power on sound and
should not exceed the duration of any power on sounds.
qoff [0-3000]: same thing as above, but for the blade retraction.
flkon [0-1]: enables the blade flicker during power on.
flkoff [0-1]: enables the blade flicker during power off.
sleep [0-65535]: delay before which the board goes in deep sleep mode
(power saving). See paragraph dedicated to idle modes for more details. When
set to the max value, board will never reach the deep sleep mode and will
remain in idle mode.
wakeup [0-2]: defines if the board can be woken up (leaving deep sleep
mode) by moving the hilt. When parameter is set to 0, and once the board has
entered deep sleep mode, board can only be woken up by the blade ignition
(activator) switch. When set to 1 or 2, motion of the hilt while the blade is off
will reset the sleep timer (previous parameter) which means that the hilt will
remain in idle mode, hence playing the accent led sequence matching that
mode. However, when parameter is set to 1, motion on the hilt allows the
board to leave the deep sleep state, while being set to 2, motion will not allow
the board to leave deep sleep once that state has been reached. See the
specific paragraph dedicated to idle modes for more details about the possible
scenarios using those 2 parameters.
pof [0-1023]: enables the Power on Force saber ignition technique (see
paragraph “Motion activated ignition” for more detail). The parameter defines
the motion threshold required to ignite the blade with a motion faking the use
of the "Force" to activate the saber. 50 works usually fine
pom [0-1]: Power on Move Special Sound. When set to 0, board will use
current angle of the hilt to choose the power on sound played when saber is
ignited by a motion. When set to 1, a motion triggered ignition will always play
a specific "power on force" sound poweronf.wav.
valsnd [0-1]: enables or disables the repeat of the selected soundbank
description sound in the vocal menu once selected. When disabled, it saves
time in the selection process. Also, when disabled, the aux. switch
confirmation process for rebooting the saber is disabled (see “rebooting the
saber” paragraph).
lockup [0-1000]: our module features an auxiliary switch to trigger
additional sound/visual effects. A short pressure on the switch generates the
blaster effect (the saber blade stops a blaster ray), and plays one of the blaster
sounds. A longer pressure (maintained) triggers a blade lockup effect: while the
switch is pressed, the sound lockup.wav is played in loop with some
shimmering applied to the high-power LED. The parameter
lockup specifies
the duration of the delay before triggering the lockup effect. A short value (50
Page 25

Plecter Labs is in no way affiliated, associated, licensed or endorsed by Disney or Lucasfilm Ltd., Industrial Light
and Magic or any of their associates.All brands and trademarks listed are the exclusive property of their respective
Owners.
25
to 100) will trigger the effect almost immediately: to trigger a blaster effect, the
user will have to release the button quickly. Conversely, a higher value will
leave more time to produce a blaster blocking feature.
blastp [0-1]: Defines if the blaster priority is enabled or not. This decides if
a clash can interrupt the blaster blocking sounds. Swings are always disabled
during blasters. With the blaster priority on, the sound of the blaster must
finish first then a swing might be executed. This allows a nice choreography for
blocking blaster rays using a long blaster file without getting the sound stopped
by a swing. If the choreography has stressed movements that might trigger a
clash, set the parameter to 1 so that no gestural events can interrupt the
blaster sequence. Conversely, if you wish a blaster sequence to be possibly
interrupted by a clash, disable the parameter.
blastm [0-1]: Enables Blaster Move™. Blaster Move allows the ability to
trigger a sequence of blaster sounds with the motion of the hilt. Only the first
sound is triggered by a short press on the aux. switch, then further “swing-like”
gestures will trigger more blaster sounds, until a blaster sound ends, or if a
clash interrupts the sequences (assuming blastp=0).
resume [0-1]: Enables the hum resume feature. Instead of starting the hum
from the beginning, the sound will resume from the position where it has been
interrupted within a ballpark of 10 ms.
menugest [0-1]: Enables the use of saber motions to browse or select
options. In the sound bank selection menu, flicking the hilt moves to the next
bank and a bang will validate the currently selected font. In the iSaber audio
player, flicking the hilt selects the next track, and bang toggles play/pause.
muteb [0-1]: Enables the mute-on-the-boot™ feature which controls the
volume of the boot sound with the angle of the hilt. If enabled, this feature also
controls the menu volume.
menupli [0-1]: Enables the PLI during the bank selection menu. Use only if
the PLI can be used and properly displayed.
High-power LED parameters :
led [0-3000],[0-1500], [0-1500], [0-1500]: the blade color is
defined by a list of 4 currents (in mA) separated by a coma. The current of the
main LED (onboard driver) can go up to 3000 mA (3A). If a current above 2000
mA is selected, a 3 minute timer will be engaged at each ignition. After 3
minutes, the current will be taken back to 2A. The timer is meant to protect the
saber's electronics which ends dissipating 15W in a closed environment. The
timer is reset each time the blade is turned off.
fled [0-3000],[0-1500], [0-1500], [0-1500]: defines the currents
/ color of the blade during a Flash on Clash™ effect (blade impact, blaster
blocking, lockup).
lled [0-3000],[0-1500], [0-1500], [0-1500]: secondary blade
color during lockup interpolated with the FoC color based on the orientation of
the hilt (used only with a 1111 “all-mixed” configuration of the FoC mixing
parameter detailed below.
Page 26

Plecter Labs is in no way affiliated, associated, licensed or endorsed by Disney or Lucasfilm Ltd., Industrial Light
and Magic or any of their associates.All brands and trademarks listed are the exclusive property of their respective
Owners.
26
randomc [0-99]: defines the randomization (in %) of the color during the
Flash on Clash™. The parameter is a max. percentage of variation applied
individually to each channel. A high value will produce a large variance of the
color.
focmix [0000-1111] : Defines how the led dice are either mixed during
the Flash on Clash or added “on top” the main blade color (legacy CFv5 FoC
effect). See further in this document about that specific topic.
flks [0-20]: speed of the energy variation / flickering effect of the blade. A
high value produces a damaged saber effect while a small value generates
subtle energy changes. The value 0 disables the effect (static blade).
flkd [0-100]: depth (in %) of the energy fluctuation effect, i.e. the range
over which the LED brightness will be affected during the effect. A low value
does not modify the energy very much while a high value « digs » big steps of
light intensity. To be used with the parameter flkrs.
pulsel [0-5000]: Pulse effect length (duration). Defines the ramp up/down
time.
pulsed [0-100]: Pulse effect depth in %. 100% will dig the full range of the
high power LED from max brightness to off.
plih [3.3-12.0]: Defines the high boundary of the PLI scale. Adjust to the
maximum or to the nominal voltage of your battery pack.
plil [3.3-12.0]: Defines the low boundary of the PLI scale. Adjust to the
minimum voltage of your battery pack. See the PLI section of that document
for tips & tricks about the use of the Power Level Indicator.
User's Notes:
Page 27

Plecter Labs is in no way affiliated, associated, licensed or endorsed by Disney or Lucasfilm Ltd., Industrial Light
and Magic or any of their associates.All brands and trademarks listed are the exclusive property of their respective
Owners.
27
The saber overdrive protection
In order to prevent an erroneous current to be set either by the manual editing of the
configuration file or during the real time edition of the saber’s configuration with
R.I.C.E., we installed a protection system in the prefs.txt file.
That file now stores an extra set of parameters defining the maximum current allowed
for each color channel using the keyword maxled. By default, each channel current is
limited to 1A:
maxled=1000,1000,1000,1000
Combos
The combo system is inherited from the video game culture and was implemented in
CF for 2 reasons. One is to have some sounds unlocked by a special sequence of hilt
movement, for the enjoyment of the user, the other reason is to be able to practice
specific saber gestures or forms and therefore get a sound notification that it’s been
done ”right”.
Each of the combo1-4.wav sound is associated to the matching combo sequence
defined in the override.txt main configuration file. Each combo can be defined by
up to 20 elements from the following list :
• ‘s’ for a swing
• ‘c’ for a clash
• ‘p’ for a spin
• ‘t’ for a stab
In addition, the combo element list is ended by a capital letter indicating if the combo
sound can be interrupted or not, and by which gesture. As a matter of fact, certain
combo sequences and associated sounds might be interesting to listen to, while others
should not block the motion flow.
• ‘S’ indicates the combo sound can be interrupted exclusively by a swing
• ‘C’ indicates only a clash can interrupt the combo sound
• ‘B’ means both swing and clash
• ‘N’ means none and the combo sound will be played until its end
As an example the following sequence requires 4 swings followed by a clash to trigger
combo1.wav and the sound cannot be interrupted:
combo1=ssscN
The user has a limited time to execute a combo before the gesture pattern engine
resets. That time is defined by the parameter tcombo and is expressed, like other
timing parameters, in a multiple of 2ms (500 = 1 second).
To disable a combo, place the string <empty> after the = sign in front of the
corresponding configuration line of the override.txt file.
Page 28

Plecter Labs is in no way affiliated, associated, licensed or endorsed by Disney or Lucasfilm Ltd., Industrial Light
and Magic or any of their associates.All brands and trademarks listed are the exclusive property of their respective
Owners.
28
Color profiles
Profiles definition
The board can embed up to 10 color profiles defining both a blade color and a Flash
On Clash (FoC) color. Those profiles are stored in the override.txt file with the
keyword color, fcolor and lcolor. Each profile (for blade, FoC or lockup) is composed
of 4 current values for their respective channel #1 2 3 and 4.
Each drive value can be in the range of 0 (led die off) to 3000 (main channel) or 1500
(secondary channels).
The board is provided with 7 default color profiles
## Color profiles
color0=0,940,0
fcolor0=940,430,0
color1=0,0,940
fcolor1=900,0,940
color2=940,0,0
fcolor2=0,630,400
color3=0,830,400
fcolor3=700,940,0
color4=840,0,630
fcolor4=0,0,940
color5=940,430,0
fcolor5=0,940,0
color6=740,930,0
fcolor6=0,740,600
If the user prefers to not use the color profiles, only one has to be left to define the
default color of the blade.
When edited / ajusted via RICE, the profiles are always stored in the override.txt
file. However, it is possible to manually remove the color profiles from the override file
and create different sets in each bank, obtaining various shades and profiles in each
sound font. Be aware that this profile organization will be discarded and reset if the
board is further configured via RICE.
Profiles vs. standard blade color definition
If no profile is found in the override.txt (or config.txt) file, the blade color,
along with FoC and lockup are found in the config.txt file under the keywords /
parameters led, fled and lled. This allows a backward compatibility with CF v7.0 and
this remains handy for single color sabers (color change *per font* remains possible
then).
Profiles editing in R.I.C.E.
While it's technically possible to redefine the maximum number of desired profiles in
RICE so that the boards saves them, the ideal way of adding color profiles is to place
them manually in the
override.txt file first place. They can be blank profiles (0
Page 29

Plecter Labs is in no way affiliated, associated, licensed or endorsed by Disney or Lucasfilm Ltd., Industrial Light
and Magic or any of their associates.All brands and trademarks listed are the exclusive property of their respective
Owners.
29
everywhere) or an identical default blade color for all of them ; then edit them in
R.I.C.E.
Profiles browsing
To initiate a color change and move to the next profile, the user must press the aux.
switch and then, *before* the lockup timer elapses (see the lockup parameter)
press the activation switch. That combo action is easier to achieve with a momentary
activation switch, however it is also possible to trigger it with a latching activator too.
Once triggered, the color starts to change and the color.wav sound is played. If
that sound file isn't present in the sound bank, the file swing1.wav will be played.
Page 30

Plecter Labs is in no way affiliated, associated, licensed or endorsed by Disney or Lucasfilm Ltd., Industrial Light
and Magic or any of their associates.All brands and trademarks listed are the exclusive property of their respective
Owners.
30
Resonant chamber
A little 28 mm diameter speaker cannot compete with some Hi-Fi stereo system,
neither in terms of quality, nor loudness. However, in order to maximize the volume of
the saber sound, a resonance chamber can be created in the hilt (same idea as the
bass reflex in a closed speaker).
To achieve this, make sure you have 1 or 2 cm of space (and therefore air) between
the speaker and the hilt cap or pommel. The saber is generally not totally full, the so
internal space of the hilt will make the back resonance chamber for the speaker which
will seriously contribute in increasing the volume.
This amplification with the resonance chamber technique is selective for a certain
range of frequencies (the bandwidth): the length of the chamber will determine the
timbre of the saber. Try different configurations with an empty camera film box until
you find the desired sound coloration. To check the obtained volume before putting
the whole electronics in the hilt, circle the loud speaker between the thumb and the
first finger and curve the palm of your hand: it will create a quite accurate simulation
of a short frontal chamber and a bigger back resonant chamber.
For comparison purpose, a good resonance chamber and a volume set to the
maximum produces a sound volume twice to three times louder than a Hasbro™.
Browsing the sound banks – rebooting the saber
To browse the sound banks and select one, the user must use the auxiliary button.
Press the aux. button when powering the saber on (general power switch or safety
key removal on the recharge port). The module plays the boot sound then announces
the sound bank selection menu (menu.wav) and waits for the release of the aux.
switch. Once released, the module plays the sound of the last selected sound bank
with the font description sound font.wav.
Pushing the button several times will browse the sound banks, each time playing the
corresponding sound. Then, once selected, pressing the aux. button during a short
time will store the sound bank number and it will be recalled automatically during
further use.
Each sound bank has its own configuration and led sequencer text files (see next
paragraph).
To simplify rebooting the saber without using the kill key or the general power switch,
the user might use the auxiliary switch to restart the saber and to access the bank
selection process. With the blade OFF, press the aux. button for 2 seconds. The
module emits the beep.wav sound (or a high beep if the file isn’t present). Release
the aux. switch: the user has 3 seconds to press the aux. button again. The module
will emit another beep then restart, play the boot sound (boot.wav) and so on. If the
aux. button is not pressed within those 3 seconds, cancel.wav (or a low deep beep)
is played and the reboot process is cancelled.
Pressing the aux. switch while applying power to the saber (like by removing the kill
key) drives the user straight in the bank selection audio menu. When the “skinning
sounds” (beep, ok, cancel) aren’t used, the system beeps volume can be adjusted
with the beep parameter on the SD card override configuration file.
The user can also disable the confirmation of the reboot process (second press on the
aux. switch) so that reboot is engaged right after the first beep. Keeping the aux.
Page 31

Plecter Labs is in no way affiliated, associated, licensed or endorsed by Disney or Lucasfilm Ltd., Industrial Light
and Magic or any of their associates.All brands and trademarks listed are the exclusive property of their respective
Owners.
31
switch pressed will make the board reach the Sound Bank Selection menu. To enable
that faster reboot process, ensure parameter valsnd is set to 0 in all your sound
banks or in the override.txt file.
When using the sound bank selection menu, the currently selected sound bank is
displayed by the corresponding accent LED glyph defined in the override.txt file. After
a couple of seconds, the accent LEDs will go in PLI mode again*. This makes a handy
alternative if the PLI isn’t used in saber mode: the user can still get the PLI
information by jumping in the Sound Bank Menu.
If you don't wish to use the PLI feature in the menu, simply disable it with the
menupli parameter in the override.txt configuration file.
Alternatively, the user can use the hilt motion to browse the sound fonts. Flicking the
hilt will move to the next sound bank while banging with your hand will validate the
currently selected sound font. Enable that feature with the menugest parameter in
the override.txt configuration file.
Creating Your Own Sounds
It’s a great personal satisfaction to build up your own soundfont. However, it’s not so
easy. Please read our online tutorial about that particular topic.
Installing a Sound Font on the SD card
The one-stop shop for sound fonts is www.saberfont.com.
There are a growing number of sound fonts available at that
website including all the legacy fonts from the Novastar
Sound CDs (NSCD), providing so many sound “universe” for
your favorite weapon. The board comes with 12 sound fonts
installed in the different sound banks but of course you
might install others.
Although editing the configuration files (text files)
can be done directly onto your microSD card,
changing the SOUND FILES (.wav of ANY kind)
requires you to format the microSD card! This is not
a recommendation, it is A REQUIREMENT: YOU MUST
FORMAT THE SD CARD prior to changing any sound
files!
1. First thing: backup the SD card on the hard disk. Easy
to do, however most people don’t bother doing so
and end up losing their initial configuration.
2. Unzip the sound font archive in a directory of your
hard disc.
*
if parameter "menupli" is set to 1 in the override.txt
configuration file
Page 32

Plecter Labs is in no way affiliated, associated, licensed or endorsed by Disney or Lucasfilm Ltd., Industrial Light
and Magic or any of their associates.All brands and trademarks listed are the exclusive property of their respective
Owners.
32
3. Take all the WAV sounds. If the sound font zip archive comes with
configuration files that are supposed to match the theme of the sound font, you
can take it as well, but make sure the settings won’t harm anything (especially
the high-power LED current).
4. Copy the files in desired sound bank and overwrite the files
5. Copy the whole SD card (Ctrl+a, Ctrl+c) to a temporary folder of the hard
drive.
6. Format the SD card in FAT (FAT16 or FAT32)
7. Select the whole content of the temporary directory on the hard drive and copy
it in one run to the SD card (Ctrl+a, Ctrl+c, Ctrl+v on the SD drive). Avoid
drag-and-drop if you can.
If you wish to try different sound fonts quickly, copying back and forth all the files will
soon be boring and time consuming. Start by configuring your board to use bank1
with a working SD card. Use the vocal menu to select that bank. Then, on the hard
drive, make a temporary file structure of the SD card that has only the bank1 directory
and nothing else. Use that directory to test the different sound fonts. This way you
will transfer only a limited number of files. Once the fonts have been selected, you can
store them in the different sound banks and start adjusting the parameters, which you
can now do in real time with R.I.C.E. (see further in this document).
Audio Player – iSaber
Crystal Focus embeds a little audio player. It can play audio tracks stored in the
/tracks subfolder on the SD card. The module can play up to 99 tracks named
trackXX.wav. The audio tracks have the same format as all the other sounds of the
module (22050 Hz / 16 bits mono wav files).
To access the audio player, reboot the saber and keep the aux. switch pressed to
enter the bank selection menu. Press the aux. switch until reaching the audio player,
announced by the font.wav file stored in the /tracks folder. Confirm by pressing the
aux. switch, just like selecting a sound bank.
The module then plays the first track found in the subfolder, or a random track if the
shuffle mode is enabled (see below). During the audio playback, the 8 accent LEDs
display the sound level as an animated bargraph, dancing on the beat of the music.
A quick pressure on the aux. switch stops, pauses or resumes the music. A longer
press (1.5 seconds) produces a higher beep and skips to the next track. A 3 second
press generates a low beep and reboots the saber to quit the audio player.
Alternatively, the user can use the hilt motion to control iSaber. Flicking the hilt will
move to the next audio track while banging with your hand will toggle play/pause the
current track. Enable that feature with the menugest parameter in the override
configuration file.
The blade can even be lit during iSaber which allows the user to practice saber
choreography with a musical background. The
/tracks subfolder has therefore its
Page 33

Plecter Labs is in no way affiliated, associated, licensed or endorsed by Disney or Lucasfilm Ltd., Industrial Light
and Magic or any of their associates.All brands and trademarks listed are the exclusive property of their respective
Owners.
33
configuration file config.txt. It’s is composed of a reduced number of parameters
like the ones used in the regular bank subfolders.
Currently supported parameters for iSaber : qon, qoff, offp, onp, vol, beep, led
and blade flickering parameters.
Another interesting feature is that if the flicker depth is set to 0 in iSaber, while the
flicker speed is not 0, the flickering effect is directly calculated from the loudness of
the sound being played. The sound level displayed on the bargraph is then directly
mirrored on the blade that flickers on the beat of the music. Shy effect, but very nice
to play with!
iSaber audio player also has some dedicated and specific parameters in its
configuration file :
loop [0-1]: defines if the audio tracks are looped individually. Useful to play
a background atmosphere sounds or a dark lord breathing sound.
shuffle [0-1]: random selection of the tracks.
pause [0-1]: define if the short pressure on the aux. button stops the song
(pressing again then start the song from the beginning) or pauses / resumes
the playback
Clashes, Swings & Blaster (random) Selection Modes
I’ve decided to add an additional paragraph to further detail the random and randb
parameters and the associated sounds selection method.
Mode 0: since CFV6 it's now an extended random mode. In that mode, the
sound board will analyze the current motion main axis either up/down or
left/right (referred as "cut" or "slash"). The sound corpus (swing or clash files)
will be cut in 2 and a random file will be picked either in the first or second half
depending on the axis found. While CF can accept any number of swing/clash
files between 1 and 16, it's advised to keep that number in a multiple of 2 so
that this random mode works best. The user must organize the swing / clash
corpus in 2 distinct sets to obtain the desired effect.
Mode 1: linear sequence mode. Sounds are triggered one after the other. It
does not have a specific interest unless the goal is to reproduce a really
mechanical sequence of sound. It gives nice results with the
Ancient Saber
sound font by Novastar.
Mode 2: expressive selection mode. The idea came quickly after playing
around with my very first versions of Crystal Focus. The random mode was nice
but still lead to annoying repetitions. I decided to use the gesture measurement
to build a scale for selecting the appropriate sounds. The sounds must be
ordered on the SD card with swing1 / clash1 being the softest sounds, and
swingX / clashX (X being the max number of swing / clash sounds) the
hardest. From the gesture boundaries (ls & hs for swings, lc & hc for
clashes), the gesture amplitude is scaled and the harder the gesture, the
harder the sound.
Page 34

Plecter Labs is in no way affiliated, associated, licensed or endorsed by Disney or Lucasfilm Ltd., Industrial Light
and Magic or any of their associates.All brands and trademarks listed are the exclusive property of their respective
Owners.
34
Mode 3 : this a improved random mode that I initially programmed for V3. It’s
referred as RandomX mode or “Bubble Sort” random. The idea is to avoid
triggering twice the same sound in a sequence. This new algorithm will make
sure a sequence does not have any duplicate, but you might still get a double
between 2 sequences, in rare cases.
Mode 4 : it’s a new sound selection mode since V4. The idea is not to measure
the gesture hardness but the time elapsed between 2 gestures. The problem
we face with playing the adequate sound in response to a gesture is the
duration of the sound. When creating a sound font, sounds are selected to
match a certain theme or color for a saber however the duration of the swing
sounds are not necessarily constant. It might result some inconsistency
between the chaining speed of gesture and the duration of sounds. Swing and
clash sounds must be ordered from the shortest to the longest.
After each gesture, a timer is started. When the next gesture occurs, the time
is compared with the scale of parameters gtsl and gtsh (Gesture Time Scale
Low and High). Those parameters are in multiples of 2 ms.
Ideally, the Low boundary will match the fastest speed (ie the shortest duration
between 2 gestures). A value around 135 to 170 works fine considering that
faster sequences of clashes might be possible, but we’re not playing so much
with Kendo style. Also, the swing rate limiter (parameter swing) should be
adjusted to be equal or lower than gtsl. The high boundary gtsh defines the
maximum timing you consider as being part of a sequence. Above this time,
you decide you have a sequence breakpoint and that the duration elapsed
between 2 gestures is “long”. Values from 400 to 800 work fine.
To get the algorithm working fine, you need to get the maximum of timing
fluctuation within the scale (variance), so that you trigger a variety of sounds.
Otherwise, you’ll lead to a mechanical repetition of the same group of sounds.
You can decide to have the best match to the clash sounds by setting a really
reduced timing range (gtsh - gtsl small), and subtle variations of timing will
trigger various sounds. Or you can decide to get a larger Time Scale: more
compatible sequences of swing and clash sounds (gtsh - gtsl larger).
In any case, to avoid getting always the same sound when the time interval
between 2 gestures is “long”, a random sound will be picked up in the 4 last
sounds (swing / clash 5 to 8).
Page 35

Plecter Labs is in no way affiliated, associated, licensed or endorsed by Disney or Lucasfilm Ltd., Industrial Light
and Magic or any of their associates.All brands and trademarks listed are the exclusive property of their respective
Owners.
35
Advanced Wiring & Usage
Wiring a tactile feedback motor and a progressive power On LED
It is possible to wire additional peripherals on our controller and make them follow the
fluctuations applied to the high power LED.
Therefore, a little force feedback motor (like the ones used in cellphones) and a power
on LED can be added. Those peripherals will behave the same way as the high-power
LED does: progressive fade in and out during power on/off and perturbation during a
clash, blaster blocking or blade lockup effects. The peripherals are connected on the
output of the high-power LED current regulator but return to ground instead of the
high-power LED negative (L-).
To avoid vampire wiring on the high-power LED positive pad (L+), an extra wiring pad
has been provided for that purpose (in yellow on the wiring diagram below).
Calculation of the power-on LED resistor
The power-on LED is not current regulated, it just takes the voltage applied to the
high-power LED running at its nominal current. We therefore need to limit the current
in the power on LED, as well as in the force-feedback motor.
The calculation of the resistor depends on the forward voltage of the high-power LED,
which varies with the current used and the LED color, the forward voltage of the
accent LED and the current flowing in it.
Example
A classic 3 or 5 mm LED (red, green or yellow) has a forward voltage of 1.6 to 1.8
volts and can take up to 20 mA.
For a red, red-orange or amber luxeon Rebel LED the forward voltage is about
2.9V. Let’s take for instance a red power-on LED (1.6V) at 15 mA.
R
Power-on LED
= (V
luxeon
– V
Power-on LED
) / I
Power-on LED
R
Power-on LED
= (2.9 – 1.6) / 0.015 = 86 Ω
Which leads to 82Ω or 91Ω in the E12 resistor series.
For a white, blue, green or cyan high-power LED, the forward voltage is about
3.7 V. Let’s take for example a green LED (1.8V) at 15 mA.
Page 36

Plecter Labs is in no way affiliated, associated, licensed or endorsed by Disney or Lucasfilm Ltd., Industrial Light
and Magic or any of their associates.All brands and trademarks listed are the exclusive property of their respective
Owners.
36
R
Power-on LED
= (V
luxeon
– V
Power-on LED
) / I
Power-on LED
R
Power-on LED
= (3.7 – 1.8) / 0.015 = 95 Ω
Which leads to 91Ω or 100Ω in the E12 series.
Calculation of the force-feedback motor resistor
There are too many various sorts of motors
to determine a specific resistor. The motors
we sell are designed to work in the 1V to 2V
range and the current they take increases
very quickly when the power supply voltage
increases due to the non-centered weight
that produces the rumbling effect.
We can however take 1.5V as a base voltage
with a 100 mA maximum current to avoid
too much current flowing in the high-power
LED driver and limit heating.
For a red, red-orange or amber luxeon LED the forward voltage is about 2.9V.
R
motor
= (V
luxeon
– V
motor
) / I
motor
R
motor
= (2.9 – 1.5) / 0.1 = 14 Ω - ½ watt
For a white, blue, green or cyan luxeon the forward voltage is about 3.7 V.
R
motor
= (V
luxeon
– V
motor
) / I
motor
R
motor
= (3.7 – 1.5) / 0.1 = 22 Ω - ½ watt
For an unknown motor, experimentation is the key, starting for instance with a ½
watt 100 or 150Ω resistor and an amp-meter to find out the supply voltage of the
motor within the limit of the max current used (100 mA max). The best solution is to
power the motor with a regulated power supply and to increase slowly the voltage
while monitoring the current and when the current and voltage are found, you can go
back to the above formula. Be sure to use at least a ½ watt resistor in all cases.
An easy workaround is to use a multiturn trimming potentiometer of 100Ω
or 1kΩ. This makes possible to adjust the speed with accuracy.
Page 37

Plecter Labs is in no way affiliated, associated, licensed or endorsed by Disney or Lucasfilm Ltd., Industrial Light
and Magic or any of their associates.All brands and trademarks listed are the exclusive property of their respective
Owners.
37
Wiring a general Power-On Indicator / Accent LED
It’s is sometimes useful (or good looking) to have an LED lighting up as soon as the
kill key is removed. Of course, 1 of the 8 accent LEDs could still blink as idle mode
indicator, but a permanently on LED could be nice to simply indicate the battery pack
is working properly. This is also very nice to have indicator lighting up the internal ring
of a chromed anti-vandal switch.
The CF board provides a regulated 3.3V pad for that purpose, shown in purple in the
illustration below.
Simple Flash on Clash™ / FoC™ effect (CFv5 legacy mode)
Crystal Focus now features on-board parts to ease the production of a Flash on
Clash™ effect.
With the now well established technology of multi-die high-power LEDs, or multi-leds
(like the tri-rebels or tri-cree), certain dice can be used to light up the blade, while a
remaining die (dice) can add some more light -possibly with a different color, when a
clash is triggered. Depending on the configuration file, the FoC™ can also be triggered
when blaster blocking, lockup and force clash events are registered.
The FoC™ pad is only a 3.3V remote control pad and cannot drive any power. Hence,
it controls a Power Xtender™ that is now under the board, suppressing the need for
an external part to drive the FoC die.
The board now has two color channels that allow for driving independently 2 separate
dice. Crystal Focus also embeds on its PCB the footprint for a 2512 / 2W SMD resistor
that suppresses the need for an external power resistor to drive the extra dice.
Page 38

Plecter Labs is in no way affiliated, associated, licensed or endorsed by Disney or Lucasfilm Ltd., Industrial Light
and Magic or any of their associates.All brands and trademarks listed are the exclusive property of their respective
Owners.
38
The user must be concerned with the current used by the FoC die, the overall current
used by the complete setup, and the current the battery pack can provide. Exceeding
the capacity of the battery pack, or its discharge rate could lead to battery
deterioration or explosion.
Example of use:
Let’s consider the drive an extra white die at 1A for the FoC. Forward voltage of that
die is around 3.7V.
Required resistor for the FoC circuit:
R = (Vpack – Vf die) / FoC current
R = (7.4 – 3.7) / 1 = 3.7 ohm
Wattage of the resistor:
P = RxI2 = 3.7 watt.
Since the FoC circuit is only active for a short time (maximum 10 seconds during a
lockup), it’s acceptable to use a 2 or 3W resistor in the example above.
If the user wants to drive an accent LED out of the FoC pad (and not a high-power
LED die), this can be of course achieved without a Power Xtender board, just like any
accent LED. The pad outputs 3.3V and 18 mA maximum. However, note that
dedicated accent LED pads now exist to mirror the blade behavior and provide more
flexibility.
To configure a classic Flash On Clash in the configuration file, just setup the main
channel current as well as the FoC channel 1 to the same current then add some
current to the another color channel to define the brightness of the additional die that
will light up during the FoC effect. Obviously, the current defined for the 2 additional
channels make no sense here as they are not driving a current driver. If you want to
activate one channel during the Flash On Clash effect, set the channel "current" to the
max (1500). Lowering the value will adjust the drive of the FoC but it will make the
onboard Power Extender act as a resistor and it will absorb some of the heat.
However, a drive adjustment is not recommended most of the time, leave it at the
High-Power
LED
Main die
2512 2W SMD resistor
FoC Die +
FoC Die
-
On-board PEx
Page 39

Plecter Labs is in no way affiliated, associated, licensed or endorsed by Disney or Lucasfilm Ltd., Industrial Light
and Magic or any of their associates.All brands and trademarks listed are the exclusive property of their respective
Owners.
39
max and adjust the value of the 2512 resistor instead. The drive value can be tweaked
in very special cases for which the resistor required is extremely small or zero.
Color mixing
There's a lot to say about color mixing and the possibilities are fairly endless, but we'll
try to summarize that topic in just a few paragraphs.
Pseudo color mixing (without the Color Xtender™ Board)
It's possible to achieve approximate color mixing by using just the on-board Power
Extenders (PEx). Each PEx can drive up to 1.5A with the "direct drive" method, ie
without using any current regulator. Please note however that this method is rather
recommended for a single cell setup (see the single cell “hack” section of this
document).
If the current involved in the additional dice of the blade LED is above 350 mA,
external power (2 - 4 W) resistor will be needed, just like when powering a stunt off a
battery pack with no electronics. In that case, the 2512 SMD resistor footprint will be
bridged and the power resistor placed outside of the board for proper heat sinking.
Aside of this, the wiring is the same as a simple (legacy) Flash on Clash™ effect as
seen above but generalize to 2 additional channels / dice.
That simplified dice driving will however not perfectly synchronize the 3 channels
during ramping or pulse effect. The color shade might also change and/or fluctuate as
the battery pack is depleted as the current isn't regulated for the 2 auxiliary channels.
However, it's a nice and simple way to obtain a custom blade shade as a combination
of several led dice. To define the color of the 2 additional channels, adjust only the
external resistors, do not lower the drive (led2, led3) it must stay at the maximum
value. Fine tuning can be done to the color pseudo-mixing by adjusting the drive
between 1300 and 1500 but the resistor must be the system limiting and defining the
current in the additional LED dice.
Page 40

Plecter Labs is in no way affiliated, associated, licensed or endorsed by Disney or Lucasfilm Ltd., Industrial Light
and Magic or any of their associates.All brands and trademarks listed are the exclusive property of their respective
Owners.
40
Accurate color mixing (using the Color Xtender™ Board)
We designed a special color mixing engine called FlexiBlend™ to ensure proper color
mixing and to avoid color separation. The engine synchronizes the control of the
main channel (onboard driver) and the 2 auxiliary channels on a satellite board called
the Color Xtender™.
In that configuration, the onboard PEx aren't used, only their control signals are sent
to the satellite board.
The control signals are named FoC1 and FoC2 on the PCB to maintain the legacy of
the system (which was initially meant to be the Flash on Clash Control) even if now
it's a generalized color control.
The example below shows 3 dice wired as BRG (Blue Red Green)
Sometimes, splitting the wiring of the sound board between the top and the bottom of
the board can make the whole install tidier. Some of the color channel pads are
available from the bottom of the CF printed circuit board as presented on the picture
below.
Page 41

Plecter Labs is in no way affiliated, associated, licensed or endorsed by Disney or Lucasfilm Ltd., Industrial Light
and Magic or any of their associates.All brands and trademarks listed are the exclusive property of their respective
Owners.
41
Using all the 4 color channels
CF has one main on-board driver and 2 additional channels equipped with onboard
power extenders to match various wiring situations: with or without color mixing
(simple Flash on Clash only), single or dual cell, with or without the Color Extender
board.
To keep the PCB size identical to our former boards, the 4th channel doesn’t have any
onboard power extender however, as explained below it’s possible to have the benefit
of all 4 channels with NO additional parts when using the board with the Color
Extender.
4 channel wiring with the CEx (dual-cell recommended)
We assume here the user wants to use a 4 dice LED containing one die dedicated to
the Flash-on-Clash, such as an RGBW.
Wire the non FoC dice to the main channel and to the color extender board using
color channels #2 and #4. This allows saving channel #3 onboard PEx which can then
drive the W die for a dedicated “on-top” styled Flash-on-Clash. The user can choose to
use the on-board SMD resistor footprints or an external power resistor to drive the
FoC LED die.
4 channel wiring without the CEx (single-cell recommended)
In that configuration, one driving unit will be missing for the 4th die but it can be
added using an external Power Extender which small size makes it easy to fit in the
hilt. In the case the onboard resistor footprint isn’t used (using an external power
resistor), it must be bridged with a piece of solid wire, or the board positive can be
directly wired to the external resistor.
Page 42

Plecter Labs is in no way affiliated, associated, licensed or endorsed by Disney or Lucasfilm Ltd., Industrial Light
and Magic or any of their associates.All brands and trademarks listed are the exclusive property of their respective
Owners.
42
Flash on Clash™ Mixing Techniques
During the former development of CFv6 and our Flexiblend color mixing engine, the
Flash on Clash effect was modified to fit specific color mixing requirements, so that
the Flash on Clash color (defined by fled currents). However, customers liked a lot the
FoC effect developed for CFV5 and further referred as “on-top” FoC* as it is defined by
adding a secondary color or die (dice) on top of the blade main color. So, technically,
from the Flexiblend color mixing engine point of view, it is not a color change but
rather the addition of another light source (which defines pretty well what the Flash
on Clash is).
So due to popular demand, I designed a Flash on Clash engine that is compatible with
both FoC styles by selecting, for each led die, which one will be color mixed during the
Flash on Clash, and which one(s) will be added “on top”.
The FoC configuration uses a new parameter focmix in the configuration file. The
parameter is defined as a bit field, in a similar way that the accent LED sequence
states. The left most digit (0 or 1) is color channel #4 while the rightmost digit is color
channel #1 (onboard driver).
A zero indicates the concerned die isn’t mixed (therefore “on-top”) while a one means
that the die will be color mixed.
As an an example, the following focmix value:
focmix=0011
means that color channels #1 and #2 will be color mixed during the FoC effect while
color channels #3 and #4 will be added on top (if active).
The di(c)e added on top have their own timeline and behavior using the parameters
focd (duration), focp (period), focr (randomness) and foc% (strength) while the
mixed di(c)e will be handled by the color mixing engine and shimmer parameters &
timeline.
Note that there’s a special configuration with all focmix bits set (1111): that “allmixed” configuration indicates the FlexiBlend color mixing engine to keep switching
between the main blade color and the FoC color. This special mode allows a realistic
Flash on Clash effect even when the main and FoC colors are totally different (as
opposed to a FoC color that is the main color with an additional die added on top of
it). Be sure to set all bits to 1 even if some of the color channels aren’t used,
otherwise the all-mixed FoC mode will remain inactive.
That very flexible FoC mixing system allows a lot of scenarios to be achieved. Here are
a few (3-channel) examples.
A) Using a GGW tri-rebel or tri-cree and no color extender (CEx) board. Thanks to
the 2 cell setup, both green dice can be wired in series to consume twice less
*
This « on-top » naming is also known as « legacy FoC »
Page 43

Plecter Labs is in no way affiliated, associated, licensed or endorsed by Disney or Lucasfilm Ltd., Industrial Light
and Magic or any of their associates.All brands and trademarks listed are the exclusive property of their respective
Owners.
43
current. The main blade color isn’t affected per say during Flash on Clash, the
white die is added on top of the 2 green ones during the FoC effect.
The green dice are configured for 900 mA on channel #1, white dice is on color
channel #2, leading to the following configuration:
led=900,0,0,0
fled=900,900,0,0
focmix=0001
B) Using a RGB tri-rebel or tri-cree and the CEx board. The 3 dice are mixed using
the on-board current regulator and the Color Extender board. One color is
defined as the main blade color, while the FoC has another color (totally
different). That configuration will use FoC mixing on all dice. Let’s say the led is
wired as RGB. Main blade color is purple (red + blue) and FoC color is whitish.
FoC parameters aren’t used, only the shimmer parameters affect the blade
behavior during the Flash on Clash effect. That special “all mixed” mode will
swap back and forth between the main blade and FoC blade colors ensuring
that the FoC color doesn’t wipe out the main blade color
led=300,0,750,0
fled=500,500,500,0
focmix=1111
C) Using a RGW tri-rebel or tri-cree and CEx board. FoC color is an alteration of
the blade main color (ie : the blade color changes) but the third die is also
added on top. Let’s take this time the example of a blue blade that would
become cyanish during FoC plus the white die on top, in order to both affect
the color and overall increase the blade brightness. The first 2 color channels
remain mixed during the Flash on Clash effect, for the whole duration of the
shimmer, while the white die is applied on top, during its own specific duration
(focd).
led=1000,200,0,0
fled=1000,500,700,0
focmix=0011
Whether you plan just a color change or see the FoC as another die lighting up, the
user must consider the amount of current available from the battery pack. A color
change might actually consume a lot more current than the "normal blade" (like
moving from a red blade to a white FoC). To match the battery pack capabilities, the
overall current of the different die could need to be lowered to obtain the right color
but with less brightness (see further in this document about the R.I.C.E. editor,
reference current and link mode).
Page 44
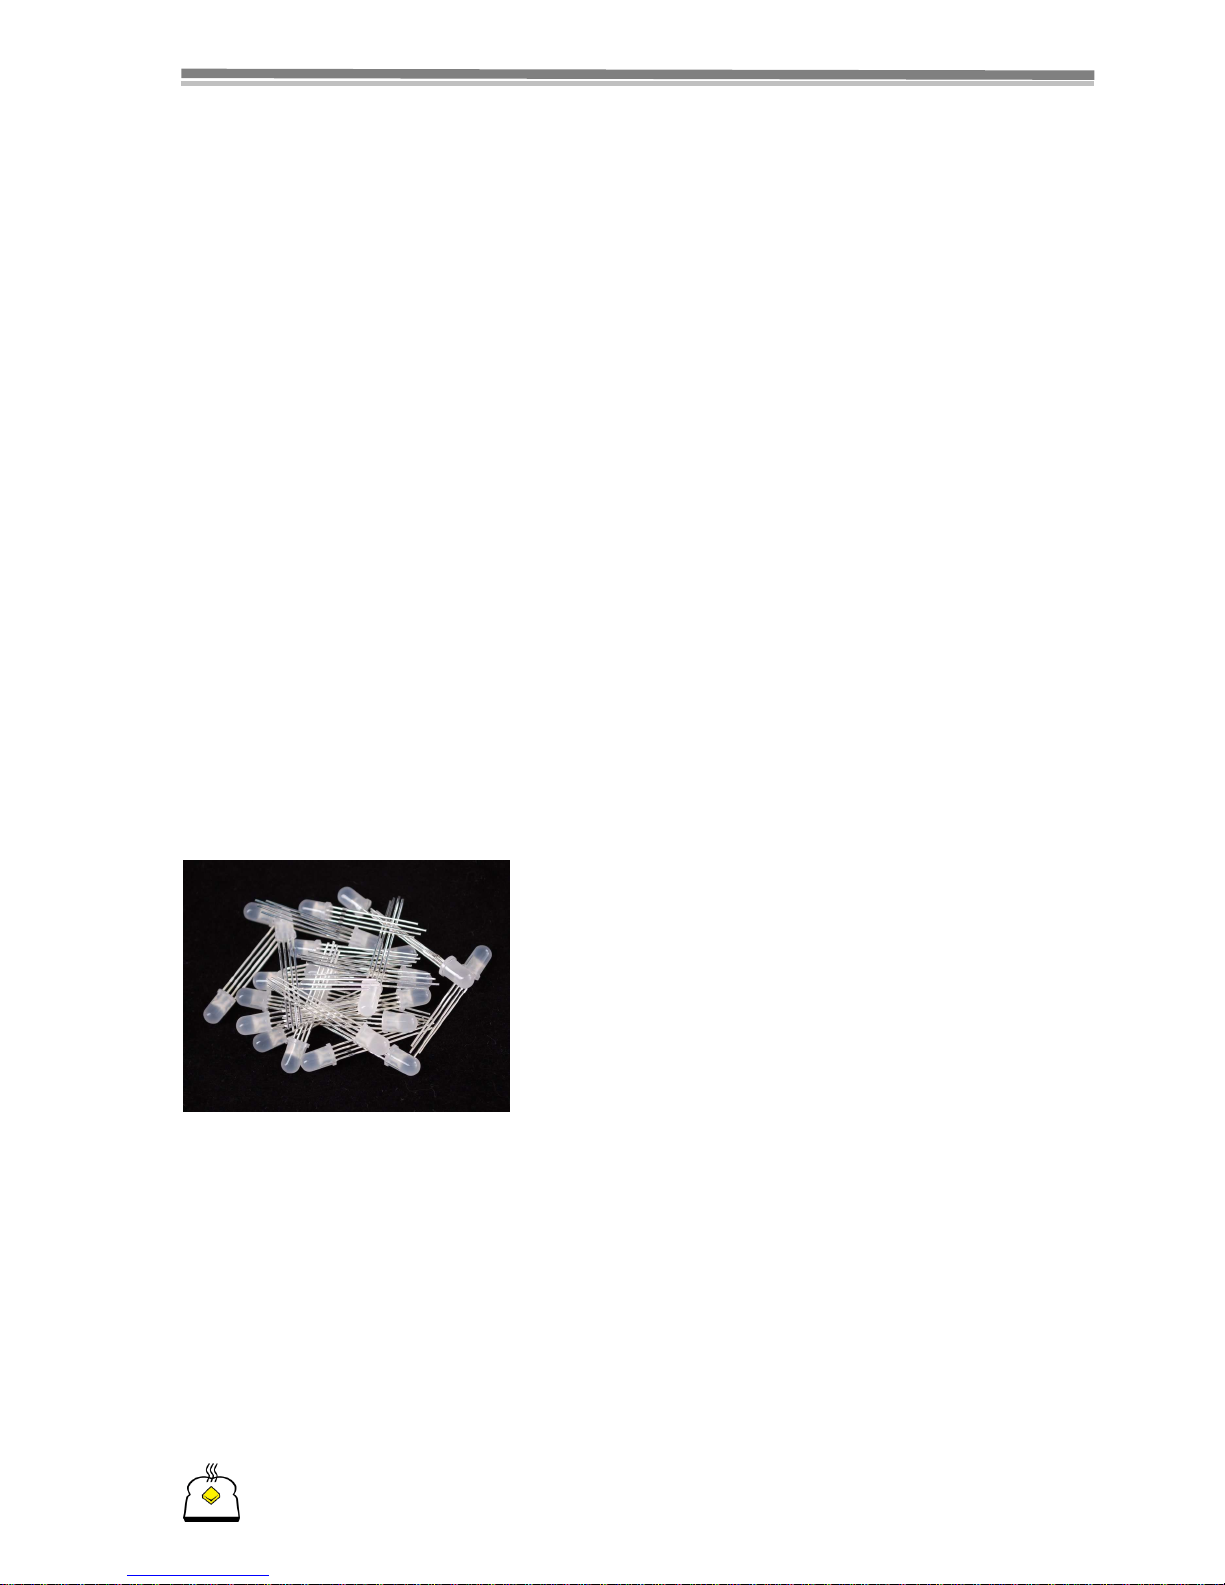
Plecter Labs is in no way affiliated, associated, licensed or endorsed by Disney or Lucasfilm Ltd., Industrial Light
and Magic or any of their associates.All brands and trademarks listed are the exclusive property of their respective
Owners.
44
Orientation control of the Lockup Color
In the All-mixed configuration of the focmix parameter (1111) the FlexiBlend engine
allows continuous color control of the lockup color. It will basically crossfade the FoC
color and the lockup color based on the hilt angle. This comes particularly neat to
simulate a dynamic blade lockup during a duel, especially with a combined effect of
pitch shifting which affects both the hum and the lockup.
Add a crystal chamber to your saber
A crystal chamber is a nice detail to add to your saber. The crystal can be lit up by a
multicolor LED which can mirror the blade behavior, for more realism. This way, the
crystal chamber color is affected by the Flash on Clash color, or simply by the main
blade flicker.
There are several ways to implement a light-up crystal chamber with CF. We describe
here a proposed wiring for a single use crystal chamber: it will light up exclusively with
the blade and will mirror it and will function only as a crystal chamber (it will not light
up or blink when the blade is off).
Using PWM driving signals
Whether or not you use the color extender board, FlexiBlend driving signals (PWM)
can be extracted to power the crystal chamber LED. Ideally, you’ll need to use an LED
that matches your high-power LED setup. For instance, if you are using an RGB trirebel, the best choice is obviously an RGB accent LED. You will need a common
cathode type of LED. Those are fairly common on ebay and in many electronic parts
outlets. Like the other accent LED pad, the maximum available current per PWM signal
is 18 mA. Most LEDs are bright and fully happy with 5 to 10 mA.
As we care about the color mixing in general, we
suggest using this kind of accent LED (or
equivalent) which tends to mix better than clear
casing 5mm LEDs.
The on-board driver PWM signal doesn’t have a pad per se but can be easily grabbed
right next to the color channel #2 pad, where the orange wire is attached on the
following diagram. The example below is provided with color channels #1, 2, 3 wired
as R, G, B. The common cathode (-) of the accent LED can return to the main
negative of the board.
Page 45

Plecter Labs is in no way affiliated, associated, licensed or endorsed by Disney or Lucasfilm Ltd., Industrial Light
and Magic or any of their associates.All brands and trademarks listed are the exclusive property of their respective
Owners.
45
Using the Main driver and Color Extender power outputs
The wiring will be similar but instead of grabbing the PWM signals, each accent LED
die will be attached to the L+ pad of the main driver and color extender outputs. The
common cathode (-) of the accent LED will return to the main negative of the board.
The user must ensure / validate what maximum voltage occurs on each L+ pad. When
using an individual LED die on each output, an educated guess is to use the LED
forward voltage. However, combining dice in series on one channel will increase the
equivalent voltage there, so beware!
Page 46

Plecter Labs is in no way affiliated, associated, licensed or endorsed by Disney or Lucasfilm Ltd., Industrial Light
and Magic or any of their associates.All brands and trademarks listed are the exclusive property of their respective
Owners.
46
Converting the Crystal Focus to single cell use
The Crystal Focus board can be modified in a very simple way to be compatible with a
single cell (we recommend the use of a high quality 18650 li-ion battery, from the
Panasonic or AW brands)
There is only one part to remove and one bridge to add on the circuit board. We made
a tutorial video detailing all the modification process:
http://www.youtube.com/watch?v=tm3lA1BuhsI
First remove
this part
Then bridge
those 2 pads
Converting the board to single cell use, while loosing at least 30% of the loudness and
a regulated audio output, allows the ability to use the board in direct drive (pseudo
color mixing) in a hilt where there is not enough room for a dual-cell pack or a color
extender.
Once converted to single cell use, the board should not be exposed to any voltage
greater than 5V.
Page 47

Plecter Labs is in no way affiliated, associated, licensed or endorsed by Disney or Lucasfilm Ltd., Industrial Light
and Magic or any of their associates.All brands and trademarks listed are the exclusive property of their respective
Owners.
47
Accent LEDs sequencer
Eight LEDs can produce 256 patterns; however for the sake of editing the sequence
we limited the sequencer to 32 stages.
The working principle of the sequencer is to put the LEDs in a given pattern/state
during a certain time (delay). Once the delay is over, a new pattern is output and so
on for the 32 stages before looping to the first one.
The main LED sequence is described for each sound bank in the leds.txt text file.
Simply open the file with window notepad to modify it, directly on the SD card or on
the hard disk. CF also has a R.I.C.E. program that allows to fine tune an accent LED
sequence on the computer and then save it directly on the board.
CF has actually several Accent LEDs configuration files that are detailed below. The
main one remains leds.txt.
Here is an example of an actual leds.txt file.
Page 48

Plecter Labs is in no way affiliated, associated, licensed or endorsed by Disney or Lucasfilm Ltd., Industrial Light
and Magic or any of their associates.All brands and trademarks listed are the exclusive property of their respective
Owners.
48
You’ll notice the special onXX and offXX lines at the beginning of the file, as well as
new keywords compared to prior versions, but we will come back to that further in
this document.
Stages & Delays
The example below shows the accent LEDs with a chasing pattern. The state of each
LED is represented either by 0 (off) or 1 (on). Each “s” line defines a pattern of the 8
LEDs (state) while the “d” line is the duration of the pattern (delay).
The closest digit (0 or 1) to the equal sign is the state of LED8 (MSB) while
the one at the end of the line is the state of LED1 (LSB)
The figure below represents the 5 first lines of the sequence of the example text file.
stage00
stage01
stage02
stage03
LED 8
LED 1
stage04
Page 49

Plecter Labs is in no way affiliated, associated, licensed or endorsed by Disney or Lucasfilm Ltd., Industrial Light
and Magic or any of their associates.All brands and trademarks listed are the exclusive property of their respective
Owners.
49
The delay between each state can be different for each “state” line, it’s not necessary
to have a pattern with constant timing. A value of 0 for a “delay” line will stop the
sequencer. Hence, it’s possible to have an accent LED animation when the saber
starts, and the animation can stop at the end of the 32 stages, or before when a “0”
delay is found in the file.
CF also has a loop instruction with a delay of 65535. Using that delay in the sequence
will make it loop before reaching the end of the sequence (stage31) which is handy
for short sequences.
When setting random to 1 the sequencer will generate a random pattern at each
stage of the sequence, ideal for a changing or non-conventional animation. The delays
will remain the ones specified in the sequence. Like all the timing parameters used in
Crystal Focus, the delay is expressed in multiples of 2ms.
The delay can go up to 60,000 corresponding roughly to 2 minutes. It’s of course
possible to use an LED output to drive an accent LED AND the remote control wire of
a power xtender board to drive an additional peripheral requiring more power than
what the accent LED pads can offer.
Deep Sleep flashing LED
It’s also possible to use one of the 8 accent LEDs to indicate the saber is in deep sleep
mode (power saving). For that purpose, 2 parameters have been added to the
configuration file config.txt.
idleled [0-7]: selection of the LED used as idle indicator. 0 matches LED
number one, 6 indicates accent LED pad seven. Since there is a specific
config.txt file in each sound bank folder, the idle LED can be different in
each sound font. So why not match the bank number? Hence, just by looking
to the flashing LED the user can remember which bank is currently selected in
the saber.
idlepulsing [0-40]: duration of the idle flash of the selected LED. In
multiples of 1/40th of second. 0 disables the effect. With 1 we get a really short
flash. With 28-30, the idle LED stays on all the time except during a brief
moment, and with 40, the idle LED remains always on.
Accent LEDs as a Bargraph : Power On/Off Sequences & PLI
With the increased number of accent LEDs on CF, complexity & possibilities have
increased too. As usual, following our own design “dogma”, we refused to carve in
stone certain behaviors of the board, since each saber is different, and some users
might want the PLI, others won’t.
When the Accent LEDs are wired as a bargraph, they become a very handy and
powerful diagnostic device. We therefore created 2 special stylish sequences over 8
stages, each “played” when the blade is ignited and powered off.
Those stages are defined in the first lines of the
leds.txt file with the keywords
onXX and offXX.
Page 50

Plecter Labs is in no way affiliated, associated, licensed or endorsed by Disney or Lucasfilm Ltd., Industrial Light
and Magic or any of their associates.All brands and trademarks listed are the exclusive property of their respective
Owners.
50
The duration of the sequence is always mapped to the duration of the power on /
power off sounds, or the specific ignition / power off time set by the quick on/off
parameters.
As for the use of the PLI, which requires a bargraph (which remains quite specific and
not present in all hilts) we also wanted said bargraph to have a modular use. Why
sacrifice a nice accent LED sequence to have the PLI permanently lit?
Therefore, there are now several Accent LED files defining specific sequences
depending on the mode the hilt is in.
In each of those sequence files appears the pli keyword. Depending on whether the
parameter is set to 1 or 0 the PLI will be displayed or will leave the bargraph animated
with the sequence specified in the file.
We defined 3 different “modes” for the use of the hilt :
• Normal: Blade is ignited, the accent LEDs play the sequence specified in the
leds.txt file OR the PLI if the matching parameter has been set to 1.
• Lockup: A lockup is engaged, the accent LEDs play the sequence specified in
the lockup.txt file OR the PLI if the matching parameter has been set to 1.
• Idle: Blade is off, board is in idle mode (ie not in deep sleep mode yet), the
accent LEDs play the sequence specified in the idle.txt file OR the PLI if the
matching parameter has been set to 1.
This allows having the PLI enabled in a specific situation (I personally like lockup or
idle for that purpose) or conversely, having the PLI displayed all the times, except
during a specific situation (like lockup, with a very fast & random sequence suggesting
the hilt energy pack is “struggling” during the lockup).
PLI tips & tricks
While setting up the upper and lower boundaries of the PLI range in the configuration
file so that they match the battery pack specs exactly, the user might tweak the
values so that the behavior of the PLI is more “realistic” while remaining useful as a
real battery pack energy gauge.
Keypoint #1: setting the upper boundary to the max voltage (or even to the nominal
voltage) of the battery pack will lead to an almost immediate drop of the PLI bargraph
when you start using the saber. I personally prefer having the PLI staying at the
maximum of the bargraph for a while so I don’t feel like it has a very poor runtime. As
an example, a 2-cell li-ion battery pack has a max voltage of 8.4V when fully charged,
and a nominal voltage of 7.4V. Setting the PLI upper boundary to 7.3 volts will make
the bargraph staying at the max for a while before it finally drops 1 bar after a while.
Page 51

Plecter Labs is in no way affiliated, associated, licensed or endorsed by Disney or Lucasfilm Ltd., Industrial Light
and Magic or any of their associates.All brands and trademarks listed are the exclusive property of their respective
Owners.
51
Keypoint #2: conversely, you might adjust the lower boundary to a realistic value. A
PCB-protected li-ion battery pack will cut off automatically at around 5.2V. Setting the
PLI lower boundary to that very value makes it notify the user of a low battery
situation too late. Hence, it will be better to set the lower boundary to a higher value
so that the last bar of the bargraph starts blinking a bit before the actual battery
pack’s total depletion (5.5V for instance).
Special Accent mode for LEDs #5 to #8
We added 2 special modes for the upper 4 accent LEDs along with the possibility to
split the display or bargaph in 2 distinct sections, each having a specific function.
Using those special modes won’t disable either the other accent leds or the possibility
of using the PLI.
We defined 3 modes for those specific accent LEDs:
• Normal: LED #5-8 remains a regular sequenced LED and also display the last
segment of the PLI bargraph (if enabled).
• High-Power LED mirror: LED #5-8 will mirror (or mimic) the behavior of the
blade main LED, including flicker, shimmer and FoC.
• Crystal Pulse™: LED5 to LED8 brightness will be pulsed up and down as
defined by the additional parameters used in the led parameters configuration
files (see below). This mode is only available in idle mode and is therefore
defined in idle.txt.
New parameters have been added to the leds.txt, idle.txt and lockup.txt files to
provide multiple scenarios for the LED5-8 accent pad. The mode of those specific
accent LEDs can be different in each saber mode (off/idle, blade on, lockup).
accmode [0-2]: type of effect of accent pads LED #5-8. 0 is normal
sequenced LED, 1 is main led mirror, 2 is Crystal Pulse™.
accpulsed [0-99]: Depth of the Crystal Pulse™ mode, in %. To have
brightness sweep from max brightness to zero and conversely, use 99%.
accpulsel [0-5000]: Duration of the pulse half-trip, in multiples of 2m like
the other timing parameters of Crystal Focus.
xtal [0-1023], [0-1023], [0-1023], [0-1023]: 4 number list,
comma separated. Defines the color of the accent LEDs 5 to 8 in idle mode
when the Crystal Pulse™ effect is enabled.
Half display / Half bargraph
In addition to the accent LEDs effect, a bargraph split is available to serve 2 different
functions, allowing various combinations, 2 of which are presented below. This can be
achieved with the parameter halfd.
Page 52

Plecter Labs is in no way affiliated, associated, licensed or endorsed by Disney or Lucasfilm Ltd., Industrial Light
and Magic or any of their associates.All brands and trademarks listed are the exclusive property of their respective
Owners.
52
There’s one particular situation for which the display split isn’t required: using the
accent sequencer exclusively as a display without using a PLI, blade mirror and/or
crystal pulse effects for accent LEDs 5 to 8. The special accent LED mode takes over
the normal LED behavior. There is no need to tweak the regular animated sequence,
but states of LEDs 5 to 8 will be overridden by the special accent mode.
Saber with 4 accent LED bargraph and illuminated crystal chamber
The best is to have parameter halfd set at all times (leds.txt, idle.txt,
lockup.txt). This will ensure that the crystal chamber (illuminated with accent LEDs
5 to 8) will remain on its own. If PLI is required, it will be automatically set to half
scale, mapping the whole energy range over the LEDs 1 to 4.
Saber with 8 accent LEDs split over PLI and animated accents
This other use case implies that one part of the bargraph / set of LEDs is meant to be
used with the PLI, while the other set is an animated sequence. In this case, setting
halfd will ensure the PLI will have its half scale mapped to the accent LEDs 1 to 4 (the
PLI is always on the lower set and LED1 is always the bottom of the scale). The four
other LEDs 5 to 8 can be used as regular accent LEDs.
Page 53

Plecter Labs is in no way affiliated, associated, licensed or endorsed by Disney or Lucasfilm Ltd., Industrial Light
and Magic or any of their associates.All brands and trademarks listed are the exclusive property of their respective
Owners.
53
Bank menu special settings
The bank selection menu has some more settings and parameters to define its
behavior (defined in the override.txt file).
menupli [0-1]: defines if the PLI will be displayed during the bank selection
menu. If enabled, the PLI will be displayed shortly after the browsing
operation. The currently selected bank number will be displayed by lighting up
the matching LED of the PLI (bank 1 = led 1) then the PLI will displayed
afterward. The user can decide to disable that feature to maintain the bank
number display during the bank selection process.
glyphXX: defines a set of states to convert the bank number into a set of leds
that will light up. It's essentially made to drive a 7 segment display so that the
currently selected bank # is reflected by an actual number on the display.
However, it can drive any shape of bargraph, as it just defines which LED or
segment is lit for each selected font in the menu.
The default configuration shows a linear coding of font # using the rank of the accent
LEDs. As there are only 8 accents for 12 available sound banks (maximum), we use
the eighth LED as the carry. The last line defines the pattern used for iSaber (audio
player).
Page 54

Plecter Labs is in no way affiliated, associated, licensed or endorsed by Disney or Lucasfilm Ltd., Industrial Light
and Magic or any of their associates.All brands and trademarks listed are the exclusive property of their respective
Owners.
54
Boot diagnostic & debugging
Crystal Focus allows various techniques to diagnose a board that fails to boot, most of
the time due to missing files, incorrect sound fonts or wrong parameter settings.
Using R.I.C.E.
The easiest way to diagnose a board is to insert the parameter debug=1 in the
configuration file of the problematic bank and connect the sound board with a USB
serial cable (3.3V) as described further in this document. The user has the option of
using the R.I.C.E. information window by pressing Ctrl+M or to use an external serial
port monitoring software such as docklight (www.docklight.de).
The latter needs to be configured with the right COM port driver matching your cable
port # and the communication speed must be set to 115200 bauds (Tools Menu,
Project Settings section).
Finally, when using docklight, press the
“play” icon (enables communication)
and boot the board: boot information
will be displayed on the screen and will
provide indication about read
parameters and loaded sounds.
Page 55

Plecter Labs is in no way affiliated, associated, licensed or endorsed by Disney or Lucasfilm Ltd., Industrial Light
and Magic or any of their associates.All brands and trademarks listed are the exclusive property of their respective
Owners.
55
Using the bargraph debug
When using an actual bargraph or set/group of accent LEDs that can be easily
identified on the hilt, a partially booting board will self diagnose by exporting an LED
pattern to the bargraph, each lit LED indicating a particular problem. That information
is also exported by the serial port and can be diagnosed with R.I.C.E. or docklight.
• LED1: SD card error / Missing SD. That issue is mentioned only if combined
with other issues and after 50 unsuccessful attempts to access the SD card.
• LED2: missing prefs.txt file
• LED3: missing override.txt file
• LED4: missing config.txt file
• LED5: missing leds.txt file
• LED6: missing idle.txt file
• LED7: missing lockup.txt file
• LED8: directory not found
Page 56

Plecter Labs is in no way affiliated, associated, licensed or endorsed by Disney or Lucasfilm Ltd., Industrial Light
and Magic or any of their associates.All brands and trademarks listed are the exclusive property of their respective
Owners.
56
“Force push” effect
One of the great improvements since version 2 is the “Force Push” sound effect. In
our favorite movies, the characters have the ability to push an opponent using
telekinesis. This effect is by definition silent, however, in the video games for instance,
an audio effect is added to provide the appropriate feedback to the player or to the
audience.
The “Force Push” gesture is (usually) done by the hand which is not holding the saber,
it’s therefore impossible to detect the gesture with it (without additional sensors). We
implemented a “trick” to control the “Force Push” using our gesture detection system
and the auxiliary button.
The main idea is to use the hand holding the saber as the “real” trigger of the effect
while the other hand fakes to do the gesture.
The fighter will “push” his opponent with one hand while moving a bit the saber/hilt
and pressing the aux. button at the same time.
The aim is to trigger a swing gesture while pressing the aux. button at the same
time: it will play the corresponding “force” sound effect (force.wav).
This combo is not so easy to achieve especially if the fighter is strongly left or right
handed. It might be easier for an ambidextrous person, or someone playing a musical
instrument. But just like dueling with a saber, it just requires practice and training to
master an expert gesture.
To get used to the Force Push technique, increase in a significant way the value of
lockup to stay away from an easy blade lockup triggering. Press the aux. button first
then wave the hilt to trigger a Force Push effect. Once you get used to this combo
(aux. button then quick waving), reduce again the parameter lockup until you obtain
a good access to the 3 effects activated by the aux. button (Blaster Deflection, Blade
Lockup, Force Push).
Since version 4, a similar combination exists with a clash. Pressing first on the aux.
switch just before triggering a clash (blade impact), the force2.wav sound is played.
Once the effect has been played, if the auxiliary button is kept pressed, the blade
lockup, blaster, swing and clash effects are disabled until the button is released.
Motion Activated Ignition: Power on Move / Power on Force
Crystal Focus has a secondary blade ignition technique, motion based. Probably not
supposed to be used for stage combat, it’s however a very nice and enjoyable demo
feature. To activate the Power On Force ignition, the pof parameter must be set to a
non-zero value. The pof parameter defines the motion threshold required to ignite
the blade. Values from 5 to 15 are usually fine.
Please note that to avoid an ignition regardless what the user is doing with the hilt,
the ignition motion must be executed in the axis of the saber. A nice way to achieve
the ignition motion is to hold the hilt in a parry/guard position and give it a good
shake downward.
Page 57

Plecter Labs is in no way affiliated, associated, licensed or endorsed by Disney or Lucasfilm Ltd., Industrial Light
and Magic or any of their associates.All brands and trademarks listed are the exclusive property of their respective
Owners.
57
That feature is compatible with the following hilt setup:
- Momentary switch (preferred). The Power on Move is bypassing a press on the
ignition button.
- Latching switch with A-POP enabled. As a matter of fact, Power on Move will
bypass the change of state of the latching switch, but without A-POP, blade
would power off immediately after starting. A-POP awaits the Aux. switch to be
pressed to power the blade off. Hence after igniting the blade with the Power
on Move, the user must manually change the switch to the ON position.
Otherwise, the next press on the aux. switch will power off the board.
The Power on Move parameter (pom) defines if the CF board will use the angle of the
hilt to select the power on sound (out of 4 different ones) OR if it will play a special
sound when the blade is ignited by a Power on Force (poweronf.wav).
Ignition Sound Angular Selection
The angle of the hilt can be used to select the power on sound during an ignition
(using the activation switch). This provides an interesting way to get ignition variants.
Ignition ramp up effect remains mapped on the selected power on sound duration
(unless fixed with the quick-on parameter), so a long ignition sound can be chosen for
the upward blade position, leading to a dramatic look, while other ignition sounds
remain shorter.
There is no parameter to disable that feature. If the user doesn’t want the Ignition
Sound Angular Selection while the sound font provides multiple power on sounds, a
single one can be picked up and copied in place of the 4 sound slots (poweron.wav,
poweron2.wav, poweron3.wav and poweron4.wav)
Multiple Power-Off Sounds
Crystal Focus also offers a motion based selection of the power-off sound. Selection is
simply made by the hilt moving (general move, not in a specific direction) or not.
During a regular power off (steady), the sound
poweroff.wav will be played. During
a power-off initiated while the hilt is moving, the sound pwroff2.wav will be played.
p
oweron.wav
p
oweron
2
.wav p
oweron
3
.wav p
oweron
4
.wav
Page 58

Plecter Labs is in no way affiliated, associated, licensed or endorsed by Disney or Lucasfilm Ltd., Industrial Light
and Magic or any of their associates.All brands and trademarks listed are the exclusive property of their respective
Owners.
58
Motion threshold is defined by the ls parameter so that motion during power off has
the same energy as a gentle swing.
There is no parameter to disable that feature. If the user doesn’t need or want an
alternate power-off sound, a single sound will be installed in both slots of the sound
font.
Pre Power-On and Post Power-Off Sounds
Additional (optional) sounds slots are available to add specific effects prior to blade
ignition or after blade retraction. They are selected randomly from an array of 4
sounds for each category: preon1-4.wav and pstoff1-4.wav.
Those sounds are by definition unmixed and the user can season a sound font with
any sounds for those particular slots.
Power Saving Modes & Usage Scenarios
Over the years, we’ve remained opposed to the popular tendency of designing boards
that waste energy and use a power hungry processor just because they are faster
and allow cheap & bulky code writing while we rather prefer to work harder to
optimize code and firmware efficiency to have all those features running on a single
board, driven by a single low power processor.
“For the sake of the Art of Embedded Electronics…”
Crystal Focus features two power saving modes.
Idle Mode
The idle mode is when the blade is off. In that state, the board will play the accent
LED sequence stored in the idle.txt file and the power saving is only partial.
That mode is meant to provide a stylish look to the hilt when the blade is off while still
being animated. It gives the impression the hilt is “active and ready to kick-in”.
Also, while in that mode, the blade can be ignited with the Power on Move if that
option has been enabled in the configuration file.
Deep Sleep Mode
After a duration defined by the sleep parameter (5000 = 10 seconds for instance)
the board will leave the Idle Mode for the Deep Sleep Mode. The accent LED sequence
defined in the the idle.txt file will no longer be played and the board will then use
only a few mA. To keep the hilt indicating that it’s powered by the battery pack (kill
key removed from the recharge port), the board will blink the chosen accent LED
using the parameters idleled and idlepulsing (refer to paragraph “Deep Sleep
Flashing LED”). Having the hilt stay in that mode allows a good part of the runtime to
be preserved even if the kill key isn’t put back in.
Page 59

Plecter Labs is in no way affiliated, associated, licensed or endorsed by Disney or Lucasfilm Ltd., Industrial Light
and Magic or any of their associates.All brands and trademarks listed are the exclusive property of their respective
Owners.
59
Scenarios & Usage
Depending on the actual use of the hilt (saber play, choreography, demo hilt etc) the
user might not want to use one or the other modes. Also, the wakeup parameter
defines how the hilt will move from the deep sleep mode back to the idle mode.
To disable the idle mode and jump straight in the deep sleep mode, set the
sleep parameter to 0 and eventually set the accent LED sequence states to
zero to avoid any light glitch just after the blade power off.
To stay in the idle mode and never reach the deep sleep mode, set the sleep
parameter to 65535. Hilt will then play the idle.txt accent LED sequence in
loop (unless sequence is interrupted with a zero delay).
With wakeup set to 0, hilt will enter idle mode after power off and will engage the
deep sleep count-down timer. Once the timer has elapsed the duration of the sleep
parameter, hilt will enter the deep sleep mode. No motion can reset the count down
timer. As a result, this provides a nice way to enjoy some accent LED sequences after
the power off, then save on the hilt runtime automatically, even if the saber is held or
waved. As mentioned above, if the user wants to ensure the hilt enters the deep sleep
mode immediately, just set the sleep parameter to 0.
The activation switch will then remain the only solution to wake up the board by
igniting the blade again.
This setup is great for an “actually used” or a costume saber, so that the user can still
enjoy the accent LED sequence playing for a while, but ensures the board will go into
power saving mode after a while (sleep parameter) and that motion will not be able
to interrupt the timer count-down process, especially when saber is worn at the belt.
With wakeup set to 1, hilt will enter idle mode after blade power off, and the deep
sleep count down timer will be reset if some motion is registered by the board. The
board is “kept alive” by motion. Once the hilt rests in a stable position and the timer
finally expires, it will enter deep sleep mode. Also, once the board has entered the
deep sleep mode, a motion of the hilt will wake it up, returning to the idle mode and
starting to play the idle.txt accent LED sequence.
This setup is recommended when demonstrating a hilt while ensuring it will go into
power saving mode when not held, shown or demonstrated.
With wakeup set to 2, hilt will behave almost exactly like when set to 1, however
once the deep sleep mode has been reached, motion will not make the board return
to idle sleep. That mode is great because once the board is in power saving mode,
grabbing it (packing up, moving to another place…) will not wake it up, hence
preserving runtime.
Page 60

Plecter Labs is in no way affiliated, associated, licensed or endorsed by Disney or Lucasfilm Ltd., Industrial Light
and Magic or any of their associates.All brands and trademarks listed are the exclusive property of their respective
Owners.
60
Mute-On-The-Go™
Proposed / requested by Novastar for the specific situation of teaching saber classes
and interacting with students. We all enjoy our saber to be loud when playing with it,
however, it’s hard to show saber moves and interact with the students with the saber
sound in the background.
It was already possible to mute the saber in the previous versions by using a
dedicated bank in which mute was enabled, however it was not very convenient to go
back and forth between banks just to show a few saber moves in a quiet way.
We therefore tweaked the firmware so that, IF Anti Power On is disabled, pressing
the aux. switch prior to pressing the activator switch will mute the saber until
powering the blade off (the power-off sound will be played). Further “regular” ignition
(without pressing the aux. switch prior ignition) will have the normal sound volume as
setup in the configuration file of the selected sound bank.
Mute-On-The-Boot™
Suggested by Alex Gordon, this feature combines our hilt angle measurement and
volume control and allows for the ability to work in quiet environment or to simply
boot the saber without alerting the neighborhood. It controls the volume of the boot
sound based on the same 4 hilt orientations used for the power-on sound selection.
An upward hilt will play the boot sound at the maximum volume while a downward hilt
will mute it.
When enabled, this feature also controls the menu volume with the exception that it
cannot mute it to keep the user from feeling “lost” with a silent saber stuck in the
bank menu.
User’s Notes
Page 61

Plecter Labs is in no way affiliated, associated, licensed or endorsed by Disney or Lucasfilm Ltd., Industrial Light
and Magic or any of their associates.All brands and trademarks listed are the exclusive property of their respective
Owners.
61
Using R.I.C.E.(Real-time Internal Configuration Editor)
R.I.C.E. is a computer program that allows the user to remotely control, change and
save the configuration of the current sound bank without disassembling the saber,
using a data cable like the one sold at TCSS. R.I.C.E. is now available on PC (windows
XP, Vista, Seven and Windows 8) and on MacOS.
R.I.C.E. is very easy to use. The program is
available for MacOS and Windows computers.
With Windows 7, the TCSS cable will be most of
the time recognized automatically without the
need of installing drivers. With MacOS or
Window 8, the user will probably need to install
the drivers.
The data cable is a USB serial port. You can
source your own, there are mostly 3 different
chipsets on the market, FTDI, the Prolific
PL2303 and the Silicon Labs (Silabs) CP2102.
The TCSS cable uses a silabs CP2102 chipset.
The R.I.C.E. data connection to the sound board just requires 3 wires: Rx, Tx and the
ground.
Make sure the COM port is recognized by the operating system by going to the system
panel, then the device list and finally expand the COM/LPT section to check your port
is there. Either leave the port # or change it, then make a note of which port #
corresponds to the R.I.C.E. cable.
If the USB peripheral appears with a question mark icon, you need to install its driver.
Download the latest drivers for your OS on the website of the chipset manufacturer.
Getting started with R.I.C.E.
The R.I.C.E. pads are under the sound board and are labeled. To connect the data
cable we recommend using a 3.5 mm stereo female jack with the following wiring:
Ring=TXD
Tip=RXD
Sleeve=GND
While it's possible to wire the sleeve (GND) wire to the GND pad of the board, we
recommend connecting it to the battery pack negative and not to the board
negative to avoid a kill key / recharge port bypass in the case a metal female jack is
used. Prefer a female jack with a plastic housing.
Page 62

Plecter Labs is in no way affiliated, associated, licensed or endorsed by Disney or Lucasfilm Ltd., Industrial Light
and Magic or any of their associates.All brands and trademarks listed are the exclusive property of their respective
Owners.
62
Note: When not using the
saber, especially when the kill
key is inserted in the recharge
port, disconnect the R.I.C.E.
cable from the data port.
If you got a USB serial port
adapter from another source,
the pinout might differ. If you
cannot get the RICE software
to talk to the board, try
swapping Rx and Tx.
To configure the board in real
time with R.I.C.E. , just unzip
the software archive in a directory of the hard drive and double click on the program
icon. You'll get straight in the R.I.C.E. main window.
The numerous parameters of CF have been split into 5 tabs, the first one being
dedicated to the parameters stored in the override.txt file. The 4 other tabs
contain parameters of the currently loaded font and are organized by "themes" as
much as possible to ease the configuration process.
To battery pack negative (
-)
Page 63

Plecter Labs is in no way affiliated, associated, licensed or endorsed by Disney or Lucasfilm Ltd., Industrial Light
and Magic or any of their associates.All brands and trademarks listed are the exclusive property of their respective
Owners.
63
To establish communication with the saber, turn the blade on and then select the
serial port (even if the R.I.C.E. port is already displayed in the drop-down menu, the
user must select and click it to start the communication).
It's advisable to use a single serial port at a time. Sometimes you'll have your
Bluetooth serial port enabled at the same time and appearing in the port selection
menu: make sure you identify the serial / COM port # corresponding to your R.I.C.E.
cable.
If you have a doubt, go to the System control panel and open the Devices Manager.
Plugging / unplugging your cable will identify it in the list. You can change the port #
by right clicking on the COM peripheral and going in the advanced properties. I tend
to renumber all my data cable as COM2 but I use only one at a time.
Note: if by mistake you unplug your cable while the R.I.C.E. program is open, click
"autoconnect" a couple of times to ensure the COM port list is updated again.
With the saber on and the COM port selected, click connect. The saber should
answer echo and the green light will turn on.
From there, your saber is ready to receive real-time configuration changes.
Reading the current settings
Just click on the "Read Cfg" button and all the parameters of the different tabs will
refresh with the current settings of the saber (for the currently loaded sound bank
which number appears on the right side of the app).
Changing settings
The key point with R.I.C.E. is that the data cable doesn't need to stay connected all
the time to the saber once you've altered a parameter and you want to test it in an
actual condition. For example, the motion sensitivity parameters have to be tested by
waving the hilt. It's not a problem at all : R.I.C.E. supports the ability to have the data
cable "hot unplugged" and the blade led can even be turned off and turned on again
(for testing parameters like quick on and quick off durations). Then finally, the cable
can be "hot plugged" again to proceed to the saving operation.
Discarding settings
Not sure of what you've done? You want to start over? Discarding settings can be
done in 2 ways:
Insert the kill key in the recharge port to cut the power of the saber. Non saved
changes made to the configuration will be lost / discarded.
Click on the default button in the app to have a default configuration applied to
the saber. Beware, if your switch setup doesn't match the default, you might
have to play with the switch to maintain the saber on until you have actually
changed the switch setting.
Page 64

Plecter Labs is in no way affiliated, associated, licensed or endorsed by Disney or Lucasfilm Ltd., Industrial Light
and Magic or any of their associates.All brands and trademarks listed are the exclusive property of their respective
Owners.
64
Saving the settings
Once you're satisfied with the configuration of the saber, you can click on the "Save
on SB" button. The saber will play the power off sound followed by the ok.wav sound
or 3 note melody and will reboot with the settings saved.
There is also a “Save override on SB” button to save specifically the override settings.
Finally, if you’ve made changes in both configurations, use the “Save All” button.
Using R.I.C.E. as a debug tool
Your saber has issues, you don't know where it's stuck or why. Manually edit the
configuration file of the (expected) sound bank that is accessed when you boot the
saber add debug=1 on the first line of the file.
The board will be a lot more verbose during the boot process and will send out some
useful debugging information.
To see the boot process log, press Ctrl-M to open the Max Window of the R.I.C.E.
program. Before powering on the saber (ie removing the kill key) make sure the data
cable is inserted in the saber data port and in the USB port on the computer side, then
select the right COM port in R.I.C.E.
Finally, remove the kill key to power on the saber and look at the log of information
printed in the Max window.
Color Setup & Color Mixing
Page 65

Plecter Labs is in no way affiliated, associated, licensed or endorsed by Disney or Lucasfilm Ltd., Industrial Light
and Magic or any of their associates.All brands and trademarks listed are the exclusive property of their respective
Owners.
65
A few special features have been incorporated to R.I.C.E. to ease the color selection
process.
Reference Current
Before being able to define the blade color, the user must know the maximum ratings
of the leds and the battery pack capabilities. As a matter of fact a white blade is the
33% mix of red + green + blue. But at which (total) current?
The color swatch in the "LED" tab of the R.I.C.E. program produces ratio between the
different primary colors that then have to be converted in currents to drive the led.
The reference current defines the max current of a die (or led, in the case of a trirebel or a tri-cree). Setting a max value of that current will ensure that the color
selection via the swatch won't exceed that current on a die.
For instance, like shown above, a 1000 mA (1A) reference current will produce a white
blade with 3 x 1000 mA (1A on each die) total.
Rough color setup
First of all, based on the led specs and battery pack capabilities, define your reference
current. Ideally set it lower than the absolute max ratings (a bit of overhead is always
good).
From there, select the color with the swatch. Once you're happy with the color, you
can make it brighter (same shade / tin, but more brightness) with the process above.
The swatch of course doesn't know how your LEDs are wired (multi-led or multi-die).
So we setup a color channel swapping system so the color selection with the swatch
affects the right current channels 1, 2 and 3. Obviously, as the swatch deals with RGB,
only RGB combinations are present there. For special combinations of LEDs or dice
(like RGW), an initial manual color setup will be better (see below) then a fine tuning
with the Link mode will adjust the final brightness (see below too).
Color fine tuning
Once you're happy with the shade, you have two possibilities to fine tune the color.
One is to increase the reference current: you'll see all the channels being increased
while keeping the same ratio (hence maintaining the color shade). That technique is
valid if you initially selected a really low reference current and you're just taking it up
in order to reach the nominal value or to slightly overdrive the LED if it supports it.
If the reference current was already set but you want to increase a little bit the
brightness because overdriving is possible on one die for instance, check the "Link"
box under the color swatch and adjust the main channel. The other channels will be
automatically updated while preserving the ratio between them.
For this last method, beware, no current limit is provided in link (the reference current
won't be a boundary) so be careful when playing with the main slider (channel #1)
and ensure you're staying under the max ratings of each led die.
Manual color setup
Of course, defining a color by hand is totally possible. Start by un-checking the Link
box (if it was enabled) then adjust manually the different current channels. You can
always refine the final brightness by using the Link mode again once the shade is
setup.
Page 66

Plecter Labs is in no way affiliated, associated, licensed or endorsed by Disney or Lucasfilm Ltd., Industrial Light
and Magic or any of their associates.All brands and trademarks listed are the exclusive property of their respective
Owners.
66
Flash On Clash™ / FoC™
In the FoC tab, you'll find a similar setup to define the blade color during the Fx
events (blaster, lockup etc) along with the FoC mixing strategy.
The FoC color can also be subject to changes using the Random settings in the "FoC"
tab. The bigger the parameter, the more variance the FoC color will receive.
Lockup Color
That tab allows you to define the lockup color that will be interpolated with the FoC
color during lockup, based on the orientation of the hilt. If you wish to have a
constant color during the lockup effect, set an identical color in both FoC and lockup
tabs.
Color mixing specific issues
There are at least 2 points to consider for the use of a multi-die LED in order to
achieve color mixing.
The main channel (on-board driver) can go up to 3A. The user might take this
in consideration. While each of the 6 fonts can host a different configuration
and therefore a different blade color, the wiring of the dice must reflect the use
of the color the user wants to achieve. For instance, for a "dark side" saber
using both the red and amber dice of a RGBA (in parallel), the main and
dominant reddish color will use more current and must be therefore wired on
the main channel.
If the saber has other configurations with pure blue or green blades, those will
be obviously less bright than the R-A combo, unless mixed with it.
One specific setup of special fx doesn't work so well with color mixing: heavy
flicker on a 100% pulse. The FlexiBlend™ engine has a minimum threshold of
5mA on each channel (under, led is off, above led is on). If a heavy flicker is
applied to a custom mix of for instance a 80% blue blade with 20% of green (=
cyan), the flicker might take the green dice to such a small current that it might
go under the 5mA and turn off. If that happens, one color will disappear and so
the mix.
The user must realize that the flicker is a deliberate act against the quality of
the mixing however FlexiBlend™ deals with it in most situations except when
hitting the lower boundary. A similar situation can occur with a moderate to
heavy flicker during a pulse effect. In a similar way, the pulse effect dims out
the current too close to zero (or zero) and despite the fact that the flicker will
affect all dice with the good ratio, one die might drop under 5mA before the
other resulting in erratic color mixing at the bottom of the pulse.
Rather than automatically limiting the amount of flicker and to stick to our "fully
configurable" set of features, we left it totally open and only recommend that the
user adjust the flicker settings accordingly. Issues will occur only when using a 90100% pulse effect and/or a 80-100% flicker which is quite extreme. The 95-100%
pulse effect should be used with very little to no flicker for preserving the color
mixing.
Page 67

Plecter Labs is in no way affiliated, associated, licensed or endorsed by Disney or Lucasfilm Ltd., Industrial Light
and Magic or any of their associates.All brands and trademarks listed are the exclusive property of their respective
Owners.
67
User’s Notes
Page 68

Plecter Labs is in no way affiliated, associated, licensed or endorsed by Disney or Lucasfilm Ltd., Industrial Light
and Magic or any of their associates.All brands and trademarks listed are the exclusive property of their respective
Owners.
68
Troubleshooting & FAQ
Q: I’ve updated the sounds on the SD card and now the module does not work
anymore. It generates some beeps when it starts.
A: you must format the SD card (in FAT16 / FAT32) before updating the sounds, while
it’s not necessary to do so for the configuration files that can be edited in place on the
SD card. To simplify the update process, put the new sounds on the SD, overwrite the
old ones. Then select the whole contents of the SD card, and copy it in a temporary
directory/folder on the hard disk. Format then the card, and next copy the files back
to the SD card in one run.
Q: what’s the meaning of the beeps when the module starts?
A: it means that a file is missing or hasn’t been found. It can be the boot sound, or
the configuration files. Three beeps generally mean that many important files haven’t
been found.
Q: when I power up the saber, I get 3 beeps. I haven’t updated the card.
A: You might have a corrupted preference file (prefs.txt). Get the default one from
the default package.
Q: can I rename the sub-folders on the SD card?
A: no, the module expects a certain organization of the file system on the card so that
it can find the sounds.
Q: I don’t have the aux. Button wired, can I rename the sub-folders to « swap »
them?
A: no, because it will modify the SD card file structure. Wire an auxiliary button to
access the different sound banks.
Q: I wired a rumbling motor in my hilt and now I have swings triggered while the hilt
rests on a flat surface.
A: The motor makes the board vibrate enough so that it’s interpreted as a swing.
Reduce the speed of the motor and/or mechanically isolate the board from the motor.
Increasing the gate parameter will help in most cases.
Page 69

Plecter Labs is in no way affiliated, associated, licensed or endorsed by Disney or Lucasfilm Ltd., Industrial Light
and Magic or any of their associates.All brands and trademarks listed are the exclusive property of their respective
Owners.
69
Plecter Labs would like to thank its affiliates for their useful input on the Crystal Focus
Board specs, new features, ideas, testing and constructive criticism as well as proof
reading of the user’s manual.
I also would like to deeply thank the CF users, customers and the illuminated saber
hobby community for the trust and support input in my work throughout the years,
pushing the design of our favorite props towards perpetual improvement.
“Custom Electronics for Props that WORK!”
Page 70

Plecter Labs is in no way affiliated, associated, licensed or endorsed by Disney or Lucasfilm Ltd., Industrial Light
and Magic or any of their associates.All brands and trademarks listed are the exclusive property of their respective
Owners.
70
Non exhaustive list of trademarks owned by Plecter Labs
Blaster Move™
Wake on Move™
Power on Move™
Power on Force™
FoC™ / Flash On Clash™
Vocal Menu™
Mute on the go™
Anti Power On/Off Protection - APOP™
R.I.C.E. - Real time Internal Configuration Editor™
Crystal Pulse™
Crystal Focus™ and Crystal Focus Saber Core™
Petit Crouton™
Nano Biscotte™
Power On Angular Selection™
SD config™
Force Clash™
Force Swing™
StabFx™
SpinFx™
ComboFx™
Buttered Toast™
S.S.B.T.™
Secret Society of the Buttered Toast™
Power Extender™
Power Xtender™
Saber Audio Player™ (SAP™) aka iSaber.
AccuBolt™
FlexiBlend™
The use of Plecter Labs trademarked terms is prohibited for use in advertisement or
sales of a product not made by Plecter Labs or for a product not containing a Plecter
Labs electronic device.
 Loading...