

Page 1
Model XX0483
PA1380
Page 1 of 8
Installation Instructions
Installation Instructions
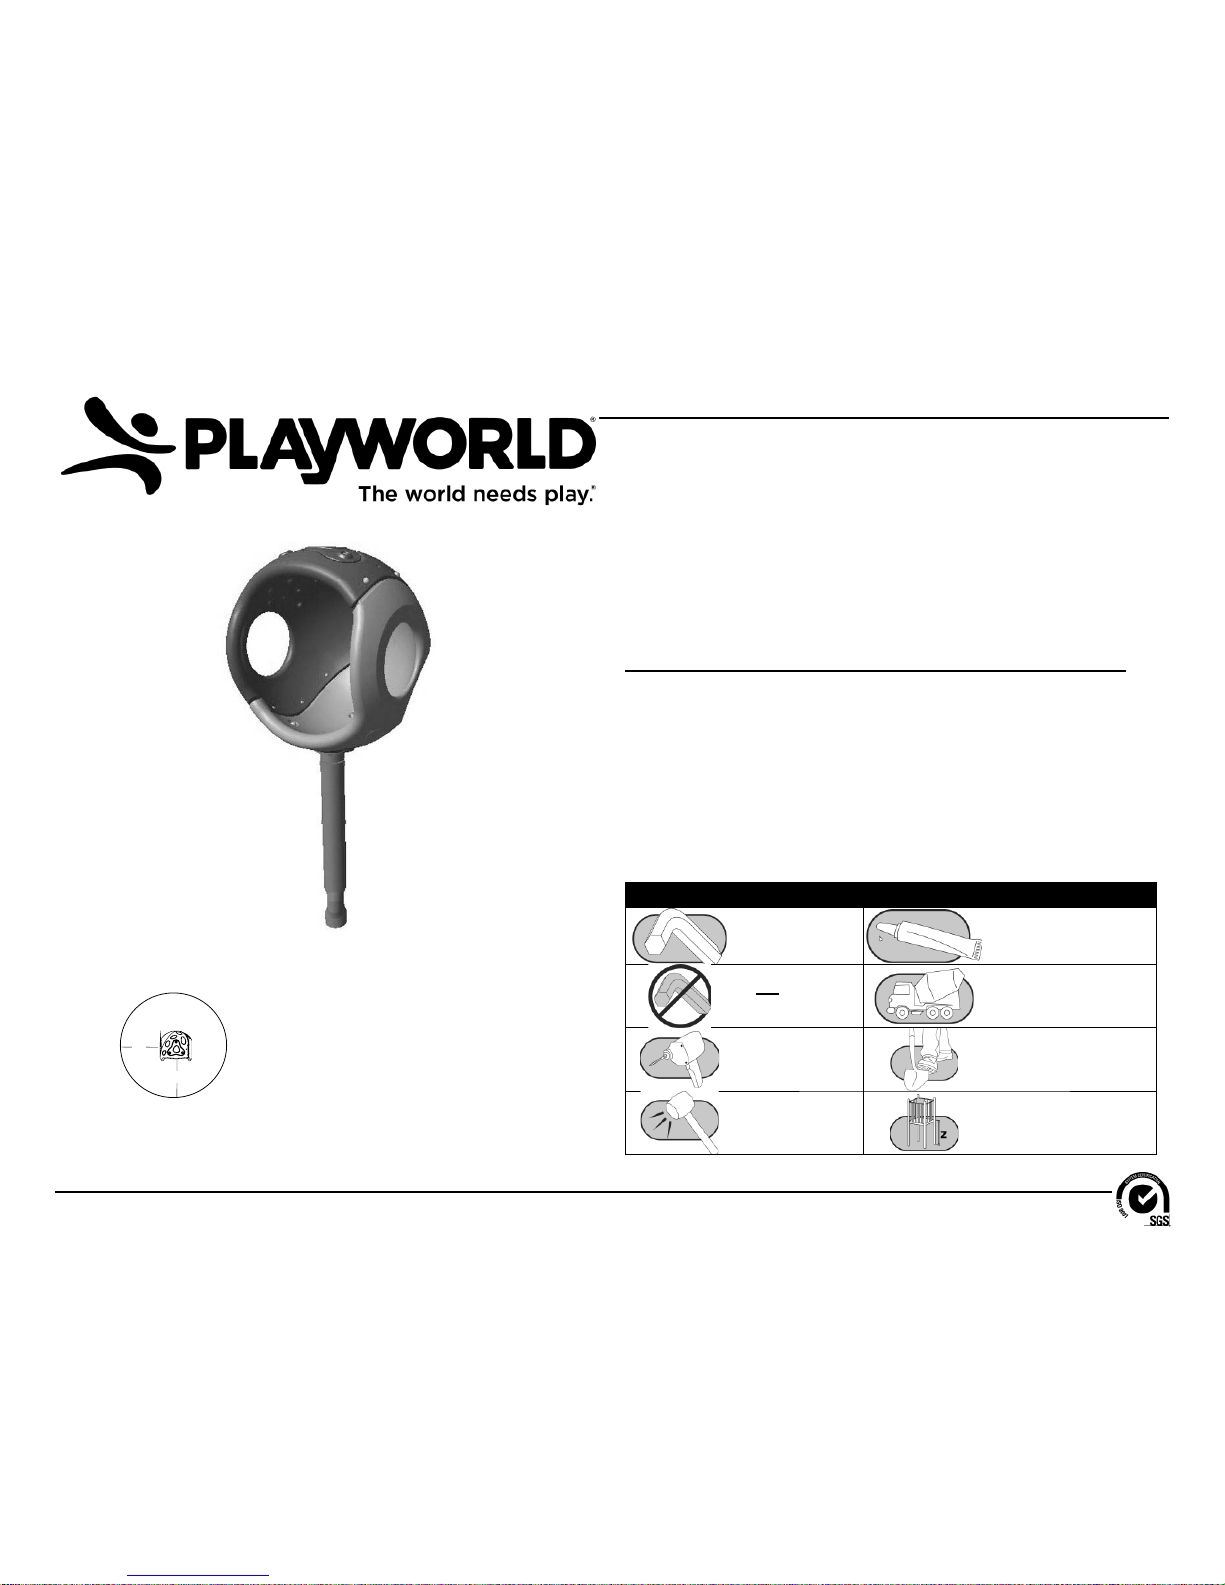
Playworld Systems® Model XX0483
Cozy Cocoon
Spinning Post Mount
Installation Preparation
Recommended Crew: ........................... Two (2) adults
Installation Time: ................................... 1.5 man-hours
Concrete Required: ............................... 0.13 cubic yard (0,10 cubic meters)
Use Zone: .............................................. Refer to information below
User Group Age (years): ....................... ASTM/CSA: 2-12, EN: 2-14
ICON KEY
Fully Tighten
Hardware
Add 1 Drop of
Thread Locking Adhesive
Do Not Fully TIghten
Hardware
Pour Concrete
Drill Dig Footing Holes
Hammer Critical Fall Height
Assembly View
Equipment Use Zone
A - (ASTM) 72 in. (1830 mm)
(CSA) 1800 mm
(EN) 2000 mm
A
A
Page 2
Installation Instructions
Model XX0483
PA1380
Page 2 of 8
685)$&,1*/(9(/
Top View
Elevation Views
Footing Diagram
ASTM/CSA: 14" (356 mm)
EN: 48.4" (1245 mm)
KEY
Position
Unit of Measurement
Top #
Inches
Bottom #
[Millimeters]
Page 3

Model XX0483
PA1380
Page 3 of 8
Installation Instructions
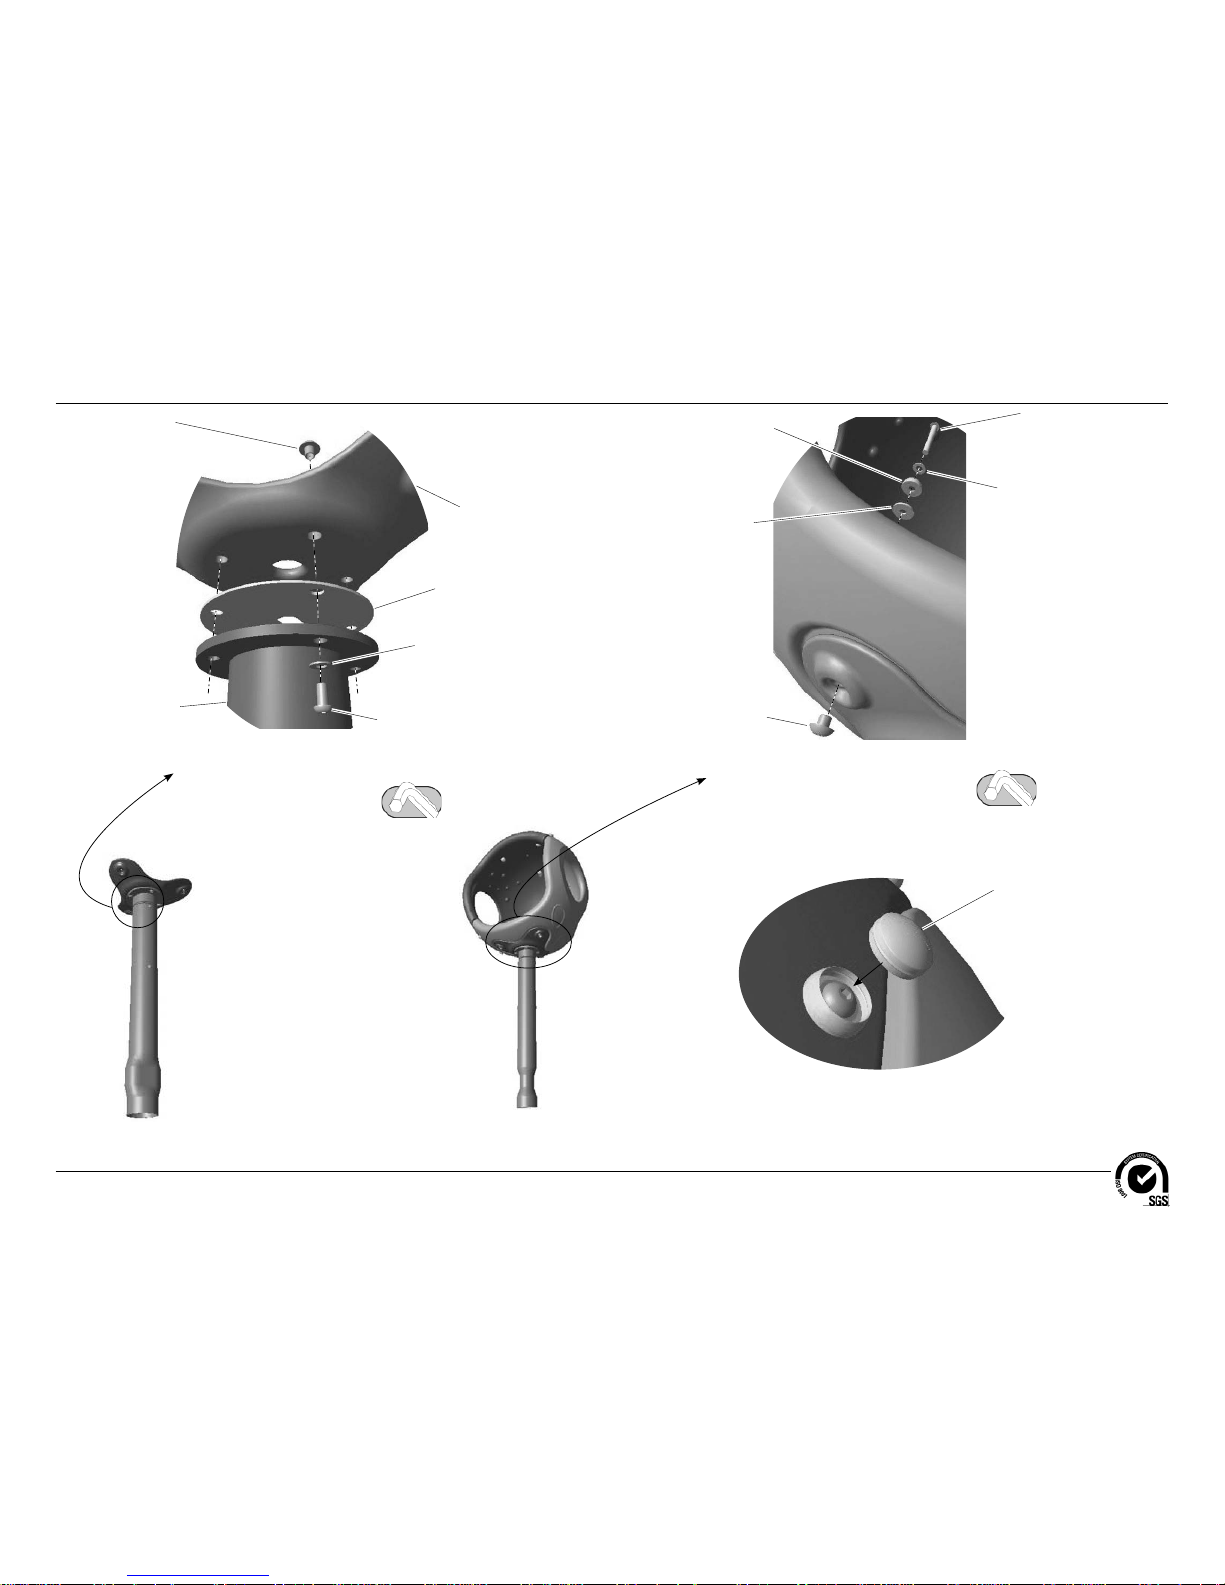
Detail A
Step 4
Attach the cocoon cover casting
to a cocoon half.
Follow the details in alphabetical order. For clarifi cation, each detail references the
step description. The step descriptions start on page 5.
Cocoon Cover
Casting
AAU0718
(1 Total)
Cocoon Half
BPL3150
(1 Total)
3/8" x 2-3/4"
Button Head Bolt
BAE06677
(3 Total)
3/8" Button Head Nut
BAE0663
(3 Total)
Plastic Washer
BPL0300
(3 Total)
3/8" Flat Washer
BAE0595
(3 Total)
3/8" I.D. x 1-1/4" O.D.
Fender Washer
BAE0936
(3 Total)
Detail B
Step 5
Attach the cocoon halves together.
3/8" x 2-1/4"
Button Head Bolt
BAE06675
(8 Total)
3/8" x 1.63" Barrel Nut
BAE0633
(8 Total)
Plastic Washer
BPL0300
(8 Total)
3/8" Flat Washer
BAE0595
(8 Total)
Cocoon Half
BPL3150
(1 Total)
Page 4
Installation Instructions
Model XX0483
PA1380
Page 4 of 8
Detail D
Step 7
Attach the cocoon support post assembly to the
bottom of the cocoon.
Cocoon Post Casting
AAU0715
(1 Total)
Post Casting Plate
APL1722
(1 Total)
Cocoon Support Post
w/ Bearing
ASY0258
(1 Total)
3/8" Button Head Nut
BAE0663
(4 Total)
3/8" Flat Washer
BAE0595
(4 Total)
3/8" x 3/4"
Button Head Bolt
BAE0659
(4 Total)
Detail C
Step 6
Attach the cocoon support post to the
cocoon post casting.
3/8" x 2-3/4"
Button Head Bolt
BAE06677
(3 Total)
3/8" Button Head Nut
BAE0663
(3 Total)
Plastic Washer
BPL0300
(3 Total)
3/8" Flat Washer
BAE0595
(3 Total)
3/8" I.D. x 1-1/4" O.D.
Fender Washer
BAE0936
(3 Total)
Detail E
Step 9
Insert the bolt caps into the plastic washers.
Bolt Cap
BPL0300
(14 Total)
Page 5
Model XX0483
PA1380
Page 5 of 8
Installation Instructions
Notes Before You Begin: Do not over tighten bolts during assembly, only snug
tighten them until assembly is complete. Do not install bolt caps until the structure
is completely assembled and properly footed.
Carefully read and understand these installation instructions before you
begin.
Step 1: Before attempting to assemble your equipment, please review all
installation information carefully. Should you experience any diffi culty during the
installation process, please call us at the phone number shown on the last page
of these instructions.
Step 2: Separate and identify all components and hardware.
Step 3: Excavate the footing as shown in the Footing Details in the Annex at
the end of this document. Use the Support Post footing detail for the cocoon
support post.
Step 4: Attach the cocoon cover casting to a cocoon half. See Detail A. Insert
the casting onto a cocoon half and attach as shown. Fully tighten the connections
according to tightening torque specifi cations.
Torque Specifi cations:
Bolts and nuts - Snug tighten and then tighten an additional one half turn.
Step 5: Attach the cocoon halves together. See Detail B. Place the two cocoon
halves together and attach as shown. Fully tighten the connections according to
tightening torque specifi cations.
Step 6: Attach the cocoon support post w/ bearing to the cocoon post casting.
See Detail C. Position the support post and casting plate against the bottom
of the cocoon post casting and attach as shown. Fully tighten the connections
according to tightening torque specifi cations.
Step 7: Attach the cocoon support post assembly to the bottom of the cocoon.
See Detail D. Place support post assembly against the bottom of the cocoon and
attach as shown. Fully tighten the connections according to tightening torque
specifi cations.
Final Details.
Step 8: Plumb and level the component in it's footing. Block and brace for
concrete. Pour concrete after all equipment has been assembled. Allow 72 hours
for concrete to completely cure.
Step 9: Select plastic bolt caps and press into the plastic washers. See Detail
E.
Hint: The bolt caps install more easily when they are warm.
Step 10: For areas complying with ASTM standard F1487 or the CSA Z-614, apply
the age appropriate label to the component at eye level or at a visible location.
Page 6

Installation Instructions
Model XX0483
PA1380
Page 6 of 8
Bill of Materials
XX0483 - COZY COCOON SPINNING POST MOUNT
PART NO. DESCRIPTION QTY.
AAU0715 COCOON MOUNT (POST/BEARING) 1
AAU0718 COCOON COVER 1
APL1722 PLATE - 7.75" O.D. x 12 GA 1
ASY0258 ASSEMBLY - COCOON BEARING 1
BAE0595 WASHER - 3/8" SAE FLAT 18
BAE0633 NUT - 3/8"-16 x 1.63 BARREL 8
BAE0659 BOLT - 3/8"-16 x 3/4" BUTTON HEAD - S.S. 4
BAE0663 NUT - 3/8"-16 x 7/16" BUTTON HEAD 10
BAE06675 BOLT - 3/8"-16 x 2-1/4" BUTTON HEAD - S.S. 8
BAE06677 BOLT - 3/8"-16 x 2-3/4" BUTTON HEAD - S.S. 6
BAE0922 TOOL - TT 45 L WRENCH 2
BAE0936 WASHER - 3/8" I.D. x 1-1/4" O.D. FENDER 6
BPL0300 CAP - 3/8" BOLT 14
BPL3150 COCOON 2
ALB0025 LABEL - AGE APPROPRIATE SHEET 1
BAD0085 THREAD LOCKING ADHESIVE 1
1000 Buffalo Road • Lewisburg, PA 17837
www.playworldsystems.com
For Customer Service, Call
800-233-8404 or
570-522-9800
OUTSIDE U.S.
Page 7

Model XX0483
PA1380
Page 7 of 8
Installation Instructions
Fasteners
• Inspect for loose fasteners.
Tightening torque specifi cations are:
Bolts and Nuts: Snug tighten and tighten an additional
one-half turn.
• If during the maintenance process a bolt needs to be
removed from a part or parts, it will be necessary to apply
a drop of liquid thread lock / loctite to the bolt before
reinstallation.
• Inspect for missing, worn or broken fasteners. If any
missing, worn or broken fasteners are found, refer to the
installation instructions for proper replacement fastener.
If any damage is detected, barricade equipment to
prevent use until repair is completed. Contact your sales
representative immediately for a replacement part.
Plastic Parts
• Inspect all plastic surfaces for sharp points, cracks
or jagged edges. If any damage is detected and is
determined to be unsafe, barricade equipment to prevent
use until repair is completed. Minor burrs or sharp edges
may be removed by using a sharp utility knife or block
plane to remove sharp burr.
Castings
• Inspect the aluminum castings to insure they are properly
secured to the component.
• Visually inspect the castings for cracks or breakage. If
any damage is detected, barricade the equipment to
prevent use until repair is completed. Contact your sales
representative immediately for a replacement part.
Welds
• Inspect all welded joints. If any broken welds are detected,
barricade equipment to prevent use until repair is
completed. Contact your sales representative immediately
for a replacement part.
Equipment Maintenance
Playworld Systems® Model XX0483
Cozy Cocoon
Spinning Post Mount
Finish
• Inspect metal parts for fi nish damage.
To repair painted surfaces, sand damaged area with
sandpaper and wipe clean. Mask area and paint with
primer and allow to dry. Paint primed area with colormatching paint and allow to dry. Recoat area with colormatching paint if required. Drying time is approximately
8 hours between coats.
Footings
• Inspect component to be solid in footing and secure. If
any damage is detected, barricade equipment to prevent
use until repair is completed.
Surfacing
• Refer to the specifi c surfacing maintenance detail sheet
for additional information.
Replacement Parts
• Refer to your installation instructions to obtain replacement
part number.
• Contact your sales representative or call Playworld
Systems’ Customer Service for a replacement part.
1000 Buffalo Road • Lewisburg, PA 17837
www.playworldsystems.com
For Customer Service, Call
800-233-8404 or
570-522-9800
OUTSIDE U.S.
Page 8

Installation Instructions
Model XX0483
PA1380
Page 8 of 8
Inspection Form
• Be sure that you are using a copy of this Inspection Form and not your original.
• Use the Inspection Codes listed below and record condition of equipment at time of
examination on the Inspection Checklist.
• Document any item from the Inspection Checklist that will require maintenance along with
any corrective action on the Maintenance Schedule.
• Be sure to include appropriate dates and signatures on each section to properly document
maintenance procedure.
Preventive Maintenance
. . . for Safety's Sake!
Repairer: Name (Please Print) __________________________________ Signature:________________________________________ Date:___ /___ /___
MAINTENANCE SCHEDULE
Item in Question Description of Problem Corrective Action Date
Inspector: Name (Please Print) __________________________________ Signature:_________________________________________ Date:___ /___ /___
Inspection Codes
P = Pass F = Fail
NA = Not Applicable
INSPECTION CHECKLIST Frequency
Inspection
Code Date
Date Repairs
Completed
Inspect plastic parts for damage. Medium
Inspect for loose, missing, worn, or broken fasteners. High
Inspect metal parts for structural and fi nish damage. Medium
Inspect surfacing to insure proper depth and distribution. High
Inspect footing to insure support is secure and footing is not damaged. Low
Page 9

Guidelines & Information (fs RPE) Annex Page 1 of 6
Guidelines
Important ! Please Read Completely Before Beginning Installation. According
to a report published by the U. S. Consumer Product Safety Commission (C.P.S.C.)
72% of all playground injuries result from accidental falls. With this in mind, this
equipment is designed to fi ll the need for safe yet challenging play. In conjunction
with design efforts to reduce the possibilities of injuries, this equipment must
be installed "Step by Step" per our installation instructions. As a new owner you
are responsible for the correct installation, safe use, and maintenance of your
equipment.
Installation Guidelines
• Identify all parts and thoroughly read the assembly instructions before
beginning construction.
• Refer to your playground equipment plan and footing diagram to assure
the equipment purchased will fi t into your selected site area. The use and noencroachment zones around the play equipment shall be obstacle-free areas
designated for unrestricted circulation.
• ASTM compliance: For rotating play equipment that rotates around a vertical
axis with a maximum dimension greater than 20 inches (508 mm) measured
from the axis of rotation to the outermost perimiter which exceed the speed
limitation requirements shall not be less than 108 inches (2743 mm) on all sides.
This includes a use zone of 72 inches (1829 mm) that shall not overlap the use
zone of other structures. The exemption is equipment where the diameter of the
platform is less than 20 in. (510 mm) may overlap if the adjacent designated play
surfaces of each structure are less than 30 in. (760 mm) above the protective
surface. If adjacent designated play surfaces on either structure exceed a height
of 30 inches (760 mm), the minimum distance between structures shall be 108
inches (2743 mm).
• For rotating play equipment that rotates around a vertical axis with a maximum
dimension less than or equal to 20 inches (508 mm) measured from the axis of
rotation to the outermost perimeter shall not be less than 72 inches (1829 mm)
on all sides. Overlapping use zones is allowable if the adjacent fall height of
each structure is less than or equal to 30 inches (760 mm) above the protective
surfacing. If adjacent play structures have a fall height greater than 30 inches
(760 mm) than the distance between the structures shall be no less than 108 in.
(2743 mm).
• CSA compliance: For rotating play equipment, the use zone should extend on
all sides a minimum distance of 1800 mm. This use zone may not be overlapped
by the use zones of adjacent play equipment. A no-encroachment zone is also
required for play equipment over 500 mm in diameter that rotates around a vertical
axis. In addition to the use zone measurement, this zone will extend an additional
1800 mm and may not be overlapped by the use or no-encroachment zones of
adjacent play equipment.
• EN compliance: For rotating play equipment, the use zone should extend on
all sides a minimum distance of 2000 mm. This use zone may not be overlapped
by the use zones of adjacent play equipment. There must also be a head clearance
of 2000 mm above the maximum height of the rotating play equipment. Refer to
the Use Zone diagram or master structure drawing.
• Site layout is a critical part of the overall installation. Footings must be
measured and marked accurately according to the footing diagram. A level and
clear installation site is ideal.
• Good drainage around the structure and its supports is important. Inquire with
local contractors for appropriate recommendations.
• After laying out all footings and before digging holes, be sure to inquire about
underground utilities that may exist.
• Do not leave the job site unattended without making sure that all fastening
hardware on all components are tightened according to tightening torque
specifi cations listed on every installation guide. We also recommend roping off
construction area and covering all holes that do not contain a piece of equipment
with plywood or other suitable material.
• Excavate holes as shown in the footing detail. If a level and clear site cannot
be obtained, adjust the depth of footing to maintain a level footing base. If soil
conditions are loose or unstable, a larger diameter footing may be required. Inquire
with local contractors for appropriate recommendations. Be sure concrete that
might have splashed onto the unit is washed off before it dries. Allow concrete to
harden 72 hours before allowing your structure to be used. Assemble the entire
structure before pouring concrete unless specifi cally instructed to do so in
the installation instructions.
Page 10

Guidelines & Information (fs RPE) Annex Page 2 of 6
• Insure that Age Appropriate and Hard Surface Warning/Playworld Systems
identifi cation labels are properly affi xed to the play equipment. Labels are to be
plainly visible according to current playground equipment guidelines.
• IMPORTANT! Because accidental falls around your playground equipment
can occur, Playworld Systems recommends that the area under and around the
structure be covered with a resilient material such as sand, bark mulch, or wood
chips. If loose fi ll surfacing materials are used, Playworld Systems recommends
a depth of 12 in. (305 mm). An approved rubber safety matting can also be used.
Many protective surfacing materials can become compacted due to weather
and use, which reduces their shock absorbency. It is strongly recommended
that the surfacing be checked weekly and material added or replaced as
necessary. Hard surfaces, such as asphalt, concrete and packed earth are
not acceptable for use under playground equipment.
• The entire area, under and around the playground equipment, must be
covered with protective surfacing material. The impact attenuation of the
protective surfacing under and around playground equipment should be rated to
have a critical height value of at least the height of the highest accessible part
of the equipment. The critical height for surfacing is to be rated in accordance
with A.S.T.M. standard, designated F1292, A Standard Specifi cation for Impact
Attenuation of Surface Systems Under and Around Playground Equipment. Critical
fall heights for Europe and Canadian compliance shall be listed on the elevation
page or master structure drawing if they differ from the ASTM standard. Contact
the manufacturer of unitary surfacing materials (rubber matting) for the critical
height rating for their products.
Tools Required: Playworld Systems supplies a service kit that contains commonly
used hex key wrenches required to assemble your equipment. You may also
need: shovel, digging iron, post hole digger, steel rake, wheelbarrow, garden hoe,
water hose, tape measure, level, alignment tool, 3/8" ratchet with 9/16" socket,
and 9/16" combination wrench.
Maintenance
• Inadequate maintenance of equipment has resulted in injuries on the
playground. Because the safety of playground equipment and its stability depends
on good inspection and maintenance, a comprehensive maintenance program
must be developed for each playground and strictly followed. All equipment
must be inspected frequently for any potential hazards. Special attention must to
be given to moving parts and other components that can be expected to wear.
Inspections must to be carried out in a systematic manner by trained personnel.
Any damaged or worn parts, or any other hazards identifi ed during inspections
must be repaired or replaced immediately. Complete documentation of all
maintenance inspections and repairs must be retained.
Supervision Guidelines
• Playworld Systems strongly recommends close supervision of the children as
they play as well as intensive classroom and home instruction about safe behavior
on playground equipment.
• Playground supervisors should be aware that not all playground equipment is
appropriate for all children who may use the playground. Signs should be posted
near the equipment indicating the recommended age of the users. Supervisors
should direct children to equipment appropriate for their age.
• It is important that playground supervisors recognize that preschool-age
children require more attentive supervision on playgrounds than older children.
• Do not permit the use of wet playground equipment. Wet equipment will inhibit
necessary traction and gripping capabilities. Slips or falls could occur.
• Do not permit too many children on the same piece of equipment at the same
time. It is suggested that children take turns.
• Constantly observe play patterns to discover possible hazardous play and
suggest changes in equipment use or play patterns.
Guidelines
Page 11

Guidelines & Information (fs RPE) Annex Page 3 of 6
Footing Details (in ground)
2" (51 mm)
18"
(457 mm)
Diameter
Varies
54"
(1372 mm)
Varies
48"
(1219 mm)
GroundZerO® Support Post Footing Detail ASTM/CSA
Ground Level
Concrete
Protective Surfacing Level
Factory-Applied Protective
Surfacing Level Sticker
End Cap from
Post Shipping Tube
(Drill holes in cap to allow
for water drainage)
Support Post
2b Stone
2" (51 mm)
18"
(457 mm)
Diameter
Varies
42"
(1067 mm)
Varies
36"
(914 mm)
Support Post Footing Detail (ASTM/CSA)
Ground Level
Concrete
Protective Surfacing Level
Factory-Applied Protective
Surfacing Level Sticker
Support Post
2b Stone
End Cap from
Post Shipping Tube
(Drill holes in cap to allow
for water drainage)
400 mm
1220 mm
1375 mm
Footing Detail GroundZerO® Support Post (EN)
Ground Level
Concrete
Protective Surfacing
GroundZerO® Support Post
2b Stone
Factory Applied Surfacing Label
Soil
460 mm
Diameter
>200 mm
400 mm
915 mm
1065 mm
Footing Detail Support Post (EN)
Ground Level
Concrete
Protective Surfacing
Support Post
2b Stone
Factory Applied Surfacing Label
Soil
460 mm
Diameter
>200 mm
Page 12

Guidelines & Information (fs RPE) Annex Page 4 of 6
FOOTING NOTES (IN GROUND)
• Support post footing depth equals 42 in. (1067 mm) minus the depth of the
protective surfacing material. The posts are designed to have 24" (610 mm) in
concrete.
Example: If 12 in. (305 mm) of wood mulch is used for surfacing, the footing
depth would be 30 in. (762 mm).
• GroundZerO
®
support post footing depth equals 54 in. (1372 mm) minus the
depth of the protective surfacing material. The posts are designed to have 36"
(914 mm) in concrete.
Example: If 12 in. (305 mm) of wood mulch is used for surfacing, the footing
depth would be 42 in. (1067 mm).
• Most support posts and component support legs will have either a factory-applied
sticker with a line, or factory-applied mark designating the level of protective
surfacing on a clear and level installation site. The footing depth measurements
are based on this line/mark.
• If the play equipment is installed on uneven terrain, maintain support post mark
for the protective surfacing level at the lowest grade. Adjust other footings
accordingly. Support posts and all attaching decks and play components must
be plumb and level.
• Do not encase the bottom of the support post in concrete. Place the post directly
on packed stone or other porous material.
• The footings shown on Playworld Systems’ documentation are recommendations
based on historical performance in average soil conditions. Footing dimensions
may be modifi ed by the owner based on actual soil conditions.
For example:
- If local soil is loose or unstable, a larger footing may be required.
- If local soil is considered stable, such as bedrock, clay or hard packed earth, a
smaller footing may be used. Before changing footing dimensions, we strongly
recommend that the footings be reviewed and approved by a registered
engineer.
• The base of the footing must be below the frost line.
• Assemble the entire structure before pouring concrete unless specifi cally
instructed to do so in the installation instructions.
Footing Details (in ground)
2" (51 mm)
18"
(457 mm)
Diameter
Varies
42"
(1067 mm)
Varies
36"
(914 mm)
Ground Level
Concrete
Protective Surfacing Level
Factory-Applied Protective
Surfacing Level Sticker
Support Post
Block
Porous Material
Support Post Footing Detail (ASTM/CSA)
Block Option
2" (51 mm)
18"
(457 mm)
Diameter
Varies
54"
(1372 mm)
Varies
48"
(1219 mm)
GroundZerO® Support Post Footing Detail ASTM/CSA
Block Option
Ground Level
Concrete
Protective Surfacing Level
Factory-Applied Protective
Surfacing Level Sticker
Support Post
Block
Porous Material
Footing Notes
Page 13

Guidelines & Information (fs RPE) Annex Page 5 of 6
FOOTING NOTES (SURFACE MOUNT)
• Most support posts and component support legs will have either a factory-applied
sticker with line, or factory-applied mark designating protective surfacing level
on a clear and level installation site.
• If the play equipment is installed on uneven terrain, maintain support post mark
for the protective surfacing level at the lowest grade. Adjust other footings
accordingly. Support posts and all attaching decks and play components must
be plumb and level.
• The footing size may vary due to local soil and weather conditions.
• Base of footing must be below frost line.
Surface mount hardware is not supplied. Customer is responsible for
concrete base and providing surface mount hardware as specifi ed by a
registered structural engineer for each specifi c project application.
Surface Mount Footing Detail
Concrete Base
Anchor Bolts
Supplied By
Customer
Protective
Surfacing Level
Surface Mount Post
Footing Notes
Footing Detail (surface mount)
Page 14

Guidelines & Information (fs RPE) Annex Page 6 of 6
FINAL INSPECTION
• Playworld Systems® insists on the installation of protective surfacing within the
use zone of each play structure in accordance with the applicable standard or
specifi cations appropriate for the fall height of each structure.
• Playworld Systems
®
strongly recommends close supervision of children as
they play. The owners of playground equipment and the parents or guardians
of children are responsible for this proper supervision.
• As the owner of playground equipment, you are responsible for the maintenance
of the equipment and surrounding play area. A comprehensive maintenance and
inspection schedule must be developed and all equipment inspected frequently.
Refer to the inspection and maintenance schedule in the back of this booklet.
• Perform a thorough final check on the installed equipment to insure all
equipment is installed as specifi ed by manufacturer’s installation instructions.
• Review all Installation Instructions for specifi ed dimensions. Make sure
dimensions called for in instructions agree with actual installation.
• Double check height dimensions. Height measurements are taken from the
top of the protective surfacing material.
• Insure all fasteners are tightened according to tightening torque specifi cations
listed on your installation instructions.
• Insure all exposed pipe ends have properly installed end caps. Insure that
drive rivets are secure.
• Clean dried concrete off of components and any other affected surface.
• Touch-up any scratches or installation damage to powder coated fi nish with
color-matched spray paint.
• Allow adequate time for proper curing, both for concrete and urethane
cement if rubber safety surfacing tiles have been installed.
• Insure that protective surfacing is properly installed according to C.P.S.C.
(or other appropriate body) recommendations. Footings must not be exposed.
• Insure that hard surface warning/Playworld Systems
®
identifi cation labels are
properly affi xed to the play equipment. Labels are to be plainly visible according
to current playground equipment guidelines. For locations complying with ASTM
F1487 or CSA Z-614, Age Appropriate labels must also be applied in a visible
location.
• Dispose of all packaging material properly. These materials which include
large plastic bags and sheets can be a suffocation hazard. Dispose of these
materials out of reach or contact of small children.
Surfacing Warning Label
 Loading...