

Page 1
Installation Instructions
Installation Guidelines
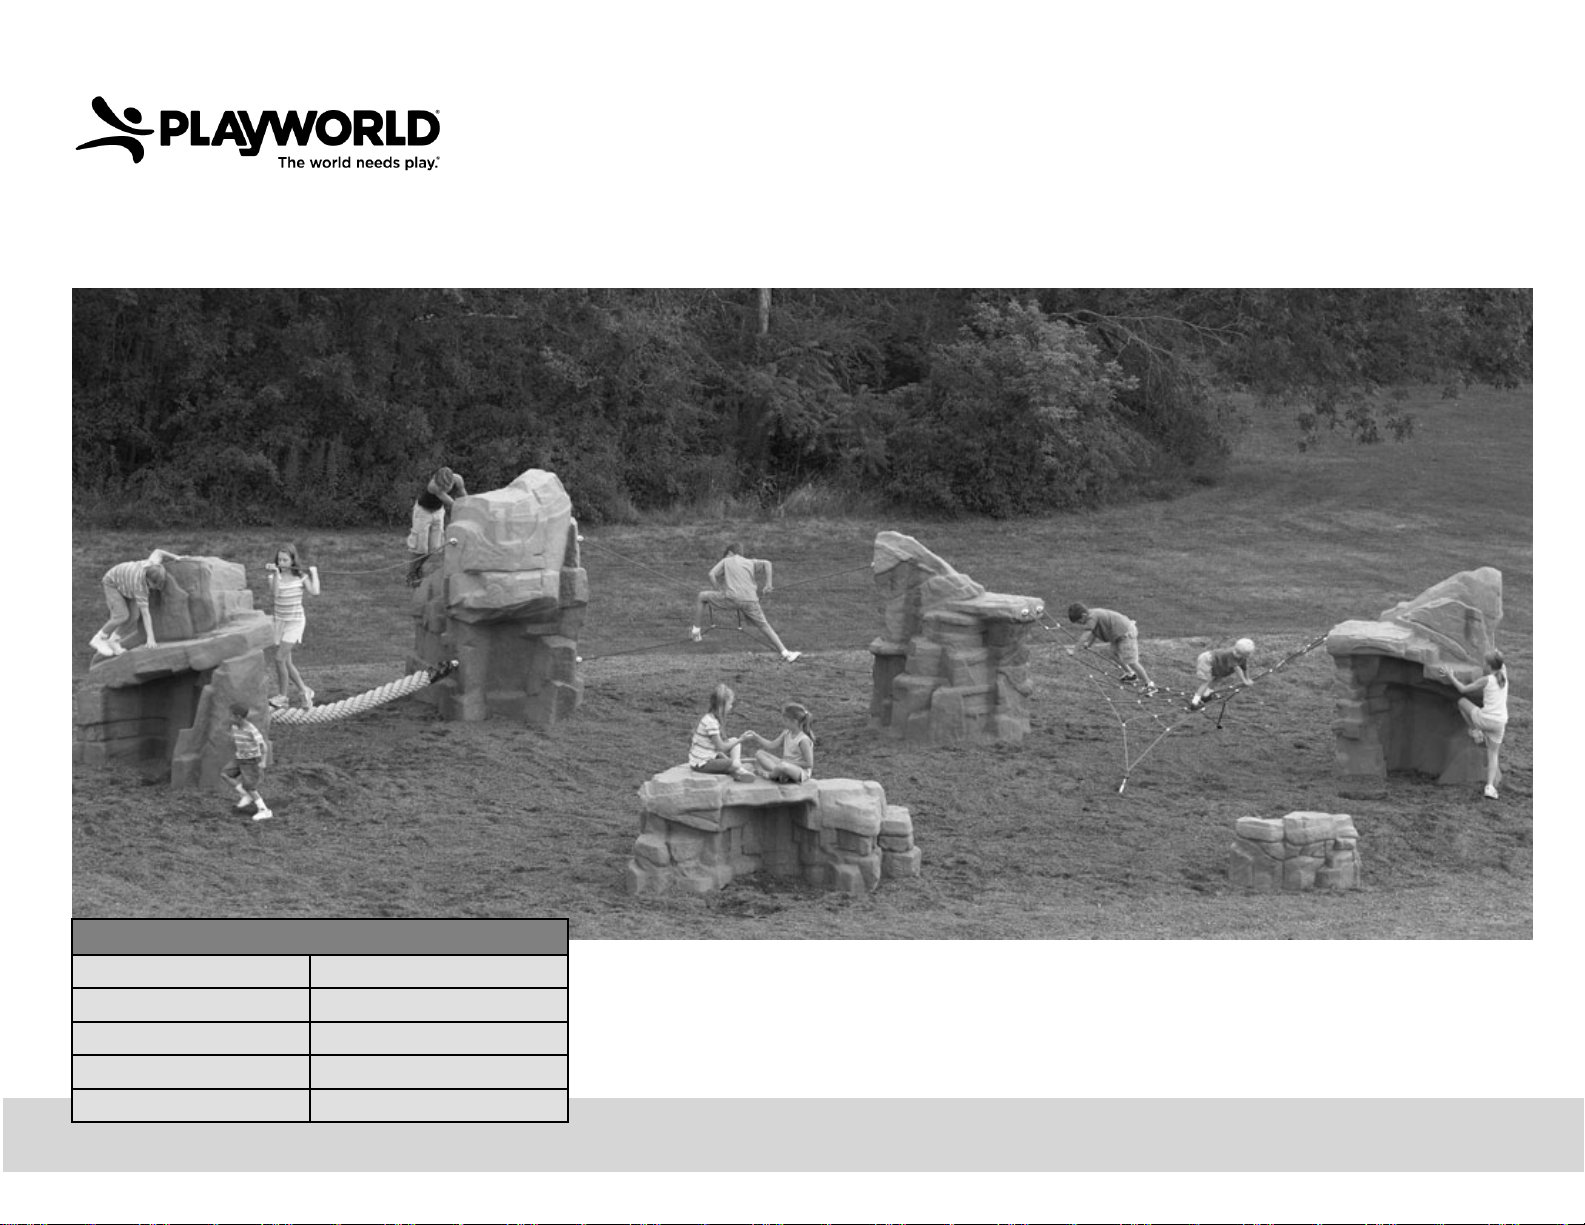
Recommended User Age Group
Tower 5-12 years old
Castle 5-12 years old
Ridge 5-12 years old
Picnic 2-12 years old
Models BD0012-0016, **BD0018-19, *BD0020, BD0021
PA1178, *ECN2167 (*BD0013 & *BD0016), *ECN2825, **PA1440
Page 1 of ##
Bench 2-12 years old
www.playworldsystems.com
Page 1 of 33
Page 2
Installation Instructions
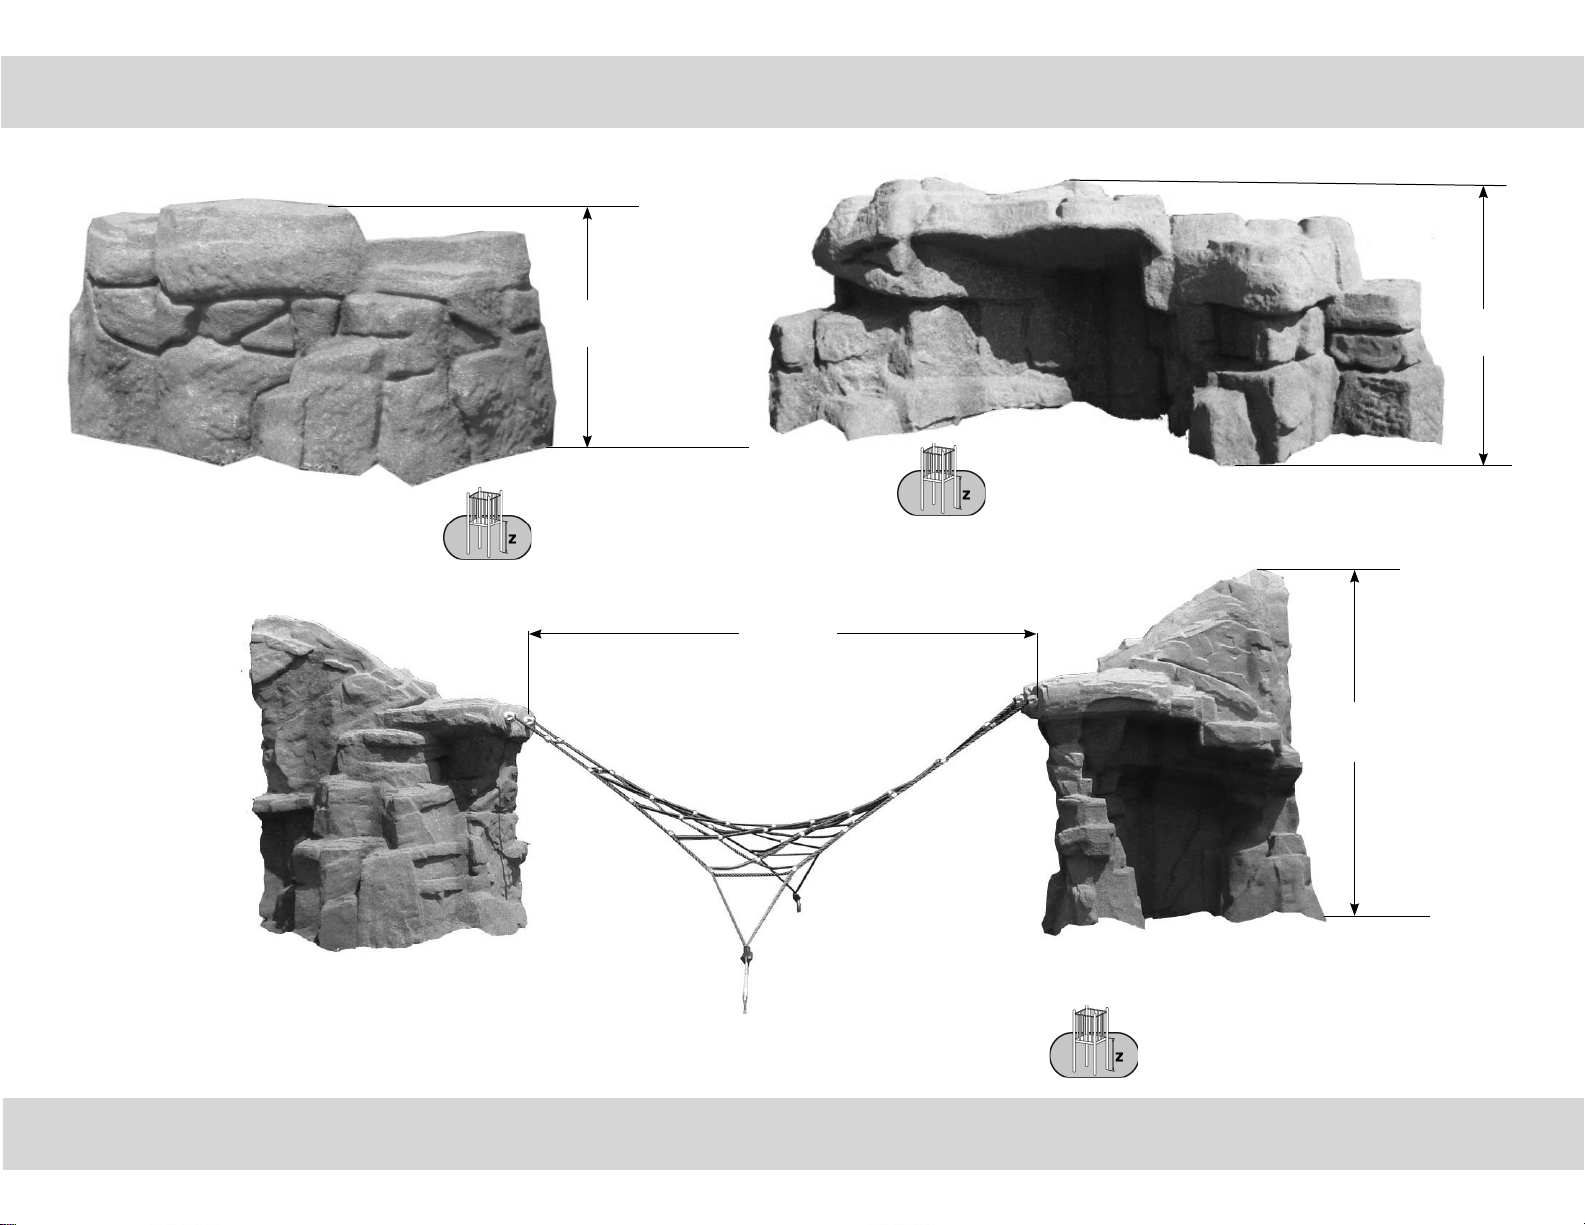
Elevation Views
Bench Boulder
20"
(508 mm)
Surface Level
Critical Fall Height:
20" (508 mm)
120"
(3048 mm)
Critical Fall Height:
36" (914 mm)
Picnic Boulder
36"
(914 mm)
Surface Level
72.5"
(1841 mm)
Tower Boulder
Boulder to Ground Net Climber
Models BD0012-0016, **BD0018-19, *BD0020, BD0021
Page 2 of ##
PA1178, *ECN2167 (*BD0013 & *BD0016), *ECN2825, **PA1440
www.playworldsystems.com
Tower Boulder
Critical Fall Height:
72.5" (1841 mm)
Surface Level
Model ####
PA ECN ####
Page 2 of 33
Page 3
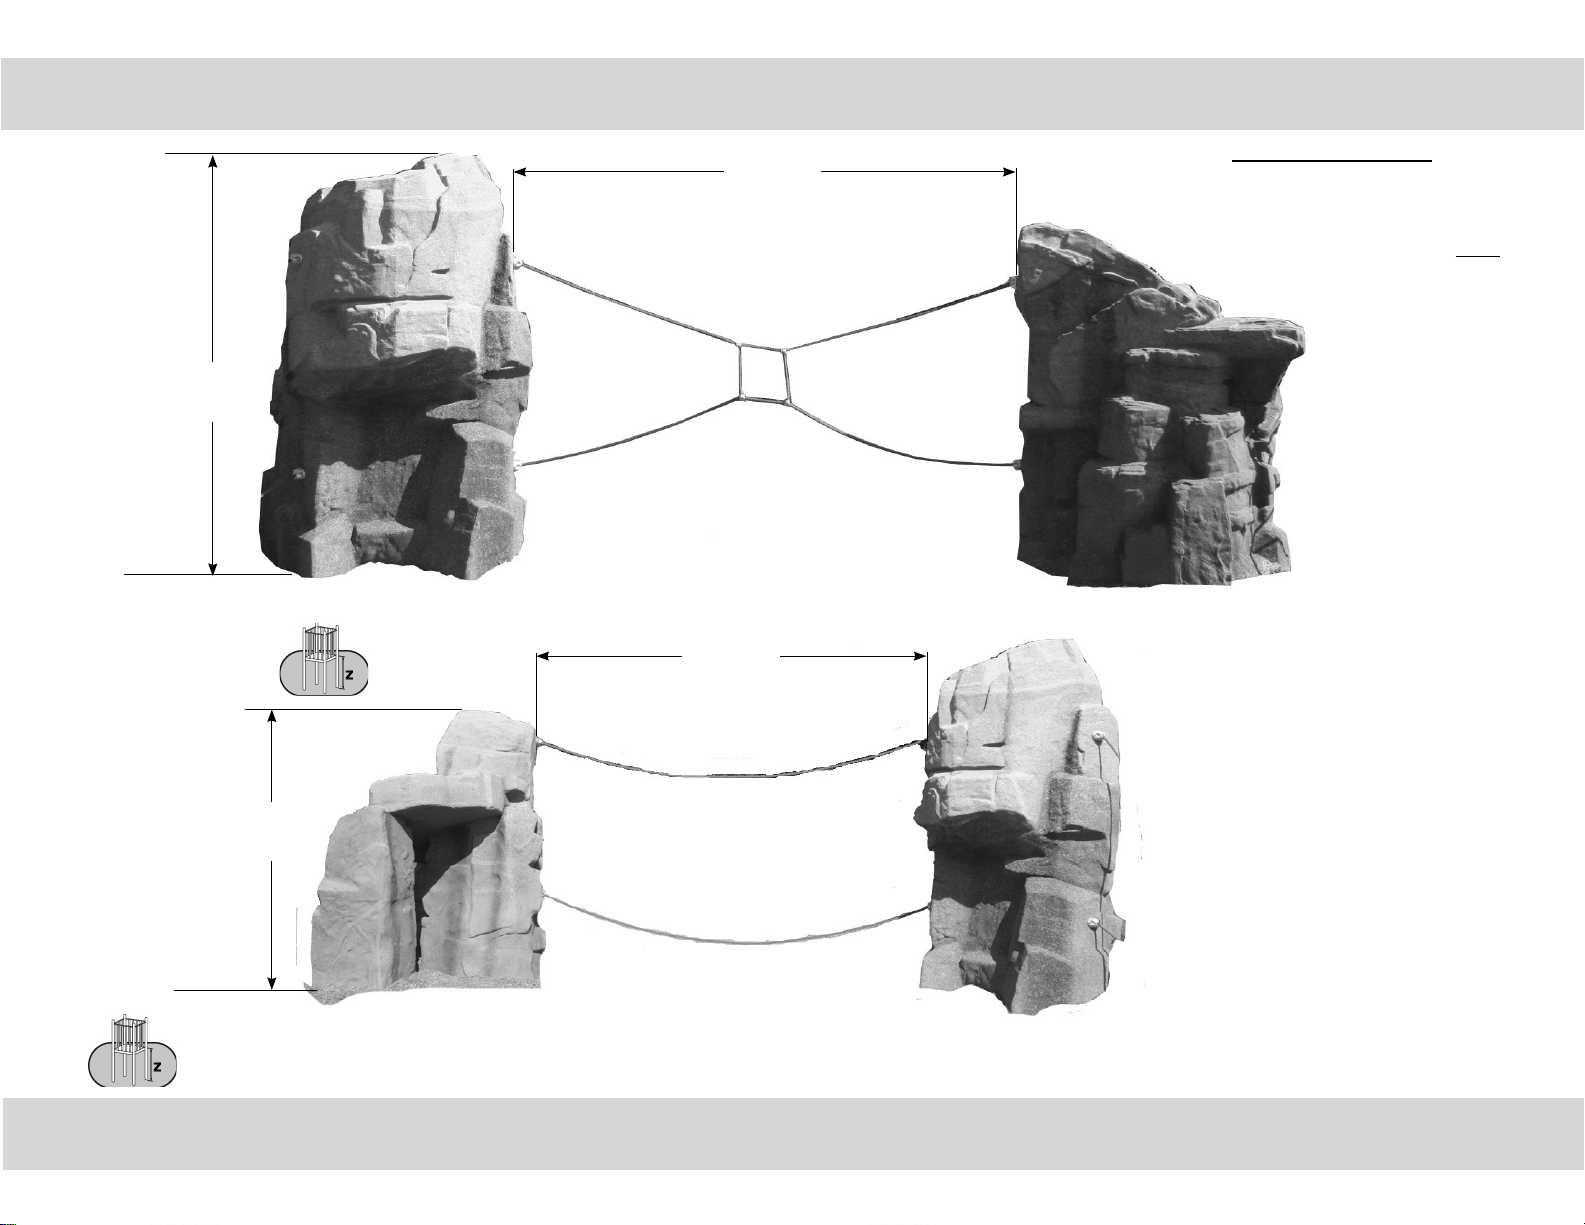
Elevation Views
Installation Instructions
(2388 mm)
Surface Level
93"
Castle Boulder
Critical Fall Height:
93" (2388 mm)
120"
(3048 mm)
10 ft. Mod X
120"
(3048 mm)
Very Important Note: When
positioning the boulders, make
sure the holes for the attachment
of ropes are STRAIGHT across
from each other and NOT
DIAGONAL.
Tower Boulder
72"
(1829 mm)
Surface Level
Critical Fall Height:
72" (1829 mm)
Models BD0012-0016, **BD0018-19, *BD0020, BD0021
PA1178, *ECN2167 (*BD0013 & *BD0016), *ECN2825, **PA1440
Page 3 of ##
Ridge Boulder
www.playworldsystems.com
Note: The dimensions for the
ROPE BRIDGE (not shown)
are the same as the Boulder
Tight Rope.
Boulder Tight Rope
Castle Boulder
Page 3 of 33
Page 4
Installation Instructions
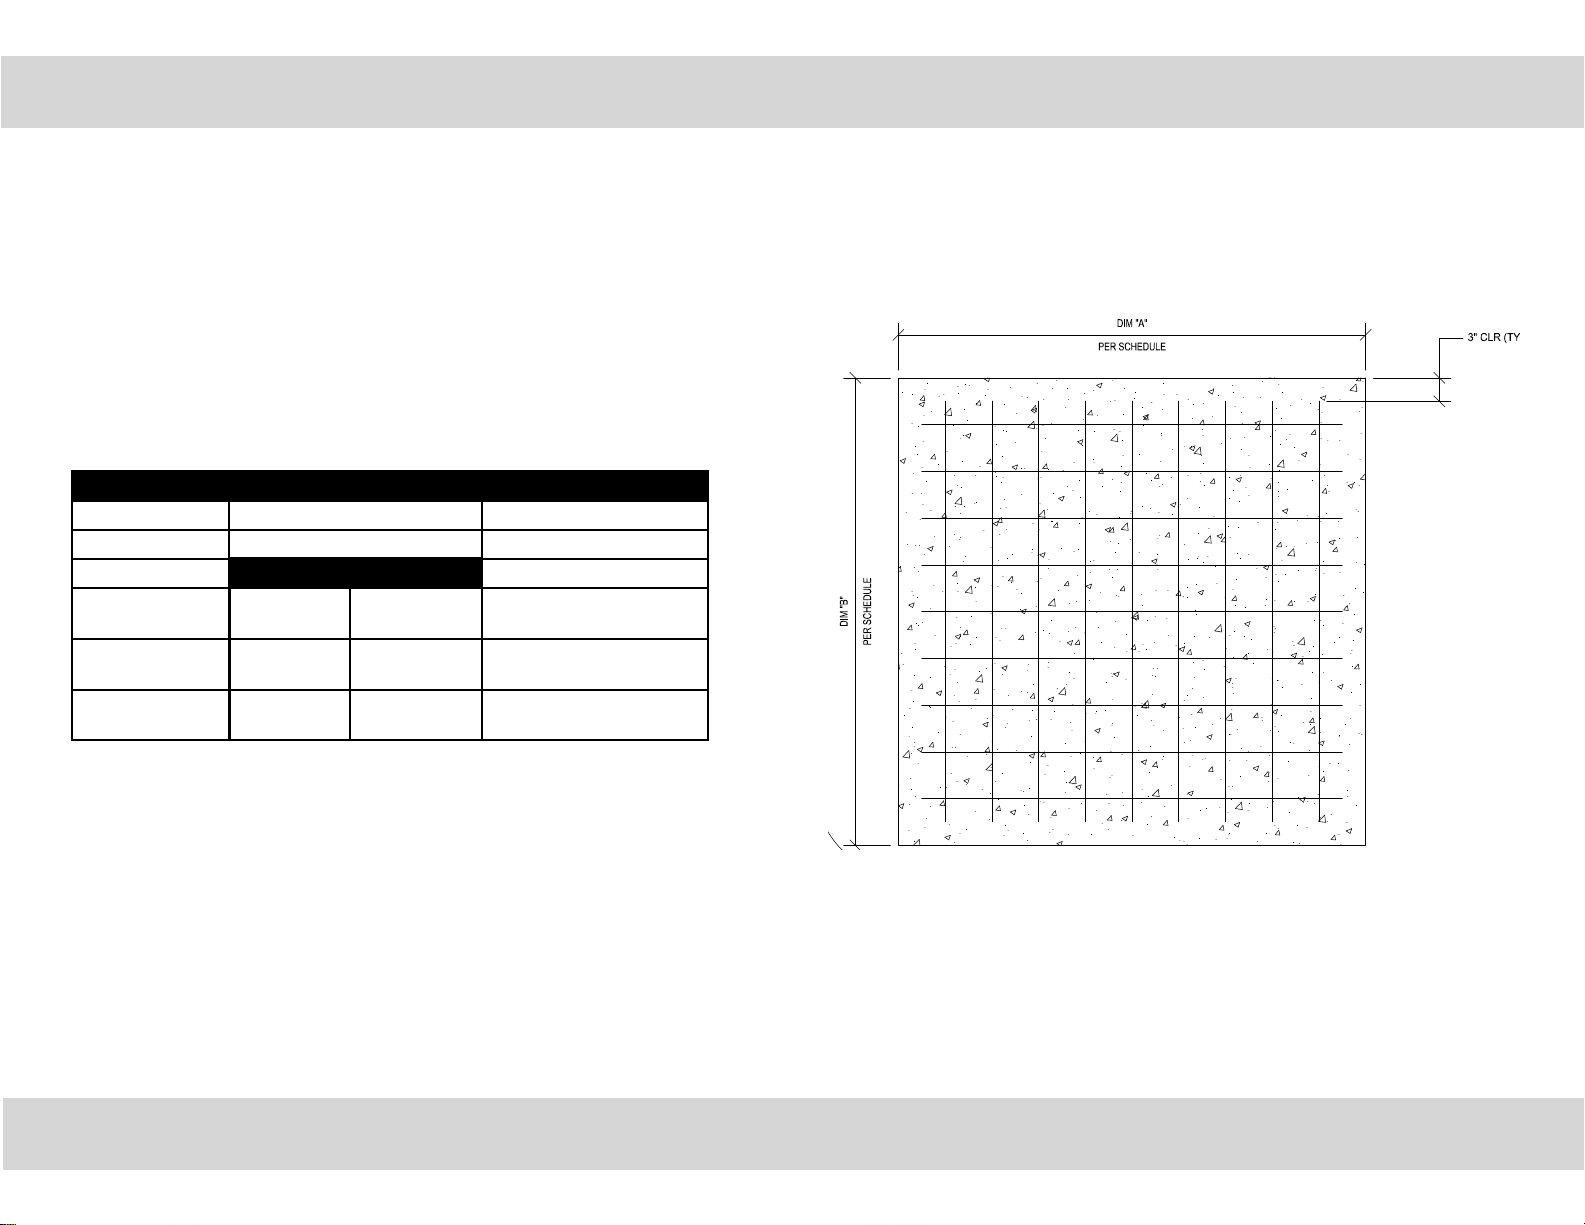
Footing Dimensions
FOOTING OF CLIMBING BOULDERS:
A concrete pad is recommended for installation of the climbing boulders. Excavate
hole according to the pad dimension below. Allow 72 hours for concrete to
completely cure.
Important Note: Each concrete pad should have gravel fi ll 6 in below the local
frost line
Concrete Pad Dimension Recommendation:
Boulder Model Concrete Pad Dimension Concrete Required
ZZBD0012 will sit directly on gravel fi ll N/A
ZZBD0013 will sit directly on gravel fi ll N/A
Dim A Dim B
ZZBD0014
ZZBD0015
ZZBD0016
8 ft
(2438 mm)
9 ft.
(2743 mm)
10 ft.
(3048 mm)
8 ft.
(2438 mm)
6 ft.
(1829 mm)
8 ft.
(2438 mm)
1.98 cubic yards
(1.5 cubic meters)
1.66 cubic yards
(1.27 cubic meters)
2.47 cubic yards
(1.89 cubic meters)
Models BD0012-0016, **BD0018-19, *BD0020, BD0021
Page 4 of ##
PA1178, *ECN2167 (*BD0013 & *BD0016), *ECN2825, **PA1440
www.playworldsystems.com
Model ####
PA ECN ####
Page 4 of 33
Page 5
Installation Instructions
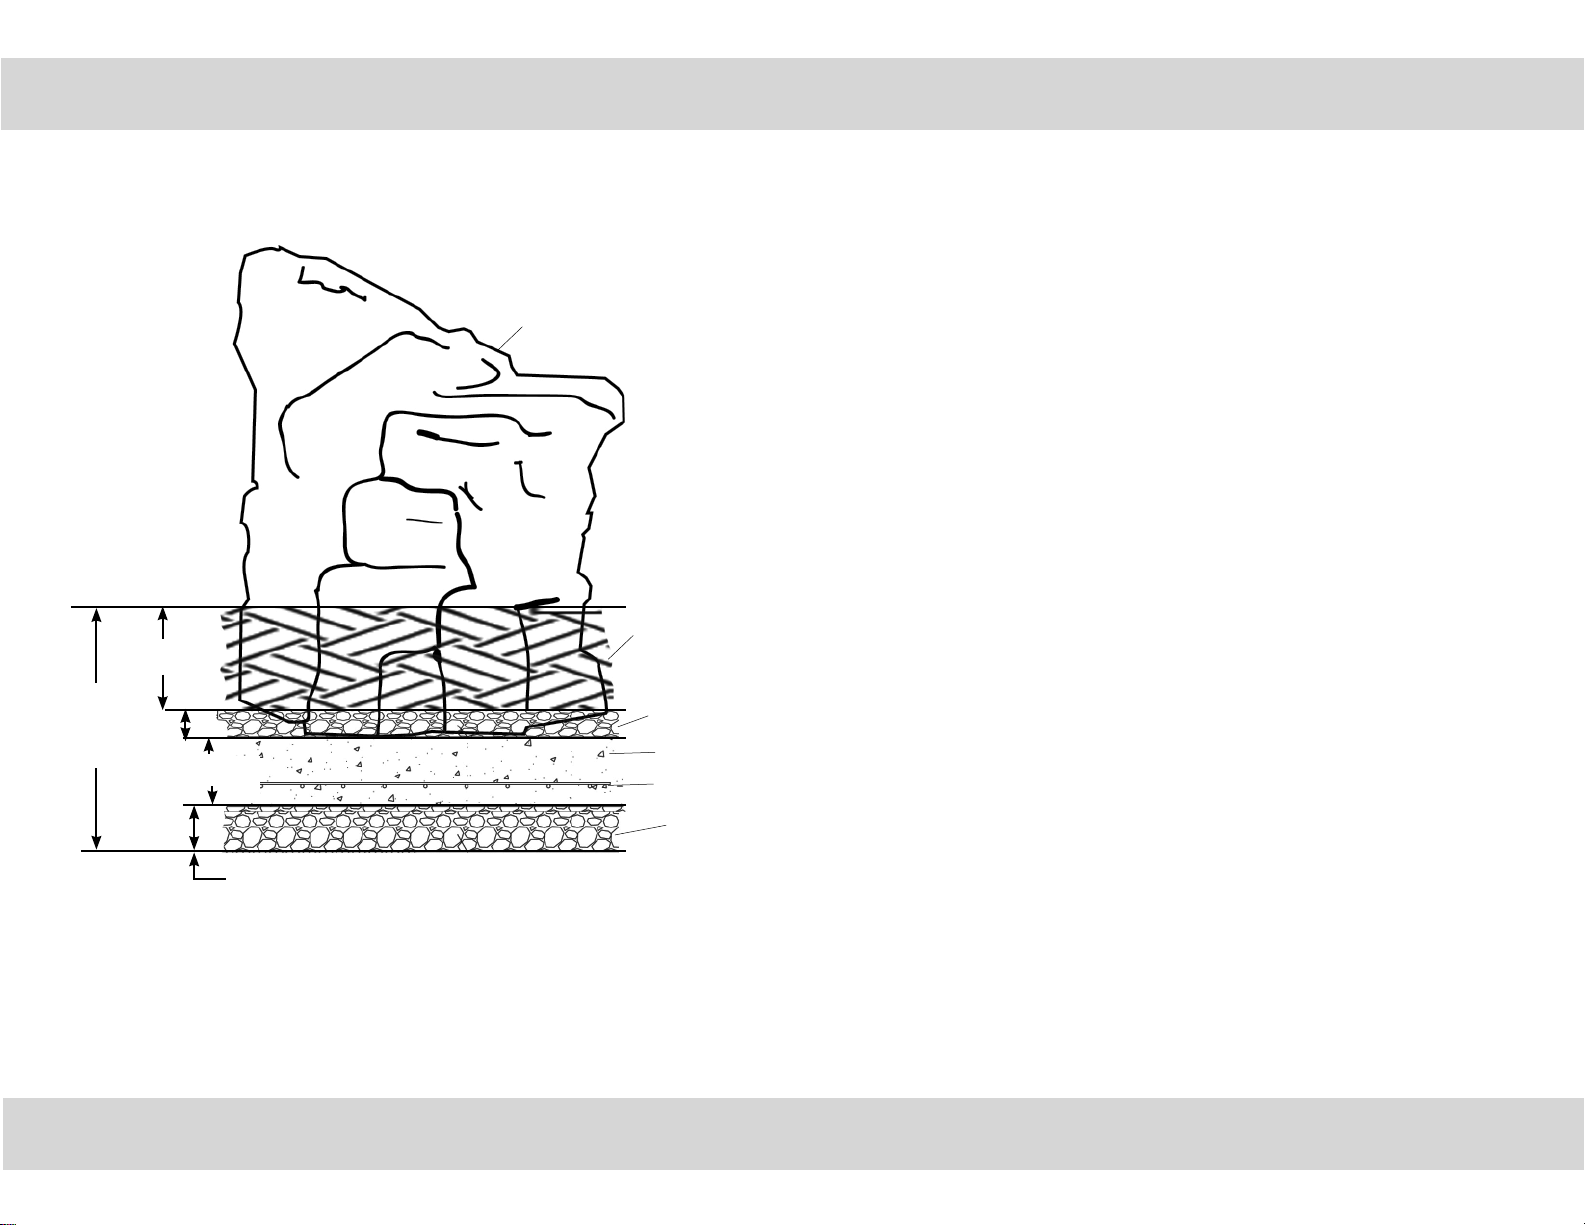
FOOTING NOTES
• The area below the footing shall be excavated to a depth of 6" (152 mm) below the local
frost line and fi lled with gravel or crushed rock compacted to 95%.
• If questioning local site conditions exist, site to be examined by a licensed engineer.
6"
(152 mm)
Below
Frost Line
12"
(305 mm)
3"
(76 mm)
10"
(254 mm)
Varies (dependent on frost line depth)
Boulder
Protective Surfacing
Gravel
Concrete Slab
Reinforcement Bar
Gravel
• Allowable soil bearing value of 1,500 PSF assumed (soil type V per l.B.C. table
1804.2).
• Concrete strength is 2,500 PSI minimum.
• Reinforcement is ASTM A615 Grade 60.
• Applicable Codes:
2006 l.B.C. / 2005 A.S.C.E.7
2005 A.C.I. 316
• Design Criteria:
Importance Factor = 1.00
Basic Wind Speed = 120 mph
Exposure Category = B
Seismic Response Coeffi cient: Cs = 0.40 (max)
Seismic soil class = D
Footing Detail
Models BD0012-0016, **BD0018-19, *BD0020, BD0021
PA1178, *ECN2167 (*BD0013 & *BD0016), *ECN2825, **PA1440
Page 5 of ##
www.playworldsystems.com
Page 5 of 33
Page 6

Installation Instructions
Footing Dimensions
120"
(3048 mm)
60"
(1524 mm)
141.5"
(3594 mm)
BOULDER TO GROUND NET FOOTING
52.8"
(1340 mm)
28"
(711 mm)
Footing Diagram
Boulder to Ground Net Climber
ZZBD0021
Models BD0012-0016, **BD0018-19, *BD0020, BD0021
Page 6 of ##
PA1178, *ECN2167 (*BD0013 & *BD0016), *ECN2825, **PA1440
www.playworldsystems.com
FOOTING NOTES
• Footing size may vary due to local soil and weather conditions.
• The base of the footing must be below frost line.
Surface mount hardware is not supplied. Customer is responsible for
concrete base and providing surface mount hardware as specifi ed by a
registered structural engineer for each specifi c project application.
Model ####
PA ECN ####
Page 6 of 33
Page 7
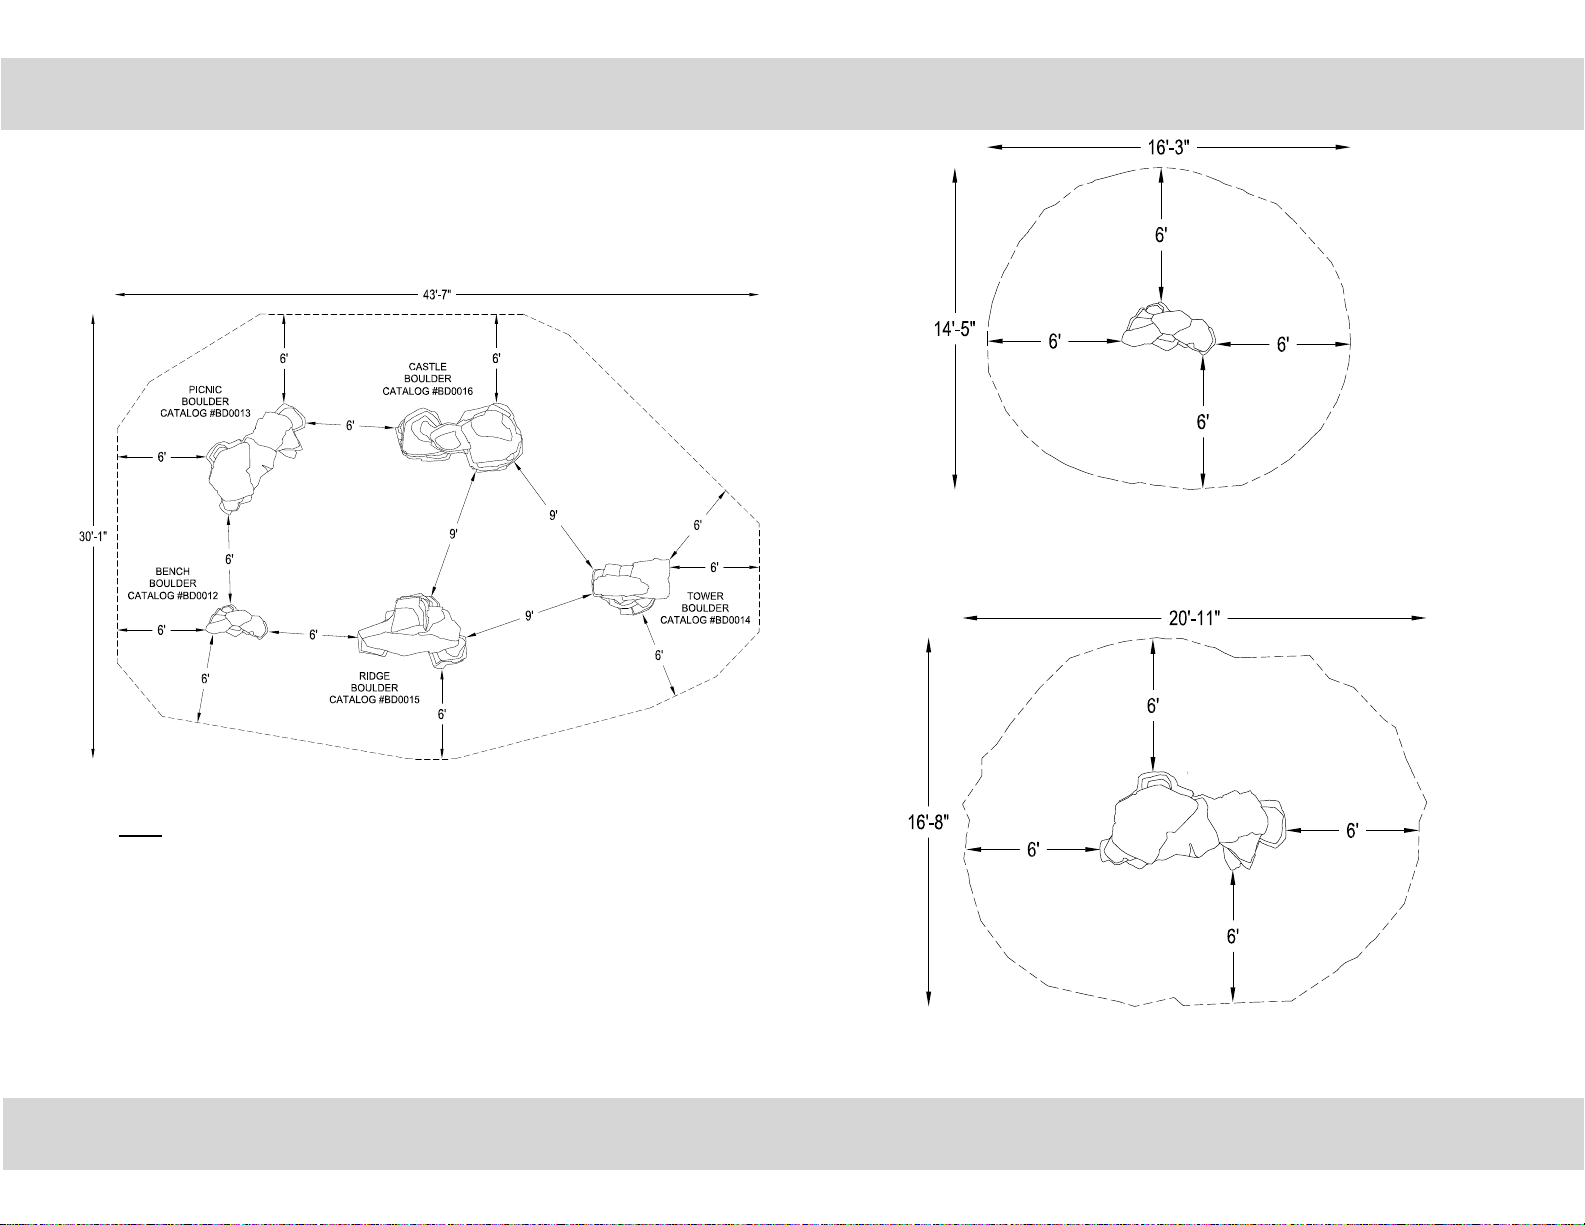
Use Zone
Installation Instructions
PLACEMENT OF CLIMBING BOULDERS:
Select the desired site location and position the climbing boulders. Measure for
all use zones using the master layout drawing. Site should be level.
Bench Boulder
ZZBD0012
Note: The Diagram shown above is provided as an example only. The
quantity, layout and placement of your climbing boulders may be diff erent
and you need to refer to your specifi c site plan for your particular
confi guration.
Models BD0012-0016, **BD0018-19, *BD0020, BD0021
PA1178, *ECN2167 (*BD0013 & *BD0016), *ECN2825, **PA1440
Page 7 of ##
www.playworldsystems.com
Picnic Boulder
ZZBD0013
Page 7 of 33
Page 8
Installation Instructions
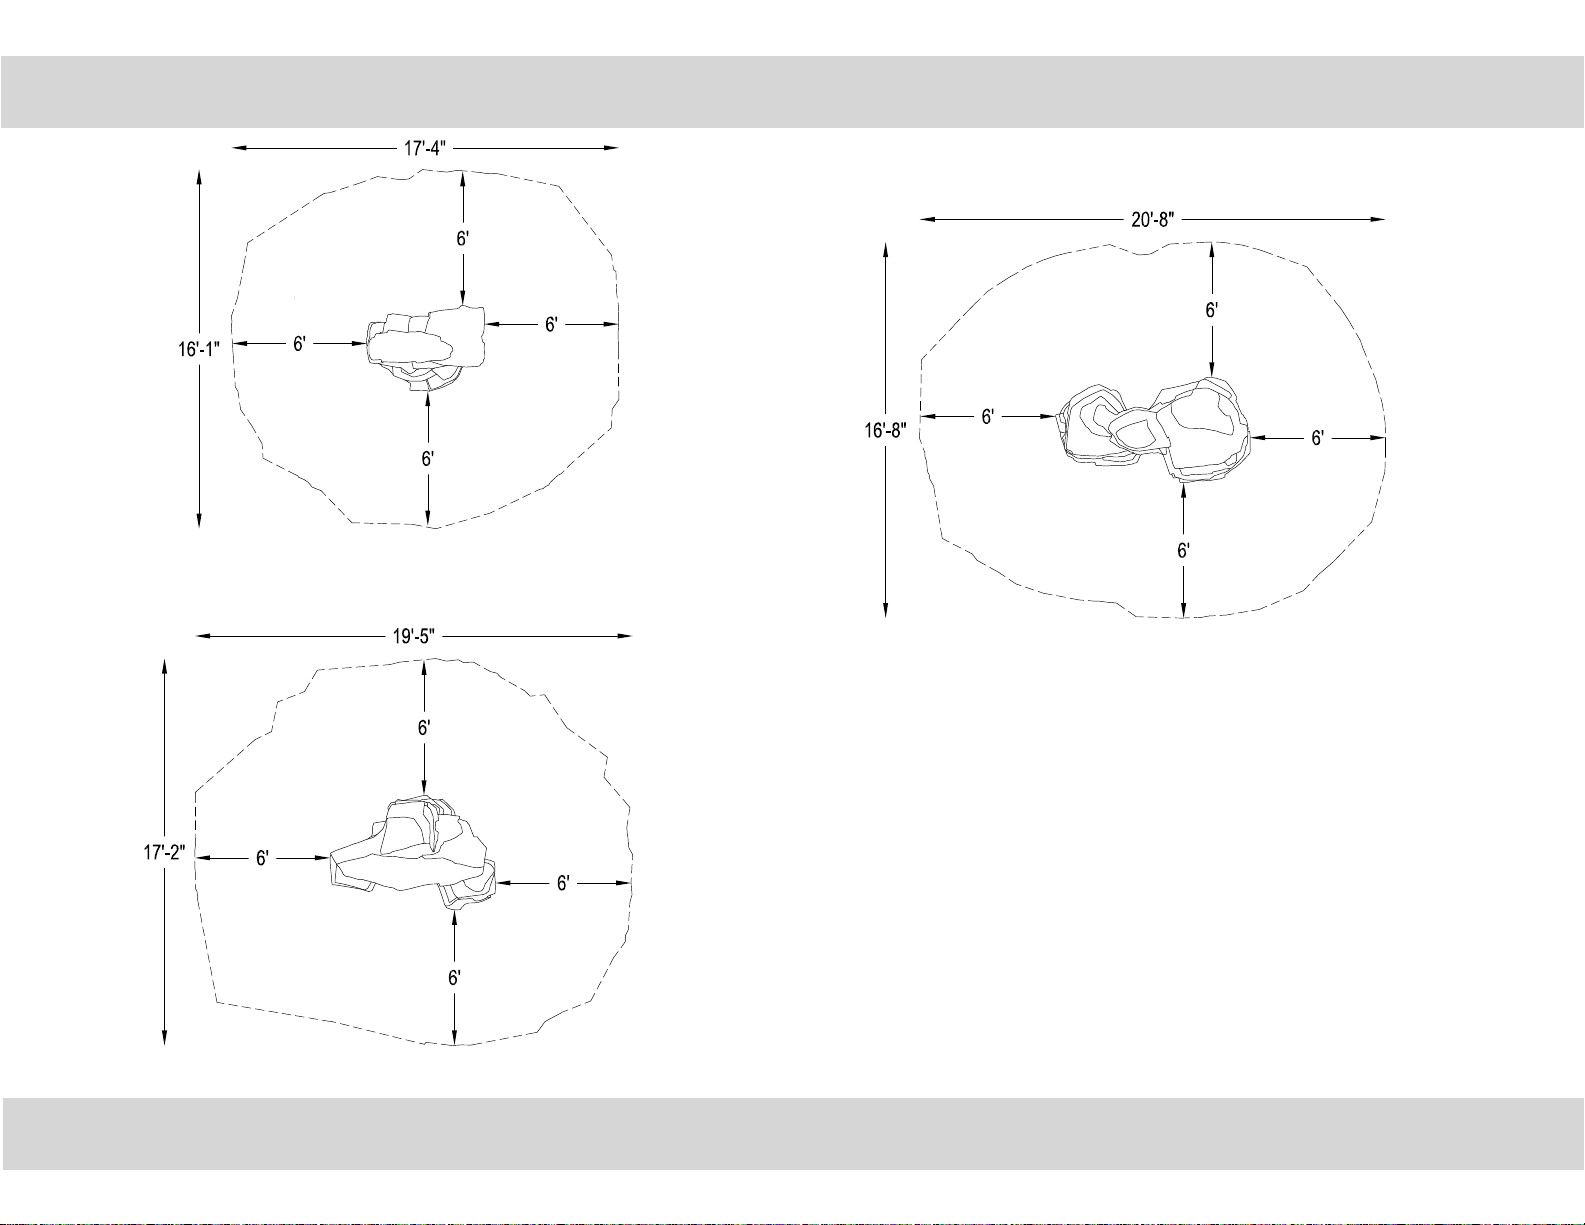
Use Zone
Tower Boulder
ZZBD0014
Castle Boulder
ZZBD0016
Models BD0012-0016, **BD0018-19, *BD0020, BD0021
Page 8 of ##
PA1178, *ECN2167 (*BD0013 & *BD0016), *ECN2825, **PA1440
www.playworldsystems.com
Ridge Boulder
ZZBD0015
Model ####
PA ECN ####
Page 8 of 33
Page 9
Rigging Guidelines
Installation Instructions
RIGGING GUIDELINES
While these boulders are very strong and resistant to damage, improper rigging
techniques can damage the product and more importantly can create a serious
hazard to persons or property in the vicinity of the boulder movement. The
following comments are guidelines that are not intended to replace sound practices
for proper rigging. Rather they are provided as a supplement to proper rigging
techniques.
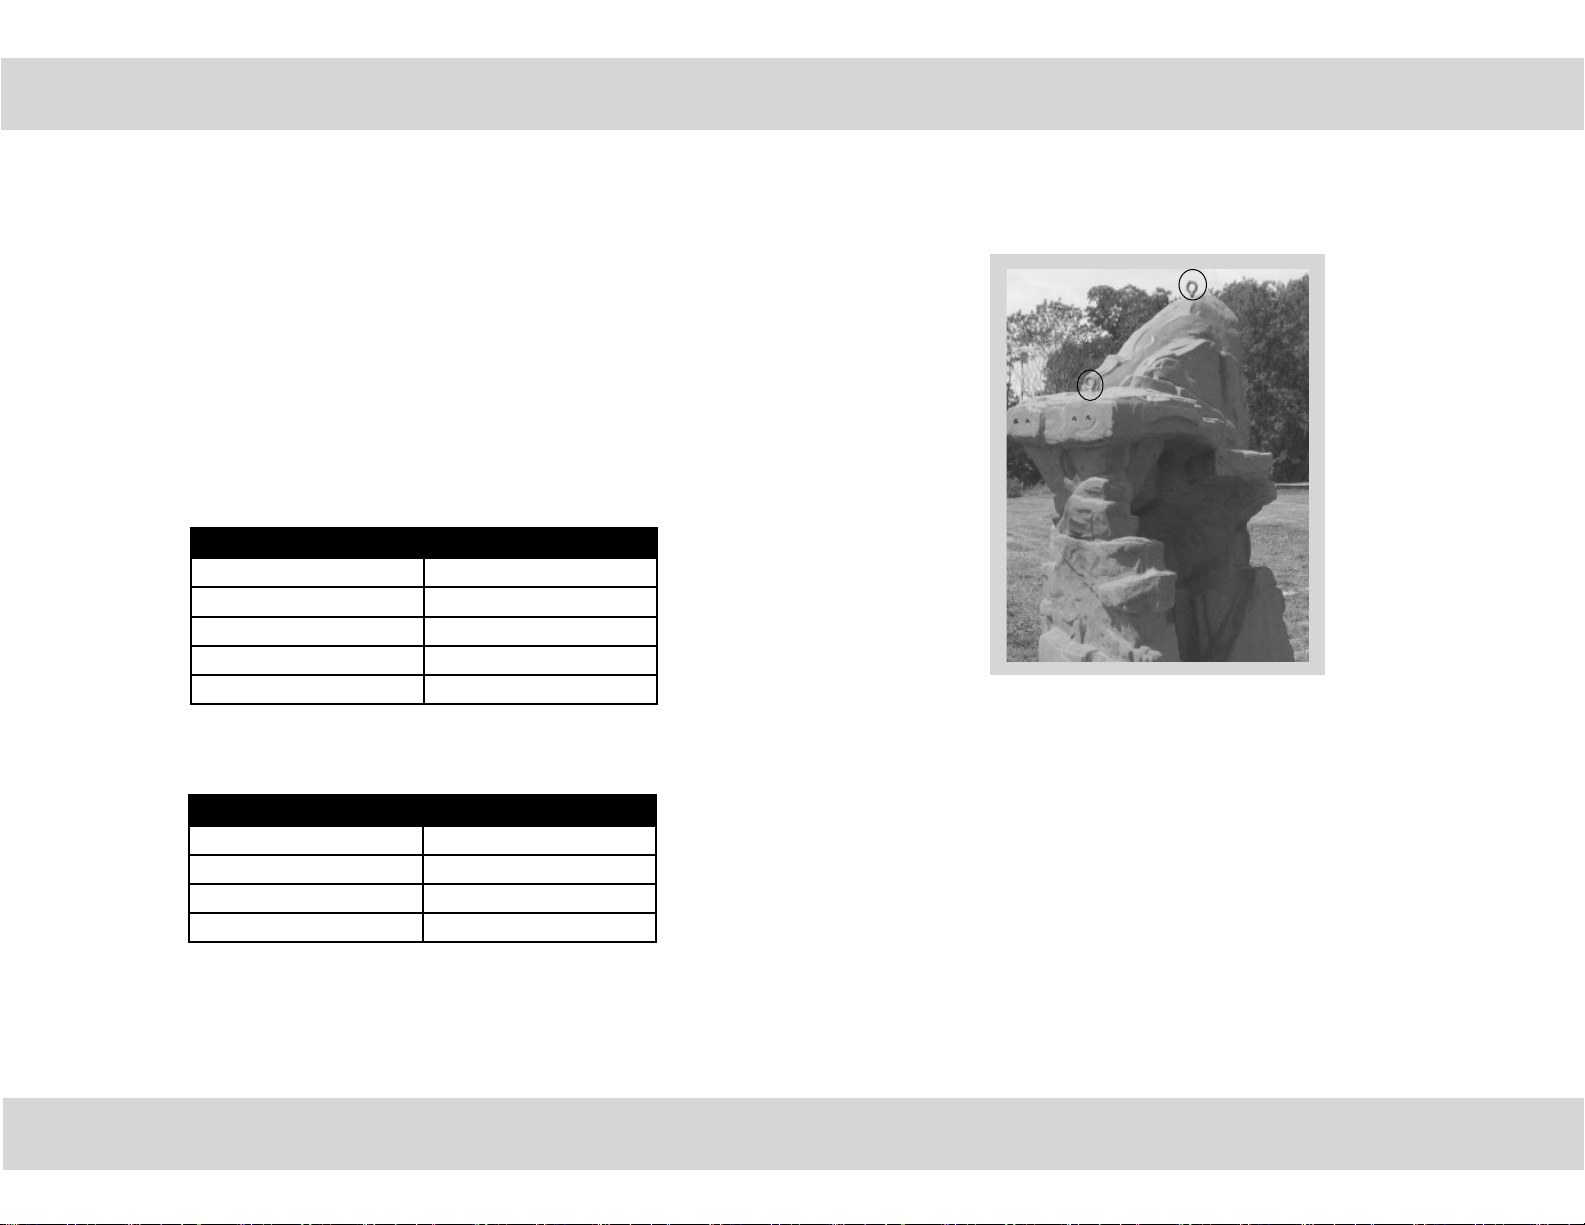
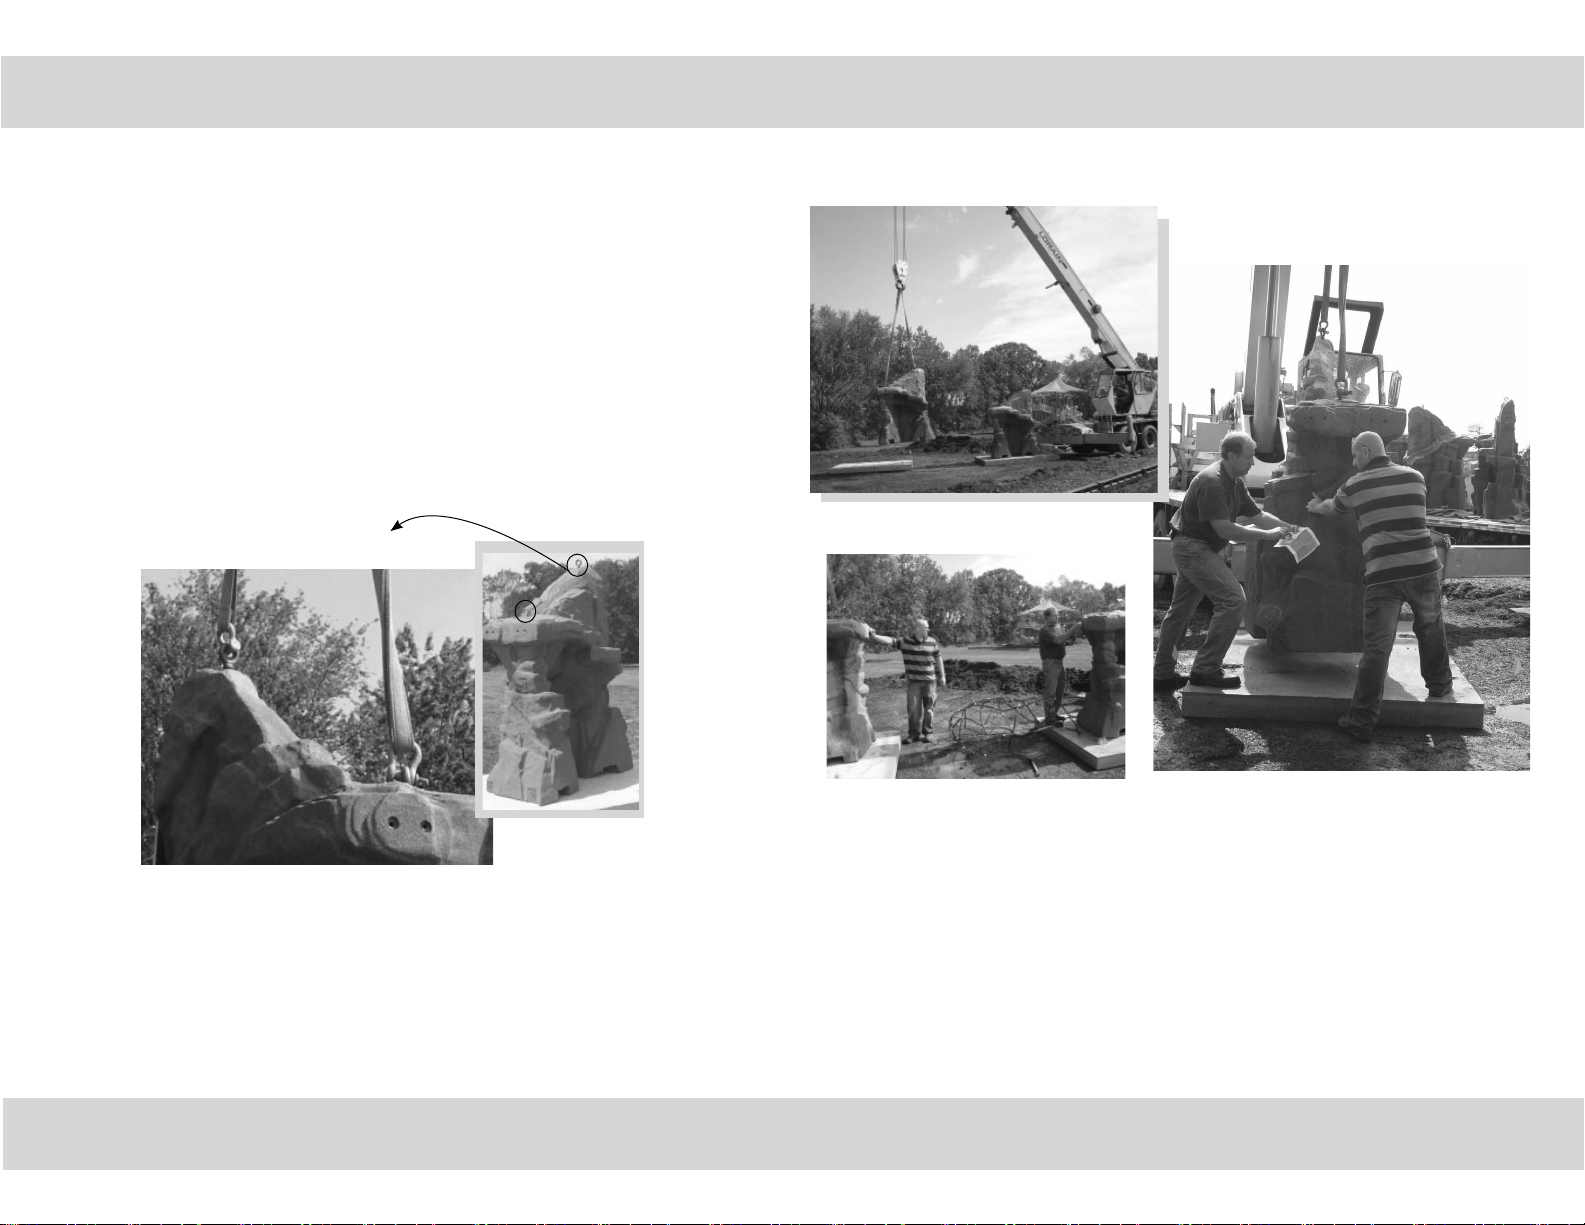
Due to their size and weight, it is recommended that a crane be used for lifting
and moving the boulders from the top with the supplied eyebolts. Refer to the
crane operators expertise to apply safe rigging and lifting practices. Please refer
to the weight charts below.
Boulder Model Weight
ZZBD0012 1160 lbs. (527,3 kg)
ZZBD0013 4500 lbs. (2131,8 kg)
ZZBD0014 4640 lbs. (2109,1 kg)
ZZBD0015 7830 lbs. (3559,1 kg)
ZZBD0016 12000 lbs. (6327,3 kg)
Rope Model Weight
ZZBD0018 9.9 lbs. (4,5 kg)
ZZBD0019 9.4 lbs. (4,3 kg)
ZZBD0020 76.7 lbs. (34,9 kg)
ZZBD0021 67.4 lbs. (30,6 kg)
Models BD0012-0016, **BD0018-19, *BD0020, BD0021
PA1178, *ECN2167 (*BD0013 & *BD0016), *ECN2825, **PA1440
Page 9 of ##
www.playworldsystems.com
EYE BOLTS
Eye bolts are provided with each boulder, except the bench boulder, to aid in the
rigging and lifting practices. When the boulders are in their desired location, the
eye bolts should be removed. Refer to the patch and repair process on page 18
to remove the eye bolts and cover the holes after use.
Page 9 of 33
Page 10
Installation Instructions
Boulder Installation
Carefully read and understand these installation instructions before you
begin.
__Step 1: Before attempting to assemble your equipment, please review all
installation information carefully. Should you experience any diffi culty during the
installation process, please call us at the phone number shown on the last page
of these instructions.
__Step 2: Separate and identify all components and hardware.
__Step 3: Excavate footings as indicated on page 4 and page 5 of this document.
Clearly mark the footings locations for easy installation.
__Step 4: Attach the rigging equipment to the boulder using the eye bolts. Make
sure they are securely attached before lifting.
Models BD0012-0016, **BD0018-19, *BD0020, BD0021
Page 10 of ##
PA1178, *ECN2167 (*BD0013 & *BD0016), *ECN2825, **PA1440
www.playworldsystems.com
__Step 5: Place boulder on the concrete slab according to your layout plan. Before
detaching the crane connection, measure for accuracy.
Note: For ease in positioning, cut a 2" x 4" board to the length of space needed
between boulders. While lowering the boulders into place, place the board between
boulders to ensure proper distancing.
Page 10 of 33
Model ####
PA ECN ####
Page 11
Rope Installation
Installation Instructions
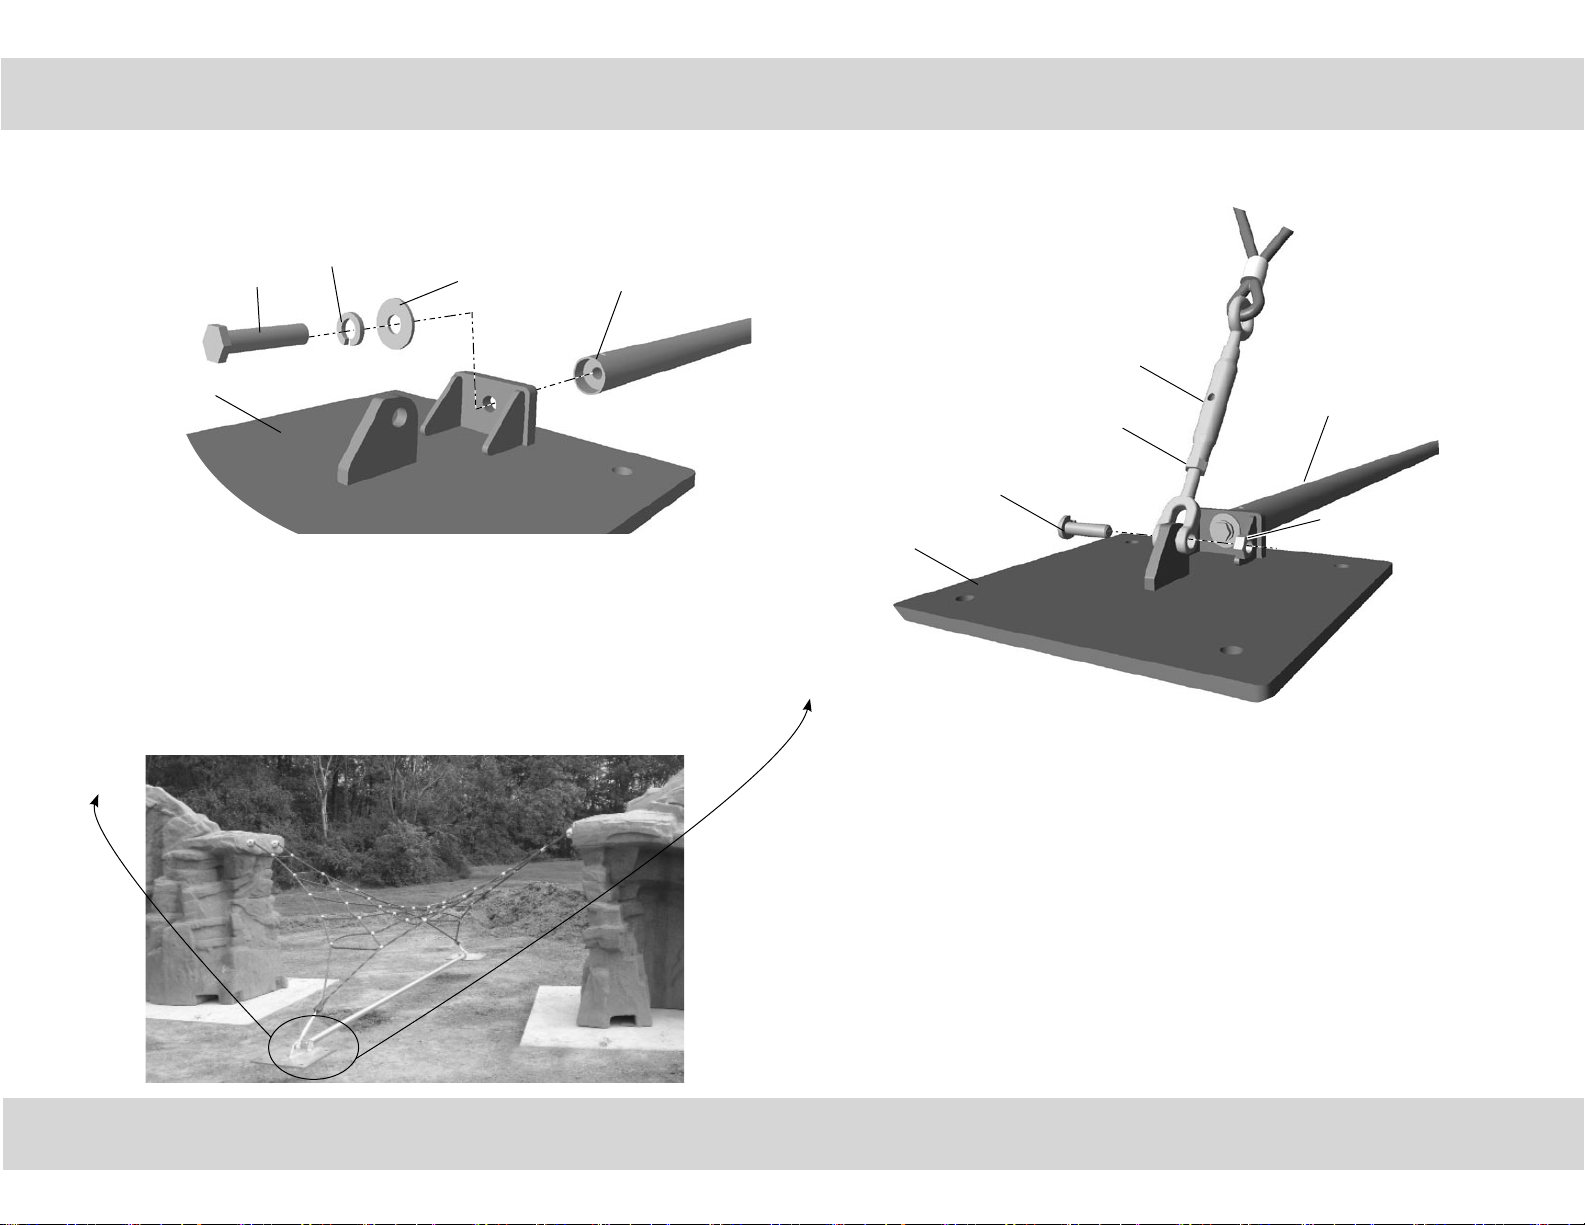
ROPE CONNECTIONS
When the boulders are in the appropriate positions, the climbing ropes may be
attached. Follow the appropriate details for the ropes that are being connected.
Hex Head Bolt
BAE0106
Footing Frame
AFR0685
Split Lock Washer
BAE0109
5/8" Flat W
BAE0804
asher
Rung
ARG0423
BOULDER TO GROUND NET CLIMBER
Attach the rung to the footing frame.
__Step 1: Attach the rung to the footing frame. Select the rung, the footing frame,
and the appropriate hardware. There are (2) two connections. Place the rung in
the appropriate location between the two footing frames. Attach both ends as
shown using existing hardware supplied with the turnbuckle.
Turnbuckle
Assembly
Jam nuts
Bolt Supplied with
Net Climber
Footing Frame
AFR0685
Rung
ARG0423
Nut Supplied with
Net Climber
Attach the turn buckle assembly to the footing frame.
__Step 2: Attach the turn buckle assembly to the footing frame. There is (1) one
connection per turnbuckle assembly, (2) two total connections. Pull the turnbuckle
down to the footing frame and align the holes. Attach as shown.
Important Note: When the entire structure has been assembled and footed and
the concrete has cured, tighten the turn buckles until the net climber has reached
the desired level of tautness. When the assembly has reached desired tautness,
twist the jam nuts to the center of the turn buckle.
Models BD0012-0016, **BD0018-19, *BD0020, BD0021
PA1178, *ECN2167 (*BD0013 & *BD0016), *ECN2825, **PA1440
Page 11 of ##
www.playworldsystems.com
Page 11 of 33
Page 12
Rope Installation
Installation Instructions
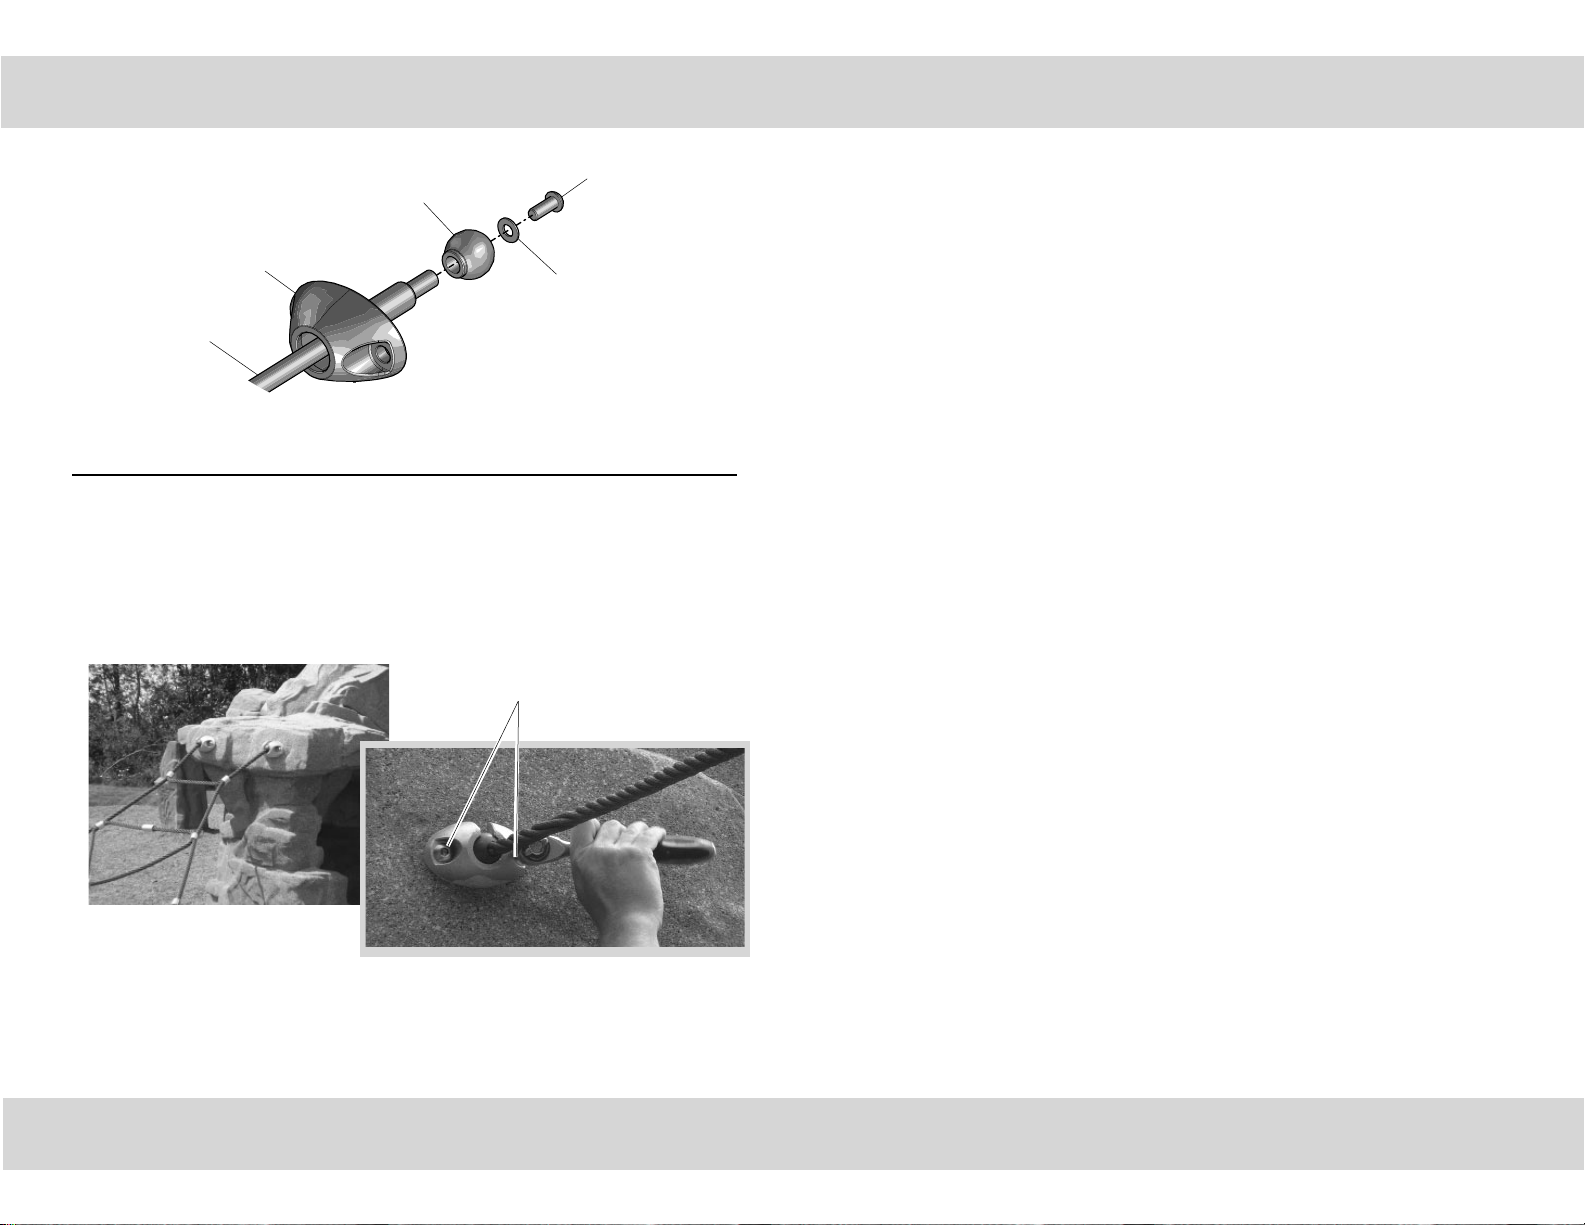
Rope End Sphere
(supplied w/ rope)
M10 x 25mm Male Bolt
(supplied w/ rope)
Swivel Casting
AAU0654
Rope
3/8" Flat Washer
(supplied w/ rope)
Note: Steps 3-4 can be used for the Mod X and the Boulder Tight Rope.
For the Boulder Rope Bridge see the instructions on pages 13 and 14. All
connections are the same. Refer to top view for rope locations.
__Step 3: Attach the single swivel castings to the rope. Select the rope and the
single swivel castings. Place the rope end spheres on the ends of the rope, and
attach as shown.
Note: The swivel casting shown in the picture below is the old swivel casting and
not the new casting that isn't split on the one side.
1/2" x 1-1/2"
Button Head Bolt
BAE0687
(Representative Model)
__Step 4: Attach the single swivel castings to the boulder. Select the appropriate
hardware. There are (2) two connections per casting. Place the swivel casting
onto the boulder and align the holes. Attach as shown.
Models BD0012-0016, **BD0018-19, *BD0020, BD0021
Page 12 of ##
PA1178, *ECN2167 (*BD0013 & *BD0016), *ECN2825, **PA1440
www.playworldsystems.com
Page 12 of 33
Model ####
PA ECN ####
Page 13
Boulder Rope Bridge Rope Installation
Installation Instructions
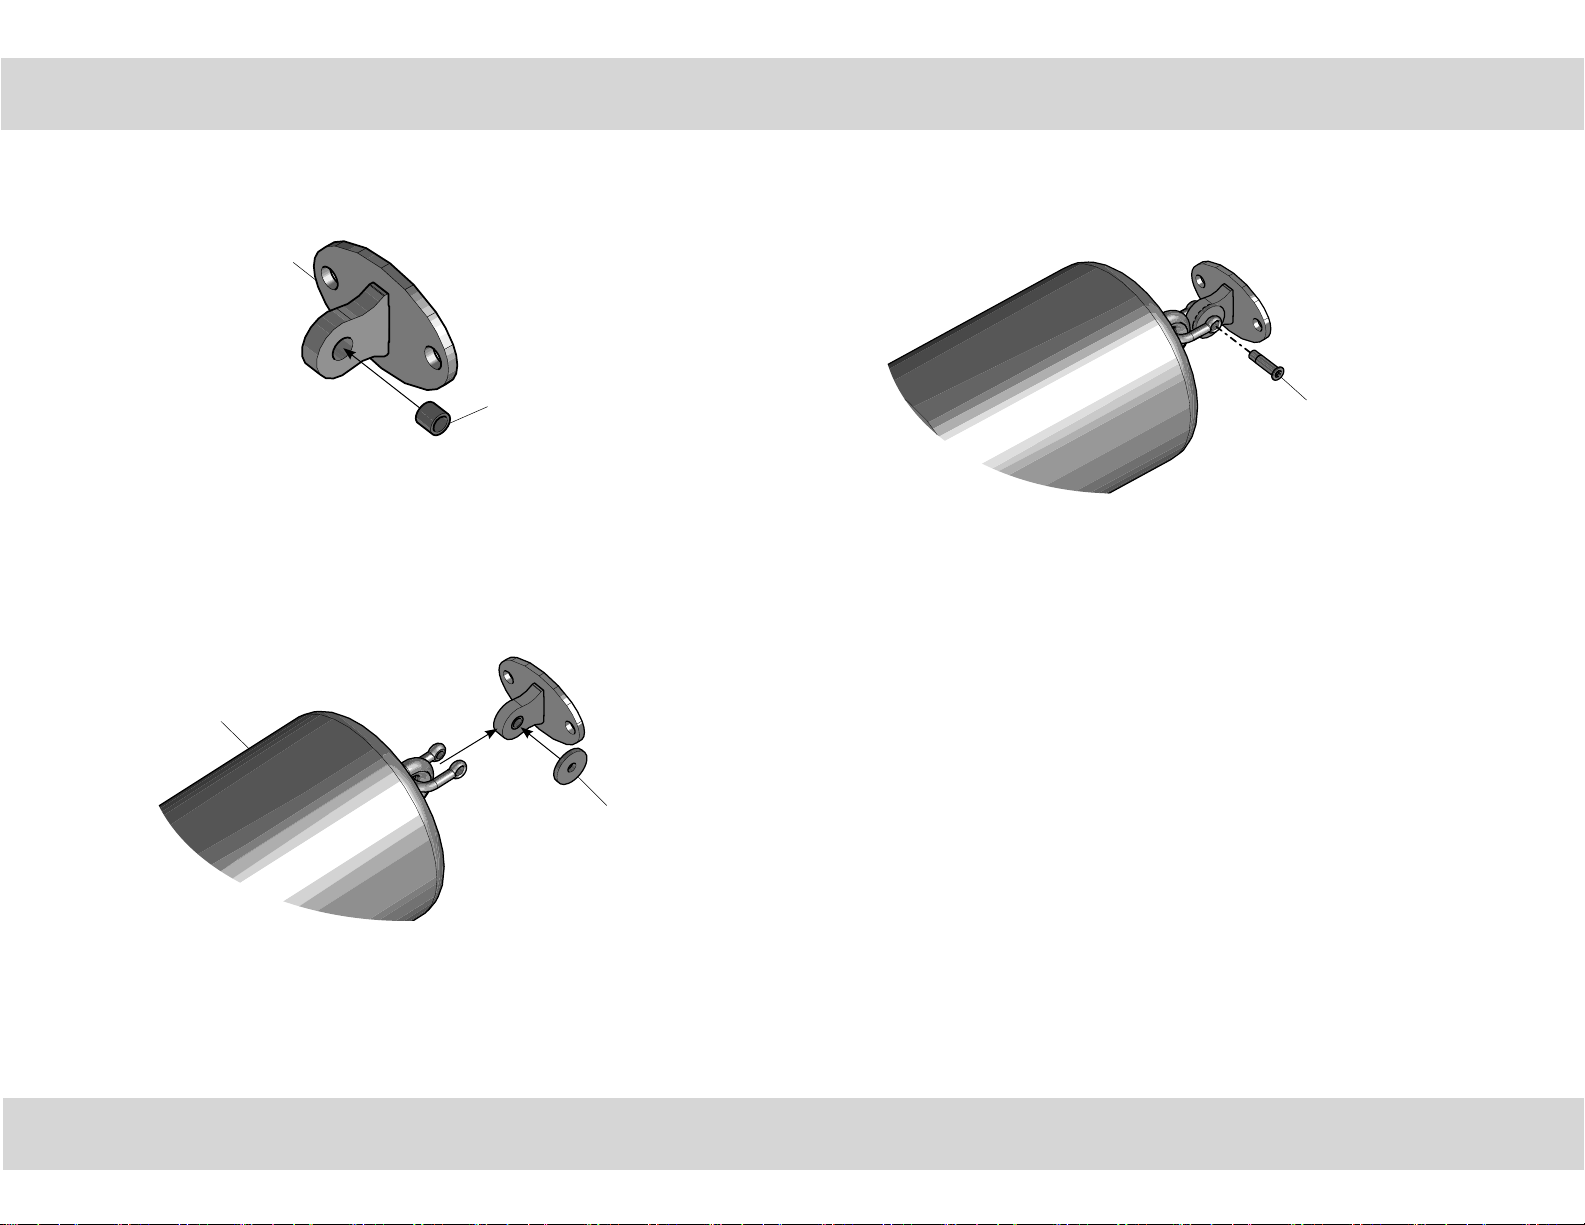
Follow the details in alphabetical order. For clarifi cation, each detail references the
step description. The step descriptions start on page 14.
Rope Bracket
ABC1136
(2 Total)
Insert bushings into tabs on rope brackets.
10' Rope Bridge
AMC1090
(1 Total)
Detail A-1
.50" Bushing
BAE9093
(2 Total)
M10 x 40mm Flat Head Bolt
(supplied w/ rope)
Detail A-3
Attach the rope bridge to the rope brackets.
Rope Spacer
(supplied w/ rope)
Detail A-2
Position rope bridge and rope spacer over
each rope bracket.
Models BD0012-0016, **BD0018-19, *BD0020, BD0021
PA1178, *ECN2167 (*BD0013 & *BD0016), *ECN2825, **PA1440
Page 13 of ##
www.playworldsystems.com
Details A-1 through A-3
Step 1
Attach the rope bridge to the rope brackets.
Page 13 of 33
Page 14
Boulder Rope Bridge Rope Installation
Installation Instructions
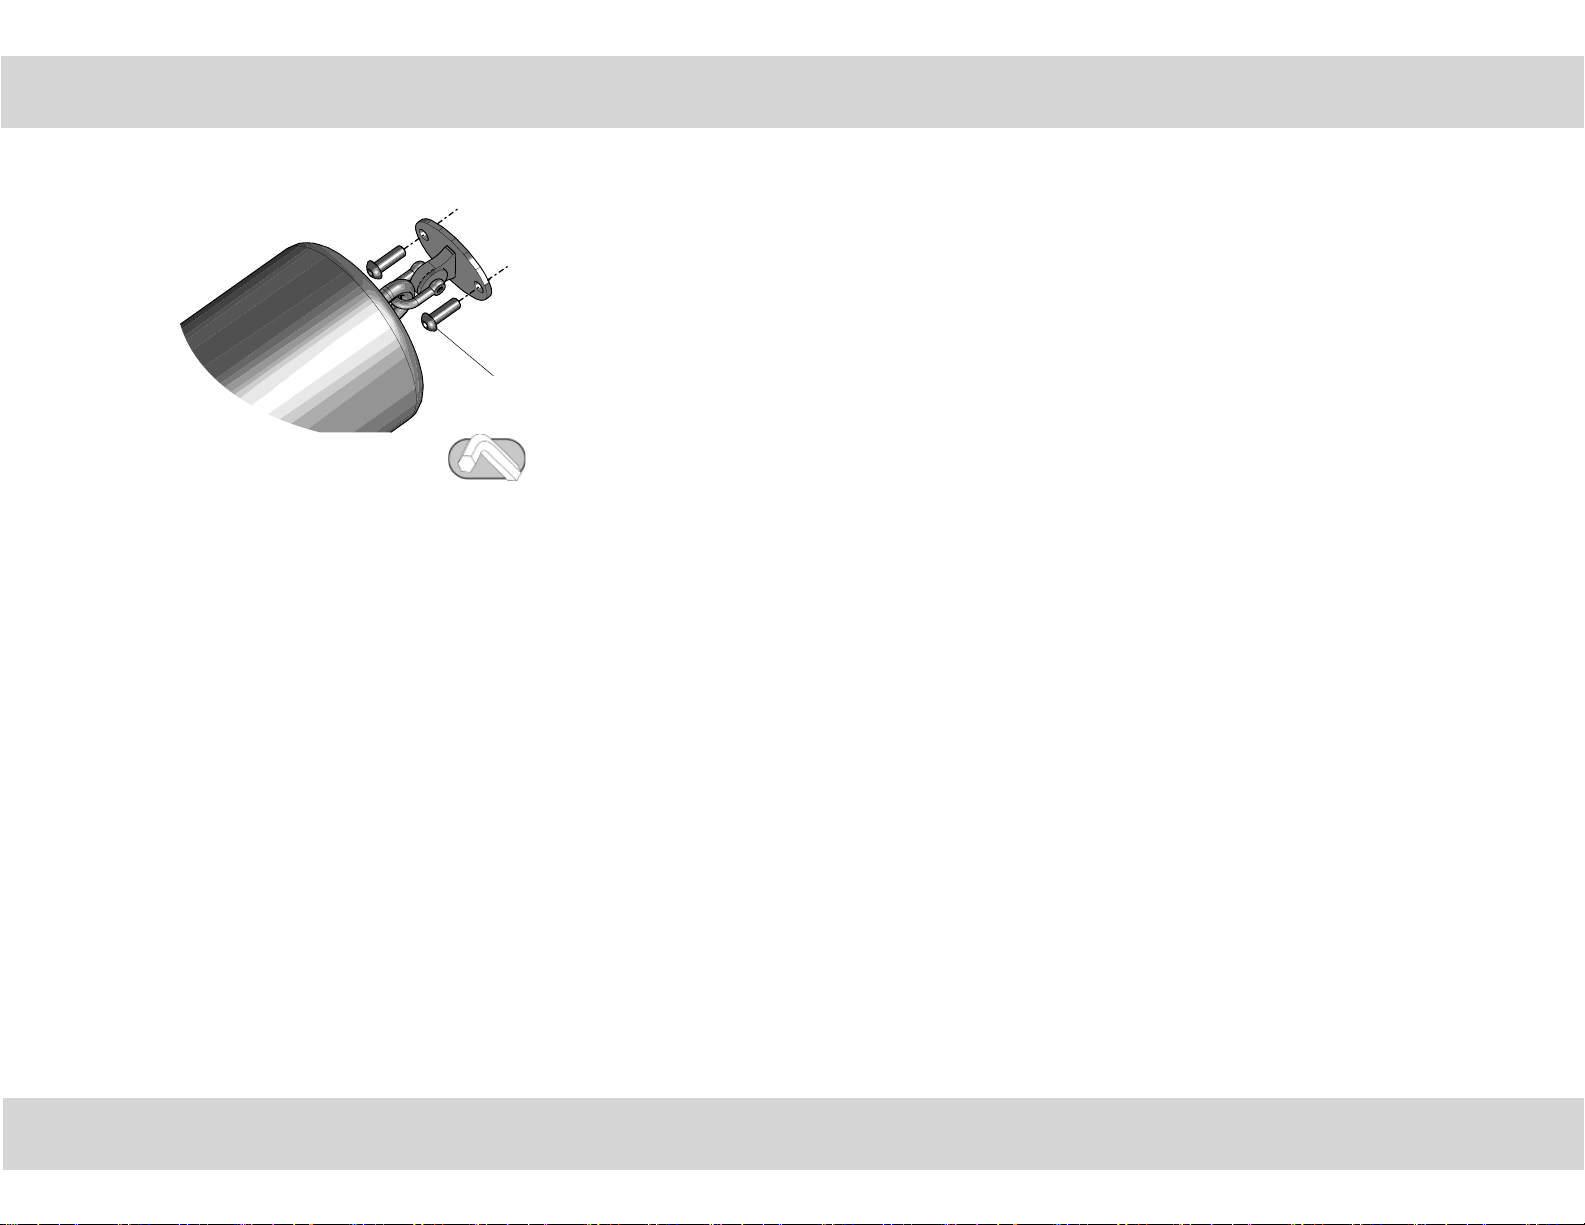
Step 1: Attach the rope bridge to the rope brackets. See Details A-1 through
A-3. Insert bushings into tabs on the rope brackets. Position rope bridge and
rope spacer over each rope bracket. Attach the rope bridge to the rope brackets.
Step 2: Connect the rope to the boulders. See Detail B. Attach each bracket to
a boulder as shown.
1/2" x 1-1/2"
Button Head Bolt
BAE0687
(4 Total)
Detail B
Step 2
Attach the brackets to the boulder.
Final Details.
Step 3: Tighten all fasteners. Fully tighten all fasteners according to tightening
torque specifi cations.
Torque Specifi cations:
Bolts and nuts - Snug tighten and then tighten an additional one half turn.
Models BD0012-0016, **BD0018-19, *BD0020, BD0021
Page 14 of ##
PA1178, *ECN2167 (*BD0013 & *BD0016), *ECN2825, **PA1440
www.playworldsystems.com
Page 14 of 33
Model ####
PA ECN ####
Page 15
Footing Installation
Installation Instructions
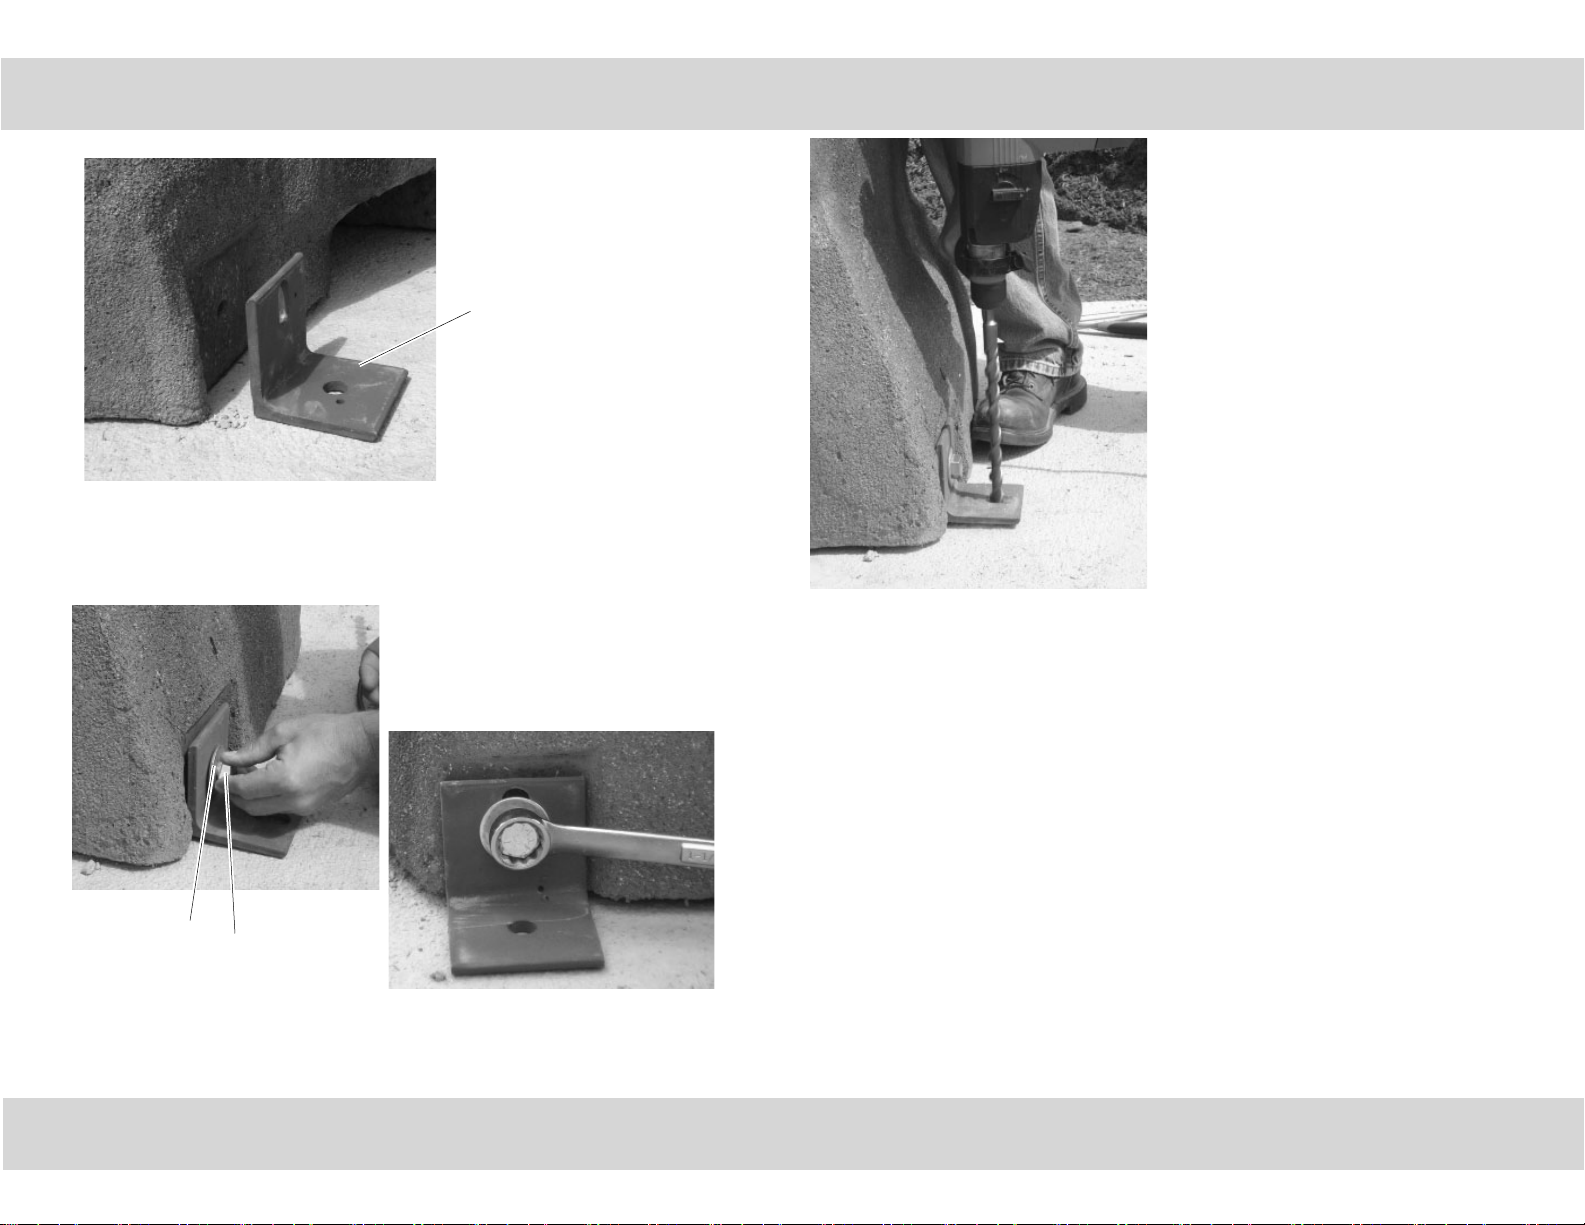
Anchor Bracket
ABC0519
__Step 1: After the boulder is in the proper location, align the footing bracket
with the hole in the boulder. The bracket should be oriented with the larger hole
against the boulder.
__Step 3: Using a 3/4 in. drill bit, drill through the hole in the plate into the concrete.
The hole should be about 5-1/2 in. deep.
3/4" Flat Washer
BAE0317
__Step 2: Insert the hardware through the bracket into the boulder. Snug
tighten the hardware so that the bracket stays in place. Do not fully tighten the
hardware.
Models BD0012-0016, **BD0018-19, *BD0020, BD0021
PA1178, *ECN2167 (*BD0013 & *BD0016), *ECN2825, **PA1440
Page 15 of ##
3/4" x 1-1/2"
Hex Head Bolt
BAE0316
www.playworldsystems.com
Page 15 of 33
Page 16
Installation Instructions
Footing Installation
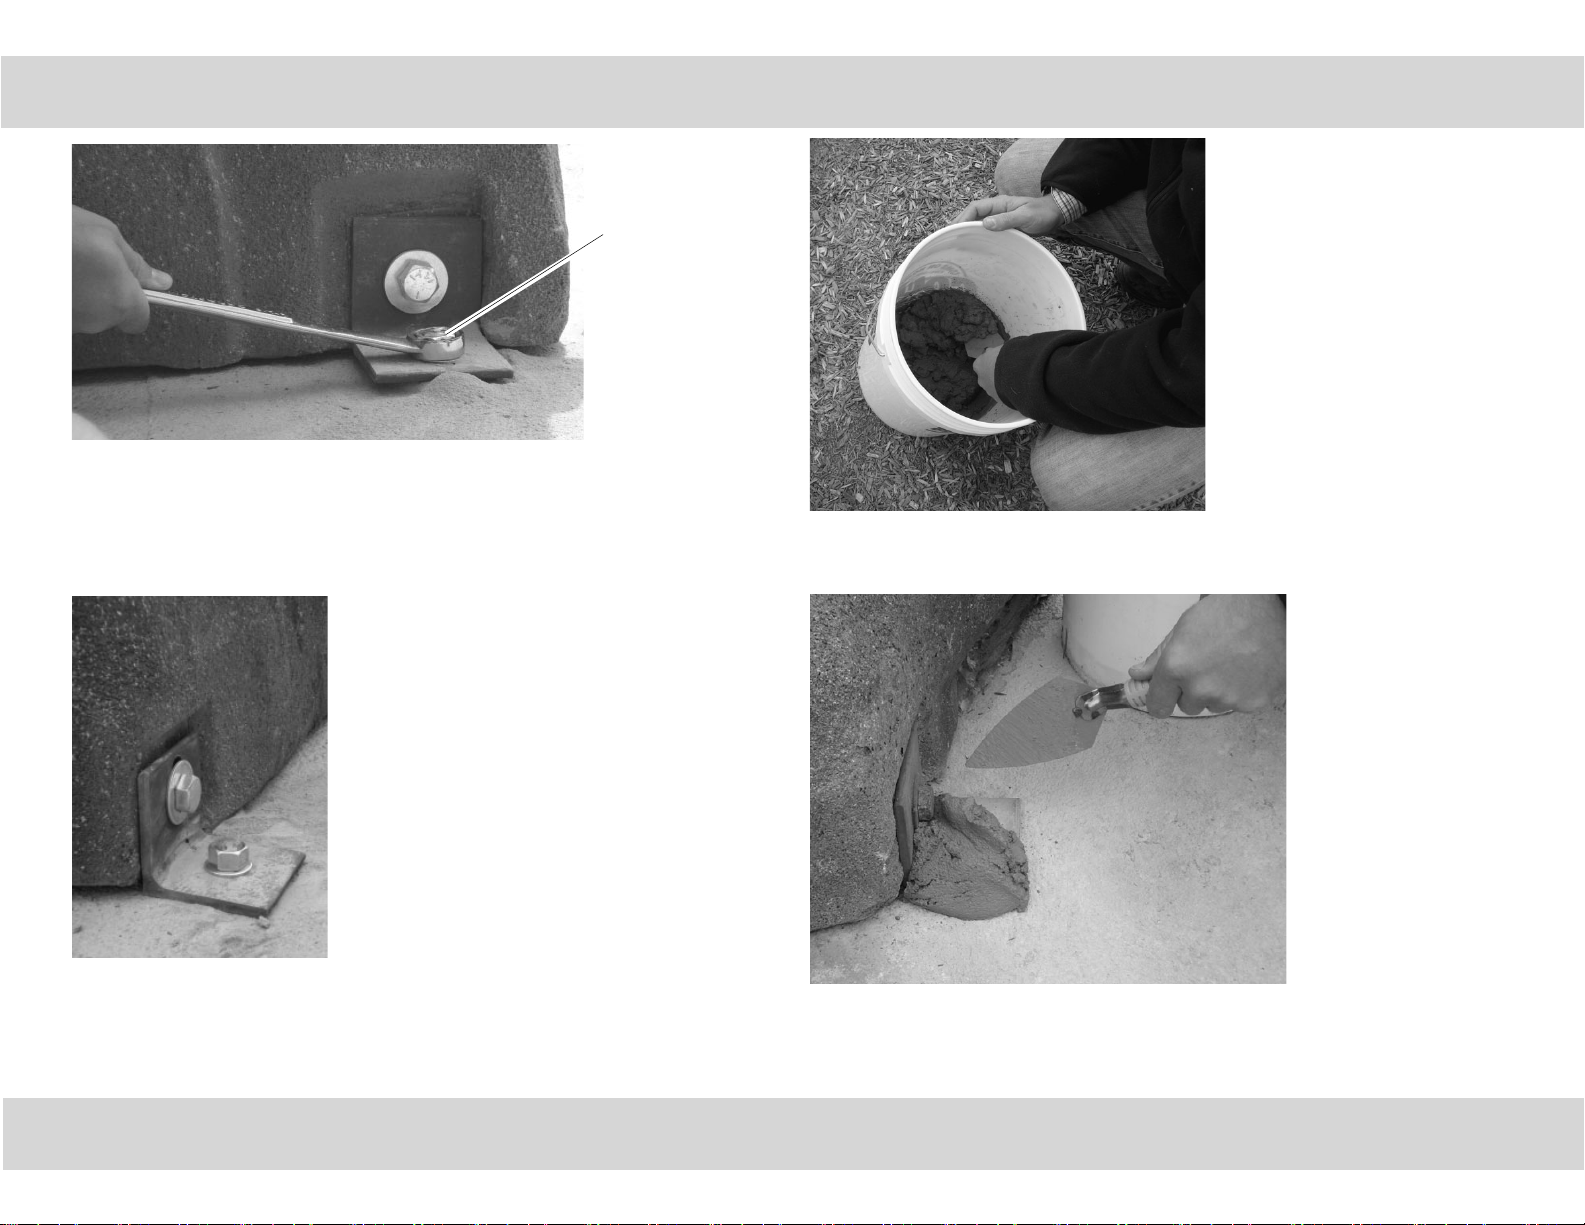
3/4" x 5"
Anchor Bolt
BAE0319
__Step 4: Using an 1-1/8" wrench Tighten the hardware into the base material
until the hex washer head contacts the fi xture.
Note: If the anchor bolt will not install completely, remove the bolt and assure
that all dust has been evacuated or drill the hole deeper. Begin re-installation of
the anchor by hand to prevent cross-threading.
__Step 6: Mix the grout following the manufacture's instructions.
__Step 5: When the entire boulder has been footed, fully tighten all fasteners
according to tightening torque specifi cations.
Torque Specifi cations:
Bolts and nuts - Snug tighten and then tighten an additional one half turn.
Models BD0012-0016, **BD0018-19, *BD0020, BD0021
Page 16 of ##
PA1178, *ECN2167 (*BD0013 & *BD0016), *ECN2825, **PA1440
www.playworldsystems.com
__Step 7: Pack grout over the footings until they are covered.
PA ECN ####
Page 16 of 33
Model ####
Page 17
Footing Installation
Installation Instructions
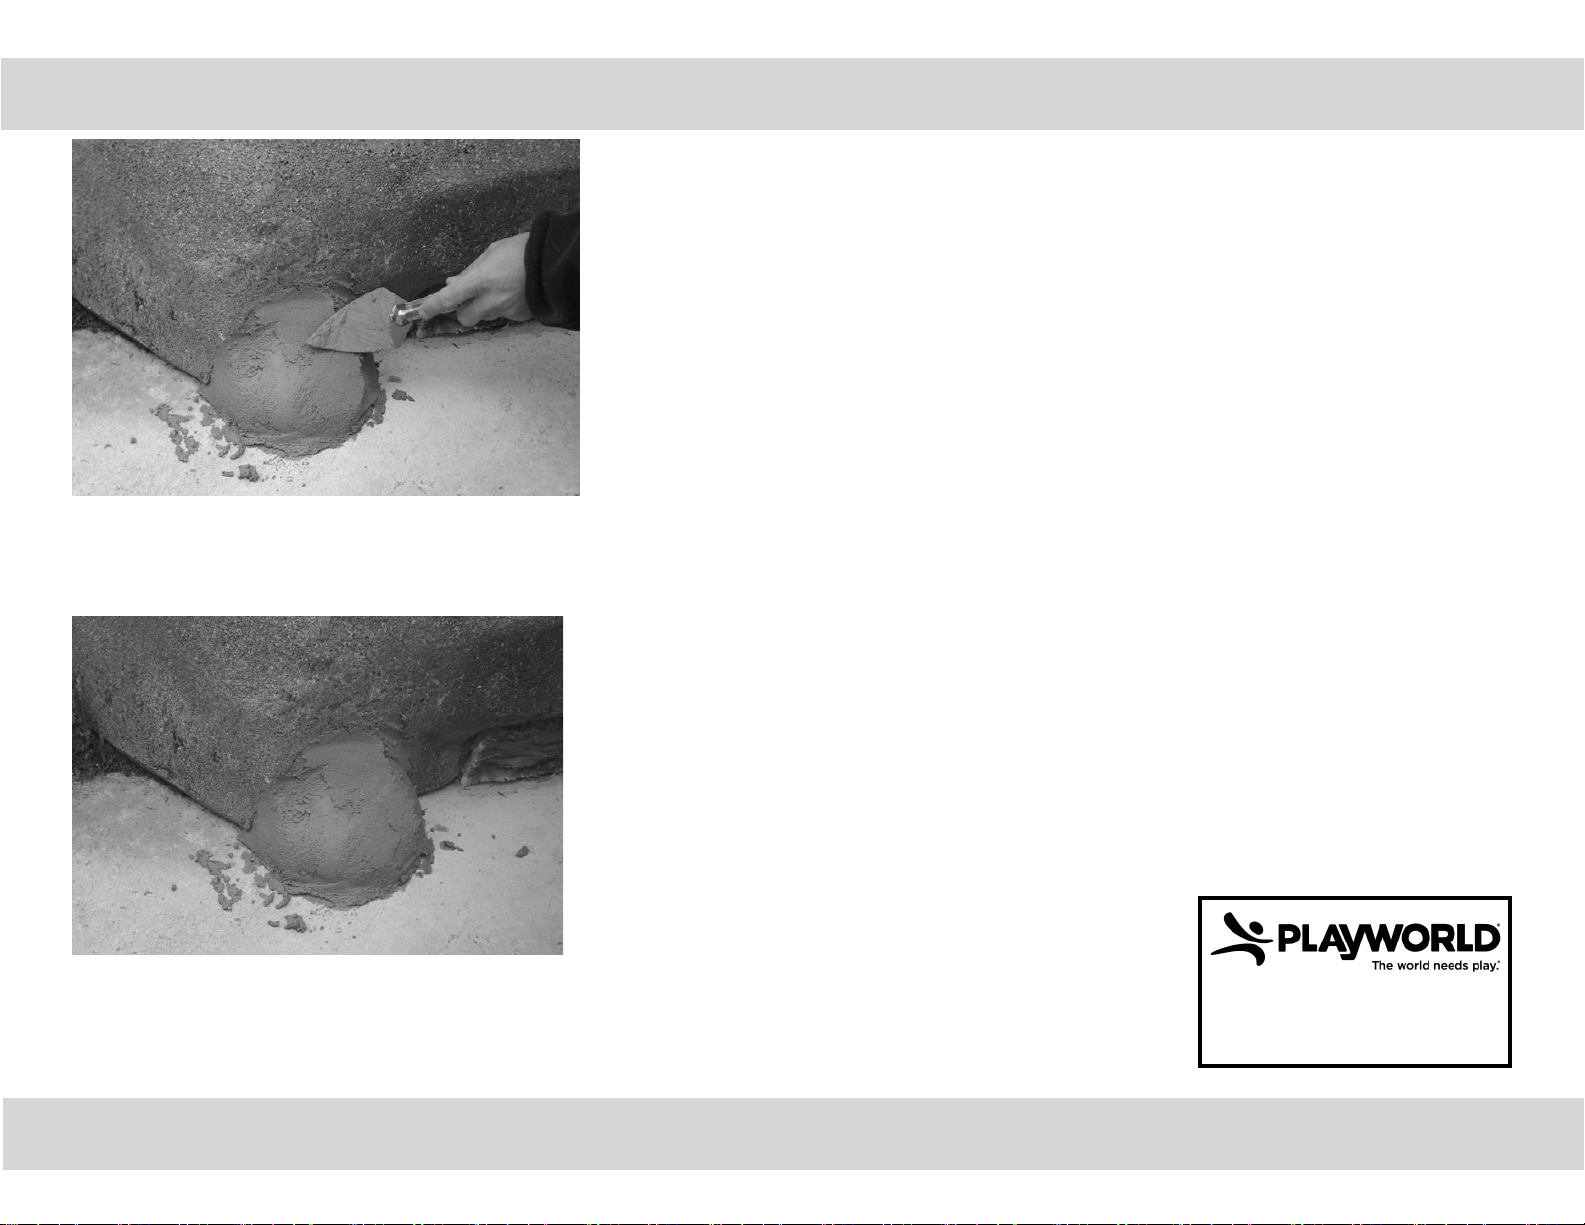
__Step 8: Smooth the grout.
__Step 10: Install 3 in. of gravel over the concrete pad. Cover the gavel with 12
in. of resilient surfacing material.
__Step 9: Allow the grout to dry according to manufacture specifi cations before
covering with gravel.
Models BD0012-0016, **BD0018-19, *BD0020, BD0021
PA1178, *ECN2167 (*BD0013 & *BD0016), *ECN2825, **PA1440
Page 17 of ##
www.playworldsystems.com
For Customer Service, Call
800-233-8404 or
570-522-9800
1000 Buff alo Road • Lewisburg, PA 17837
www.playworldsystems.com
OUTSIDE U.S.
Page 17 of 33
Page 18

Installation Instructions
Bill of Materials
BD0012 - BENCH BOULDER
PART NO. DESCRIPTION QTY.
BPL3256 BENCH BOULDER 1
BD0013 - PICNIC BOULDER
PART NO. DESCRIPTION QTY.
BPL3257 PICNIC BOULDER 1
BD0014 - TOWER BOULDER
PART NO. DESCRIPTION QTY.
AUNH0029 TOWER BOULDER HARDWARE KIT 1
BPL3258 TOWER BOULDER 1
BD0015 - RIDGE BOULDER
PART NO. DESCRIPTION QTY.
AUNH0030 RIDGE BOULDER HARDWARE KIT 1
BPL3259 RIDGE BOULDER 1
BD0019 - BOULDER TIGHT ROPE
PART NO. DESCRIPTION QTY.
AAU0654 BOULDER SWIVEL CASTING 4
AMC0361 NET - 118" SINGLE ROPE 2
BAD0085 THREAD LOCKING ADHESIVE 1
BAE0687 BOLT - 1/2"-13 x 1.50" BUTTON HEAD - SS 8
BAE0906 TOOL - 5/16" SHORT HEX KEY WRENCH 1
BD0020 - BOULDER ROPE BRIDGE
PART NO. DESCRIPTION QTY.
AAU0654 BOULDER SWIVEL CASTING 2
ABC1136 BRACKET - 4.56" x 2.31" x 2.88" 2
AMC0361 NET - 117.97" SINGLE ROPE 1
AMC1090 10' ROPE BRIDGE 1
BAD0085 THREAD LOCKING ADHESIVE 1
BAE0687 BOLT - 1/2"-13 x 1.50" BUTTON HEAD - SS 8
BAE0906 TOOL - 5/16 SHORT HEX KEY WRENCH 1
BAE9093 BUSHING - .399" I.D. x .560" O.D. x .500" 2
BAE0906 TOOL - 5/16" SHORT HEX KEY WRENCH 1
BD0021 - BOULDER TO GROUND NET CLIMBER
BD0016 - CASTLE BOULDER
PART NO. DESCRIPTION QTY.
AUNH0031 CASTLE BOULDER HARDWARE KIT 1
BPL3260 CASTLE BOULDER 1
BD0018 - 10' MOD X
PART NO. DESCRIPTION QTY.
AAU0654 BOULDER SWIVEL CASTING 4
AMC0359 NET -10' MOD X 1
BAD0085 THREAD LOCKING ADHESIVE 1
BAE0687 BOLT - 1/2"-13 x 1.50" BUTTON HEAD - SS 8
BAE0906 TOOL - 5/16 SHORT HEX KEY WRENCH 1
Models BD0012-0016, **BD0018-19, *BD0020, BD0021
Page 18 of ##
PA1178, *ECN2167 (*BD0013 & *BD0016), *ECN2825, **PA1440
www.playworldsystems.com
PART NO. DESCRIPTION QTY.
AAU0654 BOULDER SWIVEL CASTING 4
AFR0685 FRAME - NET CLIMBER FOOTING 2
AMC0360 BOULDER NET CLIMBER 1
ARG0423 RUNG - 1.90" O.D. x 129.00" w/INSERTS 1
BAD0085 THREAD LOCKING ADHESIVE 1
BAE0106 BOLT - 5/8" x 2-1/2" HEX HEAD 2
BAE0109 WASHER - 5/8" SPLIT LOCK 2
BAE0687 BOLT - 1/2"-13 x 1.50" BUTTON HEAD - SS 8
BAE0804 WASHER - 5/8" FLAT 2
BAE0906 TOOL - 5/16" SHORT HEX KEY WRENCH 1
Page 18 of 33
Model ####
PA ECN ####
Page 19
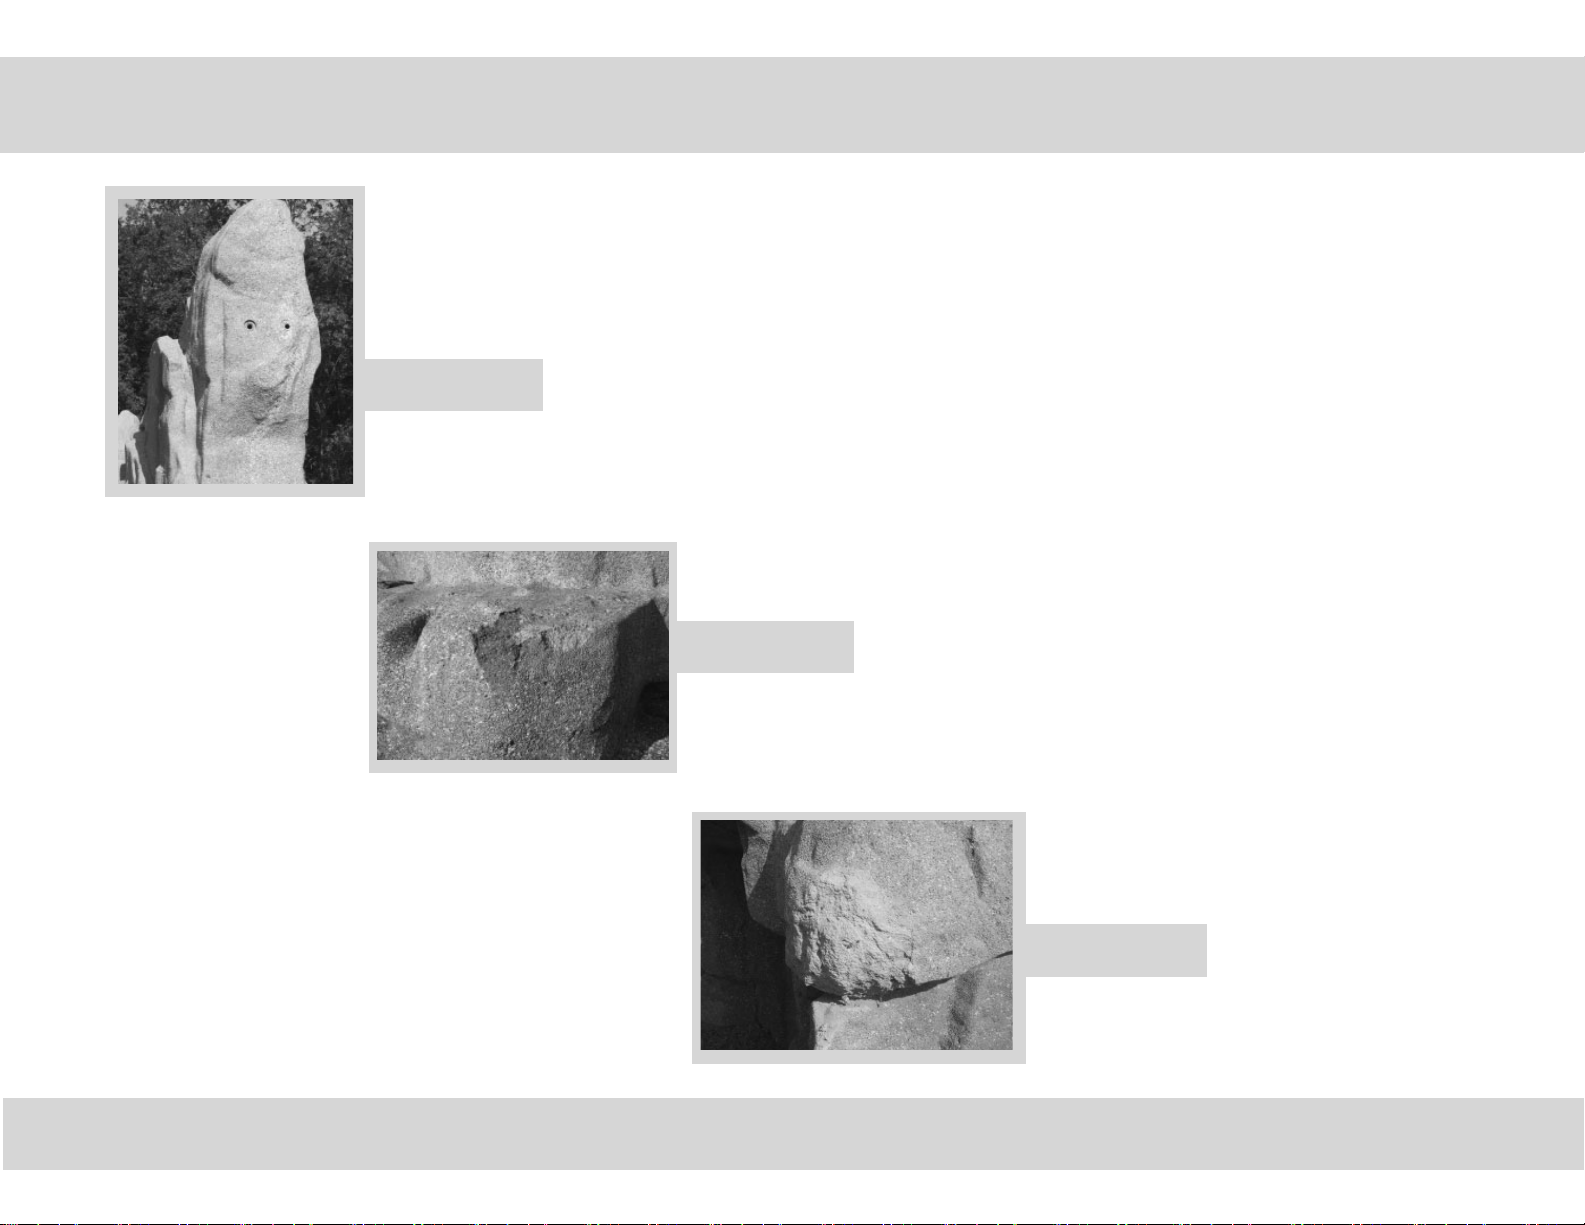
Installation Instructions
Boulder Repair Manual
Page 19
Filling and Painting Bolt Holes
Page 21
Models BD0012-0016, **BD0018-19, *BD0020, BD0021
PA1178, *ECN2167 (*BD0013 & *BD0016), *ECN2825, **PA1440
Page 19 of ##
www.playworldsystems.com
Scuff Mark Color Touch Up
Page 23
Large Damage Repair
Page 19 of 33
Page 20
Installation Instructions
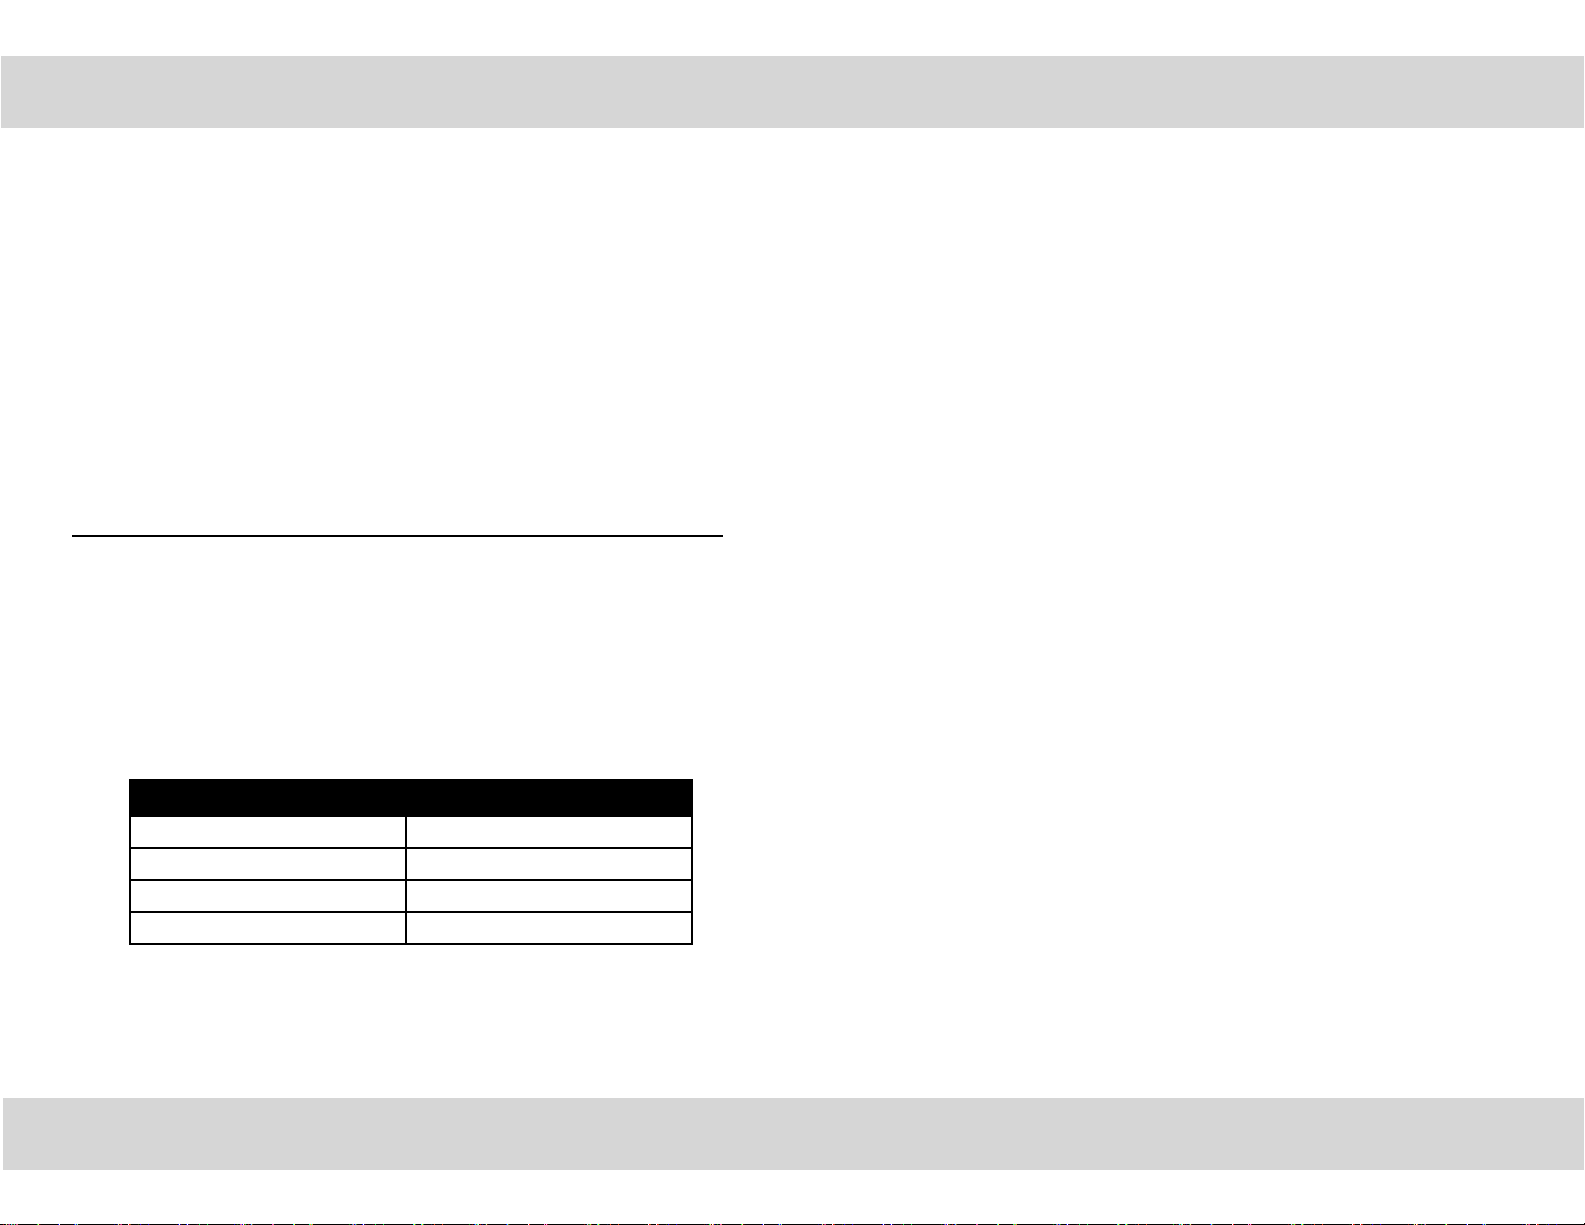
General Information
__Notes Before You Begin: Please read and understand these instructions
before beginning the repair process.
__1: Ensure that you give yourself enough time to color the boulder eff ectively.
__2: Always wear appropriate eye protection when using any of these repair
materials.
__3: Separate and identify all tools and materials.
__4: Ensure that the stain is dry before moving to the next color. On a hot, sunny
day this may take a few minutes, but on a cold day it will take a lot longer.
__5: In the event the information regarding the stain is lost; refer to the Behr’s
website:
www.behr.com/behrx/act/view/products?catId=5&sc_name=Concrete+Floor+Coatings
Then click on the Solid Color Concrete Stain No. 800.
__6: If extra supplies are required to complete the task; they may be found at
your local hardware or home store. If the repair requires more stain than what
has been provided, it can be purchased at your local Home Depot. It is the Solid
Color Concrete Stain manufactured by Behr. The chart below lists the color
names and codes required for the boulders.
Slate Boulder Desert Tan Boulder
801 Natural Slate 835 Saddleback
852 Gun Metal 833 Coronado
823 Ice White 809 Chestnut Brown
*Black *Black
*Black is not a standard color, but will be custom blended
at the paint center.
Models BD0012-0016, **BD0018-19, *BD0020, BD0021
Page 20 of ##
PA1178, *ECN2167 (*BD0013 & *BD0016), *ECN2825, **PA1440
www.playworldsystems.com
Page 20 of 33
Model ####
PA ECN ####
Page 21
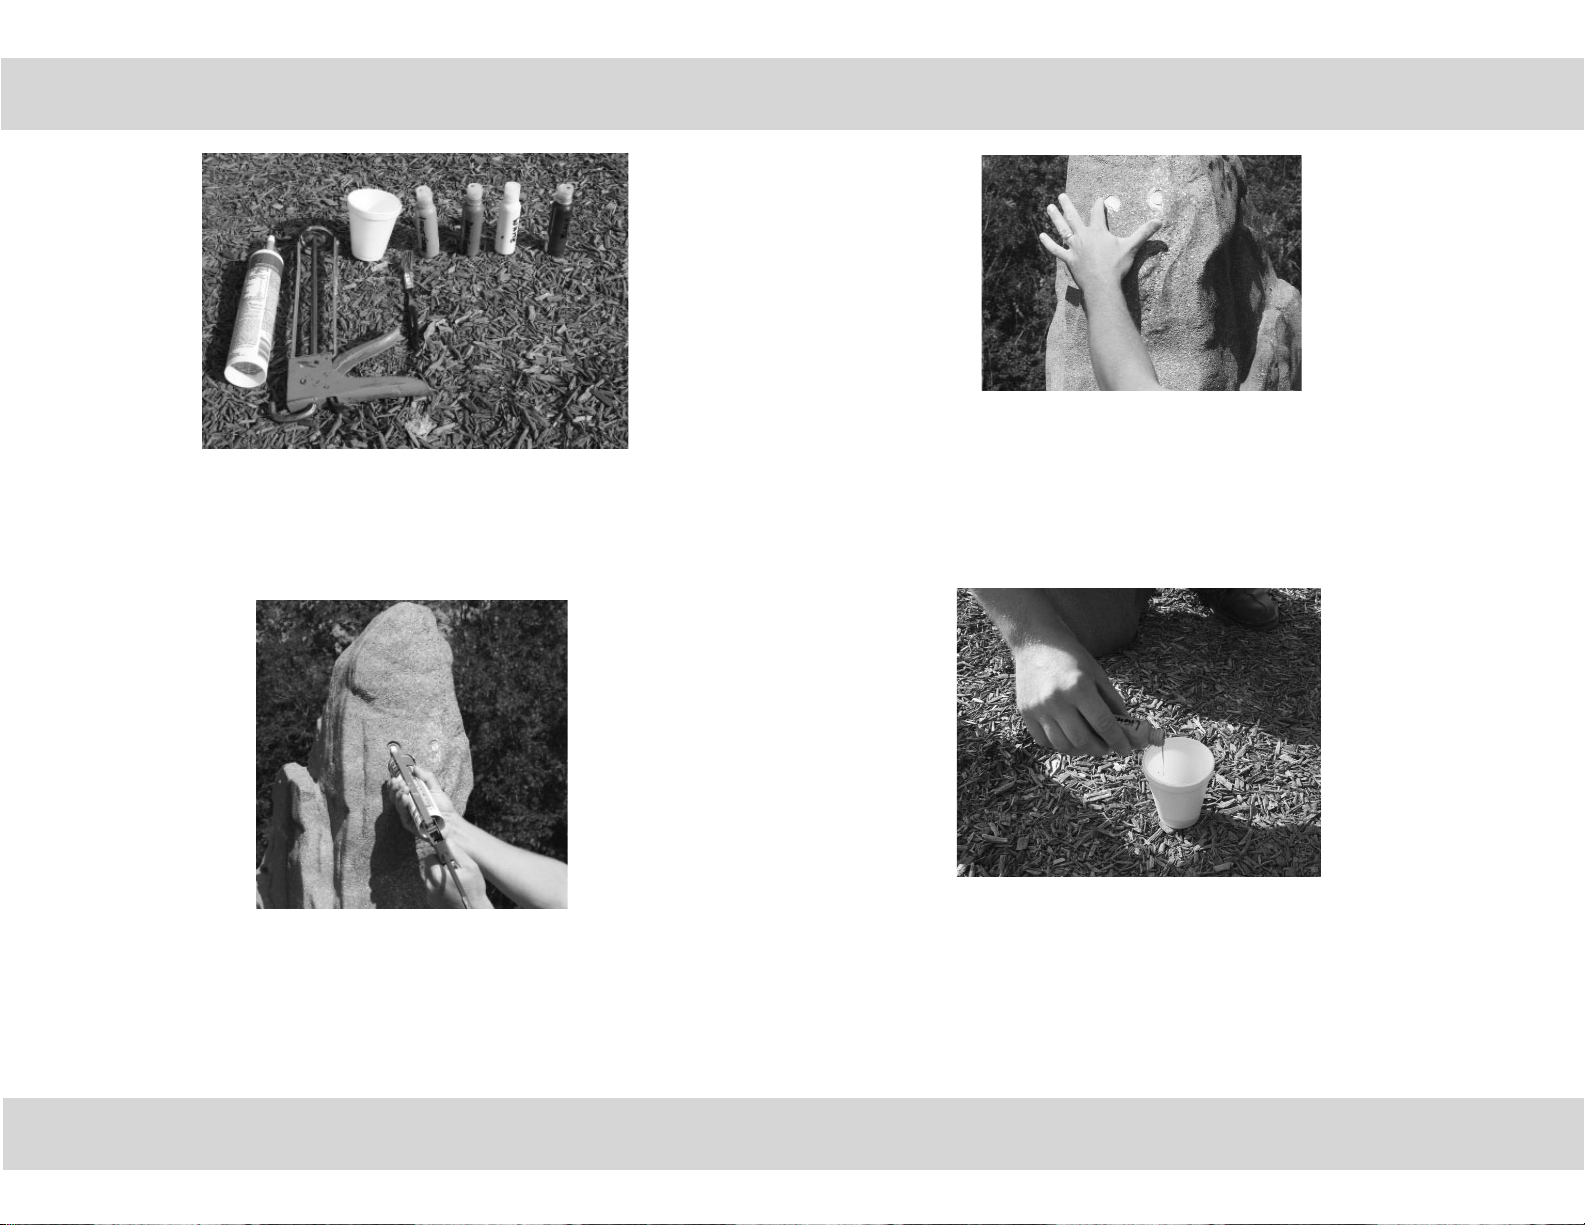
Filling and Painting Bolt Holes
Installation Instructions
Required Tools: Caulk gun, and a bottle of water.
Items from Kit: Caulk, small paint brushes, 3 mixing cups, and
concrete stain.
Step 2: Spread out the Caulk
Moisten your fi nger and spread out the caulk in the hole to ensure that it is totally
fi lled. The caulk doesn’t have to be completely smooth. Variation will help it blend
into the surrounding texture. Allow the caulk to cure according to the directions
on the package.
Step 1: Fill the Bolt Holes
Fill the bolt holes with the caulk that has been provided in the kit. Use only enough
caulk to fi ll the hole. Don’t try and blend it into the surrounding boulder. Keep
the caulk area to a minimum.
Models BD0012-0016, **BD0018-19, *BD0020, BD0021
PA1178, *ECN2167 (*BD0013 & *BD0016), *ECN2825, **PA1440
Page 21 of ##
www.playworldsystems.com
Step 3: Mix the Base Color
Select the base color of the boulder (the Slate Boulder uses the Natural Slate stain
color and the Desert Sand Boulder uses the Saddleback stain color). Dilute the
stain by adding 4 parts water to 1 part stain in one of the mixing cups. An example
would be 4 ounces of water to 1 ounce of stain. Stir to blend the liquids.
Page 21 of 33
Page 22

Installation Instructions
Filling and Painting Bolt Holes
Step 4: Apply the Base Color
Apply the base color to the caulk using a small paint brush. Completely cover
the caulk without fading the paint into the surrounding area. Keeping the painted
area to a minimum will make it less visible.
Step 5: Mix the Highlight Colors
The highlight colors can now be diluted and mixed in one of the mixing cups.
The formula is the same for the highlight colors as the base color: 4 parts water
to 1 part stain.
- For Slate use Gun Metal
- For Desert Tan use Coranado
Step 6: Apply the Highlight Colors
Allow the base stain to dry before applying the highlight colors. The stain can either
be applied by dabbing the boulder with a brush or fl icking the paint from the brush.
The idea is just to give a little color variation so a little goes a long way.
Repeat Steps 5 and 6 for all of the highlight colors in the order listed below.
Add the highlight colors in the following order:
Slate – Gun Metal, Ice White, and Black
Desert Tan – Coronado, Chestnut Brown, and Black
Models BD0012-0016, **BD0018-19, *BD0020, BD0021
Page 22 of ##
PA1178, *ECN2167 (*BD0013 & *BD0016), *ECN2825, **PA1440
www.playworldsystems.com
Page 22 of 33
Model ####
PA ECN ####
Page 23
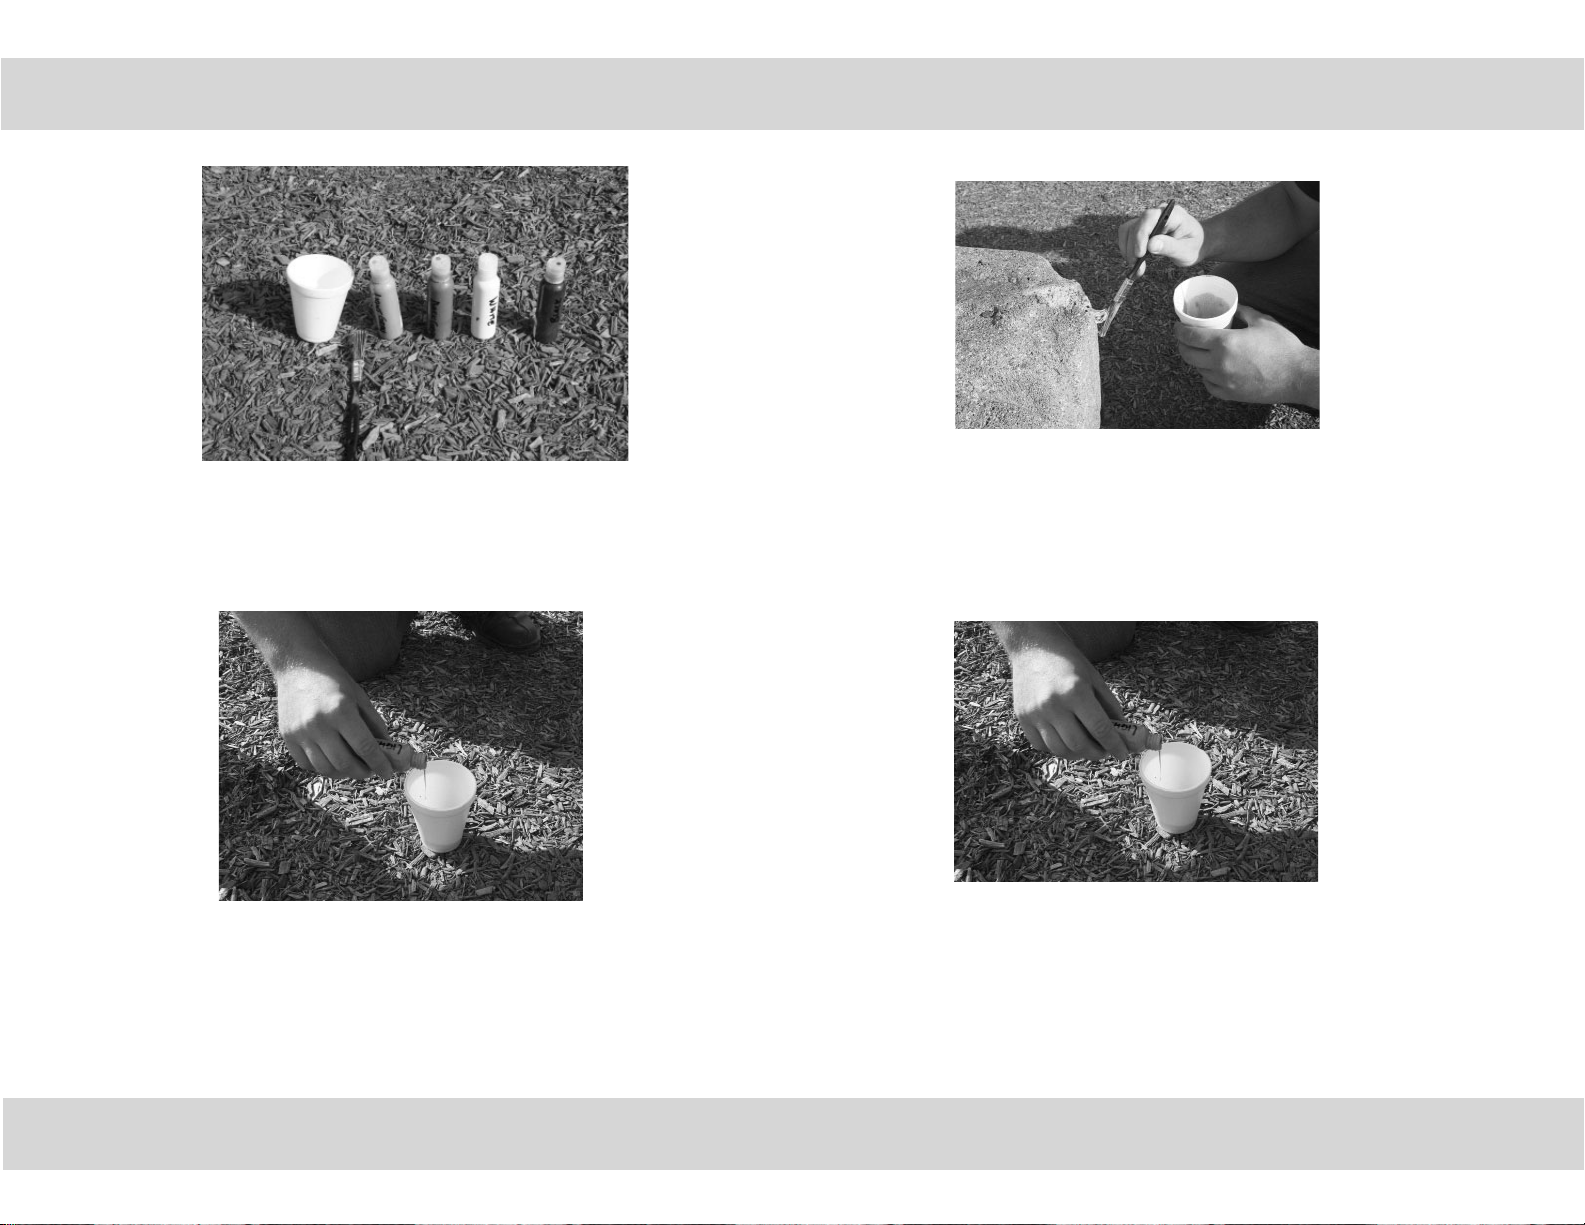
Scuff Mark Color Touch Up
Installation Instructions
Required Tools: Bottle of water.
Items from Kit: Small paint brushes, 3 mixing cups, spray
bottle, concrete sealer, and concrete stain.
Step 1: Mix the Base Color
Select the base color of the boulder (the Slate Boulder uses the Natural Slate stain
color and the Desert Sand Boulder uses the Saddleback stain color). Dilute the
stain by adding 4 parts water to 1 part stain in one of the mixing cups. An example
would be 4 ounces of water to 1 ounce of stain. Stir to blend the liquids.
Step 2: Apply the Base Color
Apply the base color to the scuff ed area using a small paint brush. Completely
cover the scuff ed area without fading the paint into the surrounding area. Keep
the painted area to a minimum to make color matching easier.
Step 3: Mix the Highlight Colors
The highlight colors can now be diluted and mixed into one of the mixing cups.
The formula is the same for the highlight colors as the base color: 4 parts water
to 1 part stain.
- For Slate use Gun Metal
- For Desert Tan use Coranado
Models BD0012-0016, **BD0018-19, *BD0020, BD0021
PA1178, *ECN2167 (*BD0013 & *BD0016), *ECN2825, **PA1440
Page 23 of ##
www.playworldsystems.com
Page 23 of 33
Page 24
Installation Instructions
Scuff Mark Color Touch Up
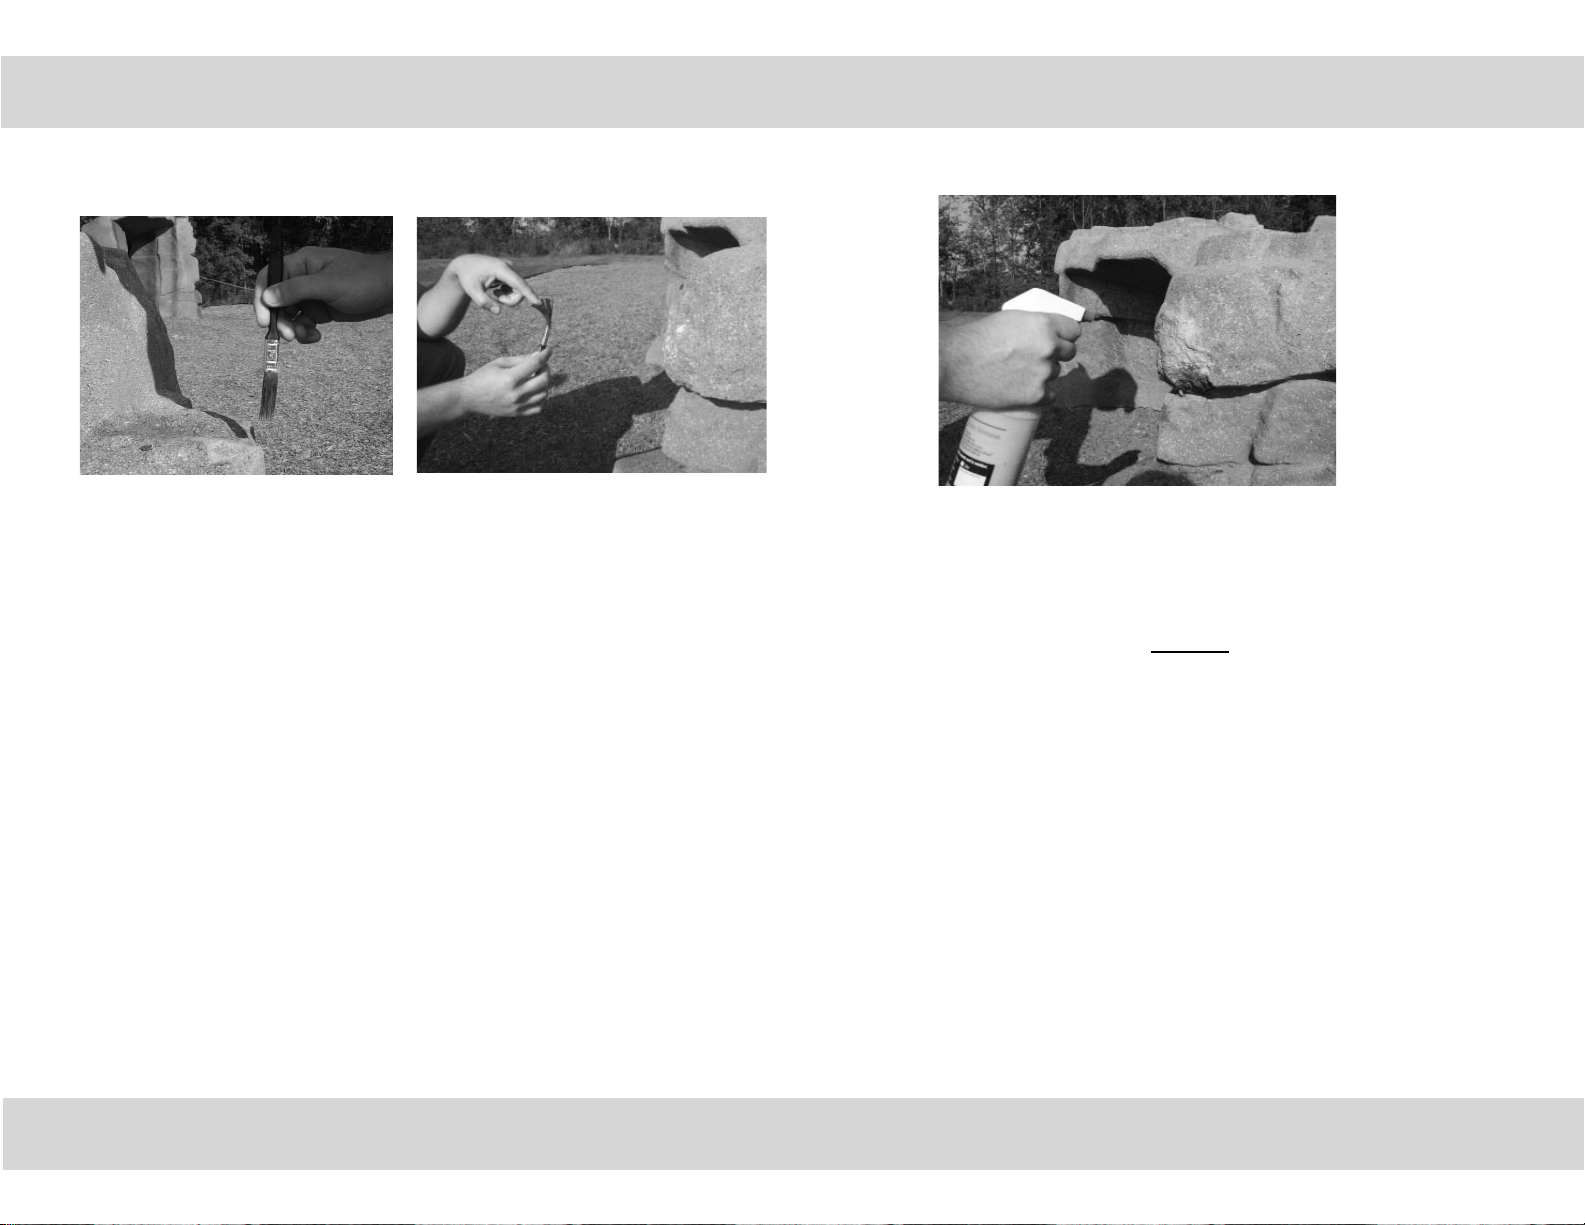
Step 4: Apply the Highlight Colors
Allow the base stain to dry before applying the highlight colors. The stain can either
be applied by dabbing the boulder with a brush or fl icking the paint from the brush.
The idea is just to give a little color variation so a little goes a long way.
Repeat Steps 3-5 for all of the highlight colors in the order listed below.
Add the highlight colors in the following order:
Slate – Gun Metal, Ice White, and Black
Desert Tan – Coronado, Chestnut Brown, and Black
Step 5: Apply the Sealer
The fi nal step of the process will be to spray the area with a sealer. Ensure that
the paint is completely dry before applying the sealer.
Pour the sealer directly into the bottle. DO NOT dilute the sealer. It will be used
at full strength.
Models BD0012-0016, **BD0018-19, *BD0020, BD0021
Page 24 of ##
PA1178, *ECN2167 (*BD0013 & *BD0016), *ECN2825, **PA1440
www.playworldsystems.com
Page 24 of 33
Model ####
PA ECN ####
Page 25
Large Damage Repair
Installation Instructions
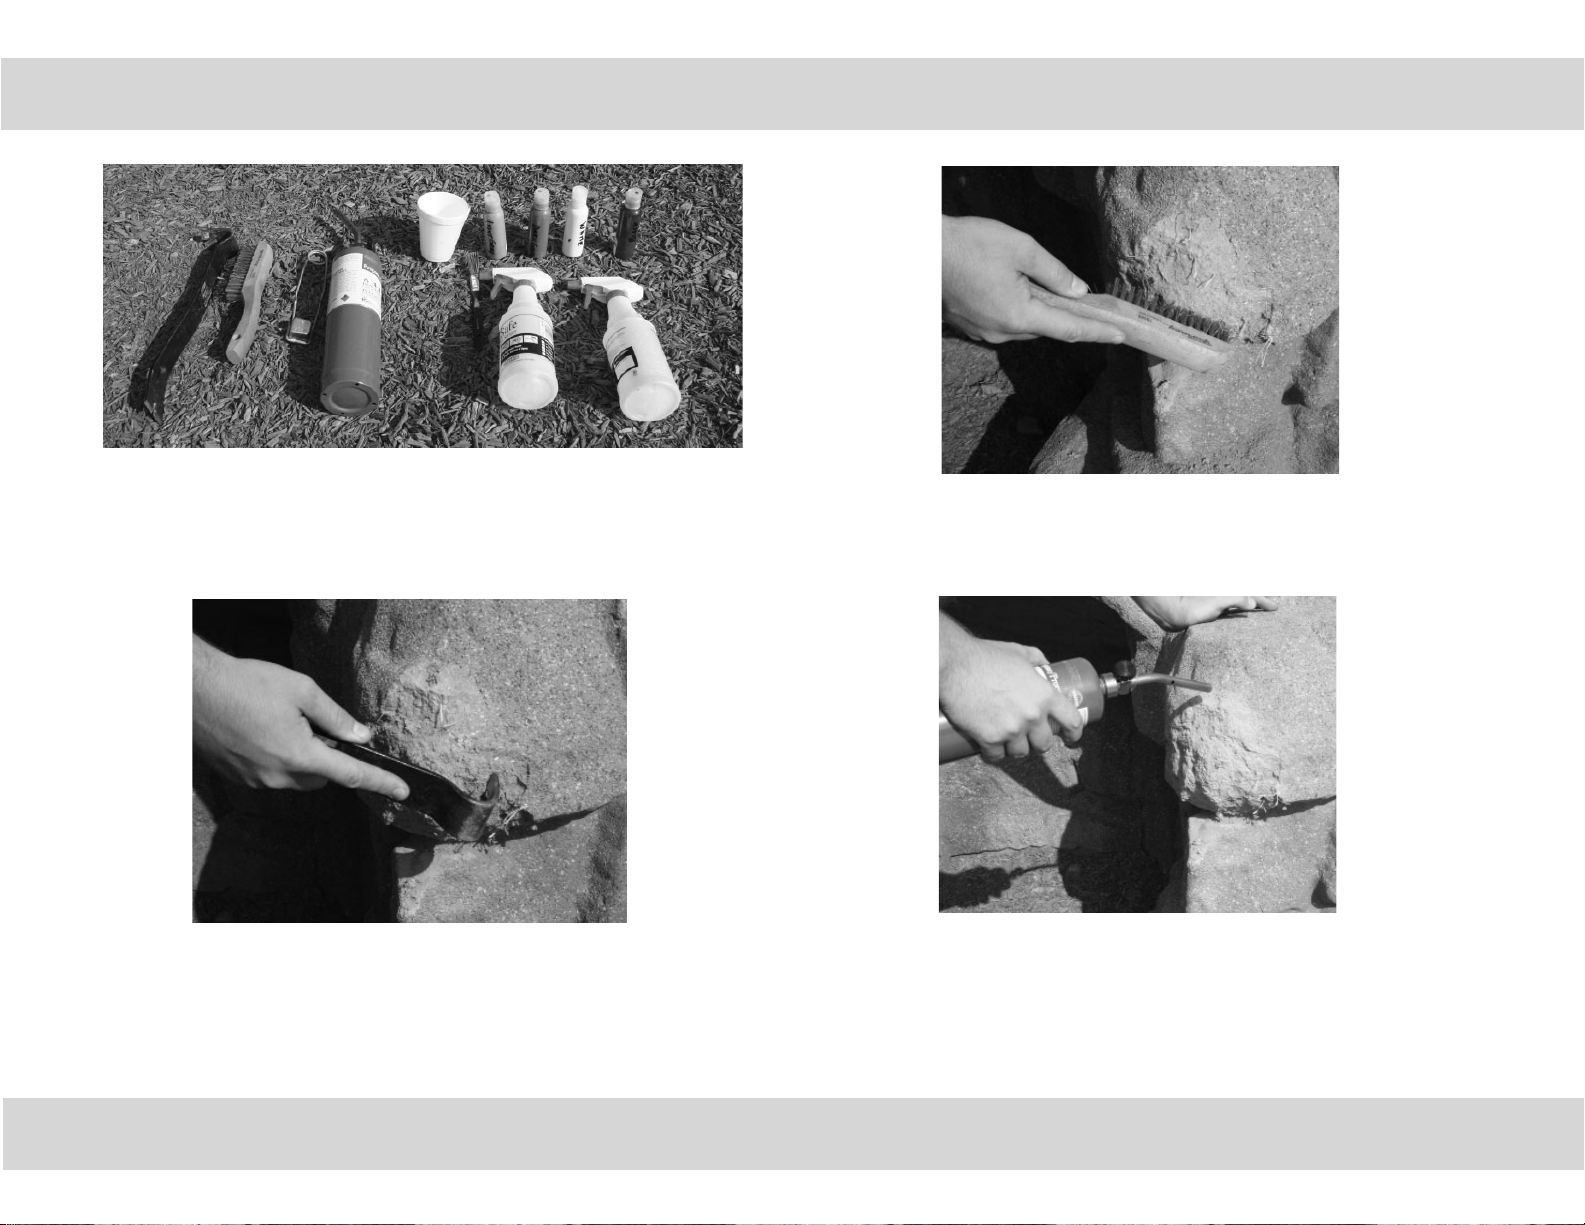
Required Tools: Pry bar or claw hammer, wire brush, propane
torch, water sprayer or garden hose.
Items from Kit: Concrete Stain, concrete sealer, 3 mixing cups,
2 spray bottles, and 2 small paint brushes.
Step 2: Remove Loose Debris
Brush the damaged area thoroughly with a wire brush to remove all of the loose
debris.
Step 1: Remove Sharp Edges
Use a hard object such as a pry bar or the back of a claw hammer to break the
sharp edges of the damaged area if it is too rough. This will ensure that the boulder
will be safe to climb as well as blend the area with the rest of the boulder.
Models BD0012-0016, **BD0018-19, *BD0020, BD0021
PA1178, *ECN2167 (*BD0013 & *BD0016), *ECN2825, **PA1440
Page 25 of ##
www.playworldsystems.com
Step 3: Flame the Concrete Fibers
The fi bers may be visible if a section of the boulder has been broken off . The
most eff ective method of removing the fi bers is to fl ame (or melt) the fi bers with
a small fl ame. A very short contact time will be suffi cient to melt the fi bers.
Page 25 of 33
Page 26
Installation Instructions
Large Damage Repair
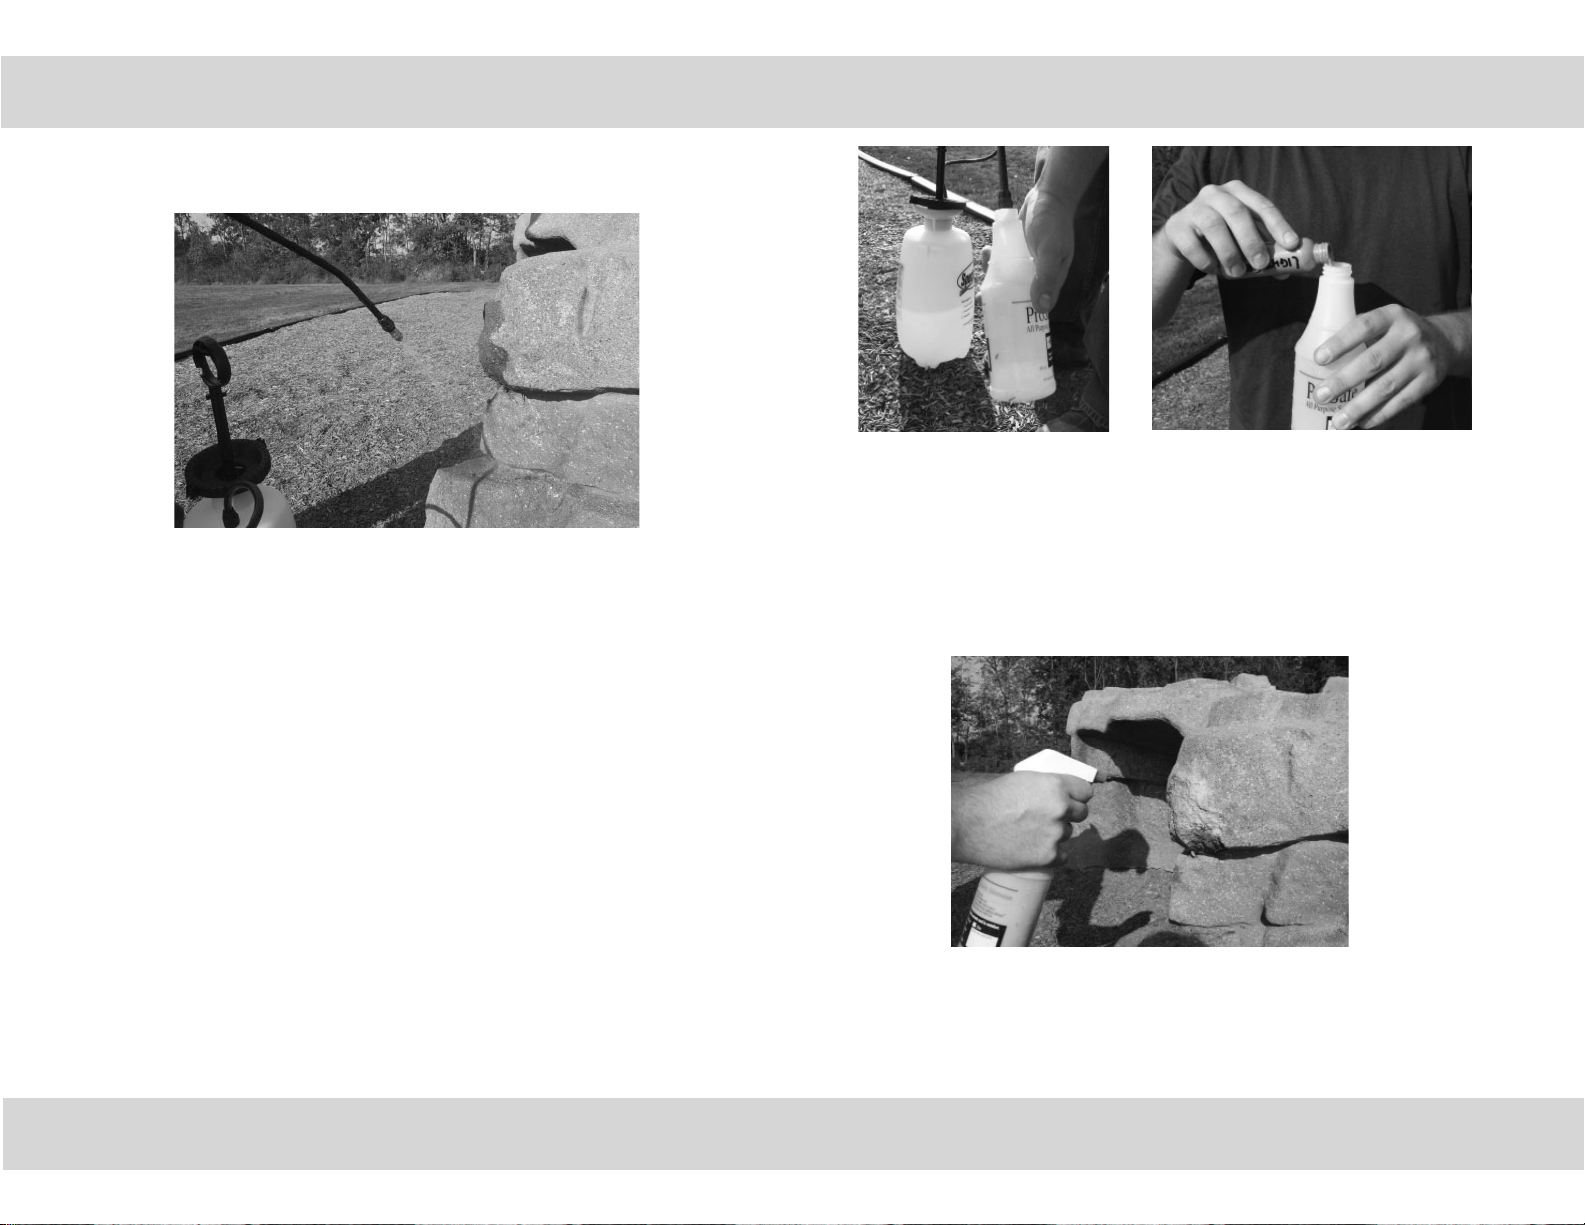
Step 4: Wet the Area
Wet the damaged and surrounding areas with a sprayer or garden hose. This is
an important step for three reasons:
1. The water makes it apparent to the user exactly where the stain needs to be
applied.
2. The water will remove the dust to ensure that there is a clean surface for the
stain.
3. It will prevent the stain from drying onto the rest of the boulder surfaces
Step 5: Dilute the Stain
Select the base color of the boulder (Slate is Natural Slate and Desert Sand is
Saddleback) to start. Dilute the stain by adding 4 parts water to 1 part stain in a
small hand sprayer. An example would be 4 ounces of water to 1 ounce of stain.
Shake the bottle to ensure that it is mixed properly.
Models BD0012-0016, **BD0018-19, *BD0020, BD0021
Page 26 of ##
PA1178, *ECN2167 (*BD0013 & *BD0016), *ECN2825, **PA1440
www.playworldsystems.com
Step 6: Test Spray and Lay Color
Use a scrap piece of cardboard to practice spraying the stain. Adjust the sprayer
nozzle so that the stain is emitted as a mist instead of a spray. Spray the damaged
area until it is covered. Do not try to fade it into the surrounding area.
Page 26 of 33
Model ####
PA ECN ####
Page 27
Large Damage Repair
Installation Instructions
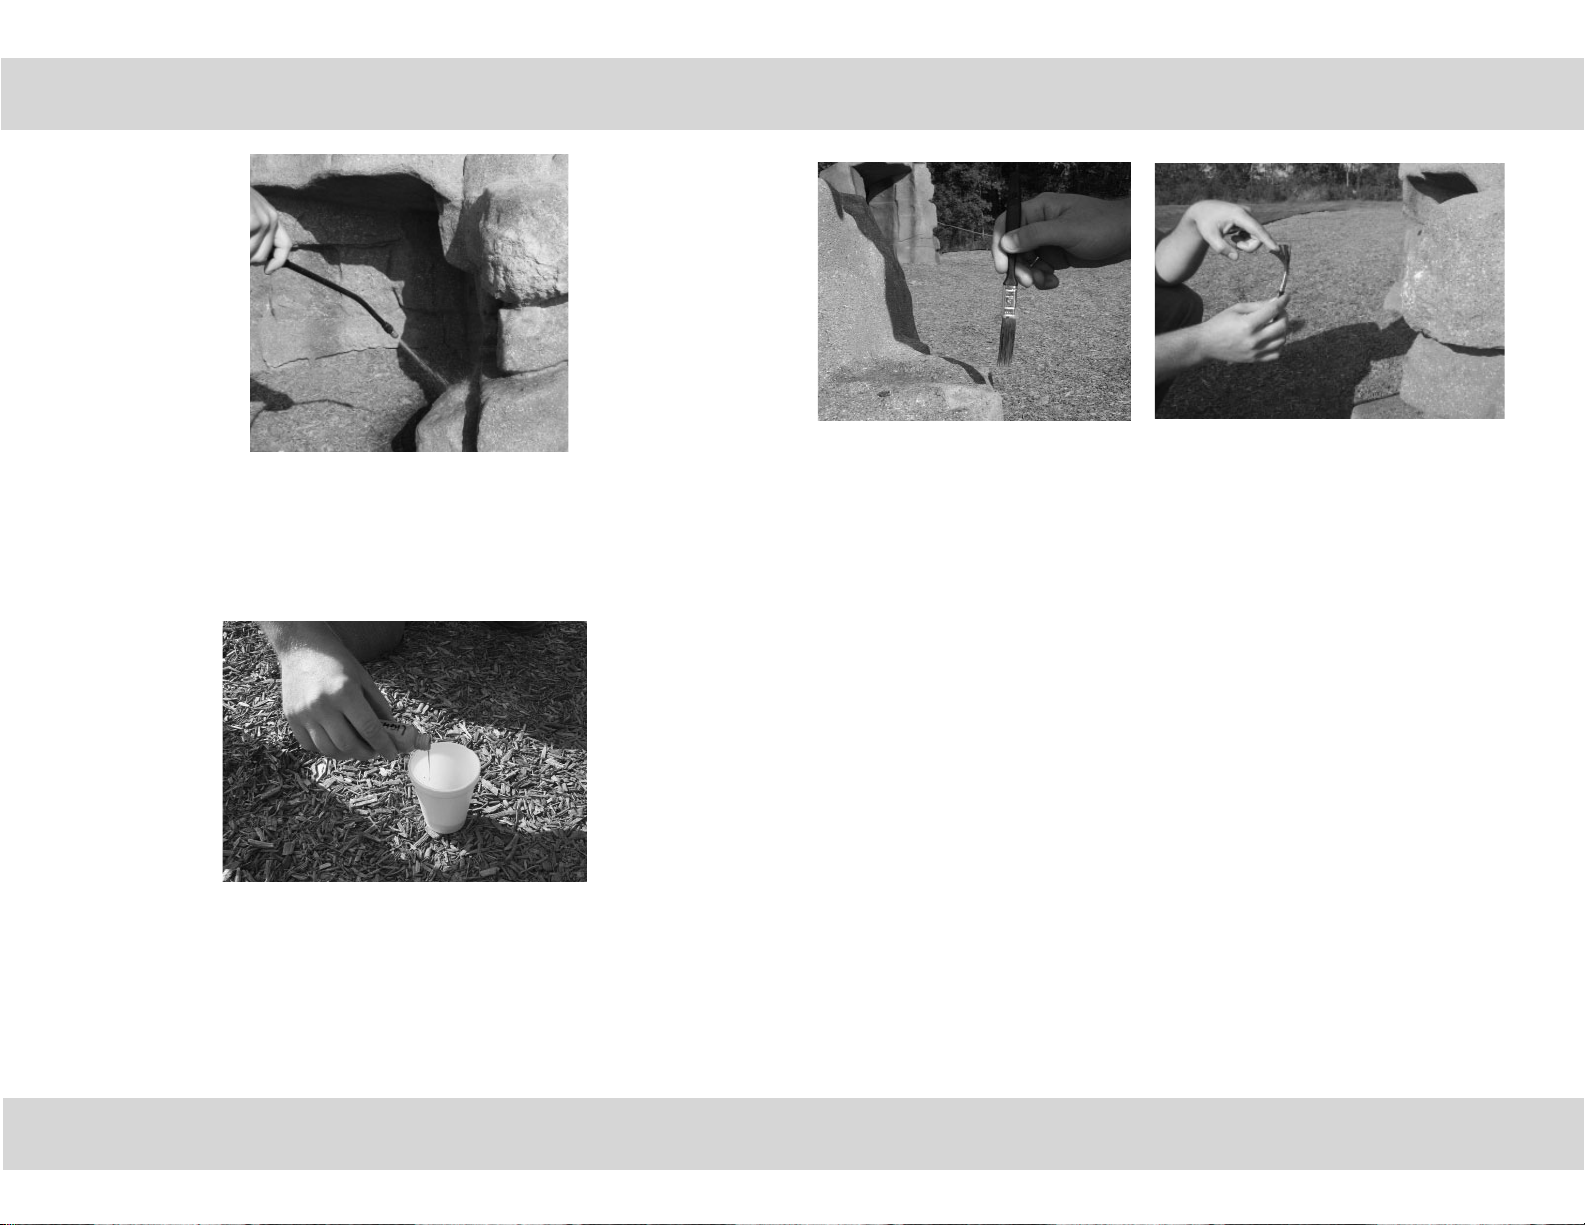
Step 7: Immediately Wash
Immediately wash the surrounding area (Not the damaged area) with the sprayer
or hose. The water will remove any overspray and runs that may be present.
Step 8: Mix the Highlight Colors
The highlight colors can now be diluted and mixed into one of the mixing cups.
The formula is the same for the highlight colors as the base color: 4 parts water
to 1 part stain.
- For Slate use Gun Metal
- For Desert Tan use Coranado
Step 9: Apply the Highlight Colors
Allow the base stain to dry before applying the highlight colors. The stain can either
be applied by dabbing the boulder with a brush or fl icking the paint from the brush.
The idea is just to give a little color variation so a little goes a long way.
Repeat steps 8 and 9 for all of the highlight colors in the order listed below.
Add the highlight colors in the following order:
Slate – Gun Metal, Ice White, and Black
Desert Tan – Coronado, Chestnut Brown, and Black
Models BD0012-0016, **BD0018-19, *BD0020, BD0021
PA1178, *ECN2167 (*BD0013 & *BD0016), *ECN2825, **PA1440
Page 27 of ##
www.playworldsystems.com
Page 27 of 33
Page 28
Installation Instructions
Large Damage Repair
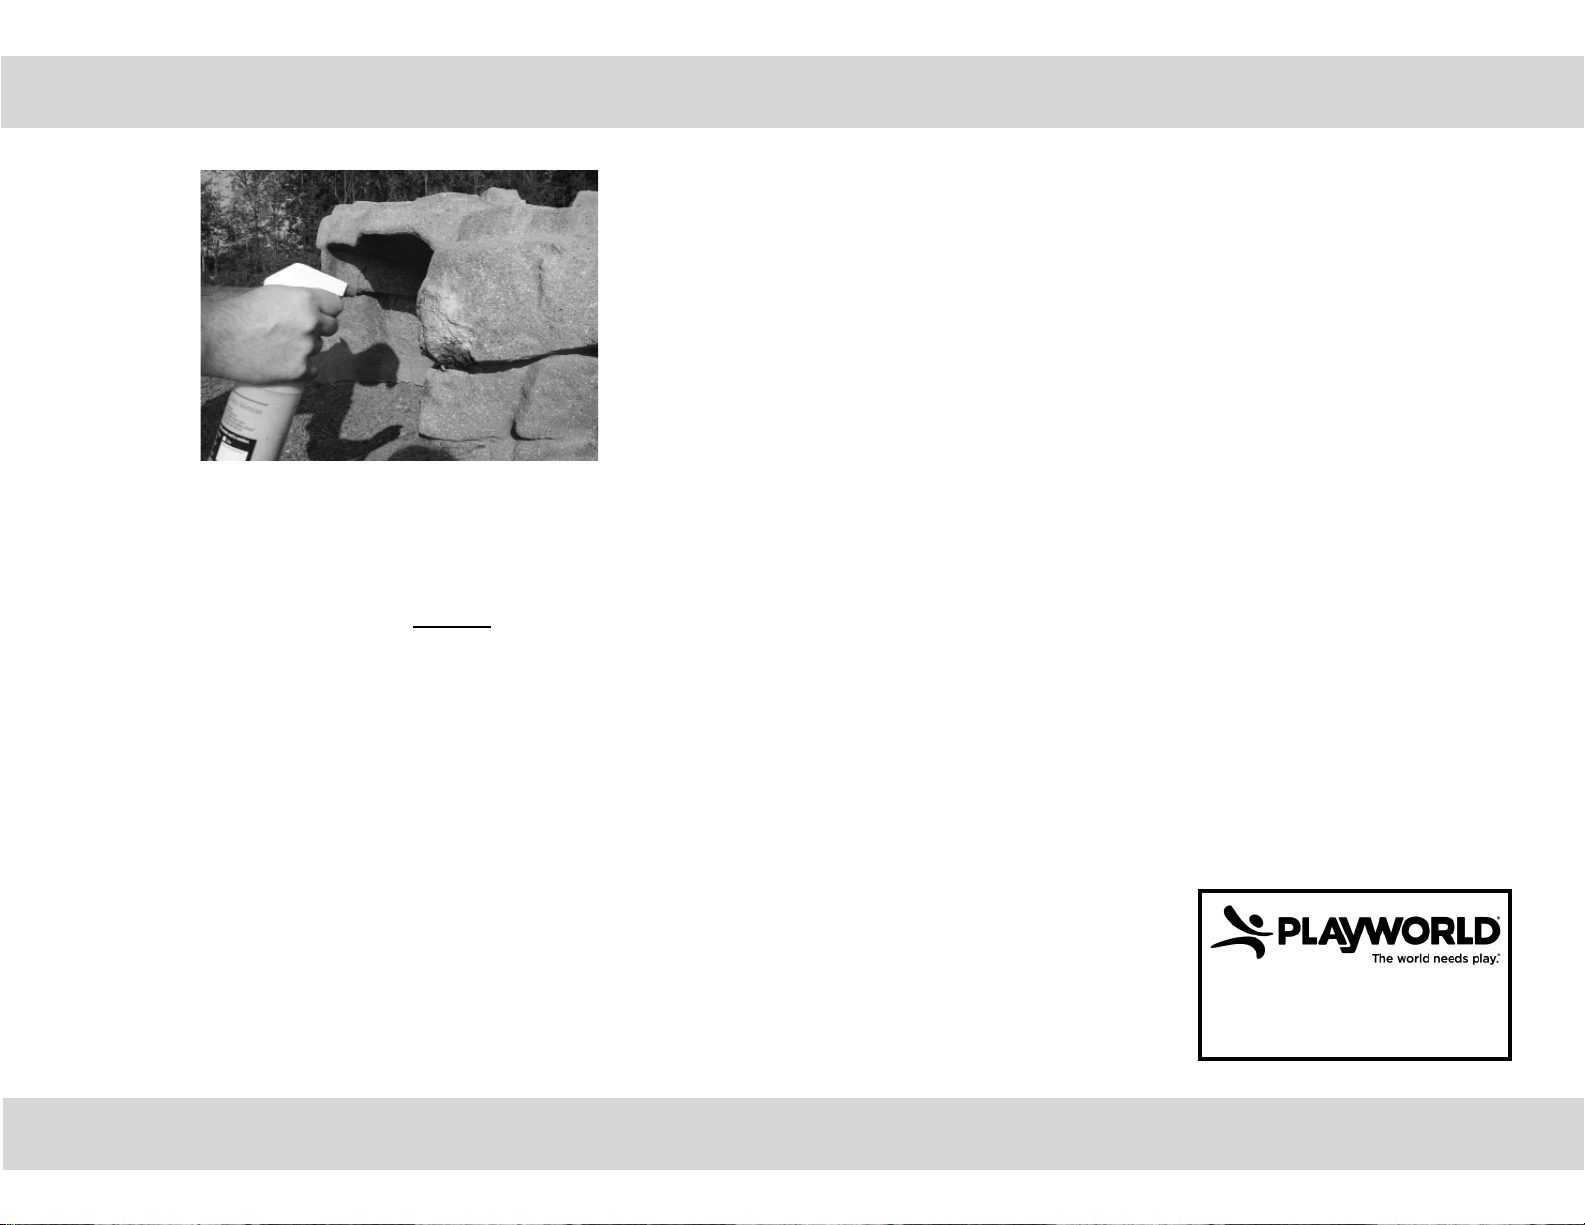
Step 10: Apply the Sealer
The fi nal step of the process will be to spray the area with a sealer. Ensure that
the paint is completely dry before applying the sealer.
Pour the sealer directly into the bottle. DO NOT dilute the sealer. It will be used
full strength.
Models BD0012-0016, **BD0018-19, *BD0020, BD0021
Page 28 of ##
PA1178, *ECN2167 (*BD0013 & *BD0016), *ECN2825, **PA1440
www.playworldsystems.com
For Customer Service, Call
800-233-8404 or
570-522-9800
1000 Buff alo Road • Lewisburg, PA 17837
www.playworldsystems.com
PA ECN ####
OUTSIDE U.S.
Page 28 of 33
Model ####
Page 29

Installation Instructions
This page is
intentionally left blank.
Models BD0012-0016, **BD0018-19, *BD0020, BD0021
PA1178, *ECN2167 (*BD0013 & *BD0016), *ECN2825, **PA1440
Page 29 of ##
www.playworldsystems.com
Page 29 of 33
Page 30
Installation Instructions
maintenance / inspection information
INTRODUCTION
Playworld Systems® has developed this guide to assist the owner/operators in
the maintenance of our Climbing Boulders. To properly accomplish this task, we
recommend the development of a comprehensive maintenance program, which
include proper documentation, and prompt repair of any discovered problems.
Periodic inspections should be conducted on a scheduled basis to evaluate
structural integrity, wear conditions, and condition of protective fall surfacing
material for each Climbing Boulder.
Maintenance is a very important part in the safe operation of a bouldering park.
Every agency needs to develop its own criteria for establishing a frequency for
scheduled preventive maintenance inspections. Frequency of maintenance is
aff ected by various elements such as usage, environment, and vandalism. There
is no ideal, clear-cut or generic maintenance standard or schedule that could
be applied to each and every site therefore; it is highly recommended that each
owner/operator establish its own set of maintenance standards, based upon a
sound, written maintenance plan established by its own resources and needs.
High Frequency - The high frequency inspection is to check for protective fall
surfacing problems, vandalism, and debris that could lead to a hazardous situation.
This is a visual inspection and must be performed daily.
· Due to the risk and nature of bouldering, protective fall surfacing material
becomes one of the most important elements of the park. A protective fall
surfacing material is required around all Climbing Boulders and therefore
carries a High Frequency inspection.
Medium Frequency - The medium frequency inspection is to check for problems
due to usage and the environment. This inspection is more detailed and requires
physical examination of the Climbing Boulders.
Low Frequency - The low frequency inspection is more detailed than the medium
frequency in that structural related items must be inspected.
Models BD0012-0016, **BD0018-19, *BD0020, BD0021
Page 30 of ##
PA1178, *ECN2167 (*BD0013 & *BD0016), *ECN2825, **PA1440
www.playworldsystems.com
Page 30 of 33
Model ####
PA ECN ####
Page 31

maintenance / inspection information
Installation Instructions
MAINTENANCE INSPECTION FORM INSTRUCTIONS
• Develop a scheduled maintenance program based on equipment use.
Maintenance should be performed by trained and experienced personnel.
• All documents furnished are originals. Make copies for your program. It is also
advisable to have a copy of the park layout to accompany maintenance forms.
• Identify the action park in the proper section. Write in applicable information in
the designated spaces.
• Identify each individual inspection sheet. The fi rst sheet explains what you are to
check. The second sheet is the inspection form used to document the inspection
results.
• Place the appropriate code in the box that corresponds with the inspection
requirements.
• Document each item requiring maintenance at the bottom of the inspection
form, a description of the problem and the corrective action taken.
• You are responsible for routine maintenance and upkeep of an action park as
its owner/operator.
• Make any necessary repairs and record each repair on the Inspection Form.
MAINTENANCE INSPECTION INFORMATION
Site or Park Name:
Date of Inspection:
Inspector's Name:
Inspector's Signature:
Repairer's Name:
Repairer's Signature:
Date Repairs Completed:
Date Inspection Form Received:
Supervisor's Name:
Supervisor's Signature:
Comments:
• File the completed documentation with the owner/operator of the park.
• Keep a copy of all Inspection Forms for future reference.
This page is to be attached to front of every packet of inspection forms (one per inspection).
Models BD0012-0016, **BD0018-19, *BD0020, BD0021
PA1178, *ECN2167 (*BD0013 & *BD0016), *ECN2825, **PA1440
Page 31 of ##
www.playworldsystems.com
Page 31 of 33
Page 32

Installation Instructions
maintenance / inspection information
Climbing Boulder
· Inspect all surfaces of the climbing boulder for sharp points, cracks or jagged
edges. If any damage is detected and is determined to be unsafe, barricade
the climbing boulder to prevent use until the repair is completed. Repairs can
be made using the boulder color touch-up kit and following the instructions
contained with these instructions.
· Wash the Climbing Boulder with a power washer. This will keep any loose
debris and/or mud from collecting on the climbing surfaces that could hinder
the grip of a climber.
Footings
· Inspect the Climbing Boulder footings. If any damage is detected, barricade
the equipment to prevent use until repair is completed.
Surfacing
· Due to the risk and nature of bouldering, protective fall surfacing material
becomes one of the most important elements of the park. A protective fall
surfacing material is required around all Climbing Boulders and therefore
carries a High Frequency inspection.
Models BD0012-0016, **BD0018-19, *BD0020, BD0021
Page 32 of ##
PA1178, *ECN2167 (*BD0013 & *BD0016), *ECN2825, **PA1440
www.playworldsystems.com
For Customer Service, Call
800-233-8404 or
570-522-9800
1000 Buff alo Road • Lewisburg, PA 17837
www.playworldsystems.com
PA ECN ####
OUTSIDE U.S.
Page 32 of 33
Model ####
Page 33
inspection form
Installation Instructions
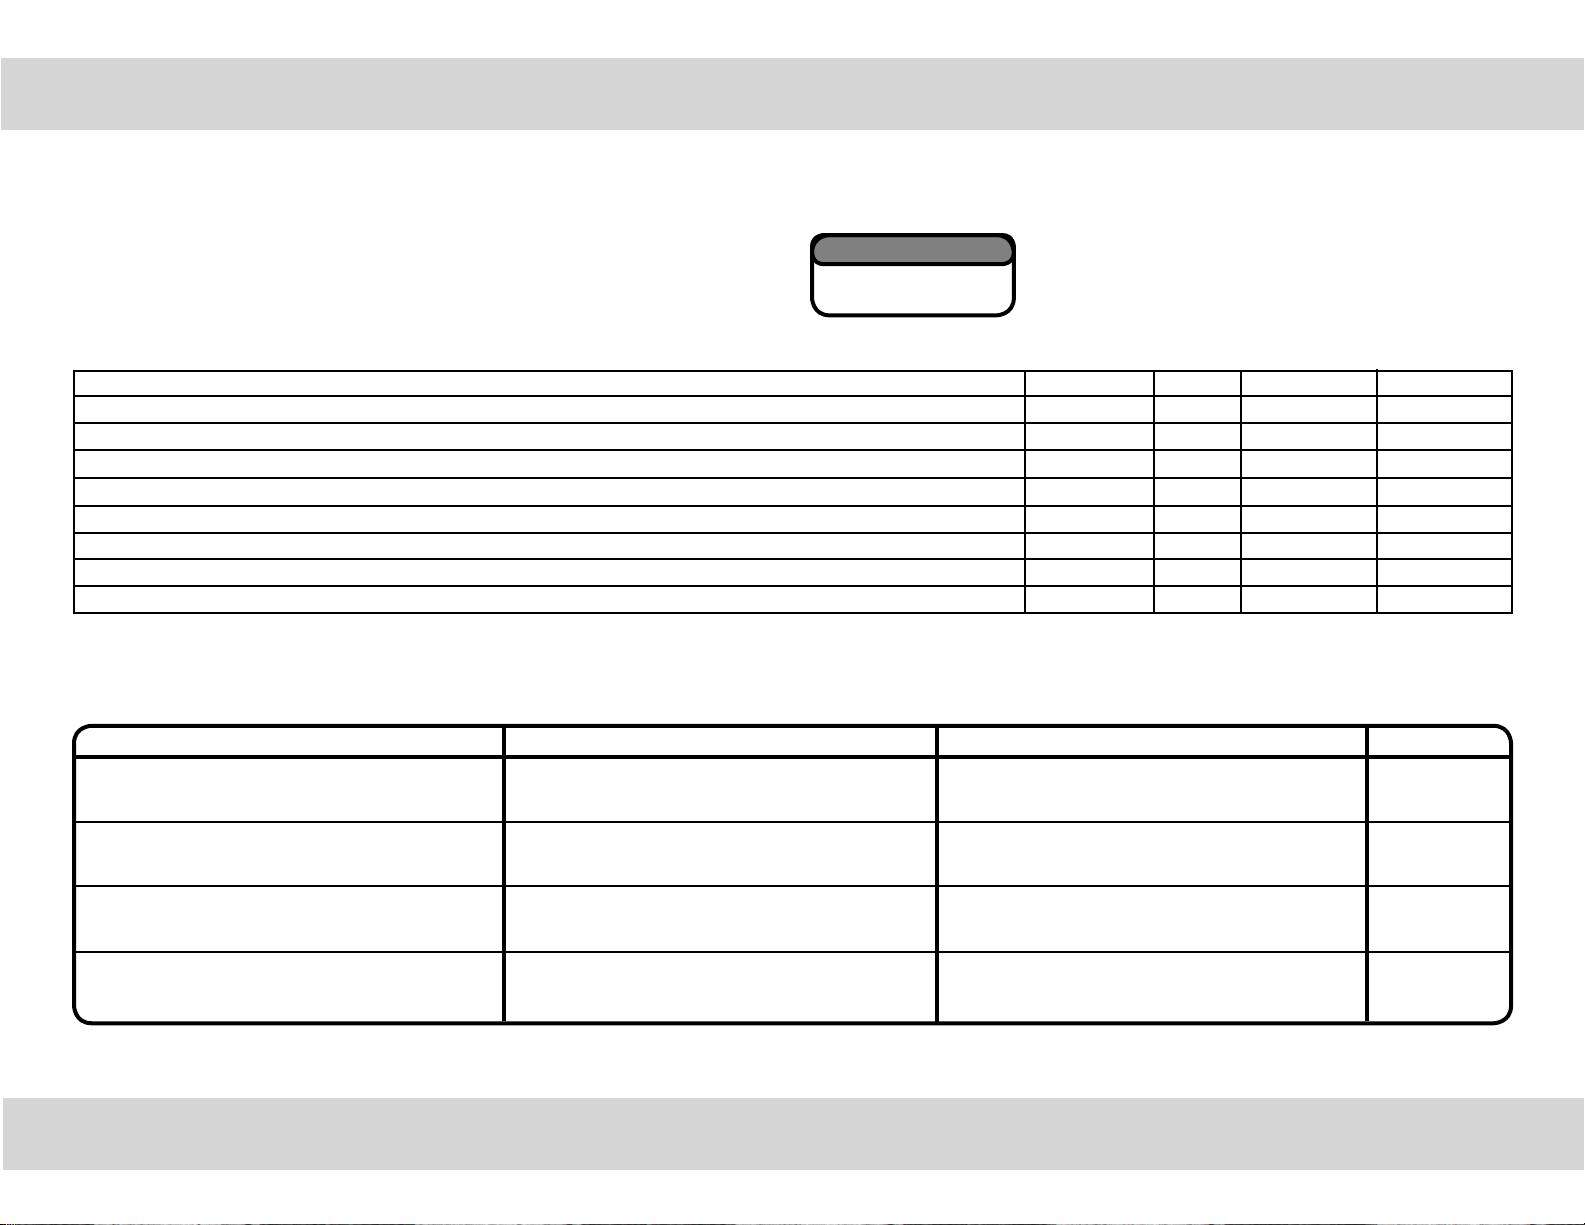
• Be sure that you are using a copy of this Inspection Form and not your original.
• Use the Inspection Codes as shown and record condition of equipment at time of
examination on the Inspection Checklist.
• Document any item from the Inspection Checklist that will require maintenance along
with any corrective action on the Maintenance Schedule.
• Be sure to include appropriate dates and signatures on each section to properly
document maintenance procedure.
INSPECTION CHECKLIST
Inspect protective surfacing for depth and condition.
Inspect climbing surface and structure for damage.
Inspect climbing surfaces for any smooth or slippery areas.
Inspect footings for exposure or nonsecure anchors
Inspect entire climbing area to be clean; free of debris, obstructions, temporary objects and slippery/wet spots.
Inspect area to insure proper drainage.
Inspector: Name (Please Print) _______________________________________ Signature:_________________________________________ Date:___ /___ /___
Preventive Maintenance
. . . for Safety's Sake!
Inspection Codes
P = Pass F = Fail
NA
= Not Applicable
Frequency
High
Medium
Medium
Low
High
Medium
Insp.
Code
Inspection
Date
Date Repairs
Completed
MAINTENANCE REVIEW
Item in Question
Description of Problem
Corrective Action
Date
Repairer: Name (Please Print) _______________________________________ Signature:_________________________________________ Date:___ /___ /___
Models BD0012-0016, **BD0018-19, *BD0020, BD0021
PA1178, *ECN2167 (*BD0013 & *BD0016), *ECN2825, **PA1440
Page 33 of ##
www.playworldsystems.com
Page 33 of 33
 Loading...