

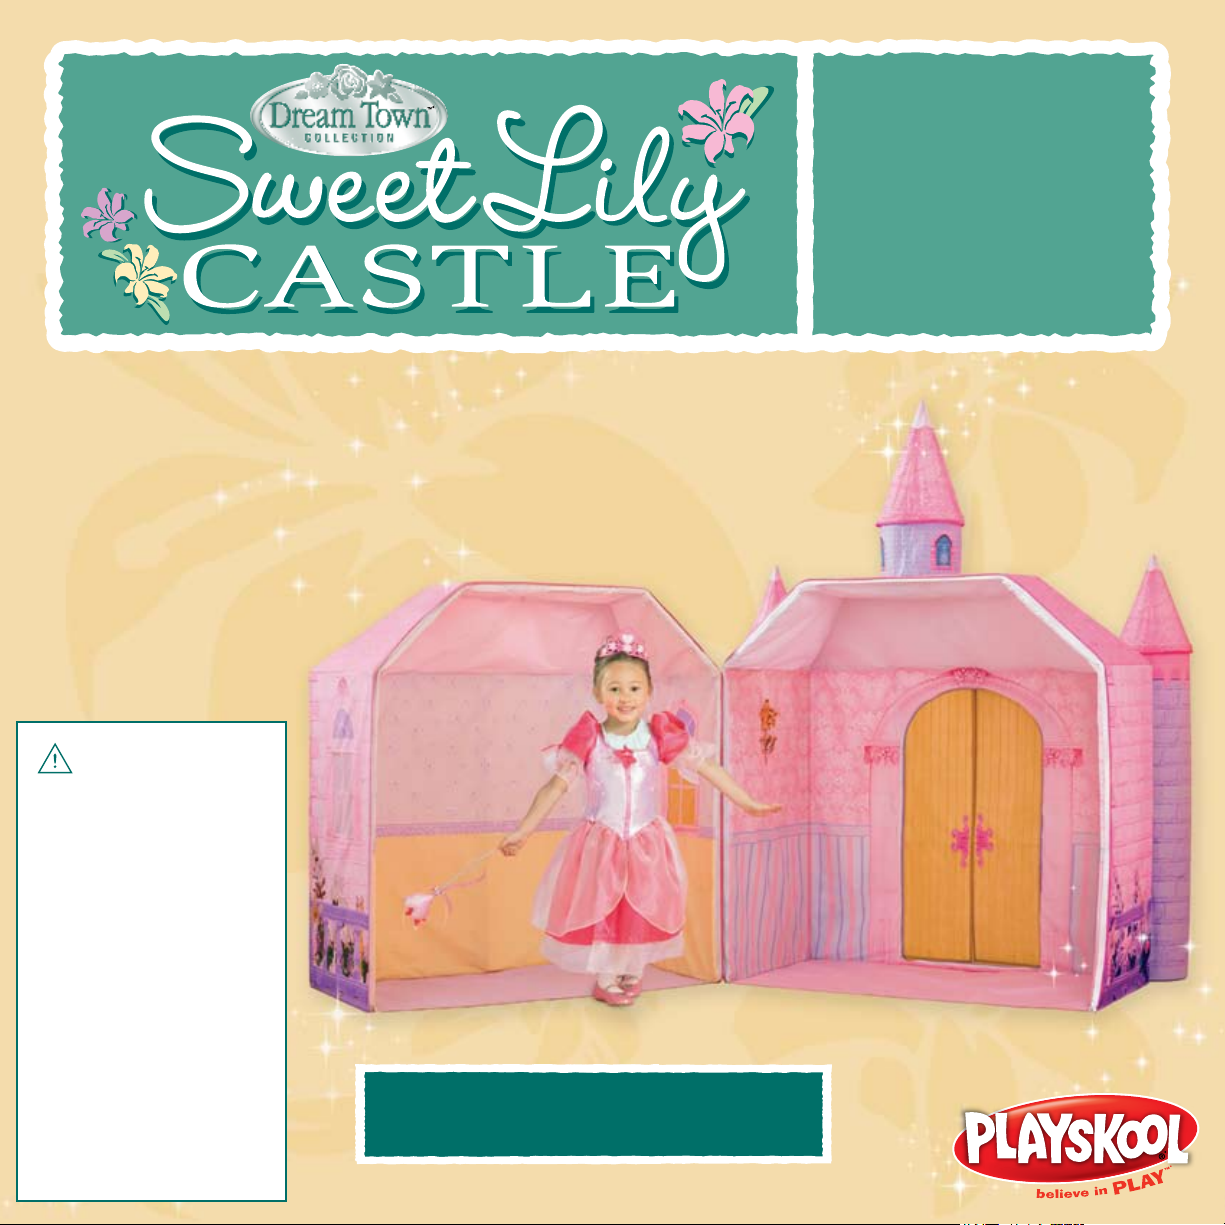
Page 1
This Castle meets the
ammability requirements of
CPAI-84. The fabric may burn
if left in continuous contact
with any ame source. The
application of any foreign
substance to the Castle fabric
may render the ame resistant
properties ineective.
KEEP ALL FLAME
AND HEAT SOURCES
AWAY FROM THE
SWEET LILYTM CASTLE
FABRIC.
WARNING:
Adult assembly
required.
AGES 3+
Thanks for
purchasing the
SWEET LILYTM Castle.
Please read and retain
these instructions.
68779
For video assembly instructions, please visit
www.mysweetlilycastle.com
Page 2
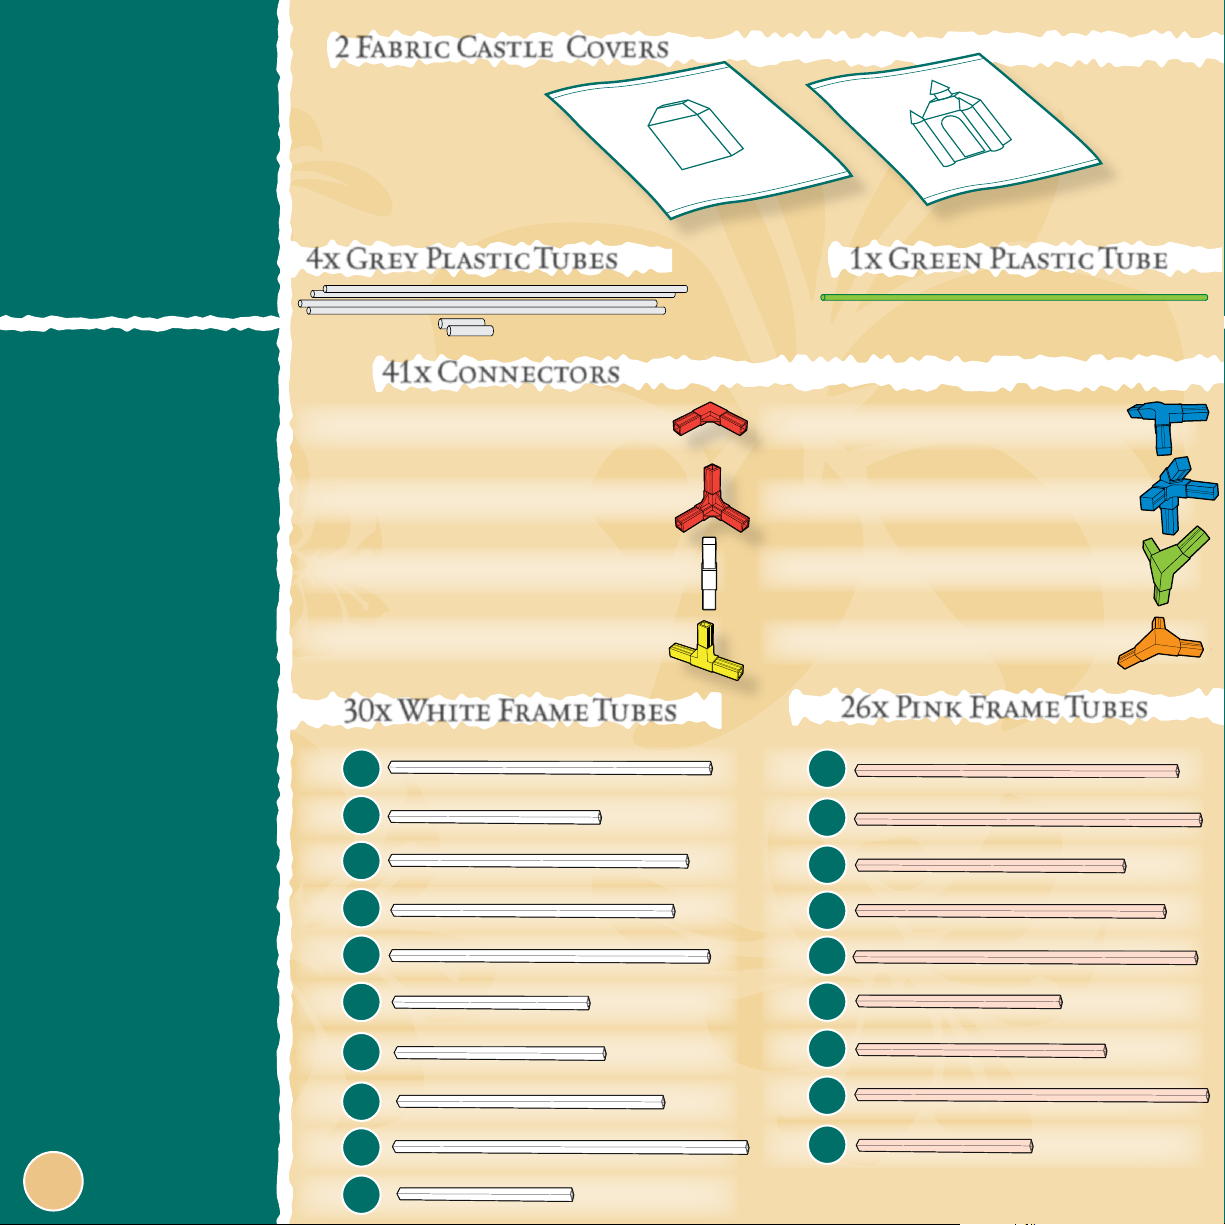
2 Fabric Castle Covers
BACK
FRONT
Includes:
Also includes:
1 princess dress
(ts sizes 3T to 6X)
1 tiara
1 wand
1 frog prince
4x Grey Plastic Tubes
2 x Grey Plastic Connectors
41x Connectors
4 x front bottom connectors (red)
4 x back corner connectors (red)
11 x straight connectors (white)
6 x tee connectors (yellow)
30x White Frame Tubes
Front side
#1
2 x
#2
2 x
1x Green Plastic Tube
4 x hip corner top connectors (blue)
4 x hip corner base connectors (blue)
4 x roof corner X connectors (green)
4 x roof corner Y connectors (orange)
26x Pink Frame Tubes
Back side
#1
2 x
#2
2 x
1
2 x
12 x
2 x
2 x
2 x
2 x
2 x
2 x
#3
#4
#5
#6
#7
#8
#9
#10
10 x
2 x
2 x
2 x
2 x
2 x
2 x
#3
#4
#5
#6
#7
#8
#9
Page 3
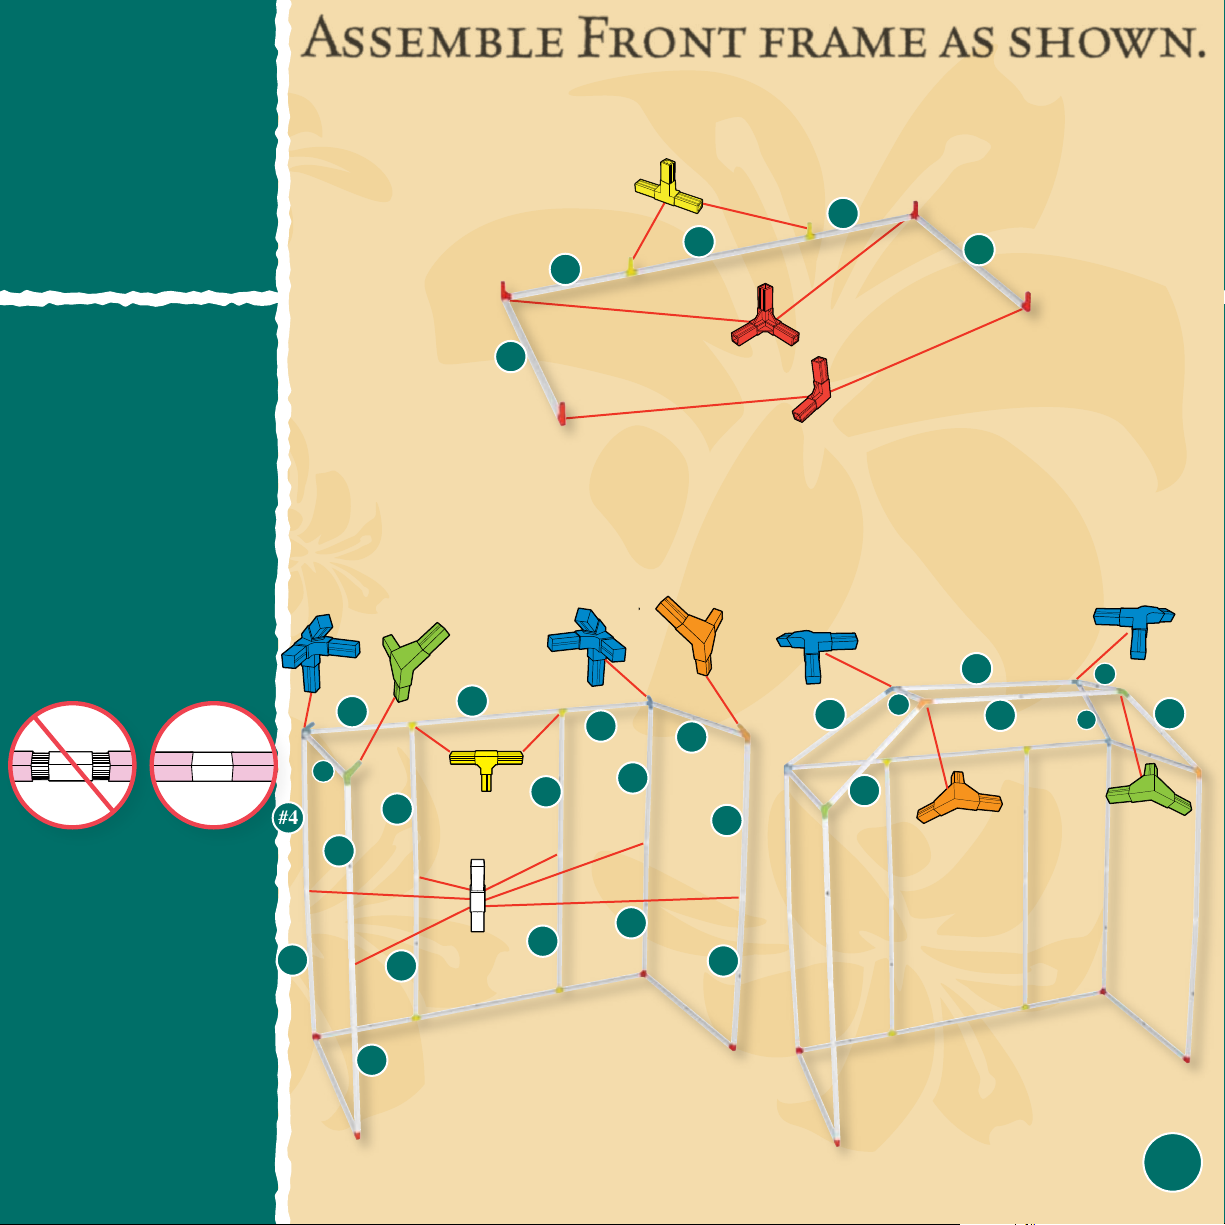
Front
Assemble Front frame as shown.
This will be done in Three steps:
1.
Start with the base—just like building a normal house.
Frame
Assembly:
Parts required
for this step:
- All connectors
- All white frame tubes
Make sure
connectors are
pushed into the
tubes as far as they
will go.
#2
#1
2.
Build the castle walls—add all the
vertical tubes with the connectors
on the top. Add tubes for the top
of the walls.
#3
#4
#6
#4
#4
#6
#5
#4
#4
#5
#3
#2
3.
Build the roof—add the tubes and
connectors, as shown.
create a four-sided peak.
#8
#4
#10
#7
#1
#9
The roof will
#9
#10
#8
#7
#4
#4
#4
#4
#4
#4
2
Page 4
Back
Assemble Back frame as shown.
This will be done in Three steps:
1.
Start with the base—just like building a normal house.
Frame
Assembly:
Parts required
for this step:
- Remaining connectors
- All pink frame tubes
Make sure
connectors are
pushed into the
tubes as far as
they will go.
#2
#1
2.
Build the castle walls—add all the
vertical tubes with the connectors on
the top. Add tubes for the top of
the walls.
#5
#4
#3
#3
#3
#5
#3
#4
#2
#1
3.
Build the roof—add the tubes and
connectors, as shown. The roof will
create a four-sided peak.
#8
#3
#7
#9
#6
#8
#9
#7
#6
3
#3
#3
#3
#3
#3
Page 5

Castle
BACK
Back
Cover:
Parts required
for this step:
- Completed Frame (pink)
- SWEET LILY
Castle Back
SWEET LILY Castle Back Cover
4.
1.
Assemble pink frame as shown on page 3.
2.
Remove the SWEET LILY Castle back cover
from the bag marked “Back.”
3.
Completely unzip the cover all the way
around.
5.
Lay the cover out so both the rectangular
red seam and lavender wall face up.
Separate the inside and outside walls
by pulling apart the hook-and-loop
fasteners (don’t forget
the windows!).
6.
Line up the frame on the red seam
as shown.
4
Page 6

7.
Lift the inside wall up and attach it to the frame
with the hook-and-loop fasteners.
8.
Pull out any excess cover from the outside corners of the frame base to make a snug pocket.
Make sure the bottoms of the
strips line up with the bottoms of
the pads.
17x
fasteners
Pull the cover over the closed end of the frame and across the top of the roof (you may need a helper).
The zipper strip should align with the frame.
5
Page 7

9.
Zip up the cover around the frame. Press the three hook-and-loop fasteners along inside the cover at
the top of the frame to keep the roof from sagging.
10.
Align and fasten the hook-and-loop fastener around
both windows.
The back of the castle is now
complete. Let’s do the front!
6
Page 8

SWEET LILY Castle Front Cover
FRONT
1.
Assemble white frame as shown on page 2.
2.
Remove the SWEET LILY Castle front cover
Castle
Front
Cover:
Parts required
for this step:
- Completed Frame (white)
- SWEET LILY
Castle Front
from the bag marked “Front”.
3.
Completely unzip the cover all
the way around.
5.
Separate the inside and outside walls
by pulling apart the hook-and-loop
fasteners.
4.
Unzip the front doors.
6.
Lay the cover so the rectangular red seam
is exposed. The pink inside wall is over the
the printed oor. The doors should
be tucked under the oor.
7
Page 9

6.
Line up the frame on the red seam, as shown.
7.
Lift the inside wall up and attach it to the frame
with the hook-and-loop fasteners.
Make sure the bottoms of the
strips line up with the bottoms
of the pads.
16x
fasteners
8
Page 10

8.
Pull out any excess cover from the outside corners of the frame base to make a snug pocket.
Pull the cover with the doors over the closed end of the frame and across the roof
(you may need a helper). The zipper strip should align with the frame.
9
9.
Zip up cover around the frame. Press the three hook-and-loop fasteners along inside the cover
at the top of the frame to keep the roof from sagging.
Page 11

10.
Fasten the two wide hook-and-loop fasteners around the vertical tubes on both sides of the door.
Zip up the door.
11.
Unhook the fasteners in the roof turret. Raise the turret by bending the green plastic tube to
t inside. The at end ts in the middle of the center disk at the bottom and the cone-shaped
end faces up.
The front of the
castle is now
complete. Let’s build
the towers!
10
Page 12

Questions? Call 1-800-PLAYSKL
Tower
Assembly:
Parts required
for this step:
- 2 Tower covers
- 4 Grey plastic tubes
- 2 Grey plastic connectors
1.
Take two grey tubes and one
connector. Insert a tube into each
end of connector.
2.
Open the hook-and-eye fasteners in the
tower.
the tower up to the the point. Fit the
bottom of the plastic tube into the
middle of the center disk in the
tower oor.
Insert one end of the tube into
Storage:
3.
Reclose the tower and attach it
to the hook-and-loop fasteners
at the front corners of the
castle. The windows
face out. Repeat
Steps 1,2 and 3 for
the second tower.
Product and colors may vary.
© 2008 Hasbro. All Rights Reserved.
TM & ® denote U.S. Trademarks.
© 2008 Worlds Apart Ltd. All rights Reserved. PN# 0000000000
For the entire
Dream TownTM Collection
 Loading...