

Page 1
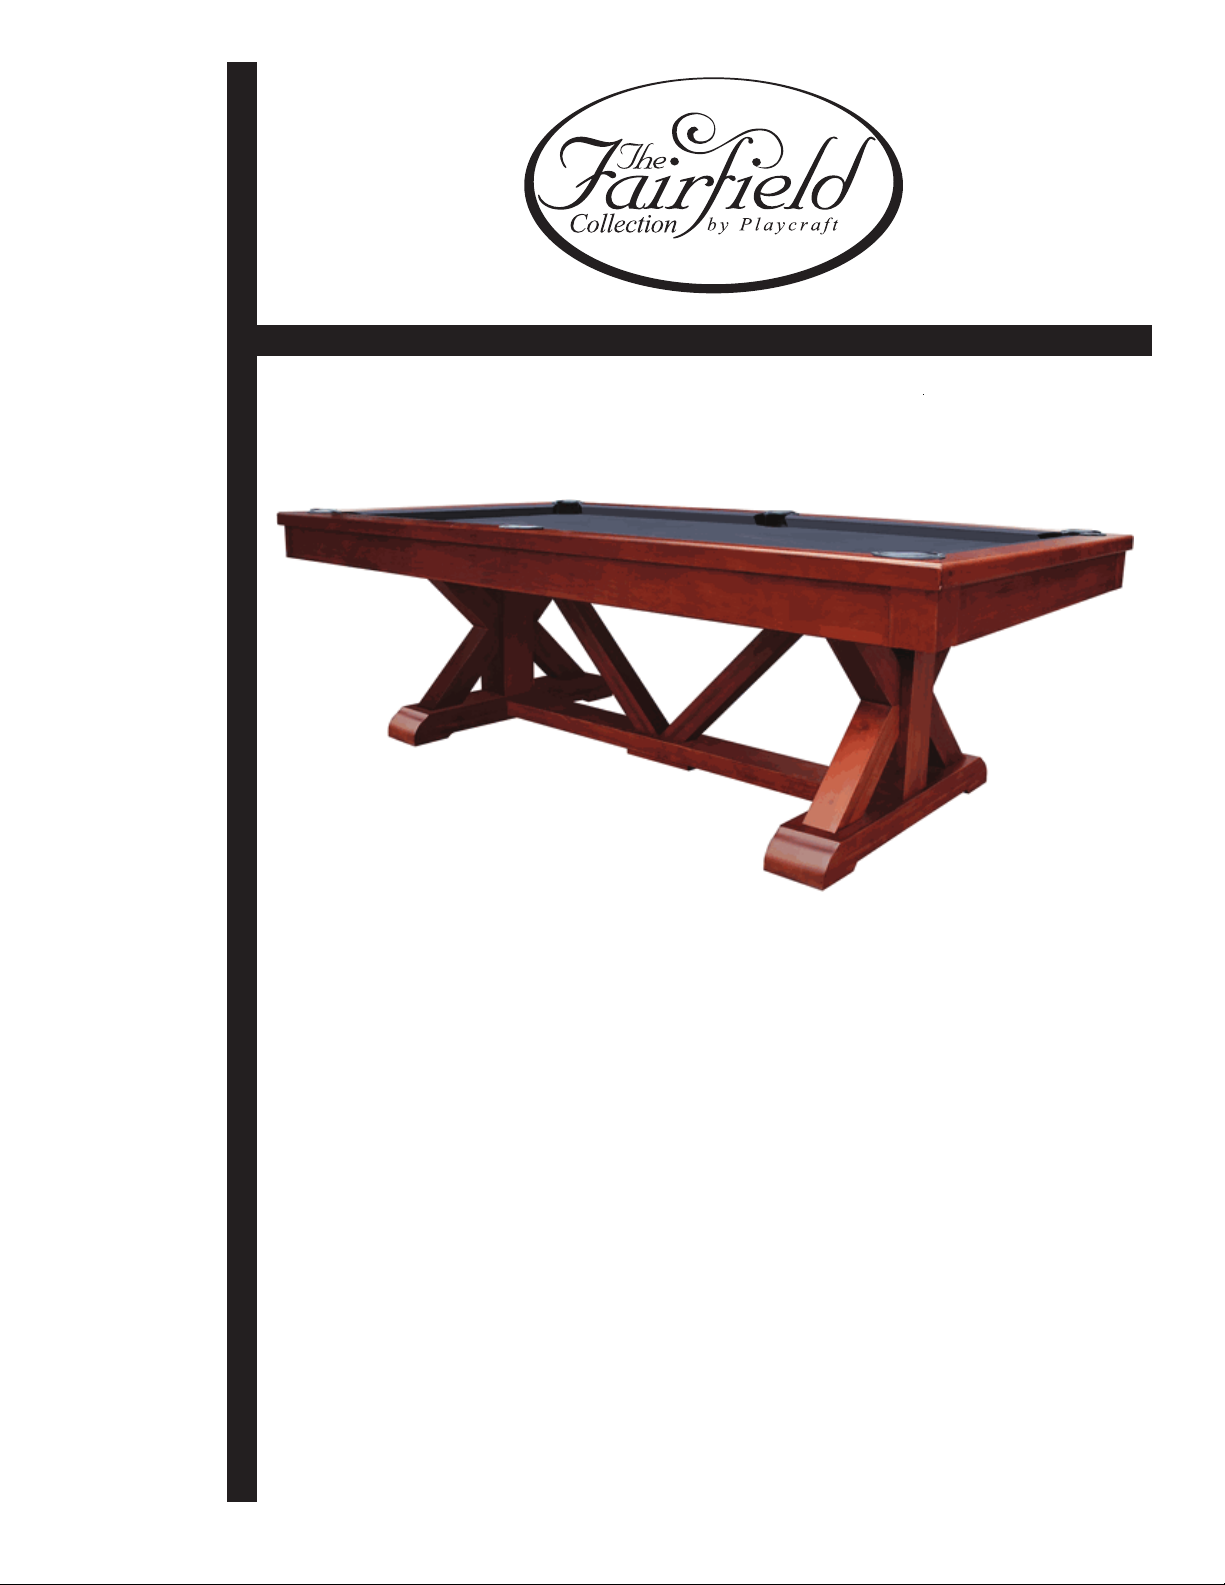
Brazos River
Models:
PTBRRESP08 - Brazos Espresso 8’
PTBRRCHT08 - Brazos Chestnut 8‘
PTBRRBLK08 - Brazos Weathered Black 8’
ASSEMBLY INSTRUCTIONS
PTBRRBRO08 - Brazos Weathered Brown 8’
Page 2

page 1
Congratulaons on selecng a Brazos River slate pool table - part of the Fairfield Collecon
by Playcra. Please contact us ia email at support@playcra.com should you require any
assistance.
Please carefully read all safety instrucons and direcons before proceeding
1) Your table is designed for use indoors in a climate controled environment only.
Damage can occur if the table is exposed to water, dampness, high humidity,
freezing temperatures, etc.
2) Professional assembly is strongly recommended. This assembly manual is intended to
guide an experienced slate pool table installer with the assembly process of this
specific cabinet. It does not guide on seng the slate or aaching the billiard cloth
for which the process is the same regardless of the cabinet type.
2) The pool table cabinet and slate are extremely heavy. Two or more people are
required for assembly.
3) The table must be assembled in the final locaon where the table will be played.
Aempng to move the table once assembled could result in damage to the table
or serious injury.
5) Only use the table for its intended purpose.
6) Damaged or worn parts may be dangerous for users and the integrity of the table.
Replace worn or damaged components immediately and do not use the table unl any
issues have been resolved. For best results, use only spare parts supplied by Playcra.
7) Unauthorized repairs or alterang the table’s design or funcons may be dangerous and
will void the warranty.
8) Check all screws, bolts, etc. on a regular basis to ensure that they are in good working
condion and have not loosened over me.
9) Over me, pool tables may require releveling. This is considered normal maintenance
as required with owning a slate pool table
Page 3
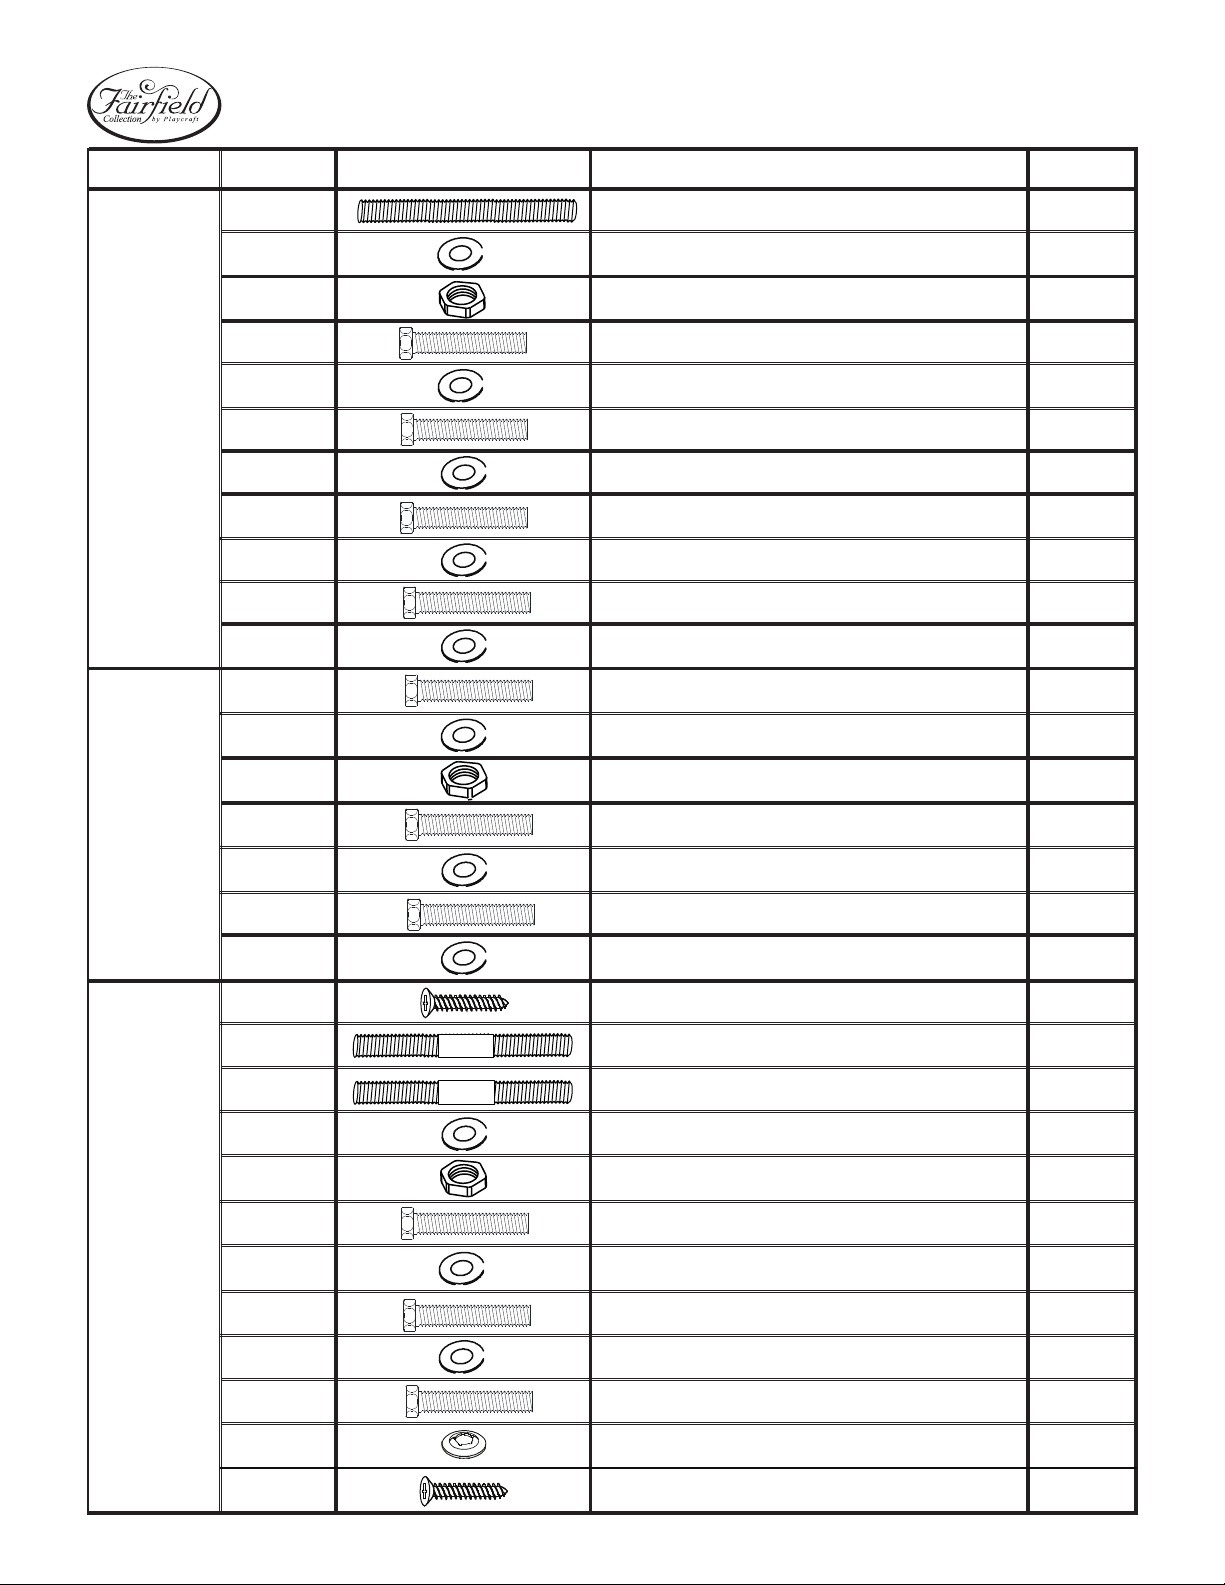
Parts List - hardware *images not to scale
page 2
LEGS / APRONS
PART #
H1
H2
H3
H4
H5
H6
H7
H8
H9
H10
H11
H12
H13
IMAGE
DESCRIPTION QTY
HANGER BOLT 3/8” x 5-7/8”
FLAT WASHER 3/8” ID
HEX NUT 3/8” ID
HEX BOLT 3/8” x 3-1/8”
FLAT WASHER 3/8” ID
HEX BOLT 3/8” x 2-3/8”
FLAT WASHER 3/8” ID
HEX BOLT 3/8” x 2-3/8”
FLAT WASHER 3/8” ID
HEX BOLT 5/16” x 2”
FLAT WASHER 5/16” ID
HEX BOLT 3/8” x 5-1/8“
FLAT WASHER 3/8” ID
4
8
8
2
2
2
2
2
2
4
4
12
24
H14
H15
H16
H17
BEAMS / FRAME
H18
H19
H20
H21
H22
H23
H24
H25
H26
H27
HEX NUT 3/8” ID
HEX CROSS BOLT 5/16” x 2”
FLAT WASHER 3/8” ID
HEX CROSS BOLT 5/16” x 3-1/16”
FLAT WASHER 3/8” ID
FLAT HEAD SCREW 3/8” x 2-3/4”
HANGER BOLT 5/16” x 5-1/2“
HANGER BOLT 5/16” x 3-1/2“
FLAT WASHER 5/16” ID
HEX NUT 5/16” ID
HEX CROSS BOLT 5/16” x 1”
FLAT WASHER 5/16” ID
HEX CROSS BOLT 5/16” x 1-1/2”
FLAT WASHER 5/16” ID
12
4
4
16
16
12
2
8
10
10
24
24
12
12
RAILS / POCKETS / SLATE
H28
H29
H30
HEX CROSS BOLT 3/8” x 2-1/2“
DOME WASHER 3/8” ID
FLAT HEAD SCREW #10 x 5/8”
18
18
24
Page 4
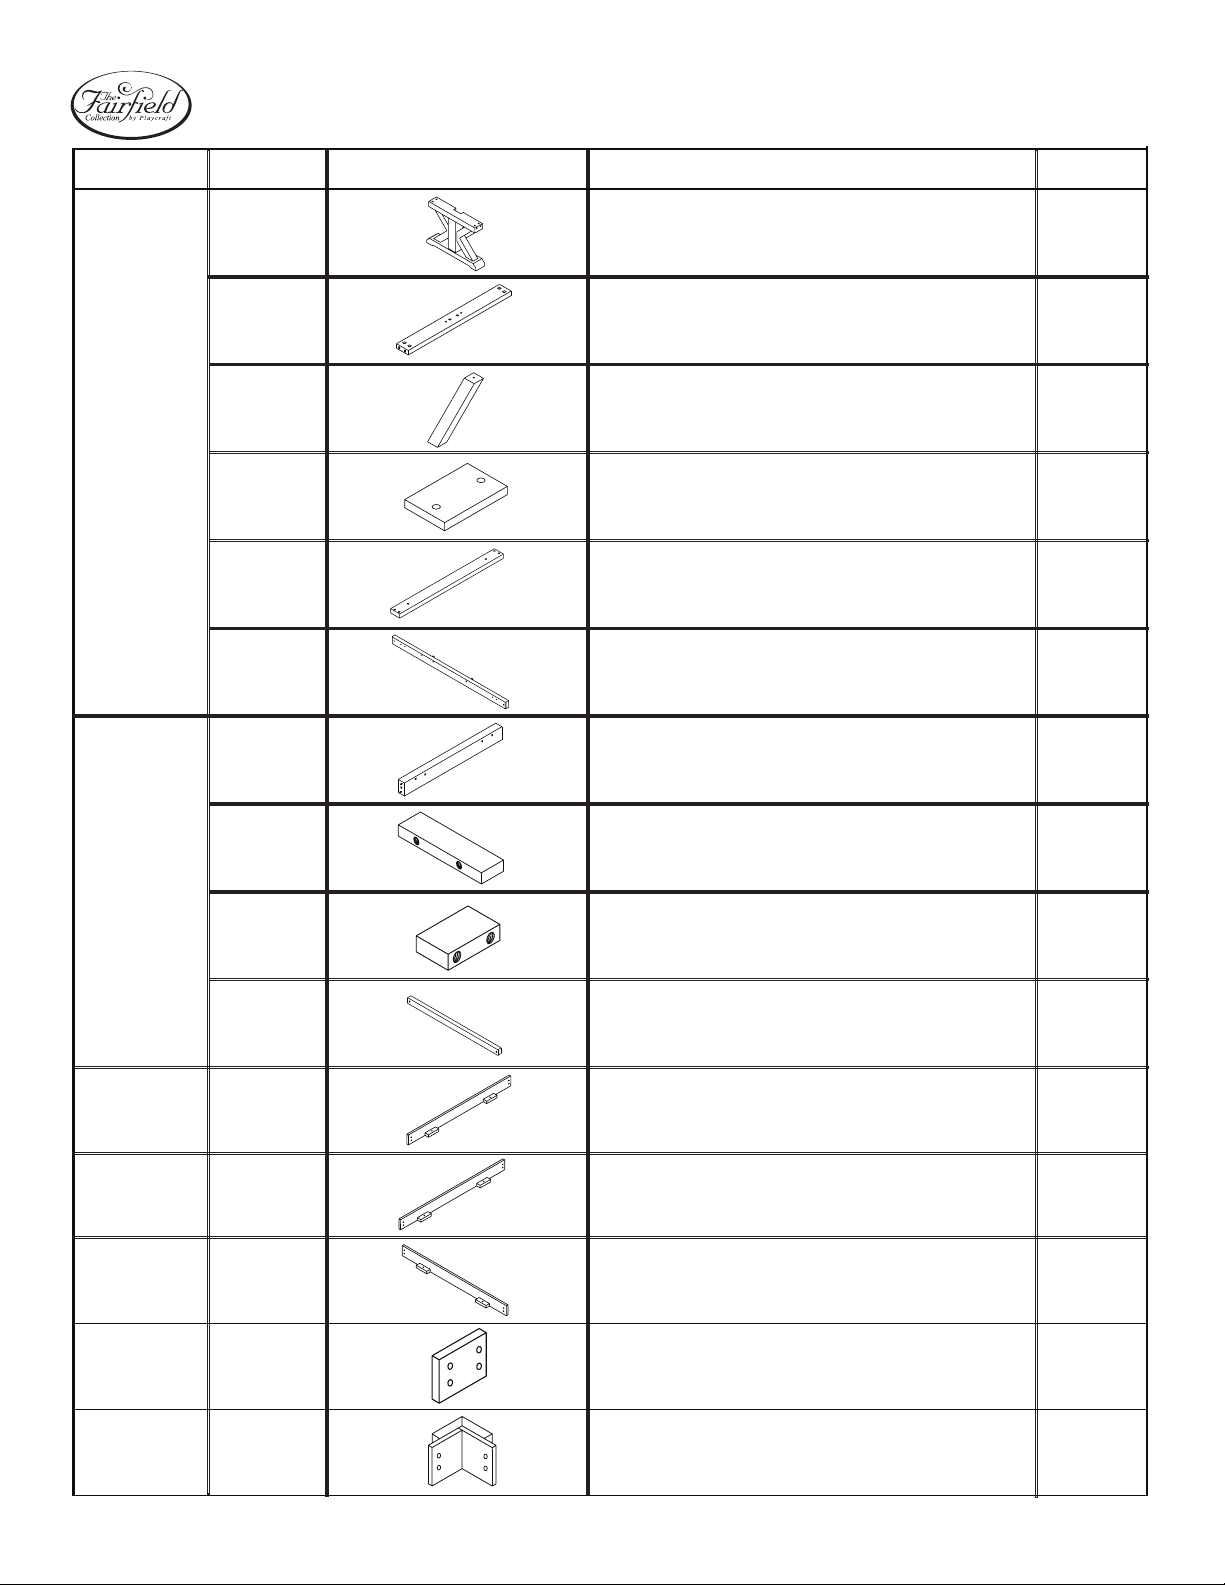
Parts List - cabinet
page 3
LEG
APRONS / FRAMESUPPORT BEAMS
PART #
1
2
3
4
5
6
IMAGE
DESCRIPTION QTY
LEG
BOTTOM CONNECTING BEAM
LEG CROSS SUPPORT
CONNECTING BEAM BASE
TOP CONNECTING BEAM
SIDE FRAME
2
1
2
1
1
2
7
8
9
10
11
12
13
END FRAME
LONG SLATE ATTACH BLOCK
SHORT SLATE ATTACH BLOCK
SLATE SUPPORT CROSS BEAM
LEFT SIDE APRON
RIGHT SIDE APRON
END APRON
2
4
4
2
2
2
2
14
15
APRON JOINT
2
CONNECTOR BLOCK
APRON CORNER
4
CONNECTOR BLOCK
Page 5
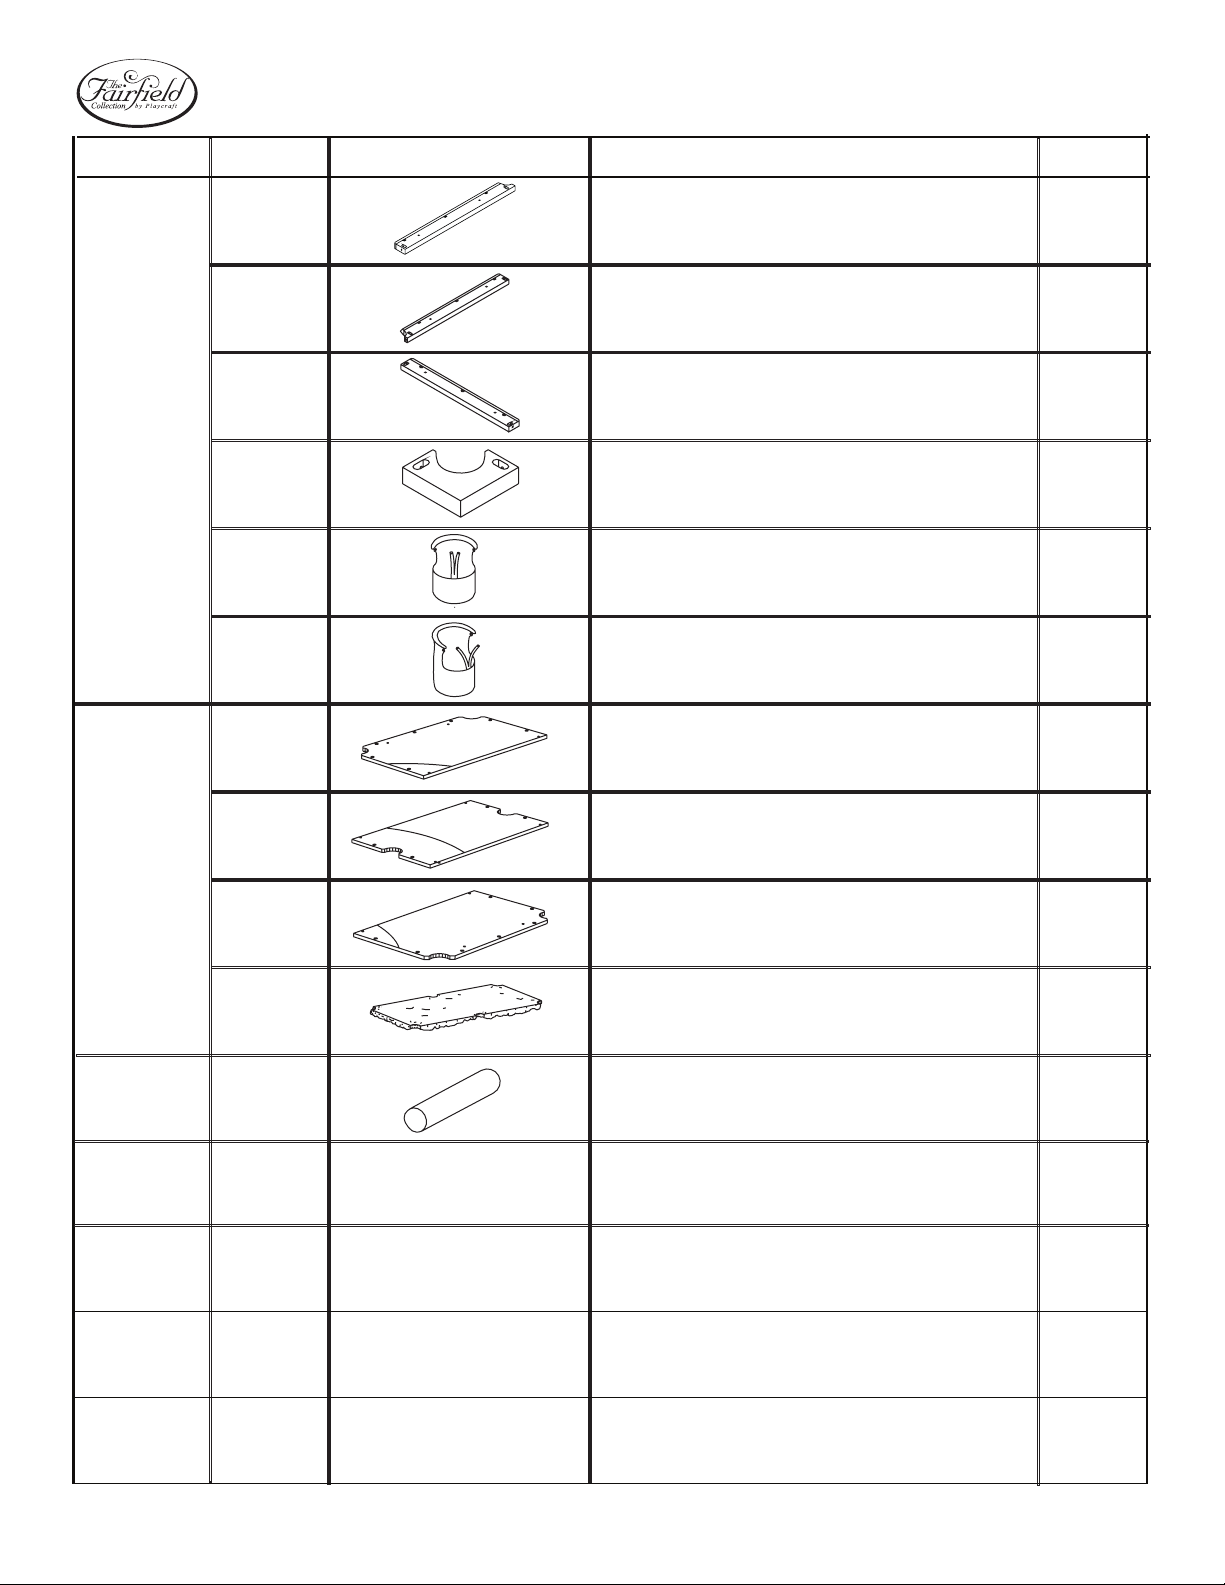
Parts List - cabinet cont.
page 4
LEG
APRONS / FRAMESUPPORT BEAMS
PART #
16
17
18
19
20
21
IMAGE
DESCRIPTION QTY
TOP RAIL LEFT SIDE
TOP RAIL RIGHT SIDE
TOP RAIL END
TOP CORNER
SIDE POCKET
CORNER POCKET
2
2
2
4
2
4
26
SATE - LEFT END
SATE - CENTER
SATE - RIGHT END
BILLIARD CLOTH
WOOD PEGS
1
1
1
1
16
Page 6
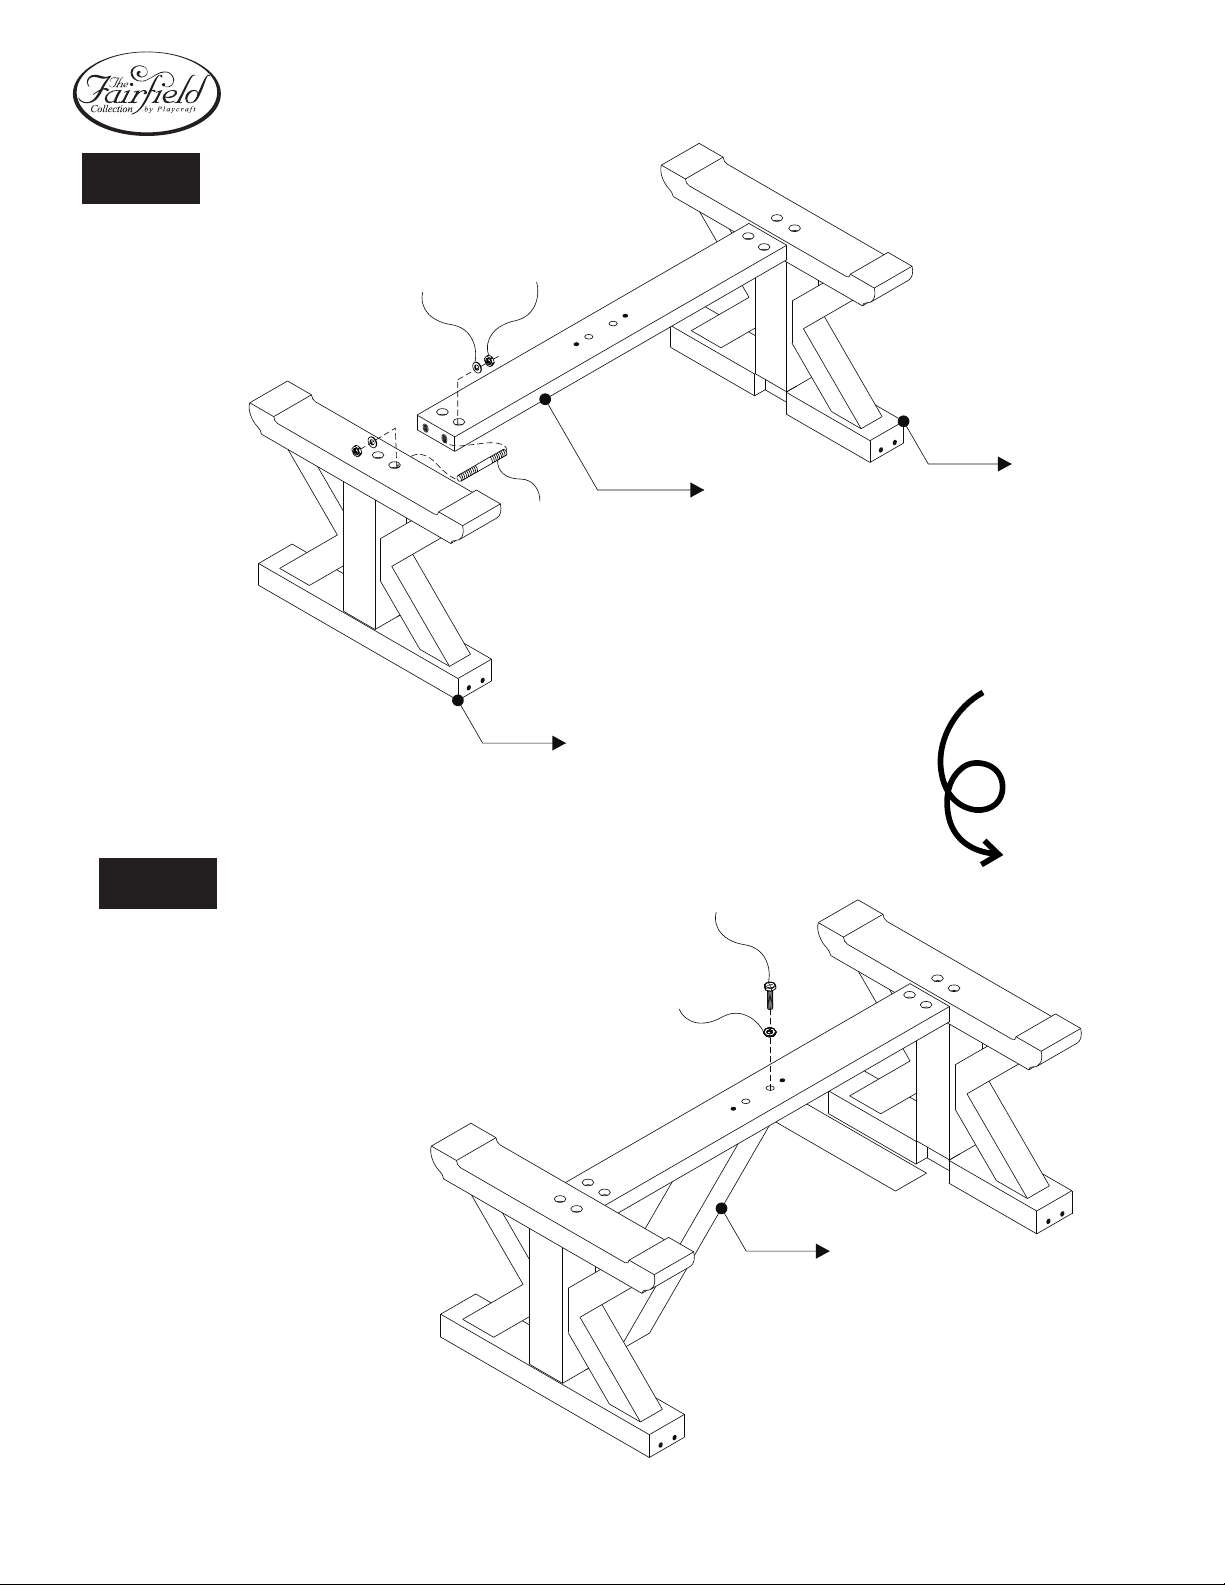
FIG.1
page 5
H2
H3
1
2
H1
1
FIG.2
Caution: Leg base assembly is very heavy. Two or more
people are required to turn over to prevent injury
or damage to the base.
H5
H4
3
Page 7
page 6
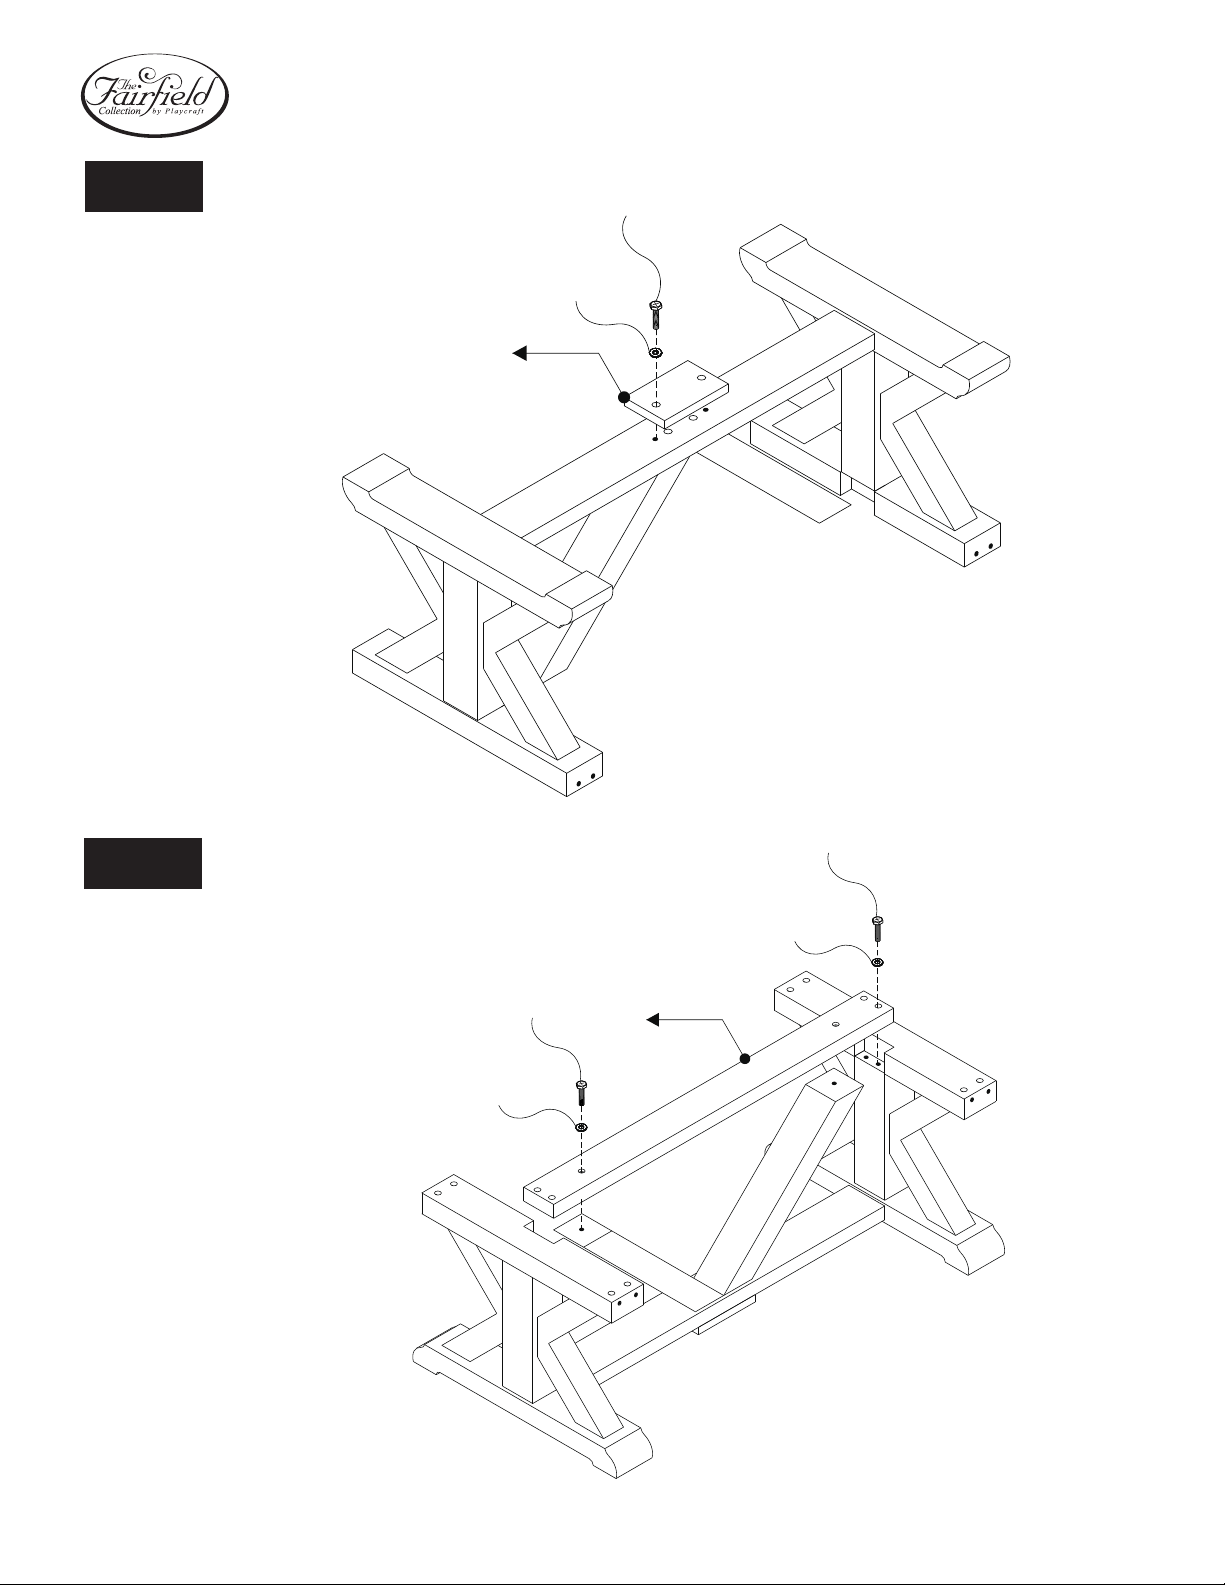
FIG.3
H6
H7
4
FIG.4
H10
H11
H8
5
H9
Page 8
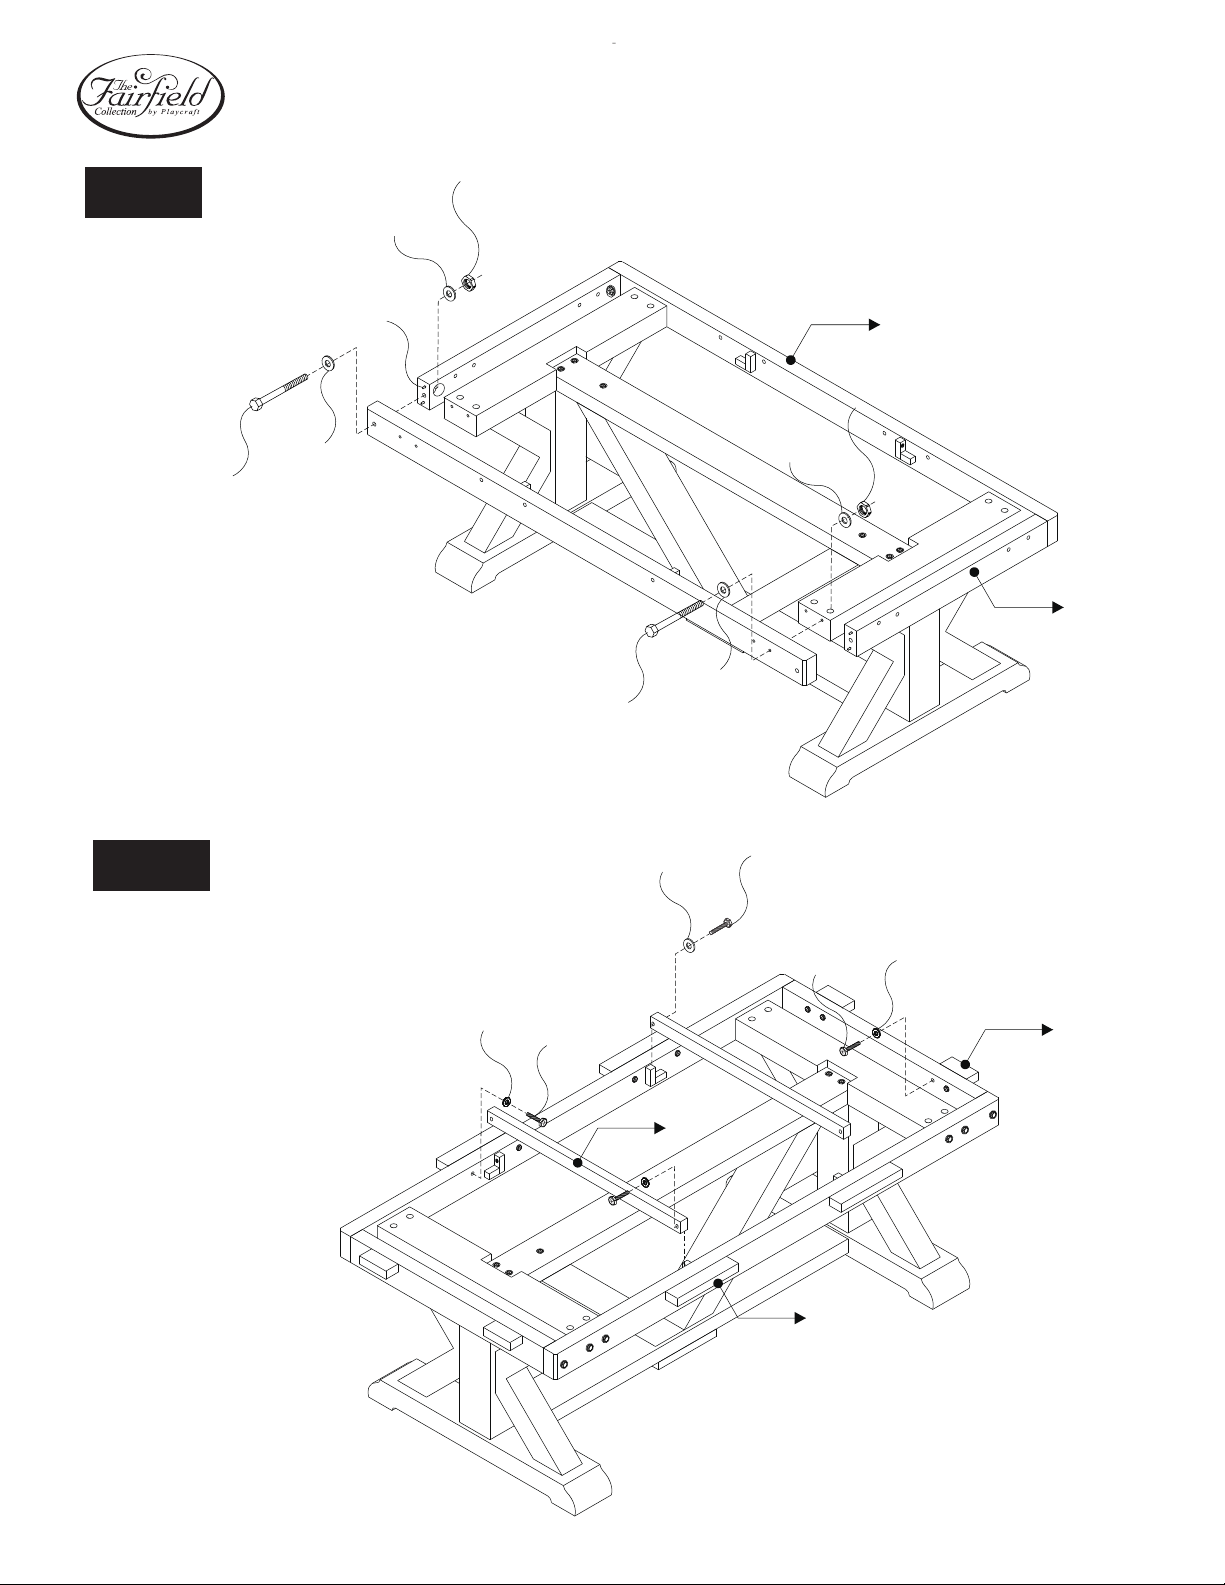
FIG.5
page 7
H14
H13
H12
FIG.6
WOOD PEGS
H13
H12
H13
H16
6
H14
H13
7
H15
H18
H17
10
H17
8
H18
9
Page 9
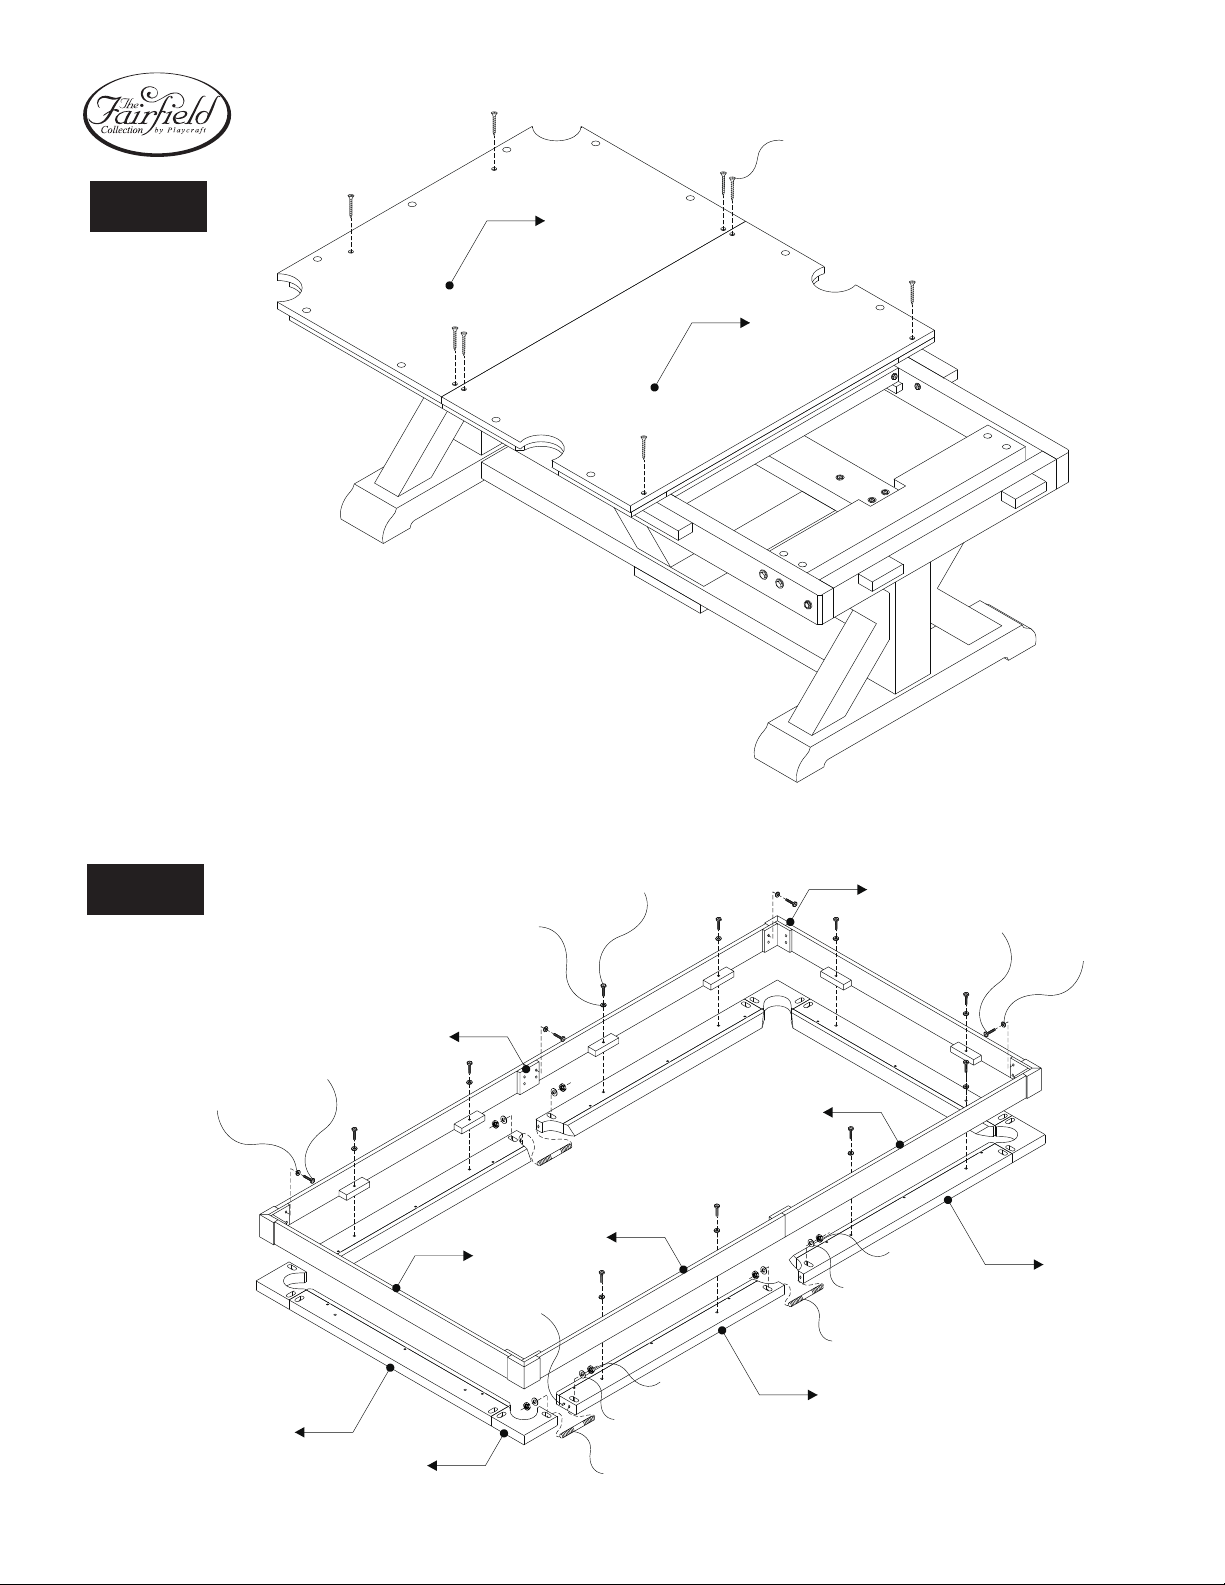
H19
page 8
FIG.7
22
23
FIG.8
H25
18
H24
14
19
H27
11
13
WO O D J OINT
H26
H22
H21
H23
12
H22
H20
16
15
H23
H24
H25
17
Page 10
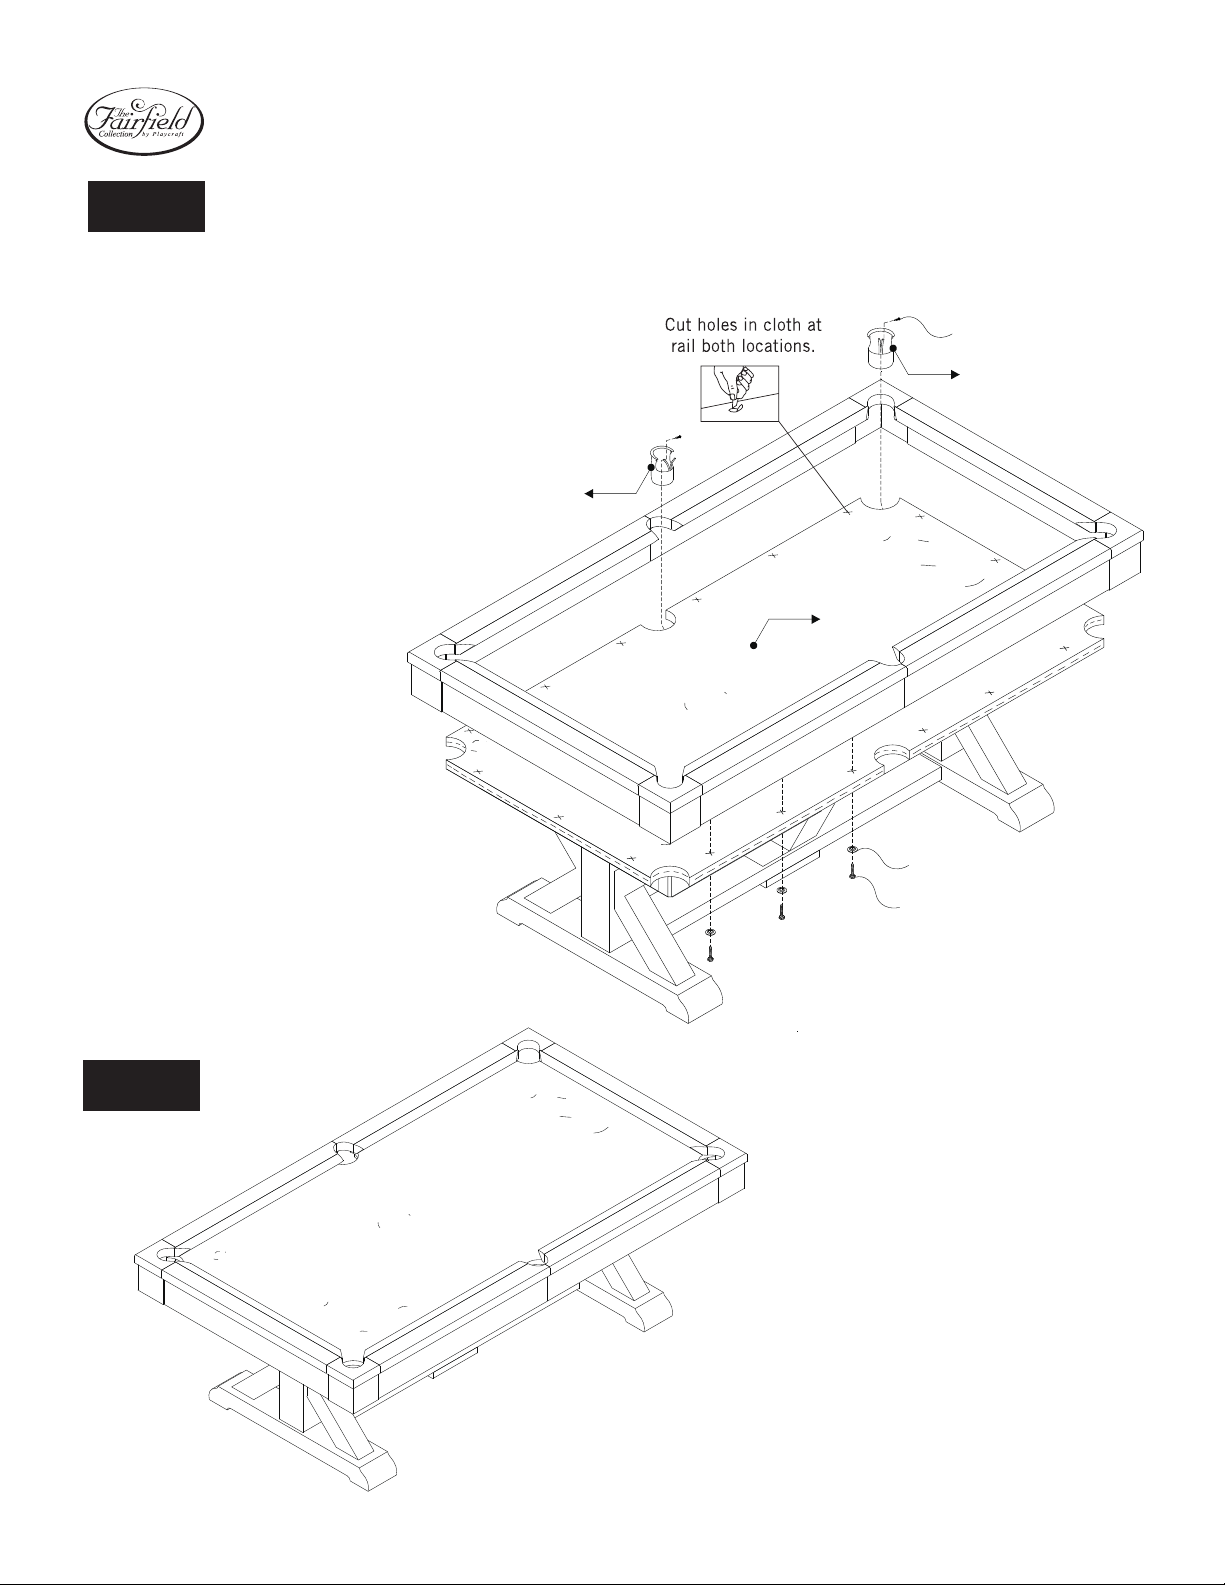
FIG.9
NOTE: Proceeding to the next step requires the cusions and slate bed to be covered with billiard cloth.
Cauon: The rail and apron assembly is extremely heavy.
Four or more people are require to carefully turn over
the assembly and place it on the slate plaorm. Be
Certain the corners and apron joints are supported.
H30
21
20
25
page 9
FIG 10
H29
H28
Page 11

Customer Service
For quesons on assembly or for missing or damaged parts, please contact us via email
at support@playcra.com. Please visit our website at www.playcra.com to see
more industry leading Playcra and Playcra Sport game tables.
Thank you for choosing Playcra!
Global Merchants, Inc.
12 Lunar Drive
Woodbridge, CT 06525
 Loading...