

Page 1

IPS-3
Integrated Playback System
USER MANUAL
Version 1.1
Page 2

Page 3

3
IMPORTANT SAFETY INSTRUCTIONS
!
CAUTION: TO REDUCE THE RISK OF ELECTRIC
SHOCK, DO NOT REMOVE COVER. NO USER
SERVICEABLE PARTS INSIDE. REFER SERVICING
TO QUALIFIED SERVICE PERSONNEL.
The lightning flash with arrowhead symbol within an equilateral triangle is intended
to alert the user to the presence of uninsulated “dangerous voltage” within the
product’s enclosure that may be of sufficient magnitude to constitute a risk of
electric shock to persons.
!
The exclamation point within an equilateral triangle is intended to alert the user to
the presence of important operating and maintenance (servicing)instructions in the
literature accompanying the appliance.
Read and follow these instructions and keep this manual in a safe place.
Do not use this apparatus near water.
Clean only with dry cloth.
Do not block any ventilation openings.
Do not install near any heat sources such as radiators, heaters, or other apparatus
(including pre-amplifiers and amplifiers) that produce heat.
Do not install this apparatus in a confined space such as book cases or closed
cabinets.
Unplug this apparatus from the mains during lightning storms or when unused for
long periods of time.
CAUTION
IPS-3 User Manual
INFORMATION TO THE USER
Alteration or modification carried out without appropriate approval may invalidate the user’s
right to operate the equipment.
Page 4

IPS-3 User Manual
4
WARRANTY
Playback Designs warrants the IPS-3 product against defects in material and workmanship
under normal use and service for a period of time specified by the product’s serial number
from the date of first delivery to the owner. The warranty time period is for 30 days. If within
the first 30 days of ownership you register your Playback Designs IPS-3 product, by
sending us a copy of your sales receipt, your name, address, city, state, zip code, phone
number, email address and your dealer’s store name, we will extend the warranty to 3
years. This warranty is limited to the original owner.
Playback Designs will pay for return shipping charges (domestically) back to the owner
when the product is sent to Playback Designs within the first 30 days after purchase and
the fault can be confirmed by Playback Designs. Otherwise, owner will be responsible for
all shipping charges to and from Playback Designs. International customers must deal with
their local dealer or distributor.
For all warranty claims, a copy of the original invoice must accompany the product.
Opening the product or modifying it in any way by the owner, including but not limited to
cryogenic treatment, will void any warranty.
Please contact Playback Designs for a RA (Return Authorization) number and shipping
instructions before shipping any product to Playback Designs.
Playback Designs products are sold worldwide through authorized dealers with restricted
territories. If any Playback Designs product is purchased from non-authorized dealers or
from a dealer selling outside his / her authorized territory all warranties will be void.
If you purchased this product from a dealer please take a moment and send us an email to
[email protected] so we can register you for the warranty. If this product has
been shipped to you directly from Playback Designs you are automatically registered.
Playback Designs does not recommend using any power conditioners with this product.
Any damage caused to this product caused by the use of power conditioners will not be
covered by this warranty.
Page 5
IPS-3 User Manual
5
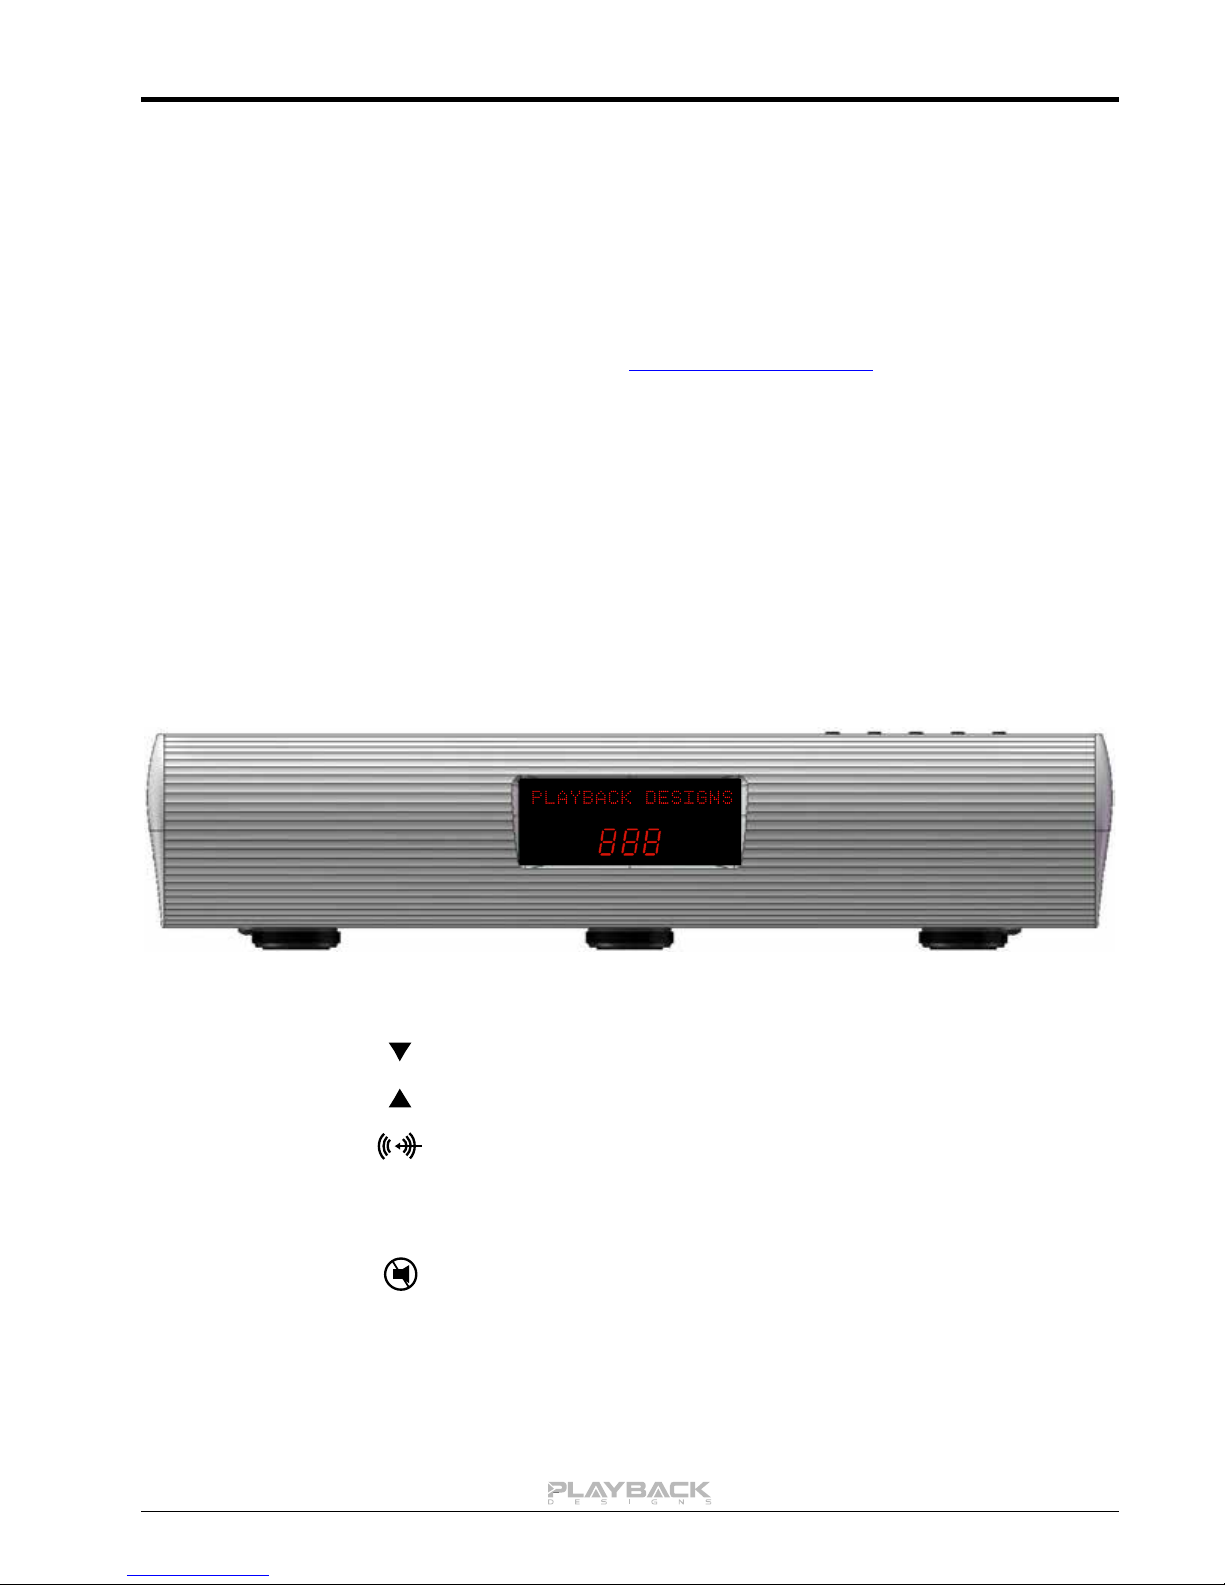
Buttons:
Adjust volume down
Adjust volume up
Each time this button is pressed a new input is selected in the sequence:
AES => Coax => PLINK => USB => Ana1 => Ana2 => Ana3
fn
No function
Mute speaker outputs
BEFORE USING THE PRODUCT
What is in the box: IPS-3 playback system
Remote control unit with mounted batteries
Power cord (110V versions only)
User manual
Registration If you purchased this product from a dealer please take a moment and
send us an email to [email protected] so we can register you for
the warranty.
Installation: The AC voltage supplied to the unit should match the voltage rating
indicated on the rear panel.
Do not place the IPS-3 on any other equipment that generates heat.
As the IPS-3 may become warm during operation, always leave sufficient
space around it for ventilation. Always allow adequate air circulation
around the system.
FRONT PANEL FUNCTIONS
Page 6
IPS-3 User Manual
6
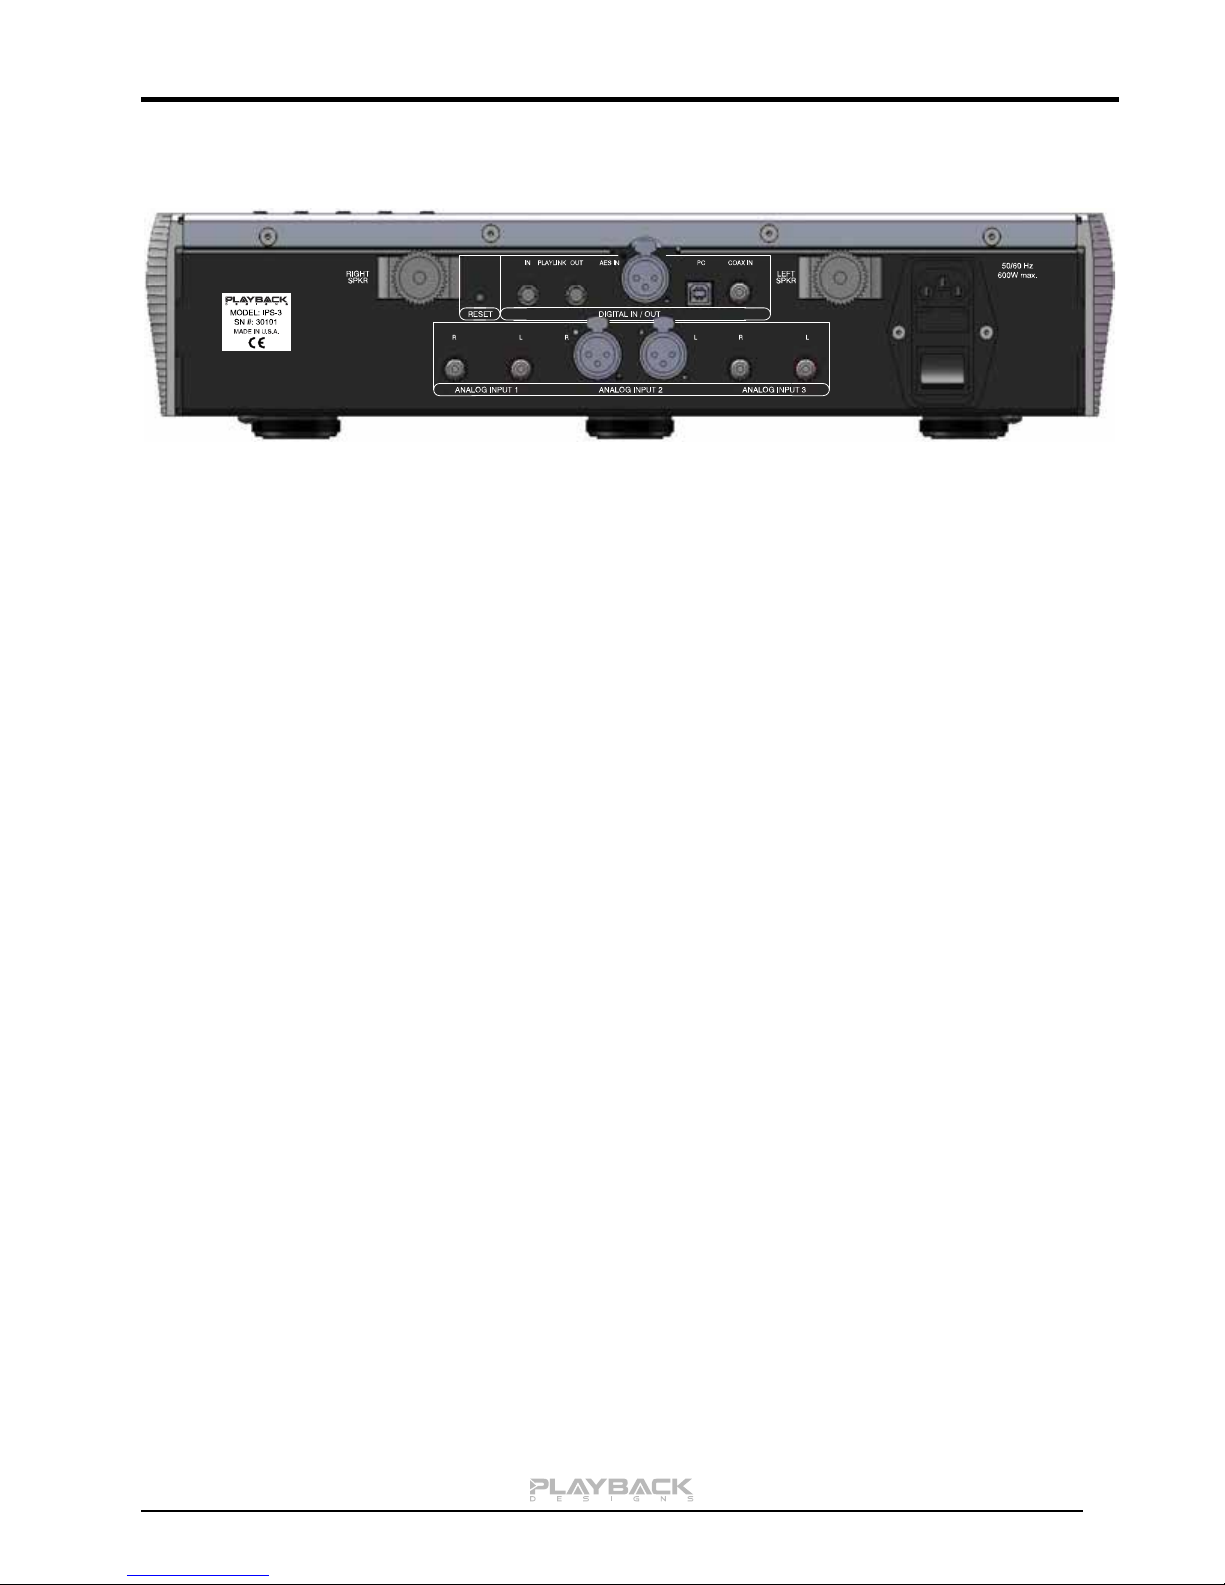
CONNECTIONS
Analog inputs: Analog 1 (RCA): unbalanced, max. level: 3.5Vrms
Analog 2 (XLR): balanced, pin 2 hot, max. level: 3.5Vrms
Analog 3 (RCA): unbalanced, max. level: 3.5Vrms
Digital outputs: PLINK: Proprietary optical link (PlayLink) to other Playback Designs equipment,
such as the optional USB-X extender.
Digital inputs: AES: XLR connector for AES/EBU formatted stereo linear PCM data, up to
24bits and up to 192kHz and 64FS DSD.
COAX: same as AES, but COAX formatted on RCA connector.
PLAYLINK: This optical proprietary link (PlayLink) is used to connect to other
Playback Designs equipment, such as the OpBox player. This
connection supports multiple audio formats.
PC: USB connection to computer based audio systems.
System Control: RESET: Used in connection with firmware update procedure (see appendix A).
Power: Before connecting the IPS-3 to the AC mains, please make sure that the rated voltage is
set correctly as indicated on the rear panel. Operating the system at the wrong voltage will
damage the unit. The voltage rating of the power supply cannot be changed by the user.
Playback Designs strongly recommends not to use any power conditioner for this product
(see warranty statement in this manual). A surge protector should be used to protect this
product from harmful power surges.
Page 7
7
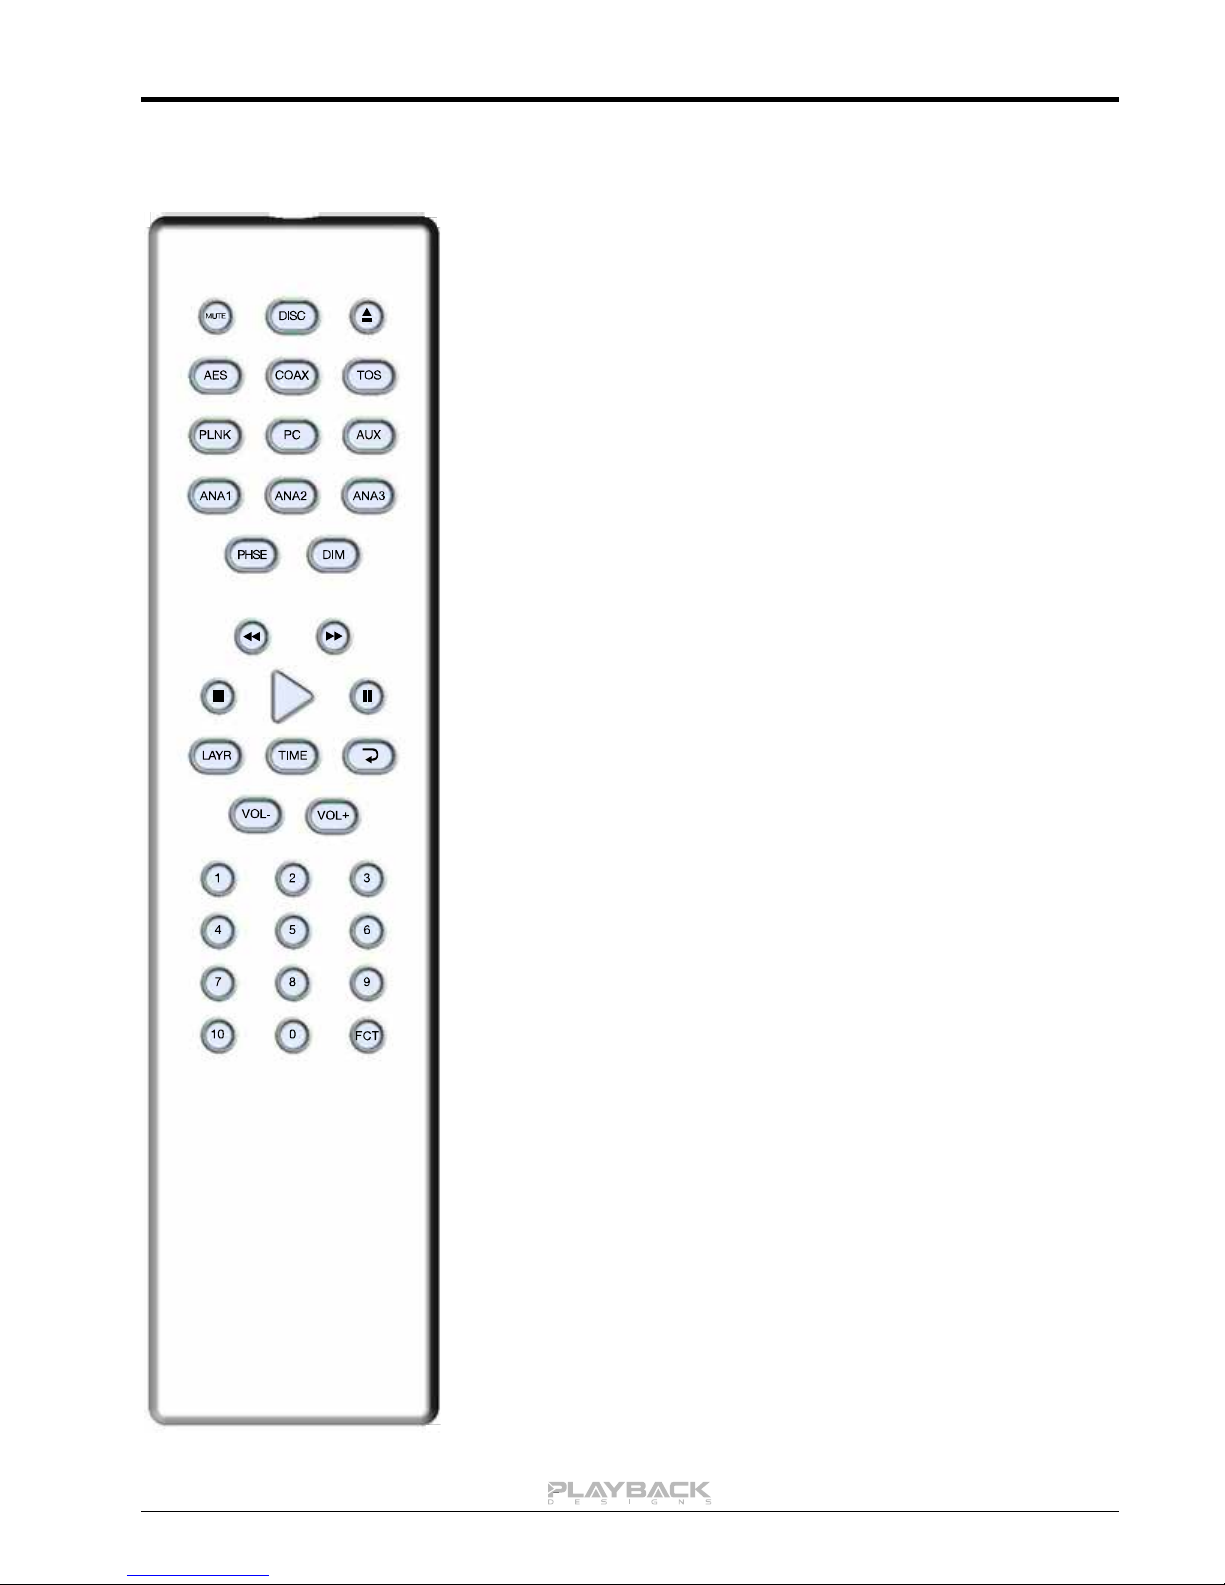
REMOTE CONTROL UNIT
MUTE
AES
COAX
PLINK
PC
ANA1
ANA2
ANA3
PHSE
DIM
FCT
VOL+/-
All others
Mutes the speaker outputs, but not the digital ones.
Input Selections:
Selects the AES input for conversion to analog.
Selects the COAX input for conversion to analog.
Selects the PlayLink input for connection to USB-X.
Selects the USB input from PC.
Selects analog input 1.
Selects analog input 2.
Selects analog input 3.
The first time this buttons is pressed the alphanumeric display indicates the absolute phase for the
digital inputs. If it is pressed again within 5 seconds
the absolute phase is toggled.
Toggles upper display on/off and dims lower volume
display.
Press and hold this button to enter the setup menu
and to display settings. See section "setup menu"
later in this manual for more details.
Increases or decreases volume.
Not used for IPS-3.
IPS-3 User Manual
Page 8
8
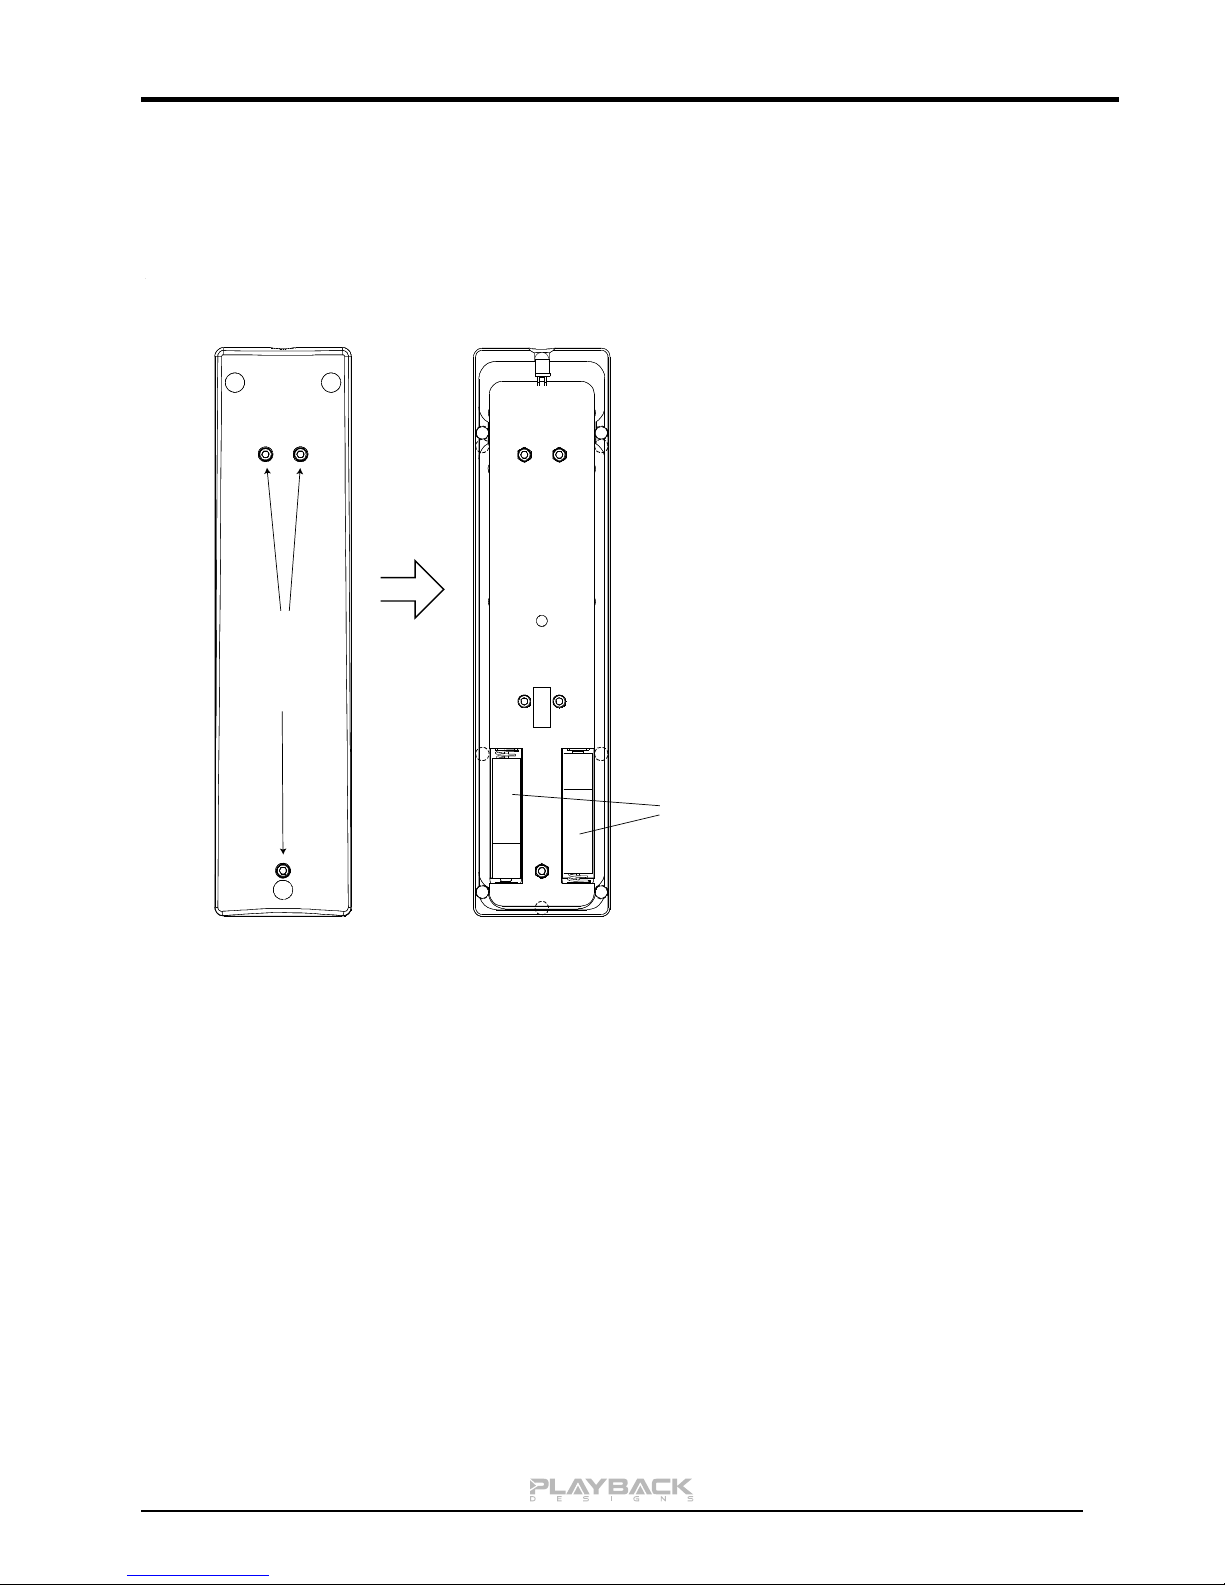
CHANGING BATTERIES ON REMOTE
hex socket
screws, use
3/32" hex key
to open
-
+
+
-
Back cover removedBackside of remote
AAA Batteries
The remote operates with 2 AAA
size batteries. In order to change
them the back cover needs to be
removed as shown in picture on the
left. Make sure that replacement
batteries are inserted with their
polarities as indicated in the picture.
The screws can be opened with a
3/32” hex or Allen key.
IPS-3 User Manual
Page 9

IPS-3 User Manual
9
CONNECTING THE IPS-3 TO A WINDOWS BASED PC or APPLE MAC
Supported PCM audio resolutions: all sample rates up to 384kHz and word lengths up to 24 bits.
Supported DSD audio resolutions: 2.8224MHz (as on SA-CD), 5.6448MHz and 11.2896MHz.
Connection protocol and method: USB 2.0 / Audio class 2.0 compliant, asynchronous mode where IPS-3
generates high precision clock master and computer is clock slaved.
PC requirements: Windows 7 or later
ASIO compatible player software such as JRiver, Foobar,
MediaMonkey etc.
Internet connection for downloading software from
www.playbackdesigns.com.
Mac requirements: OS X (10.6.6 or later)
iTunes with or without plug-in to automate sample rate switching.
Internet connection for downloading software from
www.playbackdesigns.com.
In order for your computer to communicate with the IPS-3 and to exchange audio data a custom driver
software needs to be installed before you can connect it to the IPS-3. If your computer is a Mac running OSX
10.6.6 or later you don’t need any driver software as OSX already supports all PCM formats up to 384kHz
sample rate. DSD file playback is supported via the DoP standard using PCM frames which is also supported
by OSX without any additional driver. A driver has to be installed on all Windows based PCs for any kind of
audio playback via the IPS-3.
IMPORTANT NOTE FOR WINDOWS PC USERS:
The Windows operating system is by design not a real-time system. It is designed to allow certain processes
to take time away from real-time processes such as playing audio. This can result in audible dropouts,
sometimes very short, but sometimes also quite long. Some PCs are pre-configured with drivers and
processes by the manufacturer that cause such dropouts, and others are user-installed with additional
software that do not allow flawless real-time playback of audio. Fortunately, there is a free utility software that
allows you to test your PC for real-time capability:
1. Go to http://www.resplendence.com/latencymon and download the utility program LatencyMon.
There is also a good description of the program and some more technical background on the same
website.
2. Run LatencyMon, leave it running for 10-15 minutes and the software will tell you if you PC is suitable
for playing audio without dropouts.
If you are considering purchasing a new PC, this utility program is small enough and doesn’t require any
installation which allows you to load it onto a flash stick and test it on the PC you are thinking about buying.
Most computer stores will allow this test.
Driver software installation and first time connection:
1. Do not connect the IPS-3 to the computer yet.
2. Turn on your computer.
3. Windows PC users only: Launch your favorite internet browser and navigate to
www.playbackdesigns.com. Click on Support and then Product Drivers. Download the USB
Windows driver version 1.7 (do not use version 1.1):
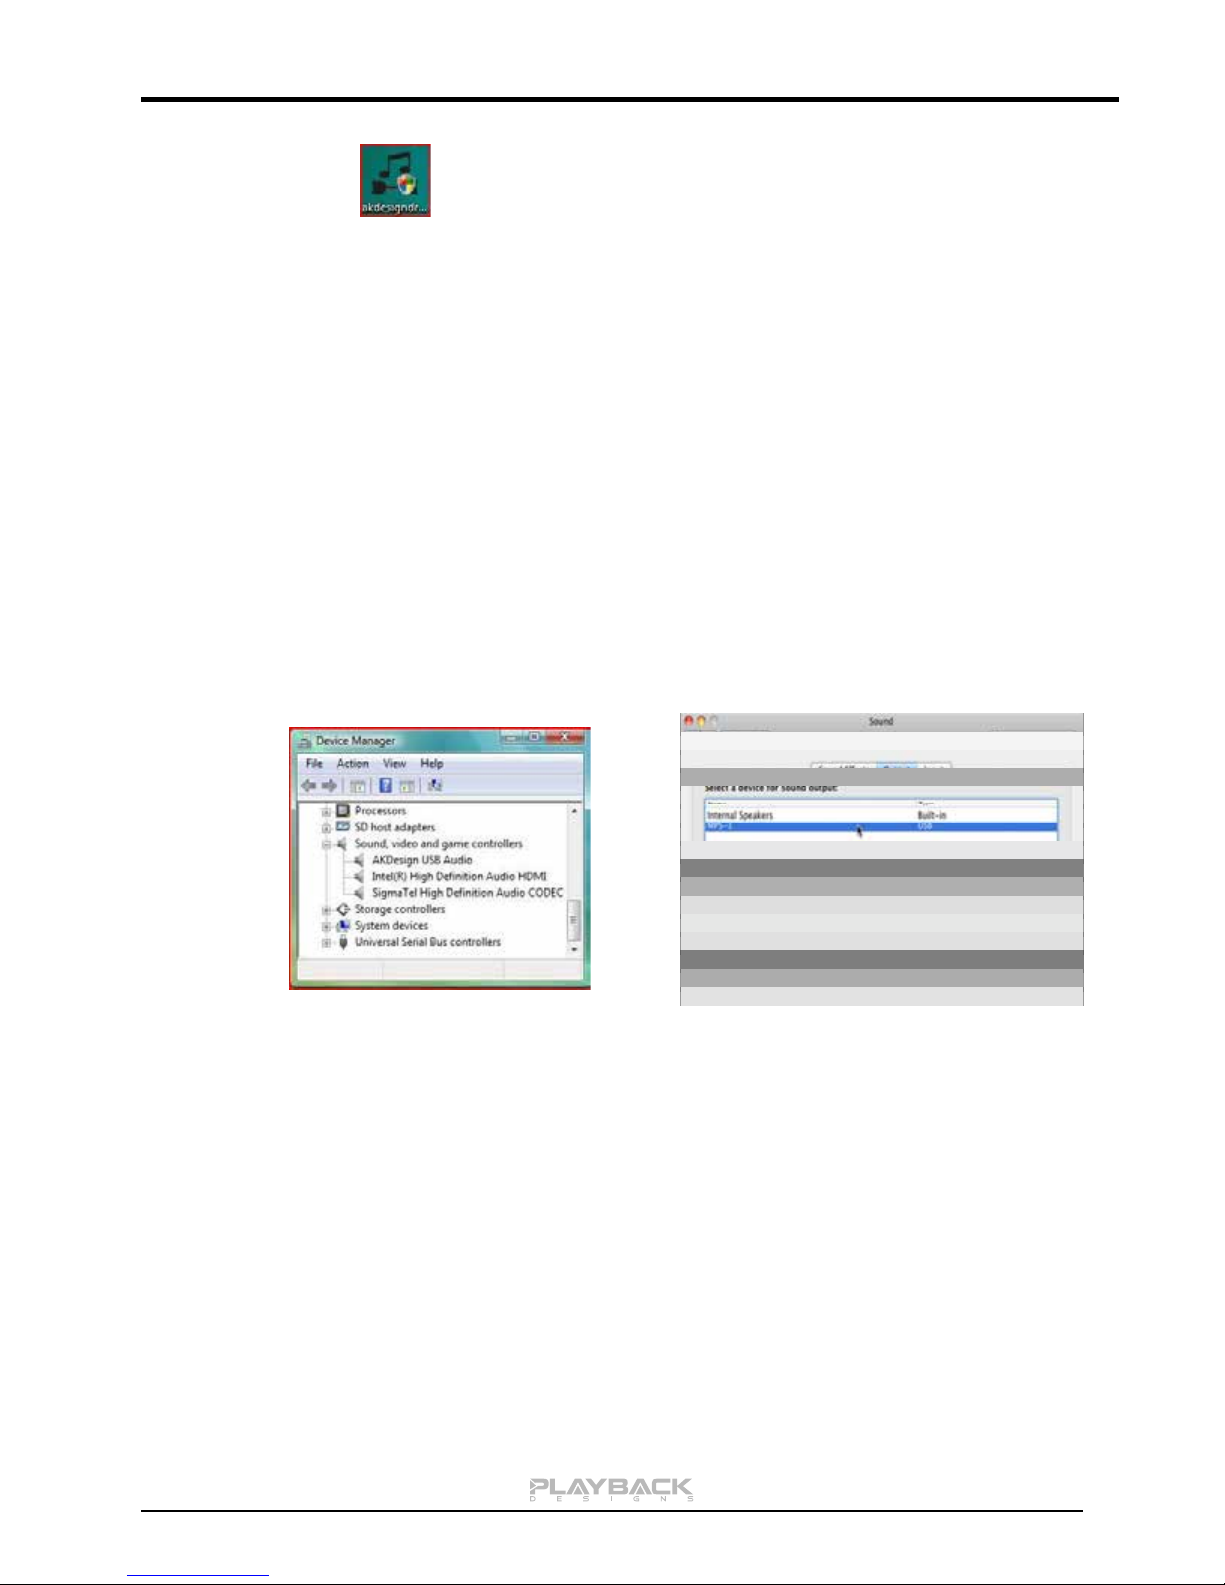
akdesigndrv.zip for PC. Unzip it to the desktop.
No driver software is required for the Mac platform.
4. Windows PC users only: Double click on:
Page 10
10
akdesigndrv.exe (PC)
On the PC in the device manager (below),
where the driver will show up as AKDesign
USB Audio under the Sound, Video and
Game Controllers tab. It will not be listed in
the Sound Control panel
on the Mac in the Sound Control panel
(below), where the IPS-3 should be listed as
an audio output device
and follow the instructions on your screen. This will install the driver necessary to communicate with
the Playback Designs products via USB.
5. Once your computer is properly configured, power on the IPS-3.
6. Select PC input from the remote control if not already done before.
7. Connect the included USB cable between IPS-3 (PC on rear panel) and your computer.
8. The computer will take a moment to enumerate the IPS-3 on its USB bus and notify you when it is
installed successfully. Do not attempt to play anything before the computer tells you that the device is
ready to use. You can check successful driver installation and connection:
IPS-3 User Manual
9. For PC users only: Configure your player software to send audio data to the ASIO interface.
Depending on your player software this may be identified as “AKDesign USB ASIO” or simply as
“ASIO”. Some players may need a plug-in for ASIO compatible playback.
10. For Mac users only: launch iTunes.
11. For best performance and bit perfect reproduction make sure to set all volume controls in the
computer playback software, Windows / OSX control panel to exactly 0db (wide open), turn off all
operating systems sounds, effects or equalizer that might be running in your playback software or
Windows / OSX. Control the volume only with your analog pre-amp.
12. Your system is now ready for high resolution playback.
Page 11
IPS-3 User Manual
11
Re-connection after system has been previously configured:
1. Power on both computer and IPS-3. Select PC input on IPS-3.
2. Connect USB cable.
3. Enumeration should be quick on Windows and about 10 seconds with Mac and may not indicate
anything except with failure. The front panel should indicate the chosen sample rate.
4. For best performance and bit perfect reproduction make sure to set all volume controls in the
computer playback software, Windows / OSX control panel to exactly 0db (wide open), turn off all
operating systems sounds, effects or equalizer that might be running in your playback software or
Windows / OSX. Control the volume only with your analog pre-amp.
5. Your system is now ready for high resolution playback.
During playback with PC
When changing songs from within your computer player software the USB protocol automatically
communicates all necessary sample rate changes to the IPS-3. The front panel of the IPS-3 always indicates
the true sample rate during file playback. This system will never perform any sample rate conversion or any
signal processing that could adversely affect the sonic performance, but rather use the exact bits from your
file and convert them directly to analog.
During playback with Mac
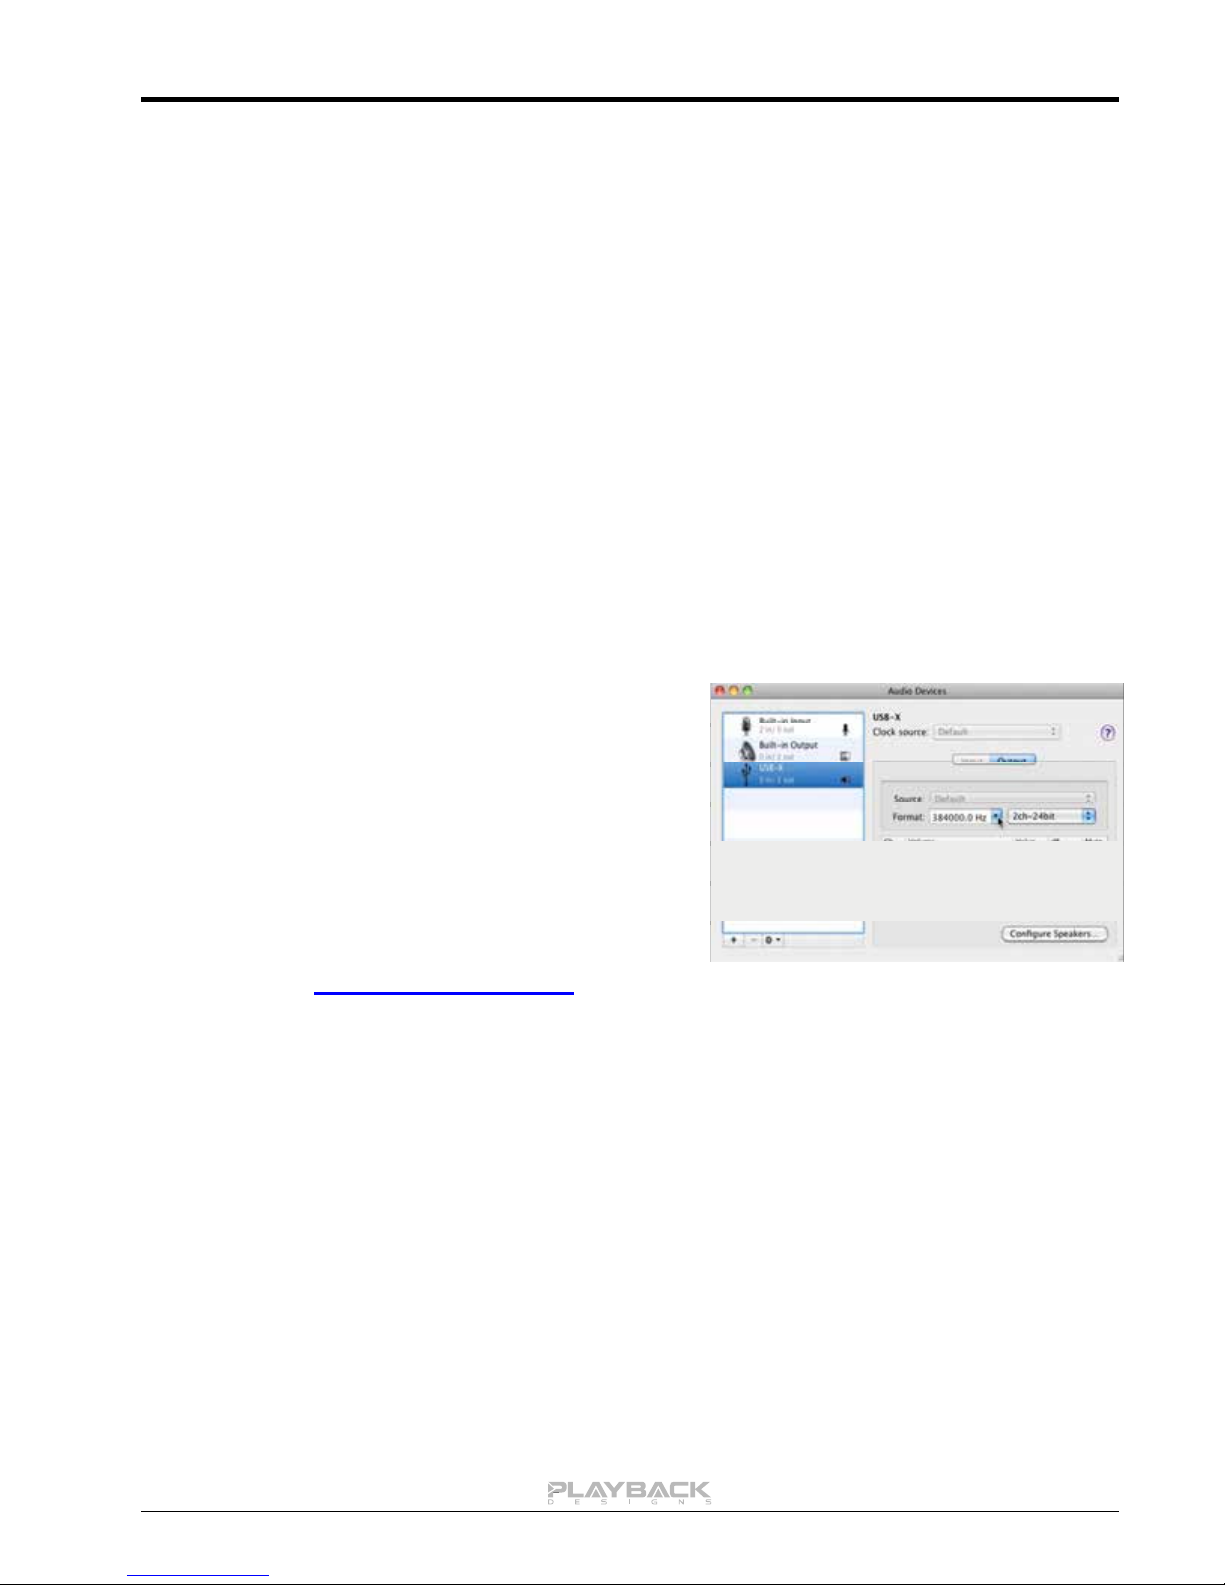
The native OSX operating system and iTunes do not
understand the needs of audiophile consumers and insist on
sample rate conversion. When connecting the IPS-3 OSX will
automatically select the highest possible sample rate
(384kHz) and convert all your songs to this rate before
playing them out through USB. This will result in degraded
performance. You can manually select the sample rate in the
Audio/MIDI Setup utility to correspond with the native sample
rate of the song (as shown in picture), but this can be a
tedious process if your library contains songs with more than
1 sample rate. Alternatively, 3rd party plug-ins for iTunes exist
that automate this process and always select the correct
sample rate for bit perfect playback.
Check our website www.playbackdesigns.com for an updated list of supported plug-ins.
Playback of DSD files
The IPS-3 supports native DSD playback up to 11.2MHz and DoP playback up to 5.6MHz. DoP is a standard
that allows raw DSD data to be sent over a normal PCM link (DSD is NOT converted to PCM). This standard
only supports DSD rates up to 5.6MHz. Mac computers can only support the DSD file format via DoP and
hence are limited to 5.6MHz. Windows based computers on the other hand, require a custom driver software
that can be made to support DSD natively at higher sample rates.
So for DSD playback on Windows computers the playback software should be configured for native DSD
playback, whereas on Mac computers it should be configured for DSD via DoP playback..
Testing your system for bit perfect reproduction
Windows / OSX and your player software offer multiple places for volume control, effects processing,
dithering, equalization or sample rate conversion. Generally, these algorithms affect the sonic performance in
a negative way, especially in low volume listening levels. It is therefore recommended that all volume controls
on your computer are set to exactly 0db (wide open) and all operating system sounds, effects, equalizers and
other algorithms are turned off. You should only control volume with your analog pre-amp. In order to test
your system to make sure that no hidden control or algorithm on your computer may impact your sonic
performance you can play a special test file:
Page 12
IPS-3 User Manual
12
1. Launch your favorite internet browser and navigate to www.playbackdesigns.com. Click on
Support and then Product Drivers. Download the test file “TestPat352.wav”.
2. The test file contains non audible audio, but it is still a good idea to mute your preamplifier.
3. Launch your playback software and play the test file while the IPS-3 is connected via USB and its PC
input is selected.
4. If all the controls on your computer are set correctly then the front panel on the IPS-3 will indicate this
by displaying ”BIT PERF” for 5 seconds at the end of the playback. If it doesn’t show this then at
least 1 control on your computer is impacting the performance of your system.
General notes
1. For best performance and bit perfect reproduction make sure to set all volume controls in the
playback software, control panel to exactly 0db (wide open), turn off all operating system sounds,
effects or equalizer that might be running in your playback software or Windows / OSX. Control the
volume only with your analog pre-amp.
2. While the IPS-3 has no problem supporting playback via USB while it is switched to a different input
(i.e. AES, Coax or analog inputs) it is a good idea to stop playback on your computer before
selecting another input. The clock management in the IPS-3 may not provide the correct frequency to
the USB port if it is not selected. The computer software may have a problem with that and may
malfunction. So when not listening to the USB input, stop playback on your computer.
When things do not seem to work
The IPS-3 is a hardware device with very little software inside and if it doesn’t show any signs of
malfunctioning in other playback modes, it is relatively safe to assume that the problem is either with the USB
link or the computer. Generally, you should look for any signs of trouble on your computer first, and don’t
assume that because your computer may work with someone else’s USB DAC, but not with the IPS-3, that
the problem is with the IPS-3. The IPS-3 uses different software inside your computer.
Here are a few suggestions for what to do:
1. Make sure that the driver is properly installed (PC only). See step 8 under driver installation above for
instructions for how to check successful installation and connection.
2. Make sure you use the USB cable that was shipped with the IPS-3. Other USB cables can be used,
but they need to be USB2.0 compatible.
3. Disconnect the USB cable and restart your
computer.
4. Connect the USB cable while the PC input is
selected on the IPS-3. On Mac computers it can
take up to 10 seconds to enumerate.
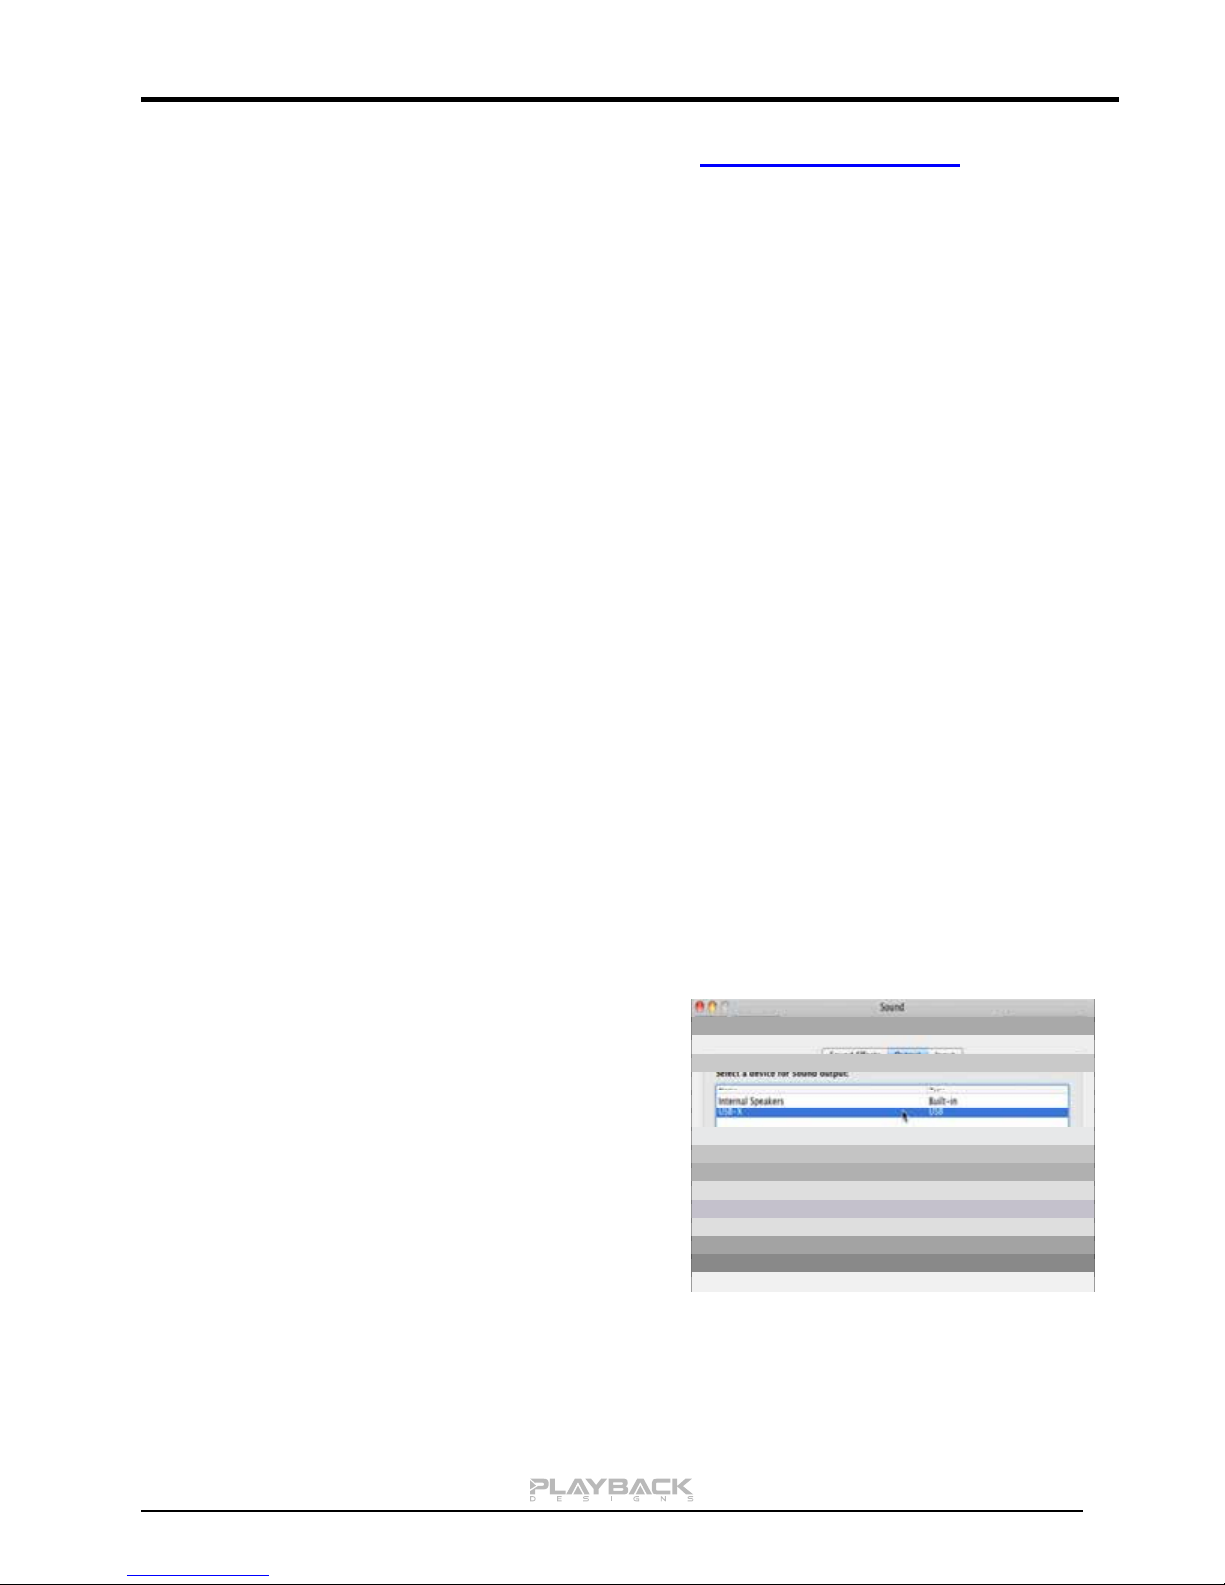
5. On Mac computers it can happen that after
successful enumeration OSX selects the internal
audio output instead of the IPS-3. This can easily
be corrected manually in the sound control panel in
System Preferences as shown in this screen shot.
6. If at this point your PC computer still does not play through the IPS-3 and the driver or IPS-3 cannot
be identified in the Device Manager (PC) then disconnect the USB cable and try re-installing the
driver following exactly above instructions.
7. If you are a PC user and are able to play audio, but you hear occasional dropouts, please see
IMPORTANT NOTE FOR PC USERS above. You should definitely run LatencyMon.
Page 13

IPS-3 User Manual
13
.SETUP MENU
The IPS-3 has several options that can be set via remote control. By pressing and holding the FCT button the
setup menu is displayed on the front panel. After no further button has been pressed for 5 seconds the
display goes automatically back to normal operation. After entering the setup menu the FCT button can be
pressed shortly to advance to the next menu item. Each programmable menu item may be toggled between 2
settings by pressing the play button.
IMPORTANT: Do not attempt to change any settings while the IPS-3 is connected to any PLINK or USB-X
devices. Always disconnect any optical cables.
The following options are available in sequence:
1. Serial number. This option is not user programmable.
2. PLINK Input format: This is currently fixed to the Sonoma format and may be expanded in the future.
3. Firmware version. This option is not user programmable.
4. Temperature: this displays the measured temperature inside the IPS-3.
Page 14

IPS-3 User Manual
14
Power Supply
North America model……… AC 120V, 60Hz
Europe model……………….AC 230V, 50Hz
Consumption…………………………...600W
Max. Analog Input Level:
XLR: 3.5Vrms per signal, pin 2 Hot
RCA: 3.5Vrms
Weight…………………………………….. 19kg / 42 lb
Operating Temperature………………+5°C to +30°C
Ext. dimensions (W x H x D) 43 x 10 x 45cm
17 x 3.5 x 17.5 inches
Nominal Output Power……...130W (8Ω), 260W (4Ω)
Superimposed and linearized Class B
Batteries for remote control unit……………….2x AAA
Mains fuse:
6.3A / 230V slow blow, 20mm, for 110V operation
3A / 230V slow blow, 20mm, for 230V operation
EXTERNAL CLOCK
A unique feature of the IPS-3 is its elaborate and sophisticated clock generator which does not require to be
locked to an external source. It completely shields any incoming digital audio stream from its sensitive internal
clock circuitry through various stages of buffering with unique control algorithms. This removes any incoming
jitter from external sources so well that no complicated setups with master – slave clocking configurations are
needed, as is often the case with other equipment. In fact, the IPS-3 performs equally well with jittery sources
as with higher quality ones. For this reason the IPS-3 does not require an external clock.
BREAKING IN THE IPS-3
Breaking in the Playback Designs IPS-3 is time consuming but well worth the effort. It would be a mistake to
pre-judge the system based on what you might hear at first listen. This is what you can expect to hear at
different intervals during break-in:
1. Out of the box: The system will have good clarity, but the highs can be recessed. Bass might appear
to be a bit muddy and lacking punch. Soundstage might sound closed in.
2. 50 - 150 Hours: The sound will open up a little bit, but can still sound a bit brittle.
3. 150 - 350 Hours: Midrange will start smoothing out and clarity will increase, but highs might continue
to remain recessed. At this point, there probably will not be much change in the bass. You will
probably wonder how the Playback Designs system will ever sound like others have described, but
we assure you that you will start to hear substantial changes within another week of play.
4. 350 - 500 Hours: The magic will be starting. Highs will be open and airy. Midrange will appear much
more full bodied and natural. Soundstage will be huge and the image presentation will start appearing
very holographic. Bass will be incredibly deep and tight with texture and detail galore.
5. Over 500 Hours: The system will continue to change subtly over the upcoming month of usage, but
you should be recognizing a very life-like and natural sound.
SPECIFICATIONS
Page 15
15
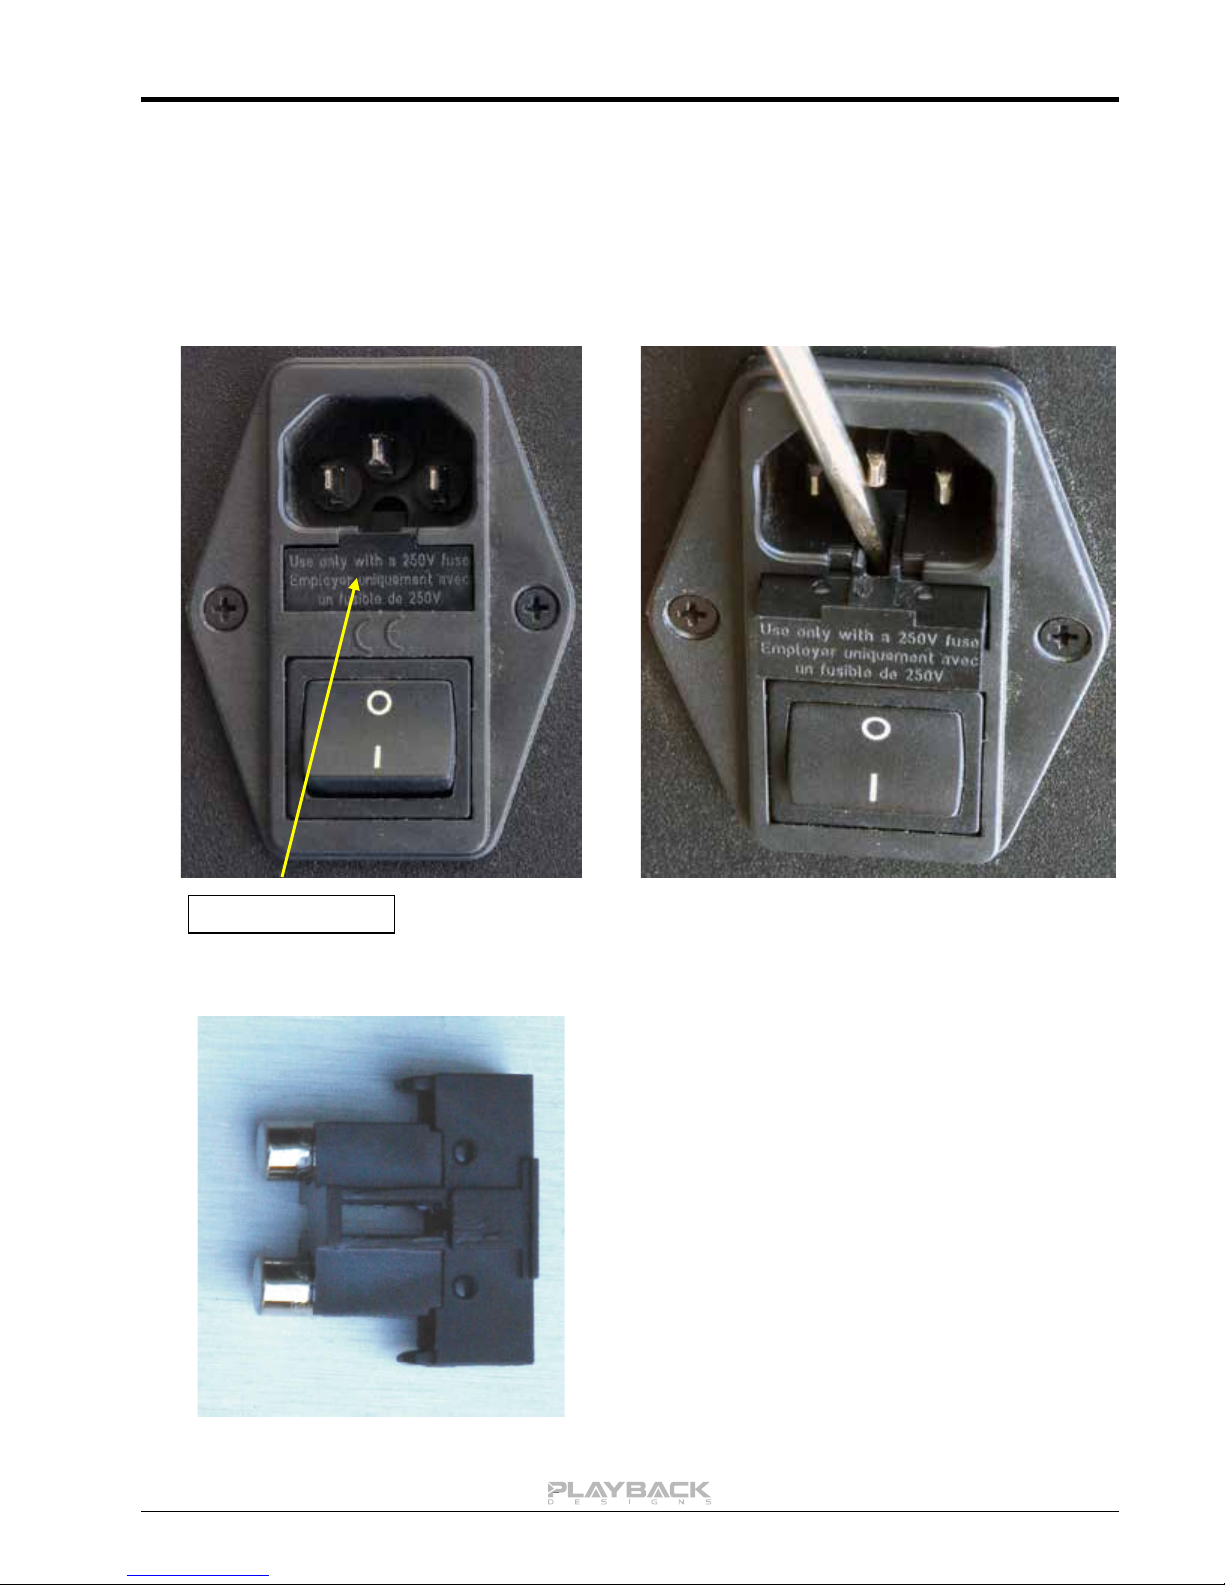
CHANGING THE FUSE ON THE IPS-3
1. Locate fuse compartment on power connector on
rear panel.
2. Use a small screw driver to pry open the fuse
holder.
3. The fuse holder contains 2 fuses. The top one is a
spare and can replace the blown one at the bottom.
4. Replace fuse holder into power connector by
making sure that good fuse is at bottom.
Replacement fuses should be rated:
6.3A / 230V slow blow, 20mm, for 110V operation
3A / 230V slow blow, 20mm, for 230V operation
Fuse compartment
Inside the power connector on the rear panel of the IPS-3 is a fuse that protects the system from dangerous
power surges. If the system fails to power up or no light on the front panel is lit then proceed as follows to
change the fuse:
IPS-3 User Manual
Page 16

IPS-3 User Manual
16
Appendix A: Upgrading the Firmware in your IPS-3
Playback Designs is constantly innovating new algorithms and methods for audio processing and from time to
time may release new firmware for the IPS-3 that may further enhance the sonic performance or add new
features. New releases will be distributed as audio wave files. They can be played into the IPS-3 just like any
other audio file. The IPS-3 processor will automatically detect this file and update the firmware. No audio will
be audible as the processor will automatically set the volume to 0.
The IPS-3 contains 2 processors and hence there may be 2 separate files available, one for each processor.
Before updating the firmware in the IPS-3 you should check what version is currently installed to make sure it
is indeed an older version. The chapter Setup Menu explains how to find the firmware version. It is displayed
with 2 numbers. Each number represents the version for one processor.
Upgrade Procedure:
1. Power on IPS-3.
2. Connect your computer with the included USB cable to the PC input on the rear panel.
3. Load the wave file with the update firmware into your player software on your computer.
4. Play the file.
5. The front panel will indicate WRITING FLASH. It is important that at this point you no longer
touch the system, nor your PC, nor the remote, don't change the input, don't turn the power
off. Go have a cup of tea, because it will take about 2 minutes for this to finish.
6. Once playback has finished the front panel will return to either normal display or it will say
WRITING FAILURE. A failure can happen when you didn't obey the instructions in the
previous steps or your PC had a dropout during playback. If this failure happens, don't panic,
but follow the next steps precisely:
a. DO NOT POWER OFF the IPS-3.
b. Disconnect your computer from the IPS-3.
c. Push the RESET button on the rear panel.
d. Wait for the Soft Start to finish and re-connect the USB cable.
e. play a normal audio file to make sure everything is still working normally.
f. Stop playback and go to step 3.
7. If playback of the update file has finished and the front panel does not display any error
message, but indicates normal operation then stop playback and disconnect the USB cable.
8. power off the IPS-3.
9. power on the IPS-3 and proceed to normal operation.
 Loading...