

Page 1

Voyager Legend® CS
Bluetooth Headset System
User guide
Page 2

Welcome
Congratulations on purchasing your new Plantronics product. This guide contains instructions
for setting up and using your Voyager Legend CS Wireless Headset System.
Please refer to the separate safety instructions for important product safety information prior
to installation or use of the product.
2
Page 3
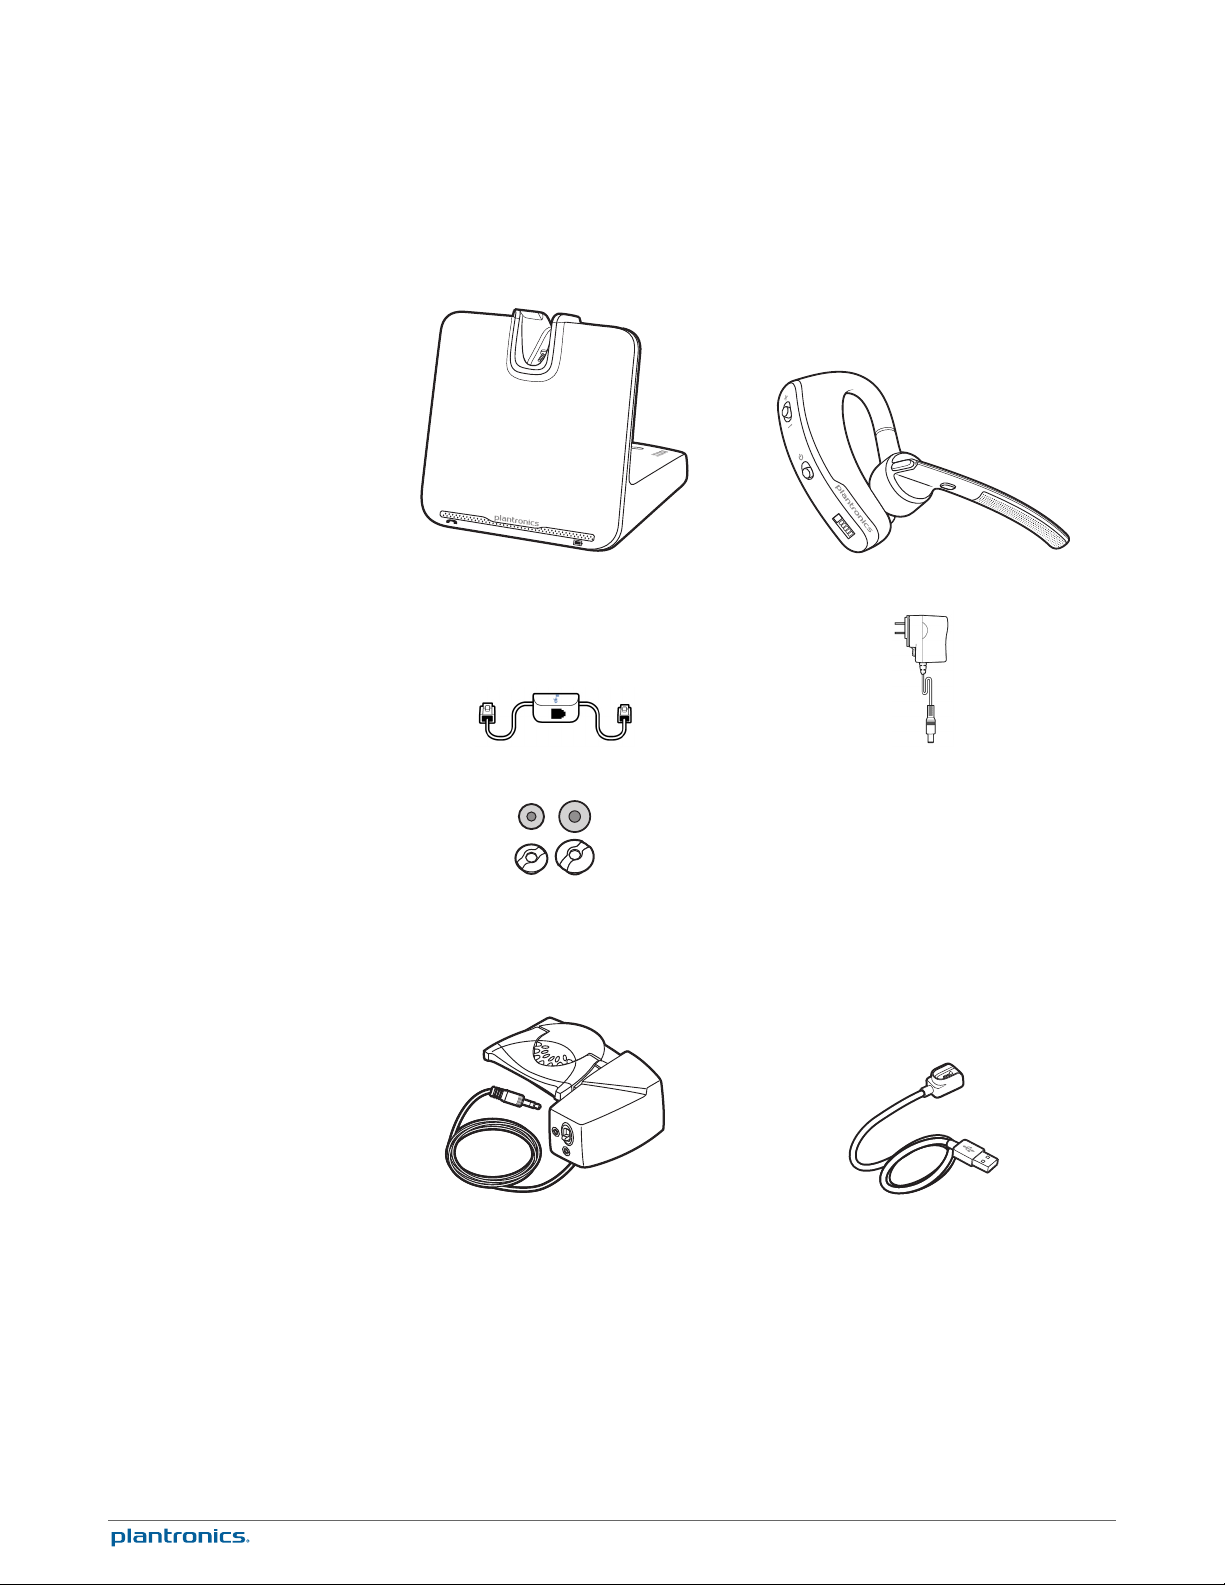
What's in the box
Base Headset
Telephone interface cable Power supply
Ear tips
Some models may also include:
HL10 lifter
USB Charge cable
3
Page 4
1
2
3
5
7
4
6
109
8
4
1
2
3
5
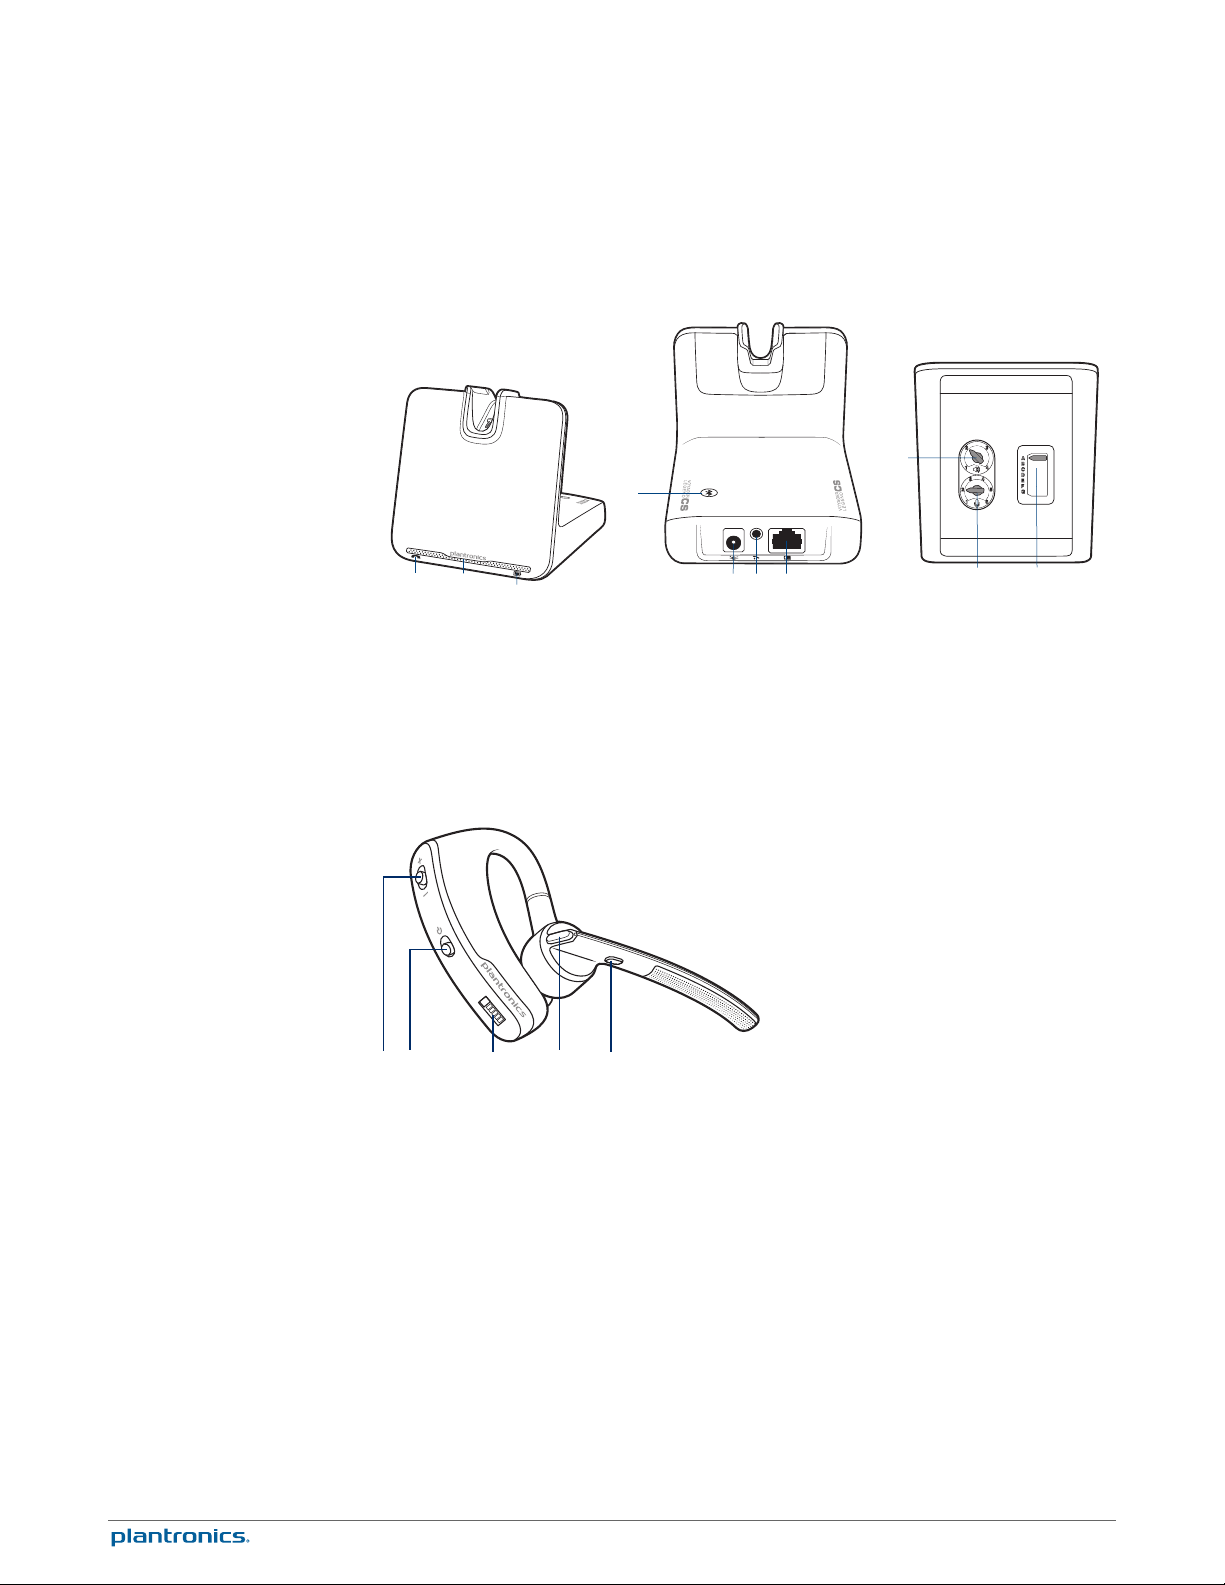
Base and headset basics
Base
Call/mute LED
1
Power on/pairing LED
2
Charging LED
3
Pairing button
4
Power jack
5
*For installation setup
Headset
Volume +/- button
1
Power button
2
Snap-fit magnetic charge connection
3
Handset lifter/EHS cable jack
6
Telephone interface cable
7
Listening volume dial*
8
Speaking volume dial*
9
Configuration switch*
10
Call button
4
Mute microphone/voice command button
5
4
Page 5
1 2
3 4 5
6 7
8
9
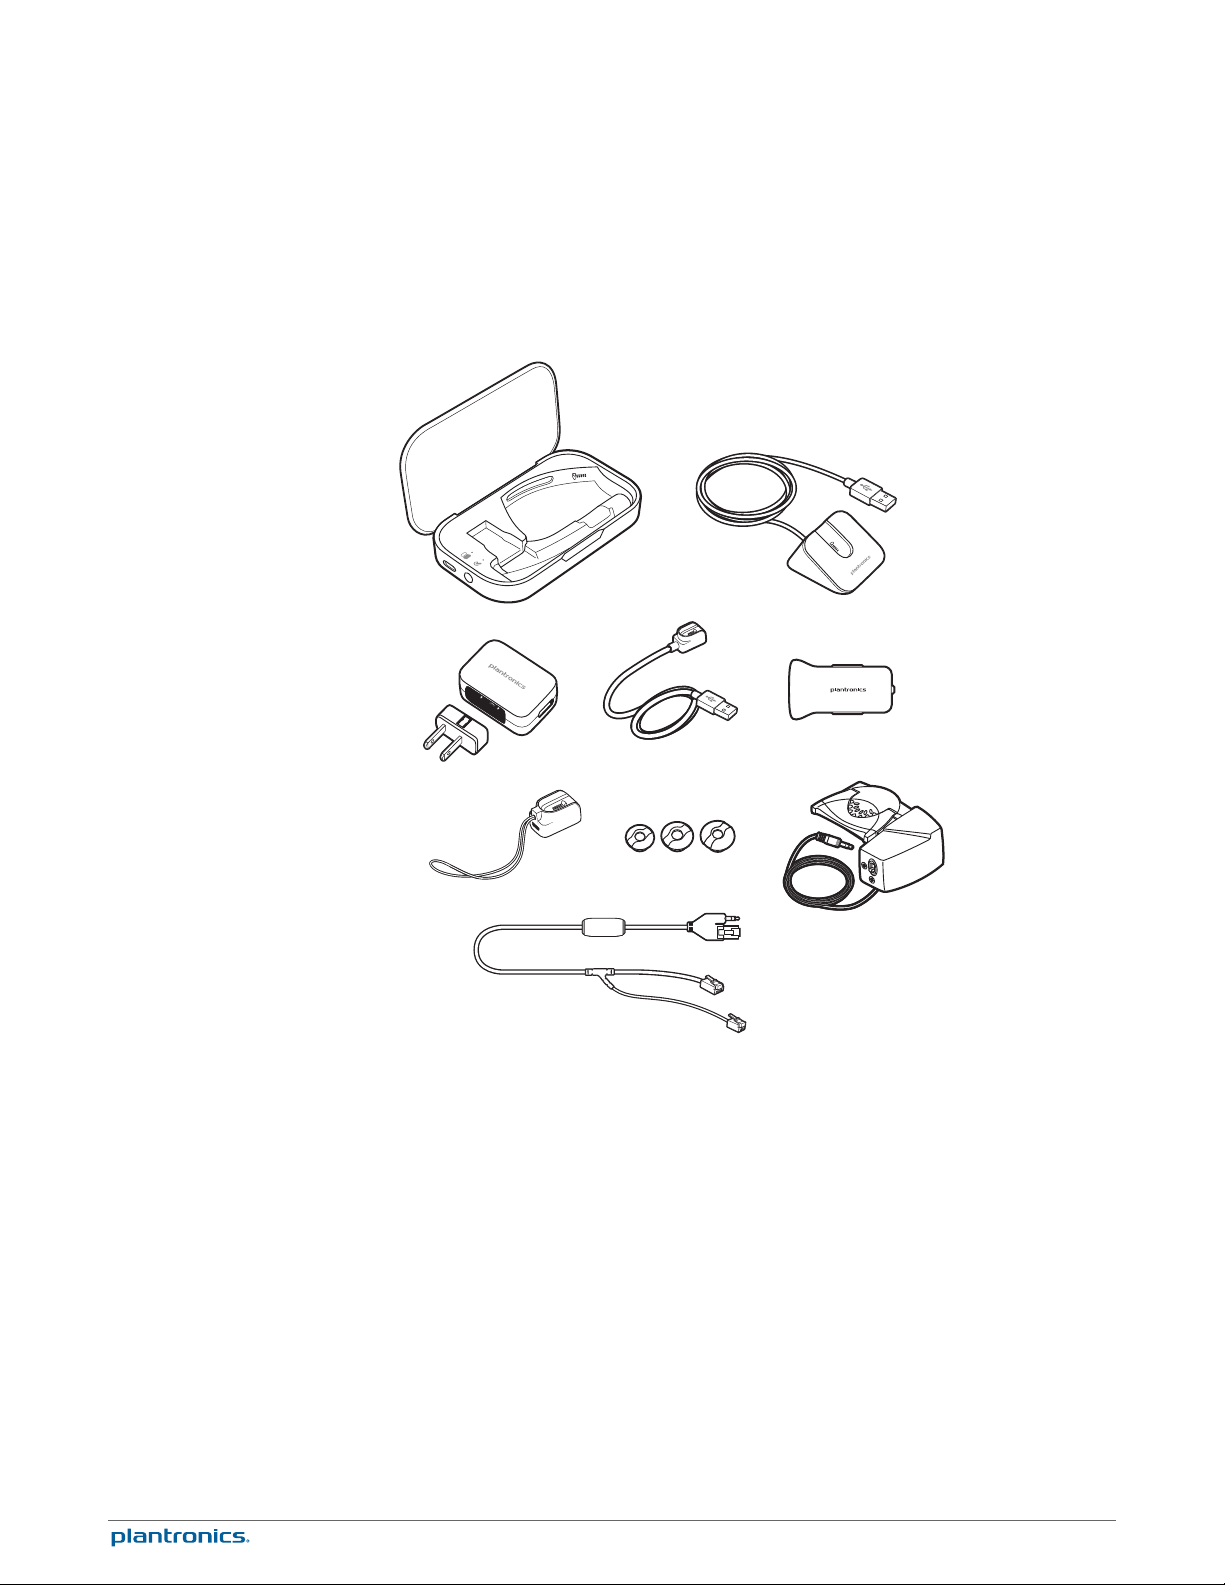
Accessories
Sold separately.
Portable charge case
1
Desktop charge stand
2
AC charger
3
USB charge cable*
4
Car charge adapter
5
Micro USB charge adapter
6
Ear tip kit (available in S, M, L)
7
HL10 lifter* Automatically lifts handset and returns it to the cradle. Enables remote call
8
control with your headset.
Electronic hookswitch cable (EHS cable) Electronically and automatically takes your desk
9
phone handset off the hook. Enables remote call control with your headset.
*Included with some models.
5
Page 6
1
2
2
1
2
2
2
1
3
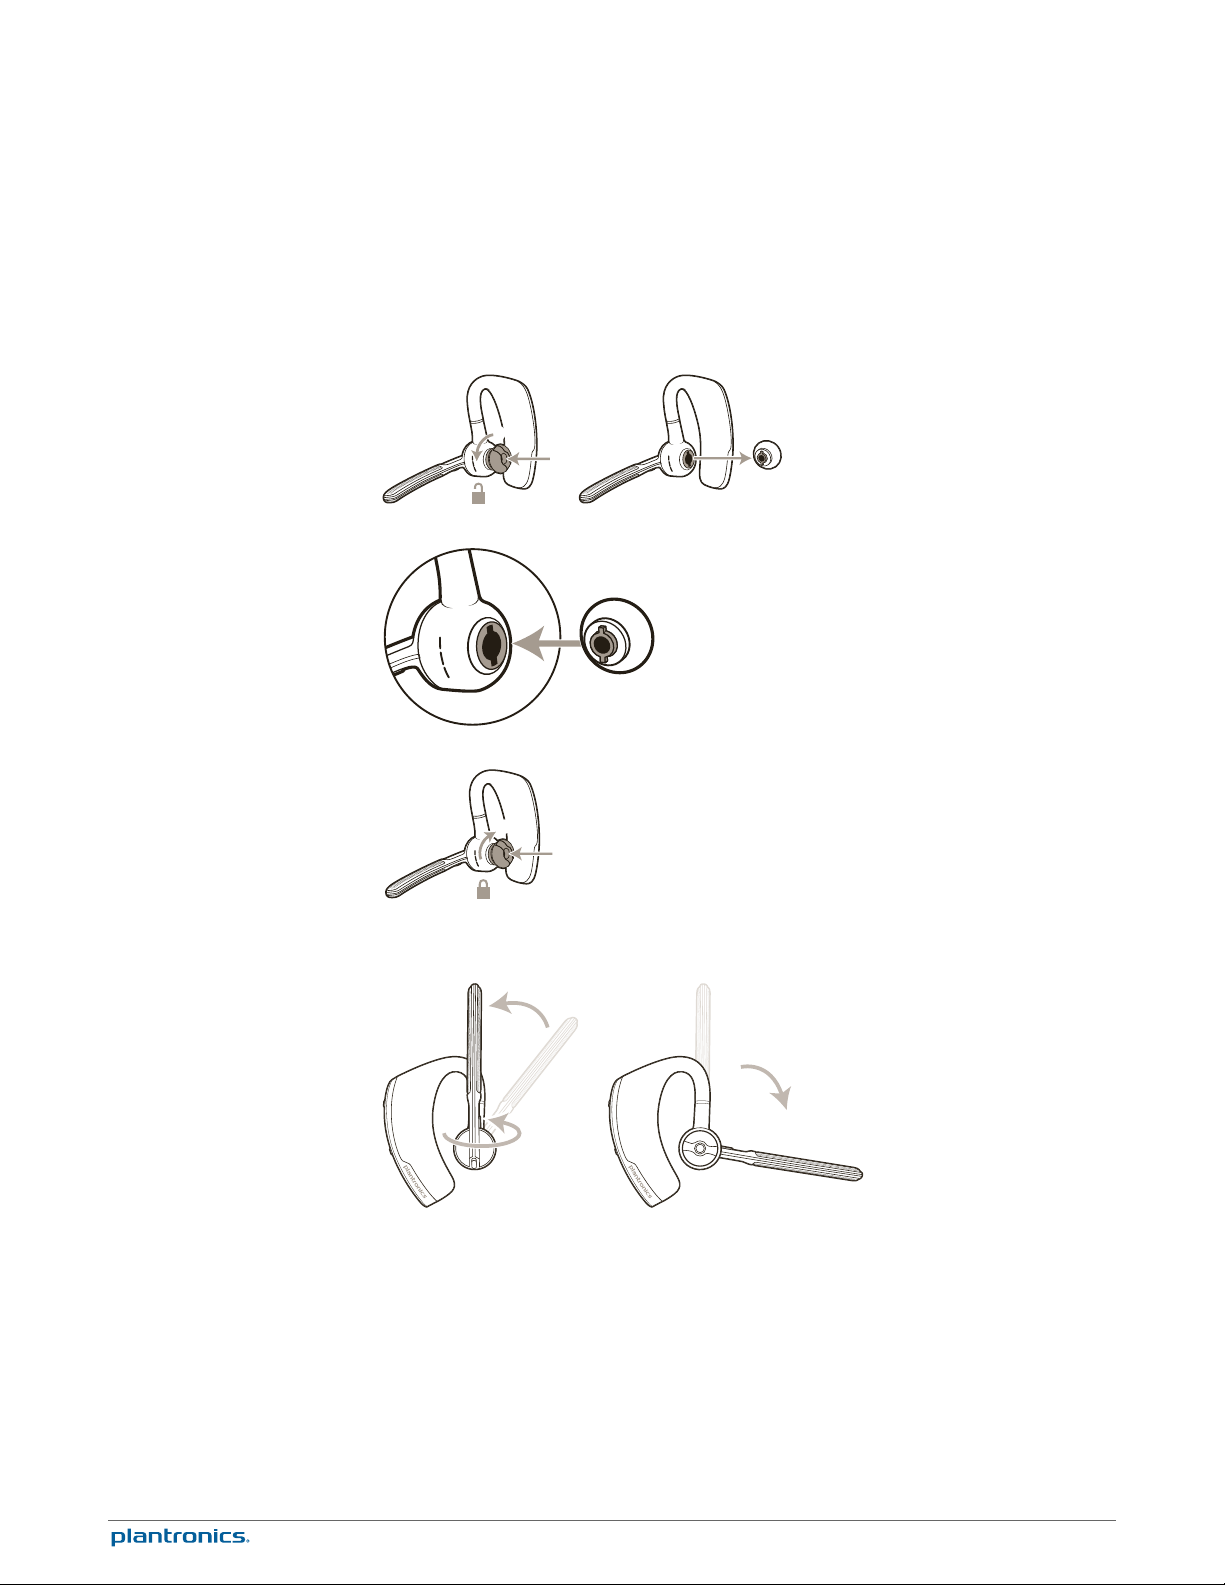
Fit
Change the ear tip
Replace the ear tip for a better fit.
1
Push in ear tip and rotate to the left to unlock it.
2
Align new ear tip into slot.
3
Rotate it to the right to lock it into place.
Wear on the left or right
To wear the headset on your other ear, rotate the boom upwards then twist it around so the ear
tip is on the other side before lowering the boom.
6
Page 7
=
20
Connect Your Desk Phone
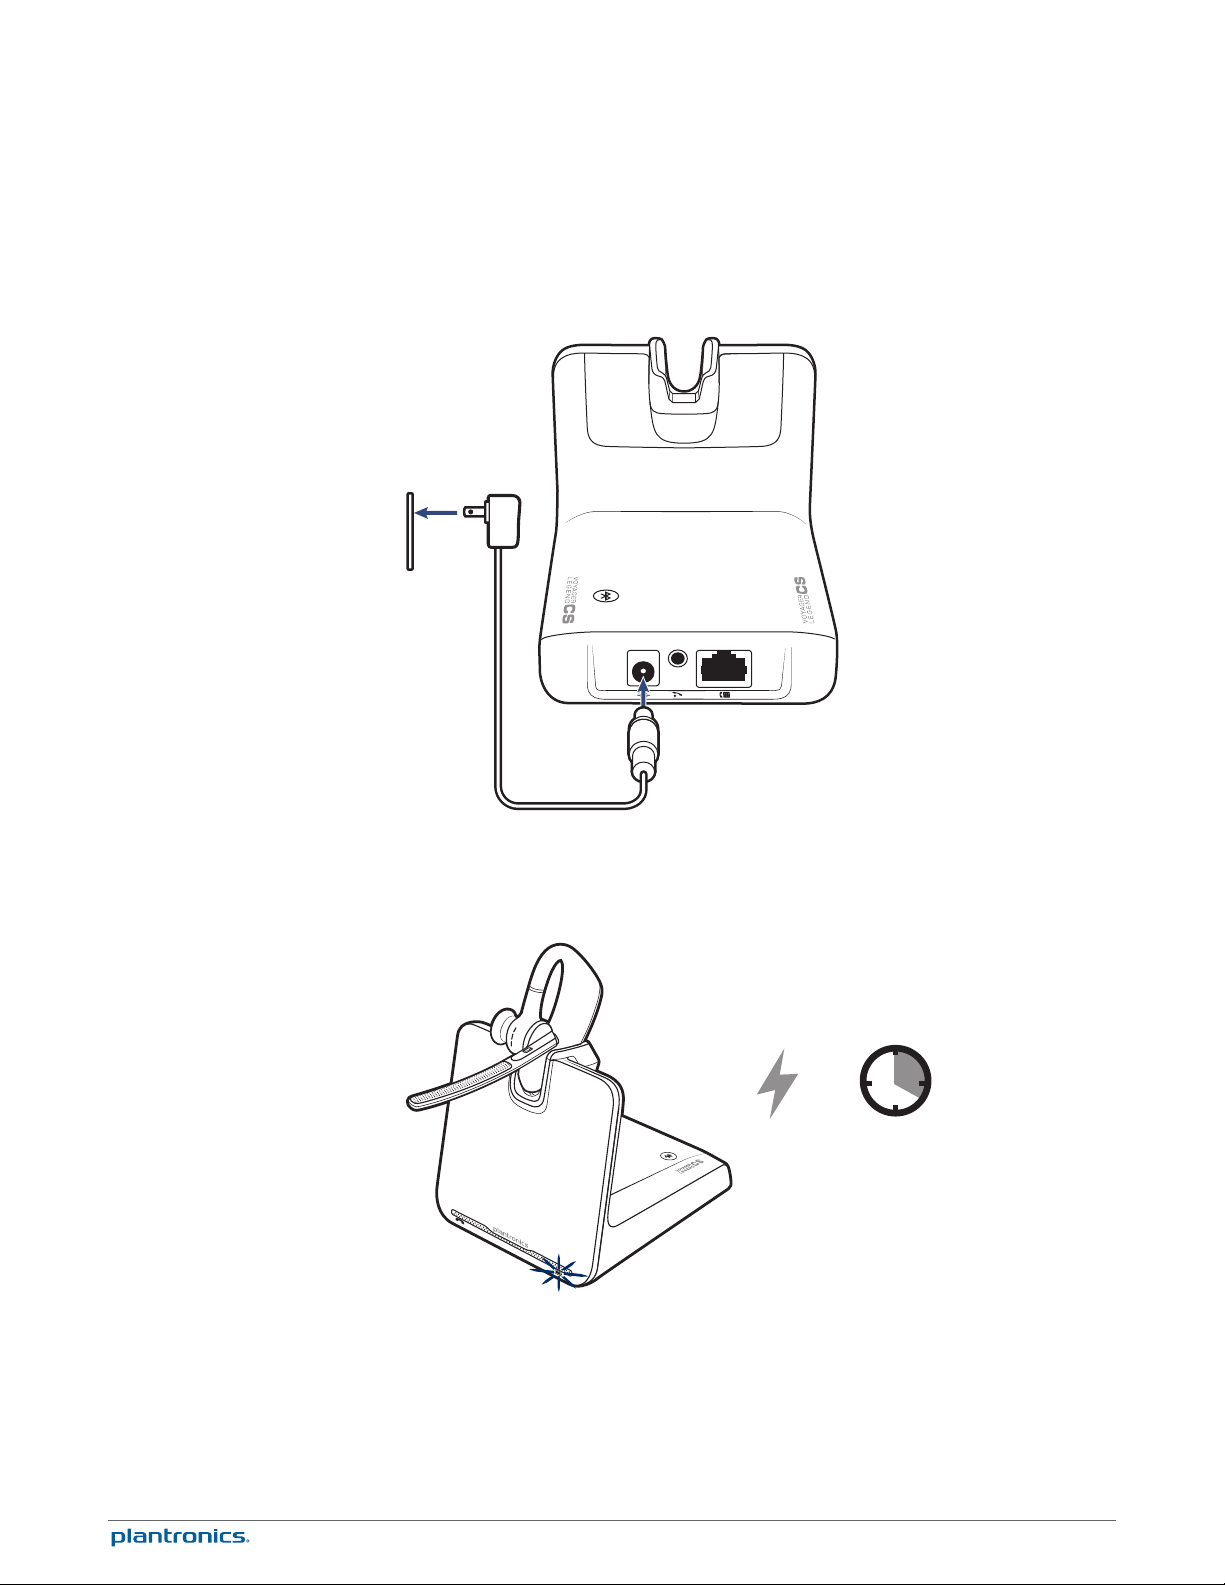
Connect the power
Charge the headset
Plug one end of the power supply into the power jack on the back of the base and the other end
into a working power outlet. The Power On LED will be solid white.
Place the headset in the charging cradle. The charging LED on the base will flash blue when
charging and turn solid blue when the headset is fully charged. Charge for at least 20 minutes
prior to the first use. A full charge takes 90 minutes.
Connect and configure
your desk phone
There are three setup options for connecting the Voyager Legend CS to your desk phone.
Select one of the following and continue.
• Desk phone (standard)
• Desk phone + HL10 Lifter (sold separately)
• Desk phone + EHS cable (sold separately)
7
Page 8
NOTE If you will be using a standard desk phone setup or a desk phone with an HL10 lifter, see below.
If you will be using the desk phone with an EHS cable, refer to Desk phone plus EHS cable section in
this guide. For further installation information refer to the EHS Getting Started guide that came with
your EHS cable or go to plantronics.com/accessories.
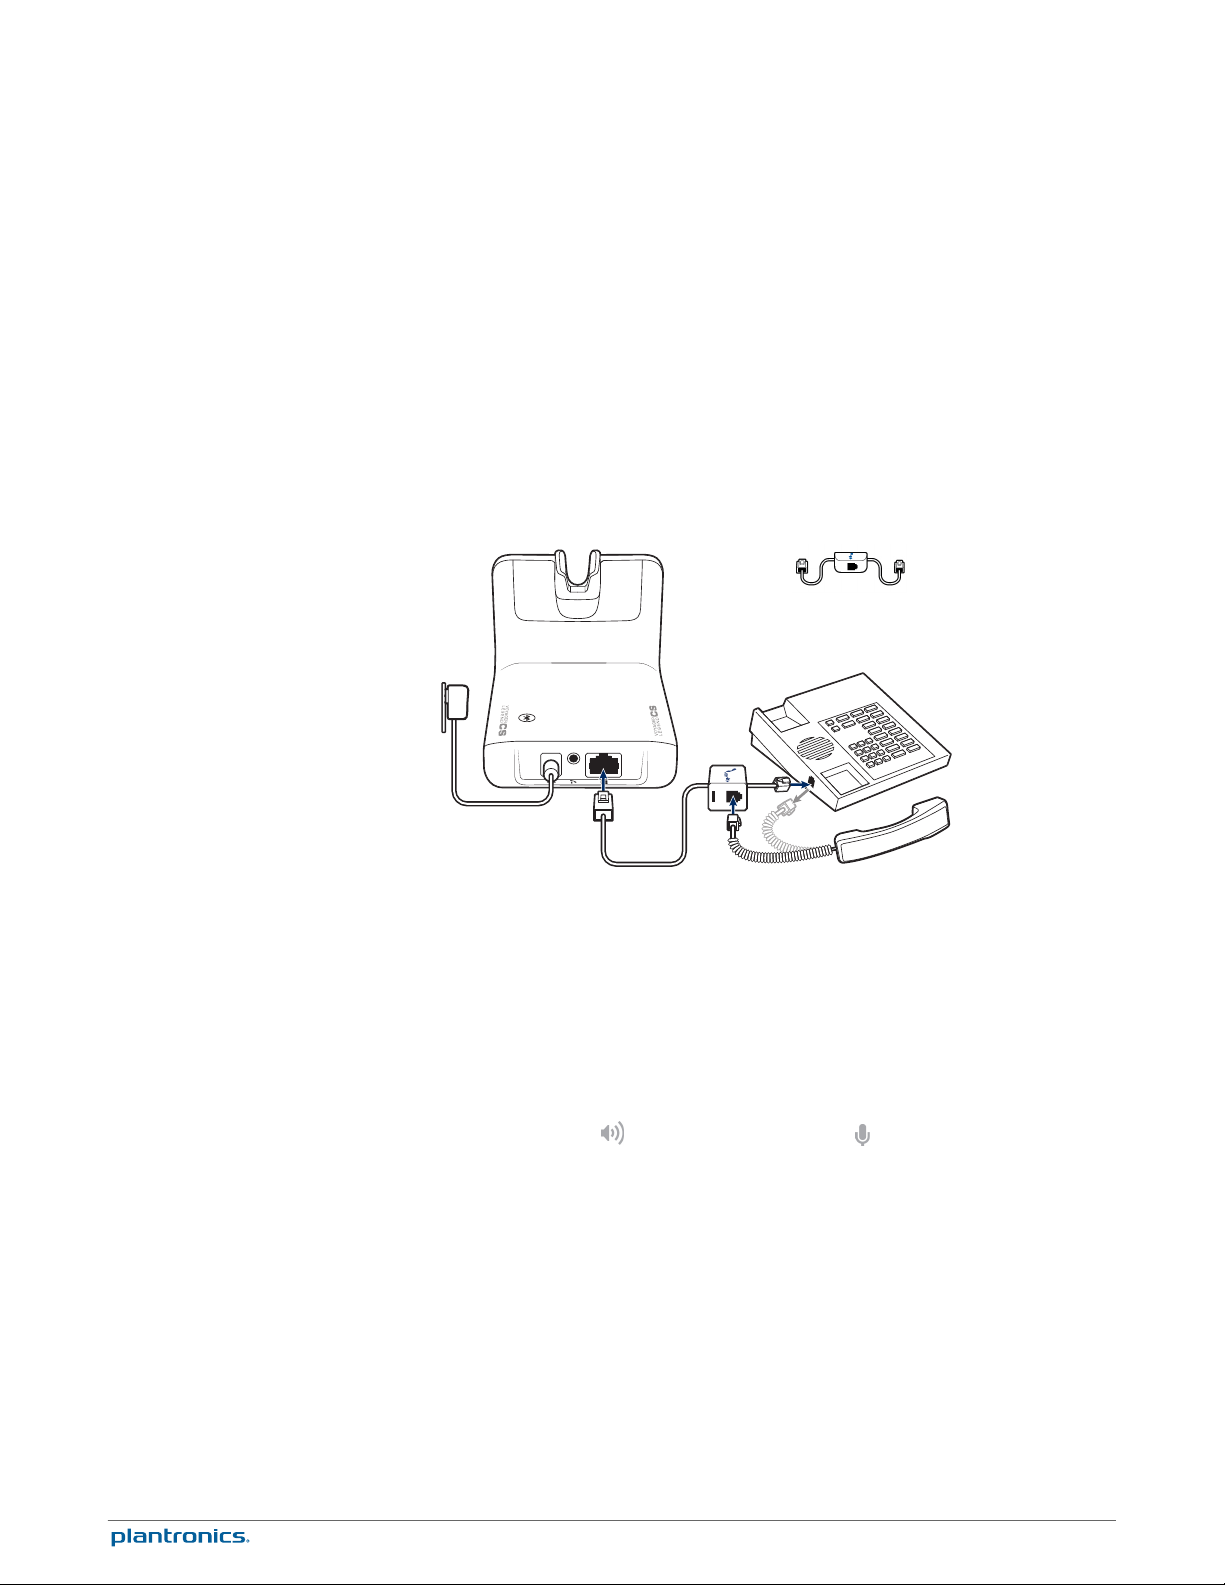
Desk phone (standard)
1
Connect one end of the telephone interface cable to the back of the base.
2
Disconnect the handset coil cord from the desk phone and re-connect it to the telephone
interface cable junction box.
3
Connect the remaining end of the telephone interface cable into the open handset port on the
desk phone.
USE
NOTE Your desk phone handset will continue to work; it's just hooked up differently.
NOTE If your phone has a built-in headset port, you should only use the headset port if you will not be
using the HL10 lifter. In this configuration, you must first press both the headset button on your phone
and the call control button on the headset to answer or end calls.
Check configuration and
make a test call
1
If your desk phone has a volume control, set it to mid-range.
2
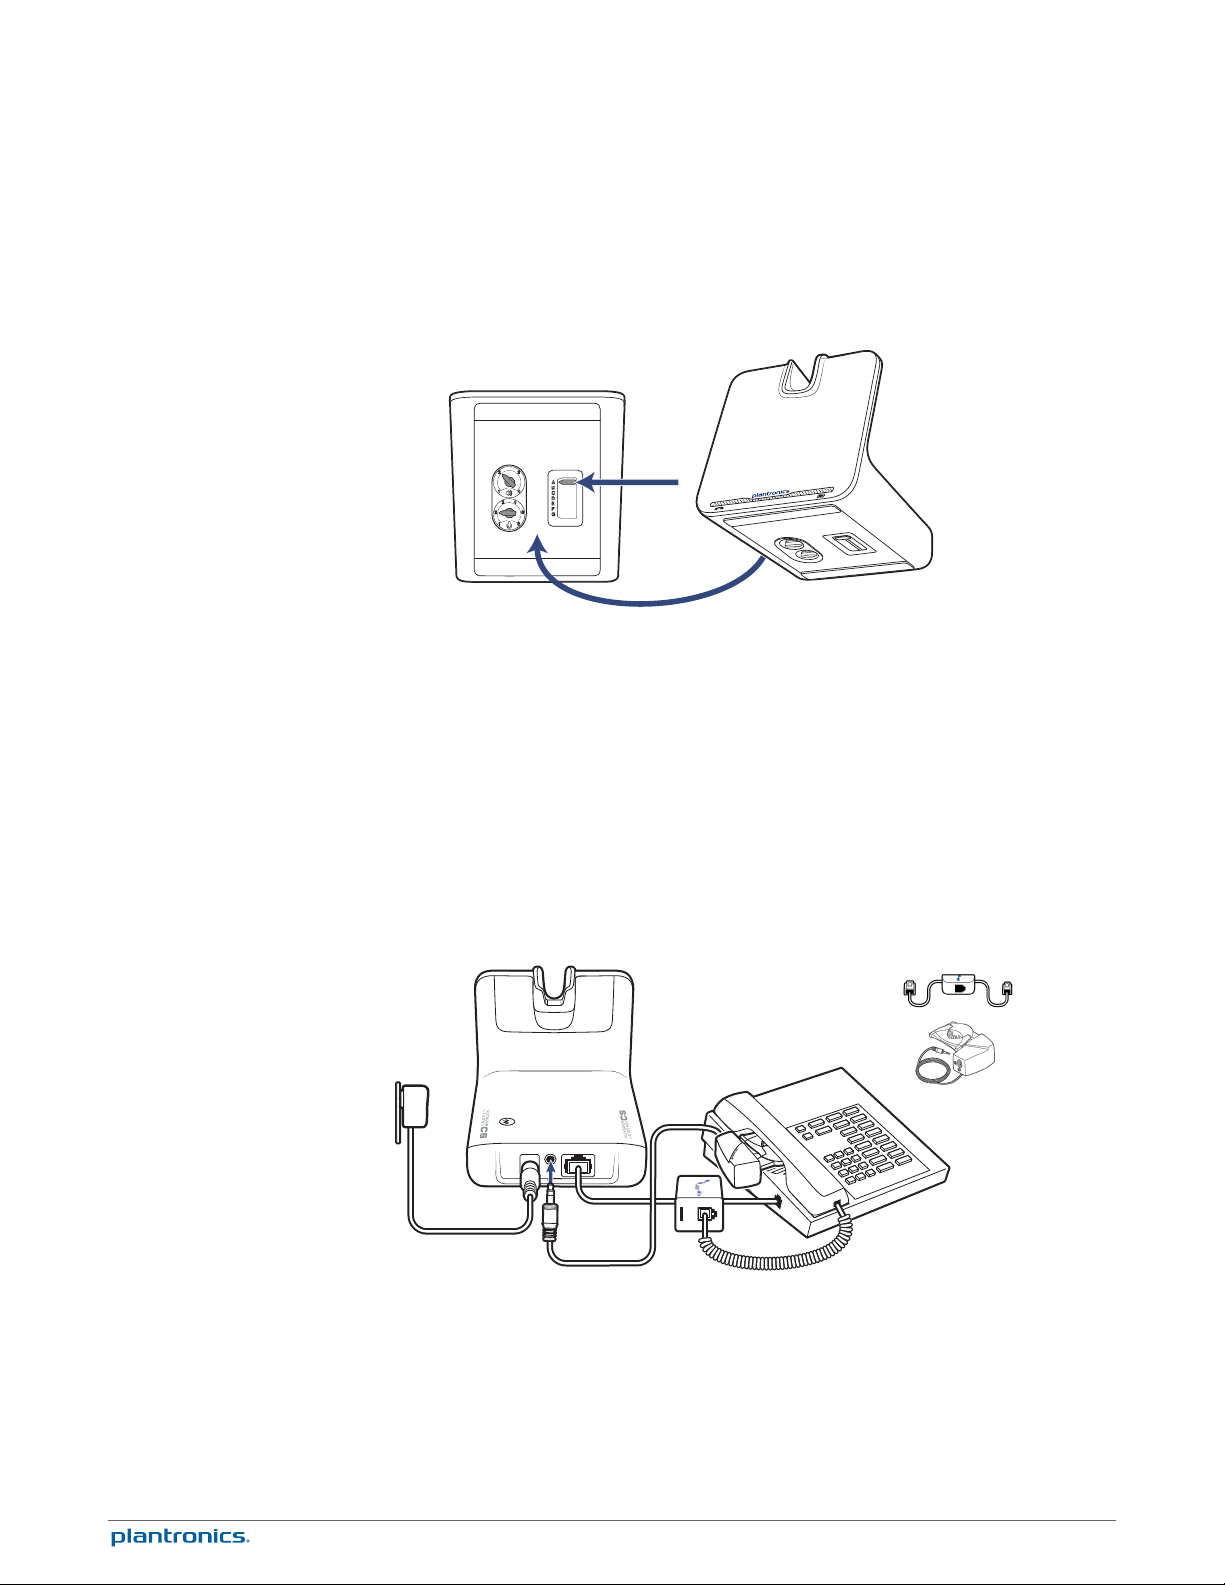
Look at the bottom of your base and make sure the default settings are correct. Set your desk
phone's volume as well.
Set the listening volume dial
and the speaking volume dial to 2.
Set the configuration switch to A.
Set the desk phone volume to mid-range.
8
Page 9
3
Remove the handset from the desk phone cradle.
4
While wearing your headset, press the call button on the headset.
5
If you do not hear a dial tone, adjust the configuration switch (A-G) until you do.
NOTE For most phones, these factory settings will sound best.
6
Dial a test call from the desk phone. If needed, fine-tune the volume with the headset volume
controls. You can also adjust the desk phone speaking and listening volumes on the bottom of
the base.
Desk phone plus HL10
First follow the steps above for Desk phone (standard).
1
Firmly press the handset lifter power cord into the handset lifter jack.
USE
2
While wearing your headset, slide the handset lifter arm under the handset until the lifter base
touches the side of the phone.
9
Page 10
3
Slide the lifter up to where it nearly touches the handset earpiece.
4
Press the call button on your headset to activate the lifter.
5
If you hear a dial tone the lifter is set correctly and needs no adjustment.
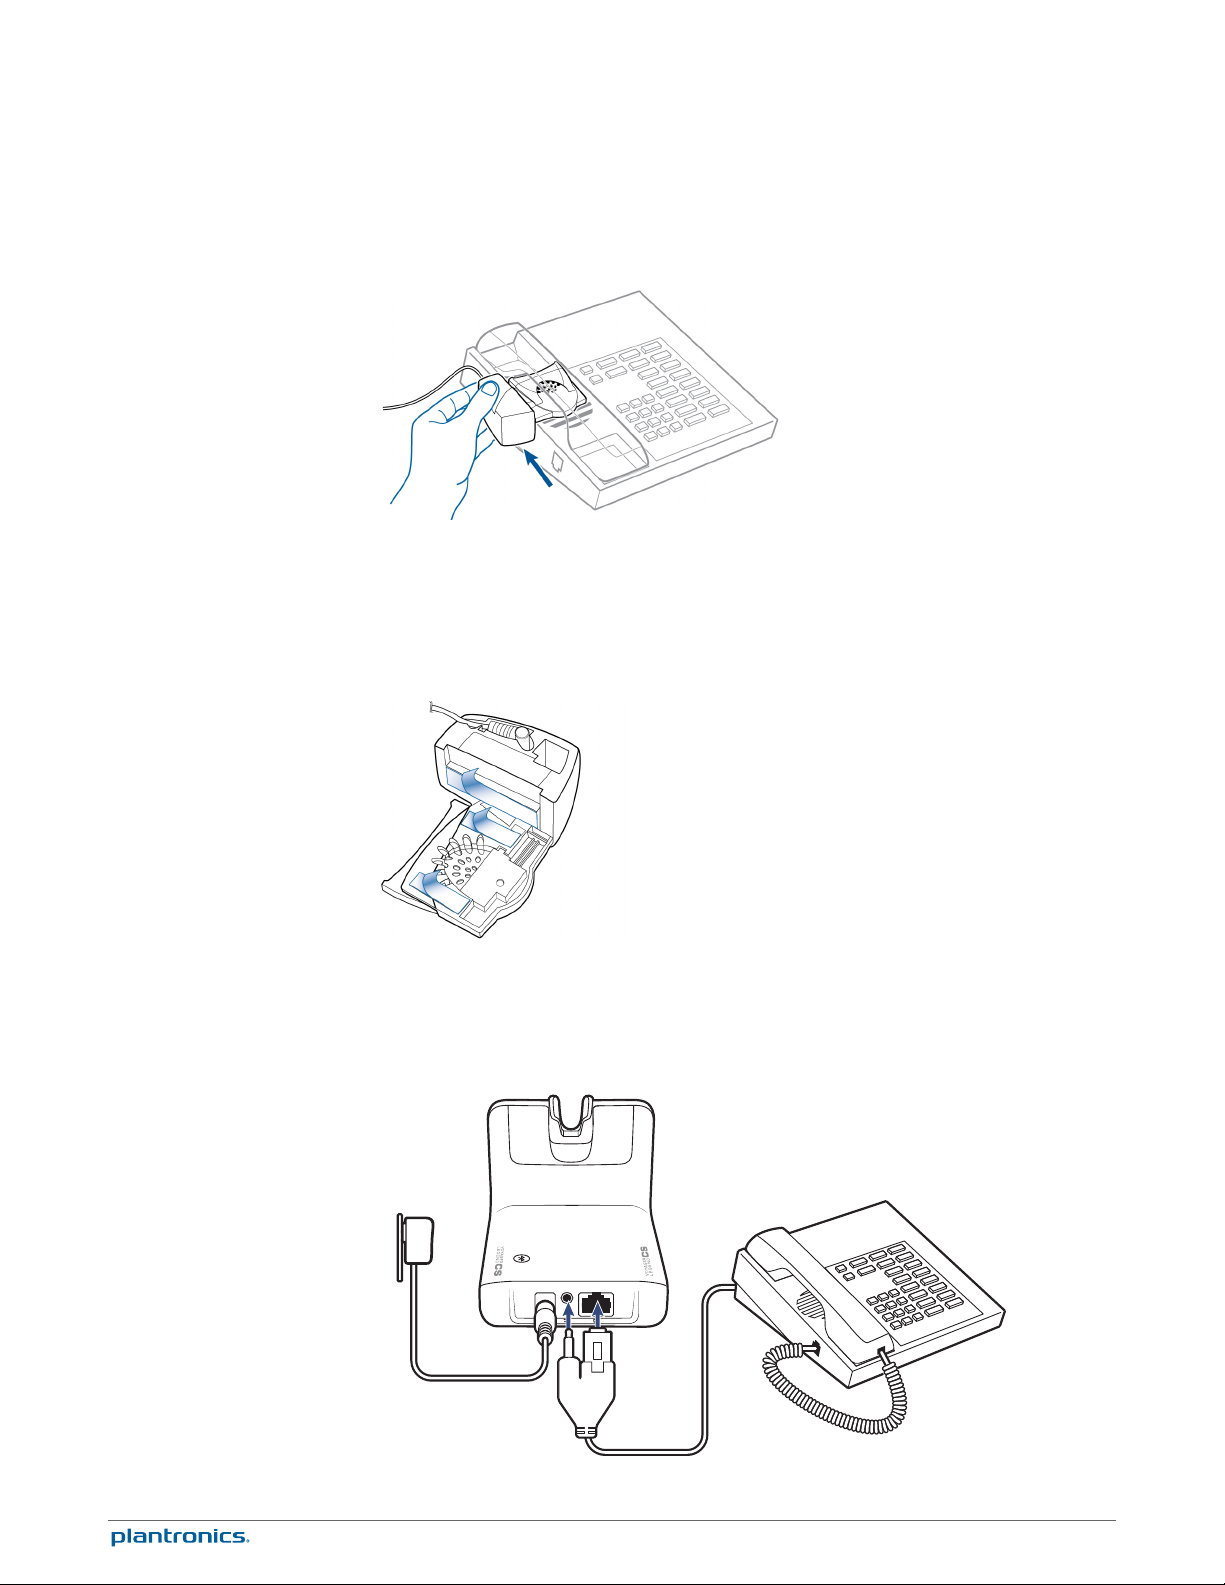
6
Remove the protective strips from the 3 mounting tapes on the underside of the lifter.
7
Gently place the lifter on the desk phone in the pre-determined position.
8
Press firmly to adhere.
Desk phone plus EHS
cable
Connect the end of the EHS cable to the base and the other end of the desk phone as described
in the EHS Quick Start Guide.
NOTE For further installation information refer to the EHS Quick Start Guide that came with your EHS
cable or at www.plantronics.com/accessories .
10
Page 11
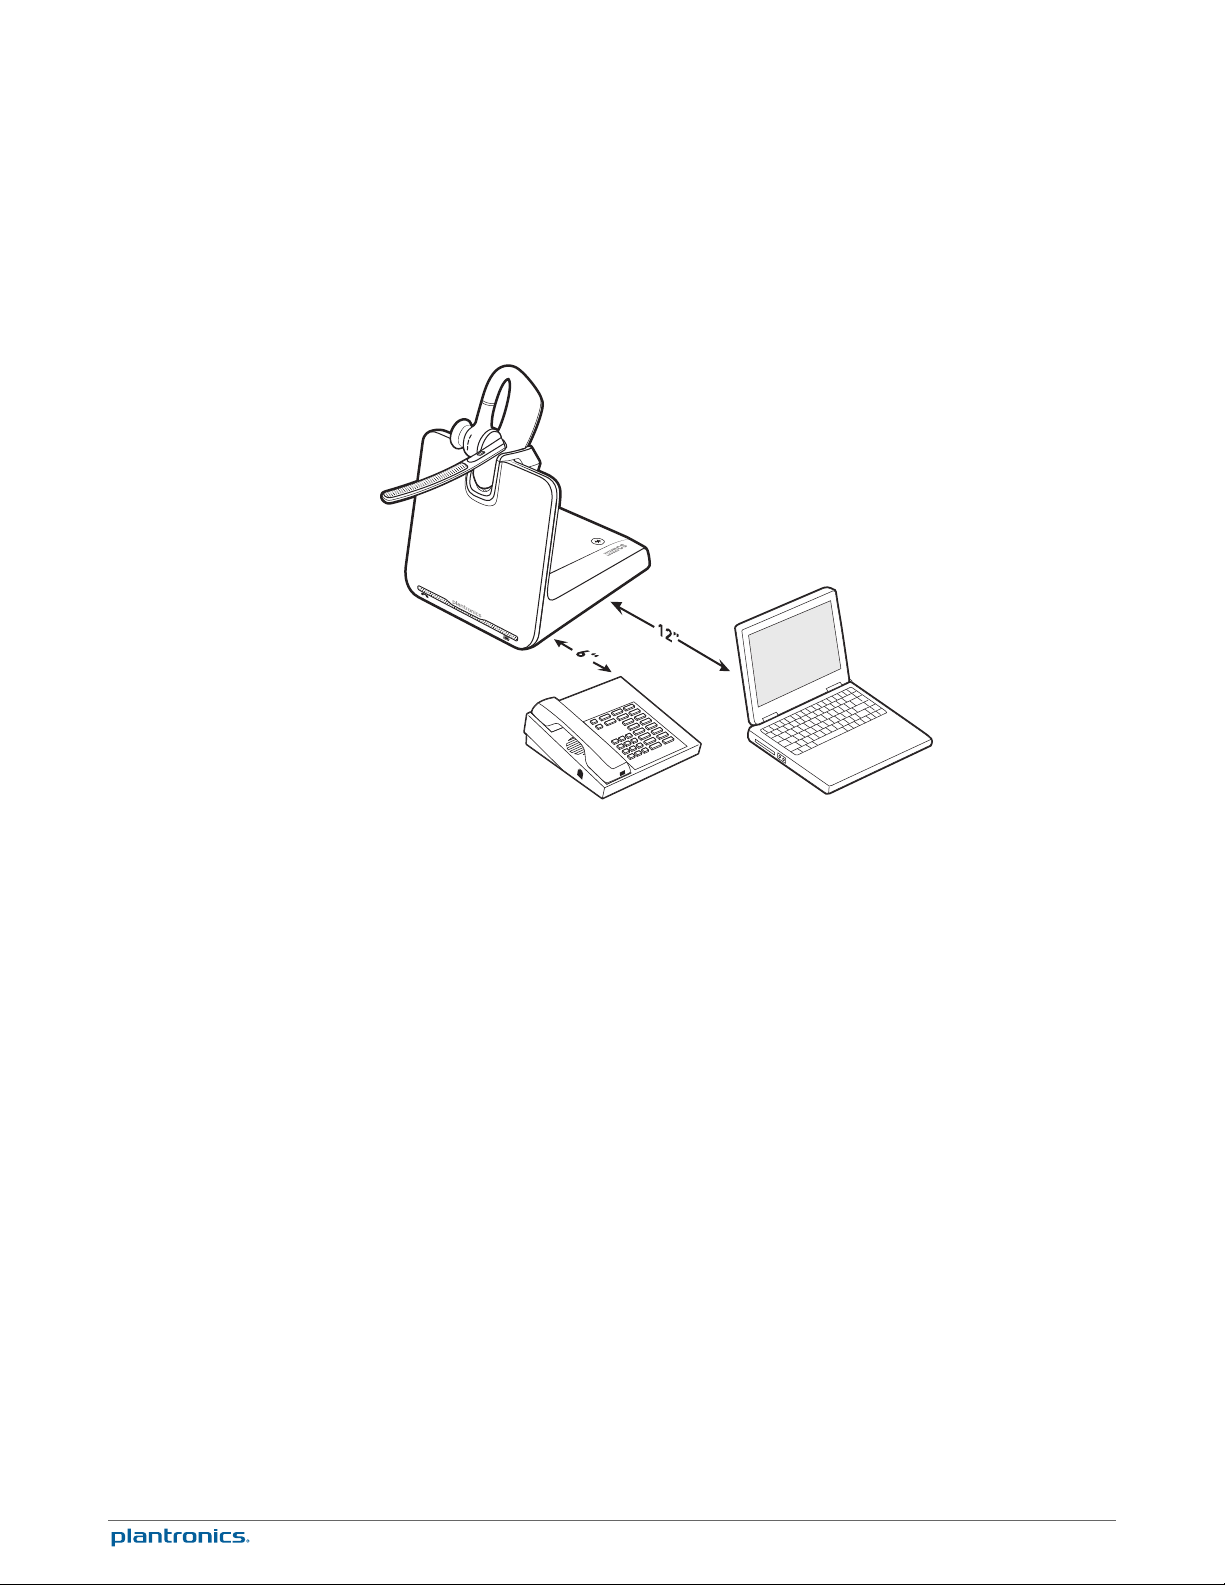
Position your base
The minimum recommended separation between your desk phone and the base is 6 inches.
The minimum recommended separation between the base and computer is 12 inches. Incorrect
position can cause noise and interference problems.
11
Page 12
voice
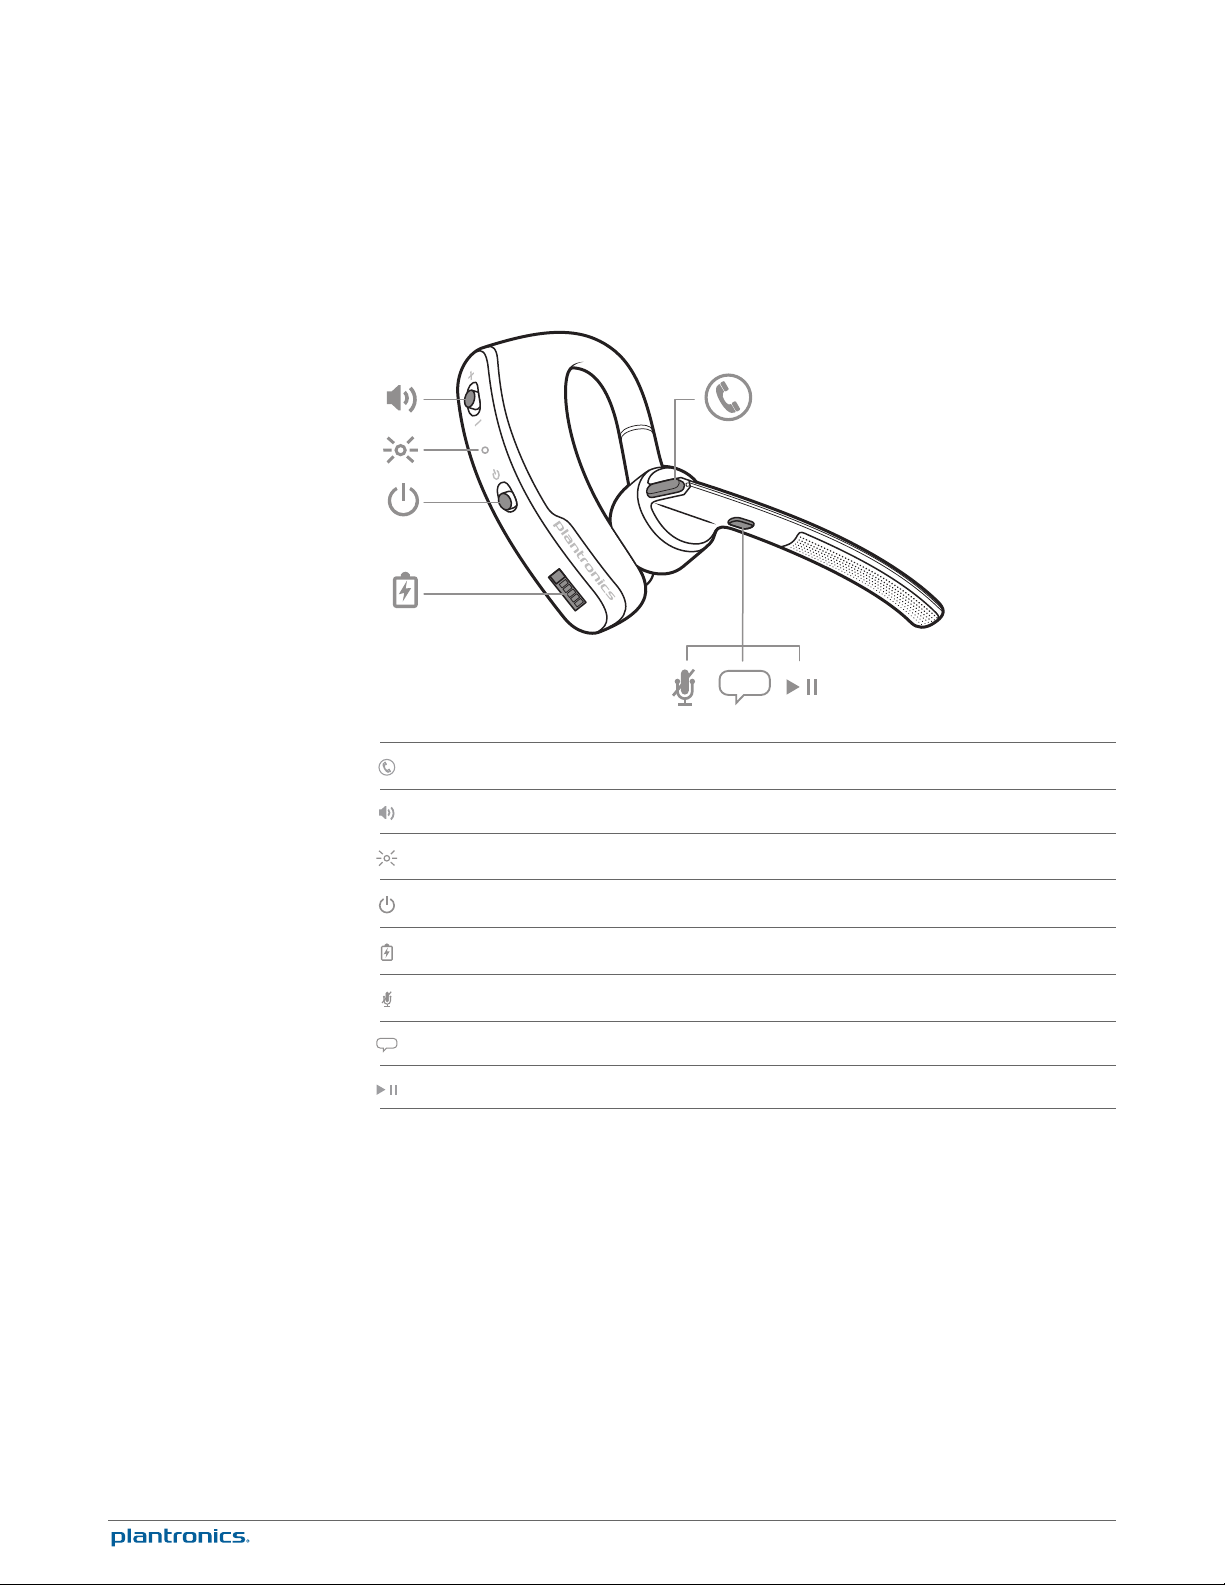
Headset Overview
Headset controls
Talk time
Adjust the volume
Out of range indications
Call button
Volume button
Headset LED (indicator light)
Power button
Magnetic charge port
Mute button
Voice button (mobile phone use only)
Play/Pause button (mobile phone use only)
With a single full charge, the Voyager Legend CS will provide up to 7 hours of talk time and up
to 11 days of standby time.
Toggle the Volume button (show icon) up (+) or down (-) during a call to adjust the volume.
While not on a call you can toggle the Volume button (show icon) to adjust the volume level for
voice prompts and notifications.
The wireless range for the Voyager Legend headset is 10 m from the desktop base or your
mobile phone. Audio quality can be expected to deteriorate after 10 m and wireless
connectivity eventually stop when range limits are exceeded.
When you leave the operating range of the base or mobile phone, a voice prompt will
announce:
• "Phone 1 Disconnected"; any audio is terminated
NOTE Note: If both desk phone and mobile phone are connected to the headset, "Phone 1
Disconnected" and "Phone 2 Disconnected" will be announced as connections are lost
12
Page 13

When you return to the operating range of the base or mobile phone, a voice prompt will
announce:
• "Phone 1 Connected"; audio restored if active
NOTE Note: If both desk phone and mobile phone are connected to the headset, "Phone 1
Connected" and "Phone 2 Connected" will be announced as connections are restored.
Low battery warnings
Battery Level Tone Voice Prompt
30 minutes of talk time
remaining (this alert only occurs
during an active call)
10 minutes of talk time
remaining
Double high tone every 15
minutes
Triple high tone every 30
seconds
"Battery Low" repeats every 30
minutes
"Recharge Headset" every 3
minutes
13
Page 14
1
2
3
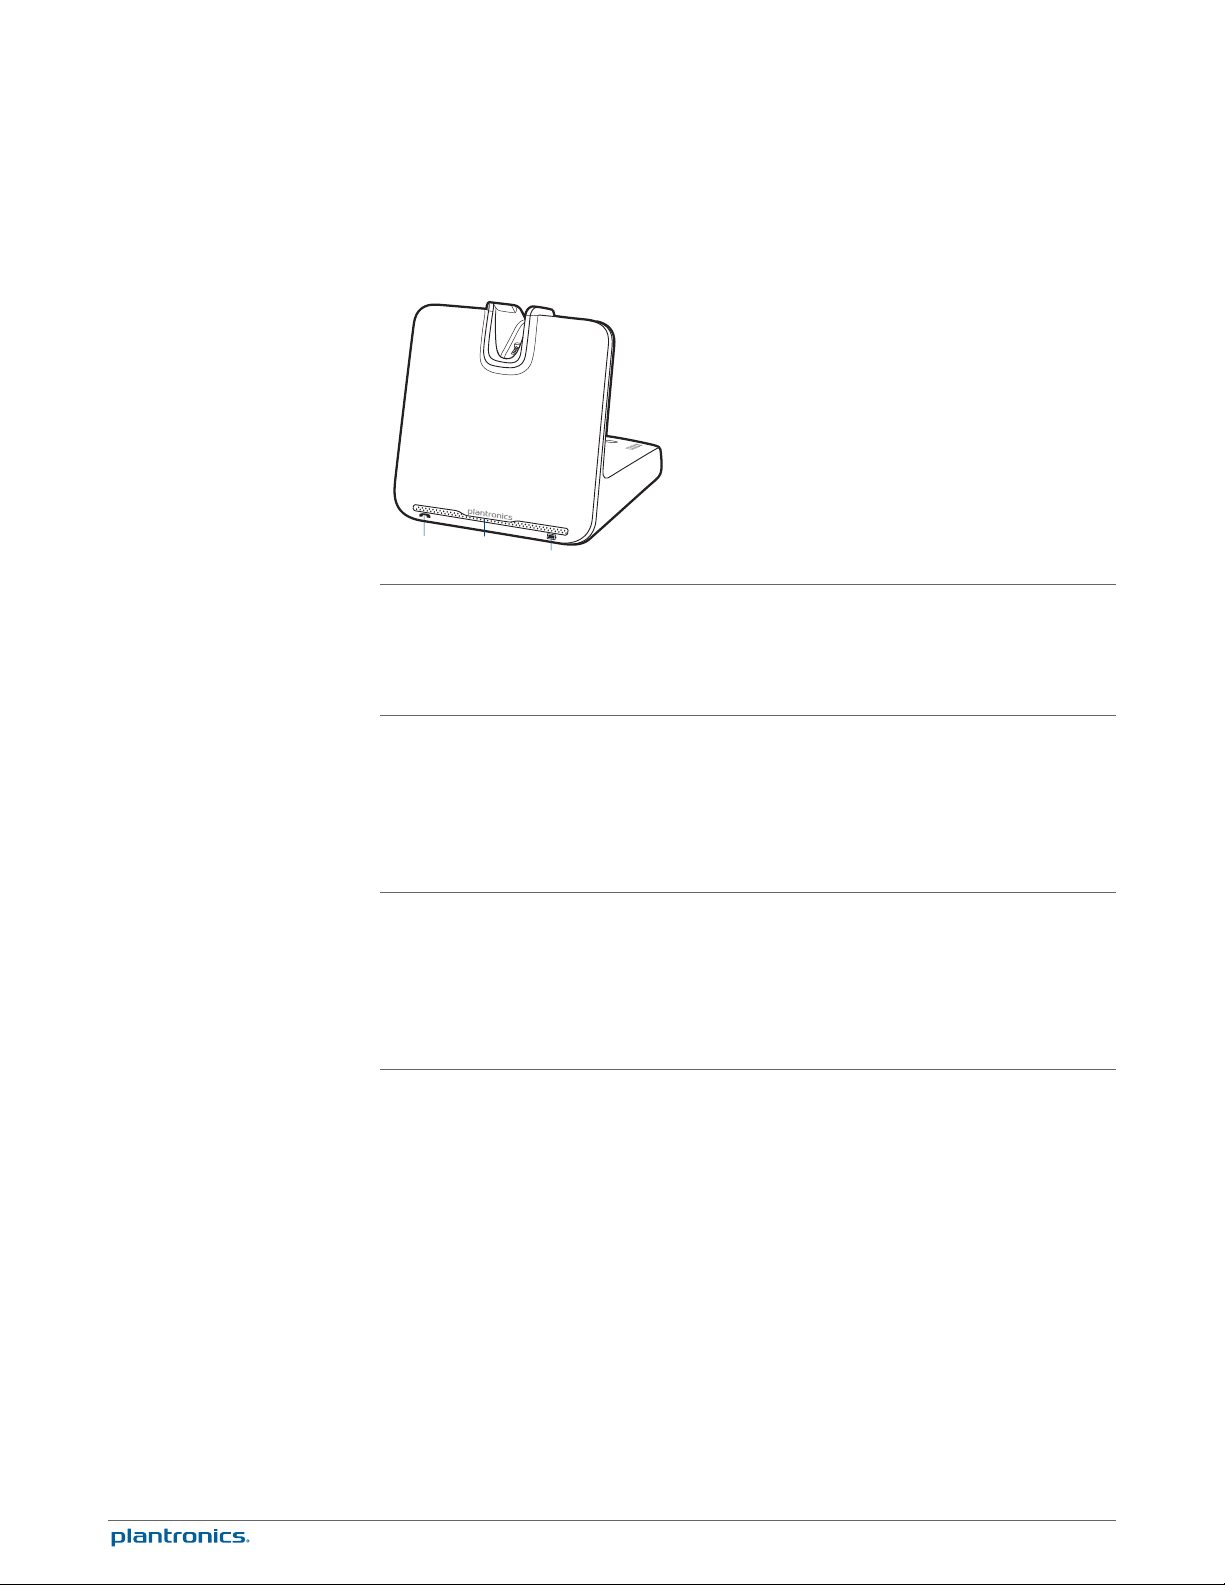
Base LEDs
1 Call Status LED
2 Power On/Pairing LED
3 Headset Battery LED (when docked)
Idle = Unlit
Incoming call = fast blue flash
On call = solid blue
Call (headset mic) muted = slow blue flash
Power off = unlit
Powered = solid blue (headset paired/connected)
Powered = solid red (headset not paired or
disconnected)
In pairing mode = red/blue flashing
Pairing successful = solid blue
Full battery, charging stopped = solid blue
High, charging = 3 blue flashes every 10 seconds
Medium, charging = 2 blue flashes every 10
seconds
Low, charging = 2 red flashes every 10 seconds
Critical, charging = 3 red flashes every 10 seconds
14
Page 15
PLT_Legend
PLT_Legend
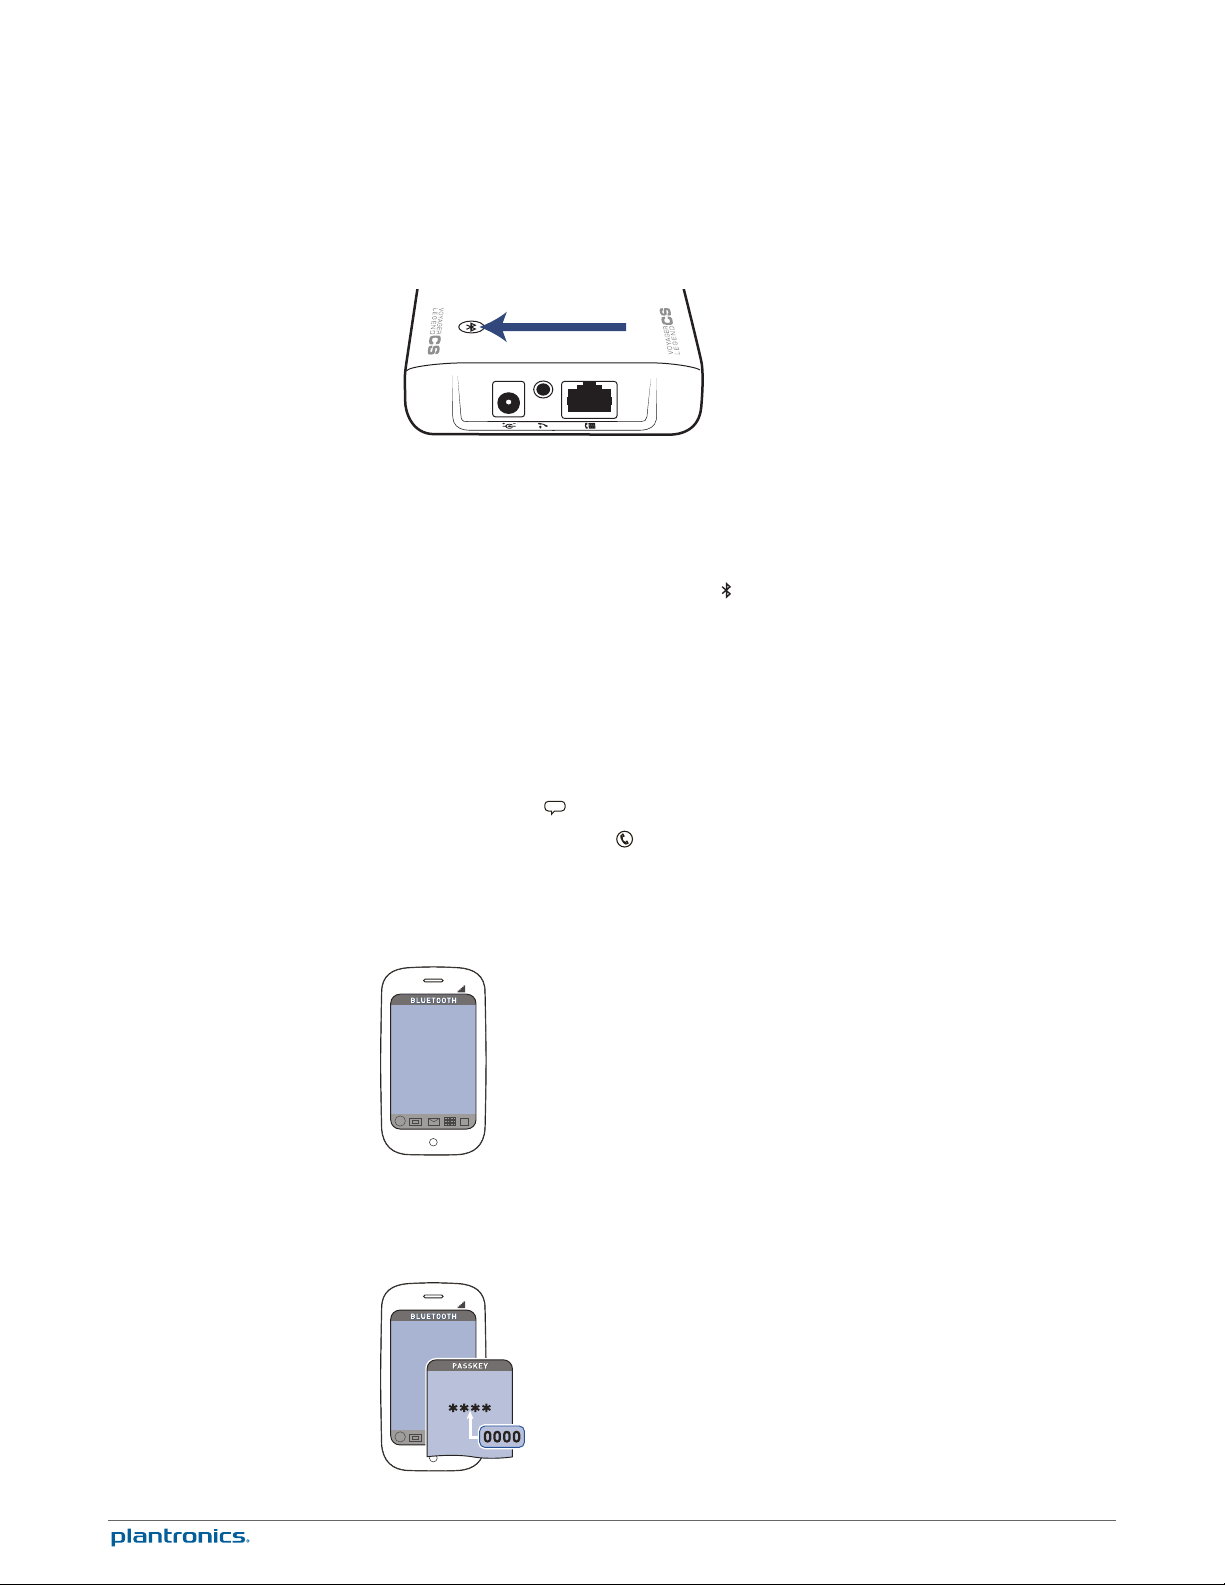
Your Base: Pairing
Pairing your base to your
headset
Bluetooth pairing button
Pairing headset
Pair phone or tablet
The headset and base that came in the box are already paired to each other. However, if you
wish to use a new headset or need to restore subscription to your current headset, the units
can be paired to each other by doing the following.
1
Press and hold the Bluetooth pairing button
2
Switch on your headset and do either of the following:
• Tap the Voice button and say "Pairing Mode"
• Press and hold the call button until you hear "Pairing"
The power LED will turn solid blue once paired.
Pair your headset to your phone or another device, such as a tablet.
1
Switch on your headset then choose:
• Tap the Voice button
•
Press and hold the Call button
2
While the headset LEDs are flashing red and blue, activate Bluetooth® on your phone and set it
to search for new devices.
3
Select "PLT_Legend".
and say "Pair mode", or
until you hear "Pairing"
until the power LED (middle) flashes RED/BLUE.
4
If your phone asks for a passcode, enter four zeros (0000) for the passcode or accept the
connection.
15
Page 16

5
Once successfully paired, LEDs stop flashing red and blue. The LED will remain solid blue and
you will hear "pairing successful".
NOTE To enable caller name announcement, allow access to your contacts if your phone prompts you.
16
Page 17

Call Controls - Desk Phone
Place a call
Answer a call
Reject a call (desk phone)
End a call
Mute a call
1
Wearing the headset, press the Call button .
2
Remove the handset from the cradle; you will hear the dial tone.
This step will be automatic if you install a handset lifer or EHS cable accessory. For a complete list of
accessories, visit www.plantronics.com/accessories
3
Dial the number using your desk phone.
4
To end the call, press the headset Call button
1
If wearing the headset, press the Call button , or
2
If not wearing the headset, place the headset on your ear; the call will be answered
automatically.
3
Remove the handset from the cradle. Your call is now active.
This step will be automatic if you install a handset lifer or EHS cable accessory. For a complete list of
accessories, visit www.plantronics.com/accessories
Use the Call Reject function on your desk phone, if supported.
Press the Call button
1
MUTE ON: During a call, press the Mute button and you will hear the "mute on" voice prompt
which indicates that the headset microphone is muted. The mute reminder is repeated every 15
minutes alternating between the voice prompt and a tone.
2
MUTE OFF: During a call while muted, press the Mute button
which unmutes the headset microphone.
to end current call.
and hang up the handset.
and you will hear "mute off",
Answer a second
incoming call
1
SECOND CALL ON DIFFERENT PHONE: Press the Call button
the Call button again to answer the second call.
2
ON DESK PHONE, SECOND DESK PHONE CALL: Press the Call button to end the first call
then, if supported by your phone, press the Call button again to answer the second call.
Note: Your desk phone may also have second call management features which are better suited
to specific second call management needs.
to end the first call, then press
17
Page 18

Call Controls - Mobile Phone
Place a call
Answer a call
Reject a call
End a call
Mute a call
Answer a second
incoming call
1
Wearing the headset, press the Call button .
2
Dial the number using mobile phone.
3
To end the call, press the Call button
1
If wearing your headset press Call button
2
If wearing the headset and prompted, "Incoming call, answer or Ignore", say "Answer", or
3
If not wearing your headset, place the headset on your ear; the call will be answered
automatically.
1
Press the Call button
2
Say "Ignore" when prompted, or
3
Use the Call Reject function of your mobile phone, if supported.
Press the Call button to end current call.
1
MUTE ON: During a call, press the Mute button and you will hear the "mute on" voice prompt
which indicates that the headset microphone is muted. The mute reminder is repeated every 15
minutes alternating between the voice prompt and a tone.
2
MUTE OFF: During a call while muted, press the Mute button
which unmutes the headset microphone.
1
SECOND CALL ON DIFFERENT PHONE: Press the Call button to end the first call, then press
the Call button again to answer the second call.
2
ON MOBILE PHONE CALL, SECOND MOBILE CALL: Press the Call button once to end current
call, then say "answer" when prompted to answer the second call.
for 2 seconds, or
on the headset or end via your mobile phone.
, or
and you will hear "mute off",
NOTE Your mobile phone may also have second call management features.
18
Page 19

Customise your headset
Your headset understands and speaks in English. You can change the language and other
settings online.
MyHeadset™ Updater tool enables you to:
• Receive firmware updates
• Change language for voice alerts and commands (English U.K., French, German and Spanish.
Voice alerts are also available in Cantonese and Mandarin.)
• Change regional phone number for Vocalyst service
• Turn voice commands on/off
• Turn Smart Sensors™on/off
• Turn high quality audio (A2DP) streaming on/off
• Turn "mute off" voice alert on/off
19
Page 20

Features
Listen to audio via A2DP
Transmission range
Simultaneous call
handling behaviour (PC
Mobile)
Voice alerts
Voice alerts list
Your Voyager Legend headset can play media files (music, podcasts, navigation, etc.) from any
A2DP (Advanced Audio Distribution Profile for Bluetooth)-enabled mobile device.
Your Voyager Legend Bluetooth headset has a 10 meter effective range. Voice prompts from
your headset will alert you if you lose connection with your base or mobile phone.
You can be on a call using a computer softphone application and receive a mobile phone call.
The ringtone for the mobile phone call is heard in the headset. Tapping the call button on the
headset will end the computer softphone call. Tapping the call button again will answer the
mobile phone call.
NOTE Answering the call on your mobile phone sends the audio to the mobile phone and leaves the
computer softphone call active on the headset.
You can be on a mobile phone and receive a call on your computer softphone. The ringtone for the
computer softphone call is heard in the headset during the call.
Tapping the call button on the headset ends the mobile phone call. Tapping the call button again
answers the computer softphone call.
If you receive a computer softphone call and mobile call at the same time, tapping the call button
will pick up the call that came in first.
Your headset speaks English.
• "Battery low/medium/high"
Voice commands
Voice commands list
• "Connection switched"
• "Headset connected"
• "Not connected"
• "Mute on/off"
• "Pairing"
• "Pairing successful"
• "Power on/off"
• "Recharge headset"
• "Redial"
Tap the Voice button
can I say?” tells you the full list of available commands. You can change the voice command
language by visiting and downloading the MyHeadset™ Updater tool. The available languages
are English (US and UK), French, German, Italian, Japanese, Korean, Mandarin, Russian, Spanish
and Swedish. Voice commands for Cantonese, Danish and Norwegian must be spoken in
English.
• "Am I connected?"
• "Answer"
• "Call information"
, wait for command request, then say a command. For example, “What
• "Call Vocalyst"
20
Page 21

• "Cancel"
• "Check battery"
• "Ignore"
• "Pair mode"
• "Redial"
• "What can I say"
NOTE The voice-dial feature on your phone is initiated by pressing the Call button for 2 seconds.
The voice-dial feature is not a headset voice command and only works with supporting phones.
Disable the answer/ignore
voice commands
To disable the "answer/ignore" voice commands:
1
Switch on the headset.
2
Press and hold the Voice button until you hear a double tone.
3
Repeat to reactivate the voice answer commands.
21
Page 22

Troubleshooting
Headset
Desk phone
Talk time performance is
significantly degraded even after a
full recharge.
I can’t hear a dial tone in the
headset.
I hear static. Make sure there are at least 12 inches between your base and
The sound is distorted. Lower the speaking volume dial or listening volume dial on the
Battery is wearing out. Contact us at www.plantronics.com/
support .
Make sure your headset is charged.
Make sure your headset is subscribed to base. See Subscription
button.
Press the call control button on your headset.
If using a lifter, make sure the lifter is lifting the handset high
enough to operate the hookswitch; set to a higher setting if
necessary.
Adjust the configuration switch on the base until a dial tone is
heard. operate the hookswitch; set to a higher setting if
necessary.
Fine-tune the listening volume on the headset.
If the volume is still too low, adjust the listening volume dial on
the base.
your computer, and 6 inches between your base and your
telephone. You may hear static as your headset is going out of
range; move closer to the base.
base. For most telephones, the correct setting is position 2.
If your desk phone has a volume control, lower until the
distortion disappears.
If the distortion is still present, adjust the headset volume control
to lower the headset speaker volume. If the distortion persists,
lower the listening volume dial on the base.
Make sure there is at least 12 inches between your base and your
computer, and at least 6 inches between your base and your
telephone.
I hear echo in the headset. Lower the listening volume dial and speaking volume dial on the
base. For most telephones, the correct setting is position 2.
If the audio level is too low in this position, adjust the headset
volume control to increase the headset speaker volume.
If your speaking volume is too low for your listener in this
position, adjust the position of the headset to make sure the
microphone is a finger’s width from the corner of your mouth.
Adjust the configuration switch. The most commonly used
position is “A”.
People I talk to can hear a buzz in
the background.
The handset lifter is installed but
does not lift the handset.
Move the base further away from your phone.
If the base power supply is plugged into a power strip, plug it
into the wall directly.
Ensure the handset lifter power cord is firmly pushed into the
handset lifter jack on the base.
22
Page 23

NEED MORE HELP?
www.plantronics.com/support
Plantronics, Inc. Plantronics BV
345 Encinal Street
Santa Cruz, CA 95060
United States
©
2013 © 2013 Plantronics, Inc. All rights reserved. Plantronics and Voyager Legend are trademarks or registered trademarks of Plantronics, Inc. The
Bluetooth® word mark and logos are owned by the Bluetooth SIG, Inc. and any use of such marks by Plantronics, Inc. is under licence. All other
trademarks are the property of their respective owners.
Patents: US 8,208,673; D617,316; D681,003; 681,014; D681,002; D662,089; BR 3020120011493; CN ZL201230489876.9; ZL201230059196.3; EM
002109637-0001; 002109637-0002; 002109637-0003; 001315261-0001; IN 243252; TW D151481; Patents Pending
201137-07 (09.13)
South Point Building C
Scorpius 140
2132 LR Hoofddorp
 Loading...