

Page 1
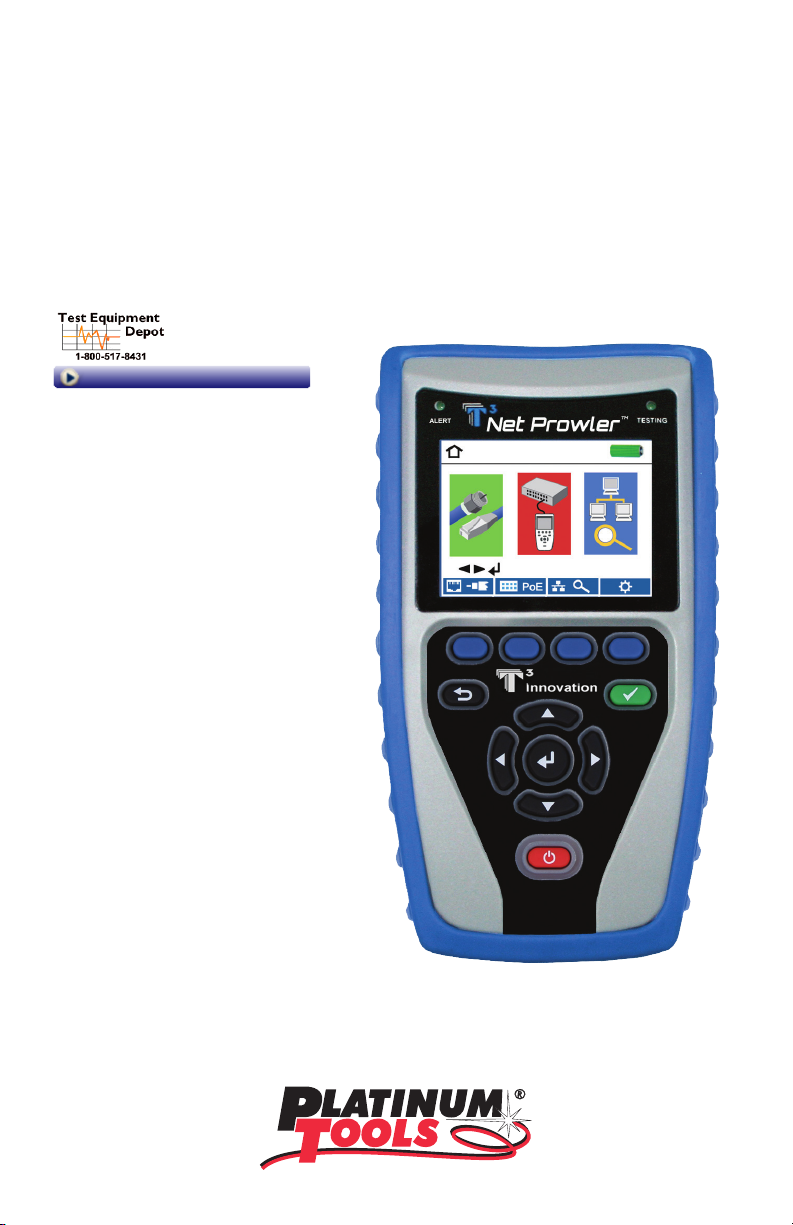
Net Prowler
Identify, Monitor & Test LAN Issues
Quick Start Guide
99 Washington Street
Melrose, MA 02176
Phone 781-665-1400
Toll Free 1-800-517-8431
Visit us at www.TestEquipmentDepot.com
Port Discovery
IPV4 and IPV6 Protocols
Port Test/CDP/LLDP
VLAN Detection
Device Discovery
Ping IPV4, IPV6 and URL
TM
CAT 3/5e/6/6a
Coax
Telephone Cable
TNP700
TNP850K1
Page 2

Thank you for purchasing a Platinum Tools tester.
Before you start using it, make sure that you have the latest updates for your
tester. Check the latest firmware version at our website www.platinumtools.
com/testers. You can also download the companion software that allows you
to name, save and print out your test results.
2
Net Prowler Quick Start Guide
Page 3
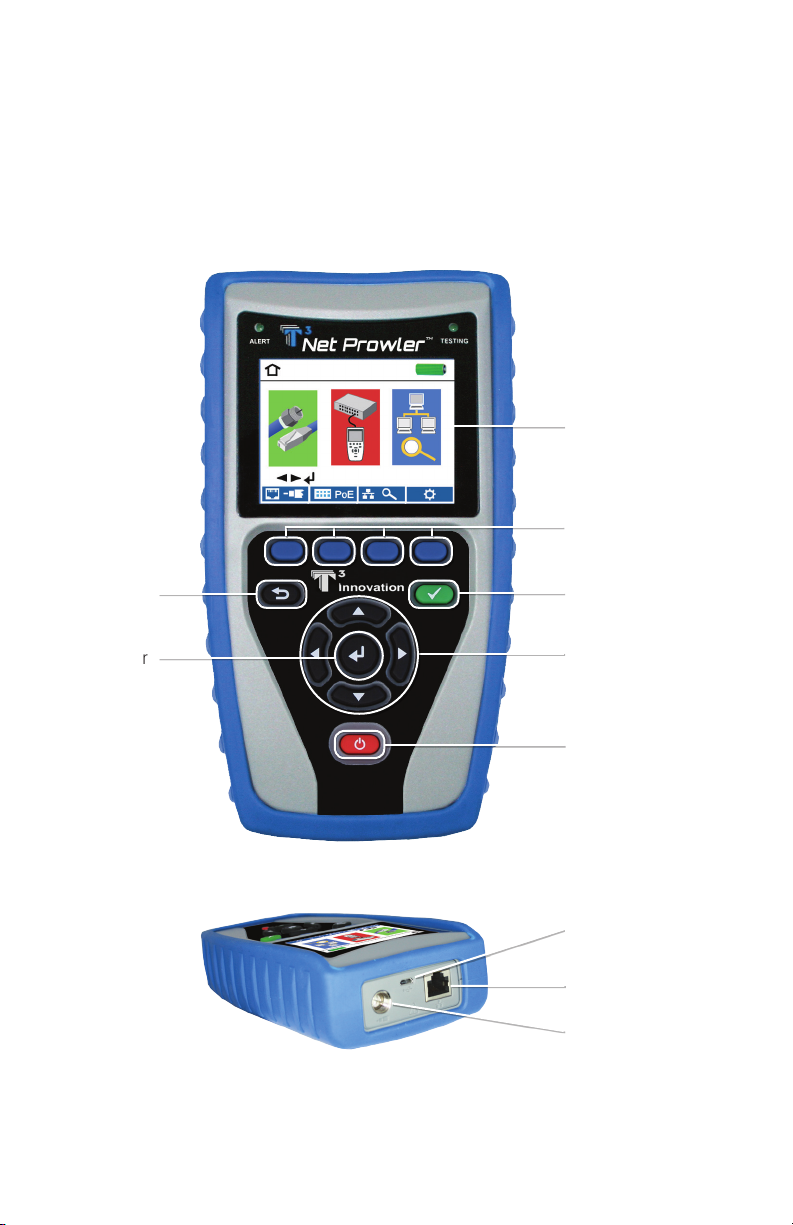
Net Prowler
Identify, Monitor & Test LAN Issues
Full color LCD display
Soft keys perform the
function on the display
above each button.
TM
Back
Enter
Test
Direction cursors to
move in LCD display
On/Off
Micro USB Port
RJ45 Jack
F-connector Jack
3
Page 4
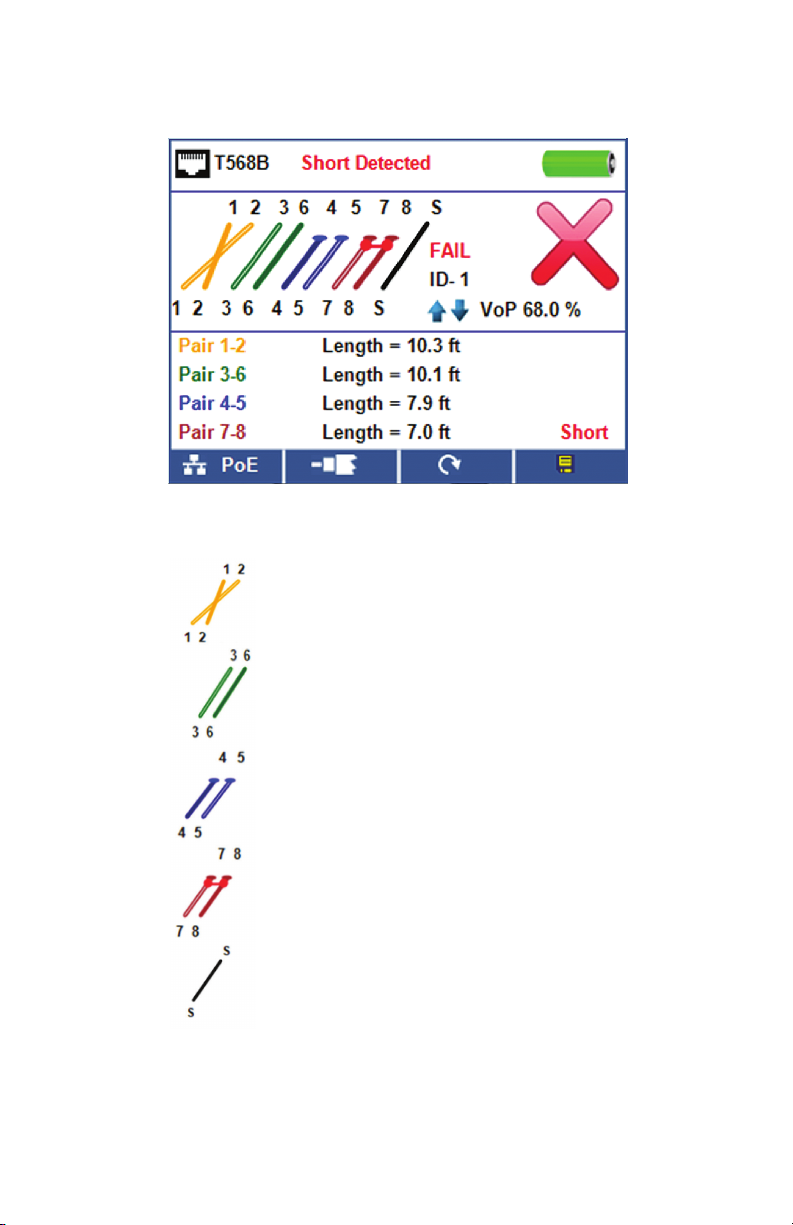
Net Prowler Graphic Report
Legend
Pair 1-2 measures 10.3 ft but is mis-wired.
Pair 3-6 measures 10.1 ft and is properly connected.
Pair 4-5 has an open at 7.9 ft.
Pair 7-8 has a short at 7.0 ft.
Shielded cable detected.
4
Net Prowler Quick Start Guide
Page 5

How to Perform a Cable Test
Network Cable Test Coax Cable Test Telephone Cable Test
• Power on the Net Prowler. Connect a network, coax, or telephone cable to the
appropriate connector on the top of the Net Prowler.
Warning! Do not plug an RJ11 cable directly into the Net Prowler! A standard RJ11
cable will damage the Net Prowler’s RJ45 jack. Use the included RJ adapter patch
cable that is included with the Net Prowler.
• Press the enter button to display the cable test menu. The Cable Prowler will
automatically perform a test upon entering the cable test menu.
• To test coax or telephone cable, press the coax or telephone soft key
.
• If a remote is NOT being used (one ended test), the Net Prowler will test the
length of each pair, opens, shorts, or split pairs. Performing a one ended test will
not verify connectivity on the opposite end of the cable.
• If a remote is being used, connect the remote to the opposite end of the cable.
• To calibrate the VOP, connect a known length of cable to the Net Prowler and
press the up/down/left/right buttons to increase or decrease the VOP. Press the
left and right buttons to select and change the VOP one digit at a time.
• While adjusting the VOP, press the test button every so often until the length of
the cable is displayed.
• Press the green test button or the loop mode soft key to perform
additional tests.
• To save a cable test, press the save icon .
• Use the arrow buttons and the enter button to name the cable test file.
• Press the save icon to save the cable test file .
5
Page 6

Tone Generator
• Power on the Net Prowler.
• Use the left or right arrow buttons to select the tone generator icon and
press the enter button.
• The Net prowler will automatically activate the tone generator upon entering the
tone generator menu.
• Connect your cable to either the RJ45 jack or coax connector located on the top
of the Net Prowler.
• To switch between network and coax cables, press the coax cable/RJ45 soft key
/ .
• Press the up or down arrow buttons to select tone cadences 1 thru 4.
• Press the left or right arrow buttons to select which pin or pair to place the tone.
• Use a tone probe alongside the cable or at the end of the cable to hear an
audible tone.
6
Net Prowler Quick Start Guide
Page 7

Network / PoE Detection
• Power on the Net Prowler.
• Connect the Net Prowler to a switch
or active network jack.
• Use the left or right arrow buttons to
select the Network/PoE icon
and press the enter button or
press the Network/PoE
soft key
• The Net Prowler will automatically detect and display link capability, connection
.
speed, PoE class, and PoE Min/Max voltages.
• To perform a Network Test only, press the PoE soft key .
• To save the PoE data, press the Save soft key .
• Use the arrow buttons and the enter button to name the PoE file.
• Press the Save soft key to save the PoE file.
Link Light
• Power on the Net Prowler.
• Connect the Net Prowler to an
active network cable or port.
• Press the Network/PoE soft key
then press the Link Light
soft key
• The Link Light will automatically begin
.
upon entering the Link Blink menu.
• The Link LED above the LCD screen will flash at the same cadence as
the port light.
• Use the up and down arrows to adjust the transmit frequency to suit
the switch characteristics
7
Page 8

Setup
• From the main screen, press the “setup” soft key .
• Use the up and down buttons to navigate through the 5 settings pages.
• Use the left or right arrow buttons to select a setting then use the up and down
arrow buttons to change the highlighted setting.
• Press the enter button to accept your changes.
• Press the down arrow button to select a language (English, Spanish, Italian,
French and German). Press the right arrow button to change the Language.
• To edit an IP address or Favorites, scroll to the desired IP or URL and press the
right arrow button.
• Use the right arrow button to highlight a digit and the up and down buttons to
change the digit.
• To enter or edit a URL, press the keypad soft key then press the URL
soft key
• When finished editing an IP or URL address, press the “Done” soft key
.
to return to the setup screen.
• Press the Save soft key to save your changes
8
Net Prowler Quick Start Guide
Page 9

How to Perform a Port Discovery Test
Network/PoE Test
• Connect the Net Prowler to a switch or active network jack.
• From the home screen, use the right arrow button to select the Network/
PoE icon and press the enter button or press the Network/POE soft key
.
• The Net Prowler will automatically detect and display link capability, connection
speed, PoE mode and PoE Min/Max voltages.
• To perform a Network Test only, press the PoE off soft key .
• To save the PoE data, press the Save soft key .
• Use the arrow buttons and the enter button to name the PoE file.
• Press the Save soft key to save the PoE file .
Port Testing
• Connect the Net Prowler to a switch or active network jack.
• From the Network/PoE screen, press the Port test soft key .
• The Net Prowler will automatically perform a port test upon entering the Port
Test screen.
• Select one of the following Port Test soft keys to perform a specific test:
▪ DHCP – Obtain Network IP address and DHCP information
▪ LLDP – View Link Layer Discovery Protocol supported switch information
▪ CDP – View advertised Cisco protocol information
▪ Link Light – Flash the port LED on a hub, switch, or router to identify
the port you are connected to
9
Page 10

How to Perform a Device Discovery Test
Ping IPV4/IPV6
• Connect the Net Prowler to a switch, router, or active network jack.
• From the home screen, use the right arrow button to select the Network
Discovery icon and press the enter button
Discovery soft key
• The Net Prowler will perform a DHCP test and obtain an IP address (to ping
.
IPV6, press the IPV6 soft key).
• Press the ping soft key .
• Use the left and right arrows to highlight a digit. To change a digit, use the up
and down arrows or press the keypad soft key
keypad. To unselect the keypad, press the keypad soft key again.
• Press the test button to ping the IP address.
List
• Press the list soft key to view discovered IP addresses and manually
pinged IP addresses.
or press the Network
to use an alphanumeric
• To ping an IP address in the list, use the up and down buttons to navigate to the
desired IP address and press the test button.
Favorites
• From the List screen, press the Favorites soft key to ping from the
favorites list.
• Use the up and down arrow buttons to scroll through the list.
• Press the test button to select an IP or URL address. The Net Prowler will
show the URL IP address obtained by the DNS server.
• Press the test button again to ping the IP address.
10
Net Prowler Quick Start Guide
Page 11

IP Discovery
• From the Network Discovery screen, press the IP discovery soft key .
• The Net Prowler will scan the network and display IP addresses within a
Network. The list will include device labels to the left of the IP addresses.
• Use the up and down arrow buttons to scroll through the IP list. Press the enter
button
to view the MAC address associated with the selected IP address.
TCP/UDP Throughput Testing
• Please refer to the Net Prowler instruction manual for TCP/UDP throughput
instructions.
11
Page 12

Net Prowler Kits
TNP700
•Net Prowler Main Unit
•#1-5 Coax ID and Test Remote Set
•#1-5 Data ID-only Remote Set
•F Female to F Female Adapter F81
•Network/Tel Testing & ID Remote #1
•No-Fault Cable – (2)
•Micro USB Cable
•Hanging Pouch
•Quick Start Guide
•User Manual (Online)
•Warranty Activation Card
TNP850K1
•Net Prowler Main Unit
•#1-8 Network/Tel Test and ID
Smart Remotes
•#1-8 ID and Test Coax Remote Set
•#1-12 ID-only Data Remote Set
•Micro USB Cable
•No-Fault Cable – (2)
•RJ45 Port Saver
•RJ45 Alligator 12 Inch
•F Female to F Female Adapter F81 – (2)
•BNC Female to F Female Adapter
•BNC Female to F Male Adapter
•Durable Plastic Case
•Quick Start Guide
•User Manual (Online)
•Warranty Activation Card
Test Equipment Depot - 800.517.8431 - 99 Washington Street Melrose, MA 02176
TestEquipmentDepot.com
 Loading...