

Page 1
PACKAGE CONTENTS
• Tripod
• Carrying case
• Quick Setup Guide
FEATURES
• Holds most cameras and camcorders that take a 1/4-20 mounting screw
• Removable center column can be used as a 58.7" Monopod
• Ultra-uid 3-way pan head for precise setting and smooth video
• Dual bullseye levels to ensure maximum leveling of your camera or camcorder
• Quick-ip leg locks for quick and easy setup
• Collapses to 24.2" for portability
• Aluminum legs for light weight and durability
• No-slip rubber feet for stability
• Supports cameras or camcorders up to 11 lbs.
PTTPM665C
66.5" TRIPOD/MONOPOD
COMBO
QUICK SETUP GUIDE
Before using your new product,
please read these instructions to prevent any damage.
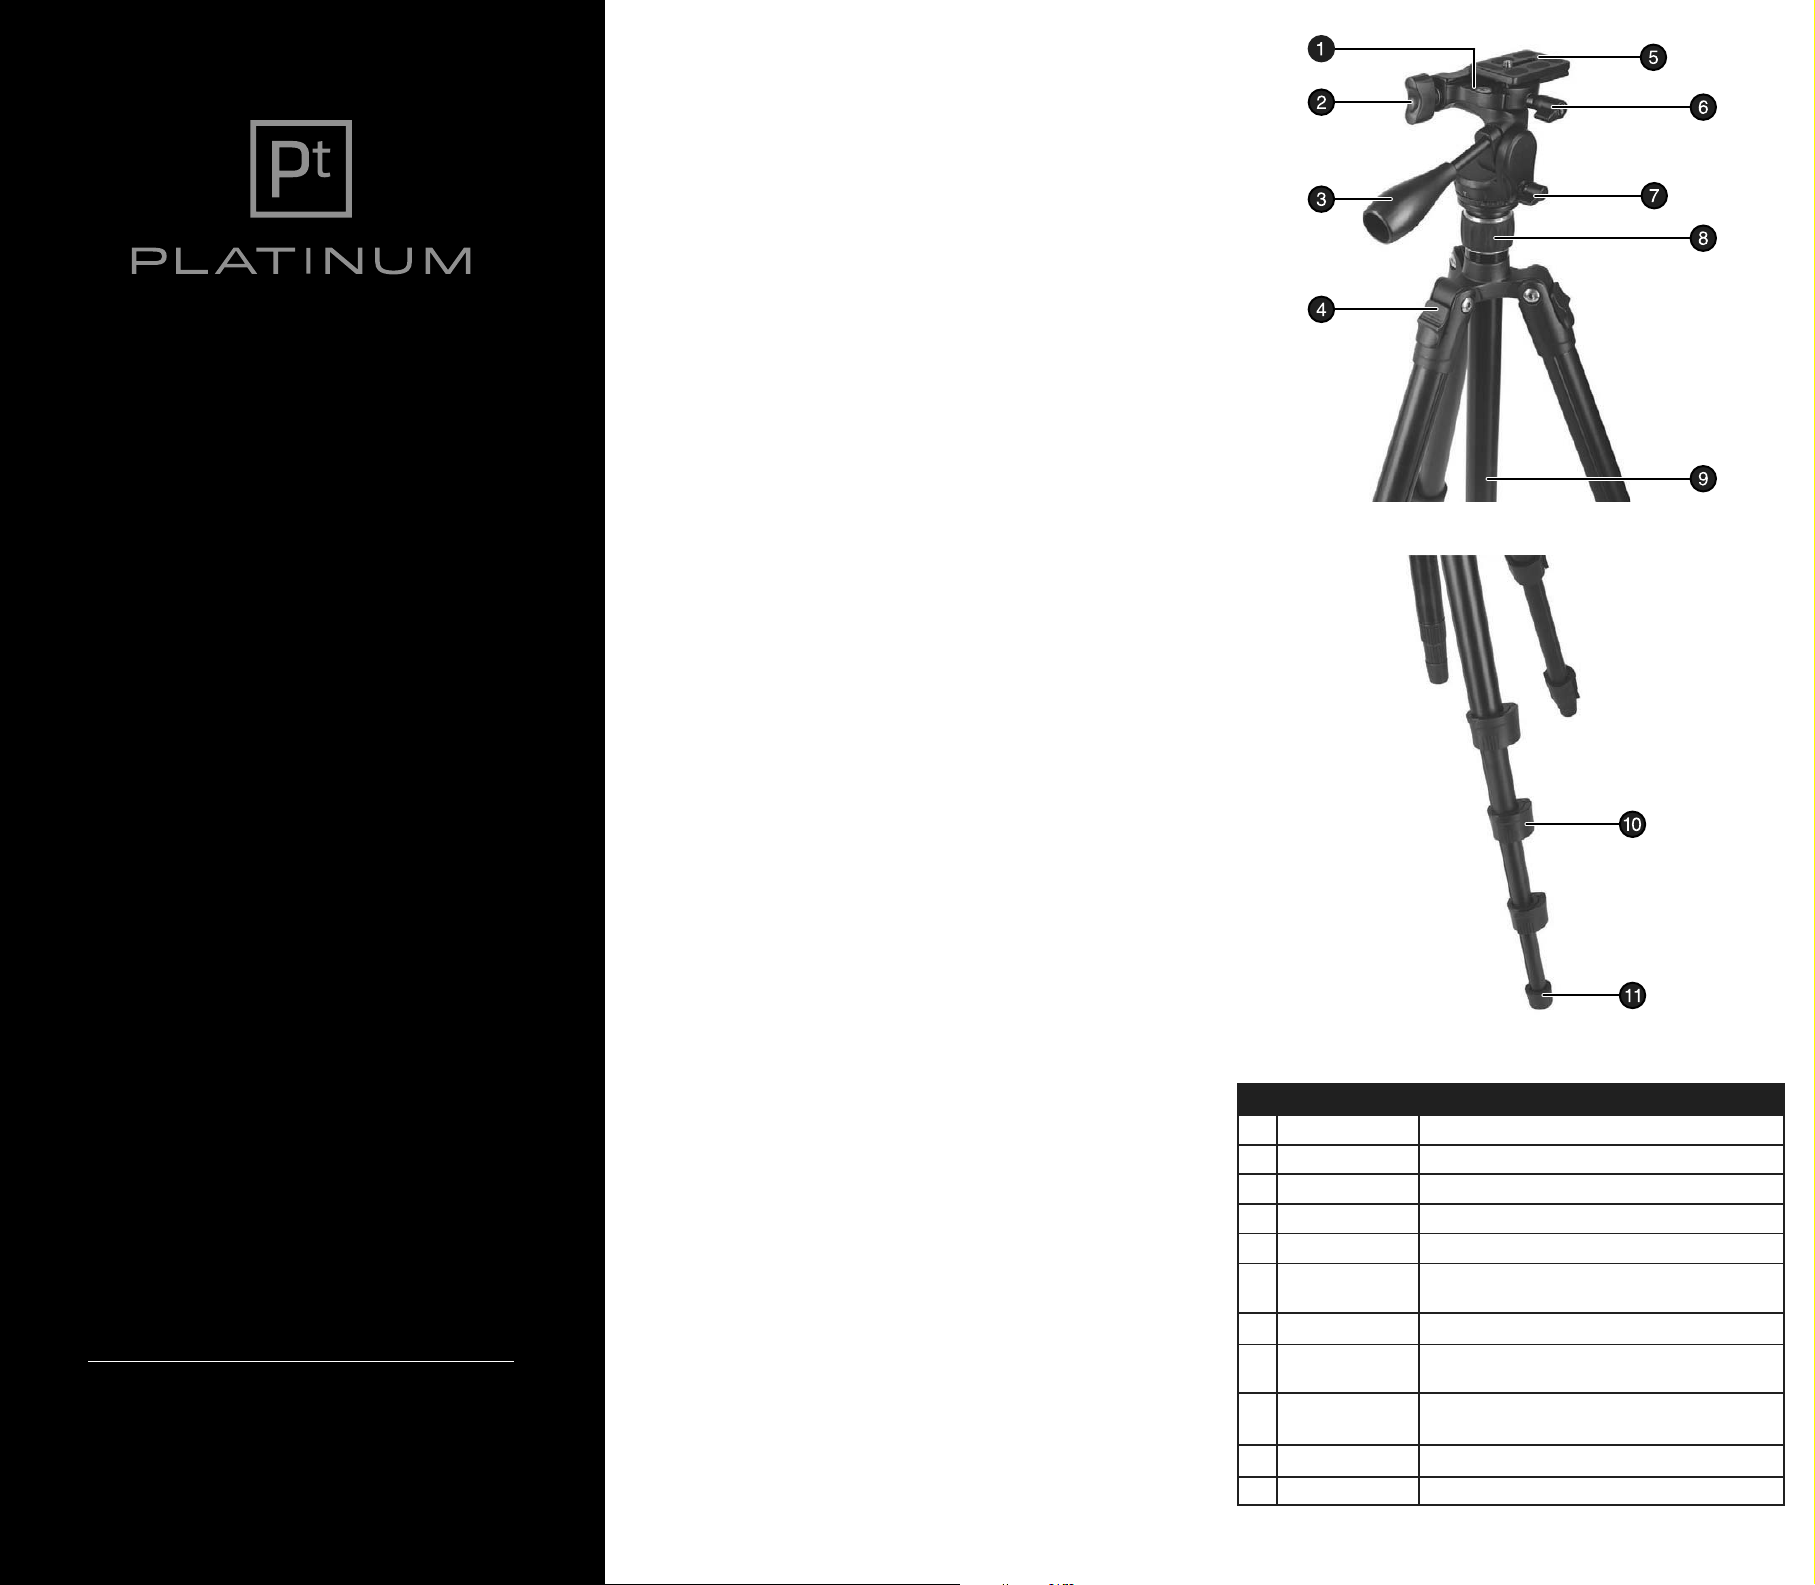
# ITEM
1 Leveling bubble
2 Vertical tilt lock knob
3 Vertical tilt lock handle
4 Leg release button
5 Mounting plate
6 Quick-release plate
locking knob
7 Pan locking knob
8 Center column locking
screw
9 Center column/
monopod leg
10 Flip-lever leg locks
11 Rubber feet
DESCRIPTION
The quick release plate is level when the bubble is in the center.
Adjusts the camera angle for landscape or portrait orientations.
Adjusts vertical tilt for head.
Lets you adjust the leg angle position
Holds your camera.
Secures the quick-release plate to the tripod.
Locks the tripod head so that it will not rotate horizontally.
Locks the center column in place.
Provides quick height adjustment.
Locks the legs in place.
Provide a secure, non-slip footing for your tripod.
Page 2
SETTING UP YOUR TRIPOD
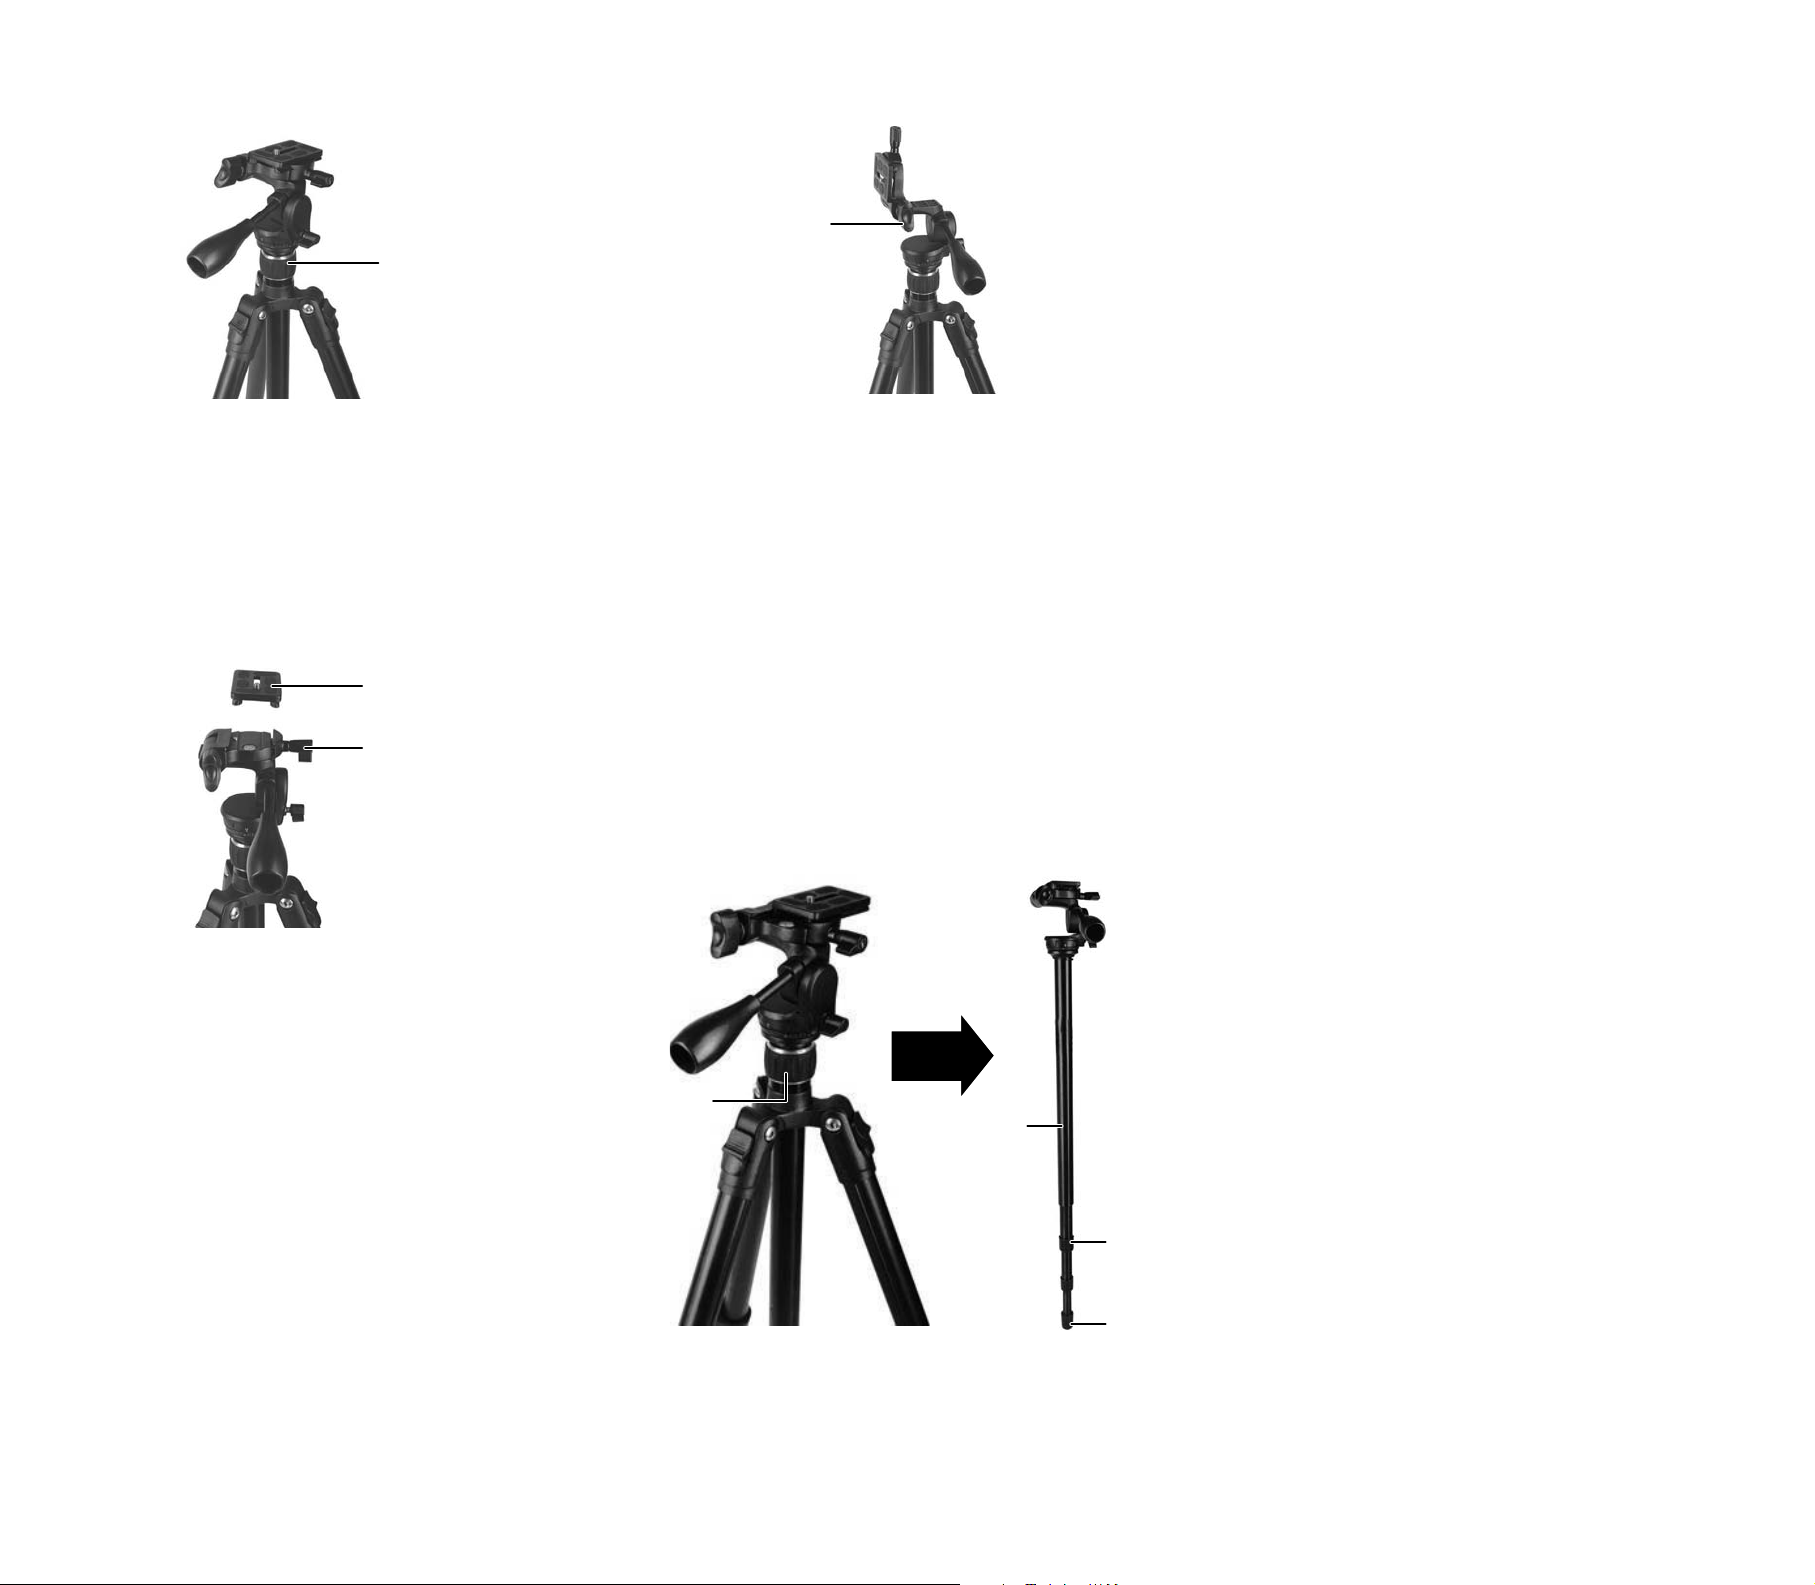
1 Open the ip-lever leg locks on each leg.
2 Extend the leg sections from the top down (thickest section rst) to reach the height
you want.
Center column
locking screw
3 Close the ip-lever leg locks on each leg.
Caution: Incorrectly securing a leg lock can cause the tripod leg to retract unexpectedly
and could result in damage to the tripod or to the attached camera or camcorder.
4 Adjust the height of the center column by loosening the center column locking screw,
raising the center column to the height you want, then tightening the locking screw.
5 To set the angle position of the legs, press the leg release buttons and lift the tripod leg.
6 To remove the mounting plate, turn the quick-release plate locking knob counter-
clockwise to loosen it, then turn the quick-release plate locking knob open, then lift the
mounting plate to remove it.
Mounting plate
Quick-release plate
locking knob
USING YOUR TRIPOD
1 To adjust your camera to portrait position, loosen the vertical tilt lock knob, rotate the
plate up to 90°, then tighten the knob.
Vertical tilt
lock knob
2 To adjust horizontal tilt, turn the pan locking knob counterclockwise, tilt the tripod head
as desired, then tighten the handle.
3 To pan, turn the pan locking knob counter-clockwise, pan the tripod head, then tighten
the knob to lock in place.
Note: For maximum stability, always make sure that your camera lens is over a leg.
4 To adjust the vertical tilt, loosen the vertical tilt handle, then use the handle to adjust
the vertical position. Tighten the vertical tilt handle.
CONVERTING TO A MONOPOD
1 Loosen the center column locking screw, and remove the center column/monopod leg
(with the pan head).
2 With one hand, grab all the twist screw leg locks on the monopod leg and twist them
counterclockwise to loosen them.
3 Extend the leg sections, starting with the thickest section, to the height you want.
4 Twist each leg lock clockwise to tighten it.
Caution: Incorrectly securing a leg lock can cause the monopod leg to retract
unexpectedly and could result in damage to the monopod or to the attached camera or
camcorder.
STORING YOUR TRIPOD
1 Remove your camera.
2 Loosen the center column locking screw. Lower the column as far as it will go, then
tighten the locking screw.
3 Collapse the legs.
4 Press the leg release buttons and push the legs in.
5 Store the tripod in the carrying case.
IMPORTANT SAFETY INSTRUCTIONS
• Make sure that all leg locks are correctly tightened and that the legs are fully opened
before use.
• Do not carry or transport your tripod with camera equipment attached (for example, over
your shoulder or cradled in your arms).
• Do not expose your tripod to excessive heat or cold, or use near any ame or re.
• Do not oil or grease any part of the tripod.
• Do not use any solvents or thinners to clean your tripod. Use only a mild detergent and
wipe dry with a soft, lint-free cloth.
• Do not exceed the load limit of this tripod.
SPECIFICATIONS
• Maximum operating height: 66.5 in. (168.9 cm)
• Minimum operating height: 22.1 in. (56 cm)
• Folded height: 24.2 in. (61.5 cm)
• Net weight: 4.3 lbs (2 kg)
• Max operating load: 11 lbs (5 kg)
• Number of leg sections: 4
• Quick release thread: 1/4 in. (0.6 cm)
• Material: aluminum alloy
ONE-YEAR LIMITED WARRANTY
CONTACT PLATINUM
For customer service, call 1-800-499-3964.
7 Align the bottom of your camera or camcorder with the 1/4" mounting screw, then
secure your camera or camcorder to the plate with the screw. The screw should be tight.
8 To attach the mounting plate to your tripod, loosen the quick-release plate locking
knob, then slide the plate onto the tripod head. Tighten the quick-release plate locking
knob.
Center column
locking screw
The Pt logo is a registered trademark of Best Buy.
PLATINUM is a trademark of Best Buy and its aliated companies. Registered in some countries.
Distributed by Best Buy Purchasing, LLC
7601 Penn Ave South, Richeld, MN 55423 U.S.A.
©2014 Best Buy. All rights reserved.
Made in China
Monopod leg
Twist locking
screw
Rubber foot
V1 ENGLISH 14-0524
 Loading...