

Page 1

Advanced On-camera TTL Flash
PT-DPF500C / PT-DPF500N
Note: Camera flashes are designed for
specific camera makes. For example, you
cannot use the Canon flash (PT-DPF500C)
with a Nikon camera.
User Guide
Before using your new product, please read these instructions to prevent any
damage.
Page 2

Advanced On-camera TTL
Flash for Canon or Nikon
Contents
Introduction . . . . . . . . . . . . . . . . . . . . . . . . . . . . . . . . . . . . . . . . . . . . . . . . . . . . . 3
Important Safety Instructions . . . . . . . . . . . . . . . . . . . . . . . . . . . . . . . . . . . . . . 3
Features . . . . . . . . . . . . . . . . . . . . . . . . . . . . . . . . . . . . . . . . . . . . . . . . . . . . . . . . . 4
Package contents . . . . . . . . . . . . . . . . . . . . . . . . . . . . . . . . . . . . . . . . . . . . . . . . . . . . 4
Flash body . . . . . . . . . . . . . . . . . . . . . . . . . . . . . . . . . . . . . . . . . . . . . . . . . . . . . . . . . . 4
Control panel. . . . . . . . . . . . . . . . . . . . . . . . . . . . . . . . . . . . . . . . . . . . . . . . . . . . . . . . 5
LCD (Canon). . . . . . . . . . . . . . . . . . . . . . . . . . . . . . . . . . . . . . . . . . . . . . . . . . . . . . . . . 6
Auto-flash (E-TTL) mode. . . . . . . . . . . . . . . . . . . . . . . . . . . . . . . . . . . . . . . . . . . . 6
Manual (M) mode . . . . . . . . . . . . . . . . . . . . . . . . . . . . . . . . . . . . . . . . . . . . . . . . . 6
Stroboscopic (MULTI) mode . . . . . . . . . . . . . . . . . . . . . . . . . . . . . . . . . . . . . . . . . 6
Optical transmission shooting . . . . . . . . . . . . . . . . . . . . . . . . . . . . . . . . . . . . . . . 7
LCD (Nikon) . . . . . . . . . . . . . . . . . . . . . . . . . . . . . . . . . . . . . . . . . . . . . . . . . . . . . . . . . 7
Auto-flash (i-TTL) mode . . . . . . . . . . . . . . . . . . . . . . . . . . . . . . . . . . . . . . . . . . . . 7
Manual (M) mode . . . . . . . . . . . . . . . . . . . . . . . . . . . . . . . . . . . . . . . . . . . . . . . . . 8
Stroboscopic (RPT) mode . . . . . . . . . . . . . . . . . . . . . . . . . . . . . . . . . . . . . . . . . . . 8
Radio transmission shooting/optical transmission shooting. . . . . . . . . . . . . . 8
Installing batteries . . . . . . . . . . . . . . . . . . . . . . . . . . . . . . . . . . . . . . . . . . . . . . . 9
Low battery warning . . . . . . . . . . . . . . . . . . . . . . . . . . . . . . . . . . . . . . . . . . . . . . . . 10
Attaching your flash to the camera . . . . . . . . . . . . . . . . . . . . . . . . . . . . . . . . . 10
Attaching your flash to the stand . . . . . . . . . . . . . . . . . . . . . . . . . . . . . . . . . . 11
Turning your flash on and off . . . . . . . . . . . . . . . . . . . . . . . . . . . . . . . . . . . . . . 11
Power management. . . . . . . . . . . . . . . . . . . . . . . . . . . . . . . . . . . . . . . . . . . . . . . . . 11
Master flash . . . . . . . . . . . . . . . . . . . . . . . . . . . . . . . . . . . . . . . . . . . . . . . . . . . . . 11
Slave flash. . . . . . . . . . . . . . . . . . . . . . . . . . . . . . . . . . . . . . . . . . . . . . . . . . . . . . . 11
Selecting a flash mode . . . . . . . . . . . . . . . . . . . . . . . . . . . . . . . . . . . . . . . . . . . 12
Using Auto-flash mode . . . . . . . . . . . . . . . . . . . . . . . . . . . . . . . . . . . . . . . . . . . 12
Taking a picture. . . . . . . . . . . . . . . . . . . . . . . . . . . . . . . . . . . . . . . . . . . . . . . . . . . . . 13
Using flash exposure compensation. . . . . . . . . . . . . . . . . . . . . . . . . . . . . . . . . . . . 13
Using flash exposure bracketing (Canon only) . . . . . . . . . . . . . . . . . . . . . . . . . . . 14
Locking the flash exposure (Canon only). . . . . . . . . . . . . . . . . . . . . . . . . . . . . . . . 15
Using high-speed sync (Canon). . . . . . . . . . . . . . . . . . . . . . . . . . . . . . . . . . . . . . . . 15
Using high-speed sync (Nikon) . . . . . . . . . . . . . . . . . . . . . . . . . . . . . . . . . . . . . . . . 16
Using second-curtain sync (Canon) . . . . . . . . . . . . . . . . . . . . . . . . . . . . . . . . . . . . 17
Using second-curtain sync (Nikon). . . . . . . . . . . . . . . . . . . . . . . . . . . . . . . . . . . . . 17
Modeling flash . . . . . . . . . . . . . . . . . . . . . . . . . . . . . . . . . . . . . . . . . . . . . . . . . . . . . 17
Using Manual mode . . . . . . . . . . . . . . . . . . . . . . . . . . . . . . . . . . . . . . . . . . . . . . 18
Flash output range . . . . . . . . . . . . . . . . . . . . . . . . . . . . . . . . . . . . . . . . . . . . . . . . . . 18
Using the Optical S1 secondary flash setting . . . . . . . . . . . . . . . . . . . . . . . . . . . . 19
Using the Optical S2 secondary flash setting . . . . . . . . . . . . . . . . . . . . . . . . . . . . 19
Manual off-camera high-speed setting (Nikon only). . . . . . . . . . . . . . . . . . . . . . 19
Using Stroboscopic mode . . . . . . . . . . . . . . . . . . . . . . . . . . . . . . . . . . . . . . . . . 19
Calculating the shutter speed . . . . . . . . . . . . . . . . . . . . . . . . . . . . . . . . . . . . . . . . . 20
Maximum Stroboscopic flashes (Canon) . . . . . . . . . . . . . . . . . . . . . . . . . . . . . . . . 21
Maximum Stroboscopic flashes (Nikon). . . . . . . . . . . . . . . . . . . . . . . . . . . . . . . . . 21
Using wireless flash shooting: optical transmission . . . . . . . . . . . . . . . . . . . 22
Canon flash overview . . . . . . . . . . . . . . . . . . . . . . . . . . . . . . . . . . . . . . . . . . . . . . . . 22
Nikon flash overview . . . . . . . . . . . . . . . . . . . . . . . . . . . . . . . . . . . . . . . . . . . . . . . . 22
Slave/master positioning and operating range . . . . . . . . . . . . . . . . . . . . . . . . . . 23
Switching between normal flash and wireless flash (Canon). . . . . . . . . . . . . . . 23
Switching between normal flash and wireless flash (Nikon) . . . . . . . . . . . . . . . 23
Turning the master flash on or off (Canon) . . . . . . . . . . . . . . . . . . . . . . . . . . . . . . 24
Turning the master flash on or off (Nikon) . . . . . . . . . . . . . . . . . . . . . . . . . . . . . . 24
Setting the communication channel (Canon) . . . . . . . . . . . . . . . . . . . . . . . . . . . . 25
Setting the communication channel (Nikon) . . . . . . . . . . . . . . . . . . . . . . . . . . . . 25
Using fully automatic wireless flash shooting (Canon) . . . . . . . . . . . . . . . . . . . . 26
Using one slave flash. . . . . . . . . . . . . . . . . . . . . . . . . . . . . . . . . . . . . . . . . . . . . . 26
Using multiple slave flashes. . . . . . . . . . . . . . . . . . . . . . . . . . . . . . . . . . . . . . . . 27
Using fully automatic wireless flash shooting in Auto-flash mode (Nikon) . . . 27
Using automatic wireless flash with a single slave flash . . . . . . . . . . . . . . . . 27
Using fully automatic wireless flash . . . . . . . . . . . . . . . . . . . . . . . . . . . . . . . . . 29
Using multiple master flashes. . . . . . . . . . . . . . . . . . . . . . . . . . . . . . . . . . . . . . . . . 29
Setting the wireless flash ratio for multiple slave flashes (Canon only) . . . . . . 29
About slave group control. . . . . . . . . . . . . . . . . . . . . . . . . . . . . . . . . . . . . . . . . . 30
2
Page 3

Using wireless flash shooting in Manual mode (Canon) . . . . . . . . . . . . . . . . . . . 30
Manually setting the slave flashes . . . . . . . . . . . . . . . . . . . . . . . . . . . . . . . . . . 31
Using wireless flash shooting in Manual flash mode (Nikon). . . . . . . . . . . . . . . 31
Using wireless flash shooting in Stroboscopic mode (Canon) . . . . . . . . . . . . . . 32
Using manual wireless flash shooting in Stroboscopic mode (Nikon). . . . . . . . 32
Using wireless flash shooting: radio (2.4G) transmission . . . . . . . . . . . . . . . 33
Positioning and operating range using a single slave flash . . . . . . . . . . . . . . . . 33
Positioning and operating range using multiple slave flashes. . . . . . . . . . . . . . 34
Auto shooting with using different flash modes for each group (Canon only). 35
Shooting with a different flash mode for each group (Canon only) . . . . . . . . . 35
Using other applications. . . . . . . . . . . . . . . . . . . . . . . . . . . . . . . . . . . . . . . . . . .37
Using sync triggering. . . . . . . . . . . . . . . . . . . . . . . . . . . . . . . . . . . . . . . . . . . . . . . . 37
Using auto-focus assist beam. . . . . . . . . . . . . . . . . . . . . . . . . . . . . . . . . . . . . . . . . 37
Using bounce flash. . . . . . . . . . . . . . . . . . . . . . . . . . . . . . . . . . . . . . . . . . . . . . . . . . 37
Creating a catchlight . . . . . . . . . . . . . . . . . . . . . . . . . . . . . . . . . . . . . . . . . . . . . . . . 38
Setting the flash coverage in manual zoom mode . . . . . . . . . . . . . . . . . . . . . . . 38
Using the wide panel to extend the flash coverage. . . . . . . . . . . . . . . . . . . . . . . 39
Customizing function settings. . . . . . . . . . . . . . . . . . . . . . . . . . . . . . . . . . . . . .39
Canon functions . . . . . . . . . . . . . . . . . . . . . . . . . . . . . . . . . . . . . . . . . . . . . . . . . . . . 40
Nikon functions . . . . . . . . . . . . . . . . . . . . . . . . . . . . . . . . . . . . . . . . . . . . . . . . . . . . 40
Controlling your flash from the camera’s menus (Canon) . . . . . . . . . . . . . . .41
Flash function settings menu . . . . . . . . . . . . . . . . . . . . . . . . . . . . . . . . . . . . . . . . . 41
Flash C.Fn settings menu . . . . . . . . . . . . . . . . . . . . . . . . . . . . . . . . . . . . . . . . . . . . 41
Understanding protection functions . . . . . . . . . . . . . . . . . . . . . . . . . . . . . . . .42
Over-temperature protection. . . . . . . . . . . . . . . . . . . . . . . . . . . . . . . . . . . . . . . . . 42
Protection error messages . . . . . . . . . . . . . . . . . . . . . . . . . . . . . . . . . . . . . . . . . . . 43
Maintaining . . . . . . . . . . . . . . . . . . . . . . . . . . . . . . . . . . . . . . . . . . . . . . . . . . . . . 43
Troubleshooting. . . . . . . . . . . . . . . . . . . . . . . . . . . . . . . . . . . . . . . . . . . . . . . . . . 43
Upgrading firmware . . . . . . . . . . . . . . . . . . . . . . . . . . . . . . . . . . . . . . . . . . . . . . . . 44
Specifications . . . . . . . . . . . . . . . . . . . . . . . . . . . . . . . . . . . . . . . . . . . . . . . . . . . . 45
Legal notices. . . . . . . . . . . . . . . . . . . . . . . . . . . . . . . . . . . . . . . . . . . . . . . . . . . . .46
ONE-YEAR LIMITED WARRANTY . . . . . . . . . . . . . . . . . . . . . . . . . . . . . . . . . . . . . . 47
Introduction
Congratulations on your purchase of a high-quality Platinum
product. Your PT-DPF500C for Canon cameras or PT-DPF500N for
Nikon cameras represents the state of the art in advanced
on-camera TTL flash technology and is manufactured for reliable
and trouble-free performance.
Important Safety Instructions
To p rev ent dam age to y our fla sh or injury to you or to others,
read the following safety precautions in their entirety before
using your flash.
1 Read and understand all instructions.
2 Keep these instructions.
3 Always keep your flash dry. Do not use in rain or in damp
conditions.
4 Do not leave or store your flash in places where the ambient
temperature is over 122°F (50°C), for example, in an
automobile. Otherwise the electronic parts may be
damaged.
5 Your flash contains high-voltage electronic parts. Touching
the high-voltage circuit inside it may result in electric shock.
Do not disassemble. Should repairs become necessary, your
flash must be sent to an authorized maintenance center.
6 Stop using your flash if it breaks open due to a drop or strong
impact. Otherwise, electric shock may occur if you touch the
electronic parts inside it.
7 Do not fire your flash directly into the eyes (especially those
of babies) within short distances. Otherwise, visual
impairment may occur. When taking pictures of babies, keep
your flash at least 3.3 feet (1 meter) away from them. Using
bounce flash to reduce light intensity is also recommended.
3
Page 4

8 Do not use your flash in the presence of flammable gases,
Catchlight
panel
Built-in wide
panel
Flash head
Sync cord
jack
USB port
Optical control
sensor
Focus assist
beam
Slave flash
ready in dicator
External
power supply
socket
Hotshoe
chemicals, and other similar materials. In certain
circumstances, these materials may be sensitive to the strong
light emitting from your flash and fire or electromagnetic
interference may result.
9 Overheating occurs if you use your flash continuously
without letting it cool down. We advise that you let your
flash cool 10 minutes after 30 continuous full-power flashes.
SAVE THESE INSTRUCTIONS
Features
• Designed for demanding use
• High-output design for maximum performance
• Full feature set for maximum flexibility
• TTL compatibility for seamless integration with camera
focus and metering system.
• Advanced backlit screen for visibility in low-light
• Uses 4 AA batteries (not included)
Package contents
• Platinum Advanced On-camera TTL Flash for Canon or
Nikon
•Carrying Case
•Stand
•User Guide
Flash body
4
Notes:
•The External power supply socket is used to connect an
external battery pack or power supply (battery pack and
power supply are not included).
•The USB port is for firmware updates only. You cannot use
this port to charge or power your flash.
Page 5

Control panel
LCD
Battery
compartment
Lock ring
FN 2 button
FN 1 (ZOOM/
C.FN) button
MODE
button
Tes t b utt on/
Flash rea dy
indicator
Select dial
FN 3 button
FN 4 button
Wirele ss
selection
button
Power
switch
SET button
Note: The functions of the FN buttons 1 though 4 change
depending on what setting you are accessing or adjusting.
5
Page 6

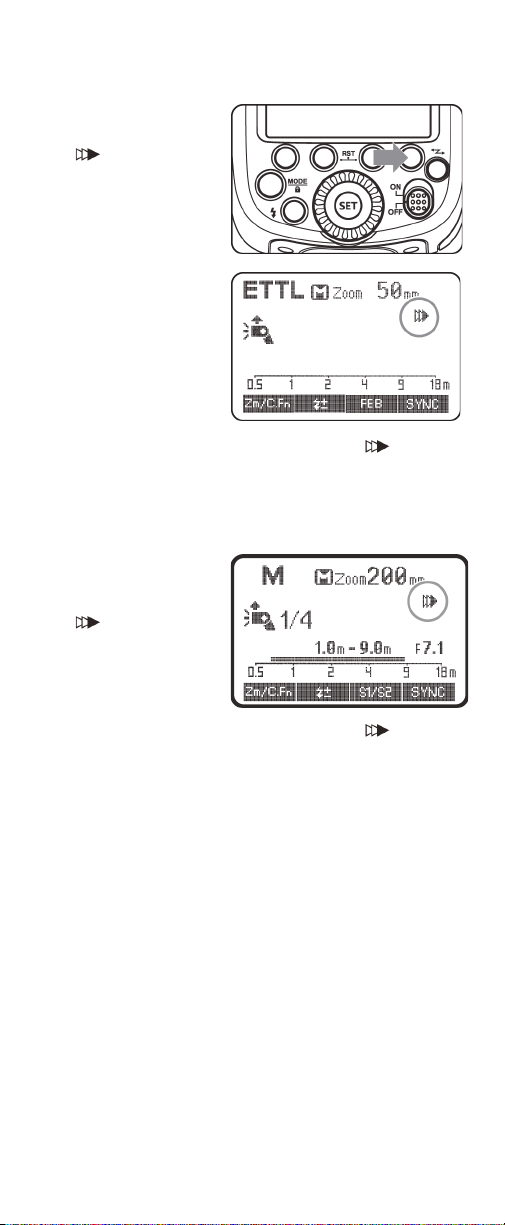
LCD (Canon)
Zoom
Automatic/
Manual
Flash exposure
compensation
amount
Flash exposure
compensation
Focus
length
High-speed/
second
curtain sync
Aperture
Distance
indicator
Effective
flash range
E-TTL/E-TTL II
Auto-flash
mode
Master
flash ON icon/
Master
flash OFF
Flash exposure
bracketing
Flash
exposure
bracketing
sequence
Manual flash mode
Manual flash output
Stroboscopic
mode
Number of
flashes
Flash
frequency
Notes:
• The LCD only shows the settings currently applied.
• The functions displayed above FN (function) buttons 1 to 4,
such as SYNC and , change according to the setting’s
status.
• When a button or dial is operated, the LCD lights.
Auto-flash (E-TTL) mode
Manual (M) mode
Stroboscopic (MULTI) mode
6
Page 7

Optical transmission shooting
Gr Group flash
Optical transmission
Flash
mode
Channel
(1, 2, 3, or 4)
Master flash
Firing group
Master flash ON
icon/
Master flash OFF
Flash
ratio
Slave
mode
indicator
Slave icon
Zoom
Automatic/
Manual
Auto-flash
mode
Flash
exposure
compensatio n
Flash
exposure
compensatio n
amount
Focus
length
High-speed/
second
curtain sync
Aperture
Distance
indicator
Effective
flash range
Beeper ON
Master flash
Slave flash
LCD (Nikon)
Notes:
• The LCD only shows the settings currently applied.
• The functions displayed above FN (function) buttons 1 to 4,
such as SYNC and , change according to the setting’s
status.
• When a button or dial is operated, the LCD lights.
Auto-flash (i-TTL) mode
7
Page 8

Manual (M) mode
Manual flash mode
Manual flash output
Stroboscopic
mode
Number of
flashes
Flash
frequency
Gr Group flash
Radio
transmission
Optical
transmission
Flash mode
Channel
(1, 2, 3, or 4)
Flash
exposure
compensatio n
Firing
group
Slave mode indicator
Slave mode icon
Stroboscopic (RPT) mode
Radio transmission shooting/optical transmission shooting
Master flash
Slave flash
8
Page 9

Installing batteries
Battery
compartment
cover
Note: Using premium batteries, such as non-rechargable
lithium or high-output rechargable batteries, will noticeably
reduce flash recycle time and improve battery life.
1 While pressing in on the battery compartment cover, slide
the cover down, then lift the cover to open the
compartment.
2 Insert four AA batteries (not included) into the battery
compartment. Make sure that the + and – symbols on the
batteries match the symbols in the battery compartment.
3 Close the battery compartment cover.
Cautions:
• Batteries should not be exposed to excessive heat, such as
sunshine, heat registers, or fire.
• Battery chemicals can cause a rash. If the batteries leak, clean
the battery compartment with a cloth. If chemicals touch
your skin, wash immediately.
• Make sure that batteries are disposed of correctly. Do not
burn or incinerate.
Notes:
• Do not mix batteries of different types.
• Do not mix old and new batteries.
• Remove batteries when the charge is depleted.
• If your flash is not going to be used for an extended period of
time, remove the batteries.
9
Page 10

Low battery warning
Canon LCD
Nikon LCD
If the battery power is low,
the icon blinks on the
LCD. You need to replace
the batteries.
Attaching your flash to the camera
1 If the camera has a plastic protective cover on the hotshoe,
remove it.
2 Rotate the lock ring on your flash’s mounting shoe
counter-clockwise as far as it will go to make sure that the
lock ring is completely loosened.
3 Slip your flash's
mounting shoe into
the camera's hotshoe.
Make sure that the
shoe is all the way into
the hotshoe.
4 Rotate the lock ring
on your flash’s
mounting shoe
clockwise until it locks
in place.
5 To remove your flash,
rotate the lock ring
counter-clockwise to
loosen your flash,
then slide your flash
out of the hotshoe.
10
Page 11

Attaching your flash to the stand
1 Rotate the lock ring on your flash’s mounting shoe
counter-clockwise as far as it will go to make sure that the
lock ring is completely loosened.
2 Slide your flash’s mounting foot into the slot on the stand.
3 Rotate the lock ring on your flash’s mounting foot clockwise
until it locks in place.
4 Set the stand on a flat, stable surface.
OR
Screw the bottom of the stand into a standard camera tripod.
Turning your flash on and off
1 Make sure that the batteries are installed. See Installing
batteries on page 9.
2 Slide the ON/OFF switch to turn on your flash.
If you set up your flash as the master flash, your flash turns
off a fter about 90 seconds. To turn on (wake) your flash, press
the camera shutter halfway or press any button.
If you set up your flash as a slave flash, your flash turns off
after about 60 minutes. To turn on (wake) your flash, press
any button.
3 Slide the switch again to turn off your flash.
Power management
Master flash
When you set up your flash as the master flash, your flash turns
off after about 90 seconds of inactivity. You can turn off the auto
power off function.
1 Press the FN 1 (ZOOM/C.FN) (Backlight/Custom Setting)
button for two seconds or longer until the C.Fn menu is
displayed. For the location of the FN 1 button, see Control
panel on page 5.
2 Turn the select dial to
select APO, then press
the SET button. The
LCD blinks.
3 Turn the select dial to select ON or OFF, then press the SET
button.
4 To reset a function to the default, press and hold the FN 1
CLEAR button until OK is displayed on the LCD.
Note: If you decrease the flash brightness, press the (test)
button to release the stored power. When your flash recharges,
the amount of stored power matches the lower setting.
Slave flash
When you set up your flash as a slave flash, your flash turns off
after about 60 minutes of inactivity. You can change the auto
power off (Sv APOT) function to 30 minutes.
1 Press the FN 1 (ZOOM/C.FN) (Backlight/Custom Setting)
button for two seconds or longer until the C.Fn menu is
displayed. For the location of the FN 1 button, see Control
panel on page 5.
11
Page 12

2 Turn the se lect d ia l to
select Sv APOT, then
press the SET button.
The LCD blinks.
3 Turn the select dial to select 60min or 30min.
4Canon: Press the SET button to lock in the new setting, then
press the FN 4 button to exit the screen.
OR
Nikon: Press and hold the FN 1 CLEAR button until OK is
displayed on the LCD.
Selecting a flash mode
Your flash has three flash modes:
• Auto-flash mode—Your flash and camera work together to
calculate the correct exposure for the subject and
background. For more information, see Using Auto-flash
mode on page 12.
Note: In Auto-flash mode, Canon flashes display E-TTL on the
LCD. Nikon flashes display i_TTL.
• Manual (M) mode—Lets you manually adjust your flash
output from 1/1 full power to 1/128th power in one-third
stop increments. For more information, see Using Manual
mode on page 18.
• Stroboscopic mode—Lets you take a rapid series of flashes
to capture multiple images of a moving subject in a single
photograph. For more information, see Using Stroboscopic
mode on page 19.
Note: In Stroboscopic mode, Canon flashes display MULTI on
the LCD. Nikon flashes display RPT.
To se le ct a flash mo de :
•Press the MODE
button one or more
times. Your flash
mode displayed on
the LCD changes
each time you press
the button. You can
select:
• E-TTL (Canon) or
i_TTL (Nikon)
(Auto-flash mode)
• M (Manual mode)
• MULTI (Canon) or RPT (Nikon) (Stroboscopic mode).
Using Auto-flash mode
Note: In Auto-flash mode, Canon flashes display E-TTL on the
LCD. Nikon flashes display i_TTL.
In Auto-flash mode, the camera and your flash work together to
calculate the correct exposure for the subject and the
background. In this mode, multiple TTL functions are available,
including:
• Flash exposure compensation (FEC)
• Flash exposure bracketing (FEB) (Canon)
• Flash exposure lock (Canon)
• High-speed sync (HSS)
• Second curtain sync
• Modeling flash
12
Page 13

To select Auto-flash mode
Canon LCD
Nikon LCD
• Press the MODE
button one or more
times to select E-TTL
(Canon) or i-TTL
(Nikon).
Taking a picture
1 On the camera, press the shutter button halfway to focus.
The aperture and effective flash range are displayed in the
camera’s viewfinder.
2 On the camera, fully press the shutter button. Your flash fires
a pre-flash that the camera uses to calculate exposure and
flash output the instant before the photo is taken. Then the
camera takes the picture.
Using flash exposure compensation
Your flash automatically determines the flash output (amount of
light your flash puts out). You can use flash exposure
compensation (FEC) to adjust the flash output. This function
makes pictures brighter or darker.
1 Press the FN 2 button.
The (FEC) icon and
the flash exposure
value are highlighted
on the LCD.
13
Page 14

2 Turn the se lect d ia l to
select 0.3 (1/3 step),
0.7 (2/3 step), or +0
(no flash exposure
compensation).
3 Press the SET button to save the setting.
Using flash exposure bracketing (Canon only)
Flash exposure bracketing helps you get a correct exposure
especially when shooting a moving object or when
environmental lighting is complex.
With flash exposure bracketing, the camera takes three flash
shots while automatically changing the flash output for each shot
from -3 to +3. One shot is exposed according to camera
calculations. One shot is over-exposed and another shot
under-exposed. You can adjust the over and under exposure
amount.
1 Press the FN 3 button.
The (FEB) icon and
the exposure
bracketing amount
are highlighted on the
LCD.
2 Turn the se lect d ia l to
select 0.3 (1/3 step) or
0.7 (2/3 step).
3 Press the SET button to confirm the setting. The FEC and FEB
settings are displayed on the LCD.
Notes:
• FEB mode turns off after three photos are taken. You can keep
FEB mode turned on. See the FEB ACL option in Customizing
function settings on page 39.
• You can change the FEB shooting sequence. See the FEB
option in Customizing function settings
• If you decrease the flash brightness, press the (test) button
to release the stored power. When your flash recharges, the
amount of stored power matches the lower setting.
on page 39.
14
Page 15

Locking the flash exposure (Canon only)
In Auto-flash mode, the camera automatically adjusts the flash
exposure when you focus the camera. You can lock the flash
exposure to prevent the camera from changing the flash
exposure.
1 Center the subject in
the camera’s
viewfinder.
2 Press the FEL button on the camera. If the camera does not
have an FEL button, press the * button. The camera flash
fires a pre-flash and your flash stores the flash exposure in
memory.
3 To set a new flash exposure, press the FEL (or *) button to
clear your flash’s memory, then repeat steps 1 and 2.
Notes:
• If the subject is too far away and underexposed, the icon
blinks in the viewfinder. Move closer to the subject and try the
lock again.
•If ETTL is not displayed on the LCD, you cannot lock the flash
exposure.
• If the subject is too small, the lock might not be very effective.
Using high-speed sync (Canon)
High-speed sync lets your flash automatically synchronize with
the camera shutter speed. This function is convenient when you
want to use aperture priority for fill-flash portraits.
1 Press the FN 4 (SYNC)
button. The
(high-speed sync) icon
is displayed on the
LCD.
Note: When you set the
camera to high-speed
sync, your flash is
automatically set to
high-speed sync.
2 Make sure that the icon is displayed in the camera’s
viewfinder.
Notes:
• If you set a shutter speed that is the same as or slower than
the camera’s maximum flash sync speed, the icon is not
displayed in the viewfinder.
• With high-speed sync, the faster the shutter speed, the shorter
the effective flash range.
• To return to normal flash, press the FN 2 button again. The
icon disappears when you press the shutter button
halfway.
15
Page 16

• You cannot use Stroboscopic mode when using high-speed
sync mode.
• Over-temperature protection may be activated after 15
consecutive high-speed sync flashes.
• When the over-temperature protection is started, is
displayed on the LCD.
Using high-speed sync (Nikon)
1 Press the FN 4 (SYNC)
button. The
(high-speed sync) icon
is displayed on the
LCD.
Note: When you set the
camera to high-speed
sync, your flash is
automatically set to
high-speed sync.
2 Use the camera’s menu to set the flash sync speed to 1/320s
or 1/250s.
OR
Turn the camera control dial to set the shutter speed to
1/250s or higher.
3 Press the camera shutter button halfway. When the icon
is displayed on your flash’s LCD, it indicates that the
high-speed sync function on your flash is turned on.
4 To make sure that the high-speed sync function is turned on,
look for the shutter speed in the camera viewfinder. If the
speed is 1/250s or faster, the high-speed sync function is
turned on.
Notes:
• If you set the shutter spee d to 1/320s (Auto FP) or 1/250s (Auto
FP) in the camera settings, is displayed on your flas h's LCD
regardless of the practical shutter speed.
• With high-speed sync, the faster the shutter speed, the shorter
the effective flash range.
• To return to normal flash, set the flash sync speed to an option
other than Auto FP. The icon disappears when you press
the shutter button halfway.
• You cannot use Stroboscopic mode when using high-speed
sync mode.
• Over-temperature protection may be activated after 15
consecutive high-speed sync flashes.
• When the over-temperature protection is started, is
displayed on the LCD.
16
Page 17
Using second-curtain sync (Canon)
With a slow shutter speed, you can create a light train that follows
the subject. Your flash fires right before the shutter closes.
• Press the FN 4
(SYNC) button one or
more times until the
(second curtain
sync) icon is
displayed.
Note: If the camera is not set to rear mode, the icon does
not appear on your flash’s LCD.
Using second-curtain sync (Nikon)
With a slow shutter speed, you can create a light train that follows
the subject. Your flash fires right before the shutter closes.
• Set the camera to
rear mode, then
press the shutter
button halfway. The
(second curtain
sync) icon is
displayed on your
flash's LCD.
Note: If the camera is not set to rear mode, the icon does
not appear on your flash’s LCD.
Modeling flash
If the camera has a depth-of-field preview button, pressing it fires
your flash continuously for one second. This is called modeling
flash which lets you see the shadow effects on the subject and
the lighting balance. You can fire the modeling flash during
wireless or normal flash shooting.
Caution: To avoid overheating and damaging the flash head,
do not fire the modeling flash for more than 10 consecutive
times. If you fire the modeling flash 10 consecutive times, let
your flash cool for at least 10 minutes before using it again.
17
Page 18

Using Manual mode
Canon LCD
Nikon LCD
In Manual mode, you can manually adjust the flash output from
1/1 full power to 1/128th power in one-third stop increments.
Use a hand-held flash meter to determine the flash output you
need.
1 Press the MODE
button one or more
times to select M
(Manual mode).
2 Turn the se lect d ia l to
choose the flash
output amount you
want.
3 Press the SET button to save the setting.
Flash output range
The following table shows how the stop changes in terms of the
f/stop when you increase or decrease the flash output.
For example, when you decrease the flash output to 1/2, 1/2-0.3,
or 1/2-0.7, then increase the flash output to more than 1/2,
1/2+0.3, 1/2+0.7, or 1/1 are displayed.
Figures displayed when reducing flash output level
1/1-0.3 1/1-0.7
1
1/2+0.7 1/2+0.3 1/4+0.7 1/4+0.3 **** ****
Figures displayed when increasing flash output level
1/2
1/2-0.3 1/2-0.7
**** ****
1/4
18
Page 19

Using the Optical S1 secondary flash
Canon LCD
setting
The S1 secondary flash with optical sensor mode makes your
flash fire synchronously when the main flash fires. This produces
the same effect as using a radio trigger to create multiple lighting
effects.
Note: S1 and S2 optical triggering and off-camera high-speed
modes are only available in Manual flash mode.
• To turn on the S1 mode, press the FN 3 (S1/S2) button one
or more times until S1 appears on the LCD.
Using the Optical S2 secondary flash setting
If the camera has a pre-flash function, the S2 secondary flash with
optical sensor mode makes your flash ignore a single pre-flash
from the main flash. Your flash fires in response to the second,
(actual flash) from the main flash.
Note: S1 and S2 optical triggering and off-camera high-speed
modes are only available in Manual flash mode.
• To turn on the S2 mode, press the FN 3 (S1/S2) button one
or more times until S2 appears on the LCD.
Manual off-camera high-speed setting (Nikon only)
In Manual flash mode, press the FN 4 (SYNC) button to select
high-speed mode. The icon is displayed on the LCD.
Note: S1 and S2 optical triggering and off-camera high-speed
modes are only available in Manual flash mode.
Using Stroboscopic mode
Note: In Stroboscopic mode, Canon flashes display MULTI on
the LCD. Nikon flashes display RPT.
In the Stroboscopic mode, the camera takes a rapid series of
flashes to capture multiple images of a mov ing subject in a single
photograph.
You can set the firing frequency (number of flashes per second
expressed as Hz), the number of flashes, and the flash output.
1 Press the MODE
button one or more
times to select MULTI
(Canon) or RPT
(Nikon) (Stroboscopic
mode).
19
Page 20

2 Turn the se lect d ia l to
Nikon LCD
choose the flash
output amount you
want.
3 Press the FN 3 (MULTI) button to select the frequency. The
next item to set blinks on the LCD.
4 Turn the select dial to set the number of flashes.
5 Press the FN 4 (Hz) button to select Hz, then turn the select
dial to select the number of flashes per second.
6 After you finish, press the SET button. All the settings appear
on the LCD.
Calculating the shutter speed
When you use Stroboscopic mode, the shutter remains open
until the firing stops. Use the following formula to calculate the
shutter speed and set the speed on the camera.
Note: In Stroboscopic mode, Canon flashes display MULTI on
the LCD. Nikon flashes display RPT.
Number of Flashes / Flash Frequency = Shutter Speed
For example, if the number of flashes is 10 and the firing
frequency is 5Hz, the shutter speed should be at least two
seconds.
Notes:
• The Stroboscopic flash mode is most effective with a highly
reflective subject against a dark background.
• We recommend using a tripod and a remote control.
• A flash output of 1/1 and 1/2 cannot be set for the
Stroboscopic flash mode.
• You can use the camera’s “bulb” function in Stroboscopic flash
mode. Bulb mode lets you manually open and close the
shutter.
20
Page 21

If number of flashes is displayed as “––” the firing continues until
the shutter closes or the battery is exhausted. The number of
flashes are limited as follows:
Maximum Stroboscopic flashes (Canon)
Flash
output/Hz
1/4 7654433
1/8 14141210 8 6 5
1/16 30 30 30 20 20 20 10
1/32 60 60 60 50 50 40 30
1/64 90 90 90 80 80 70 60
1/128 100 100 100 100 100 90 8 0
Flash
output/Hz
1/4 22222 2
1/8 44444 4
1/16 88888 8
1/32 20 20 20 18 16 12
1/64 50 40 40 35 30 20
1/128 70 70 60 50 40 40
If the number of flashes is displayed as ––, the number of flashes,
regardless of the flash frequency, is as follows:
Flash output 1/4 1/8 1/16 1/32 1/64 1/128
Number of flashes 2 3 8 12 20 40
123456-78-9
10 11 12-14 15-19 20-49 50-199
Maximum Stroboscopic flashes (Nikon)
Flash
output/Hz
1/4 765443
1/8 14141210 8 6
1/16 30 30 30 20 20 20
1/32 60 60 60 50 50 40
1/64 90 90 90 80 80 70
1/128 90 90 90 90 90 90
123456-7
Flash
output/Hz
1/4 3 2 2 2 2
1/8 5 4 4 4 4
1/16 10 8 8 8 8
1/32 30 20 18 16 1 2
1/64 60 50 35 30 2 0
1/128 80 70 50 40 40
8-9 10 11-19 20-50 60-100
21
Page 22

Using wireless flash shooting: optical transmission
Notes:
• Master flash refers to the camera flash on a camera. Slave
flash refers to flashes controlled by the master flash.
• The master flash can control all of the slave flashes using
wireless.
Canon flash overview
Your Canon flash supports the wireless flash application and
functions as either a master or a slave flash. As a master flash, it
can control Canon speedlites, such as 580EXII and 600EX-RT. As a
slave flash, it can be controlled by the wireless signals from
Canon speedlites, such as 580EXII, 600EX-RT, and from the
commanders on Canon cameras, such as 7D/60D/600D.
Any flash settings (for example, flash exposure compensation,
high-speed sync, FE lock, FEB, Manual flash, or Auto-flash) on the
master flash are automatically sent to the slave flashes. So the
only thing you need to do is to set the master flash to ETTL
mode.
You can set up three slave groups for Auto-flash shooting to
create various lighting effects.
You r flas h can work in Au to-fla sh (E-TTL), Manual flash, and OFF
modes when set as a master flash.
Nikon flash overview
Your Nikon flash is compatible with the Nikon Creative Lighting
System (CLS). It can function as either an optic wireless master or
slave flash. As a master flash, it can control Nikon speedlights (for
example, SB-900 and SB-910 via wireless). As a slave flash, it can
be controlled by the wireless signals of Nikon speedlights (for
example SB-900 and pop-up flash commanders on Nikon
cameras (for example, D7100/D7000/D800).
You can set up three slave groups for Auto-flash shooting to
create various lighting effects.
Any flash settings for the slave flashes on the master flash in
Auto-flash, Manual, or Stroboscopic mode are automatically sent
to the slave flashes. All you need to do is to set the master flash
for each slave group without making any settings on the slave
flashes during the shooting.
Your flash can work in Auto-flash, Manual, Stroboscopic, or OFF
flash modes when set as a master flash.
22
Page 23

Slave/master positioning and operating
Indoor
Slave
Outdoor
Master
49.2 ft.
(15 m)
32.8 ft.
(10 m)
80°
26.2 ft.
(8 m)
39.4 ft.
(12 m)
range
For wireless flash shooting in optical transmission mode, position
the master flash and one slave flash as shown below:
Switching between normal flash and wireless flash (Canon)
Master flash setting
• Press the button
one or more times
until (optical
transmission) and
MASTER is displayed
on the LCD.
Slave flash setting
• Press the button
one or more times
until (optical
transmission) and
SLAVE is displayed on
the LCD.
Note: To return to
normal flash shooting, set the wireless setting to OFF. You can
also reset your flash to normal settings by pressing and
holding the FN 2 and FN 3 buttons simultaneously for two
seconds.
Switching between normal flash and wireless flash (Nikon)
Master flash setting
• Press the
button one or more
times to select . If
RPT is displayed,
Stroboscopic mode
is on. The LCD
backlight turns
green.
23
Page 24

Slave flash setting
• On the slave drive,
press the
button one or more
times to select
and make sure that
SLAVE is displayed
on the LCD. The LCD
backlight turns
orange.
Note: To return to normal flash shooting, set the wireless setting
to OFF. You can also reset your flash to normal settings by
pressing and holding the FN 2 and FN 3 buttons
simultaneously for two seconds.
Turning the master flash on or off (Canon)
When the master flash is set to OFF, only the slave flashes fire.
1 Press the FN 4 button
one or more times
until MENU 2 is
displayed on the LCD.
2 Press the FN 1
(ON/OFF) to turn the
master flash on or off.
ON: is displayed
on the LCD.
OFF: is displayed
on the LCD.
Turning the master flash on or off (Nikon)
When the master flash is set to OFF, only the slave flashes fire.
1 On the master flash,
press the FN 4 (Gr)
button to select the
M, A, B, or C group,
then press the FN 3
(MODE) button to
select OFF.
2 Press the MODE/Lock
button to change to
RPT mode. The
settings from Step 1
and the active slave
flash Channel and
Group selections are
displayed on the LCD.
24
Page 25

Setting the communication channel (Canon)
If other wireless flash systems are nearby, you can change the
channel IDs to prevent signal interference.
Important: The channel IDs selected on the master flash and
the slave flashes must match.
1 Press the FN 4 button
one or more times
until MENU 3 is
displayed on the LCD.
2 Press the FN 1 (CH)
button one or more
times until CH is
displayed on the LCD.
3 Turn the select dial to choose a channel to select a channel ID
from 1 to 4.
4 Press the SET button to confirm.
Setting the communication channel (Nikon)
If other wireless flash systems are nearby, you can change the
channel IDs to prevent signal interference.
Important: The channel IDs selected on the master flash and
the slave flashes must match.
1 Press the FN 3 (CH)
button, then turn the
select dial to select a
channel ID from 1
to 4.
2 Press the SET button to confirm.
25
Page 26

Using fully automatic wireless flash shooting (Canon)
You can use one or more slave flashes in fully automatic wireless
flash shooting.
Using one slave flash
1 Attach the master flash to the camera.
2 Set the master flash to
MASTER mode. See
Switching between
normal flash and
wireless flash (Canon)
on page 23
3 Set the other flash to
SLAVE mode. See
Switching between
normal flash and
wireless flash (Canon)
on page 23.
4 Make sure that the master flash and slave flash are set to the
same communication channel. See Setting the
communication channel (Canon) on page 25.
5 Position the camera and slave flash. See Slave/master
positioning and operating range on page 23.
6 Set the master flash to Auto-flash (E-TTL(Canon)) mode. See
Selecting a flash mode
The slave flash is automatically set to the same flash mode as
the master flash.
7 Make sure that both
flashes are ready. On
the master flash, the
ready indicator turns
on. On the slave flash,
the AF-assist area
blinks in one second
intervals.
.
on page 12.
8 Press the (test)
button. The slave flash should fire. If the slave flash does not
fire, you may need to adjust its angle toward the master flash
or shorten its distance from the master flash.
26
Page 27

Using multiple slave flashes
When you need a stronger flash output or more convenient
lighting operation, increase the number of slave flashes and
make sure that they are all set up as a single flash group.
To add slave flashes, use the same steps as outlined in Using one
slave flash on page 26. You can use any flash group (A/B/C).
When you increase the number of slave flashes and set the
master flash firing ON, all the flash groups fire the same flash
output. The master flash takes into account the impact of the
slave flashes to create a overall correct level of exposure
(standard exposure).
Caution: If you are using optical transmission shooting, a slave
flash may not work or may fire unexpectedly if your flash is too
close to a fluorescent light or computer screen.
Notes:
• Press the camera’s depth-of-field preview button to fire a
modeling flash.
• If the slave flash's auto power off function works, press the
master flash’s test button to turn it on. Test firing is not
available during the camera’s regular metering time.
• The effective time of slave auto power off is changeable. See
Slave flash
• If the auto AF-assist beam is set to OFF, the AF-assist area
does not blink when a slave flash is ready. See Customizing
function settings on page 39.
on page 11.
Using fully automatic wireless flash shooting in Auto-flash mode (Nikon)
Using automatic wireless flash with a single slave flash
1 On the master flash,
press the FN 4 (Gr)
button to select the
M, A, B, or C group,
then press the FN 3
(MODE) button.
27
Page 28

2 Press the MODE/Lock
button to change to
Stroboscopic (RPT)
mode (Canon). The
settings from Step 1
and the active slave
flash Channel and
Group selections are
displayed on the LCD.
Note: You can set the M, A, B, or C group to the TTL mode
independently.
3 Set the other camera
flash as the wireless
slave flash. You can set
the group to A, B, or C.
4 Make sure that the master flash and slave flash are set to the
same channel. See Setting the communication channel
(Nikon) on page 25.
5 Position the camera and flashes. See Slave/master
positioning and operating range on page 23.
6 Make sure that the flash ready indicator on the camera is lit.
7 Make sure that the
slave flash ready
indicator is lit on your
flash. The auto-focus
assist beam lighting
area blinks once per
second.
Note: The auto
AF-assist transmitter
beam lighting area
does not blink if you
have turned off the AF-assist beam function.
8 Press the master
flash's (test) button.
If the slave flash is
angled correctly, the
slave flash fires. If it
does not flash, adjust
the angle and distance
between the master
and slave flashes.
Notes:
• If the slave flash is too close to a fluorescent lamp or computer
screen, your flash may fire an unexpected flash.
• You cannot fire a test flash during the camera's regular
metering time.
• If the slave flash's auto power off function is turned off, you
can press your flash's test button to turn on your flash.
• You can change the auto power off time. See Customizing
function settings on page 39.
28
Page 29

Using fully automatic wireless flash
The flash exposure compensation (FEC) and high-speed sync
(SYNC) settings that you set on the master flash are automatically
sent to the slave flash. You do not need to change settings on the
slave flash.
1 Set the FEC setting. See Using flash exposure compensation
on page 13
2 Set the SYNC setting. See Using high-speed sync (Nikon)
page 16.
.
on
Using multiple master flashes
You can use the same lighting source (slave flash) with multiple
cameras.
Attach a master flash to each camera, then make sure that the
flash mode, group, and channel settings are the same on all
cameras.
For more information, see:
• Selecting a flash mode
• Setting the communication channel (Canon) on page 25 or
Setting the communication channel (Nikon)
on page 12
on page 25
Setting the wireless flash ratio for multiple slave flashes (Canon only)
You can divide slave flashes into groups and balance their
illumination (flash ratio).
Auto control exposure the total output from all flashes equals the
amount of light needed to light the shot correctly. For example, if
your are using two flashes and the total light output you want is
100 units, the total output is split between the two flashes.
1 On each slave flash,
press the FN 3 (Gr)
button, then turn the
select dial to select
group A, B, or C. Use a
different group for
each slave flash.
2 On the master flash,
press the FN 4 button
one or more times
until MENU 2 is
displayed on the LCD.
3 On the master flash,
press the FN 2 (RATIO)
button one or more
times until RATIO A:B
(for two slave flashes)
or RATIO A:B C (for
three slave flashes) is
displayed on the LCD.
29
Page 30

4 On the master flash,
press the FN 3 (Gr)
button, turn the select
dial to set the amount
of flash ratio (from 0 to
+/-3 in +/-0.3
increments), then
press the SET button
to confirm.
5 If you are using three slave flashes, press the FN 2 ()
button, turn the select dial to the flash exposure
compensation amount, then press the SET button to
confirm.
When you take a picture, the flashes will fire according to the
flash ratio.
About slave group control
If you set three slave flashes to group A, all three slave flashes are
controlled as if they were one camera flash.
Notes:
• When you use the RATIO A:B C setting, group A, B, and C fire
flashes synchronously. When you use the RATIO A:B setting,
group C does not fire a flash.
•If group C is facing the shooting subject, over exposure may
occur.
• Some EOS film cameras that support Auto-flash (E-TTL
(Canon)), do not support multiple flash wireless shooting
using a flash ratio setting.
The flash ratio of 8:1 to 1:1 to 1:8 is equivalent to 3:1 to 1:1 to 1:3
(1/2 step increment).
8:1 4:1 2: 1 1: 1 1:2 1:4 1 :8
5.6:1 2.8 :1 1.4:1 1: 1. 4 1: 2. 8 1:5.6
Using wireless flash shooting in Manual mode (Canon)
If you are using multiple slave flashes and you want each slave
flash to output at a different level, use Manual flash mode and
assign a different group and flash output to each flash.
On the master flash:
1 Set the flash mode to Manual (M). See Selecting a flash mode
on page 12.
2 Press the FN 4 button one or more times until MENU 1 is
displayed on the LCD.
3 Press the FN 2 ( RATIO)
button one or more
times to select the
firing groups. You can
select:
• RATIO OFF: All slave
flashes fire with the
same flash output.
• RATIO A/B: Two
slave flashes that fire
with different flash
outputs.
• RATIO A: B C: Three
slave flashes that fire
with different flash
outputs.
30
Page 31

Notes:
• When you select RATIO OFF, set A, B, or C as the firing group
for the slave flashes.
• To fire all slave flashes with the same flash output, select
RATIO OFF.
4 Press the FN 3 (Gr)
button, turn the select
dial to select the flash
output (from 0 to +/-3
in +/-0.3 increments)
for the groups, then
press the SET button
to confirm.
Manually setting the slave flashes
You can set the flash mode on the slave flashes instead of the
master flash.
On each slave flash
1 Set each flash to SLAVE mode. See Switching between
normal flash and wireless flash (Canon) on page 23.
2 Set each slave flash to Manual (M) mode. See Selecting a
flash mode on page 12.
Using wireless flash shooting in Manual flash mode (Nikon)
If you are using multiple slave flashes and you want each slave
flash to output at a different level, use Manual flash mode and
assign a different group and flash output to each flash.
You set all settings on the master flash.
1 Press the FN 4 (Gr)
button to choose
groups, then press the
FN 3 (MODE) button
to set your flash to M
mode.
2 Press the FN 2
button, then turn the
select dial to set the
flash output for the
selected group.
3 Press the SET button to confirm.
4 Repeat Steps 2 and 3 for each group.
When you take a picture, each group fires at the set flash ratio.
31
Page 32

Using wireless flash shooting in Stroboscopic mode (Canon)
• Set the master flash
to Stroboscopic
(MULTI) mode
(Canon), then adjust
the settings on the
flashes as needed.
See Using
Stroboscopic mode
on page 19.
Using manual wireless flash shooting in Stroboscopic mode (Nikon)
1 Press the MODE
button one or more
times to select RPT
(Nikon).
2 Follow the instructions in Using Stroboscopic mode
page 19.
Note: You can set the firing frequency of Stroboscopic flash in
optic transmission wireless shooting between 1 Hz to 100 Hz.
You cannot use the setting between 250 Hz to 500 Hz.
on
32
Page 33

Using wireless flash shooting:
Slave
Master
Transmission
distance is about
328 ft. (100 m).
radio (2.4G) transmission
Important: When a Canon camera’s shooting mode is set to a
fully automatic mode or an Image Zone mode, the operations
in this section are not available. Set the camera’s shooting
mode to P/Tv/Av/M/B (Creative Zone Mode).
Using a master or slave flash with a radio transmission wireless
shooting function makes it easy to shoot with advanced wireless
multiple flash lighting, in the same way as TTL auto-flash
shooting.
Wireless shooting using radio transmission has advantages over
wireless shooting using optic transmission. For example, radio
transmission is less affected by obstacles and the slave flash's
wireless sensor does not have to point to the master flash. The
main functional differences are:
Canon
Func tion Radi o Opt ic
Distance 100 m 15 m
Channels 1 to 32 1 to 4
A/B/C power OFF, 1/128 ~ 1/1 1/128 ~ 1/1
Interference Low High
Group A/B/C/D/E A/B/C
Nikon
Func tion Radi o Opt ic
Distance 100 m 15 m
Channels 1 to 32 1 to 4
Interference Low High
You can perfo rm wir eless i-T TL auto-flash shooting by setting the
master flash to i-TTL (Auto-flash mode). See Using Auto-flash
mode on page 12.
Positioning and operating range using a single slave flash
For wireless flash shooting in radio transmission mode, position
the master and slave flashes as shown below:
33
Page 34

Notes:
B
A
A
B
C
• Mount the slave flash on the included stand. See Attaching
your flash to the stand on page 11.
• Before shooting, perform a test flash and test shooting.
• The transmission distance might be shorter depending on
conditions such as the positioning of the slave flash, the
surrounding environment, and weather conditions.
Positioning and operating range using multiple slave flashes
You can divide the slave flashes into two or three groups and
perform TTL auto-flash while changing the flash ratio (factor). In
addition, you can set and shoot with a different flash mode for
each firing group (up to five groups).
Auto shooting with two slave groups
Auto shooting with three slave groups
34
Page 35

Auto shooting with using different flash
Manual
flash
Auto external flash
metering
E-TTL II
Ceiling
Manual
flash
Manual
flash
modes for each group (Canon only)
Shooting with a different flash mode for each group (Canon only)
Important: This feature is only available when you use radio
transmission mode.
When using an EOS digital camera released since 2012, such as
the EOS-1DX (except for EOS 1200D), you can shoot with a
different flash mode set for each firing group, with up to five
groups (A/B/C/D/E).
You can set the flash modes to E-TTL II autoflash and manual (M)
flash. When the flash mode is set to E-TTL II, exposure is
controlled to result in standa rd exposure for the main subject as a
single group.
Note: This function is for advanced users who are
knowledgeable and experienced in lighting.
1 On the master flash,
press the MODE
button, then turn the
select dial to set the
flash mode to Gr.
35
Page 36

2 On each slave flash,
press the FN 4 button
one or more times
until MENU 1 is
displayed on the LCD,
then press the FN 3
(Gr) button to select
A, B, C, D, or E.
3 On the master flash,
press the FN 4 button
one or more times
until MENU 1 is
displayed on the LCD,
then press the FN 3
(Gr) button to select a
group (A, B, C, D, or E).
4 On the master flash
with a firing group
selected, press FN 2
(MODE) button, then
select the flash mode
of the group. You can
select ETTL, M, or –––
(off). Repeat this step
for each group.
5 On the master flash,
press the FN 3 ()
button, turn the select
dial to set the flash
function that
corresponds to flash
mode, then press the
SET button to
confirm. Repeat this
step for each group.
36
Page 37

6 On the master flash, if you are using M mode, set the flash
360°
-7° to 90°
output.
OR
If you are using ETTL mode, set the flash exposure
compensation amount as needed.
Repeat this step for each group.
7 On the master flash, press the FN 4 ( ) button to return to
shooting-ready mode.
Using other applications
Using sync triggering
Your flash has a 3.5mm sync cord jack. By inserting a trigger plug
into the jack, your flash fires synchronously with the camera
shutter. For the location of the jack, see Flash body
Using auto-focus assist beam
In poorly-lit or low-contrast shooting environments, the built-in
auto-focus assist beam automatically lights to make
auto-focusing easier. The beam lights only when auto-focusing is
difficult and turns off as soon as auto-focusing becomes correct.
If you want to turn off the auto-focus assist beam, set the AF
function to OFF on the C.Fn menu. For more information, see
Customizing function settings
Note: If the auto-focus assist beam does not light, the camera
has a correct auto-focus.
The effective range of the auto-focus assist beam is:
Position Effective Range
Center 2.0 ~ 32.8 ft./ 0.6 ~10 m
Periphery 2.0 ~ 16.4 ft./ 0.6 ~ 5 m
on page 39.
on page 4.
Using bounce flash
By pointing the flash head toward a wall or ceiling, your flash
bounces off the surface before illuminating the subject. Bounce
flash can soften shadows behind the subject for a more
natural-looking shot.
To set the bounce direction, hold the flash head and turn it
toward the surface you want to use to bounce the flash.
Notes:
• If the wall or ceiling is too far away, the bounced flash might
be too weak and result in underexposure.
• The wall or ceiling should be a plain, white color for high
reflectance. If the bounce surface is not white, a color cast
may appear in the picture.
37
Page 38

Creating a catchlight
With the catchlight panel, you can create a catchlight in the
subject’s eyes to add life to the facial expression.
1 Point the flash head
upward by 90°, then
pull out the wide
panel. The catchlight
panel comes out at
the same time. For the
location of both
panels, see Flash body
on page 4
2 Push the wide panel
back in.
.
3 Position the flash head as described in Using bounce flash
page 37.
Important:
• Point the flash head straight ahead, then upward by 90°. The
catchlight does not appear if you swing the flash head left or
right.
• For the best catchlight effect, stay about 4.9 ft. (1.5 m) away
from the subject.
on
Setting the flash coverage in manual zoom mode
You can set the flash coverage automatically or manually. You can
set the flash coverage to match the lens focal length from 20 mm
to 200 mm.
In addition, you can use the wide panel to expand the flash
coverage for a 14mm wide-angle lens. See Using the wide panel
to extend the flash coverage on page 39.
• In manual zoom
mode, press the FN 1
(ZOOM/C.FN)
button, then turn the
select dial to change
the flash coverage. If
A is displayed, the
flash coverage will be
set automatically.
Important: If you set the flash coverage manually, make sure
that it covers the lens focal length. Otherwise, the picture will
not have a dark periphery.
38
Page 39

Using the wide panel to extend the flash coverage
When your flash is in manual zoom mode, you can use the
built-in wide panel to extend the flash coverage for 14mm,
wide-angle lenses.
1 Pull out the wide
panel and place it over
the flash head. The
catchlight panel
comes out at the same
time.
2 Push the catchlight panel back in. The flash coverage is
extended to 14 mm.
Note: When the wide panel is over the flash head, the FN 1
(ZOOM/C.FN) button does not work.
Customizing function settings
When you select a custom function and adjust the setting, the
function and setting are displayed on the LCD.
1 Press the FN 1 ZOOM/C.FN (Backlight/Custom Setting)
button for two seconds or longer until the C.Fn menu is
displayed. For the location of the FN 1 button, see Control
panel on page 5.
2 Turn the select dial to select a function, then press the SET
button. The LCD blinks.
3 Turn the select dial to select a setting, then press the SET
button.
4 To reset a function to the default, press and hold the FN 1
(CLEAR) button until OK is displayed on the LCD.
39
Page 40

Canon functions
Custom
function
m/ft. Distance indicator
APO Auto power off
FEB ACL FEB auto cancel
FEB FEB order
AF AF-assist beam
Sv APOT
Beep Beeper
Light Backlight timing
LCD LCD contrast ratio 0-9 10 levels
Function Settings
m meters
ft. feet
ON ON
OFF OFF
ON ON
OFF OFF
0 – +
– 0 +
ON ON
OFF OFF
Slave auto power off
timer
60min 60 minutes
30min 30 minutes
ON ON
OFF OFF
12sec Off in 12 seconds
OFF Always off
ON Always on
Settings &
description
Nikon functions
Custom
function
m/ft. Distance indicator
APO Auto power off
AF AF-assist beam
Sv APOT
Beep Beep er
Light Backlight timing
LCD LCD contrast ratio 0-9 10 levels
Function
description
Slave auto power off
timer
Settings
m meters
ft. feet
ON ON
OFF OFF
ON ON
OFF OFF
60min 60 minutes
30min 30 minutes
ON ON
OFF OFF
12sec Off in 12 seconds
OFF Always off
ON Always on
Settings &
description
Custom
Function
#
C.Fn-00
C.Fn-01
C.Fn-03
C.Fn-04
C.Fn-08
C.Fn-10
C.Fn-20
C.Fn-22
40
Page 41

Controlling your flash from the camera’s menus (Canon)
If you attach your flash to an EOS camera which has a speedlite
control function, you can control your flash using the camera’s
menus. For more information, see the documentation that came
with the camera. The camera has two menus: Flash function
settings and Flash C.Fn settings.
Note:
• If you set the flash exposure compensation (FEC) on your
flash, you cannot set the flash exposure comp ensation on the
camera. To set FEC on the camera, set FEC on your flash to
0(zero).
• If you set any custom functions and flash settings, other than
FEC, on both your flash and the camera, the most recent
settings take effect.
Flash function settings menu
From the Flash function settings menu, you can control:
• Flash mode
• Shutter sync (first and second curtain and high speed sync)
•FEB
• Flash exposure compensation
•Flash firing
You can also clear all settings.
Flash C.Fn settings menu
From the Flash C.Fn settings menu, you can adjust the custom
functions:
•C.Fn-00
•C.Fn-01
•C.Fn-03
•C.Fn-04
•C.Fn-08
•C.Fn-10
•C.Fn-20
•C.Fn-22
For more information on custom functions, see Customizing
function settings on page 39.
41
Page 42

Understanding protection functions
Over-temperature protection
• To avoid overheating and damage to the flash head, do not
fire more than 30 continuous flashes in fast succession at
1/1 full power. After 30 continuous flashes, let your flash
cool for at least 10 minutes.
• If you fire more than 30 continuous flashes, then fire more
flashes in short intervals, the internal over-temperature
protection function may be activated and make the
recycling time over 10 seconds. If this occurs, let your flash
cool about 10 minutes.
• When the over-temperature protection is started, is
displayed on the LCD.
The number of flashes that will activate the overheating
protection based on the power output level are:
Power output Number of flashes
1/1 30
1/2 +0.7 40
1/2 +0.3 50
1/2 60
1/4(+0.3,+0.7) 100
1/8(+0.3,+0.7) 200
1/16(+0.3,+0.7) 300
1/32(+0.3,+0.7) 500
1/64(+0.3,+0.7)
1/128(+0.3,+0.7)
The number of flashes that will activate over-temperature
protection in high-speed sync triggering mode are:
Power output Number of flashes
1/1 15
1/2(+0.3,+0.7) 20
1/4(+0.3,+0.7)
1/8(+0.3,+0.7)
1/16(+0.3,+0.7)
1/32(+0.3,+0.7)
1/64(+0.3,+0.7)
1/128(+0.3,+0.7)
1000
30
40
50
42
Page 43

Protection error messages
Your flash provides additional real-time protection to secure your
flash and your safety.
Error messages and descriptions are:
Displayed on
the LCD
E1
E2
E3
E9
A failure has occurred on the recycling system so
that your flash cannot fire.
Restart your flash. If the problem still exists, call
Best Buy Customer Support. The Customer
Support phone number is on the back cover of this
User Guide.
Your flash has overheated. Let your flash cool for
10 minutes.
The voltage on two outlets of the flash tube is too
high. Your flash needs to be ser viced or replaced.
Contact Best Buy Customer Support for
information about servicing or replacing your
flash. The Customer Service phone number is on
the back cover of this User Guide.
Errors occurred during the upgrading process.
Make sure that you are using the correct firmware
upgrade method, then try again.
If the upgrade does not work, contact Best Buy
technical support for help.
Meaning
Maintaining
Most users will not have to provide any maintenance to their
flashes. Contact Best Buy technical support for help if problems
or questions arise.
• Unauthorized service voids the warranty.
• Shut down your flash immediately should abnormal
operation be detected.
• To clean your flash, wipe it down with a dry cloth. Do not
use solvents or harsh cleaners, as this can damage the finish
or cause internal damage.
Troubleshooting
My flash will not charge.
• Make sure that the batteries are installed correctly. See
Installing batteries
• Make sure that the batteries are not dead. Replace the
batteries. See Installing batteries
• If the icon blinks on the LCD, the battery power is low.
Replace the batteries. See Installing batteries
My flash does not fire.
• Your flash is not attached securely to the camera. Attach
your flash securely to the camera. See Attaching your flash
to the camera on page 10.
• The electrical contacts on your flash or the camera are dirty.
Clean the contacts by turning off your flash, removing your
flash from the camera (if attached), then wiping the
electrical contacts on the flash mounting foot and the
camera hotshoe with a clean, dry cloth.
on page 9.
on page 9.
on page 9.
43
Page 44

or is not displayed in the camera’s viewfinder
• Wait until your flash is fully recycled and your flash ready
indicator lights up.
• If the flash ready indicator lights up but or is not
displayed in the view finder, make sure that your flash is
securely attached to the camera hotshoe.
• If the flash ready indicator does not light up after a long
wait, check the batteries. If the battery power is low, the
icon blinks on your flash's LCD. Replace the batteries. See
Installing batteries
The power turns off by itself.
• If your flash is set as the master flash, it automatically turns
off after 90 seconds of inactivity. Press the camera shutter
button halfway or press any flash button to wake it up. To
turn off the auto power off function, see Power
management on page 11.
• If your flash is set as a slave flash, it automatically enters
sleep mode after 60 minutes (or 30 minutes) of inactivity.
Press any flash button to wake it up. To change the auto
power off time, see Power management
Auto zoom does not work.
• The camera flash is not attached securely to the camera.
Attach your flash securely to the camera. See Attaching your
flash to the camera on page 10.
The flash exposure is underexposed or overexposed.
• There was a highly reflective object (for example, a glass
window) in the picture. If you have a Canon flash, use the FE
lock to control the exposure. For more information, see
Locking the flash exposure (Canon only)
• You used high-speed sync. With high-speed sync, the
effective flash range is shorter. See Using high-speed sync
(Canon) on page 15 or Using high-speed sync (Nikon) on
page 16.
• Make sure that the subject is within the effective flash range
displayed.
• You used Manual flash mode. Set the flash mode to
Auto-flash (E-TTL (Canon) or i_TTL (Nikon)) or modify the
flash output. See Selecting a flash mode
Photos have dark corners or only parts of the target subject
are illuminated.
• The focal length of the lens exceeds the flash coverage.
Check the flash coverage you set. Your flash has a flash
coverage between 20mm and 200mm, which fits
medium-format cameras. Pull the wide panel out to extend
the flash coverage. See Setting the flash coverage in manual
zoom mode on page 38 and Using the wide panel to ex tend
the flash coverage on page 39.
on page 9.
on page 11.
on page 15.
on page 12.
Upgrading firmware
Your flash supports firmware upgrades through the USB port.
Update information will be released on our official website.
Contact Best Buy support to determine if an upgrade is available
and how to install the upgrade.
Note: You need a USB cable (not included) to connect to the USB
port on your flash.
44
Page 45

Specifications
Specifications are subject to change without notice.
Typ e
Compat ible came ras PT-DPF500C: Canon EOS cameras with E-TTL II
Guide No.
(1/1 output @ 200 mm)
Flash coverage • (20 to 200 mm) (14mm with wide panel)
Flash duration 1/300 to 1/20000 seconds
Exposure control
Exposu re control sys tem PT-DPF500C: E-TTL II auto-flash and manual flash
Flash exp osure
compensation (F EC)
FE lock (Canon) With FEL button or * button
Sync mode High-speed sy nc (up to 1/8000 seconds), first-curtain
Stroboscopic flash PT-DPF500C: Multi flash:
Wireless flash (optical transmission and RF transmission)
Wireless flash function Master, slave, off
Controllable slave groups PT-DPF500C:
Tra nsm iss ion ran ge
(approx.)
Channels Optical: 4 (1 ~ 4)
Slave-ready indicator Two red indicators blink
Modeling flash Fired with camera’s depth-of-field preview button
Auto-focus assist beam
Effective range (approx.) Center: 2.0 ~ 32.8 ft. (0.6 ~ 10 m)
Power supply
AA batteries (4) Premium batteries, such as non-rechargable lithium or
auto-flash
PT-DPF500N: Nikon DSLR cameras with i-T TL auto flash
190 (feet ISO 100)
60 (m ISO 100)
• Auto zoom (flash coverage set automatically to
match the lens focal length and image size)
• Manual zoom
• Swinging/tilting flash head (bounce flash): 0° to
360° horizontally and -7° to 90° vertically
PT-DPF500N: i-TTL auto-flash and manual flash
PT-DPF500C: Manual. FEB: ± 3 stops in 1/3 stop
increments (Manual FEC and FEB can be used at the same
time.)
PT-DPF500N: Manual FEB: ±3 stops in 1/3 stop
increments
sync, and second-curtain sync
Provided (up to 100 times, 199Hz)
PT-DPF500N: Stroboscopic flash
Provided (up to 90 times, 100Hz)
Optical: 3 (A, B, and C)
RF: 5 (A, B, C, D, and E)
PT-DPF500N:
3 (A, B, and C)
Optical:
•Indoors: 39.4 to 49.2 ft. (12 to 15 m)
• Outdoors: 26.2 to 32.8 ft. (8 to 10 m)
• Master unit reception angle: ±40° horizontally,
±30° vertically
RF:
• 100 m
RF: 32 (1 ~ 32)
Periphery: 2.0 ~ 16.4 ft. (0.6 ~ 5 m)
high-output rechargable batteries, will noticeably
decrease flash recycle time and improve battery life.
Alkaline batteries can also be used.
45
Page 46

Recycle time Approx. 0.1 ~ 2.6 seconds (Panasonic eneloop Ni-MH
batteries)
Red LED indicator lights when your flash is ready.
Full power flashes Approx. 230 (2500mA Ni-MH batteries)
Power s aving Power of f automa tically after approx. 90 seconds of idle
Sync triggering
operation. (60 minutes if set as slave)
Hotshoe, 3.5mm sync line, Wireless control port
mode
Color Temperature
5600±200k
Dimensions
W × H × D 2.5 × 3 × 7.5 in. (64 × 76 × 190 mm)
Weight Without batteries:14.5 oz. (410 g)
Weight With batteries: 18.7 oz. (530 g)
Legal notices
FCC Part 15
This device complies with Part 15 of the FCC Rules. Operation of this product is subject to the following
two conditions: (1) this device may not cause harmful interference, and (2) this device must accept
any interference received, including interference that may cause undesired op eration.
This equipment has been tested and found to comply within the limits for a class B digital device,
pursuant to Part 15 of the FCC Rules. These limits are designed to provide reasonable protec tion
against harmful interference in a residential instal lation. This equipment generates, uses, and can
radiate radio frequency energy and, if not installed and used in accordance with th e instructions, may
cause harmful interference to radio communications. However, there is no guarantee that interference
will not occur in a particular installation. If this equip ment does cause harmful interference to radio or
television reception, which can be determined by t urning the equipment off and on, the user is
encouraged to try to correct the inter ference by one or more of the following measures:
• Reorient or relocate the receiving antenna.
• Increase the separation between the equipment and receiver.
• Connect the equipm ent into an outlet on a circuit different from that to which the receiver is
connected.
• Consult the dealer or an exp erienced radio/TV technician for help.
FCC warning
Changes or modifications not expressly approved by the par ty responsible for compliance with the FCC
Rules could void the user’s authority to operate this equipment.
46
Page 47

ONE-YEAR LIMITED WARRANTY
Definitions:
The Distributor* of Platinum branded prod ucts warrants to you, the original purchaser of this new
Platinum-branded product (“Product”), that the Product shall be free of defects in the original
manufacturer of the material or workmanship for a period of one (1) year from the date of your
purchase of the Product (“Warranty Period”).
For this warranty to apply, your Product must be purchased in the United States or Canada from a Best
Buy brand retail store location or www.bestbuy.com or w ww.bestbuy.ca that are packaged with this
warranty statement.
How long does the coverage last?
The Warranty Period lasts for 1 year (365 days) from the date you purchased the Product. Your
purchase date is printed on the receipt you received with the Product.
What does this warranty cover?
During the Warranty Period, if the original manufacture of the material or workmanship of the
Product is determined to be defective by an authorized Platinum repair center or store personnel,
Platinum will (at its sole opt ion): (1) repair the Product with new or rebuilt parts; or (2) replace the
Product at no charge with new or rebuilt com parable products or parts. Products and par ts replaced
under this warranty become the proper ty of Platinum and are not returned to you. If service of
Products or parts are required after the Warranty Period expi res, you must pay all labor and parts
charges. This warranty lasts as long as you own your Platinum Product duri ng the Warrant y Period.
Warranty coverage terminates if you sell or otherwise transfer the Product.
How to obtain warranty service?
If you purchased the Product at a B est Buy retail store location, please take your original receipt and
the Product to any Best Buy s tore. Make sure that you place the Product in its original packaging or
packaging that provides the same amount of protec tion as the original packaging. If you purchased
the Product from a Best Buy online web site (www.bestbuy.com or www.bestbuy.ca), mail your
original receipt and the Produ ct to the address listed on the web site. Ma ke sure that you put the
Product in its original packagi ng or packaging that provides the same amount of protec tion as the
original packaging.
To obtain warranty service, in the United States call 1-888-BESTBUY or Canada call 1-866-BESTBUY.
Call agents may diagnose and correct the issue over the phone.
Where is the warranty valid?
This warranty is valid only in the United States and Canada at Best Buy branded retail stores or
websites to the original purchaser of the product in the county where the original purchase was made.
What does the warranty not cover?
This warranty does not cover:
• Customer instruction/education
• Installation
•Set up adjustments
• Cosmetic damage
• Damage d ue to acts of God, such as power surges
•Accident(s)
•Misuse
•Abuse
• Negligence
• Commercial purpose s/use, including but not limited to use in a place of business or in communal
areas of a multiple dwelling condominium or apartment complex, or otherwise used in a place of
other than a private home.
• Modification of any part of the Product, including the antenna
• Disp lay panel damaged by static (non-moving) images applied for le ngthy periods (burn-in).
• Damage d ue to incorrect operation or maintenance
• Connection to an incorrect voltage or power supply
• Attempted repair by any person not authorized by Platinum to service th e Product
• Products sold “as is” or “with all faults”
• Consumab les, including but not limited to batteries (i.e. AA, AA A, C etc.)
• Products wh ere the factory applied serial number has been altered or removed
• Loss or Theft of thi s product or any part of the product
• Display panels containing up to three (3) pixel failures (dots that are dark or incorrectly
illuminated) grouped in an area smaller than one tenth (1/10) of the display size or up to five (5)
pixel failures throughout the display. (Pixel based displays may contain a limited number of pixels
that may not function normally.)
• Failures or Damage caused by any contact including but not limited to liquids, gels or pastes.
47
Page 48

REPAIR REPLACEMENT AS PROVIDED UNDER THIS WARRANTY IS YOUR EXCLUSIVE REMEDY FOR BREACH
OF WARRANTY. PLATINUM SHALL NOT BE LIABLE FOR ANY INCIDENTAL OR CONSEQUENTIAL DAMAGES
FOR THE BREACH OF ANY EXPRESS OR IMPLIED WARRANTY ON THIS PRODUCT, INCLUDING, BUT NOT
LIMITED TO, LOST DATA, LOSS OF USE OF YOUR PRODUCT, LOST BUSINESS OR LOST PROFITS. PLATINUM
PRODUCTS MAKES NO OTHER EXPRESS WARRANTIES WITH RESPECT TO THE PRODUCT, ALL EXPRESS
AND IMPLIED WARRANTIES FOR THE PRODUCT, INCLUDING, BUT NOT LIMITED TO, ANY IMPLIED
WARRANTIES OF AND CONDITIONS OF MERCHANTABILITY AND FITNESS FOR A PARTICULAR PURPOSE,
ARE LIMITED IN DURATION TO THE WARRANTY PERIOD SET FORTH ABOVE AND NO WARRANTIES,
WHETHER EXPRESS OR IMPLIED, WILL APPLY AFTER THE WARRANTY PERIOD. SOME STATES, PROVINCES
AND JURISDICTIONS DO NOT ALLOW LIMITATIONS ON HOW LONG AN IMPLIED WARRANTY LASTS, SO
THE ABOVE LIMITATION MAY NOT APPLY TO YOU. THIS WARRANTY GIVES YOU SPECIFIC LEGAL RIGHTS,
AND YOU MAY ALSO HAVE OTHER RIGHTS, WHICH VARY FROM STATE TO STATE OR PROVINCE TO
PROVINCE.
Contac t Platin um:
1-800-499-3964
www.bestbuy.com/platinum
The Pt logo is a registered trademark of B est Buy. PLAT INUM is a trademark of Best Buy and its
affiliated companies.
Registered in some countries.
*Distributed by Best Buy Purchasing, LLC
7601 Penn Ave South, Richfield, MN 55423 U.S.A.
©2017 Best Buy. All rights reserved.
Made in China
48
Page 49

495051
Page 50

Page 51

Page 52

www.bestbuy.com/platinum
1-800-499-3964
The Pt logo is a registered trademark of Best Buy. PLATINUM is a trademark of Best Buy
and its affiliated companies.
Registered in some countries.
*Distributed by Best Buy Purchasing, LLC
7601 Penn Ave South, Richfield, MN 55423 U.S.A.
©2017 Best Buy. All rights reserved.
Made in China
V2 17-0072
ENGLISH
 Loading...