

Page 1

USB 3.0 Multi-Format Memory
Card Reader
PT-CR30A1-C
USER GUIDE
PLEASE READ THESE INSTRUCTIONS TO PREVENT ANY DAMAGE.
BEFORE USING YOUR NEW PRODUCT,
Page 2

PT-CR30A1-C
USB 3.0 Multi-Format Memory Card Reader
Contents
Welcome . . . . . . . . . . . . . . . . . . . . . . . . . . . . . . . . . . . . . . . . . . . . . . . . . . . . . . . .2
Features . . . . . . . . . . . . . . . . . . . . . . . . . . . . . . . . . . . . . . . . . . . . . . . . . . . . . . . . .2
Important safety instructions . . . . . . . . . . . . . . . . . . . . . . . . . . . . . . . . . . . . .3
Card reader components . . . . . . . . . . . . . . . . . . . . . . . . . . . . . . . . . . . . . . . . .3
Package contents . . . . . . . . . . . . . . . . . . . . . . . . . . . . . . . . . . . . . . . . . . .3
Minimum system requirements . . . . . . . . . . . . . . . . . . . . . . . . . . . . .3
Front and back view . . . . . . . . . . . . . . . . . . . . . . . . . . . . . . . . . . . . . . . .4
Card slots . . . . . . . . . . . . . . . . . . . . . . . . . . . . . . . . . . . . . . . . . . . . . . . . . . .5
Using your card reader . . . . . . . . . . . . . . . . . . . . . . . . . . . . . . . . . . . . . . . . . . .6
Connecting your card reader . . . . . . . . . . . . . . . . . . . . . . . . . . . . . . . .6
Data LED . . . . . . . . . . . . . . . . . . . . . . . . . . . . . . . . . . . . . . . . . . . . . . . . . . .7
Formatting a memory card in Windows . . . . . . . . . . . . . . . . . . . . . .7
Formatting a memory card with Macintosh . . . . . . . . . . . . . . . . . .8
Troubleshooting . . . . . . . . . . . . . . . . . . . . . . . . . . . . . . . . . . . . . . . . . . . . . . . . .8
Specifications . . . . . . . . . . . . . . . . . . . . . . . . . . . . . . . . . . . . . . . . . . . . . . . . . . . .9
Legal notices. . . . . . . . . . . . . . . . . . . . . . . . . . . . . . . . . . . . . . . . . . . . . . . . . . . .10
One-year limited warranty - Platinum . . . . . . . . . . . . . . . . . . . . . . . . . . . .11
Welcome
Congratulations on your purchase of a high-quality Platinum product. Your
PT-CR30A1-C memory card reader represents the state-of-the-art in memory card
reader design and is designed for reliable and trouble-free performance.
Features
• Easily transfer music, photos, video, and other files between your computer
and a digital camera/camcorder, action camera, smartphone, tablet, or similar
device.
• Supports SD, SDHC, SDXC, microSD, microSDHC, microSDXC, MMC, MMCplus,
MemoryStick, MS PRO, MS-Duo, MS PRO Duo, MS PRO-HG Duo, MemoryStick
Micro (M2), CompactFlash types I and II cards.
• Plug & Play: drivers automatically load.
• USB 3.0 high speed transfer. Also compatible with USB 2.0 computers.
• Allows transfer of data between compatible card slots.
2
Page 3

USB 3.0 Multi-Format Memory Card Reader
Important safety instructions
Before getting started, read these instructions and save them for later reference.
• Do not drop or hit your card reader.
• Do not install your card reader in a location that is subject to strong vibrations.
• Do not disassemble or try to modify your card reader. Disassembly or
modification may void your warranty and could damage your card reader.
• Do not store your card reader in a damp location. Do not allow moisture or
liquids to drip into your card reader. Liquids can damage your card reader
leading to a fire or electric shock.
• Do not insert metal objects, such as coins or paper clips, into your card reader.
• Do not remove a card when the LED indicator shows data activity is in
progress. You may damage the card or lose data stored on the card.
• When incerting CF cards, pay extra attention to the card orientation and the
angle of insertion so as not to damage the connector pins. DO NOT use
excessive force.
Card reader components
Package contents
•Multi-Format Memory Card Reader
•Quick Setup Guide
• USB 3.0 Cable
Minimum system requirements
• Windows PC or Macintosh computer
• Pentium 233MHz or higher processor
• 1.5 GB of hard drive space
• Windows® 8, Windows® 7, Windows® Vista, Windows® XP* or Mac OS 10.4 or
higher
*Some memory cards, such as the SDXC, are not compatible with Windows XP. Refer to your
card manufacturer to determine if your card is compatible with your OS (operating system).
3
Page 4
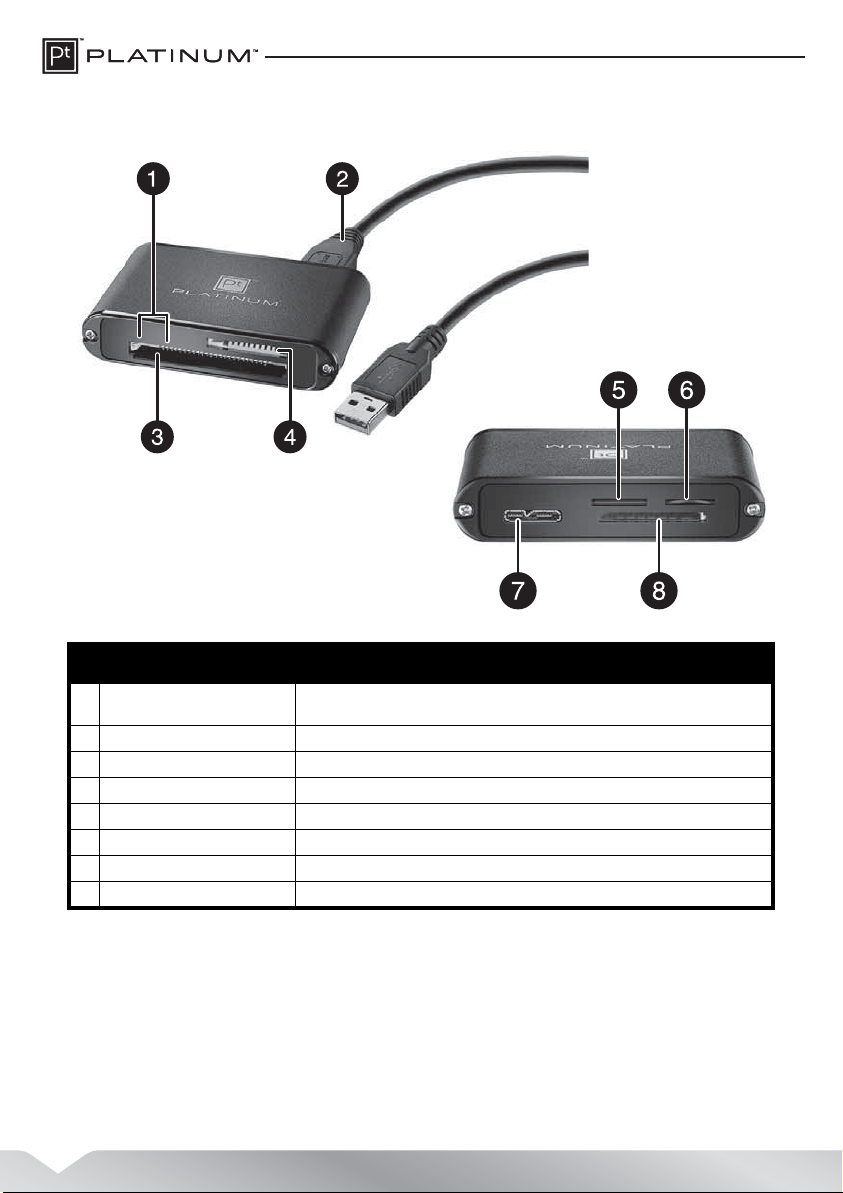
Front and back view
# Item Description
1 Data LEDs The green (left) LED lights or blinks when a USB 2.0 connection is used.
2 USB data cable Connect to your card reader and your computer.
3 CF memory card slot Insert a CF memory card into this slot, label side up.
4 MS memory card slot Insert an MS memory card into this slot, label side up.
5 M2 memory card slot Insert an M2 memory card into this slot, label side up.
6 microSD memory card slot Insert a microSD memory card into this slot, label side up.
7 USB 3.0 cable port Connect your USB 3.0 cable to this port.
8 SD/MMC memory card slot Insert an SD/MMC memory card into this slot, label side up.
The blue (right) LED lights or blinks when a USB 3.0 connection is used.
4
Page 5

USB 3.0 Multi-Format Memory Card Reader
Card slots
This diagram shows the correct slots for the different types of media cards
supported. Refer to the following section for additional details.
Media
Card Slot
MS/MS Pro Insert Memory Stick PRO Duo, Memory Stick Duo, Memory
SD/MMC Insert Secure Digital card (SD, SDHC, SDXC,
microSD Insert microSDHC or microSD cards into this slot. No
M2 Insert M2 cards into this slot.
CF (Types I
and II)
Card Image Details
Stick PRO, Memory Stick PRO HG, or Memory Stick cards
into this slot.
Mini SD), or MultiMedia Card (MMC, MMCplus, RS-MMC)
into this slot.
Note: A memory card adapter is required for Mini SD and
RS-MMC.
adapter is required.
Insert Compact Flash™ (CF) type I/II, UDMA card into this
slot.
Note: Pay extra attention to the orientation and alignment
of the card so that you do not damage the connector pins
in this slot.
5
Page 6

Using your card reader
Connecting your card reader
• Plug one end of the USB cable into the card reader, then plug the other end
into an available USB port on your computer. Your computer loads the drivers
automatically and a removable disk drive icon appears in the My Computer/
Computer (Windows Vista) window or your desktop on Mac OS X.
Note
If you connect this card reader to a USB 2.0 port, the green LED
lights. When you transfer data over USB 2.0, the green LED
blinks. If you connect this card reader to a USB 3.0 port, the blue
LED lights. When you transfer data over USB 3.0, the blue LED
blinks.
To access a memory card using Windows:
1 Insert a card into the appropriate slot, label side up. The data LED lights.
Caution
• Insert cards into the correct slot label side up. Failure to
do so may result in damage to your card and/or card
reader.
• This card reader supports multiple cards at the same
time, such as CF+MS+SD+microSD or CF+MS+SD+M2.
It does not support microSD and M2 cards at the same
time.
2 Click Start, then click My Computer or Computer. Double-click the
appropriate drive to access the data on the memory card.
3 To access files and folders on the memory card, use normal Windows
procedures for opening, copying, pasting, or deleting files and folders.
To remove a memory card using Windows:
Caution
Do not insert or remove memor y cards while the green or blue
data LED on the reader is flashing. Doing so may cause damage
to your card or loss of data.
1 When you have finished working with the files on the memory card, right-click
the memory card drive in My Computer or Computer or Windows Explorer, then
click Eject. The data LED on the memory card reader turns off.
2 Carefully remove the memory card.
6
Page 7

USB 3.0 Multi-Format Memory Card Reader
To access a memory card using Macintosh OS X 10.4 or higher:
1 Insert a card into the appropriate slot. The data LED lights and a new memory
card icon appears on the desktop.
Caution
Cards must be inserted into the correct slot label side up,
other wise you may damage the card and/or the slot.
2 Open the Finder window, then click on the card’s name in the left menu to
view its contents.
3 Use normal Mac procedures for opening, copying, pasting, or deleting files
and folders.
To remove a memory card using Mac OS X:
1 When you have finished working with the files on the memory card, drag the
memory card icon to the Eject icon or right-click the name of the memory
card on the desktop, then select Eject.
2 When the data LED stops blinking, carefully remove the memory card. The
name of the card disappears from the Find er window.
Caution
Do not insert or remove memor y cards while the green or blue
data LED on the reader is flashing. Doing so may cause damage
to your card or loss of data.
Data LED
Indicates when a slot is reading from or writing to a card.
• LED Off–Your card reader is not being used.
• LED On–A card is inserted in one of the slots.
• LED flashing–Data is being transferred to or from a card and the computer.
Formatting a memory card in Windows
Caution
Formatting a memory card permanently deletes all files on the
card. Be sure that you copy any value d files to a comput er before
formatting a memory card. Do not disconnect the card reader or
remove the memory card while formatting is in progress.
If your computer has trouble recognizing a new memory card, format the memory
card in your device or by using the following procedure.
To format a memory card in Windows:
1 Click Start, then click My Computer or Computer.
2 Under Removable Storage, right-click the appropriate memory card drive.
3 Select Format.
7
Page 8

4 Type a name into the Volume Label box. The name of your memory card
appears next to the drive.
5 Click Start, then click OK in the Warn ing dialog box.
6 Click OK on the Format Complete window.
7 Click Close to finish.
Formatting a memory card with Macintosh
Caution
Formatting a memory card permanently deletes all files on the
card. Be sure that you copy any value d files to a comput er before
formatting a memory card. Do not disconnect the card reader or
remove the memory card while formatting is in progress.
If your computer has trouble recognizing a new memory card, format the memory
card in your device or by using the computer.
To format a memory card:
1 Click Go, then click Utilities.
2 Double-click the Disc Utility from the list.
3 In the left-hand column, select the memory card you want to format, then
click the Erase tab.
4 Specify a volume format and name for the memory card, then click Erase. A
warning box opens.
5 Click Erase again. The Erase process takes a minute or so to erase and reformat
your memory card.
Troubleshooting
Symptom Solution
Memory cards do not appear in My Computer or
Compu ter (Windows operating systems) or on
the desktop (Mac operating systems).
8
• Make sure that the memory card is fully inserted into the slot.
• Make sure that the card reader is fully connected to your computer.
Unplug and reconnect your card reader.
• Try a different memory card of the same type in the same slot. If a
different memory card works, the original memory card should be
replaced.
• Disconnect the cable from your card reader and shine a flashlight
into the empty card slots. Look to see if any pin inside is bent, then
straighten bent pins with the tip of a mechanical pencil. Replace
your memory card reader if a pin has bent so much that it touches
another pin.
• Make sure that your computer has the lates OS updates and service
packs installed.
Page 9

Symptom Solution
Memory cards appear in My Compute r or
Compu ter (Windows operating systems) or on
the desktop (Mac operating systems) but errors
occur when writing or reading.
No icon appears when a card is inserted into the
reade r (MAC OS X).
File transfer is very slow or not any faster than a
USB 2.0 card reader.
• Make sure that the memory card is fully inserted into the slot.
• Try a diffe rent mem ory ca rd of th e same t ype in the sam e slot. I f the
different memory card works, the original memory card should be
replaced.
• Some cards have a read/write security switch. Make sure that the
security switch is set to Write Enabled.
• Make sure that the amount of data you attempted to store has not
exceeded the capacity of the card.
• Inspect the ends of the memor y cards for dirt or material closing a
hole. Clean the contacts wi th a lint-free cloth and small amounts of
isopropyl alcohol.
• If errors persist, replace the memor y card.
• Some memor y cards, such as SDXC, are not compatible with XP.
Refer to your card manufacturer to see if your card is compatible
with your OS.
• Is you are using a USB extens ion cable with the card reader, or using
a USB hub, try plugging the card reader directly into the USB port
on your computer using the supplied three foot USB 3.0 cable.
• The card may have been formatted in Windows FAT 32 format.
Using a PC or digital device, reformat the card using
OS X-compatible FAT or FAT16 format.
• Caused by slower speed (lower class) cards with slow tran sfer rates.
Upgrade to a faster class of card (for example, Class 10) to improve
transfer speed.
USB 3.0 Multi-Format Memory Card Reader
Specifications
Supported file systems FAT 12/16/32, NTFS, and exFat
Five memory card slots CF slot
SD/SDHC/MMC slot
MS Pro Duo/MS Pro slot
microSD slot
M2 slot
Indicators Card detected: Blue LED on (USB 3.0) or green LED on (USB 2.0)
Data access: Blue LED flashing (USB 3.0) or green LED flashing (USB 2.0)
Supported cards CompactFlash (I & II, UDMA), Secure Digital (SD, SDHC, SDXC, Mini SD*),
MultiMediaCard (MMC, MMC plus, RS-MMC*), and Memory Stick (MS, MS Pro,
MS Duo, MS Pro Duo, MS Pro HG, M2) cards, microSDHC, microSD.
Note: Cards marked with * require an adapter.
USB Cable USB 3.0 A-type plug to micro-USB 3.0 plug
OS Support Windows XP, Windows Vista, Windows 7, Windows 8 and 8.1, Mac OS 10.4 or
higher
Dimensions (L × D × H) 1.7 H x 3.3 W x 0.6 D in. (4.4 x 8.42 x 1.6 cm)
Operating temp. 32° F~104° F (0° C~40° C)
Storage temperature -4° F~140° F (-20° C~60° C)
Certification FCC Class B, ICES-003
9
Page 10

Legal notices
FCC statement
Changes or modifications not expressly approved by the party responsible for
compliance could void the user’s authority to operate the equipment.
This equipment has been tested and found to comply with the limits for a Class B
digital device, pursuant to part 15 of the FCC Rules.
These limits are designed to provide reasonable protection against harmful
interference in a residential installation. This equipment generates, uses and can
radiate radio frequency energy and, if not installed and used in accordance with the
instructions, may cause harmful interference to radio communications. However,
there is no guarantee that interference will not occur in a particular installation.
If this equipment does cause harmful interference to radio or television reception,
which can be determined by turning the equipment off and on, the user is
encouraged to try to correct the interference by one or more of the following
measures:
• Reorient or relocate the receiving antenna.
• Increase the separation between the equipment and receiver.
• Connect the equipment into an outlet on a circuit different from that to which
the receiver is connected.
• Consult the dealer or an experienced radio/TV technician for help.
This device complies with part 15 of the FCC Rules. Operation is subject to the
following two conditions: (1) This device may not cause harmful interference, and (2)
this device must accept any interference received, including interference that may
cause undesired operation.
Industry Canada ICES-003 Compliance Label:
CAN ICES-3(B)/NVM-3(B)
10
Page 11

USB 3.0 Multi-Format Memory Card Reader
One-year limited warranty - Platinum
Definitions:
The Distributor* of Platinum branded products warrants to you, the original purchaser of this new
Platinum-branded product (“Product”), that the Product shall be free of defects in the original
manufacturer of the material or workmanship for a period of one (1) year from the date of your purchase
of the Product (“Warranty Period”).
For this warranty to apply, your Product must be purchased in the United States or Canada from a Best
Buy brand or Future Shop brand retail store location or www.bestbuy.com or www.bestbuy.ca or
www.futureshop.ca that are packaged with this warranty statement.
How long does the coverage last?
The Warranty Period lasts for 1 year (365 days) from the date you purchased the Product. Your purchase
date is printed on the receipt you received with the Product.
What does this warranty cover?
During the Warranty Period, if the original manufacture of the material or workmanship of the Product is
determined to be defective by an authorized Platinum repair center or store personnel, Platinum will (at
its sole option): (1) repair the Product with new or rebuilt parts; or (2) replace the Product at no charge
with new or rebuilt comparable products or parts. Products and parts replaced under this warranty
become the property of Platinum and are not returned to you. If service of Products or parts are required
after the Warranty Period expires, you must pay all labor and parts charges. This warranty lasts as long as
you own your Platinum Product during the Warranty Period. Warranty coverage terminates if you sell or
otherwise transfer the Product.
How to obtain warranty service?
If you purchased the Product at a Best Buy or Future Shop retail store location, please take your original
receipt and the Product to any Best Buy or Future Shop store. Make sure that you place the Product in its
original packaging or packaging that provides the same amount of protection as the original packaging. If
you purchased the Product from a Best Buy or Future Shop online web site (www.bestbuy.com,
www.bestbuy.ca, or www.futureshop.ca), mail your original receipt and the Product to the address listed
on the web site. Make sure that you put the Product in its original packaging or packaging that provides
the same amount of protection as the original packaging.
To obtain warranty service, in the United States call 1-888-BESTBUY, Canada call 1-866-BESTBUY for Future
Shop call 1-800-663-2275. Call agents may diagnose and correct the issue over the phone.
Where is the warranty valid?
This warranty is valid only in the United States and Canada at Best Buy or Future Shop branded retail
stores or websites to the original purchaser of the product in the county where the original purchase was
made.
What does the warranty not cover?
This warranty does not cover:
•
Customer instruction/education
•
Installation
•
Set up adjustments
•
Cosmetic damage
•
Damage due to acts of God, such as power surges
•
Accident(s)
•
Misuse
•Abuse
•Negligence
11
Page 12

• Commercial purposes/use, including but not limited to use in a place of business or in communal areas
of a multiple dwelling condominium or apartment complex, or otherwise used in a place of other than
a private home.
• Modification of any part of the Product, including the antenna
• Display panel damaged by static (non-moving) images applied for lengthy periods (burn-in).
• Damage due to incorrect operation or maintenance
• Connection to an incorrect voltage or power supply
• Attempted repair by any person not authorized by Platinum to service the Product
• Products sold “as is” or “with all faults”
• Consumables, including but not limited to batteries (i.e. AA, AAA, C etc.)
• Products where the factory applied serial number has been altered or removed
• Loss or Theft of this product or any part of the product
• Display panels containing up to three (3) pixel failures (dots that are dark or incorrectly illuminated)
grouped in an area smaller than one tenth (1/10) of the display size or up to five (5) pixel failures
throughout the display. (Pixel based displays may contain a limited number of pixels that may not
function normally.)
• Failures or Damage caused by any contact including but not limited to liquids, gels or pastes.
REPAIR REPLACEMENT AS PROVIDED UNDER THIS WARRANTY IS YOUR EXCLUSIVE REMEDY FOR BREACH
OF WARRANTY. PLATINUM SHALL NOT BE LIABLE FOR ANY INCIDENTAL OR CONSEQUENTIAL DAMAGES
FOR THE BREACH OF ANY EXPRESS OR IMPLIED WARRANTY ON THIS PRODUCT, INCLUDING, BUT NOT
LIMITED TO, LOST DATA, LOSS OF USE OF YOUR PRODUCT, LOST BUSINESS OR LOST PROFITS. PLATINUM
PRODUCTS MAKES NO OTHER EXPRESS WARRANTIES WITH RESPECT TO THE PRODUCT, ALL EXPRESS AND
IMPLIED WARRANTIES FOR THE PRODUCT, INCLUDING, BUT NOT LIMITED TO, ANY IMPLIED WARRANTIES
OF AND CONDITIONS OF MERCHANTABILITY AND FITNESS FOR A PARTICULAR PURPOSE, ARE LIMITED IN
DURATION TO THE WARRANTY PERIOD SET FORTH ABOVE AND NO WARRANTIES, WHETHER EXPRESS OR
IMPLIED, WILL APPLY AFTER THE WARRANTY PERIOD. SOME STATES, PROVINCES AND JURISDICTIONS DO
NOT ALLOW LIMITATIONS ON HOW LONG AN IMPLIED WARRANTY LASTS, SO THE ABOVE LIMITATION MAY
NOT APPLY TO YOU. THIS WARRANTY GIVES YOU SPECIFIC LEGAL RIGHTS, AND YOU MAY ALSO HAVE
OTHER RIGHTS, WHICH VARY FROM STATE TO STATE OR PROVINCE TO PROVINCE.
Contact Platinum:
For customer service please call 800-499-3964
*Distributed by Best Buy Purchasing, LLC
7601 Penn Avenue South, Richfield, Minnesota, U.S.A. 55423-3645
© 2014 BBY Solutions, Inc.
All rights reserved. PLATINUM is a trademark of BBY Solutions, Inc. Registered in some countries. All other
products and brand names are trademarks of their respective owners.
12
Page 13

The Pt logo is a registered trademark of Best Buy and its affiliated companies.
PLATINUM trademark of Best Buy and its affiliated companies.
Registered in some countries. Distributed by Best Buy Purchasing, LLC
7601 Penn Ave South, Richfield, MN 55423 U.S.A.
©2014 Best Buy. All rights reserved.
Made in China.
V1 ENGLISH
14-0793
 Loading...