

Page 1

PlateSpin PowerConvert
User Guide
PlateSpin PowerConvert User Guide - 1 –
Copyright 2005
Page 2

Table of Contents
Introduction .................................................................................................. 3
Terminology .................................................................................................. 4
PowerConvert Overview .................................................................................. 5
PowerConvert Server Requirements ............................................................... 5
PowerConvert Client Requirements ................................................................ 5
Source Server Requirements ............................................................................. 6
PowerConvert Image Server Requirements ..................................................... 6
Target Virtual Server Requirements ............................................................... 6
The PowerConvert Server................................................................................ 7
PowerConvert Server Installation Instructions.......................................................... 7
The PowerConvert Client ................................................................................. 8
PowerConvert Client Installation Instructions........................................................... 8
Product Activation and License Management ................................................... 9
Customer Experience Improvement Program ....................................................11
The Server View ...........................................................................................12
The Jobs View ..............................................................................................13
Server Discovery ..........................................................................................14
Discovering Source Servers, Target Virtual Servers and Target Image Servers ....15
Discovering Servers Through Automatic Network Discovery..............................16
Discovering target physical servers ...............................................................17
Server Analysis.............................................................................................19
Analyzing Discovered Servers ......................................................................20
Peer to Peer Conversion Jobs..........................................................................21
Converting to Virtual Servers .......................................................................22
Converting to Physical Servers..........................................................................35
PlateSpin Flexible Image Jobs .........................................................................42
Creating a PlateSpin Image Server .....................................................................43
Capturing a PlateSpin Flexible Image ............................................................44
Creating Images Using Existing Volume Data .................................................46
Using Raw Volume Data ..............................................................................49
Deploying a PlateSpin Flexible Image..................................................................51
Running Jobs................................................................................................53
Saving Jobs ...............................................................................................53
Manually Starting Saved Jobs.......................................................................53
Scheduling Saved Jobs................................................................................54
Reports .......................................................................................................55
APPENDIX A: Adding Drivers for Physical Target Servers.....................................56
APPENDIX B: Troubleshooting.........................................................................57
Installation................................................................................................57
Discovery..................................................................................................57
Peer-to-Peer Conversions ............................................................................58
Using Images ............................................................................................59
APPENDIX C: FAQ .........................................................................................60
PlateSpin PowerConvert User Guide - 2 –
Copyright 2005
Page 3

Introduction
Welcome to the PlateSpin® PowerConvert™ User Guide.
PlateSpin PowerConvert is a powerful, fully automated Operating System
Portability™ solution that enables the complete interchange of data, applications,
and operating systems (the software layer) across Intel infrastructure in the data
center, breaking the dependency between hardware infrastructure and server
software.
PlateSpin PowerConvert's OS Portability technology provides you with the flexibility
to best match software and applications with the hardware infrastructure unique to
your data center, all from a single point of control. Freely move the software layer in
any direction, between any physical server, virtual server, or image, without ever
having to be in physical contact with the source or target machines.
This guide contains step-by-step instructions to get you converting in no time at all.
Please contact our support team at [email protected] regarding
any questions or feedback.
PlateSpin PowerConvert User Guide - 3 –
Copyright 2005
Page 4

Terminology
PowerConvert Server The central server which controls all server discovery,
image capture and conversion jobs. The
PowerConvert Server also hosts the database for
which all information regarding discovered servers
and jobs is stored.
PowerConvert Client An interface to the PowerConvert Server. It is
through the PowerConvert Client where the user will
perform their work.
PlateSpin Image Server An image repository for PlateSpin Images. Images
can be captured to or deployed from an Image
Server. A PlateSpin Image Server is comprised of a
PlateSpin “Controller” and an image list file.
While any discovered Windows server can be
configured as a PlateSpin Image Server, a simple way
to get started is to designate the PowerConvert
Server as a PlateSpin Image Server.
Source Server A server which will be converted to a virtual machine,
moved to a physical server or used to create a flexible
image.
Target Server The server which will host the result of the source
server’s conversion. This can be a virtual server
(VMware GSX Server, VMware ESX Server, Microsoft
Virtual Server), a PlateSpin Image Server or a
physical server.
Server Discovery By discovering a server, PowerConvert gathers
configuration data for use during the conversion
process. The collected data can be seen through a
properties dialog in the PowerConvert Client.
PlateSpin Controller A small service allowing communication between the
systems involved during the conversion process. The
controller is automatically deployed as required and is
removed automatically when a server is
undiscovered.
Volume Data A resource that contains a set of files that makes up a
volume. Currently PowerConvert supports Acronis
True Image, Symantec LiveState and PlateSpin
Packages as volume data
Raw Volume Data A directory containing a set of file that makes up a
volume. Raw volume data sources can be created by
extracting data from an image or backup archive such
as Ghost, a LUN on a SAN or simply a file system on a
local hard drive.
PlateSpin PowerConvert User Guide - 4 –
Copyright 2005
Page 5

PowerConvert Overview
There are three main steps to performing a server conversion:
1) Discover the source and target servers
2) Configure and create the conversion job
3) Execute the conversion job
When the conversion completes, a fully functional server will have been created.
Configurable options provide full customization of settings for the converted server.
Files on the original source server are left untouched, allowing it to continue working
in the environment if desired.
Volume data can also be captured and deployed, allowing for easy provisioning of
physical and virtual servers.
PowerConvert Server Requirements
IIS and the .NET Framework 1.1 SP1 (including ASP.NET) must be installed prior to
installing the PowerConvert Server.
The PowerConvert Server can be installed on the following platforms.
• Windows 2000 Server (SP4)
• Windows 2000 Advanced Server (SP4)
• Windows 2003 Server
Disk requirements: 1.5 GB of free disk space
Memory requirements: Minimum 512 MB of RAM
PowerConvert can be installed within a virtual machine that meets the
above specifications.
For more information about installing IIS and .NET refer to KB article 20008
PowerConvert Client Requirements
The .NET Framework 1.1 SP1 must be installed on servers running the PowerConvert
Client. This can be obtained from the Microsoft website.
The PowerConvert Client can be installed on the following platforms.
• Windows 2000 Server (SP4)
• Windows 2000 Advanced Server (SP4)
• Windows XP
• Windows 2003 Server
PlateSpin PowerConvert User Guide - 5 –
Copyright 2005
Page 6

Source Server Requirements
The following source operating systems are supported when performing conversions
to virtual servers, or capturing images.
• Windows NT Server (SP4, SP6a)
• Windows 2000 Server
• Windows 2000 Advanced Server
• Windows 2003 Server
• Redhat Linux (7, 8, AS 3.0, ES 3.0)
The following source operating systems are supported when performing conversions
to physical servers.
• Windows 2000 Server
• Windows 2000 Advanced Server
• Windows 2003 Server
Windows based source servers require that WMI be installed. Windows NT Server
does not include WMI as part of the default installation. The WMI Core distributable
can be obtained through the Microsoft website. If WMI is not installed, discovery of
the server will fail.
Linux based source servers must be running SSHD.
PowerConvert Image Server Requirements
The .NET Framework 1.1 SP1 must be installed prior to installing the PowerConvert
Image Server.
The PowerConvert Image Server can be installed on the following platforms.
• Windows 2000 Server (SP4)
• Windows 2000 Advanced Server (SP4)
• Windows 2003 Server
Target Virtual Server Requirements
The following virtual infrastructure platforms are supported by PowerConvert.
• VMware GSX Server for Windows 3.0 and higher
• VMware ESX Server 2.1 and higher
• Microsoft Virtual Server
Please see knowledge base article #20002 for the most recent list of supported
virtual infrastructure platforms.
PlateSpin PowerConvert User Guide - 6 –
Copyright 2005
Page 7
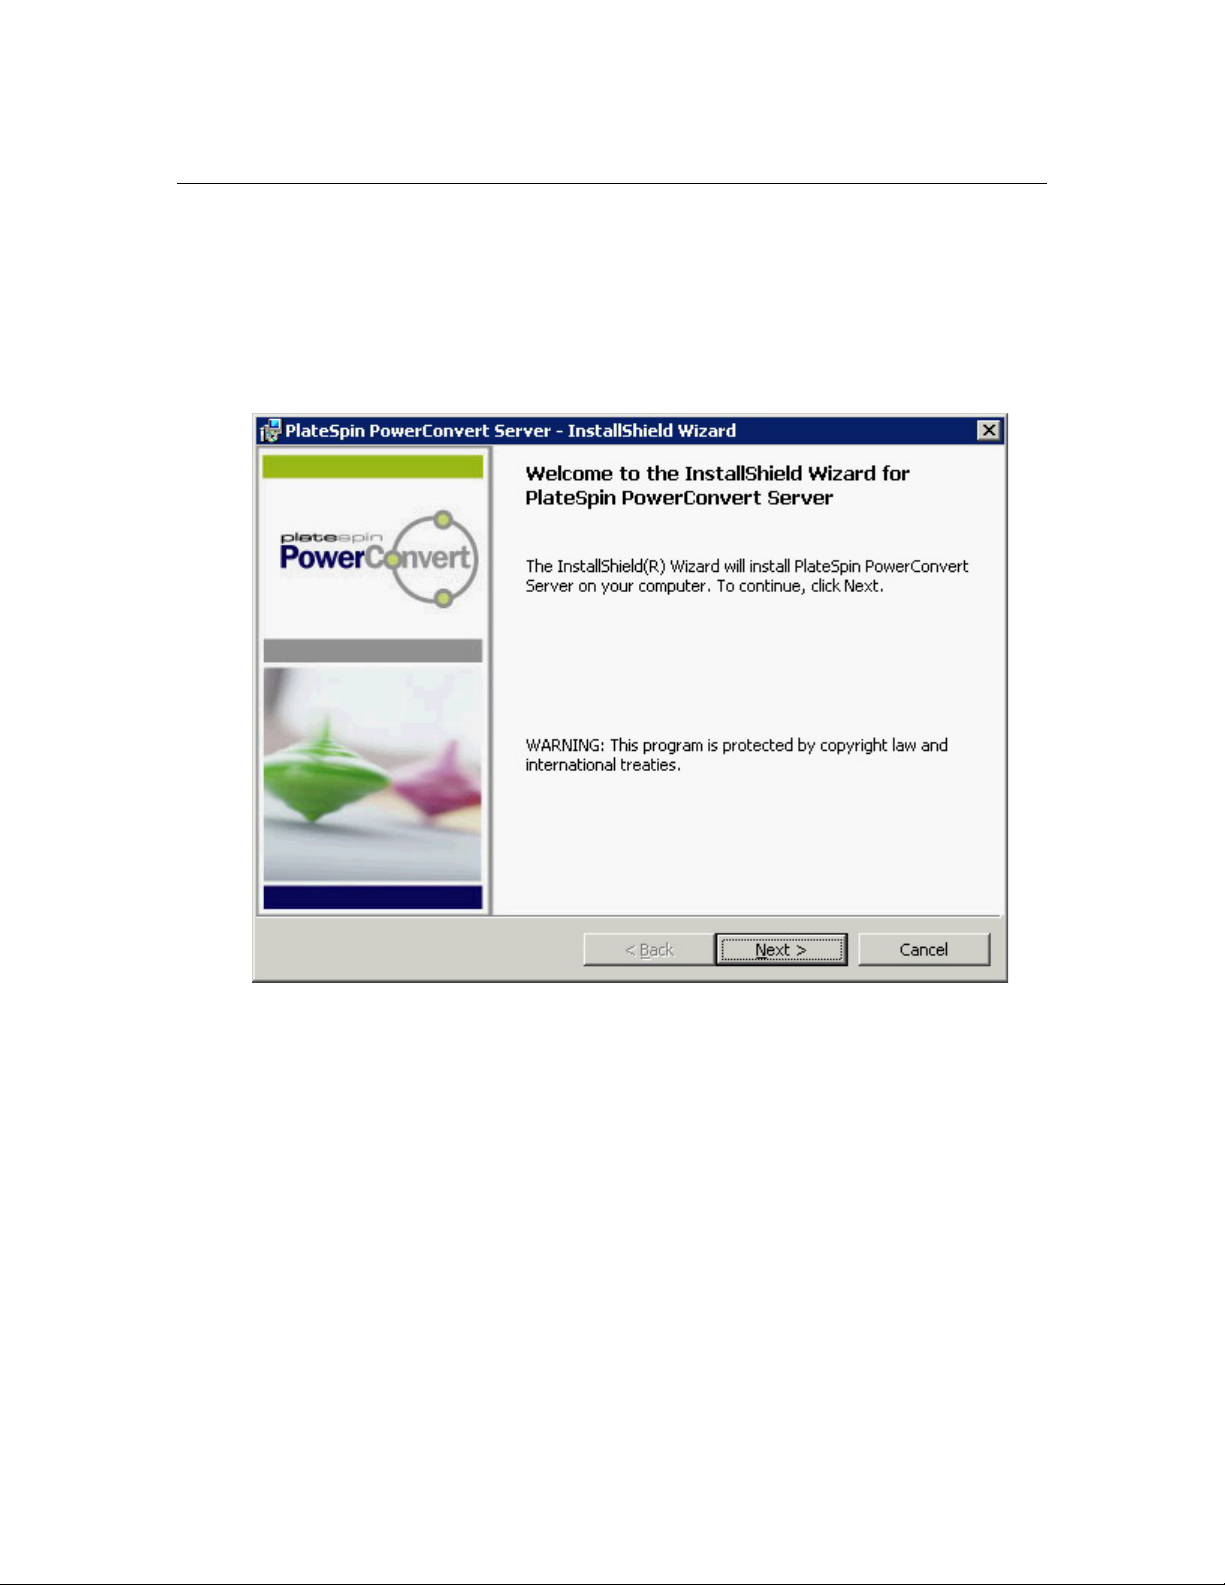
The PowerConvert Server
PlateSpin PowerConvert ships as a single executable. This executable will install the
PowerConvert Server and make the PowerConvert Client installer available.
PowerConvert Server Installation Instructions
1. Double-click PowerConvertServerSetup-####.EXE as downloaded from the
PlateSpin website to begin the installation
2. If this is the first time PowerConvert has been installed, the MSDE installation
will begin
NOTE: It is required to reboot after the MSDE installation if prompted.
3. When prompted, select the directory where the PowerConvert Server will be
installed (default: C:\Program Files\PlateSpin PowerConvert Server)
4. Click ‘Finish’ when prompted, to complete the installation
PlateSpin PowerConvert User Guide - 7 –
Copyright 2005
Page 8
The PowerConvert Client
Once the PlateSpin PowerConvert Server is installed, the PowerConvert Client will be
available.
PowerConvert Client Installation Instructions
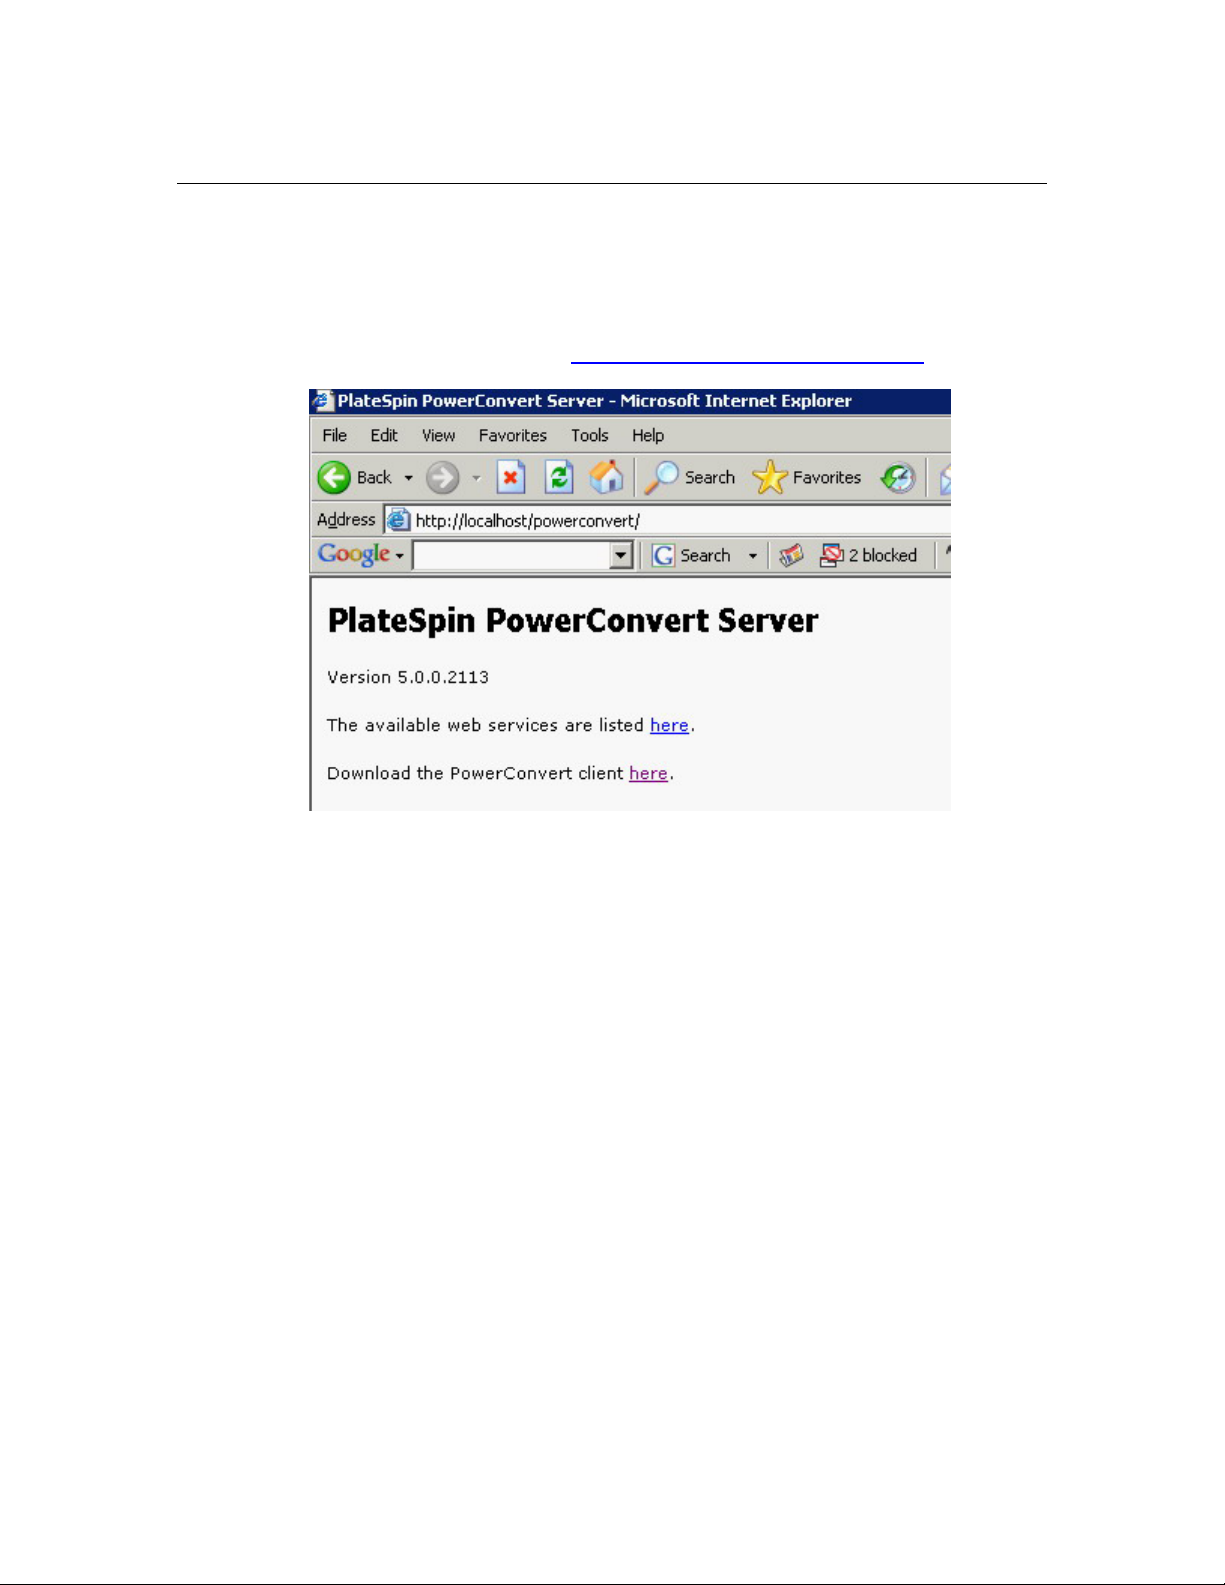
1. Open a web-browser and go to http://localhost/powerconvert
NOTE: If installing the PowerConvert Client on a remote system,
replace ‘localhost’ with the hostname or IP address of the
PowerConvert Server
2. Click the link to download the PlateSpin PowerConvert Client and choose
“Open” to begin the installation
3. When prompted, select the directory where the PowerConvert Client will be
installed (default: C:\Program Files\PlateSpin PowerConvert Client) and
choose whether the PowerConvert Client will be installed for all users on the
system or only the current user
4. Click ‘Finish’ when prompted, to complete the installation
PlateSpin PowerConvert User Guide - 8 –
Copyright 2005
Page 9
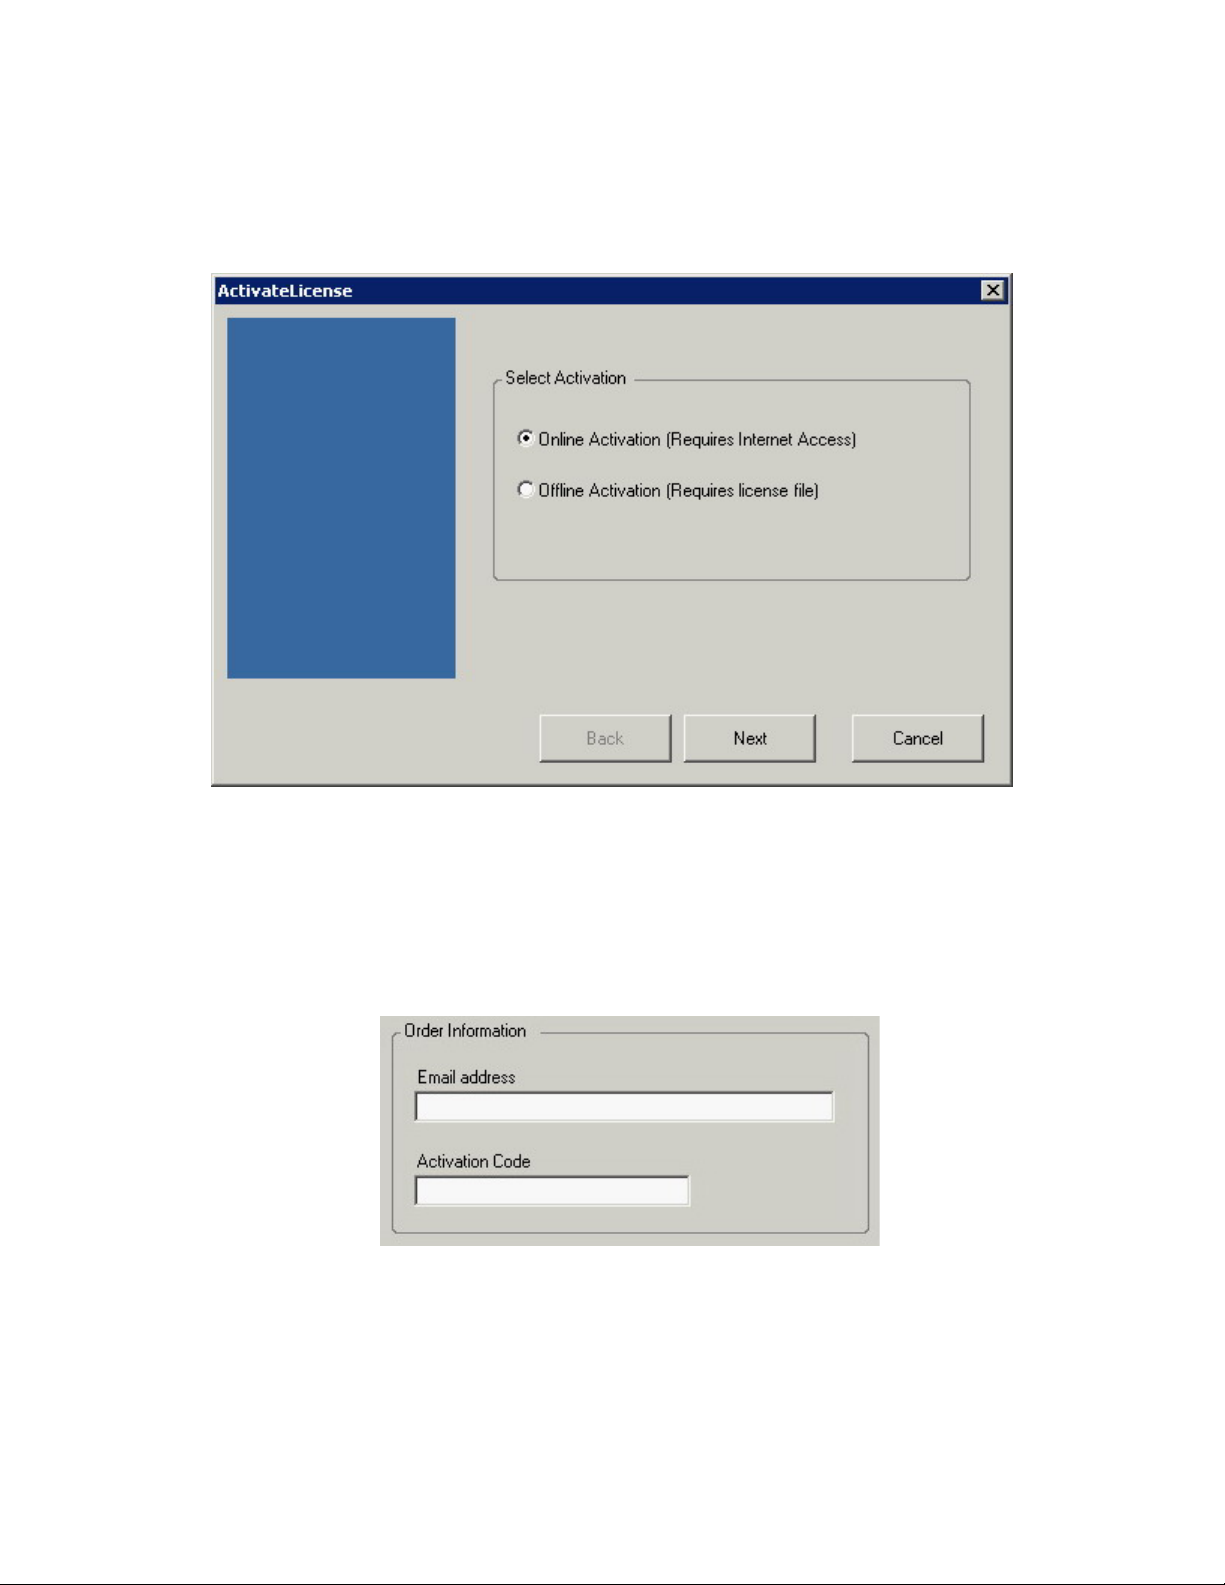
Product Activation and License Management
When the PowerConvert Client is launched for the first time, the License Wizard is
displayed.
Online Activation
Using online activation will obtain a PowerConvert license over the internet.
1. Select the ‘Online Activation’ option and click ‘Next’
2. Enter the e-mail address and activation code and click ‘Next’ to obtain the
PowerConvert License
3. The PowerConvert Client will now obtain the required license from the internet
and activate the PowerConvert Server
PlateSpin PowerConvert User Guide - 9 –
Copyright 2005
Page 10
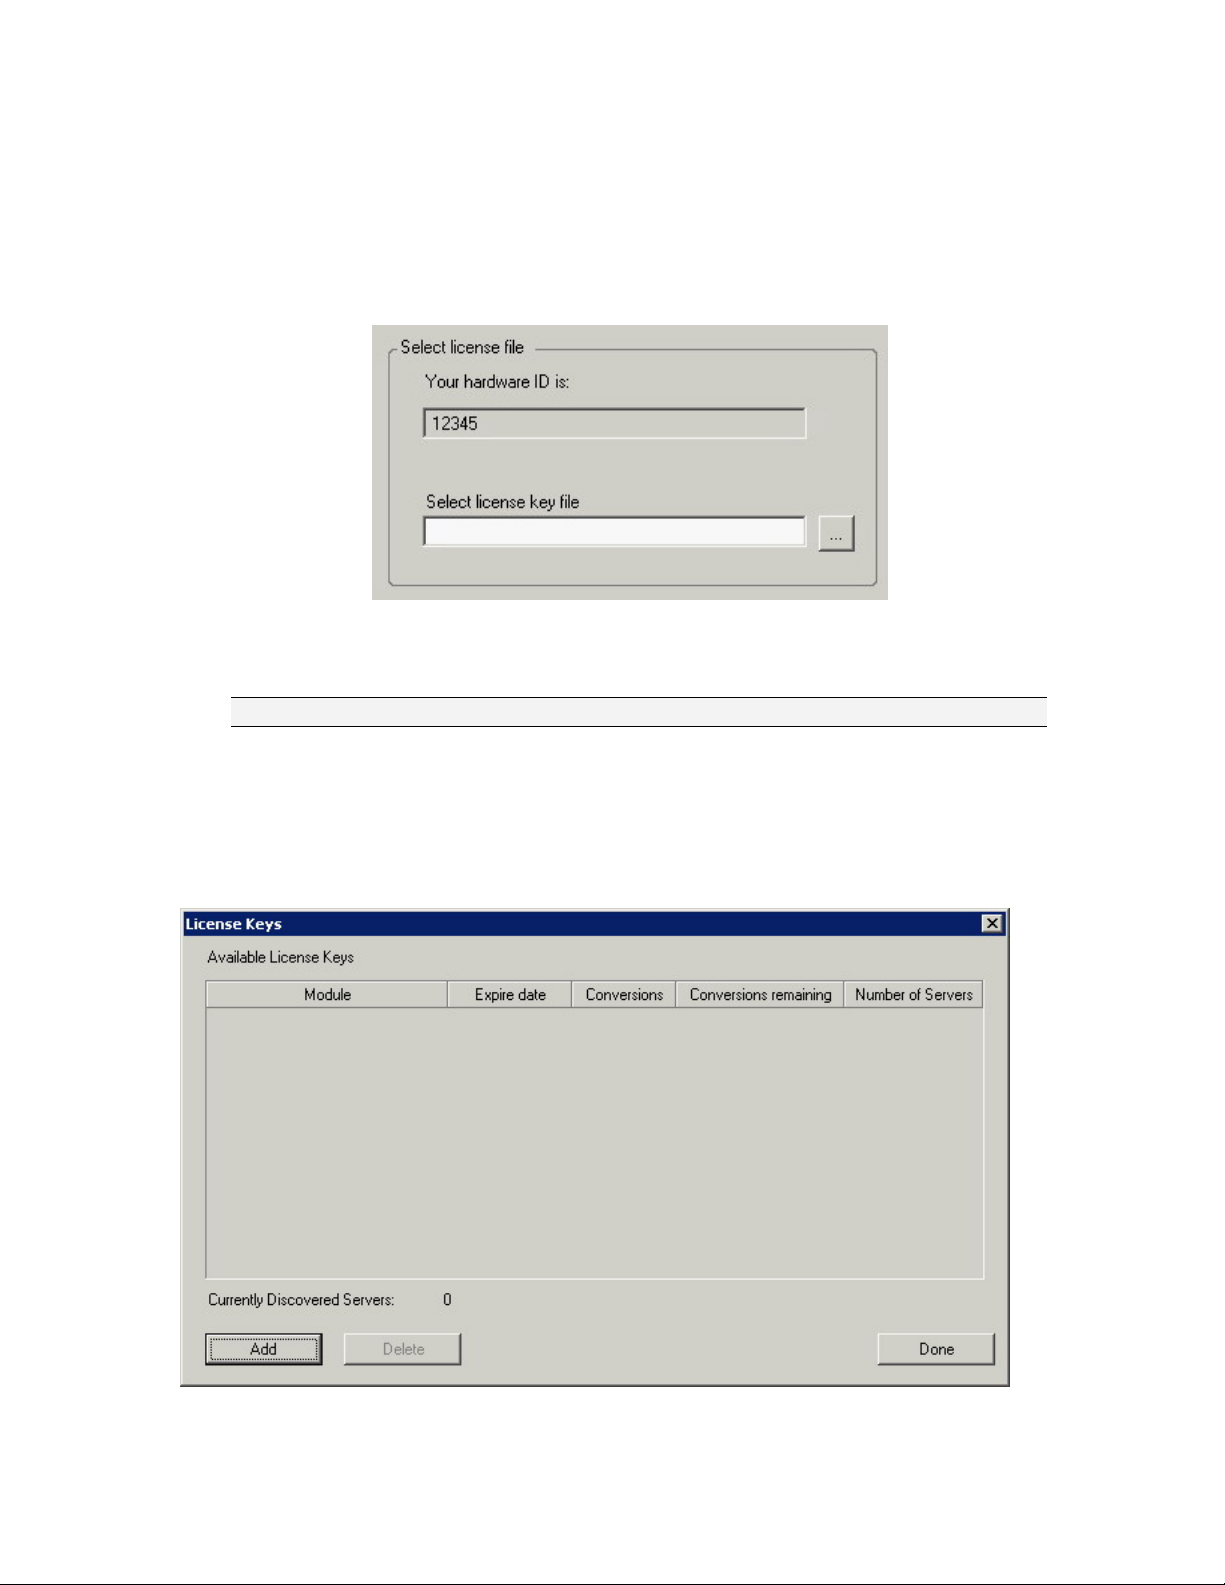
Offline Activation
Using offline activation requires the use of a PowerConvert license file.
1. Select the ‘Offline Activation’ option and click ‘Next’
2. When prompted, enter the path to the PowerConvert license file
3. The PowerConvert Client will activate the PowerConvert Server based on the
provided license file
Information regarding product activation can be found at the PlateSpin website
Managing Licenses
The License Manager can be accessed by selecting TOOLS -> LICENSE MANAGER
from the PowerConvert Client toolbar. From here, all applied PowerConvert licenses
will be shown, along with the functionality provided by each.
Additional licenses can be added at any time by clicking the ‘Add’ button.
PlateSpin PowerConvert User Guide - 10 –
Copyright 2005
Page 11
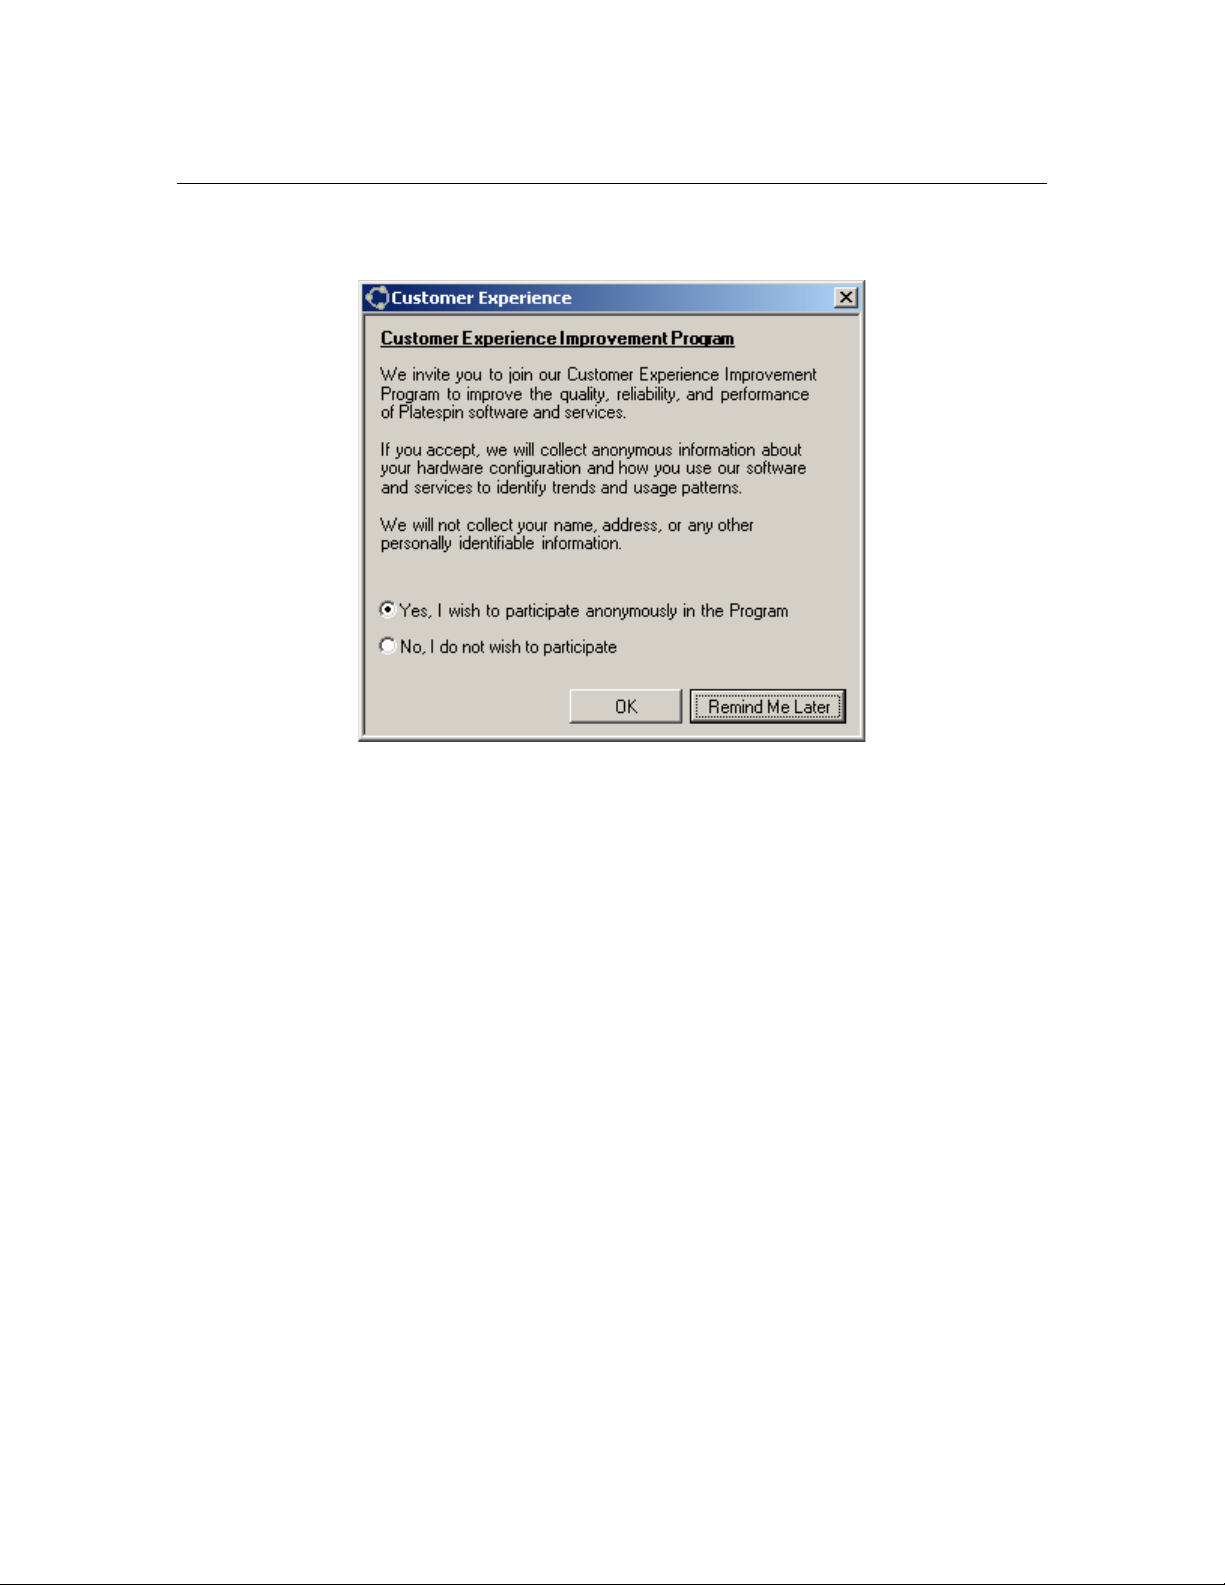
Customer Experience Improvement Program
When starting the PowerConvert Client for the first time, a prompt will appear to
participate in the Customer Experience Improvement Program.
By participating in this program, anonymous usage statistics regarding PowerConvert
will be periodically sent to PlateSpin in order to assist in the continual improvement
of the product.
PlateSpin PowerConvert User Guide - 11 –
Copyright 2005
Page 12
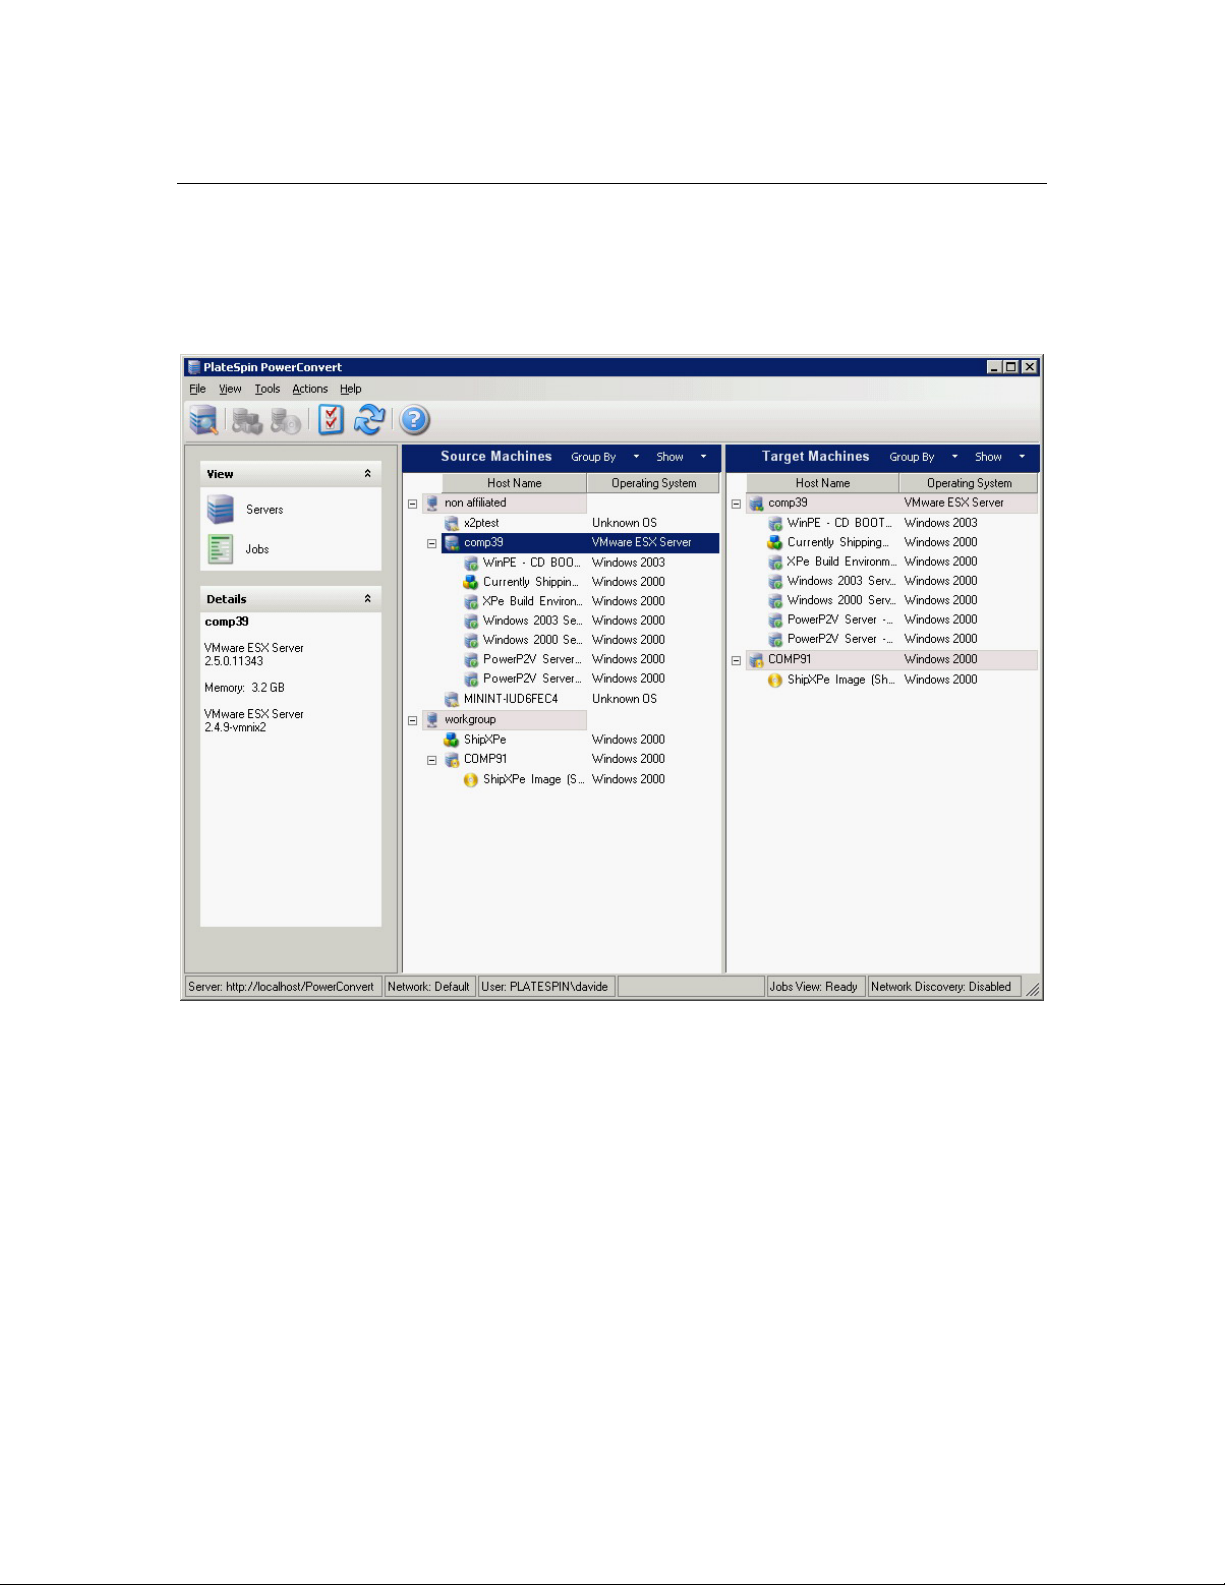
The Server View
The server view allows for easy management of servers to be used with
PowerConvert. Two panes make up the main portion of the view. The left pane lists
all discovered source servers, while the right pane lists all discovered target servers.
Image servers and virtual infrastructure servers are shown on both panes, as they
can be used as both source and as a target.
Each pane can be filtered by using the ‘Group By’ and ‘Sort’ pull-down menus.
Within seconds the lists can be filtered based on operating system, domain, machine
name and machine type.
PlateSpin PowerConvert User Guide - 12 –
Copyright 2005
Page 13
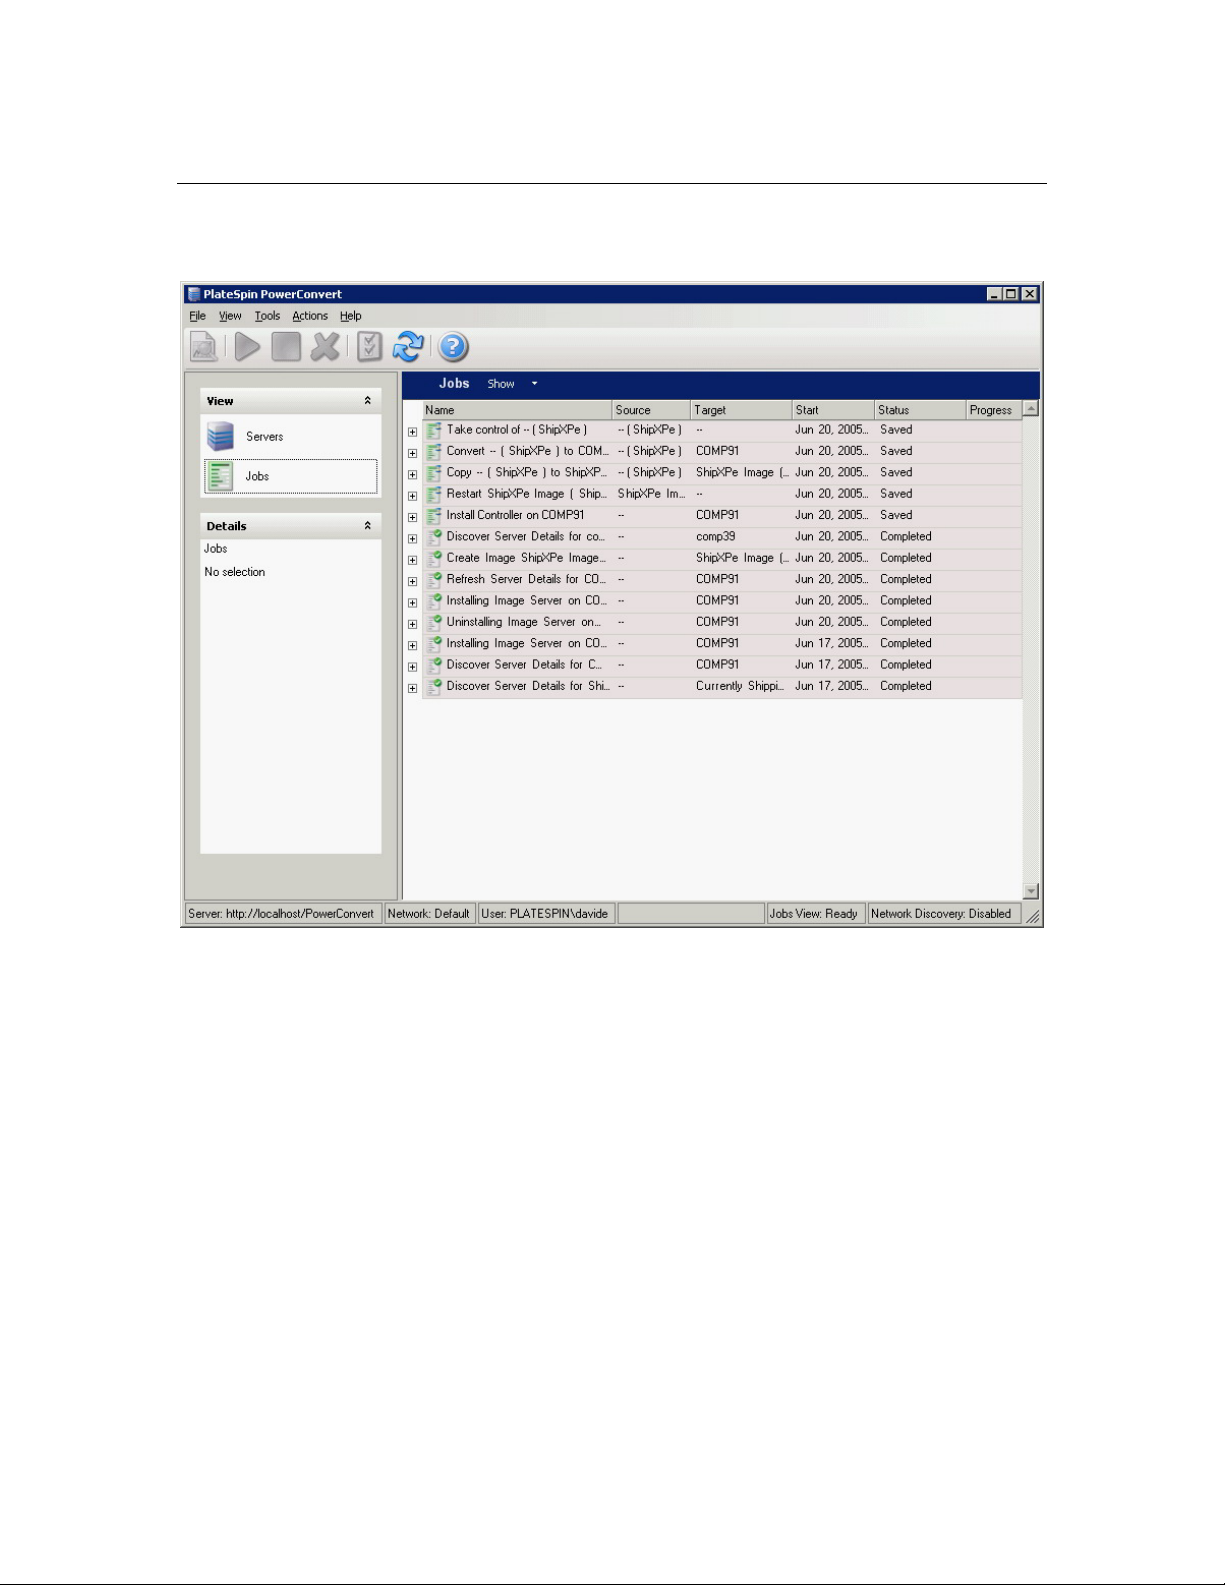
The Jobs View
The jobs view displays all discovery, conversion and image capture jobs run by the
PowerConvert Server.
Using the ‘Show’ pull-down menu the jobs view can be easily filtered to display the
desired information. Within seconds, jobs can be filtered based on their current
state.
PlateSpin PowerConvert User Guide - 13 –
Copyright 2005
Page 14

Server Discovery
A server discovery must be performed to gather information regarding the source
and target servers prior to performing a conversion. The discovery process gathers
detailed information about the servers, which is used by PowerConvert to perform
the conversion.
WMI must be available on Windows based servers prior to performing a server
discovery. PowerConvert uses WMI to obtain information about the server.
For Linux and VMware ESX Servers, sshd must be installed and running.
PlateSpin PowerConvert User Guide - 14 –
Copyright 2005
Page 15

Discovering Source Servers, Target Virtual Servers and Target
Image Servers
1. Select Discover | Server Details on the tool bar
2. Enter the host name or IP address of the source server
NOTE: Multiple servers can be discovered by entering multiple host names
or IP addresses, separated with a comma
3. Select the Operating System of the source server
4. Enter administrator credentials for the server being discovered and click OK
5. After discovery is complete, the server will be available as a source for
conversions
ALTERNATE METHOD
1. In the right pane of the server view, right-click the desired source server
NOTE: Undiscovered servers will only appear in the right pane if ‘Network
Discovery’ is turned enabled. To do this, double click Network
Discovery in the bottom right corner of the client. If a large number of
servers exist on the network, enabling this option may take a long time
and will not be practical in the environment.
2. In the context menu, select Discover Server Details
3. Select the Operating System of the source server
4. Enter administrator credentials for the server being discovered and click OK
5. After discovery is complete, the server will be available as a source for
conversions
Enable “Save (Encrypted Locally)” for PowerConvert to store the entered
credentials for use at during conversions.
For more information about discovering source server details, please see the
PowerConvert Knowledge Base article 20042
NOTE: Prior to discovering VMware GSX Servers, the VMware GSX
Server API must be installed on the PowerConvert Server and the
target server. The API can be obtained from the VMware GSX Server
download site.
PlateSpin PowerConvert User Guide - 15 –
Copyright 2005
Page 16

Discovering Servers Through Automatic Network Discovery
The PowerConvert Client’s automatic Network Discovery option allows for easy
browsing of all servers within a given domain or workgroup. Details are not
gathered during this process, requiring a full discovery prior to performing
conversions.
The Network Discovery feature can be enabled or disabled by right-clicking the
bottom-right corner of the PowerConvert Client.
There are two methods for discovering servers which are seen through the automatic
network discovery.
Discovering Individual Servers
1. Right-click the server to be discovered and select Discover
2. Enter administrator credentials for the server being discovered and click OK
3. After discovery is complete, the server will be available as a source for
conversions
Discovering All Servers in a Domain
1. Expand the domain listing which contains the servers to be discovered
2. Once the servers are seen in the PowerConvert Client, right-click the domain
name and select Discover All Servers
3. Enter administrator credentials which are valid for all servers in the domain
and click OK
4. After discovery is complete, the servers will be available as a sources for
conversions
NOTE: The DISCOVER ALL SERVERS option is only available if there are no
previously discovered servers in the domain.
PlateSpin PowerConvert User Guide - 16 –
Copyright 2005
Page 17
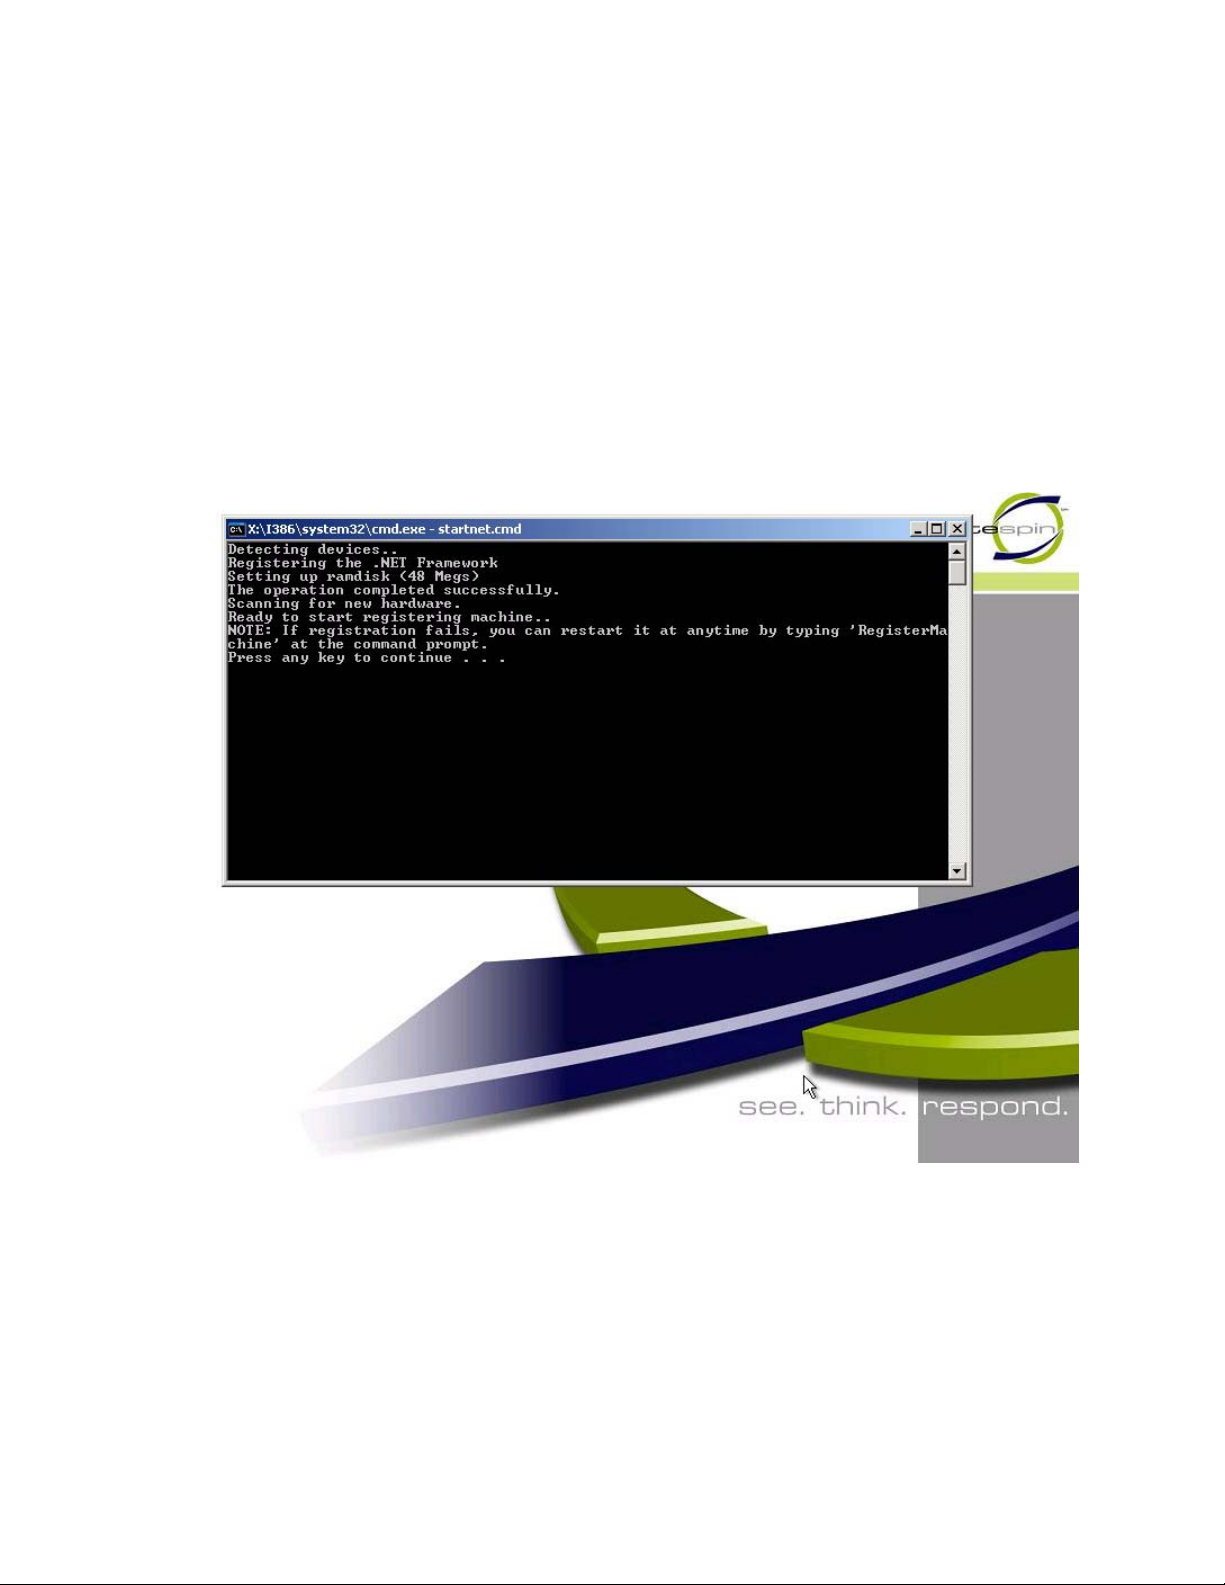
Discovering target physical servers
Different steps must be performed to discover target physical servers.
To begin the discovery process, download WINPE.ISO from the PlateSpin website and
burn it to a CD. Use this CD to boot the physical server which will be used as the
destination for the conversion.
Follow these steps to perform the discovery process for a physical target server.
1. Once the server boots from the CD, a command prompt window will appear
stating the registration process is about to begin. Press any key to start the
process.
2. A second command prompt window will appear, prompting for the
PowerConvert URL. It must be entered using the following syntax
HTTP://<POWERCONVERTSERVER>/PowerConvert
Replace <POWERCONVERTSERVER> with the IP address of the server where
PowerConvert is installed.
3. Enter administrator credentials for the PowerConvert server (be sure to
specify an authority, for example domain\admin or hostname\admin)
4. Enter the password for the provided credentials
5. Available network cards will be detected and displayed by their MAC address.
If DHCP is available on the NIC to be used, simply press ENTER to continue.
PlateSpin PowerConvert User Guide - 17 –
Copyright 2005
Page 18
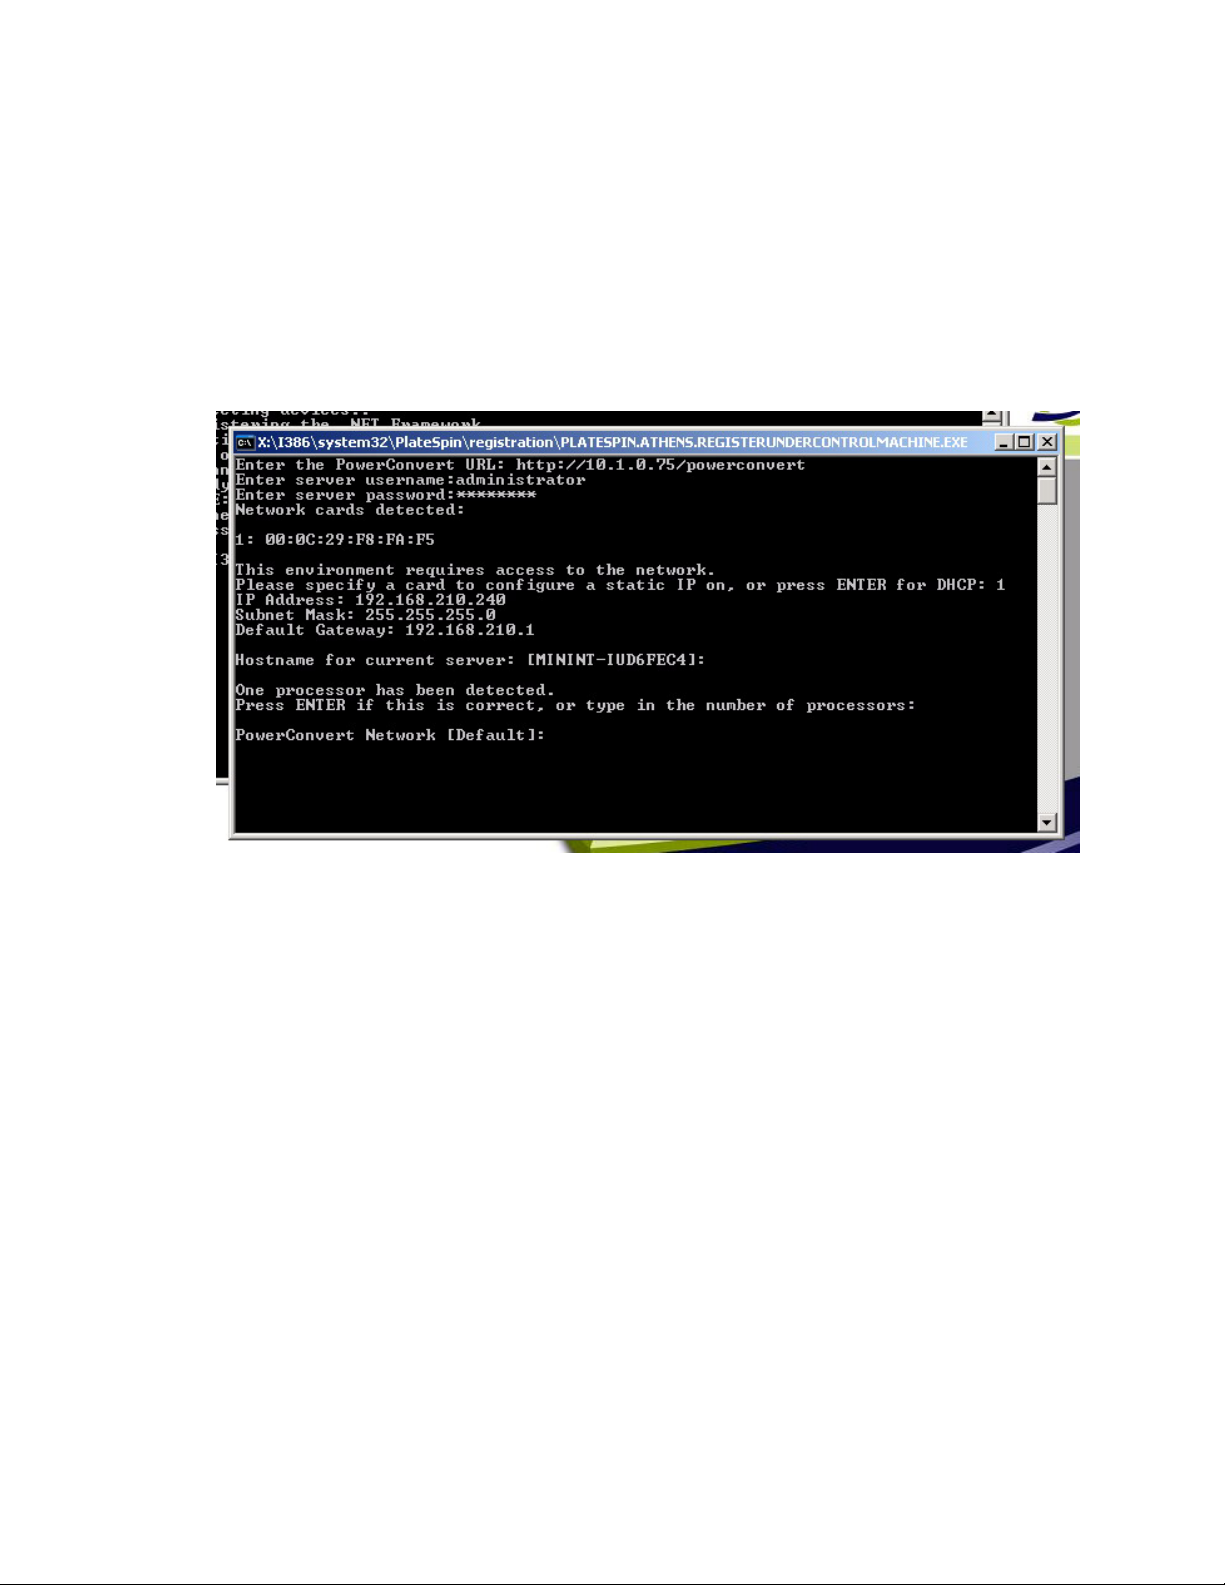
If DHCP is not available, select the desired NIC to configure with a static IP
address
a. Enter the desired IP address
b. Enter the desired subnet mask
c. Enter the desired gateway
6. Enter a host name for the physical server, or press ENTER to accept the
default
7. Enter the PowerConvert network where the discovered server should be
placed. If unsure what to value to use, keep the default setting by pressing
ENTER
The network configuration will initialize and the server registration process will
complete. Once the second command prompt window has closed, click the ‘Refresh’
button within the PowerConvert Client to see the discovered server. It will be
available in the Target Server pane.
PlateSpin PowerConvert User Guide - 18 –
Copyright 2005
Page 19

Server Analysis
After discovering source and target servers, an analysis can be performed to find
potential causes of failure. Doing so can be beneficial when beginning any large
scale conversion project.
PlateSpin PowerConvert User Guide - 19 –
Copyright 2005
Page 20
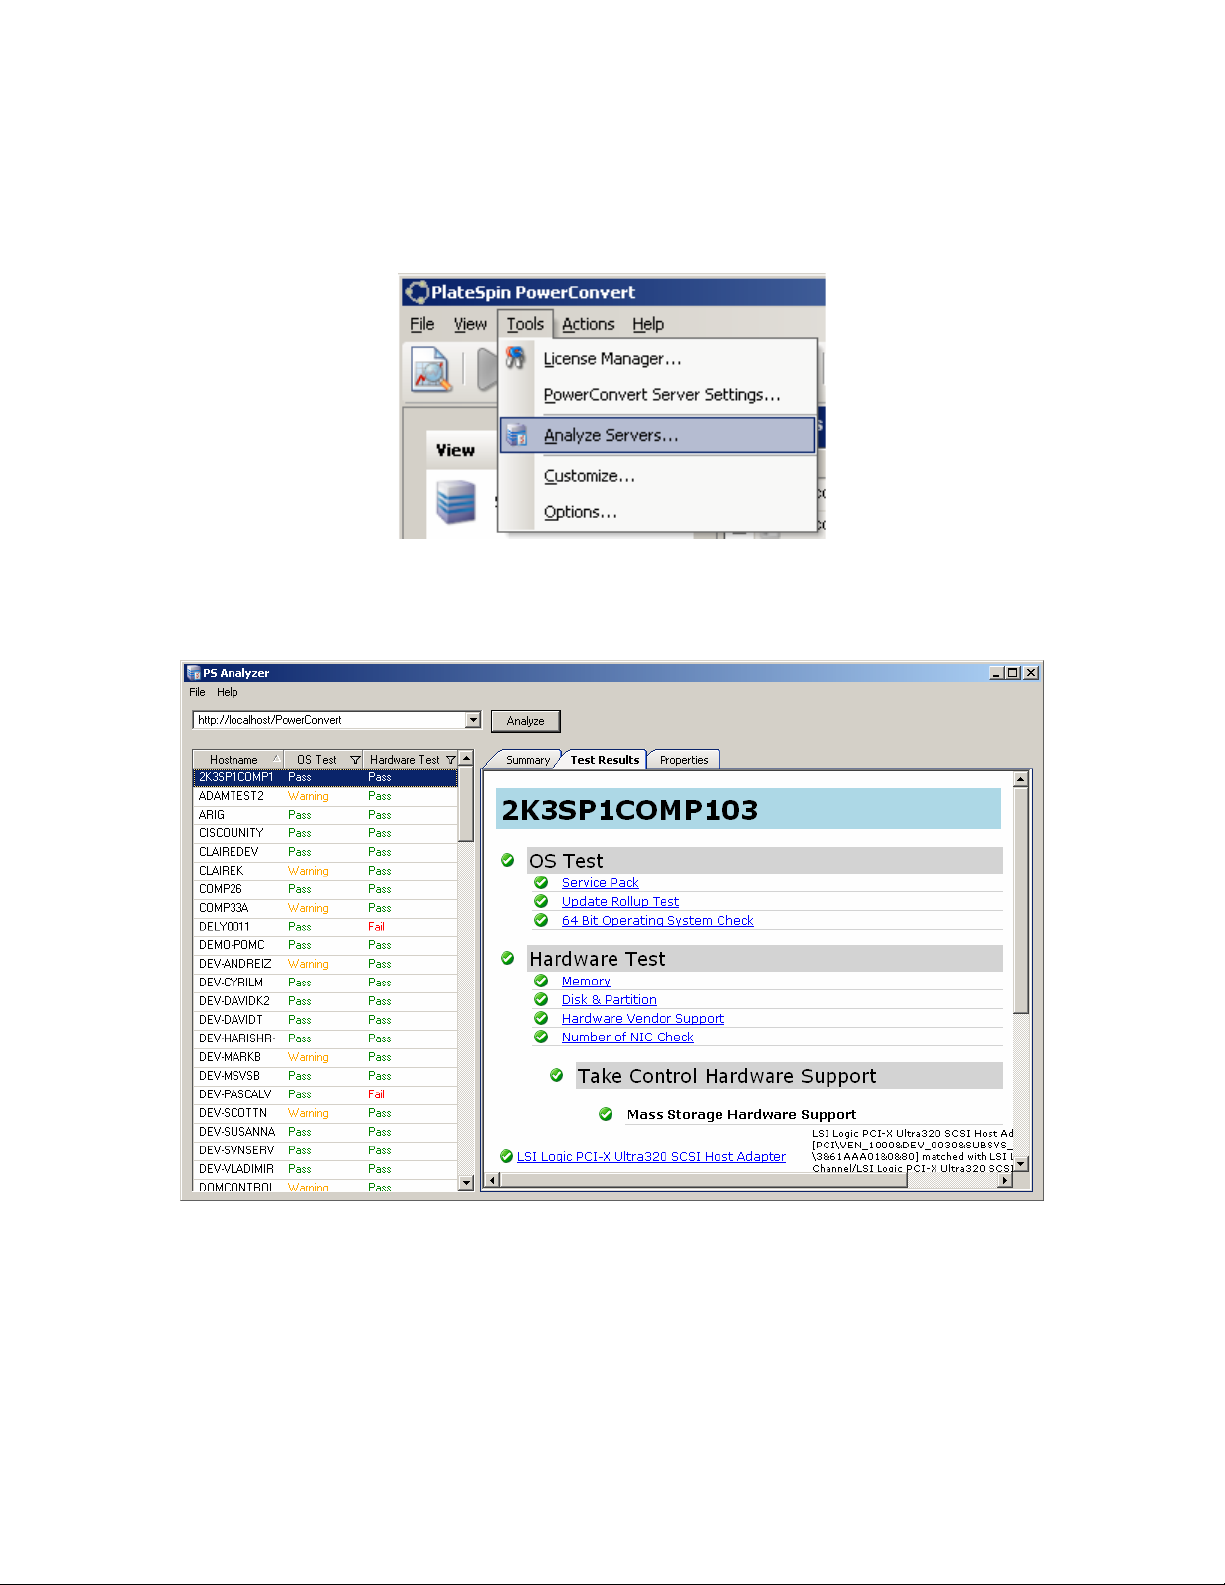
Analyzing Discovered Servers
To analyze all currently discovered servers, select ‘Analyze Servers’ from the TOOLS
menu in the PowerConvert Client.
Enter the network path to the PowerConvert Server and click the ANALYZE button.
The analysis may take a few minutes to complete, depending on the number of
discovered servers.
Analyzed servers will be listed in the left pane. By highlighting each server, test
results can be viewed in the right pane.
NOTE: ‘Take Control Hardware Support’ checks for source machine
hardware compatibility, while ‘Target Hardware Support’ checks hardware
compatibility for use as a target physical server
PlateSpin PowerConvert User Guide - 20 –
Copyright 2005
Page 21

Peer to Peer Conversion Jobs
Peer to peer conversions are performed from physical or virtual source servers, to
physical or virtual target servers without the use of an intermediary data store.
While physical to virtual conversions are most common, PowerConvert also supports
virtual to virtual, physical to physical and virtual to physical conversions. This
functionality allows for full OS portability within a data center. Server upgrades,
consolidation and disaster recovery scenarios can all be fully automated through a
single user interface.
The following table illustrates the configurable options for different types of
conversions.
Virtual
Targets
RAM Assignment X
Disk layout X X
Services and Daemons X X
Volume selection X X
Volume Resizing X X
Number of processors X
Host name X X
TCP/IP Settings X X
SID Generation X X
Services/Daemons X X
Domain/Workgroup
Joining
X X
Physical
Targets
PlateSpin PowerConvert User Guide - 21 –
Copyright 2005
Page 22
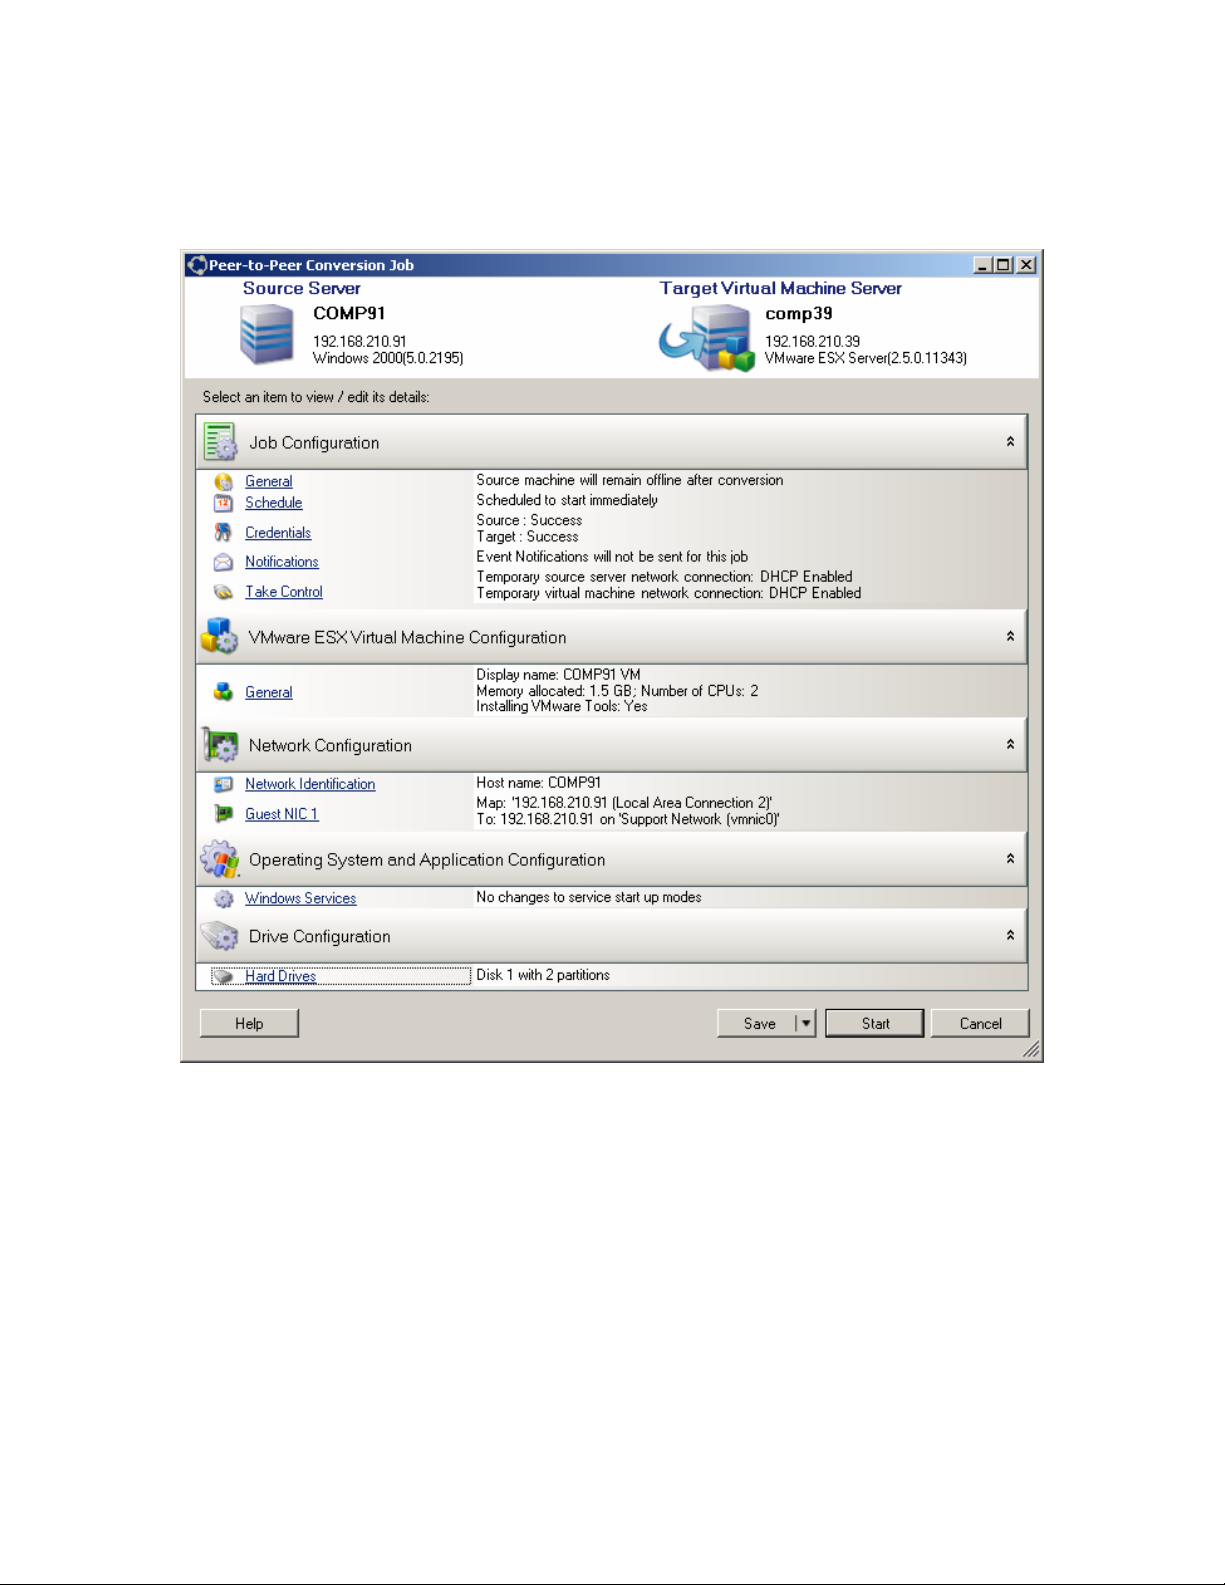
Converting to Virtual Servers
The configuration screen provides customizable parameters for the conversion job.
Simply drag-and-drop the discovered source server to the discovered physical target
server to configure the conversion job
1. Set the Job Configuration options to specify settings for use during the
conversion job
PlateSpin PowerConvert User Guide - 22 –
Copyright 2005
Page 23
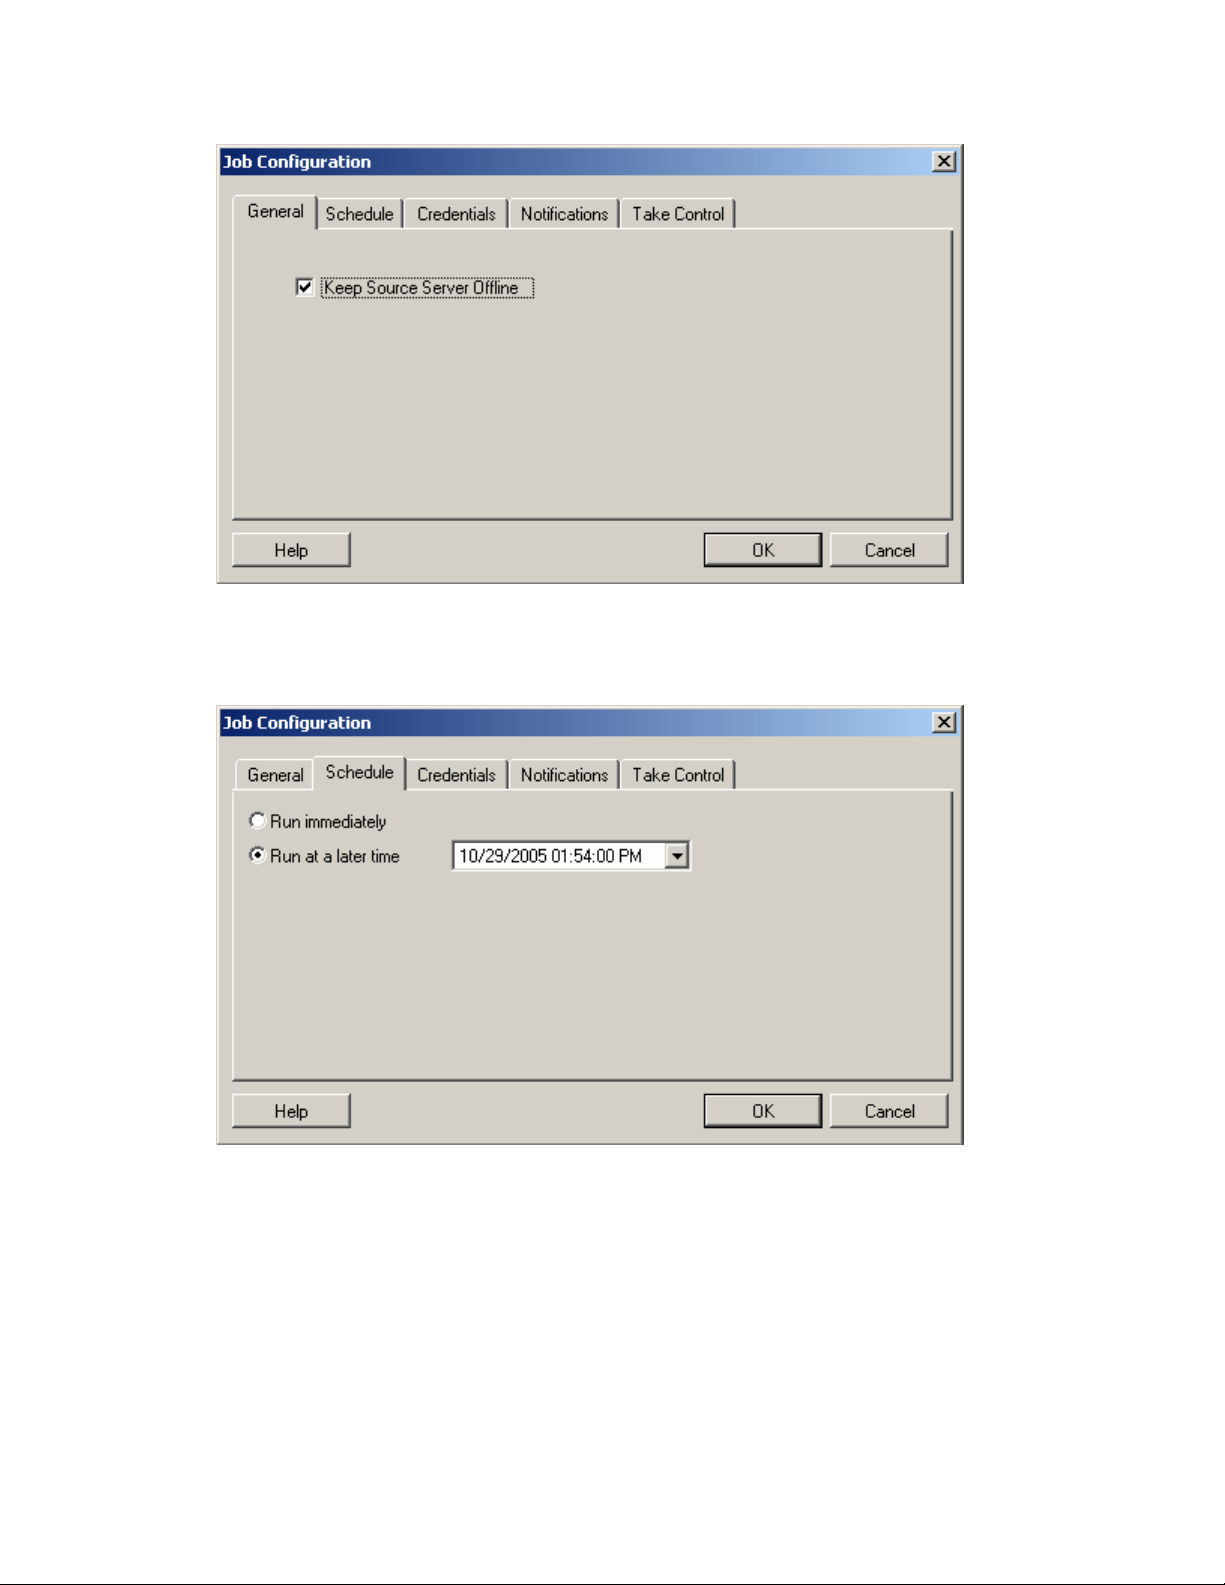
KEEP SOURCE SERVER OFFLINE – Enabling this option keeps the source
server offline to guarantee no hostname or IP address conflicts after the
conversion has completed
RUN IMMEDIATELY – Select to start the conversion job when executed
RUN AT A LATER TIME – Enable to select a specific date and time for the
conversion to run
PlateSpin PowerConvert User Guide - 23 –
Copyright 2005
Page 24
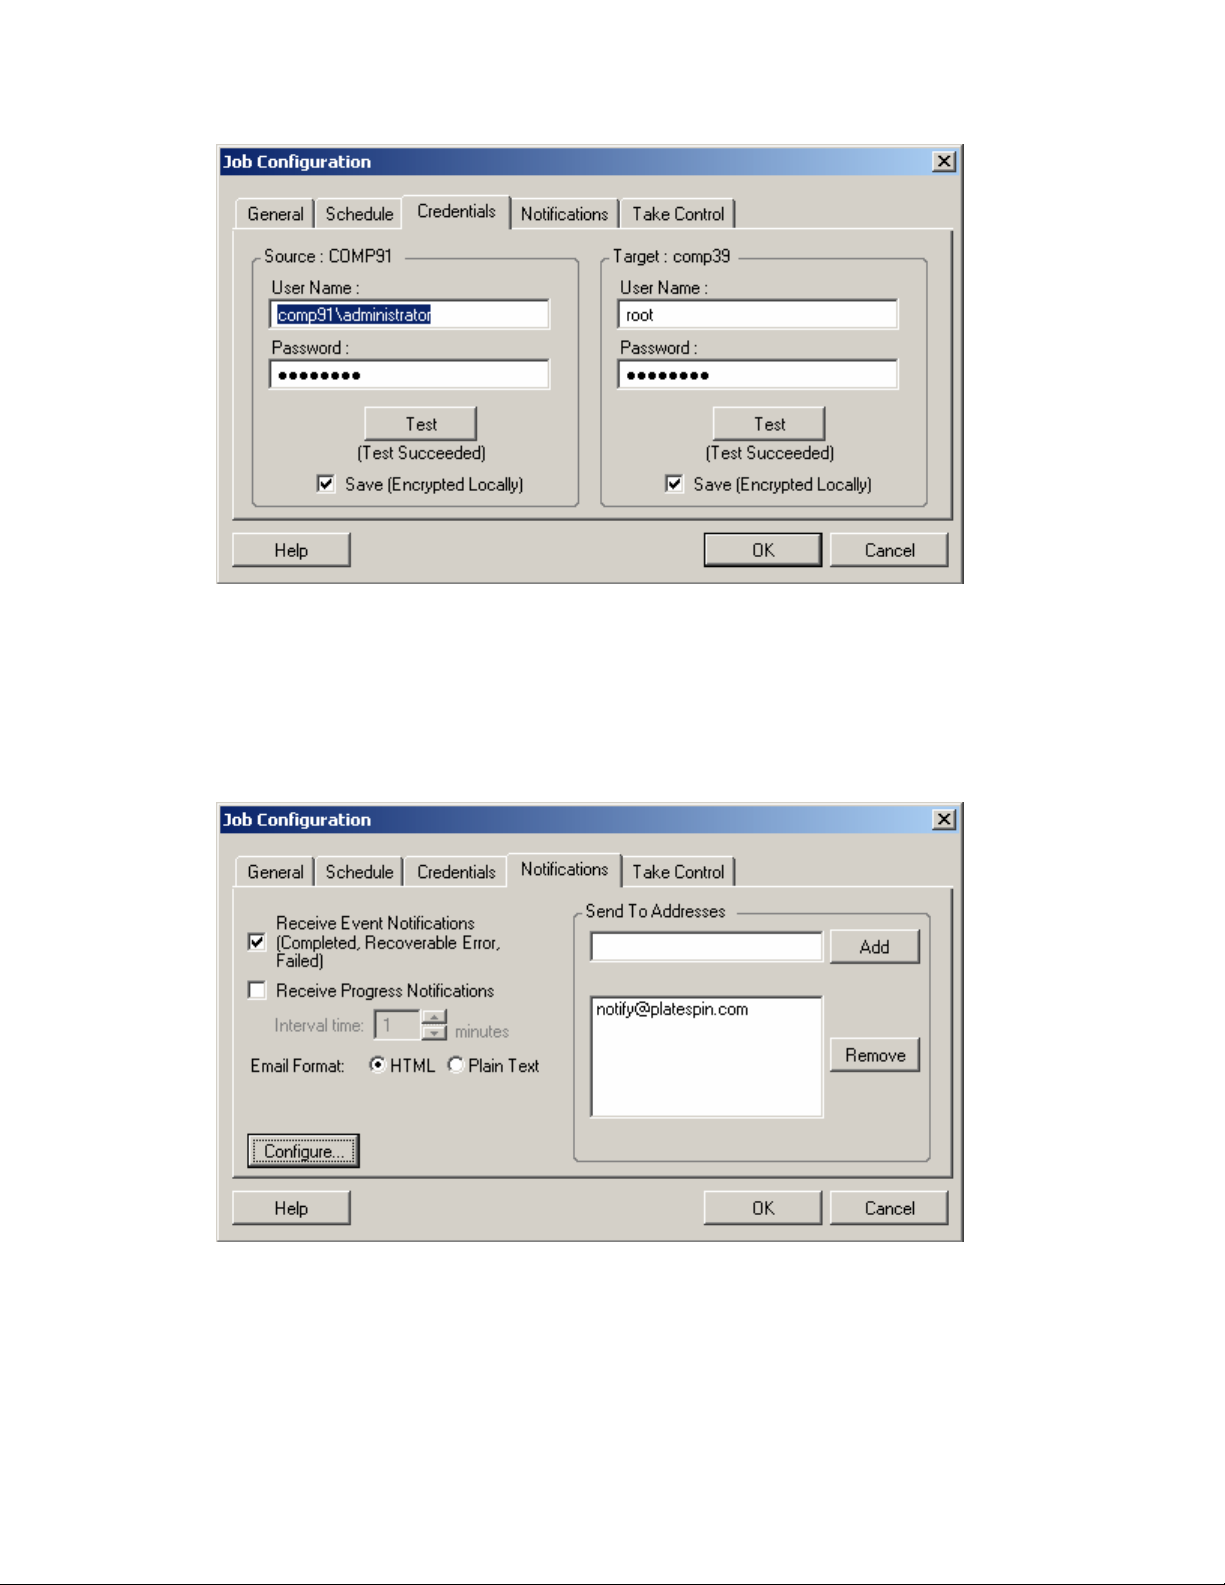
USER NAME – Enter valid administrator or root credentials for the source and
target servers
PASSWORD – Enter a valid password for the administrator or root account
TEST – Click this button to test the entered credentials
SAVE (ENCRYPTED LOCALLY) – Enable to save the entered credentials for
use during future conversions
RECEIVE EVENT NOTIFICATIONS – Enable to be sent e-mail notifications
when the job enters a completed, recoverable error or failed state
RECEIVE PROGRESS NOTIFICATIONS – Enable to be sent regular e-mail
notifications for a specified interval of time
INTERVAL TIME – Enter the time in minutes for e-mail notifications to be
sent
PlateSpin PowerConvert User Guide - 24 –
Copyright 2005
Page 25
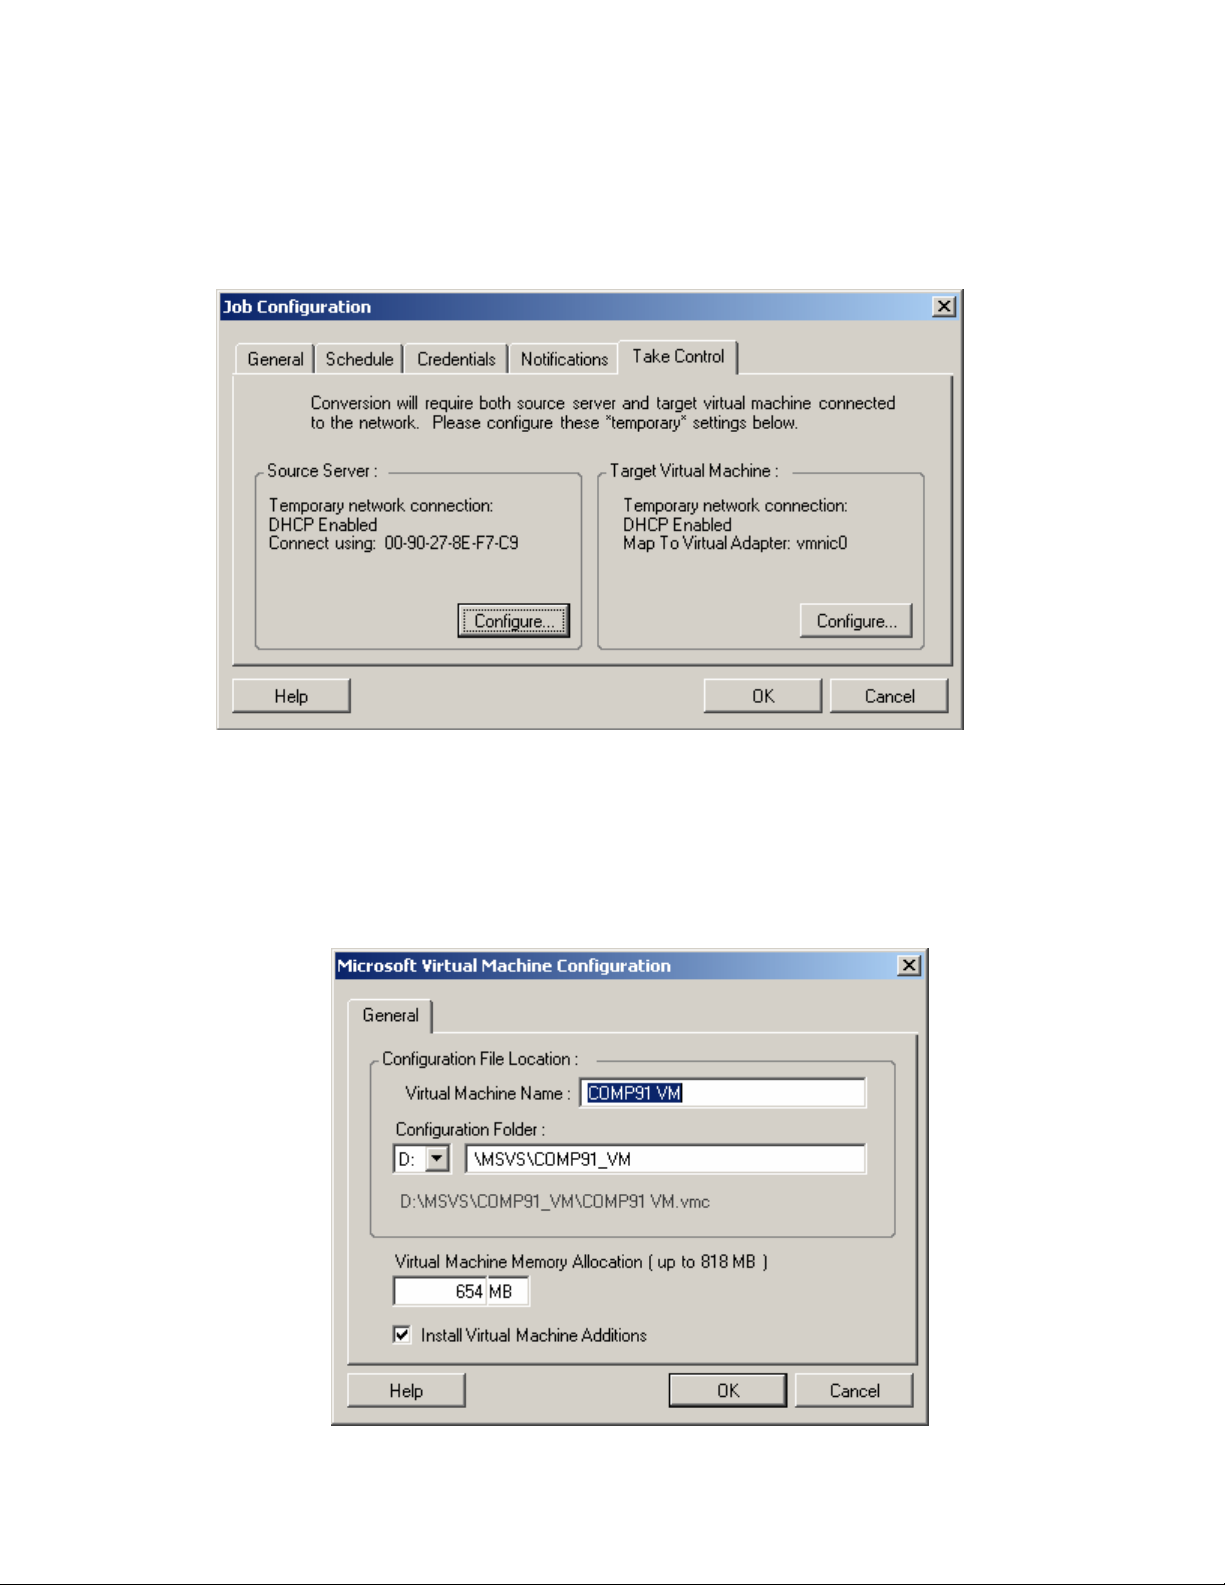
E-MAIL FORMAT– Select to receive e-mail notifications in HTML or plain text
format
SEND TO ADDRESSES – Use the ADD and REMOVE buttons to build a list of
e-mail address which will receive the notifications.
CONFIGURE – Click this button to configure TCP/IP settings for use during
the conversion process on both the source server and target virtual machine
2. Virtual machine settings can be configured, specific to the virtual platform
being used.
Microsoft Virtual Server
PlateSpin PowerConvert User Guide - 25 –
Copyright 2005
Page 26
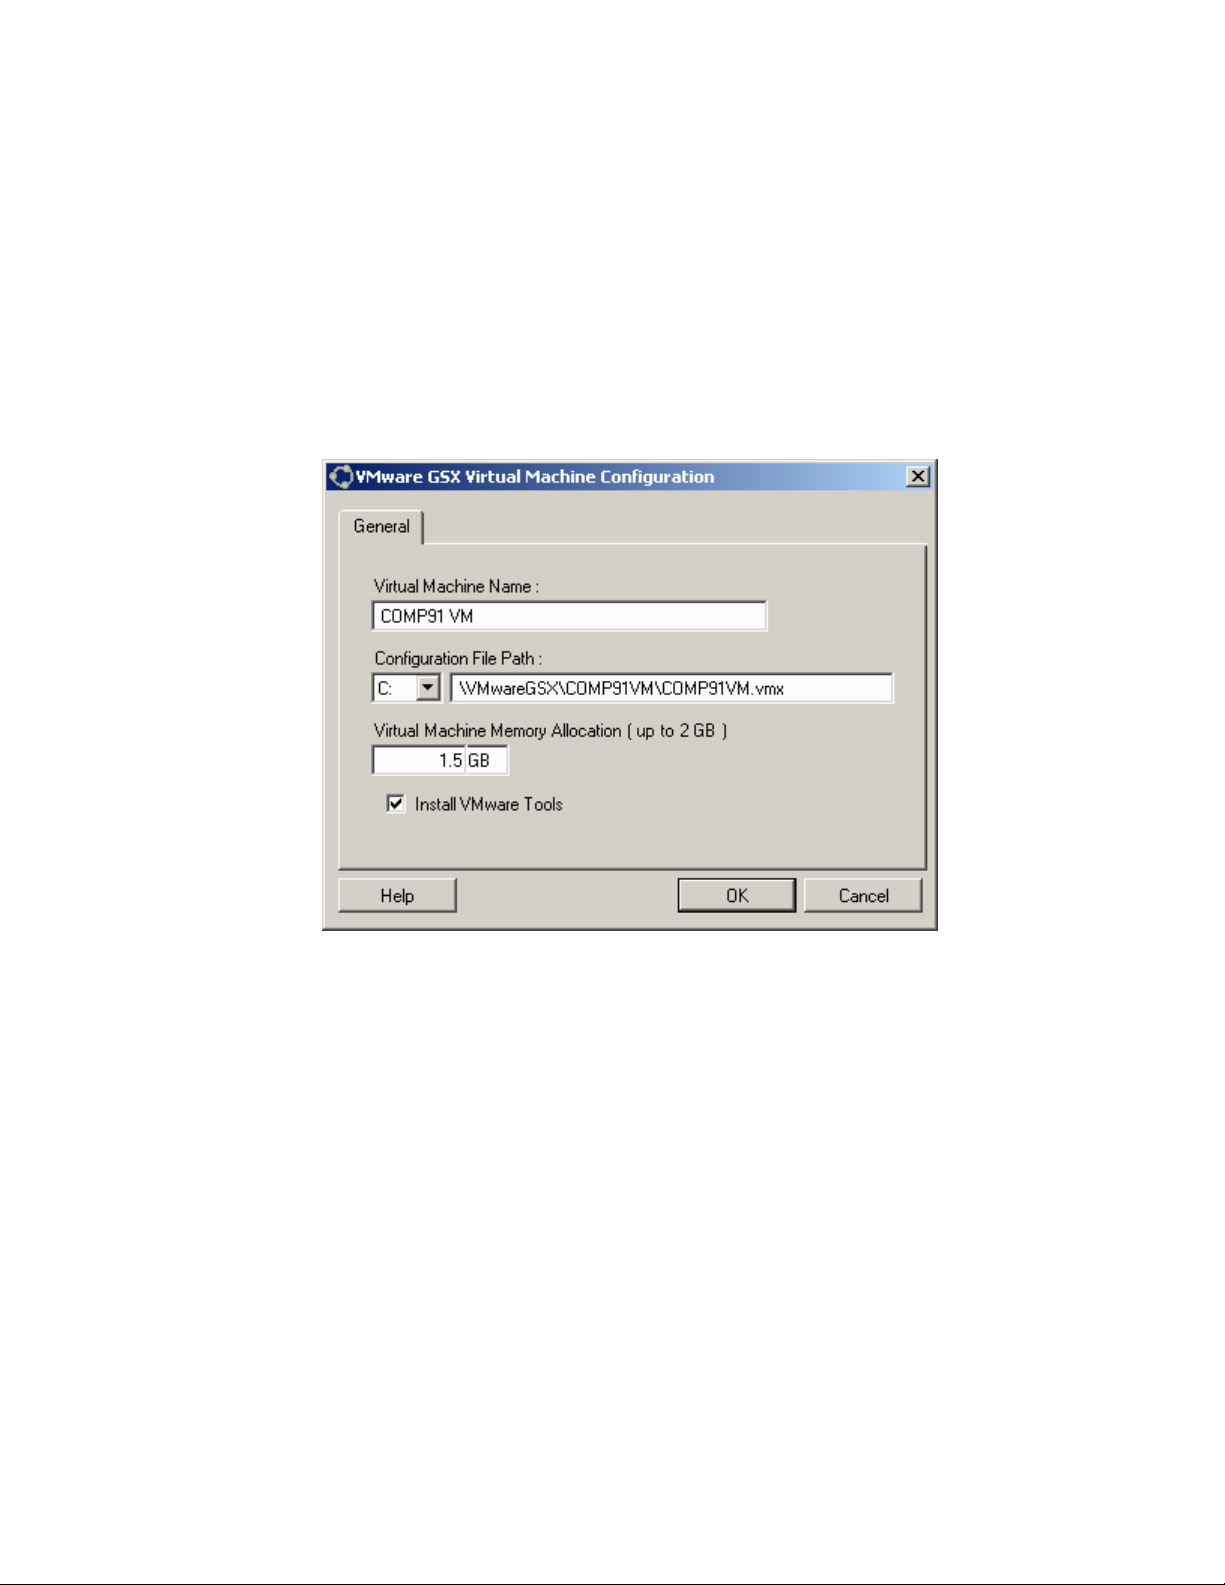
VIRTUAL MACHINE NAME – Enter the display name for the new virtual
machine
CONFIGURATION FOLDER– Select the directory where the configuration
files will be stored for the virtual machine
VIRTUAL MACHINE MEMORY ALLOCATION– Enter a value for the amount
of RAM to be assigned to the virtual machine
INSTALL VIRTUAL MACHINE ADDITIONS – Enable this option to install
VM Additions during the conversion process
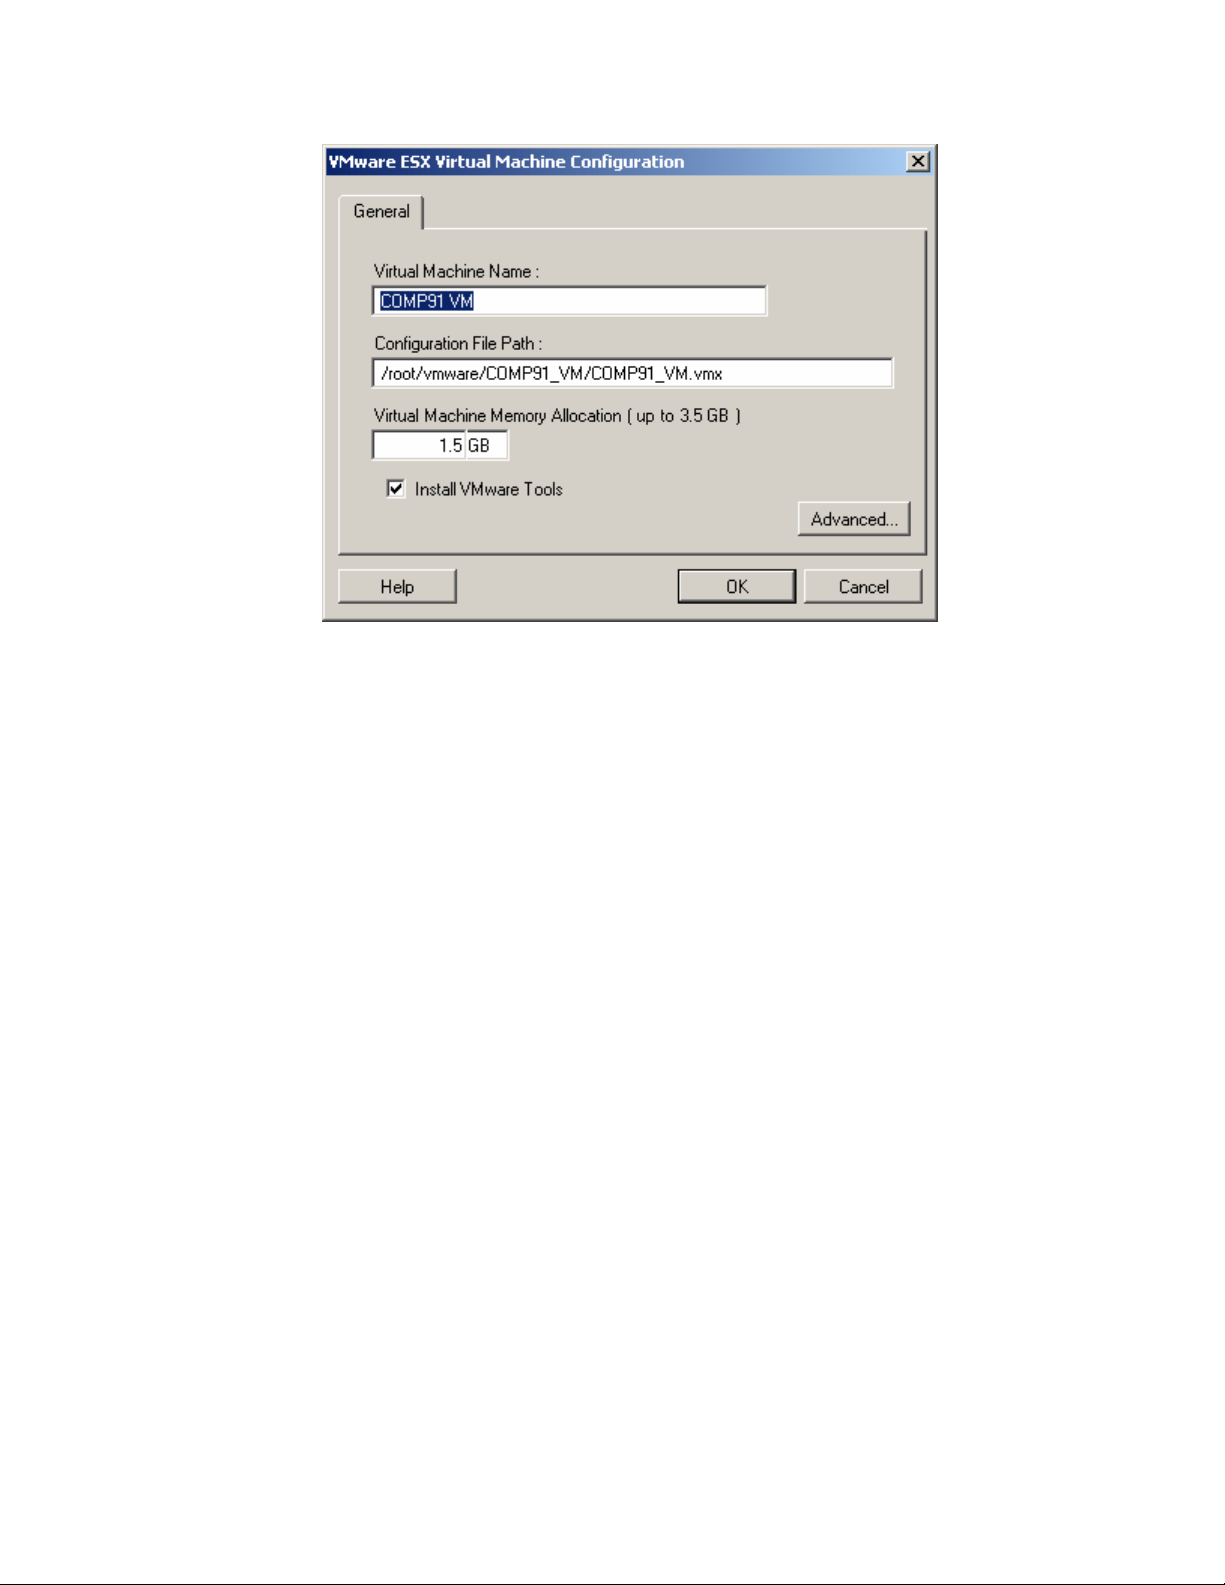
VMware GSX Server
VIRTUAL MACHINE NAME – Enter the display name for the new virtual
machine
CONFIGURATION FILE PATH– Select the directory where the configuration
files will be stored for the virtual machine
VIRTUAL MACHINE MEMORY ALLOCATION– Enter a value for the amount
of RAM to be assigned to the virtual machine
INSTALL VMWARE TOOLS– Enable this option to install VMware Tools
during the conversion process
VMware ESX Server
PlateSpin PowerConvert User Guide - 26 –
Copyright 2005
Page 27
VIRTUAL MACHINE NAME – Enter the display name for the new virtual
machine
CONFIGURATION FILE PATH– Select the path where the configuration files
will be stored for the virtual machine
VIRTUAL MACHINE MEMORY ALLOCATION– Enter a value for the amount
of RAM to be assigned to the virtual machine
INSTALL VMWARE TOOLS– Enable this option to install VMware Tools
during the conversion process
PlateSpin PowerConvert User Guide - 27 –
Copyright 2005
Page 28
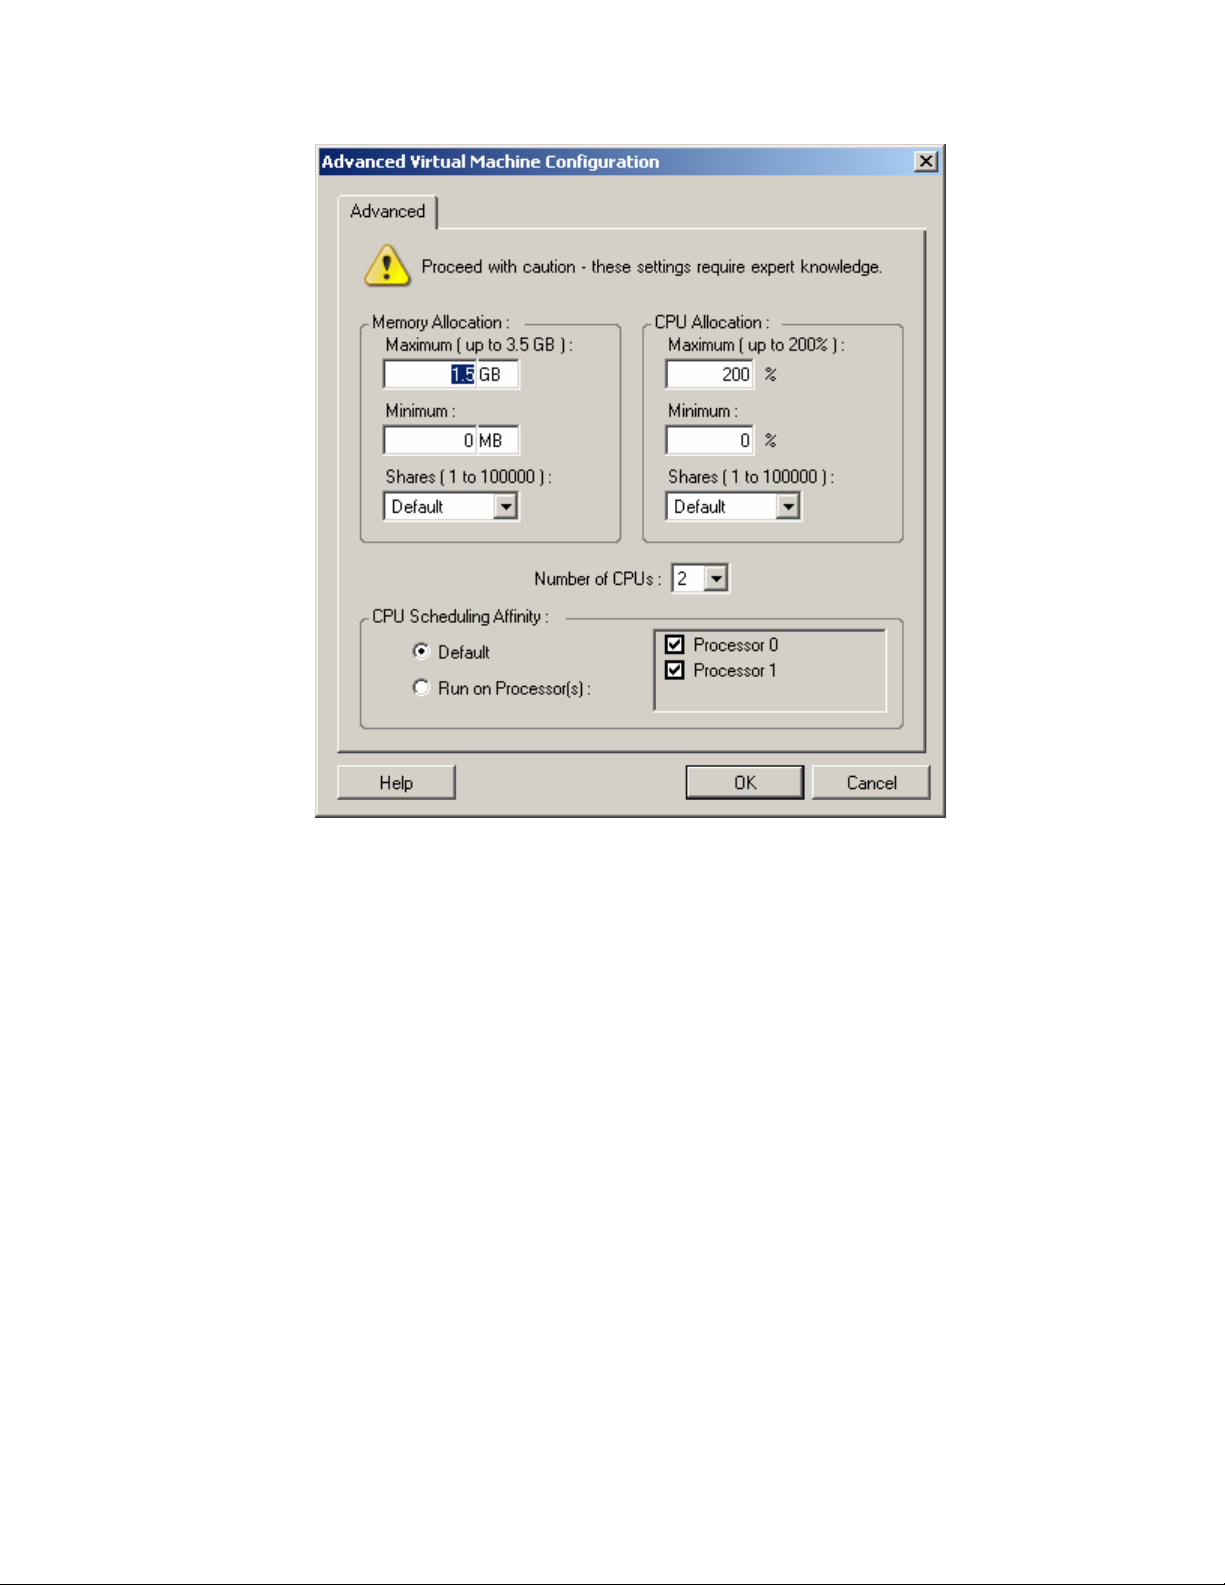
MEMORY ALLOCATION
MAXIMUM – Enter the maximum RAM to be used by the virtual
machine
MINIMUM– Enter the minimum RAM to be used by the virtual
machine
SHARES– Use this pull-down menu to select the memory share
allocation for the virtual machine
CPU ALLOCATION
MAXIMUM – Enter the maximum CPU utilization for the virtual
machine
MINIMUM– Enter the minimum CPU allocation for the virtual machine
SHARES– Use this pull-down menu to select the CPU share allocation
for the virtual machine
NUMBER OF CPUS– Select the number of processors to be assigned to the
virtual machine
CPU SCHEDULING AFFINITY
DEFAULT – Select to allow VMware ESX Server to control CPU
scheduling
RUN ON PROCESSORS– Select to choose the processors used by the
virtual machine
PlateSpin PowerConvert User Guide - 28 –
Copyright 2005
Page 29
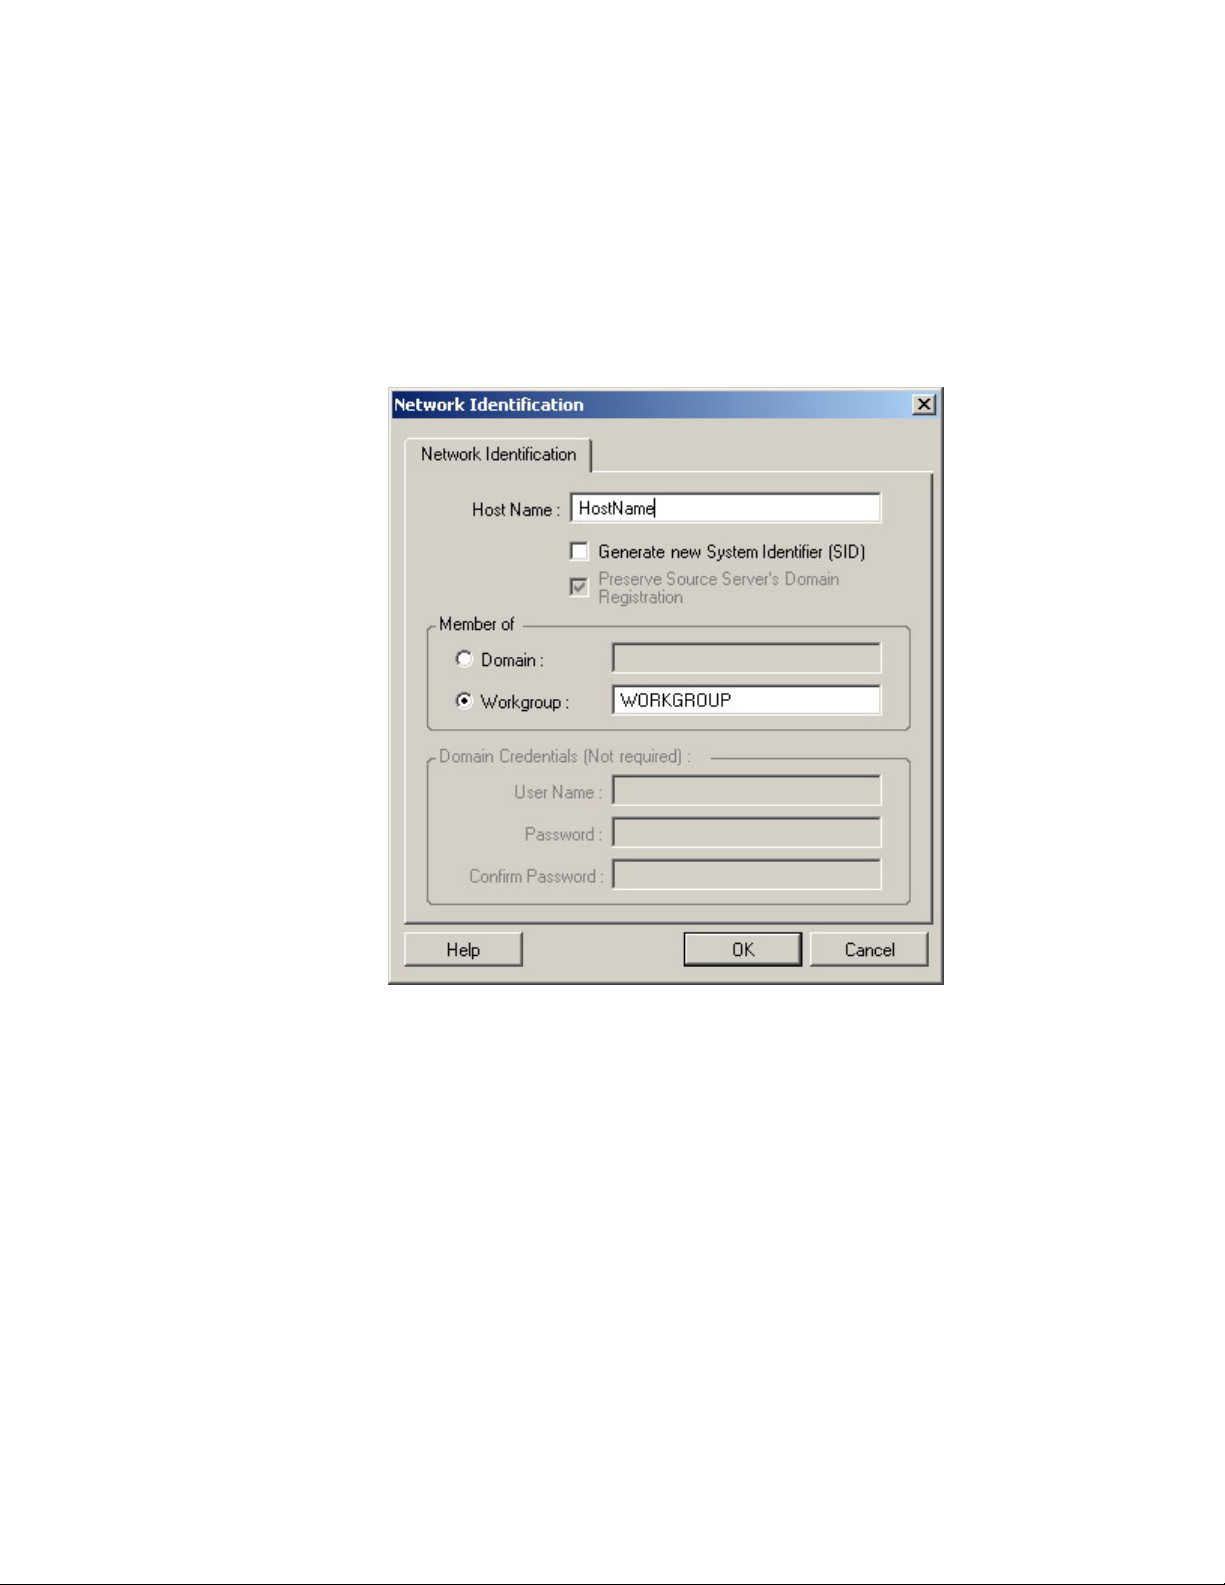
3. A conversion job is auto configured so the created target server will be
created with the same settings as the original source. The network
configuration can be modified to meet the requirements for the converted
server
a. Modify the Network Identification settings to configure the host name
and domain/workgroup registration of the created target server
Windows Source Servers
HOST NAME – Enter the desired host name for the target
server
GENERATE NEW SYSTEM IDENTIFER (SID) – Enable this
option for the create target server to be assigned a new SID
during the conversion
DOMAIN / WORKGROUP - Enter the domain or workgroup
the target server will be part of
DOMAIN CREDENTIALS – If the target server will be part of a
domain, enter valid credentials which have permission to add
machines to the domain
PlateSpin PowerConvert User Guide - 29 –
Copyright 2005
Page 30
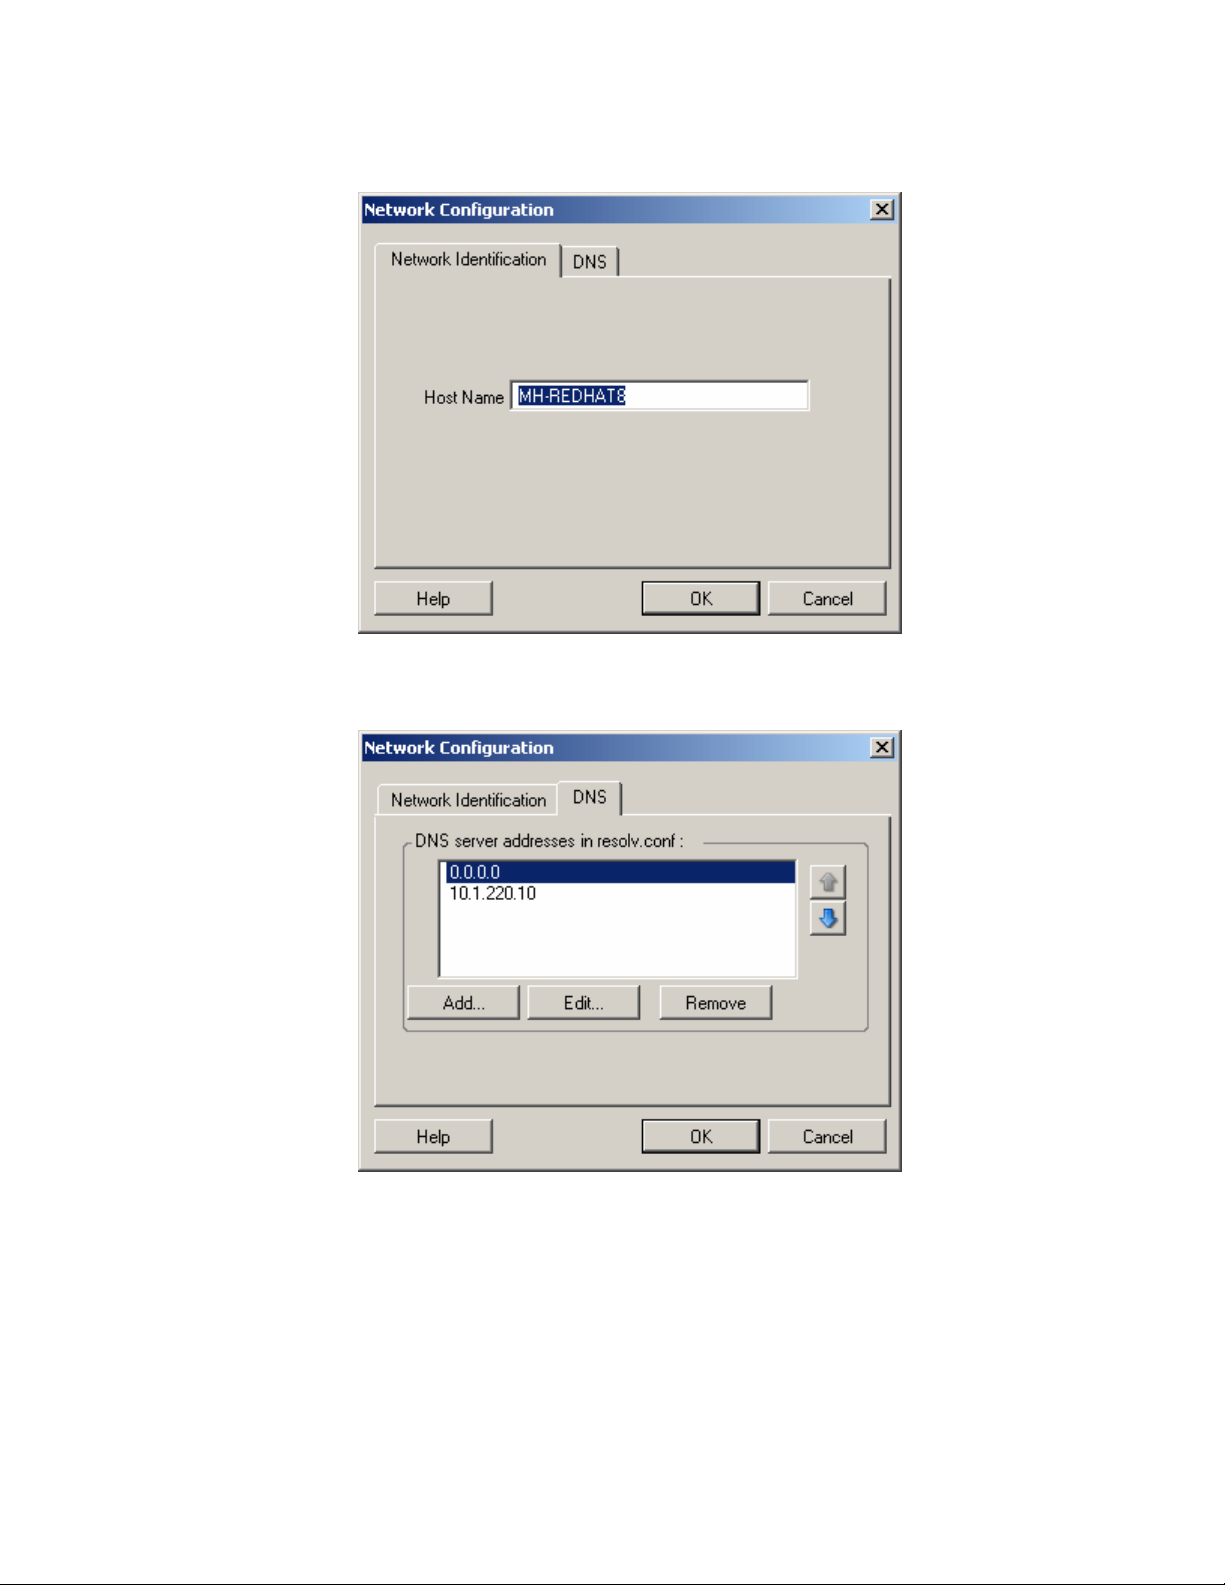
Linux Source Servers
HOST NAME – Enter the desired host name for the target server
DNS SERVER ADDRESS IN RESOLV.CONF – Use the ADD, EDIT and
REMOVE buttons to manage DNS server entries for the new virtual
machine
b. Modify the Network Connection settings to configure the TCP/IP
properties for the network adapters on the created target server
PlateSpin PowerConvert User Guide - 30 –
Copyright 2005
Page 31
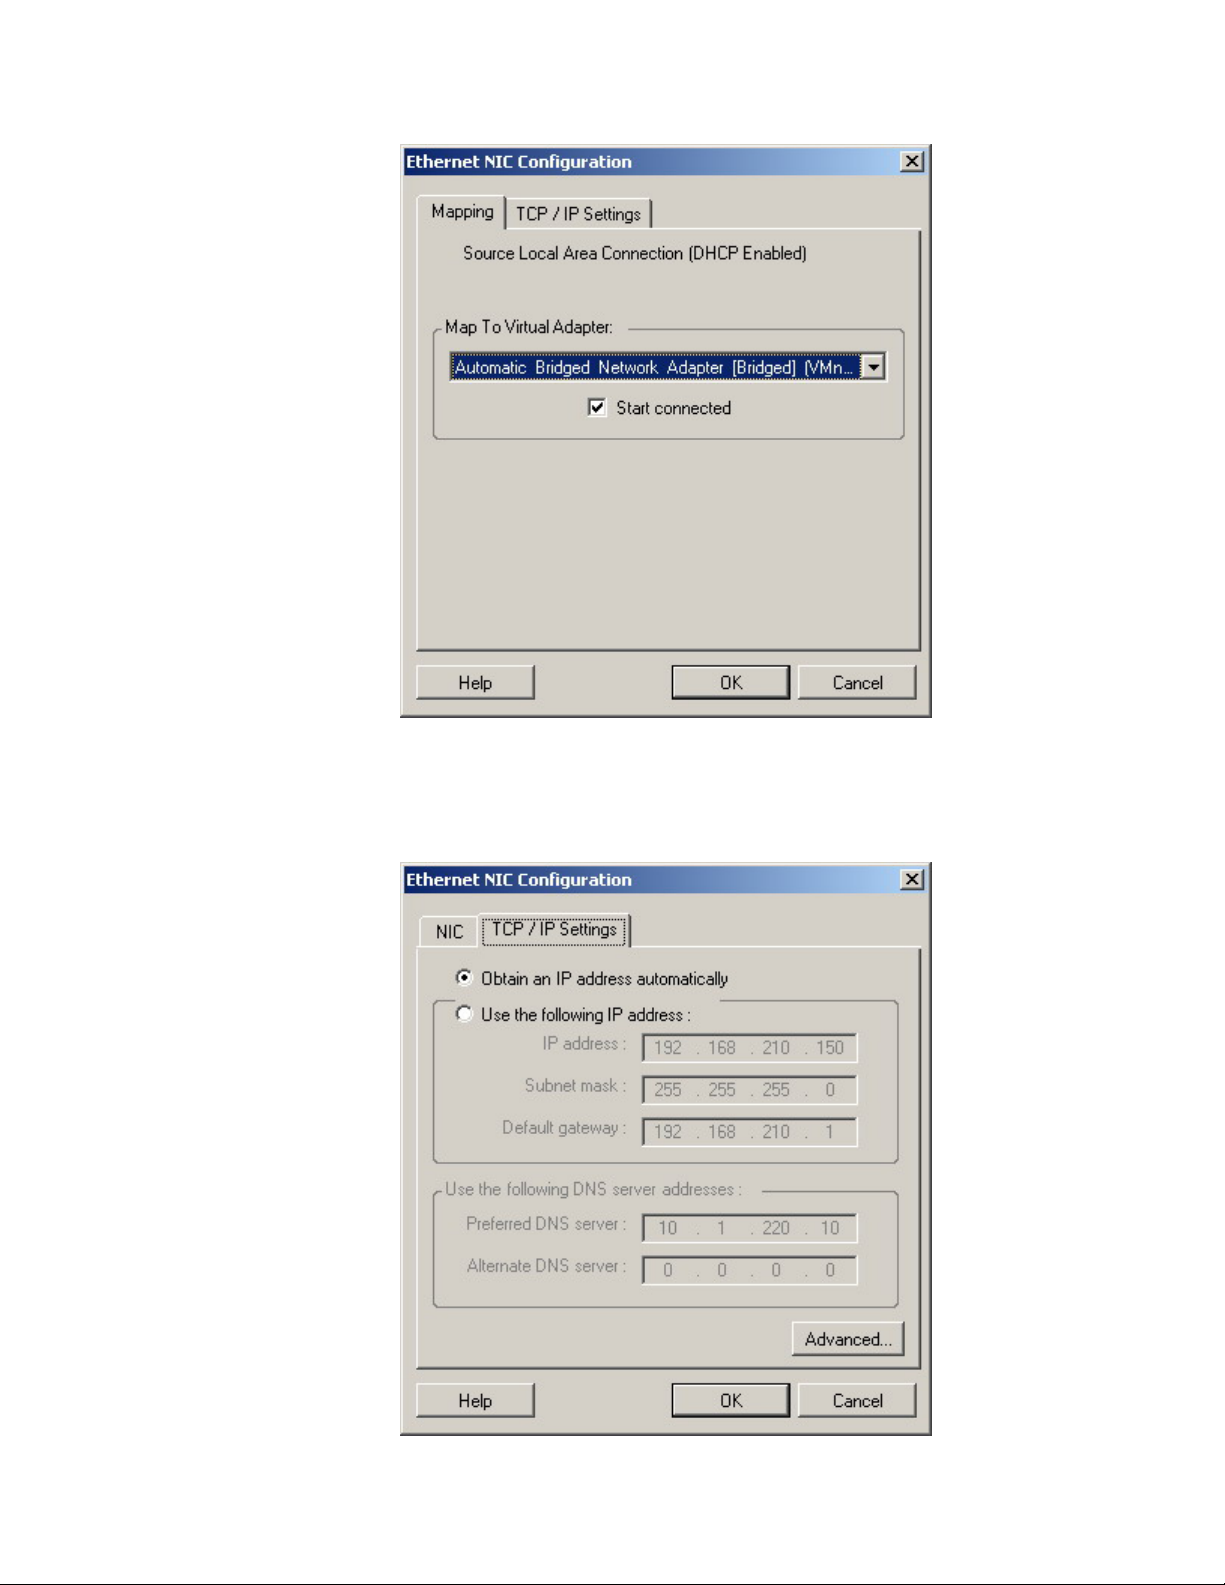
MAP TO VIRTUAL ADAPTER – Select the virtual adapter
which will be used on the target virtual machine
CONNECTED – Enable this option to connect the VMnic when
starting the target virtual machine
PlateSpin PowerConvert User Guide - 31 –
Copyright 2005
Page 32
OBTAIN AN IP ADDRESS AUTOMATICALLY – Select this
option to use DHCP for this connection
USE THE FOLLOWING IP ADDRESS – Select this option to
assign a static IP address for this connection
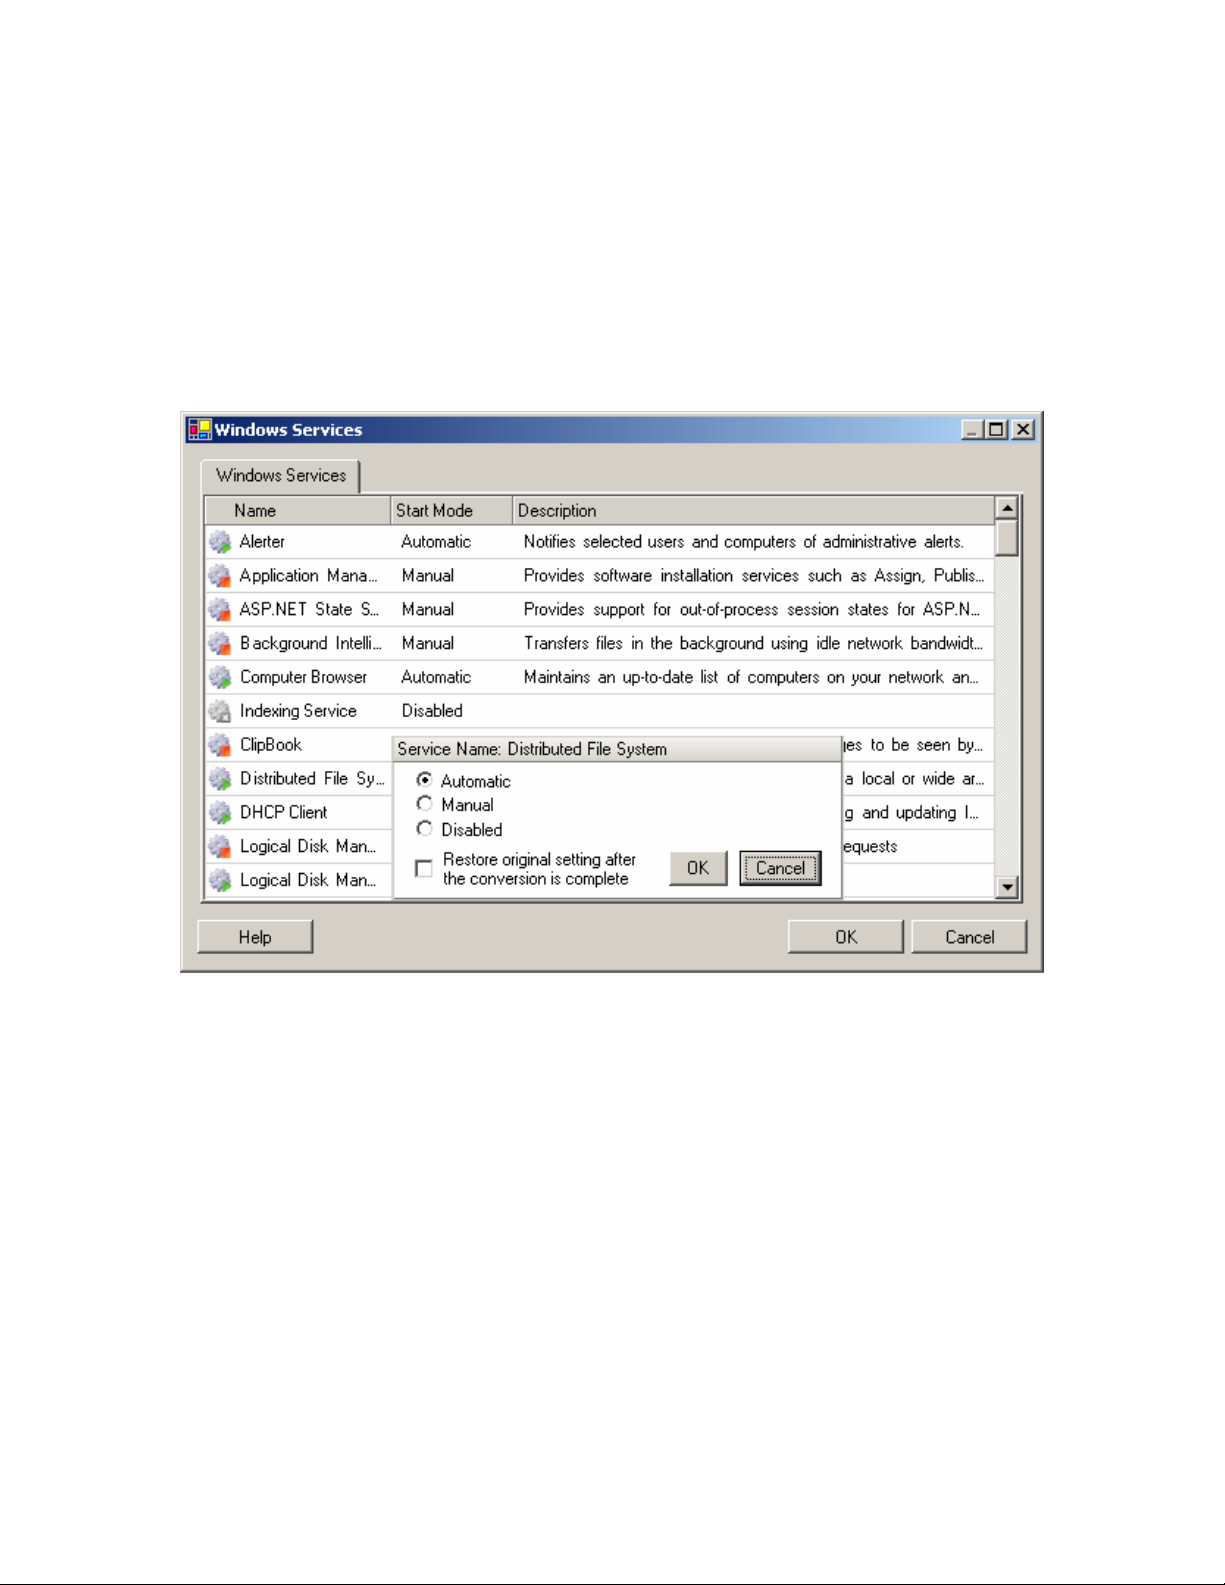
c. Installed services (Windows) and daemons (Linux) can be enabled or
disabled as part of the conversion process
Windows Source Servers
START MODE – Click this column for the desired service to determine its
startup mode in the new virtual machine
RESTORE ORIGINAL SETTING AFTER THE CONVERSION IS
COMPLETE – Enable this option if the change should only be made to the
service during the conversion process, returning to the original state when
the conversion has completed
PlateSpin PowerConvert User Guide - 32 –
Copyright 2005
Page 33
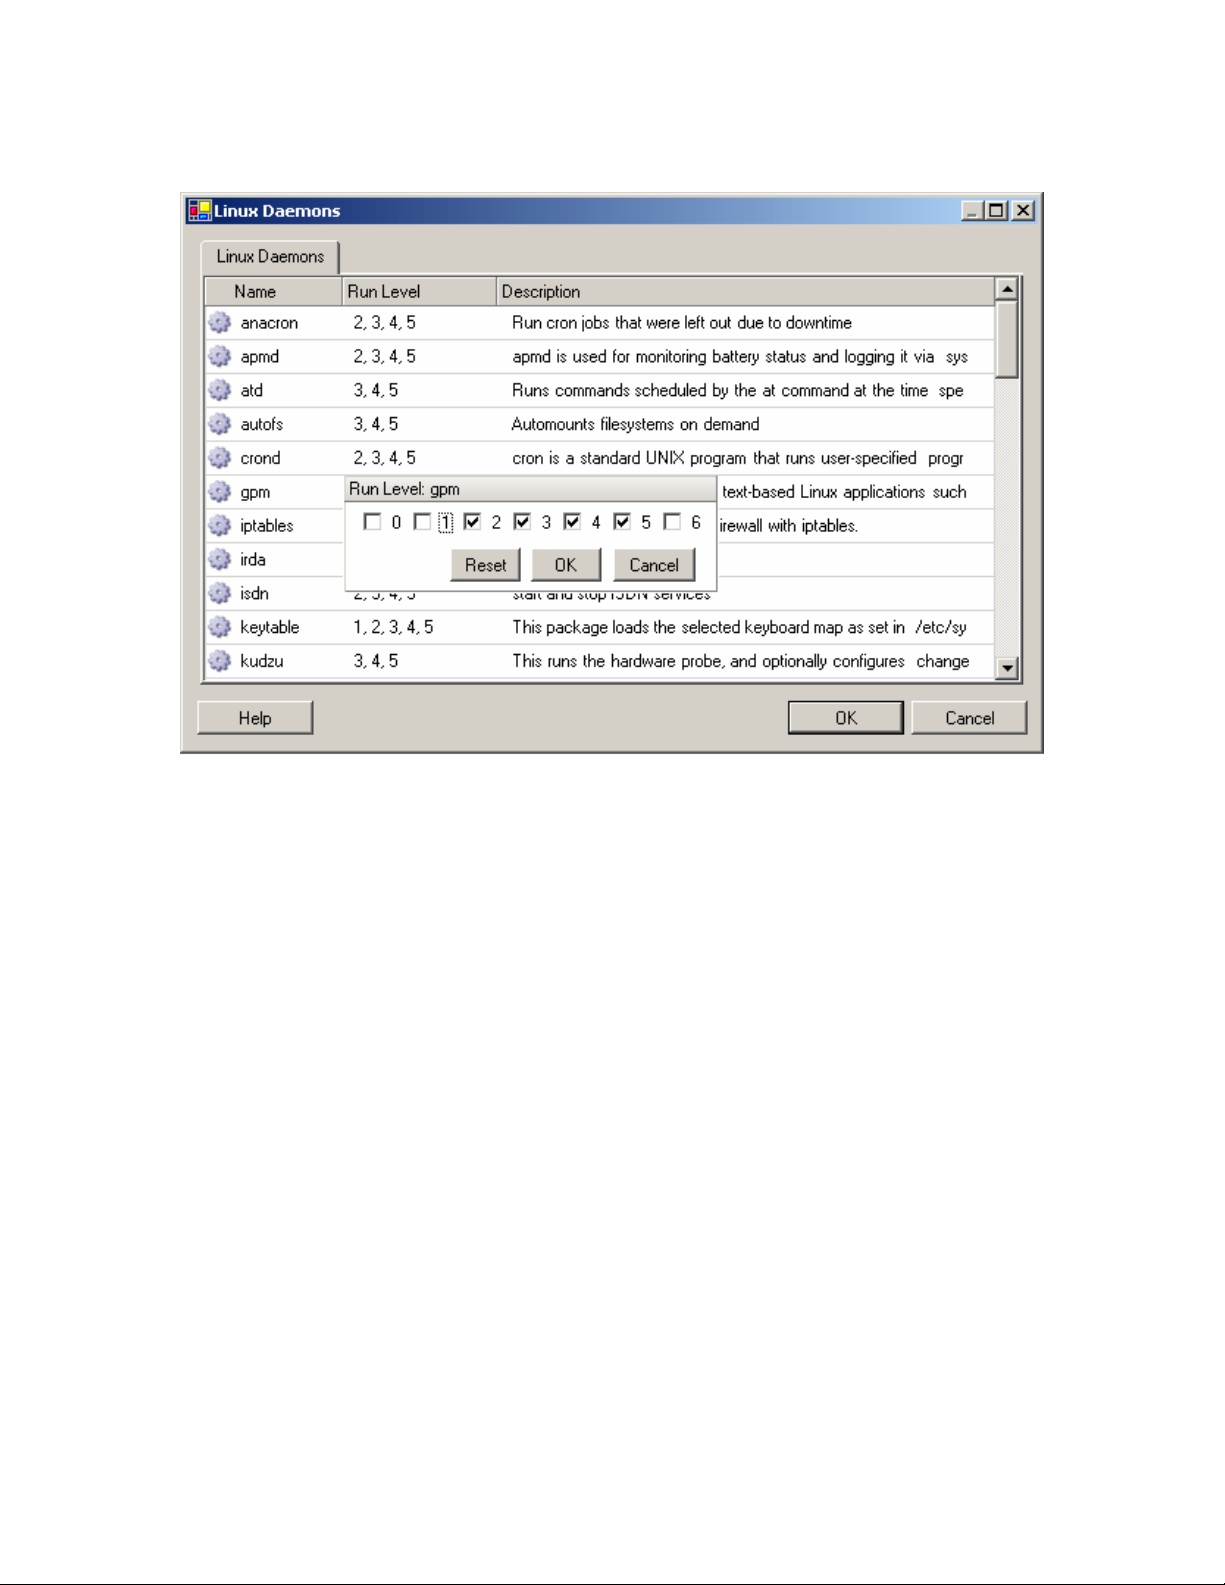
Linux Source Servers
RUN LEVEL – Click this column for the desired daemon to select the run
levels it will be used
d. Modify the Drive Configuration settings to select the volumes to copy
during the conversion.
PlateSpin PowerConvert User Guide - 33 –
Copyright 2005
Page 34
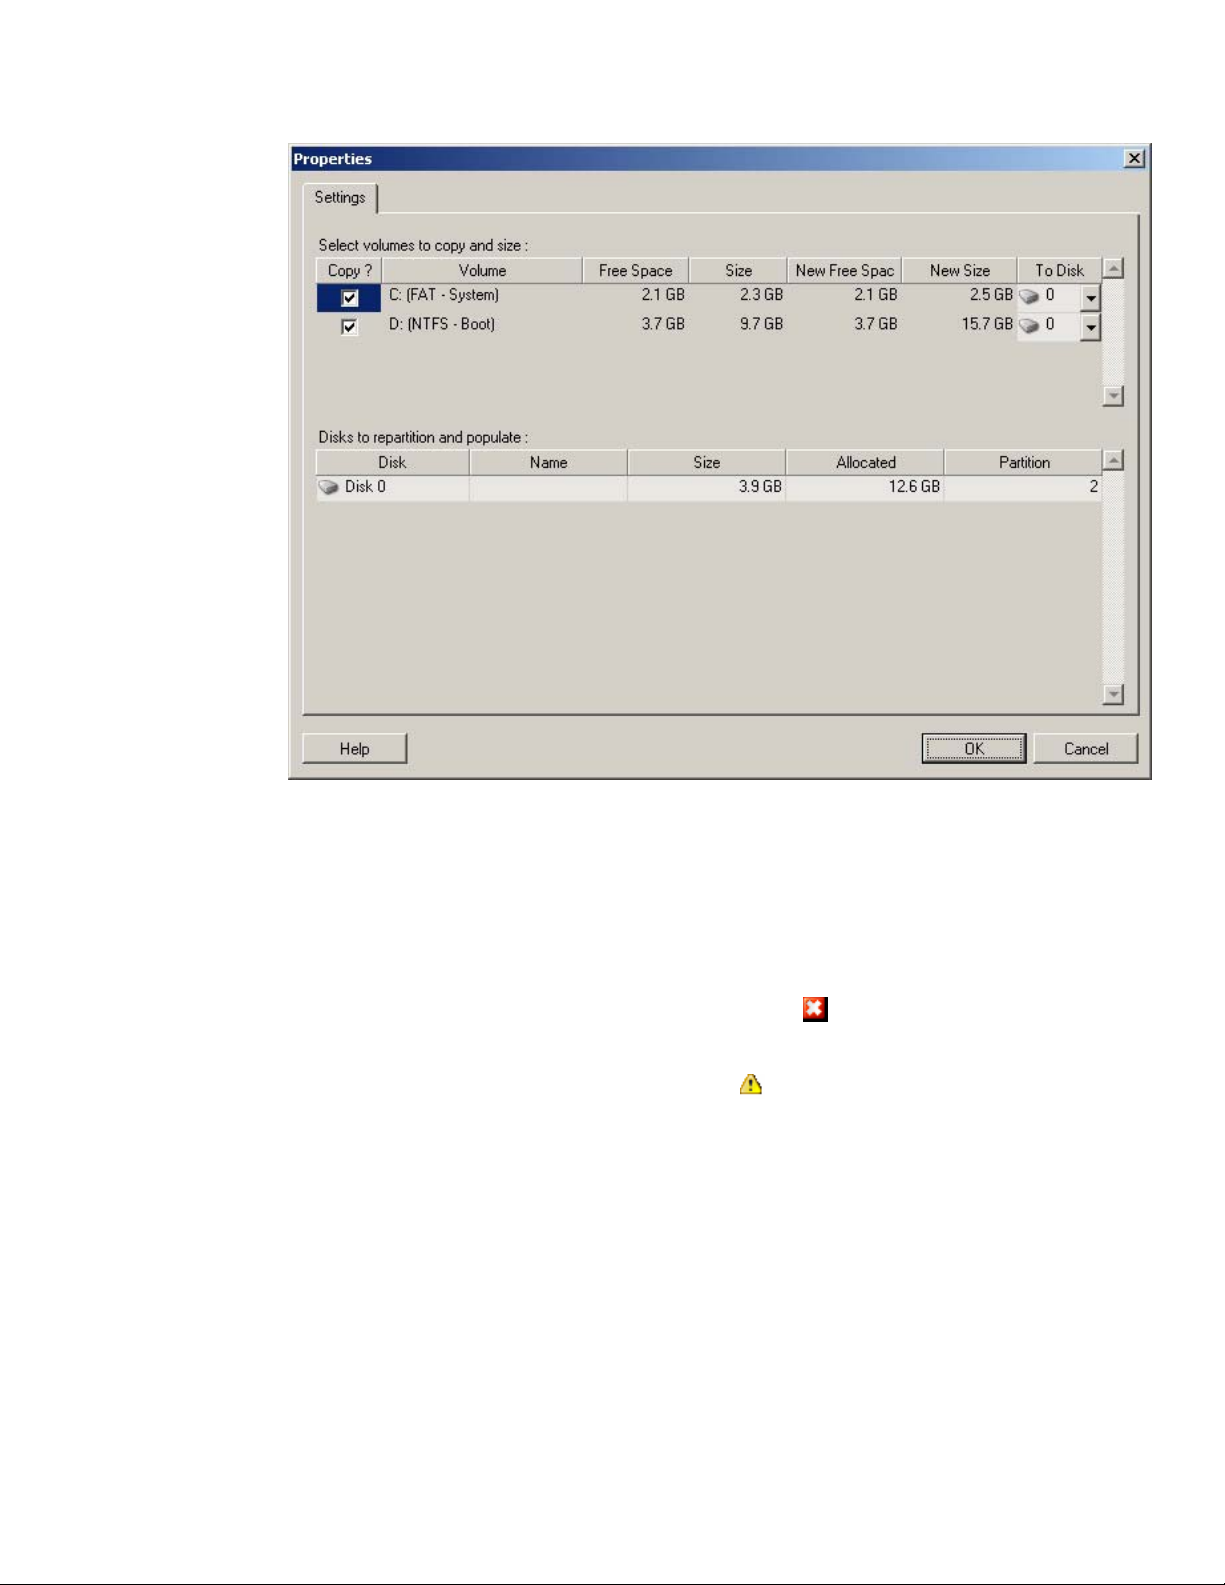
COPY – Select the volumes to be copied during the conversion
NEW FREE SPACE – To resize the volume during the
conversion, enter the desired amount of free space (Will
automatically adjust NEW SIZE)
NEW SIZE – To resize the volume during the conversion, enter
the desired size (Will automatically adjust NEW FREE SPACE)
TO DISK – Select which hard drive the volume will be copied to
on the physical target server
4. Review the conversion job for any errors – marked by
. Error markers
show what needs to be resolved before the conversion job can start. Position
the mouse cursor over the error markers for detailed information.
5. Review the order for any warnings – marked by
. Warning markers show
configurations options which should be confirmed prior to starting the
conversion. Position the mouse cursor over the warning markers for detailed
information.
6. Click Start to schedule the conversion job.
PlateSpin PowerConvert User Guide - 34 –
Copyright 2005
Page 35
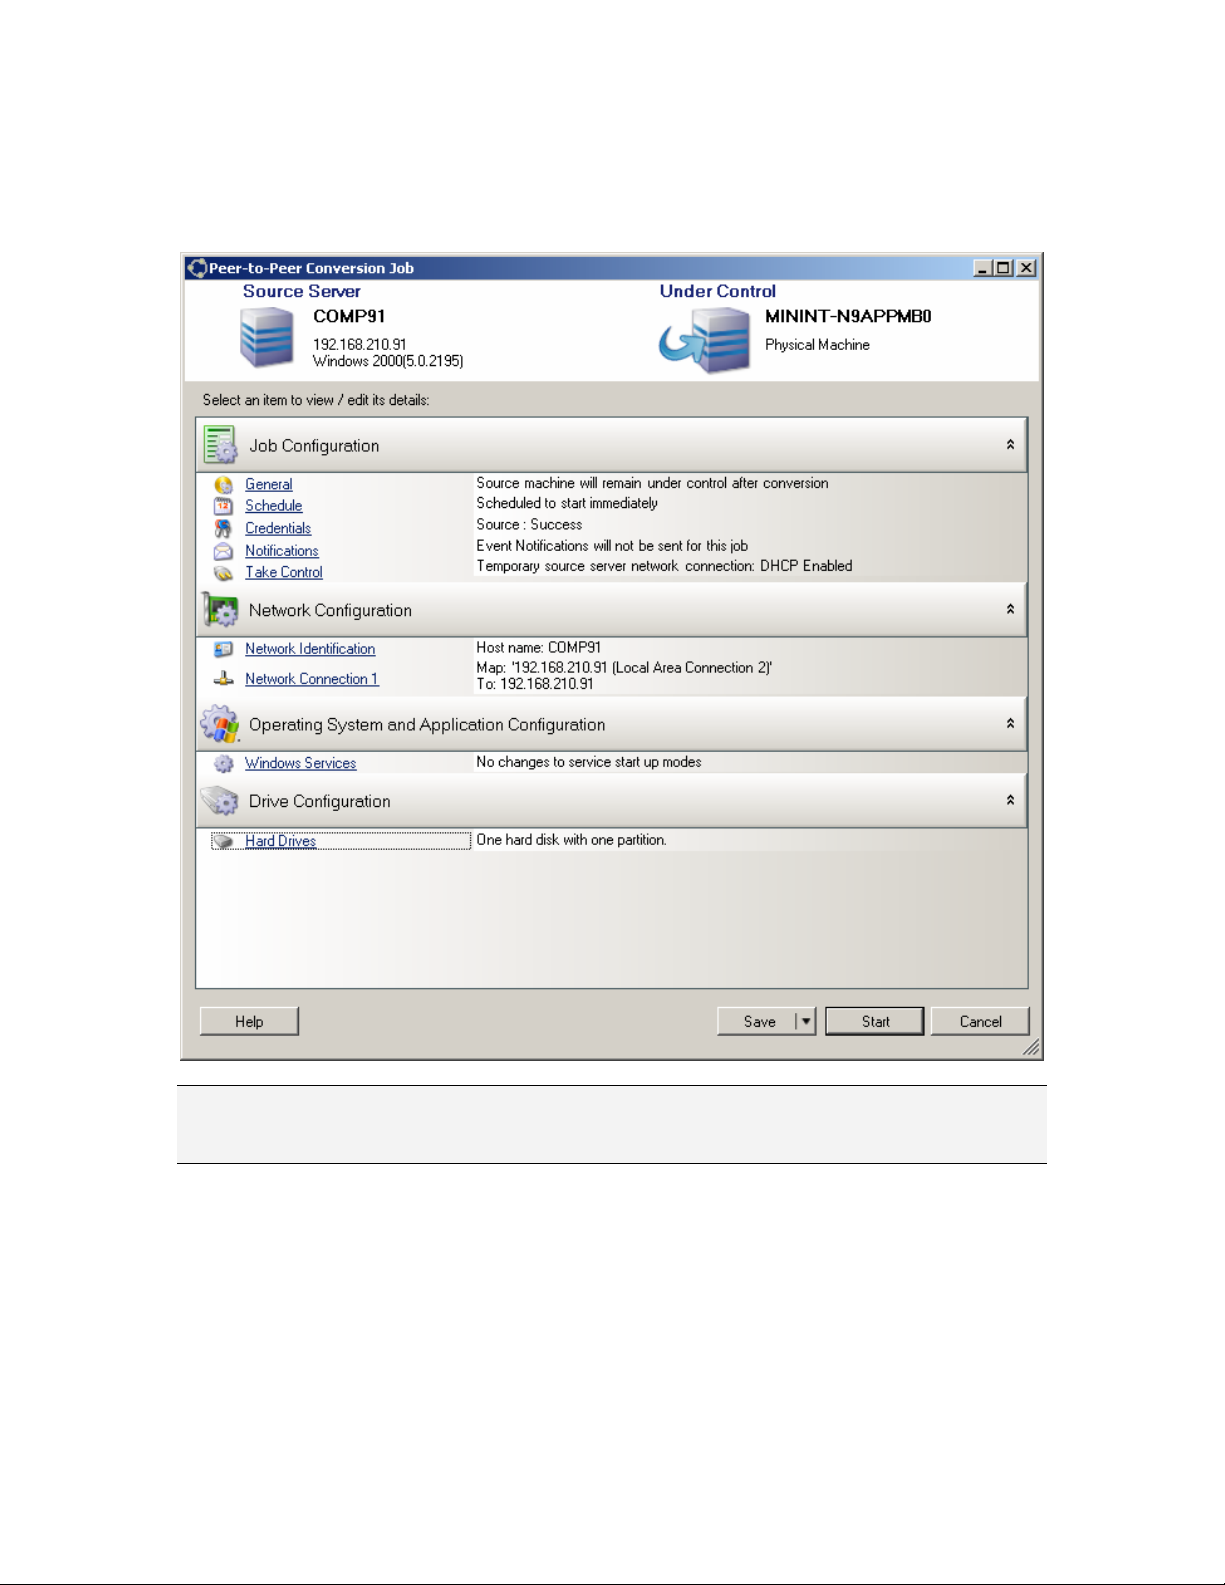
Converting to Physical Servers
The configuration screen provides customizable parameters for the conversion job.
PlateSpin PowerConvert contains hardware support for most common datacenter
hardware. Please see APPENDIX A for information on adding drivers for target
physical servers.
Simply drag-and-drop the discovered source server to the discovered physical target
server to configure the conversion job
1. Set the Job Configuration options to specify settings for use during the
conversion job
PlateSpin PowerConvert User Guide - 35 –
Copyright 2005
Page 36
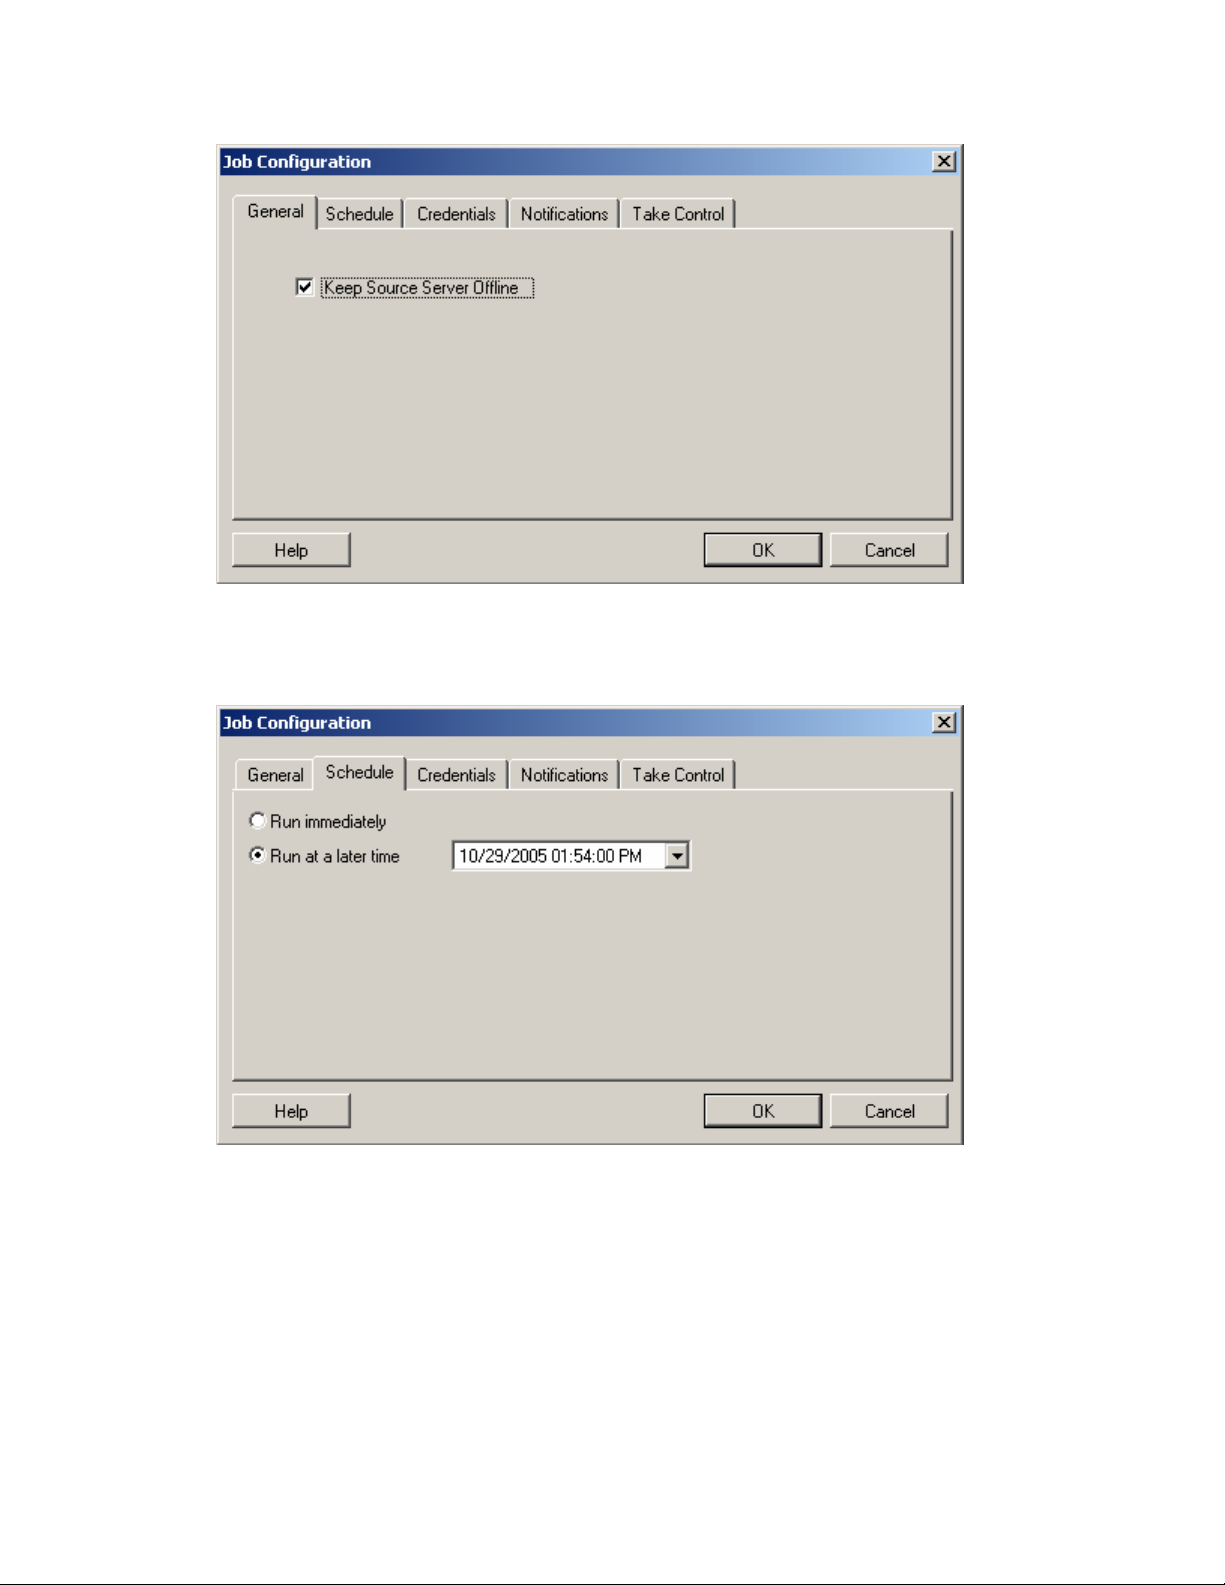
KEEP SOURCE SERVER OFFLINE – Enabling this option keeps the source
server offline to guarantee no hostname or IP address conflicts after the
conversion has completed
RUN IMMEDIATELY – Select to start the conversion job when executed
RUN AT A LATER TIME – Enable to select a specific date and time for the
conversion to run
PlateSpin PowerConvert User Guide - 36 –
Copyright 2005
Page 37
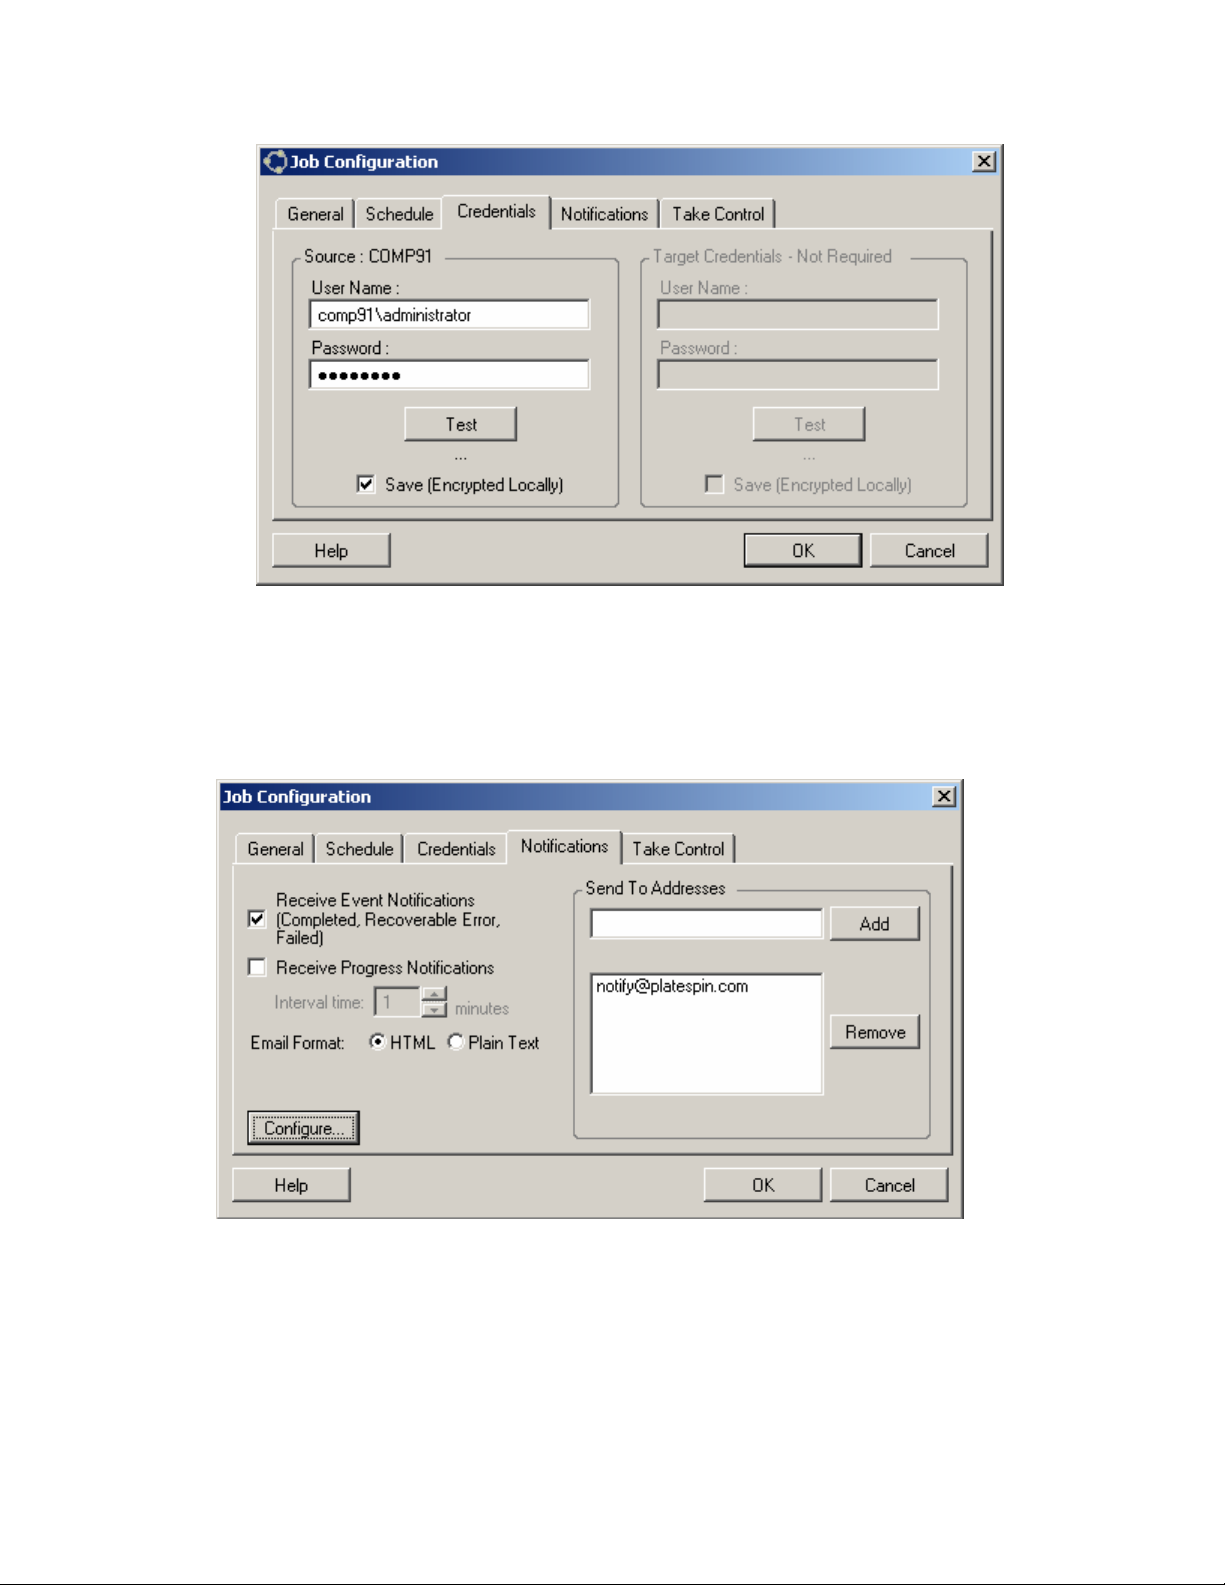
USER NAME – Enter valid administrator credentials for the source server
PASSWORD – Enter a valid password for the administrator account
TEST – Click this button to test the entered credentials
SAVE (ENCRYPTED LOCALLY) – Enable to save the entered credentials for
use during future conversions
RECEIVE EVENT NOTIFICATIONS – Enable to be sent e-mail notifications
when the job enters a completed, recoverable error or failed state
RECEIVE PROGRESS NOTIFICATIONS – Enable to be sent regular e-mail
notifications for a specified interval of time
INTERVAL TIME – Enter the time in minutes for e-mail notifications to be
sent
E-MAIL FORMAT– Select to receive e-mail notifications in HTML or plain text
format
PlateSpin PowerConvert User Guide - 37 –
Copyright 2005
Page 38
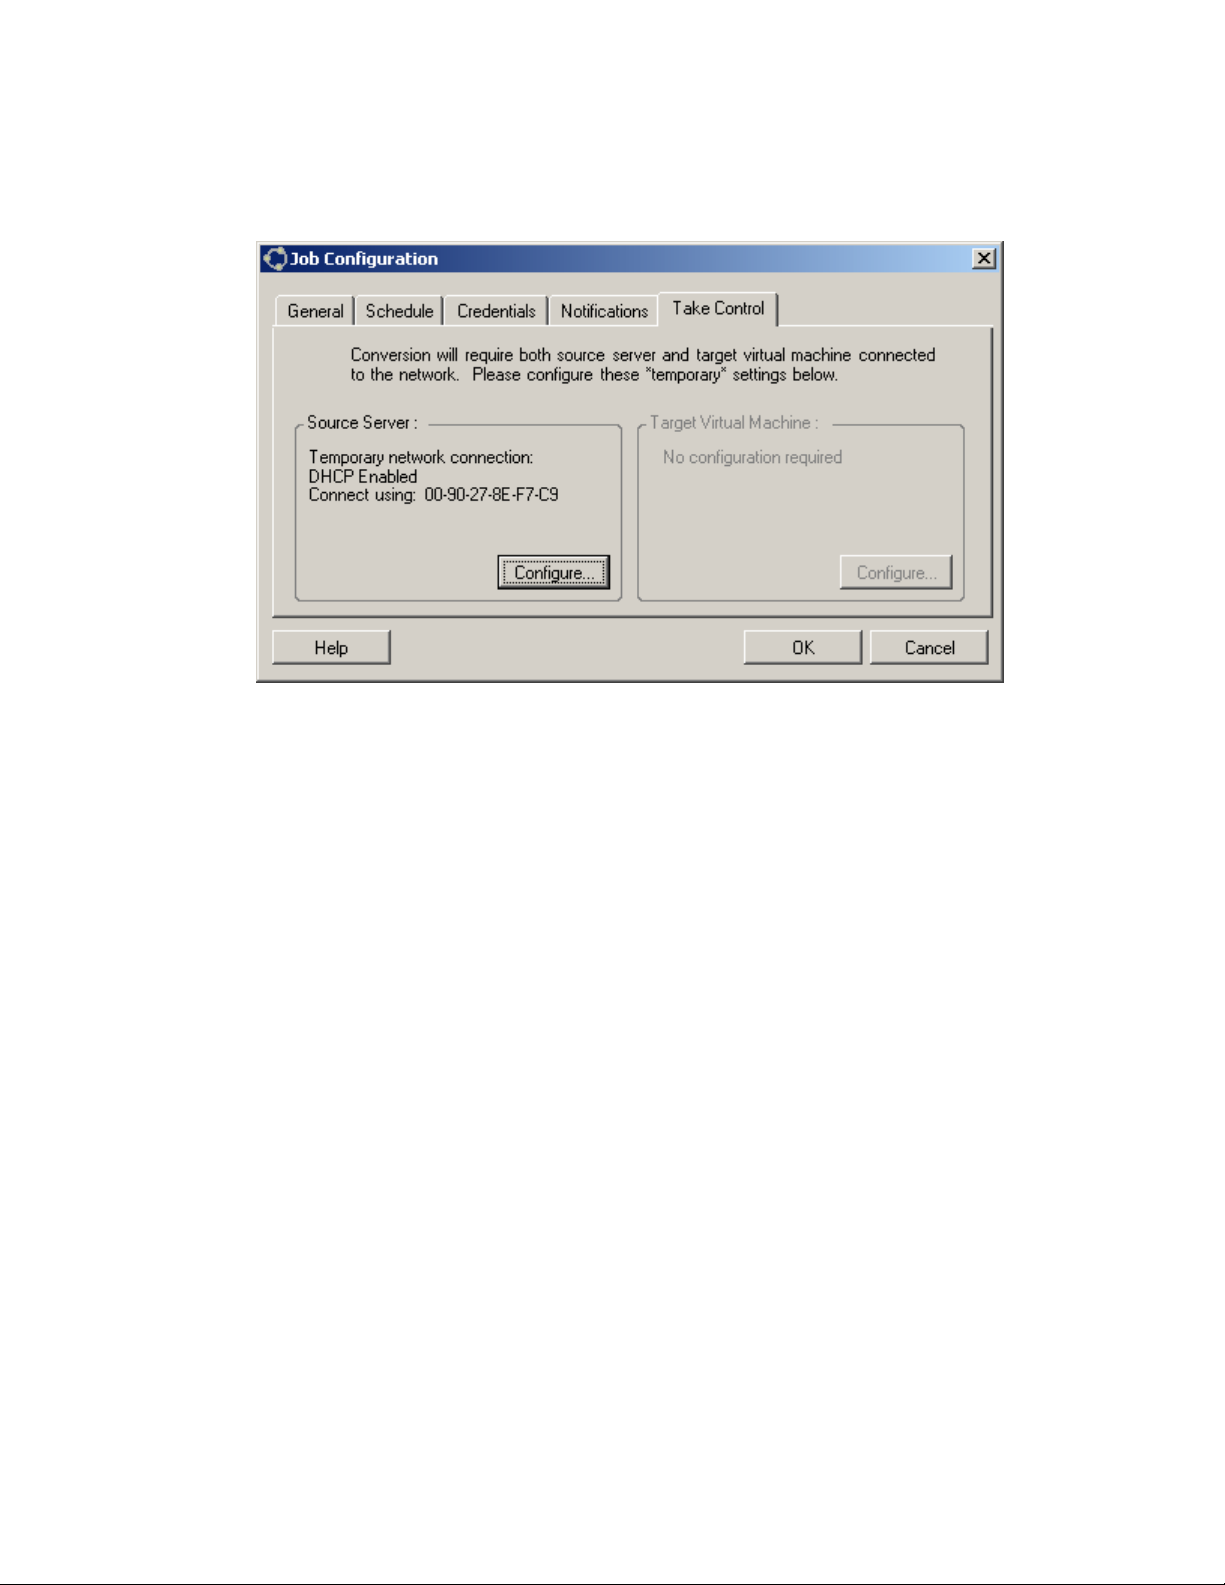
SEND TO ADDRESSES – Use the ADD and REMOVE buttons to build a list of
e-mail address which will receive the notifications.
CONFIGURE – Click this button to configure TCP/IP settings for use during
the conversion process on both the source server and target virtual machine
2. A conversion job is auto configured so the created target server will be
created with the same settings as the original source. The network
configuration can be modified to meet the requirements for the converted
server
a. Modify the Network Identification settings to configure the host name
and domain/workgroup registration of the created target server
PlateSpin PowerConvert User Guide - 38 –
Copyright 2005
Page 39
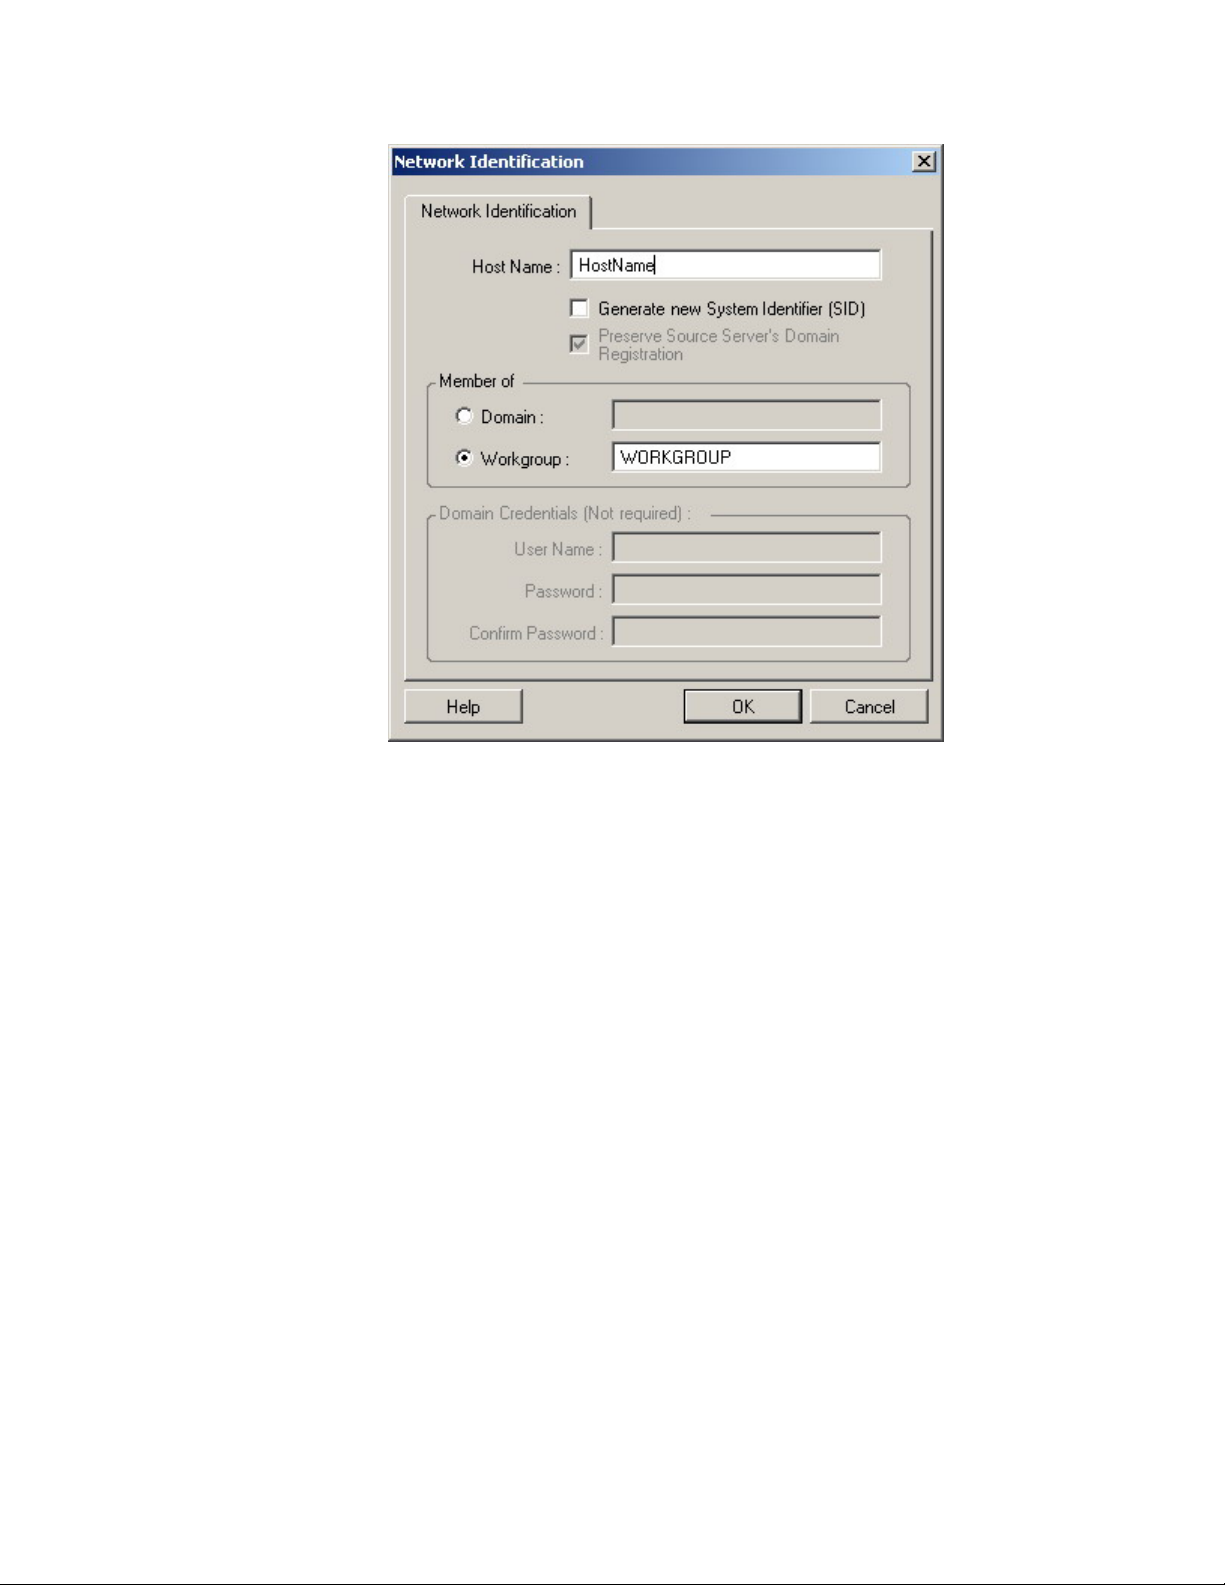
HOST NAME – Enter the desired host name for the target
server
GENERATE NEW SYSTEM IDENTIFER (SID) – Enable this
option for the create target server to be assigned a new SID
during the conversion
DOMAIN / WORKGROUP - Enter the domain or workgroup
the target server will be part of
DOMAIN CREDENTIALS – If the target server will be part of a
domain, enter valid credentials which have permission to add
machines to the domain
b. Modify the Network Connection settings to configure the TCP/IP
properties for the network adapters on the created target server
PlateSpin PowerConvert User Guide - 39 –
Copyright 2005
Page 40
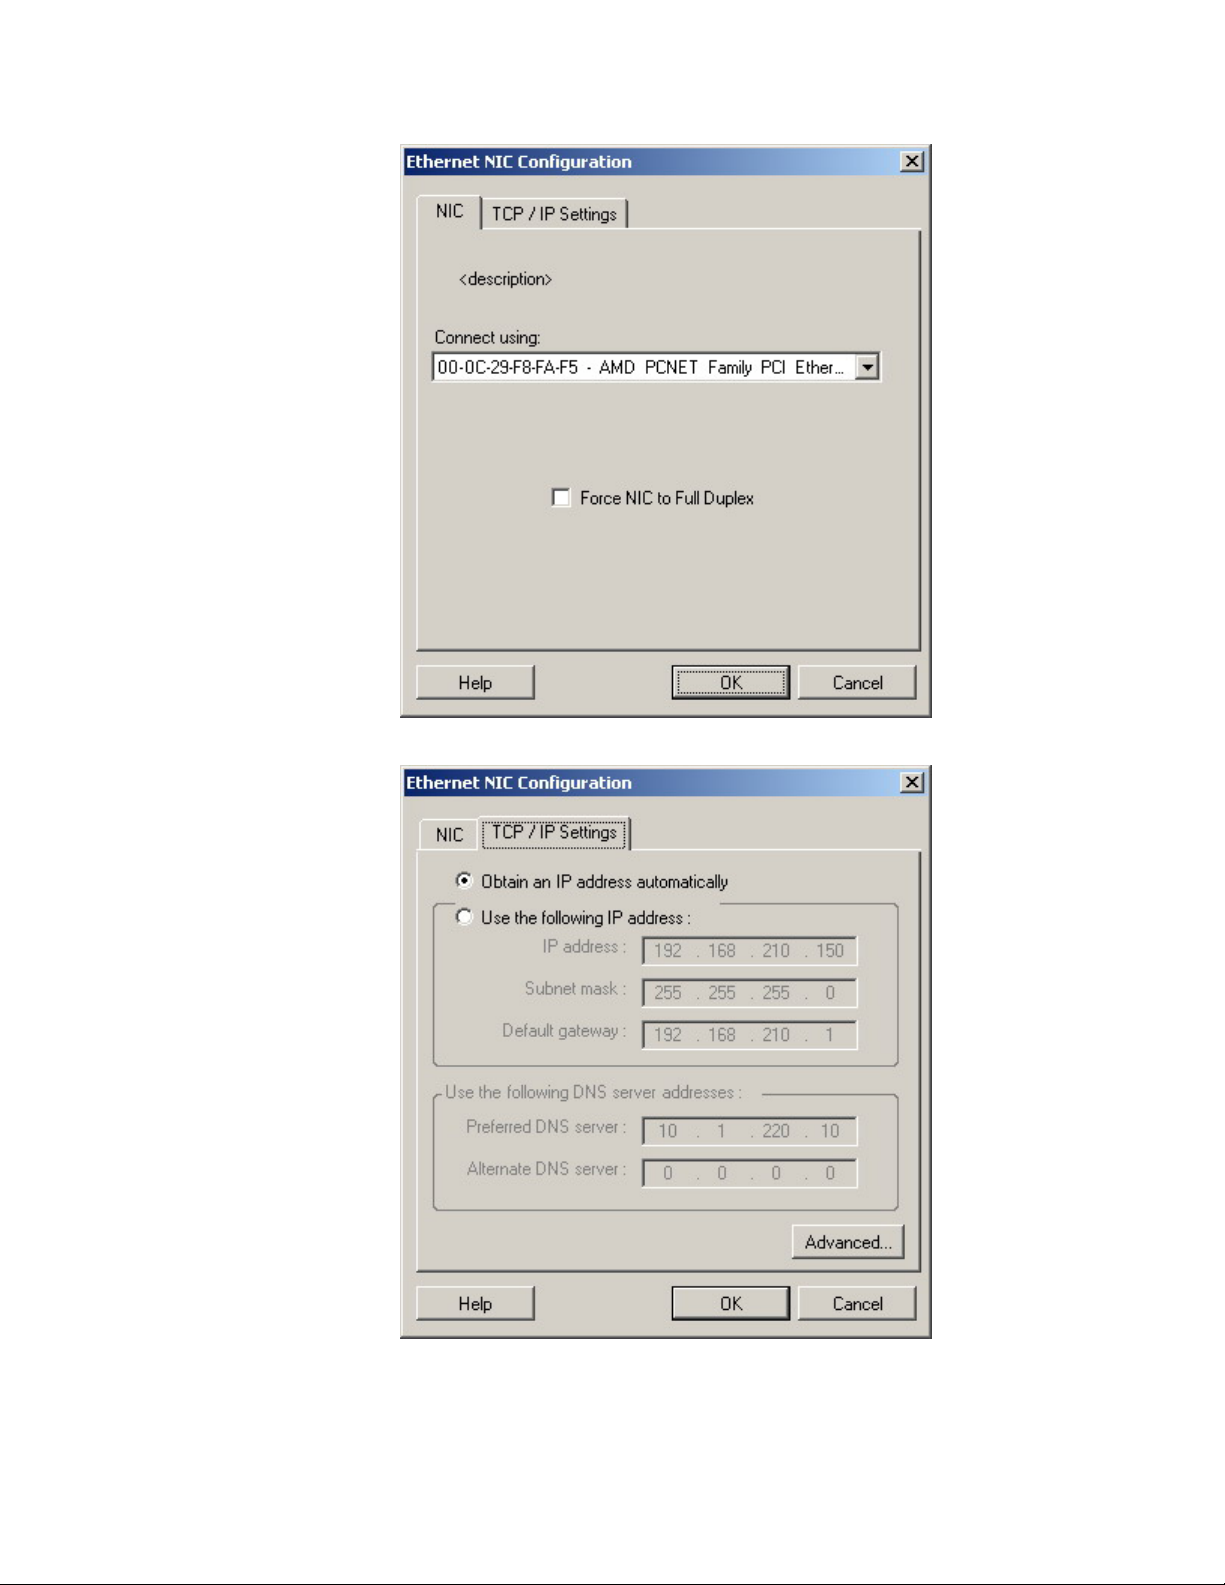
CONNECT USING – Select the network adapter of the physical
source server to use for this connection
OBTAIN AN IP ADDRESS AUTOMATICALLY – Select this
option to use DHCP for this connection
USE THE FOLLOWING IP ADDRESS – Select this option to
assign a static IP address for this connection
PlateSpin PowerConvert User Guide - 40 –
Copyright 2005
Page 41
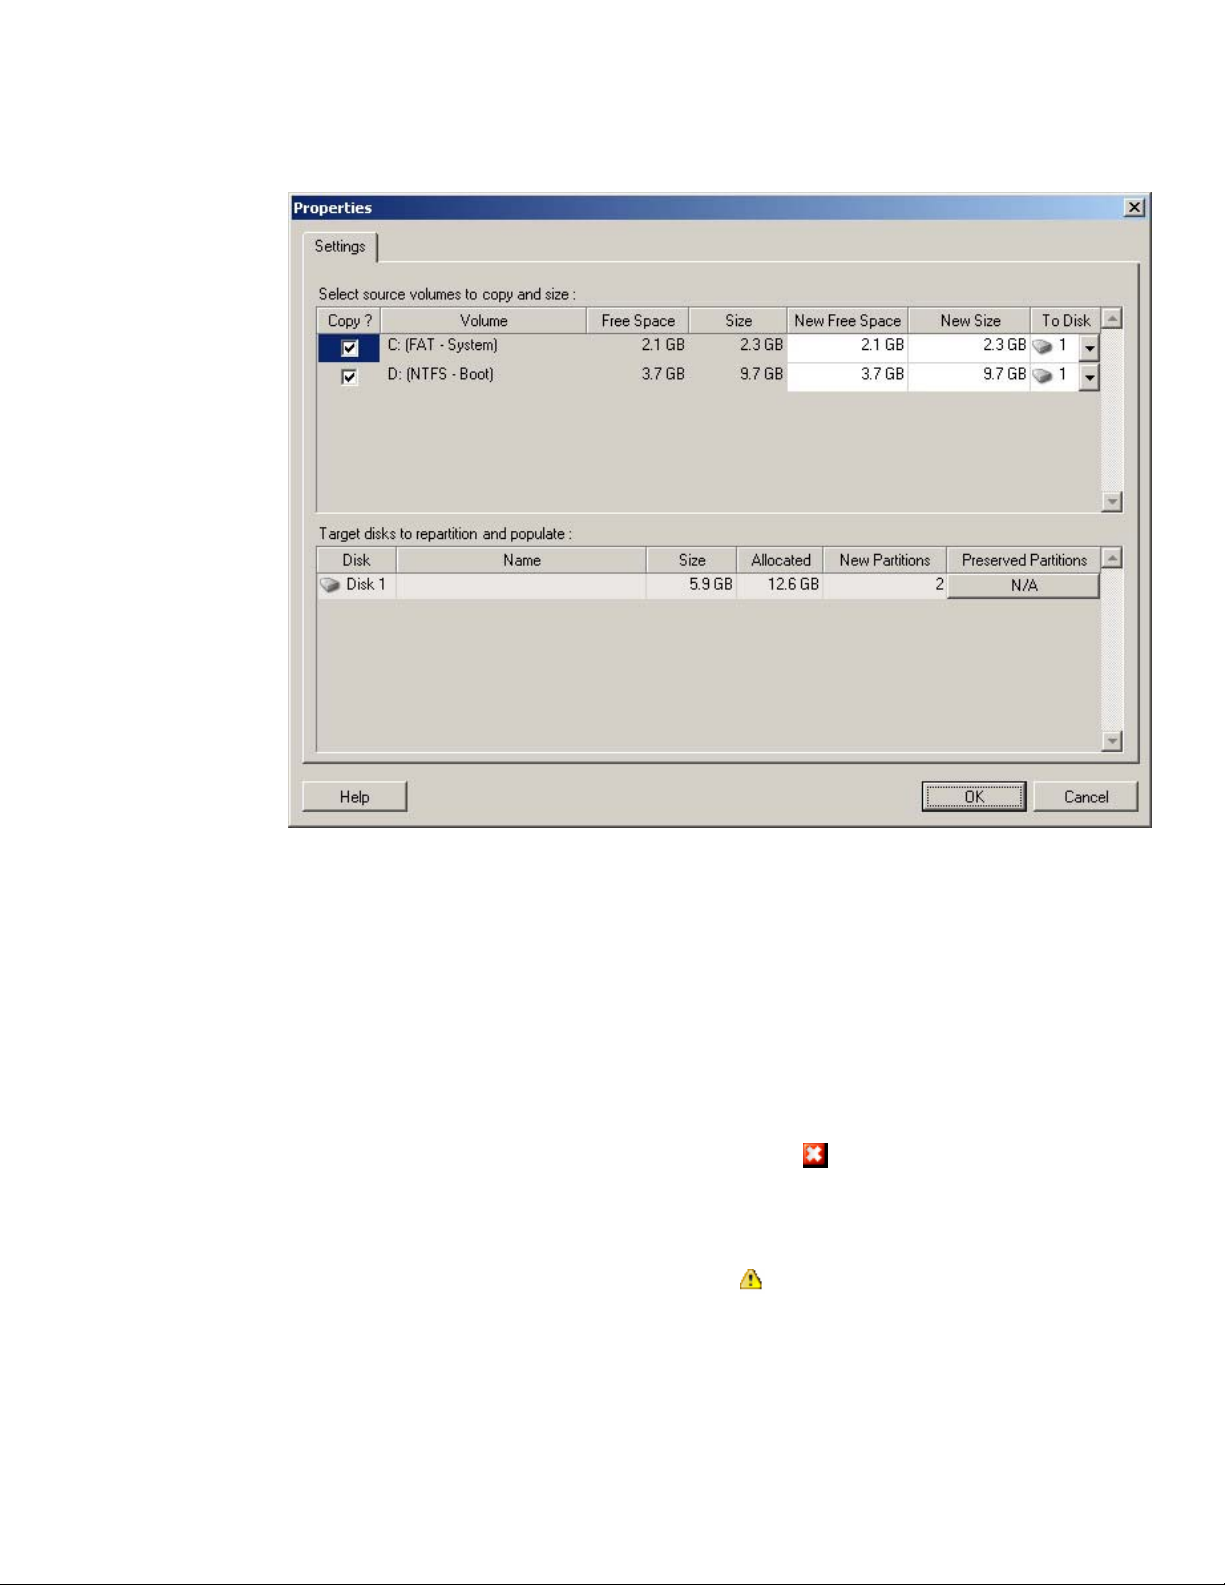
c. Modify the Drive Configuration settings to select the volumes to copy
during the conversion.
COPY – Select the volumes to be copied during the conversion
NEW FREE SPACE – To resize the volume during the
conversion, enter the desired amount of free space (Will
automatically adjust NEW SIZE)
NEW SIZE – To resize the volume during the conversion, enter
the desired size (Will automatically adjust NEW FREE SPACE)
TO DISK – Select which hard drive the volume will be copied to
on the physical target server
PRESERVED PARTITIONS –Click this column to determine if
an existing vendor partition should remain intact during the
conversion. Deselecting the partition will permanently remove
it from the server.
3. Review the conversion job for any errors – marked by
. Error markers
show what needs to be resolved before the conversion job can start. Position
the mouse cursor over the error markers for detailed information.
4. Review the order for any warnings – marked by
. Warning markers show
configurations options which should be confirmed prior to starting the
conversion. Position the mouse cursor over the warning markers for detailed
information.
5. Click Start to schedule the conversion job.
PlateSpin PowerConvert User Guide - 41 –
Copyright 2005
Page 42

PlateSpin Flexible Image Jobs
PlateSpin Flexible Images are a powerful tool for provisioning and data recovery
requirements. Data can be captured from a source server and later deployed to
virtual or physical target servers.
A PlateSpin Flexible Image is made up of an XML file containing configuration data
from the source machine being imaged, along with one or more sets of volume data.
PlateSpin PowerConvert supports multiple types of volume data as part of a
PlateSpin Flexible Image: PlateSpin package, Acronis True Image, Symantec
LiveState and raw volume data.
Using a PlateSpin Flexible Image is as simple as capturing the source data and
importing it to a PlateSpin Image Server.
Like peer to peer conversions, image deployment allows for multiple configurable
options based on the target platform.
Virtual
Targets
RAM Assignment X
Disk layout X X
Volume selection X X
Volume Resizing X X
Number of processors X
Host name X X
TCP/IP Settings X X
SID Generation X X
Domain/Workgroup
Joining
X X
Physical
Targets
PlateSpin PowerConvert User Guide - 42 –
Copyright 2005
Page 43
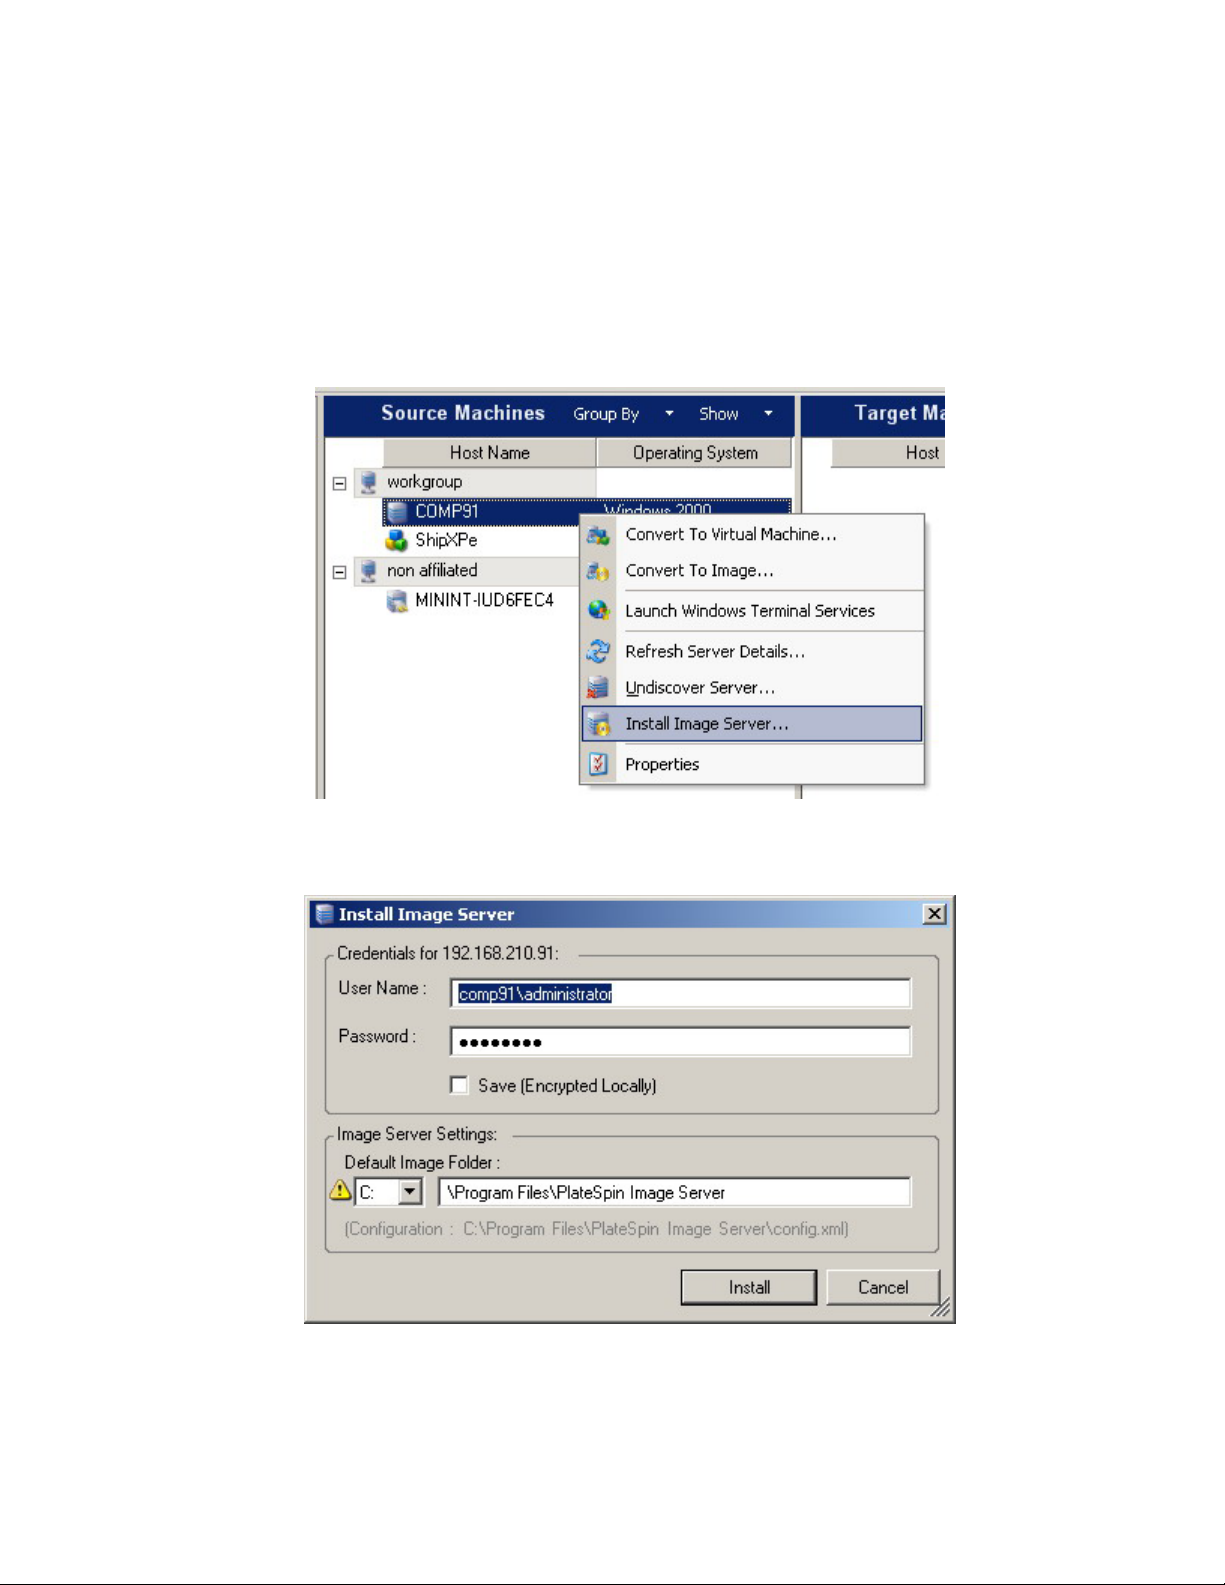
Creating a PlateSpin Image Server
Follow these steps to create a PlateSpin Image Server from the PowerConvert client:
1. Perform a server discovery for the system which will host the PlateSpin Image
Server
2. In the source server pane of the PowerConvert Client, right click the
discovered server and select Install PlateSpin Image Server
3. Enter administrator credentials for the selected server, along with the desired
directory for the PlateSpin Image Server installation
4. PowerConvert will now push a PlateSpin Controller to the server and configure
it to run a PlateSpin Image Server
PlateSpin PowerConvert User Guide - 43 –
Copyright 2005
Page 44
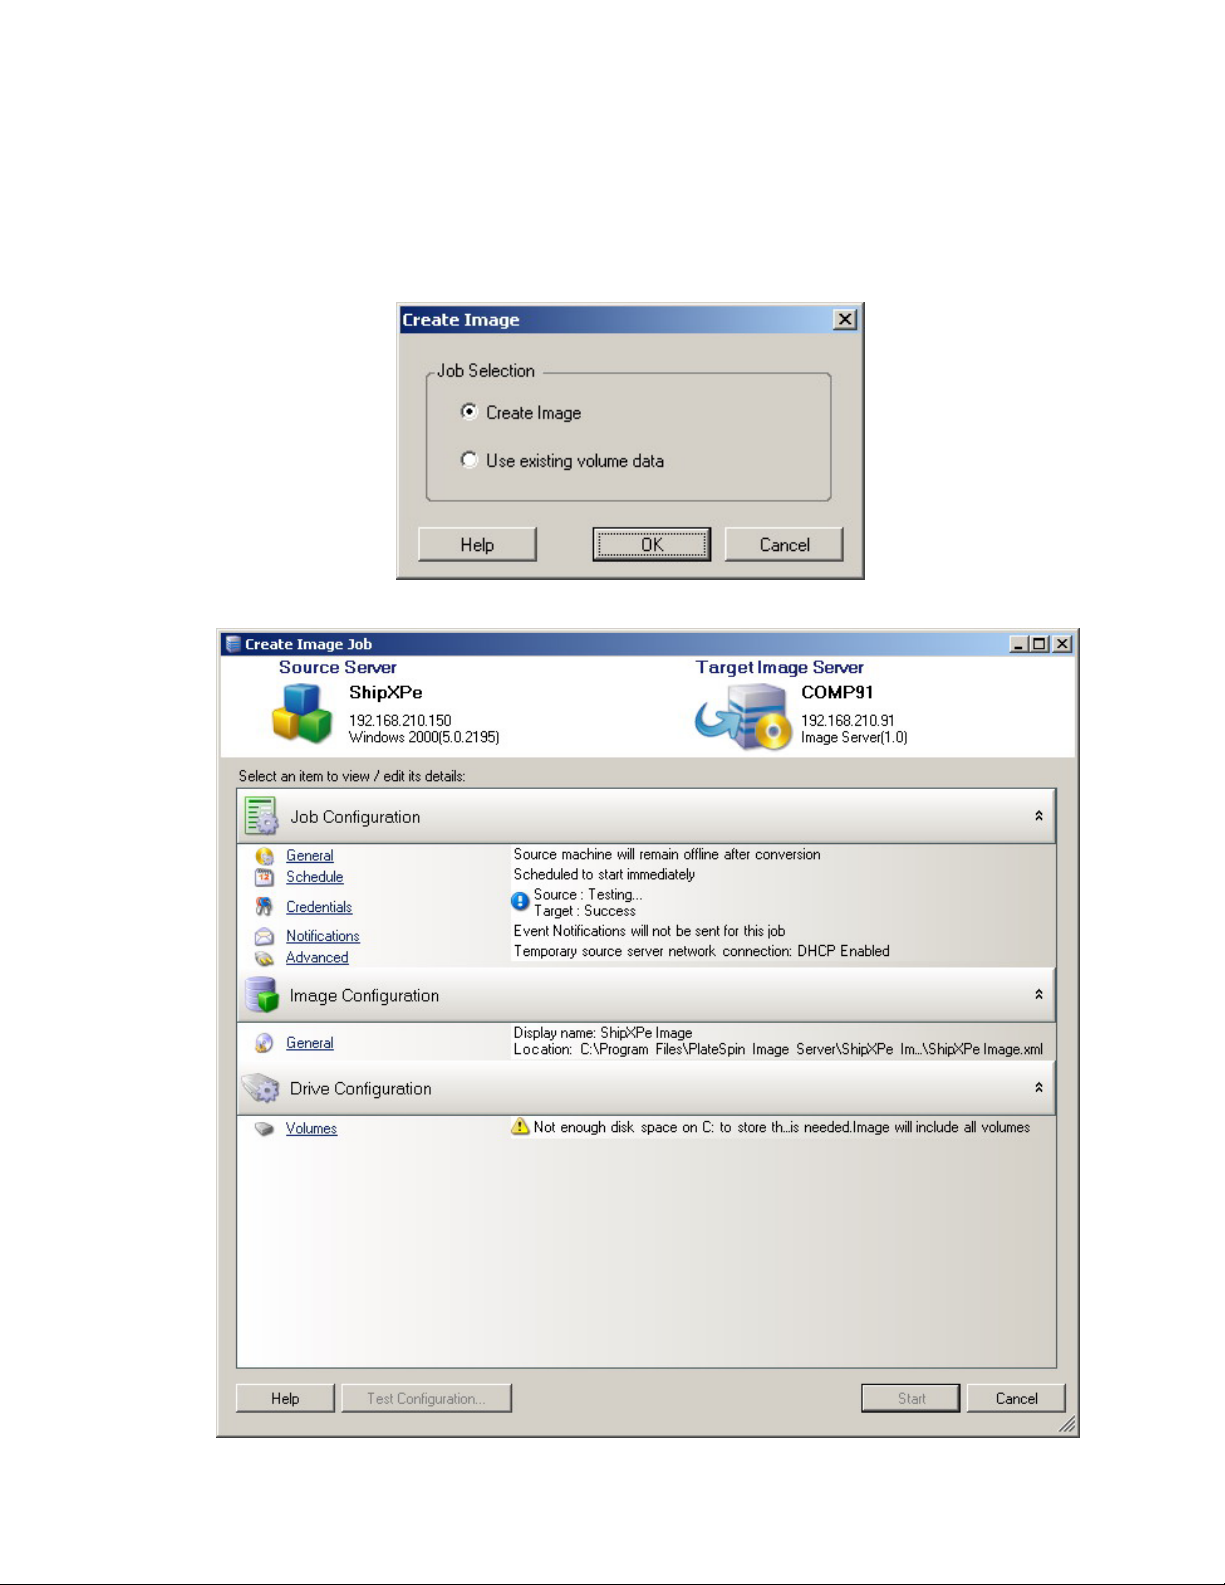
Capturing a PlateSpin Flexible Image
1. Using the PowerConvert Client, drag-and-drop the source server to the
PlateSpin Image Server
2. Select ‘Create Image’
3. The job configuration window will appear
PlateSpin PowerConvert User Guide - 44 –
Copyright 2005
Page 45
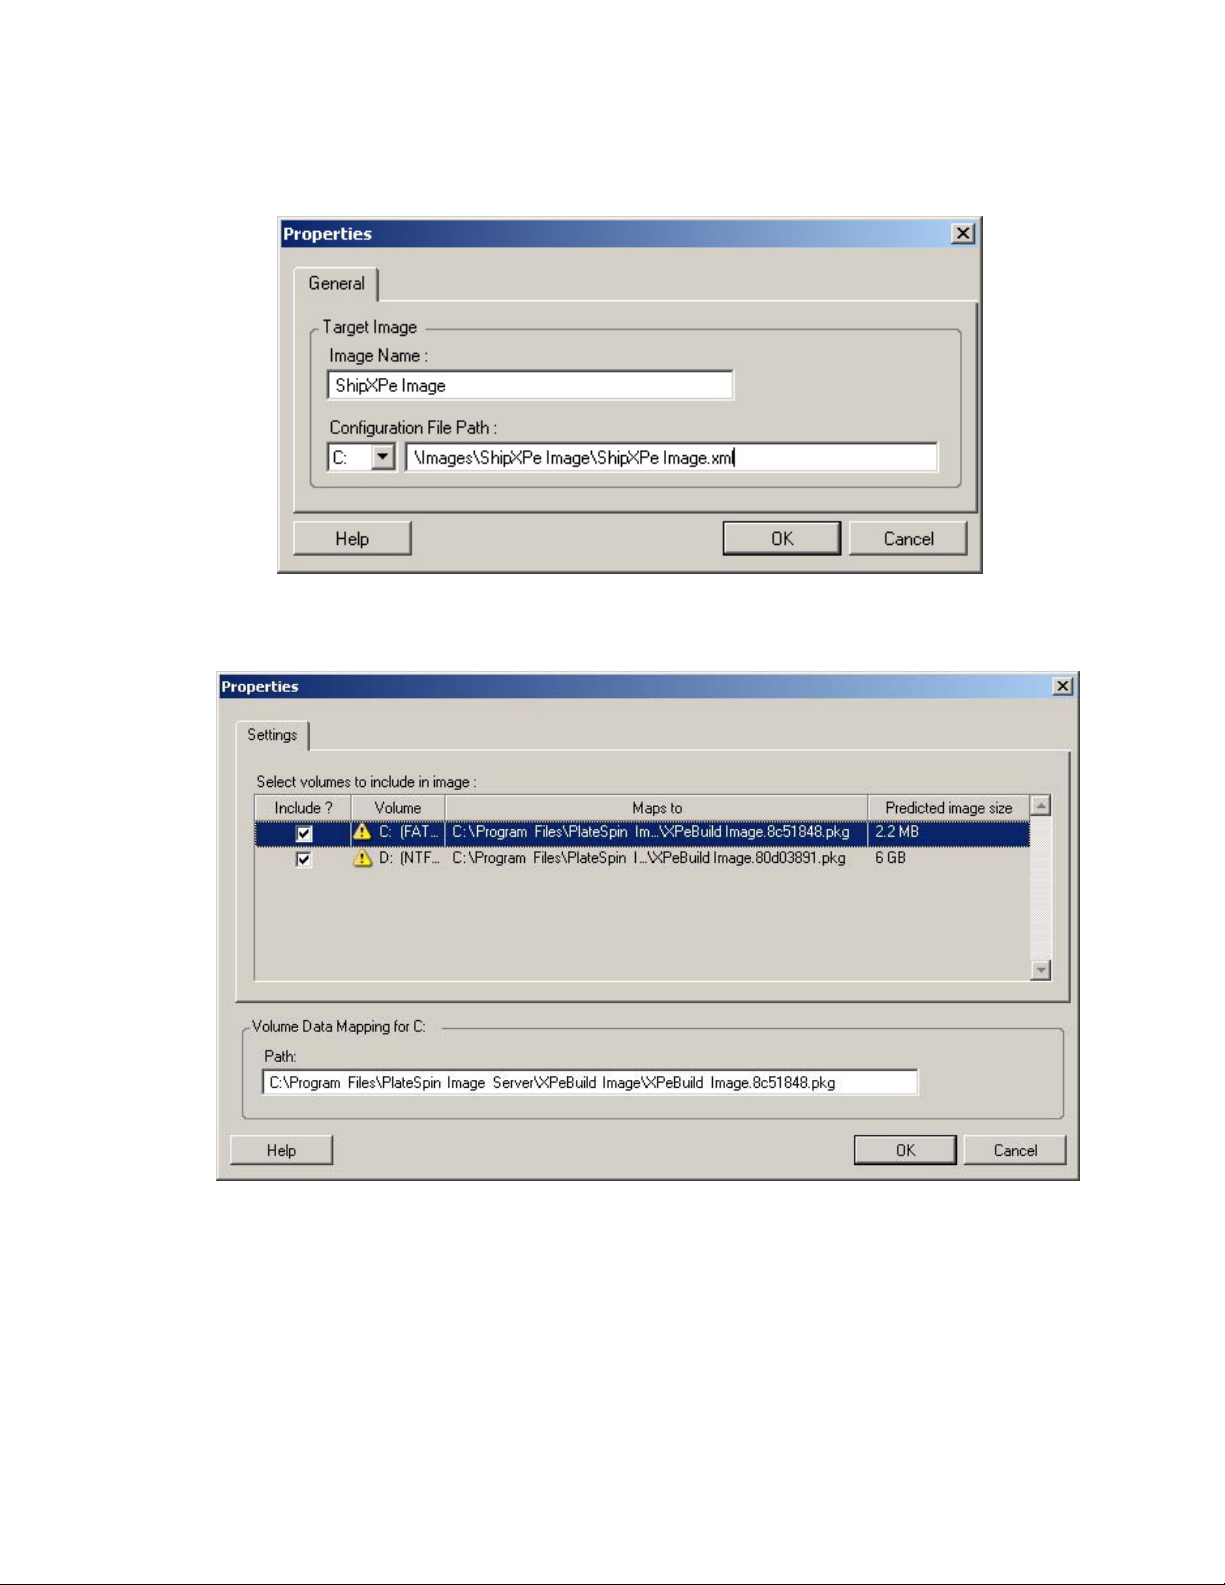
4. Edit the Image Configuration properties to set the image name and choose
the path where the image will be stored
5. Edit the Drive Configuration settings to select which volumes will be included
in the image
6. Edit the Job Configuration settings as desired to control how the image
creation job will run
7. Click START to begin the image capture
PlateSpin PowerConvert User Guide - 45 –
Copyright 2005
Page 46
Creating Images Using Existing Volume Data
PowerConvert can use existing images created with Acronis True Image or Symantec
LiveState as volume data for a PlateSpin Image. Acronis True Image or Symantec
LiveState must be installed on the PlateSpin Image Server to use this functionality.
Importing Images from Acronis True Image and Symantec LiveState
1. Using the PowerConvert Client, discover the source server for which
corresponds to the existing Acronis True Image or Symantec LiveState image
2. Drag and drop the source server to the target PlateSpin Image Server
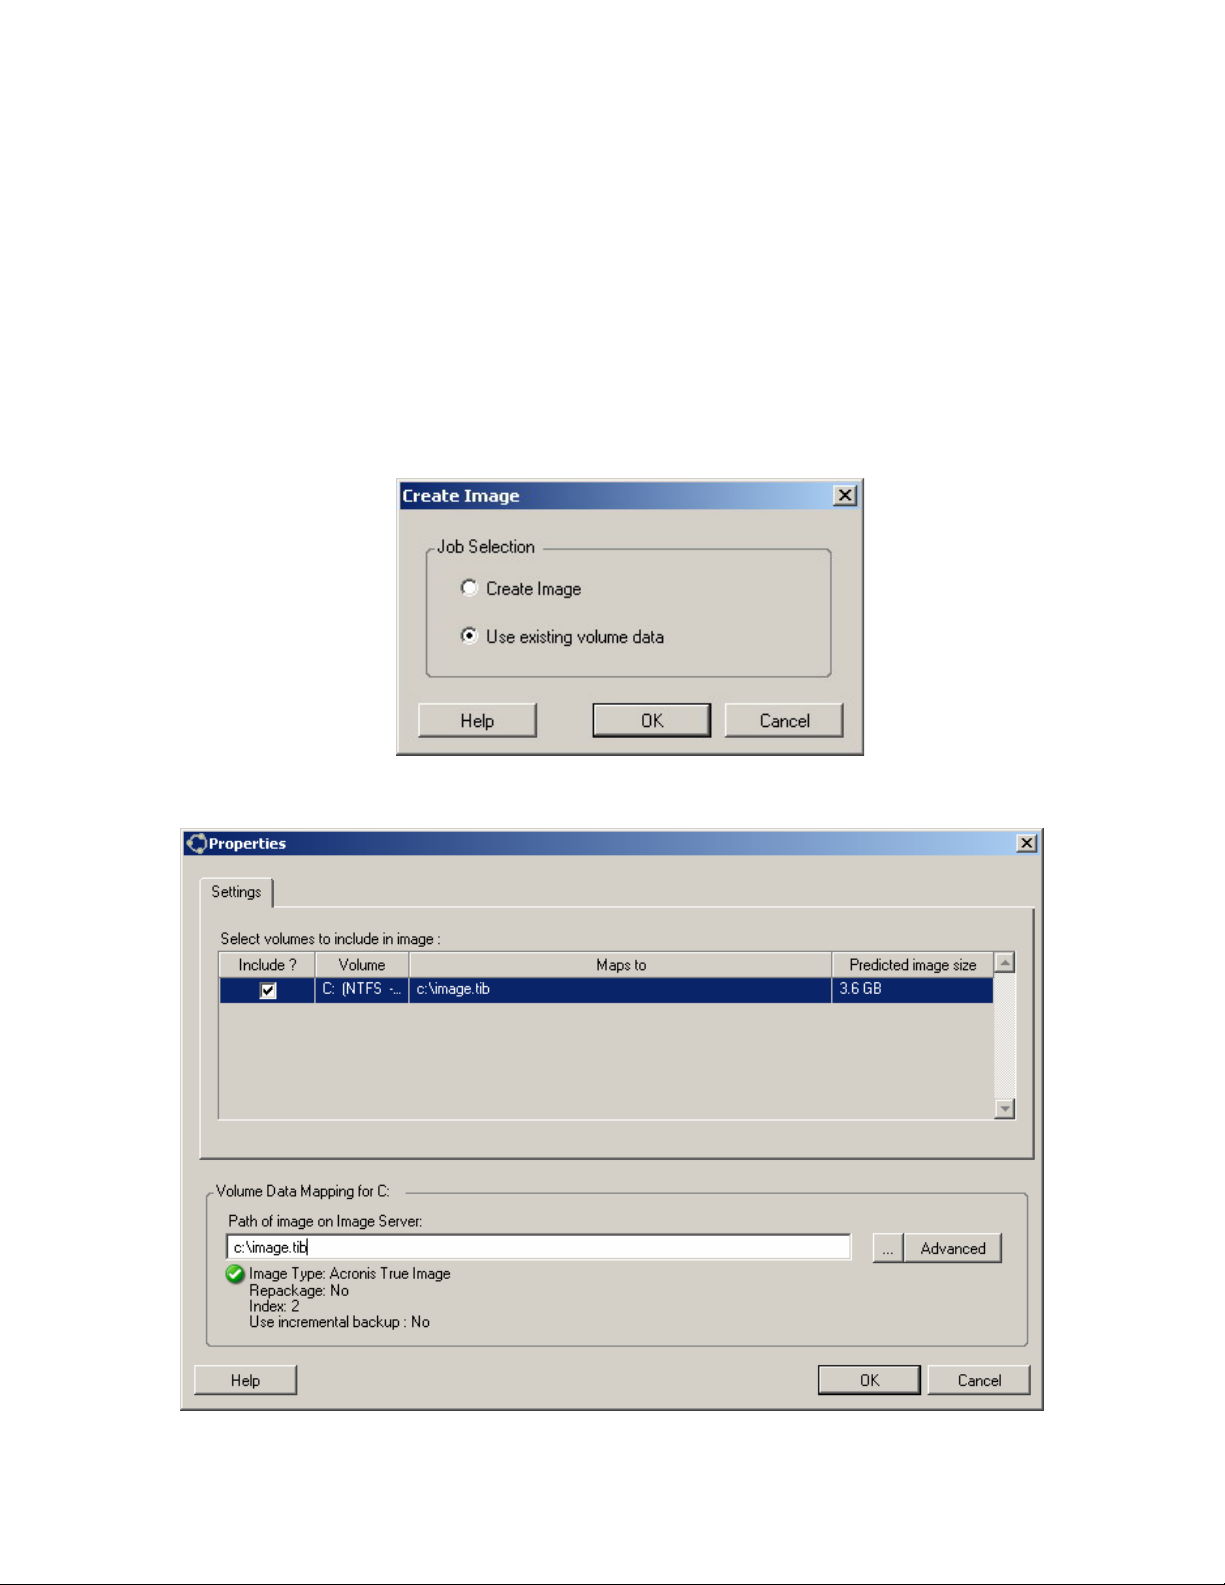
3. Select ‘Use Existing Volume Data’
4. Open the ‘Volumes’ configuration screen to select the image(s)
PlateSpin PowerConvert User Guide - 46 –
Copyright 2005
Page 47
5. Highlight each volume and enter the full path of the image, located on the
local HD of the image server, in the text box at the bottom of the window
NOTE: If using an incremental LiveState image, the .iv2i and .v2i files
must exist in the same directory. Enter the path to the .iv2i file in the
volume configuration for PowerConvert
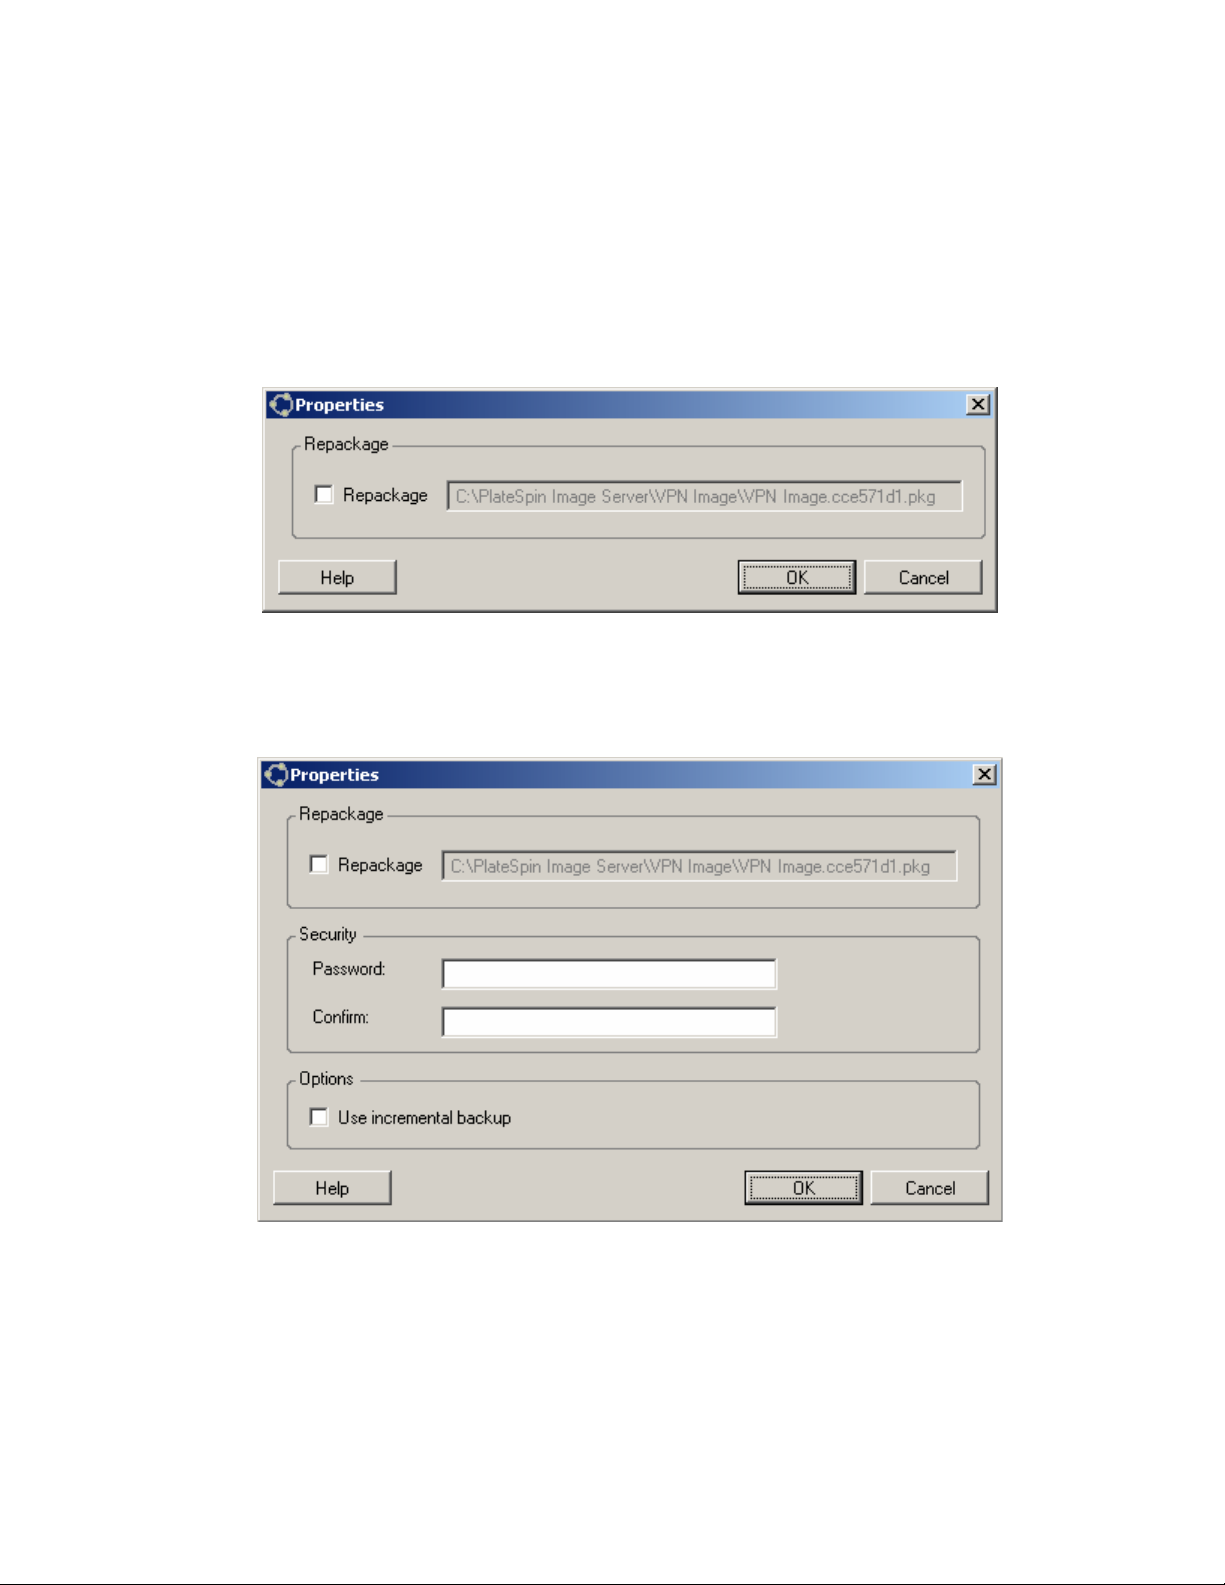
6. For each image, further options can be configured by clicking the ‘Advanced’
button
Raw Volume Data
REPACKAGE – Enable this option to create a PlateSpin Image from the
provided image file
Symantec LiveState
REPACKAGE – Enable this option to create a PlateSpin Image from the
provided image file
SECURITY –If the provided image is password protected, enter the required
password
USE INCREMENTAL BACKUP –Enable if the provided image is part of an
incremental backup set
PlateSpin PowerConvert User Guide - 47 –
Copyright 2005
Page 48
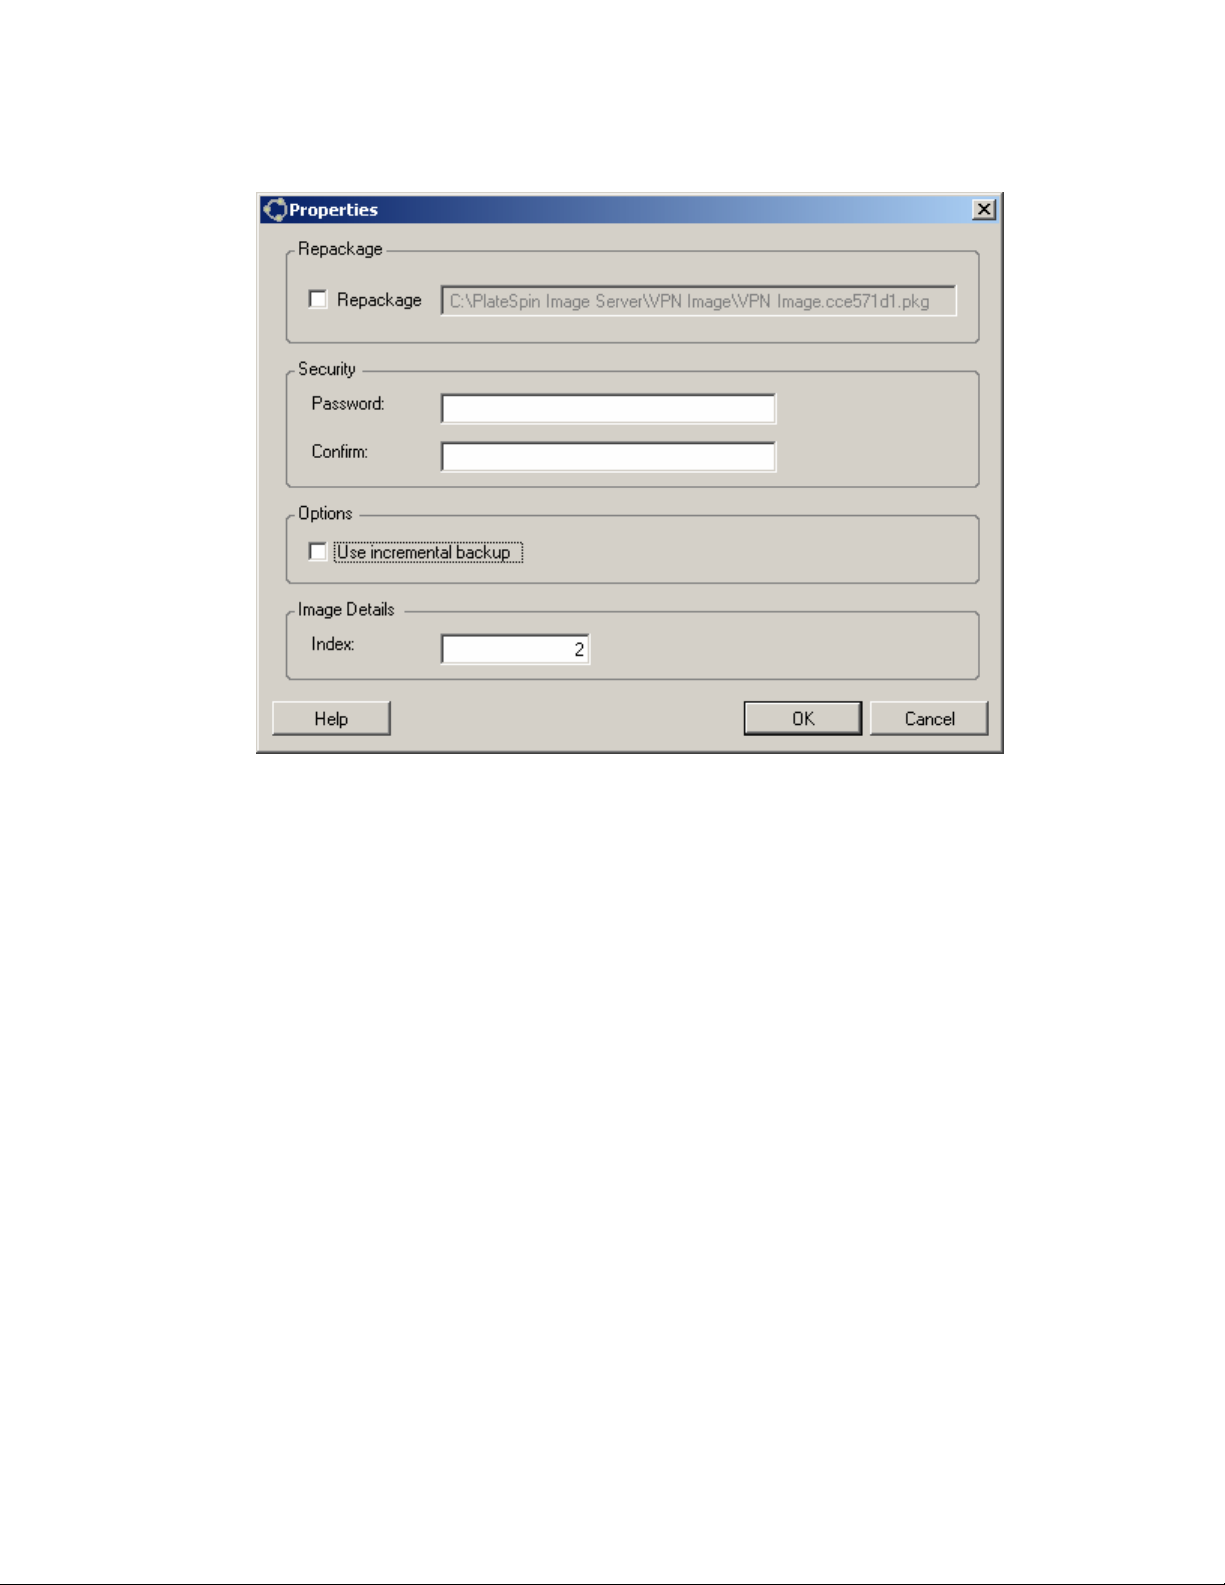
Acronis True Image
REPACKAGE – Enable this option to create a PlateSpin Image from the
provided image file
SECURITY –If the provided image is password protected, enter the required
password
USE INCREMENTAL BACKUP –Enable if the provided image is part of an
incremental backup set
INDEX (Acronis only) – Enter the index number for the volume contained in
the provided image. The following table shows the index numbers for each
volume.
Volume: A B C D E F G H I J K L M
Index: 0 1 2 3 4 5 6 7 8 9 10 11 12
Volume: N O P Q R S T U V W X Y Z
Index: 13 14 15 16 17 18 19 20 21 22 23 24 25
For example, if the image contains data from the E: volume on the source
server, the index should be set to 4.
7. Once suitable images have been provided for each volume to be included,
confirm the settings for the Job Configuration and Image Configuration
sections
8. Click ‘Start’ to begin the image creation process.
PlateSpin PowerConvert User Guide - 48 –
Copyright 2005
Page 49
Using Raw Volume Data
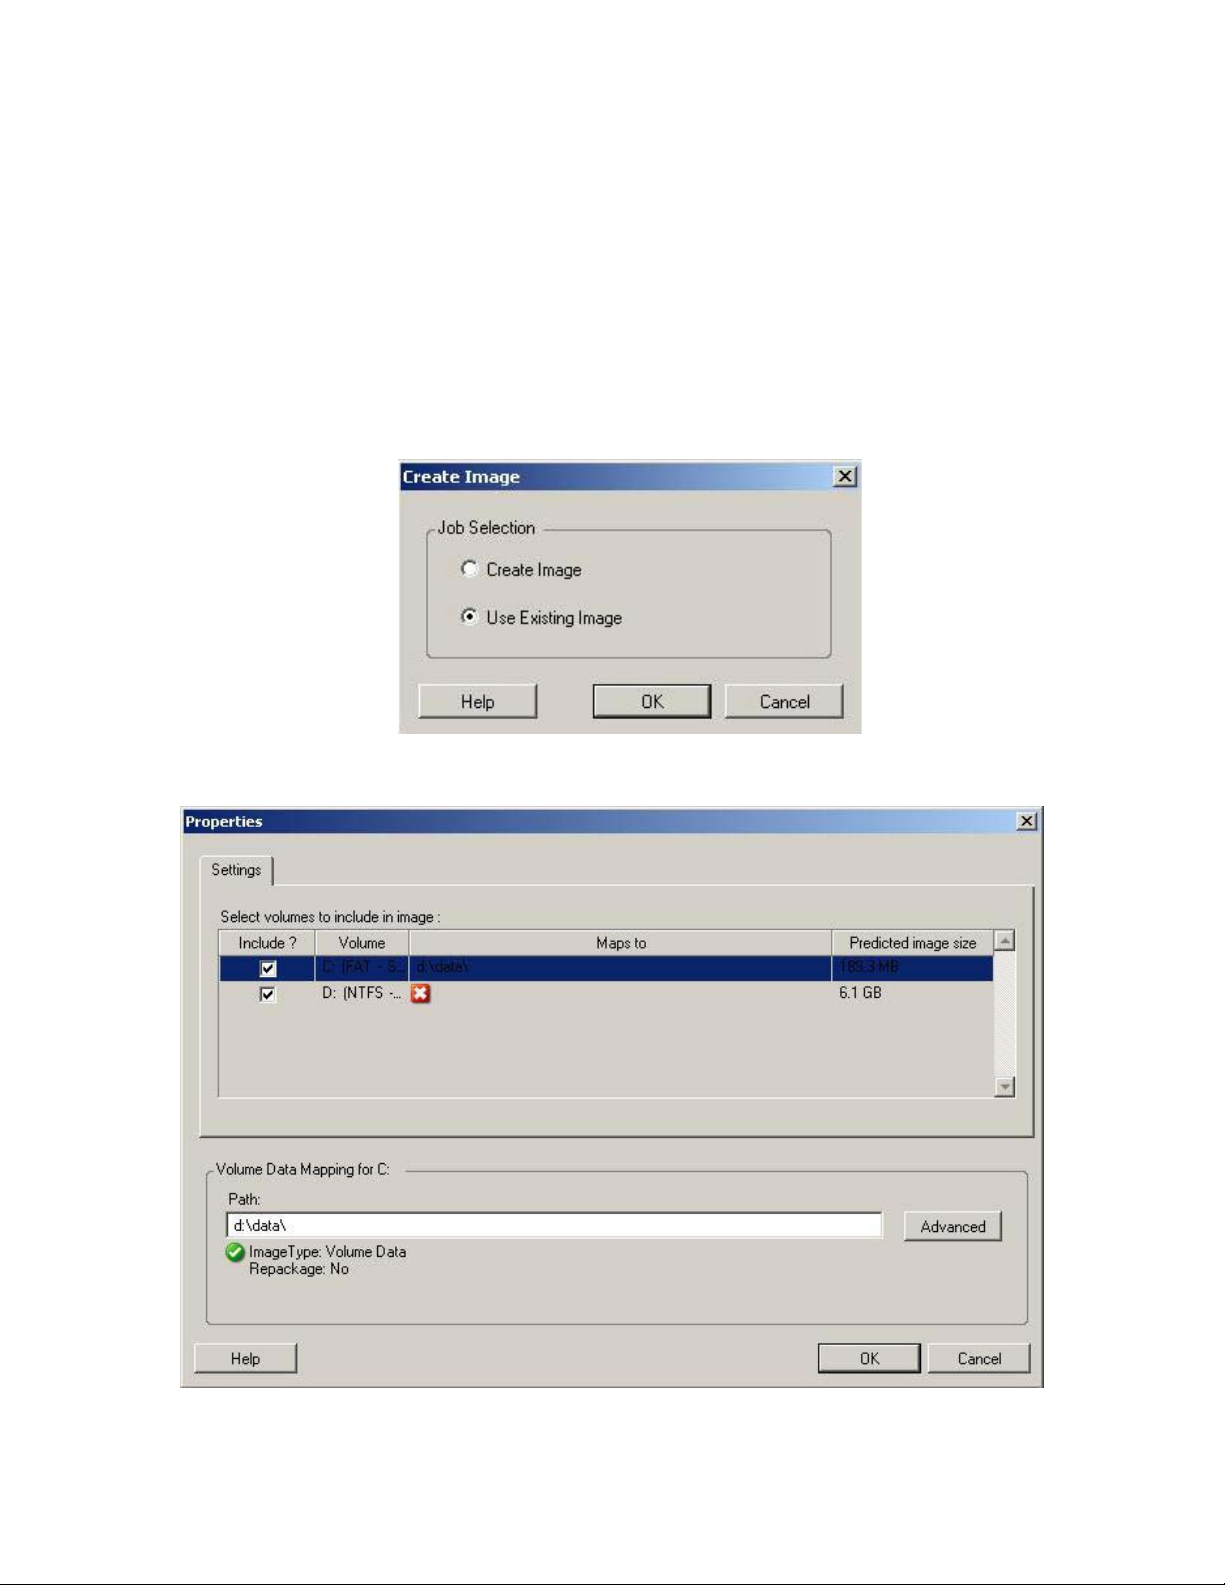
PowerConvert can also use raw volume data when deploying an image. Raw volume
data is simply a directory which contains files that make up a volume. The following
steps will explain how to use raw volume data with PowerConvert.
Importing RAW Data
1. Using the PowerConvert Client, open the server view and select the source
machine to be captured.
2. Drag and drop the source server on to the target PlateSpin Image Server
3. Select ‘Use Existing Image’
4. Open the ‘Volumes’ configuration screen to select the image(s)
PlateSpin PowerConvert User Guide - 49 –
Copyright 2005
Page 50
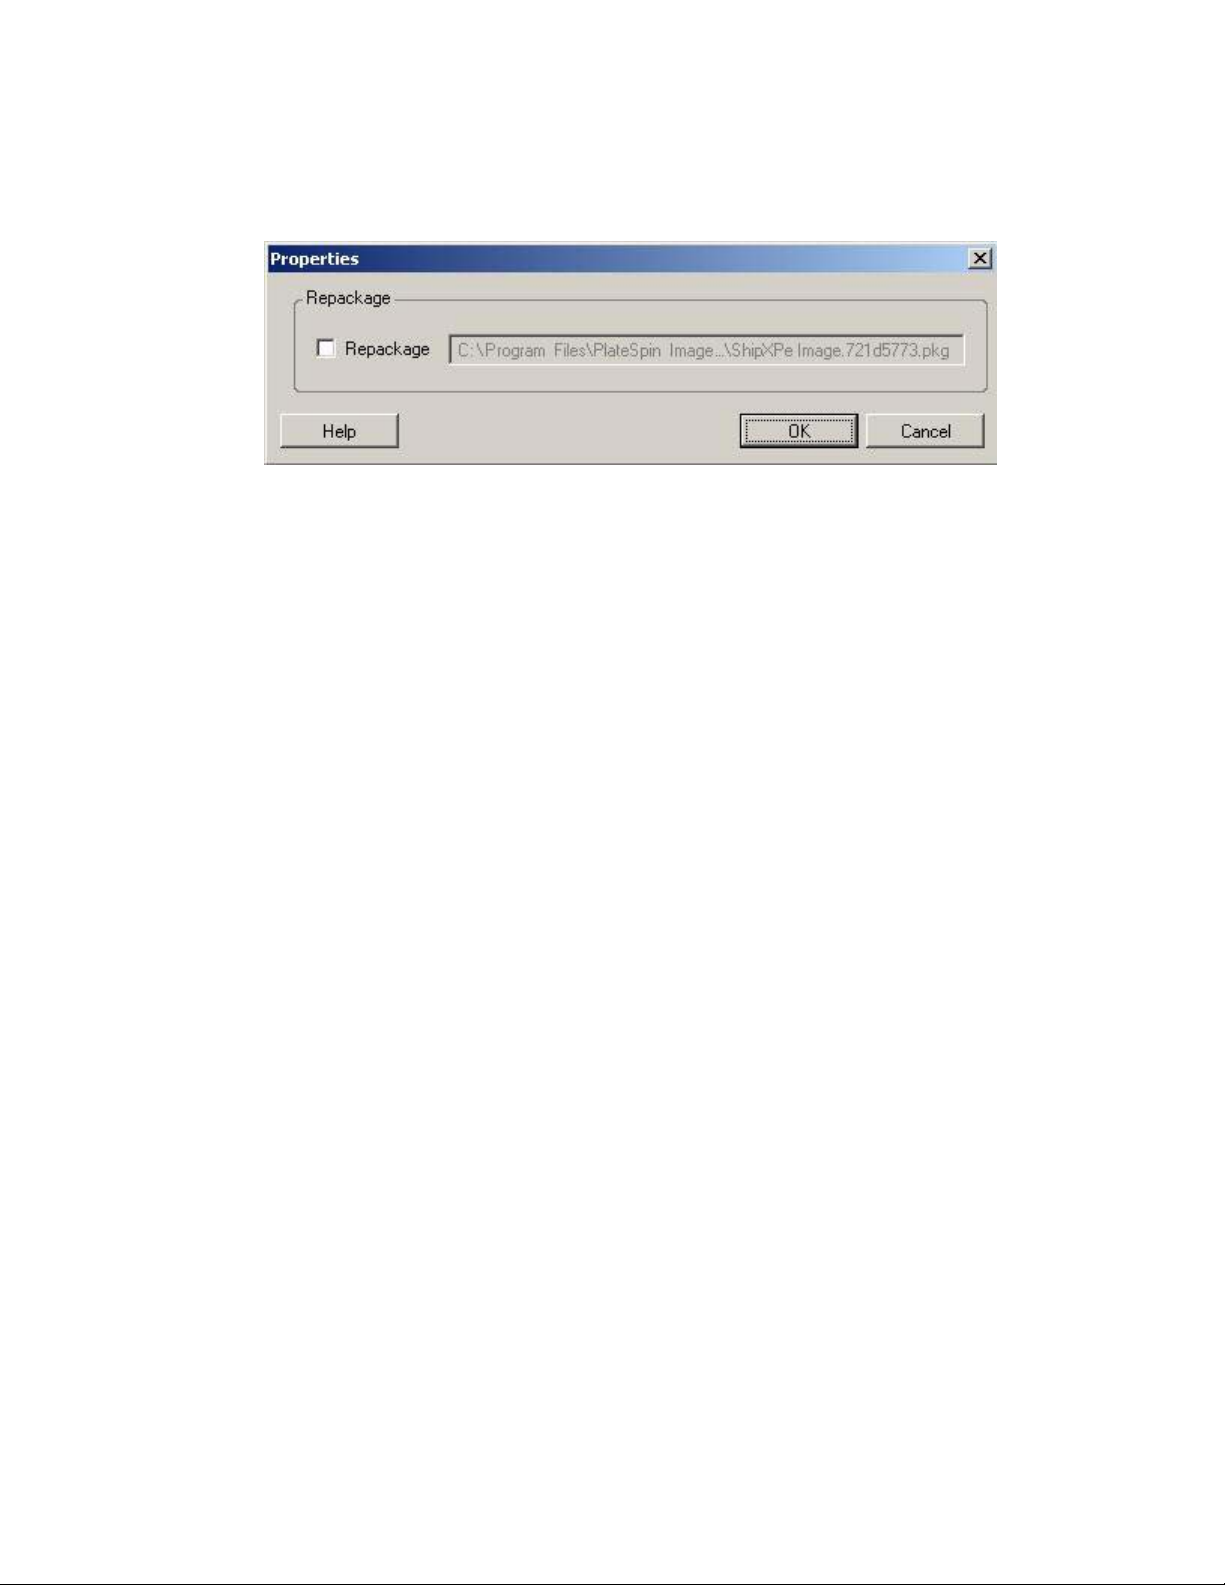
5. Highlight each volume and enter the full path to the directory containing the
raw volume data in the text box at the bottom of the window
6. For each image, click the ‘Advanced’ button to configure further options
REPACKAGE – Enable this option to have PowerConvert create a PlateSpin
Image from the provided image file. This removes the requirement to use the
original image for each deployment.
7. Once the raw volume data has been provided for each volume to be included,
confirm the settings for the Job Configuration and Image Configuration
sections
8. Click ‘Start’ to begin the image creation process.
PlateSpin PowerConvert User Guide - 50 –
Copyright 2005
Page 51
Deploying a PlateSpin Flexible Image
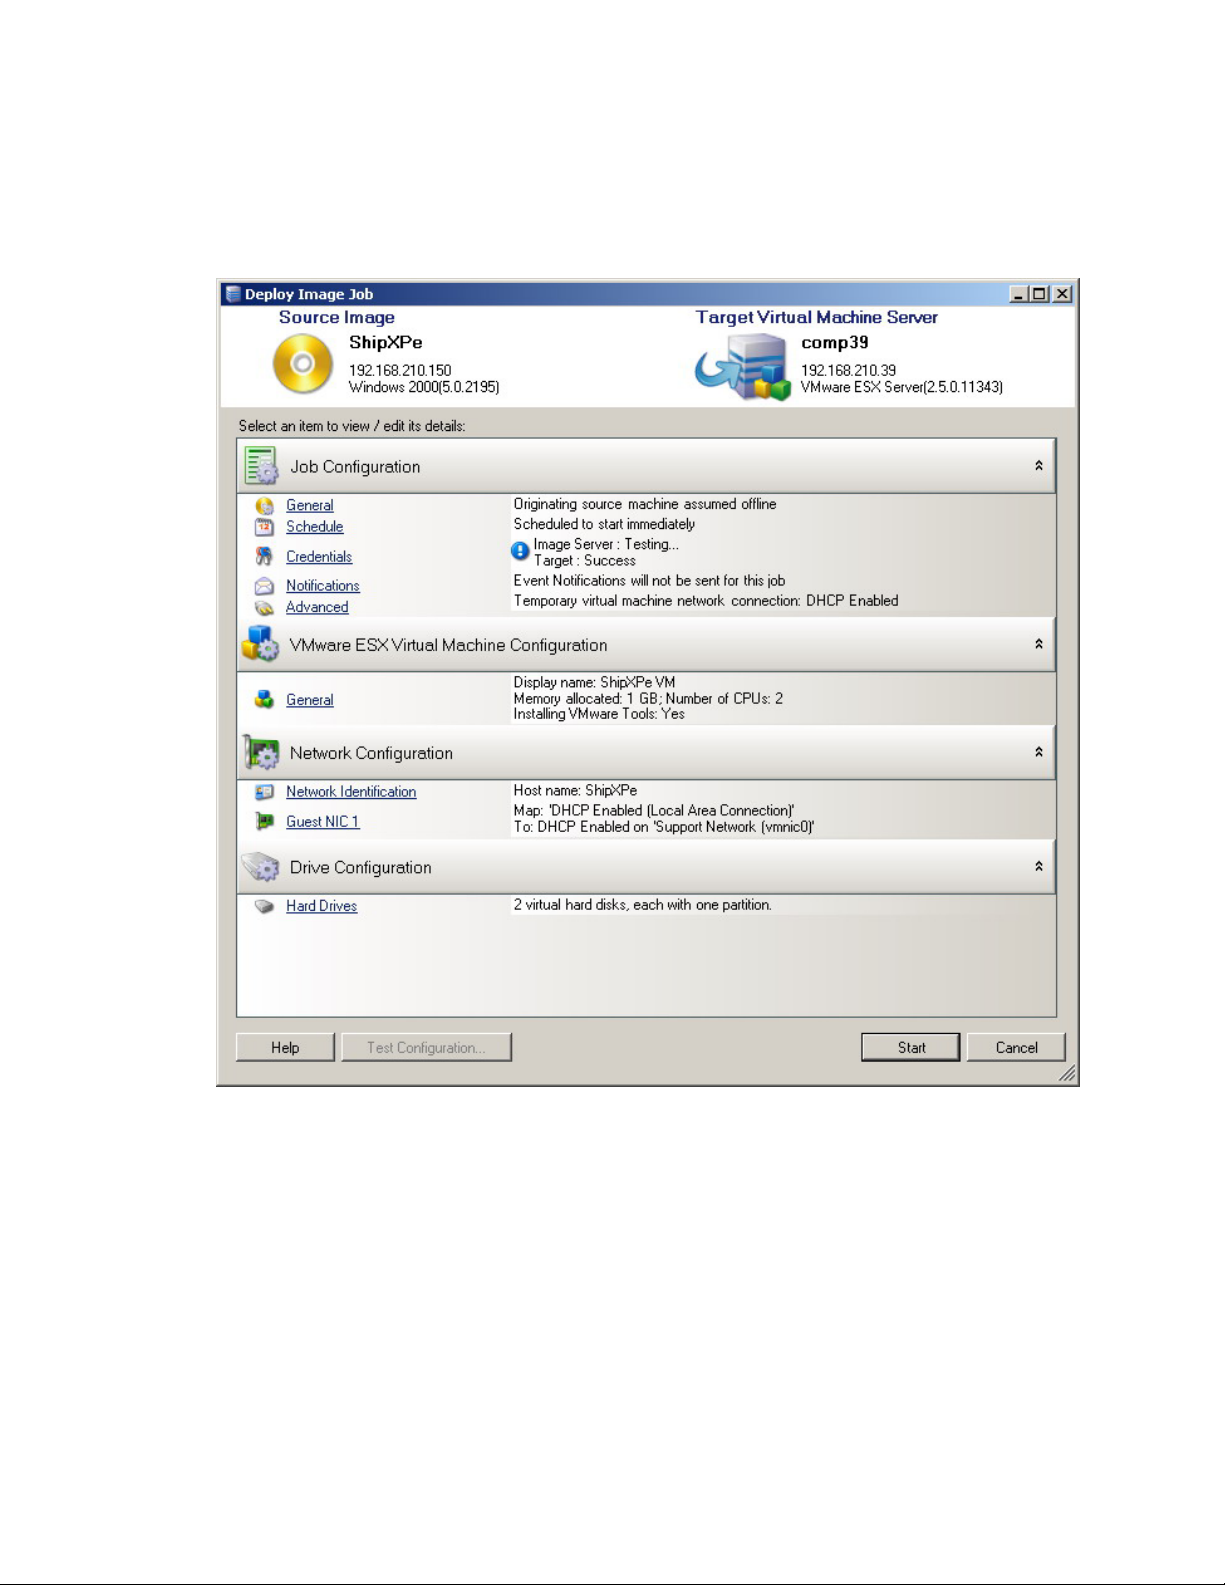
1. Simply drag-and-drop the desired image to a discovered target server to
configure the conversion job
2. A conversion job is auto configured so the created target server will be
created with the same settings as the original source. The network
configuration can be modified with the desired settings
a. Modify the Network Identification settings to configure the host name
and domain/workgroup registration of the created target server
b. Modify the Guest NIC settings to configure the TCP/IP properties for
the network adapters on the created target server
c. Modify the Drive Configuration settings to select the volumes to copy
during the conversion.
3. If the intended target is a virtual server, modify the Virtual Machine
properties to configure parameters such as assigned RAM and installation of
VMware Tools / VMAdditions
PlateSpin PowerConvert User Guide - 51 –
Copyright 2005
Page 52

4. Review the conversion job for any errors – marked by
show what needs to be resolved before the conversion job can start. Position
the mouse cursor over the error markers for detailed information.
5. Review the order for any warnings – marked by
configurations options which should be confirmed prior to starting the
conversion. Position the mouse cursor over the warning markers for detailed
information.
6. Click Start to deploy the image
. Warning markers show
. Error markers
PlateSpin PowerConvert User Guide - 52 –
Copyright 2005
Page 53

Running Jobs
After the desired options are configured, clicking ‘START’ will begin the conversion
job. PowerConvert also allows jobs to be saved for execution at a later time. Saved
jobs can be manually started from the PowerConvert Client or be scheduled to
automatically run at a specified time.
Saving Jobs
1. Once all options have been configured for the job, click the SAVE button and
choose the desired option
SAVE (DEBUG) – Selecting this option will save each step of
the conversion as a separately executable job. This option
should only be used for troubleshooting purposes.
SAVE AS – Selecting this option will save the conversion job to
be run at a later time.
Manually Starting Saved Jobs
1. In the PowerConvert Client, change to the Jobs View
2. Locate the saved job in the view
3. Right-click the saved job and select START
The saved job will now run with all the configured settings.
PlateSpin PowerConvert User Guide - 53 –
Copyright 2005
Page 54

Scheduling Saved Jobs
Once a job has been saved using the steps listed above, it can be scheduled using
the following steps.
1. Located the saved job in C:\Documents and Settings\<USERNAME>\Local
Settings\Application Data\PlateSpin Ltd\PlateSpin
PowerConvert\%PowerConvert Version Number%\jobs\
The job will have its own unique alphanumeric folder name and file name (for
example: \jobs\4f035cda-5c2b-4b73-9923-148ba743e560\32025d86-8850-4c798bf3-bb9c22b0ac1d.job)
2. Go to C:\Program Files\PlateSpin PowerConvert Client\CommandLine on the
PowerConvert server
3. Using a text editor, create a batch file containing the following line to execute
the saved job
PowerConvert.Console.exe run /job=%Full Path to Job in quotations%
For example:
PowerConvert.Console.exe run /job="C:\documents and settings\Administrator\Local
Settings\Application Data\PlateSpin Ltd\PlateSpin
PowerConvert\5.0.1.2221\jobs\4f035cda-5c2b-4b73-9923148ba743e560\32025d86-8850-4c79-8bf3-bb9c22b0ac1d.job"
4. Using Windows Task Scheduler or AT commands, setup a task to run the
batch file at the desired date and time
NOTE: A valid Administrator account must be used to run the scheduled task
PlateSpin PowerConvert User Guide - 54 –
Copyright 2005
Page 55
Reports
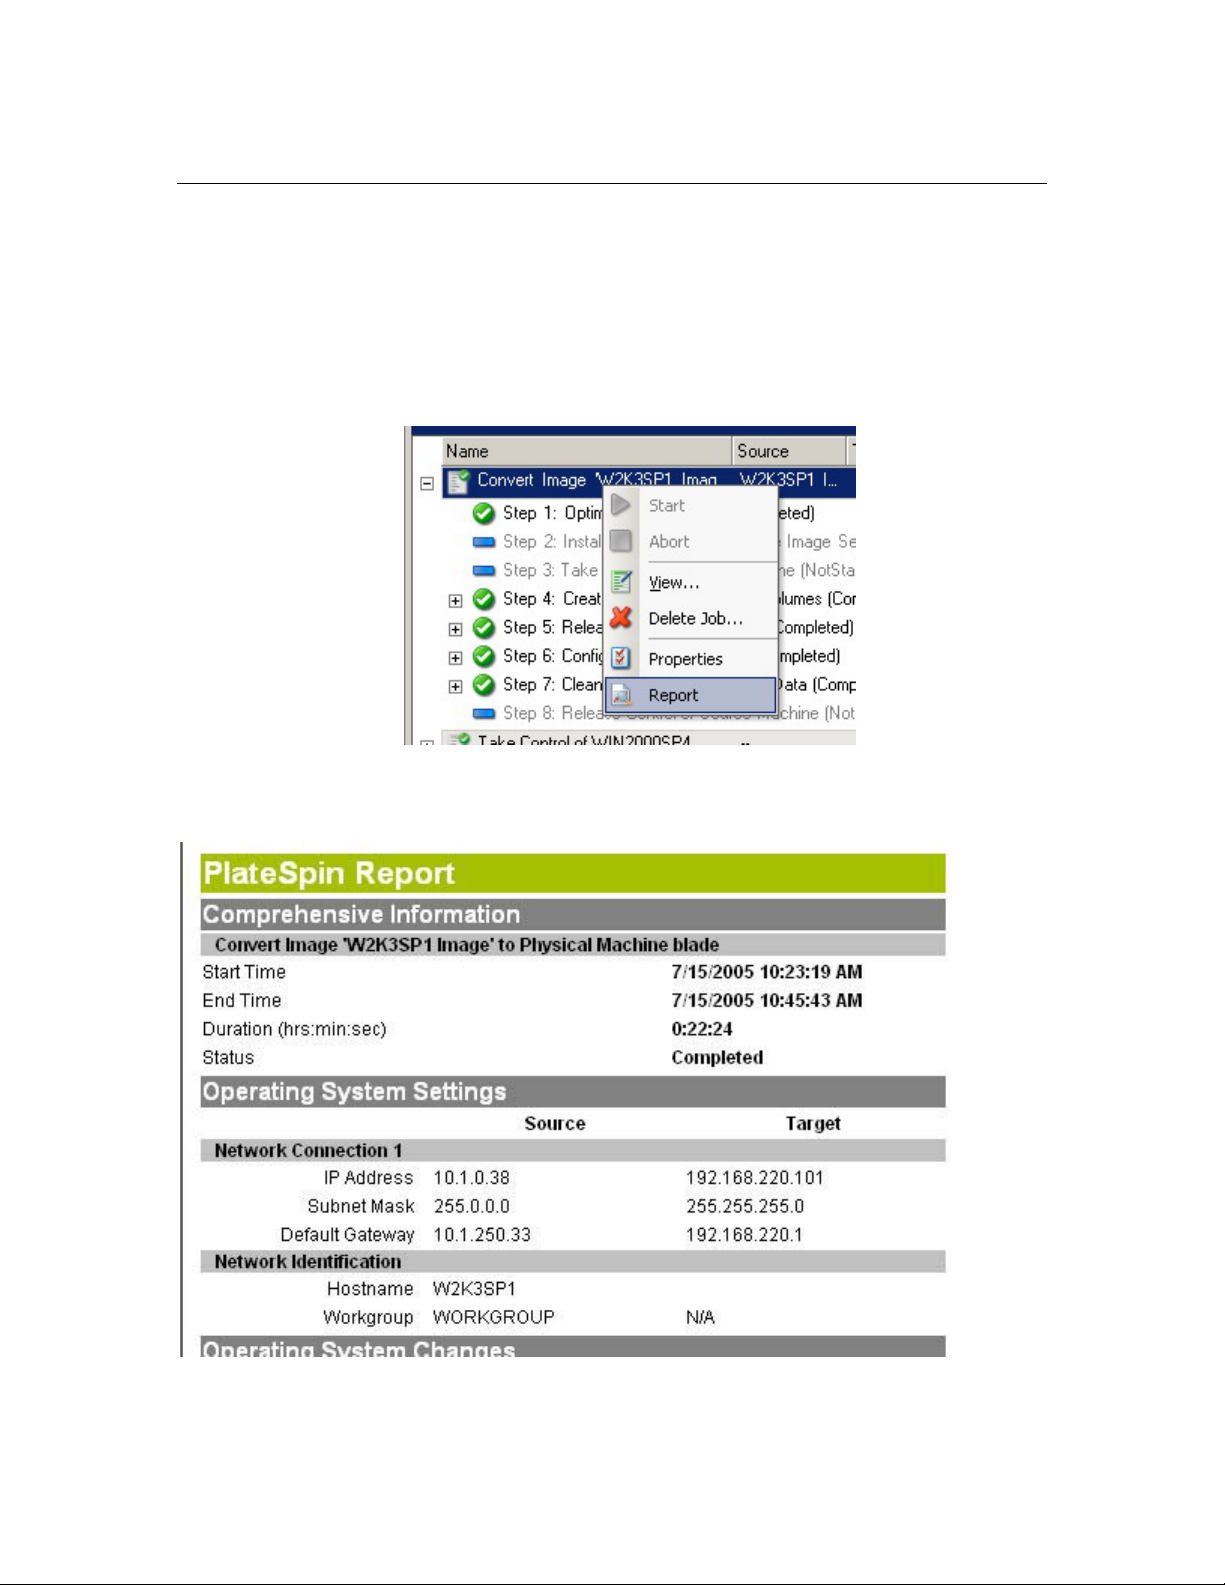
PowerConvert can generate detailed reports of running and completed jobs. They
provide a record of the task performed during the job.
Reports can easily be generated using the following steps.
1. In the PowerConvert Client, change to the Jobs View
2. Locate the desired job in the view
3. Right-click the job and select REPORT
A web browser window will open, displaying the requested report.
PlateSpin PowerConvert User Guide - 55 –
Copyright 2005
Page 56

APPENDIX A: Adding Drivers for Physical Target Servers
During the conversion process, PowerConvert will automatically install the required
drivers for the physical target server. PowerConvert ships with drivers for the most
common hardware found in current datacenters.
Should PowerConvert be missing a driver, support can be added using the following
steps.
1. Unpack the driver INF, SYS, CAT and other files to a temporary directory (i.e.
C:\temp)
NOTE: Drivers which ship in EXE format must be unpacked before adding
them to PowerConvert.
2. From a command prompt window, enter the ‘temp’ subdirectory within the
PowerConvert installation directory
3. Use ‘PlateSpin.Athens.UploadDeviceDriver.exe’ to add the required driver
PlateSpin.Athens.UploadDeviceDriver.exe
Usage: /path=c:\drv /operatingsystem=x /servicepack=0 /athens_name=PowerConvert
[/language=...]
Where:
/path - Path to driver(s)
/operatingsystem - Operating System the drivers are for. Must be one of: Windows 2000,
WindowsXP, Windows2003
/servicepack - Service pack for operating system selected
/athens_name - The URL of the PowerX Server where the drivers should be uploaded to - if
the job is running on the PowerConvert server please type powerconvert
/language - The driver language. (Default = Language independent)
The following syntax would be used to upload drivers which have been unpacked
to C:\temp\scsi and PowerConvert is installed on a server with an IP address of
192.168.1.100. The drivers are to be used for conversions of source machines
running Windows 2000 Server with SP4.
PlateSpin.Athens.UploadDeviceDriver.exe /path=c:\temp\scsi
/operatingsystem=Windows2000 /servicepack=4 /athens_name=powerconvert
PlateSpin PowerConvert User Guide - 56 –
Copyright 2005
Page 57

APPENDIX B: Troubleshooting
Installation
An unexpected error occurs when trying to install PowerConvert to a non
default location
When installing PowerConvert to a custom directory, the ASPNET account must
have full access to the root of the drive where the directory exists. For
example, if PowerConvert was being installed to D:\PC, the ASPNET account
must have full control of D:\.
HTTP 403 Error
PlateSpin PowerConvert makes use of ASP.NET for its web services. If ASP.NET
in not installed on the server, the web services will not function correctly and
the installation will fail with this error.
ASP.NET is included as part of the .NET Framework. When installing the .NET
Framework, IIS must already be installed on the server for ASP.NET to be
configured. If the .NET Framework was installed prior to IIS, simply uninstall
and reinstall the .NET Framework.
Discovery
“Application has generated an error” during registration of physical server
This error will occur if the physical server was unable to contact the
PowerConvert Server. A common cause is incorrect information entered during
the registration process. Simply type ‘registermachine’ to restart the
registration process.
Commands such as ‘ping’ can be used to confirm basic connectivity with the
PowerConvert Server.
My physical server has completed the registration process, but is not seen in
the PowerConvert Client
The full registration process can take a couple of minutes to complete. Once
the second command prompt window has closed on the physical server, wait a
few minutes before clicking the ‘Refresh’ button in the PowerConvert Client.
“Package <…> Not Found” during discovery of existing Windows servers
The PlateSpin PowerConvert Server requires .NET 1.1 SP1. This error message
will occur during the discovery process if the service pack has not been
installed.
‘Could not find file
"\\{servername}\admin$\{servername_randomID}.xml"’
During the discovery process, PlateSpin PowerConvert places a small
executable on the source server and a remote execute request is sent via
WMI. If WMI rejects the execution request, the server discovery will fail.
The following steps will allow PowerConvert to attempt an alternate method of
remotely executing the file.
PlateSpin PowerConvert User Guide - 57 –
Copyright 2005
Page 58

1. Navigate to the C:\Program Files\PlateSpin PowerConvert Server\Web
directory
2. Using a text editor, open the web.config file
3. In the web.config file, the following entry is located near the end of the file:
<add key="MachineDiscoveryUsingService" value="false" />
Change the value in this line so that it is set to "true" instead:
<add key="MachineDiscoveryUsingService" value="true" />
4. Save the changes to the web.config file
5. Retry the discovery
Peer-to-Peer Conversions
Conversion failed while ‘Waiting for Controller to Start’
A failure while waiting for a controller to start is generally caused by one of the
following problems.
1. The network settings for the temporary IP addresses under the Job
Configuration -> Advanced section were not properly configured
2. There was a possible network outage that prevented the source/target
machine from communicating with the PowerConvert Server
3. The source/target machine was not able to fully boot up under PlateSpin
control
To diagnose the exact cause of failure, check the state of the system whose
controller has failed to start. Commands such as ‘ipconfig’ and ‘ping’ are
available to verify basic network connectivity.
File transfer hangs at 1% or progresses at a slow pace
By default, a link type of AUTO is used on the source server during a
conversion. If the source server is connected to a switch port which is forced to
100/FULL, the ‘Force Full Duplex’ option must be enabled when configuring the
conversion. Should this option be set incorrectly, a duplex mismatch will occur
on the network.
Unable to determine suitable boot partition
When converting existing source servers, the boot volume must pass the
following checks.
1) It must be on a basic disk
2) It must have 175MB of free space
3) It must be a primary partition
If either of these are not true for the system volume, the conversion will fail
while attempting to take control of the source server.
Newly created PowerConvert Job remain at a "Scheduled" or "NotStarted"
state
This behavior generally indicates that there is a problem with the PlateSpin
Operations Framework Controller on the PowerConvert Server. Use the
Windows services plug-in to confirm the PlateSpin Operations Framework
Controller service is running.
PlateSpin PowerConvert User Guide - 58 –
Copyright 2005
Page 59

How to troubleshoot failures at "Configuring Virtual Machine"
Failures during the configuration step generally indicate that a timeout has
occurred when attempting to configure the target server. Although the
conversion job has failed, the conversion is most likely successful. If the virtual
machine can boot and be successfully logged in to, the conversion is complete.
Since the configuration did not have an opportunity to finish, it may be
necessary to manually configure network settings and install virtual tools.
Using Images
Cannot see Images on Image Server in the PowerConvert Client
If the Server view is configured to group servers by "Machine", discovered
image servers cannot be expanded. To display the images, re-configure the
Server View so the machines will be grouped by "Domain" instead of
"Machine". The images will now be visible.
Failed to mount image: The volume does not contain a recognized file
system
When installing a PlateSpin Image Server on Windows 2003, the following
error message may appear when importing or deploying volume data. To
resolve the error, use the Windows services plug-in on the PlateSpin Image
Server. Modify the log-on properties for the ‘PlateSpin Operations
Management Controller’ service to use an account with local administrative
privileges. Restart the service after making this change.
Security descriptors not intact on deployed server when using volume data
from a Symantec Ghost image
When creating a PlateSpin Image using Raw Volume Data that was extracted
from a Ghost Image, the security descriptors will not be preserved on the VM.
This is due to the extracted files inheriting permissions of their parent
folder, without having any knowledge of original source machine's permissions.
PlateSpin PowerConvert User Guide - 59 –
Copyright 2005
Page 60

APPENDIX C: FAQ
How long does a conversion take?
A conversion job has three main steps.
1) Take control
2) File transfer
3) Configuration
The majority of time is spent on the file transfer. Speeds of 25 to 30Mbps
can be expected during the file transfer process. To calculate a rough time
estimate take the total size of all the volumes to be copied in megabytes
multiply by 8 to get the size in Megabit divided by 25 to get the total time in
seconds, and finally divide by 60 to get the total time in minutes.
The other steps take an estimated 15 to 30 minutes to complete.
Which ports need to be open on my firewall/router to use PowerConvert?
The following ports are used by PowerConvert during the discovery process:
22 (TCP) SSH port for discovering servers running Linux or VMware ESX
Server
135/445 (TCP) DCOM/RPC** port for discovering Windows based servers
80 (TCP) For communication between the PowerConvert Server and the
source/target machines
3725 (TCP) Used for file transfer between the source server and target
machine
**WMI (RPC/DCOM) may use TCP ports 135 and 445 as well as
random/dynamically assigned ports above 1024. If problems occur during the
discovery process, another alternative is to temporarily place the server in a
DMZ (or temporarily open the firewall) for the discovery process only.
Does PowerConvert support source servers with dynamic disks?
Yes. PowerConvert 5.1 now fully supports converting source servers with
dynamic disks. The target server will be created with basic disks, enabling
removing unnecessary dynamic disk configurations. After a conversion the
disk can always be upgraded to dynamic if necessary.
Why didn’t step 2 or 3 run during the conversion?
Step 2 of the conversion process involves installing a controller on a target
virtual server. This only occurs during the first conversion to a specific virtual
server. Subsequent conversions will skip this step.
Step 3 of the conversion process involves installing a controller on a target
PlateSpin Image Server. This only occurs during the first conversion to a
specific PlateSpin Image Server. Subsequent conversions will skip this step.
Can multiple conversions be run simultaneously?
PowerConvert has the ability to run multiple simultaneous conversions. When
doing so, it is suggested to have 1GB RAM minimum in the PowerConvert
Server.
PlateSpin PowerConvert User Guide - 60 –
Copyright 2005
Page 61

A maximum of 2 conversions per target server is recommended to ensure
sufficient resources are available for the conversion.
Can Linux and VMware ESX Servers with custom SSH ports be used with
PowerConvert?
When discovering systems running Linux or VMware ESX Server, the SSH port
can be entered using the following syntax.
hostname:portnumber
The port number will be saved by PowerConvert for use during conversions.
PlateSpin PowerConvert User Guide - 61 –
Copyright 2005
 Loading...