

Page 1

F200 and F300
Platemeter User
Manual
Page 2

Welcome ...
Thank you for choosing an F200 or F300
Platemeter.
The electronic rising platemeter provides farmers with an
easy, accurate and reliable way to measure and record
pasture health and share that information.
Further information about
assembling and using your platemeter contact us at:
www.platemeters.co.nz [email protected]
facebook.com/platemeters
Platemeters Limited, 275 Cameron Road, Tauranga 3110, New Zealand
0800 577 505
Page 3

Contents
1 Assembling the Platemeter ..................................................................... 5
1.1 Your Platemeter ...................................................................................... 5
2 Platemeter Parts ............................................................................................ 6
3 Retrofitting the Platemeter Counter ................................................ 7
4 Caring for your Platemeter ..................................................................... 9
5 Battery Life and Charging ....................................................................... 10
5.1 Recharging the battery .................................................................... 10
5.2 Replacing the battery ........................................................................ 11
6 Calibrating your Platemeter .................................................................. 12
7 Things to do before you start your walk ....................................... 14
8 P-Plus Instalation ............................................................................................ 14
8.1 Download Link ......................................................................................... 14
8.1.1 Moving P-Plus and your farm data to a new
computer ......................................................................................... 15
8.1.2 How to Run P-Plus with the Pasture Cover
Module ............................................................................................... 16
8.1.3 How to Licence P-Plus Software .................................... 16
8.1.4 Entering Your Licence Key ................................................. 17
8.1.5 Re – Licensing .............................................................................. 17
9 Operating the Electronic Counter ..................................................... 18
9.1 F200 Front Display Buttons ........................................................... 18
9.2 F300 Front Display Buttons .......................................................... 19
9.3 Startup / Self-test ................................................................................ 19
10 Current DairyNZ Equations .................................................................... 21
10.1 Entering Factory Default Formula ........................................... 21
10.2 Entering Your Own Formula .......................................................... 22
10.2.1 F200 Entering Formula ....................................................... 22
10.2.2 F300 Entering Formula ....................................................... 23
11 Using the Correct Measuring Technique ..................................... 24
12 Taking Paddock Readings or the Pasture Walk ..................... 26
12.1 F200 Pasture Walk ............................................................................... 26
F200 and F300 User Manual | 3
Page 4

12.2 F300 Pasture Walk ............................................................................... 27
12.2.1 View Saved Paddock Data ................................................ 29
12.2.2 Delete Single Paddock Data ............................................ 29
13 FAQ’s and Trouble Shooting ................................................................... 30
13.1 There is no visual display ................................................................ 30
13.2 The counter does not “beep” when taking a reading . 30
13.3 Cog becoming worn .......................................................................... 31
13.4 The counter continuously beeps and eventually
turns off ........................................................................................................ 32
13.5 Cog not running freely ..................................................................... 32
13.6 Counter Readings do not seem accurate ........................ 32
13.7 Battery retainer falling out ........................................................... 33
13.8 Front panel or membrane problems .................................... 33
13.9 How do I change the formula? ................................................... 33
14 Servicing and Repairs ................................................................................ 34
4 | F200 and F300 User Manual
Page 5
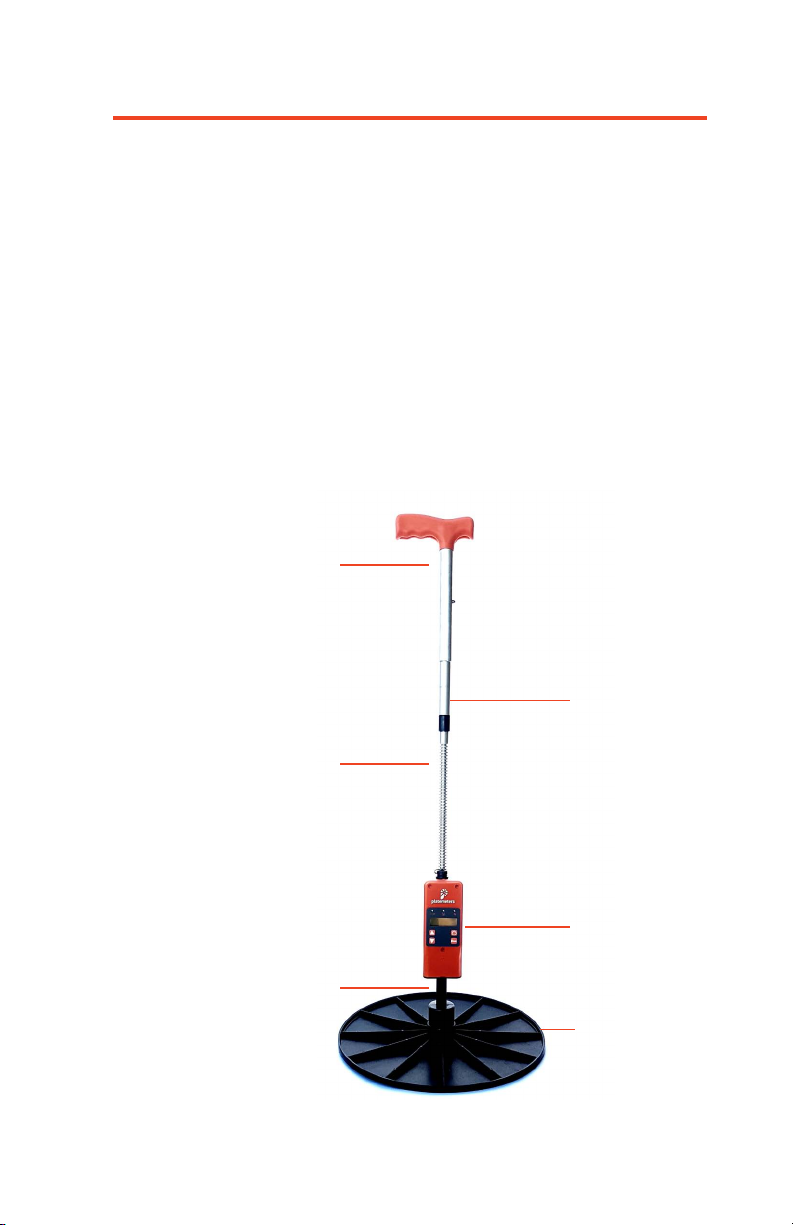
1 - Assembling the Platemeter
Your Platemeter will come pre-assembled and only requires
two steps to be ready for use:
1. Attach the lower handle to the grooved rod by screwing
the two parts together.
2. Attach the plastic plate to the bottom of the slide tube
by screwing to the thread at the base of the slide tube.
Note: Under no circumstances should you apply any type of oil, or
lubrication to the platemeter. It is a dry bearing system and any
lubricant may damage the platemeter and may void your warranty.
1.1 Your Platemeter
Upper Handle
Grooved Rod
Slide Tube
Lower Handle
Electronic Counter
Rising Plate
F200 and F300 User Manual | 5
Page 6
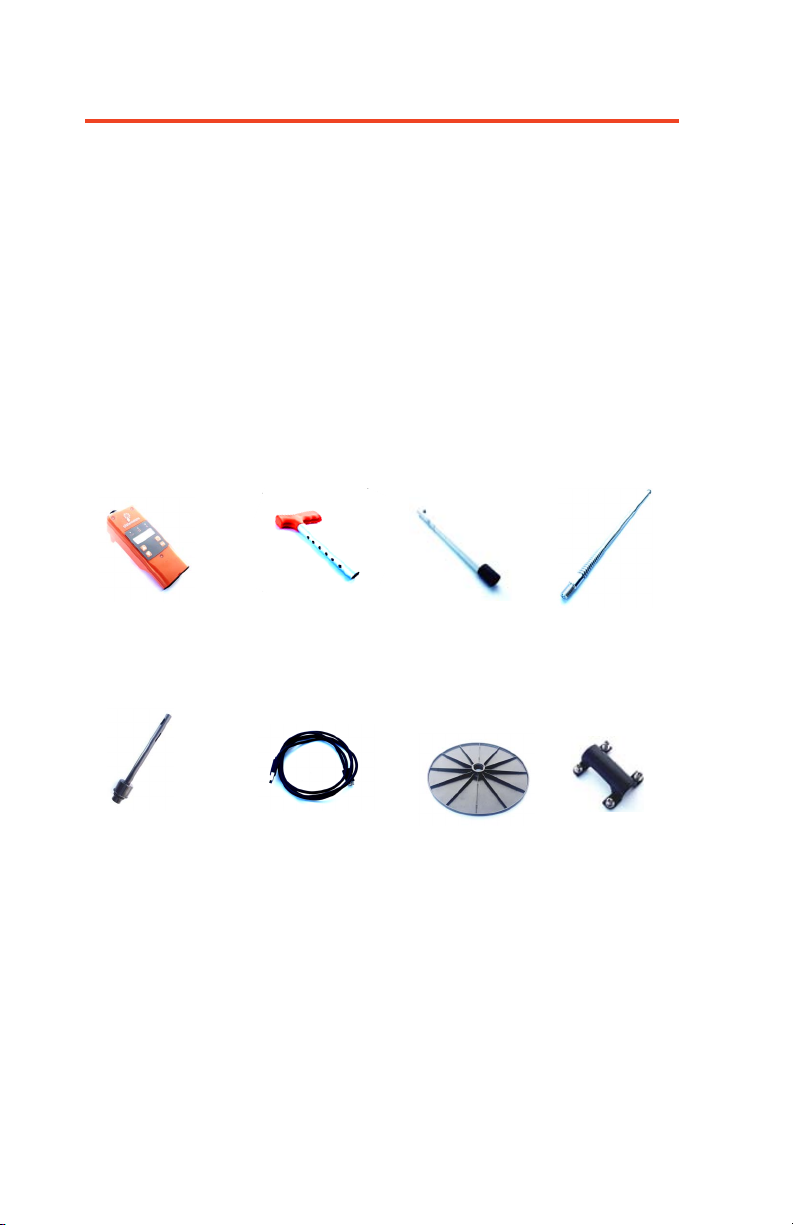
2 - Platemeter Parts
The F200 and F300 Platemeters are designed with breakaway
components, meaning if damaged in an accident the parts
are cost effective and easy to replace and in most cases the
part can be replaced by the user.
If your Platemeter is damaged or you require a part, please
refer to the below diagram to identify the correct part. If you
need to replace or repair components for the potentiometer,
membrane or within the counter you’ll need to send your
Platemeter or the counter to us for assessment.
Electronic Counter
Slide Tube
Upper Handle Lower Handle Grooved Rod
USB Charger
Cable
Rising Plate
Bracket
and Screws
Visit platemeters.co.nz/collections/parts-for-sale to purchase
replacement parts and contact us using the details at the
bottom of the page if your Platemeter requires servicing or
you’d like to send it to us for assessment.
6 | F200 and F300 User Manual
Page 7

3 - Retrofitting the Platemeter Counter
The Platemeters electronic counter can be attached to most
AgHub, Jenquip, Tru-Test, and FarmWorks and other manual
plate meters with little to or no modification. To purchase
retrofitting kits or counters and view our ‘How To’ instructional
videos visit www.platemeters.co.nz.
Follow the instructions below to attach your platemeter
counter. It must be correctly attached and aligned to ensure
smooth operation.
1. Remove all existing electronic counters from the shaft.
2. Check that a cog is attached to the small shank on the
back of the counter.
3. If the cog isn’t attached, heat the cog in a hot cup
of water prior to pressing onto the shaft - don’t use
excessive pressure as this may damage the cog.
4. Lay the counter face down on a flat surface so that the
cog is to your left.
5. Turn the cog on the counter anti-clockwise (to the left)
until it stops.
6. Hold the Platemeter with the handle to the left. The
hole in the slide tube where the cog fits should face
toward you.
7. Make sure the grooved rod is fully closed to the bottom
end of the black slide tube. If you have difficulty
keeping the plate closed, you can put tape around the
large washer and the bulb of the slide tube.
8. Place the slide tube with the grooved rod inserted onto
the back of the counter, fitting the cog into the slit of
the tube, the cog should be situated in the middle of
the hole in the slide tube.
F200 and F300 User Manual | 7
Page 8

9. Place the plastic bracket onto the slide tube, aligning
the raised ridge in the bracket with the hole in the slide
tube and the screw holes on back of the counter.
10. Place a screw and washer in each side of the bracket
and half-tighten; making sure that the cog meets the
middle of the grooved rod and tighten the four screws.
11. Check the counter is correctly attached by turning
the grooved rod it to make sure it moves easily in
all positions. If it sticks then either the slide tube or
grooved rod may be damaged, bent or corroded and
may need replacing, or it’s not correctly aligned.
12. Attach the plastic plate by screwing on to the bulb of
the slide tube and place the Platemeter in an upright
position on a hard surface to check the plate closes
fully.
8 | F200 and F300 User Manual
Page 9

4 - Caring for your Platemeter
Avoid getting the counter wet
The counter is in a robust case which is splash proof. However,
as it’s an electronic device avoid getting the counter saturated.
Immersion in water will result in the circuitry getting wet and
damaged, reducing the life of your Platemeter.
Keep the shaft clean
A build-up of dirt will affect the accuracy of the Platemeter
because the shaft will not run smoothly, and more force is
required to take a reading.
Clean the shaft with a poly pad or similar
Do not use lubricant as this will build up inside the black outer
shaft.
Power Off
Remember to check the counter is switched off between
cover walks, and ensure you turn the power off when you have
finished your walk. The switch is easily left on which will waste
the battery.
F200 and F300 User Manual | 9
Page 10

5 - Battery Life and Charging
5.1 Recharging the battery
The Platemeter should always be switched OFF during
recharging.
The rechargeable battery should give years of service
before needing to be replaced. If it does need replacing,
the instructions on how to do this are in Replacing the
Rechargeable Battery section.
Attach the charger that was supplied with your Platemeter
to the small socket on the side of the counter and turn the
wall socket on. The battery will take 5 hours to recharge. No
damage will occur to the Platemeter if the charger is left on
beyond this time.
F200 - the display will show Ch and decimal points will scroll
along the bottom of the display, when charged the display will
show FULL. The battery is now charged.
F300 - the display will show - 300 this is time in minutes (5
hours). The display will count down to ‘0’, after which the
display will show FULL and the unit will give 3 beeps. The
battery is now charged.
CAUTION: Do not use any charger other than the one supplied with the
Platemeter. This will void the product warranty.
10 | F200 and F300 User Manual
Page 11

5.2 Replacing the battery
The battery can be recharged hundreds of times, but
eventually the time between charges will shorten and if this
happens, a replacement battery should be fitted.
Before you replace the battery make sure the unit is switched
off.
- Remove the counter from the black tube and loosen the
screw in the middle of the counter back.
- Pull out the battery retainer clip from the bottom of the
counter.
- Remove the battery and gently remove the battery snap. To
avoid damage to the battery snap it is recommended you
use a screwdriver to flip off the battery clip as damage can
occur to the internal connections if grasped by fingers and
pulled off.
- Replace the battery with the same type and specification as
the one that came with your counter.
- Press the battery snap firmly onto the new battery and insert
back into the battery retainer.
- Replace the battery retainer into the counter taking care not
to catch the wires in the side wall of the counter.
- Tighten the central screw on the back and refit to the black
tube.
- Charge the battery for at least 16 hours before initial
use. Make sure the counter is re-calibrated before you
commence your next walk.
Alternatively, you can send the Platemeter us and we’ll supply
and replace the battery. Please contact us beforehand so we
can give you an estimated cost and instructions for packaging
the unit.
F200 and F300 User Manual | 11
Page 12
6 - Calibrating your Platemeter
To ensure the Platemeter accurately measures the compressed
height of pasture, the counter must be calibrated. This
requires setting a base level of zero so measurements can be
benchmarked against this. If the counter does not return to
zero after each ‘plonk’ it will not record the measurement and
the counter won’t beep.
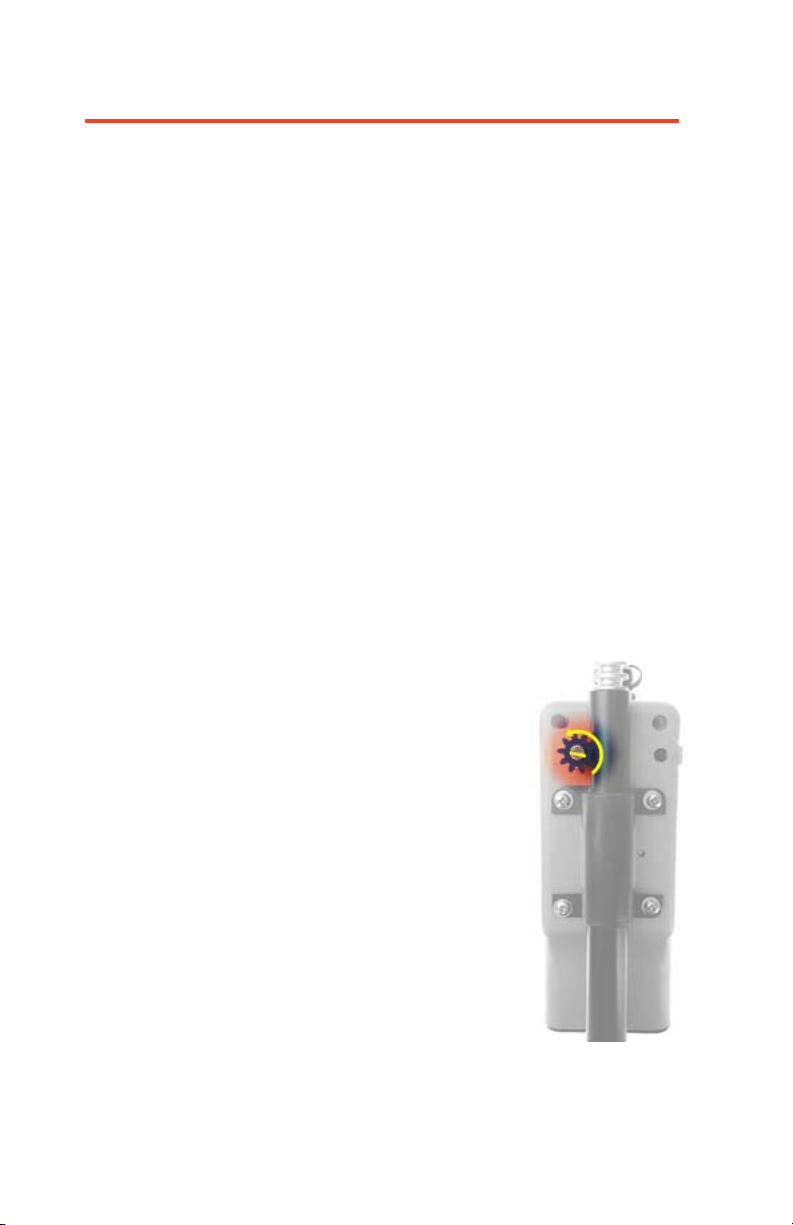
If the counter is removed from the black tube or receives
a severe knock it may jump a groove on the steel shaft,
which will put the counter out of calibration and it will need
to be recalibrated. You’ll need a small flat blade screwdriver
that will fit into the slot of the silver shaft at the back of the
counter.
How to calibrate:
- Ensure the unit is switched off plate is fully down on a
firm flat surface and the .
- Hold down the COUNT button
while switching the unit on. The
display will change to CAL briefly
and display a colon ‘:’ followed by a
number. Let’s assume you see ‘: 5’
when you switch on.
- The colon signifies that it is in fine
calibration mode.
- Use a flat blade screwdriver and
turn the silver shaft within the cog,
clockwise (looking at the display)
until the display reads ‘0’. NB: The
cog and steel shaft must remain
stationary.
12 | F200 and F300 User Manual
Page 13

- Once the counter reads zero, move the counter up the
full length of the shaft The colon will disappear once
it passes 9 and enter ‘clicks’ mode. At full height the
display should read ‘50’, which is 50 half centimetres.
- The counter is now calibrated.
- Switch off when you have finished, and then back on
again without pressing any buttons.
Test the zero calibration by raising and lowering the plate
several times. A beep should sound and the kgDM/ha is
displayed on the LCD screen as the plate falls. If it doesn’t,
repeat the steps above and retest.
If the calibration fails to hold then check the black saddle is
screwed down firmly, and the platemeter doesn’t twist easily
on the steel shaft. Otherwise the potentiometer, which the cog
drives may be faulty and will need replacing. This can happen
with excessive wear and by dust and dirt getting into the dry
bearing of the potentiometer.
Important: Be careful not to over-wind the metal cog fitting and this can
damage the unit. Use a firm but gentle amount of force to wind the fitting
anti-clockwise.
For more information about calibrating your platemeter and
“How To” videos visit www.platemeters.co.nz.
F200 and F300 User Manual | 13
Page 14

7 - Things to do before you start your walk
The F200 and F300 Platemeters can be used immediately out
of the box, but you P-Plus installed on your computer before
you need can enter or load data from your first walk.
If P-Plus is not installed, refer to the section below. When P-Plus
software is installed on your computer, you’ll need to setup your
farm by creating:
• aproperty
• paddocks
• equations
• denethewalkorder.
- Ensure you are not using the demonstration farm.
- Start Up / Self-Test – see section a.3.
- Enter or choose your equation. See Section 10.
8 - P-Plus Instalation
This section outlines the basic instructions for installing
P-Plus on your computer. For more detailed information about
using P-Plus, please visit our website www.platemeters.co.nz
Alternativly help can be found in P-Plus by pressing the F1 key
on your keyboard at any point. This will bring up help relative to
the P-Plus window you have open at the time.
8.1 Download Link
To download P-Plus visit:
platemeters.co.nz/pages/p-plus-pasture-software.
When you select the link, you will be taken to a drop box page
with a blue download button. Click the blue button and select
‘Direct Download’.
14 | F200 and F300 User Manual
Page 15

You can see the status as it downloads, most likely on the
toolbar at the bottom of your screen (depending on how
your computer is set up) – pplus.exe.
If you select this once it is finished your screen may go
black with a message saying “Do you want to allow this
app from an unknown publisher to make changes to your
device?”. Select Yes.
You will then be taken through the installation setup,
including agreement to the Terms and Conditions.
Once this is done, you can access P-Plus from
the icon on your desktop.
8.1.1 Moving P-Plus and your farm data to a new computer
On the old computer
- You will need a USB memory stick to put the backup on.
- Backup your farm data. Go to Help and Backup for
details on how to do this.
- Browse to your USB memory stick so it becomes your
selected backup location.
- Backup your farm data.
On the new computer
- Install P-Plus and request a new licence by contacting us.
- Make a new farm with the same name as the old
computer
- Select Farm and Restore, Use the TOP browse only and
browse to the USB Memory stick
- Find the backup file
- Select the backup file and then select OK in Restore
- This will put your farm data into P-Plus
- Check the data is ok
- Wait for new licence key to arrive to activate your P-Plus
licence. This may take up to 48 hours.
F200 and F300 User Manual | 15
Page 16
8.1.2 How to Run P-Plus with the Pasture Cover Module
Once the installation is complete, go to your desktop and
double click on your P-Plus Icon to start the program.
Alternatively, from the windows task bar click on the Start
menu, select All Programs then from the P-Plus Program
Group, select P-Plus.
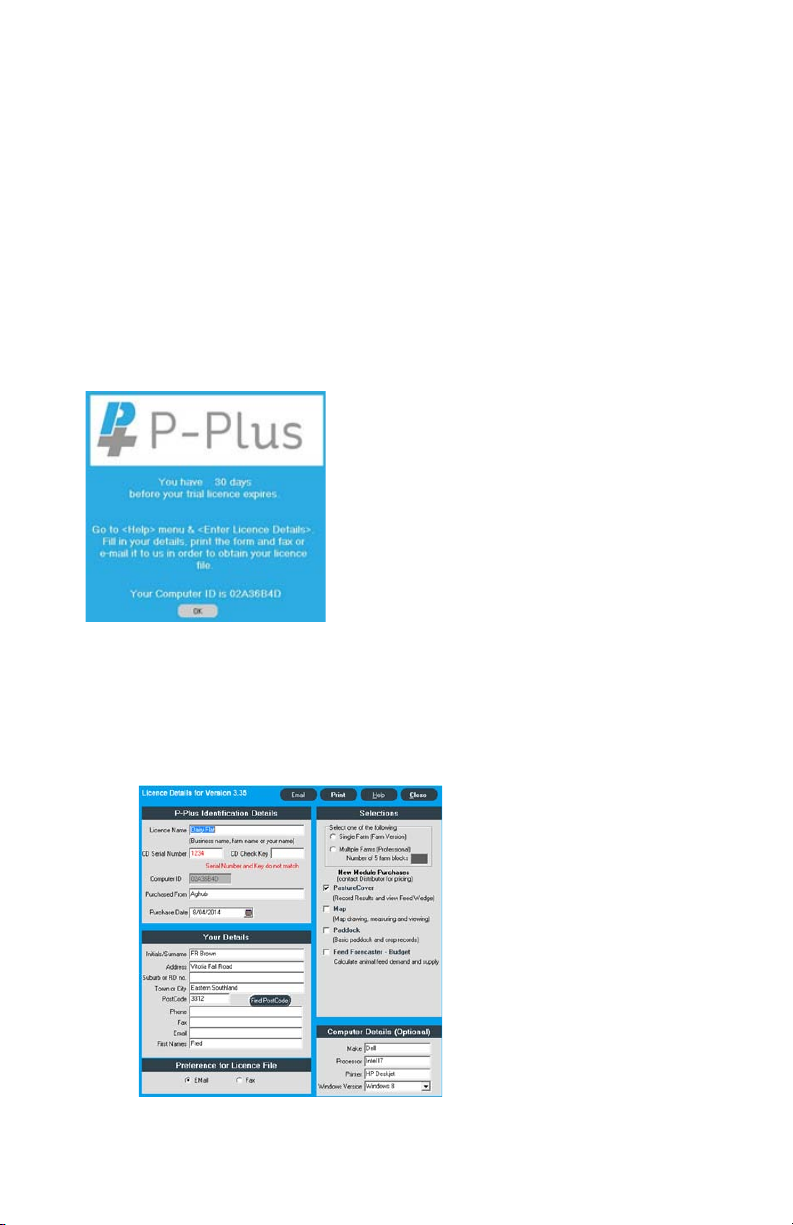
On opening P-Plus the window in the image below will
appear. This is simply a warning window advising the
number of days left in the trial licence to evaluate your
P-Plus software.
This screen will disappear when you
have registered P-Plus correctly.
Please click on OK to close the screen.
If you are upgrading from a licenced
copy of P-Plus the warning window
may not appear.
8.1.3 How to Licence P-Plus Software
This screen will automatically appear after OK button is pressed
on the 30-day trial period screen.
16 | F200 and F300 User Manual
Page 17

This is an older function of the software and no longer needs
to be filled out. Instead of completing this, please email info@
platemeters.co.nz with:
- Your Computer ID – this can be found on the first screen when
you open P-plus, or navigate to Help, About.
- The Platemeter ID – this is a code found on either the top of the
counter, or at the bottom, where the battery retainer is.
- Licence name – this is the name of the owner or purchaser of
the software licence.
- Farm Name
- Phone number
8.1.4 Entering Your Licence Key
Once the Licence Details have been received and processed by
Platemeters, a P-Plus Licence key will be emailed back to you with
some basic instructions on how to activate your licence.
8.1.5 Re – Licensing
P-Plus may need to be re-licensed on a replacement computer or
in the event of significant changes being made to your computer.
In either case P-Plus may become unlicensed.
This will require the generation and issue of a new licence file.
In this case contact Platemeters.
F200 and F300 User Manual | 17
Page 18

9 - Operating the Electronic Counter
The Platemeter is switched On and Off using the toggle switch at
the back of the unit. Off is in the ‘up’ position. When the unit is off
there are no numbers displayed on the LCD screen.
9.1 F200 Front Display Buttons
The various functions of the F200 are accessed by the
two buttons on the front of the unit, labelled ‘Avg/Reset’
and ‘Count/Formula’. The wordings in bold type are the
primary functions. These are activated by a short press of
the button. The secondary functions ‘Reset’ and ‘Formula’
are activated by holding the button down until the
function operates.
When the unit is first switched on the display will show
the model number, the current formula in use and finally
the calculated kgDM/ha based on that formula, and any
readings in memory. Pressing the “Avg” button will briefly
display the Average pasture height.
This is often referred to as “clicks” (measured in 0.5cm)
and will be displayed to one decimal place (i.e. 0.0 or 12.4).
Note: 1 click= 0.5cm
The number of readings is displayed when ‘Count’ button is
pressed. The display will show a ‘c’ on the left side and the
count on the right. The display will return to normal after 2
seconds.
All readings can be cleared (reset) by holding down the “Reset” button
for approximately 2 seconds, then the display will change to “0”.
18 | F200 and F300 User Manual
Page 19

9.2 F300 Front Display Buttons
The various functions of the F300 are accessed by the four
Buttons on the front of the unit labelled
- Disp/Enter
- Avg/Reset
- Count/Menu and the
- Up/Down arrow buttons
The wordings in bold type are the primary functions.
These are activated by a short press of the button. The
secondary functions in normal type are activated by
holding the button down until the function operates
- Disp/Enter - shows the current paddock number
selected (1 – 100).
- Up/Down arrows - used to scroll back and forth in some
options.
- Count - the number of readings is displayed. The
display will show a ‘c’ on the left side and the count on
the right. Holding the button down will take you to a
menu of other options described in sections 9 and 11.
- Avg/Reset - Pressing this button briefly for ‘Avg’ will
display the average height of your readings in clicks
(0.5cm). Holding it down for ‘Reset” will save the
average height to memory and reset all data ready for
the next paddock.
9.3 Startup / Self-test
- Switch On. The unit will beep and display ‘F200’ or
‘F300’. It may also beep 3 times and display ‘Lo’ if the
battery needs recharging. The current formula in use
will be displayed next with the ‘+’ part of the equation
first (default 500) and then the ‘x’ part second (default
140). The display will then show the kgDM/ha calculation
based on that formula and any readings stored in
memory.
- To clear the readings, press and hold the ‘Reset’ button
until the display shows ‘0.0’
F200 and F300 User Manual | 19
Page 20

There is one default plate equation and one custom (user
editable) equation. The former is built into the chip and
cannot be replaced or modified. This equation is typically
used between April and September in New Zealand.
The counter also provides an option for selecting your
own equation or those recommended by consultants,
DairyNZ or Beef + Lamb. When you receive your counter,
it will normally be setup for the DairyNZ recommended
equation for the autumn/winter months. Please refer to
Section 9 Current DairyNZ Equations for examples of the
DairyNZ equations.
20 | F200 and F300 User Manual
Page 21

10 - Current DairyNZ Equations
For your convenience the following are the equations
recommended by DairyNZ .
Months Rising Platemeter Equations Dairy Pastures
Winter (April-Sept)
October Platemeter Reading x 115 + 850
November Platemeter Reading x 120 + 1000
December Platemeter Reading x 140 + 1200
January Platemeter Reading x 165 + 1250
February Platemeter Reading x 185 + 1200
March Platemeter Reading x 170 + 1100
These formulas are in P-Plus already and to use them for
F200’s, you will need to manually enter them into your Plate
Meter. For F300’s you will need to upload them to your
Platemeter.
Platemeter Reading x 140 + 500
(Factory Default)
Equations may change without notice and are influenced
by seasonal differences. If you are unsure of the current
equation contact DairyNZ or your local consultant. There are
also different equations suited to summer, wet and irrigated
pasture that are not recorded here. Sheep and Beef pastures
differ in density to dairy pastures and will therefore require
different equations.
10.1 Entering Factory Default Formula
While the Platemeter is switched on, hold down the
‘Formula’ button. The display looks like this ‘F_ _ d’, press
the ‘Reset’ button briefly for the F200, or the ‘Enter’
button for the F300. The display will then show (500) and
then (140). The default formula has now been loaded and
saved to memory.
F200 and F300 User Manual | 21
Page 22

10.2 Entering Your Own Formula
10.2.1 F200 Entering Formula
To enter your own cover equation or one that may
have been recommended by a third party such as
your consultant, DairyNZ or Meat & Wool please do
the following:
- While the F200 is switched on, hold down the
‘Formula’ button. The display looks like this ‘F_ _
d’.
- Press the formula button again briefly then
change the ‘d’ (default) to ‘c’ (custom).
- Now press ‘Reset’ briefly and the display will look
like this: ‘0_ _ _’. This is the first of two numbers
you will enter. The first number is the equation
‘add’ number and the second the ‘multiply’
number. For example in the October equation
above, the first number (115) is the ‘multiply’
number and the second (850) is the ‘add’
number.
- The ‘add’ number is 4 digits long and can range
from 0 to 9999. Starting with the first digit,
press the ‘Formula’ button to change this digit
to a value from 0 to 9. Press the ‘reset’ button
when it is correct. NB: 850 for example would be
entered as (0850). The next digit will change to
a zero. Repeat this process until all 4 digits have
been entered. The display then changes to the
‘multiply’ number.
- The ‘multiply’ number has 3 digits and can range
from 0 to 199. The first digit will appear as ‘0’
Press the Formula button to change this digit to
a value of ‘0’ or ‘1’. Press the Reset button when it
is correct and the next digit will appear. The last
two digits can have values from ‘0’ to ‘9’. Repeat
this process until all digits are entered and the
display returns to its normal state.
22 | F200 and F300 User Manual
Page 23

10.2.2 F300 Entering Formula
To enter your own cover equation or one that may
have been recommended by a third party such as
your consultant, DairyNZ or Beef + Lamb please do
the following:
- While the F300 is switched on, hold down the
‘Menu’ button
- The display looks like this ‘F_ _ d’
- Press the ‘Up arrow’ button once to change the
‘d’ (default) to ‘c’ (custom).
- Now press ‘Enter’ and the display will show the
first figure of the current “add” equation and
may look like this: ‘0_ _ _’. This is the first of two
numbers you will enter.
- The first number is the equation ‘add’ number
and the second the ‘multiply’ number. For
example in the October equation in section 9
above, the number (115) is the ‘multiply’ number
and the (850) is the ‘add’ number.
- The ‘add’ number is 4 digits long and has to be
entered first. It and can range from 0 to 9999.
- Starting with the first digit, press the ‘Up arrow’
button to change this digit to a value from 0 to
9. Press the ‘Enter’ button when it is correct. NB:
850 for example would be entered as (0850).
- The next digit displayed, will be whatever figure
is part of the old formula. Use the ‘Up arrow’ to
change it, or press ‘Enter’ if it is correct.
- Repeat this process until all 4 digits have been
entered.
- The display then changes to the ‘multiply’
number which only has 3 figures.
- The ‘multiply’ number can range from 0 to 255.
- The first digit will appear as ‘0’, ‘1’ or ‘2’
F200 and F300 User Manual | 23
Page 24

- Press the ‘Up arrow’ button to change this digit
to the desired value of ‘0’, ‘1’ or ‘2’
- Press the ‘Enter’ button when it is correct and the
next digit will appear.
- The last two digits can be any value to create a
maximum number of 255.
Repeat this process until all digits are entered and press the
‘Enter’ button for the display to return to its normal state.
Your new formula is now active and saved to memory.
11 - Using the Correct Measuring Technique
Different platemeter measuring techniques can alter
pasture covers by as much as 600 kgDM/ha. This can be the
difference between thinking there is adequate or even surplus
pasture available and all is well, or pasture deficit and urgent
action is required.
All pasture measurement techniques require calibration
to convert the actual reading to dry matter. The technique
that is used when walking around the farm taking the
measurements needs to be the same as that used to calibrate
the Platemeter. This technique is to place the plate on top of
the pasture with no downward force, and then push the shaft
to ground level – making sure the plate is vertical when the
shaft hits the ground.
Taking measurements by holding the Platemeter 10cm or
more above the top of the pasture and plunging the plate
onto the pasture will give lower, incorrect readings. This is
because the downward force of the plate compresses the
pasture more than occurred when the calibrations were down,
giving a lower average height and cover readings.
24 | F200 and F300 User Manual
Page 25
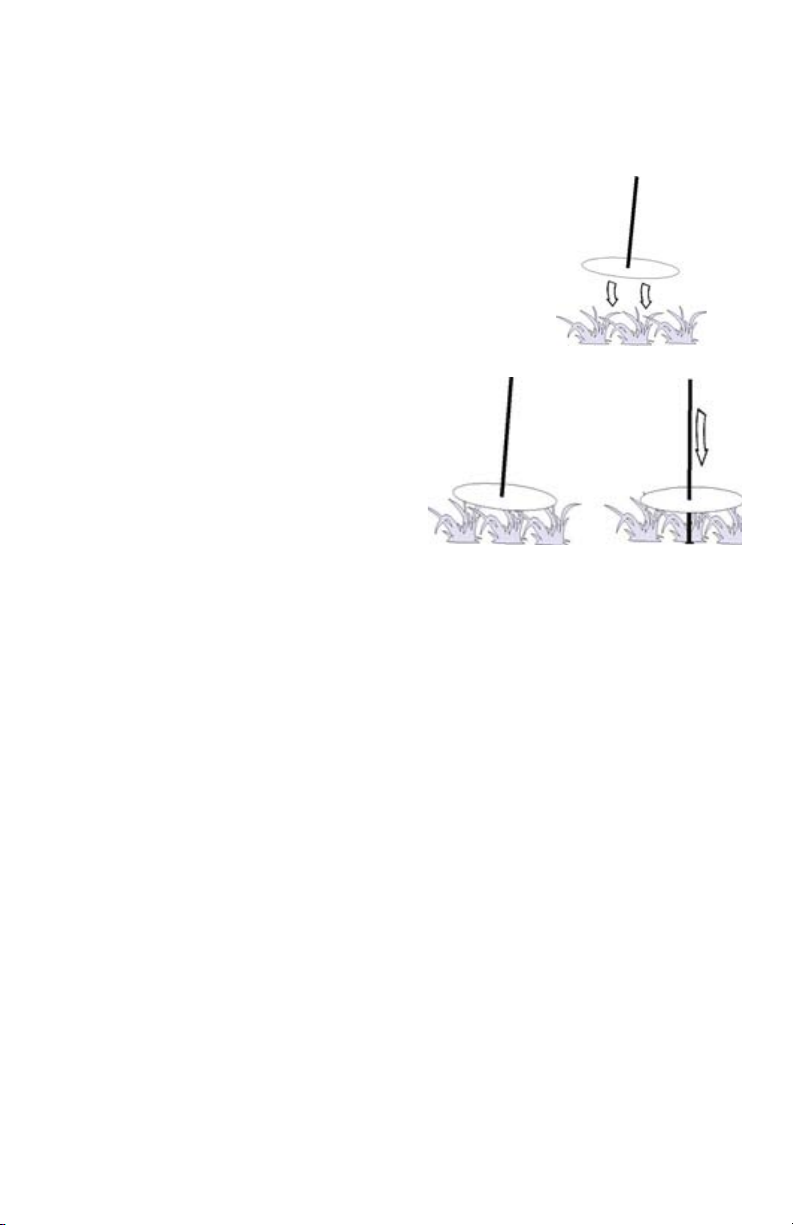
These two techniques are illustrated below: -
Incorrect Technique
The Platemeter is held above the pasture and
plunged in one movement onto the pasture.
The higher the plate is held and the greater the
force applied, the lower the reading will be.
Correct Technique
Place the plate on top of the
pasture with as little pressure as
possible.
Push the shaft down to ground
level with the shaft vertical.
When using the correct technique, no differences have been
found in the readings between the Platemeter and any
of the mechanical Platemeters. However, operators using
the incorrect technique will get lower readings with any
Platemeter than those using the correct technique.
F200 and F300 User Manual | 25
Page 26

12 - Taking Paddock Readings or
the Pasture Walk
IMPORTANT:
Please ensure that you wait for the Platemeter to beep at each plonk before
lifting, otherwise the reading will not be recorded.
For F200’s you can print off the Pasture Cover Walks “Cover Entry Form” from
your P-Plus software program before undertaking a pasture walk. This will
enable you to record each paddock height/cover for later inputting into the
program. It will also provide a copy of the previous two walks (if available) for
comparison.
12.1 F200 Pasture Walk
- Switch the unit on using the toggle switch at the back of
the unit.
- Reset by holding the ‘Reset’ button until the display
changes to ‘0’. This should be accompanied by 2 short
beeps.
- Walk across the paddock taking readings every few
paces. You will hear a beep every time a reading is
stored. The kgDM/ha is immediately recalculated and
displayed. The number of samples (plonks) to be taken
should range between 20 and 40 per paddock however
this will be determined by the variance existing in
the cover. You will hear 3 short beeps when you have
completed 29 plonks and one long beep when you reach
30.
- The recommended number of readings is 30. Plonks
need to be taken on a regular basis e.g. every five paces
to even out any variations; however, avoid stock camp
areas, tracks or uncharacteristic areas. The greater the
variability the greater the number of plonks you should
take.
- If you need to negotiate an obstacle (e.g. fence or creek)
switch the unit off so that no readings are taken if the
plate moves. On the other side of the obstacle, switch the
unit back on and continue taking readings.
26 | F200 and F300 User Manual
Page 27

- When you have completed the paddock, you can press
the ‘Avg’ button to show the average pasture cover,
although the F200 will default to kgDM/Ha.
- Write down the average height and/or the average cover.
- Repeat until you have completed every paddock.
- Switch the unit off using the toggle switch at the back.
12.2 F300 Pasture Walk
The F300 has the ability to save the recorded “average
height readings” to a specific paddock number that
you select on the F300. These readings can then be
downloaded from the F300 (via the mini USB cable) and
associated with your paddocks in your walk order (which
you need to have pre-defined in your P-Plus software
program).
- Switch the unit on using the toggle switch at the back of
the unit.
- If you are starting the first paddock, you will need to
make sure the F300 does not contain any old data.
- Press and hold the reset button until the display
changes to ‘0’. This should be accompanied by 2 short
beeps.
- Now press and hold the ‘Menu’ button. Press the ‘arrow’
button twice until you see P CL (paddock clear).
- Now press ‘Enter’ All recorded paddock data will be set
to ‘0’. Including any unsaved data in memory.
- Press and hold the ‘Enter’ button you will see E_ _
1. Pressing the ‘arrow’ button will scroll the numbers
upwards. If you want to scroll back, hold the ‘Count’
button while briefly pressing the arrow button. The
number will change to the previous paddock number.
The arrow (on its own) will now scroll the numbers
backwards. Stop at the number (this maybe your walk
order number) you want to record and press ‘Enter’.
F200 and F300 User Manual | 27
Page 28

The number is now set. You can check it at any time by
pressing ‘Disp’. NOTE: The paddock number needs to
match up with the paddock walk order number you have
defined in P-Plus.
- Walk across the paddock taking readings every few
paces. You will hear a beep every time a reading is
stored.
The kgDM/ha is immediately recalculated and displayed.
The number of samples (plonks) to be taken should
range between 20 and 40 per paddock however this
will be determined by the variance existing in the cover.
You will hear 3 short beeps when you have completed 29
plonks and one long beep when you reach 30. This is the
recommended minimum number of readings.
Plonks need to be taken on a regular basis e.g. every
five paces to even out any variations, however avoid
stock camp areas, tracks or uncharacteristic areas. The
greater the variability the greater the number of plonks
you should take.
If you need to negotiate an obstacle (e.g. fence or creek)
switch the unit off so that no readings are taken if the
plate moves. All data recorded so far is saved. On the
other side of the obstacle, switch the unit back on and
continue taking readings. If you make a mistake when
taking readings, the F300 has an ‘UNDO’ feature.
- Turn the unit off and then hold down the reset button
as you turn it back on. You will see the word ‘Undo’ on
the LCD, followed by the currently select equation, and
then the previous DM/kg reading will be displayed. The
count will also be one less. You can then carry on taking
readings from this point.
28 | F200 and F300 User Manual
Page 29

- When you have completed the paddock, hold the ‘Reset’
button. You will first be shown the average height of the
paddock, which is then saved to memory under that
paddock number. A small triangle icon will appear in
the top left-hand corner, indicating that paddock now
contains data.
- You will then need to select the next paddock.
Repeat this process until you have completed every
paddock.
12.2.1 View Saved Paddock Data
You can view the saved paddock data and paddock
numbers at any time by pressing the arrow key. The
display will first show the paddock number and the
average height that was recorded. Pressing the arrow
key again will show the next paddock with data in it.
Once the last recorded paddock (thus far) is displayed
the F300 will beep and return you to the normal display.
However, you can escape the paddock display function
at any time by pressing ‘Disp’.
12.2.2 Delete Single Paddock Data
To clear the data in a single paddock, press and hold the
ENTER button until you see E (n). Change the number to
the desired paddock and press ENTER. Now press and
hold the reset button. The display will show a “0”. Press
and hold the reset button again. The display will remain
at 0 and the triangle icon in the top left will disappear.
That paddock data has been deleted.
F200 and F300 User Manual | 29
Page 30

13 - FAQ’s and Trouble Shooting
For any issues that require you to send the Platemeter in for
repair, please contact us prior to sending it as we may be able
to offer troubleshooting assistance over the phone.
13.1 There is no visual display
Check Resolution
The Unit is switched on Switch the toggle switch on back
The battery is not flat Recharge the battery using Mini
If battery is not holding
charge
If you have just changed
a battery you may have
damaged the battery snap
(clip to top of the battery)
13.2 The counter does not “beep” when taking a reading
If it doesn’t beep this means the counter does not know
where the bottom is therefore does not record the “plonk”.
of unit
USB cable
Replace the Battery
Requires service – contact
Platemeters
Check Resolution
The counter can become uncalibrated if it receives a knock
and the cog jumps a notch on the
metal shaft.
30 | F200 and F300 User Manual
Zero calibrate. See section 8.
If the calibration fails to hold
then the potentiometer, which
the cog drives through the
shaft is probably faulty and will
need replacing. This can occur
with excessive wear often
compounded by dust and dirt
entering the dry bearing. You
will need to send the counter
to Platemeters for service and
repair
Page 31

Check Resolution
Ensure the cog is not slipping on
the silver shaft (potentiometer)
The cog has wound off. Replace – Request a spare cog
Replace the potentiometer and
cog. Send to Platemeters for
repair.
from Platemeters.
Potentiometer damaged. The
potentiometer is the silver shaft
that drives the cog. NB: Under
no circumstances should you
apply CRC or light oil to the
potentiometer. It is a dry bearing
and any lubricant will render the
potentiometer useless.
Check the metal shaft is coming
right back into the base of the
black tube. Ensure there is no
grass or soil build-up preventing
it from doing so. Also check the
large washer at the bottom of
the shaft is not catching on the
bottom of the plate.
Check the cog is running smoothly
on the shaft. If the counter is
mounted too close to the metal
shaft there will be quite a lot of
friction when taking a reading.
If the counter is mounted too far
away from the metal shaft; the
cog is liable to jump a notch easily
Send to Platemeters for service
and repair.
Clean the Platemeter and zero
calibrate if required.
Re-assemble the Platemeter.
13.3 Cog becoming worn
Check Resolution
Not aligned correctly on the shaft. Re-align the cog or replace the
cog Order from Platemeters.
F200 and F300 User Manual | 31
Page 32

13.4 The counter continuously beeps and eventually turns off
Check Resolution
This is normally due to a low
battery. The counter requires a
given level of power to operate
correctly. If the battery doesn’t
have sufficient power it may
continuously beep to warn
you. Remember if you turn the
counter off for a few minutes
it may recover slightly but the
problem will not go away.
Recharge the battery.
Battery may be due for
replacement.
13.5 Cog not running freely
Check Resolution
Metal shaft is bent. Straighten or request a
Grass or soil build-up inside the
black tube.
Flutes on steel shaft have
become filled with grass or soil.
replacement part from
Platemeters.
Clean the Platemeter.
Clean the Platemeter.
13.6 Counter Readings do not seem accurate
Check Resolution
The counter is like a calculator – it
does not give false readings under
normal circumstances.
32 | F200 and F300 User Manual
Check the equation being used
is correct and the calibration has
been correctly set (zeroed).
See section 9 Current DairyNZ
Equations and Section 8 How to
Calibrate Your Platemeter.
Page 33

13.7 Battery retainer falling out
Check Resolution
The counter screws have not been
tightened sufficiently.
Make sure the center screw is
re-tightened after the battery is
replaced or ensure the battery retainer is properly clicked into place.
13.8 Front panel or membrane problems
Check Resolution
Buttons not clicking or
activating.
First, check that the Platemeter
is calibrated – see section 6
How to Calibrate Your Platemeter.
Service – membrane needs
replacing. Send to Platemeters
for service and repair.
13.9 How do I change the formula?
See section 10 Current Dairy Equations
If you require assistance with setting up your Platemeter
or with installing P-Plus Pasture Covers software, please
contact us.
F200 and F300 User Manual | 33
Page 34

14 - Servicing and Repairs
If a fault develops with your Platemeter, in the first instance
call us as we may be able to troubleshoot issues over the
phone. Platemeter parts are also available to purchase
though our website.
If the Platemeter needs repairing, remove the counter from
the shaft and send for servicing to:
Platemeters Limited
275 Cameron Road
Tauranga 3110, New Zealand
A standard service charge including return freight (in NZ)
applies to all repairs. If you are outside New Zealand please
contact your local distributor, or contact us if you are unsure
whe this is.
34 | F200 and F300 User Manual
Page 35

Thank you.
THANKS AGAIN FOR CHOOSING TO MAKE YOUR PASTURE
MANAGEMENT SIMPLE
WITH THE F200 OR F300 PLATEMETER
If you need any further information or support,
please contact us.
www.platemeters.co.nz [email protected]
facebook.com/platemeters
Platemeters Limited, 275 Cameron Road, Tauranga 3110, New Zealand
0800 577 505
Page 36

www.platemeters.co.nz
 Loading...