

Plasmon D875, D2175 User Manual
The Plasmon Enterprise
D-Series
D875 - D2175 Libraries ~ DVD Drive
User Manual
P/N 97704577 E


PREFACE
Copyright
Copyright 2004 by Plasmon®. All rights reserved. This document and the information contained herein
are the property of Plasmon. No part of this document may be reproduced, transmitted, transcribed,
stored in a retrieval system, or translated into any language or computer language in any form or by
any means, electronic, mechanical, magnetic, optical, chemical, manual, or otherwise, without the
express written permission of Plasmon.
United States Office
Plasmon
4425 ArrowsWest Drive
Colorado Springs, CO 80907-3489
European Headquarters, UK
Plasmon Data Limited
Whiting Way
Melbourn, Herts. SG8 6EN
Disclaimer
Plasmon makes no representation or warranties with respect to the contents of this document and
specifically disclaims any implied warranties of merchantability or fitness for any particular purpose.
Further, Plasmon reserves the right to revise this publication without obligation of Plasmon to notify any
person or organization of such revision or changes.
Trademark Notices
Plasmon is a U.S. registered trademark of Plasmon. Rotation Station is a trademark of Plasmon. All
other product names are trademarks or registered trademarks of their respective owners.
Plasmon D875 - D2175 User Manual Preface
Document Revision E Page 1

Revision History
Revision Date Description
A September 2002 Initial release.
B November 2002 Updated installation information.
C March 2003 Updated to include Multi Drive.
D June 2003 Minor updates from Service.
E October 2004 Updated format and presentation. Added bay pack-
The most current information about this product is available on the
Plasmon web site (www.plasmon.com, or www.plasmon.co.uk).
ing to Ch 2.
NOTE
Preface Plasmon D875 - D2175 User Manual
Page 2 Document Revision E
Conventions Used
A WARNING is used to alert the reader to situations or conditions
that could potentially result in personal injury, fire hazard, or
equipment damage.
A CAUTION is used to warn of undesirable procedures, or of
situations in which equipment damage could result.
WARNING
CAUTION
NOTE
A NOTE is used to emphasize an area of text or to provide
additional information.
Plasmon D875 - D2175 User Manual Preface
Document Revision E Page 3

Product Warranty
This Plasmon library is warranted free from defects in materials, parts, and workmanship and to
conform to the current product specification upon delivery. For the specific details of your warranty,
refer to your sales contract or contact the company from which the library was purchased.
The Plasmon quality system is in compliance with and registered to ISO9001:2000. All products are
assembled from new or remanufactured parts.
The warranty for the library shall not apply to failures of any unit when:
• The library is repaired by anyone other than Plasmon personnel or approved agent.
• The library is physically abused or is used in a manner that is inconsistent with the operating
instructions or product specification defined by Plasmon.
• The library is used with incompatable software and or firmware.
• The library fails because of accident, misuse, abuse, neglect, mishandling, misapplication,
alteration, faulty installation, modification, or service by anyone other than the factory service
center or its approved agent.
• The library is repaired by anyone, including an approved agent, in a manner that is contrary to the
maintenance or installation instructions supplied by Plasmon.
• The Plasmon serial number tag is removed.
• The library is damaged because of improper packaging on return.
CAUTION
Returning the library in unauthorized packaging may damage the
unit and void the warranty.
If problems with the library occur, contact your maintenance
organization. Do not void the product warranty by allowing
untrained or unauthorized personnel to attempt repairs.
WARNING
Untrained personnel operating the library may create dangerous
situations. This could lead to physical harm to the operator, data
loss, or disabling of the library system.
Please review and observe all safety rules concerning the
operation of the library.
Preface Plasmon D875 - D2175 User Manual
Page 4 Document Revision E

TABLE OF CONTENTS
PREFACE . . . . . . . . . . . . . . . . . . . . . . . . . . . . . . . . . . . . . . . . . . . . . . . . . 1
Copyright . . . . . . . . . . . . . . . . . . . . . . . . . . . . . . . . . . . . . . . . . . . . . . . . . . . . . . . . . . . . . .1
Disclaimer . . . . . . . . . . . . . . . . . . . . . . . . . . . . . . . . . . . . . . . . . . . . . . . . . . . . . . . . . . . . .1
Trademark Notices. . . . . . . . . . . . . . . . . . . . . . . . . . . . . . . . . . . . . . . . . . . . . . . . . . . . . . .1
Revision History . . . . . . . . . . . . . . . . . . . . . . . . . . . . . . . . . . . . . . . . . . . . . . . . . . . . . . . . .2
Conventions Used . . . . . . . . . . . . . . . . . . . . . . . . . . . . . . . . . . . . . . . . . . . . . . . . . . . . . . .3
Product Warranty . . . . . . . . . . . . . . . . . . . . . . . . . . . . . . . . . . . . . . . . . . . . . . . . . . . . . . . .4
LIST OF FIGURES . . . . . . . . . . . . . . . . . . . . . . . . . . . . . . . . . . . . . . . . . . . 7
IST OF TABLES . . . . . . . . . . . . . . . . . . . . . . . . . . . . . . . . . . . . . . . . . . . . 9
L
HAPTER 1
C
RODUCT OVERVIEW . . . . . . . . . . . . . . . . . . . . . . . . . . . . . . . . . . . . . . . 11
P
General Information . . . . . . . . . . . . . . . . . . . . . . . . . . . . . . . . . . . . . . . . . . . . . . . . . . . . . 11
Library Models . . . . . . . . . . . . . . . . . . . . . . . . . . . . . . . . . . . . . . . . . . . . . . . . . . . . . . . . . . . . 11
Command Processing . . . . . . . . . . . . . . . . . . . . . . . . . . . . . . . . . . . . . . . . . . . . . . . . . . . . . . 11
Media Movement . . . . . . . . . . . . . . . . . . . . . . . . . . . . . . . . . . . . . . . . . . . . . . . . . . . . . . . . . . 11
Bulk Loading and Unloading Media . . . . . . . . . . . . . . . . . . . . . . . . . . . . . . . . . . . . . . . . . . . . 11
The Magazine . . . . . . . . . . . . . . . . . . . . . . . . . . . . . . . . . . . . . . . . . . . . . . . . . . . . . . . . .12
Media and Magazine Handling . . . . . . . . . . . . . . . . . . . . . . . . . . . . . . . . . . . . . . . . . . . . . . . . 13
Major Hardware Components . . . . . . . . . . . . . . . . . . . . . . . . . . . . . . . . . . . . . . . . . . . . .14
Front Access Door . . . . . . . . . . . . . . . . . . . . . . . . . . . . . . . . . . . . . . . . . . . . . . . . . . . . . . . . . 14
Front Panel Display . . . . . . . . . . . . . . . . . . . . . . . . . . . . . . . . . . . . . . . . . . . . . . . . . . . . . . . . 14
Magazine Access Door. . . . . . . . . . . . . . . . . . . . . . . . . . . . . . . . . . . . . . . . . . . . . . . . . . . . . . 14
Magazine Slots . . . . . . . . . . . . . . . . . . . . . . . . . . . . . . . . . . . . . . . . . . . . . . . . . . . . . . . . . . . . 14
Import/Export Port (I/E). . . . . . . . . . . . . . . . . . . . . . . . . . . . . . . . . . . . . . . . . . . . . . . . . . . . . . 15
Drive Modules. . . . . . . . . . . . . . . . . . . . . . . . . . . . . . . . . . . . . . . . . . . . . . . . . . . . . . . . . . . . . 15
Main Power Switch and Power Cable . . . . . . . . . . . . . . . . . . . . . . . . . . . . . . . . . . . . . . . . . . 15
SCSI Interface . . . . . . . . . . . . . . . . . . . . . . . . . . . . . . . . . . . . . . . . . . . . . . . . . . . . . . . . . . . . 15
Power Supplies. . . . . . . . . . . . . . . . . . . . . . . . . . . . . . . . . . . . . . . . . . . . . . . . . . . . . . . . . . . . 15
Rear Access Door . . . . . . . . . . . . . . . . . . . . . . . . . . . . . . . . . . . . . . . . . . . . . . . . . . . . . . . . . 16
Lift Assembly . . . . . . . . . . . . . . . . . . . . . . . . . . . . . . . . . . . . . . . . . . . . . . . . . . . . . . . . . . . . . 16
Media Transport Element (MTE) . . . . . . . . . . . . . . . . . . . . . . . . . . . . . . . . . . . . . . . . . . . . . . 16
Rotation Station . . . . . . . . . . . . . . . . . . . . . . . . . . . . . . . . . . . . . . . . . . . . . . . . . . . . . . . . . . . 16
Storage Slot Map . . . . . . . . . . . . . . . . . . . . . . . . . . . . . . . . . . . . . . . . . . . . . . . . . . . . . . . . . . 16
CHAPTER 2
LIBRARY INSTALLATION . . . . . . . . . . . . . . . . . . . . . . . . . . . . . . . . . . . . . 17
Getting Started . . . . . . . . . . . . . . . . . . . . . . . . . . . . . . . . . . . . . . . . . . . . . . . . . . . . . . . . .17
Unpacking the Library. . . . . . . . . . . . . . . . . . . . . . . . . . . . . . . . . . . . . . . . . . . . . . . . . . . . . . . 17
Library Position. . . . . . . . . . . . . . . . . . . . . . . . . . . . . . . . . . . . . . . . . . . . . . . . . . . . . . . . . . . . 17
Library Environment . . . . . . . . . . . . . . . . . . . . . . . . . . . . . . . . . . . . . . . . . . . . . . . . . . . . . . . . 18
Power Cable and Power Switch . . . . . . . . . . . . . . . . . . . . . . . . . . . . . . . . . . . . . . . . . . . . . . . 18
Removing Internal Packing Material . . . . . . . . . . . . . . . . . . . . . . . . . . . . . . . . . . . . . . . . . . . . 18
Plasmon D875 - D2175 User Manual Table of Contents
Document Revision E Page 5

Library Initialization. . . . . . . . . . . . . . . . . . . . . . . . . . . . . . . . . . . . . . . . . . . . . . . . . . . . . . . . . 19
SCSI Connection . . . . . . . . . . . . . . . . . . . . . . . . . . . . . . . . . . . . . . . . . . . . . . . . . . . . . . .20
Loading Media . . . . . . . . . . . . . . . . . . . . . . . . . . . . . . . . . . . . . . . . . . . . . . . . . . . . . . . . .21
Identifying Storage Slots. . . . . . . . . . . . . . . . . . . . . . . . . . . . . . . . . . . . . . . . . . . . . . . . . . . . . 23
D1525 - D2175 Bay Installation . . . . . . . . . . . . . . . . . . . . . . . . . . . . . . . . . . . . . . . . . . . .24
Library Packing Instructions. . . . . . . . . . . . . . . . . . . . . . . . . . . . . . . . . . . . . . . . . . . . . . .28
Packing Instructions (D1525 - D2175 Expansion Bays) . . . . . . . . . . . . . . . . . . . . . . . . .32
CHAPTER 3
ENU SYSTEM . . . . . . . . . . . . . . . . . . . . . . . . . . . . . . . . . . . . . . . . . . . . 39
M
Navigating the Menu System . . . . . . . . . . . . . . . . . . . . . . . . . . . . . . . . . . . . . . . . . . . . . .39
Power Up Menu Options . . . . . . . . . . . . . . . . . . . . . . . . . . . . . . . . . . . . . . . . . . . . . . . . .41
Main Menu Overview . . . . . . . . . . . . . . . . . . . . . . . . . . . . . . . . . . . . . . . . . . . . . . . . . . . .42
Library Status Menu Overview . . . . . . . . . . . . . . . . . . . . . . . . . . . . . . . . . . . . . . . . . . . . . . . . 44
Set Up Library Menu Overview. . . . . . . . . . . . . . . . . . . . . . . . . . . . . . . . . . . . . . . . . . . . . . . . 47
APPENDIX A
SPECIFICATIONS . . . . . . . . . . . . . . . . . . . . . . . . . . . . . . . . . . . . . . . . . . . 51
Overall Library Specifications. . . . . . . . . . . . . . . . . . . . . . . . . . . . . . . . . . . . . . . . . . . . . .51
Power Cable Specification . . . . . . . . . . . . . . . . . . . . . . . . . . . . . . . . . . . . . . . . . . . . . . . .53
SCSI Cable Specification. . . . . . . . . . . . . . . . . . . . . . . . . . . . . . . . . . . . . . . . . . . . . . . . .53
SCSI Cables and Connectors. . . . . . . . . . . . . . . . . . . . . . . . . . . . . . . . . . . . . . . . . . . . . . . . . 53
SCSI Cable Length. . . . . . . . . . . . . . . . . . . . . . . . . . . . . . . . . . . . . . . . . . . . . . . . . . . . . . . . . 53
SCSI Termination . . . . . . . . . . . . . . . . . . . . . . . . . . . . . . . . . . . . . . . . . . . . . . . . . . . . . . . . . . 53
APPENDIX B
SCSI BUS INFORMATION . . . . . . . . . . . . . . . . . . . . . . . . . . . . . . . . . . . . 55
SCSI Bus Configurations . . . . . . . . . . . . . . . . . . . . . . . . . . . . . . . . . . . . . . . . . . . . . . . . .55
Single Bus Configuration . . . . . . . . . . . . . . . . . . . . . . . . . . . . . . . . . . . . . . . . . . . . . . . . . . . . 55
Dual Bus Configuration. . . . . . . . . . . . . . . . . . . . . . . . . . . . . . . . . . . . . . . . . . . . . . . . . . . . . . 56
Triple Bus Configuration . . . . . . . . . . . . . . . . . . . . . . . . . . . . . . . . . . . . . . . . . . . . . . . . . . . . . 57
SCSI ID Configuration . . . . . . . . . . . . . . . . . . . . . . . . . . . . . . . . . . . . . . . . . . . . . . . . . . .58
Drive Combinations . . . . . . . . . . . . . . . . . . . . . . . . . . . . . . . . . . . . . . . . . . . . . . . . . . . . .59
APPENDIX C
SAFETY AGENCY STANDARD. . . . . . . . . . . . . . . . . . . . . . . . . . . . . . . . . . 61
FCC Notice . . . . . . . . . . . . . . . . . . . . . . . . . . . . . . . . . . . . . . . . . . . . . . . . . . . . . . . . . . .61
Industry Canadian Notice per ICES-003 . . . . . . . . . . . . . . . . . . . . . . . . . . . . . . . . . . . . .61
Australia / New Zealand. . . . . . . . . . . . . . . . . . . . . . . . . . . . . . . . . . . . . . . . . . . . . . . . . .61
Taiwan (BSMI) Class A Warning Statement. . . . . . . . . . . . . . . . . . . . . . . . . . . . . . . . . . .62
Laser Safety Notice . . . . . . . . . . . . . . . . . . . . . . . . . . . . . . . . . . . . . . . . . . . . . . . . . . . . .62
CDRH Regulations. . . . . . . . . . . . . . . . . . . . . . . . . . . . . . . . . . . . . . . . . . . . . . . . . . . . . .62
Lithium Battery . . . . . . . . . . . . . . . . . . . . . . . . . . . . . . . . . . . . . . . . . . . . . . . . . . . . . . . . .62
APPENDIX D
RROR CODES . . . . . . . . . . . . . . . . . . . . . . . . . . . . . . . . . . . . . . . . . . . . 63
E
NDEX . . . . . . . . . . . . . . . . . . . . . . . . . . . . . . . . . . . . . . . . . . . . . . . . . . . 85
I
ONTACTING PLASMON . . . . . . . . . . . . . . . . . . . . . . . . . . . . . . . . . . . . . 87
C
Table of Contents Plasmon D875 - D2175 User Manual
Page 6 Document Revision E

LIST OF FIGURES
The Bulk Loading Magazine . . . . . . . . . . . . . . . . . . . . . . . . . . . . . . . . . . . . . . . . . . . . . . . . . . . . . . . . 12
D875 - D2175 Library, Front View . . . . . . . . . . . . . . . . . . . . . . . . . . . . . . . . . . . . . . . . . . . . . . . . . . . . 14
D875 - D2175 Library, Rear View . . . . . . . . . . . . . . . . . . . . . . . . . . . . . . . . . . . . . . . . . . . . . . . . . . . . 16
Space Planning for the Library . . . . . . . . . . . . . . . . . . . . . . . . . . . . . . . . . . . . . . . . . . . . . . . . . . . . . . 17
D875 - D2175 Power Connector and Power Switch . . . . . . . . . . . . . . . . . . . . . . . . . . . . . . . . . . . . . . 18
Removing the Packing Foam from the MTE . . . . . . . . . . . . . . . . . . . . . . . . . . . . . . . . . . . . . . . . . . . . 19
Connecting the SCSI Interface . . . . . . . . . . . . . . . . . . . . . . . . . . . . . . . . . . . . . . . . . . . . . . . . . . . . . . 20
Magazine Slots . . . . . . . . . . . . . . . . . . . . . . . . . . . . . . . . . . . . . . . . . . . . . . . . . . . . . . . . . . . . . . . . . . 21
Slot Storage Map. . . . . . . . . . . . . . . . . . . . . . . . . . . . . . . . . . . . . . . . . . . . . . . . . . . . . . . . . . . . . . . . . 23
Expansion Bay Installation (a) . . . . . . . . . . . . . . . . . . . . . . . . . . . . . . . . . . . . . . . . . . . . . . . . . . . . . . . 24
Expansion Bay Installation (b) . . . . . . . . . . . . . . . . . . . . . . . . . . . . . . . . . . . . . . . . . . . . . . . . . . . . . . . 25
Expansion Bay Installation (c) . . . . . . . . . . . . . . . . . . . . . . . . . . . . . . . . . . . . . . . . . . . . . . . . . . . . . . . 26
Expansion Bay Installation (d) . . . . . . . . . . . . . . . . . . . . . . . . . . . . . . . . . . . . . . . . . . . . . . . . . . . . . . . 26
Expansion Bay Installation (e) . . . . . . . . . . . . . . . . . . . . . . . . . . . . . . . . . . . . . . . . . . . . . . . . . . . . . . . 27
Expansion Bay Installation (f) . . . . . . . . . . . . . . . . . . . . . . . . . . . . . . . . . . . . . . . . . . . . . . . . . . . . . . . 27
Packing the D875 - D2175 Libraries (a) . . . . . . . . . . . . . . . . . . . . . . . . . . . . . . . . . . . . . . . . . . . . . . . 28
Packing the D875 - D2175 Libraries (b) . . . . . . . . . . . . . . . . . . . . . . . . . . . . . . . . . . . . . . . . . . . . . . . 29
Packing the D875 - D2175 Libraries (c) . . . . . . . . . . . . . . . . . . . . . . . . . . . . . . . . . . . . . . . . . . . . . . . 29
Packing the D875 - D2175 Libraries (d) . . . . . . . . . . . . . . . . . . . . . . . . . . . . . . . . . . . . . . . . . . . . . . . 30
Packing the D875 - D2175 Libraries (e) . . . . . . . . . . . . . . . . . . . . . . . . . . . . . . . . . . . . . . . . . . . . . . . 30
Packing the D875 - D2175 Libraries (f) . . . . . . . . . . . . . . . . . . . . . . . . . . . . . . . . . . . . . . . . . . . . . . . . 31
Expansion Bay Packing (a) . . . . . . . . . . . . . . . . . . . . . . . . . . . . . . . . . . . . . . . . . . . . . . . . . . . . . . . . . 32
Expansion Bay Packing (b) . . . . . . . . . . . . . . . . . . . . . . . . . . . . . . . . . . . . . . . . . . . . . . . . . . . . . . . . . 33
Expansion Bay Packing (c) . . . . . . . . . . . . . . . . . . . . . . . . . . . . . . . . . . . . . . . . . . . . . . . . . . . . . . . . . 33
Expansion Bay Packing (d) . . . . . . . . . . . . . . . . . . . . . . . . . . . . . . . . . . . . . . . . . . . . . . . . . . . . . . . . . 34
Expansion Bay Packing (e) . . . . . . . . . . . . . . . . . . . . . . . . . . . . . . . . . . . . . . . . . . . . . . . . . . . . . . . . . 34
Expansion Bay Packing (f) . . . . . . . . . . . . . . . . . . . . . . . . . . . . . . . . . . . . . . . . . . . . . . . . . . . . . . . . . 35
Expansion Bay Packing (g) . . . . . . . . . . . . . . . . . . . . . . . . . . . . . . . . . . . . . . . . . . . . . . . . . . . . . . . . . 35
Expansion Bay Packing (h) . . . . . . . . . . . . . . . . . . . . . . . . . . . . . . . . . . . . . . . . . . . . . . . . . . . . . . . . . 36
Expansion Bay Packing (i). . . . . . . . . . . . . . . . . . . . . . . . . . . . . . . . . . . . . . . . . . . . . . . . . . . . . . . . . . 36
Expansion Bay Packing (j). . . . . . . . . . . . . . . . . . . . . . . . . . . . . . . . . . . . . . . . . . . . . . . . . . . . . . . . . . 37
LCD Display Format . . . . . . . . . . . . . . . . . . . . . . . . . . . . . . . . . . . . . . . . . . . . . . . . . . . . . . . . . . . . . . 39
Power Up LCD Display . . . . . . . . . . . . . . . . . . . . . . . . . . . . . . . . . . . . . . . . . . . . . . . . . . . . . . . . . . . . 41
Main Menu Overview. . . . . . . . . . . . . . . . . . . . . . . . . . . . . . . . . . . . . . . . . . . . . . . . . . . . . . . . . . . . . . 42
Library Status Menu Options . . . . . . . . . . . . . . . . . . . . . . . . . . . . . . . . . . . . . . . . . . . . . . . . . . . . . . . . 44
Set Up Library Menu Options . . . . . . . . . . . . . . . . . . . . . . . . . . . . . . . . . . . . . . . . . . . . . . . . . . . . . . . 47
Single Bus Configuration . . . . . . . . . . . . . . . . . . . . . . . . . . . . . . . . . . . . . . . . . . . . . . . . . . . . . . . . . . . 55
Dual Bus Configuration . . . . . . . . . . . . . . . . . . . . . . . . . . . . . . . . . . . . . . . . . . . . . . . . . . . . . . . . . . . . 56
Triple Bus Configuration . . . . . . . . . . . . . . . . . . . . . . . . . . . . . . . . . . . . . . . . . . . . . . . . . . . . . . . . . . . 57
Plasmon D875 - D2175 User Manual List of Figures
Document Revision E Page 7

List of Figures Plasmon D875 - D2175 User Manual
Page 8 Document Revision E

LIST OF TABLES
D875 - D2175 Library Models . . . . . . . . . . . . . . . . . . . . . . . . . . . . . . . . . . . . . . . . . . . . . . . . . . . . . . . 11
Plasmon Pre-loaded Media . . . . . . . . . . . . . . . . . . . . . . . . . . . . . . . . . . . . . . . . . . . . . . . . . . . . . . . . . 12
Magazine Slot LED Indicators . . . . . . . . . . . . . . . . . . . . . . . . . . . . . . . . . . . . . . . . . . . . . . . . . . . . . . . 22
Organization of Media in the Library . . . . . . . . . . . . . . . . . . . . . . . . . . . . . . . . . . . . . . . . . . . . . . . . . . 23
LCD Symbols. . . . . . . . . . . . . . . . . . . . . . . . . . . . . . . . . . . . . . . . . . . . . . . . . . . . . . . . . . . . . . . . . . . . 40
Power Up LCD Symbols . . . . . . . . . . . . . . . . . . . . . . . . . . . . . . . . . . . . . . . . . . . . . . . . . . . . . . . . . . . 41
Main Menu Selections . . . . . . . . . . . . . . . . . . . . . . . . . . . . . . . . . . . . . . . . . . . . . . . . . . . . . . . . . . . . . 43
Library Status Menu Selections. . . . . . . . . . . . . . . . . . . . . . . . . . . . . . . . . . . . . . . . . . . . . . . . . . . . . . 45
Set Up Library Menu Selections . . . . . . . . . . . . . . . . . . . . . . . . . . . . . . . . . . . . . . . . . . . . . . . . . . . . . 48
D875 - D2175 Specifications . . . . . . . . . . . . . . . . . . . . . . . . . . . . . . . . . . . . . . . . . . . . . . . . . . . . . . . . 51
Media Specifications . . . . . . . . . . . . . . . . . . . . . . . . . . . . . . . . . . . . . . . . . . . . . . . . . . . . . . . . . . . . . . 52
Maximum Allowable SCSI Cable Length (LVD) . . . . . . . . . . . . . . . . . . . . . . . . . . . . . . . . . . . . . . . . . 53
Factory Default SCSI IDs for the D875 - D2175 Libraries . . . . . . . . . . . . . . . . . . . . . . . . . . . . . . . . . . 58
SCSI Bus and Drive Combinations . . . . . . . . . . . . . . . . . . . . . . . . . . . . . . . . . . . . . . . . . . . . . . . . . . . 59
D875 - D2175 Error Codes . . . . . . . . . . . . . . . . . . . . . . . . . . . . . . . . . . . . . . . . . . . . . . . . . . . . . . . . . 64
Plasmon D875 - D2175 User Manual List of Tables
Document Revision E Page 9

List of Tables Plasmon D875 - D2175 User Manual
Page 10 Document Revision E

CHAPTER 1
PRODUCT OVERVIEW
General Information
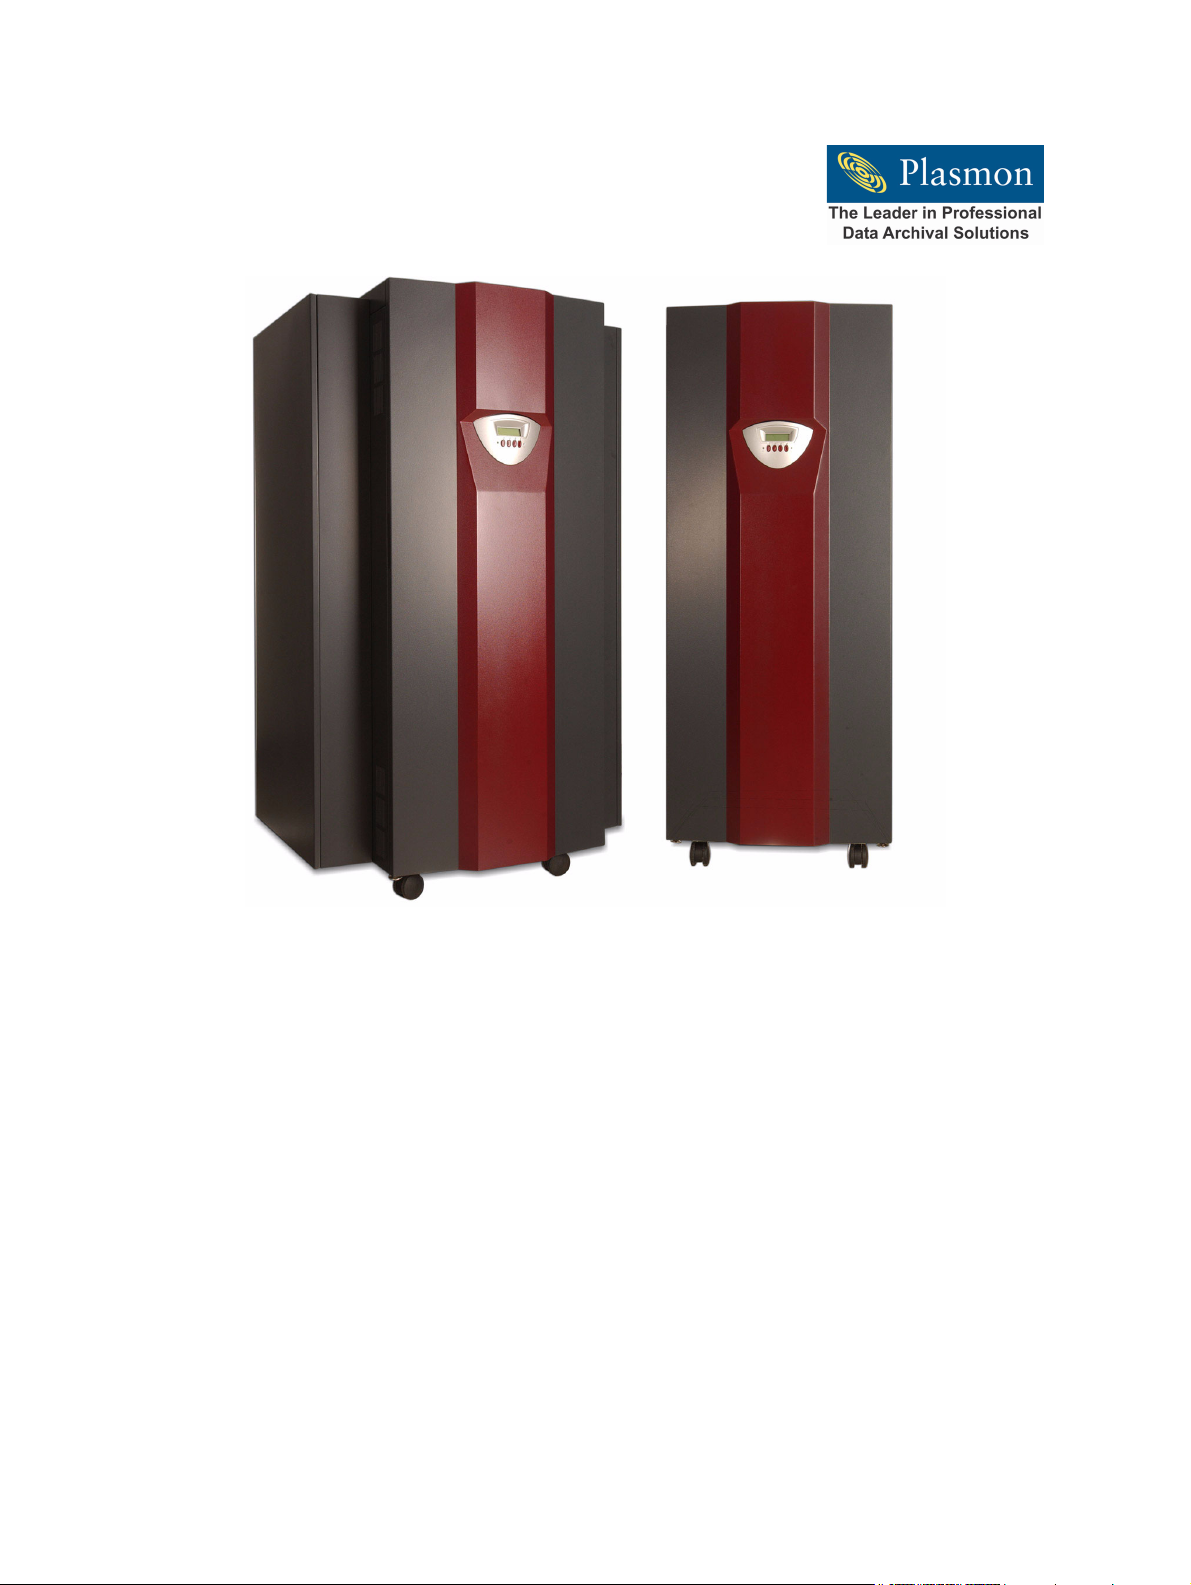
The D875 - D2175 libraries make multiple CD-R, CD-RW, DVD-R, DVD-RAM, and DVD-RW media
available to computer systems for reading and writing using Multi Drive technology. These libraries are
scalable with capacities ranging from 750 to 2175 media. A media transport element (MTE) with a dual
picker makes rapid media exchanges and provides high performance in a multi-user environment. A
patented Rotation Station
Library Models
This manual covers the following Plasmon libraries:
™ allows use of both single and double sided media.
Table 1. D875 - D2175 Library Models
Model Number of Media Slots Number of Drives
D875 750 to 875 2 to 12
D1525 1400 to 1525 2 to 12
D2175 2050 to 2175 2 to 12
The number of media slots varies because adding a drive module, which holds two drives, subtracts 25
media storage slots.
Command Processing
The library responds to SCSI commands from a host computer system to load and unload drives, and
move media within the library.
Media Movement
The media transport element (MTE) is used to move media between the media storage area and the
drives or the I/E port. To speed the process, the MTE can hold two pieces of media simultaneously.
Bulk Loading and Unloading Media
Bulk loading and unloading of media is performed by using the ten slot magazines, and the Bulk Load
Library and Bulk Unload Library front panel menu options.
Plasmon D875 - D2175 User Manual Product Overview
Document Revision E Page 11
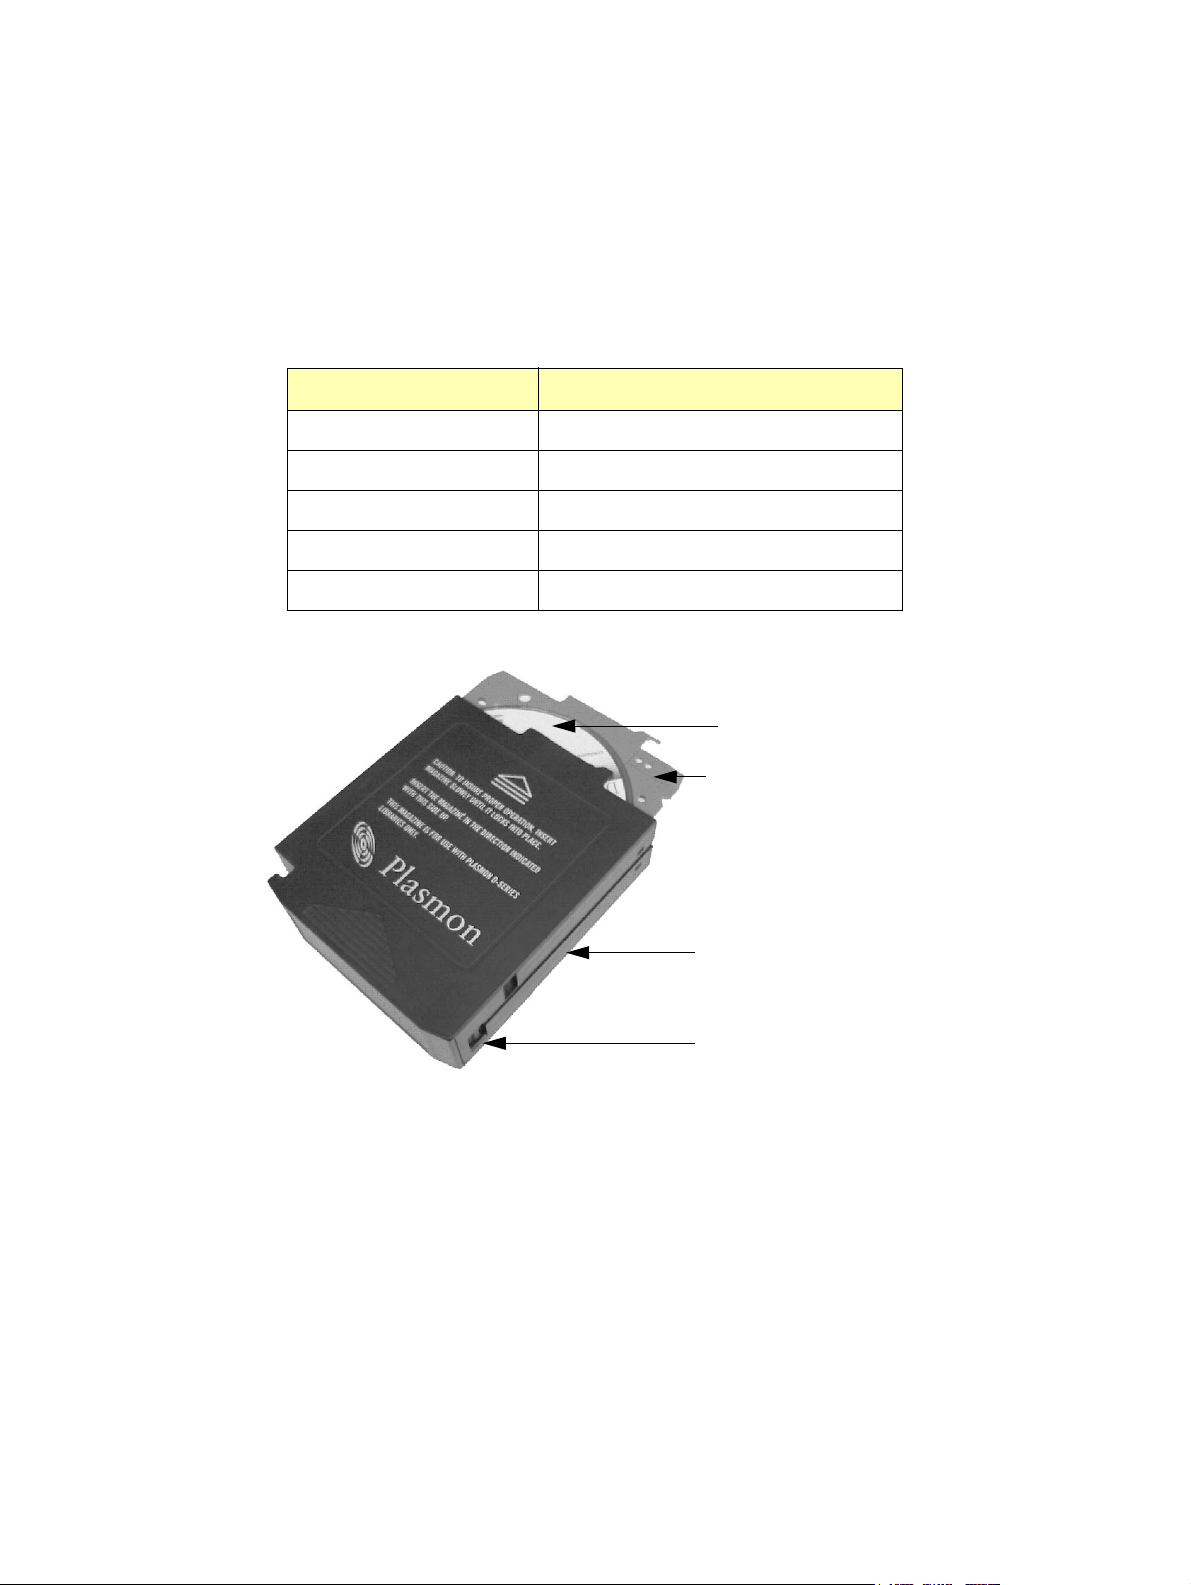
The Magazine
The Plasmon D875 - D2175 library uses CD-R, CD-RW, DVD-R, DVD-RAM, and DVD-RW pre-loaded
media in a ten slot magazine. Packs of 40 pieces of media are also available. Contact Plasmon for
ordering information. In the US, Asia/Pacific, South America, and Canada call 1-800-451-6845. In
Europe, Middle East, and Africa call +44 (0) 1763 262 963.
Table 2. Plasmon Pre-loaded Media
Media Type Capacity
DVD-R 9.4 GB (dual sides)
DVD-R 4.7 GB (single sided)
DVD-RAM 9.4 GB (dual sided)
DVD-RAM 4.7 GB (single sided)
DVD-RAM 2.6 GB (single sided)
Media
Media
Tray
Magazine
Media Tray Release
Figure 1. The Bulk Loading Magazine
Product Overview Plasmon D875 - D2175 User Manual
Page 12 Document Revision E

Media and Magazine Handling
To maintain maximum system reliability, the operator should take the time to inspect and clean each
magazine before loading into the library.
CAUTION
Always condition the media to the normal operating temperature
of the room before using them.
Improper handling or an inappropriate environment can damage the media, the magazine, or media
trays. To ensure continued reliability, observe the following:
• When loading a magazine into the library or when handling a magazine, ensure that the case is
clean. Dirty magazines can cause problems in loading or the loss of written data.
• Do not load damaged media trays into a magazine or the library. Damaged media trays can
interfere with system robotics.
• Do not expose the media to moisture or direct sunlight.
NOTE
Plasmon can not guarantee error free library operation if media is
not purchased from Plasmon.
Plasmon supplied media are packaged in a clean room and
quality inspected to ensure error free library operation.
Plasmon D875 - D2175 User Manual Product Overview
Document Revision E Page 13
Major Hardware Components
The following figures show the locations of major library hardware components. A brief description of
these components appears after each figure.
Front Access Door
Magazine Slots for
Bulk Loading
(top five slots)
Front Panel Display
Magazine Access Door
Power Supplies
(three supplies
maximum, located
behind the panel)
Figure 2. D875 - D2175 Library, Front View
I/E Port
Drive Modules (6X)
(two drives per
module)
SCSI Bus
Connectors
Main Power Switch
and AC Connector
Front Access Door
The front door provides access to the magazine slots and import/export port (I/E port), drive modules,
power supplies, main power switch, SCSI connections, and circuit boards.
Front Panel Display
The keypad and display which provide the user interface to the system. It is used to display tests,
modes, error codes, and other user related messages.
Magazine Access Door
The magazine access door opens on the magazine slots.
Magazine Slots
There are five magazine slots behind the magazine access door. Each magazine slot holds one
magazine containing up to ten pieces of media. These slots are used to bulk load the library. They can
also be used as removable storage.
Product Overview Plasmon D875 - D2175 User Manual
Page 14 Document Revision E

Import/Export Port (I/E)
The Import/Export port (I/E port) holds one magazine containing ten pieces of media. The port is
located below the five magazine slots and is used to remove and load media while the library is on-line.
Drive Modules
Each drive module contains two 120 mm Multi Drives which accommodate CD-R, CD-RW, DVD-R,
DVD-RAM, or DVD-RW media. The drives allow reading and writing of data to the media. Contact
Plasmon for the latest drive updates.
Main Power Switch and Power Cable
The power cable is routed through the bottom of the library to the power connector. The power switch
is located just above the power connector.
SCSI Interface
The connection between the library and a host computer. The interface to the library is LVD SCSI
using a 68-pin high density connection. The host computer must also be set up for LVD SCSI.
Power Supplies
A maximum of three power supplies may be installed in the library. One power supply can power up to
six drives. Two power supplies are required for 12 drives. Three power supplies provide a redundant
power supply option for the library. The supplies are hot swappable.
Plasmon D875 - D2175 User Manual Product Overview
Document Revision E Page 15
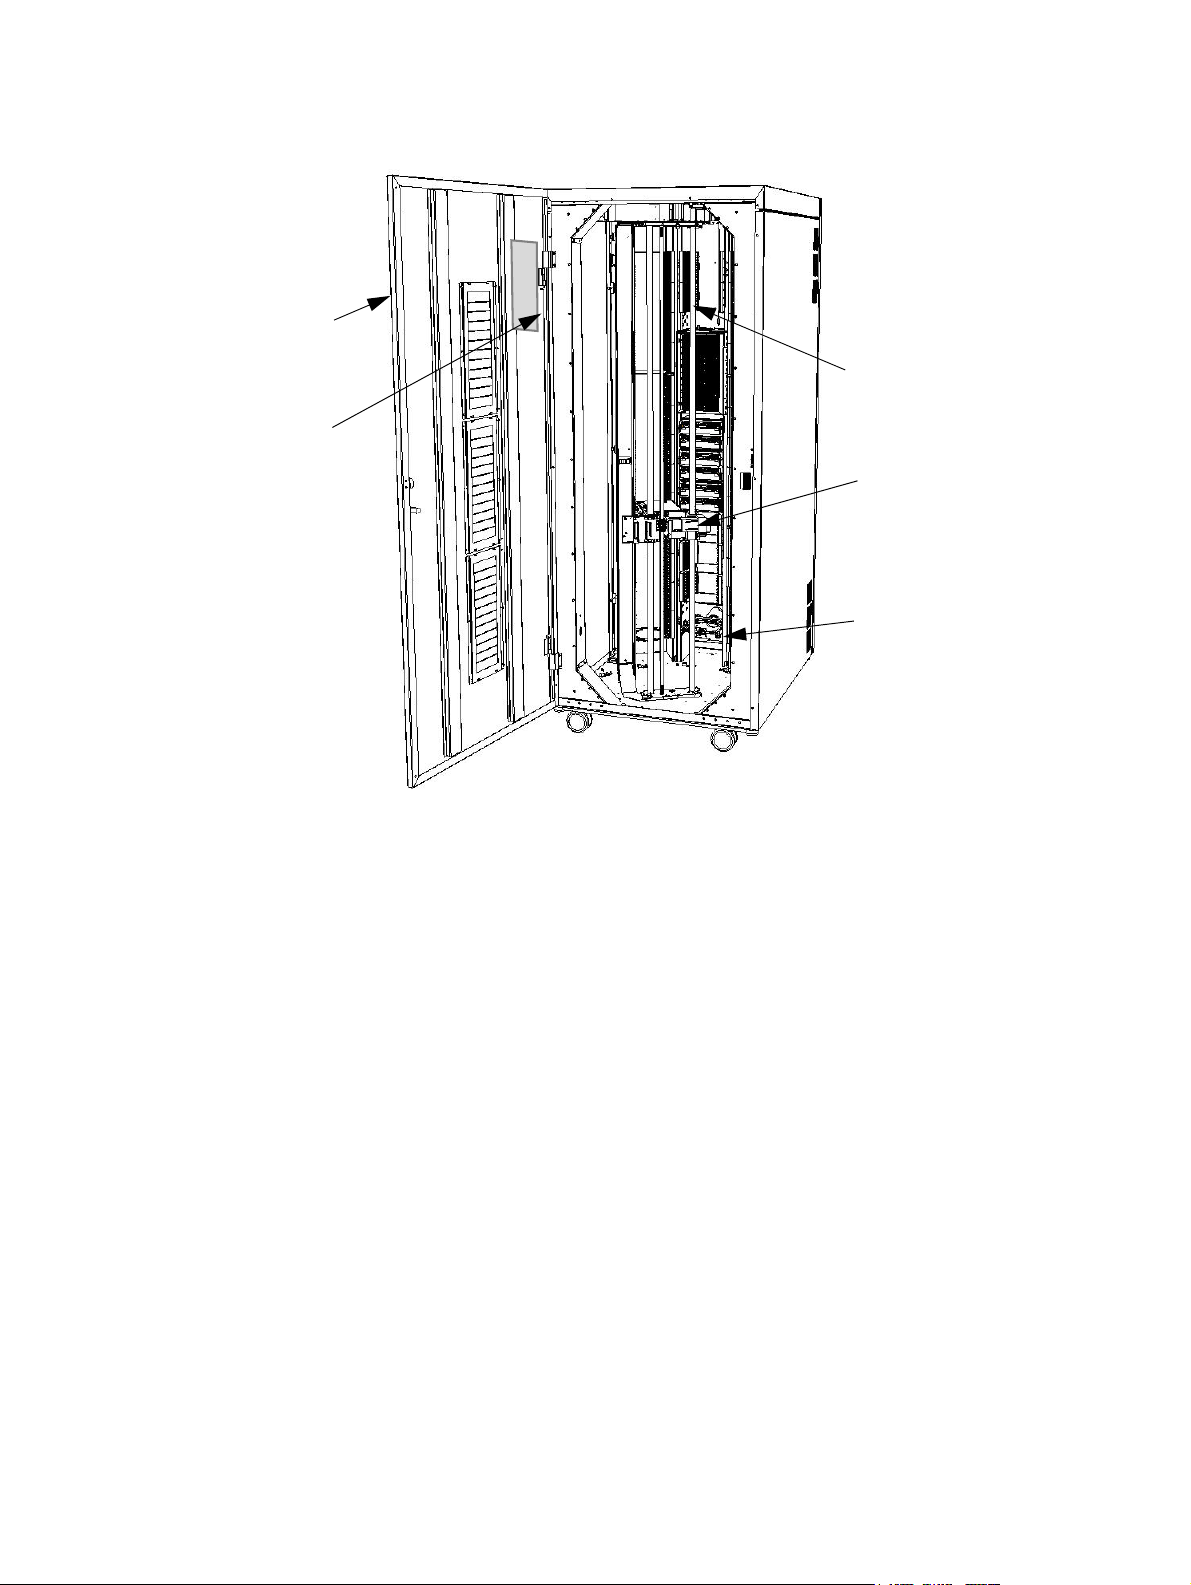
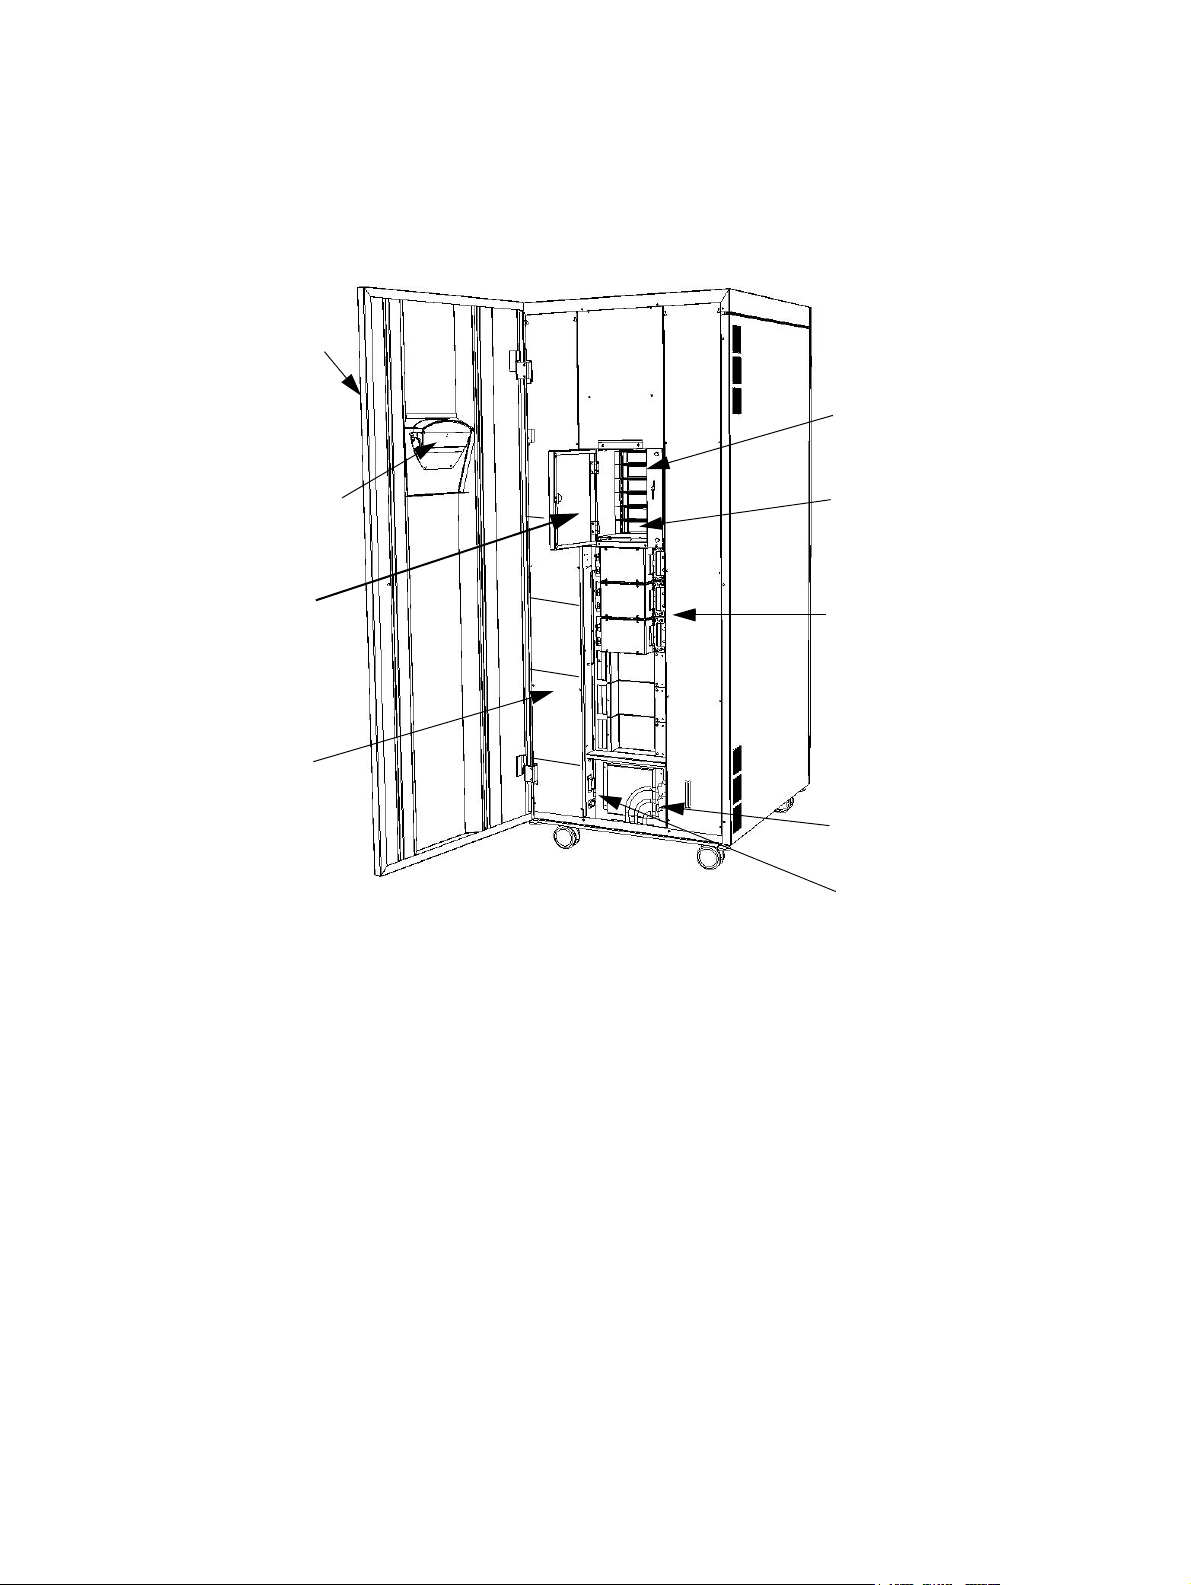
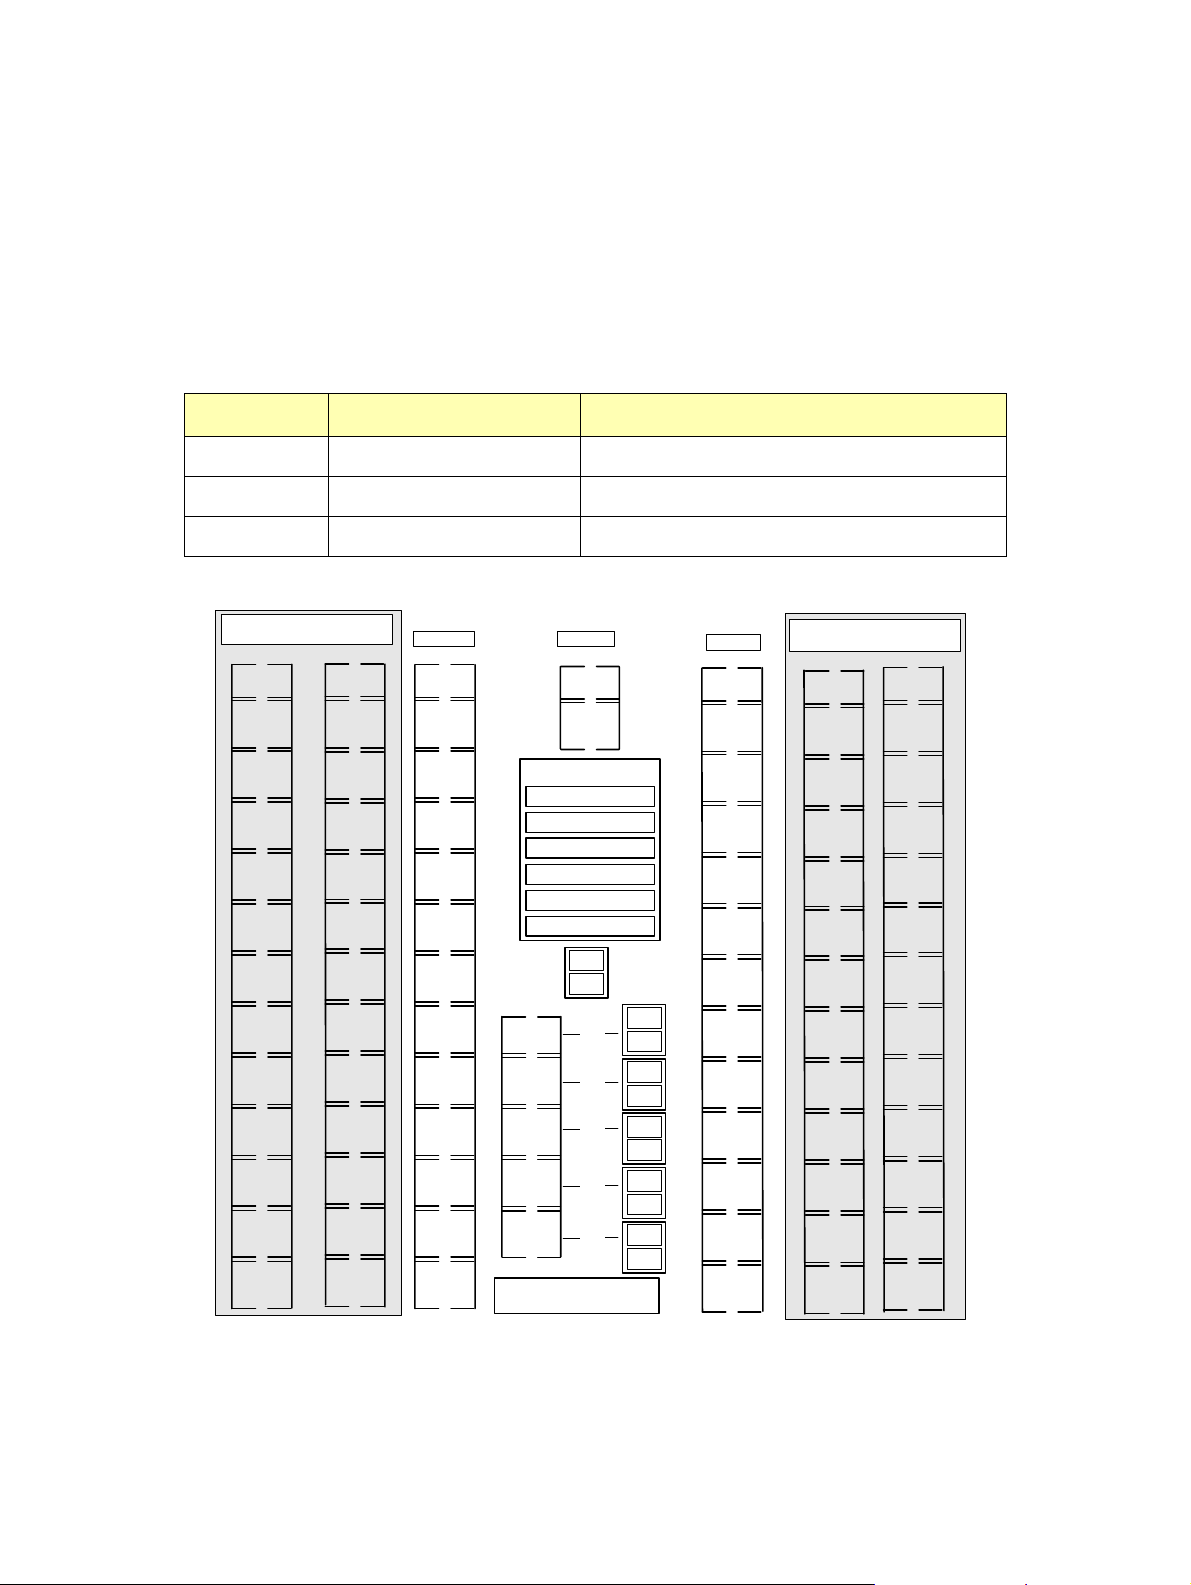
Rear Access Door
Storage Slot Map
Lift Assembly
Media Transport Element (MTE)
Rotation Station
Figure 3. D875 - D2175 Library, Rear View
Rear Access Door
The rear door provides access to the robotic elements and media slots in the library.
Lift Assembly
The lift assembly provides the vertical and pivotal motion for the media transport element (MTE),
providing access to all media locations.
Media Transport Element (MTE)
The MTE is the mechanism that picks media and moves it between storage locations and the drives.
Rotation Station
The Rotation Station allows use of double-sided media.
Storage Slot Map
The storage slot map is located on the inside of the rear access door. It identifies the media locations
for all D875 - D2175 models.
Product Overview Plasmon D875 - D2175 User Manual
Page 16 Document Revision E
CHAPTER 2
LIBRARY INSTALLATION
Getting Started
This chapter provides information for installing the Plasmon D875 - D2175 libraries and the procedures
necessary to quickly put a library on-line.
Unpacking the Library
Save all packing material in case it is ever necessary to ship the library.
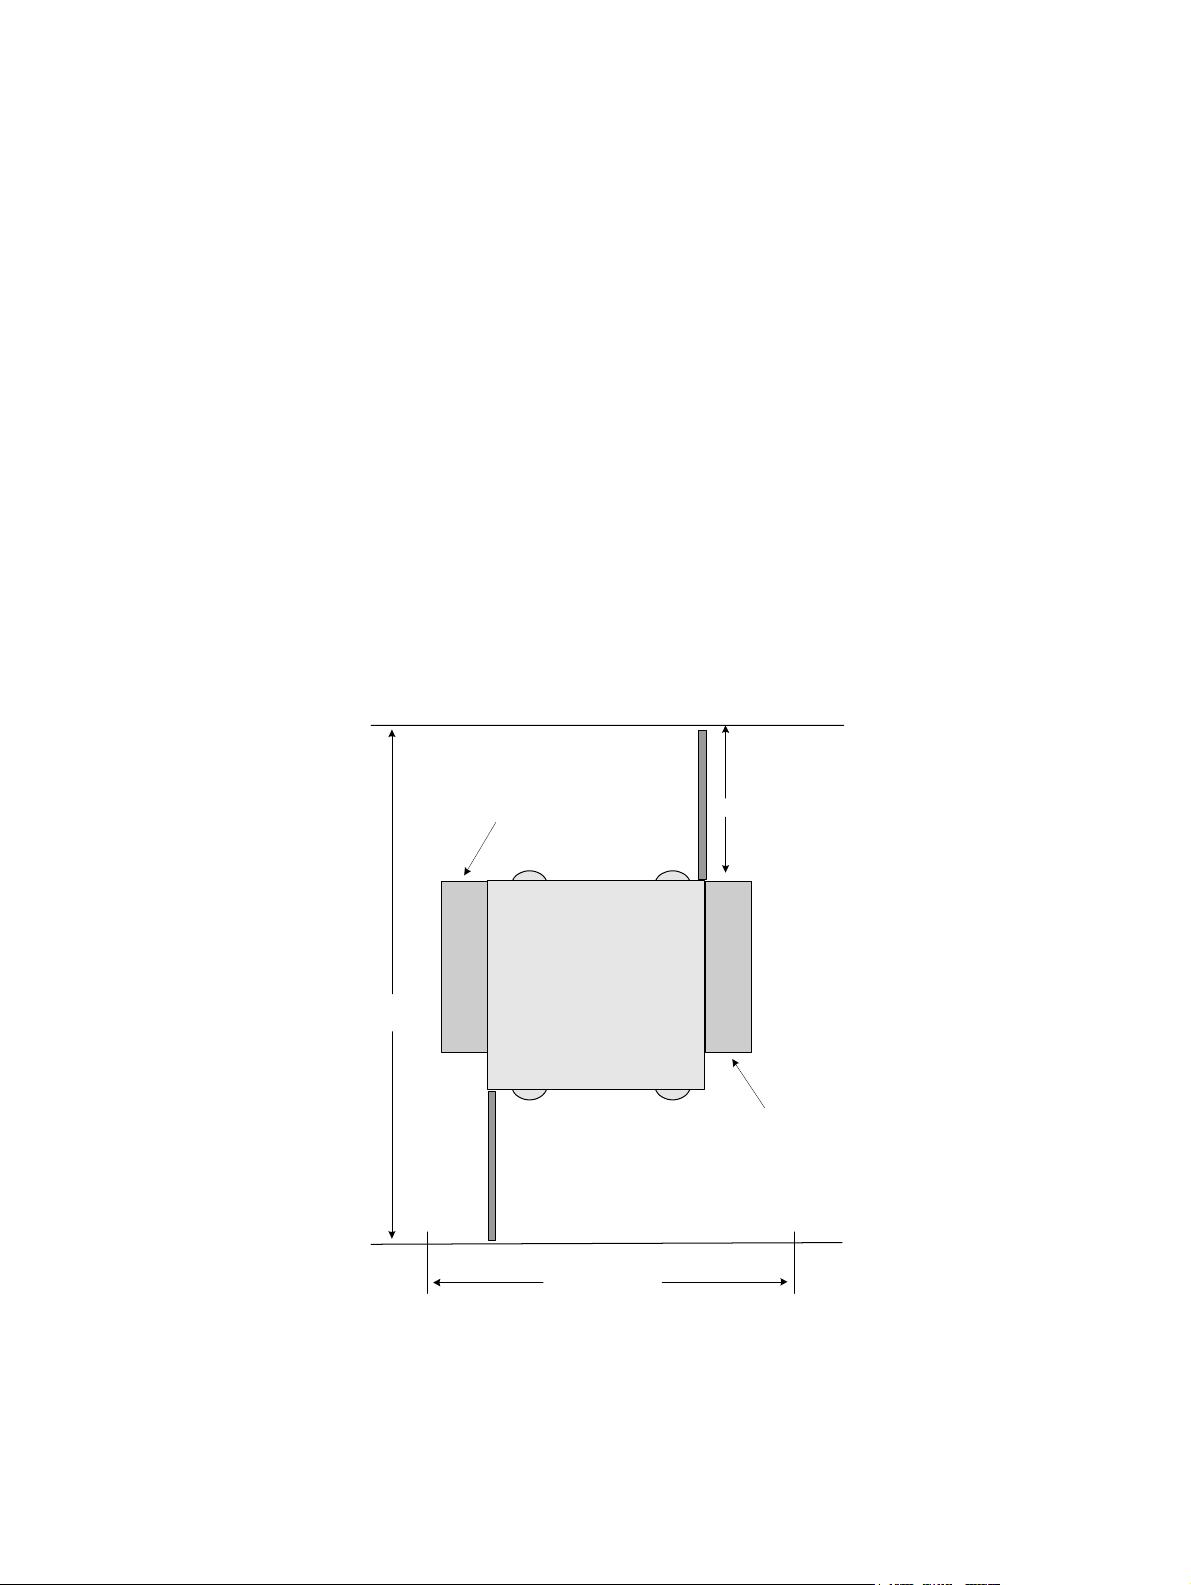
Library Position
Position the library in a location that allows both the front and rear door to open completely without any
obstructions. The figure below should be used as a guide for library space planning.
Top View
Rear Access Door
Expansion Bay
Library
92" (233.7cm)
Front Access Door
56 " (142.3cm)
Figure 4. Space Planning for the Library
Allow 3 inches (7.6 cm) behind and 2 inches (5.1 cm) on both sides of the unit for sufficient airflow.
35" (89 cm) min
Expansion Bay
Plasmon D875 - D2175 User Manual Library Installation
Document Revision E Page 17
Library Environment
To ensure long term reliability, operate the library only between 10° to 32°C (50° to 90°F) and 10% to
90% relative humidity. The media and drives require a clean environment. Excessive dust and dirt can
lead to data loss, and increase service calls.
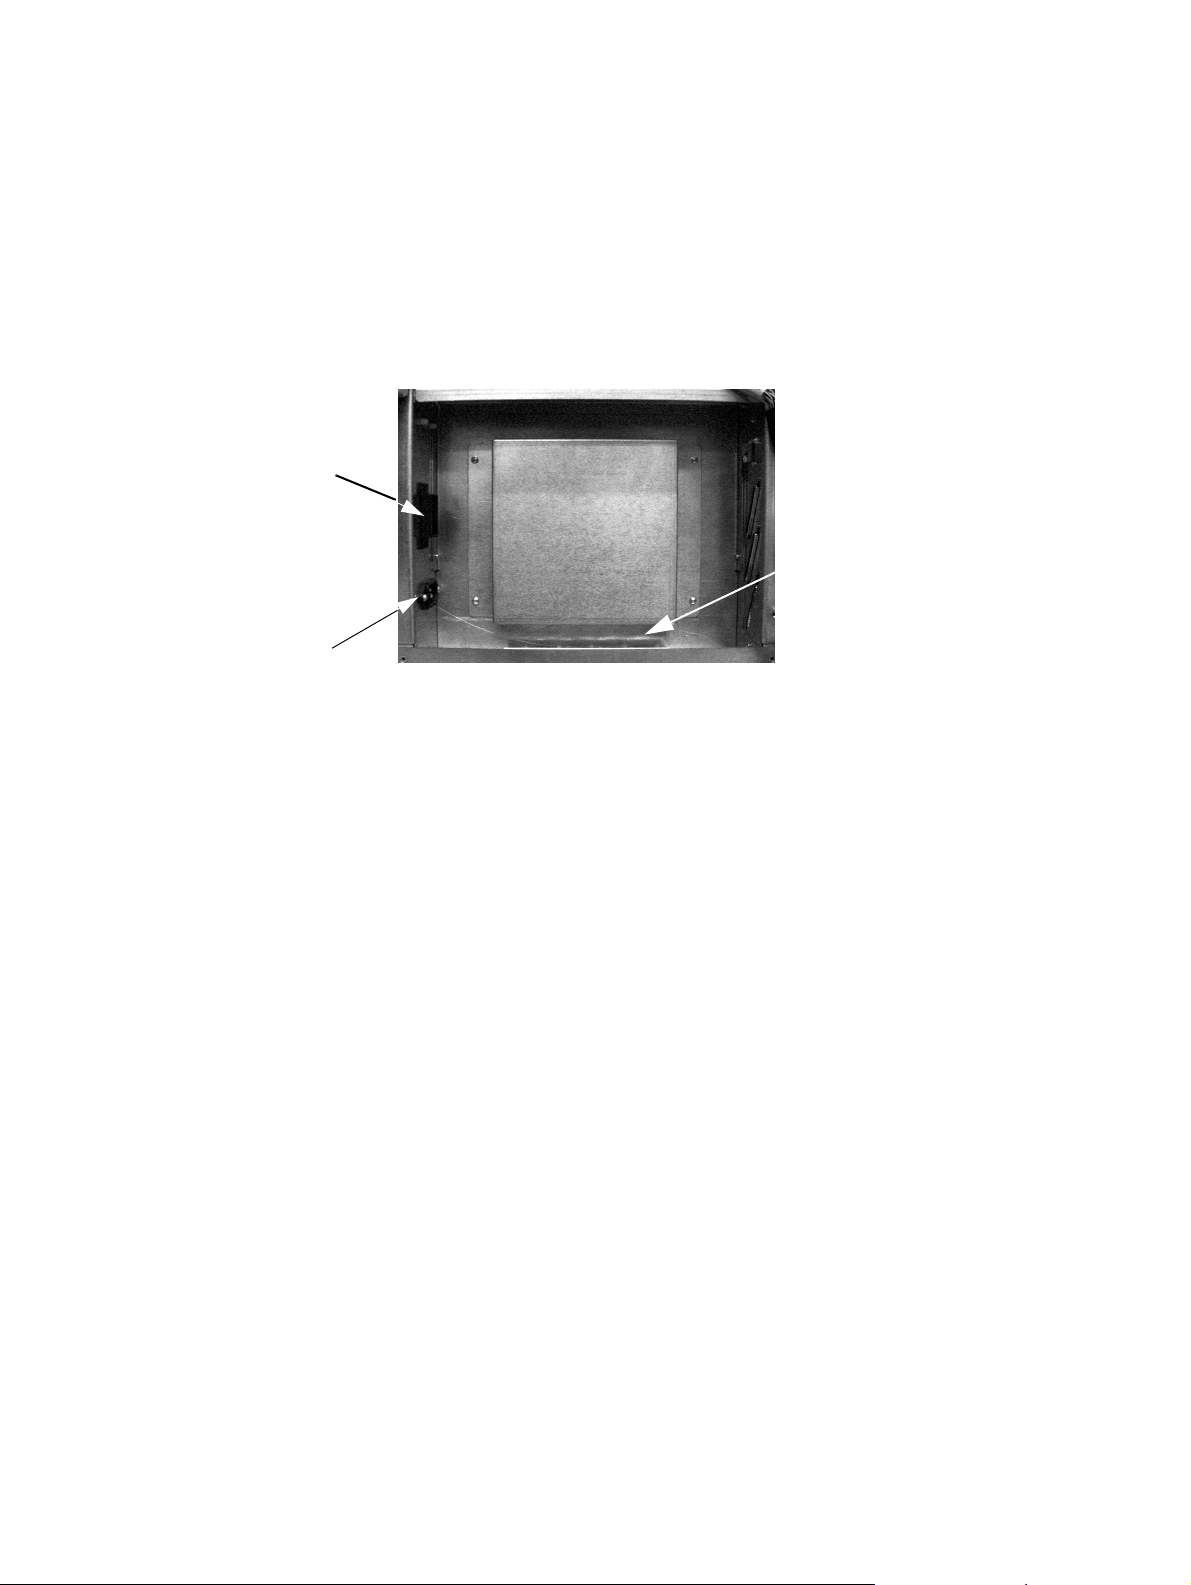
Power Cable and Power Switch
Open the front door of the library and route the supplied power cable through the access hole in the
bottom of the library to the power cable connector.
Power Switch
Thread the power cable
through the bottom of
the library
Power Connector
Figure 5. D875 - D2175 Power Connector and Power Switch
Connect the power cable to a suitable AC source. The power switch is located beside the power cable
connection. Power on the library.
The front panel display now prompts to remove the protective packaging material.
Removing Internal Packing Material
1. Apply power to the library.
2. Follow the instructions on the front panel display to check the time and date and remove
all packing material.
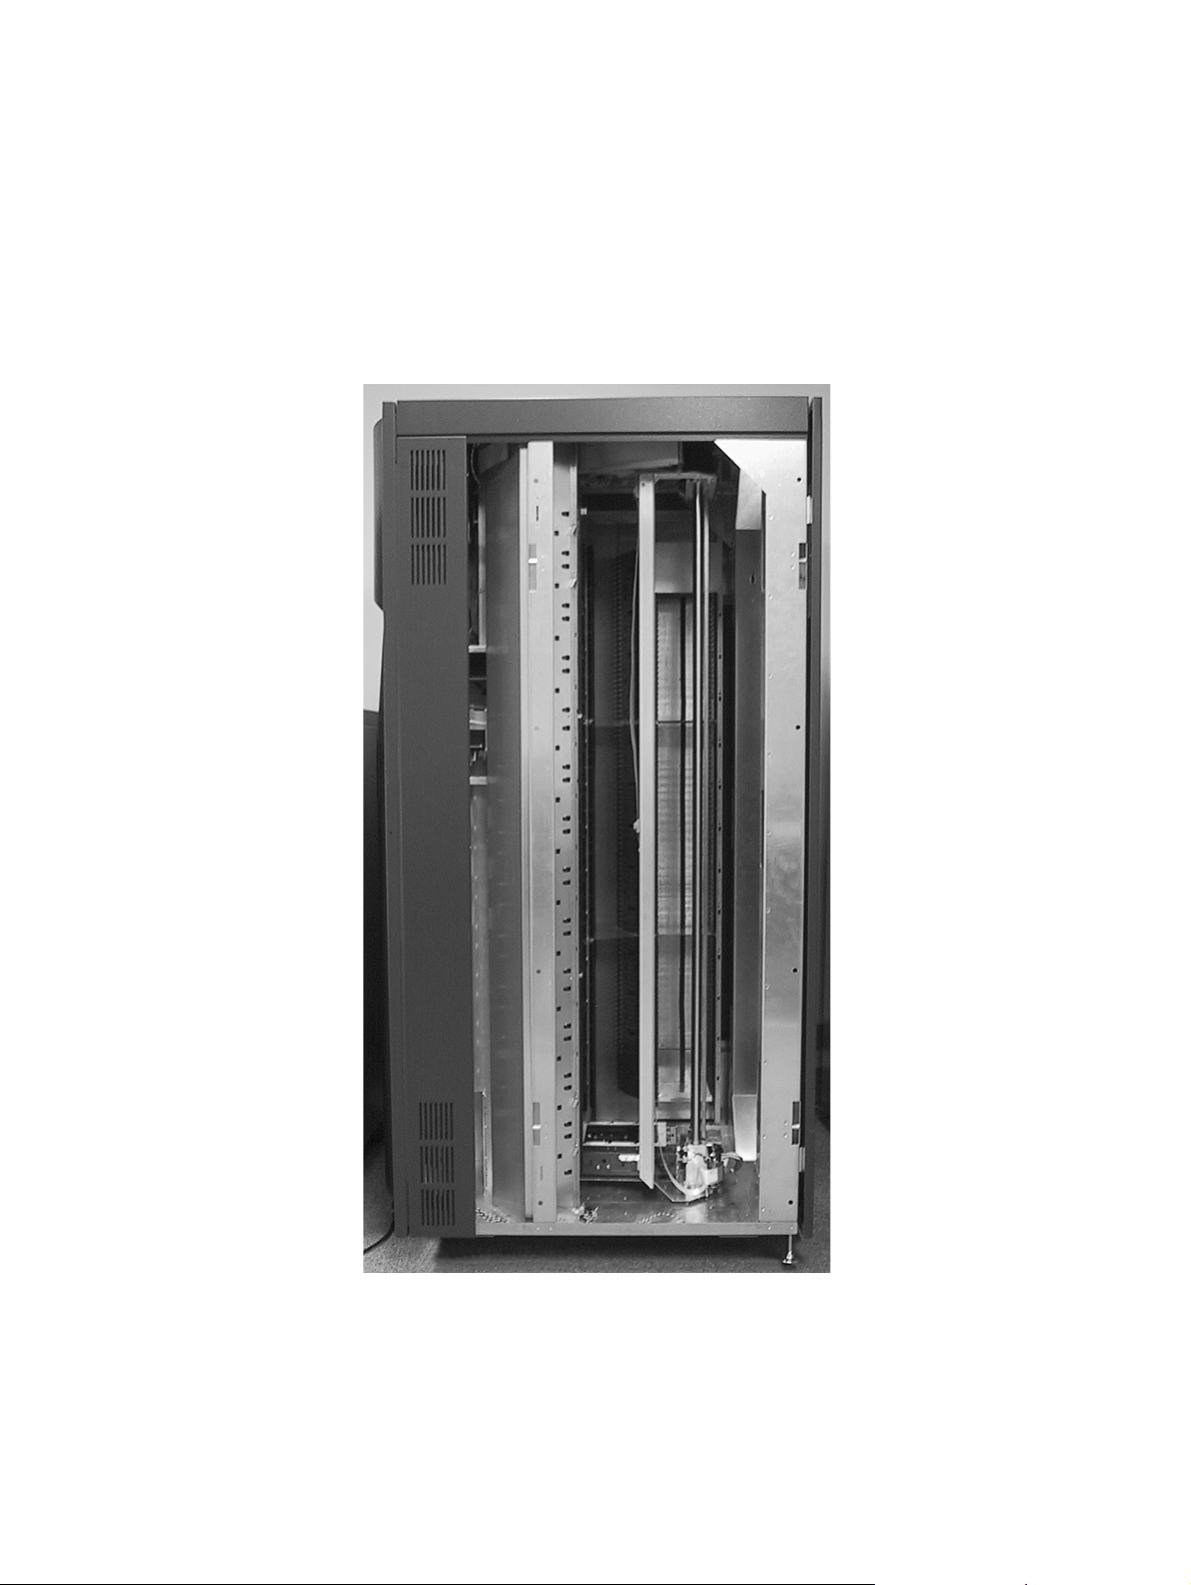
3. Use the supplied key to unlock and open the rear access door. The library is not operable
with this door open.
4. Remove the two pieces of MTE protective packing foam. See the figure below.
Library Installation Plasmon D875 - D2175 User Manual
Page 18 Document Revision E
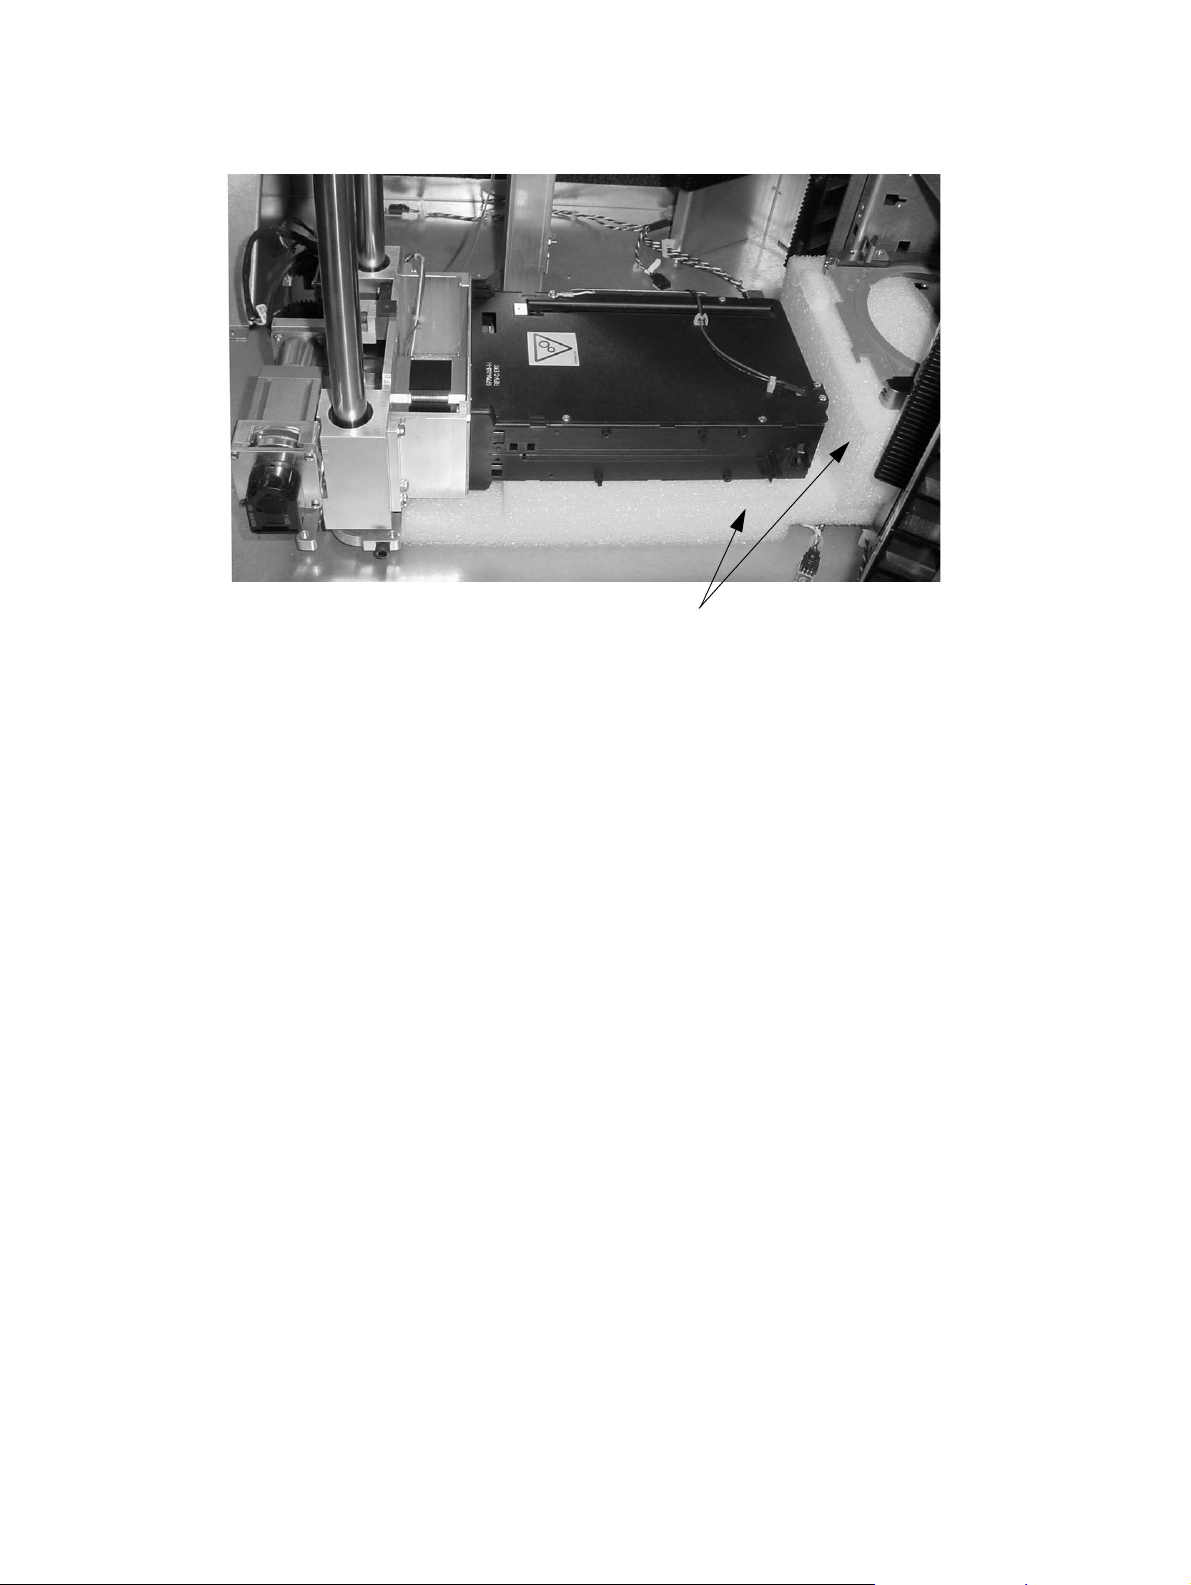
Packing Foam
Figure 6. Removing the Packing Foam from the MTE
Library Initialization
After the protective packaging material is removed the user is prompted on the front panel display to
close the rear door. The library now performs a self-calibration and initialization routine.
NOTE
It may be necessary to reboot the host computer for it to recognize
the library.
Some modifications to the host hardware or operating system may be necessary for it to recognize the
library. These modifications may include patches, driver updates, or modifications to the configuration
files. Please consult the host hardware or operating system documentation to see if any of these
applications apply.
Plasmon D875 - D2175 User Manual Library Installation
Document Revision E Page 19

SCSI Connection
Turn the library’s power switch to the off position prior to connecting the SCSI interface.
The library requires a host computer with a dedicated LVD SCSI host bus adapter (HBA). Ensure that
the library is powered off prior to connecting the SCSI cables.
The SCSI cable passes through the bottom of the library into the appropriate SCSI connector inside
the front door of the library.
CAUTION
Ensure the host computer provides an LVD SCSI interface. HVD
SCSI is not compatible with LVD SCSI. If an improper connection
is made, damage to the library or connected equipment could
result.
SCSI Connection
(one, two, or three buses)
Figure 7. Connecting the SCSI Interface
Library Installation Plasmon D875 - D2175 User Manual
Page 20 Document Revision E
Loading Media
There are two methods for loading media into the D875 - D2175 libraries:
• High Speed Bulk Loading (recommended): This method is intended as the first time solution to
mass load the library with media when the library is off-line. This method utilizes all six magazine
slots to load the library.
• I/E Port Magazine Loading: This is intended for importing and exporting up to ten pieces of media
in a removable magazine while the library is on-line.
When loading the library for the first time, use the high speed bulk loading method described below:
1. Turn on the power.
2. From the front panel menu select Set Up Library>Offline Operations>Bulk Load Library.
3. Open the library front door and the magazine access door. Note that when the Bulk Load
Library option is selected, the magazine door opens.
4. Place a pre-loaded magazine in each magazine slot (magazine 1 through magazine 6).
5. When the green LED goes out, remove the appropriate empty magazine and install the
next full magazine.
NOTE
Third party software is required to operate the library
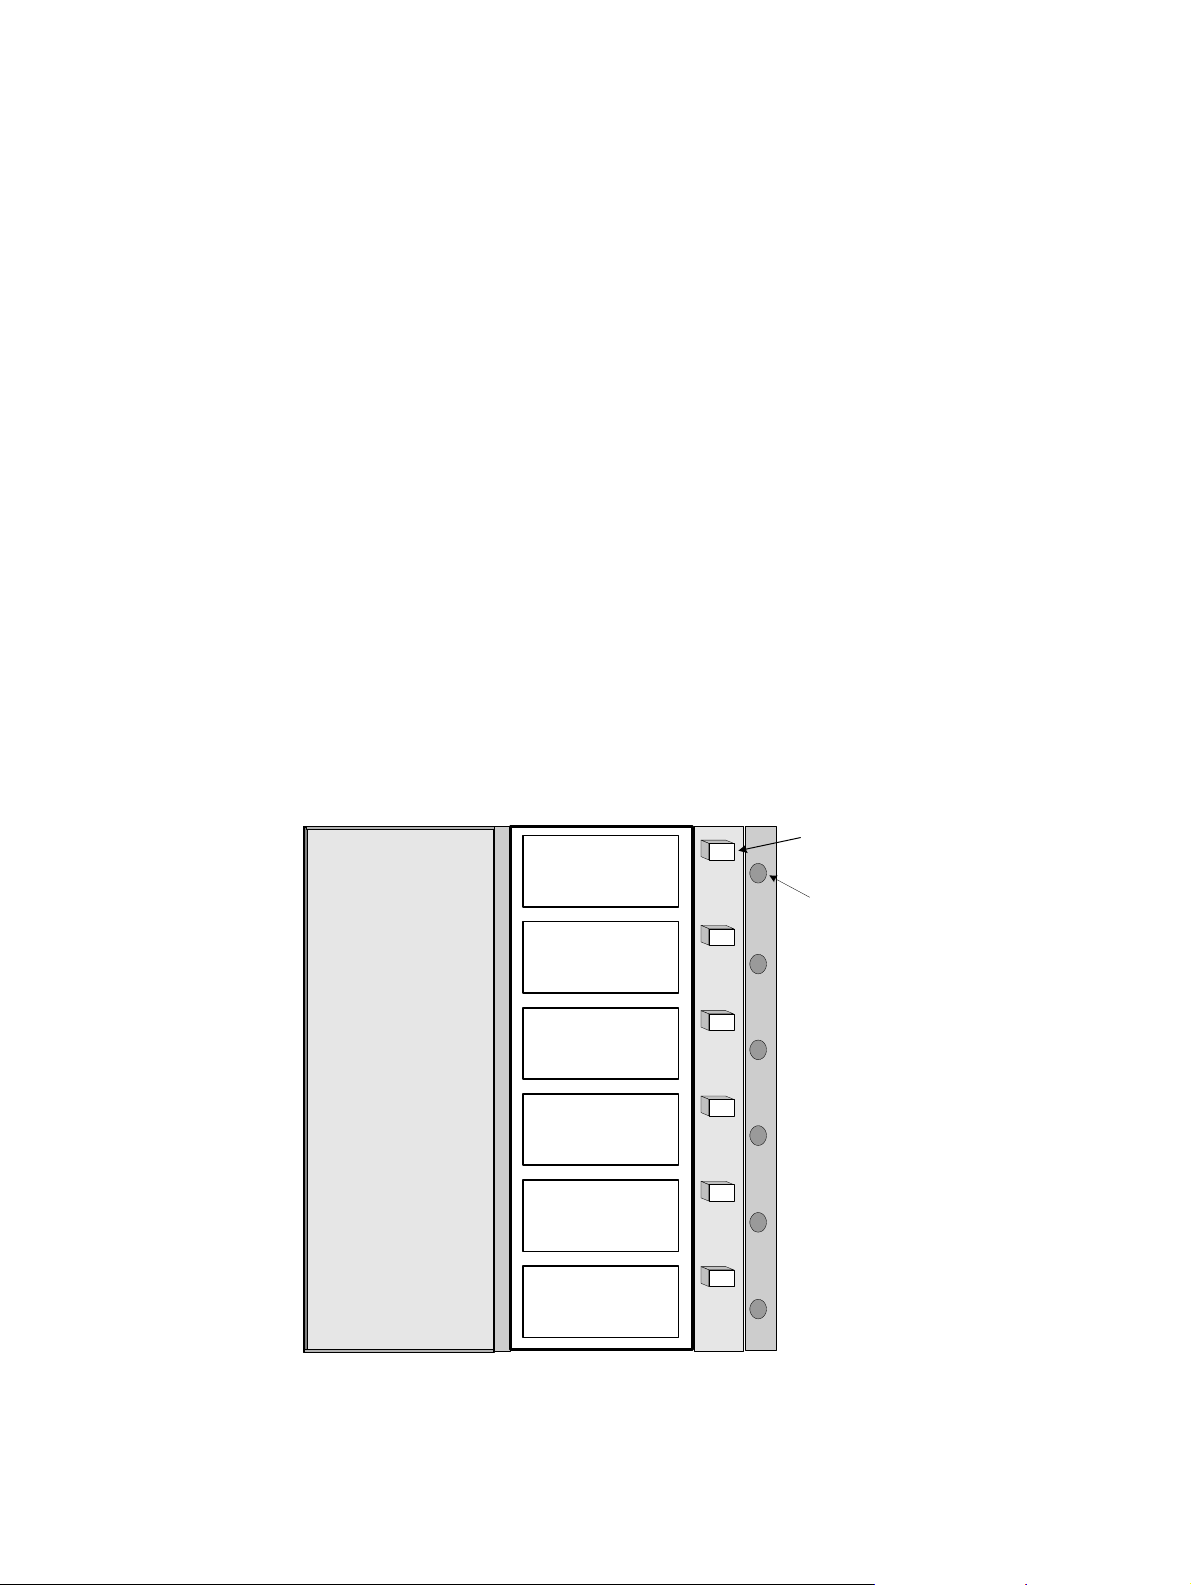
Magazine 6
41 - 50
Magazine 5
31 - 40
Magazine Access Door
Magazine 4
21 - 30
Magazine 3
11 - 20
Magazine 2
1 - 10
I/E Slot
IE 1 - IE 10
Magazine Eject
Button
Load Status
Indicator
Figure 8. Magazine Slots
Plasmon D875 - D2175 User Manual Library Installation
Document Revision E Page 21
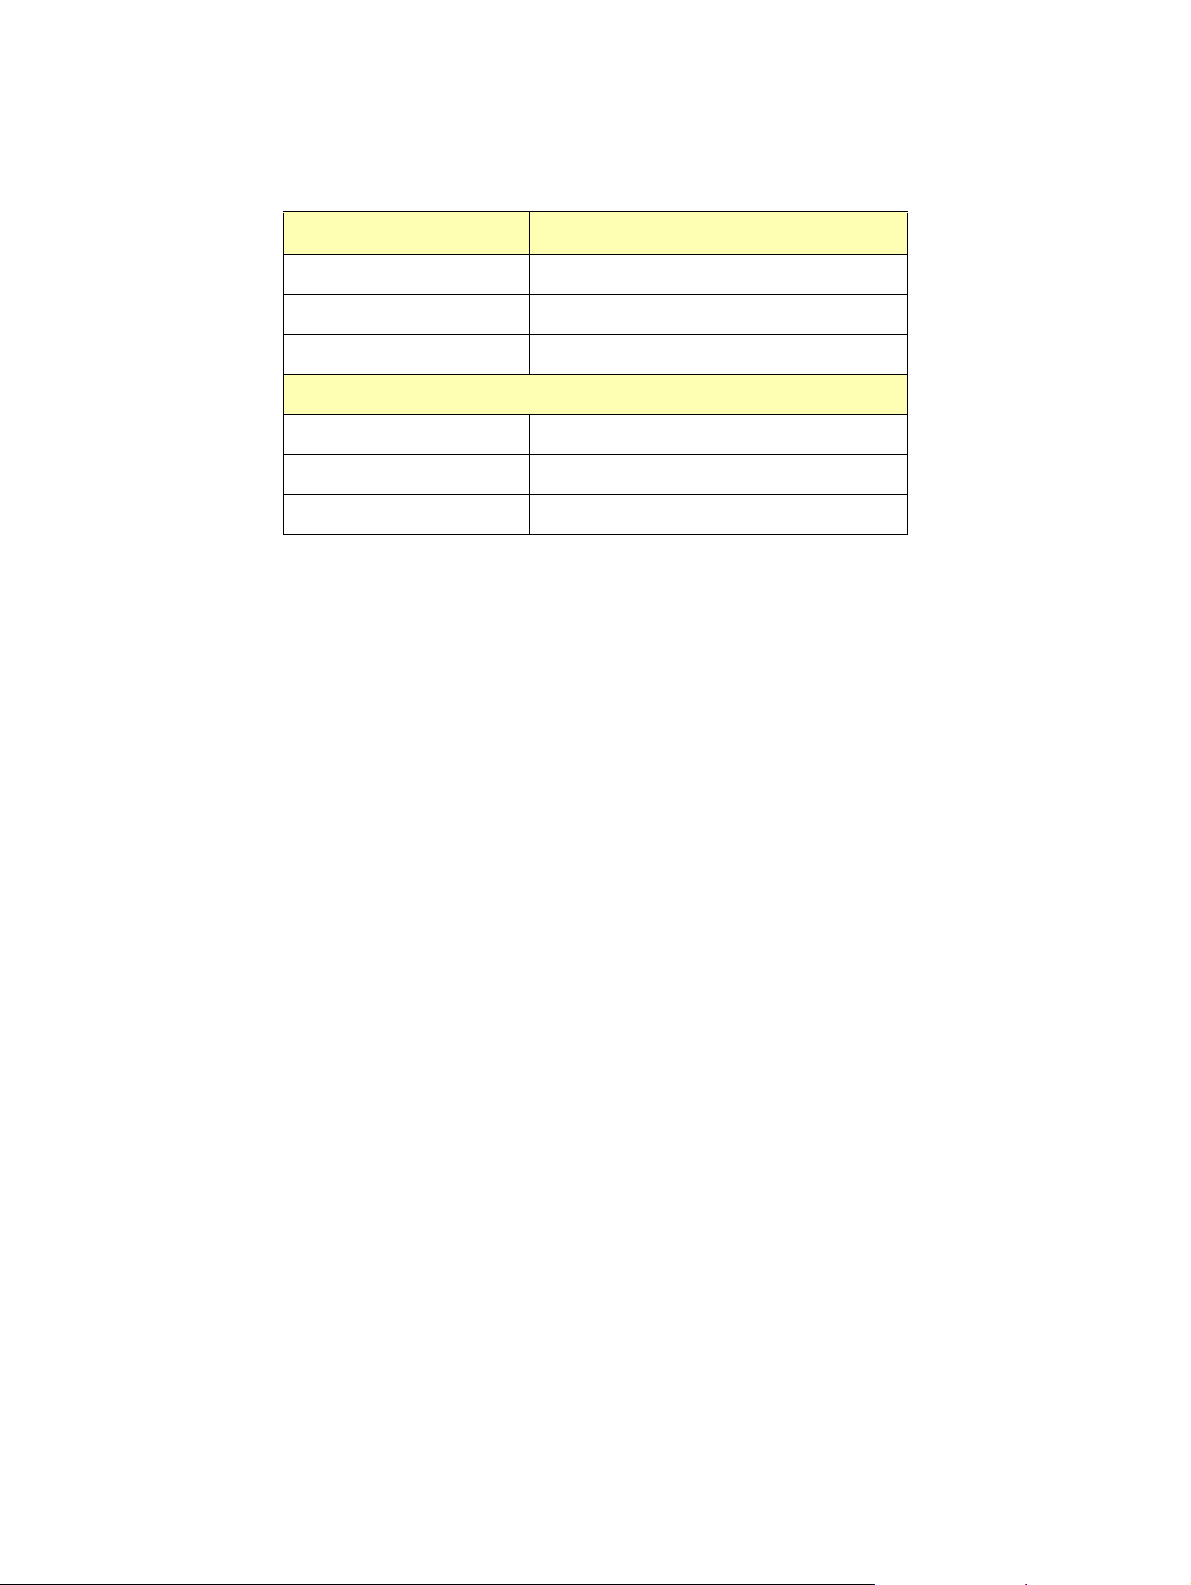
Table 3. Magazine Slot LED Indicators
LED State Description
On Magazine present or not present
Off N/A
Blinking Magazine may be removed
Bulk Loading Indicators
On Magazine in use
Off Remove to reload with media
Blinking Insert magazine in appropriate position
Library Installation Plasmon D875 - D2175 User Manual
Page 22 Document Revision E
Identifying Storage Slots
Viewing the system through the open rear access door, the columns are numbered from left to right.
The left most column (when the left expansion bay is installed) is column one and the right most
column (when the right expansion bay is installed) is column seven. The media slots are numbered
from top to bottom, except for the magazine slots. The table below shows the model number, the
number of slots, and provides a listing of the columns involved. The column numbers in the table are
listed in sequence.
Table 4. Organization of Media in the Library
Model Number of Slots Column Numbers
D875 750 to 875 All Magazine Slots + 3, 4, and 5
D1525 1400 to 1525 All Magazine Slots + 3, 4, 5, 1, and 2
D2175 2050 to 2175 All Magazine Slots + 3, 4, 5, 1, 2, 6, and 7
(Optional Expansion)
Column 1 Column 2
876
900
901
925
926
950
951
975
976
1000
1001
1025
1026
1050
1051
1075
1076
1100
1101
1125
1126
1150
1151
1175
1176
1200
1201
1225
1226
1250
1251
1275
1276
1300
1301
1325
1326
1350
1351
1375
1376
1400
1401
1425
1426
1450
1451
1475
1476
1500
1501
1525
Column 3
51
75
76
100
101
125
126
150
151
175
176
200
201
225
226
250
251
275
276
300
301
325
326
350
351
375
Column 4
376
400
401
425
Magazine Slots
41 - 50
31 - 40
21 - 30
11 - 20
1 - 10
I/E 1 - I/E 10
Drive
1
Drive
426
450
451
475
476
500
501
525
526
550
2
Or *
Or
Or
Or
Or
Rotation Station
Drive
Drive
Drive
Drive
Drive
Drive
Drive
Drive
10
Drive
11
Drive
12
Column 5
551
575
576
600
601
625
626
650
651
675
676
700
701
725
3
4
5
6
7
8
9
726
750
751
775
776
800
801
825
826
850
851
875
(Optional Expansion)
Column 6 Column 7
1526
1550
1551
1575
1576
1600
1601
1625
1626
1650
1651
1675
1676
1700
1701
1725
1726
1750
1751
1775
1776
1800
1801
1825
1826
1850
1851
1875
1876
1900
1901
1925
1926
1950
1951
1975
1976
2000
2001
2025
2026
2050
2051
2075
2076
2100
2101
2125
2126
2150
2151
2175
Shaded areas represent the optional expansion modules (650 slots each module)
* = Each drive module takes an equivalent space of 25 storage slots
Figure 9. Slot Storage Map
Plasmon D875 - D2175 User Manual Library Installation
Document Revision E Page 23
D1525 - D2175 Bay Installation
The expansion storage bays that attach to the sides of the Plasmon D875 library are shipped
separately. The following instructions explain how to mount the bays to the main library chassis.
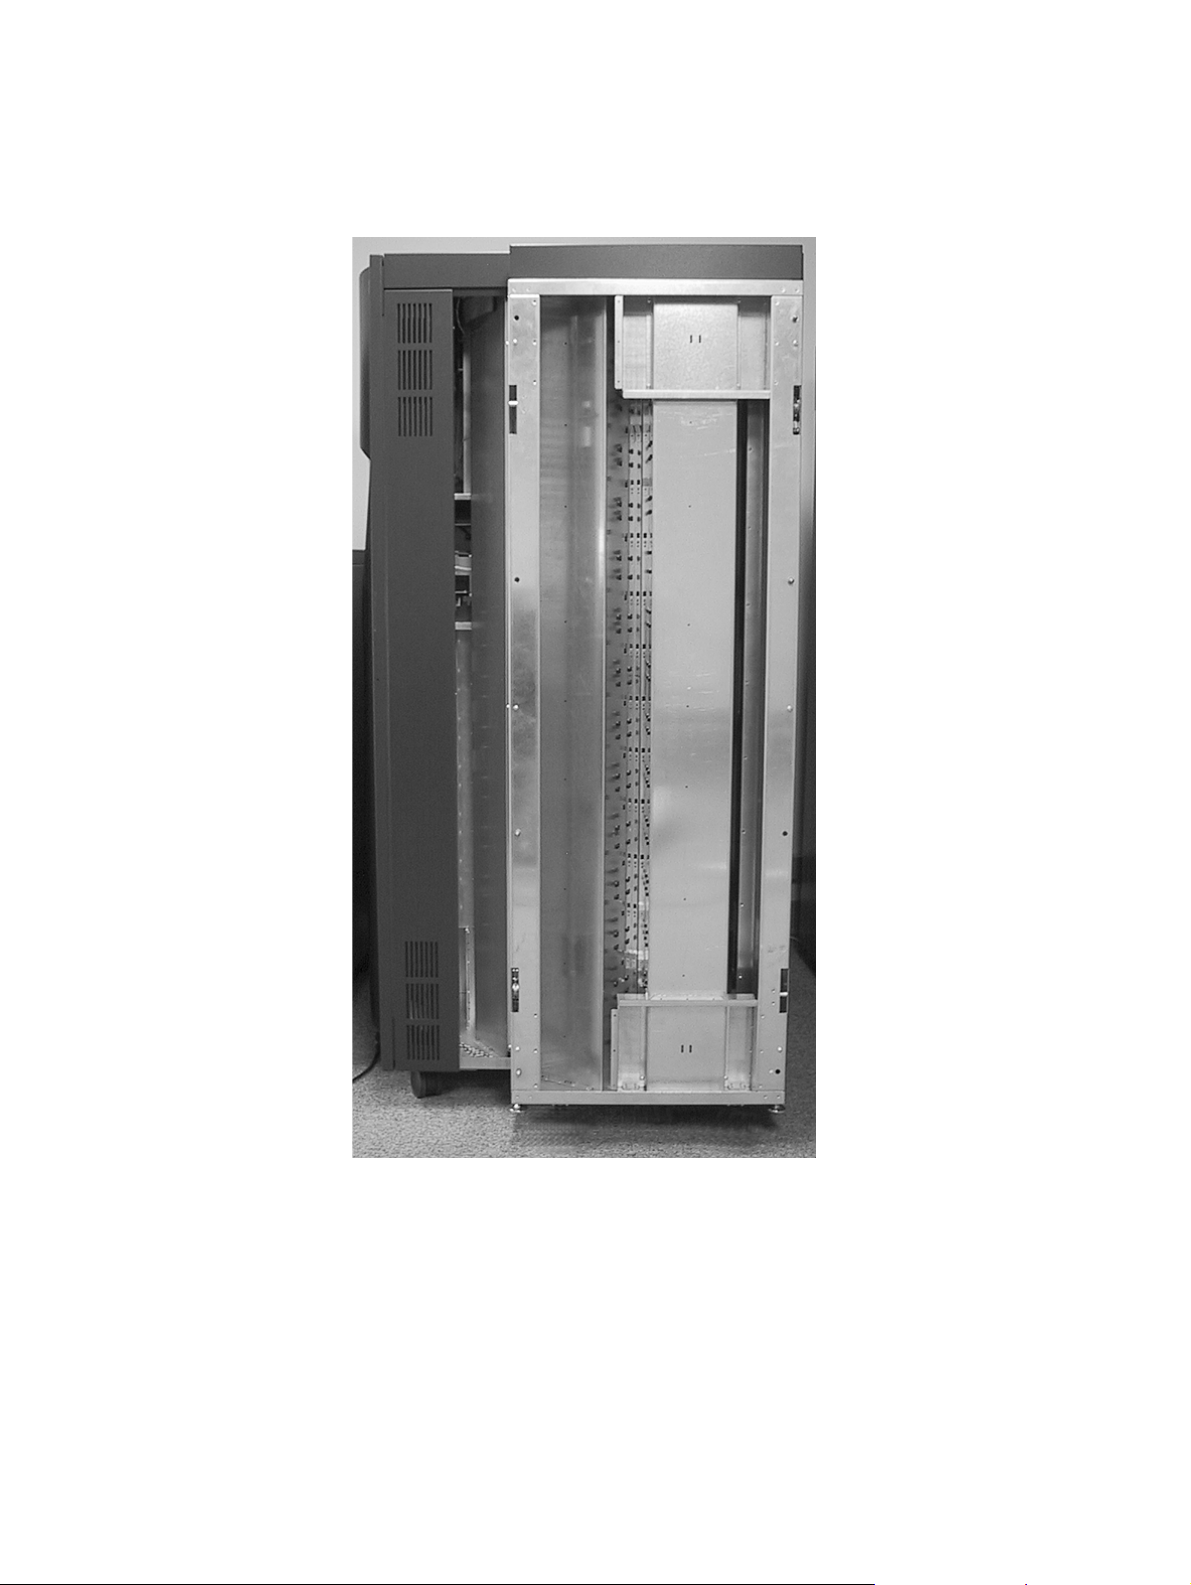
Note: This operation should be performed by two people.
1. The main library chassis is shipped without side panels as shown below. Remove the
side panels if upgrading a standard D875 library to a D1525 and D2175.
Figure 10. Expansion Bay Installation (a)
Library Installation Plasmon D875 - D2175 User Manual
Page 24 Document Revision E
2. Position the expansion bay flush against the library chassis matching the guide pins on
the chassis to the guide holes on the expansion bay.
Figure 11. Expansion Bay Installation (b)
Plasmon D875 - D2175 User Manual Library Installation
Document Revision E Page 25
 Loading...