


Plasmon 97707987 User Manual

Preliminaries
Copyright statement
No part of this publication may be reproduced in any form or by any
means or used to make any derivative, such as translation,
transformation, or adaptation, without permission from Plasmon
PLC.
Trademarks
Plasmon, Raidtec Solutions, SNAZ and SNAZ OS are registered
trademarks of Plasmon PLC Copyright 2006. Other names and/or
trademarks belong to their respective proprietors.
Limited warranty
Plasmon PLC makes no representation or warranties with respect to
the contents or use of this user’s guide, and specifically disclaims any
express or implied warranties of merchantability or fitness for any
particular purpose.
Further, Plasmon PLC reserves the right to make revisions on this
documentation without obligation to notify any person or entity of
such changes.
Modifications
Changes or modifications not expressly approved by Plasmon PLC
could void the warranty.
Changes
The material in this user manual is for information only, and is
subject to change without notice.
Plasmon PLC reserves the right to make changes in the product
design and installation software without reservation and without
notification to its users.
Additional information may be obtained from your supplier, or
from the address on the back cover of this guide.
ii 97707987 Rev A

Table of Contents

Introduction ........................................................ 1
SNAZ network attached file servers ........................ 2
Front panel features ................................................. 4
Rear panel features ................................................... 5
The SNAZ Manager ............................................. 7
Overview ................................................................... 8
SNAZ Manager Server Configuration Wizard 8
Home page features 8
Menu bar 9
On-line help 10
Tool Tips 10
System status 11
System menu ........................................................... 13
Time & Date 13
Services 15
Software Update 23
Notification 24
Shares on the SNAZ ................................................ 28
How a Share is created 28
Network menu ........................................................ 30
Configuration 30
Users 32
Groups 35
Shares 37
Storage menu .......................................................... 40
RAIDs 41
Volumes 46
Browse 50
iv 97707987 Rev A

Data protection menu .............................................53
Snapshots 54
Replication Sources 59
Replication Targets 63
Configuration Backup 64
Data Backup 66
Diagnostics menu ....................................................68
Storage Devices 68
System Information 73
Shutdown menu ......................................................75
97707987 Rev A v

vi 97707987 Rev A

Chapter 1
Introduction

SNAZ network attached file servers
The SNAZ family of network attach file servers (NAS) provide robust
and easily managed file serving for departmental, branch office and
medium sized company applications.
• S4-350 is a 1U 19 inch rack mount unit with 4 drive bays
offering user storage of between 750GB and 1.5TB (Usable
Capacity using RAID 5; the S4-350 is configured without a hot
spare)
• S8-350 is a 2U 19inch rack mount unit with 8 drive bays
offering user storage of up to 2TB (Usable Capacity using RAID
5). For larger capacity requirements, the associated 2U SNAZ
Expansion unit extends the S8 capacity to 4TB and 6TB of user
storage (Usable Capacity using RAID 5).
Key Features include:
• 750GB to 6TB of user storage
• SNAZ OS v4 is a dedicated Linux based, XFS journaled
operating system for fast, reliable operation
• Windows CIFS and UNIX NFS support enable file sharing
between Window, Linux and UNIX users.
• Dual Gigabit Ethernet (with teaming and failover) connection
to the network(s)
• Powerful Xeon processor supports many simultaneous client
users
• RAID 5 fault tolerance is standard with administrator
configurable RAID 0, 1.
2 97707987 Rev A

• Hot swappable SATA disk drives and hot spare disk(s) (the S4-
350 is configured without a hot spare) for resilient operation.
• Browser based SNAZ Manager, gives easy installation and
ongoing management with extensive context related onscreen help
• Convenient user storage management capabilities such as
Group and User Quotas and on-line volume expansion
• Configurable stand alone User and File access rights as well as
easy integration with Windows Active Directory.
• Powerful, built-in BakBone NetVault backup utility ensures
extensive compatibility with tape drives, autoloaders and
libraries and flexible back-up.
• Snapshot important data to a separate volume for almost
instantaneous backup
• Replicate between SNAZ units with SNAZ Replifile for data
protection.
97707987 Rev A 3
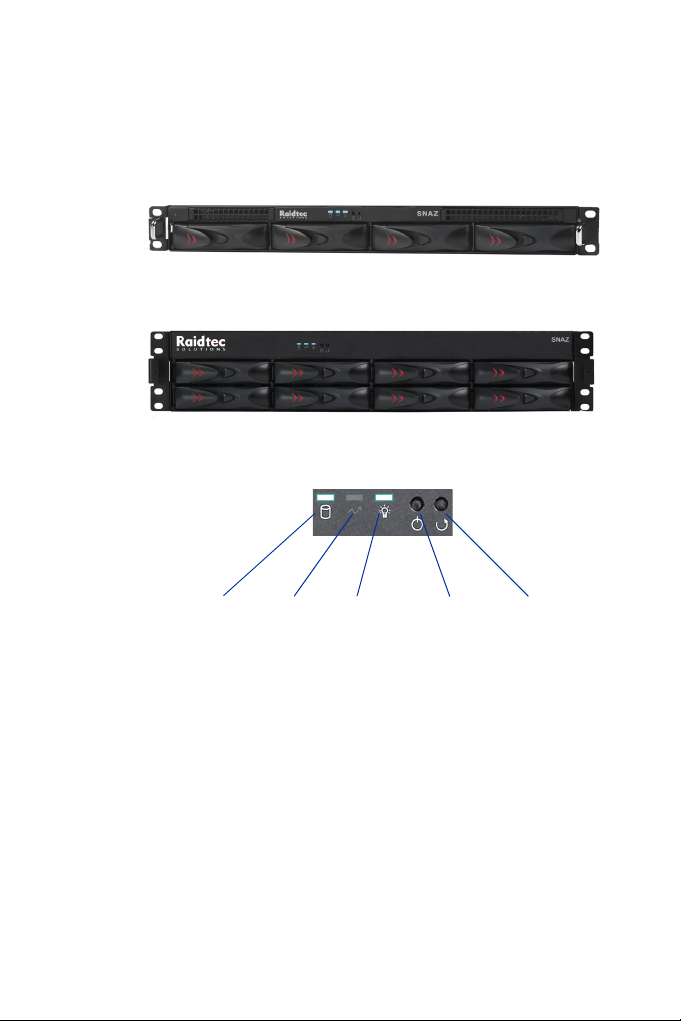
Front panel features
The SNAZ front panel controls have the following features:
System Drive
Indicator
4 97707987 Rev A
Not used
Power On
Indicator
Power button
Reset button
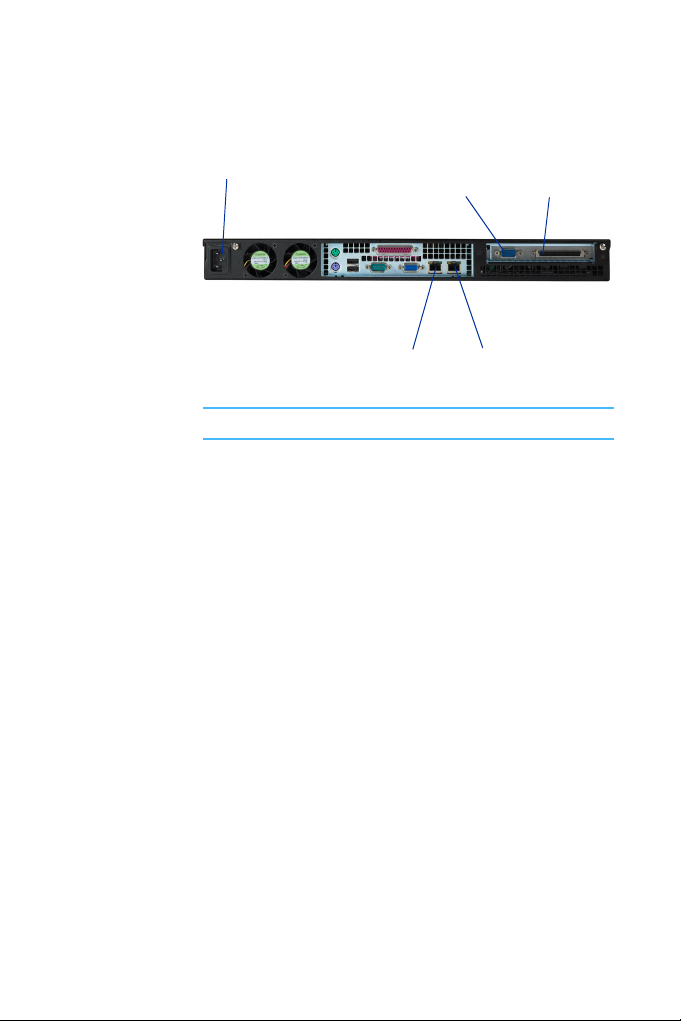
Rear panel features
AC Power inlet
(APC Smart UPS Connection)
Note: SNAZ S4 rear view shown (SNAZ S8 similar)
Serial Port
Gigabit Ethernet
(Eth1)
(Tape Backup Device)
Gigabit Ethernet
(Eth0)
SCSI Connection
97707987 Rev A 5

6 97707987 Rev A

Chapter 2
The SNAZ Manager
Overview
This chapter describes the features of the SNAZ Manager, which
administrator’s use to configure and monitor the SNAZ and its
Users, Groups and Shares.
SNAZ Manager Server Configuration Wizard
The first time you start the SNAZ Manager, you’ll see is the Server
Configuration Wizard. This page allows you to perform the initial
configuration of your SNAZ.
For further details of the Server Configuration Wizard, please
refer to the SNAZ Quick Start Guide.
Home page features
The SNAZ Manager home page gives an overview of current system
status, and allows you to access all the system configuration and
monitoring operations, via a menu bar along the top of the page.
8 97707987 Rev A

Menu bar
The menu bar lets you access all the SNAZ’s configuration and
monitoring options, as well as the on-line help.
1 Move the pointer over a top-level menu item to reveal
submenu options, for example:
2 Click on your chosen option, refer to Table 2-1 for further
information.
Table 2-1 SNAZ Manager menu bar
Menu/Icon Description
System Lets you set the time and date, update
Network Lets you configure the network settings
Storage Lets you define and monitor the status
Data Protection Lets you configure snapshots, replica-
Diagnostics Lets you monitor the status of devices in
Shutdown Lets you shutdown or reboot the SNAZ
system software, manage system services
and define notification recipients.
and define users, groups and shares
of volumes and RAIDs
tions, perform a configuration backup
and describes how to backup the SNAZ
and attached to the SNAZ and view the
system information (serial number, software version, etc.)
Displays context-sensitive on-line help
Returns you to the System - Status
(home) page
Logs you out of the current Web interface session
97707987 Rev A 9
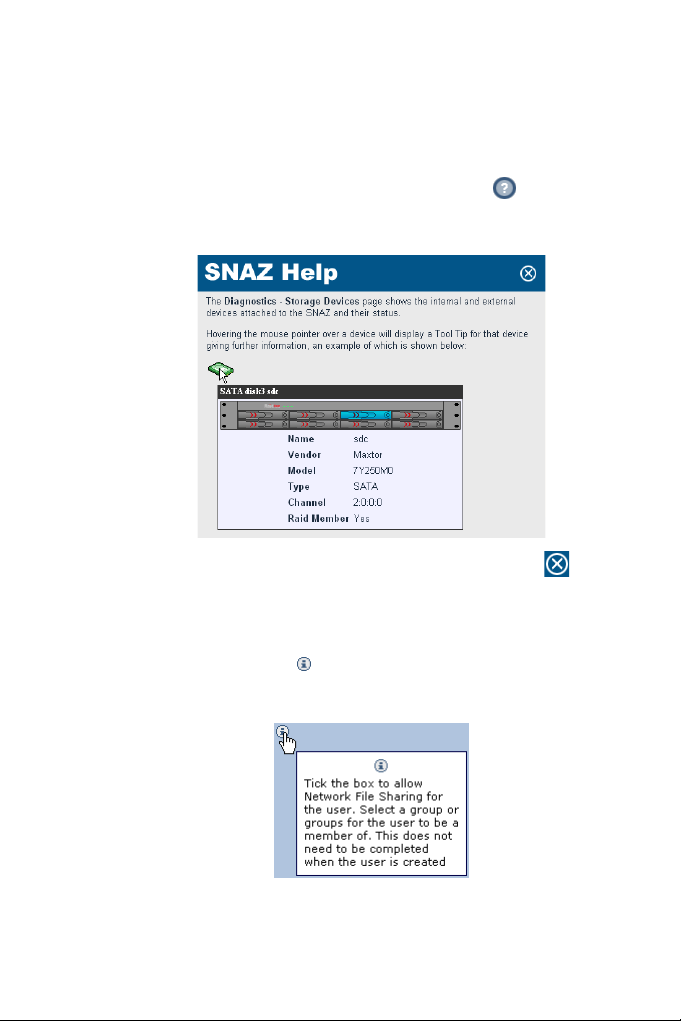
On-line help
Each page of the Web interface has an on-line help page associated
with it. To access the on-line help for a page:
1 From the page you require help with, click the icon.
The SNAZ Help page will open in a pop-up browser Window.
For example:
2 When you are finished using the on-line help, click the icon
to close the Window.
Tool Tips
Whenever you see the icon next in the Web interface, you can
hover over the icon to view a Tool Tip for that item.
For example:
10 97707987 Rev A
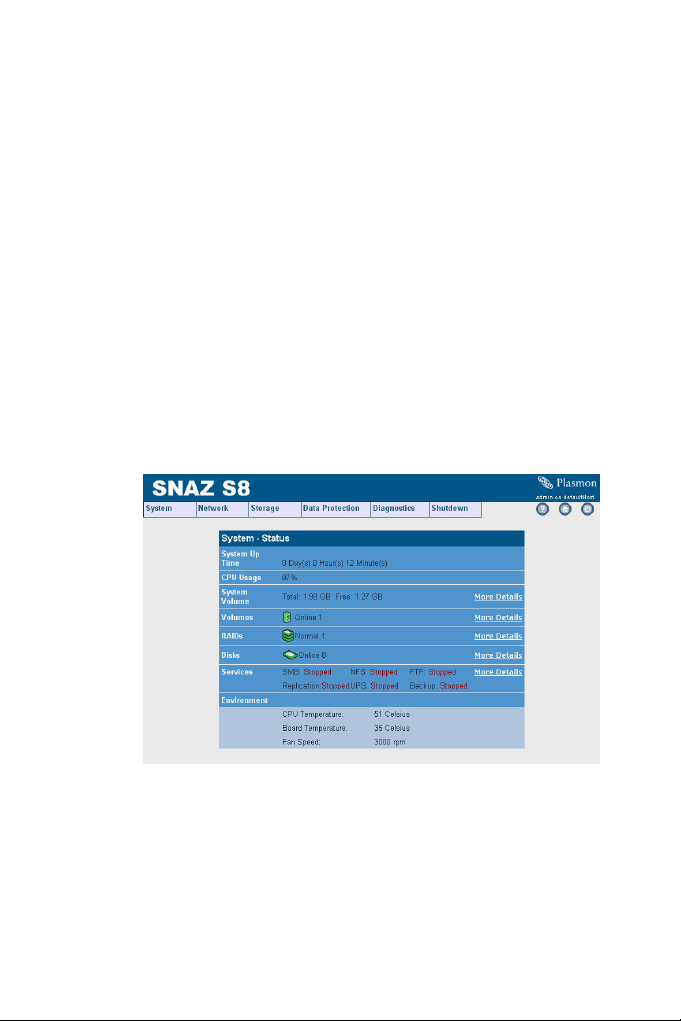
System status
The SNAZ Manager System - Status (home) page automatically
refreshes its content every 30 seconds and displays the following
information:
• System Up Time - The amount of time which has elapsed since
the SNAZ was last rebooted
• CPU Usage - The current CPU utilisation, as sampled over 3
seconds
• System Volume - The total size and amount of free space
available in the System Volume
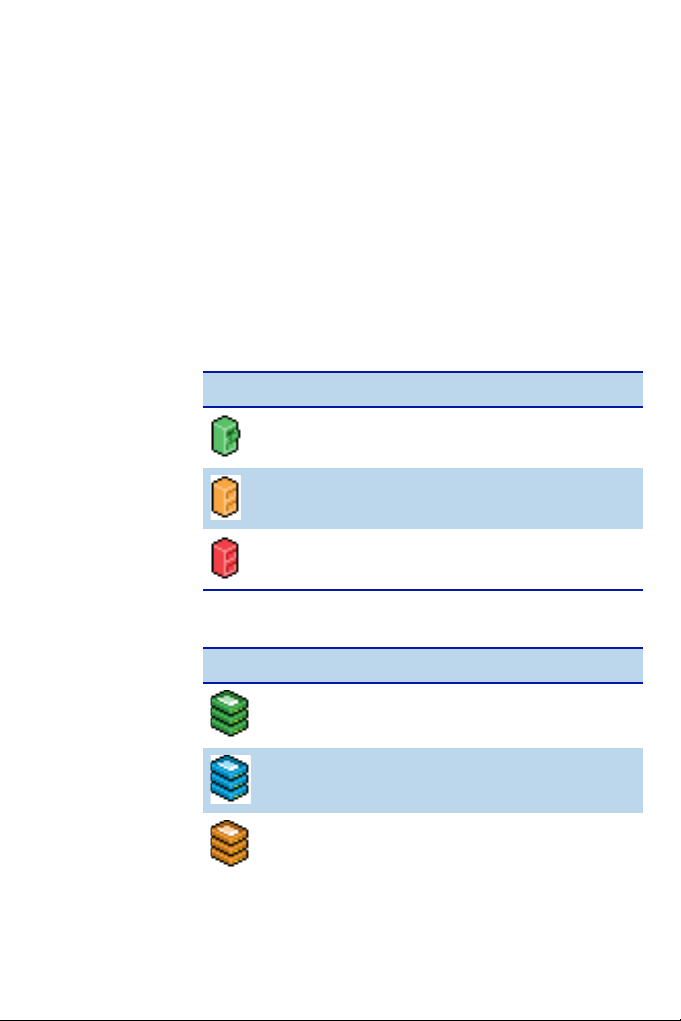
• Volumes - The number of storage Volumes present on the
System and their status:
Icon Meaning
The volume(s) that are Online
The volume(s) that are Offline
The volume(s) that are Faulty
• RAIDs - The number of RAIDs present on the System and their
status:
Icon Meaning
The RAID(s) that are Online
The RAID(s) that are Degraded and/or
Resynchronising
The RAID(s) that are Offline
97707987 Rev A 11
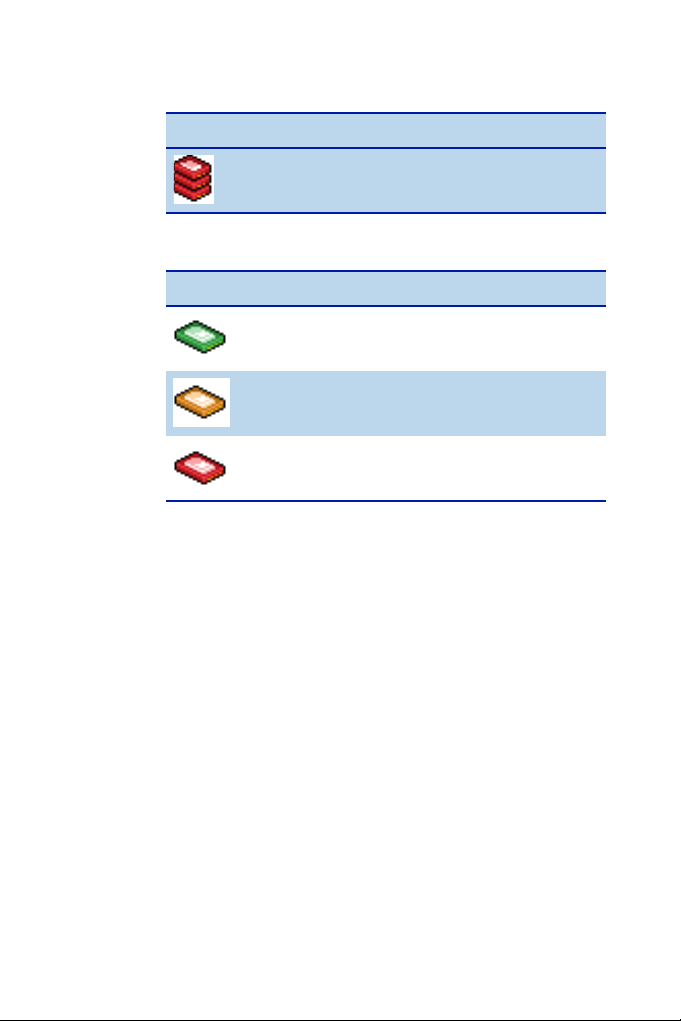
Icon Meaning
The RAID(s) that are Faulty
• Disks - The number of Disks present on the System and their
status:
Icon Meaning
The Disk(s) that are Online
The Disk(s) that are Offline
The Disk(s) that are Faulty
• Services - The Services configured on the System and their
status (Started or Stopped).
The following is shown only if your version of SNAZ enclosure has
environmental monitoring hardware:
• Environmental - The SNAZ will display the CPU and
motherboard temperature.
12 97707987 Rev A
System menu
The System menu allows you to access:
• Status (home) page - see System status on page 11
• Time & Date
• Services - see page 15
• Software Update - see page 23
• Notification - see page 24.
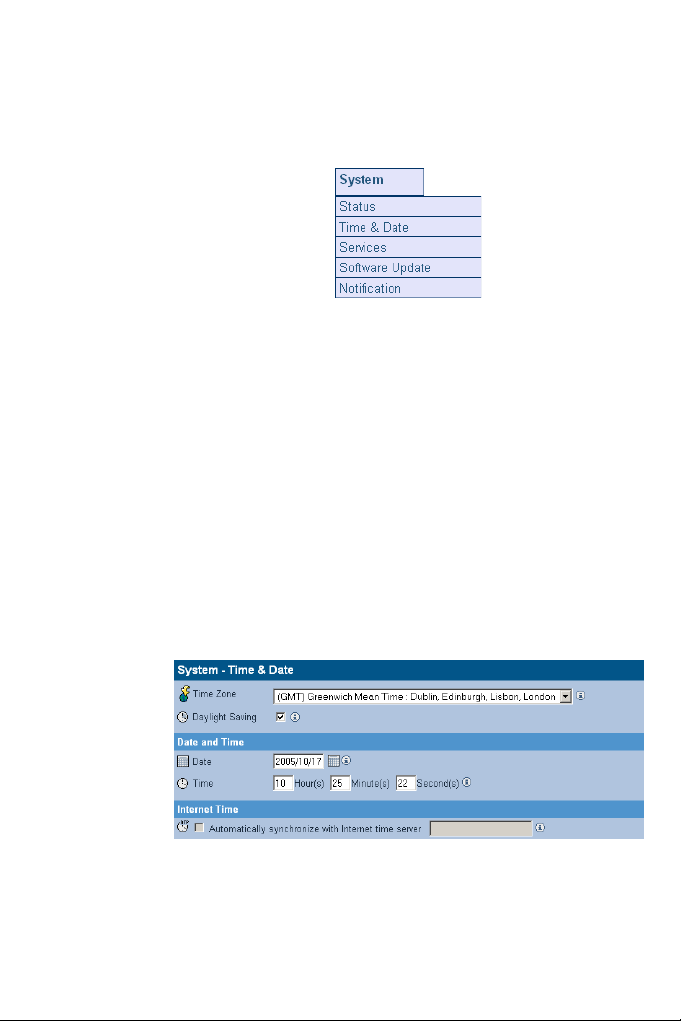
Time & Date
The System - Time & Date page allows you to:
• Set the time and date manually
• Synchronize the system’s time with a Network Time Protocol
(NTP) Server.
To set the time and date manually:
1 From the menu bar, select System - Time & Date.
2 Use the drop-down menus to select a Time Zone from the list.
3 If appropriate, tick the box for Daylight Saving time.
97707987 Rev A 13
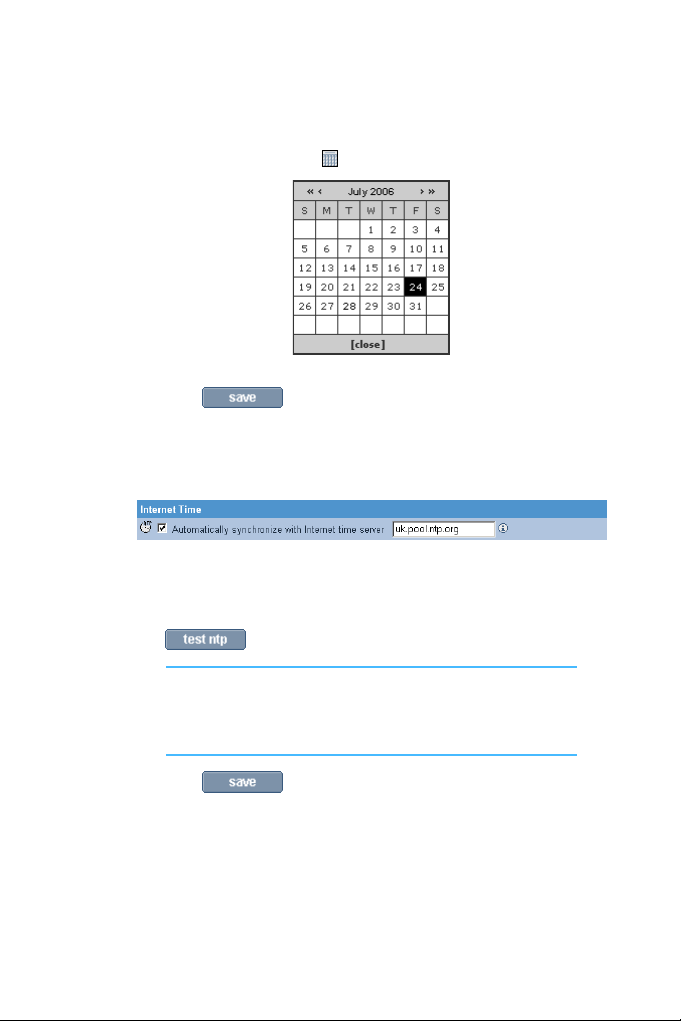
4 Set the Date, you can either type in the date in the format
YYYY/MM/DD (e.g. 2006/07/24 for the 24th July 2006) or click
on the calendar icon ( ) to show the Select Date pop-up:
5 Set the Time in the format Hour(s), Minute(s) and Second(s).
6 Click to save the changes.
Synchronising the time and date with an NTP server
To set the time and date using an NTP server:
1 From the menu bar, select System - Time & Date.
2 Tick the Automatically synchronize with Internet time
server box and enter an NTP server URL to automatically
synchronize the time with an Internet time server.
You can test the connection to the NTP server by clicking
.
Note: If you are using a SNAZ and an Active Directory Server, it
is essential that their system time be synchronised. We
recommend that the same NTP server is used for both the SNAZ
and the Active Directory Server.
3 Click to save the changes.
14 97707987 Rev A

Services
The System - Services page allows you to start, stop and, in some
cases, configure:
• MS Networking - see page 16
• NFS - This is configured via the Network - Shares page - see
page 37
• FTP - see page 23
• Replication - This is configured via the Data Protection -
Replication Target page - see page 63
• UPS - see page 20
• Backup - see page 22.
97707987 Rev A 15
MS Networking
To configure MS Networking:
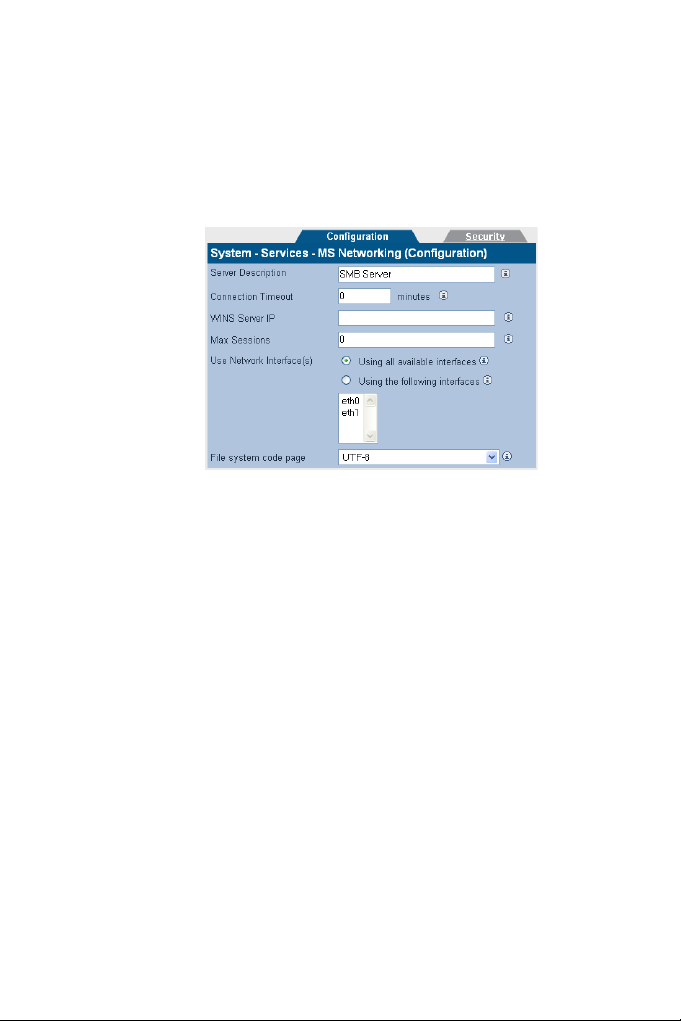
1 From the menu bar, select System - Services and click on MS
Networking. The MS Networking (Configuration) page
opens:
2 Enter a Server Description. This is a name (or type)
description for the server.
3 If required, enter a Connection Timeout in minutes. This is
the amount of time that connections may remain idle, with no
open files, before disconnecting them from the share. The
default timeout is 30 minutes.
4 If required, enter a WINS Server ID. This is the IP address of
the Windows Internet Naming Service (WINS) server.
5 If required, enter the number of Max Sessions. This is the
maximum number of concurrent MS Networking sessions that
the SNAZ will accept. The default is 60 sessions.
6 Select whether MS Networking connects:
• Using all available interfaces - to use any and all
available network ports
• Using the following interfaces - to use a network port
specified from the drop-down list.
7 Click on the Security tab. This gives access to the Active
Directory Server user authentication features.
16 97707987 Rev A
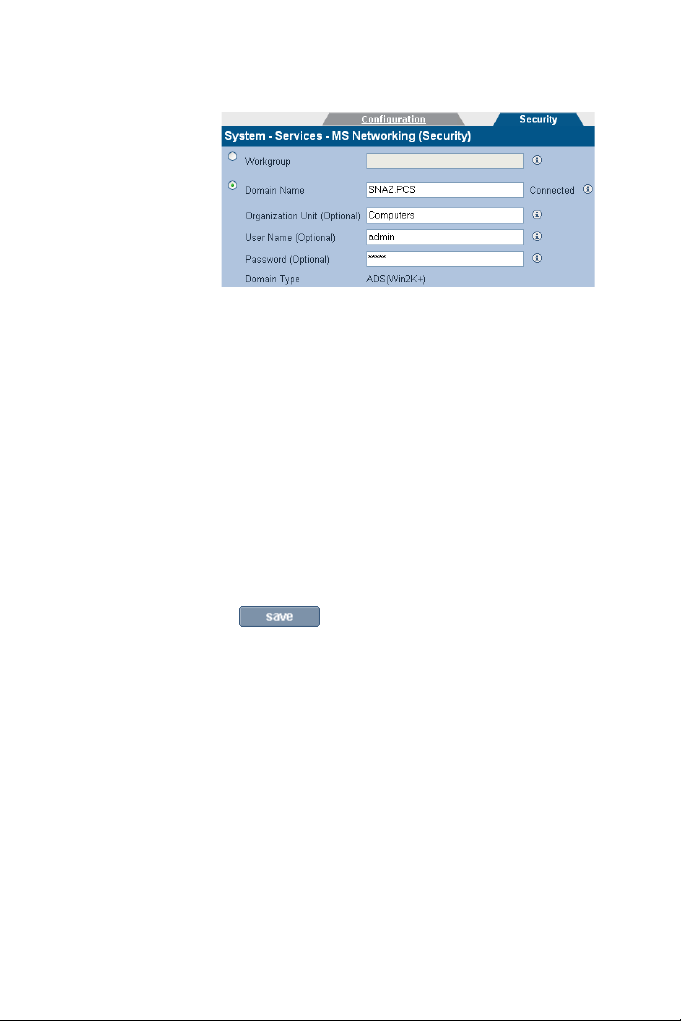
8 If required, enter a Workgroup.
OR
Enter a Domain Name. This is the domain name the MS
Networking service will use and is not the same as a DNS
domain name.
9 If required, enter the name of the Organization Unit (OU)
within the Active Directory structure in which the SNAZ will
appear. By default, the server will appear within the OU
named “Computers”.
10 If required, enter the Windows User Name. If a Windows User
Name is entered, their Password must be supplied.
11 The Domain Type is derived from the connection to the
Active Directory Server. The two types of domain are:
• ADS (Win2K+)
• NT Compatible.
12 Click to save the changes.
97707987 Rev A 17
FTP
To configure FTP access to the SNAZ:
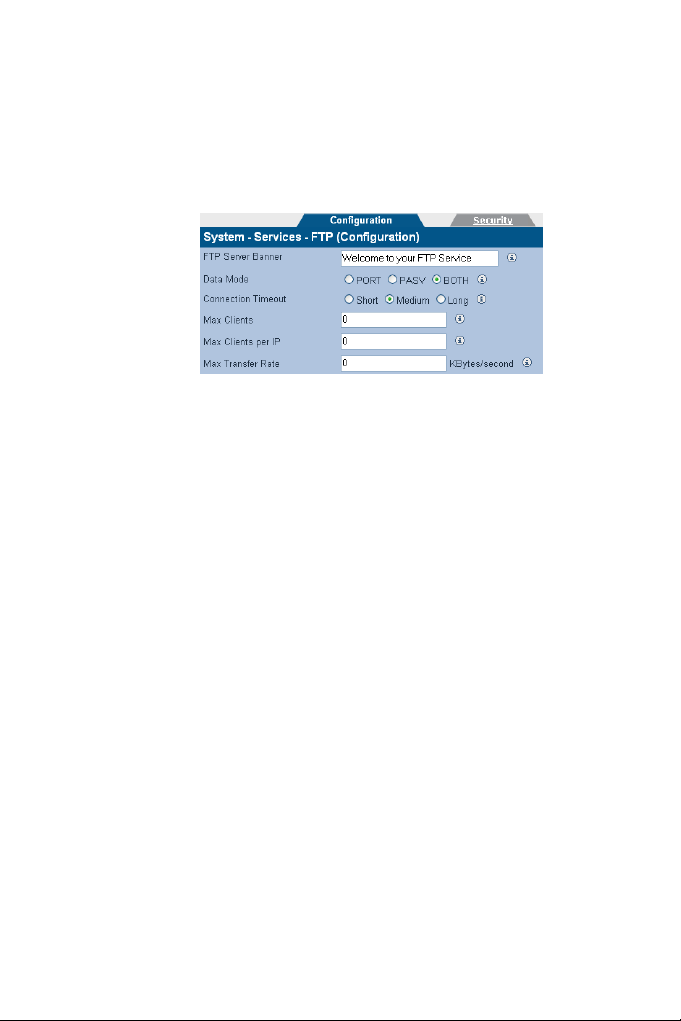
1 From the menu bar, select System - Services and click on FTP.
The FTP (Configuration) page opens:
2 If required, enter an FTP Server Banner. This is a message
which will be displayed to users when they access the SNAZ via
FTP.
3 Enter a Data Mode. The data mode can be:
• PORT - The client connects from a random unprivileged
port (N > 1024) to the FTP server's command port, port 21.
Then, the client starts listening to port N+1 and sends the
FTP command PORT N+1 to the FTP server. The server will
then connect back to the client's specified data port from
its local data port, which is port 20
• PASV - The client initiates both connections to the server,
solving the problem of firewalls filtering the incoming
data port connection to the client from the server. When
opening an FTP connection, the client opens two random
unprivileged ports locally (N > 1024 and N+1). The first port
contacts the server on port 21, but instead of then issuing a
PORT command and allowing the server to connect back to
its data port, the client will issue the PASV command. The
result of this is that the server then opens a random
unprivileged port (P > 1024) and sends the PORT P
command back to the client. The client then initiates the
connection from port N+1 to port P on the server to
transfer data
• BOTH - The FTP client defines the connection method
(PORT or PASV) and the server responds accordingly.
4 Enter a Connection Timeout. This defines how long the SNAZ
should remain connected, but idle, before disconnecting.
18 97707987 Rev A
The timeout settings for connections are:
• 30 seconds for Short
• 60 seconds for Medium
• 300 seconds for Long.
The timeout settings for transfers are:
• 150 seconds for Short
• 300 seconds for Medium
• 1500 seconds for Long.
5 Enter Max Clients. This is the maximum number of concurrent
FTP client connections.
6 Enter Max Clients per IP. This is the maximum number of
concurrent FTP client connections per IP address.
7 Enter the Max Transfer Rate. This is the maximum rate, in
Bytes, of FTP data transfer.
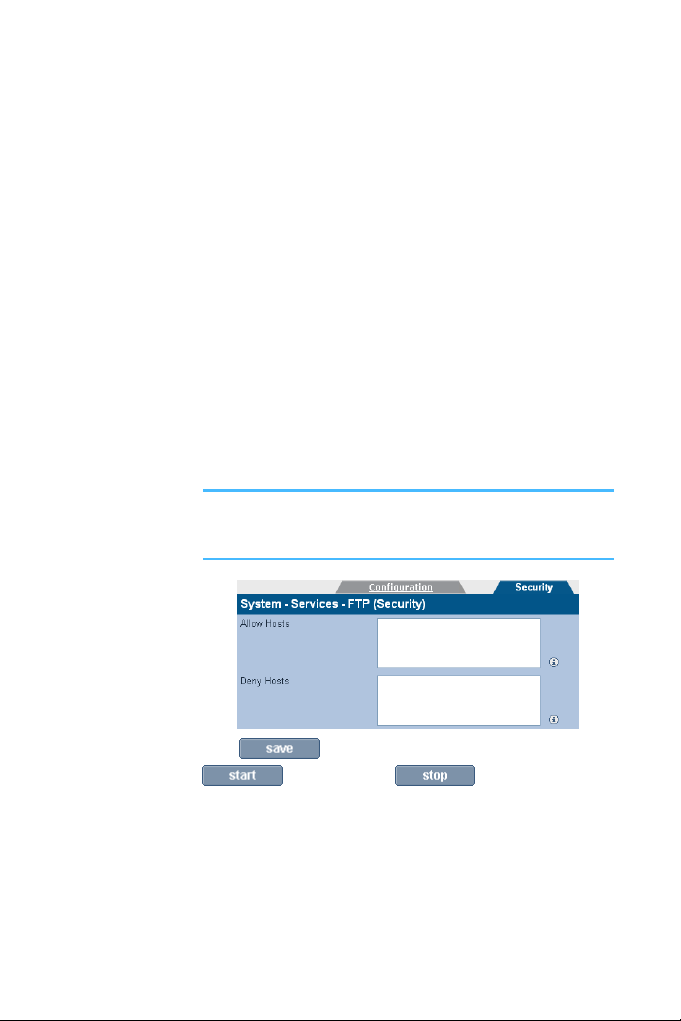
8 Click on the Security tab. This allows you to enter IP addresses
and/or hostnames which you wish to explicitly Allow or Deny
FTP access to the SNAZ.
Note: When hosts are added to either the Allow or Deny lists, all
other hosts automatically become marked as the opposite, unless
they are specified otherwise.
9 Click to save the changes and, as appropriate, click
to start or click to stop the service.
97707987 Rev A 19

UPS
The information in the System - Services - UPS page is derived
from the UPS itself.
Refer to your UPS’s documentation for further details.
Note: The SNAZ only supports APC Smart brand UPSs.
1 From the menu bar, select System - Services and click on
UPS. The UPS (Status) page opens:
• UPS Model - The type of UPS attached to the SNAZ
• Status - The UPS's status (e.g ONLINE,)
• Line Voltage - The UPS's input voltage
• Battery Charge - The amount of battery charge, in
percent, remaining
• Battery Time Left - The amount of battery charge, in
minutes, remaining
• Output Voltage - The UPS's output voltage (to the SNAZ)
• UPS Temperature - The temperature of the UPS enclosure
• Last time power was transferred to UPS - The last time
the power was transferred from the mains supply to the
UPS.
20 97707987 Rev A