

Page 1

Plantronics Voyager® PRO
User Guide
Page 2

Thank you for purchasing the Plantronics
Voyager PRO headset. This guide contains
instructions for setting up and using your new
headset.
Please refer to the separate For Your Safety
guide for important product safety information
prior to use of the product.
Getting Assistance
The Plantronics Technical Assistance Center
is ready to assist you. You can find answers
to frequently asked questions, ask a question
using e-mail, receive service over the Internet, or
speak directly with a representative. Visit www.
plantronics.com/support or call 1-866-363BLUE (2583).
NOTE If you are considering returning
this headset, please contact the Technical
Assistance Center first.
ii
Registering Your Product
Visit www.plantronics.com/productregistration to
register your product online so we can provide
you with the best service and technical support.
NOTE For pairing your headset, your Passkey/
PIN code is 0000.
Page 3

Contents
Package Contents and Accessories ...........................................iv
Charging Your Headset ................................................................2
Checking the Battery Status ..............................................3
Automatic Battery Status Alerts .........................................3
Pairing Your Headset ....................................................................4
How to Pair Your Headset for the First Time ......................4
Adjusting the Fit ...........................................................................6
Changing Ear Tips ..............................................................7
Headset Controls and Indicators..................................................8
Product Specifications ...............................................................10
Using More than One Bluetooth Phone ....................................11
How to Initiate a Call ........................................................11
How to Answer a Call While Talking on the Other Phone 11
Troubleshooting ..........................................................................12
Limited Warranty ........................................................................13
EN
iii
Page 4
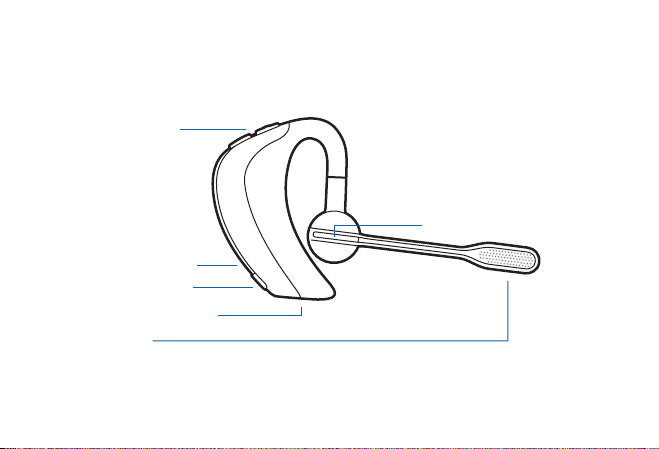
Package Contents and Accessories
Volume Up (+) and
Down (-) Buttons
Mute (press +/- buttons
simultaneously)
Status Indicator (LED)
Power On/Off Button
Micro USB Charging Jack
Microphones
iv
Call Control Button
Page 5
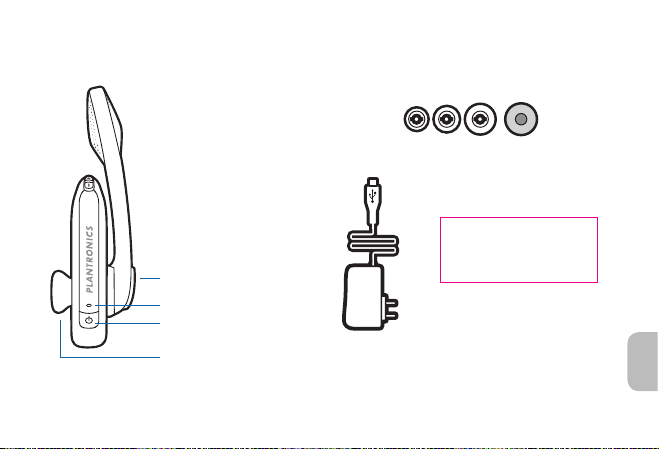
Package Contents and Accessories
Soft Gel (S, M, L) Eartips
and Foam Eartip Cover
Call Control Button
Status Indicator (LED)
Power On/Off Button
Eartip
AC Charger
For a complete list of accessories available for purchase, go to www.plantronics.com.
Charging Case
EN
1
Page 6
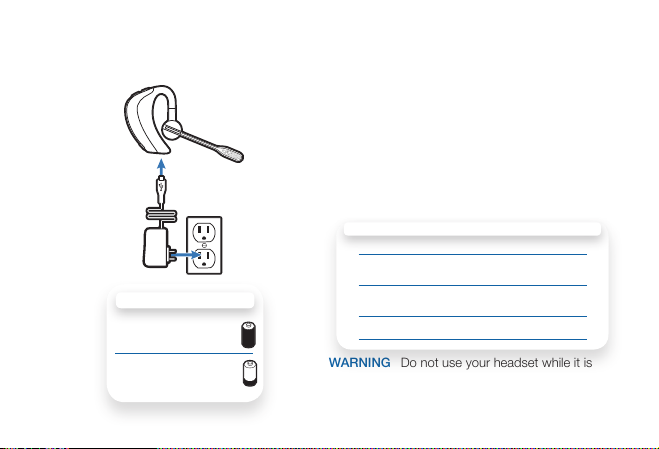
Charging Your Headset Charging Your Headset
Using the AC Charger
Your new headset performs best when fully
charged.
1 Plug the AC charger into a power outlet.
2 Connect the AC charger to the charging
jack on the headset.
CHARGING STATUS INDICATOR LIGHT
Charge Level Indicator Light
Fast charge
0-70%
CHARGING TIME
2 hours ...........................
Full charge
30 minutes .....................
Minimum charge
before first use
70%-100% Very slow red flashing LED
Fully charged LED off
WARNING Do not use your headset while it is
connected to the charger. The headset will not
function while it is charging.
2
Solid red LED during charge
cycle
until fully charged
Page 7
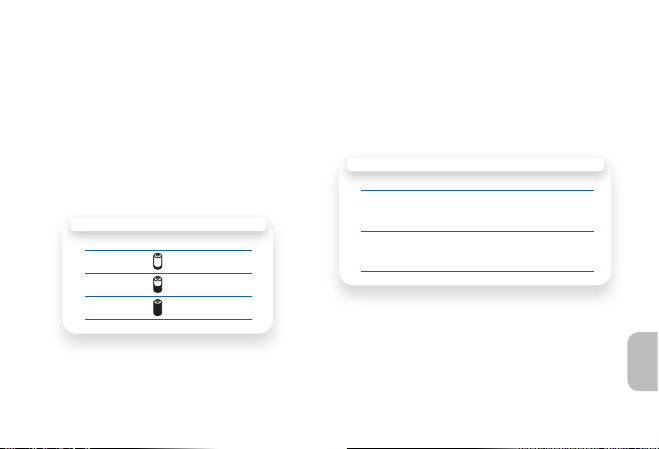
Checking the Battery Status
Your headset is equipped with an embedded,
non-replaceable battery that can be recharged.
To check the status, the headset must be powered
on. Tap the power button and the indicator light
flashes red to show the battery charge level.
CHARGE INDICATOR LIGHTS
Red Flashes Battery Level
3 Less than 1/3 full
2 1/3 to 2/3 full
1 More than 2/3 full
Automatic Battery Status Alerts
When the battery charge is very low, a vocal
warning and tone will automatically occur.
LOW BATTERY WARNINGS
Battery Level Whisper Tone
1/3 charge “Battery Low”
Critically low “Recharge
repeats every
15 minutes
Battery” repeats
every 2 minutes
Double high tone
every 5 minutes
Triple high tone
every 10 seconds
EN
3
Page 8

Pairing Your Headset Pairing Your Headset
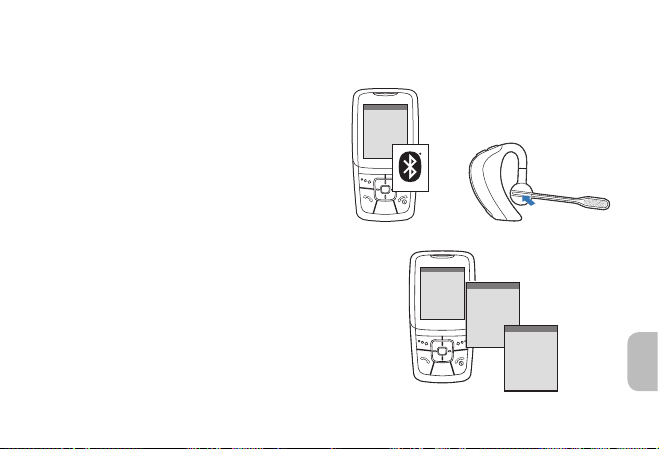
Pairing is the process of introducing your
headset to your phone. Before using your
headset for the first time, you must pair it
with your Bluetooth® enabled phone. Your
new headset includes Plantronics QuickPair
Technology to simplify the Bluetooth setup
process. The first time you turn your earpiece
on, your earpiece automatically enters pairing
mode for 10 minutes. Once paired successfully,
your earpiece stays on for instant use.
If not successfully paired after 10 minutes, your
earpiece automatically powers off. When you
turn the earpiece on again, it automatically
goes into pairing mode until successfully paired
with a Bluetooth phone.
To see a demo of the pairing process, visit
www.plantronics.com/EasyToPair
4
How to Pair Your Phone with Your
Headset for the First Time
1 Turn on your phone’s Bluetooth feature.
For most phones, select Settings/Tools >
Connections > Bluetooth > On. See your
phone’s user guide for more information.
2 Turn the headset on.
Press and hold the power button until the
indicator flashes red/blue. The headset is
now in pairing mode.
If you don’t see the red/blue flash, press and
hold the power button to turn your headset
off, and then press and hold the power
button again until you see the red/blue flash.
NOTE This headset is equipped with Secure
Simple Pairing (SSP). If your phone supports
Page 9
SSP, your phone will automatically locate and
SETTINGS
SETTINGS
Time and Da te
Phone Settings
Bluetooth
Sound Settings
Network S erv ices
Security
Reset Settings
BLUETOOTH
BLUETOOTH
Dis cov er/
Search
8BK;JEEJ>
8BK;JEEJ>
FheFbWdjhed_Yi
PASSKEY
0000
pair with this headset.
3 Use the commands on your phone to
locate your headset.
For most phones, select Settings/Tools >
Connections > Bluetooth > ProPlantronics.
See your phone’s user guide for more
information.
4 When prompted for the Passkey/PIN
code, enter 0000.
Pairing is successful when the indicator on
your headset flahes blue. Your headset is
now connected and ready to use.
NOTE To pair your headset with an additional
device, turn on the device then repeat steps 2
through 4.
1
2
3
4
EN
5
Page 10
Adjusting the Fit
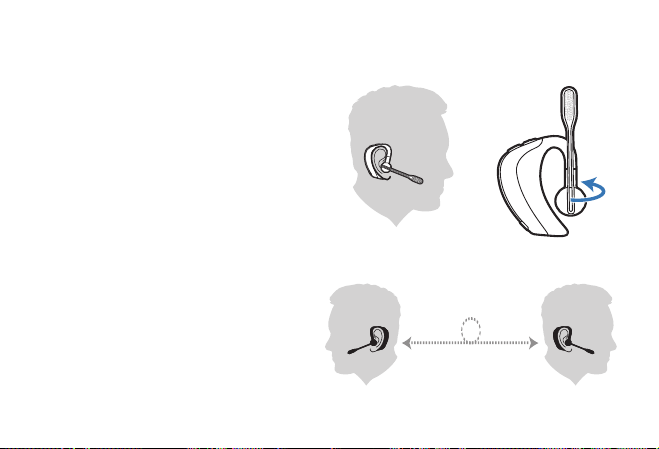
1 Place the earloop behind your ear and
rotate the headset so that the speaker
rests comfortably in your ear.
2 Align the microphone with the corner of
your mouth.
For optimal voice clarity, pivot the boom
toward the corner of your mouth.
3 The headset can be worn on either ear
by swiveling the speaker housing and
closed boom.
6
1
2
3
3
Page 11
Changing Ear Tips
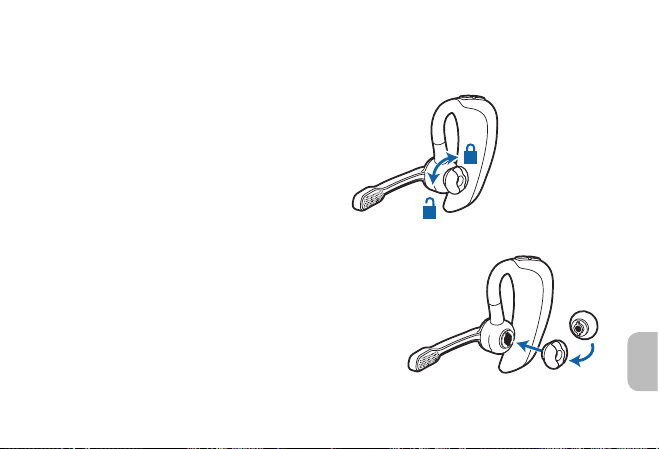
The headset comes with the medium eartip
installed, but you can replace it with the optional
small or large eartip provided.
1 To remove the eartip, grip the eartip with
your thumb and forefinger. Gently push
it down and rotate it a quarter turn to the
left to align with slots on the eartip with
the speaker housing. Gently lift the eartip
away from the headpiece.
2 To attach a new eartip, align the tabs on
the eartip with the slots on the speaker
housing. Gently push the eartip down
while turning it a quarter turn to the right.
The eartip will stop rotating when it is
attached.
Adjusting the Fit
1
2
EN
7
Page 12

Headset Controls and Indicators
Action Indicator Light Tone
Reject call Press call control
Missed call Tap call control to
Mute call Press volume up
Adjust the volume
(during call)
WARNING Do not use headsets at high volumes for an extended period of time. Doing so can cause
hearing loss. Always listen at moderate levels. See www.plantronics.com/healthandsafety for more
information on headsets and hearing.
for 1 second
dismiss indicator
and down buttons
simultaneously for
1 second
Tap volume up or
volume down
8
None Single low tone
Triple purple flash
until dismissed
None Mute on: Headset whispers “Mute
Single blue flash Tone at each change in volume.
None
On” followed by low-high tone, then
low tone every 5 minutes
Mute off: Headset whispers “Mute
Off” followed by high-low tone
Double tone when min/max volume
level reached.
Page 13

Headset Controls and Indicators
Action Indicator Light Tone
Redial Double-tap call
Voice-activated
dialing
Transfer a call from
headset to phone
or from phone to
headset
Check status Press any button Short blue flash None
Enable/disable call
indicator
control button
Press call control
button for 1 second
While on a call, press
call control button for
1 second
Press power and
volume buttons for
1 second
None Double low tone
None Single low note (phone
None Single followed by double
Turn indicator on: blue glow
increases for 2 seconds.
Turn indicator off: blue glow
fades for 2 seconds
may then prompt you to
say a name)
low tones
Single low tone
EN
9
Page 14

Product Specifications
Talk time* Up to 6 hours
Standby time* Up to 5 days or 120 hours
Range* Up to 33 feet (10 meters)
Headset weight 17.5 grams
Battery type Lithium ion polymer
Charge time 2 hours for full charge
Bluetooth version 2.1 + EDR (Enhanced Data
Profile HSP, HFP, Secure Simple
Rate)
Pairing
10
Power
requirements
Storage/operating
temperature
Charging
temperature
* Performance dependent on battery and may vary by
device. Audio quality degrades as you move out of
range and is dependent upon the device with which
the headset is paired.
5V DC – 180 mA
50F – 104F (10C-40C)
32F - 104F (0-40C)
Page 15
Using More Than One Bluetooth Phone
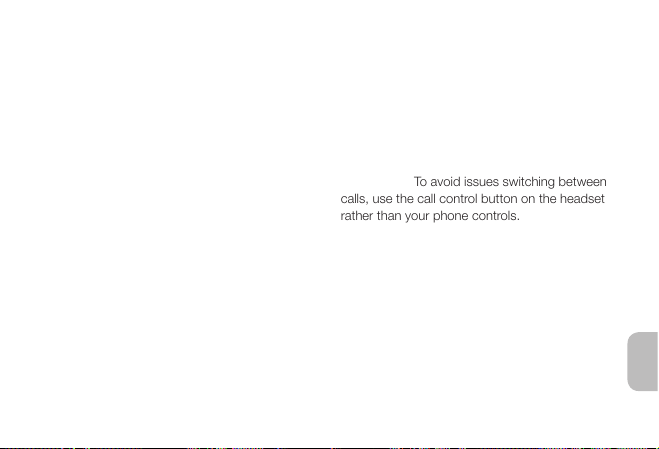
Plantronics Voyager PRO supports multipoint
technology, which allows you to use one
headset with two different Bluetooth mobile
phones. To pair an headset to a second phone,
see “Pairing Your Headset” on page 4.
How to Initiate a Call
The headset initiates a call on the phone you
most recently used. To use the second phone,
initiate the call using the controls on the second
phone. The second phone forms an active link
with the headset.
How to Answer a Call While Talking on
the Other Phone
To answer the second call, the first call must be
terminated. There is no function for placing one
call on hold while answering another call from
the headset. To avoid issues switching between
calls, use the call control button on the headset
rather than your phone controls.
1 Press the call control button once to
hang up the existing call.
2 Press the call control button again to
answer the new call from the other
phone.
NOTE If you choose not to answer the second
call, and you have voice mail on the second
phone, the call will go to voice mail.
EN
11
Page 16

Troubleshooting
My phone did not
locate the headset.
I could not enter
my PIN code/Passkey.
I cannot hear
caller/dial tone.
Callers cannot
hear me.
12
Turn both your phone and headset off and on, and then repeat the pairing process
on page 4.
Turn both your phone and headset off and on, and then repeat the pairing process
on page 4. Your Passkey/PIN code is 0000.
The headset may not be turned on. Tap the call control button. If a blue light
flashes then the headset is on. If not, then press the call control button for
approximately 2 seconds until you hear a tone or see the indicator glow blue.
Your headset battery may be drained. Charge your battery. See “Charging Your
Headset” on page 2.
Your headset may be out of range from your phone. Move back into range and
manually reconnect by pressing the call control button.
Make sure that the headset is sitting correctly in your ear with the microphone
pointing towards the corner of your mouth. See “Adjusting the Fit” on page 6.
Page 17

imPortant SaFetY and oPerational
inFormation
Please read the following safety and operational instructions before using your
Bluetooth earpiece and accessories. Please keep these instructions for your reference.
Additional warnings may be present on the product, packaging, or in the user
instructions.
This symbol identifies and alerts the user to the presence of important safety
warnings.
GENERAL:
Operating and storage temperature is 10°C to +40°C (50°F to +104°F)
WARNINGS
Exposure to high volume sound levels or excessive sound pressure may damage your
hearing. Although there is no single volume setting that is appropriate for everyone,
you should always use your earpiece with the volume set at moderate levels and avoid
prolonged exposure to high volume sound levels. The louder the volume, the less time
is required before your hearing could be affected. You may experience different sound
levels when using your earpiece with different devices. The device you use and its
settings affect the level of sound you hear. If you experience hearing discomfort, you
should stop listening to the device through your earpiece. To protect your hearing, some
hearing experts suggest that you:
1. Set the volume control in a low position before putting the earpiece on your ears.
2. Limit the amount of time you use earpiece at high volume.
3. Avoid turning up the volume to block out noisy surroundings.
4. Turn the volume down if the sound from the earpiece prevents you from hearing
people speaking near you.
See www.plantronics.com/healthandsafety for more information on earpiece and
hearing.
• Use of a earpiece that covers both ears will impair your ability to hear other
sounds. Use of such an earpiece while operating a motor vehicle or riding a
bicycle may create a serious hazard to you and/or others, and is illegal in most
regions.
• Check local laws regarding use of a mobile phone and earpiece while driving.
If you use the earpiece while driving ensure your attention and focus remain on
driving safely.
• Observe all signs and instructions that require an electrical device or RF radio
product to be switched off in designated areas, such as gas/refueling stations,
hospitals, blasting areas, potentially explosive atmospheres, or aircraft.
16
Page 18

• Keep all products, cords, and cables away from operating machinery. As with
all corded products, there is a danger of strangulation if a cord should become
wrapped around your neck.
• This product is not a toy. Never allow children to play with the product– small
parts may be a choking hazard.
• Install and use eartips and earbuds in accordance with the instructions provided.
Do not force eartips or earbuds down the ear canal. If either becomes lodged in
the ear canal, seek medical attention immediately.
• Ensure eartips and earbuds are kept clean and free of ear wax buildup to
maintain the specified product performance.
• Applying excessive pressure to the earpiece may injure the outer ear. Do not wear
the earpiece while sleeping or in other situations where pressure may be exerted
against the earpiece.
• Do not disassemble or insert anything into the product or charger because this
may cause damage to the internal components or cause injury to you.
• If the product or charger: overheats; has a damaged cord or plug; has been
dropped or damaged; has been dropped into water, disconnect any charger from
its supply, discontinue use of the product and contact Plantronics.
• Prevent rain, moisture or other liquid from coming into contact with the product
to protect against damage to your earpiece or injury to you. This warning is not
applicable for ruggedized or sports products which are designed to withstand
contact with moisture.
CHARGING WARNINGS
• To reduce the risk of electric shock, explosion or fire, use only the charger
supplied by Plantronics to charge the product. Do not use the chargers with
other products or for any other purpose. Ensure that the voltage rating corresponds to the local mains or power supply you intend to use.
• If your earpiece is designed to be charged with your mobile phone charger using
a custom adapter, use only mobile phone chargers approved and provided by
your mobile phone manufacturer.
• Charge the earpiece according to the instructions supplied with the unit.
• Ensure the mains (AC Power) socket-outlet for the charger is located near the
equipment and is easily accessible.
en
17
Page 19

BATTERY WARNINGS
To avoid the risk of explosion, fire or leakage of toxic chemicals, please observe the
following warnings:
• Do not dispose of the product or battery in a fire. The battery cells may explode.
• Do not open or mutilate the battery. There may be corrosive materials which can
cause damage to eyes or skin and may be toxic if swallowed.
• Always store batteries where children cannot reach them.
• If your product has a non-replaceable battery, do not attempt to open the product
or remove the battery.
• If your product has a replaceable battery, use only the battery type supplied by
Plantronics. Observe the correct polarity when installing the battery. Remove
the battery if it will not be used for an extended period; remove a spent battery
promptly.
• If your product is designed to be recharged from a non-rechargeable battery:
use only the battery type specified in the product instructions; do not use a
rechargeable battery.
• Do not allow any battery or its holder to contact metal objects such as keys
or coins.
RECYCLING: Your product and batteries must be recycled or disposed of properly.
Contact your local recycling center for information on proper disposal.
18
Page 20
Page 21

Regulatory Notices
INDUSTRY CANADA RADIO EQUIPMENT
The term “IC:” before the radio certification number only signifies that Industry Canada
technical specifications were met. Operation is subject to the following two conditions:
(1) this device may not cause interference, and (2) this device must accept any
interference, including interference that may cause undesired operation of the device.
“Privacy of communications may not be ensured when using this telephone.” This
product meets the applicable Industry Canada technical specifications of the RSS210.
en
20
Page 22

Limited Warranty
This warranty covers defects in materials and workmanship of products manufactured, sold or certified by
Plantronics which were purchased and used in the United States and Canada.
The warranty lasts for one year from the date of purchase of the products.
This warranty extends to you only if you are the end user with the original purchase receipt.
We will, at our option, repair or replace the products that do not conform to the warranty. We may use functionally equivalent reconditioned/refurbished/remanufactured/pre-owned or new products or parts.
To obtain service in the U.S., contact Plantronics at 1-866-363-BLUE (2583). To obtain service in Canada call
(800) 540-8363.
THIS IS PLANTRONICS’ COMPLETE WARRANTY FOR THE PRODUCTS.
This warranty gives you specific legal rights, and you may also have other rights that vary from state to state.
Please contact your dealer or our service center for the full details of our limited warranty, including items not
covered by this limited warranty.
EN
13
Page 23

345 Encinal
Santa Cruz, CA 95060
United States
Tel: 800-544-4660
www.plantronics.com
©2008 Plantronics, Inc. All rights reserved. Plantronics, the logo design, Vopyager, QuickPair, and Sound Innovation
are trademarks or registered trademarks of Plantronics, Inc. The Bluetooth® word mark and logos are owned by
the Bluetooth SIG, Inc. and any use of such marks by Plantronics, Inc. is under license. All other trademarks are the
property of their respective owners.
US Patents Pending.
xxxxx-xx (10/09)
 Loading...