

Page 1

Polycom® UC Software 5.1.0
UC Software 5.1.0 | May 2014 | 3725-49104-004 Rev A
ADMINISTRATOR’S GUIDE
Polycom, Inc. 1
Page 2

Polycom® UC Software 5.1.0 Administrator’s Guide 5.1.0
Copyright ©2014, Polycom, Inc. All rights reserved. No part of this document may be reproduced, translated into
another language or format, or transmitted in any form or by any means, electronic or mechanical, for any purpose,
without the express written permission of Polycom, Inc.
6001 America Center Drive
San Jose, CA 95002
USA
Polycom®, the Polycom logo and the names and marks associated with Polycom products are trademarks and/or
service marks of Polycom, Inc. and are registered and/or common law marks in the United States and various other
countries. All other trademarks are property of their respective owners. No portion hereof may be reproduced or
transmitted in any form or by any means, for any purpose other than the recipient's personal use, without the express
written permission of Polycom.
End User License Agreement By installing, copying, or otherwise using this product, you acknowledge that you
have read, understand and agree to be bound by the terms and conditions of the End User License Agreement for
this product.
Patent Information The accompanying product may be protected by one or more U.S. and foreign patents and/or
pending patent applications held by Polycom, Inc.
Open Source Software Used in this Product This product may contain open source software. You may receive
the open source software from Polycom up to three (3) years after the distribution date of the applicable product
or software at a charge not greater than the cost to Polycom of shipping or distributing the software to you. To
receive software information, as well as the open source software code used in this product, contact Polycom by
email at OpenSourceVideo@polycom.com.
Disclaimer While Polycom uses reasonable efforts to include accurate and up-to-date information in this document,
Polycom makes no warranties or representations as to its accuracy. Polycom assumes no liability or responsibility for
any typographical or other errors or omissions in the content of this document.
Limitation of Liability Polycom and/or its respective suppliers make no representations about the suitability of the
information contained in this document for any purpose. Information is provided “as is” without warranty of any kind
and is subject to change without notice. The entire risk arising out of its use remains with the recipient. In no event
shall Polycom and/or its respective suppliers be liable for any direct, consequential, incidental, special, punitive or
other damages whatsoever (including without limitation, damages for loss of business profits, business interruption,
or loss of business information), even if Polycom has been advised of the possibility of such damages.
Customer Feedback We are striving to improve our documentation quality and we appreciate your feedback. Email
your opinions and comments to DocumentationFeedback@polycom.com.
Visit the Polycom Support Center for End User License Agreements, software downloads, product documents,
product licenses, troubleshooting tips, service requests, and more.
Polycom, Inc. 2
Page 3

Contents
Conventions Used in Polycom Guides ..................................................................................14
Information Elements ............................................................................................................................. 14
Typographic Conventions ...................................................................................................................... 15
Writing Conventions ............................................................................................................................... 15
Before You Begin ....................................................................................................................16
Audience, Purpose, and Required Skills ............................................................................................... 16
Frequently Asked Questions .................................................................................................................. 16
What’s New in Polycom UC Software 5.1.0?......................................................................................... 17
Recommended Software Tools ............................................................................................................. 17
Read the Feature Parameter Tables ..................................................................................................... 17
Example One: Feature Parameter Tables ............................................................................................. 18
Example Two: Configuring Grouped Parameters .................................................................................. 19
Get Help ................................................................................................................................................. 22
Polycom Support .............................................................................................................................................. 22
Polycom and Partner Resources ...................................................................................................................... 22
The Polycom Community .................................................................................................................................. 22
Welcome to the Polycom UC Software Family of Phones ....................................................24
The Polycom UC Software Family of Phones........................................................................................ 24
SoundPoint IP Desktop Phones ....................................................................................................................... 25
SoundStation IP Conference Phones ................................................................................................ ............... 25
VVX Business Media Phones ........................................................................................................................... 26
VVX Expansion Modules .................................................................................................................................. 27
SoundStructure VoIP Interface ......................................................................................................................... 28
Key Features of Your Polycom Phones ................................................................................................. 28
The Polycom UC Software Big Picture ................................................................ ..................31
Where Polycom Phones Fit in Your Network......................................................................................... 32
Understand Polycom Phone Software Architecture .............................................................................. 34
What Is the Updater? ........................................................................................................................................ 34
What Is the Polycom UC Software? .................................................................................................................. 35
What Are the UC Software Template Configuration Files? ............................................................................... 36
What Are the Resource Files? .......................................................................................................................... 36
Set Up Your Device Network ..................................................................................................38
Establish Link Connectivity .................................................................................................................... 39
Wired Devices................................................................................................................................................... 39
Set Security and Quality of Service ....................................................................................................... 39
VLANs and Wired Devices ............................................................................................................................... 39
802.1X Authentication ....................................................................................................................................... 40
Polycom, Inc. 3
Page 4

Polycom® UC Software 5.1.0 Administrator’s Guide 5.1.0
IP Communication Settings.................................................................................................................... 41
PSTN Communication Settings ............................................................................................................. 42
Provisioning Server Discovery ............................................................................................................... 44
Supported Provisioning Protocols ..................................................................................................................... 45
Phone Network Menus ........................................................................................................................... 47
Main Menu ........................................................................................................................................................ 48
Provisioning Server Menu ................................................................................................................................. 50
DHCP Menu ..................................................................................................................................................... 51
Network Interfaces Menu (Ethernet Menu) ....................................................................................................... 52
VLAN Menu ...................................................................................................................................................... 54
802.1X Menu .................................................................................................................................................... 55
PAC File Information ......................................................................................................................................... 55
CMA Menu ........................................................................................................................................................ 56
Login Credentials Menu .................................................................................................................................... 56
TLS Security Menu ................................................................................................................................ ........... 57
TLS Profile Menu .............................................................................................................................................. 57
Applications Menu ............................................................................................................................................ 58
Syslog Menu ..................................................................................................................................................... 58
Set Up the Provisioning Server ..............................................................................................60
Why Use a Provisioning Server? ........................................................................................................... 60
Provisioning Server Security Notes ....................................................................................................... 61
Set Up an FTP Server as Your Provisioning Server .............................................................................. 62
Download Polycom UC Software Files to the Provisioning Server........................................................ 62
Deploy and Update Polycom Phones with a Provisioning Server ......................................................... 64
Deploy Polycom Phones with a Provisioning Server ........................................................................................ 64
Upgrade Polycom UC Software ............................................................................................................. 66
Upgrade Phones from UC Software 4.0.x ......................................................................................................... 67
Support Legacy Phones......................................................................................................................... 68
Provision VVX 1500 Phones Using a Polycom CMA System ............................................................... 71
Provision Using Polycom CMA ......................................................................................................................... 72
Disable the Polycom CMA System ................................................................................................................... 73
Upgrade Polycom UC Software Using Polycom CMA ................................ ...................................................... 73
Monitor Using Polycom CMA ............................................................................................................................ 73
Configuration Methods ................................ ................................................................ ...........75
Use the Centralized Provisioning Method: Configuration Files ............................................................. 77
Understand the Master Configuration File ........................................................................................................ 80
Understand Variable Substitution ..................................................................................................................... 82
Use the Template Configuration Files ............................................................................................................... 84
Change Configuration Parameter Values ......................................................................................................... 86
Provision with the Web Configuration Utility .......................................................................................... 88
Access the Web Configuration Utility ................................................................................................................ 89
Choose Language Files for the Web Configuration Utility Interface.................................................................. 91
Phone User Interface – Menu System Settings ..................................................................................... 92
Set Up Basic Phone Features ................................................................................................94
Polycom, Inc. 4
Page 5

Polycom® UC Software 5.1.0 Administrator’s Guide 5.1.0
Basic Phone Features at a Glance ........................................................................................................ 94
Configure the Call Logs ......................................................................................................................... 95
Example Call Log Configuration ....................................................................................................................... 97
Understand the Call Timer ..................................................................................................................... 98
Configure Call Waiting Alerts ................................................................................................................. 98
Example Call Waiting Configuration ................................................................................................................. 99
Called Party Identification ...................................................................................................................... 99
Configure Calling Party Identification ................................................................................................... 100
Example Calling Party Configuration .............................................................................................................. 101
Configure PSTN Calling Party Identification ........................................................................................ 101
Enable Missed Call Notification ........................................................................................................... 102
Example Missed Call Notification Configuration ............................................................................................. 103
Connected Party Identification ............................................................................................................. 103
Distinctive Incoming Call Treatment .................................................................................................... 103
Example Call Treatment Configuration ........................................................................................................... 104
Apply Distinctive Ringing ..................................................................................................................... 105
Example Distinctive Ringing Configuration ..................................................................................................... 106
Apply Distinctive Call Waiting .............................................................................................................. 106
Example Distinctive Call Waiting Configuration .............................................................................................. 107
Configure Do Not Disturb ..................................................................................................................... 107
Example Do Not Disturb Configuration ........................................................................................................... 109
Configure the Headset and Speakerphone ......................................................................................... 110
Example Handset, Headset, and Speakerphone Configuration ...................................................................... 111
Use the Local Contact Directory .......................................................................................................... 111
Example Configuration ................................................................................................................................... 113
Configure the Local Digit Map ............................................................................................................. 114
Understand Digit Map Rules ................................................................ ........................................................... 115
Microphone Mute ................................................................................................................................. 118
Enable Persistent Mute ........................................................................................................................ 118
Configure the Speed Dial Feature ....................................................................................................... 119
Example Speed Dial Configuration ................................................................................................................. 120
Set the Time and Date Display ............................................................................................................ 122
Example Configuration ................................................................................................................................... 123
Add an Idle Display Image ................................................................................................................... 124
Example Idle Display Image Configuration ..................................................................................................... 125
Ethernet Switch .................................................................................................................................... 126
Set a Graphic Display Background ...................................................................................................... 127
Example Graphic Display Background Configuration ................................................................ ..................... 128
Connect Polycom VVX Expansion Modules ........................................................................................ 129
VVX Expansion Module Power Values ........................................................................................................... 130
Generate Configured Line Key Information ......................................................................................... 131
Configure Smart Paging ....................................................................................................................... 132
Example Smart Paging Configuration ............................................................................................................. 133
Enable Automatic Off-Hook Call Placement ........................................................................................ 135
Example Automatic Off-Hook Placement Configuration ................................................................................. 136
Configure Call Hold .............................................................................................................................. 136
Polycom, Inc. 5
Page 6

Polycom® UC Software 5.1.0 Administrator’s Guide 5.1.0
Example Call Hold Configuration .................................................................................................................... 137
Use Call Transfer ................................................................................................................................. 138
Example Call Transfer Configuration .............................................................................................................. 139
Create Local and Centralized Conferences ......................................................................................... 139
Enable Conference Management ........................................................................................................ 140
Example Conference Management Configuration .......................................................................................... 141
Configure Call Forwarding ................................................................................................................... 142
Example Call Forwarding Configuration ......................................................................................................... 144
Configure Directed Call Pick-Up .......................................................................................................... 145
Example Directed Call Pickup Configuration .................................................................................................. 146
Enable Group Call Pickup .................................................................................................................... 147
Example Group Call Pickup Configuration ...................................................................................................... 147
Configure Call Park and Retrieve ........................................................................................................ 149
Example Call Park and Retrieve Configuration ............................................................................................... 149
Enable Last Call Return ....................................................................................................................... 151
Example Configuration for Last Call Return .................................................................................................... 151
Set Up Advanced Phone Features ....................................................................................... 154
Configure the Phone Keypad Interface ................................................................................................ 156
Assign Multiple Line Keys Per Registration ......................................................................................... 157
Example Configuration ................................................................................................................................... 158
Enable Multiple Call Appearances ....................................................................................................... 158
Example Multiple Call Appearances Configuration ......................................................................................... 160
Customize and Download Fonts .......................................................................................................... 161
Set the Phone Language ..................................................................................................................... 162
Example Phone Language Configuration ....................................................................................................... 164
Use Pinyin Text Input ........................................................................................................................... 165
Enable Instant Messaging.................................................................................................................... 166
Example Instant Messaging Configuration ..................................................................................................... 166
Synthesized Call Progress Tones ........................................................................................................ 167
Use the Microbrowser and Web Browser ............................................................................................ 168
Example Microbrowser and Web Browser Configuration ................................................................................ 169
Remote Packet Capture for Logs ........................................................................................................ 170
Example Remote Packet Capture Using Wireshark ....................................................................................... 171
Configure Real-Time Transport Protocol Ports.................................................................................... 173
Example Real-Time Transport Protocol Configuration .................................................................................... 174
Configure Network Address Translation .............................................................................................. 174
Example Network Address Translation Configuration..................................................................................... 175
Use the Corporate Directory ................................................................................................................ 176
Example Corporate Directory Configuration ................................................................................................... 177
CMA Directory ...................................................................................................................................... 179
Record and Play Audio Calls Locally ................................................................................................... 180
Example Call Recording Configuration ........................................................................................................... 181
Enable Centralized Call Recording ...................................................................................................... 183
Example Call Recording Configuration ........................................................................................................... 186
Configure the Digital Picture Frame ..................................................................................................... 186
Polycom, Inc. 6
Page 7

Polycom® UC Software 5.1.0 Administrator’s Guide 5.1.0
Example Digital Picture Frame Configuration ................................................................................................. 187
Configure Enhanced Feature Keys ...................................................................................................... 188
Some Guidelines for Configuring Enhanced Feature Keys ............................................................................. 189
Enhanced Feature Key Examples .................................................................................................................. 190
Understanding Macro Definitions .................................................................................................................... 192
Macro Actions ................................................................................................................................................. 192
Prompt Macro Substitution ............................................................................................................................. 193
Expanded Macros ........................................................................................................................................... 194
Special Characters ......................................................................................................................................... 194
Example Macro ............................................................................................................................................... 194
Speed Dial Example ................................................................ ....................................................................... 195
Configure Soft Keys ............................................................................................................................. 196
Example Soft Key Configurations ................................................................................................................... 197
Enable the Power-Saving Feature ....................................................................................................... 200
Example Power-Saving Configuration ............................................................................................................ 201
Configure Push-to-Talk and Group Paging .......................................................................................... 201
Push-to-Talk ................................................................................................................................................... 202
Group Paging ................................................................................................................................................. 203
Example PTT/Paging Configuration................................................................................................................ 204
Flexible Line Key Assignment .............................................................................................................. 206
Example Flexible Line Key Assignment Configuration .................................................................................... 207
Configure Shared Call Appearances ................................................................................................... 208
Example Configuration ................................................................................................................................... 210
Enable Bridged Line Appearance ........................................................................................................ 212
Example Bridged Line Appearance Configuration .......................................................................................... 213
Use Busy Lamp Field ........................................................................................................................... 215
Example BLF Configuration ............................................................................................................................ 217
Enable Voicemail Integration ............................................................................................................... 219
Example Voicemail Configuration ................................................................................................................... 220
Enable Multiple Registrations .............................................................................................................. 221
Example Multiple Registration Configuration .................................................................................................. 223
Use Hoteling ........................................................................................................................................ 225
Example Hoteling Configuration ..................................................................................................................... 225
Configure SIP-B Automatic Call Distribution........................................................................................ 226
Example SIP-B Automatic Call Distribution Configuration .............................................................................. 227
Configure Feature-Synchronized Automatic Call Distribution (ACD) .................................................. 229
Example Feature Synchronized ACD Configuration ....................................................................................... 231
Set Up Server Redundancy ................................................................................................................. 234
DNS SIP Server Name Resolution ...................................................................................................... 235
Behavior When the Primary Server Connection Fails ..................................................................................... 236
Recommended Practices for Fallback Deployments ...................................................................................... 237
Use the Presence Feature ................................................................................................................... 238
Example Presence Configuration ................................................................................................................... 239
Use CMA Presence ............................................................................................................................. 240
Enable Access URL in SIP Messages ................................................................................................. 240
Example Access URL in SIP Messages Configuration ................................................................................... 243
Configuring the Static DNS Cache ...................................................................................................... 243
Polycom, Inc. 7
Page 8

Polycom® UC Software 5.1.0 Administrator’s Guide 5.1.0
Example Static DNS Cache Configuration ...................................................................................................... 244
Displaying SIP Header Warnings ........................................................................................................ 247
Example Display of Warnings from SIP Headers Configuration ..................................................................... 248
Quick Setup of Polycom Phones ......................................................................................................... 249
Example Quick Setup Configuration ............................................................................................................... 250
Provisional Polling of Polycom Phones ............................................................................................... 251
Example Provisional Polling Configuration ..................................................................................................... 252
Configure Polycom BroadSoft UC-One Application ............................................................................ 252
Example BroadSoft UC-One Configuration .................................................................................................... 254
Set Up Microsoft Lync Server 2010 and 2013 ..................................................................................... 254
Example Configuration: Setting the Base Profile to Lync ................................................................................ 256
Enable Polycom Desktop Connector Integration ................................................................................. 258
Example PDC Configuration ................................................................ ........................................................... 260
Enable Microsoft Exchange Calendar Integration ............................................................................... 261
Example Exchange Calendar Configuration ................................................................................................... 262
Set Up Phone Audio Features .............................................................................................. 264
Customize Audio Sound Effects .......................................................................................................... 265
Example Configuration ................................................................................................................................... 266
Context Sensitive Volume Control ....................................................................................................... 266
Voice Activity Detection ....................................................................................................................... 267
Generate Dual Tone Multi-Frequency (DTMF) Tones ......................................................................... 267
DTMF Event RTP Payload................................................................................................................... 268
Acoustic Echo Cancellation ................................................................................................................. 268
Audio Codecs ....................................................................................................................................... 269
IP Type-of-Service ............................................................................................................................... 272
IEEE 802.1p/Q ..................................................................................................................................... 273
Voice Quality Monitoring (VQMon) ...................................................................................................... 273
Audible Ringer Location ....................................................................................................................... 274
Bluetooth Headset Support .................................................................................................................. 274
Built-In Audio Processing Features ..................................................................................................... 275
Automatic Gain Control ................................................................................................................................... 275
Background Noise Suppression ..................................................................................................................... 275
Comfort Noise Fill ........................................................................................................................................... 275
Dynamic Noise Reduction .............................................................................................................................. 275
Jitter Buffer and Packet Error Concealment ................................................................................................... 276
Low-Delay Audio Packet Transmission .......................................................................................................... 276
Set Up Phone Video Features .............................................................................................. 277
Video Transmission ............................................................................................................................. 277
Video Codecs ....................................................................................................................................... 279
H.323 Protocol ..................................................................................................................................... 280
Supported Video Standards ............................................................................................................................ 281
Supported Polycom Interoperability ................................................................................................................ 282
Use the H.323 Protocol ................................................................................................................................... 283
Switching Between Voice and Video During Calls .............................................................................. 286
Polycom, Inc. 8
Page 9

Polycom® UC Software 5.1.0 Administrator’s Guide 5.1.0
Set Up User and Phone Security Features .......................................................................... 287
Local User and Administrator Passwords ............................................................................................ 288
Disable External Ports and Features ................................................................................................... 288
Example Configuration ................................................................................................................................... 291
Set Visual Security Classification ........................................................................................................ 291
Modify Security Classification Level ................................................................................................................ 292
Example Configuration ................................................................................................................................... 294
Incoming Signaling Validation .............................................................................................................. 294
Configuration File Encryption ............................................................................................................... 295
Digital Certificates ................................................................................................................................ 295
Generate a Certificate Signing Request .............................................................................................. 297
Configure TLS Profiles ......................................................................................................................... 298
Download Certificates to a Polycom Phone .................................................................................................... 300
Set TLS Profiles .............................................................................................................................................. 300
Support Mutual TLS Authentication ..................................................................................................... 301
Configurable TLS Cipher Suites .......................................................................................................... 302
Secure Real-Time Transport Protocol ................................................................................................. 303
Lock the Phone .................................................................................................................................... 305
Secondary Port Link Status Report ..................................................................................................... 307
Support 802.1X Authentication ............................................................................................................ 308
Set User Profiles .................................................................................................................................. 309
Troubleshoot Your Polycom Phones................................................................................... 315
Understand Error Message Types ....................................................................................................... 315
Updater Error Messages ................................................................................................................................. 316
Polycom UC Software Error Messages .......................................................................................................... 316
Status Menu ......................................................................................................................................... 319
Log Files............................................................................................................................................... 319
Reading a Boot Log File ................................................................................................................................. 322
Reading an Application Log File ..................................................................................................................... 323
Reading a Syslog File ..................................................................................................................................... 324
Manage the Phone’s Memory Resources ............................................................................................ 324
Identify Symptoms .......................................................................................................................................... 324
Check the Phone’s Available Memory ............................................................................................................ 325
Manage the Phone Features .......................................................................................................................... 326
Test Phone Hardware .......................................................................................................................... 327
Upload a Phone’s Configuration .......................................................................................................... 328
Network Diagnostics ............................................................................................................................ 328
Ports Used on Polycom Phones .......................................................................................................... 328
Power and Startup Issues .................................................................................................................... 329
Dial Pad Issues .................................................................................................................................... 330
Screen and System Access Issues ..................................................................................................... 331
Calling Issues ....................................................................................................................................... 331
Display Issues ...................................................................................................................................... 332
Audio Issues ........................................................................................................................................ 333
Polycom, Inc. 9
Page 10

Polycom® UC Software 5.1.0 Administrator’s Guide 5.1.0
Licensed Feature Issues ...................................................................................................................... 333
Upgrading Issues ................................................................................................................................. 334
SoundStation Duo Failover Issues ...................................................................................................... 336
Miscellaneous Maintenance Tasks ...................................................................................... 337
Trusted Certificate Authority List .......................................................................................................... 337
Encrypt Configuration Files .................................................................................................................. 339
Polycom UC Software Dependencies .................................................................................................. 341
Supported VVX 1500 and CMA Server Interoperability ....................................................................... 342
Multiple Key Combinations .................................................................................................................. 342
Reboot the Phone ........................................................................................................................................... 342
Reset to Factory Defaults ............................................................................................................................... 343
Update Log Files............................................................................................................................................. 344
Set the Base Profile ........................................................................................................................................ 344
Default Feature Key Layouts ............................................................................................................... 344
SoundPoint IP 321/331/335 ............................................................................................................................ 346
SoundPoint IP 450 .......................................................................................................................................... 348
SoundPoint IP 550/560/650 ............................................................................................................................ 349
SoundStation IP 5000 ..................................................................................................................................... 350
SoundStation IP 6000 ..................................................................................................................................... 351
SoundStation Duo........................................................................................................................................... 352
VVX 400 and 410............................................................................................................................................ 356
VVX 500 ......................................................................................................................................................... 358
VVX 600 ......................................................................................................................................................... 359
VVX 1500 ....................................................................................................................................................... 360
Internal Key Functions ......................................................................................................................... 361
Assign a VLAN ID Using DHCP ........................................................................................................... 365
Parse Vendor ID Information ............................................................................................................... 366
Product, Model, and Part Number Mapping ........................................................................................ 367
Disable the PC Ethernet Port ............................................................................................................... 369
Capture the Phone’s Current Screen ................................................................................................... 369
LLDP and Supported TLVs .................................................................................................................. 370
Supported TLVs .............................................................................................................................................. 371
Configuration Parameters .................................................................................................... 377
<acd/> .................................................................................................................................................. 380
<apps/> ................................................................................................................................................ 380
<attendant> .......................................................................................................................................... 383
<bg/> .................................................................................................................................................... 385
<bitmap/> ............................................................................................................................................. 385
<bluetooth/> ......................................................................................................................................... 386
<call/>................................................................................................................................................... 386
<callLists/> ........................................................................................................................................... 391
<device/>.............................................................................................................................................. 392
<diags/> ............................................................................................................................................... 400
<dialplan/> ........................................................................................................................................... 401
Polycom, Inc. 10
Page 11

Polycom® UC Software 5.1.0 Administrator’s Guide 5.1.0
<dir> ..................................................................................................................................................... 405
<broadsoft/> ................................................................................................................................................... 405
<local/> ........................................................................................................................................................... 406
<corp/> ........................................................................................................................................................... 406
<divert/> ............................................................................................................................................... 409
<dns/> .................................................................................................................................................. 410
DNS-A ............................................................................................................................................................ 410
DNS-NAPTR ................................................................................................................................................... 410
DNS-SRV ....................................................................................................................................................... 411
<efk/> ................................................................................................................................................... 412
<exchange/> ........................................................................................................................................ 414
<feature/> ............................................................................................................................................. 414
<font/> .................................................................................................................................................. 417
<hoteling/> ........................................................................................................................................... 419
<httpd/> ................................................................................................................................................ 419
<homeScreen/> ................................................................................................................................... 420
<key/> .................................................................................................................................................. 420
<keyboard/> ......................................................................................................................................... 422
<lcl/> ..................................................................................................................................................... 423
<ml/> ............................................................................................................................................................... 423
<datetime/> ..................................................................................................................................................... 425
SoundStation Duo Localization Preferences .................................................................................................. 426
<license/> ............................................................................................................................................. 427
<lineKey/> ............................................................................................................................................ 428
<loc/> ................................................................................................................................................... 429
<log/> ................................................................................................................................................... 430
<level/> <change/>and<render/> .................................................................................................................... 431
<sched/> ......................................................................................................................................................... 432
<mb/> ................................................................................................................................................... 433
<msg/> ................................................................................................................................................. 434
<mwi/>.................................................................................................................................................. 435
<nat/> ................................................................................................................................................... 436
<phoneLock/> ...................................................................................................................................... 436
<powerSaving/> ................................................................................................................................... 437
<pres/> ................................................................................................................................................. 439
<prov/> ................................................................................................................................................. 439
<pstn/> ................................................................................................................................................. 442
<ptt/> .................................................................................................................................................... 442
<qos/> .................................................................................................................................................. 444
<reg/> ................................................................................................................................................... 445
<request/> ............................................................................................................................................ 455
<roaming_buddies/> ............................................................................................................................ 456
<roaming_privacy/> ............................................................................................................................. 456
<saf/> ................................................................................................................................................... 456
<se/> .................................................................................................................................................... 458
Polycom, Inc. 11
Page 12

Polycom® UC Software 5.1.0 Administrator’s Guide 5.1.0
<pat/> ............................................................................................................................................................. 458
<rt/> ................................ ................................................................ ................................................................ 462
<sec/> .................................................................................................................................................. 464
<encryption/> .................................................................................................................................................. 464
<pwd/><length/> ............................................................................................................................................. 465
<srtp/> ............................................................................................................................................................ 466
<H235/> .......................................................................................................................................................... 468
<dot1x><eapollogoff/> .................................................................................................................................... 468
<hostmovedetect/> ......................................................................................................................................... 469
<TLS/> ............................................................................................................................................................ 469
<softkey/> ............................................................................................................................................ 472
<tcpIpApp/> .......................................................................................................................................... 475
<dhcp/> ........................................................................................................................................................... 475
<dns/> ............................................................................................................................................................. 475
<ice/> .............................................................................................................................................................. 476
<sntp/> ............................................................................................................................................................ 477
<port/><rtp/> ................................ ................................................................ ................................................... 479
<keepalive/> ................................................................................................................................................... 479
<fileTransfer/> ................................................................................................................................................ 480
<tones/> ............................................................................................................................................... 481
<DTMF/> ........................................................................................................................................................ 481
<chord/> ......................................................................................................................................................... 482
<up/> .................................................................................................................................................... 483
<upgrade/> ........................................................................................................................................... 487
<video/> ............................................................................................................................................... 487
<camera/> ...................................................................................................................................................... 490
<codecs/> ....................................................................................................................................................... 490
<localCameraView/> ....................................................................................................................................... 494
<voice/>................................................................................................................................................ 495
<codecPref/> .................................................................................................................................................. 495
<volume/> ................................................................................................................................ ....................... 497
<vad/> ............................................................................................................................................................. 498
<quality monitoring/> ...................................................................................................................................... 498
<rxQoS/> ........................................................................................................................................................ 500
<voIpProt/> .......................................................................................................................................... 501
<server/> ........................................................................................................................................................ 501
<SDP/> ........................................................................................................................................................... 504
<SIP/> ............................................................................................................................................................. 505
<H323/> .......................................................................................................................................................... 513
<webutility/> ......................................................................................................................................... 514
<xmpp/> .......................................................................................................................................................... 514
Session Initiation Protocol (SIP) .......................................................................................... 516
RFC and Internet Draft Support ........................................................................................................... 516
Request Support ............................................................................................................................................. 517
Header Support .............................................................................................................................................. 518
Response Support .......................................................................................................................................... 521
Polycom, Inc. 12
Page 13

Polycom® UC Software 5.1.0 Administrator’s Guide 5.1.0
Hold Implementation ....................................................................................................................................... 525
Reliability of Provisional Responses ............................................................................................................... 525
Transfer .......................................................................................................................................................... 525
Third Party Call Control .................................................................................................................................. 525
SIP for Instant Messaging and Presence Leveraging Extensions .................................................................. 526
Shared Call Appearance Signaling ................................................................................................................. 526
Bridged Line Appearance Signaling ................................................................................................................ 526
Polycom UC Software Menu System ................................................................................... 527
Third-Party Software ............................................................................................................. 533
Polycom, Inc. 13
Page 14
Name
Icon
Description
Note
The Note icon highlights information of interest or important information needed
to be successful in accomplishing a procedure or to understand a concept.
Administrator Tip
The Administrator Tip icon highlights techniques, shortcuts, or productivity
related tips.
Caution
The Caution icon highlights information you need to know to avoid a hazard that
could potentially impact device performance, application functionality, or
successful feature configuration.
Warning
The Warning icon highlights an action you must perform (or avoid) to prevent
issues that may cause you to lose information or your configuration setup,
and/or affect phone or network performance.
Web Info
The Web Info icon highlights supplementary information available online such
as documents or downloads on support.polycom.com or other locations.
Timesaver
The Timesaver icon highlights a faster or alternative method for accomplishing
a method or operation.
Power Tip
The Power Tip icon highlights faster, alternative procedures for advanced
administrators already familiar with the techniques being discussed.
Troubleshooting
The Troubleshooting icon highlights information that may help you solve a
relevant problem or to refer you to other relevant troubleshooting resources.
Settings
The Settings icon highlights settings you may need to choose for a specific
behavior, to enable a specific feature, or to access customization options.
Conventions Used in Polycom Guides
Polycom guides contains graphical elements and a few typographic conventions. Familiarizing yourself
with these elements and conventions will help you successfully perform tasks.
Information Elements
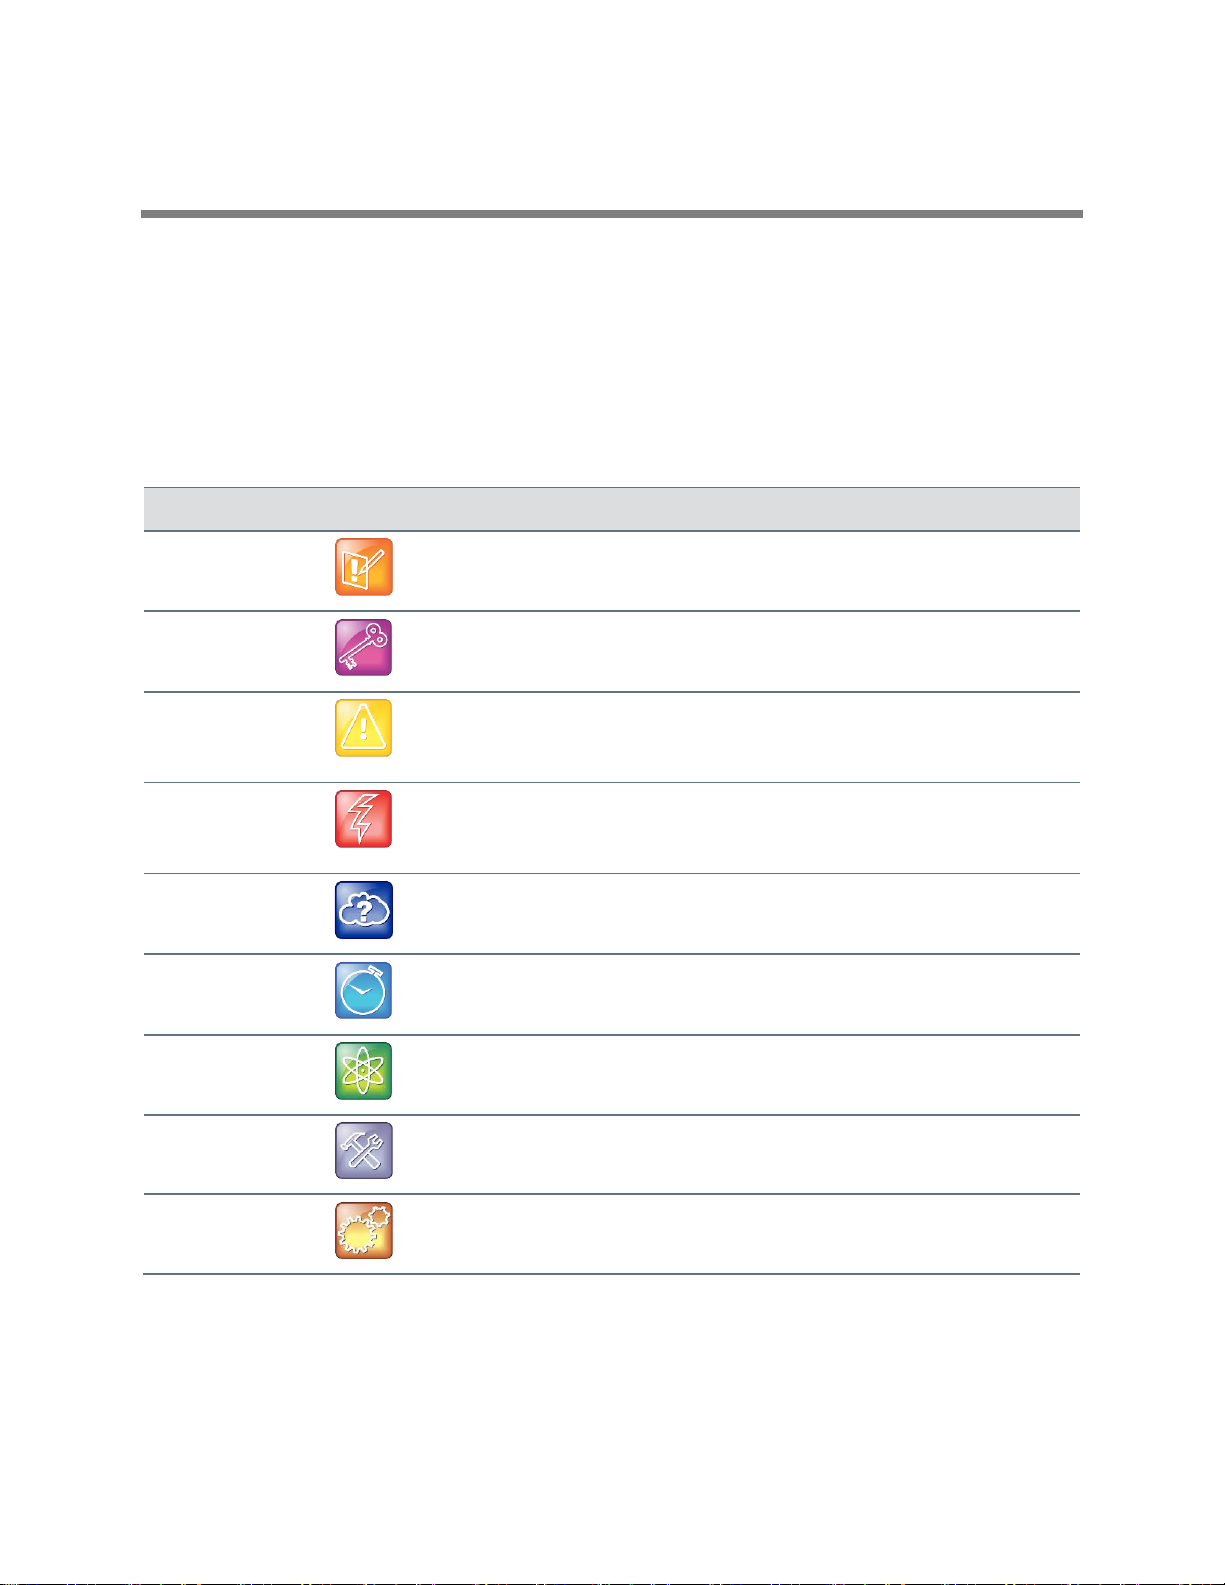
Polycom guides may include any of the following icons to alert you to important information.
Icons Used in Polycom Guides
Polycom, Inc. 14
Page 15
Polycom® UC Software 5.1.0 Administrator’s Guide 5.1.0
Convention
Description
Bold
Highlights interface items such as menus, menu selections, window and dialog
names, soft keys, file names, and directory names when they are involved in a
procedure or user action. Also used to highlight text to be entered or typed.
Italics
Used to emphasize text, to show example values or inputs (in this form:
<example>), and to show titles of reference documents available from the Polycom
Support Web site and other reference sites.
Blue Text
Used for cross references to other sections within this document and for hyperlinks
to external sites and documents.
Courier
Used for code fragments and parameter names.
Convention
Description
<MACaddress>
Indicates that you must enter information specific to your installation, phone, or
network. For example, when you see <MACaddress>, enter your phone’s 12-digit
MAC address. If you see <installed-directory>, enter the path to your installation
directory.
>
Indicates that you need to select an item from a menu. For example, Settings >
Basic indicates that you need to select Basic from the Settings menu.
parameter.*
Used for configuration parameters. If you see a parameter name in the form
parameter.* , the text is referring to all parameters beginning with parameter.
See Read the Feature Parameter Tables for an example.
Typographic Conventions
A few typographic conventions, listed next, are used in Polycom guides to distinguish types of in-text
information.
Typographic Conventions
Writing Conventions
This guide also uses a few writing conventions to distinguish conditional information.
Writing Conventions
Polycom, Inc. 15
Page 16

Before You Begin
The Polycom® UC Software Administrator’s Guide provides instructions for installing, provisioning, and
administering Polycom phones. This guide helps you understand the Polycom VoIP network and
telephony components, provides descriptions of all available phone features, and helps you perform the
following tasks:
● Install and configure your phone on a network server or Web server
● Configure your phone’s features and functions
● Configure your phone’s user settings
● Troubleshoot common phone issues
Audience, Purpose, and Required Skills
System administrators and network engineers should read this guide to learn how properly to set up
Polycom phones. This guide describes administration-level tasks and is not intended for end users.
Before reading this guide, you should be familiar with the following:
● Computer networking and driver administration for your operating system
● An XML editor
● The XML-based configuration file format used for the Polycom UC Software
Frequently Asked Questions
Refer to the frequently asked questions (FAQs) to help answer questions you may have about the
solution before you begin.
What is the default user name, user password, and admin password?
The default user name, user password, and admin password are as follows:
● User name Polycom (case sensitive)
● User password 123
● Admin password 456
How do I find the IP address of my phone?
Locating the IP address of a phone varies by phone model:
● VVX phones Home > Settings > Status > Network >TCP/IP Parameters.
● SoundPoint IP Menu > Status > Network >TCP/IP Parameters.
How do I know which Polycom UC Software version(s) my phones support?
All Polycom UC Software versions available for SoundPoint IP and SoundStation phones are listed on the
Polycom UC Software Release Matrix for SoundPoint IP and SoundStation IP Phones.
Polycom, Inc. 16
Page 17

Polycom® UC Software 5.1.0 Administrator’s Guide 5.1.0
All Polycom UC Software versions available for VVX and SoundStructure phones are listed on the
Polycom UC Software Release Matrix for VVX Phones and SoundStructure.
How do I change the language that displays on my phone?
To change the language your phone displays, go to Menu /Home > Settings > Basic > Preferences >
Language and choose from the languages listed.
What’s New in Polycom UC Software 5.1.0?
Polycom UC Software 5.1.0 includes the following new or enhanced features:
● Remote packet capture for remote logging
● Persistent mute
● Expansion modules for VVX phones
● Smart paging feature for the Polycom VVX Expansion Modules
● Security update with Microsoft Lync Server – Web Configuration Utility disabled
● Enhanced presence with Microsoft Lync Server
● Automatic root certificate using Lightweight Directory Access Protocol (LDAP) with Microsoft Lync
Server
● Data Center Resiliency with Microsoft Lync Server
● PIN Authentication for the SoundStructure card.
● Centralized call recording with BroadSoft BroadWorks r20 Server
● Visual indication of security classification with BroadSoft BroadWorks r20 Server
● Disable external ports and features with BroadSoft BroadWorks r20 Server
Recommended Software Tools
Polycom recommends that you use an XML editor—such as XML Notepad—to create and edit
configuration files. In this way, all configuration files that you create will be valid XML files.
If the configuration files are not valid XML, they will not load on the handset and an error message will be
logged to the provisioning server.
Read the Feature Parameter Tables
Each of the feature descriptions discussed in Configure the Phone Features includes a table of
parameters that you configure to make the features work. This brief section explains the conventions
used in the feature parameter tables. Polycom strongly recommends gaining familiarity with these
conventions in order to read the tables and successfully perform configuration changes.
The feature parameter tables indicate one or more of three provisioning methods you can use to
configure a feature: a centralized provisioning server, the Web Configuration Utility, or the local phone
user interface. Note that the types of provisioning methods available for each feature varies; not every
feature uses all three methods.
Polycom, Inc. 17
Page 18
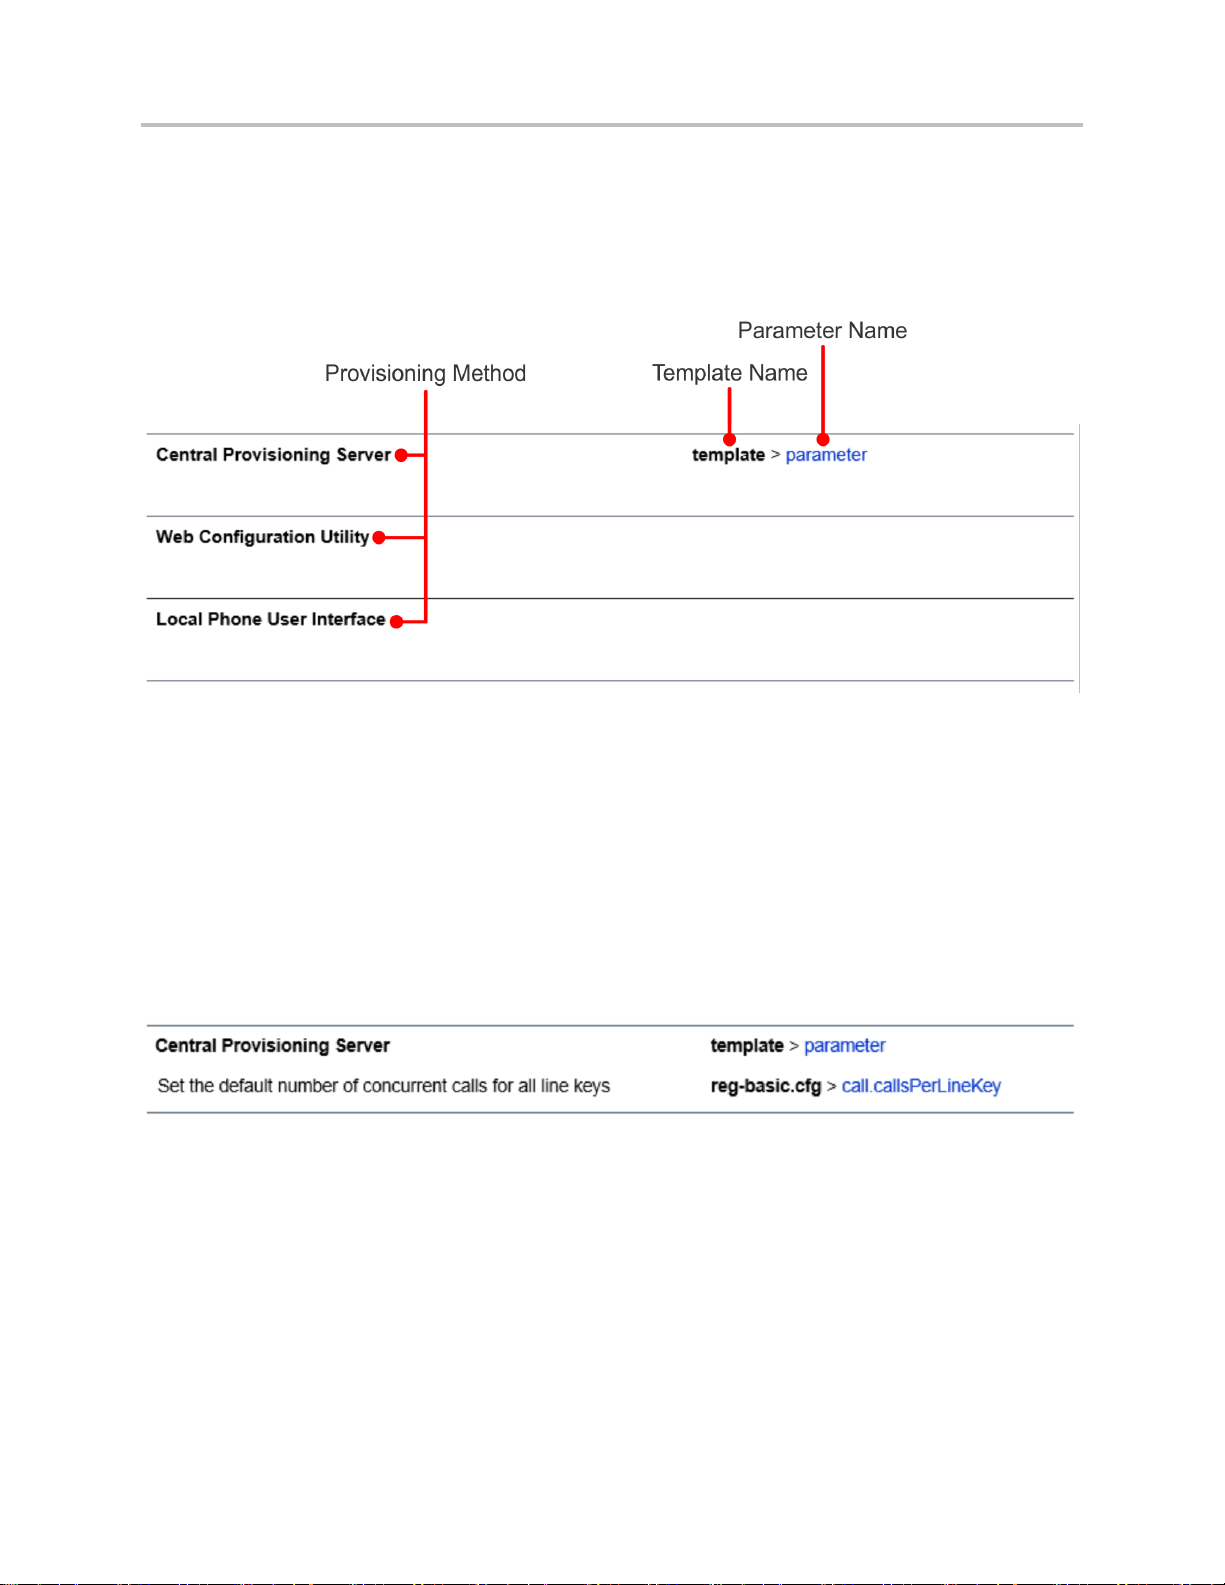
Polycom® UC Software 5.1.0 Administrator’s Guide 5.1.0
The central provisioning server method requires you to configure parameters located in template
configuration files that Polycom provides in XML format. The following illustration shows you how to use
the parameter tables to locate the template name and the name of the parameter you configure to get the
phone features working.
Feature Parameter Table Format
To quickly locate a specific parameter, locate and open the template name indicated. Then, use the
parameter name to navigate the folders in the XML tree structure. The parameter name contains the XML
folder path. The two following examples explain this convention in more detail.
Example One: Feature Parameter Tables
The example shown next is taken from the section Enable Multiple Call Appearances in the Configuration
Methods section.
Feature Parameter Table for Multiple Call Appearances
This example indicates that the reg-basic.cfg template file contains the calls.callsPerLineKey
parameter, which sets the number of concurrent calls for a phone’s line keys. Because the default value
varies by device, click on the blue parameter name to go to the parameter description, which includes
default and permissible values. If you want to change the parameter value, locate and open the reg.basic
template, expand the reg folder, and locate the parameter calls.callsPerLineKey. Set the
parameter value to a permissible number, as shown in the following illustration.
Polycom, Inc. 18
Page 19
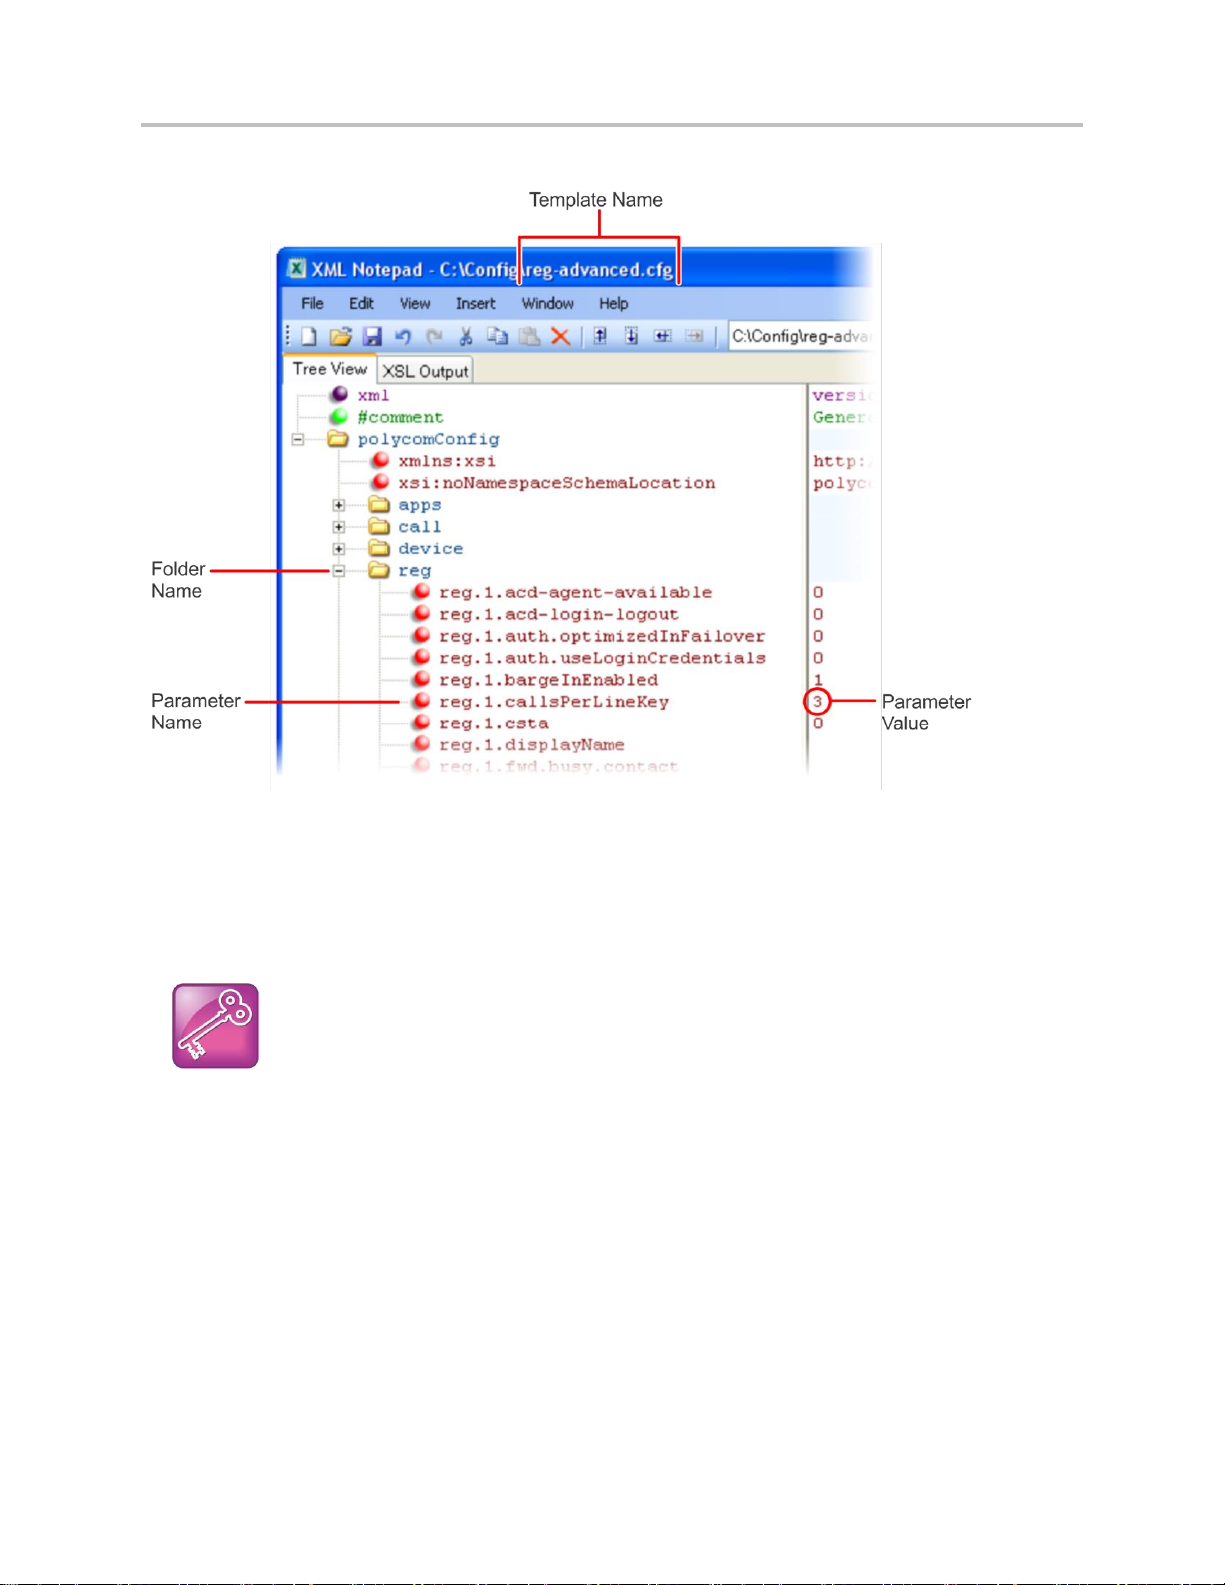
Polycom® UC Software 5.1.0 Administrator’s Guide 5.1.0
Tip: Each Parameter Is Linked
Each parameter listed in the tables in various sections is linked to its definition in the section
Configuration Parameters. This section defines each parameter and list the permissible values,
including the default value, of each parameter. If you want to find out more about a parameter you
see listed in the tables, click the blue parameter name.
Example Multiple Call Appearances
Note that some of the file paths in the templates are long and you may have to expand several folders in
the XML tree structure to locate a specific parameter.
Note also that some feature parameters are located in more than one template file. In these cases, the
parameter tables will list all related template files.
Example Two: Configuring Grouped Parameters
Some of the features have several related parameters that you will need to configure to get the feature
working. In these cases, instead of listing every parameter, the table will specify a group of related
parameters with an abbreviated XML path name ending with (.*), which indicates you can configure a
group of related parameters.
Abbreviated XML paths, like full parameter names, are linked to their definitions in the reference sections
in the section Configuration Parameters. Specifically, since the reference sections lists parameters
Polycom, Inc. 19
Page 20
Polycom® UC Software 5.1.0 Administrator’s Guide 5.1.0
alphabetically, abbreviated XML path are linked to the first of a group of parameters listed alphabetically
in the reference section. The next example shows you that in the site.cfg template, the tcpIpApp.sntp
folder contains several related parameters that configure basic SNTP settings.
Feature Parameter Table for Time and Date SNTP Settings
This example indicates that there is a group of SNTP parameters you can configure in the site.cfg
template file. The abbreviated parameter name tcpIpApp.sntp.* indicates that you can configure
parameters in the tcpIpApp.sntp folder as well as parameters in tcpIpApp.sntp subfolders.
Polycom, Inc. 20
Page 21
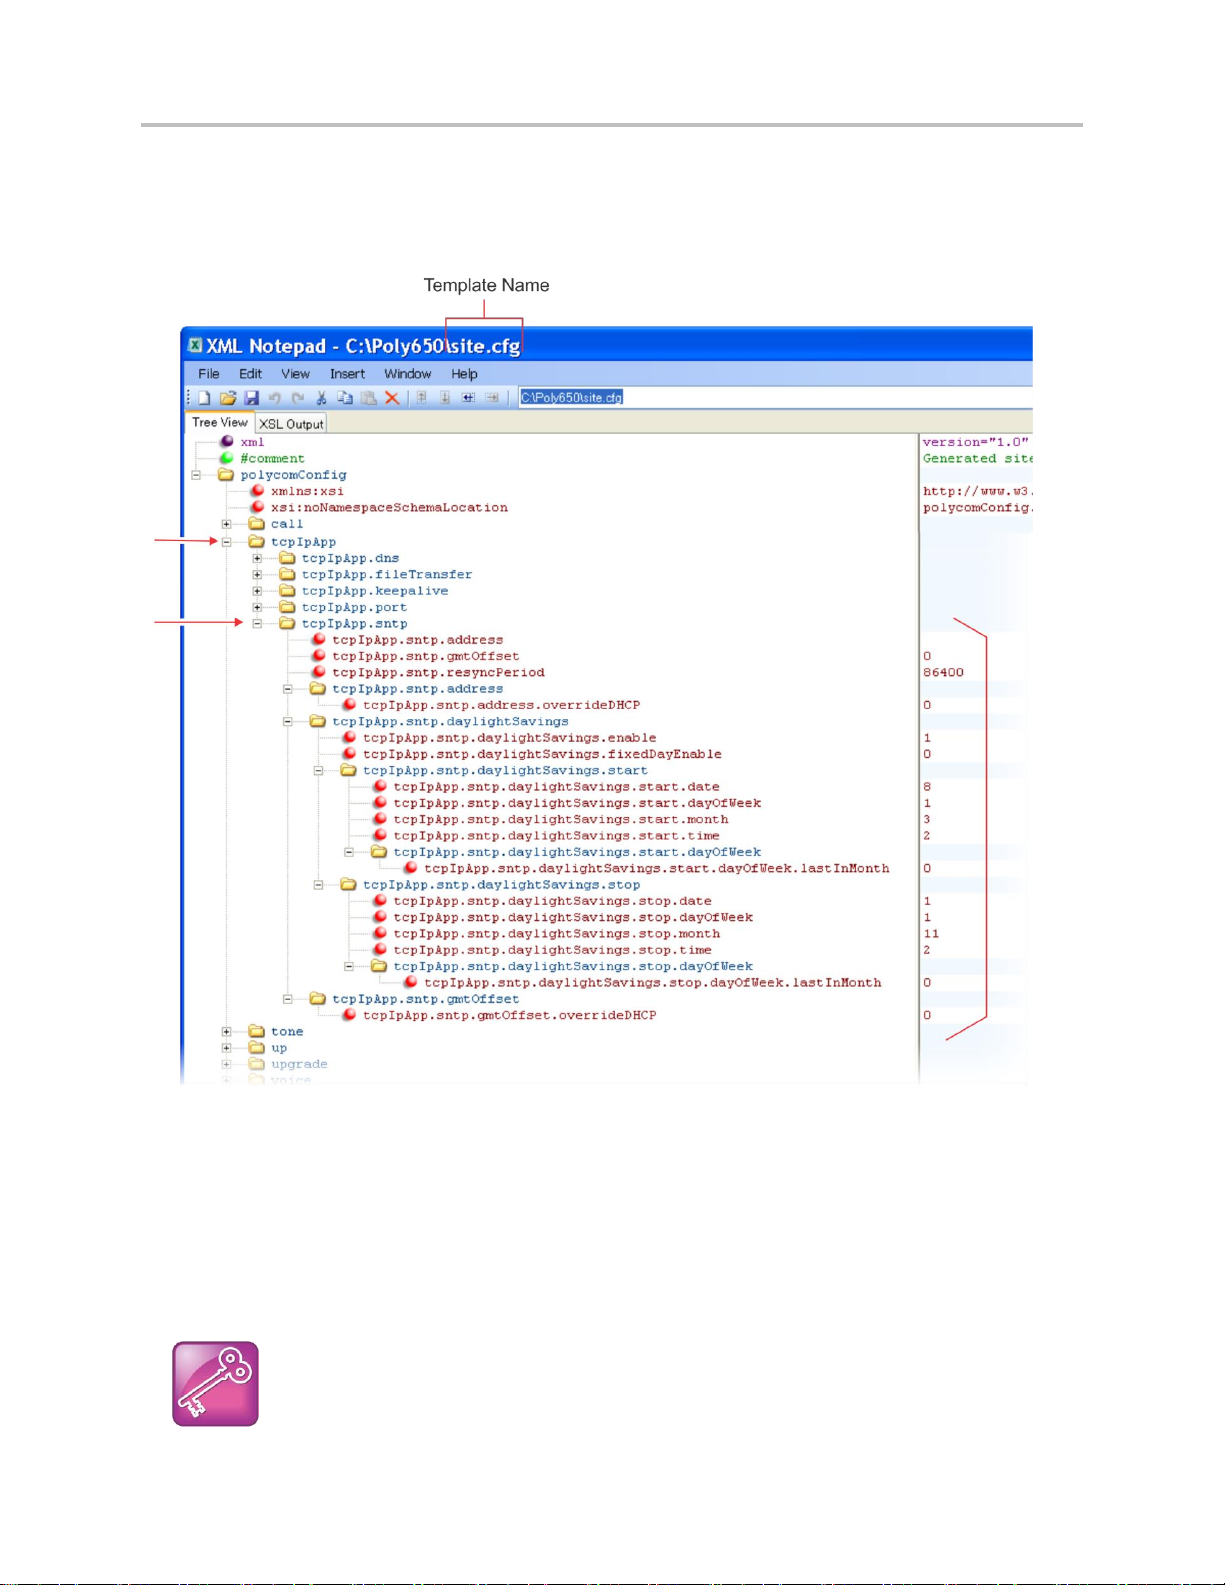
Polycom® UC Software 5.1.0 Administrator’s Guide 5.1.0
Tip: Using an XML Editor
Polycom recommends using an XML editor such as XML Notepad 2007 to open and edit the
configuration template files.
To locate these parameters in the XML file, use the parameter name. The parameter name contains the
XML folder path, as shown in the following illustration.
Locating Parameters in the Templates
In cases where the feature has several related parameters, you may find it helpful to refer to the
parameter reference section in the section Polycom UC Software Menu System for a definition of each
parameter. All parameter names, including abbreviated names, are linked to the parameter reference
section - simply click on the parameter name.
This section has shown you how to read the configuration parameter tables so that you can locate the
parameters in the XML template file.
Polycom, Inc. 21
Page 22

Polycom® UC Software 5.1.0 Administrator’s Guide 5.1.0
Get Help
For more information about installing, configuring, and administering Polycom products, refer to
Documents and Downloads at Polycom Support.
Polycom Support
If you are looking for help or technical support for your phones, the following types of documents are
available at the Polycom Support Center:
● Quick Start Guides, which describe how to assemble phones
● Quick User Guides, which describe the basic phone features
● User Guides, which describe both basic and advanced phone features
● Web Applications Developer’s Guide, which provides guidance in the development of applications
that run on your phone’s Web browser or microbrowser
● Feature Description and Technical Notifications, such as Technical Bulletins and Quick Tips, that
describe workarounds to existing issues and provide expanded descriptions and examples
● Release Notes, which describe the new and changed features and fixed problems in the latest
version of the software
You can find Request for Comments (RFC) documents by entering the RFC number at
http://www.ietf.org/rfc.html.
For other references, look for the Web Info icon throughout this Administrator’s Guide.
Polycom and Partner Resources
To find all Polycom partner solutions documentation, see Strategic Global Partner Solutions.
The Polycom Community
The Polycom Community gives you access to the latest developer and support information. Participate in
discussion forums to share ideas and solve problems with your colleagues. To register with the Polycom
Community, simply create a Polycom online account. When logged in, you can access Polycom support
personnel and participate in developer and support forums to find the latest information on hardware,
software, and partner solutions topics.
Polycom, Inc. 22
Page 23

Polycom® UC Software 5.1.0 Administrator’s Guide 5.1.0
For support or service, please contact your Polycom reseller or visit support.polycom.com for software
downloads, product documents, product licenses, troubleshooting tips, service requests, and more.
We are constantly working to improve the quality of our documentation, and we would appreciate your
feedback. Please send email to VoiceDocumentationFeedback@polycom.com.
Polycom recommends that you record the phone model numbers, software (both the Updater and UC
Software), and partner platform for future reference.
Phone models:
Updater version:
UC Software version:
Partner Platform:
Polycom, Inc. 23
Page 24

Web Info: Support for Polycom Phones
You can find all documentation for all Polycom phones on the Polycom Support site. Choose your
phone model for specific documentation. For more information, contact your Polycom distributer.
Welcome to the Polycom UC Software Family of Phones
This section introduces the family of Polycom® phones including:
● SoundPoint IP Desktop Phones
● SoundStation IP Conference Phones
● VVX Business Media Phones
● VVX Expansion Modules
● SoundStructure VoIP Interface
Note that Polycom UC Software 5.1.0 supports the following Polycom® products:
● Polycom
● Polycom
● Polycom
● Polycom
● Polycom
● Polycom
● Polycom
®
VVX® 300, 310 business media phones
®
VVX® 400, 410 business media phones
®
VVX® 500, 600 business media phones
®
VVX® 1500 business media phone
®
VVX® Camera
®
VVX® Expansion Modules
®
SoundStructure® VoIP Interface
The Polycom family of phones provides a powerful, yet flexible IP communications solution for Ethernet
TCP/IP networks. Not only do the phones deliver excellent voice quality, but also come with a highresolution graphic display screen for call information, multiple languages, directory access, and system
status. The phones can also support advanced functionality, including multiple call and flexible line
appearances, HTTPS secure provisioning, presence, custom ringtones, and local conferencing.
From an administrator’s perspective, the phones are endpoints in an overall network topology designed to
interoperate with other compatible equipment including application servers, media servers, internetworking gateways, voice bridges, and other endpoints.
The Polycom UC Software Family of Phones
This section provides you with a graphic view of the Polycom family of phones.
Polycom, Inc. 24
Page 25
Polycom® UC Software 5.1.0 Administrator’s Guide 5.1.0
SoundPoint IP 321, 331, and 335
SoundPoint IP 450
SoundPoint IP 550 and 560
SoundPoint IP 650
SoundStation IP Conference Phones
Polycom currently supports the following conference phones. Note that Polycom UC Software 5.x.x
does not support SoundStation IP phones.
SoundStation IP 5000
SoundStation IP 6000
SoundPoint IP Desktop Phones
Polycom currently supports the following desktop phones. Note that Polycom UC Software 5.x.x does not
support SoundPoint IP desktop phones.
Polycom, Inc. 25
Page 26
Polycom® UC Software 5.1.0 Administrator’s Guide 5.1.0
SoundStation 7000
SoundStation Duo
VVX Business Media Phones
Polycom UC Software 5.1.0 supports the following VVX business media phones.
VVX 300, 310
VVX 400, 410
VVX 500
VVX 600
Polycom, Inc. 26
Page 27

Polycom® UC Software 5.1.0 Administrator’s Guide 5.1.0
VVX 1500
Expansion Module - LCD Color
Expansion Module - Paper
VVX Expansion Modules
Polycom 5.1.0 supports the following expansion modules for the VVX business media phones.
Polycom, Inc. 27
Page 28
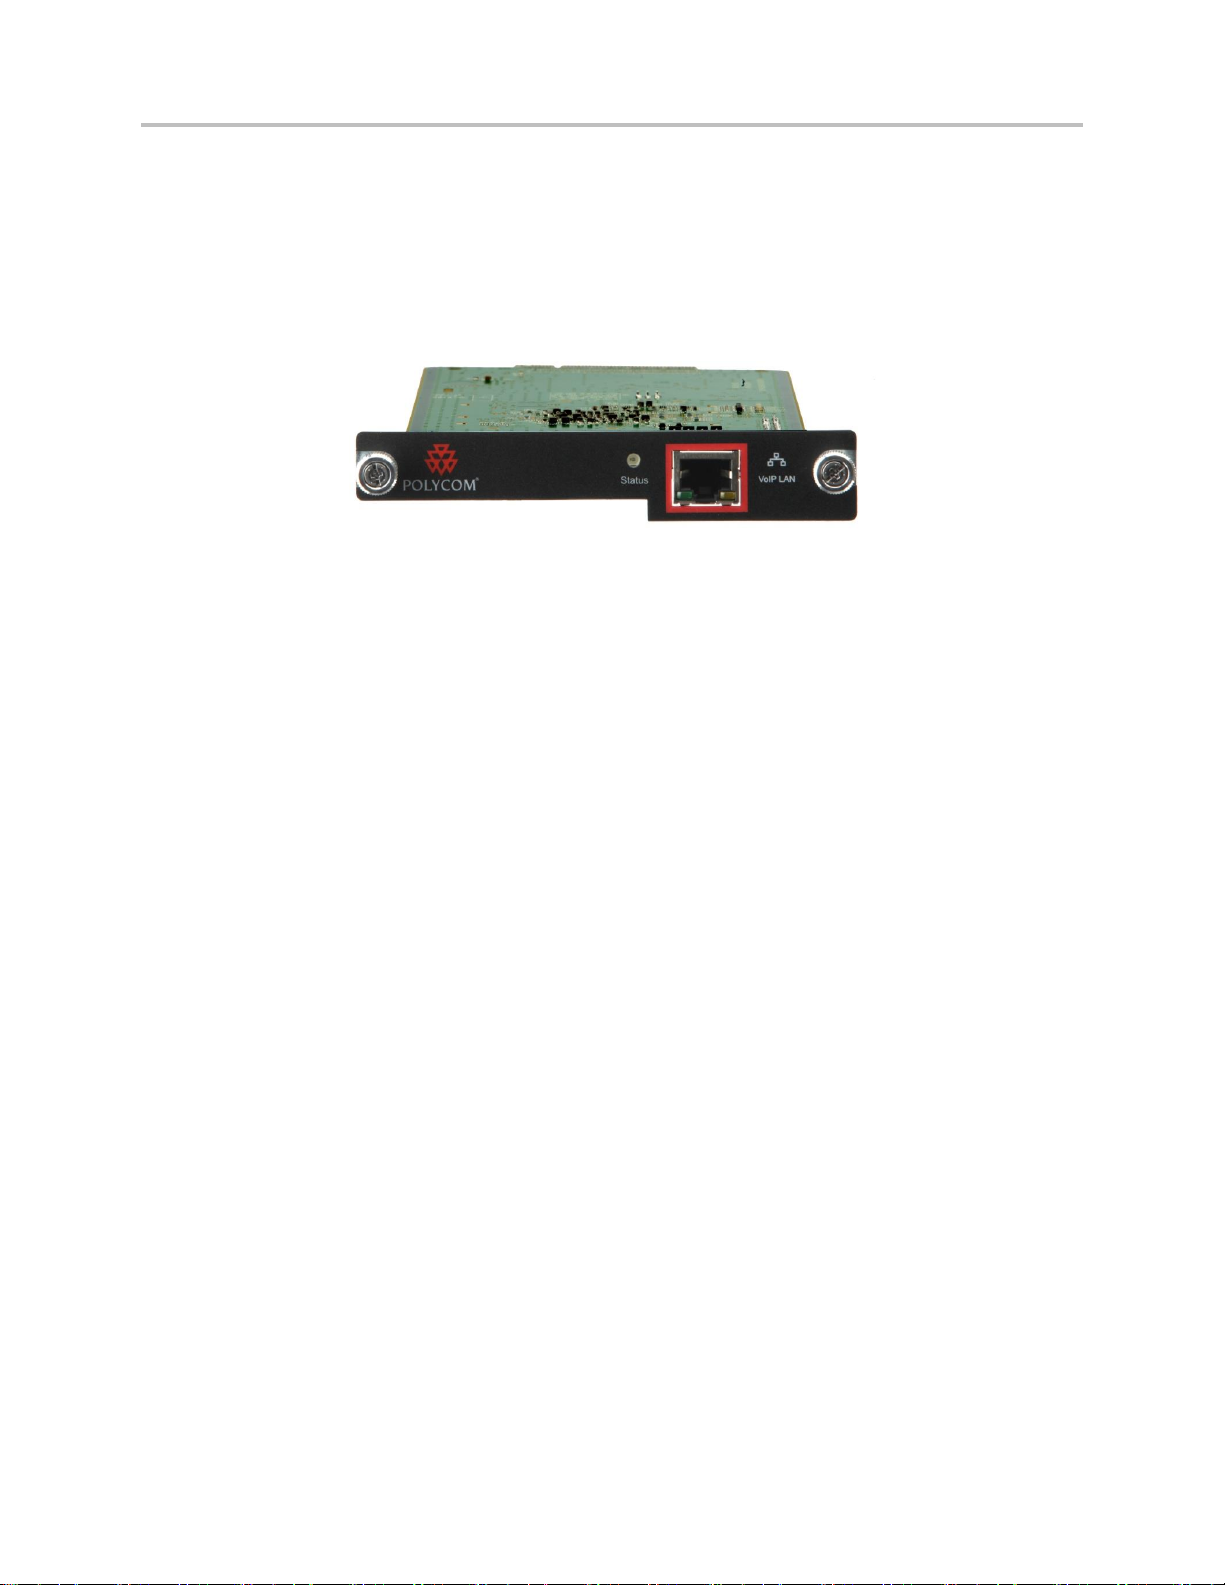
Polycom® UC Software 5.1.0 Administrator’s Guide 5.1.0
SoundStructure VoIP Interface
SoundStructure VoIP Interface
The SoundStructure VoIP Interface is a plug-in card for SoundStructure products that adds SIP telephony
to any SoundStructure system. SoundStructure products are used for installed-room audio and video
conferencing applications. Polycom UC Software 5.1 supports use of the SoundStructure VoIP Interface.
Key Features of Your Polycom Phones
Polycom phones running Polycom UC Software include the following key features:
● Award winning sound quality with a full-duplex speakerphone or conference phone
Permits natural, high-quality, two-way conversations
Uses Polycom industry leading Acoustic Clarity Technology
Most phone models support Polycom HDVoice™ Technology
Polycom phones support sidetone. Sidetone is the sound of a speaker’s own voice fed back to
the receiver, enabling the speaker to hear their own voice instead of silence and adjust the
volume of their speaking voice. Sidetone helps to let speakers know that the call is connected.
● Easy-to-use
An easy transition from traditional PBX systems into the world of IP Communications
Up to 18 dedicated hard keys for access to commonly used features
Up to four context-sensitive soft keys for further menu-driven activities
● Platform independent
Supports multiple protocols and platforms enabling standardization of one phone for multiple
locations, systems, and vendors
● Faster Boot Time
The time between phone reboot and obtaining a dial tone has been noticeably reduced.
● Field upgradeable
Upgrade phones as standards develop and protocols evolve
Extends the life of the phone to protect your investment
Application flexibility for call management and new telephony applications
Polycom, Inc. 28
Page 29

Polycom® UC Software 5.1.0 Administrator’s Guide 5.1.0
● Large liquid-crystal display LCD screen
Easy-to-use, easily readable, and intuitive interface
Support of rich application content, including multiple call appearances, presence and instant
messaging, and XML services
SoundPoint IP 321/331/335 102 x 23 pixel graphical LCD
SoundPoint IP 450 256 x 116 pixel graphical grayscale LCD (supports Asian characters)
SoundPoint IP 550/560/650 320 x 160 pixel graphical grayscale LCD (supports Asian
characters)
SoundPoint IP 670 320 x 160 pixel color LCD
SoundStation IP 5000, 600, Duo 248 x 68 pixel graphical LCD
SoundStation IP 7000 255 x 128 graphical LCD
VVX 1500 800 x 480 pixel graphical color touch screen LCD
VVX 300, 310 208 x 104 pixel grayscale graphical LCD
VVX 400, 410 320 x 240 pixel graphical LCD
VVX 500 320 x 240 pixel graphical color touch-screen LCD
VVX 600 480 x 272 pixel graphical color touch-screen LCD
VVX LCD Expansion Module 272 x 480 pixel screen size LCD
● Dual auto-sensing 10/100/1000baseT Ethernet ports on certain Polycom phones
Leverages existing infrastructure investment
No re-wiring with existing CAT 5 cabling
Simplifies installation
1000baseT is supported by the SoundPoint IP 560, VVX 1500, and the SoundStructure VoIP
Interface.
● Power over Ethernet (PoE) port or Power Pack option
Built-in IEEE 802.3af PoE port on the SoundPoint IP 320/321/330/331/335, 450, 550, 560, and
650, the SoundStation IP 5000, 6000, Duo, and VVX 300, 310, 400, 410, 500, 600, and 1500
(auto-sensing)
Unused pairs on Ethernet port are used to deliver power to the phone via a wall adapter,
meaning fewer wires on your desktop (for the SoundStation IP 6000 conference phones)
● Multiple language support on most phones
Set on-screen language to your preference. Select from Arabic, Chinese (Simplified and
Traditional), Danish, Dutch, English (Canada, United Kingdom, and United States), French,
German, Italian, Japanese, Korean, Norwegian, Polish, Portuguese (Brazilian), Russian,
Slovenian, Spanish (International), and Swedish.
Note that Japanese and Korean are not supported on the SoundPoint IP 321, 331, or 335
phones.
● Web browser
Supports a subset of XHTML constructs that run like any other Web browser
● Browser on the Polycom VVX 500, 600, and 1500 phones
Polycom, Inc. 29
Page 30

Polycom® UC Software 5.1.0 Administrator’s Guide 5.1.0
Note: Phones Supported by Polycom UC Software 4.0.x Only
The SoundPoint IP 670, and SoundStation IP 6000 and 7000 phones are considered legacy phones
and are supported and updated only with Polycom UC Software 4.0.x. These phone models will not
be supported beyond Polycom UC Software 4.0.x. For information, see the Polycom UC Software
4.0.1 Administrator's Guide.
Supports XHTML 1.1 constructs, HTML 4.01, JavaScript, CCS 2.1, and SVG 1.1 (partial
support)
● XML status/control API
Ability to poll phones for call status and device information
Ability to receive telephony notification events
UC Software
Polycom, Inc. 30
Page 31

Web Info: Using VVX 1500 Phones in a Strict H.323 Environment
For more information on using VVX 1500 phones in a strict H.323 environment, see the Deployment
Guide for the Polycom VVX 1500 D Business Media Phone.
The Polycom UC Software Big Picture
This section provides an overview of the Polycom UC Software, specifically an understanding of how the
phones fit into the network configuration. If you want to begin setting up your Polycom phones, go to Set
Up Your Device Network.
The UC Software supports the deployment of Polycom phones in several deployment scenarios:
● As a Session Initiation Protocol (SIP)-based endpoint interoperating with a SIP call server or
softswitch.
● As an H.323 video endpoint (Polycom
®
VVX® 500, 600, and 1500 business media phones).
The Session Initiation Protocol (SIP) is the Internet Engineering Task Force (IETF) standard for
multimedia communications over IP. It is an ASCII-based, application-layer control protocol (defined in
RFC 3261) that can be used to establish, maintain, and terminate calls between two or more endpoints.
Like other voice over IP (VoIP) protocols, SIP is designed to address the functions of signaling and
session management within a packet telephony network. Signaling allows call information to be carried
across network boundaries. Session management provides the ability to control the attributes of an endto-end call.
For Polycom phones to successfully operate as a SIP endpoint in your network, you will require:
● A working IP network
● Routers configured for VoIP
● VoIP gateways configured for SIP
● The latest (or a compatible version) Polycom UC Software image
● An active, configured call server to receive and send SIP messages
For information on IP PBX and softswitch vendors, see the Polycom ARENA VoIP Interoperability
Partners list.
The rest of this section consists of the following sections:
● Where Polycom Phones Fit in Your Network
● Understand Polycom Phone Software Architecture
If you want to begin setting up your Polycom phones on the network, go to Set Up Your Device
Environment.
Polycom, Inc. 31
Page 32

Polycom® UC Software 5.1.0 Administrator’s Guide 5.1.0
Where Polycom Phones Fit in Your Network
Most Polycom phones connect physically through a Category 5 (Cat-5) cable to a standard office twistedpair (IEEE 802.3) 10/100/1000 megabits per second Ethernet LAN, and send and receive all data using
the same packet-based technology. See the figure Polycom Wired Phones in a Network for an illustration
of wired phones in a network.
Since the phone is a data terminal, digitized audio being just another type of data from its perspective, the
phone is capable of vastly more than traditional business phones. Moreover, Polycom phones run the
same protocols as your office personal computer, which means that many innovative applications can be
developed without resorting to specialized technology.
Polycom, Inc. 32
Page 33

Polycom® UC Software 5.1.0 Administrator’s Guide 5.1.0
There are many ways to set up a phone network using Polycom phones and the following illustration
Polycom Wired Phones in a Network is just one example of a network setup.
Polycom Wired Phones in a Network
Polycom, Inc. 33
Page 34

Polycom® UC Software 5.1.0 Administrator’s Guide 5.1.0
Note: The Updater is also Known as BootROM
The Updater was referred to as the BootROM in previous versions of the UC Software, specifically
UC Software 3.3.x and SIP 3.2.x and earlier.
Understand Polycom Phone Software Architecture
The Polycom phone software is made of four basic components:
● Updater The software that loads first when the phone is powered on
● Polycom UC Software The software that implements the phone functions and features
● Configuration files The files that contain the phone’s settings
● Resource files Optional files that contain settings for advanced features
Polycom Phone Software Architecture
What Is the Updater?
The Updater is a small application that resides in the flash memory on the phone. Polycom phones,
except the SoundStation IP 6000 and 7000, come installed with the Updater.
Polycom, Inc. 34
Page 35

Polycom® UC Software 5.1.0 Administrator’s Guide 5.1.0
When you start/boot/reboot the phone, the Updater performs the following tasks:
1 The setup menu displays so you can set various network and provisioning options.
The Updater requests IP settings and accesses the provisioning server (also called the boot server)
to look for any changes to the Updater software.
If updates are found, they are downloaded and saved to flash memory, which overwrites itself after
verifying the integrity of the download.
2 If new updates are downloaded, the Updater formats the file system, removes any application
software and configuration files that were present.
3 Downloads the master configuration file.
The Updater and the application use this file to acquire a list of other files that the phone needs.
4 Examines the master configuration file for the name of the application file, and then looks for this
file on the provisioning server.
If the copy on the provisioning server is different from the one stored in device settings, or there is
no file stored in flash memory, the application file is downloaded.
5 Extracts the Polycom UC Software from flash memory.
6 Installs the application into RAM, and then uploads an event log file from the boot cycle.
The Updater will then terminate, and the Polycom UC Software begins running the phone’s operations.
What Is the Polycom UC Software?
The Polycom Unified Communications Software, or Polycom UC Software, manages the protocol stack,
the digital signal processor (DSP), the user interface, and the network interaction. The UC Software
implements the following functions and features on the phones:
● VoIP signaling for a wide range of voice and video telephony functions using SIP signaling for call
setup and control
● SIP and H.323 signaling for video telephony
● Industry standard security techniques for ensuring that all provisioning, signaling, and media
transactions are robustly authenticated and encrypted
● Advanced audio signal processing for handset, headset, and speakerphone communications using
a wide range of audio codecs
● Flexible provisioning methods to support single phone, small business, and large multi-site
enterprise deployments
The software is a binary file image and contains a digital signature that prevents tampering or the loading
of rogue software images.
There is a new image file in each release of software.
Both the Updater and Polycom UC Software run on all phone models that Polycom currently supports.
For a list of legacy phone models, see Support Legacy Phones.
Current build archives have both split and combined images. You can decide which model(s) to support.
Using split files reduces internal network traffic during reboots and updates. Using combined files means
you need to download only one software file.
Polycom, Inc. 35
Page 36

Polycom® UC Software 5.1.0 Administrator’s Guide 5.1.0
Configuration Methods
You can make changes to the phone’s configuration using any of the following configuration methods. Note
that there is a precedence order among the configuration methods: changes made to settings using a higherpriority method override settings made using a lower-priority method. Configuration changes are uploaded to
the phone as override files that remain active until you remove them or reset to default.
The precedence order for configuration parameter changes is as follows (highest to lowest priority):
Local phone user interface
Web Configuration Utility
Polycom CMA system
Central Provisioning Server
Default values
What Are the UC Software Template Configuration Files?
The Polycom UC Software that you download contains template configuration files, valid XML files that
you can change using an XML editor. These template files contain a number of parameters that provision
the phones with features and settings. The template configuration files are very flexible: you can
rearrange the parameters within the template, move parameters to new files, or create your own
configuration files from only those parameters you want. This flexibility is useful when you want to apply
the same features and settings to a large number of phones. Use of the configuration files to provision the
phones with features and settings is called the centralized provision method—the configuration files
enable you to store a single set of configuration files on a central provisioning server and configure all of
your phones to read the same set of files.
Polycom recommends that you configure phones using the centralized provisioning method. However,
there are several methods you can use to configure the phones and you can use one or multiple methods
in combination. If you are using a Polycom VVX 1500 business media phone, you can use the Polycom
Converged Management Application™ (CMA™) server. Alternatively, you can configure individual
phones using the phone’s menu system, accessible through the local user interface, or using Web
Configuration Utility.
You will need to keep in mind that there is a hierarchy among the configuration methods and settings you
make using a higher-priority method will override settings you make using a lower-priority method. The
following lists all of the available ways to set features and settings for the phones. Each of these methods
is detailed in the section Configuration Methods.
What Are the Resource Files?
In addition to the software and configuration files, resource files are available in the UC Software
download. Examples of resource files include:
● Language dictionaries
● Custom fonts
● Ringtones
Polycom, Inc. 36
Page 37

Polycom® UC Software 5.1.0 Administrator’s Guide 5.1.0
Web Info: Resetting Your Phone to the Factory Default Settings
For instructions on how to reset your phone to factory default settings, see Quick Tip 18298:
Updating, Troubleshooting, and Resetting SoundPoint IP, SoundStation IP, and VVX 1500 Phones.
● Contact directories
If you need to remove resource files from a phone at a later date—for example, if you are giving the
phone to a new user—you will have to apply factory default settings to that phone.
Polycom, Inc. 37
Page 38

Note: Understanding the Startup Sequence
Note that only step 1 is required and automatic. Steps 2, 3, and 4 are optional as all these
settings can be manually configured on the device. It is common to complete step 3 using a
DHCP server within the LAN.
Set Up Your Device Network
Polycom® SoundPoint® IP, VVX® business media phones, and SoundStation® phones using Polycom UC
Software operate on an Ethernet local area network (LAN). The SoundStation Duo™ can operate on a
LAN or a Public Services Telephony Network (PSTN). Local area network design varies by organization
and Polycom phones can be configured to accommodate a number of network designs. This section
shows you several automated and manual ways to configure Polycom phones to operate on a LAN.
Connecting your Polycom phone to the LAN will initiate the following default startup sequence:
1 The phone establishes network connectivity.
Wired phones establish a 10M/100M/1000M network link with an Ethernet switch device and will
not function until this link is established. If the phone cannot establish a link to the LAN, an error
message Network link is Down displays.
2 Apply appropriate security and Quality of Service (QoS) settings (optional).
Assign the phone to a VLAN and/or 802.1X authentication.
3 Establish DHCP negotiation with the network and IP address, network addressing options, network
gateway address, and time server.
4 Provision server discovery.
This is commonly done using DHCP as part of the previous step. As of UC Software 4.0, the phone
contacts the provisioning server after the phone is operational in order to speed up boot time. You
can disable the provisioning server discovery process as a way of reducing load on a provision
server, for example, after a power failure.
After the provisioning server discovery is complete the phone initiates the provisioning process described
in Set Up the Provisioning Server.
The steps to set up a provisioning server are described in more detail in the following sections:
● Establish Link Connectivity
● Set Security and Quality of Service
● IP Communication Settings
● PSTN Communication Settings
● Provisioning Server Discovery
● Phone Network Menus
Polycom, Inc. 38
Page 39

Polycom® UC Software Administrator’s Guide 5.1.0
Digest Authentication for Microsoft Internet Information Services
If you want to use digest authentication against the Microsoft Internet Information Services server:
Use Microsoft Internet Information Server 6.0 or later.
Digest authentication needs the user name and password to be saved in reversible encryption.
The user account on the server must have administrative privileges.
The wildcard must be set as MIME type; otherwise, the phone will not download *.cfg, *.ld and other required
files. This is because the Microsoft Internet Information Server cannot recognize these extensions and will
return a “File not found” error. To configure wildcard for MIME type, see IIS 6.0 does not serve unknown MIME
types.
For more information, see Digest Authentication in IIS 6.0 on Microsoft TechNet.
Establish Link Connectivity
Wired devices not using PoE establish a connection to the LAN. If you want to change the phone’s
configuration, do so prior to connecting the devices.
Wired Devices
Typical network equipment supports one of the three following Ethernet line rates: 10Mbps, 100Mbps,
and 1000Mbps. The phones are configured to automatically negotiate the Ethernet rate so that no special
configuration is required. You do have the option to change the line rates and/or duplex configuration.
Polycom recommends that you keep the default settings. If you do change the settings, you should do so
before deploying the phones.
The phone supports two features to prevent Denial of Service (DoS):
● Storm Filtering To change this parameter, go to Network Interfaces Menu (Ethernet Menu).
● VLAN Filtering To change this parameter, go to VLAN Menu. Note that VLAN filtering is not
supported on the VVX family of phones.
Support for Storm and VLAN filtering varies by device:
Set Security and Quality of Service
You have the option of using several layer-2 mechanisms that increase network security and minimize
audio latency. This section describes each of the network security options.
VLANs and Wired Devices
You can use a Virtual LAN (VLAN) to separate and assign higher priority to a voice VLAN as a way of
minimizing latency.
There are several methods you can use to configure the phone to work on a particular VLAN:
Polycom, Inc. 39
Page 40

Polycom® UC Software Administrator’s Guide 5.1.0
Web Info: Understand 802.1X
For more information on 802.1X authentication, see Introduction to IEEE 802.1X and Cisco® IdentityBased Networking Services (IBNS) at Cisco 802.1X.
See also IEEE 802.1X Multi-Domain Authentication on Cisco Catalyst Layer 3 Fixed Configuration
Switches Configuration Example.
● LLDP Link Layer Discovery Protocol (LLDP) is a vendor-neutral Layer 2 protocol that allows a
network device to advertise its identity and capabilities on the local network. To change these
parameters, go to VLAN Menu.
● CDP Compatible Cisco Discovery Protocol (CDP) is a proprietary Data Link Layer network
protocol. CDP Compatible follows the same set of rules. To change this parameter, go to VLAN
Menu.
● DHCP Dynamic Host Configuration Protocol (DHCP) is an automatic configuration protocol used
on IP networks. To change this parameter, go to DHCP Menu. To use DHCP for assigning VLANs,
see Assign a VLAN ID Using DHCP. Note that the use of DHCP for assigning VLANs is not well
standardized and is recommended only if the switch equipment does not support LLDP or CDP
Compatible methods.
● Static The VLAN ID can be manually set from the phone UI or from a configuration file. To
change this parameter, go to VLAN Menu. This will set the device setting parameter only.
If the phone receives a VLAN setting from more than one of the above methods, the priority is as follows
(from highest to lowest):
● LLDP
● CDP
● Device settings
● DHCP VLAN discovery
802.1X Authentication
802.1X authentication is a technology that originated for authenticating Wi-Fi links. It has also been
adopted for authenticating PCs within fixed LAN deployments.
When VoIP phones (with a secondary Ethernet port) are used to connect PCs on a network the 802.1X
authentication process becomes more complex since the PC is not directly connected to the 802.1X
switch.
There are several ways to configure 802.1X authentication of devices connected to the PC port of the
phone:
● You can configure many switches to automatically trust or accept a VoIP phone based on its MAC
address. This is sometimes referred to as MAC Address Bypass (MAB).
● Some switches support a feature whereby they will to automatically trust a device that requests a
VLAN using the CDP protocol.
● Some deployments support Multiple Device Authentication (MDA). In this situation, both the phone
and the PC will separately authenticate themselves.
Polycom, Inc. 40
Page 41

Polycom® UC Software Administrator’s Guide 5.1.0
Tip: For Novice Administrators
Read this section if you have never set up a provisioning server before.
Timesaver: Reducing Repetitive Data Entry
Polycom recommends using DHCP where possible to eliminate repetitive manual data entry.
Parameter
DHCP Option
DHCP
DHCP INFORM
Configuration File
(application only)
Device
Settings
IP address
- • - - •
Subnet mask
1 • - - •
IP gateway
3 • - - •
Boot server
address
See DHCP Menu or
Provisioning Server
Discovery.
• • -
•
In this scenario since the phone is closest to the 802.1X switch, the phone needs to notify the
switch when the PC is disconnected. This can be achieved using an 802.1X EAPOL-Logoff
message.
Polycom products support all three of these authentication methods. Multiple Device Authentication is
new as of UC Software 4.0.0.
To configure 802.1X, see the section 802.1X Menu.
IP Communication Settings
When the phone has established network connectivity it needs to acquire several IP network settings to
proceed with provisioning. These settings are typically obtained automatically from a DHCP server.
You have the option to set the IP communication settings manually from the phone UI, or to pre-provision
using a device.set capability.
When making the DHCP request the phone will include information in Option 60 that can assist the DHCP
server in delivering the appropriate settings to the device. For more information, see Technical Bulletin
54041: Using DHCP Vendor Identifying Options with Polycom Phones.
The table DHCP Network Parameters details the settings that are supported through the DHCP menu:
DHCP Network Parameters
Polycom, Inc. 41
Page 42

Polycom® UC Software Administrator’s Guide 5.1.0
Parameter
DHCP Option
DHCP
DHCP INFORM
Configuration File
(application only)
Device
Settings
SIP server
address
151 Note: You can
change this value by
changing the device
setting. See <device/>.
• - -
•
SNTP server
address
Look at option 42, then
option 4.
• - •
•
SNTP GMT offset
2 • - • •
DNS server IP
address
6 • - - •
DNS INFORM
server IP address
6 • - - •
DNS domain
15 • - - •
VLAN ID
See DHCP Menu.
Warning: Link Layer Discovery Protocol (LLDP) overrides Cisco
Discovery Protocol (CDP). CDP overrides Local FLASH which
overrides DHCP VLAN Discovery.
Web Info: RFC Information on DHCP Options
For more information on DHCP options, see RFC 2131 and RFC 2132.
Note: Overriding the DHCP Value
The configuration file value for SNTP server address and SNTP GMT offset can be configured to
override the DHCP value: see tcpIpApp.sntp.address.overrideDHCP.
The CDP Compatibility value can be obtained from a connected Ethernet switch if the switch
supports CDP.
If you do not have control of your DHCP server or do not have the ability to set the DHCP options, enable
the phone to automatically discover the provisioning server address. One way is to connect to a
secondary DHCP server that responds to DHCP INFORM queries with a requested provisioning server
value. For more information, see RFC 3361 and RFC 3925.
PSTN Communication Settings
The SoundStation Duo conference phone is the only Polycom phone running Polycom UC Software that
supports PSTN mode. The PSTN communication settings described in this section apply only to
SoundStation Duo conference phones.
The SoundStation Duo has several connection modes, each with its own default behavior. You can
change both the connection and the default behavior of a connection method.
Polycom, Inc. 42
Page 43

Polycom® UC Software Administrator’s Guide 5.1.0
Note: Changing Modes During a Call
If you change operational modes during a call, it will have no effect on the current call. Your next call
will use the new mode.
Web Info: Changing Basic Settings on the SoundStation Duo
For more information on setting up the phone for use with PSTN, see the SoundStation Duo Quick
Start Guide at Polycom Support.
There are three ways to connect your Polycom SoundStation Duo conference phone:
● To an analog phone jack only.
By default, the phone will only operate in Public Switched Telephone Network (PSTN) mode.
● To a Session Initiation Protocol (SIP) call server only.
By default, the phone will only operate in SIP mode.
● To both a SIP server and an analog phone jack.
By default, the phone will automatically operate in SIP mode. If the phone is unable to register with
a SIP server, or the network connection is unavailable, the phone will operate in PSTN mode.
You can override the default behavior and specify one of three operational modes the phone will use.
● Auto (Automatic Mode Detect) This is the default operational mode. Select this option if you
want your phone to automatically select which operational mode it uses. The phone will use PSTN
mode if it is unable to register with a SIP server or if the network connection is unavailable.
● PSTN Only Select this option if you want your phone to operate exclusively in PSTN mode.
● SIP Only Select this option if you want your phone to operate exclusively in SIP mode.
After you connect the phone for PSTN use, you need to configure two basic settings for the phone to
operate properly in PSTN mode:
● The language the phone will use.
● The country in which the phone is located.
The phone requires this basic information to automatically configure other PSTN settings, since several
PSTN settings are country specific.
Polycom, Inc. 43
Page 44

Polycom® UC Software Administrator’s Guide 5.1.0
Name
Permitted Values
Default
Flash Timing
80, 100, 300, 600 (ms)
The default value depends on the
country code that is configured
for the phone. The flash duration
is automatically set to the default
for that country.
The length of time before a hook flash times-out (or the call disconnects). The flash duration is based on the
country of origin that is specified for the phone.
Caller ID
On, Off, Removed
On
Caller ID displays a caller’s phone number (and possibly a name), on the called party’s phone.
Specify whether caller ID is on, off, or removed. If caller ID is removed, the Caller ID Type menu item is removed
from the phone’s menu.
Note: Caller ID is a subscription service. Check with your local telephone service provider to determine if this
service is available in your area.
For additional information about Caller ID, see Configure PSTN Calling Party Identification.
PSTN Extension
Numerical string, up to a
maximum of 32 numbers
Null
The phone’s telephone number. The number will display on the idle screen.
Caller ID Type
Bellcore
ETSI
DTMF
Off
Bellcore
The type of caller ID to use. If the value for Caller ID is ‘Removed,’ Caller ID Type won’t display in the phone’s
menu. Note: The British Telecom and Japanese Caller ID standard is not supported. If you’re using the phone in
the United Kingdom or Japan, choose the ‘Removed’ option in the Caller ID parameter.
After you configure the country and language, you can configure more advanced PSTN settings, such as
the PSTN extension, caller ID, caller ID type, and flash timing, by navigating to the Advanced menu on
the phone: Menu > Settings > Advanced > Default password 456 > Enter. The table Advanced PSTN
Settings lists the advanced PSTN settings you can configure.
Advanced PSTN Settings
Provisioning Server Discovery
After the phone has established network connectivity it proceeds to the Configuration stage. In this stage
the following steps are carried out:
Software update
Application of configuration settings relevant to a customer network
Polycom, Inc. 44
Page 45

Polycom® UC Software Administrator’s Guide 5.1.0
Admin Tip: Setting Up a Provisioning Server
Read this section if you are new to this process or have never set up a provisioning server before.
Web Info: Provisioning Polycom Phones
For more information on best practices with respect to provisioning, see White Paper 60806: UC
Software Provisioning Best Practices.
In many deployments a centralized provisioning server is used for the software update and configuration
functions. The phone supports several methods to ‘discover’ this provisioning server:
● Static You can manually configure the server address from the phone's user interface or the Web
Configuration Utility, or you can pre-provision the phone. The server address is manually
configured from the phone’s user interface, the Web Configuration Utility, or pre-provisioned using
device.set in a configuration file.
● DHCP A DHCP option is used to provide the address or URL between the provisioning server and
the phone.
● DHCP INFORM The phone makes an explicit request for a DHCP option (which can be answered
by a server that is not the primary DHCP server). For more information, see RFC 3361 and RFC
3925.
● Quick Setup This feature offers a soft key to the user that takes them directly to a screen to enter
the provisioning server address and information. This is simpler than navigating the menus to the
relevant places to configure the provisioning parameters. For more information, see Technical
Bulletin 45460: Using Quick Setup with Polycom Phones.
To change these parameters, go to Provisioning Server Menu.
Supported Provisioning Protocols
The Updater performs the provisioning functions of uploading log files, master configuration files, software
updates, and device setting menu changes.
By default, phones are shipped with FTP enabled as the provisioning protocol. You can change the
provisioning protocol by updating the Server Type option. Or, you can specify a transfer protocol in the
Server Address, for example, http://usr:pwd@server (see Provisioning Server Menu). The Server Address
can be an IP address, domain string name, or URL, and can be obtained through DHCP.
Configuration file names in the <MACaddress>.cfg file can include a transfer protocol, for example,
https://usr:pwd@server/dir/file.cfg. If a user name and password are specified as part of the server
address or file name, they are used only if the server supports them. If a user name and password are
required but not specified, the device settings are sent to the server.
Polycom, Inc. 45
Page 46

Polycom® UC Software Administrator’s Guide 5.1.0
Tip: Choosing a Valid URL
A URL should contain forward slashes instead of back slashes and should not contain spaces.
Escape characters are not supported. If a user name and password are not specified, the Server
User and Server Password from device settings will be used (see Provisioning Server Menu).
Note: Active and Passive FTP Methods
There are two types of FTP methods - active and passive. UC Software is not compatible with active
FTP.
Note: HTTP/HTTPS Authentication
Both digest and basic authentication are supported when using HTTP/HTTPS for UC Software. The
Updater supports only digest authentication when using HTTP.
Web Info: To View Trusted Certificate Authorities
For more information, see the section Trusted Certificate Authority List and Technical Bulletin 17877:
Using Custom Certificates With Polycom Phones.
Digest Authentication for Microsoft Internet Information Services (IIS)
If you want to use digest authentication against the Microsoft Internet Information Services server:
Use Microsoft Internet Information Server 6.0 or later.
Digest authentication needs the user name and password to be saved in reversible encryption.
The user account on the server must have administrative privileges.
The wildcard must be set as MIME type; otherwise, the phone will not download *.cfg, *.ld and other required
files. This is because the Microsoft Internet Information Server cannot recognize these extensions and will
return a “File not found” error. To configure wildcard for MIME type, see IIS 6.0 does not serve unknown MIME
types.
For more information, see Digest Authentication in IIS 6.0 on Microsoft TechNet.
To guarantee software integrity, the Updater will download only cryptographically signed Updater or UC
Software images. When using HTTPS, the phone trusts widely recognized certificate authorities; you can
add custom certificates to the phone. Note that log files are not appended when using HTTP or HTTPS.
As of SIP 3.2, Mutual Transport Layer Security (TLS) authentication is available. For more information,
see Support Mutual TLS Authentication.
As of UC Software 4.0.0, 802.1X authentication is available. For more information, see Support 802.1X
Authentication.
Polycom, Inc. 46
Page 47

Polycom® UC Software Administrator’s Guide 5.1.0
Tip: For Novice Administrators
Read this section if you are new to this process or have never set up a provisioning server before.
Tip: Changing the Default Administrator Password
Polycom recommends that you change the default administrative password. See
Local User and Administrator Passwords.
Phone Network Menus
You have the option of modifying the phone network configuration.
You can update the network configuration parameters in two ways:
● During the Updater Phase. The setup menu is accessible during the auto-boot countdown of the
Updater phase of operation. While your phone boots up, press the Cancel soft key, and press the
Setup soft key to launch the setup menu. To access the setup menu, you will have to enter the
administrator’s password.
● After your phone starts and is running UC Software. The network configuration menu is
accessible from the phone’s main menu. Select Menu > Settings > Advanced > Admin Settings
> Network Configuration. To access the Advanced menu, you will have to enter the
administrator’s password.
You have the option of modifying the phone network configuration parameters in the following menus and
sub-menus:
● Main Menu
● Provisioning Server Menu
● Network Interfaces Menu (Ethernet Menu)
● CMA Menu
● TLS Security
● Syslog Menu
Use the soft keys, the arrow keys, and the Select and Delete keys to make changes.
Certain parameters are read-only due to the value of other parameters. For example, if the DHCP client
parameter is enabled, the Phone IP Address and Subnet Mask parameters are grayed out or not visible
since the DHCP server automatically supplies these parameters and the statically assigned IP address
and subnet mask will never be used in this configuration.
Polycom, Inc. 47
Page 48

Polycom® UC Software Administrator’s Guide 5.1.0
Tip: Resetting Network Configurations
The basic network configuration referred to in the subsequent sections can be reset to factory
default settings using the phone’s main menu: Select Menu > Settings > Advanced > Admin
Settings > Reset to Defaults > Reset Device Settings. Or use a multiple key combination, as
described in the section Polycom UC Software Release Matrix for VVX Phones
Multiple Key Combinations.
Name
Possible Values
Provisioning Menu
See Provisioning Server Menu.
Network Interfaces Menu or Ethernet Menu
See Network Interfaces Menu (Ethernet Menu).
CMA Menu
See CMA Menu.
TLS Security Menu
See TLS Security Menu.
SNTP Address
Dotted-decimal IP address OR Domain name string
The Simple Network Time Protocol (SNTP) server the phone obtains the current time from.
GMT Offset
-13 through +12
The offset of the local time zone from Greenwich Mean Time (GMT) in half hour increments.
DNS Server
Dotted-decimal IP address
The primary server the phone directs Domain Name System (DNS) queries to.
DNS AltServer
Dotted-decimal IP address
The secondary server to which the phone directs DNS queries.
DNS Domain
Domain name string
The phone’s DNS domain.
Hostname
hostname
The DHCP client hostname.
Main Menu
You can modify the configuration parameters shown in the table Main Menu from the setup menu while
the phone boots, or from the Administrative Settings menu from a phone running UC Software.
Main Menu
Polycom, Inc. 48
Page 49

Polycom® UC Software Administrator’s Guide 5.1.0
Name
Possible Values
Syslog Menu
See Syslog Menu.
Quick Setup
Enabled, Disabled
If enabled, a QSetup soft key displays on the idle screen when you are in Lines View. When you press this soft key,
a menu displays enabling you to configure the parameters required to access the provisioning server.
Note: The Quick Setup option is not available in the Updater.
EM Power
Enabled, Disabled
SoundPoint IP 650 only. This parameter is relevant if the phone uses a Power over Ethernet (PoE) source. If
enabled, the phone will set power requirements in CDP to an appropriate value so that up to three Expansion
Modules (EMs) can be powered. If disabled, the phone will set power requirements in CDP to an appropriate value
which means no EMs will be powered and no EMs will work. For exact power requirements, see Technical Bulletin
48152: Power Consumption of Polycom Phones.
Reset to Defaults
There are five ways to reset or clear phone features and settings, including settings from web or local override files.
For details, see the section Reset to Factory Defaults.
Base Profile
Generic, Lync
Use this to enable Lync-compatible phones to register with Lync Server. When set to Lync, the phone automatically
provisions with the minimum parameters required to register with Lync Server. You cannot modify or customize the
Base Profile. By default, the Base Profile is set to Generic.
Settings: Preventing Invalid Parameter Values
If you insert invalid parameter values into the configuration file, the phone ignores the invalid values
or in some cases use default values. If the phone cannot acquire any configuration files from the
provisioning server, the phones use values from its previous configuration.
Tip: Text Entry on the SoundPoint IP 321, 331, and 335 Phones
To switch the text entry mode on SoundPoint IP 321, 331, and 335 phones, press the # key. You
may want to use URL or IP address modes when entering server addresses.
Polycom, Inc. 49
Page 50

Polycom® UC Software Administrator’s Guide 5.1.0
Name
Possible Values
DHCP Menu
See DHCP Menu. Note: This menu is disabled when the DHCP client is disabled.
Server Type
0=FTP, 1=TFTP, 2=HTTP, 3=HTTPS, 4=FTPS
The protocol that the phone will use to obtain configuration and phone application files from the provisioning server.
See Supported Provisioning Protocols.
Note: Active FTP is not supported for BootROM version 3.0 or later. Passive FTP is supported. Only implicit FTPS
is supported.
Server Address
Dotted-decimal IP address OR URL
Domain name string or a URL. All addresses can be followed by an optional directory. The address can also be
followed by the file name of a .cfg master configuration file, which the phone will use instead of the default
<MACaddress>.cfg file. The provisioning server to use if the DHCP client is disabled, if the DHCP server does not
send a boot server option, or if the Boot Server parameter is set to Static.
The phone can contact multiple IP addresses per DNS name. These redundant provisioning servers must all use
the same protocol. If a URL is used, it can include a user name and password. See Supported Provisioning
Protocols. For information on how to specify a directory and use the master configuration file, see Understand the
Master Configuration File.
Note: ":", "@", or "/" can be used in the user name or password if they are correctly escaped using the method
specified in RFC 1738.
Server User
String
The user name requested when the phone logs into the server (if required) for the selected Server Type.
Note: If the Server Address is a URL with a user name, this will be ignored.
Server Password
String
The password requested when the phone logs in to the server if required for the selected Server Type.
Note: If the Server Address is a URL with user name and password, this will be ignored.
File Transmit Tries
1 to 10 Default 3
The maximum number of attempts to transfer a file. (An attempt is defined as trying to download the file from all IP
addresses that map to a particular domain name.)
Retry Wait
0 to 300 seconds Default 1
The minimum amount of time that must elapse before retrying a file transfer. The time is measured from the start of
a transfer attempt, which is defined as the set of upload/download transactions made with the IP addresses that
map to a given provisioning server’s DNS. If the set of transactions in an attempt is equal to or greater than the
Retry Wait value, then there will be no further delay before the next attempt is started.
For more information, see Deploy and Update Polycom Phones.
Provisioning Server Menu
The configuration parameters shown in Provisioning Server Menu can be modified on the Provisioning
Server Menu.
Provisioning Server Menu
Polycom, Inc. 50
Page 51

Polycom® UC Software Administrator’s Guide 5.1.0
Name
Possible Values
Tag SN to UA
Disabled, Enabled
If enabled, the phone’s serial number (MAC address) is included in the User-Agent header of HTTP/HTTPS
transfers and communications to the browser.
The default value is Disabled.
Upgrade Server
String
The address/URL that will be accessed for software updates requested from the phones Web configuration utility.
ZTP
Disabled, Enabled
See Zero-Touch Provisioning Solution.
Tip: Changing the Default Passwords
The Server User and Server Password parameters should be changed from the default values.
Name
Possible Values
Boot Server
0=Option 66, 1=Custom, 2=Static, 3=Custom+Option 66
Option 66 The phone will look for option number 66 (string type) in the response received from the DHCP server.
The DHCP server should send address information in option 66 that matches one of the formats described for
Server Address in Provisioning Server Menu.
Custom The phone will look for the option number specified by the Boot Server Option parameter (below), and the
type specified by the Boot Server Option Type parameter (below) in the response received from the DHCP server.
Static The phone will use the boot server configured through the Server Menu. For more information, see
Provisioning Server Menu.
Custom + Option 66 The phone will use the custom option first or use Option 66 if the custom option is not
present.
Note: If the DHCP server sends nothing, the following scenarios are possible:
If a boot server value is stored in flash memory and the value is not 0.0.0.0, then the value stored in flash
is used.
Otherwise the phone sends out a DHCP INFORM query.
If a single DHCP INFORM server responds, this is functionally equivalent to the scenario where the
primary DHCP server responds with a valid boot server value.
If no DHCP INFORM server responds, the INFORM query process will retry and eventually time out.
If the server address is not discovered using DHCP INFORM then the phone will contact the ZTP server if
the ZTP feature is enabled.
DHCP Menu
The DHCP menu is accessible only when the DHCP client is enabled. You can update DHCP
configuration parameters shown in the table DHCP Menu.
DHCP Menu
Polycom, Inc. 51
Page 52

Polycom® UC Software Administrator’s Guide 5.1.0
Name
Possible Values
Boot Server Option
128 through 254 (Cannot be the same as VLAN ID Option)
When the Boot Server parameter is set to Custom, this parameter specifies the DHCP option number in which the
phone will look for its boot server.
Boot Server Option Type
0=IP Address, 1=String
When the Boot Server parameter is set to Custom, this parameter specifies the type of DHCP option in which the
phone will look for its provisioning server. The IP Address provided must specify the format of the provisioning
server. The String provided must match one of the formats described for Server Address in Provisioning Server
Menu.
Option 60 Format
0=RFC 3925 Binary, 1=ASCII String
RFC 3925 Binary: Vendor-identifying information in the format defined in RFC 3925.
ASCII String: Vendor-identifying information in ASCII.
For more information, see Technical Bulletin 54041: Using DHCP Vendor Identifying Options With Polycom Phones.
Note: DHCP option 125 containing the RFC 3295 formatted data will be sent whenever option 60 is sent. DHCP
option 43 data is ignored.
Note: Multiple DHCP INFORM Servers
If multiple DHCP INFORM servers respond, the phone should gather the responses from these
DHCP INFORM servers. If configured for Custom+Option66, the phone will select the first response
that contains a valid custom option value. If none of the responses contain a custom option value,
the phone will select the first response that contains a valid option66 value.
Name
Possible Values
DHCP
Enabled, Disabled
If enabled, DHCP will be used to obtain the parameters discussed in IP Communication Settings.
IP Address
Dotted-decimal IP address
The phone’s IP address.
Note: This parameter is disabled when DHCP is enabled.
Network Interfaces Menu (Ethernet Menu)
The Network Interfaces Menu displays only if there are multiple network interfaces to the phone. For
supported SoundPoint IP, SoundStation IP, and VVX phones, the Ethernet menu will display instead of
the Network Interfaces menu.
You can select the following items in the Network Interfaces Menu:
● Ethernet Menu
You can select items shown in the table Ethernet Menu.
Ethernet Menu
Polycom, Inc. 52
Page 53

Polycom® UC Software Administrator’s Guide 5.1.0
Name
Possible Values
Subnet Mask
Dotted-decimal subnet mask
The phone’s subnet mask.
Note: This parameter is disabled when DHCP is enabled.
IP Gateway
Dotted-decimal IP address
The phone’s default router.
VLAN
See VLAN Menu.
802.1X Authentication
Enabled, Disabled
If enabled, the phone will use the 802.1 Authentication parameters to satisfy the negotiation requirements for each
EAP type.
802.1X Menu
See 802.1X Menu.
Storm Filtering
Enabled, Disabled
If enabled, received Ethernet packets are filtered so that the TCP/IP stack does not process bad data or too much
data.
The default value is Enabled.
LAN Port Mode
0 = Auto, 1 = 10HD, 2 = 10FD, 3 = 100HD, 4 = 100FD,
5 = 1000FD
The network speed over Ethernet. The default value is Auto. HD means half duplex and FD means full duplex.
Note: Polycom recommends that you do not change this setting.
PC Port Mode
0 = Auto, 1 = 10HD, 2 = 10FD, 3 = 100HD, 4 = 100FD,
5 = 1000FD, -1 = Disabled
The network speed over Ethernet. The default value is Auto. HD means half duplex and FD means full duplex.
Note: Polycom recommends that you do not change this setting unless you want to disable the PC port.
1000BT LAN Clock
0=Auto 1=Slave 2=Master
The mode of the LAN clock.
The default value is Slave (this device receives its clock timing from a master device).
Note: Polycom recommends that you do not change this setting unless you have Ethernet connectivity issues. This
setting was chosen to give the best results from an EMI perspective.
1000BT PC Clock
0=Auto 1=Slave 2=Master
The mode of the PC clock. The default value is Auto.
Note: Polycom recommends that you do not change this setting unless you have Ethernet connectivity issues. This
setting was chosen to give the best results from an EMI perspective.
Polycom, Inc. 53
Page 54

Polycom® UC Software Administrator’s Guide 5.1.0
Note: LAN Port Mode Support
The LAN Port Mode applies to all phones supported by SIP 3.0. The PC Port Mode parameters are
available only on phones with a second Ethernet port.
The following phones support the LAN Port Mode and PC Port Mode setting of 1000FD:
SoundPoint IP 560 and 670, VVX 310, 410, 500, 600, and 1500, and the SoundStructure
card.
The 1000BT LAN Clock and 1000BT PC Clock parameters are available only on SoundPoint
IP 560 phones.
Name
Possible Values
VLAN ID
Null, 0 through 4094
The phone’s 802.1Q VLAN identifier. The default value is Null.
Note: Null = no VLAN tagging
LLDP
Enabled, Disabled
If enabled, the phone will use the LLDP protocol to communicate with the network switch for certain network
parameters. Most often this will be used to set the VLAN that the phone should use for voice traffic. It also reports
power management to the switch. The default value is Enabled.
For more information on how to set VLAN and LLDP, see LLDP and Supported TLVs.
CDP Compatibility
Enabled, Disabled
If enabled, the phone will use CDP-compatible signaling to communicate with the network switch for certain network
parameters. Most often this will be used to set the VLAN that the phone should use for Voice Traffic, and for the
phone to communicate its PoE power requirements to the switch. The default value is Enabled.
VLAN Discovery
0=Disabled, 1=Fixed (default), 2=Custom
For a detailed description, see Assign a VLAN ID Using DHCP.
Disabled: No VLAN discovery through DHCP.
Fixed: Use predefined DHCP vendor-specific option values of 128, 144, 157 and 191. If one of these is used, VLAN
ID Option will be ignored
Custom: Use the number specified for VLAN ID Option as the DHCP private option value.
VLAN ID Option
128 through 254 (Cannot be the same as Boot Server Option) (default is
129)
The DHCP private option (when VLAN Discovery is set to Custom).
For more information, see Assign a VLAN ID Using DHCP.
VLAN Menu
You can modify the parameters shown in the table VLAN Menu.
VLAN Menu
Polycom, Inc. 54
Page 55

Polycom® UC Software Administrator’s Guide 5.1.0
Name
Possible Values
EAP Method
0 = None, 1=EAP-TLS, 2=EAP-PEAPv0/MSCHAPv2, 3=EAP-PEAPv0/GTC, 4=EAPTTLS/EAP-MSCHAPv2, 5=EAP-TTLS/EAP-GTC, 6=EAP-FAST, 7=EAP-MD5
The selected EAP type to be used for authentication. For more information, see Support 802.1X Authentication.
Identity
UTF-8 encoded string
The identity (or user name) required for 802.1X authentication.
Password
UTF-8 encoded string
The password required for 802.1X authentication. The minimum length is 6 characters.
Anonymous ID
UTF-8 encoded string
The anonymous user name for constructing a secure tunnel for tunneled authentication and FAST authentication.
PAC File Info
See PAC File Information.
EAP-FAST Inband
Provisioning
Enabled, Disabled
A flag to determine whether EAP-FAST Inband Provisioning is enabled. This parameter is used only if EAP Method
is EAP-FAST.
Name
Possible Values
Description
PAC File
Password
UTF-8 encoded string
The password required to decrypt the PAC file.
PAC File Name
UTF-8 encoded string
The path or URL of the PAC file for download.
Remove PAC File
UTF-8 encoded string
A flag to determine whether or not to delete the PAC file
from the phone.
802.1X Menu
The 802.1X Menu displays on the VVX 500 and 600 when 802.1X authentication is enabled. You can
modify configuration parameters shown in the 802.1X Menu.
802.1X Menu
PAC File Information
You can modify Protected Access Credential (PAC) File Information shown in the table PAC File
Information Menu.
PAC File Information Menu
Polycom, Inc. 55
Page 56

Polycom® UC Software Administrator’s Guide 5.1.0
Name
Possible Values
CMA Mode
Disabled, Static, Auto
Determines how the phone should retrieve the Polycom CMA server IP address. The possible values are:
Auto The phone must use SRV lookup to find the Polycom CMA server IP address.
Disabled The Polycom CMA server is not contacted.
Static The Polycom CMA server name or IP address is specified in device settings.
Server Address
Dotted-decimal IP address OR Domain name string OR
URL
The Polycom CMA server name or IP address.
Login Credentials
See Login Credentials Menu.
Name
Possible Values
Domain
UTF-8 encoded string
The domain name used by a server.
User
UTF-8 encoded string
The user name used to authenticate to a server.
Password
UTF-8 encoded string
The password used to authenticate to a server.
CMA Menu
The CMA Menu appears only if CMA provisioning is enabled. Currently, the CMA Menu displays only on
the Polycom VVX 1500 phone. For more information, see Provision VVX 1500 Phones Using a Polycom
CMA System.
You can modify parameters shown in the table CMA Menu.
CMA Menu
Login Credentials Menu
You can modify the parameters shown in the Login Credentials Menu.
Login Credentials Menu
Polycom, Inc. 56
Page 57

Polycom® UC Software Administrator’s Guide 5.1.0
Name
Possible Values
OCSP
Enabled, Disabled
The Online Certificate Status Protocol checks the revocation status of X.509 digital certificates downloaded during
negotiation of a TLS connection.
FIPS
Enabled, Disabled
The Federal Information Processing Standard enables the validation and usage of FIPS-140 certified encryption
algorithms.
Install Custom CA Cert
URL
A CA certificate that is installed on the phone to be used for TLS authentication.
Install Custom Device Cert
URL
A device certificate installed on the phone to be used for Mutual TLS authentication.
Clear Certificate
Yes, No
A flag to determine whether or not the device certificate can be removed from the phone.
TLS Profile x
There are currently two TLS Platform profiles. See TLS Profile Menu.
Applications
See Applications Menu.
Name
Possible Values
SSL Cipher Suite
String
The global cipher suite.
Custom SSL Cipher Suite
String
A custom cipher suite.
TLS Security Menu
This section refers to the TLS Security menu available in the Updater and UC Software. You can modify
the parameters shown in the table TLS Security Menu.
TLS Security Menu
TLS Profile Menu
You can modify the parameters shown in table TLS Profile Menu.
TLS Profile Menu
Polycom, Inc. 57
Page 58

Polycom® UC Software Administrator’s Guide 5.1.0
Name
Possible Values
CA Cert List
String
The CA certificate sources that are valid for this profile.
Device Cert List
String
The device certificate sources that are valid for this profile.
Name
Possible Values
802.1X
1 or 2
The TLS Profile to use for 802.1X authentication.
Provisioning
1 or 2
The TLS Profile to use for provisioning authentication.
Provisioning
Enable or Disable
The TLS Profile to enable or disable common name validation.
Syslog
1 or 2
The TLS Profile to use for syslog authentication.
Web Info: Information on Syslog
For more information on the syslog protocol, see RFC 3164.
Applications Menu
You can modify the parameters shown in the Applications Menu.
Applications Menu
Syslog Menu
Syslog is a standard for forwarding log messages in an IP network. The term syslog is often used for both
the actual syslog protocol as well as the application or library sending syslog messages.
The syslog protocol is a simple protocol: the syslog sender sends a small textual message (less than
1024 bytes) to the syslog receiver. The receiver is commonly called syslogd, syslog daemon, or syslog
server. Syslog messages can be sent through UDP, TCP, or TLS. The data is sent in cleartext.
Because syslog is supported by a wide variety of devices and receivers, syslog can be used to integrate
log data from many different types of systems into a central repository.
Polycom, Inc. 58
Page 59

Polycom® UC Software Administrator’s Guide 5.1.0
Name
Possible Values
Server Address
Dotted-decimal IP address OR Domain name string
The syslog server IP address. The default value is Null.
Server Type
None=0, UDP=1, TCP=2, TLS=3
The protocol that the phone will use to write to the syslog server. If set to None (or 0), transmission is turned off, but
the server address is preserved.
Facility
0 to 23
A description of what generated the log message. For more information, see section 4.1.1 of RFC 3164.
The default value is 16, which maps to local 0.
Render Level
0 to 6
Specifies the lowest class of event that will be rendered to syslog. It is based on log.render.level and can be a
lower value. See <log/>.
Note: Use left and right arrow keys to change values.
Prepend MAC Address
Enabled, Disabled
If enabled, the phone’s MAC address is prepended to the log message sent to the syslog server.
You can modify the parameters shown in the table Syslog Menu.
Syslog Menu
Polycom, Inc. 59
Page 60

Web Info: Registering Standalone Polycom Phones
If you want to register a single Polycom phone, see the Polycom Web Configuration Utility User
Guide.
Set Up the Provisioning Server
This section provides instructions for setting up your Polycom phones with a provisioning server. If you
are new to this process, it is important to read every section in this section.
Because of the large number of optional installations and configurations that are available, this section
focuses on one particular way that the Polycom® UC Software and the required external systems might
initially be installed and configured in your network.
Set Up the Provisioning Server includes the following topics:
● Why Use a Provisioning Server?
● Provisioning Server Security Notes
● Set Up an FTP Server as Your Provisioning Server
● Download Polycom UC Software Files to the Provisioning Server
● Deploy and Update Polycom Phones with a Provisioning Server
● Upgrade Polycom UC Software
● Support Legacy Phones
● Provision VVX 1500 Phones Using a Polycom CMA System
Why Use a Provisioning Server?
Read this section if you have never set up a provisioning server before.
Polycom strongly recommends that you use a provisioning server to install and maintain your Polycom
phones. You can set up a provisioning server on the local LAN or anywhere on the Internet. A
provisioning server maximizes the flexibility you have when installing, configuring, upgrading, and
maintaining the phones, and enables you to store configuration, log, directory, and override files on the
server. If you allow the phone write access to your provisioning server, the phone can use the server to
upload all of the file types and store administrator and user settings. The phone is designed such that if it
cannot locate a provisioning server when it boots up, it will operate with internally saved parameters. This
is useful when the provisioning server is not available.
You can configure multiple (redundant) provisioning servers—one logical server with multiple
addresses—by mapping the provisioning server DNS name to multiple IP addresses. The default number
of provisioning servers is one and the maximum number is eight. For more information on the protocol
used, see Supported Provisioning Protocols.
If you set up multiple provisioning servers, you must be able to reach all of the provisioning servers with
the same protocol and the contents on each provisioning server must be identical. The parameters
Polycom, Inc. 60
Page 61

Polycom® UC Software Administrator’s Guide 5.1.0
Tip: Allowing File Uploads to Your Provisioning Server
Polycom recommends that you allow file uploads to the provisioning server where the security
environment permits. File uploads allow event log files to be uploaded. Log files provide backup
copies of changes users make to the directory, and to the phone’s configuration through the Web
server and/or local user interface. These log files help Polycom provide customer support when
diagnosing issues that may occur with the phone operation.
Tip: Use RFC-Compliant Servers
Polycom recommends that you use RFC-compliant servers.
described in Provisioning Server Menu can be used to configure the number of times each server will be
tried for a file transfer and also how long to wait between each attempt. You can configure the maximum
number of servers to be tried. For more information, contact your Certified Polycom Reseller.
Provisioning Server Security Notes
Read this section if you have never set up a provisioning server before.
For organizational purposes, Polycom recommends configuring a separate log file directory, an override
directory, a contact directory, and a license directory, though this is not required. Each directory can have
different access permissions. For example, you can allow LOG, CONTACTS, and OVERRIDES to have
full read and write access, and LICENSE to have read-only access.
You should ensure that the file permissions you create provide the minimum required access and that the
account has no other rights on the server.
The phone’s server account needs to be able to add files that it can write to in the log file directory and
the provisioning directory. It must also be able to list files in all directories mentioned in the
<MACaddress>.cfg file. All other files that the phone needs to read, such as the application executable
and the standard configuration files, should be made read-only using file server file permissions.
Each phone may open multiple connections to the server.
The phone will attempt to upload log files, a configuration override file, and a directory file to the server if
changed. This requires that the phone’s account has delete, write, and read permissions. The phone will
still function without these permissions, but will not be able to upload files.
If you know the phone is going to download a file from the server, you should mark the file as read-only.
Polycom, Inc. 61
Page 62

Polycom® UC Software Administrator’s Guide 5.1.0
Tip: Choosing a Provisioning Protocol
By default, Polycom sets FTP as the provisioning protocol on all Polycom phones. This guide
focuses on the FTP provisioning protocol. Other supported protocols include TFTP, HTTP, and
HTTPS.
Set Up an FTP Server as Your Provisioning Server
Read this section if you have never set up a provisioning server before.
A simple provisioning configuration uses File Transfer Protocol or FTP. FTP servers are free, require
installation, and use logins and passwords. A free and popular server, FileZilla Server, is available for
Windows. FileZilla Server (version 0.9.xx) has been tested with the UC Software.
To set up an FTP server using FileZilla Server:
1 Download and install the latest version of FileZilla Server.
2 After installation, a Connect to Server pop-up displays on your computer. Click OK to open the
administrative user interface.
3 To configure a user, select Edit > Users in the status bar.
4 Click Add.
5 Enter the user name for the phone and select OK.
For example, bill123.
6 Select the Password checkbox and enter a password.
For example, 1234. The phone will use this password to log in.
7 Select Page > Shared folders to specify the server-side directory where the provisioning files will
be located (and the log files uploaded).
8 Select Add and pick the directory.
9 To allow the phone to upload logs onto the provisioning server, select Shared Folders > Files,
then select Write and Delete checkboxes, and then click OK.
10 Determine the IP address of the FTP server by entering cmd in the Run dialog on your Start menu,
and enter ipconfig in the command prompt.
The IP Address of the FTP server is shown.
Download Polycom UC Software Files to the Provisioning Server
This section explains how to download the Polycom Unified Communications (UC) Software to the
provisioning server.
Polycom, Inc. 62
Page 63

Polycom® UC Software Administrator’s Guide 5.1.0
Note: See the Release Notes for a Description of all Parameters for a UC Software Release
For a description of each file in a UC Software distribution, see the UC Software Release Notes for a
particular UC Software release on:
Polycom UC Software Support Center
Polycom UC Software Release Matrix for SoundPoint IP and SoundStation IP Phones
Polycom UC Software Release Matrix for VVX Phones.
Go to the Polycom UC Software Support Center to download current and past releases, access
supporting documentation; or, you navigate to the downloads and documents available for a specific
product. Polycom provides the UC Software download in ZIP file format.
To determine which Polycom UC Software release you need for your phones, refer to the following
documents:
● For SoundPoint IP and SoundStation IP phones, see Polycom UC Software Release Matrix for
SoundPoint IP and SoundStation IP Phones to match your phone model to all UC Software
releases and software components. You can download all UC Software from this Release Matrix.
● For VVX phones, see the Polycom UC Software Release Matrix for VVX Phones.
To download the Polycom UC Software:
1 Access Polycom UC Software from the:
Polycom UC Software Support Center
Polycom UC Software Release Matrix for SoundPoint IP and SoundStation IP Phones
Polycom UC Software Release Matrix for VVX Phones
Choose the combined UC Software package or the split UC Software package. Both packages are
provided in ZIP file format. The split software package is smaller and simplifies the provisioning
process. Whereas the combined version contains all files for all phone models, the split version
contains sip.ld files for each phone model, enabling you to choose files for your phone model and
store software versions for different phone models in the same directory.
2 Acknowledge that you read the notices, accept the agreement, and choose Submit.
3 Save the UC Software ZIP file download.
4 Extract (uncompress) the ZIP file.
Copy all files from the distribution ZIP file to the home directory on the provisioning server,
maintaining the same folder hierarchy. To simplify provisioning, Polycom recommends editing
copies of each file as a best practice to ensure that you have unedited template files containing the
default values.
● The split image file contains individual sip.ld files for each phone model as well as all of the
template configuration files included in the combined image file. To find the sip.ld file for your
phones, see Product, Model, and Part Number Mapping.
For a list and brief description of all available template files included with Polycom UC Software 5.0,
see Use the Template Configuration Files.
Polycom, Inc. 63
Page 64

Polycom® UC Software Administrator’s Guide 5.1.0
Tip: Choosing the File Name for a Per-Phone Configuration File
Do not use the following file names as your per-phone file name: <MACaddress>-phone.cfg,
<MACaddress>-web.cfg, <MACaddress>-app.log, <MACaddress>-boot.log, or <MACaddress>-
license.cfg. These file names are used by the phone itself to store user preferences (overrides) and
logging information.
Deploy and Update Polycom Phones with a Provisioning Server
This section explains how to deploy and update Polycom phones from a provisioning server. If you are
provisioning the phones using a provisioning server for the first time, follow the provisioning process
shown in Deploy Polycom Phones with a Provisioning Server. If you are using a phone in one of the
following special scenarios, refer to the relevant section:
● If your organization uses the Polycom
read Provision VVX 1500 Phones Using a Polycom CMA System to understand the different
provisioning options available for your organization’s VVX 1500 phones.
As of Polycom UC Software 4.0.1, and UC Software 5.0, the Updater and UC Software are packaged
together for all phones except the SoundStation IP 6000.
As of Polycom UC Software 3.3.0, Polycom phones can boot up without any configuration files; however,
you will need to configure certain parameters in the configuration files - for example, a registration
address, label, and SIP server address - to make the phones usable.
You can create as many configuration files as you want and your configuration files can contain any
combination of parameters you put in them. You can put all parameters into one file or, for example, you
can put SIP server parameters in one file and phone features parameters in another file. For detailed
information on how to use the configuration files, see the section Use the Template Configuration Files.
®
Converged Management Application™ (CMA™) system,
For large-scale deployments, the centralized provisioning method using configuration files is strongly
recommended. For smaller scale deployments, the Web Configuration Utility or local interface may be
used, but administrators need to be aware that settings made using these methods will override settings
made using configuration files.
For instructions on how to encrypt your configuration files, see Encrypt Configuration Files.
Deploy Polycom Phones with a Provisioning Server
To deploy phones with a provisioning server:
1 Obtain a list of MAC addresses for the phones you want to deploy.
The MAC address is a 12-digit hexadecimal number on a label on the back of the phone and on the
outside of the shipping box.
2 Create a per-phone phone<MACaddress>.cfg file.
Add phone registration parameters to the file, for example reg.1.address, reg.1.label,
and reg.1.type.
Polycom, Inc. 64
Page 65

Polycom® UC Software Administrator’s Guide 5.1.0
Settings: Configuring Your Phone for Local Conditions
Most of the default settings are typically adequate; however, if SNTP settings are not available
through DHCP, you will need to edit the SNTP GMT offset, and (possibly) the SNTP server address
for the correct local conditions. Changing the default daylight savings parameters will likely be
necessary outside of North America. Disable the local Web (HTTP) server or change its signaling
port if the local security policy dictates (see <httpd/>). Change the default location settings for user
interface language and time and date format (see <lcl/>)
3 Create a per-site site<location>.cfg file.
For example, add the SIP server or feature parameters such as
voIpProt.server.1.address and feature.corporateDirectory.enabled.
4 Create a master configuration file by performing the following steps:
a Enter the name of each per-phone and per-site configuration files created in steps 2 and 3 in the
CONFIG_FILES attribute of the master configuration file (000000000000.cfg). For help using
the master configuration file, see Understand the Master Configuration File.
For example, add a reference to phone<MACaddress>.cfg and sip650.cfg.
b (Optional) Edit the LOG_FILE_DIRECTORY attribute of master configuration file so that it points
to the log file directory.
c (Optional) Edit the CONTACT_DIRECTORY attribute of master configuration file so that it points to
the organization’s contact directory.
d (Optional) Edit the USER_PROFILES_DIRECTORY attribute of master configuration file if you
intend to enable the User Login feature.
For more information, see Set User Profiles.
e (Optional) Edit the CALL_LISTS_DIRECTORY attribute of master configuration file so that it
points to the user call lists.
5 Perform the following steps to configure the phone to point to the IP address of the provisioning
server and set up the user:
a On the phone’s Home screen or idle display, select Settings > Advanced > Admin Settings >
Network Configuration > Provisioning Server.
When prompted for the administrative password, enter 456. The Provisioning Server entry is
highlighted.
b Press the Select soft key.
c Scroll down to Server Type and ensure that it is set to FTP.
d Scroll down to Server Address and enter the IP address of your provisioning server.
Press the Edit soft key to edit the value and the OK soft key to save your changes.
Scroll down to Server User and Server Password and enter the user name and password of
the account you created on your provisioning server, for example, bill1234 and 1234,
respectively.
e Press the Back soft key twice.
Polycom, Inc. 65
Page 66

Polycom® UC Software Administrator’s Guide 5.1.0
Admin Tip: Updating UC Software on a Single Phone
You can use the Software Upgrade tool in the Web Configuration Utility to update the UC Software
version running on a single phone. Note that configuration changes made to individual phones
using the Web Configuration Utility will override configuration settings made using central
provisioning. For instructions on how to update UC Software, see Use the Software Upgrade Tool
in the Web Configuration Utility (Feature Profile 67993).
Web Info: Downgrading from UC Software 4.0.0 or later
Once you have deployed the phones using UC Software 4.0.0 or later, you can downgrade to a
previous software release by following the instructions in Technical Bulletin 64731: Upgrading
Polycom Phones to and Downgrading Phones From Polycom UC Software 4.0.0.
f Scroll down to Save & Reboot, and then press the Select soft key.
The phone reboots.
The UC Software modifies the APPLICATION APP_FILE_PATH attribute of the master
configuration file so that it references the appropriate sip.ld files. For example, the reference to
sip.ld is changed to 2345-12600-001.sip.ld to boot the SoundPoint IP 650 image.
After this step, the UC Software will try the unmodified APPLICATION APP_FILE_PATH
attribute.
At this point, the phone sends a DHCP Discover packet to the DHCP server. This is found in the
Bootstrap Protocol/option “Vendor Class Identifier” section of the packet and includes the
phone’s part number and the BootROM version.
For more information, see Parse Vendor ID Information.
6 Ensure that the configuration process completed correctly.
On the phone, press the Menu key, and then select Status > Platform > Application > Main to
see the UC Software version and Status > Platform > Configuration to see the configuration files
downloaded to the phone.
Monitor the provisioning server event log and the uploaded event log files (if permitted). All
configuration files used by the provisioning server are logged.
The phone will upload two logs files to the LOG_DIRECTORY directory:
<MACaddress>-app.log and <MACaddress>-boot.log.
You can now instruct your users to start making calls.
Upgrade Polycom UC Software
You can upgrade the software that is running on the Polycom phones in your organization. The upgrade
process varies with the version of Polycom UC Software that is currently running on your phones and with
the version that you want to upgrade to. The Updater, UC Software executable, and configuration files
can all be updated using centralized provisioning.
Polycom, Inc. 66
Page 67

Polycom® UC Software Administrator’s Guide 5.1.0
Caution: Mandatory Changes to Configuration Files
To ensure predictable phone behavior, the configuration files listed in CONFIG_FILES attribute of
the master configuration file must be updated when the software is updated. You will need to add
new configuration files to the CONFIG_FILES attribute in the appropriate order.
To continue setting up a provisioning server, administrators can use the instructions shown in Upgrade
Phones from UC Software 4.0.x. If you provisioned a VVX 1500 phone using CMA, see Upgrade Polycom
UC Software Using Polycom CMA.
If you are using legacy phones—including SoundPoint IP 300, 301, 320, 330, 430, 500, 501, 600, 601,
and 670, or SoundStation IP 4000, 6000 and 7000 phones—you will need to change the phone
configuration files to support these legacy phones. To provision legacy phones, go to Support Legacy
Phones.
The following models were discontinued:
● The SoundPoint IP 300 and 500 phones as of May 2006
● The SoundPoint IP 301, 600, and 601 phones as March 2008
● The SoundPoint IP 501 phone as of August 2009
● The SoundStation IP 4000 phone as of May 2009
● The SoundPoint IP 430 phone as of April 2010
● The SoundPoint IP 320 and 330 phones as of December 2009
The following models will not be supported beyond UC Software 4.0.x:
● The SoundStation IP 6000 phone
● The SoundStation IP 7000 phone
● The SoundPoint IP 670 phone
Upgrade Phones from UC Software 4.0.x
If your Polycom phones are running a version of UC Software 4.0.x or later, you can upgrade to a more
recent UC Software version using the instructions in this section. If your phones are running a software
release earlier than UC Software 4.0.x, you can upgrade to UC Software 4.0.x by following the
instructions in Technical Bulletin 64731: Upgrading Polycom Phones to and Downgrading Phones From
Polycom UC Software 4.0.0.
To update phones to Polycom UC Software 4.0.1:
1 Back up your existing application and configuration files.
2 Create your new configuration using UC Software 4.1.0.
Configuration file changes and enhancements are explained in the Release Notes that accompany
the software.
3 Save the new configuration files and images (such as sip.ld) on your provisioning server.
4 Reboot the phones using an automatic method such as polling or check-sync.
Polycom, Inc. 67
Page 68

Polycom® UC Software Administrator’s Guide 5.1.0
Tip: Rebooting Your Phone
You should only reboot your phone using the multiple-key combination as a backup option if another
reboot method fails. For details on using a multiple key combination to reboot your phone, see
Multiple Key Combinations.
You can reboot phones remotely through the SIP signaling protocol. See the parameter
voIpProt.SIP.specialEvent.checkSync.alwaysReboot in <voIpProt/>.
You can configure the phones to periodically poll the provisioning server to check for changed
configuration files or application executable. If a change is detected, the phone will reboot to
download the change. See prov.polling.*.
The phones can be rebooted remotely through the SIP signaling protocol. See
<voIP.SIP.specialEvent.*/>.
The phones can be configured to periodically poll the provisioning server for changed configuration files
or application executables. If a change is detected, the phone may reboot to download the change.
Support Legacy Phones
With enhancements available since BootROM 4.0.0 and SIP 2.1.2, you can specify a different software
and configuration files for legacy phones in the same master configuration file you are using for your nonlegacy phones.
Polycom UC Software 5.0 or later software distributions contain only the files for that release. To use a
software version for a legacy phone in the same master configuration file, you need to specify the phone
product name, phone model number, or phone part number, and rename the legacy phone configuration
files.
To get the phone product name, phone model number, or phone part number for a phone, see Product,
Model, and Part Number Mapping.
You must rename the sip.ld, sip.cfg, and phone1.cfg from a previous 2.1.x distribution that is compatible
with SoundPoint IP 300 and 500 phones, or a previous 3.1.y distribution that is compatible with
SoundPoint IP 301, 501, 600, 601, and SoundStation IP 4000 phones, or a previous 3.2.z distribution that
is compatible with SoundPoint IP 430 phones, or a previous 3.3.w distribution that is compatible with
SoundPoint IP 320 and 330 phones, or a previous 4.0.v distribution that is compatible with SoundPoint IP
670 and SoundStation IP 6000 and 7000 phones.
Polycom, Inc. 68
Page 69

Polycom® UC Software Administrator’s Guide 5.1.0
Supported Software for Legacy Phones
The SoundPoint IP 300 and 500 phones will be supported on the latest maintenance patch release of the SIP
2.1 software stream—currently SIP 2.1.4. Any critical issues that affect SoundPoint IP 300 and 500 phones
will be addressed by a maintenance patch on this stream until the End of Life date for these products. Phones
should be upgraded to BootROM 4.0.0 for these changes to be effective.
The SoundPoint IP 301, 501, 600, and 601, and the SoundStation IP 4000 phones will be supported on the
latest maintenance patch release of the SIP 3.1 software stream—currently SIP 3.1.7 . Any critical issues that
affect SoundPoint IP 300 and 500 phones will be addressed by a maintenance patch on this stream until the
End of Life date for these products. Phones should be upgraded to BootROM 4.0.0 or later for these changes
to be effective.
The SoundPoint IP 430 phone will be supported on the latest maintenance patch release of the SIP 3.2
software stream—currently SIP 3.2.4RevB. Any critical issues that affect SoundPoint IP 430 phones will be
addressed by a maintenance patch on this stream until the End of Life date for these products. Phones should
be upgraded to BootROM 4.2.2 for these changes to be effective.
The SoundPoint IP 320 and 330 phones will be supported on the latest maintenance patch release of the UC
Software 3.3.1 software stream—currently UC Software 3.3.1RevF. Any critical issues that affect SoundPoint
IP 320 and 330 phones will be addressed by a maintenance patch on this stream until the End of Life date for
these products. Phones should be upgraded to BootROM 4.0.0 for these changes to be effective.
The SoundPoint IP 670 and SoundStation IP 6000 and 7000 are supported only by UC Software 4.0.x. Critical
issues that affect these phones will be addressed by a maintenance patch on the 4.0.x stream until the End of
Life date for these products. Phones should be upgraded to BootROM 4.0.0 for these changes to be effective.
If you are upgrading legacy phones to UC Software 4.0.x, Polycom recommends modifying your
configuration files in the following way.
To upgrade legacy phones to UCS 4.1.x:
1 Complete one of the following steps:
Place all bootrom.ld files corresponding to the BootROM release zip file onto the provisioning
server.
Ensure that all phones are running BootROM 4.x.x or later.
2 Copy sip.ld (or the appropriate individual sip.ld from the split image file) from the UC Software
4.1.0 or later release distribution onto the provisioning server.
3 Rename the sip.ld, sip.cfg, and phone1.cfg from the previous distribution to one of the following
sets of names, depending on the phone models that you are provisioning:
For SoundPoint IP 300 and 500 phones, rename the files to sip_21x.ld, sip_21x.cfg, and
phone1_21x.cfg, respectively.
For SoundPoint IP 301, 501, 600, 601, and SoundStation IP 4000 phones, rename the files to
sip_31y.ld, sip_31y.cfg, and phone1_31y.cfg, respectively.
For SoundPoint IP 430 phones, rename the files to sip_323.ld, sip_323.cfg, and
phone1_323.cfg, respectively.
For SoundPoint IP 320 and 330 phones, rename sip.ld to sip_33x.ld and add *_33x to the end
of each .cfg configuration files (for example, rename phone1.cfg to phone1_33x.cfg and
rename sip-basic.cfg to sip-basic_33x.cfg).
4 Save the renamed configuration files to the provisioning server.
Polycom, Inc. 69
Page 70

Polycom® UC Software Administrator’s Guide 5.1.0
5 Modify the 000000000000.cfg file, if required, to match your configuration file structure.
The following illustration shows an example file:
6 Remove the <MACaddress>.cfg files on your provisioning server if the files correspond to legacy
phones.
Polycom, Inc. 70
Page 71

Polycom® UC Software Administrator’s Guide 5.1.0
Use Variable Substitutions for Legacy Phones
You can support legacy phones using an enhancement that was added in BootROM 3.2.1/SIP 2.0.1. This
enhancement enables you to use a phone-specific variable substitution [PHONE_MAC_ADDRESS] to name
your configuration files and avoid the need to create a unique <MACaddress>.cfg file for each phone.
If you do not use a variable substitution, you will need to change all of the <MACaddress>.cfg files for
SoundPoint IP 300, 301, 320, 330, 430, 500, 501, 600, and 601, and SoundStation IP 4000 phones. You will
also need to make changes to all of the <MACaddress>.cfg files if you do not know which phones are
SoundPoint IP 300, 301, 320, 330, 430, 500, 501, 600, and 601 or SoundStation IP 4000 models.
For details on using variable substitution as a configuration method, see Provisioning with the Master
Configuration File (Best Practices 75907).
For more information, see Technical Bulletin 35311: Maintaining Older Polycom Phones Beyond Their Last
Supported Software Release.
Web Info: Provisioning VVX 1500 Phones using a Polycom CMA System
For more information about provisioning by a Polycom CMA system, see the Polycom CMA System
Operations Guide.
Provision VVX 1500 Phones Using a Polycom CMA System
You can provision your organization’s VVX 1500 phones and update the software using a Polycom CMA
system. See the latest UC Software Release Notes on the Latest Polycom UC Software Release for
Polycom UC Software and Polycom CMA for specific compatibility requirements and recommendations.
You can also provision your organization’s VVX 1500 phones in a hybrid way, using both Polycom CMA
and a provisioning server. In hybrid scenarios, settings made using the Polycom CMA have a higher
priority than settings made using centralized provisioning. When the phone reboots, it will check the
Polycom CMA system first for new software, and then check the provisioning server for configuration files
and directories. Note that the phone will not check the provisioning server for software when CMA
provisioning is enabled. To disable the CMA system, see Disable the Polycom CMA System.
In dynamic management mode, the Polycom CMA system can do the following:
● Configure your VVX 1500 phones using an automatic provisioning service
● Register your VVX 1500 phones with a standard-based presence service, so that presence states
are shared with Polycom CMA contacts
● Provide your VVX 1500 phones with automatic software updates
This section contains information on:
● Provision Using Polycom CMA
● Disable the Polycom CMA System
Polycom, Inc. 71
Page 72

Polycom® UC Software Administrator’s Guide 5.1.0
Tip: Domain When You Are Not Using Single Sign On
If you are not using a Single Sign On login with Active Directory on the Polycom CMA system, the
phone will use the local accounts created on the Polycom CMA server.
Tip: Configuring the Line Key with a Polycom CMA System
Only one phone line associated with a Polycom CMA system can be provisioned on a VVX 1500
phone, but the line key associated with that line is configurable. For more information on
configuration file settings, see <prov/>.
● Upgrade Polycom UC Software Using Polycom CMA
● Monitor Using Polycom CMA
Provision Using Polycom CMA
In order to provision using the Polycom CMA system, the VVX phones must be installed with Polycom UC
Software 3.3.1 or later.
Polycom CMA requires that the management application be installed on the same network to which your
VVX 1500 phones are connected.
To configure the provisioning service settings on VVX 1500 phones:
1 Press the Menu key, and then select Settings > Advanced > Administration Settings > Network
Configuration > CMA Menu.
You must enter the administrator password to access the network configuration. The factory default
password is 456.
2 Enter the following values:
CMA Mode: Select Static or Auto. If Auto: CMA picks the DNS name (ignores the Server
Address—listed next). If Static, CMA uses the server address, listed next.
Server Address: Enter the address of the Polycom CMA system running the provisioning
service. The address can be an IP address or a fully qualified domain name. For example,
123.45.67.890.
3 Scroll to Login Credentials and tap the Select soft key. Enter the following values:
Domain: Enter the domain for registering to the provisioning service. For example,
NorthAmerica.
User: Enter the user name for registering to the provisioning service. For example, bsmith.
Password: Enter the password that registers the VX 1500 phone to the provisioning service
(associated with the CMA user account). For example, 123456.
4 Tap the Back soft key three times.
5 Select Save Config.
The VVX 1500 phone reboots.
Polycom, Inc. 72
Page 73

Polycom® UC Software Administrator’s Guide 5.1.0
Web Info: Searching the CMA Directory
The user can now search for CMA users and groups in the CMA directory, place calls to those
contacts, and view their presence status. For more information, see the User Guide for the Polycom
VVX 1500 Phone.
Disable the Polycom CMA System
If you provision phones using the CMA system, and then want to disable that provisioning, use the
following procedure.
To disable Polycom CMA provisioning:
1 Press the Menu key, and then select Settings > Advanced > Administration Settings > Network
Configuration > CMA Menu.
You must enter the administrator password to access the network configuration. The default
password is 456.
2 In CMA Mode: select Disable.
3 Tap the Back soft key twice.
4 Select Save Config.
The VVX 1500 phone reboots.
Upgrade Polycom UC Software Using Polycom CMA
Software upgrades of the VVX 1500 phones are triggered by the Polycom CMA system as either
automatic or scheduled updates.
Software update timer changes will not take effect until the next interval—after the current interval
expires. For example:
● The current software update timer is set to 60 minutes.
● The provisioning by the Polycom CMA system fails.
● The software update timer is reset to five minutes (default). The five-minute timer is not set off until
the last 60 minutes timer expires.
Monitor Using Polycom CMA
The following information is sent by the VVX 1500 phone to the Polycom CMA system:
● Network adapter probe This is the first message that the VVX 1500 phone sends to the Polycom
CMA system. It provides the phone’s IP address.
● Software update check This message provides the phone model, MAC address, and UC
Software version currently running on the phone.
● Software update status This message provides confirmation of the phone’s software upgrade.
Polycom, Inc. 73
Page 74

Polycom® UC Software Administrator’s Guide 5.1.0
● Provisioning profile This message requests configuration data for the phone so that the user
can access the CMA directory, add CMA contacts to their Buddy list, and place audio and video
calls to those contacts.
● Provisioning status This message provides confirmation of the receipt of the configuration data
from the Polycom CMA system.
● Call statistics These messages are sent for all calls placed or answered by the phone’s user.
● Call end This message is sent after all calls have ended.
● Heartbeat data This message contains status information about the phone. This message is sent
to the Polycom CMA system periodically. How often the message is sent is configured by the
administrator of the Polycom CMA system.
● Events This message provides information like gatekeeper registration events, presence
registration events, and LDAP events to the Polycom CMA system.
Polycom, Inc. 74
Page 75

Web Info: Registering a Single Polycom Phone
If you want to register a single Polycom phone, see Quick Tip 44011: Registering Standalone
Polycom SoundPoint IP, SoundStation IP, and VVX 1500 Phones.
Configuration Methods
This section explains three configuration methods you can use to configure settings and features on the
phones:
● Local phone user interface (for a single phone)
● Web Configuration Utility (for a single phone)
● Centralized provisioning method (for multiple phones)
If you are using the VVX 1500, see Provision VVX 1500 Phones Using a Polycom CMA System for
further provisioning information.
The three methods explained in this section configure the phone features and settings detailed in
Configure the Phone Features. Note that not all of the features and settings are available using each
configuration method. You can use a single method or you can use a combination of methods.
If you plan to use multiple configuration methods, be aware of the priority among the configuration
methods as shown in the figure Priority Among Configuration Methods. Settings you make using a
method with a higher priority override settings you make using a method with lower priority. Specifically,
changes you make using the Phone User Interface override settings made from the Web Configuration
Utility, CMA, and configuration files. Changes made from CMA override only the changes made from
configuration files.
Priority Among Configuration Methods
Polycom, Inc. 75
Page 76

Polycom® UC Software Administrator’s Guide 5.1.0
Tip: Administrative and User Settings
Settings available to administrators are not available to users and will not duplicate settings
available to users. Be cautious about using multiple configuration methods for administrative
settings.
Troubleshooting: Understanding Configuration Priority Settings
If you or a user makes a configuration change using a higher-priority method, changes made to the
same settings using a lower-priority method will not apply.
Polycom strongly recommends using configuration files—part of the centralized provisioning method—to
provision and configure settings for multiple phones. Typically, settings you make using configuration files
apply to multiple phones. Settings made using the Web Configuration Utility and the phone’s user
interface are applied on a per-phone basis and are available to individual phone users.
Override Files
When you make a change by using a configuration method higher than another, an override file is created
and uploaded to your provisioning server. You can use these override files to save user custom
preferences and to apply specific configurations to phone groups.
You can store the override file to the phone, or permit the phone to upload the override file to the
provisioning server by permitting the phone Write Access to the provisioning server. If you permit the
phone to upload to the provisioning server, the override file is named either <MAC Address>-phone.cfg
or <MAC Address>-Web.cfg and contains all of the changes that you or phone users make from their
phone or using the Web Configuration Utility respectively. The advantage of allowing the phone write
access to the provisioning server for override files is that user settings for a phone will survive restarts,
reboots, and software upgrades you apply to all phones using a provisioning server. If you allow the
phone to write to the provisioning server, the phone uploads an override file the next time a configuration
change is made from the phone. Note that if you reformat the phone’s file system, the override file will be
deleted.
Resetting to Default
There are five ways to reset or clear features and settings being applied by an override file.
● On the phone, go to Menu > Settings > Advanced > Administration Settings > Reset to
Defaults.
The following options display:
Reset Local Configuration Clears the override file generated by changes using the phone
user interface
Reset Web Configuration Clears the override file generated by changes using the Web
Configuration Utility.
Polycom, Inc. 76
Page 77

Polycom® UC Software Administrator’s Guide 5.1.0
Settings: Using the Default Value for a Configuration Parameter
The phone will use the default value for a configuration parameter as long as the parameter has not
been configured from any other source. Parameters can be changed using the local phone user
interface, the Web configuration utility, a Polycom CMA system, and configuration files hosted on a
central provisioning server.
Reset Device Settings Resets the phone’s flash file system settings that are not stored in an
override file. These are your network and provisioning server settings and include custom
certificates and encryption keys. Local, web, and other configuration files remain intact.
Format File System Formats the phone’s flash file system and deletes the UC Software
application, log files, configuration, and override files. Note that if the override file is stored on
the provisioning server, the phone will re-download the override file when you provision the
phone again. Formatting the phone’s file system does not delete those device settings affecting
network and provisioning, and any certificates and encryption keys remain on the phone.
Reset to Factory Removes the web and local override files, any stored configuration files in
the flash file system, as well as any custom certificates and encryption keys. All network and
provisioning settings are reset but the UC Software application and updater remain intact.
The rest of this section explains each of the following configuration methods:
● Use the Centralized Provisioning Method: Configuration Files
● Provision with the Web Configuration Utility
● Phone User Interface – Menu System Settings
Use the Centralized Provisioning Method: Configuration Files
Polycom recommends using a central provisioning server when your VoIP environment has multiple
phones. Polycom provides template configuration files in XML format that you can use to create a set of
phone features and settings specific to your organization. All of the phone features and settings are
outlined in Configure the Phone Features. The UC Software configuration files you use to configure the
phones are very flexible. Parameters can be stored in the files in any order and can be placed in any
number of files. You can change the XML tree structure, move parameters around within the XML files,
change the file names, or create your own configuration files. These files dictate the behavior of the
phone once it is running the Polycom UC Software. Be aware that the configuration files have default
values that you may want to change.
Applying configuration files to phones from a central provisioning server enables you to apply a single set
of parameters and settings to all of the phones in your deployment. The configuration files maximize
flexibility in installing the UC Software, configuring the phones, and in upgrading and maintaining the
phone settings over time.
Polycom phones can boot up without any configuration files; however, certain parameters will need to be
changed for your phones to be usable within your organization. Note that if a phone cannot locate a
provisioning server upon boot up, it will operate with internally stored default settings. To send and
Polycom, Inc. 77
Page 78

Polycom® UC Software Administrator’s Guide 5.1.0
Settings: Choosing a Per-Phone Configuration File Name
Do not use <MACaddress>-phone.cfg, <MACaddress>-Web.cfg, <MACaddress>-app.log,
<MACaddress>-boot.log, or <MACaddress>-license.cfg as the per-phone filename—where the
MACaddress is represented as a 12-digit number (for example, 000123456789). These filenames
are used by the phone itself to store user preference overrides and logging information.
receive calls, you must specify a SIP server address and a registration address (the equivalent of a
phone number) in the configuration files.
Note that as of Polycom UC Software 4.0.0, you can create user-specific configuration files that enable
phone users to use their features and settings from any phone including those outside of your
organization. To create a user-specific file, create a <user>.cfg on the provisioning server for the user
(including default user accounts). For more information, see Set User Profiles.
Polycom, Inc. 78
Page 79

Polycom® UC Software Administrator’s Guide 5.1.0
The figure Network Layout Using Centralized Provisioning shows an example of a phone network using
the centralized provisioning method.
Network Layout Using Centralized Provisioning
Polycom, Inc. 79
Page 80

Polycom® UC Software Administrator’s Guide 5.1.0
Settings: Use the .cfg extension on the master configuration file.
The master configuration file must have the .cfg extension. No other configuration files must have
the .cfg extension.
Settings: Pay Attention to Per-Phone File Names
Do not use the following names as extensions for per-phone files: <MACaddress>-phone.cfg,
<MACaddress>-Web.cfg, <MACaddress>-app.log, <MACaddress>-boot.log, or
<MACaddress>-license.cfg. These filenames are used by the phone to store override files and
logging information.
Understand the Master Configuration File
The centralized provisioning method requires you to use a master configuration file, named
00000000000.cfg in the UC Software download. You can use the default master configuration file or you
can create and rename a master configuration file to apply to phones in a network in one of the following
ways:
● To all of the phones in a deployment
● To a group of phones in a deployment
● On a per-phone basis (to a single phone)
● In a specific location
Each of these ways is described next in more detail.
● Default master configuration file For deployments in which the configuration is identical for all
phones, you can use the default master configuration file, named 000000000000.cfg in the UC
Software download, to configure all the phones in a deployment. Note that the phones are
programmed to look first for their own <MACaddress>.cfg file and if a phone does not find a
matching file, it looks next for the default file. If you do create and use a per-phone master
configuration file, make a copy of the default file and rename it.
● Group and per-phone master configuration file If you want to apply features or settings to a
group of phones within your deployment or to a single phone, make a copy of the default file and
rename it. For a phone group, rename the file in a way that specifies the group-specific features or
settings. For single phones, rename the file based on the phone’s MAC address
<MACaddress>.cfg. The MAC address, also known as the serial number (SN), is a unique a-f
hexadecimal digit assigned to each phone. Note that you can use only lower-case digits, for
example, 0004f200106c.cfg. You can find the MAC address of a phone on a label on the back of
the phone or on the phone’s menu system at Menu > Status > Platform > Phone > S/N:.
● Specified master configuration file You can specify a master configuration file in the
provisioning server address, for example, http://usr:pwd@server/dir/example1.cfg. The filename
must end with .cfg and be at least five characters long. If this file cannot be downloaded, the phone
will search for a per-phone master configuration file, described next.
Polycom, Inc. 80
Page 81

Polycom® UC Software Administrator’s Guide 5.1.0
Settings: Order of the Configuration Files
The order of the configuration files listed in CONFIG_FILES is significant:
The files are processed in the order listed (left to right).
If the same parameter is included in more than one file or more than once in the same file,
the first (left) parameter read is used.
The figure Default Fields in the Master Configuration File shows default available fields in the master
configuration file, 000000000000.cfg.
Default Fields in the Master Configuration File
The following describes each of the master configuration file XML attributes and the APPLICATION
directories.
● APP_FILE_PATH The path name of the UC Software application executable. The default value is
sip.ld. Note that the phone automatically searches for the sip.ld and <part number>.sip.ld. This field
can have a maximum length of 255 characters. If you want the phone to search for a sip.ld file in a
location other than the default or use a different file name, or both, you can modify the default. For
example, you can specify a URL with its own protocol, user name and password such as
http://usr:pwd@server/dir/sip.ld.
● CONFIG_FILES Enter the names of your configuration files here as a comma-separated list.
Each file name has a maximum length of 255 characters and the entire list of file names has a
maximum length of 2047 characters, including commas and white space. If you want to use a
configuration file in a different location or use a different file name, or both, you can specify a URL
with its own protocol, user name and password, for example,
ftp://usr:pwd@server/dir/phone2034.cfg.
Polycom, Inc. 81
Page 82

Polycom® UC Software Administrator’s Guide 5.1.0
● MISC_FILES A comma-separated list of files. You can use this to list volatile files that you want
phones to download, for example, fonts, background images, or ringtone .wav files. The phone
downloads files you list here when booted, which can decrease access time.
● LOG_FILE_DIRECTORY An alternative directory to use for log files if required. A URL can also
be specified. This is blank by default.
● CONTACTS_DIRECTORY An alternative directory to use for user directory files if required. A
URL can also be specified. This is blank by default.
● OVERRIDES_DIRECTORY An alternative directory to use for configuration overrides files if
required. A URL can also be specified. This is blank by default.
● LICENSE_DIRECTORY An alternative directory to use for license files if required. A URL can
also be specified. This is blank by default.
● USER_PROFILES_DIRECTORY An alternative directory for the <user>.cfg files.
● CALL_LISTS_DIRECTORY An alternative directory to use for user call lists if required. A URL
can also be specified. This is blank by default.
● COREFILE_DIRECTORY An alternative directory for Polycom
®
VVX® business media phones
and Polycom® SoundStructure® VoIP Interface core files when you want to debug problems. This is
blank by default.
The directories labeled APPLICATION_SPIPXXX indicate phone models that are not compatible with the
latest UC Software version. If you are using any of the phone models listed in these directories, open the
directory for the phone model you are deploying, and use the available fields to provision and configure
those phones.
Understand Variable Substitution
The master configuration template file, included in the UC Software files you download from the Polycom
Voice Support Web site, is particularly important to the central provisioning method, which Polycom
recommends using for large-scale deployments. There are two methods you can use to provision or
configure phones with the master configuration file. The method you use depends on your deployment
scenario. Understanding both methods enables you to deploy and manage your phones efficiently. For a
detailed explanation of the two methods and their advantages, see Best Practices 35361: Provisioning
with the Master Configuration File.
You can also use variable substitution if you need to use different application loads on different phones
on the same provisioning server by creating a variable in the master configuration file that is replaced by
the MAC address of each phone when it reboots. You can use any of the following substitution strings:
● PHONE_MODEL
● PHONE_PART_NUMBER
● PHONE_MAC_ADDRESS
To find out the model number or part number of a product, see the section Product, Model, and Part
Number Mapping.
The following two examples illustrate the use of a variable substitution.
Polycom, Inc. 82
Page 83

Polycom® UC Software Administrator’s Guide 5.1.0
Web Info: Using the Master Configuration File
Using a variable substitution may simplify your overall provisioning. For a more detailed discussion
of using a variable substitution in the master configuration file, see Best Practices 35361:
Provisioning with the Master Configuration File.
Example One
You can create a variable in the master configuration file that is replaced by the MAC address of each
phone when it reboots as shown in the figure MAC Address Variable.
MAC Address Variable
Polycom, Inc. 83
Page 84

Polycom® UC Software Administrator’s Guide 5.1.0
Troubleshooting: Locating Duplicate Parameters
To check whether a parameter is located in more than one template file, locate the parameter in the
reference section Configuration Parameters.
Name
Description
Deployment Scenarios
applications.cfg
For applications, browser, microbrowser, XMPAPI
Typical Hosted Service Provider
Typical IP-PBX
device.cfg
Network Configuration parameters. See
Network Interfaces Menu (Ethernet Menu).
Troubleshooting
Administrative settings
Example Two
You can direct phone update to a UC Software build and configuration files based on the phone model
number and part number as shown in the figure Provisioning with Model and Part Numbers. All XML
attributes can be modified in this manner.
Provisioning with Model and Part Numbers
Use the Template Configuration Files
You will find a number of template configuration files in the Polycom UC Software 5.0 download. Most
configuration parameters are located in only one template file; however, some are included in two or more
files. If you are using a parameter that is duplicated in another file, be aware that configuration files are
read from left to right and the phone uses the file it reads first.
The table Configuration File Templates outlines each template file included with UC Software 5.1.0.
Configuration File Templates
Polycom, Inc. 84
Page 85

Polycom® UC Software Administrator’s Guide 5.1.0
Name
Description
Deployment Scenarios
features.cfg
Features related enabling corp directory USB
recording, CMA, presence, ACD, for example
Typical Hosted Service Provider
Typical IP-PBX
firewall-nat.cfg
Firewall parameters
H323.cfg
H.323 video use
Typical Hosted Service Provider using
VVX 1500 for video calls
lync.cfg
Microsoft Lync parameters
Typical Microsoft Lync Environment
reg-advanced.cfg
Advanced call server, multi-line phones
Typical Hosted Service Provider
Typical IP-PBX
reg-basic.cfg
Basic registration
Simple SIP device
Typical Hosted Service Provider
region.cfg
Non-North American geographies
Typical Hosted Service Provider
Typical IP-PBX
sip-basic.cfg
Basic call server
Simple SIP device
Typical Hosted Service Provider
sip-interop.cfg
Advanced call server, multi-line phones
Typical Hosted Service Provider
Typical IP-PBX
site.cfg
Multi-site operations
Typical Hosted Service Provider
Typical IP-PBX
techsupport.cfg
Available by special request from Polycom
Customer Support.
Troubleshooting
video.cfg
VVX 500, 600, and 1500 video
Typical Hosted Service Provider if using
VVX 1500 for video calls
Along with the templates, UC Software 5.0 includes an XML schema file—polycomConfig.xsd—that
provides information like parameters type (boolean, integer, string, and enumerated type), permitted
values, default values, and all valid enumerated type values. View this template file with an XML editor.
A string parameter, boolean, and enumerated parameters are shown in the following figures String
Parameter, Boolean Parameter, and Enumerated Parameter.
String Parameter
Polycom, Inc. 85
Page 86

Polycom® UC Software Administrator’s Guide 5.1.0
Tip: Using Blank Values and Special Characters in the Configuration Files
The UC Software interprets Null as empty; that is, attributeName="".
Boolean Parameter
Enumerated Parameter
Change Configuration Parameter Values
The configuration parameters available in the UC Software use a variety of values, including Boolean,
integer, enumerated types, and arrays (a table of values). Each parameter available in the UC Software is
listed in alphabetical order along with a description, the default value, and permissible values in the
section Configuration Parameters.
Note that the values for boolean configuration parameters are not case sensitive. The values 0, false,
and off are inter-changeable and supported. The values 1, true, and on are interchangeable and
supported. This Administrator’s Guide documents only 0 and 1.
The following rules apply when you set a parameter with a numeric value outside of its valid range:
● If the configuration file’s value is greater than the allowable range, the maximum value is used.
● If the configuration file’s value is less than the allowable range, the minimum value is used.
● If a parameter’s value is invalid, the value is ignored. Invalid parameters values can occur when
enumerated type parameters do not match a pre-defined value, when numeric parameters are set
to a non-numeric values, when string parameters are either too long or short, or when using null
strings in numeric fields. All such situations are logged in the phone’s log files.
To enter special characters in a configuration file, enter the appropriate sequence using an XML editor:
● & as &
● ” as "
Polycom, Inc. 86
Page 87

Polycom® UC Software Administrator’s Guide 5.1.0
● ’ as '
● < as <
● > as >
● random numbers as &0x12;
Customize Parameters for a Phone Model
You can customize a set of parameter values for a specific phone model by appending the PHONE
MODEL NUMBER descriptor to the parameter. For a list of all phone model names that you can use to
create phone-specific configurations, see Product, Model, and Part Number Mapping.
For example:
● mb.main.home=http://www.myserver.com/index.xhtml
● mb.main.home.SPIP560=http://www.myserver.com/ip560.xhtml
● mb.main.home.SSIP6000=http://172.24.44.41/
In this example, all phone models except the SoundPoint IP 560 and SoundStation IP 6000 will use
myserver.com as the microbrowser home page. The SoundPoint IP 560 will use ip560.html and the
SoundStation IP 6000 will use the server located at 172.24.44.41/.
Some configuration parameters cause the phone to reboot or restart when change its value. To find out if
a parameter reboots or restarts a phone when changed, locate the parameter in
Polycom, Inc. 87
Page 88

Polycom® UC Software Administrator’s Guide 5.1.0
Caution: Deprecated Configuration Parameters
Polycom may deprecate configuration parameters that some organizations may still be using—
deprecated parameters will not work. To check whether or not you are using deprecated
configuration parameters, see the latest Polycom UC Software Release Notes on Latest Polycom
UC Software Release or check the Release Notes for earlier software versions on Polycom UC
Software Support Center.
Admin Tip: Updating UC Software on a Single Phone
You can use the Software Upgrade tool in the Web Configuration Utility to update the UC Software
version running on a single phone. For detailed information, see Feature Profile 67993: Using the
Software Upgrade Tool in the Web Configuration Utility.
Web Info: Using the Web Configuration Utility
For more detailed help navigating and using the Web Configuration Utility, see the Polycom
Web Configuration Utility User Guide.
Configuration Parameters. Parameters that reboot or restart the phone are marked with a superscript (1or
2
).
Provision with the Web Configuration Utility
The Web Configuration Utility enables you to perform configuration changes on a per-phone basis. You
can use the Web Configuration Utility as the sole configuration method or in addition to centralized
provisioning. If you are provisioning more than ten or twenty phones, Polycom recommends using
centralized provisioning as your primary configuration method.
Note that configuration changes made to individual phones using the Web Configuration Utility will
override configuration settings made with central provisioning. Configuration changes made using a
phone’s user interface will override settings made using the Web Configuration Utility. If you want to
remove changes made using the Web Configuration Utility, click the Reset to Default button on any page
in the Web Configuration Utility. This section shows you how to access the Web Configuration Utility.
You can access the Web Configuration Utility using any of the following Web browsers:
● Microsoft
● Mozilla
®
Internet Explorer 7.0 or later
®
Firefox® 3.0.X or later
● Google Chrome™ 10.0.X or later
● Apple
®
Safari® 5.0.4 or later
Note that as of UC Software 4.0.0, the Web Configuration Utility has been updated, the user interface has
been made more user-friendly, and more configuration parameters are available. The Web Configuration
Polycom, Inc. 88
Page 89

Polycom® UC Software Administrator’s Guide 5.1.0
Utility comes with built-in contextual help functions that provide you with information and guidance on how
to perform basic phone configuration changes. In addition, you can display the interface of the Web
Configuration Utility in one of several languages that you can choose once you are logged in.
Access the Web Configuration Utility
You can access the Web Configuration Utility by entering the phone's IP address in a supported Web
browser, for example, http://<phone IP address>. If you are a user, log in as User; the default password is
123. If you are an administrator, log in as Admin; the default password is 456.
If you are registering your Polycom phones with Lync Server, phone access to the Web Configuration
Utility is disabled by default and must be enabled by an administrator. For details on enabling the Web
Configuration Utility when using Lync Server, see the section Enable Access to the Web Configuration
Utility in Deploying Polycom® UC Software with Microsoft® Lync™ Server.
To access the Web Configuration Utility:
1 Select one of the supported Web browsers.
Get your phone’s IP address. On the phone, press the Menu key and select Status > Platform >
Phone. Scroll down to see the IP address.
2 Enter your phone’s IP address in the browser’s address bar (as shown next).
Polycom, Inc. 89
Page 90

Polycom® UC Software Administrator’s Guide 5.1.0
A web page similar to the one shown next displays.
3 Log in as Admin—the default administrative password is 456.
A web page similar to the one shown next displays.
Use the main menu to navigate through the available settings. The sidebar on the right gives you
description of the each page, contextual field help, and the parameter for each setting.
Polycom, Inc. 90
Page 91

Polycom® UC Software Administrator’s Guide 5.1.0
Settings: Some Web Configuration Parameters Do Not Reset
Device.* parameters (for example, device.syslog) that you configure using the Web Configuration
Utility will not be saved in the <MACaddress>-Web.cfg override file.
Note: Don’t Confuse Language Files
The languages folder located in both the combined and split UC Software versions is not to be
confused with the language files for the phone interface, which are located in the
SoundPointIPLocalization folder. To save memory on the phone, Polycom recommends that you
save only the Web Configuration Utility language files that you need to the languages folder you
created in your provisioning server.
To remove the configuration changes made through the Web Configuration Utility:
1 Navigate to the Reset Web Configuration menu on the phone (Menu > Settings > Advanced >
Admin Settings > Reset to Defaults > Reset Web Configuration).
2 Press the Yes soft key.
Your phone may reboot. All web overrides are removed.
Choose Language Files for the Web Configuration Utility Interface
In the same way you can choose a language for your phone, you can choose a language for viewing the
Web Configuration Utility interface. Polycom provides a number of XML language files that you can
download from the Polycom UC Software 5.0 package to your provisioning server. By default, the
SoundPoint IP, SoundStation IP, and VVX phones display the Web Configuration Utility in English only. If
you want these phones to display the Web Utility interface in a language other than English, you need to
copy the corresponding XML language file from the languages folder to your provisioning server. This
section shows you how to copy the Web Configuration Utility language files to your provisioning server so
that phone users can use the Web Configuration Utility interface in the language of their choice.
Certain languages available on Polycom phones use an expanded character set and more memory than
other language files. On average, the XML language files for the Web Configuration Utility interface are
about 250KB in size. To conserve memory resources, Polycom recommends using only those XML
language files for the languages you need. If you want to make multiple languages available to your
users, you may need to manage the phone’s memory resources. For tips on how to do this, see Manage
the Phone’s Memory Resources.
To save XML language files to your provisioning server:
1 Create a new folder named languages on your provisioning server. This is the folder the
provisioning server will read to apply language files to the interface of the Web Configuration Utility.
If you need help setting up your provisioning server, see Set Up the Provisioning Server.
2 Download and unzip the UC Software package. You will find all of the language files for the Web
Configuration Utility interface in a folder named languages.
Polycom, Inc. 91
Page 92

Polycom® UC Software Administrator’s Guide 5.1.0
Troubleshooting: Managing the Phone’s Memory Resources
If your selected language will not display, even after you have placed it on the provisioning server
and you have rebooted the phone, your phone may have reached its available memory limit. If this
occurs, you may need to take steps to manage your phone’s available memory resources. For tips
on how to manage the phone’s memory, refer to Manage the Phone’s Memory Resources.
3 Copy the XML language file from the languages folder you downloaded from the software files to
the languages folder you created on your provisioning server. For example, if you want the Web
Configuration Utility to support French and German, copy
Website_dictionary_language_fr-fr.xml and Website_dictionary_language_dede.xml to the languages folder you created on your provisioning server.
4 Log in to the Web Configuration Utility and select a language from the Languages drop-down menu
at the top-right of the screen, as shown next.
The interface of the Web Configuration Utility displays in the language you select. If the language
does not display, ensure that you have extracted and saved the correct language file, or try
rebooting the phone.
Phone User Interface – Menu System Settings
In addition to centralized provisioning and the Web Configuration Utility, you can use the phone’s user
interface to change provisioning settings and phone features. As with the Web Configuration Utility, the
phone menu system makes some settings available to users and further settings available to
administrators.
Polycom, Inc. 92
Page 93

Polycom® UC Software Administrator’s Guide 5.1.0
Settings: Resetting Phone UI Configuration Settings
Configuration made using the phone’s user interface will override settings made via the provisioning
server configuration files and the Web Configuration Utility. To remove settings made using the
phone’s user interface, go to Reset Local Configuration menu on the phone.
Timesaver: Phone User Interface Menu System
For a map diagram of all menu settings available from the phone user interface, see Polycom UC
Software Menu System.
To access administrator settings, such as provisioning values, you will need to enter an administrative
password. On the phone user interface, you enter this password in the Settings menu. Note that you can
use an administrator password where a user password is required, but a user cannot access
administrator settings with a user password. The default user password is 123 and the default
administrative password is 456. If you are an administrator and you want to secure the administrative
settings from the phone’s user interface, change the default administrative password. See Local User and
Administrator Passwords.
Polycom, Inc. 93
Page 94

Set Up Basic Phone Features
After you set up your Polycom® phones with a default configuration on the network, phone users will be
able to place and receive calls. However, you may want to add features to the default configuration to suit
your organization and user’s needs. Polycom provides basic and advanced features that you can
configure for the phones to add efficiency and convenience. This section will show you how to configure
all available basic phone features and call management features.
Before you begin configuring phone features, take the time to read the short introductory section Read
the Feature Parameter Tables. This section provides important information you need to know in order to
successfully perform configuration changes.
Basic Phone Features at a Glance
This section shows you how to make configuration changes for the following basic features:
● Configure the Call Logs Contains call information such as remote party identification, time and
date, and call duration in three separate lists, missed calls, received calls, and placed calls.
● Understand the Call Timer Maintains a timer, in hours, minutes, and seconds, for each call in
progress.
● Configure Call Waiting Alerts Visually presents an incoming call on the screen, and plays a
configurable sound effect, when you're in another call.
● Called Party Identification Displays and logs the identity of the party in an outgoing call.
● Configure Calling Party Identification Displays a caller’s identity, derived from the network
signaling, when an incoming call is presented—if the information is provided by the call server.
● Connected Party Identification Displays and logs the identity of the party to whom you are
connected to (if the name is provided by the call server).
● Distinctive Incoming Call Treatment Automatically applies distinctive treatment to calls containing
specific attributes.
● Apply Distinctive Ringing Enables you to select a ring tone for each line, as well as a ring tone for
contacts in the contact directory.
● Apply Distinctive Call Waiting Enables you to map calls to distinct call waiting types.
● Configure Do Not Disturb Temporarily stops incoming calls.
● Configure the Headset and Speakerphone SoundPoint IP and VVX phones have a handset and a
dedicated headset connection (headset not supplied). All SoundPoint IP, SoundStation IP, and
VVX phones have full-duplex speakerphones.
● Use the Local Contact Directory The phone maintains a local contact directory that can be
downloaded from the provisioning server and edited locally. Any edits to the Contact Directory
made on the phone are saved to the provisioning server as a backup.
● Configure the Local Digit Map The phone has a local set of rules to automate the setup phase of
number-only calls.
● Microphone Mute Mutes the phone’s microphone so other parties cannot hear you. When the
microphone mute feature is activated, an icon displays on the phone’s screen.
Polycom, Inc. 94
Page 95

Polycom® UC Software Administrator’s Guide 5.1.0
● Enable Persistent Mute Have the mute state of your phone persists across calls.
● Configure the Speed Dial Feature Enables you to place calls quickly from dedicated keys as well
as from a speed dial menu.
● Set the Time and Date Display Time and date can be displayed in certain operating modes such
as when the phone is idle and during a call.
● Add an Idle Display Image Displays a custom animation on the phone's idle display.
● Ethernet Switch Connect your phone to a PC or a LAN.
● Set a Graphic Display Background Enables you to display a picture or graphic on the screen's
background.
● Connect Polycom VVX Expansion Modules Connect VVX expansion modules to your Polycom
VVX business media phones to add additional lines to your VVX phones
● Generate Configured Line Key Information Use the Web Configuration Utility to generate a PDF
file with the line key configuration for each paper display expansion module connected to your VVX
phone.
● Configure Smart Paging Enable automatic arrangement of line key assignments and page
distribution on the VVX Color Expansion Modules.
● Enable Automatic Off-Hook Call Placement Supports an optional automatic off-hook call
placement feature for each registration.
● Configure Call Hold Pauses activity on one call so that you can use the phone for another task,
such as making or receiving another call.
● Use Call Transfer Transfers a call in progress to some other destination.
● Create Local and Centralized Conferences You can host or join local conferences or create
centralized conferences using conference bridge numbers. The advanced aspects of conferencing,
like managing parties, are part of the Productivity Suite.
● Enable Conference Management Add, hold, mute, and remove conference participants, and
obtain information about participants.
● Configure Call Forwarding Provides a flexible call forwarding feature to forward calls to another
destination.
● Configure Directed Call Pick-Up and Enable Group Call Pickup Enables you to pick up calls to
another phone by dialing the extension of the other phone. Calls to another phone within a predefined group can be picked up without dialing the extension of the other phone.
● Configure Call Park and Retrieve Park an active call—puts it on hold to a specific location, so it
can be retrieved by any phone.
● Enable Last Call Return Automatically redials the number of the last received call.
Configure the Call Logs
The phone records and maintains phone events to a call log, also known as a call list. These call logs
contain call information such as remote party identification, time and date of the call, and call duration.
The log is stored as a file in XML format named <MACaddress>-calls.xml to your provisioning server. If
you want to route the call logs to another server, use the CALL_LISTS_DIRECTORY field in the master
configuration file. You can use the call logs to redial previous outgoing calls, return incoming calls, and
Polycom, Inc. 95
Page 96

Polycom® UC Software Administrator’s Guide 5.1.0
Tip: Merged Call Lists
On some phones, missed and received calls display in one call list. In these combined lists, you can
identify call types by the icons:
Missed call icon
Received call icon
Central Provisioning Server
template > parameter
Enable or disable the missed call list
features.cfg > feature.callListMissed.enabled
Enable or disable the placed call list.
features.cfg > feature.callListPlaced.enabled
Enable or disable the received call list
features.cfg > feature.callListReceived.enabled
save contact information from call log entries to the contact directory. All call logs are enabled by default.
See the table Configure the Call Logs for instructions on how to enable or disable the call logs.
The phones automatically maintain the call logs in three separate call lists: Missed Calls, Received Calls,
and Placed Calls. Each of these call lists can be cleared manually by individual phone users. You can
delete individual records or all records in a group (for example, all missed calls). You can also sort the
records or filter them by line registration.
The call lists on the SoundPoint IP and SoundStation IP phones will not be cleared or deleted when the
phone reboots. As of Polycom UC Software 4.0.1, the VVX 500 and 1500 phones will remember the
previous call history after a restart or reboot.
Configure the Call Logs
Polycom, Inc. 96
Page 97

Polycom® UC Software Administrator’s Guide 5.1.0
Element
Permitted Values
direction
In, Out
Call direction with respect to the user.
disposition
Busy, Forwarded, Normal, Partial, Preempted,
Rejected, RemotelyHandled, Transferred
What happened to the call. When a call entry is first created, the disposition is set to Partial.
line
Positive integer
The line (or registration) index.
protocol
SIP or H323
The line protocol.
startTime
String
The start time of the call. For example: 2010-01-05T12:38:05 in local time.
Example Call Log Configuration
The following illustration shows you each of the call log parameters you can enable or disable in the
features.cfg template file.
The table Call Log Elements and Attributes describes each element and attribute that displays in the call
log. Polycom recommends using an XML editor such as XML Notepad 2007 to view and edit the call log.
Note that you can place the elements and attributes in any order in your configuration file.
Call Log Elements and Attributes
Polycom, Inc. 97
Page 98

Polycom® UC Software Administrator’s Guide 5.1.0
Element
Permitted Values
duration
String
The duration of the call, beginning when it is connected and ending when the call is terminated.
For example: PT1H10M59S.
count
Positive Integer
The number of consecutive missed and abandoned calls from a call destination.
destination
Address
The original destination of the call.
For outgoing calls, this parameter designates the outgoing call destination; the name is initially supplied by the local
phone (from the name field of a local contact entry) but may later be updated via call signaling. This field should be
used for basic redial scenarios.
For incoming calls, the called destination identifies the requested party, which may be different than any of the
parties that are eventually connected (the destination may indicate a SIP URI which is different from any SIP URI
assigned to any lines on the phone).
source
Address
The source of the call (caller ID from the call recipient’s perspective).
Connection
Address
An array of connected parties in chronological order.
As a call progresses, the connected party at the far end may change, for example, if the far end transfers the call to
someone else. The connected element allows the progression of connected parties, when known, to be saved for
later use. All calls that contain a connected state must have at least one connection element created.
finalDestination
Address
The final connected party of a call that has been forwarded or transferred to a third party.
Central Provisioning Server
template > parameter
Understand the Call Timer
A call timer displays on the phone’s screen. A separate call duration timer displays the hours, minutes,
and seconds of each call in progress.
There are no related configuration changes.
Configure Call Waiting Alerts
By default, the phone will alert you to incoming calls while you are in an active call. As shown in the table
Configuring Call Waiting Alerts, you can disable call waiting alerts and you can specify the ringtone of
incoming calls.
Configuring Call Waiting Alerts
Polycom, Inc. 98
Page 99

Polycom® UC Software Administrator’s Guide 5.1.0
Enable or disable call waiting
sip-interop.cfg > call.callWaiting.enable
Specify the ringtone of incoming calls when you are in an active call
sip-interop.cfg > call.callWaiting.ring
Example Call Waiting Configuration
The following illustration shows you where to disable call waiting alerts and how to change the ringtone of
incoming calls in the sip-interop.cfg template.
Called Party Identification
By default, the phone displays and logs the identity of parties called from the phone. The phone obtains
called party identity from the network signaling. Because Called Party Identification is a default state, the
phone will display caller IDs matched to the call server and does not match IDs to entries in the Local
Contact Directory or Corporate Directory.
There are no related configuration changes.
Polycom, Inc. 99
Page 100

Polycom® UC Software Administrator’s Guide 5.1.0
Note: Automatic Caller ID Scrolling on SoundPoint IP 321, 331, and 335 Phones
As of Polycom UC Software 3.3.0, when the SoundPoint IP 321, 331, and 335 phones receive
incoming calls, the caller ID will automatically scroll from left to right. Auto-scrolling stops once the
call is connected, but you can use the left and right arrow keys to scroll manually.
Central Provisioning Server
template > parameter
Substitute the network address ID with the Contact Directory name
reg-advanced.cfg > up.useDirectoryNames
Override the default number of calls per line key for a specific line
reg-advanced.cfg > reg.x.callsPerLineKey
Web Configuration Utility
Specify whether or not to substitute the network address with the Contact Directory name. Navigate to
Preferences > Additional Preferences > User Preferences.
Configure Calling Party Identification
By default, the phone displays the identity of incoming callers if available to the phone through the
network signal. If the incoming call address has been assigned to the contact directory, you can choose
to display the name you assigned there. Note that the phone cannot match the identity of calling parties to
entries in the Corporate Directory.
Configuring Calling Party Identification
Polycom, Inc. 100
 Loading...