

Plantronics Savi W740-M, Savi W740, Savi W745, Savi W745A, Savi W740A-M User Manual
...
Savi® W740-M
Multi Device Wireless Headset System
User Guide

Contents
Welcome 4
System Requirements 4
What's in the Box 5
Base and Headset Basics 6
Accessories 7
Customize Your Headset 8
Install the Headset Battery 8
Use the Fit Kit to Assemble Your Headset 8
Right Over-the-Ear Assembly 8
Left Over-the-Ear Assembly 8
Position Your Headset 9
Over-the-Head Assembly 10
Behind-the-Head Assembly 10
Charge Your Headset 12
Desk Phone: Connect and Call 13
Choose Desk Phone Setup 13
Make a Desk Phone Call 14
Mobile: Connect and Call 15
Computer: Connect and Call 16
Connect Your Computer 16
Place a Softphone Call 16
Position Your Base 16
Headset Features 17
Headset Controls 17
Headset Power 17
Headset Battery Level 18
Mute your Headset During a Call 18
Adjust Your Headset Volume 18
Turn On/Off Headset LED 19
Out of Range Warning Tones 19
Base Features 20
Base Buttons 20
Base Subscription Button 20
Set the Range 21
Bluetooth Pairing Button 21
Daily Use 23
Incoming Calls 23
Outgoing Calls 23
Multi-Phone Status 25
Mobile Phone and Headset Audio 25
Listening to Other PC Audio 25
Combine Audio From Any Two Lines or Channels 25
Conference Up to Three Additional Headsets 25
Advanced Use 27
Install Plantronics Software 27
Plantronics Control panel 27
2

Devices Tab 27
Device Settings > Base Tab 28
Device Settings > Headset Tab 30
Device Settings > Security Tab 32
Applications Tab 32
Preferences 32
About Tab 33
Plantronics Update Manager 33
Troubleshooting 35
Headset 35
Desk Phone 36
Mobile 36
Softphone 36
3

Welcome
System Requirements
Congratulations on purchasing your new Plantronics product. This guide contains instructions
for setting up and using your Savi W740 Wireless Headset System which has a WO2 base and
a WH500 headset.
Please refer to the separate safety instructions for important product safety information prior
to installation or use of the product.
Computer
• Supported Operating Systems: Windows XP®, Windows Vista®, Windows® 7
• Processor: 400 MHz Pentium® processor or equivalent (Minimum); 1 GHz Pentium processor
or equivalent (Recommended)
• RAM: 96 MB (Minimum); 256 MB (Recommended)
• Hard Disk: 280 MB (Minimum); 500 MB or more (Recommended)
• Microsoft Windows XP-Service Pack 3 (SP3) or later (Recommended) Microsoft Windows VistaService Pack 1 (SP1) or later (Recommended)
Display
• At least 800 x 600, 256 colors
• 1024 x 768 high color, 32-bit (Recommended)
Browser
• Internet Explorer® V6 or better must be on the user’s system (Required)
4
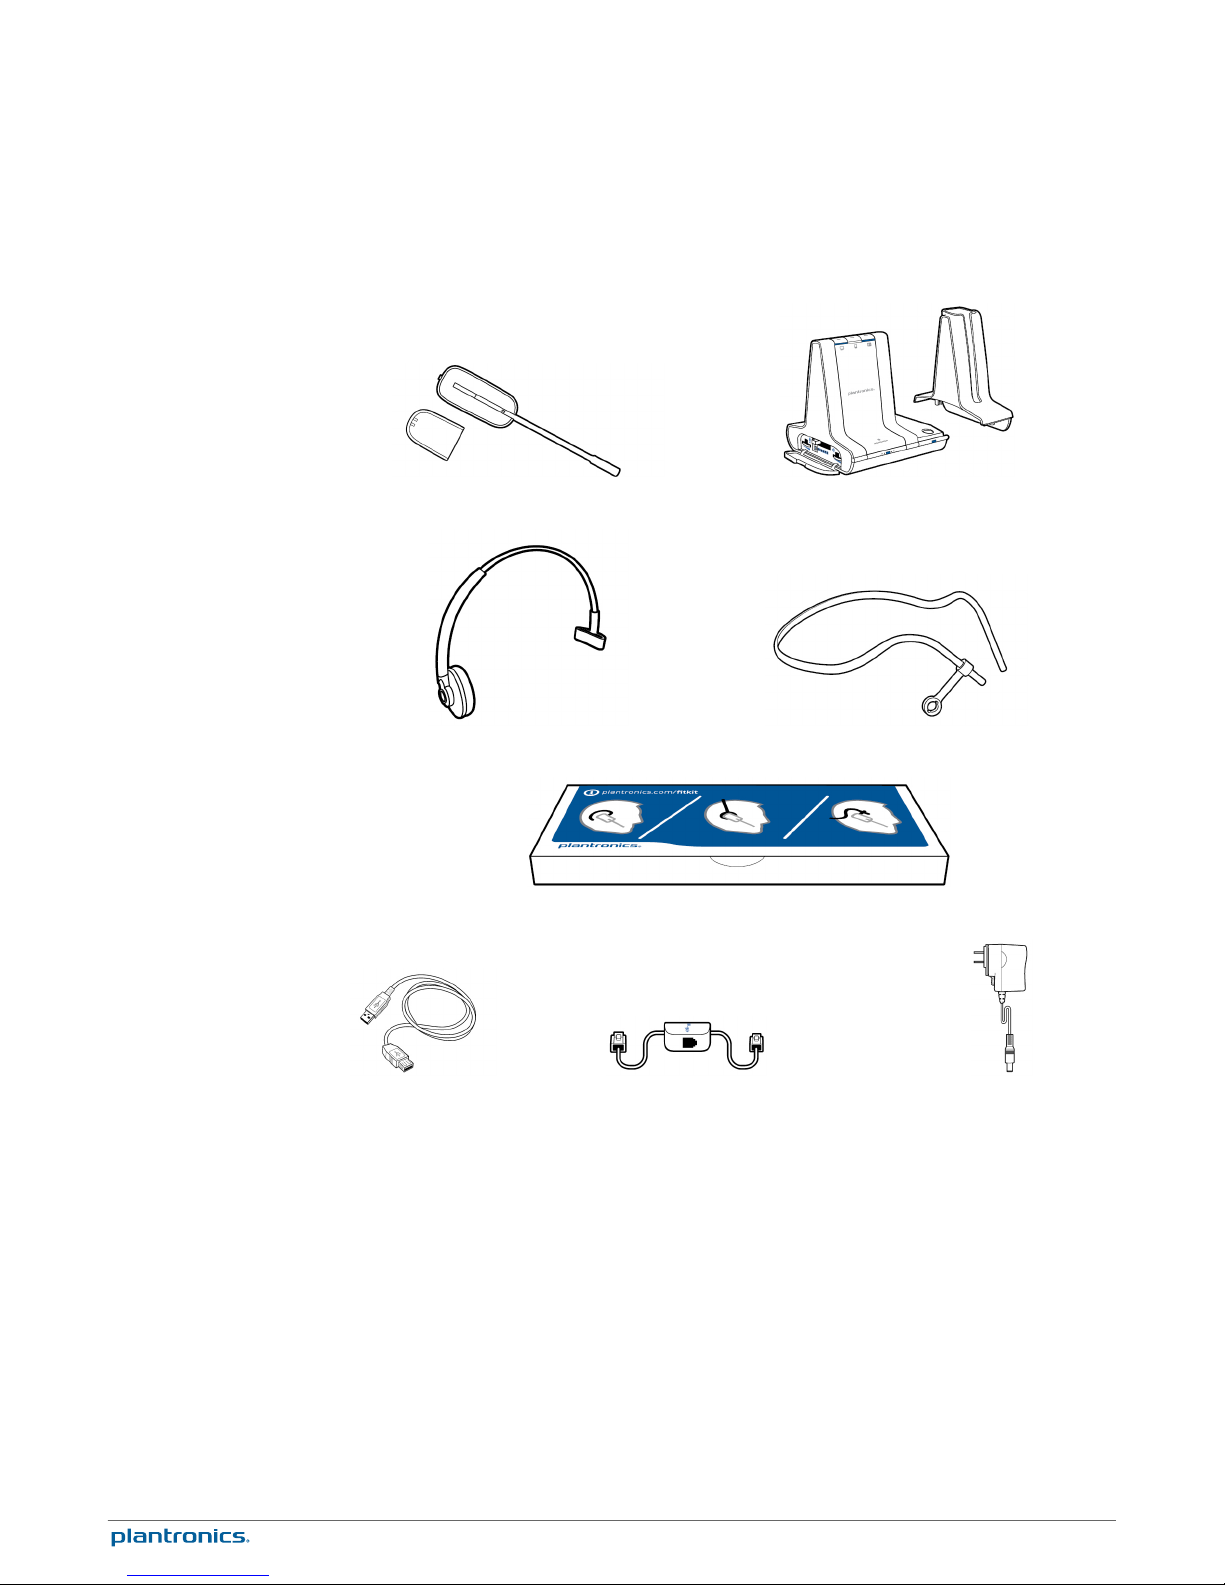
What's in the Box
Headset and battery Base and charging cradle
Over-the-head headband Behind-the-head headband
Headset fit kit with earloops, eartips and foam sleeve
USB cable Telephone interface cable Power supply
5
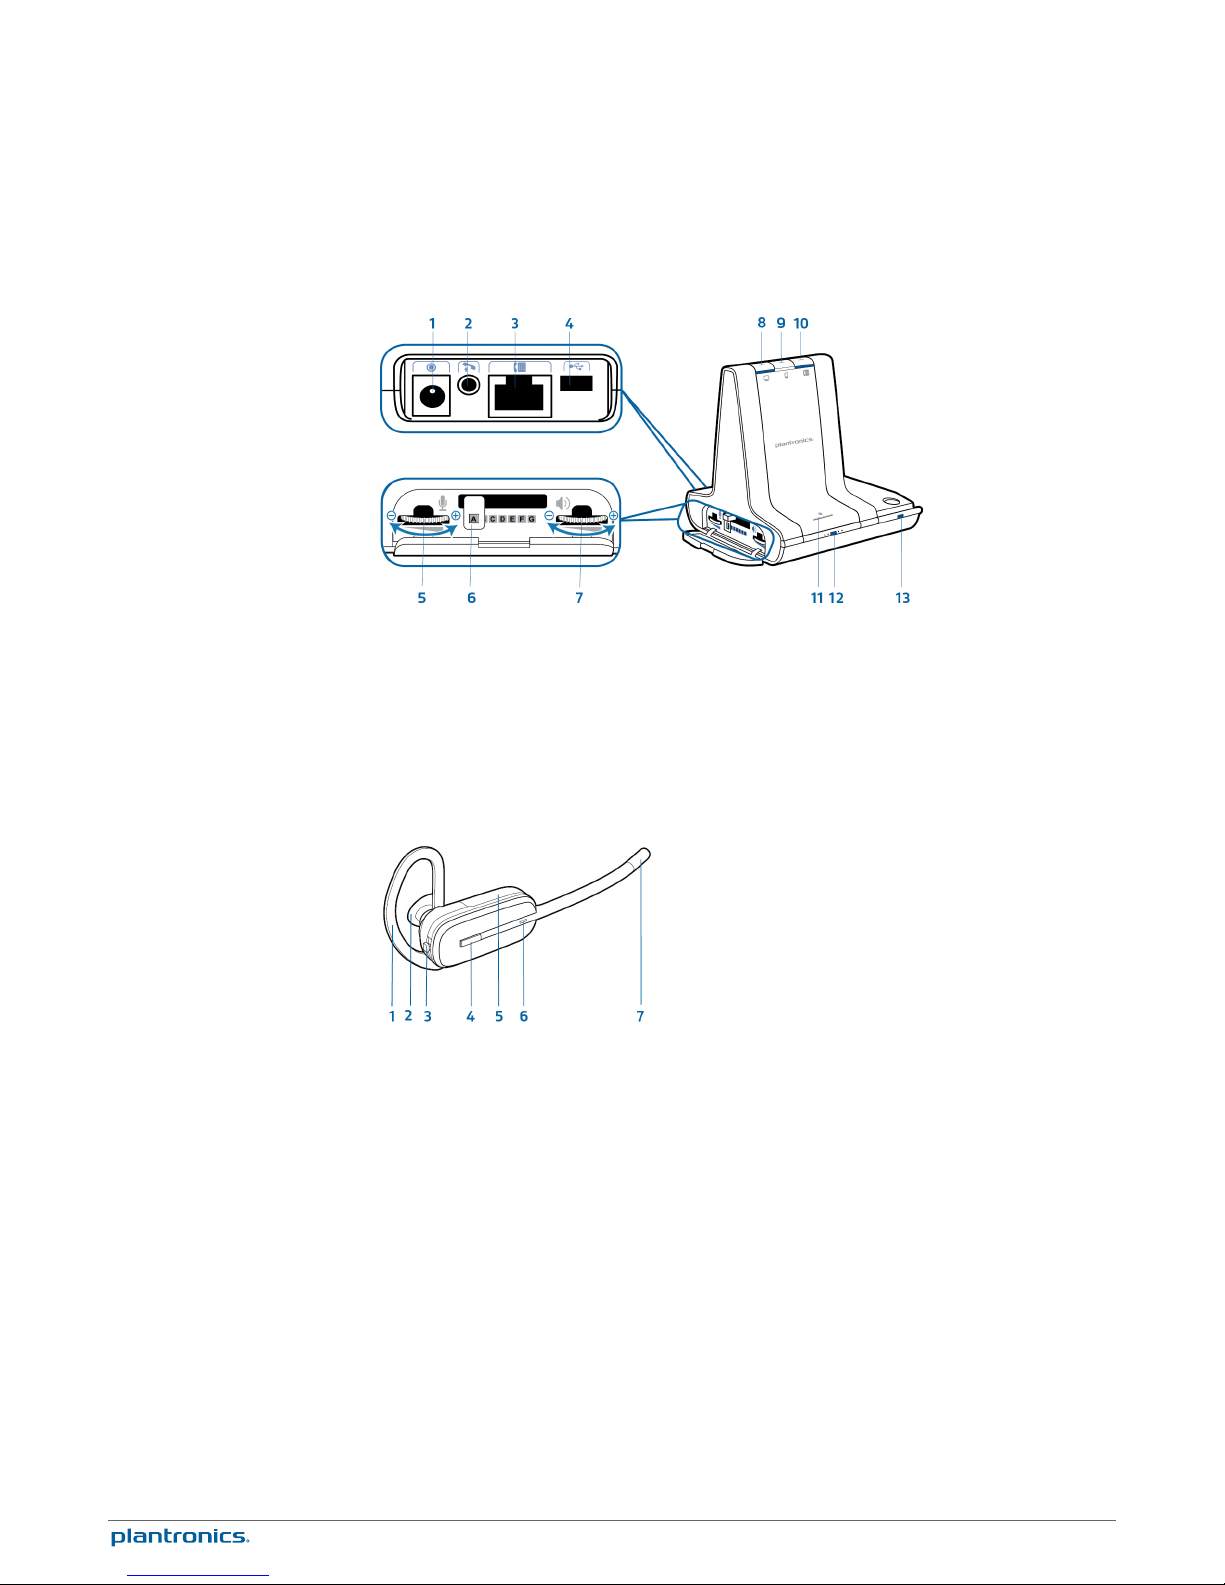
Base and Headset Basics
Base
Power jack
1
Handset lIfter jack
2
Telephone interface cable jack
3
USB port
4
Desk phone speaking volume
5
Desk phone configuration switch
6
Desk phone listening volume
7
Headset
Earloop
1
Eartip
2
Volume/Mute button
3
Call control button
4
Computer button
8
Mobile phone button
9
Desk phone button
10
Bluetooth pairing button/LED
11
Subscription button/LED
12
Charging LED
13
Battery
5
Headset LED
6
Microphone
7
6
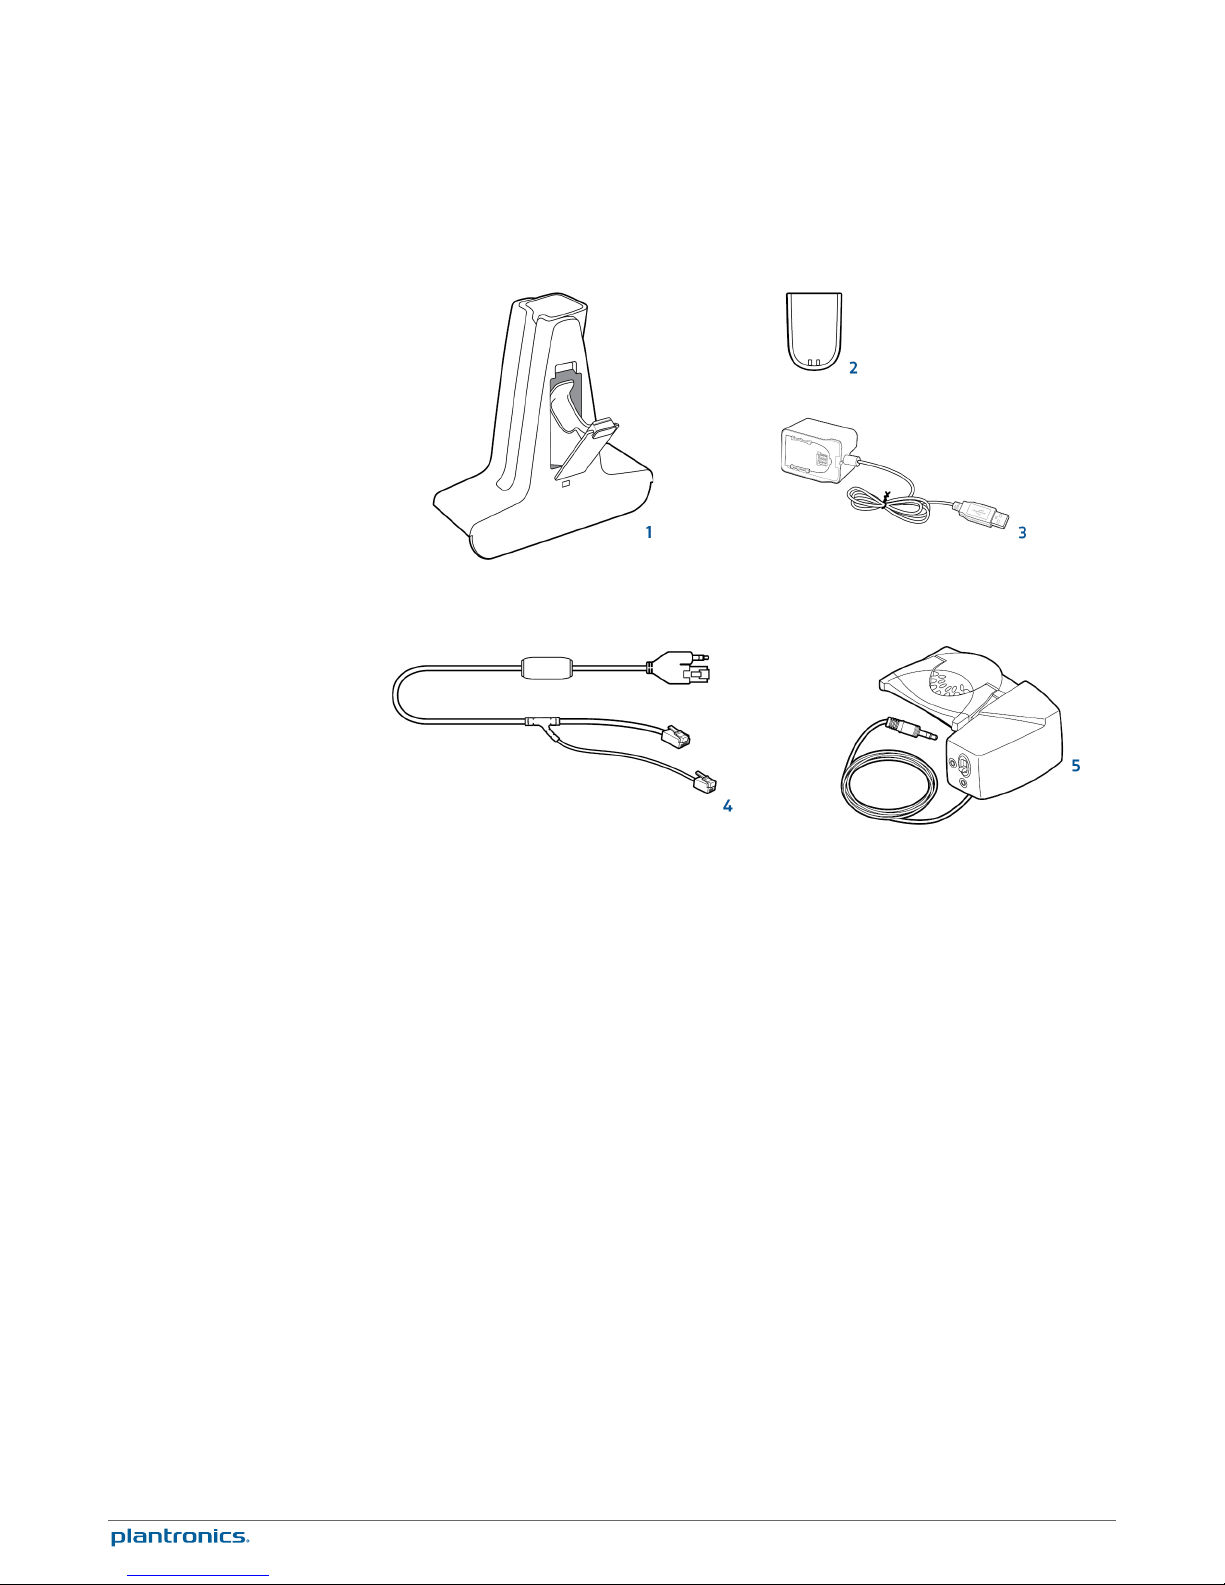
Accessories
Deluxe charging cradle Charges an extra battery while charging your headset
1
Spare battery
2
Deluxe USB charging cable Charges an extra battery while charging your headset via a USB
3
port
Electronic hookswitch cable (EHS cable) Electronically and automatically takes your desk
4
phone handset off hook. Enables remote call control with your headset.
HL10 lifter Automatically lifts handset and returns it to the cradle. Enables remote call
5
control with your headset.
7
Customize Your Headset
After you install the headset battery, choose one of the three headset
wearing styles, over-the-ear, over-the-head or behind-the-head. Use the fit
kit to assemble it and optimize the position of the microphone.
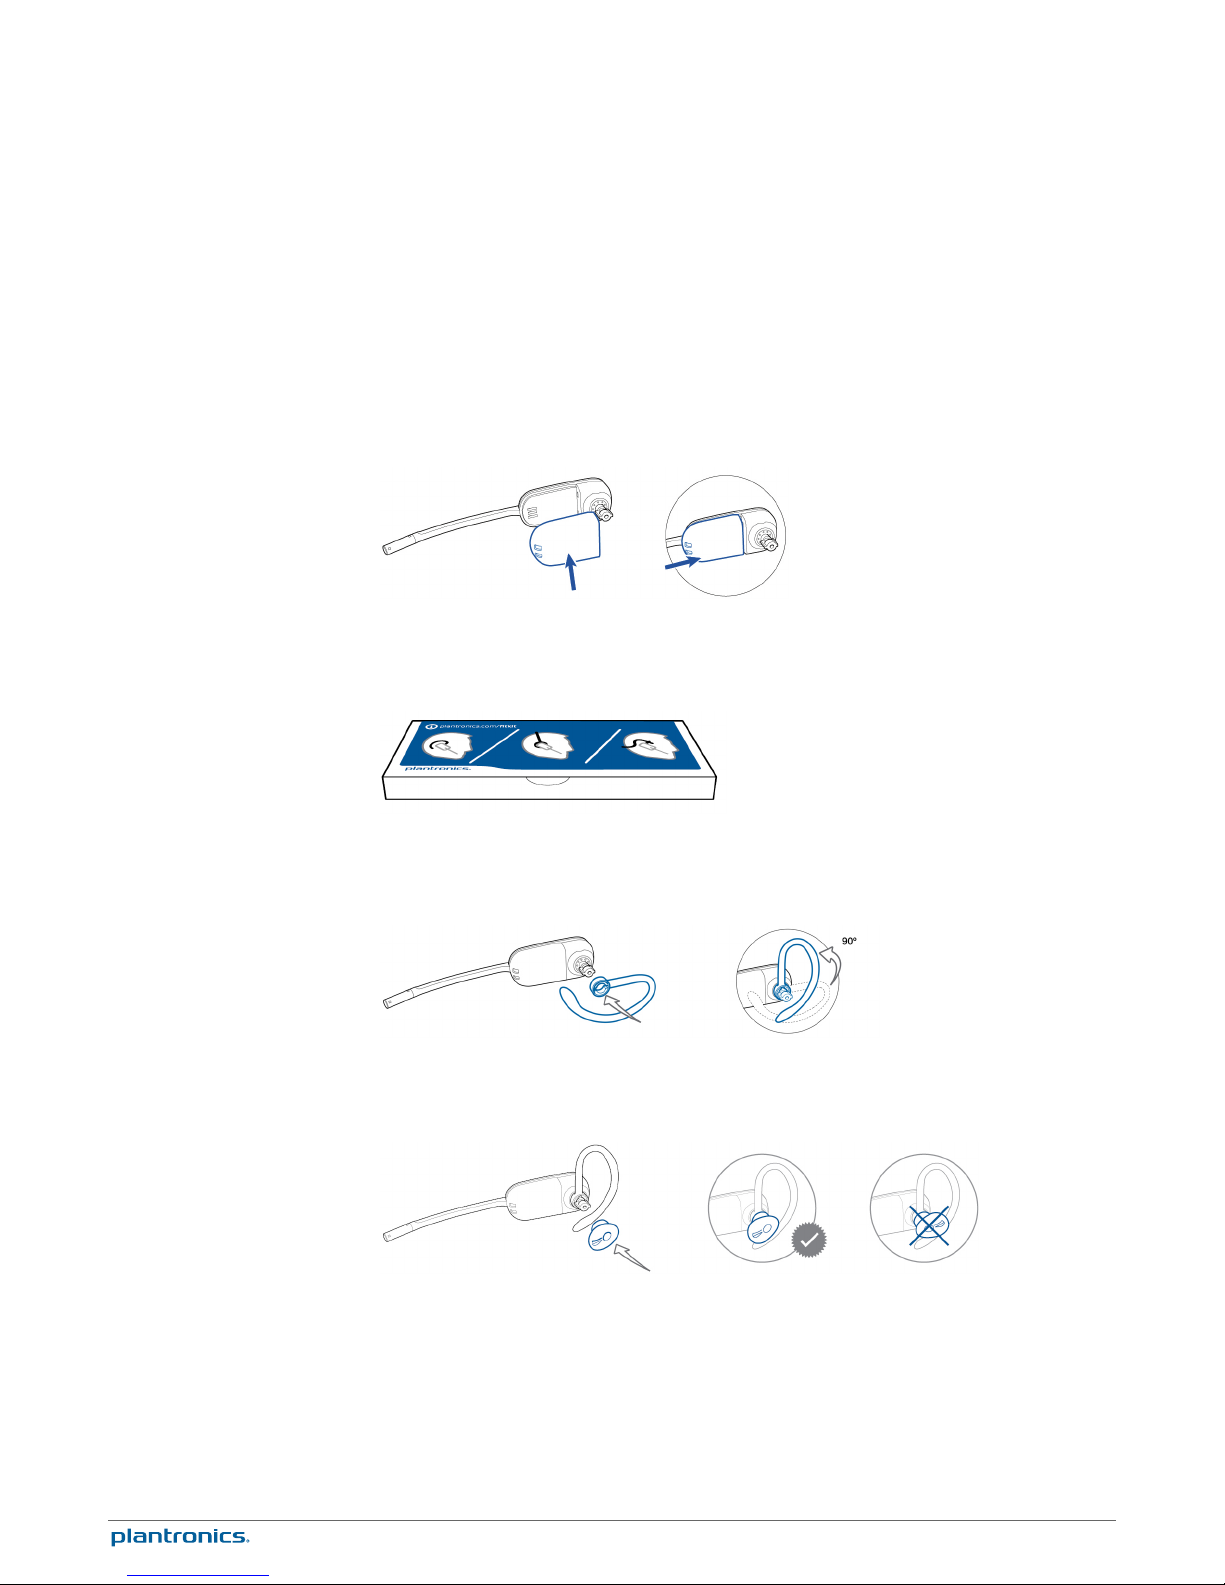
Install the Headset
Battery
Use the Fit Kit to
Assemble Your Headset
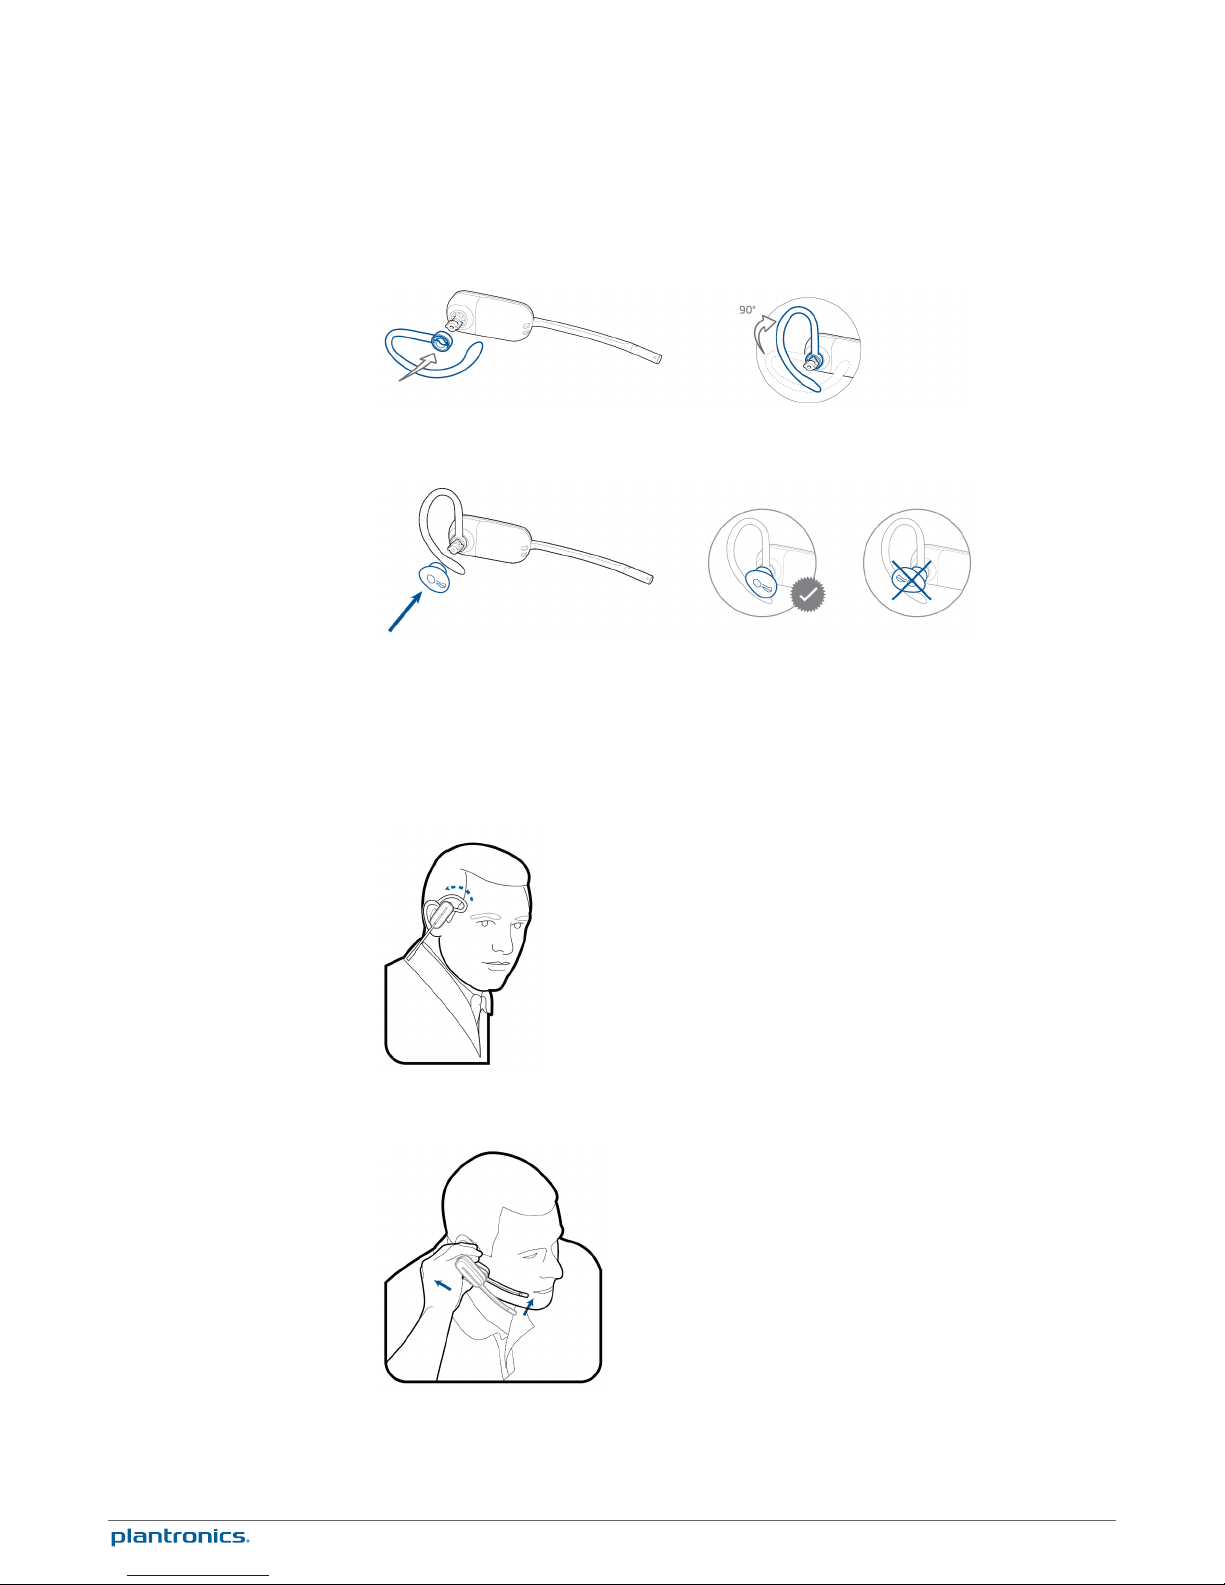
Right Over-the-Ear
Assembly
Position the battery as shown on the headset and slide into position until the battery snaps into
place.
NOTE This product has a replaceable battery. Use only the battery type supplied by Plantronics.
Choose a headset wearing style and use the fit kit to assemble it over-the-ear, over-the-head or
behind-the-head.
Choose the size of earloop that fits most comfortably. Align the earloop as shown and insert it
1
onto the headset. Rotate the earloop up 90°.
NOTE Ensure the earloop is flat against the headset before rotating.
Choose the size and style of eartip that fits most comfortably. Align the eartip with the notch
2
facing the microphone as shown. Press on to attach.
NOTE Ensure the large end of the eartip points to the microphone.
To correctly position your headset, see Position Your Headset.
3
Left Over-the-Ear
Assembly
Choose the size of earloop that fits most comfortably. Align the earloop as shown and insert it
1
onto the headset. Rotate the earloop up 90°.
8
NOTE Ensure the earloop is flat against the headset before rotating.
Choose the size and style of eartip that fits most comfortably. Align the eartip with the notch
2
facing the microphone as shown. Press on to attach.
NOTE Ensure the large end of the eartip points to the microphone.
To correctly position your headset, see Position Your Headset.
3
Position Your Headset
When you wear the headset, the microphone should rest as close to your cheek as possible
without touching. The microphone can be adjusted inward by the pivoting earpiece to optimize
the position of the headset.
Slide the headset over and behind your ear and fit the eartip into your ear.
1
Holding the base of the headset, push it in and back towards your ear to allow the pivoting
2
earpiece to bring the microphone close to your mouth. As the base of the headset moves
backwards, you will feel soft clicks until the microphone rests close to your cheek.
9
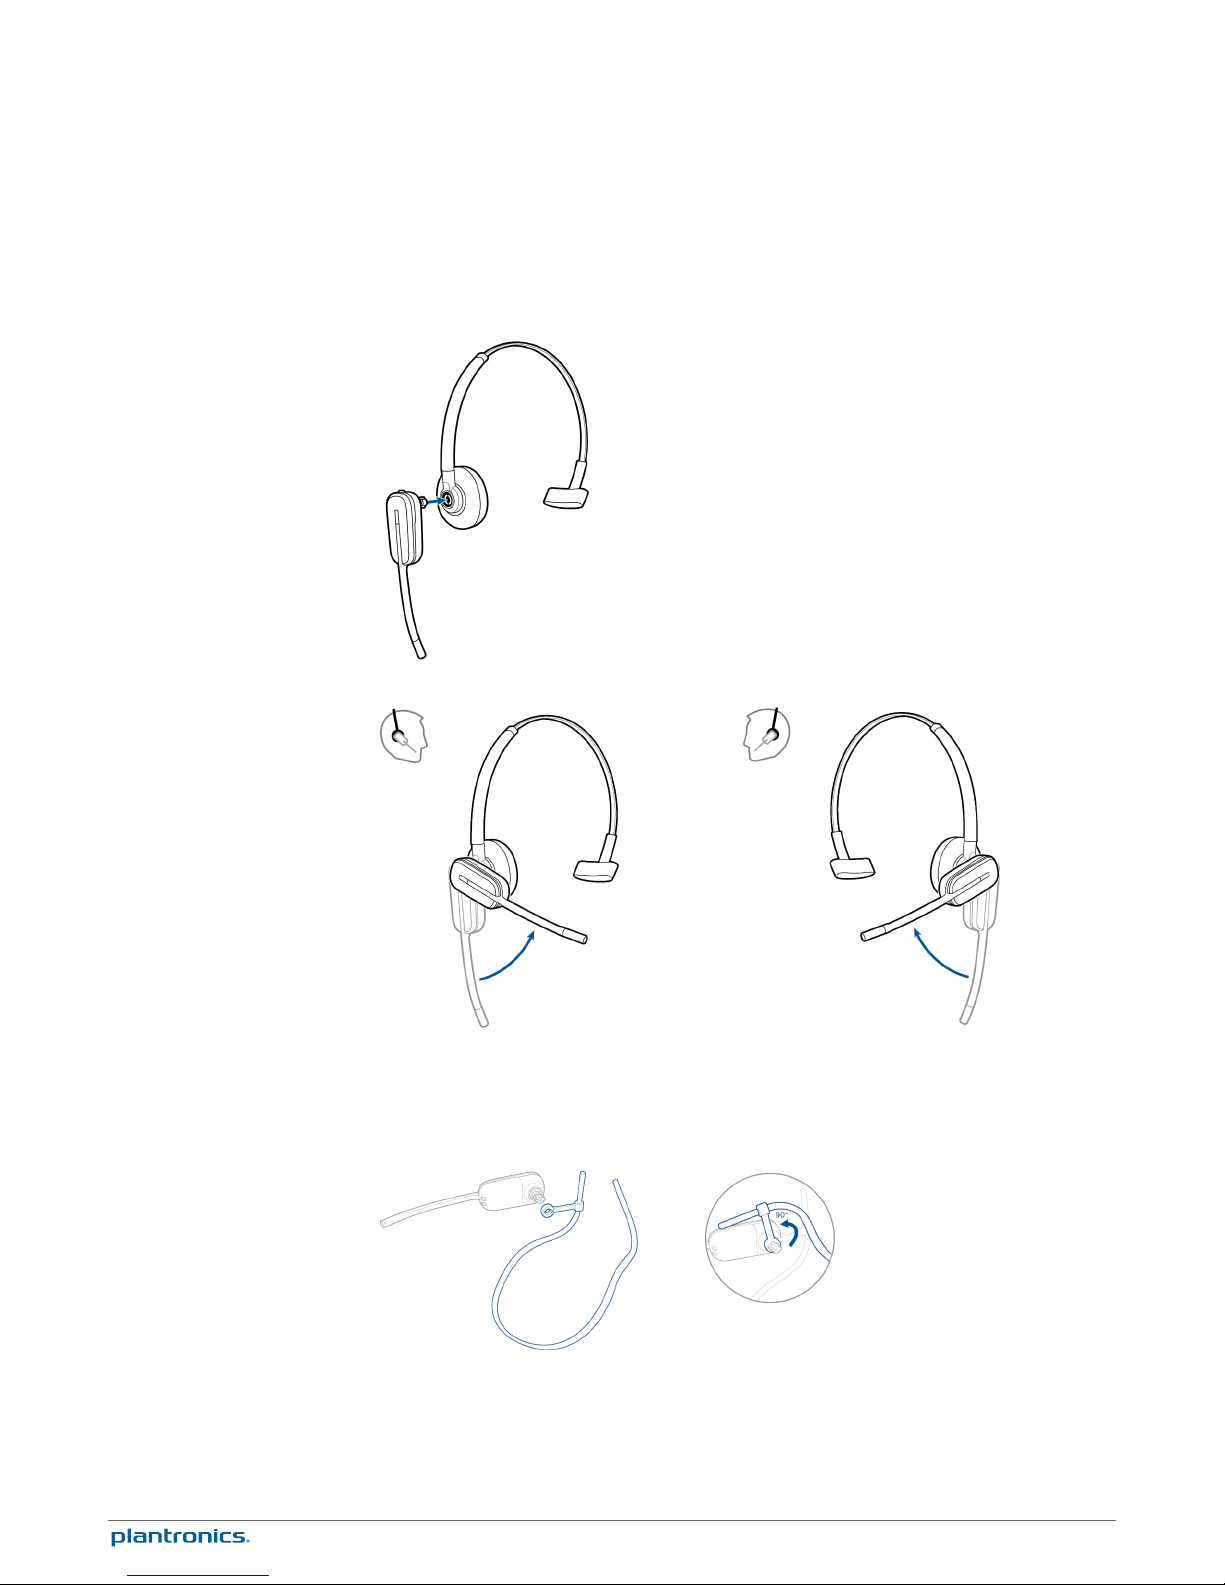
Over-the-Head Assembly
Hold the headband so it is aligned to receive the headset as shown and insert the headset into
1
the headband.
Rotate the headset up. The headband can be worn on the right or left side.
2
To optimize the position of the headset, push the headset in so the microphone is close to your
3
mouth.
Behind-the-Head
Assembly
Align the headband as shown. Ensure the headband sits flat against the headset, then rotate it
1
up 90°. If you want to wear it on the left, switch the stem to the left side of the headband.
Choose the size and style of the eartip that fits most comfortably. Align the eartip with the
2
notch facing the microphone as shown. Press on to attach.
10

NOTE Ensure the large end of the eartip points to the microphone.
To position your headset correctly, first slide the stem of the headband so the headset fits
3
comfortably.
With a finger on the headset indicator light, push in until the microphone rests as close to your
4
cheek as possible without touching.
11
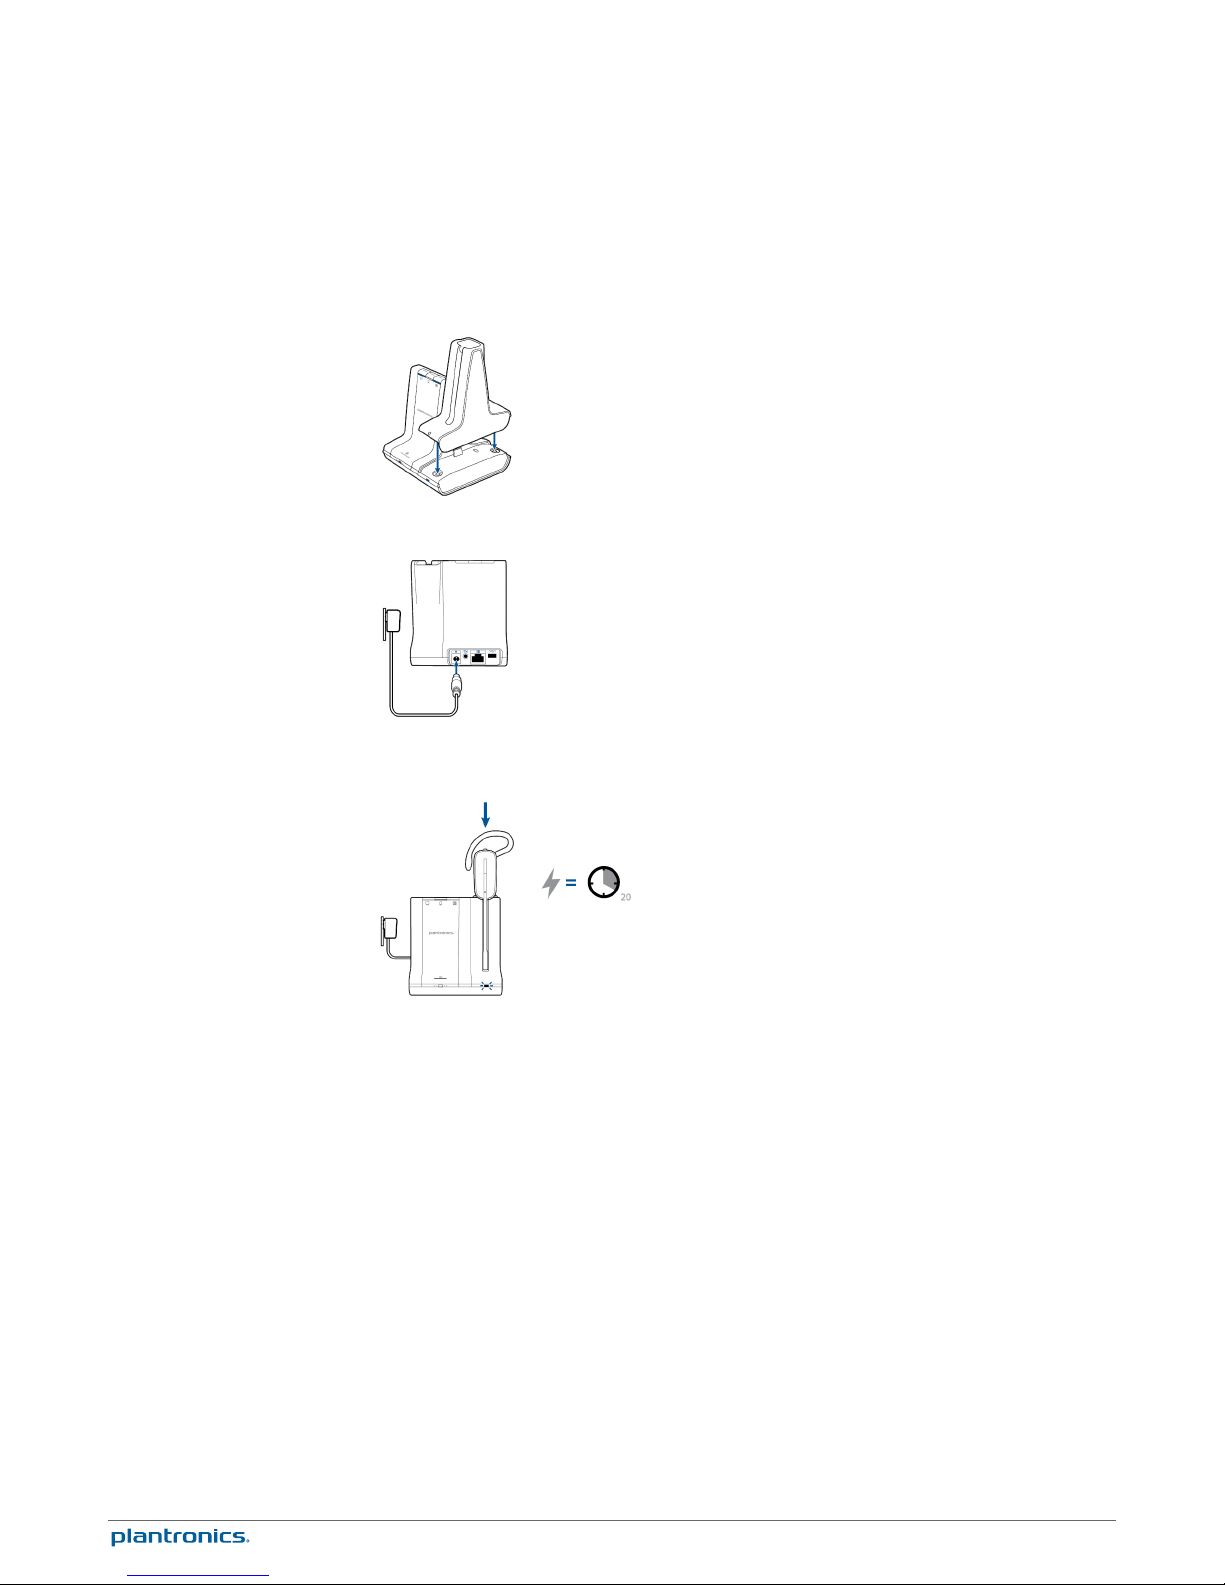
Charge Your Headset
Align the charging cradle pins with the base and press firmly until the cradle rests evenly on the
1
base.
Plug one end of power supply into power jack on back of the base and other end into working
2
power outlet.
Place the headset in the charge cradle. The charging LED will flash green when charging the
3
headset and turn solid green when the headset is fully charged. Charge for at least 20 minutes
prior to the first use. A full charge takes 3 hours.
NOTE This product has a replaceable battery. Use only the battery type supplied by Plantronics.
12
 Loading...