

Page 1

2
Plantronics
2 year Warranty
and Repair
Service
Plantronics Ltd, Interface Business Park, Bincknoll Lane, Wootton Bassett,
Wiltshire SN4 8QQ. ENGLAND
www.plantronics.com
© 2002 Plantronics Inc. All rights reserved. Plantronics, the logo design,
Plantronics and the logo design combined are registered trademarks
and Headset Switcher is a trademark of Plantronics Inc.
in the United States and various other countries.
Plantronics Ltd
Wootton Bassett, UK
Tel: 0800 410014
+ 44 1793 842200
Plantronics B.V.
Hoofddorp, The Netherlands
Tel: (0)0800 PLANTRONICS
0800 7526876 (NL)
00800 75268766 (BE/LUX)
Plantronics Sarl
Noisy-le-Grand, France
No Indigo: 0825 0825 99
+33 1 41 67 4141
Plantronics GmbH
Hürth, Germany
Tel: 0800 9323400
+ 49 22 33 3990
Österreich: 0800 242500
Schweiz: 0800 932 340
Plantronics Acoustics Italia Srl
Milan, Italy
Numero Verde: 800 950934
+ 39 02951 1900
Plantronics Iberia, S.L.
Madrid, Spain
Tel: 902 41 51 91
+ 34 91 640 47 44
Plantronics MEEA Sales Region
London, UK
Tel: +44 208 349 3579
Nordic Region
Finland 0201 550 550
Sverige 031 28 95 00
Danmark 44 35 05 35
Norge 23 17 3770
37245-01 Rev B.
Headset Switcher™
MX10 Multimedia Adapter
User Guide
• Products under warranty are
replaced free of charge.
• All units serviced to full
production standards using
original factory parts.
0800 410014
Page 2
1
6
5
4
3
2
–
+
4
3
5
6
3
WARRANTY AND SERVICE
2 4
Fig. A
Fig. D Fig. E
Fig. F
Fig. G
Fig. C
Fig. H
Fig. I
Fig. J
DIAGRAMS DIAGRAMS
•Plantronics guarantees the satisfactory condition of the
equipment with regard to manufacturing and material
defects for 2 years from the date of purchase.
(Please retain the original receipt).
•This product should be installed and used in accordance
with the instructions detailed in this user guide, and
serviced at an approved Plantronics Service Centre.
Failure to comply with these conditions may render the
warranty void.
•This does not affect your statutory rights.
Fig. B
1
2
3
3
4
4
5
5
6
6
–
+
2
3
4
5
6
1
2
3
4
3
4
5
5
6
6
–
+
2
3
4
5
6
2
1
3
4
5
1
2
3
4
5
6
–
6
+
2
2
3
4
5
6
3
4
5
6
2
3
4
5
6
Page 3
Thank you for selecting the
Headset Switcher MX10
Multimedia Adapter from
Plantronics.
The Headset Switcher MX10
Multimedia Adapter connects
your telephone and computer
or external audio device to
a Plantronics headset and
provides control of the sound
through your headset.
This user guide provides
instructions on the installation
and usage of your MX10
Multimedia Adapter.
WELCOME
Headset Switcher™
MX10 Multimedia
Adapter
www.plantronics.co.uk
Page 4

7
IMPORTANT SAFETY INFORMATION
Please read the following instructions before use:
•This product is suitable for indoor use only
•Use only the AC Adapter specified, with a power supply of the
correct voltage
•Use of battery types other than two alkaline AA or equivalent may
cause the unit to malfunction and could be hazardous
•Remove the batteries when using the AC Adapter or when the
MX10 Multimedia Adapter will not be used for more than one week
•Dispose of the batteries in accordance with local law
•Do not exceed a comfortable listening level. Do not listen to loud
material for long periods
•Do not use the MX10 with one piece telephones (i.e. telephones in
which the dial keypad is part of the handset).
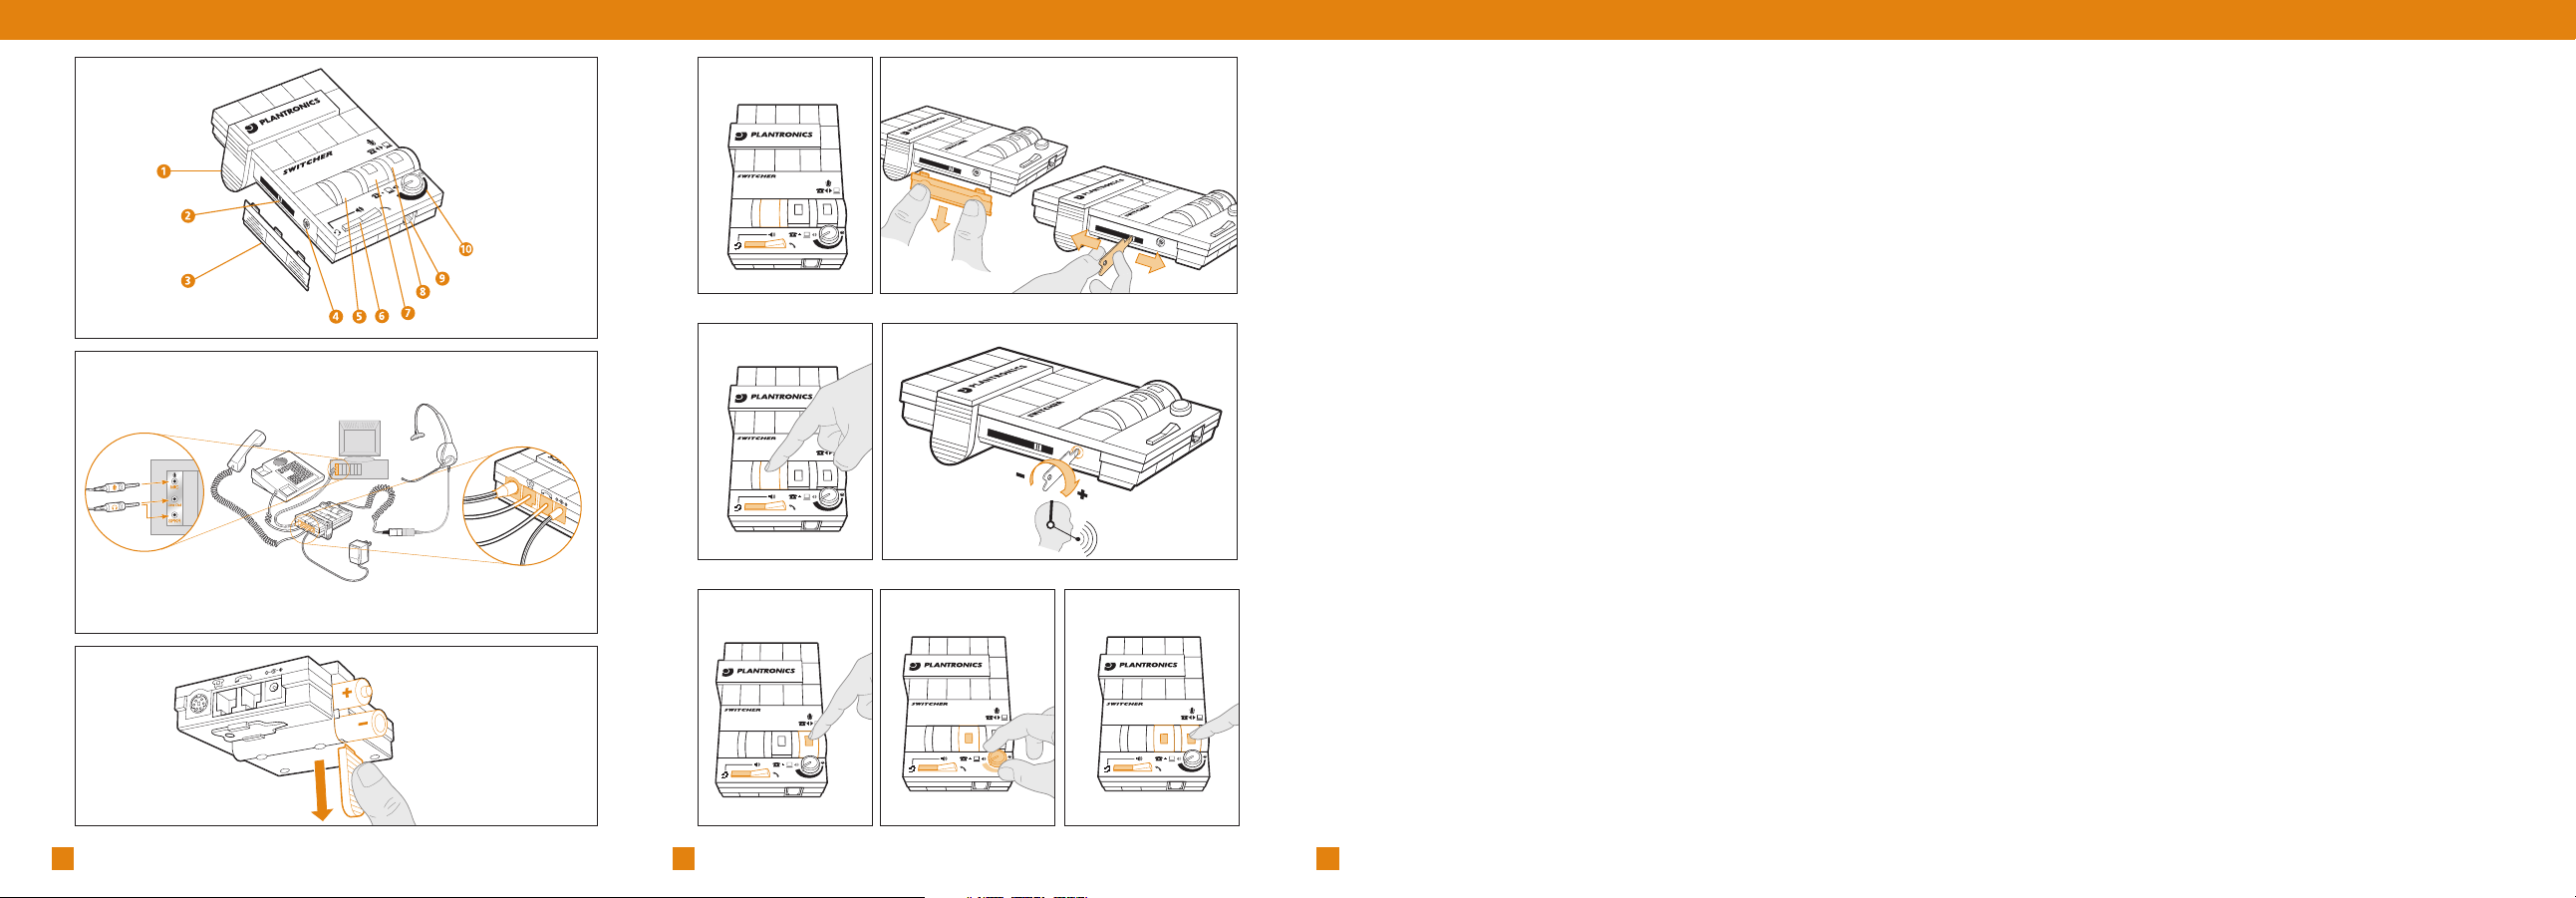
INSTALLATION
Identify the components as shown in Fig (A).
Install the MX10 Multimedia Adapter as shown in Fig (B).
We recommend the use of the AC power supply (included).
Alternatively two AA alkaline batteries (not included) may be used but
will need to be replaced frequently.
To install batteries refer to Fig (C) and follow these instructions:
1. Remove the Battery Access Door (1) located on the side of the
adapter by placing your thumb on the door and pushing down.
2. Install two AA alkaline batteries and replace the door.
3. You will hear three "beeps" through the headset when the batteries
are low.
6
1 Battery Access Door
2 Compatibility Slide Switch
3 Compatibility Slide
Switch Cover
4 Speak Volume Control
5 Listen Volume Thumbwheel
Control
6 Headset/Handset Selector
7 Telephone/Computer Audio
Switch (controls direction of
incoming sound)
8 Microphone Selection
Switch (controls direction
of microphone)
9 Headset Jack
10 External Audio Listen
Volume Control
DIAGRAM KEY DEFAULT SETTINGS
Refer to Fig (D).
These are the default switch settings for headset use:
1. Headset/Handset Selector (6) is switched to Headset.
2. Telephone/Computer Audio Switch (7) is released (no coloured
indicator showing).
3. Microphone Selection Switch (8) is released (no coloured
indicator showing).
4. Listen Volume Thumbwheel (5) is set to number 4.
5. Speak Volume Control (4) has been preset. You can adjust it when
you place your test call.
TELEPHONE/ADAPTER COMPATIBILITY
The Compatibility Slide Switch (2) has been preset to position 5, which
will work with most telephones. If adjustment is required refer to Fig (E)
and follow these instructions:
1. Remove the Compatibility Slide Switch Cover (3) by placing two
fingers or thumbs on the raised bumps and pushing down.
2. Using the flat screwdriver provided on the base of the adapter, move
the Compatibility Slide Switch (2) until you hear a clear dial tone.
Experimenting with various switch settings will not harm the adapter
or your telephone.
MAKING A TEST CALL
1. Make sure your adapter switch settings are as shown in Fig (D).
2. Put on the Headset and lift the telephone handset.
3. If a dial tone cannot be heard, adjust the Compatibility Slide
Switch (2) as described in the Telephone/Adapter Compatibility
section above.
4. Call a colleague and adjust the Listen Volume Thumbwheel
Control (5) as shown in Fig (F).
5. Adjust the Speak Volume Control (4) (how loud you sound to others)
to a comfortable level, as shown in Fig (G). The screwdriver is
provided on the base of the adapter.
6. To activate the telephone mute function press the Microphone
Selection Switch (8) as shown in Fig (H).
7. To finish the call, replace the telephone handset back on
the telephone.
Page 5

98
NOTE: Do not assume the caller cannot hear you when muted. Some soundcards
have "local loop back," which means that the caller can hear what you are
saying through the computer.
LISTENING TO EXTERNAL AUDIO
1. Make sure your adapter switch settings are as shown in Fig (I).
2. Play the external audio source and adjust the External Audio Listen
Volume Control (10) as shown in Fig (I).
3. You can make or receive a telephone call whilst listening to the
external audio source by simply lifting the telephone handset and the
adapter will automatically mix the two audio channels together. You
can adjust the listen volume of both channels independently using
the volume controls (5) & (10).
MAKING AN INTERNET TELEPHONE CALL
1. Make sure your adapter switch settings are as shown in Fig (J).
2. You are now connected to the computer soundcard and can make an
internet call.
3. If you wish to make or receive a telephone call you will need to
release the Microphone Selection Switch (8) as shown in Fig (J).
CALL RECORDING
1. Make sure your adapter switch settings are as shown in Fig (I).
2. When making or receiving a telephone call, the call may be
recorded using your external audio device or call recording software
(not included). Your side of the conversation may be quiet depending
on the model of your telephone.
Note: To control recording volume, consult your audio device user manual.
VOICE SAVER/GREETING MESSAGE
This feature enables you to pre-record a message on the external audio
device and playback the recording through the telephone line.
1. Make sure your adapter switch settings are as shown in Fig (J).
You can now record a greeting message using your PC or external
audio device.
2. When you receive a telephone call use your audio device to play
back the pre-recorded message. To take over the conversation simply
release the Microphone Selection Switch (8).
TROUBLESHOOTING
PROBLEM
I cannot hear a dial tone when I try to make or receive a phone call.
If you are using an AC Power Supply, confirm that it is plugged
in and the power outlet is turned on.
If you are using batteries, confirm that they are new and placed
in the battery compartment correctly.
Check that the Headset/Handset Selector Switch (6) is switched
to Headset.
Check that you have lifted the telephone handset out of
the cradle.
Check that the telephone handset cable and the short curly cord
to the telephone are connected in the correct jacks.
See Fig (B).
Check that the Compatibility Slide Switch (2) is in the correct
setting for your telephone. See Fig (E). You may want to try
moving the switch through all of the positions until you hear a
clear dial tone. Experimenting with various switch settings will
not harm the adapter or your telephone.
PROBLEM
Callers say that they can’t hear me at all or they can’t hear me
very well.
Make sure the microphone of your headset is
positioned in front or near your mouth. If you are
using a noise-cancelling headset, the position of
the microphone is very important.
You may need to adjust the Speak Volume Control (4).
See Fig (G).
Check that the Compatibility Slide Switch (2) is in the correct
setting for your telephone. See Fig (E). You may want to try
moving the switch through all of the positions until your caller
hears you clearly. Experimenting with various switch settings will
not harm the adapter or your telephone.
Page 6

1110
PROBLEM
I hear a low pitch hum in my headset speaker and/or my callers complain
they can hear a hum.
Move the Compatibility Slide Switch (2) between position 5
and 6 to see if the hum disappears in either position.
Ensure the External Audio Device Cable is routed away from
your monitor or other electrical device.
PROBLEM
I hear three ‘beeps’ in the headset.
If you are using batteries to power the MX10 Multimedia
Adapter, the three ‘beeps’ are telling you that the
batteries are low and need to be replaced. Refer to
the Installation section.
PROBLEM
The microphone level to my computer is too loud.
Check that the green jack plug on the external audio
device cord is plugged into the "Mic In" jack on the
soundcard.
Review your soundcard "Mixer" settings on the computer
to adjust the microphone volume.
PROBLEM
The sound from my computer is distorted.
Plug the black jack plug on the external audio device cord
into the "Line Out" jack and adjust the External Audio Listen
Volume Control (10) for comfortable volume.
PROBLEM
I am using my Headset Switcher Adapter with an audio device and no
telephone. I cannot hear the audio device.
Move the Compatibility Slide Switch (2) to position 5. Depress
the Telephone/Computer Audio Switch (7) (coloured indicator
showing). Depress the Microphone Selection Switch (8)
(coloured indicator showing).
TROUBLESHOOTING TROUBLESHOOTING
Page 7

 Loading...