

Page 1

®
NEED MORE HELP?
CALL US!
Instead of driving back to
the store, call us for help on
pairing, fit or usage of your
new headset.
1-866-363-2583
User Guide
Page 2
2
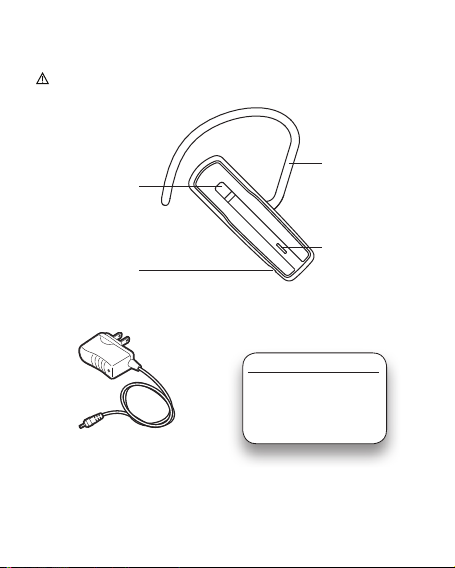
Package Contents and Features
Refer to separate Safety Guide before using headset.
Optional Earloop
One-Touch Button:
Power On/Off
Call Answer/End
Pairing Mode
Voice Dialing
Connector
for Rechargeable
Li-ion Battery
CHARGING TIME
2.5 hours ............... Full charge
Red status light glows while
charging. Do not use until
AC Charger 100 – 240V
note Never charge the battery where the temperature may fall below
32°F (0°C) or rise above 104°F (40°C). Do not use your headset while it is
connected to the charger.
(ts either ear)
LED Status Light
fully charged.
Page 3

3
What Is Bluetooth?
Bluetooth wireless technology provides a way for devices, like headsets and
phones, to communicate with each other without wires. Pairing is the set-up
process of introducing your headset to your phone. Before using your headset
for the rst time, you must pair it with your Bluetooth-enabled phone.
Plantronics QuickPair™ Technology
To simplify the Bluetooth setup process, your new headset uses Plantronics
QuickPair technology. This process is shown on the next page.
• The rst time you turn your headset on, your headset
automatically enters pairing mode for 10 minutes.
•
Until you successfully pair your headset with a Bluetooth-enabled
phone, every time you turn it on it will enter pairing mode.
• To later pair to a new phone, with the headset off, press and
hold the One-Touch Button until the LED ashes red-blue, which
indicates pairing mode status .
Range (the distance between headset and phone)
• To maintain the connection, keep your headset within 33 feet of
your phone.
• For the least amount of interference place the headset and phone
on the same side of your body.
If you move too far from your phone and lose the Bluetooth connection:
•
the headset may reconnect automatically within 60 seconds when
you move closer to your phone (you will hear a low tone), OR
• you may have to tap the One-Touch Button to reconnect (you will
hear a low tone), OR
• if neither of the above options work, you may have to reconnect
to your headset using your phone’s Bluetooth menu.
Page 4
4
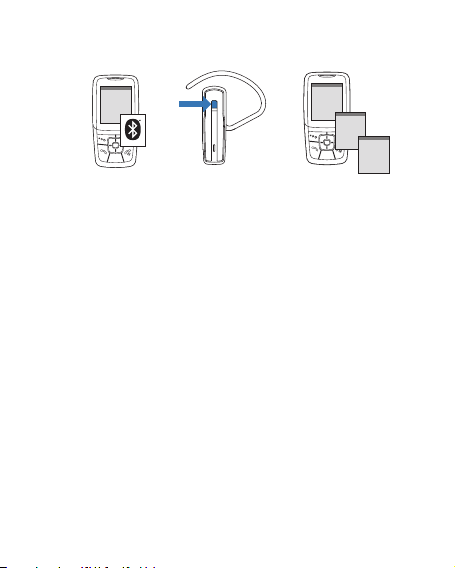
Pairing Your Headset
SETTINGS
SETTINGS
Time and Da te
Phone Settings
Bluetooth
Sound Settings
Network S erv ice s
Security
Reset Settings
BLUETOOTH
BLUETOOTH
Dis cov er/
Search
BLUETOOTH
BLUETOOTH
FreeHand 1xx
PASSKEY
0000
1
32
How to Pair Your Phone With Your Headset for the First Time
1 Turn on the Bluetooth feature on your phone.
For most phones, select Settings/Tools > Connections >
Bluetooth > On. See your phone’s user guide for more information.
2 Turn on the QuickPair feature of your headset.
Turn on your headset by pressing and holding the One-Touch Button
until the LED ashes blue, then alternately ashes red-blue.
If you don’t see these ashes, press and hold the One-Touch Button until
you see the red-blue ashes.
3 Set your Bluetooth phone to ‘discover’ to locate the headset.
This usually involves going to ‘setup,’ ‘connect,’ or ‘Bluetooth’ menu on
your phone and selecting the option to ‘discover’ or ‘add a device.’
4 Once available headsets are listed, select your headset
(FreeHand 1xx). If prompted for a passkey, enter 0000.
When pairing is successful, the status light on your headset glows blue.
Your phone will also conrm when pairing is complete.
Call Us with Questions 1-866-363-BLUE (2583)
4
Page 5

5
descending tones
high tone
On: Four rising tones then one
Off: High tone then four
turns off
On: Short blue ash
Off: Short red ash, then
end of the call.
No tone. Phone rings until
answered.
seconds when battery is critically
low. Charge immediately.
Blue ash every 2 seconds
until the call is ended.
None None
None Single low tone
None
range. Single high tone when
back in range. Single low tone
when manually or automatically
reconnected.
seconds until dismissed.
None 2 high tones when leaving
None Single low tone
Action Status Light Tone
Headset Controls and Indicators
Press and hold the
One-Touch Button for
Turn the headset
on or off
3 seconds.
Tap the One-Touch But ton. None Brief tone at the beginning or
Answer/end
Enter the number on your
a call
Make a call
phone and press Send.
None Red ashing Five rapid high tones every 10
Battery level
Use your phone to adjust
or lower volume.
While the call is in progress,
press and hold the One-
Adjust the volume
Transfer a call from
headset to phone,
Touch Button until you hear
a tone.
Tap One-Touch But ton Triple blue ash every 20
Press One-Touch Button
once to manually reconnect.
or from phone to
headset
Dismiss missed
call indicator
Out of range
Headset will automatically
attempt to reconnect when
in range.
Press and hold One-Touch
Voice dial
Button until you hear a tone.
Page 6

6
Troubleshooting
My headset
does not work
with my phone.
Callers cannot
hear me, or I
cannot hear
callers/dialing
tone.
My headset is
flashing red
then blue
Your headset may not have been in pairing mode when your phone
was searching for it. Repeat the pairing process on page 4.
You may have made incorrect menu selections on your phone while
pairing. Repeat the pairing process on page 4.
Make sure the headset is turned on.
Your headset may be out of Bluetooth range or experiencing
interference. Move the headset closer to your phone, and make sure
your headset and phone are on the same side of your body.
Your headset battery is drained. Recharge the battery using the
supplied AC power adapter.
The listening volume is too low. Increase the volume on your phone.
Your headset is in Pairing mode. If you are not trying to pair the
headset, reset it by simply turning headset off then on again.
Otherwise, see Pairing on page 4.
Page 7

7
Product Specifications
Talk Time*
Standby Time*
Charge Time
Range
Power Requirements
Battery Type
Storage/Usage
Temperature
Version
* Battery enabled. Performance may vary by device.
Up to 6.5 hours
Up to 6 days
2.5 hours for full charge
Up to 33 feet (10 meters) away from phone
5V DC – 180 mA
Rechargeable lithium ion polymer
32º F - 104º F (0º C - 40º C)
2.0 + EDR (Enhanced Data Rate)
Supports your phone’s Bluetooth Hands-free (HFP) and
Headset (HSP) proles.
Page 8

FFeeddeerraall CCoommmmuunniiccaattiioonnss CCoommmmiissssiioonn ((FFCCCC)) SSttaatteemmeenntt
1155..2211
You
are cautioned that changes or modifications not expressly approved by the part
responsible for compliance could
1155..110055((bb))
This
equipment has been tested and found to comply with the limits for a Class B digital
device,
pursuant to part 15 of the FCC rules. These limits are designed to provide
reasonable
protection against harmful interference in a residential installation. This
equipment
generates, uses and can radiate radio frequency energy and, if not installed and
used
in accordance with the instructions, may cause harmful interference to radio
communications. However, there is no guarantee that interference will not occur in a
installation. If this equipment does cause harmful interference to radio or
particular
television reception, which can be determined by turning the equipment off and on, the user
is encouraged to try to correct the interference by one or more
-Reorient or relocate the receiving antenna.
-Increase the separation between the equipment and receiver.
t the equipment into an outlet on a circuit different from that to which the receiver is
-Connec
connected.
-Consult the dealer or an experienced radio
void the user’s authority to operate the equipment.
of the following measures:
/TV technician for help.
8
Page 9

This device complies with Part 15 of the FCC Rules.Operation is subject to the following
two conditions:
1) this device may not cause harmful interference and
2) this device must accept any interference received, including interference that may cause
undesired
operation of the device.
FFCCCC RRFF RRaaddiiaattiioonn EExx ppoossuurree SSttaatteemmeenntt::
This equipment complies with FCC radiation exposure limits set forth for an uncontrolled
End users must follow the specific operating instructions for satisfying RF
environment.
exposure
compliance. This transmitter must not be co-located or operating in conjunction
with any other antenna or transmitter.
9
Page 10

Industry Canada (IC) Statement
15.21
You a
re cautioned that changes or modifications not expressly approved by the
part
responsible for compliance could void the user’s authority to operate the
equ
ipment.
15.105(b)
equipment has been tested and found to comply with the limits for a Class
This
B digital device, pursuant to part 15 of the IC rules. These limits are designed to
provide reasonable p
installation. This
energ
y and, if not installed and used in accordance with the instructions, may
ca
use harmful interference to radio communications. However, there is no
guarantee
equ
ipment does cause harmful interference to radio or television reception,
can be determined by turning the equipment off and on, the user is
which
encouraged
measur
es:
* Reorient or relocate the receiving antenna .
* Increase the separation between the equipment and receiver.
* Connect the equipment int o an outlet on a circuit different from
to which the receiver is connected.
that
* Consult the dealer or an experienced radio/TV technician for help.
ion is subject to the following two conditions:
Operat
this device may not cause interference and
1)
2)
this device must accept any interference, including interference that may
use undesired operation of the device.
ca
IC RF Radiat
This
equipment complies with IC radiation exposure limits set forth for an
uncontrolled environ
uctions for satisfying RF exposure compliance. This transmitter must not be
instr
co-l
ocated or operating in conjunction with any other antenna or transmitter.
rotection against harmful interference in a residential
equipment generates, uses and can radiate radio frequency
that interference will not occur in a particular installation. If this
to try to correct the interference by one or more of the following
ion Exposure Statement:
ment. End users must follow the specific operating
10
Page 11

Freehand 100
3115593
CONFORMS TO ANSI/UL STD. 60950-1
CERTIFIED TO CAN/CSA STD. C22.2 NO. 60950-1
11
Page 12

12
 Loading...