

Page 1

Voyager® Legend UC
Wireless Headset System (B235 and
B235-M)
User Guide
Page 2

Contents
Welcome 3
Featured highlights 3
System Requirements for Plantronics Spokes ™ Software 3
What's in the box 4
Overview 5
Headset 5
Bluetooth USB Adapter 5
The Basics 6
Call Controls 6
Mute 7
Adjust the volume 7
Use Smart Sensors 7
Play or pause streaming audio 7
Pair phone or tablet 8
Features 9
Listen to Audio via A2DP 9
Transmission Range 9
Simultaneous Call Handling Behavior (PC Mobile) 9
Voice alerts 9
Voice alerts list 9
Voice commands 10
Voice commands list 10
Disable the answer/ignore voice commands 10
Fit 11
Change the eartip 11
Wear on the left or right 11
Charge 12
USB cable to PC or USB wall charger 12
Charge case to PC or USB wall charger 12
Charge stand to PC or USB wall charger 13
Low Battery Warnings 14
Pairing your Bluetooth USB Adapter 15
Initial Pairing 15
Re-Pair USB Adapter to headset 15
Auto Connect 15
Connect PC and Call 16
Customize your headset 17
2
Page 3

Welcome
Congratulations on purchasing your new Plantronics Voyager Legend UC wireless headset
system. This user guide contains instructions for setting up and using your Voyager Legend
Bluetooth Headset and BT300 Bluetooth USB Adapter.
Featured highlights
System Requirements for
Plantronics Spokes
Software
• Auto Answer calls by placing headset on your ear.
• Auto transfers calls between mobile phone and headset.
• When on a mobile or PC call, softphone presence is automatically updated.
• Eliminates accidental dialing by locking call button when headset is not worn.
• Features wideband audio for best audio quality.
• Integrated A2DP (Advanced Audio Distribution Profile for Bluetooth) lets you listen to music,
driving directions, podcasts and more from your mobile phone.
• Automatically connects headset to PC and mobile phone when headset is within range and
powered on.
• Voice prompts announce power on/off, talk time, connection status and the name of incoming
callers (mobile phone only).
• Use Voice Commands to pair, answer or ignore incoming mobile calls, check battery or
connectivity and more.
• Magnetic snap-fit charging for easy charging anywhere.
• Change your headset's language and customize settings using MyHeadset Updater.
™
Computer
• Supported Operating Systems: Microsoft Windows XP®-Service Pack 3 (SP3) or later, Microsoft
Windows Vista®-Service Pack 1 (SP1) or later, Microsoft Windows® 7-Service Pack 1 (SP1) or
later recommended, Microsoft Windows 8
®
• Processor: 400 MHz Pentium® processor or equivalent (Minimum); 1 GHz Pentium processor or
equivalent (Recommended)
• RAM: 96 MB (Minimum); 256 MB (Recommended)
• Hard Disk: 280 MB (Minimum); 500 MB (Recommended)
3
Page 4
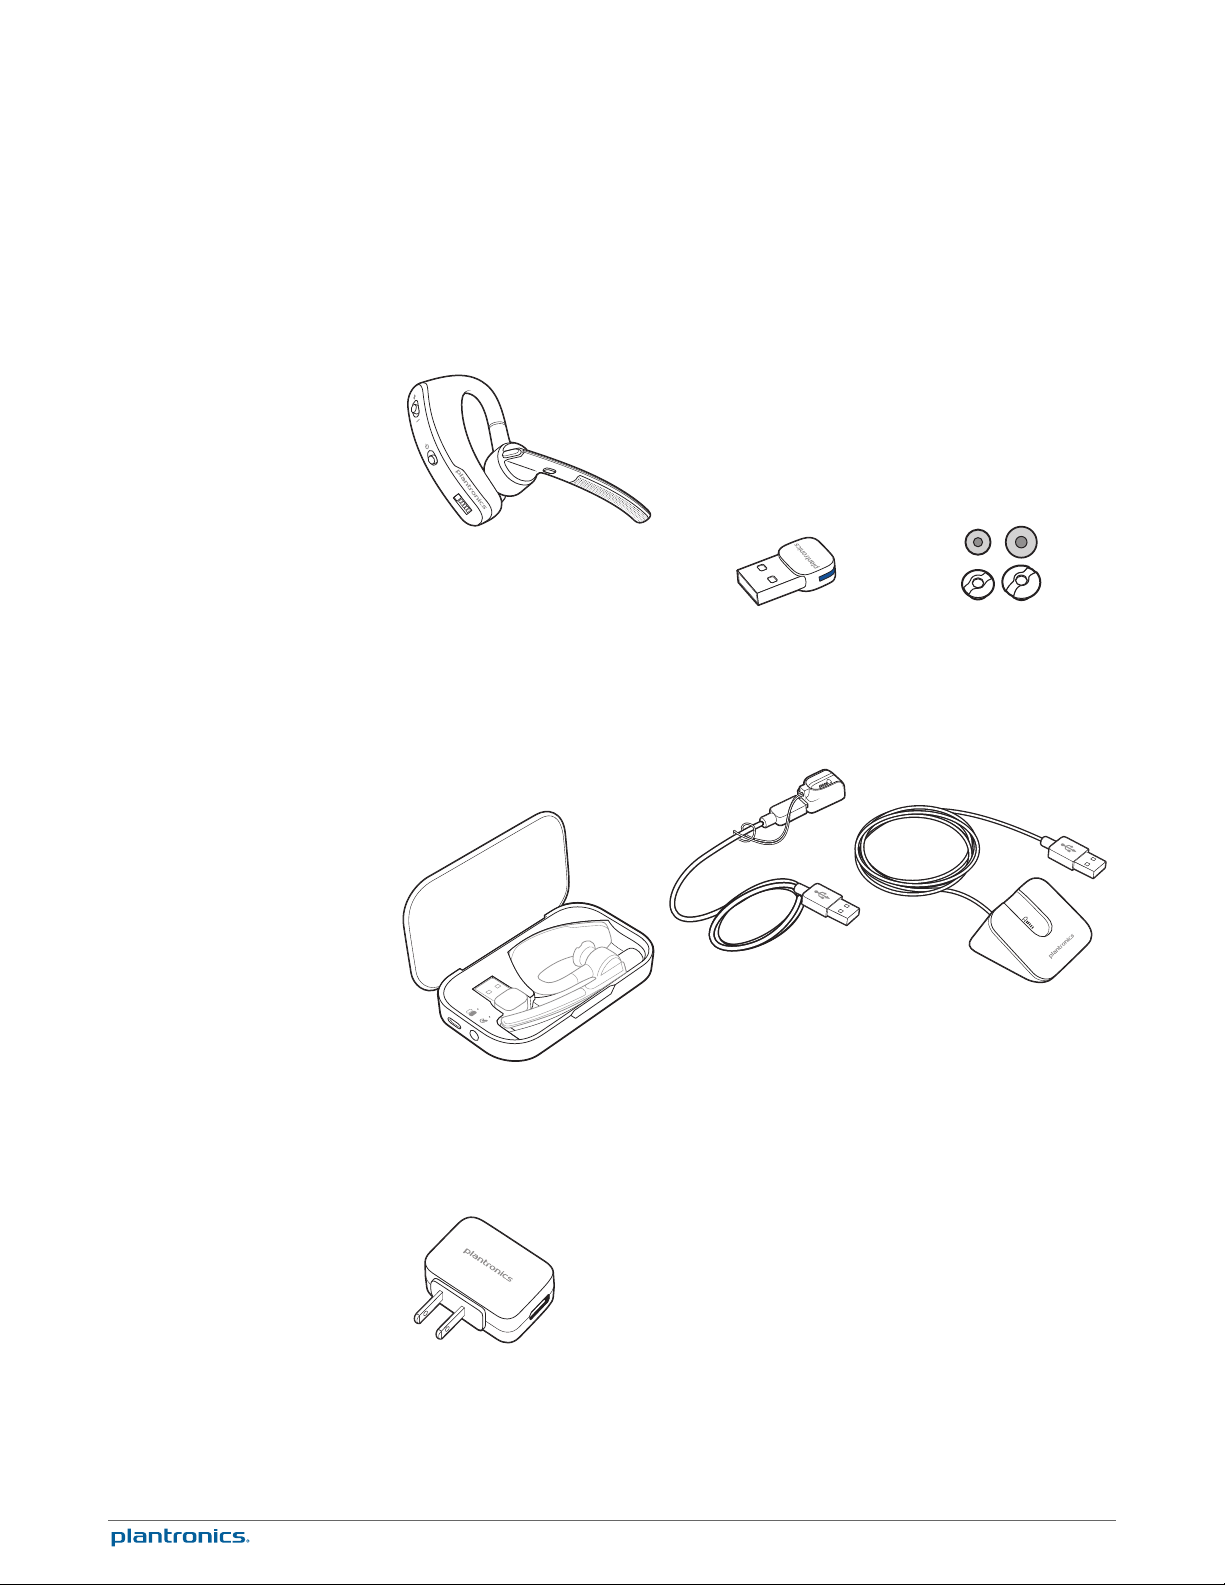
What's in the box
Voyager Legend Bluetooth Headset Bluetooth USB Adapter
Foam eartip covers and
silicone eartips
Portable charge case
AC charger
Micro USB charge cable
with headset charge
adapter Desktop charge stand
4
Page 5
voice
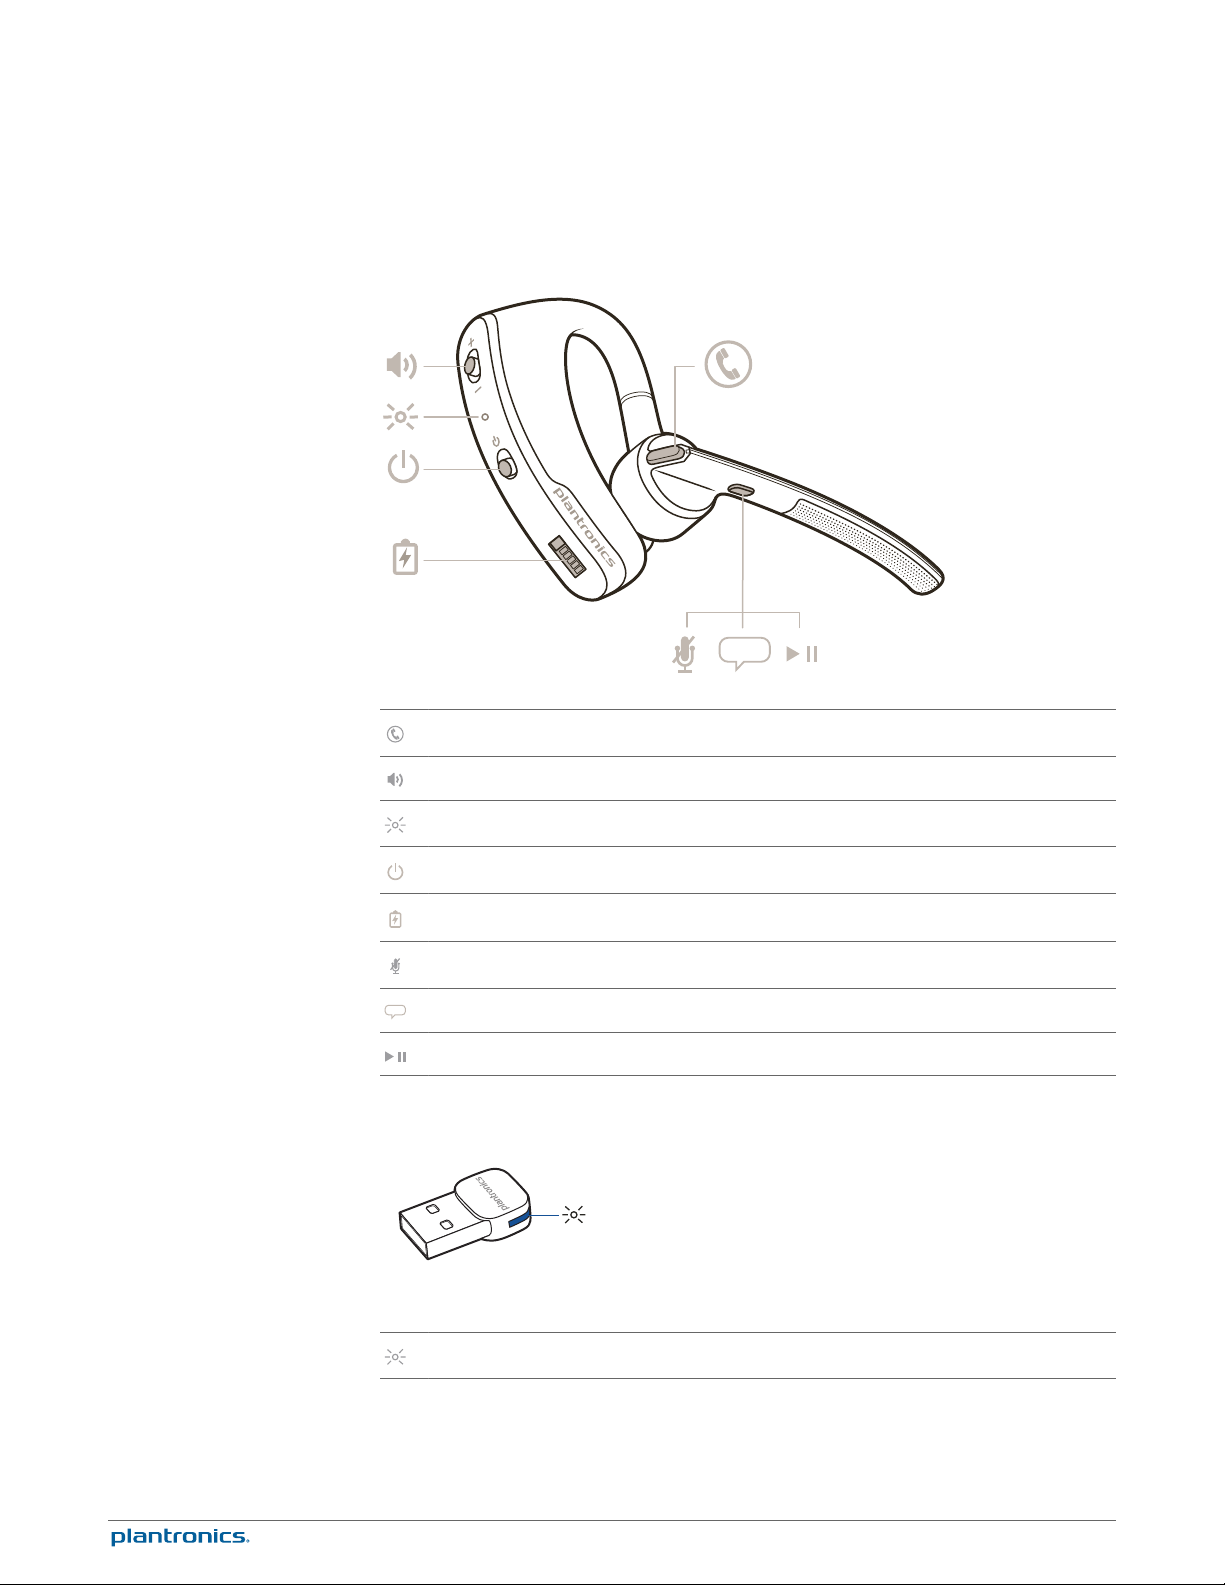
Overview
Headset
Bluetooth USB Adapter
Call button
Volume button
Indicator light (LED)
Power button
Snap-fit magnetic charge connection
Mute button
Voice button
Play/Pause button
Indicator light (LED)
5
Page 6
voice
The Basics
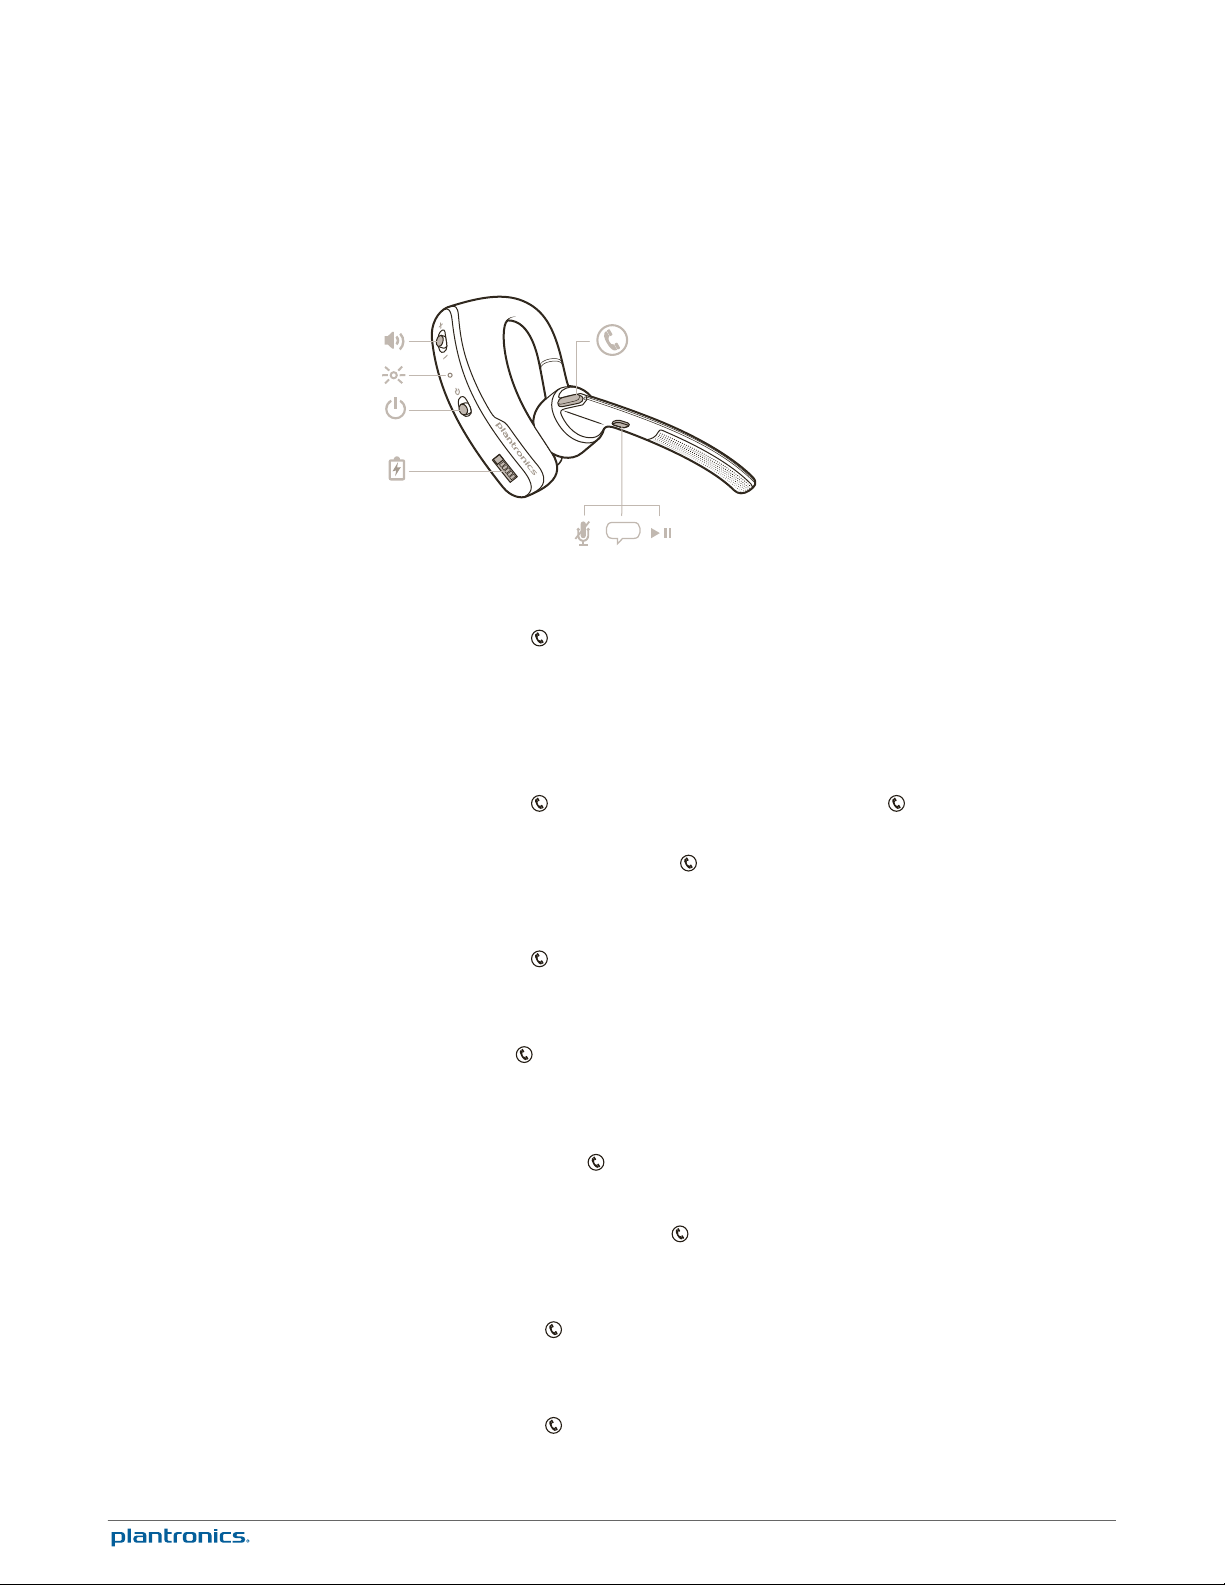
Call Controls
Answer a call
Choose:
•
Tap the Call button
• Put headset on (Smart Sensor)
• Say "answer" when prompted (mobile phone only)
Answer a second call
Choose:
•
Tap the Call button to end current call, then tap the Call button again to answer the
second call.
•
Or, for mobile calls, tap the Call button
prompted to answer the second call.
End a call
Tap the Call button to end current call.
Reject a call
Choose:
•
Press Call button
• Say “ignore” when prompted (mobile phone only)
Call back last call
Double-tap the Call button to call back the last active call regardless of whether it was an
inbound or an outbound call.
for 2 seconds
once to end current call, then say "answer" when
NOTE If no calls have been made or received in the current connected session this feature will not
function. Double-tapping the Call button
however will not connect you to the last active call from the previous session.
will result in a single low tone for each button press;
Voice dial (mobile phone)
Press the Call button for 2 seconds, this will invoke the mobile phone's voice dial command
feature.
Activate Siri (iPhone only)
Press the Call button
for 2 seconds, this will engage Siri ® on your iPhone.
6
Page 7

Caller Announcement (mobile phone only)
When wearing your headset, you will hear the name of a contact calling you so you can decide
whether to answer or ignore the call without having to check the phone screen.
An incoming caller name is announced:
• if your phone supports Phone Book Access Profile (PBAP)
• if you granted access to your contacts during pairing process (for many mobile phone's this is
preset out-of-the box and may not be necessary)
• if the caller is stored in the phone's contacts list
An incoming caller name is not announced: if the caller is unknown, unlisted, or blocked
Mute
Adjust the volume
Use Smart Sensors
You can mute the microphone during a conversation.
1
Mute on: During a call, tap the Mute
mute reminder is repeated every 15 minutes alternating between the voice prompt and a tone.
2
Mute off: During a call, tap the Mute
button, you will hear the “mute on” voice prompt. The
button, you will hear “mute off”.
NOTE The mute off voice prompt and mute reminder timing can be customized in MyHeadset
Updater. plantronics.com/myheadset
Toggle the Volume button up (+) or down (–) during a call or while streaming audio.
While not on a call or streaming audio you can toggle the Volume button to adjust the
volume level for Caller Announce and other voice prompts.
Smart Sensors™ in this headset recognize if the headset is being worn and can automatically
perform time-saving functions.
Putting on your headset will:
• Answer an incoming call
• Transfer an active call from your phone
• Resume streaming audio
Taking off your headset will:
• Transfer an active call to your phone handset
• Pause streaming audio
Play or pause streaming
audio
• Lock the Call button to avoid accidental calls
A 2-second press of the Play/Pause button
streaming audio.
will either pause or resume playback of
NOTE You must pause your streaming audio before you:
• use your headset's voice commands
• initiate an outbound call with your headset (call back or voice dial)
NOTE If you power off the headset or go out of phone range while streaming audio, your headset will
not play/pause the stream upon reconnecting until you manually resume streaming with your phone.
7
Page 8

PLT_Legend
PLT_Legend
Pair phone or tablet
Pair your headset to your phone or another device, such as a tablet.
1
Switch on your headset then choose:
• Tap the Voice button and say “Pair mode,” or
•
Press and hold the Call button until you hear “Pairing”
2
While the headset LEDs are flashing red and blue, activate Bluetooth® on your phone and set it
to search for new devices.
3
Select “PLT_Legend.”
4
If your phone asks for a passcode, enter four zeros (0000) for the passcode or accept the
connection.
5
Once successfully paired, LEDs stop flashing red and blue and you hear “pairing successful.”
NOTE To enable caller name announcement, allow access to your contacts if your phone prompts
you.
8
Page 9

Features
Listen to Audio via A2DP
Transmission Range
Simultaneous Call
Handling Behavior (PC
Mobile)
Voice alerts
Your Voyager Legend headset can play media files (music, podcasts, navigation, etc.) from any
A2DP (Advanced Audio Distribution Profile for Bluetooth)-enabled mobile device.
Your Voyager Legend Bluetooth headset has a 10 meter effective range. Voice prompts from
your headset will alert you if you lose connection with your mobile phone or PC Bluetooth
Adapter.
You can be on a call using a computer softphone application and receive a mobile phone call.
The ringtone for the mobile phone call is heard in the headset. Tapping the call button on the
headset will end the computer softphone call. Tapping the call button again will answer the
mobile phone call.
NOTE Answering the call on your mobile phone sends the audio to the mobile phone and leaves the
computer softphone call active on the headset.
You can be on a mobile phone and receive a call on your computer softphone. The ringtone for the
computer softphone call is heard in headset during the call.
Tapping the call button on the headset ends the mobile phone call. Tapping the call button again
answers the computer softphone call.
If you receive a computer softphone call and mobile call at the same time, tapping the call button
will pick up the call that came in first.
Your headset tells you about status changes with a U.S. English accent. You can change the
voice alert language by visiting plantronics.com/myheadset and downloading the MyHeadset
Updater tool. The available languages are Cantonese, English with a U.K. accent, Danish, French,
German, Italian, Japanese, Korean, Mandarin, Norwegian, Russian, Spanish and Swedish.
™
Voice alerts list
• "Power on/off"
• "Answering call"
• "Talk-time (x) hours"
• "Battery low"
• "Recharge headset"
• "Lost connection"
• "PC connected"/"PC disconnected"
• "Phone 1 connected/Phone 2 connected"
• "Pairing"
• "Pairing successful"
• "Pairing incomplete, restart headset"
• "Mute on/off"
• "Volume maximum/minimum"
• "Voice recognition on/off"
• "Calling back last number"
• "You can say"
9
Page 10

Voice commands
Tap the Voice button , wait for command request, then say a command. For example, “What
can I say?” tells you the full list of available commands. You can change the voice command
language by visiting plantronics.com/myheadset and downloading the MyHeadset™ Updater
tool. The available languages are English with a U.S. accent, English with a U.K. accent, French,
German, Italian, Japanese, Korean, Mandarin, Russian, Spanish and Swedish. Use U.K. English for
Cantonese, Danish and Norwegian as there is no voice recognition support for these three
languages.
Voice commands list
Disable the
answer/ignore voice
commands
• "Am I connected?"
• "Answer"
• "Call Vocalyst"
• "Cancel"
• "Check battery"
• "Ignore"
• "Pair mode"
• "Call back"
• "What can I say"
NOTE The voice-dial feature on your phone is initiated by pressing the Call button
The voice-dial feature is not a headset voice command.
To disable the “answer/ignore” voice commands:
1
Switch on the headset.
2
Press and hold the Voice button until you hear a double tone.
3
Repeat to reactivate the voice answer commands.
for 2 seconds.
10
Page 11

1
2
2
1
2
2
2
1
3
Fit
Change the eartip
Change the eartip for a better fit.
1
Push in eartip and rotate to the left to unlock it.
2
Align new eartip into slot.
3
Push and rotate it to the right to lock it into place.
Wear on the left or right
To wear the headset on your other ear, rotate the boom upwards then twist it around so the
eartip is on the other side before lowering the boom.
11
Page 12

Charge
USB cable to PC or USB
wall charger
There are three ways to charge your headset. Your new headset has enough power to pair and
make a few calls before charging is needed, though you may charge it at any time.
NOTE Always charge at near room temperatures; never charge battery at temperatures below 0°C
(32°F) or above 40°C (104°F).
1
Align snap-fit magnetic areas of headset and charging device.
2
Attach charging device to USB wall charger or laptop. LEDs turn off once fully charged. A full
charge will take 90 minutes. You may leave your headset connected to the charger once
charging is complete without harming the battery.
Charge case to PC or USB
wall charger
Charge the case for 90 minutes before docking your headset. Once the case if fully charged, it
can recharge your headset twice while on the go before needing connection to a charge cable
providing up to 14 hours of talk time.
12
Page 13

Understand the charge case lights
The indicator lights flash battery status for the charging case and the headset .
• 3 red flashes = battery critical
• 2 red flashes = battery low
• 2 blue flashes = battery medium
• 3 blue flashes = battery full
The case indicator lights flash when:
• the headset is docked/undocked
• the case is connected/disconnected
• the battery status button is pressed
Test battery status
Press the battery status button
to see the battery status of the charging case or the headset.
Charge stand to PC or
USB wall charger
13
Page 14

Low Battery Warnings
Battery Level Tone Voice Prompt
30 minutes of talk time
remaining (this alert only occurs
during an active call)
10 minutes of talk time
remaining
Double high tone every 15
minutes
Triple high tone every 30
seconds
"Battery Low" repeats every 30
minutes
"Recharge Headset" every 3
minutes
14
Page 15

Pairing your Bluetooth USB Adapter
Initial Pairing
Re-Pair USB Adapter to
headset
Your Bluetooth USB adapter comes pre-paired to your Voyager Legend headset.
In the event that your headset and Bluetooth USB adapter are not paired or become unpaired
do the following:
1
Remove the Bluetooth USB adapter.
2
Power on your headset then choose:
• Tap the Voice button and say "Pair Mode."
•
Press and hold the Call button until you hear "Pairing."
3
Insert Bluetooth USB adapter directly into your PC USB port. Once successfully paired, LEDs
stop flashing red and blue and you hear "PC connected."
Auto Connect
4
Headset will exit pairing mode.
Your headset will automatically connect to paired devices such as your mobile phone and
Bluetooth USB Adapter when the headset is on and within range. Voice prompts will also
prompt you when you are out of range of devices.
15
Page 16

Connect PC and Call
1
Power headset on.
2
Insert Bluetooth USB adapter directly into your PC USB port. The LED will flash and then turn
solid blue to indicate the headset is connected to the USB adapter. The LED remains solid blue
when not on an active call.
NOTE Insert your Bluetooth USB Adapter directly to your laptop or PC instead of connecting to a USB
port on the docking station or hub.
3
Load Plantronics Spokes software by visiting plantronics.com/software and click on the
"Download" button.
NOTE Spokes software allows you to customize your headset's behavior through advanced settings
and options.
4
Check your Audio Settings.
Confirm the speaker and microphone settings for your PC softphone are set to Plantronics
BT300.
PC Audio Setup for Windows 7 and Windows 8
Go to Control Panel -> Sound-> Playback tab, and set the Plantronics BT300 device as the
Default Communications Device. Next go to the Recording tab and set Plantronics BT300 as the
Default Recording Device. If you plan to listen to streaming audio set the Plantronics BT300
device as the Default Audio Device as well. In the Playback tab, this is indicated by the green
checkmark.
PC Audio Setup for Windows XP
Go to Control Panel -> Sounds and Audio Devices, and in the Audio tab set the Plantronics
BT300 as the default device for the Sound playback and Sound recording sections.
5
Place a call from your computer softphone. During an active call, the Bluetooth USB adapter will
flash blue.
Bluetooth USB Adapter LED indicators
Headset powered off
Paired/connected
None
Solid blue
Active call or audio
Flashing blue
16
Page 17

Customize your headset
Your headset understands and speaks in English. You can change the language and other
settings online.
MyHeadset™ Updater (plantronics.com/myheadset) tool enables you to:
• Receive firmware updates
• Change language for voice alerts and commands (English with a U.K. accent, English with a U.S.
accent, French, and German, Spanish). Voice alerts are also available in Cantonese and
Mandarin.)
• Change regional phone number for Vocalyst service
• Turn voice commands on/off
• Turn Smart Sensors™on/off
• Turn high quality audio (A2DP) streaming on/off
• Turn "mute off" voice alert on/off
NOTE Visit MyHeadser Updater at plantronics.com/myheadset to download the software tool
needed to customize your headset
17
Page 18

NEED MORE HELP?
www.plantronics.com/support
Plantronics, Inc. Plantronics BV
345 Encinal Street
Santa Cruz, CA 95060
United States
©
2013 Plantronics, Inc. All Rights Reserved. Bluetooth is a registered trademark of Bluetooth SIG, Inc. and any use by Plantronics is under license. All
other trademarks are the property of their respective owners.
Patents pending
89850-06 (02.13)
South Point Building C
Scorpius 140
2132 LR Hoofddorp, Netherlands
 Loading...