

Page 1
0 0 0
Plantronics . a U D i o ™ 910
BLUE TOOTH® HEADSE T SySTEm
USE R GU ID E
Page 2
3
REGISTER YOUR PRODUCT ONLINE
Visit www.plantronics.com/productregistration to register your product online
so we can provide you with the best possible service and technical support.
TABLE OF CONTENTS PACKAGE CONTENTS
Package Contents 3
Features 4
Charging 5
Powering 6
Pairing 7
Installing PerSonoCall Software 9
Adjusting Fit 12
Using Your Headset 14
Indicator Lights 17
Troubleshooting 18
Technical Assistance 20
Regulatory Notices 20
Warranty 21
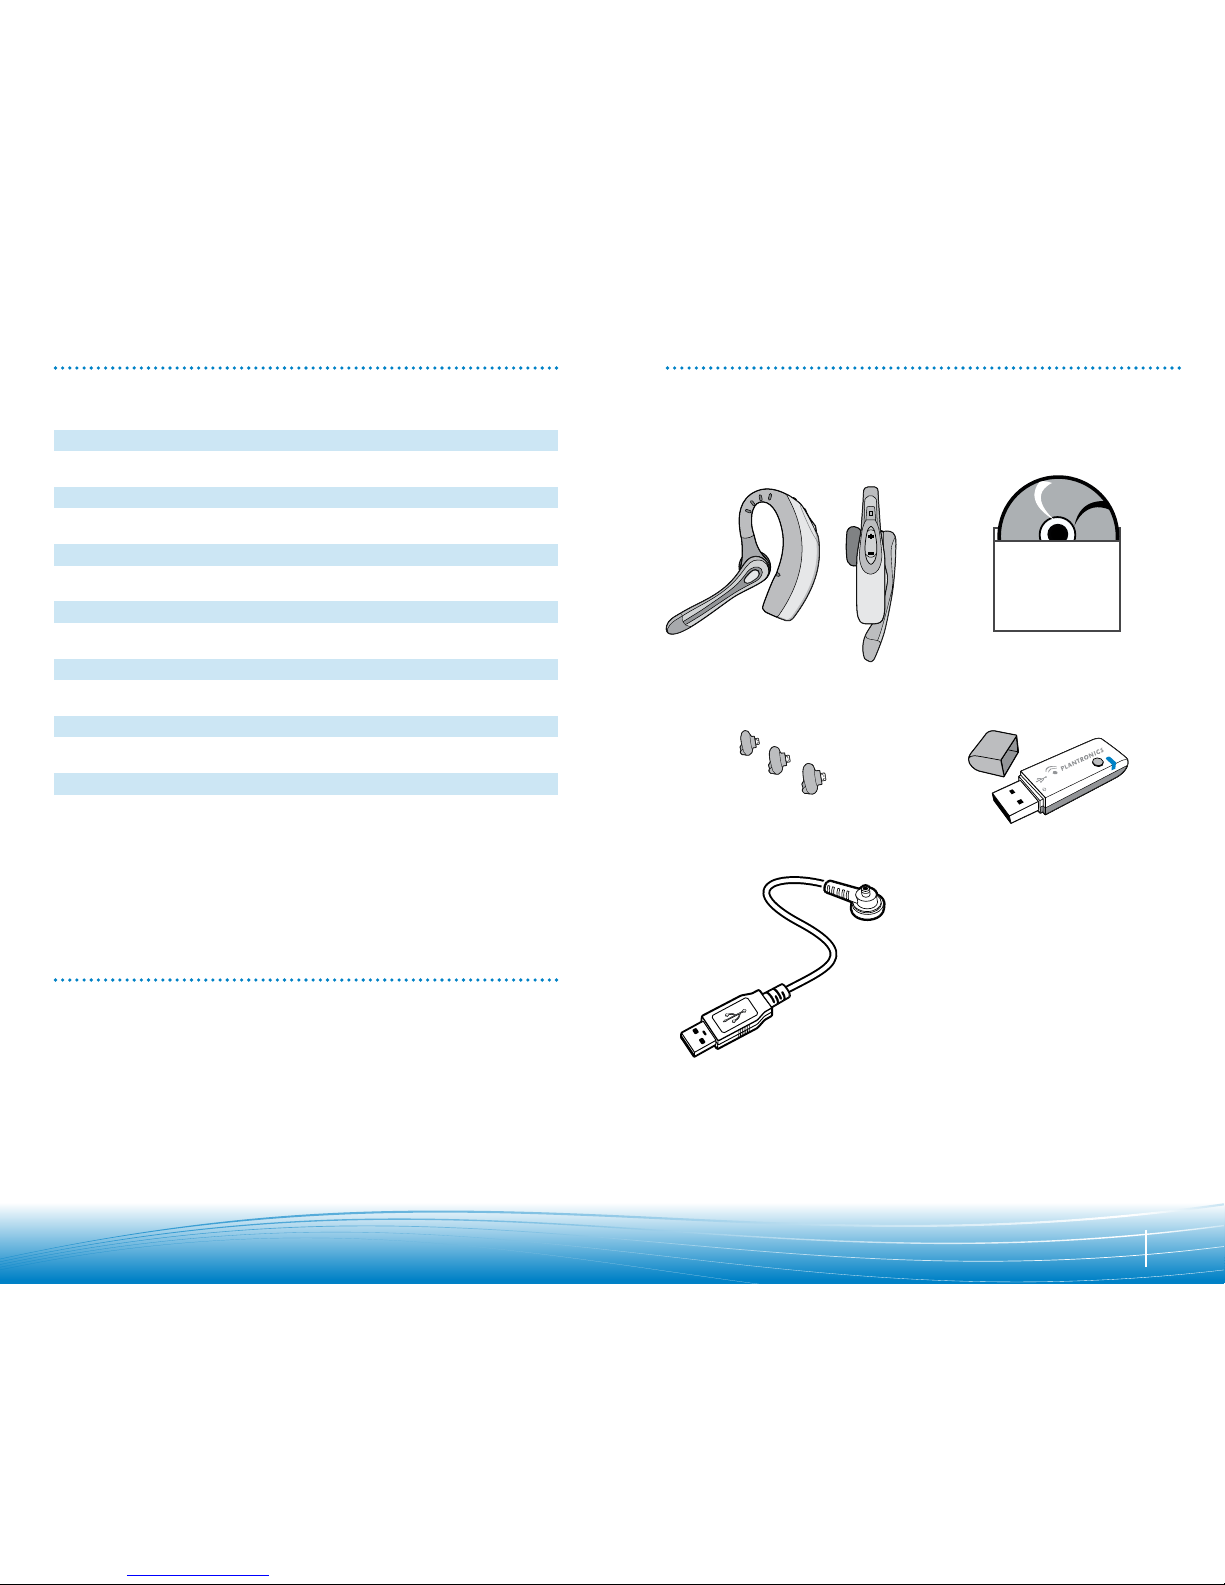
Headset
Voyager 510
(Front and Side View)
PerSonoCall
®
Software CD
USB Bluetooth Adapter
BUA-100
3 Ear Tips
(Small, Medium, Large)
Headset USB Charging Cable
Please refer to the separate Safety Instructions booklet for important product safety
information prior to installation or use of the product.
Page 3
4 5
FEATURES CHARGING
Before using, you must first charge your headset. The indicator light flashes red while
charging and turns solid blue when the headset is fully charged.
20 minutes = minimum charge
3 hours = full charge
NOTE: Do not use headset while charging and do not connect the charger while headset is in use.
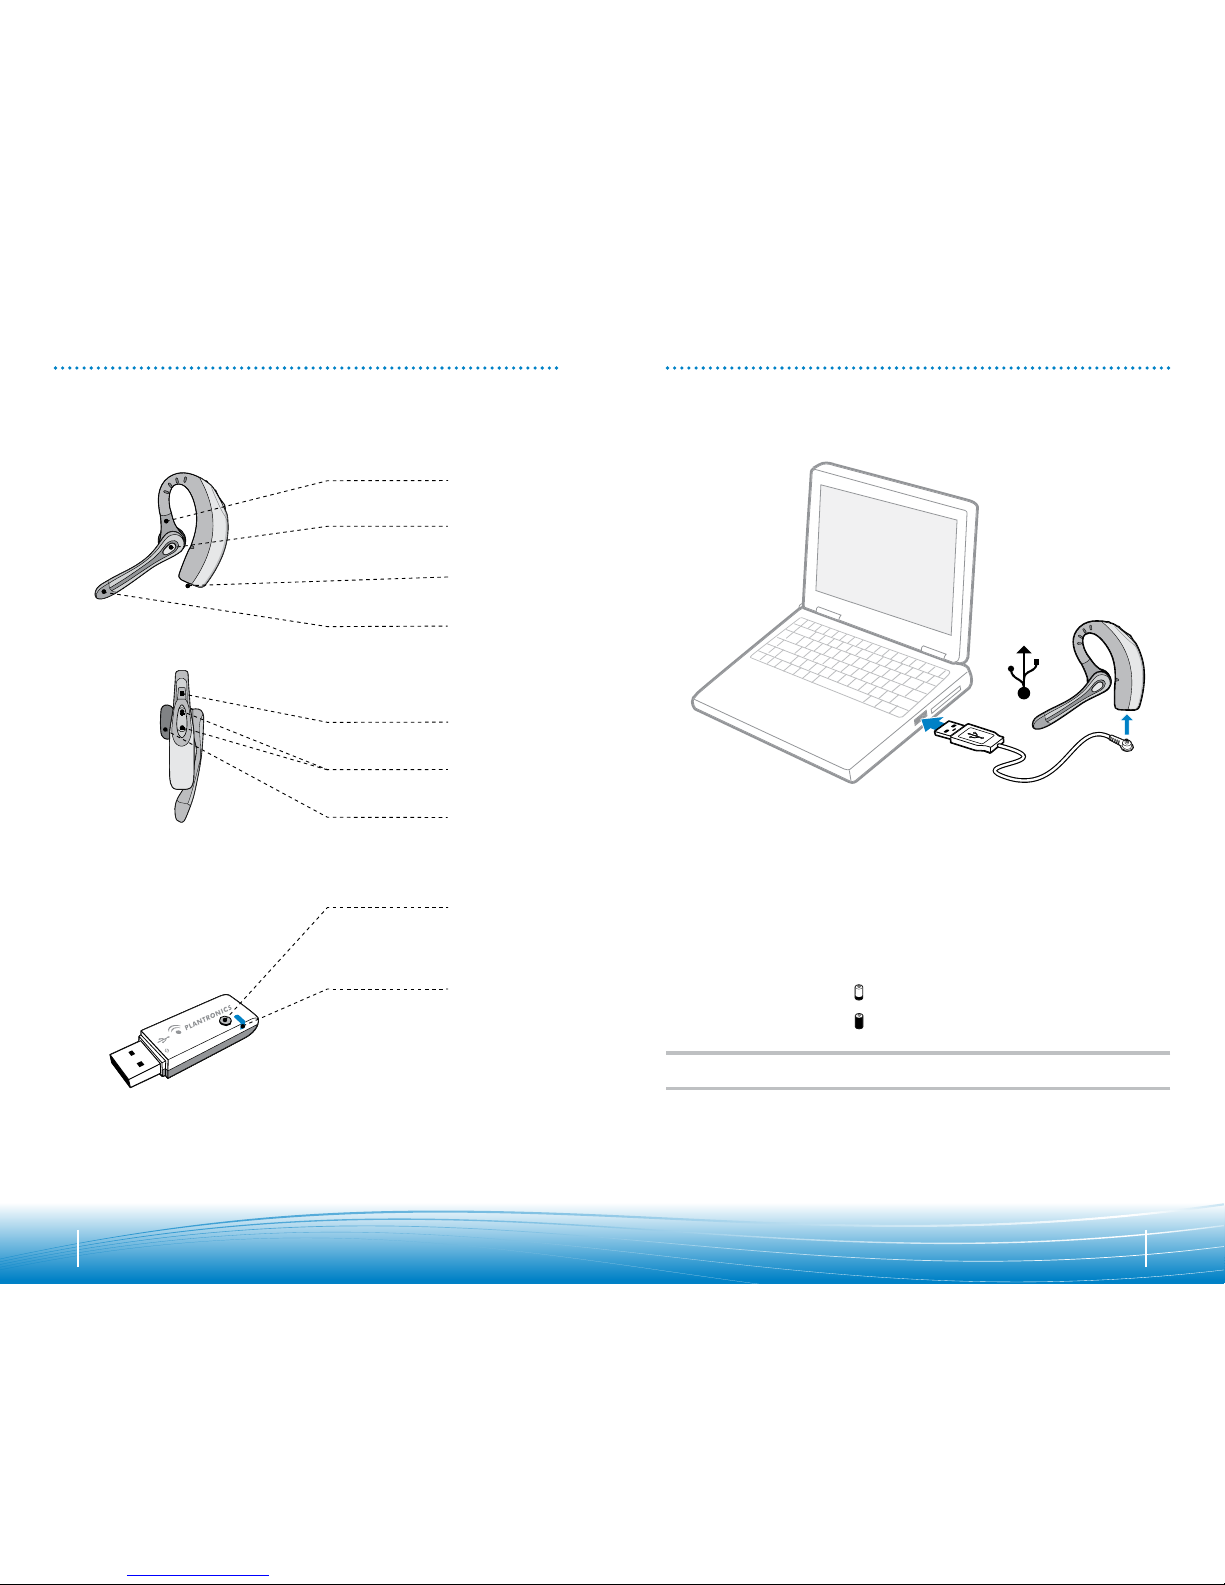
Pairing/Connect
Button
Indicator Light
Power/Mute Button
Listen Volume
Adjust Button +/-
Ear Tip
Horizontal Boom
Adjustment
Call Control
Button
Charge
Connection
Noise-Canceling
Microphone with
WindSmart® Technology
USB Charging
Page 4
Before using your headset for the first time, you must pair it with your Bluetooth phone or
device. Be sure the headset is fully charged. For set up and pairing instructions with Bluetooth
devices other than mobile phones, please consult your Bluetooth device user guide.
Turn on both devices.
6 7
POWERING PAIRING
Powering Headset
Powering USB Bluetooth Adapter
Pairing Headset with Bluetooth Phone
The USB Bluetooth adapter is automatically powered on upon inserting into the USB port
of the computer. If your USB port on the computer is hard to access, you can use the USB
extension cable.
NOTE: The USB Bluetooth adapter is automatically active with the current paired headset upon
powering on.
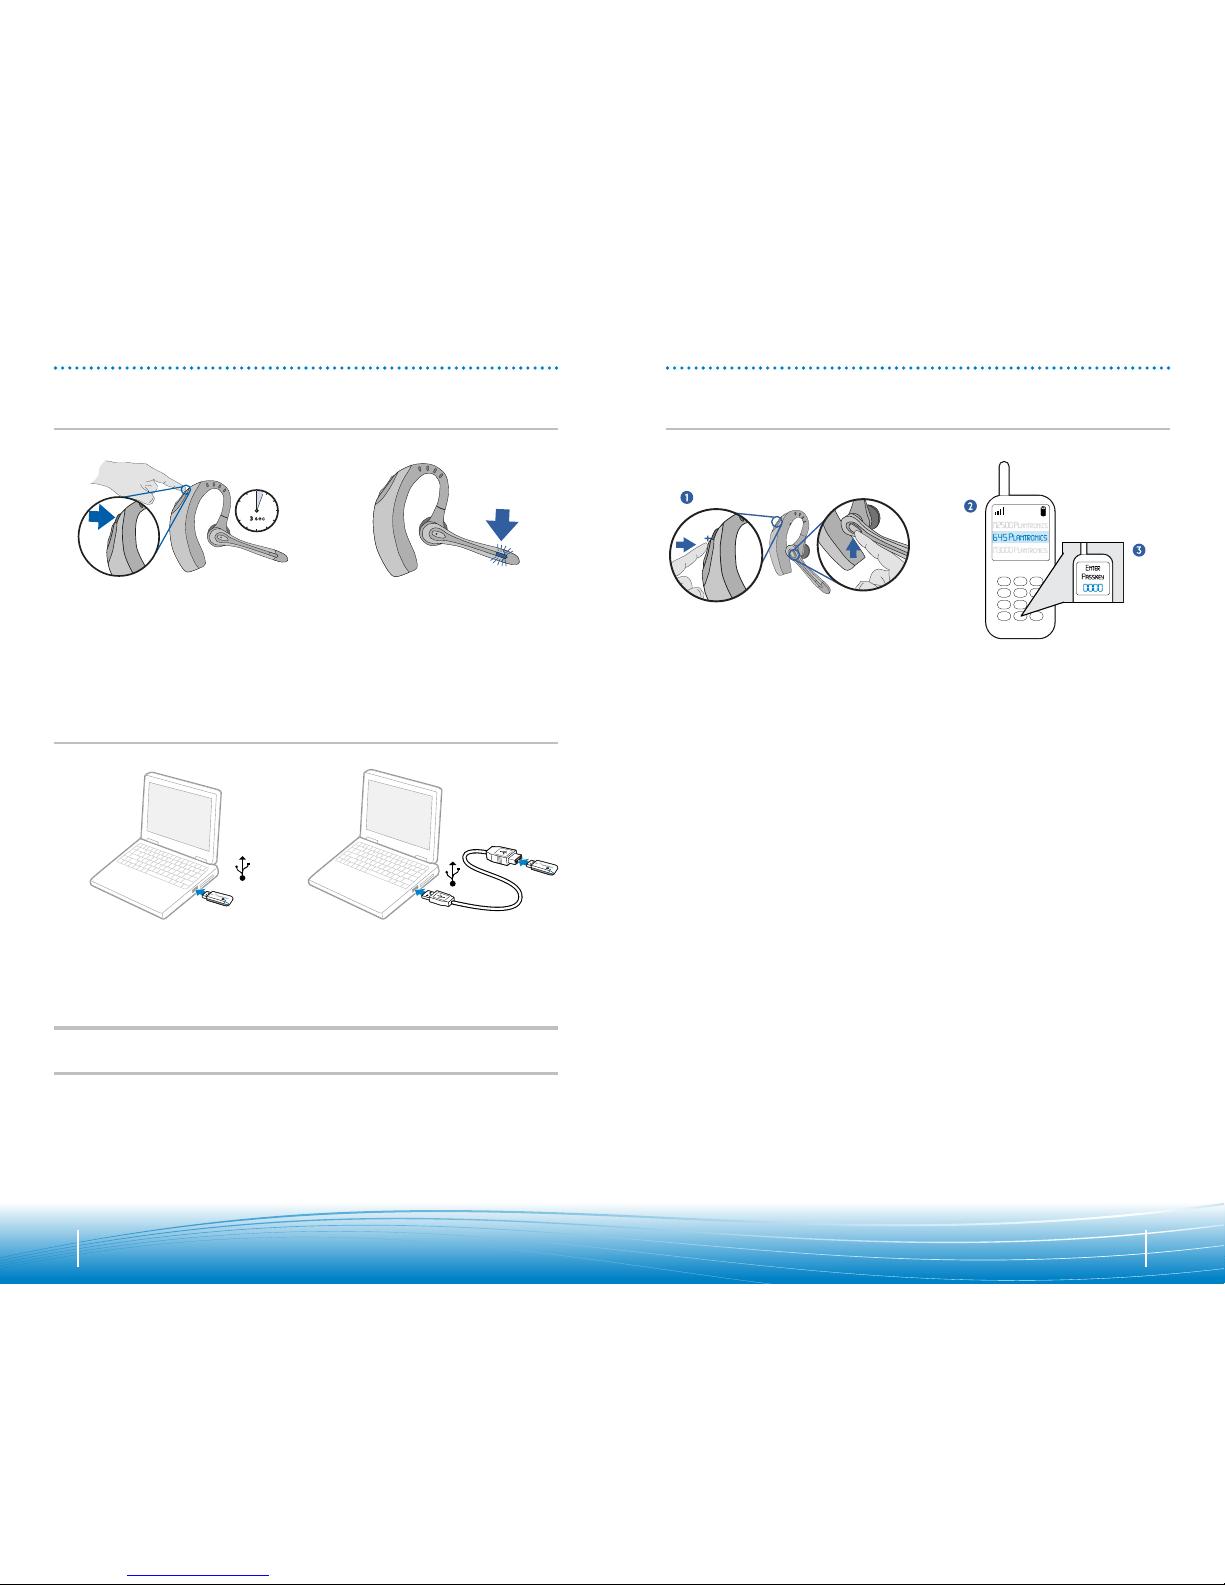
Press and hold the power/mute button
for three seconds to turn the headset
on or off.
The indicator light flashes blue when the
headset is on.
The indicator light will flash red when
the battery becomes low.
1. Simultaneously press the listen volume
adjust button marked + (volume up)
and the call control button. Release the
buttons when the indicator light begins
to flash red then blue.
2. While the headset is flashing red and
blue, use the phone menu to search
for Bluetooth devices and select “510
Plantronics”.
3. When prompted for passkey enter
0000. The headset will flash blue when
paired successfully.
Page 5
8 9
PAIRING
Pairing Headset
with USB Bluetooth Adapter
NOTE: The headset and USB Bluetooth adapter are paired to each other at the factory. However, if you
have purchased a USB Bluetooth adapter separately, or if you wish to use a replacement headset
with your existing adapter, the units must be paired.
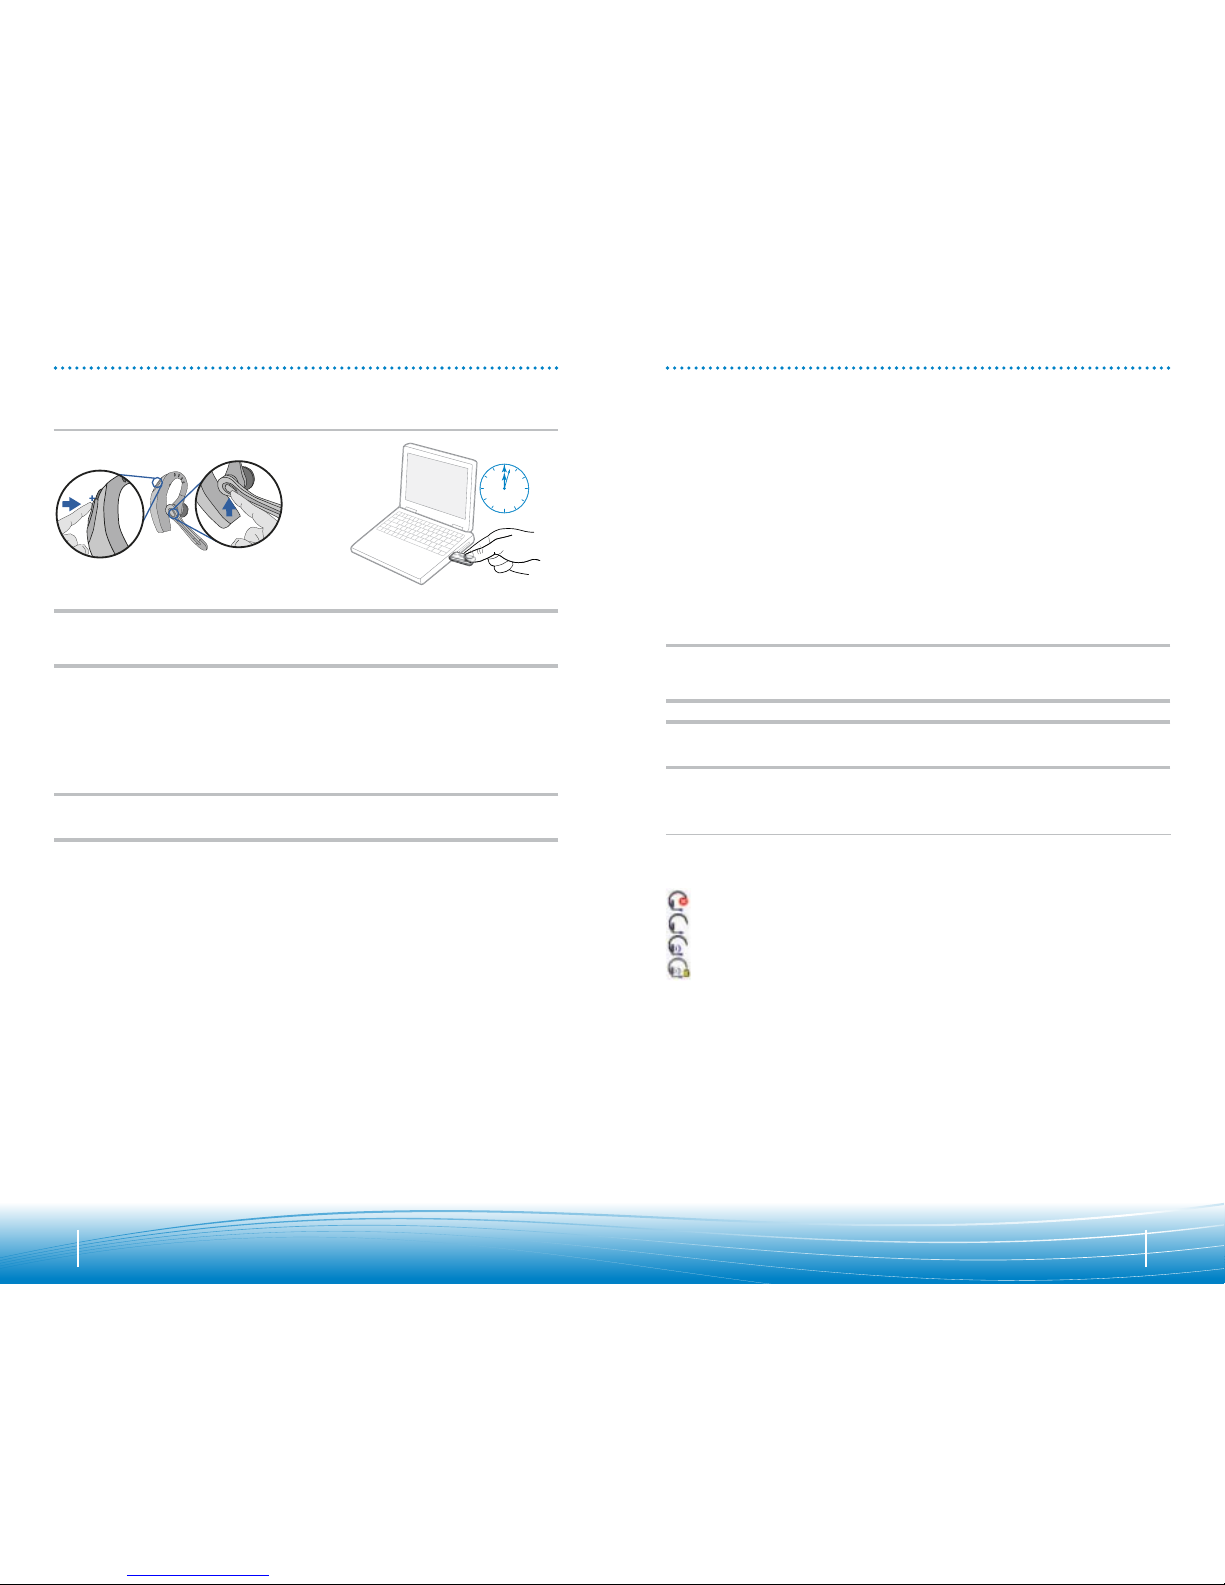
Power on the headset. Insert the USB Bluetooth adapter in the USB port of your computer.
1. Simultaneously press the listen volume
adjust button marked + (volume up)
and the call control button. Release
the buttons when the indicator light
begins to flash red then blue.
NOTE: Take caution when manually pairing the USB adapter. Do not press hard. Please “pinch”
with both fingers rather than push on the adapter to avoid damage to the adapter or USB port.
2. Pinch the pairing/connect button
for at least 2 seconds until adapter
flashes red and blue and begin pairing
with your Bluetooth headset.
2 sec.
INSTALLING PERSONOCALL® SOFTWARE
Plantronics PerSonoCall® software provides the link between your Bluetooth headset and
the softphone application on your computer. PerSonoCall software provides the ability to
remotely detect and answer/end a call from your softphone application via the headset
call control button.
In addition PerSonoCall provides some basic configuration and status information about
the system. See page 10 for more details.
1. With the CD inserted, go to the PerSonoCall main screen and click on “Install the
PerSonoCall Software.”
2. Your softphone may require you to choose which audio device you wish to use. Please
refer to softphone documentation for details.
NOTE: When the USB Bluetooth adapter is installed, it becomes the default audio device in
your computer. You can set preferences manually in the Windows® operating system through
the Sounds and Audio Devices option in the Control Panel.
NOTE: Once installed we recommend that you set PerSonoCall to launch whenever the
Windows® operating system starts. See page 10 for details.
System Tray Icons
After installing the software, one of the four system tray icons will appear in the tray bar
at the bottom of your screen showing status of headset communication with PerSonoCall.
: No headset detected
: Headset detected, no radio link to USB Bluetooth adapter
: Headset detected, and radio link to USB Bluetooth adapter active
: Headset detected, and radio link to USB Bluetooth adapter is locked on
Page 6
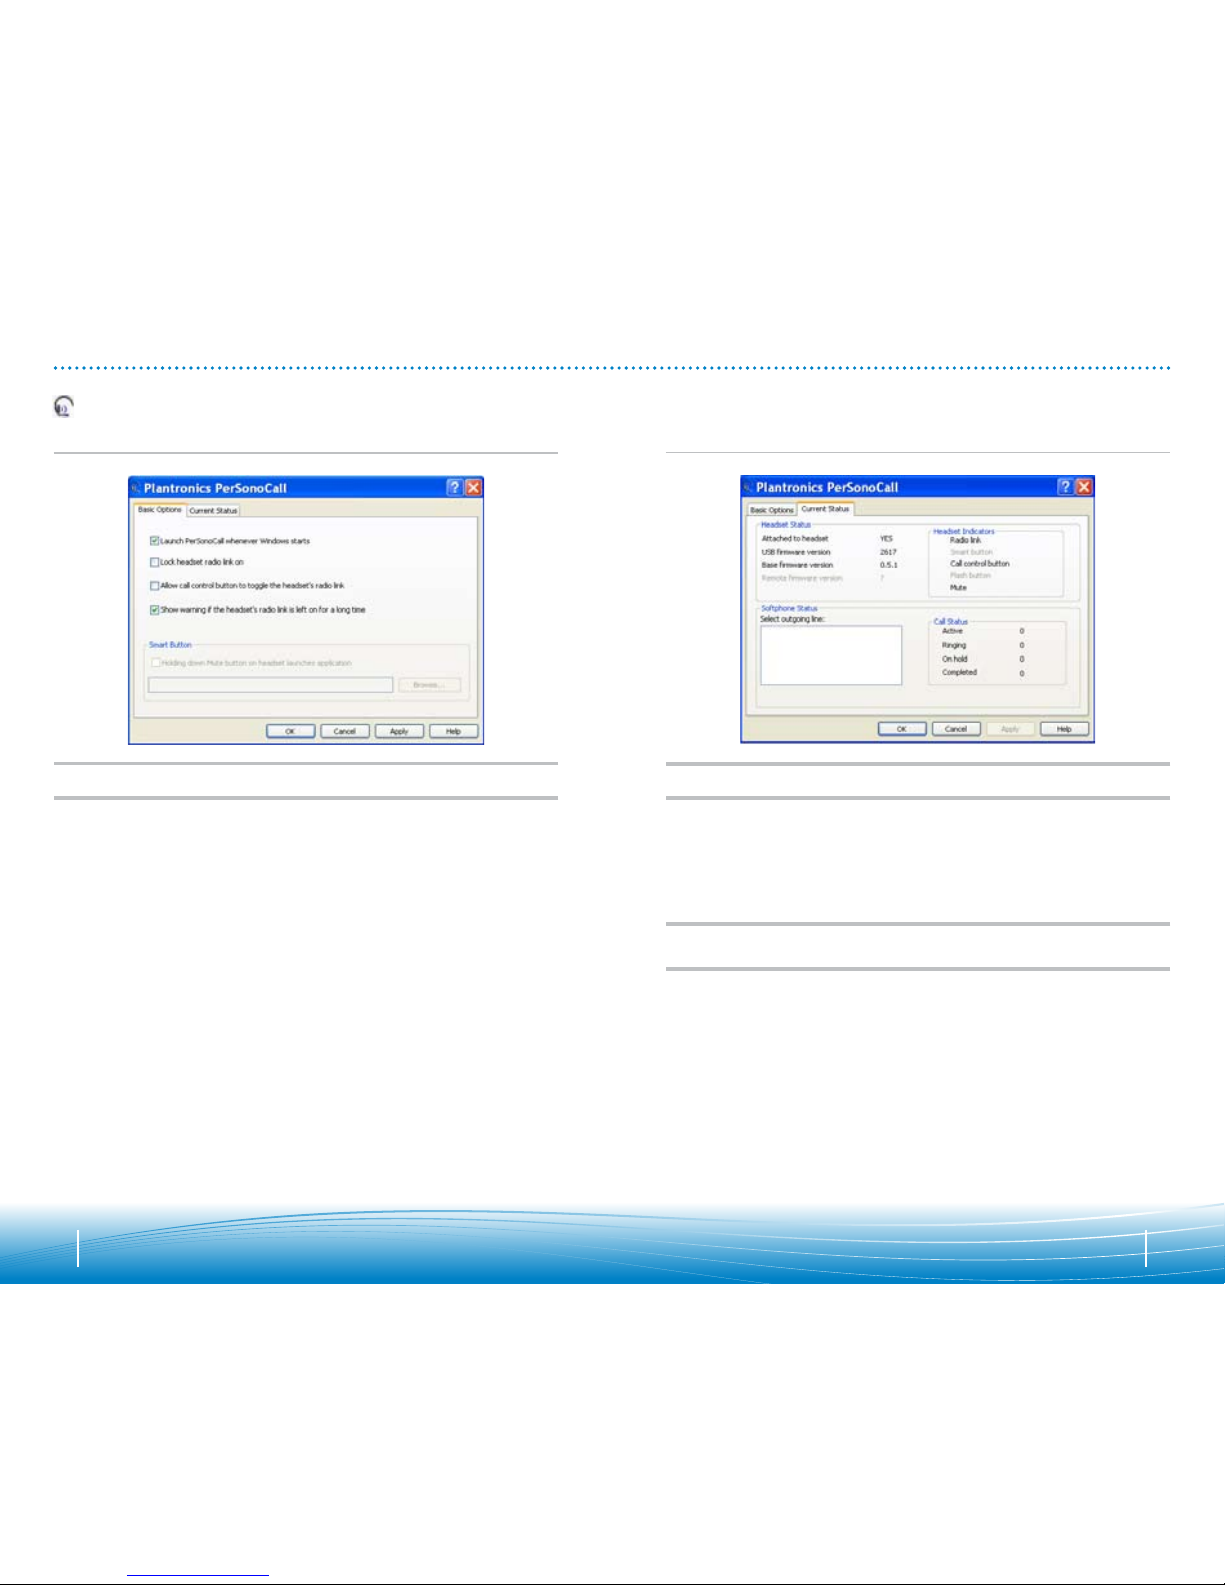
NOTE: Some PerSonoCall features are grayed out and not applicable to the .Audio 910 system.
Headset Status Box
Provides information you may need for technical assistance. The Headset Indicators
listed will be checked if active.
Softphone Status Box
Lists the selectable outgoing lines as well as the number of calls active, ringing, on
hold and completed.
NOTE: In some cases compatible softphones may not show the available outgoing line in the
Softphone Status box. This will not affect how the softphone operates with PerSonoCall.
Current Status Screen
10 11
INSTALLING PERSONOCALL SOFTWARE
NOTE: Some PerSonoCall features are grayed out and not applicable to the .Audio 910 system.
Launch PerSonoCall Whenever Windows® Starts
Check this box to automatically launch the PerSonoCall application whenever you
start your computer. This is recommended.
Lock Headset Radio Link On
Check this box to prevent PerSonoCall from turning off the radio link when no calls
are present. See “Answering/ending/making calls with PerSonoCall on softphone”
on page 14 to learn more. Be aware that locking the headset radio link on will
dramatically reduce headset standby and talk time.
Allow Call Control Button to Toggle the Headset’s Radio Link
Check this box to turn the radio link to the headset on and off to support multipoint
functionality. See page 15.
Show Warning if the Headset’s Radio Link is Left on for a Long Time
Check this box to be given a reminder if your headset radio link is left on for more
than 30 minutes. Leaving the headset radio link on for long periods of time will
dramatically reduce headset standby and talk time.
Right click on the headset system tray icon and choose “Options”. This will bring up the PerSonoCall Basic Options and Current Status Screens.
Basic Options Screen
Page 7
1312
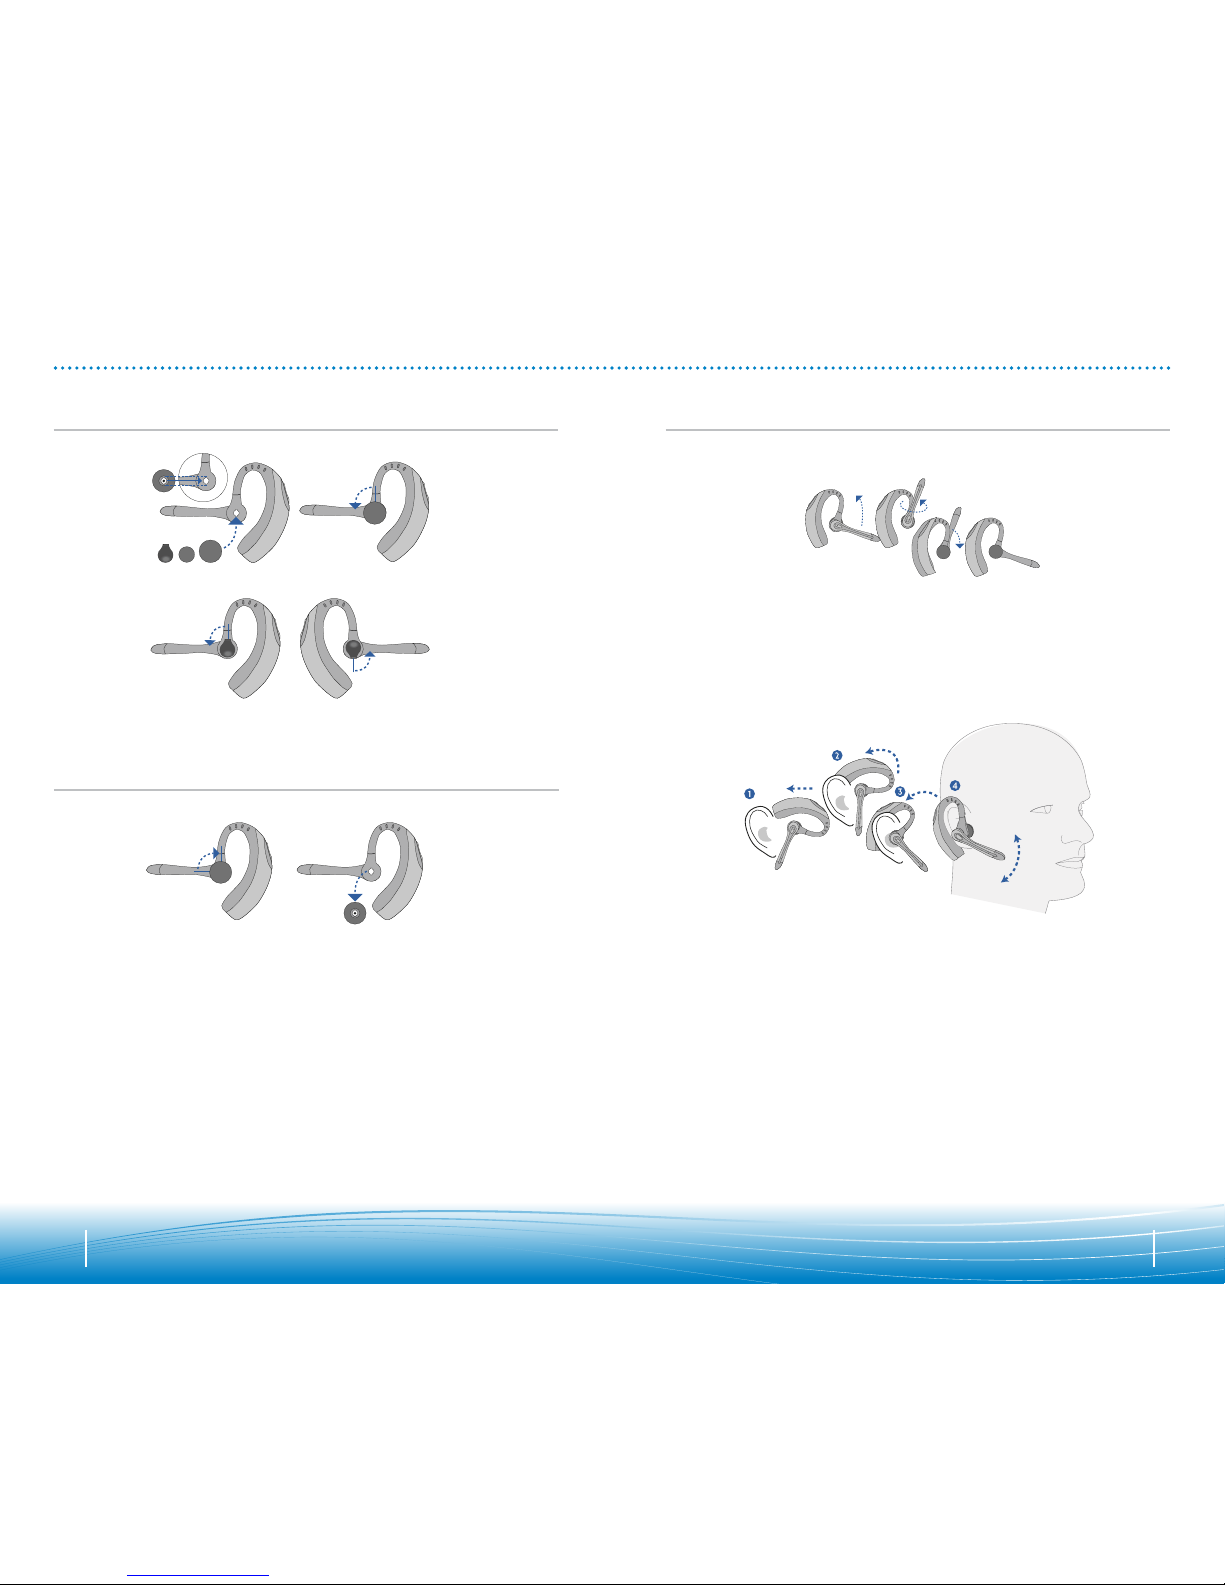
Replacing the Ear Tip
Rotate the microphone horizontally and vertically as illustrated, to select for left or right
ear wearing. The illustration shows conversion from right to left ear wearing. Reverse the
procedure to convert from left to right ear wearing.
Slide the headset over and behind your ear. Press gently towards your ear for a snug fit.
Adjust the microphone position so that it is directed towards your mouth.
Inserting a New Ear Tip
ADJUSTING FIT
Wearing the Headset
Page 8
0 0
To make a call, press the call control button to take the softphone off the hook. You should
hear a dial tone.
To answer or end a call, press the call control button.
When using PerSonoCall, the radio link between the headset and the USB Bluetooth adapter
will only be active during a call. This is the default setting intended to preserve the battery
life of the headset. However, you may wish to have the radio link active when not on a call
so you can listen to other audio sources, such as streaming audio on your PC. You can lock
the radio link on in two ways:
• Basic Options screen – check the box for "Lock headset radio link on" – see page 10.
• Right click on system tray icon – and choose "Lock radio link on".
NOTE: Locking the radio link on for extended periods of time will significantly reduce the
standby and talk time of the headset.
For Softphones Not Compatible with PerSonoCall
Check the PerSonoCall compatibility list at www.plantronics.com/personocall for the most
current information on softphone compatibility.
If your softphone is not currently supported by PerSonoCall, remote detection and answer/
end via the headset does not function. Pressing the call control button on the headset
will only open and close the radio link providing audio; you must answer the call from
the softphone.
To answer or end a call, briefly press the call control button.
To make a call, enter the number on your phone, press send, and the call is automatically
transferred to a headset; no need to press the call control button.
1514
USING YOUR HEADSET
Additional Features
Only with a Mobile Phone
Answering/ Ending/ Making Calls
with PerSonoCall on Softphone
Redialing Last Number
To activate last number redial, double
click the call control button. You will hear
a high tone for each key press. When you
hear a further tone, the last number has
been redialed.
Rejecting a Call
When receiving an incoming call, press
and hold the call control button. You will
hear a tone. When you hear a second
tone, the call has been rejected and you
can release the button.
Using Voice Dialing
With the headset on, press and hold
the call control button for 2 seconds,
until you hear a second tone, to activate
voice dialing.
NOTE: To use voice activated dialing, the
voice dialing feature must be enabled on
your phone. See your Bluetooth phone
manual for instructions.
Switching a Call From Phone to Headset
To switch an active call from your phone
to your headset, briefly press the call
control button.
Switching a Call From Headset to Phone
To switch an active call from your headset
to your phone, press and hold the call
control button until you hear a tone.
When you hear a second tone, the transfer
has been completed and you can release
the button.
Answering/ Ending/ Making Calls
with a Mobile Phone
The .Audio 910 headset has multipoint technology which allows you to seamlessly switch
between two audio devices. You can answer a call from either your PC-based softphone
or your mobile phone by pressing the call control button. The headset must be paired to
both devices, and then to enable this functionality, see "Allow call control button
to toggle the headset’s radio link" on the Basic Options screen on page 10.
Multipoint Versatility
Page 9
0 0
INDICATOR LIGHTS
1716
Bluetooth USB Adapter Indicator Lights
Headset Indicator Lights
Headset Status Light
Power Flashes Blue
Charging Flashes Red
Fully Charged Solid Blue
Battery Low Flashes Red
Pairing Flashes Red and Blue
Bluetooth Device
Connected to Headset
Flashes Blue
Action Light
Disconnected from the Headset Flashes Purple
Connected to the Headset Solid Blue
Radio Link Active Flashes Blue
Pairing Mode Flashes Red and Blue
USING YOUR HEADSET
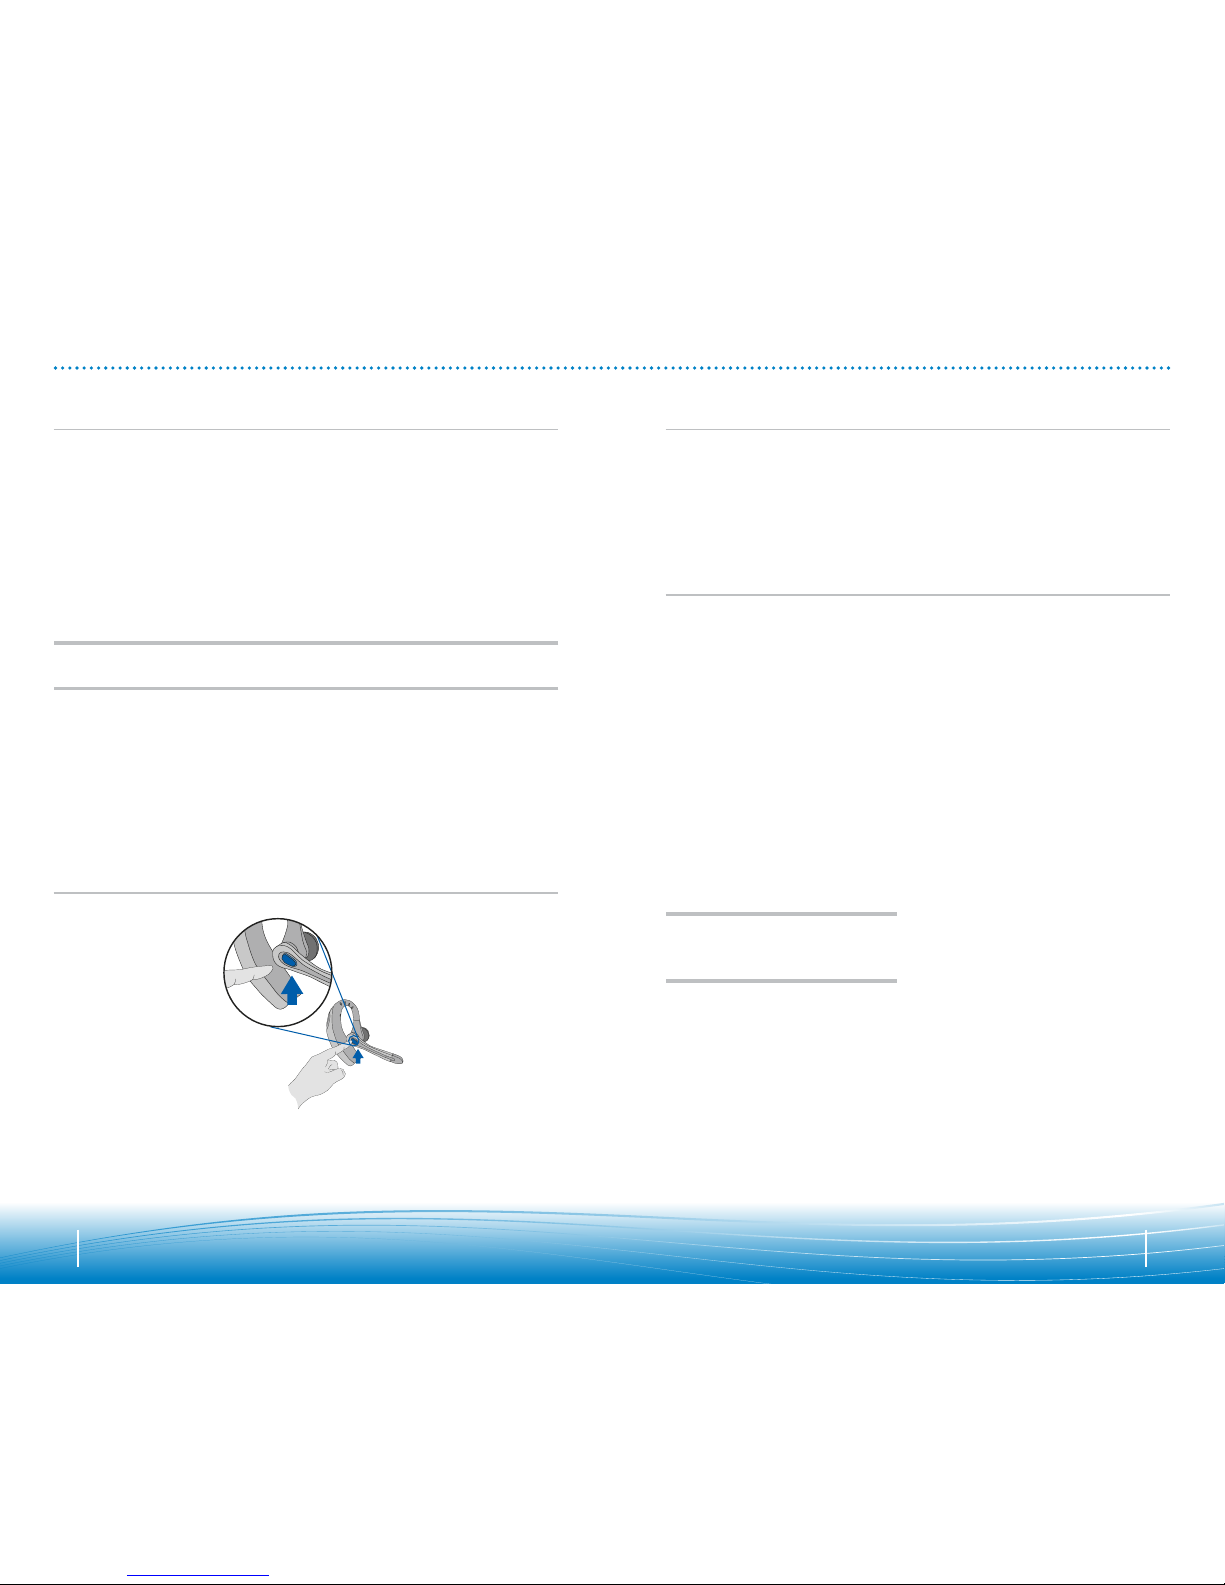
During a call, briefly press the power/mute button to mute the microphone. When muted,
the headset will sound two tones every 30 seconds.
To unmute press the button again.
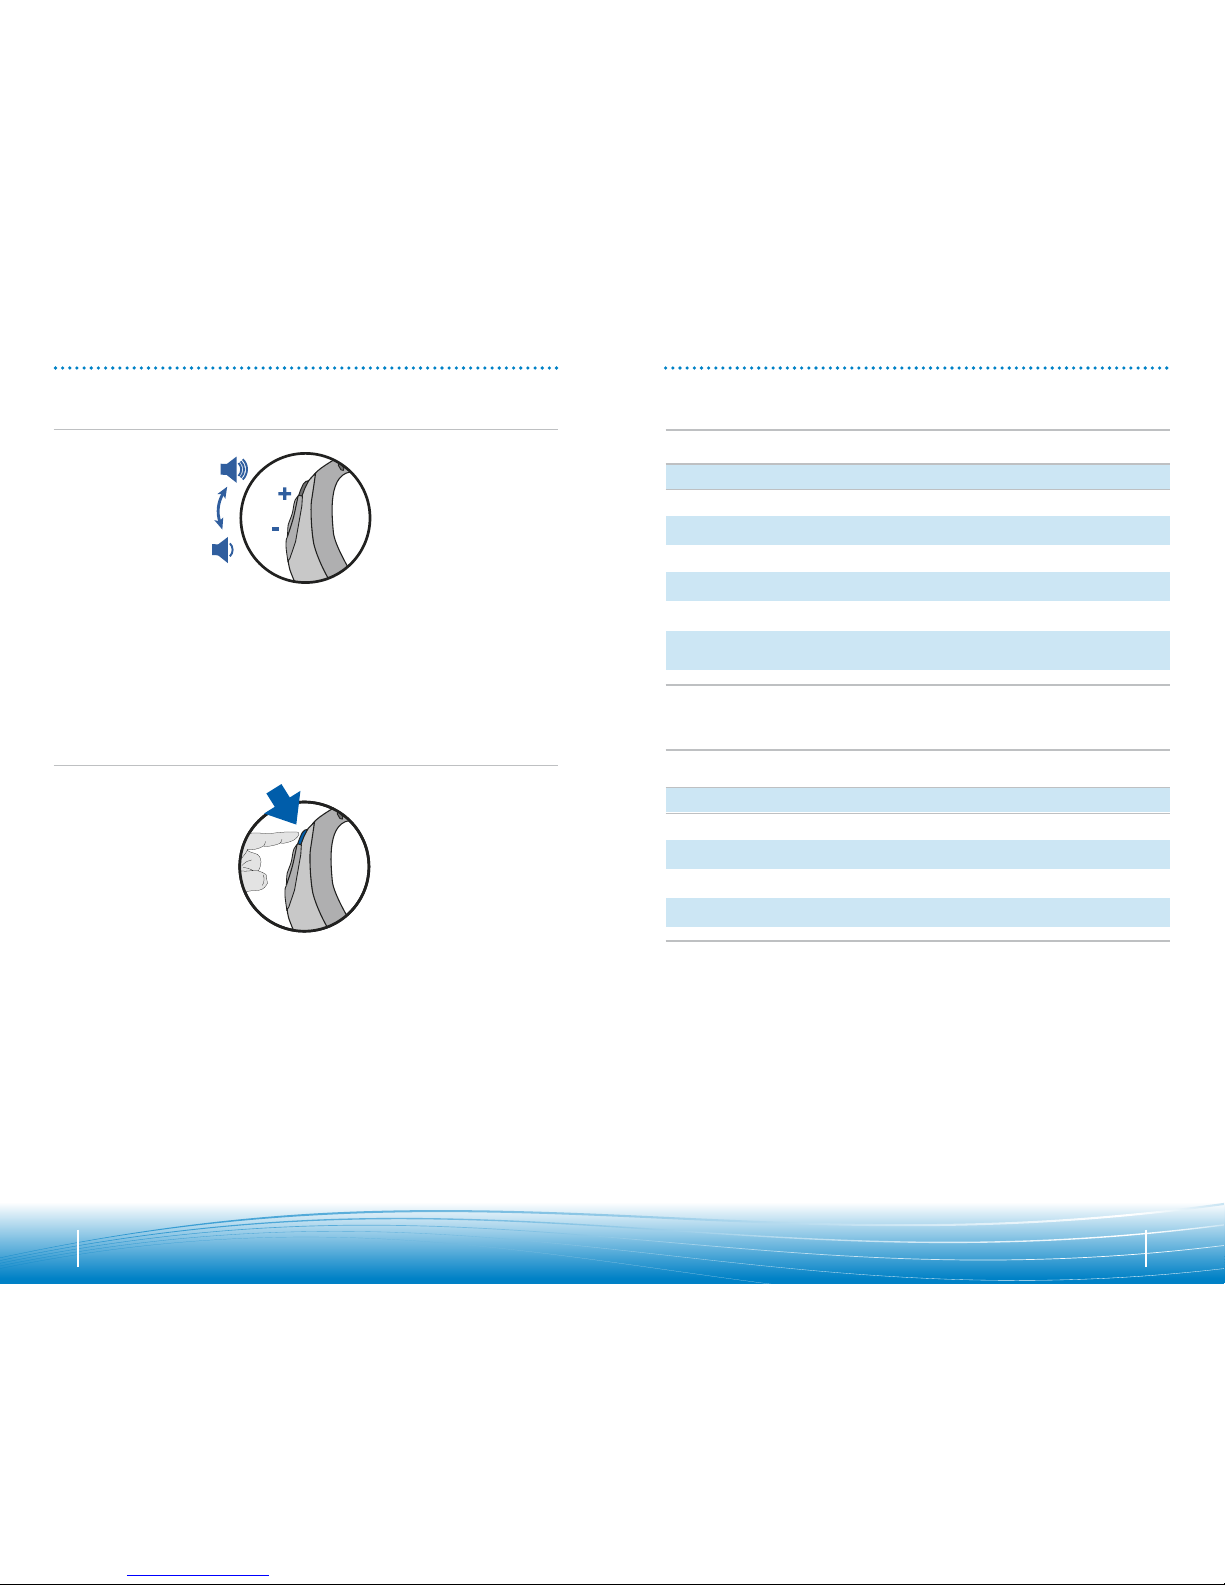
Adjusting Volume
Muting a Call
To increase listening volume, press the upper end (+) of the volume button. To decrease
listening volume, press the lower end (-).
To adjust the listen or speak volume of the softphone, please refer to the softphone
user documentation.
To adjust the listen or speak volume of the audio device on the computer, use the Sound
and Audio Device section on the control panel.
Page 10

1918
TROUBLESHOOTING FOR .AUDIO 910
• Lower the listen volume on your softphone until
the distortion disappears.
• If the distortion is still present, lower the listen
volume control on the computer.
• Adjust volume on headset. See page 16.
• Speak volume is too high. Lower the speak
volume on your softphone until the noise
disappears. If the noise is still present, lower the
microphone volume control on the computer.
• The USB Bluetooth adapter will set itself as the
default audio device in Windows
®
. Use the Audio
settings in Windows
®
under Sounds and Audio
Devices to change the device used for audio.
• Headset battery may be dead, so be sure the
headset is fully charged. See page 5.
• When a PC goes into standby or hibernation, the
USB Bluetooth adapter no longer is powered on.
Be sure your PC is in an active state.
• Battery is going bad; replace the battery
with a new battery pack. Call Plantronics at
(866) 363-BLUE (2583).
• The headset radio link is locked on. Be sure you
do not lock the radio link on for long periods of
time as it will significantly reduce standby and
talk time of the headset. See page 10.
• One beep every 10 seconds is caused by a low
battery warning. Recharge battery by returning
headset to the charging stand for one to three
hours until indicator light turns blue.
• One beep is an out of range warning.
Move closer to the USB Bluetooth adapter.
• Two beeps every 30 seconds indicate your mute is
on. Press the mute button once to turn mute off.
• Uncheck the box in the Basic Options screen for
“Allow headset call control button to toggle the
headset’s radio link.” See page 10.
• Check the box in the Basic Options screen for
“Allow headset call control button to toggle the
headset’s radio link.” See page 10.
Sound in headset is distorted.
I can hear echo in headset.
I can hear too much background
conversation or noise.
The other headset I was using to listen
to music does not work any more.
My headset stops responding
to button presses.
Battery talk time or standby time is
significantly degraded even after a
full charge.
I hear beeps in the headset.
Pressing the call control button on the
headset when I have an incoming call
on my softphone hangs up the call.
I am using my headset to answer
calls from both my softphone and
my cell phone, and pressing the call
control button on the headset takes
my softphone off hook instead of
answering my ringing cell phone.
• Check compatibility list on www.plantronics.com/
personocall to ensure your softphone is
compatible for remote answer and disconnect.
• Headset battery needs to be charged. See page 5.
• Headset is not paired to the USB Bluetooth
adapter. See page 8.
• When a PC goes into standby or hibernation, the
USB Bluetooth adapter no longer is powered on.
Be sure your PC is in an active state.
• Be sure PerSonoCall software is installed
and running. See page 9.
• Headset is not paired to the USB Bluetooth
adapter. See page 8.
• Headset battery needs to be charged. See page 5.
• Headset may be out of range of the USB
Bluetooth adapter. Move closer to adapter until
the headset is within range. Range varies with
office environment.
• When a PC goes into standby or hibernation, the
USB Bluetooth adapter no longer is powered on.
Be sure your PC is in an active state.
• Headset is not paired to the USB Bluetooth
adapter. See page 8.
• Headset is not paired to the USB Bluetooth
adapter. See page 8.
• Headset battery needs to be charged. See page 5.
• The USB Bluetooth adapter is not set as the
default audio device. Use the Audio settings in
Windows® under Sounds and Audio Devices to
select “Plantronics BT Adapter” as the audio
device.
• Listening volume is too low. Press the volume up
button on the headset. See page 16.
• Headset is muted. Press the mute button on
headset to unmute the microphone. See page 16.
• Headset microphone boom aligned incorrectly.
Align the headset boom with your mouth.
• Speak volume is too low. Increase the speak
volume on your softphone until you can be heard
by callers. If the volume is still too low, increase
the microphone level on your computer.
• Headset battery needs to be charged. See page 5.
• The USB Bluetooth adapter is not set as the
default audio device. Use the Audio settings in
Windows® under Sounds and Audio Devices
to select “Plantronics BT Adapter” as the
audio device.
My Voyager headset does not work
with the softphone I am using on my
PC. (I cannot answer or disconnect
from the headset call button).
I’ve plugged in the USB Bluetooth
adapter but my headset does not respond
to button presses.
I’ve installed PerSonoCall and the USB
Bluetooth adapter but the system tray icon
shows a red X (denoting no connection).
I cannot hear caller/dial tone.
Callers cannot hear me.
Problem Solution Problem Solution
Page 11

© 2006 Plantronics, Inc. All rights reserved. Plantronics, the logo design, .Audio, PerSonoCall,
and Sound
Innovation are trademarks or registered trademarks of Plantronics, Inc. The Bluetooth name and
the
Bluetooth trademarks are owned by Bluetooth SIG, Inc. and are used by Plantronics, Inc. under license.
Windows is either a registered trademark or a trademark of Microsoft Corporation in the United States and/
or other countries. All other trademarks are the property of their respective owners. Patents U.S. 5,210,791;
6,923,688; D512,984; Australia 303054; EM 293964-0004-0006 and Patents Pending.
Plantronics, Inc.
345 Encinal Street
Santa Cruz, CA 95060 USA
Tel: (800) 544-4660
www.plantronics.com
74146-01 (09/06)
EXPOSURE TO RF RADIATION
The internal wireless radio operates within the guidelines found in radio frequency safety standards and
recommendations, which reflect the consensus of the scientific community. Independent studies have shown
that the internal wireless radio is safe for use by consumers. Visit www.plantronics.com for more information.
WARRANTY
LIMITED WARRANTY
• This warranty covers defects in materials and workmanship of products manufactured,
sold or certified by Plantronics which were purchased and used in the United States.
• The warranty lasts for one year from the date of purchase of the products.
• This warranty extends to you only if you are the end user with the original purchase receipt.
• We will at our option, repair or replace the products that do not conform to the warranty.
We may use functionally equivalent reconditioned/refurbished/remanufactured/pre-owned
or new products or parts.
• To obtain service in the U.S., contact Plantronics at (866) 363-BLUE (2583).
• THIS IS PLANTRONICS’ COMPLETE WARRANTY FOR THE PRODUCTS.
• This warranty gives you specific legal rights, and you may also have other rights that
vary from state to state. Please contact your dealer or our service center for the full
details of our limited warranty, including items not covered by this limited warranty.
WARNING
Do not use headphones/headsets at high volumes for an extended period of time. Doing so
can cause hearing loss. Always listen at moderate levels.
SO U ND I NN OVA TI ON
REGULATORY NOTICES
TECHNICAL ASSISTANCE
FCC REQUIREMENTS PART 15
This device complies with Part 15 of the FCC Rules. Operation is subject to the following two conditions:
1. This device may not cause harmful interference, and
2. This device must accept any interference received, including interference that may cause undesired operation.
This equipment has been tested and found to comply with the limits for a Class B digital device, pursuant
to Part 15 of the FCC Rules. These limits are designed to provide reasonable protection against harmful
interference in a residential installation. This equipment generates, uses, and can radiate radio frequency
energy and, if not installed and used in accordance with the instructions, may cause harmful interference to
radio communications.
However, there is no guarantee that interference will not occur in a particular installation. If this equipment
does cause harmful interference to radio or television reception which can be determined by turning the radio
or television off and on, the user is encouraged to try to correct interference by one or more of the following
measures:
1. Reorient or relocate the receiving antenna.
2. Increase the separation between the equipment and receiver.
3. Connect the equipment into an outlet on another circuit.
4. Consult the dealer or an experienced radio/TV technician for help.
NOTE: Modifications not expressly approved by Plantronics, Inc. could void the user’s authority to operate
the equipment.
The antenna used for this transmitter must not be co-located or operating in conjunction with any other
antenna or transmitter. End-users and installers must be provided with installation instructions and
transmitter operating conditions for satisfying RF exposure compliance.
FCC REGISTRATION INFORMATION — Part 68
This equipment complies with Part 68 of the FCC rules and the requirements adopted by ACTA. On the exterior
of this equipment is a label that contains a product identifier in the format US:AAAEQ##TXXXX. If requested,
this information must be provided to your telephone company.
A plug and jack used to connect this equipment to the premises wiring and telephone network must comply
with the applicable FCC Part 68 rules and requirements adopted by ACTA. A compliant telephone cord and
modular plug is provided with this product. It is designed to be connected to a compatible jack that is also
compliant. See installation instructions for details.
The REN is useful to determine the quantity of devices you may connect to your telephone line. Excessive
RENs on a telephone line may result in the devices not ringing in response to an incoming call. In most, but
not all areas, the sum of the RENs should not exceed five (5.0). To be certain of the number of devices you
may connect to your line, as determined by the REN, contact your local telephone company. For product
approved after July 23, 2001, the REN for this product is part of the product identifier that has the format US:
AAAEQ##TXXXX. The digits represented by ### are the REN without the decimal point. (For example, 03
represents a REN of 0.3.) For earlier producers, the REN is separately shown on the label.
If this telephone equipment causes harm to the telephone network, the telephone company will notify you in
advance that temporary discontinuance of service may be required. But if advance notice isn’t practical, the
telephone company will notify the customer as soon as possible. Also, you will be advised of your right to file
a complaint with the FCC if you believe it is necessary.
The telephone company may make changes in its facilities, equipment, operations, or procedures that could
affect the proper functioning of your equipment. If they do, you will be notified in advance in order for you to
make necessary modifications to maintain uninterrupted service.
If trouble is experienced with this unit, for repair or warranty information, please contact customer service at
(800) 544-4660. If the equipment is causing harm to the network, the telephone company may request that you
disconnect the equipment until the problem is resolved.
DO NOT DISASSEMBLE THIS EQUIPMENT: It does not contain any user serviceable components.
We recommend the installation of an AC surge arrester in the AC outlet to which this equipment is connected.
Telephone companies report that electrical surges, typically lighting transients, are very destructive to customer
terminal equipment connected to AC power sources.
Visit our Web site at www.plantronics.com/support for technical support including
frequently asked questions, compatibility and accessibility information. The Plantronics
Technical Assistance Center (TAC) is also ready to assist you on 866-363-BLUE (2583).
2120
 Loading...