

Page 1

Voyager 4210/4220 Office
PLANTRONICS + POLYCOM. NOW TOGETHER AS
for desk phone
User Guide
Page 2

Contents
Overview 3
Headset overview 3
Base overview 4
Accessories 4
Hook up your system 5
Desk phone setup details 5
Position Your Base 7
Pair 8
Pair again to base 8
Pair to mobile device 8
Pair mode 8
Fit and charge 9
Wear on the right or left 9
Charge 9
Check headset battery status 9
Load software 10
The Basics 11
Power on your headset 11
Adjust volume 11
Make, answer, end calls 11
More Features 13
Play or pause audio 13
Voice assistant (smartphone feature) 13
Enable and use Amazon Alexa (smartphone feature) 13
Enable Tile 13
Online indicator 13
Corded mode (audio over USB) 14
Troubleshooting 15
Headset 15
Desk phone 16
Support 17
2
Page 3
:02
2x1x
1x
3x
Siri
Google Assistant™
Amazon
Alexa*
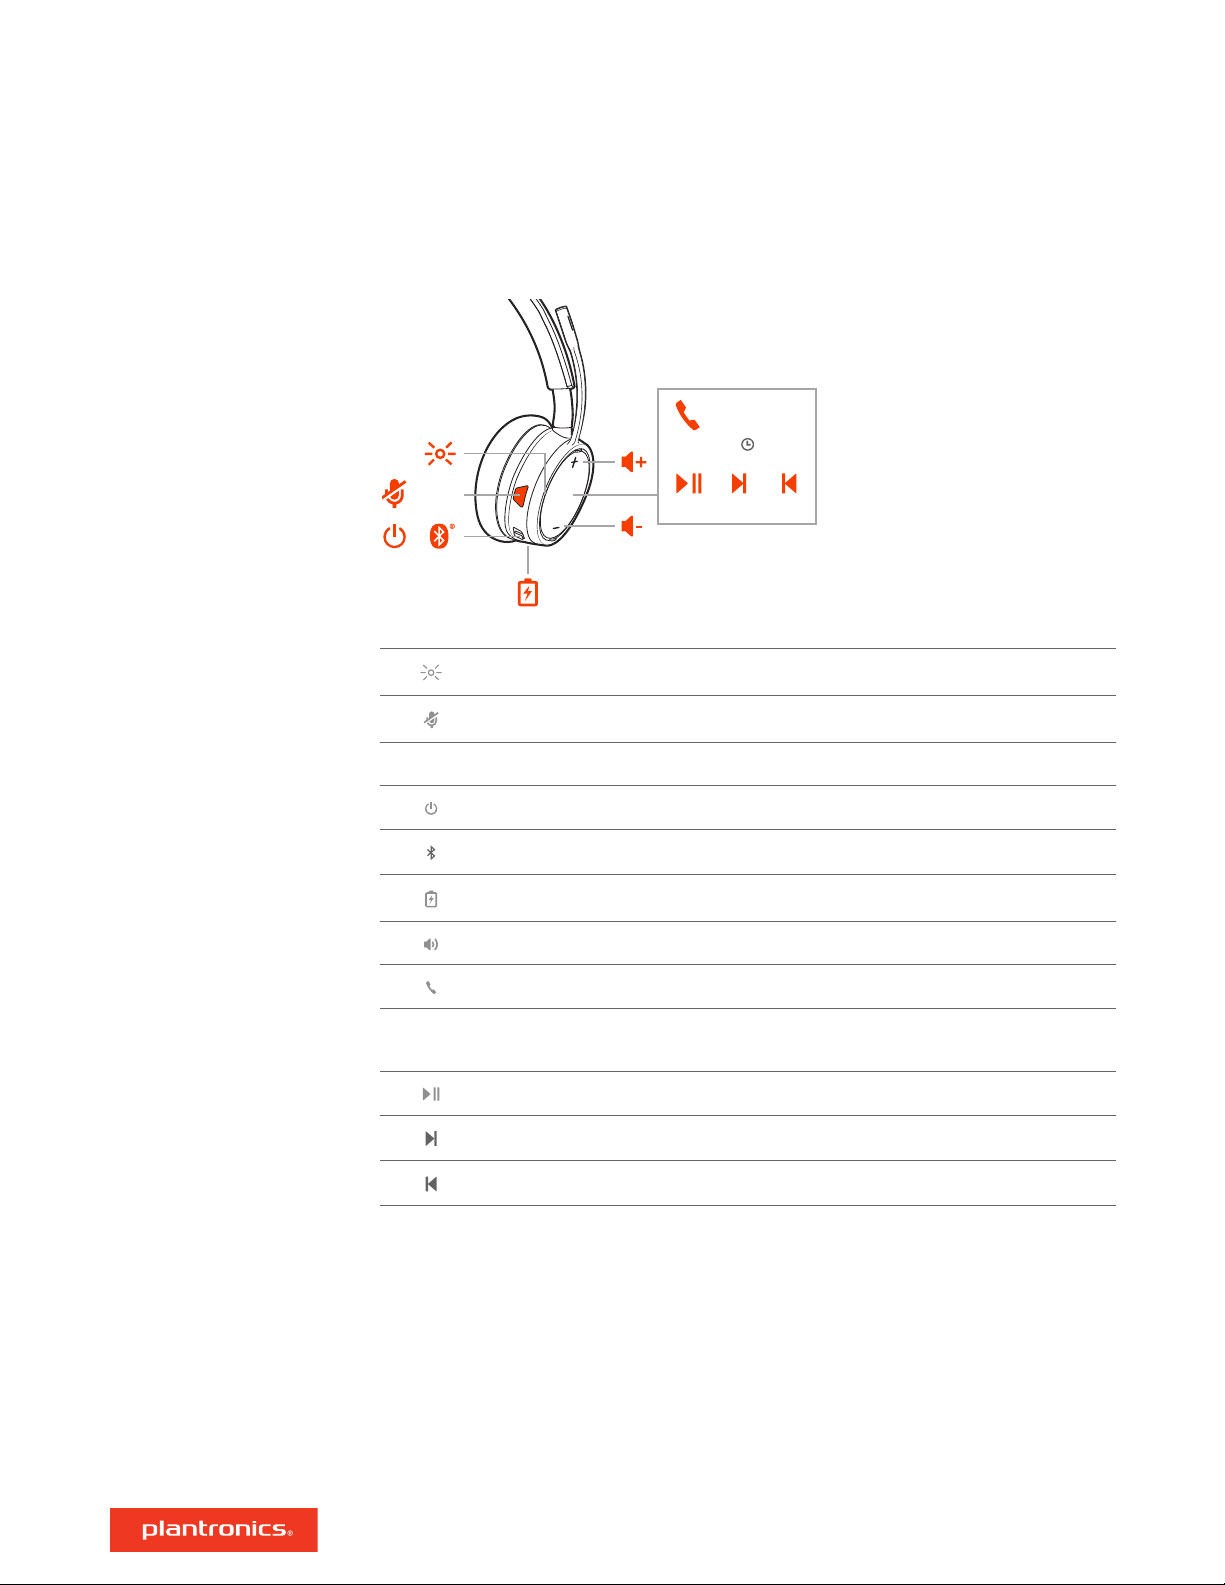
Overview
Headset overview
LEDs
Mute/unmute
Alexa Smartphone feature: Voice assistant (*requires app)
Power
Bluetooth® pairing
Charge port
Volume
Call
Siri®, Google
Assistant
Smartphone feature: Default voice assistant
™
Play/pause**
Next track**
Previous track**
NOTE **Functionality varies by application. May not function with web-based apps.
Be safe
Please read the safety guide for important safety, charging, battery and regulatory information
before using your new headset.
3
Page 4
1 2 3 4 5 6 7 8
11
9
10
Base overview
Desk phone LED
1
Bluetooth LED
2
Charging LED
3
USB port
4
Power jack
5
Handset lifter jack
6
Accessories
1 Electronic hookswitch cable (EHS cable) Electronically and automatically answers/ends a desk
phone call. Enables remote call control with your headset.
2
HL10 lifter Automatically lifts handset and returns it to the cradle. Enables remote call control
with your headset.
Telephone interface cable jack
7
Headset Bluetooth pairing button
8
Desk phone listening volume
9
Desk phone speaking volume
10
Desk phone configuration switch
11
4
Page 5
OR
NO HEADSET PORT
HEADSET PORT
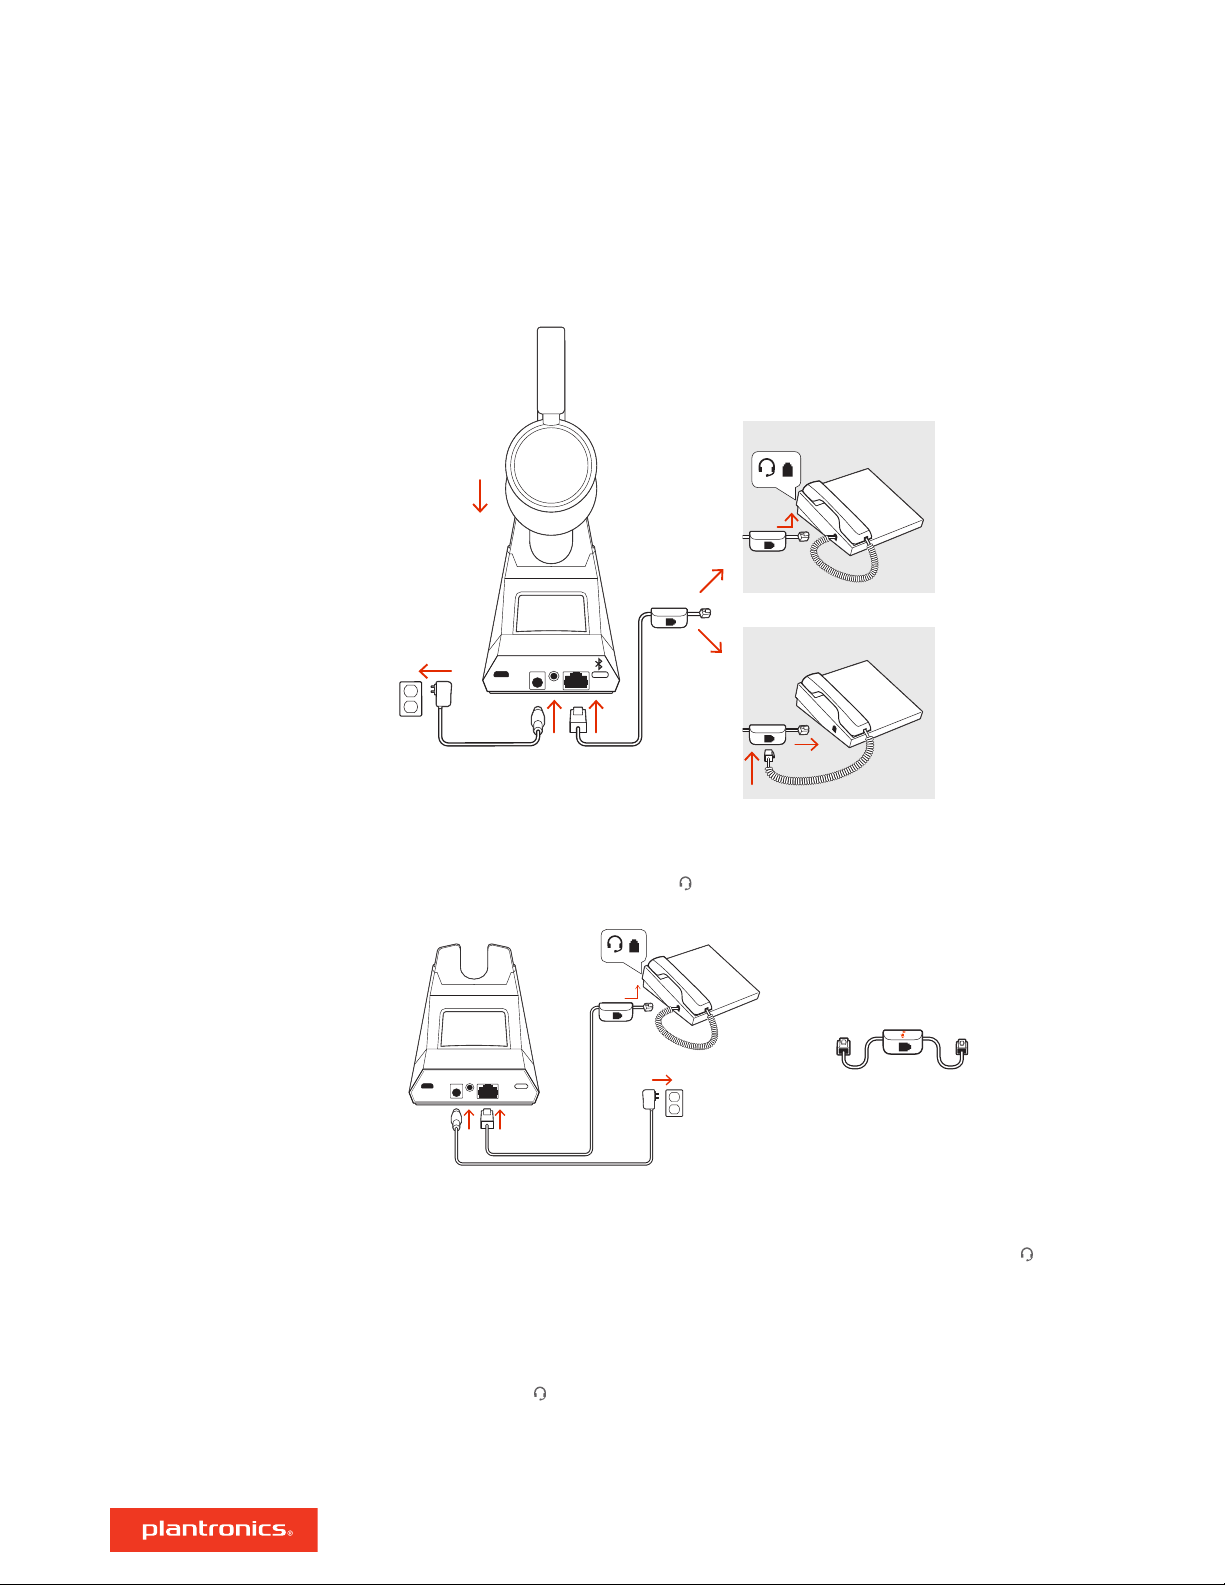
Hook up your system
Using the diagram, connect your headset system.
Desk phone setup details
Choose a desk phone setup A, B, C or D and connect cables.
A Desk phone with dedicated headset
• Connect one end of the telephone interface cable to the back of the base
• Connect the other end of the telephone interface cable into the dedicated headset port on
the desk phone
• Adjust the configuration switch on the bottom of the base to default A, which works for most
phones. Use configuration D for Cisco phones.
NOTE Use this setup if you are not using the HL10 lifter or EHS cable. In this configuration, press
both the headset
answer or end calls.
button on your desk phone and the call control button on the headset to
port
USE
B Desk phone (standard)
5
Page 6
USE
• Connect one end of the telephone interface cable to the back of the base
• Disconnect the handset coil cord from the base of the desk phone and re-connect it to the
telephone interface cable junction box
• Finally connect the remaining end of the telephone interface cable into the open handset port
on the desk phone
• Adjust the configuration switch on the bottom of the base to default A, which works for most
phones. Use configuration D for Cisco phones.
NOTE Use this setup if you are not using the HL10 lifter or EHS cable and your desk phone does
not have a dedicated headset port. In this configuration, manually remove the handset on your
desk phone and press the call control button on the headset to answer or end calls.
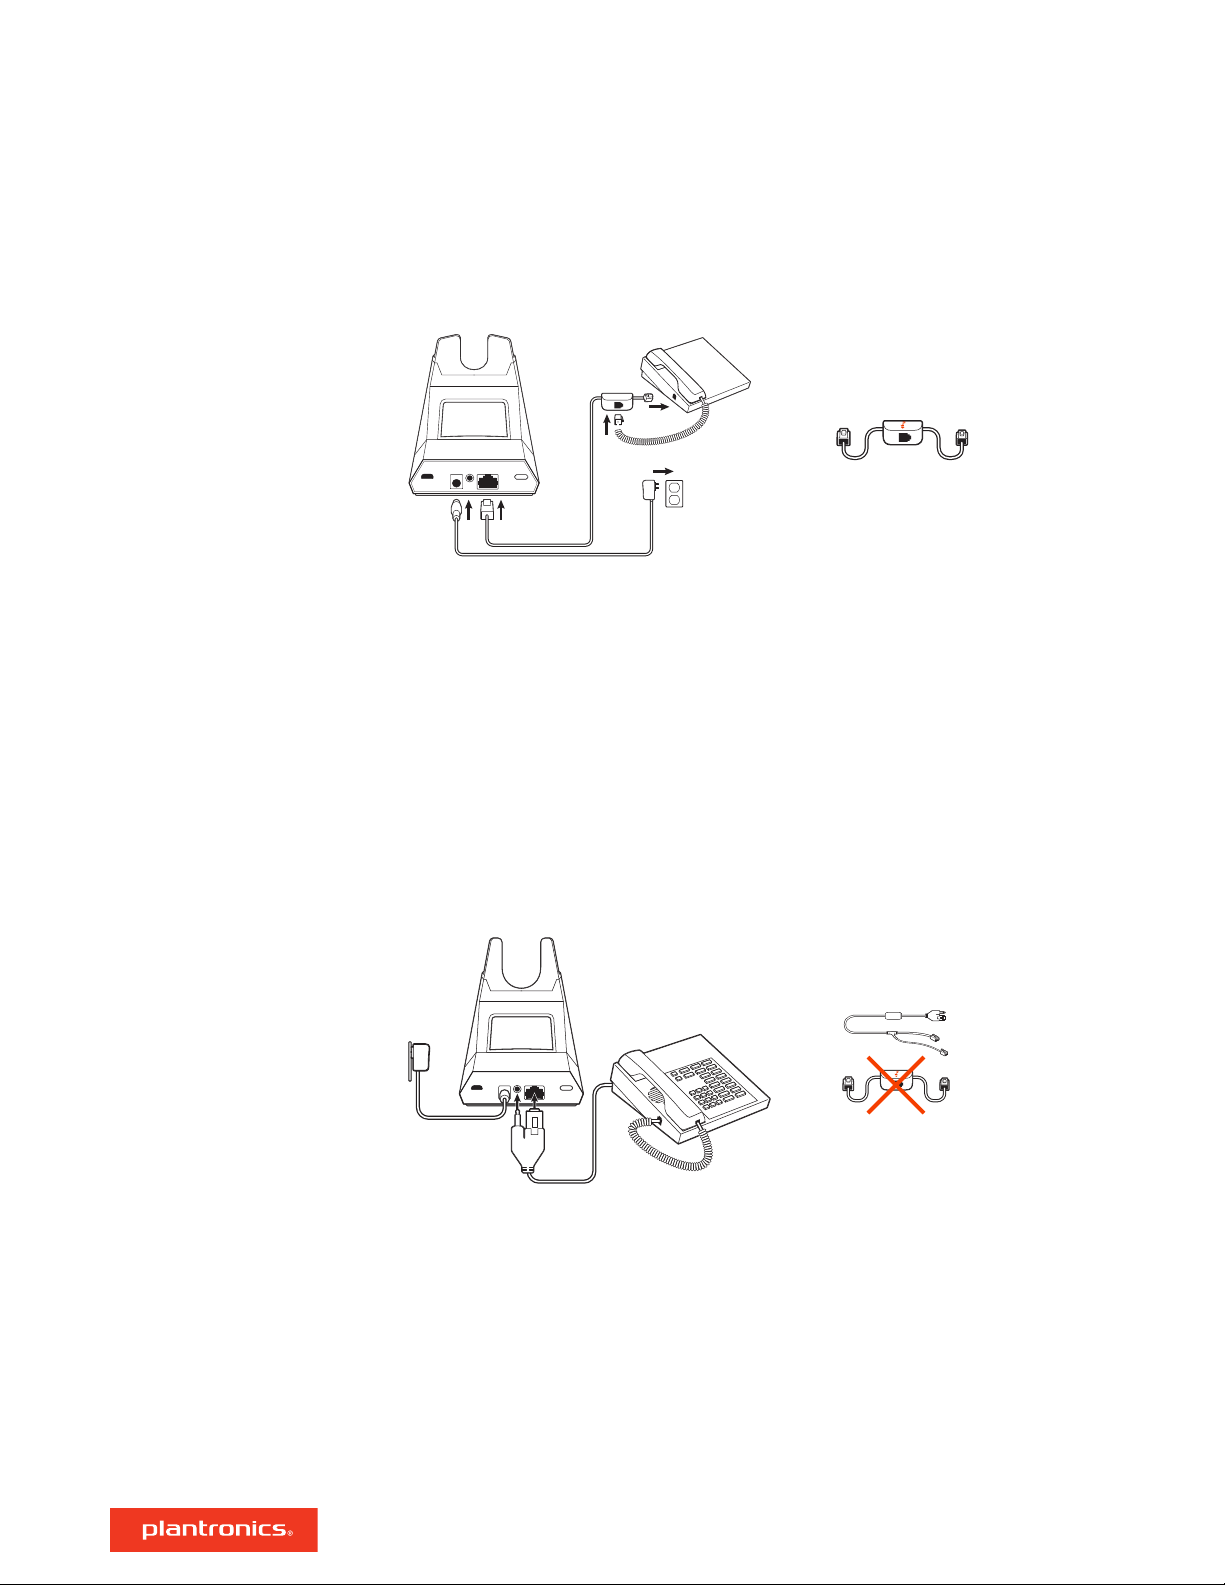
C Desk phone + EHS cable (sold separately)
USE
• Adjust the configuration switch on the bottom of the base to default A, which works for most
phones.
D Desk phone + HL10 lifter (sold separately)
6
Page 7

USE
• Adjust the configuration switch on the bottom of the base to default A, which works for most
phones. Use configuration D for Cisco phones.
Position Your Base
The minimum recommended separation between your desk phone and the base is 6 inches.
The minimum recommended separation between the base and computer is 12 inches. Incorrect
position can cause noise and interference problems.
NOTE Headset cradle may vary, but function is the same.
7
Page 8

Pair
Pair again to base
Your headset comes pre-paired to the base. To pair again:
1 Slide and hold the headset Power switch away from the off position until the LEDs flash red and
blue.
2 Put your base into pair mode by pressing and holding the Bluetooth pairing button on the back
of your base for 2 seconds until the display panel's Bluetooth icon flashes blue and red.
Pairing is successful when you hear "pairing successful" and "base connected" and the display
panel's Bluetooth
icon turns solid blue.
NOTE Your headset can pair with up to 8 devices but only maintain 2 connections simultaneously;
this includes the base.
Pair to mobile device
Pair mode
1 To put your headset in pair mode, slide and hold the Power
until you hear "pairing" and the headset LEDs flash red and blue.
2 Activate Bluetooth on your phone and set it to search for new devices.
• iPhone Settings > Bluetooth > On*
• Android Settings > Bluetooth: On > Scan for devices*
switch away from the off position
NOTE *Menus may vary by device.
3 Select “PLT V4210 Series / PLT V4220 Series.”
If necessary, enter four zeros (0000) for the passcode or accept the connection.
Once successfully paired, you hear “pairing successful” and the headset LEDs stop flashing.
NOTE Your headset can pair with up to 8 devices but only maintain 2 connections simultaneously;
this includes the base.
Slide and hold the headset Power
blue.
switch away from the off position until the LEDs flash red and
8
Page 9

R
Fit and charge
Wear on the right or left
Charge
Check headset battery
status
To position the microphone on the right or left side, rotate the microphone boom up and over.
Gently bend the boom so it is approximately 2 finger widths from the corner of your mouth.
IMPORTANT For true stereo sound, wear the boom on your right side.
Before first use, charge your headset for a minimum of 20 minutes by placing it in the cradle. The
base display's battery icon turns solid blue when charging and turns off when charge is
complete. A full charge takes approximately 90 minutes.
NOTE You may also charge your headset using a micro-USB cable connected to a power source.
There are 3 ways to check the headset battery status. Choose:
• Plantronics Hub for Windows/Mac: click on the Plantronics Hub headset icon in the system tray or
menu bar to view battery status
• Plantronics Hub for iOS/Android: check the home screen
• Slide and release the Power
observe the headset LEDs.
switch away from the off position. Listen to the voice alert or
Headset LED behavior while charging
Off Charging complete
Battery high
Battery medium
Battery low
Battery critical
TIP To reset the accuracy of the talk time alert, deplete the headset battery then charge fully.
9
Page 10

Load software
Plantronics Hub is an invaluable headset tool.
NOTE Some softphones require the installation of Plantronics Hub for Windows and Mac to enable
headset control (answer/end and mute) functionality.
• Download Plantronics Hub for Windows/Mac by visiting plantronics.com/software.
• Download Plantronics Hub for iOS/Android by visiting plantronics.com/software, the App Store
or Google Play.
Plantronics Hub iOS and Android Windows and Mac
Call control for softphones available for some
softphones
Change headset language X X
Update firmware X X
Turn features on/off X X
View user guide X X
Battery meter X X
Find MyHeadset X
Use Amazon Alexa (requires app) X
X
10
Page 11

:02
2x1x
1x
3x
Siri
Google Assistant™
Amazon
Alexa*
The Basics
Power on your headset
Adjust volume
Make, answer, end calls
To turn on the headset, slide the Power button.
• Headset volume Fine-tune your headset volume by adjusting the headset's volume up (+) and
down (-) controls.
• Desk phone volume When you are on a desk phone call and your voice is too quiet/loud, adjust
the speaking volume on the bottom of the base. If your caller's voice is too loud/quiet on a desk
phone call, adjust the listening volume.
• Base ringtone volume Adjust the base ringtone volume setting in Plantronics Hub. This ringtone
alerts you if you are not wearing your headset and a call comes in.
Make a call (deskphone)
1 Tap the headset call button. The desk phone
icon lights up on your base display. You should
hear a dial tone in your headset.
NOTE Press your phone's Headset button or manually remove the handset if you don't have an
HL10 lifter or EHS cable.
TIP If you do not hear a dial tone, turn over the base and adjust the switch (A--G). “A” works for the
majority of desk phones."D" works for Cisco phones.
2 Dial from your desk phone.
End/take a call
To answer or end a call, tap the headset Call button.
NOTE If you don't have an HL10 lifter or EHS cable, press your phone's Headset button or remove
the handset when answering a call and hang up when ending a call.
Mute
During a call, tap the headset mute button. Tap again to unmute. When mute is on, the LED is
solid red. Modify your mute settings in Plantronics Hub for Windows/Mac.
Hold a call
To hold an active call or resume a held call:
• Press the headset Call button for 2 seconds.
NOTE 2 desk phone calls can be put on hold only from your desk phone.
Switch between calls (flash)
To switch between calls:
11
Page 12

• Press the headset Call button for 2 seconds.
NOTE Switching 2 desk phone calls can only be done from your desk phone.
12
Page 13

R
More Features
Play or pause audio
Voice assistant
(smartphone feature)
Enable and use Amazon
Alexa (smartphone
feature)
Tap the Call button to pause or resume streaming audio.
NOTE Functionality varies by application. May not function with web-based apps.
Track selection
Double-tap the Call button to skip to the next track or triple-tap the Call button to play the
previous track.
NOTE Functionality varies by application. May not function with web-based apps.
Fast forward/rewind
Double-tap and hold the Call
rewind.
button to fast-forward. Triple-tap and hold the Call button to
NOTE Functionality varies by application. May not function with web-based apps.
Siri, Google Now™, Cortana Press and hold the Call button for 2 seconds to activate your phone's
default voice assistant. Wait for the phone prompt to activate voice dialing, search, and other
smartphone voice controls.
With Alexa enabled on your headset, you can ask for directions, call friends, access Alexa Skills and
more.
NOTE Amazon Alexa isn't available in all languages and countries.
1 Enable Alexa
A Pair the headset to your mobile device
B Update your Plantronics Hub mobile app (software) if necessary
Enable Tile
Online indicator
C Launch Plantronics Hub app and ensure that your headset (firmware) is up-to-date
D From Plantronics Hub main menu, choose Apps > Amazon Alexa > Enable
E Launch the Amazon Alexa app and follow the instructions to set up your headset
2 Use Alexa
A To use Alexa, tap the Mute button (when not on a call) and ask a question. You hear a tone
when Alexa is activated.
With the Tile app enabled on your mobile device, you can ring your lost headset or locate it on a
map and ask the Tile community for help.
1 Pair the headset to your mobile device
2 Update your Plantronics Hub mobile app (software) if necessary
3 Launch Plantronics Hub app and ensure that your headset (firmware) is up-to-date
4 From Plantronics Hub main menu, choose Apps > Tile > Enable
5 Launch the Tile app and follow the instructions to connect your headset
Your headset LEDs flash red to inform others that you are on a call. Manage settings in Plantronics
Hub.
13
Page 14

Corded mode (audio over
USB)
If your audio is cutting out during softphone calls, you may be experiencing Bluetooth density
problems. Improve audio performance by using density-friendly corded mode.
1 Disconnect your Bluetooth USB adapter from your computer
2 Connect your headset directly to your computer with the provided 1.5 m USB cable
3 Power off your headset to use density-friendly corded mode
NOTE Your headset battery charges while in corded mode.
14
Page 15

Troubleshooting
Headset
I can’t hear a dial tone in the
headset.
• Make sure your headset is charged.
• Make sure your headset is paired to base. See Pair again to base.
• Press the base's corresponding Audio button.
• Adjust the configuration switch (A--F) on the bottom of the base
until a dial tone is heard. The default A works for most phones.
ATTENTION Use configuration D for Cisco phones. Cisco phones
connected with EHS cable use configuration A.
• Make sure your desk phone is connected correctly to your base.
See Desk phone setup details.
• If your base is connected to your desk phone's dedicated headset
port, press the desk phone's headset button to hear a dial tone.
• If your base is connected to your desk phone's dedicated headset
port, press the desk phone's headset button and base's desk
phone button to hear a dial tone.
• If your base is connected to your handset port, manually remove
the handset to hear a dial tone (if you do not have an EHS cable or
HL10 lifter).
• Make sure your HL10 lifter is lifting the handset high enough to
operate the hookswitch; set to a higher setting if necessary.
• Adjust the headset's listening volume. See Adjust volume.
• If the volume is still too low, adjust the desk phone listening
volume on the base. See Adjust volume.
I hear static.
The sound is distorted.
I hear echo in the headset.
• Make sure there is at least 12 inches between your base and your
computer, and 6 inches between your base and your telephone. If
adjusting the distance doesn’t help, your headset is going out of
range, move closer to the base. See Position Your Base
.
• Lower the desk phone speaking volume and/or desk phone
listening volume on the base. For most telephones the correct
setting is position 2. See Adjust volume.
• If your desk phone has a volume control, lower until the distortion
disappears.
• If the distortion is still present, adjust the headset volume control
to lower the headset speaker volume. See Adjust volume.
• Make sure there is 12 inches between your base and your
computer, and 6 inches between your base and your telephone.
See Position Your Base.
• Lower the desk phone speaking volume and/or desk phone
listening volume on the base. For most telephones the correct
setting is position 2. See Adjust volume.
• If the audio level is too low in this position, increase the headset
volume. See Adjust volume.
15
Page 16

• If your speaking volume is too low for your listener in this position,
adjust the position of the headset to make sure the microphone is
as close as possible to your mouth.
Desk phone
People I talk to can hear a buzz in
the background.
The handset lifter is installed but
does not lift the handset.
I can’t hear my desk phone dial tone
in the headset.
• Move the base further away from your phone. See Position Your
Base.
• If the base power supply is plugged into a power strip, plug it into
the wall directly.
Be sure the handset lifter power cord is firmly pushed into the
handset lifter jack on the base.
Adjust the configuration switch (A--F) on the bottom of the base
until a dial tone is heard. The default A works for most phones.
ATTENTION Use configuration D for Cisco phones. Cisco phones
connected with EHS cable use configuration A.
Make sure your desk phone is connected correctly to your base.
See Desk phone setup details.
If your base is connected to your desk phone's dedicated headset
port, press the desk phone's headset button to hear a dial tone.
If your base is connected to your handset port, manually remove
the handset to hear a dial tone (if you do not have an EHS cable or
HL10 lifter).
16
Page 17

Support
NEED MORE HELP?
plantronics.com/support
Plantronics, Inc.
345 Encinal Street
Santa Cruz, CA 95060
United States
©
2019 Plantronics, Inc. All rights reserved. Poly, the propeller design, and the Poly logo are
trademarks of Plantronics, Inc. Bluetooth is a registered trademark of Bluetooth SIG, Inc. and any
use by Plantronics, Inc. is under license. All other trademarks are the property of their respective
owners.
215648-06 11.19
Plantronics B.V.
Scorpius 171
2132 LR Hoofddorp
Netherlands
17
 Loading...